

Page 1
H04760:03/09 1
crib/DAybeD
TM
SI NCE 1954
10021
Division of Foundations® Worldwide, Inc.
• 7001 Wooster Pike, Medina, OH 44256 USA • PH: +1 330.722.5033 • FAX: +1 330.722.5037
• www.child-craft.com / www.foundations.com
tHis is tHe Assembly instrUctions
For cribs solD in tHe UniteD stAtes
Assembly Directions AnD PArts list
Directions for Maintenance, Cleaning, Storage and Use of your Crib are also included.
BEFORE STARTING THE ASSEMBLY PROCEDURE, READ ALL DIRECTIONS WITH CARE.
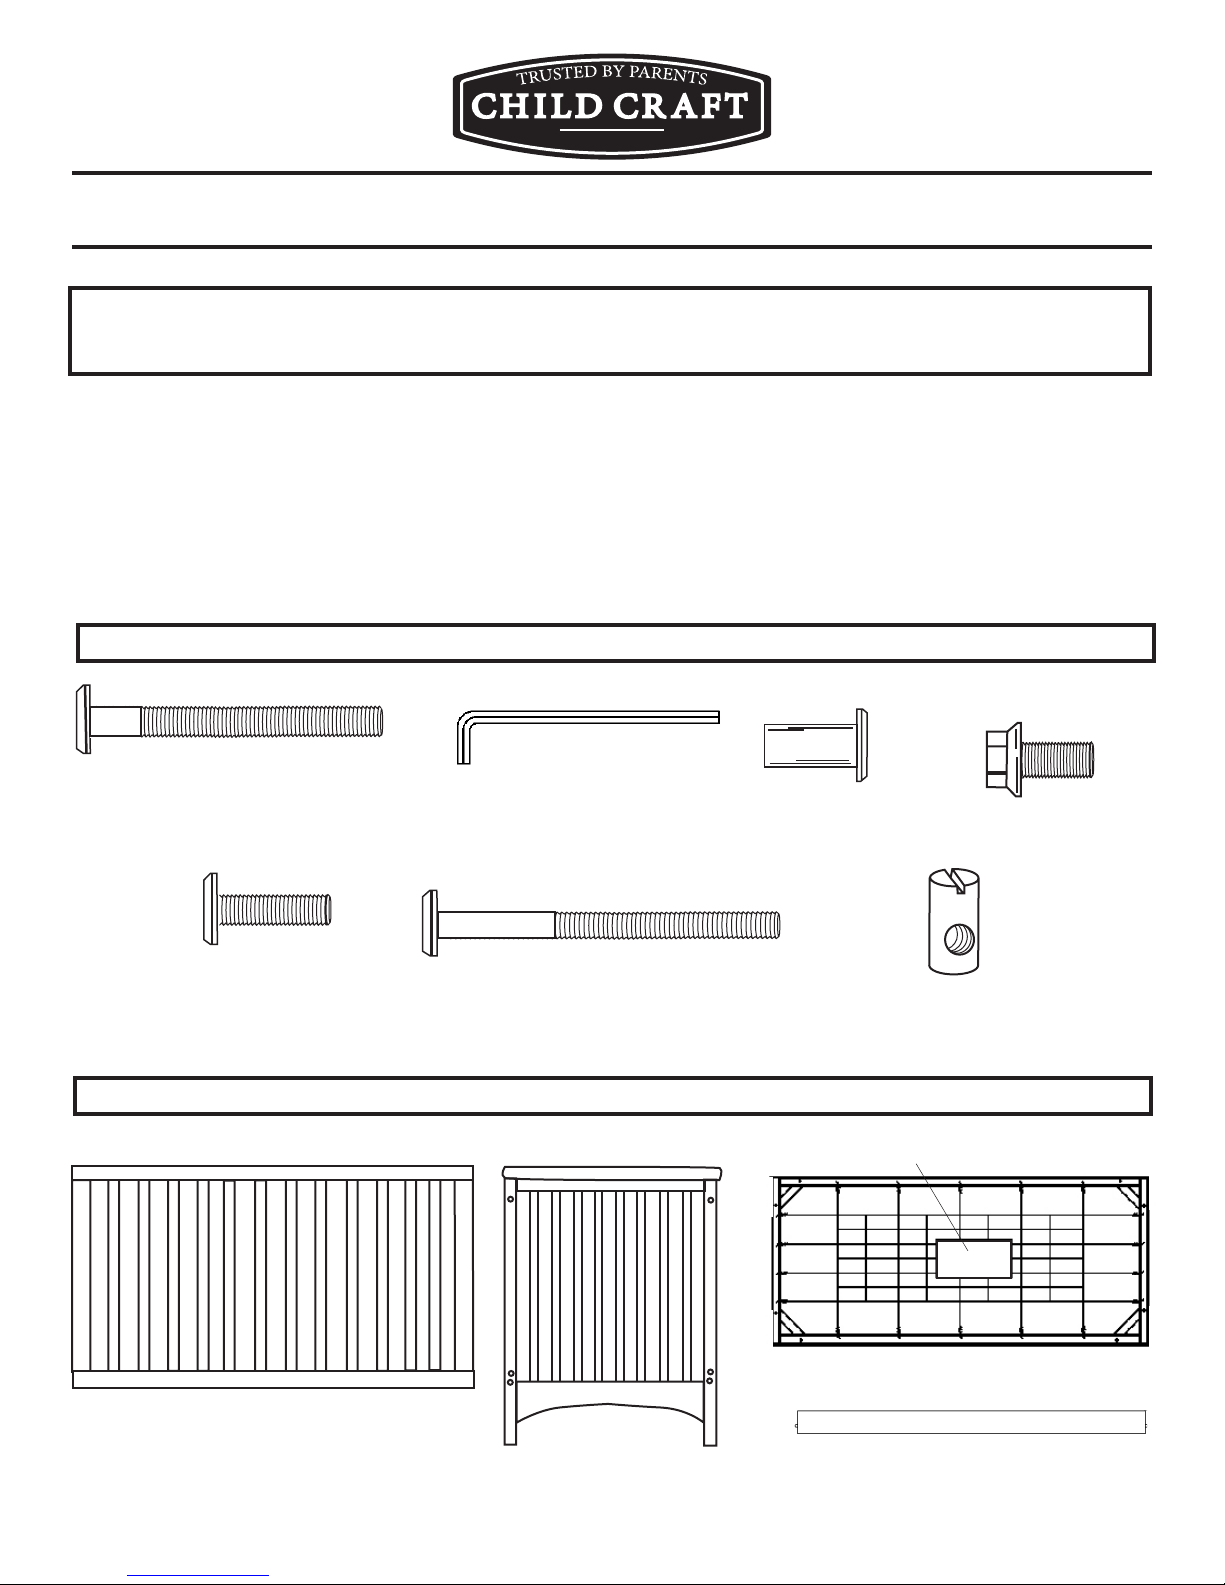
YOU WILL NEED THE FOLLOWING FOR THE ASSEMBLY OF YOUR CRIB/DAYBED:
#1 and #2 Phillip Screwdrivers Slotted Screwdriver 7 /1 6" Wrench E nc lo se d A ll en Wrenches B
(8) Allenhead Bolts
(actual size)
(2) Allenhead Bolts
(actual size)
(2) Stationary Sides
PArts encloseD in HArDwAre bAg (noted when sown actual size)
A
F
(2) Allen Wrenches
(2) Allenhead Bolts
(actual size)
B D
G
(8) Insert Nuts
(actual size)
PArts encloseD in cArton
I
(2) Head / Foot Finish
J
Assembly Directions)
C
(2 K/D Bolt Plugs
Pouch
(storage for
Machine Screws
(actual size)
(1) Spring
(4) Hex Head
H
K
(1) Crib Stretcher (for use with Daybed only)
L
SI328D
Page 2
H04760:03/092
PrePArAtion
Carefully remove and lay out all hardware and parts. During the assembly process, when using screws or bolts (fastening devices),
check each with PArts encloseD in HArDwAre bAg list by letter and size. Identify by placing each fastening device on the diagram of
the item (sketched actual size). Be sure to use the proper size specied in the assembly directions. Hardware Bag may contain extra
fastening devices. Check quantities and match to PArts encloseD in HArDwAre bAg/cArton lists. If a part is missing or broken, DO NOT
return the product to your dealer. Call Foundations® for assistance at 1 877.716.2757 (U.S. Only) or +1 330.722.5033 (Monday through
Friday, 9:00 a.m.– 4:00 p.m. Eastern Time). Before making this contact identify your crib. Model Identication numbers are stamped on a
label attached to the inside face of a Head/Foot Finish J bottom rail. Record the complete model identication number now: Include this
number with a request for a part or literature for your crib. Do not sUbstitUte PArts! #____________________.
This crib conforms to applicable regulations promulgated by the CONSUMER PRODUCT SAFETY COMMISSION and the
AMERICAN SOCIETY FOR TESTING AND MATERIALS (ASTM) Voluntary Standard in effect at the date of manufacture
and is certied by JUVENILE PRODUCTS MANUFACTURERS ASSOCIATION (JPMA) and ASTM.
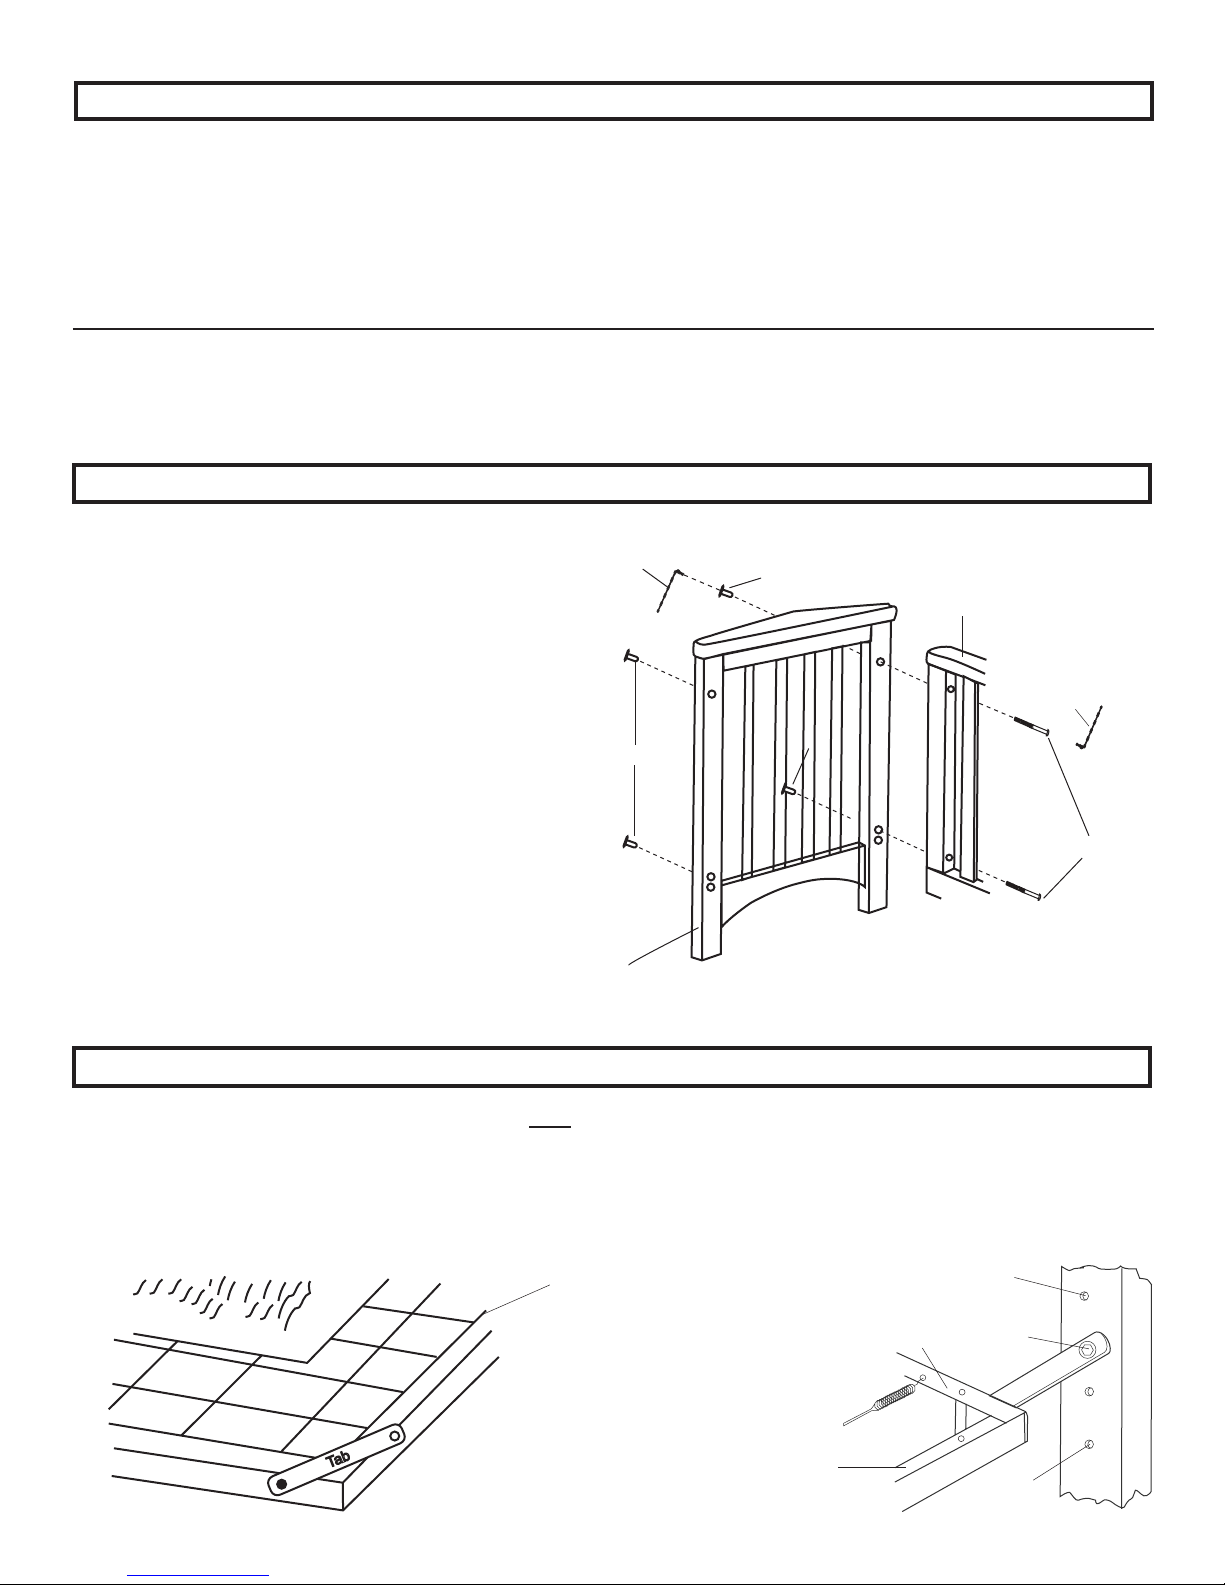
steP 1 - DiAgrAm 1: AttAcH stAtionAry siDeS to FootboArD/HeADboArD
Place the (8) Insert Nuts C into their holes in the corner
posts of Head/Foot Finishes J as shown. Align the holes
in an end rail of a Stationary Side I with the holes in a
Head/Foot Finish J. Insert Allenhead Bolts A through the
end rail on Stationary Side I, then tighten into Insert Nuts
C in Head/Foot Finish J by using the two Allen Wrenches
B. DO NOT OVERTIGHTEN. Repeat this process at the
other three corner posts.
B C
I
Large overhang
goes toward
outside of crib.
B
C
C
A
J
steP 2 - DiAgrAm 2: AttAcH sPring to crib
Locate Crib Spring K with (4) Tabs. Refer to Diagram 2. Note: Be sure top side of Crib Spring K is placed upward as illustrated.
Position the (4) Tabs attached to ends of Crib Spring K to mount to your selected position on Head/Foot Finish I posts. Select a position and install a Hexhead Machine Screw D through each of the (4) Crib Spring K Tabs and into a receiving hole in each post, then
tighten securely using 10 mm(3/8") wrench. When you decide on another placement of Crib Spring K you will need to remove the (4)
Hexhead Machine Screws D with a 10 mm (3/8") wrench and relocate to another of the four positions. Check Hexhead Machine Screws
D periodically and tighten if needed.
RNING
Top surface of Crib Spring
K Note: Text on pouch
will be visible from top
surface.
Highest
position
D
ab
T
To Relocate Crib Spring
K, Remove Hexhead
Machine Screws D
with Wrench and reposition.
Top surface of
Spring K
Tab
Lowest
position
Page 3
H04760:03/09 3
steP 3: FinisHing toUcHes
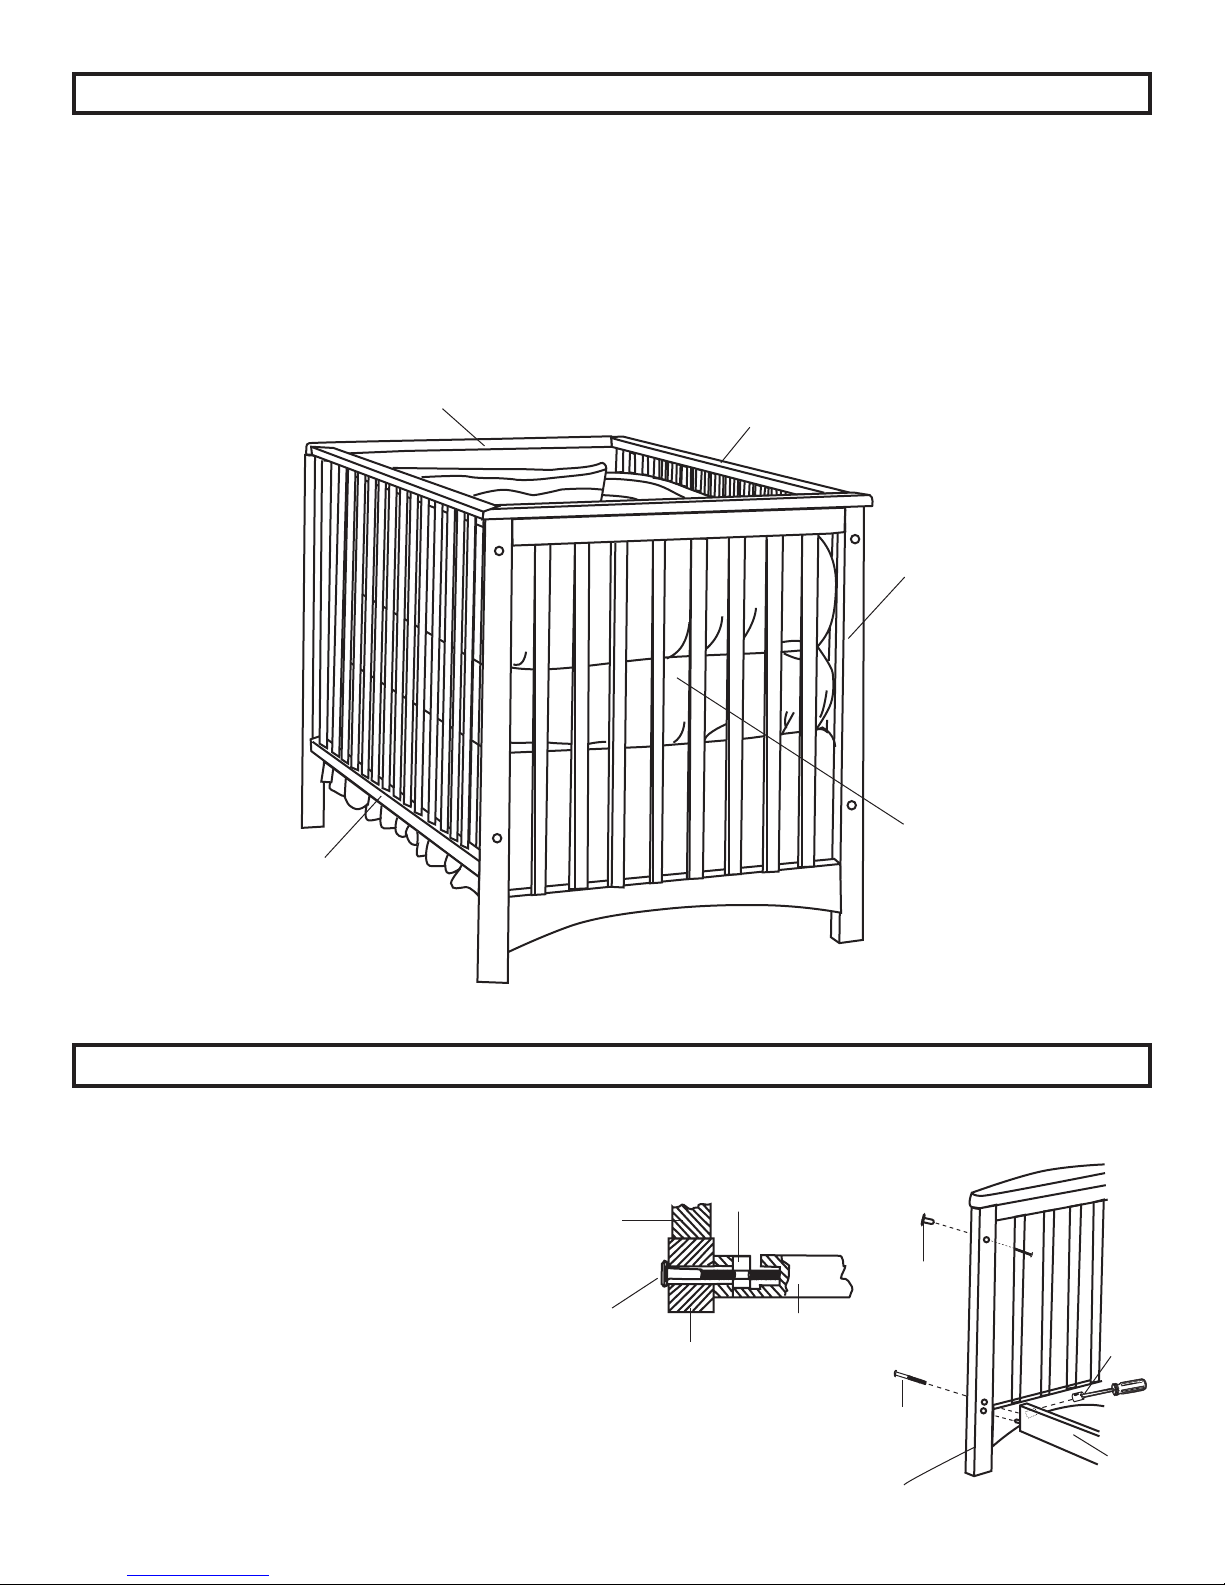
Place a purchased mattress on Spring K and crib is ready for use.
After completing crib assembly, and after making yourself aware of the Warnings, Cautions, Cleaning, Storage, Use and Maintenance
of crib, store the assembly directions in the pouch which was pre-attached to Spring K. For future referral to assembly directions you
will only need to remove them from the pouch. We caution you not to store excess hardware in pouch as this would be a danger to child
if retrieved by him/her.
Check periodically to be sure screws and bolts (fastening devices) remain tight as instructed in step of these assembly directions.
I
J
I
Assembled Crib
(style may vary)
J
Purchased Mattress
(See size requirements
under CAUTION on page 4)
When use as a crib has been completed, you have the option to convert your crib to a daybed for years of additional use in your child's
room. Remove one Stationary Side I and install Spring K in its lowest position. Store removed parts and hardware as perhaps
sometime in the future you may want to convert the daybed
back into a crib. Install Allenhead Bolt F and Insert Nut
C
in top hole of each Head/Foot Finish
shown. Locate the dowel pins in the ends of Stretcher
L into their holes in Head/Foot Finishes J. Insert
Allenhead Bolts G through their holes in Head/Foot
Finish J and into Stretcher L aligning the threaded
hole in K-D Bolt Plugs H. You can use a at tipped
screwdriver in the slotted end of the K-D Bolt Plug
H to hold and rotate it to help to align it with the
Allenhead Bolt G. Tighten securely. Place Assembly
Directions back into the pouch attached to Spring K.
• Again check to be sure each bolt is tightened
securely, then check frequently to be sure all
remain tightened.
J post as
DAybeD conversion
J
G
J
(post)
H
(top edge)
L
C
H
G
L
J
Page 4

H04760:03/094
MAINTENANCE OF YOUR CRIB/DAYBED: Upon completion of assembly be sure all screws, bolts and fastening devices have been
tightened securely. A periodic check should be made of fastening devices and tighten if needed. Before each usage or assembly, inspect
crib for damaged hardware, loose joints, missing parts or sharp edges. DO NOT use if parts are missing or broken. Contact Foundations®
for assistance at 1 877.716.2757 (U.S. Only) or +1 330.722.5033 (Monday through Friday, 9:00 a.m.– 4:00 p.m. Eastern Time). DO NOT
substitute parts. DO NOT make any alteration to this crib.
• CLEANING INSTRUCTIONS FOR YOUR CRIB/DAYBED: Mix together a mild solution of gentle dishwashing liquid and water, apply
to crib surface using a soft clean cloth lightly dampened in the solution. Rinse with clear water again using a soft clean cloth then dry all
surf aces thoroughly with a soft dry cloth. NO ABRASIVE CLEANERS, SCOURING PADS, STEEL WOOL, OR COARSE RAGS SHOULD
BE USED TO CLEAN THIS FINE FURNITURE.
• STORAGE AND USE OF YOUR CRIB/DAYBED: A printed pouch is attached to the crib spring for the permanent storage of the assembly
directions. After completing the assembly process you are advised to read and be aware of all WARNINGS, CAUTIONS, CLEANING,
STORAGE, USE AND MAINTENANCE notices contained in this set of assembly directions and printed on the pouch attached to crib
spring. You will then place the complete set of assembly directions into the pouch for future referral. We caution you not to place excess
hardware in the pouch as it could present danger to a child if retrieved and it could also puncture crib mattress. When storing crib use
CAUTION as extreme temperature or humidity changes could be harmful. Use CAUTION when a vaporizer is in use, always aim vapor
stream away from crib as well as away from any other wood furniture item.
CAUTION
ANY MATTRESS USED IN THIS CRIB MUST BE AT LEAST 27-1/4 INCHES (69 CENTIMETERS),
BY 51-5/8 INCHES (131 CENTIMETERS), WITH A THICKNESS NOT EXCEEDING 6 INCHES
(15 CENTIMETERS). The dimensions of the mattress shall be taken from seam to seam
or edge to edge where appropriate.
UPON COMPLETION OF ASSEMBLY BE SURE ALL SCREWS, BOLTS AND FASTENING
DEVICES HAVE BEEN TIGHTENED SECURELY. A FREQUENT CHECK SHOULD BE MADE OF
ALL SCREWS, BOLTS AND FASTENING DEVICES AND TIGHTEN IF NEEDED.
Page 5

H04760:03/09 5
!
WARNING
• FAILURE TO FOLLOW THESE WARNINGS AND THE ASSEMBLY INSTRUCTIONS
COULD RESULT IN SERIOUS INJURY OR DEATH.
!
WARNING: Infants can suffocate on soft bedding. NEVER add a pillow
or comforter. NEVER place additional padding under an infant.
• Read all instructions before assembling crib. Keep instructions for future use. A pouch is
attached to crib for permanent storage of the instructional literature.
• Infants can suffocate in gaps between crib sides and a mattress that is too small.
• To reduce the risk of SIDS pediatricians recommend healthy infants be placed on their backs
to sleep, unless otherwise advised by your physician.
• To help prevent strangulation, tighten all fasteners. A child can trap parts of the body or
clothing on loose fasteners.
• After raising side, make sure latches are secure (if your unit has a drop side).
• When child is able to climb out or reaches the height of 35 inches (90 centimeters) the crib
shall no longer be used.
• DO NOT place crib near window where cords from blinds or drapes may strangle a child.
• If renishing, use a non-toxic nish specied for children’s products.
• DO NOT leave child in crib with side lowered. Be sure side is in raised and locked position
whenever child is in crib.
• When child is able to pull to standing position, set mattress to lowest position and remove
bumper pads, large toys and other objects that could serve as steps for climbing out.
• NEVER use plastic shipping bags or other plastic lm as mattress covers because they can
cause suffocation.
• DO NOT use a water mattress with this crib.
• Replace teething rail(s) if damaged, cracked, or loose (if equipped with teething rails).
• Strings can cause strangulation! DO NOT place items with a string around a child’s neck, such
as hood strings or pacier cords. DO NOT suspend strings over a crib or attach strings to toys.
• When disassembling this crib, DO NOT remove any item attached with wood screws.
• Always ensure a safe environment for the child by checking regularly, before placing the child
in the crib, that every component is properly and securely in place.
• Check this product for damaged hardware, loose joints, missing parts or sharp edges before and
after assembly and frequently during use. DO NOT use crib if any parts are missing, damaged or
broken. If any parts are missing or broken or you need assistance with assembly, DO NOT return
the product to your dealer. Call Foundations® for assistance at 1 877.716.2757 (U.S. Only) or +1
330.722.5033 (Monday through Friday, 9:00 a.m.– 4:00 p.m. Eastern Time) for replacement parts
and instructional literature if needed. Include model identication numbers with your request
which you recorded on page 2. DO NOT substitute parts.
• Follow warnings on all products in a crib.
TM
SI NCE 1954
Division of Foundations Worldwide, Inc.
7001 Wooster Pike
Medina, OH 44256 USA
Telephone: 1 877.716.2757 (U.S. Only)
or +1 330.722.5033
Fax: +1 330.722.5037
www.child-craft.com
www.foundations.com
 Loading...