

Page 1

SPECIFICATIONS
Net Weight Safety certification
Interface
Humidity
LED
Dimension Power
OS support
495g
USB 3.0 / USB 2.0
Operating: 10% - 90%
Storage: -5% - 95%
Power & Access
200x128x32 mm (L/W/H) AC Power Adapter
Windows XP/Vista/7/8, MAC OS 10.3.9+, Linux Kernel 2.6.31
Material
Temperature
Transfer rate
INSTALLATION
CE
Aluminum & Plastic
Operating: 0°C ~ 70°C
Storage: -10°C ~ 75°C
USB 3.0: 5Gbps
USB 2.0: 480Mbps
INTRODUCTION
This USB 3.0 enclosure is for the use of 3.5” SATA I/II/III HDD/SSD, made from aluminum
alloy material for superior heat dissipation and finished with sandblasted appearance.
CHIEFTEC CEB-7035S is your perfect storage solution.
FEATURES
» Sandblasted finish apperance
» Supports Plug & Play and Hot Swapping
» LED indicators for power & HDD activity
» Transfer rate: USB 3.0 up to 5 Gbps, USB 2.0 up to 480Mbps
» USB 3.0 HDD enclosure for 3.5 SATA I/II/III HDD/SSD usage
» USB 3.0 data cable
Open the enclosure. Remove the screw.
1
Place the hard drive in the enclosure.
2
Page 2
Slide hard drive into SATA connector and tighten
the screws
3
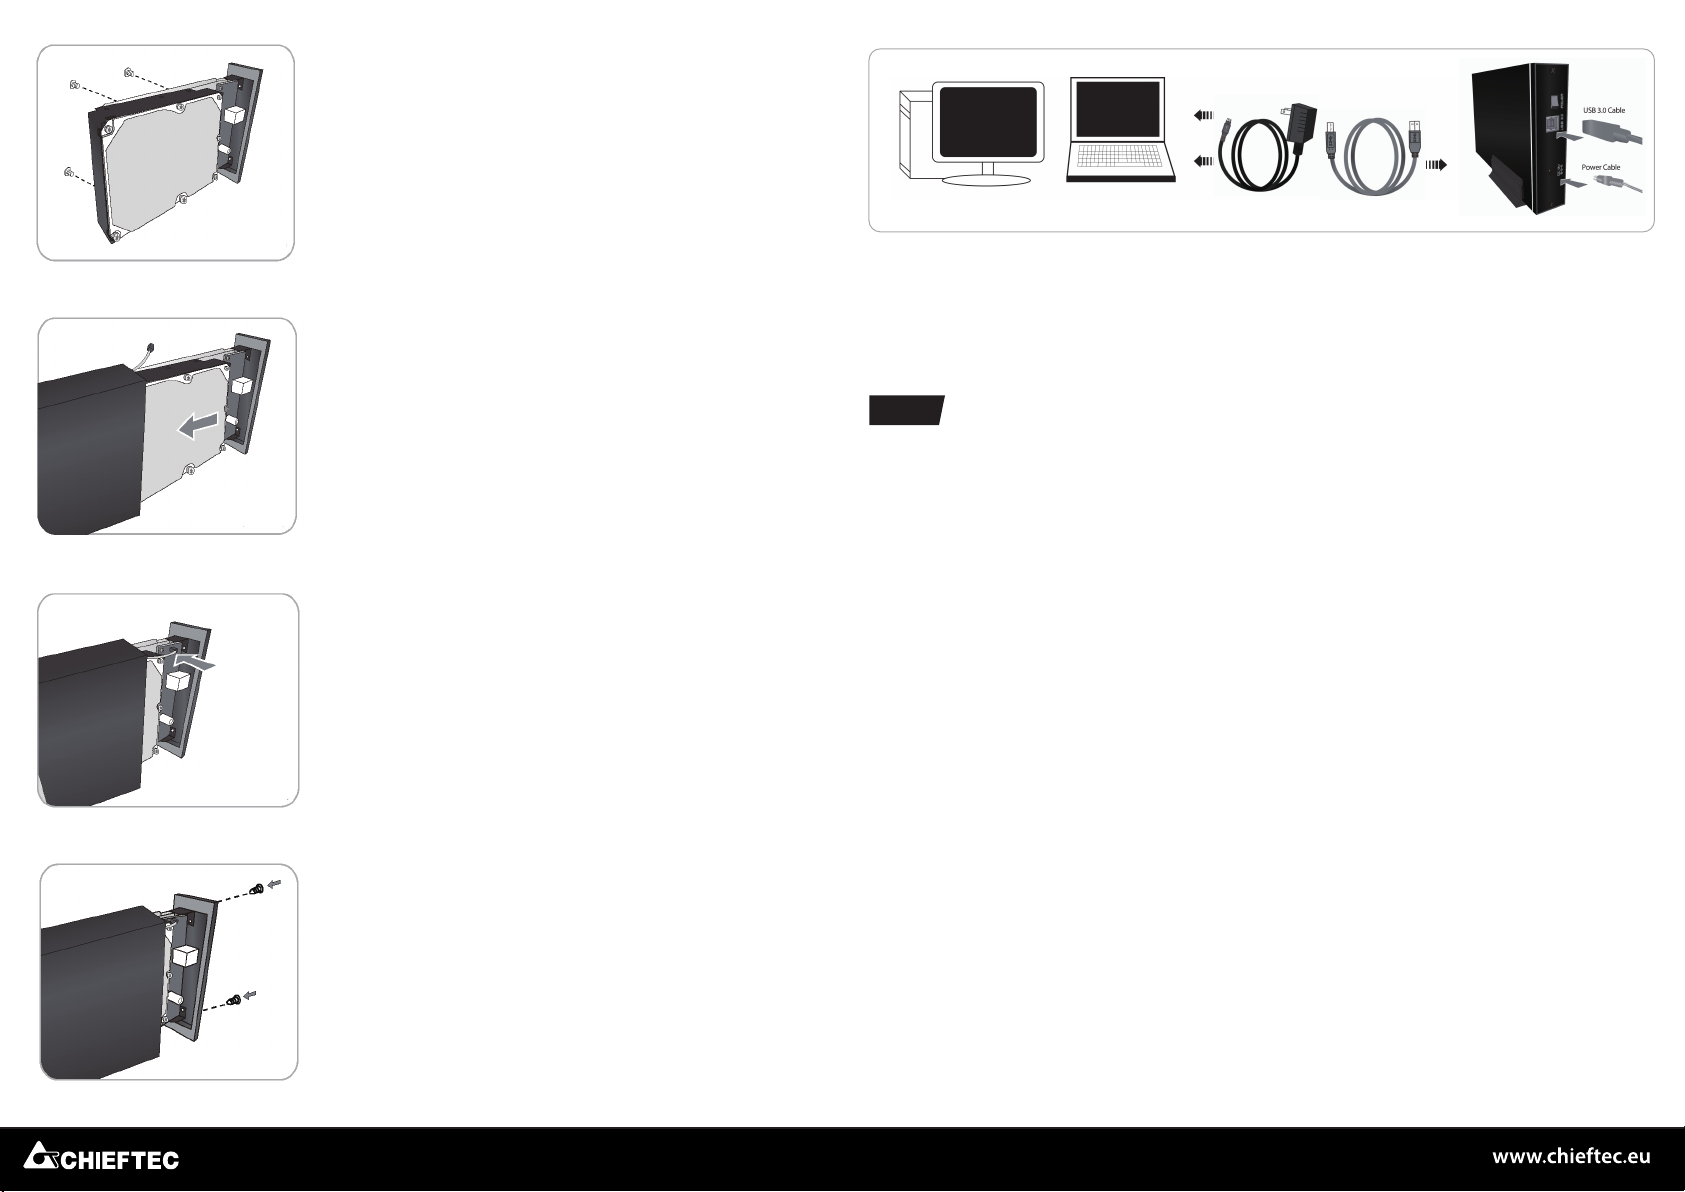
7
Connect the USB 3.0 cable to the PC, the HDD will be recognize.
If you need to replace the hard disk, close all windows, remove devices safely and the
HDD to stop running. Then follow the instructions from step 1. to 6. to remove and replace
the HDD.
Push the drive caddy back into the enclosure.
4
Connect the LED signal cable to the PCBA.
5
Make sure to fasten the 2 screws on the back of
the enclosure.
Note
When connecting the enclosure for the first time, please wait until it is recognized
1.
(different OS and different hardware may cause delay).
The enclosure is also compliant to USB 2.0 interface, reaching a transfer rate of maxi-
2.
mum 480Mbps.
If the desktop or laptop does not support USB 3.0 interface, please use the external
3.
PCI Express card (for desktop), or PCMCIA Express card (for laptop) to upgrade the
system to the best USB 3.0 transfer rate available.
Please ensure that the USB 3.0 host card driver supports the operating system.
4.
Before connecting to the PC, please ensure that the HDD is installed correctly.
5.
Please partition and format the new HDD before use.
6.
To avoid any loss of data, do not remove the enclosure while the HDD is in use.
7.
Under Windows XP OS, the maximum capacity of the HDD is 2TB (Please check
8.
Windows official website for detailed information).
If the HDD is not in use, please leave it disconnected.
9.
This product is for use in dry, indoor locations only. Avoid exposure to wet or moist
10.
conditions, only take hold of it with dry hands.
6
Page 3

SPEZIFIKATIONEN
Gewicht Konformität
Anschluss
Luftfeutigkeit
LED
Abmessung Stormversorgung
Unterstützte
Betriebssysteme
495g
USB 3.0 / USB 2.0
Betrieb: 10% - 90%
Lagerung: -5% - 95%
Power & HDD Zugriff
200x128x32 mm (L/B/H) Netzteil
Windows XP/Vista/7/8, MAC OS 10.3.9+, Linux Kernel 2.6.31
Material
Temperatur
Datentransferrate
INSTALLATION
CE
Aluminum & Plastik
Betrieb: 0°C ~ 70°C
Lagerung: -10°C ~ 75°C
USB 3.0: 5Gbps
USB 2.0: 480Mbps
EINLEITUNG
Das externe USB 3.0 Festplattengehäuse ist speziell für 3,5“ SATA I/II/III HDD/SSD
ausgelegt. Die Aluminium-Legierung mit einer schwarzen Oberflächenveredlung sorgt für
maximale Kühlung der Festplatte.
AUSSTATTUNG
» Keine speziellen Treiber notwendig
» Plug & Play, Hot Swapping
» LED für HDD/SSD Zugriff / Power LED
» Datentransferrate bis zu 5 GBit/s (USB 3.0 Super-Speed)
» USB 3.0 Festplattengehäuse für 1x 3,5“ SATA I/II/III HDD/SSD
» USB 3.0 Datenkabel
Öffnen des Gehäuses. Lösen der Schrauben.
1
Platzieren der Festplatte auf dem Schlitten.
2
Page 4

Schieben sie die Festplatte in den SATA Anschluss und
fixieren sie die Festplatte unterseitig mit denen im
Lieferumfang enthaltenen Schrauben.
3
Schieben Sie die Festplatte nun behutsam in das
Gehäuse wie auf dem Bild zu erkennen und positionieren Sie die Anschlussblende so, dass der zweipolige
LED Stecker noch genug Platz hat um ihn anzustecken.
4
Nun verbinden Sie den LED Stecker mit dem
zweipoligen Anschluss wie auf der Abbildung
dargestellt.
5
7
Unter Verwendung des im Lieferumfang befindlichen USB 3.0 Kabels, verbinden Sie nun
das Festplattengehäuse mit dem PC. Das System erkennt das Gerät automatisch (Plug &
Play) und kann verwendet werden.
ACHTUNG
1.
Beim ersten Verbinden des Gerätes mit dem System warten Sie bitte bis es
automatisch erkannt wird. In einigen Fällen, z.B. bei Verwendung unterschiedlicher
Betriebssysteme, kann es unter Umständen zu Verzögerungen kommen.
2.
Das Gerät ist abwärtskompatibel zu älteren USB Standards und liefert in diesen
Fällen natürlich auch nur die theoretische max. Datentransferrate des
entsprechenden Standards.
3.
Falls ihr Gehäuse oder Laptop USB 3.0 nicht unterstützt, verwenden Sie bitte dann
die externe PCI Express Karte (Gehäuse) oder PCMCIA Express Karte (Laptop), um
die bestmögliche Datentransferrate beim USB 3.0 zu erlangen.
4.
Bitte stellen Sie sicher, dass USB 3.0 vom Betriebssystem unterstützt wird.
5.
Stellen Sie sicher, dass die HDD korrekt installiert wurde, vor dem Anschließen an
den Rechner.
6.
Bitte formatieren Sie ihre neue Festplatte vor Gebrauch, um einen einwandfreien
Betrieb zu gewährleisten.
7.
Um Datenverlust vorzubeugen entfernen Sie das Gerät möglichst nicht während des
Schreibvorgangs auf die Festplatte.
Fixieren sie nun die beiden Schrauben, um das
Gehäuse wieder sicher zu verschließen.
6
8.
Unter Windows XP, beträgt die max. Kapazität der Festplatte 2 TB (für mehr
Informationen, besuchen Sie bitte auch die offizielle Windows Webseite)
9.
Bevor Sie die Festplatte vom System entfernen, schließen Sie möglichst alle
Anwendungen die darauf zugreifen und klicken auf das USB Symbol in der Taskleiste
(rechte Maustaste), das ihnen ermöglicht das Gerät auszuwerfen. Entfernen Sie nun
behutsam das USB Kabel.
10.
Dieses Gerät wurde für den Indoor-Einsatz also trockener Umgebung entwickelt.
Die Nutzung in anderen Umgebungen geschieht auf eigene Gefahr.
 Loading...