

Page 1

INSTALLATION INSTRUCTIONS
Instrucciones de instalación
Installationsanleitung
Instruções de Instalação
Istruzioni di installazione
Installatie-instructies
Instructions d´installation
CPU WALL MOUNT BOX
Spanish Product Description
German Product Description
Portuguese Product Description
Italian Product Description
Dutch Product Description
French Product Description
MSP-CSH1
Page 2

MSP-CSH1 Installation Instructions
18.66
EXTERNAL WIDTH
474
18.16
INTERNAL WIDTH
461
15.48
18.66
474
19.28
490
15.48
393
8.22
TOTAL DEPTH
209
DISCLAIMER
Milestone AV Technologies and its affiliated corporations and
subsidiaries (collectively "Milestone"), intend to make this
manual accurate and complete. However, Milestone makes no
claim that the information contained herein covers all details,
conditions or variations, nor does it provide for every possible
contingency in connection with the installation or use of this
product. The information contained in this document is subject
to change without notice or obligation of any kind. Milestone
makes no representation of warranty, expressed or implied,
regarding the information contained herein. Milestone assumes
no responsibility for accuracy, completeness or sufficiency of
the information contained in this document.
Chief® is a registered trademark of Milestone AV T echnologies.
All rights reserved.
WARNING:
follow all instructions can result in serious personal injury,
damage to equipment, or voiding of factory warranty! It is the
installer’s responsibility to make sure all components are
properly assembled and installed using the instructions
provided.
WARNING:
for this component can result in serious personal injury or
damage to equipment! It is the installer’s responsibility to
make sure the structure to which this component is attached
can support five times the combined weight of all equipment.
Reinforce the structure as required before installing the
component.
Failure to read, thoroughly understand, and
Failure to provide adequate structural strength
IMPORTANT WARNINGS AND
CAUTIONS!
WARNING:
serious injury or death if you do not follow the instructions.
CAUTION:
damage or destruction of equipment if you do not follow the
corresponding instructions.
A WARNING alerts you to the possibility of
A CAUTION alerts you to the possibility of
DIMENSIONS
WARNING: RISK OF ELECTRIC SHOCK ! Using the
wrong screws could result in severe personal injury or
damage to your display. Only use the screws provided
to connect display to MSP-CSH1.
WARNING:
serious personal injury or damage to equipment! It is the
installer’s responsibility to make sure the combined weight of
all components installed within and attached to the MSPCSH1 does not exceed 25 lbs (11.34 kg). The weight of the
display attached to the MSP-CSH1 also cannot exceed 25 lbs
(1 1.34 kg).
Exceeding the weight capacity can result in
2
Page 3
Installation Instructions MSP-CSH1
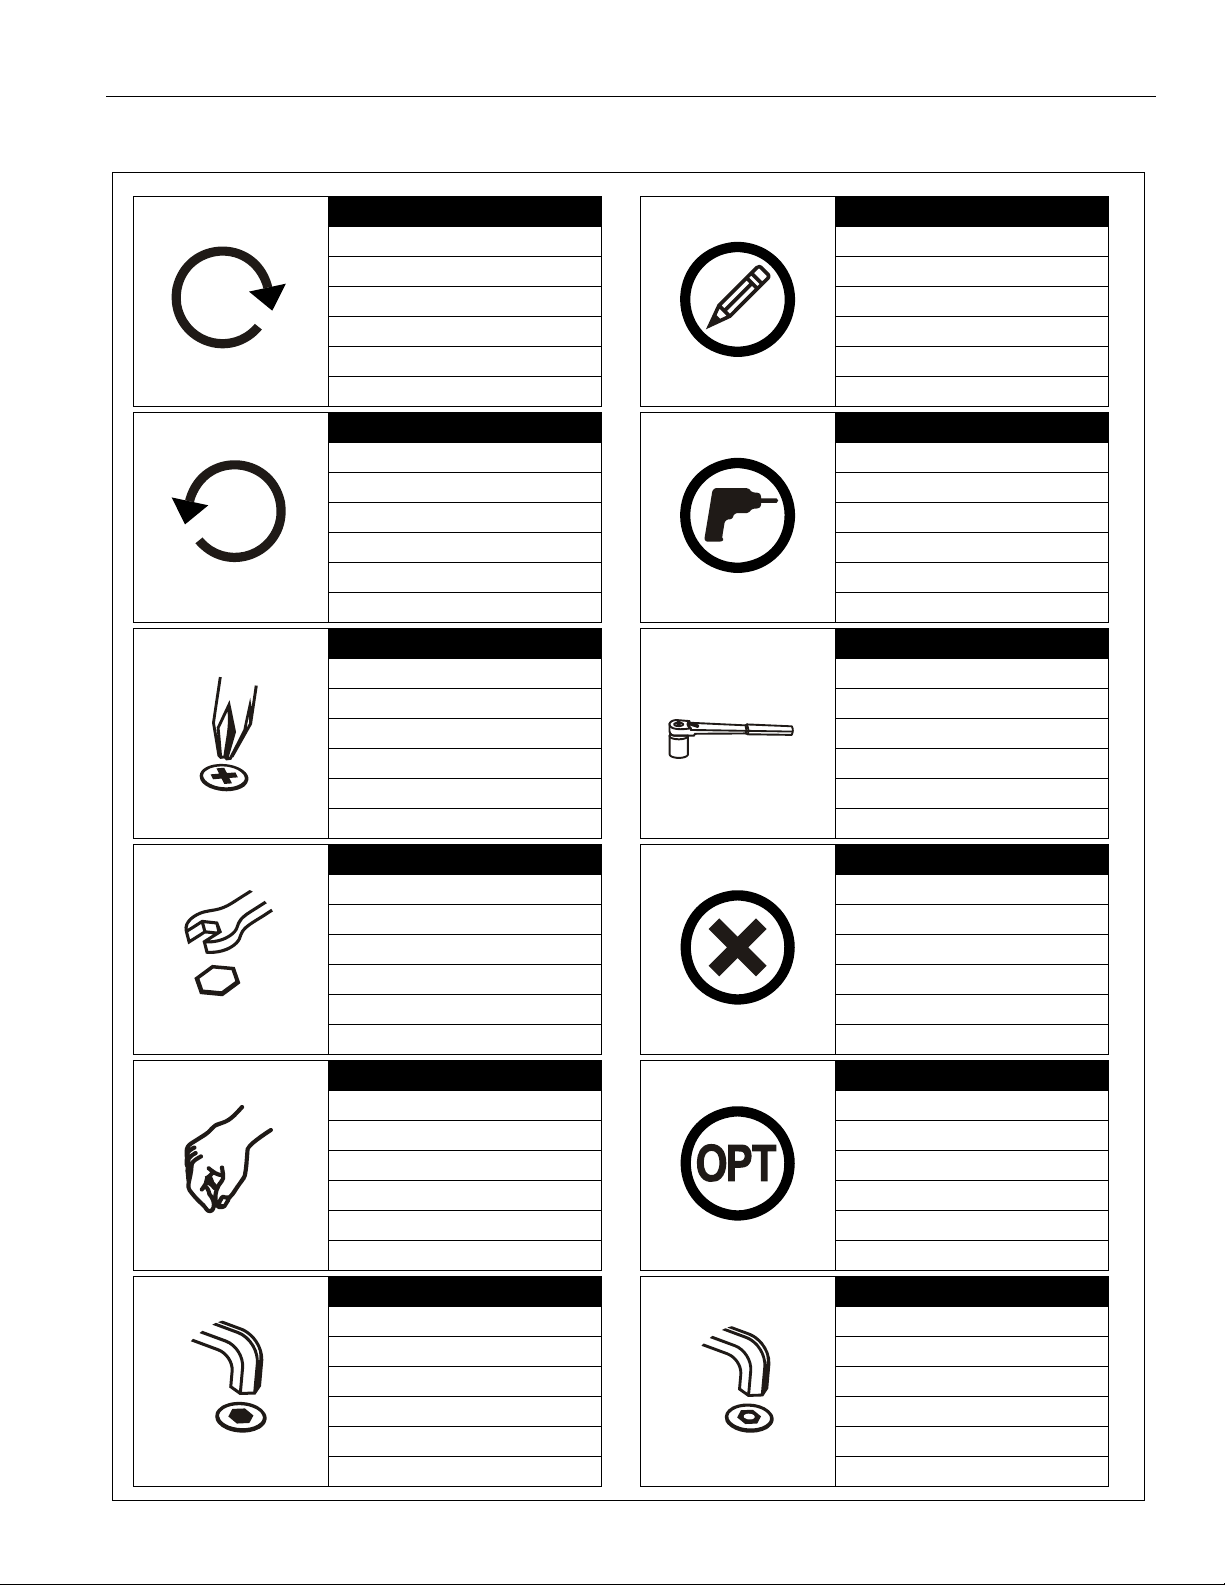
Tighten Fastener
Apretar elemento de fijación
Befestigungsteil festziehen
Apertar fixador
Serrare il fissaggio
Bevestiging vastdraaien
Serrez les fixations
Loosen Fastener
Aflojar elemento de fijación
Befestigungsteil lösen
Desapertar fixador
Allentare il fissaggio
Bevestiging losdraaien
Desserrez les fixations
Phillips Screwdriver
Destornillador Phillips
Kreuzschlitzschraubendreher
Chave de fendas Phillips
Cacciavite a stella
Kruiskopschroevendraaier
Tournevis à pointe cruciforme
Open-Ended Wrench
Llave de boca
Gabelschlüssel
Chave de bocas
Chiave a punte aperte
Steeksleutel
Clé à fourche
By Hand
A mano
Von Hand
Com a mão
A mano
Met de hand
À la main
Hex-Head Wrench
Llave de cabeza hexagonal
Sechskantschlüssel
Chave de cabeça sextavada
Chiave esagonale
Zeskantsleutel
Clé à tête hexagonale
Pencil Mark
Marcar con lápiz
Stiftmarkierung
Marcar com lápis
Segno a matita
Potloodmerkteken
Marquage au crayon
Drill Hole
Perforar
Bohrloch
Fazer furo
Praticare un foro
Gat boren
Percez un trou
Socket Wrench
Llave de cubo
Llave de cubo
Chave de caixa
Chiave a brugola
Dopsleutel
Clé à douilles
Remove
Quitar
Entfernen
Remover
Rimuovere
Verwijderen
Retirez
Optional
Opcional
Optional
Opcional
Opzionale
Optie
En option
Security Wrench
Llave de seguridad
Sicherheitsschlüssel
Chave de segurança
Chiave di sicurezza
Veiligheidssleutel
Clé de sécurité
LEGEND
3
Page 4
MSP-CSH1 Installation Instructions
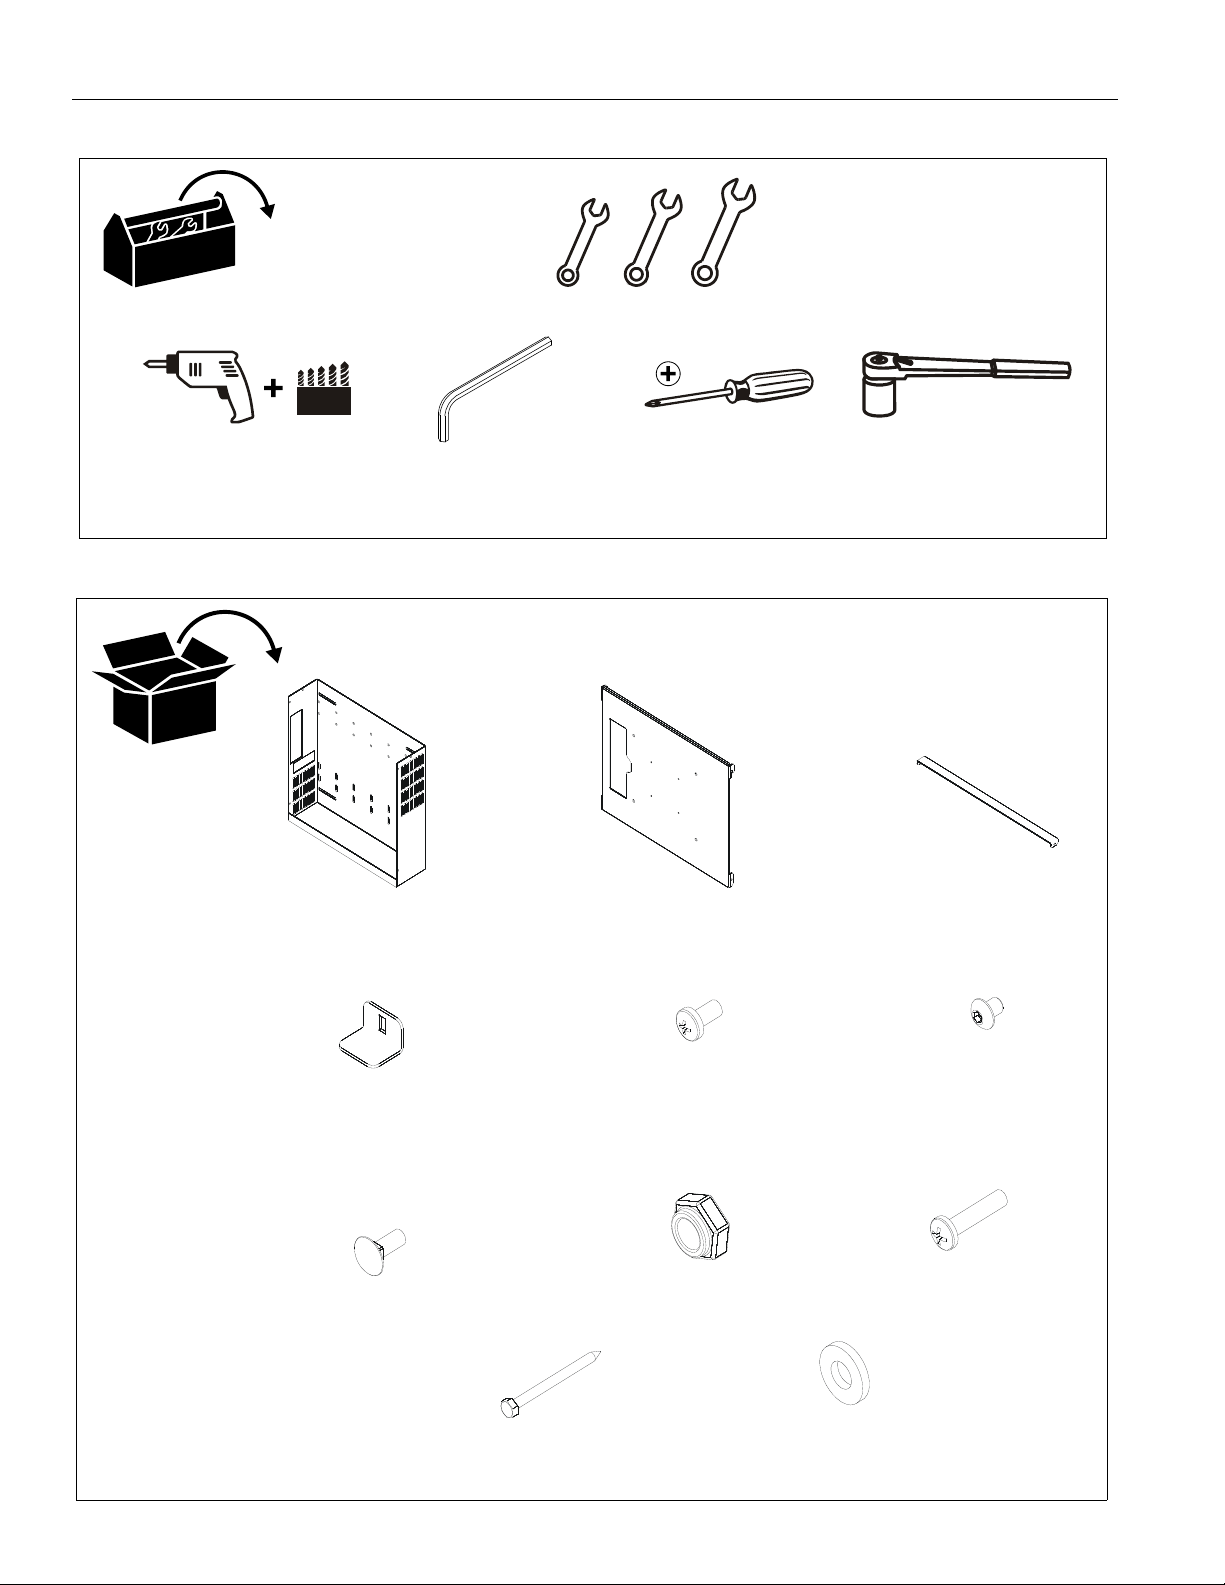
1/8"
#2
1/8"
3/8"
1/4"
A(1)
B(1)
C(1)
D(2)
E(4)
F(6)
G(2)
H(2)
J(1)
K(4)
4 x 12mm
#10-24 x 1/4"
#10-24 x 1/2"
#10-24
#10-24 x 7/8"
1/4 x 2 1/2"
[CPU Holder]
[Faceplate]
[CPU Cross Strap]
[CPU Bracket]
L(4)
4mm
TOOLS REQUIRED FOR INSTALLATION
PARTS
4
Page 5
Installation Instructions MSP-CSH1
x 4
(K) x 4
3
2
(D) x 2
1
(G) x 2
(H) x 2
2
(C)
(F) x 2
4
3
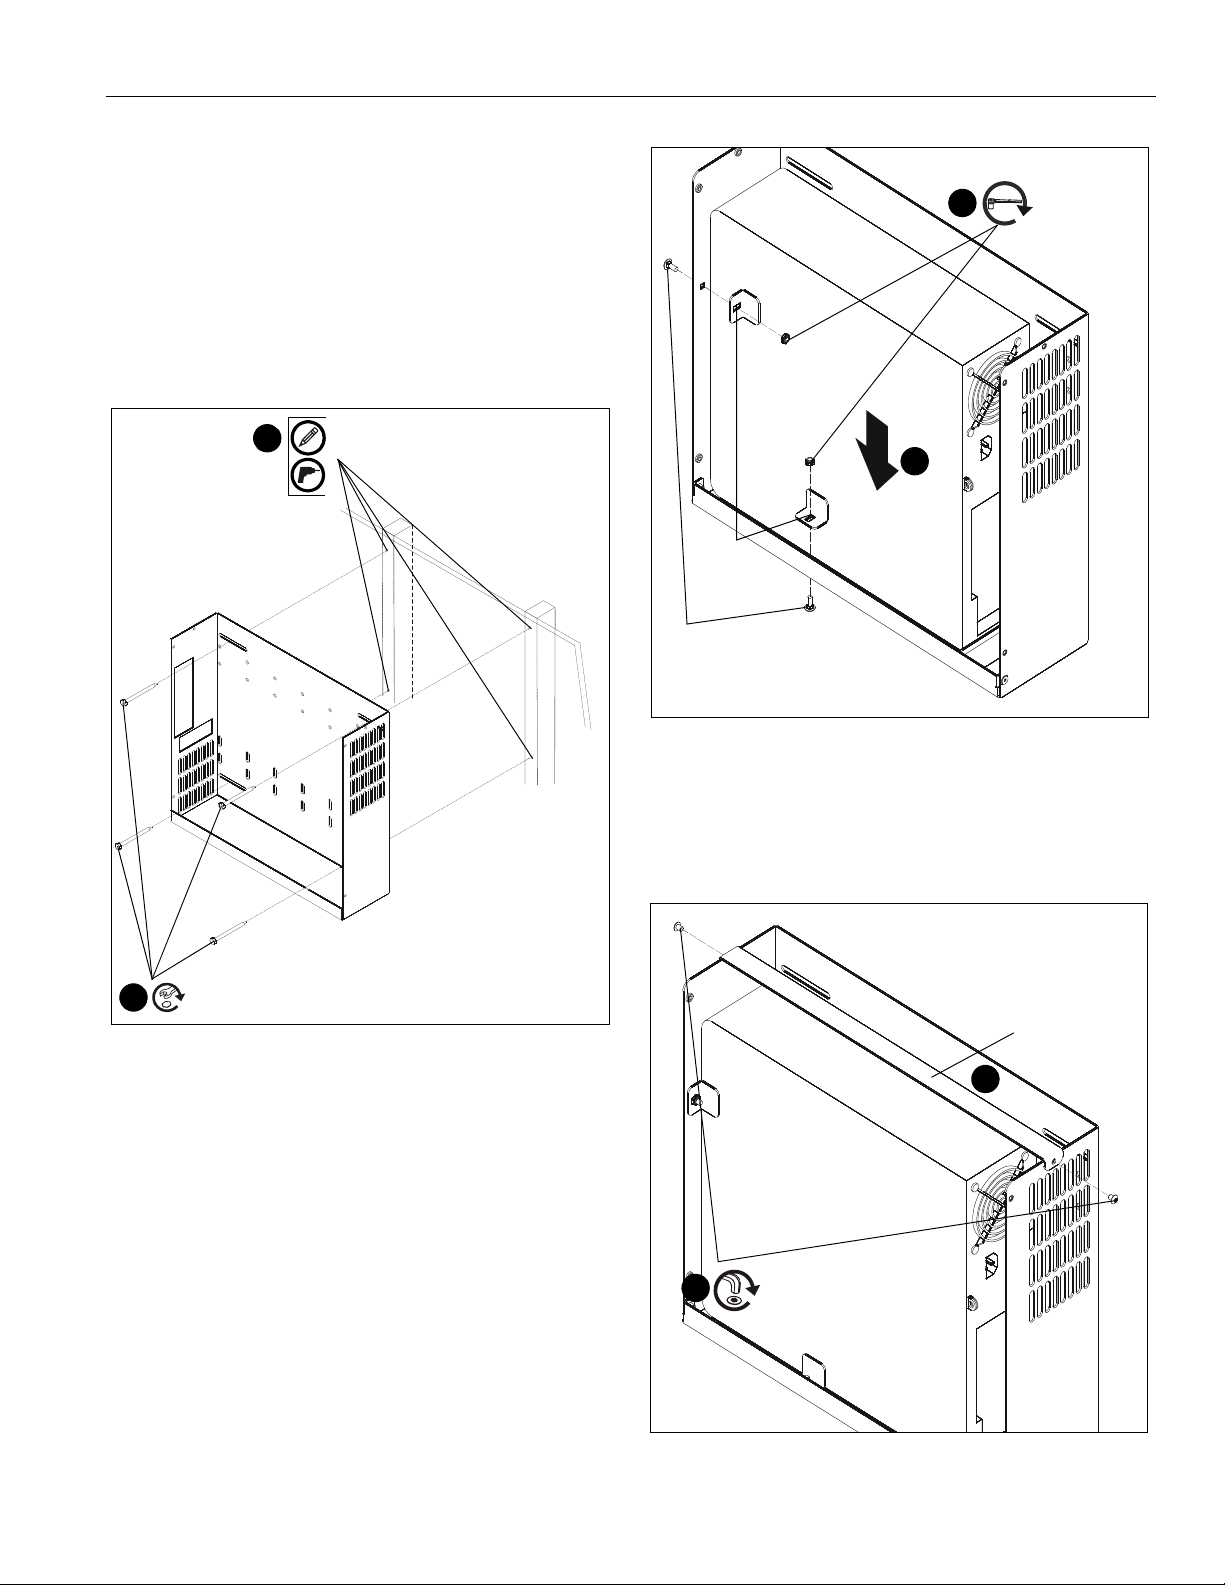
Assembly And Installation
Attach to Wa ll
NOTE:
1. Use stud finder to locate studs.
2. Using CPU holder (A) as a template, mark and drill four 1/8"
3. Install four 1/4 x 2 1/2" hex head lag screws (K) through
The MSP-CSHI must be mounted to wood studs that
are 16" apart.
holes in center of wood studs. (See Figure 1)
CPU holder (A) and into drilled holes. (See Figure 1)
Figure 1
Install CPU
1. Gently set CPU within CPU holder (A) with cables on same
side as cable management hole in CPU holder. (See Figure
2)
2. Use 3/8" socket wrench to install two #10-24 x 1/2" carriage
screws (G) through CPU holder, CPU bracket s (D) and into
#10-24 Nylock nuts (H). (See Figure 2)
Figure 2
3. Place CPU cross strap (C) over CPU holder (A) lining up
holes with top center holes on CPU holder. (See Figure 3)
4. Install two #10-24 x 1/4" button head cap screws (F) through
CPU cross strap (C) and CPU holder (A). (See Figure 3)
Figure 3
5
Page 6

MSP-CSH1 Installation Instructions
3
top of display
((E) x 4
(B)
connector hooks
(L) x 4
4
(F) x 2
5
(F) x 2
6
Attach Display to CPU Holder
WARNING:
serious personal injury or damage to equipment! It is the
installer’s responsibility to make sure the combined weight of
all components installed within the MSP-CSH1 mount
including the display does not exceed 50 lbs (22.68 kg).
Exceeding the weight capacity can result in
WARNING: RISK OF ELECTRIC SHOCK ! Using the
wrong screws could result in severe personal injury or
damage to your display. Only use the screws provided
to connect display to MSP-CSH1.
1. Lay display face side down on a level, non-abrasive
surface. Lay down a cloth if necessary to avoid scratching
the screen.
2. Lay faceplate (B) on top of display making sure the
connector hooks are facing up and are the top of the display.
Four elevated buttons on back of display should match up
with four outer holes on faceplate. (See Figure 4)
3. Install four 4 x 12mm Phillips pan machine screws (E)
through four 4mm flat washers (L), faceplate (B) and into
back of the display. (See Figure 4)
Figure 5
6. Install two #10-24 x 1/4" button head cap screws (F) through
holes in faceplate (B) and CPU holder (A). (See Figure 6)
7. Tighten two button head cap screws that were partially
installed in step #4 to fully secure faceplate to CPU holder.
4. Partially install two #10-24 x 1/4" button head cap screws
(F) through CPU holder (A) holes. DO NOT FULLY
TIGHTEN! (See Figure 5)
5. Use connector hooks to hang display and faceplate (B) to
CPU holder (A) on partially installed button head cap
screws. (See Figure 5)
Figure 4
6
Figure 6
Page 7

Installation Instructions MSP-CSH1
scanning device
(bottom view)
(J)
holder
Holder Installation
1. Install #10-24 x 7/8" Phillips pan machine screws (J)
through scanning device holder (not included) and into the
hole in the bottom of CPU holder. (See Figure 7)
Figure 7
7
Page 8

MSP-CSH1 Installation Instructions
Chief Manufacturing, a products division
of Milestone AV Technologies
8832-002001 Rev01
©2009 Milestone AV Technologies, a
Duchossois Group Company
www.chiefmfg.com
02/09
USA/International A 8401 Eagle Creek Parkway, Savage, MN 55378
P 800.582.6480 / 952.894.6280
F 877.894.6918 / 952.894.6918
Europe A Fellenoord 130 5611 ZB EINDHOVEN, The Netherlands
P +31 (0)40 2668620
F +31 (0)40 2668615
Asia Pacific A Room 24F, Block D, Lily YinDu International Building
LuoGang, BuJi Town, Shenzhen, CHINA.
P +86-755-8996 92 26
F +86-755-8996 9217
 Loading...