

Page 1

User Guide
HP Modular Keyboard with Numeric
Keypad and Accessories
Document Part Number: 365677-001
July 2004
This guide provides instructions on setting up and using the HP
modular keyboard with numeric keypad, smart card adapter,
Bluetooth keyboard adapter, and Bluetooth mouse.
Page 2

© Copyright 2004 Hewlett-Packard Development Company, L.P.
The information contained herein is subject to change without notice.
Microsoft and Windows are trademarks of Microsoft Corporation in the
U.S. and other countries.
The only warranties for HP products and services are set forth in the
express warranty statements accompanying such products and services.
Nothing herein should be construed as constituting an additional warranty.
HP shall not be liable for technical or editorial errors or omissions
contained herein.
This document contains proprietary information that is protected by
copyright. No part of this document may be photocopied, reproduced, or
translated to another language without the prior written consent of
Hewlett-Packard Company.
WARNING: Text set off in this manner indicates that failure to
Å
follow directions could result in bodily harm or loss of life.
CAUTION: Text set off in this manner indicates that failure to follow
Ä
directions could result in damage to equipment or loss of information.
User Guide
HP Modular Keyboard with Numeric Keypad and Accessories
First Edition (July 2004)
Document Part Number: 365677-001
Page 3

Contents
1 Choosing Configuration Options
Standard Configuration . . . . . . . . . . . . . . . . . . . . . . . . . . 1–2
Security Access Solution . . . . . . . . . . . . . . . . . . . . . . . . . 1–4
Wireless Solution . . . . . . . . . . . . . . . . . . . . . . . . . . . . . . . 1–5
Combined Wireless and Security Access Solution . . . . . 1–6
2 Identifying the Modular Keyboard and
Numeric Keypad Features
Standard Features . . . . . . . . . . . . . . . . . . . . . . . . . . . . . . . 2–1
Supported Operating Systems . . . . . . . . . . . . . . . . . . . . . 2–1
Modular Keyboard Kit Contents . . . . . . . . . . . . . . . . . . . 2–2
Identifying the Modular Keyboard Components . . . . . . . 2–3
Front Components . . . . . . . . . . . . . . . . . . . . . . . . . . . 2–3
Rear Components . . . . . . . . . . . . . . . . . . . . . . . . . . . 2–4
Modular Keyboard Access Buttons. . . . . . . . . . . . . . 2–5
Identifying the Numeric Keypad Components . . . . . . . . 2–6
Numeric Keypad Access Buttons . . . . . . . . . . . . . . . 2–7
3 Setting Up and Using the Modular
Keyboard
Connecting to the Computer . . . . . . . . . . . . . . . . . . . . . . 2–1
Repositioning the Numeric Keypad . . . . . . . . . . . . . . . . . 2–2
Adjusting the Slope . . . . . . . . . . . . . . . . . . . . . . . . . . . . . 2–6
Installing the Modular Access Keyboard
(MAK) Software . . . . . . . . . . . . . . . . . . . . . . . . . . . . . . . 2–7
Programming the Access Buttons . . . . . . . . . . . . . . . . . . 2–7
User Guide www.hp.com iii
Page 4

Contents
4 Adding Smart Card Security
Smart Card Features. . . . . . . . . . . . . . . . . . . . . . . . . . . . . 4–1
Supported Operating Systems . . . . . . . . . . . . . . . . . . . . . 4–1
Smart Card Adapter Kit Contents . . . . . . . . . . . . . . . . . . 4–2
Identifying the Smart Card Reader Adapter
Components . . . . . . . . . . . . . . . . . . . . . . . . . . . . . . . . . . . 4–3
Setting Up the Smart Card Solution. . . . . . . . . . . . . . . . . 4–4
Connecting as an Attachment to the Modular
Keyboard . . . . . . . . . . . . . . . . . . . . . . . . . . . . . . . . . . 4–4
Connecting as a Stand-Alone Device . . . . . . . . . . . . 4–7
Installing the Smart Card Adapter Drivers . . . . . . . . 4–8
Installing the ProtectTools Software . . . . . . . . . . . . . 4–8
Adjusting the Slope . . . . . . . . . . . . . . . . . . . . . . . . . . 4–9
Using the ProtectTools Smart Card . . . . . . . . . . . . . . . . 4–10
Identifying Compatible Smart Cards . . . . . . . . . . . . . . . 4–11
5 Converting the Modular Keyboard to a
Wireless Solution
Wireless Solution Features. . . . . . . . . . . . . . . . . . . . . . . . 3–1
Supported Operating Systems . . . . . . . . . . . . . . . . . . . . . 3–2
Bluetooth Adapter Kit Contents. . . . . . . . . . . . . . . . . . . . 3–3
Identifying the Bluetooth Keyboard Adapter
Components . . . . . . . . . . . . . . . . . . . . . . . . . . . . . . . . . . . 3–4
Identifying the Bluetooth Mouse Components . . . . . . . . 3–5
Identifying the Bluetooth Transceiver Components . . . . 3–6
Setting Up the Wireless Solution . . . . . . . . . . . . . . . . . . . 3–7
Connecting Wireless Devices . . . . . . . . . . . . . . . . . . 3–8
Installing the Bluetooth Software . . . . . . . . . . . . . . 3–15
WIDCOMM Bluetooth Software . . . . . . . . . . . 3–15
Broadcom Bluetooth Control Suite (BBCS). . . 3–17
Enabling Microsoft Bluetooth Drivers . . . . . . . . . . 3–18
Preparing the Bluetooth Transceiver to Work
with Microsoft Bluetooth Drivers . . . . . . . . . . . 3–19
Installing the Microsoft Bluetooth Drivers . . . . 3–19
iv www.hp.com User Guide
Page 5

Adjusting the Slope . . . . . . . . . . . . . . . . . . . . . . . . . 3–20
Recharging the Bluetooth Keyboard Adapter
and Bluetooth Mouse Batteries . . . . . . . . . . . . . . . . . . . 3–21
Identifying Compatible Bluetooth Devices . . . . . . . . . . 3–24
6 Installing the Bluetooth Mouse as a
Stand-Alone Device
Bluetooth Mouse Features . . . . . . . . . . . . . . . . . . . . . . . . 3–1
Supported Operating Systems . . . . . . . . . . . . . . . . . . . . . 3–2
Bluetooth Mouse Kit Contents. . . . . . . . . . . . . . . . . . . . . 3–2
Identifying the Bluetooth Mouse Components . . . . . . . . 3–3
Setting Up the Bluetooth Mouse . . . . . . . . . . . . . . . . . . . 3–4
Connecting the Bluetooth Mouse . . . . . . . . . . . . . . . 3–5
Installing the Bluetooth Software . . . . . . . . . . . . . . . 3–8
WIDCOMM Bluetooth Software . . . . . . . . . . . . 3–8
Broadcom Bluetooth Control Suite (BBCS). . . 3–10
Enabling Microsoft Bluetooth Drivers . . . . . . . . . . 3–11
Preparing the Bluetooth Transceiver to Work
with Microsoft Bluetooth Drivers . . . . . . . . . . . 3–12
Installing the Microsoft Bluetooth Drivers . . . . 3–12
Recharging the Bluetooth Mouse Batteries . . . . . . . . . . 3–13
Contents
A Troubleshooting
Technical Support . . . . . . . . . . . . . . . . . . . . . . . . . . . . . A–14
Using the Worldwide Web . . . . . . . . . . . . . . . . . . . A–14
Preparing to Call Technical Support . . . . . . . . . . . . A–14
B Regulatory Compliance Notices
Wireless Notices. . . . . . . . . . . . . . . . . . . . . . . . . . . . . . . . B–1
Canadian Regulatory Wireless Notice. . . . . . . . . . . . B–2
European Union Notice . . . . . . . . . . . . . . . . . . . . . . . B–2
Japanese Regulatory Wireless Notice . . . . . . . . . . . . B–4
Brazilian Regulatory Wireless Notice . . . . . . . . . . . . B–4
User Guide www.hp.com v
Page 6

Contents
Federal Communications Commission Notice. . . . . . . . . B–5
Modifications. . . . . . . . . . . . . . . . . . . . . . . . . . . . . . . B–5
Cables . . . . . . . . . . . . . . . . . . . . . . . . . . . . . . . . . . . . B–6
Declaration of Conformity for Products Marked
with the FCC Logo (United States Only) . . . . . . . . . B–6
Canadian Notice . . . . . . . . . . . . . . . . . . . . . . . . . . . . . . . . B–7
Avis Canadien . . . . . . . . . . . . . . . . . . . . . . . . . . . . . . B–7
Japanese Notice . . . . . . . . . . . . . . . . . . . . . . . . . . . . . . . . B–7
Korean Notice . . . . . . . . . . . . . . . . . . . . . . . . . . . . . . . . . B–7
C Ordering Kits
vi www.hp.com User Guide
Page 7

1
Choosing Configuration
Options
Congratulations on purchasing an HP modular keyboard! The
design of the modular keyboard creates a comfortable user
experience and allows you to customize your workspace with
accessories tailored to your particular needs.
The modular keyboard and its interwoven array of accessories
provide:
■ Reprogrammable buttons for quick access to Web pages,
applications, or data files.
■ A detachable numeric keypad that can be placed in a more
optimal position on the desktop or removed completely to
gain valuable desktop real estate.
■ An adjustable slope of 0°, 6°, or 12°.
■ Improved security with a smart card adapter. The smart card
adapter reads all ISO 7816-3 compatible smart cards and is
qualified with HP ProtectTools Security Manager software,
which utilizes the HP ProtectTools Smart Card.
■ A Bluetooth wireless solution that converts the modular
keyboard to a wireless Bluetooth desktop solution by adding
a Bluetooth keyboard adapter, a Bluetooth mouse, and a USB
Bluetooth transceiver. You can add other Bluetooth devices,
such as printers, and synchronize Bluetooth notebooks and
PDAs to the desktop computer.
User Guide www.hp.com 1–1
Page 8

Choosing Configuration Options
The following sections in this chapter describe some of the
typical HP modular keyboard configurations.
Standard Configuration
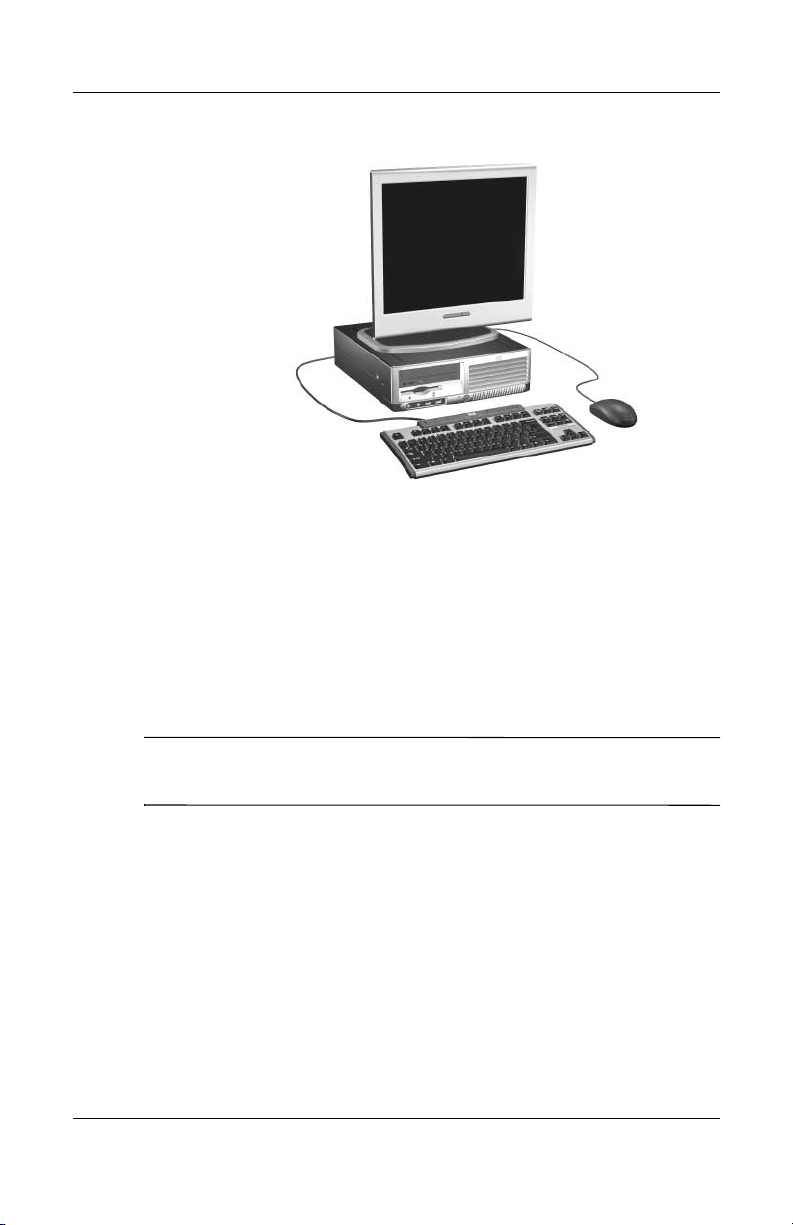
The HP modular keyboard standard configuration includes:
■ Modular keyboard
■ Detachable numeric keypad
HP Modular Keyboard Standard Configuration with Numeric
Keypad
1–2 www.hp.com User Guide
Page 9
Choosing Configuration Options
HP Modular Keyboard Standard Configuration without Numeric
Keypad
See Chapter 2, “Identifying the Modular Keyboard and Numeric
Keypad Features” for a description of the features of the modular
keyboard and numeric keypad.
See Chapter 3, “Setting Up and Using the Modular Keyboard” for
information on setting up and using the HP modular keyboard in
the standard configuration.
Refer to Appendix C, “Ordering Kits” for modular keyboard and
✎
accessory part numbers and ordering information.
User Guide www.hp.com 1–3
Page 10
Choosing Configuration Options
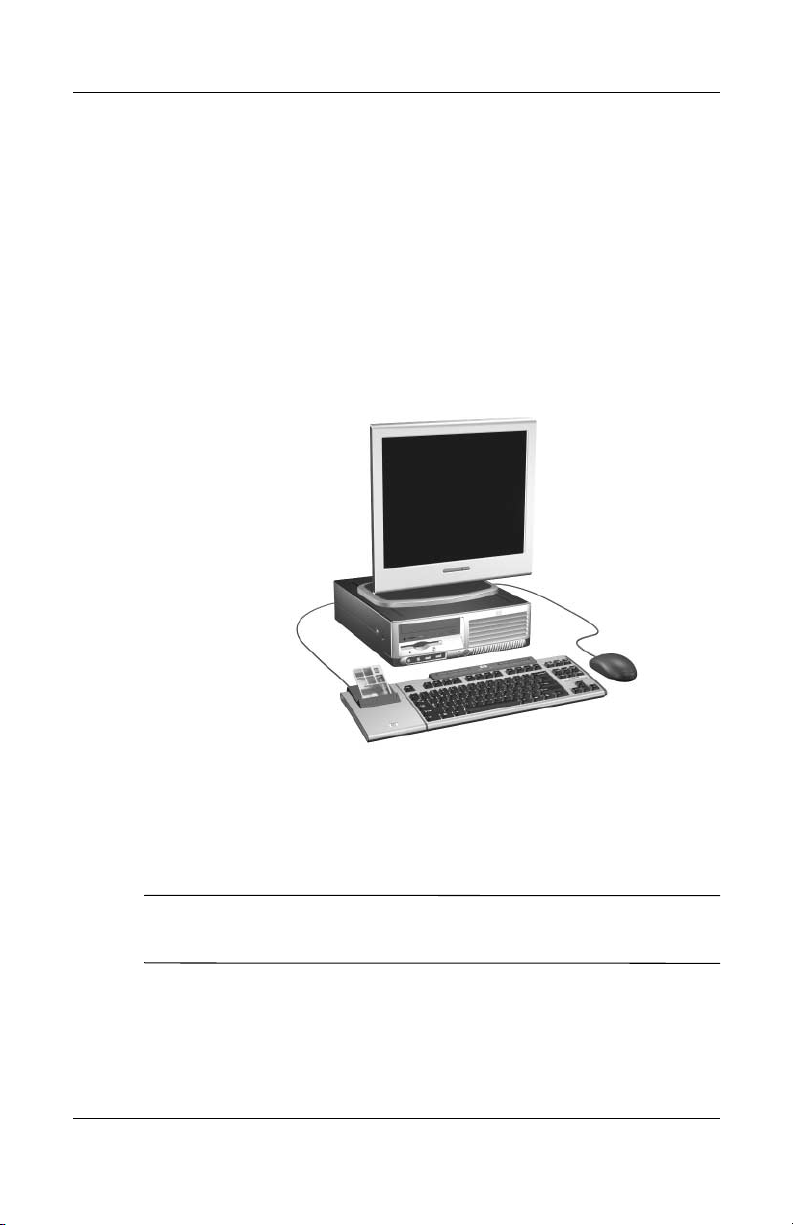
Security Access Solution
The HP modular keyboard smart card configuration is a
combination of the modular keyboard kit plus the optional smart
card adapter kit. The smart card configuration includes:
■ Modular keyboard and detachable numeric keypad
■ Detachable smart card adapter
■ HP ProtectTools smart card
HP Modular Keyboard Smart Card Configuration
See Chapter 4, “Adding Smart Card Security” for information on
setting up and using the HP modular keyboard in the smart card
configuration.
Refer to Appendix C, “Ordering Kits” for modular keyboard and
✎
accessory part numbers and ordering information.
1–4 www.hp.com User Guide
Page 11

Wireless Solution
The HP modular keyboard wireless configuration is a
combination of the modular keyboard kit plus the optional
Bluetooth adapter kit. The wireless configuration includes:
■ Modular keyboard and detachable numeric keypad
■ Bluetooth keyboard adapter
■ Bluetooth wireless optical mouse
■ Bluetooth USB transceiver
Choosing Configuration Options
HP Modular Keyboard Wireless Configuration
See Chapter 5, “Converting the Modular Keyboard to a Wireless
Solution” for information on setting up and using the HP modular
keyboard in the wireless configuration.
Refer to Appendix C, “Ordering Kits” for modular keyboard and
✎
accessory part numbers and ordering information.
User Guide www.hp.com 1–5
Page 12

Choosing Configuration Options
Combined Wireless and Security Access Solution
The HP modular keyboard wireless plus smart card configuration
is a combination of the modular keyboard kit plus the optional
Bluetooth adapter kit and the optional smart card adapter kit. The
wireless plus smart card configuration includes:
■ Modular keyboard and detachable numeric keypad
■ Bluetooth keyboard adapter
■ Bluetooth wireless optical mouse
■ Bluetooth USB transceiver
■ Smart card adapter
■ HP ProtectTools smart card
See Chapter 5, “Converting the Modular Keyboard to a Wireless
Solution” and Chapter 4, “Adding Smart Card Security” for
information on setting up and using the HP modular keyboard in
the wireless plus smart card configurations.
Refer to Appendix C, “Ordering Kits” for modular keyboard and
✎
accessory part numbers and ordering information.
1–6 www.hp.com User Guide
Page 13

Identifying the Modular
Keyboard and Numeric
Standard Features
The HP Modular Keyboard includes the following standard
features:
■ Modular keyboard ready for attachable accessories
■ Numeric keypad that can be removed or attached to either
side of the modular keyboard
■ Adjustable slope for maximum comfort
■ Six programmable modular keyboard access buttons
■ Four programmable numeric keypad access buttons
2
Keypad Features
■ Modular keyboard to computer USB connectivity
■ Numeric keypad to modular keyboard RJ-45 connectivity
Supported Operating Systems
The following are primary support operating systems for the HP
modular keyboard and numeric keypad:
■ Microsoft Windows XP Professional
■ Microsoft Windows XP Home
■ Microsoft Windows 2000 Professional
User Guide www.hp.com 2–1
Page 14

Identifying the Modular Keyboard and Numeric Keypad Features
Other legacy operating systems may also have limited support
✎
through native USB drivers or the computer BIOS.
Modular Keyboard Kit Contents
Modular keyboard
1
Numeric keypad
2
2–2 www.hp.com User Guide
USB cable
3
I/O and Security Software &
4
Documentation CD
Page 15
Identifying the Modular Keyboard and Numeric Keypad Features
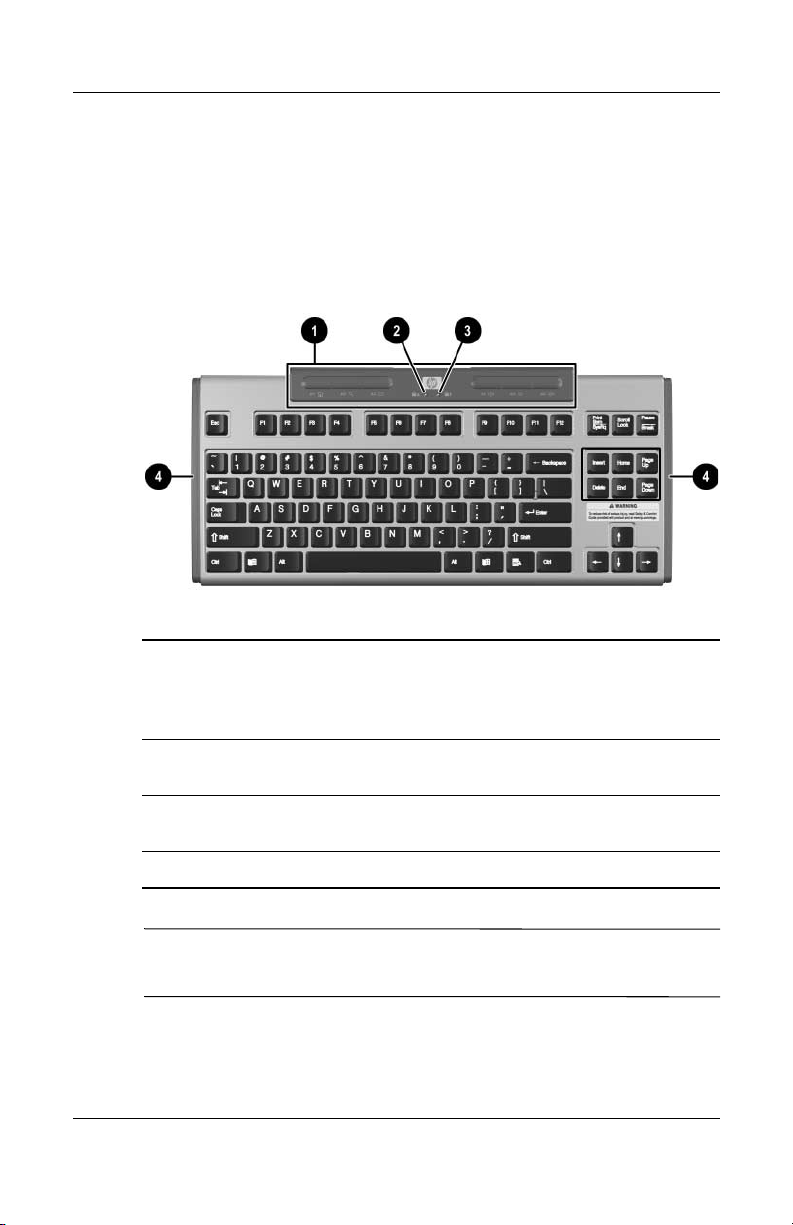
Identifying the Modular Keyboard Components
Front Components
Access buttons Provide quick access to Web pages,
1
applications, data files, and volume
adjustment. See the “Modular Keyboard
Access Buttons” section for more information.
Caps Lock indicator
2
light
Caps Lock is on when lit.
Scroll Lock indicator
3
light
Accessory interlock Physically connects optional adapters.
4
Scroll Lock is on when lit.
The Scroll Lock and Caps Lock indicator lights do not function if
✎
the modular keyboard is converted to a wireless configuration.
User Guide www.hp.com 2–3
Page 16

Identifying the Modular Keyboard and Numeric Keypad Features
Rear Components
1
2
3
4
RJ-45 connector Dedicated for numeric keypad
connection only.
USB connector Connects the modular keyboard to the
computer.
RJ-45 connector Connects the Bluetooth keyboard adapter
or smart card adapter.
Expandable feet Adjusts the slope of the modular
keyboard.
2–4 www.hp.com User Guide
Page 17

Identifying the Modular Keyboard and Numeric Keypad Features
Modular Keyboard Access Buttons
The access buttons on the modular keyboard are pre-programmed
to provide the following functions:
1
2
3
4
5
6
1
2
3
4
5
6
Home Opens the browser default home page.
Search Opens the default search engine.
Email Opens the default email application.
Volume up Increases the volume.
Volume down Decreases the volume.
Mute Toggles sound on and off.
You can re-program the access buttons to meet your particular
✎
needs. See “Programming the Access Buttons” for information.
User Guide www.hp.com 2–5
Page 18

Identifying the Modular Keyboard and Numeric Keypad Features
Identifying the Numeric Keypad Components
Access buttons Provide quick access to numeric keypad
1
functions. See the “Numeric Keypad Access
Buttons” section for more information.
Num Lock indicator
2
light
m
RJ-45 cable Connects the numeric keypad to the modular
3
Expandable feet Adjusts the slope of the numeric keypad.
4
Keyboard interlock Physically connects the numeric keypad to the
5
Num Lock is on when lit.
keyboard.
modular keyboard.
The Num Lock indicator light does not function if the modular
✎
keyboard is converted to a wireless configuration.
2–6 www.hp.com User Guide
Page 19

Identifying the Modular Keyboard and Numeric Keypad Features
Numeric Keypad Access Buttons
The access buttons on the numeric keypad are pre-programmed to
provide the following functions:
1
2
3
4
You can re-program the access buttons to meet your particular
✎
needs. See “Programming the Access Buttons” for information.
User Guide www.hp.com 2–7
Tab Functions the same as the Tab key on the
r
Backspace Functions the same as the Backspace key on the
s
Delete Functions the same as the Delete key on the
t
Calculator Launches the Microsoft Windows calculator
u
modular keyboard. Press this key to tab right.
Press this key plus the Shift key to tab left.
modular keyboard.
modular keyboard.
applet.
Page 20

Setting Up and Using the
Modular Keyboard
WARNING: To reduce the risk of serious injury, read the Safety &
Å
Comfort Guide included on the I/O and Security Software &
Documentation CD or go to www.hp.com/ergo.
Connecting to the Computer
To begin using the modular keyboard and numeric keypad,
connect the USB cable between the modular keyboard and the
computer.
1. Using the USB cable provided with the modular keyboard,
connect the Type Mini-B end of the USB cable to the USB
connector on the modular keyboard.
3
Connecting the USB Cable to the Modular Keyboard
User Guide www.hp.com 3–1
Page 21

Setting Up and Using the Modular Keyboard
2. Connect the Type A end of the USB cable to a USB
connector on the computer.
Depending on the computer model, the USB connector may be
✎
located on the front or rear of the computer. Connect the USB
cable to the USB connector that is convenient for your setup.
Connecting the USB Cable to the Computer
3. You can now begin using the modular keyboard.
Repositioning the Numeric Keypad
You can attach the numeric keypad to the left or right side of the
modular keyboard, or leave it unattached.
Whether the numeric keypad is attached or unattached to the
✎
modular keyboard, the numeric keypad’s RJ-45 cable must be
connected to the modular keyboard’s RJ-45 connector labeled
for the numeric keypad to function.
3–2 www.hp.com User Guide
Page 22
Setting Up and Using the Modular Keyboard
To move the numeric keypad from one side of the modular
keyboard to the other side:
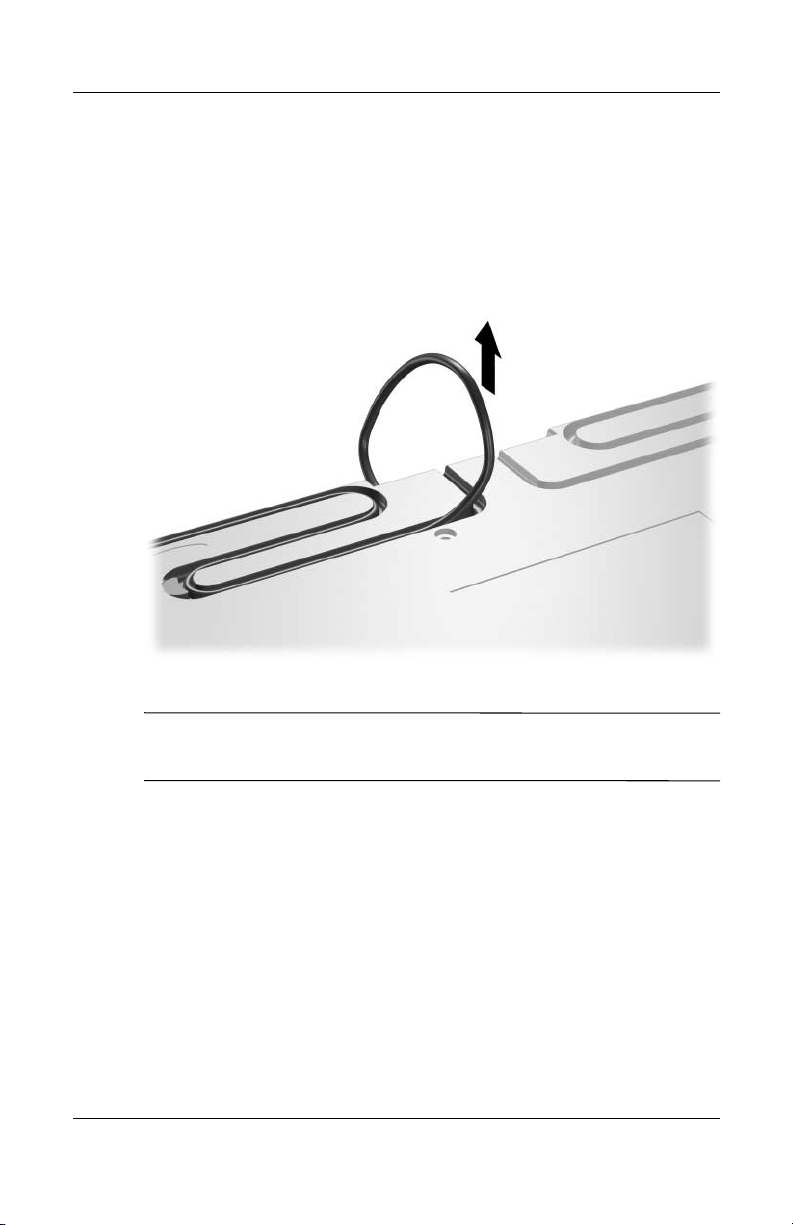
1. Remove the RJ-45 cable (that connects the numeric keyboard
to the modular keyboard) from the cable routing channel on
the bottom side of the modular keyboard.
Removing the RJ-45 Cable from the Routing Channel
You do not need to unplug the RJ-45 cable from the back of the
✎
modular keyboard.
User Guide www.hp.com 3–3
Page 23

Setting Up and Using the Modular Keyboard
2. Pull the numeric keypad free from the modular keyboard.
Removing the Numeric Keypad from the Modular Keyboard
3. Attach the numeric keypad to the other side of the modular
keyboard.
Attaching the Numeric Keypad to the Modular Keyboard
3–4 www.hp.com User Guide
Page 24

Setting Up and Using the Modular Keyboard
4. Press the RJ-45 cable into the other routing channel on the
bottom side of the modular keyboard.
Placing the RJ-45 Cable in the Routing Channel
Ensure that the RJ-45 cable is plugged into the RJ-45 connector
✎
on the back of the modular keyboard labeled .
User Guide www.hp.com 3–5
Page 25

Setting Up and Using the Modular Keyboard
Adjusting the Slope
The feet on the bottom side of the modular keyboard and numeric
keypad can be adjusted so that the modular keyboard sits flat on
the workspace surface (0° angle) 1, sits at a 6° angle 2, or sits at
a 12° angle 3.
Adjusting the Slope of the Modular Keyboard
When adjusting the slope of the modular keyboard and numeric
✎
keypad, be sure to extend all the feet on each device to the same
position.
3–6 www.hp.com User Guide
Page 26

Setting Up and Using the Modular Keyboard
Installing the Modular Access Keyboard (MAK) Software
To reprogram the access buttons on the modular keyboard and
numeric keypad, install the MAK software:
1. Insert the I/O and Security Software & Documentation CD in
the computer’s optical drive.
2. Go to D:\Modular\MAK\setup.exe (where D: is the drive
letter of the computer’s optical drive).
3. Double-click the setup.exe file.
4. Follow the on-screen instructions to install the software.
Programming the Access Buttons
The access buttons on the modular keyboard and numeric keypad
are pre-programmed to specific destinations, but can be
re-programmed to meet your particular needs.
Before you can program the access buttons, you must install the
MAK software included on the I/O and Security Software &
Documentation CD. See “Installing the Modular Access
Keyboard (MAK) Software” for information.
To program the access buttons:
1. Double-click the MAK icon in the system tray (lower right
corner of the display screen) to launch the MAK software
application.
2. Click the Help button on the MAK software interface for
instructions on programming the access buttons.
User Guide www.hp.com 3–7
Page 27

Adding Smart Card Security
Smart Card Features
The smart card accessory kit adds smart card functionality to the
HP modular keyboard, providing improved security to the
computer. Features of the smart card solution include:
■ Smart card reader adapter that can be attached to the
keyboard or configured as a stand-alone device
■ HP ProtectTools Smart Card
■ HP ProtectTools Smart Card Security Manager software,
which is used to initialize, configure, and manage smart card
security accounts
Supported Operating Systems
The smart card reader adapter requires one of the following
operating systems:
4
■ Microsoft Windows XP Professional
■ Microsoft Windows XP Home
■ Microsoft Windows 2000 Professional (this operating system
must be fully installed before installing the HP ProtectTools
software)
■ Microsoft Windows CE .NET
■ Microsoft Windows XPe
User Guide www.hp.com 4–1
Page 28

Adding Smart Card Security
Smart Card Adapter Kit Contents
Smart card adapter
1
HP ProtectTools Smart Card
2
RJ-45 cable for connecting to
3
the modular keyboard
I/O and Security Software &
4
Documentation CD
Refer to Appendix C, “Ordering Kits” for modular keyboard and
✎
accessory part numbers and ordering information.
4–2 www.hp.com User Guide
Page 29

Adding Smart Card Security
Identifying the Smart Card Reader Adapter Components
USB cable Connects the smart card adapter to the
1
computer.
Smart card slot Insert the smart card into this slot for the
2
system to read the card.
Smart card indicator
3
light
Keyboard interlock Physically connects the smart card adapter to
4
Ultra mini serial
5
connector
User Guide www.hp.com 4–3
Lights when the smart card has been inserted
and detected by the system.
the modular keyboard.
Connects the RJ-45/ultra-mini serial cable
between the smart card adapter and the
modular keyboard (not required when using
the smart card adapter as a stand-alone
device).
Page 30

Adding Smart Card Security
Setting Up the Smart Card Solution
Set up the smart card adapter as either a:
■ Modular keyboard attachment
■ Stand-alone device
If you are attaching the smart card adapter to the modular
keyboard, follow the directions in the “Connecting as an
Attachment to the Modular Keyboard” section of this chapter.
If the modular keyboard has the Bluetooth keyboard adapter
attached to it, or if you want to keep the smart card adapter
separated from the modular keyboard, or if you purchased the
smart card adapter kit but do not have a modular keyboard, set up
the smart card adapter in the stand-alone configuration as
described in the “Connecting as a Stand-Alone Device” section of
this chapter.
Connecting as an Attachment to the Modular Keyboard
If the modular keyboard does not have a Bluetooth keyboard
adapter attached to it, you can attach the smart card adapter to the
modular keyboard.
1. Attach the smart card adapter to either side of the modular
keyboard. (If the numeric keypad is attached to the right side,
attach the smart card adapter to the left side.)
Attaching the Smart Card Adapter to the Modular Keyboard
4–4 www.hp.com User Guide
Page 31

Adding Smart Card Security
2. Connect the large end of the supplied RJ-45 cable to the
RJ-45 connector on the modular keyboard labeled
h 1.
Connect the small end of the RJ-45 cable to the Ultra Mini
Serial connector on the smart card adapter labeled
Connecting the Smart Card Adapter RJ-45 Cable
x 2.
3. Route the RJ-45 cable in the channel on the bottom side of
the modular keyboard.
Placing the RJ-45 Cable in the Routing Channel
User Guide www.hp.com 4–5
Page 32

Adding Smart Card Security
4. Disconnect both ends of the USB cable that connects the
Modular Keyboard to the computer (if connected).
5. Connect the Smart Card adapter’s USB cable to a USB
connector on the computer.
Connecting the Smart Card Adapter USB Cable
6. When prompted to install the drivers for the smart card
adapter, click the Cancel button. Proceed to the “Installing
the Smart Card Adapter Drivers” section.
4–6 www.hp.com User Guide
Page 33

Adding Smart Card Security
Connecting as a Stand-Alone Device
To connect the smart card adapter as a stand-alone device:
1. Connect the Smart Card adapter’s USB cable to the computer.
Connecting the Smart Card Adapter USB Cable
2. When prompted to install the drivers for the smart card
adapter, click the Cancel button. Proceed to the “Installing
the Smart Card Adapter Drivers” section.
User Guide www.hp.com 4–7
Page 34

Adding Smart Card Security
Installing the Smart Card Adapter Drivers
1. Insert the I/O and Security Software & Documentation CD in
the computer’s optical drive.
2. Go to D:\Modular\Smart_Card\SCM\setup.exe (where D:
is the drive letter of the computer’s optical drive).
3. Double-click the setup.exe file.
4. Follow the on-screen instructions to install the software.
Installing the ProtectTools Software
The HP ProtectTools software requires Microsoft Windows 2000
✎
or Microsoft Windows XP operating systems. Microsoft
Windows 2000 must be completely installed before installing the
HP ProtectTools software.
1. Insert the I/O and Security Software & Documentation CD in
the computer’s optical drive.
2. Go to D:\Modular\Smart_Card\ProtectTools\setup.exe
(where D: is the drive letter of the computer’s optical drive).
3. Double-click the setup.exe file.
4. Follow the on-screen instructions to install the software.
4–8 www.hp.com User Guide
Page 35

Adjusting the Slope
The feet on the bottom side of the smart card adapter can be
adjusted to match the slope of the modular keyboard. It can sit flat
on the workspace surface (0° angle) 1, sit at a 6° angle 2, or sit
at a 12° angle 3.
Adding Smart Card Security
Adjusting the Slope of the Smart Card Adapter
When adjusting the slope of the smart card adapter, be sure to
✎
extend all the feet on each connected device to the same position.
User Guide www.hp.com 4–9
Page 36

Adding Smart Card Security
Using the ProtectTools Smart Card
Place the smart card in the slot face up with the gold contact pad
at the bottom. The smart card indicator light on the smart card
adapter is illuminated when the smart card is detected and/or read
by the reader.
Inserting the Smart Card into the Smart Card Slot
Refer to the HP ProtectTools software Help files for instructions
on using the smart card.
Before you can enable the BIOS Security Mode in the HP
✎
ProtectTools software, you must enter Computer Setup (F10) and
enable Smart Card BIOS Password support in the Smart Card
Options menu. Smart Card BIOS Password support is only
available with HP Business Desktop models dc7100, dx6100, and
later.
4–10 www.hp.com User Guide
Page 37

Adding Smart Card Security
Identifying Compatible Smart Cards
The following smart cards are vendor-tested as compatible with
the HP smart card adapter. For an updated list of tested smart
cards, check the Tested Products List (TPL) at
The following smart cards are qualified and approved by SCM
✎
Microsystems, Inc. Contact SCM at
technical support questions.
Schmlumberger:
CyberFlex Access 32k e-gate
CyberFlex Access 64k v1
CryptoFlex 32k
CryptoFlex 32k e-gate
PayFlex-S:
PayFlex 1K
www.scmmicro.com for
www.hp.com
PayFlex 2K
PayFlex 4K
PayFlex 8K
U.S. Government CAC:
AXALTO
Oberthur CAC:
Galactic 2.1
CosmopolIC V4
CosmopolIC v4.1
American Express:
Amex Blue
User Guide www.hp.com 4–11
Page 38

Adding Smart Card Security
Java:
GemExpresso
CyberFlex Palmera
Data Cards: Generic
SLE4406
SLE4418
SLE4428
SLE4432
SLE4436
SLE4442
SLE5536
AT24C01ASC
AT24C02SC
AT24C04SC
AT24C08SC
AT24C16SC
AT24C32SC
AT24C64SC
AT24C128SC
AT24C256SC
AT24C512SC
AT88SC153
AT88SC1608
IS23SC4418
IS23SC4428
4–12 www.hp.com User Guide
Page 39

Adding Smart Card Security
PrimeFlex Store 8K
PrimeFlex Store 2K
X24026
ST14C02
The following smart cards are qualified and approved by
✎
Gemplus Corporation. Contact Gemplus at
technical support questions.
Gemplus:
GemExpresso
GPK32k
GemClub Memo
GemClub Micro
GemSafe
www.gemplus.com for
User Guide www.hp.com 4–13
Page 40

Converting the Modular
Keyboard to a Wireless
Wireless Solution Features
The Bluetooth wireless accessory kit converts the HP modular
keyboard to a wireless solution. Features of the wireless solution
include:
■ Bluetooth keyboard adapter that converts the modular
keyboard to a rechargeable Bluetooth wireless keyboard
■ Rechargeable Bluetooth wireless optical mouse
■ Bluetooth USB transceiver that can connect up to seven
wireless devices
■ Rechargeable batteries for the Bluetooth keyboard adapter
and Bluetooth mouse
5
Solution
Refer to Appendix C, “Ordering Kits” for modular keyboard and
✎
accessory part numbers and ordering information.
For optimal performance, use the Bluetooth mouse with a mouse
✎
pad. Using the Bluetooth mouse on a transparent or reflective
surface will inhibit the ability of the optical sensor to track the
cursor.
User Guide www.hp.com 5–1
Page 41

Converting the Modular Keyboard to a Wireless Solution
Supported Operating Systems
The Bluetooth USB transceiver requires one of the following
operating systems:
■ Microsoft Windows XP Professional
■ Microsoft Windows XP Home
■ Microsoft Windows 2000 Professional (must install
WIDCOMM Bluetooth drivers, which are included with
the kit)
5–2 www.hp.com User Guide
Page 42

Converting the Modular Keyboard to a Wireless Solution
Bluetooth Adapter Kit Contents
Bluetooth keyboard adapter
1
USB cable (connects the mouse
2
to the computer for recharging
the mouse batteries)
Bluetooth wireless optical
3
mouse*
* Available as a separate accessory kit
User Guide www.hp.com 5–3
Bluetooth USB transceiver*
4
(attaches to the computer and is
required for operating the
modular keyboard and mouse
in wireless mode)
Four AA rechargeable batteries
5
(two for the Bluetooth keyboard
adapter and two for the
Bluetooth wireless mouse)
I/O and Security Software &
6
Documentation CD
Page 43

Converting the Modular Keyboard to a Wireless Solution
Identifying the Bluetooth Keyboard Adapter Components
USB connector q
1
(Type Mini-B)
RJ-45 cable Connects the Bluetooth keyboard adapter to
2
Keyboard interlock Physically connects the Bluetooth keyboard
3
Connect button k Activates the modular keyboard in wireless
4
Battery compartment Two rechargeable AA batteries must be
5
5–4 www.hp.com User Guide
Connects the USB cable included in the
modular keyboard kit to the computer when
recharging the Bluetooth keyboard adapter
batteries.
the modular keyboard.
adapter to the modular keyboard.
mode.
properly inserted in this compartment for the
modular keyboard to operate in wireless
mode.
Page 44

Converting the Modular Keyboard to a Wireless Solution
Identifying the Bluetooth Mouse Components
Right-click button Performs standard right-click functions.
1
Scroll wheel Scrolls through documents or Web pages (not
2
supported by all software applications).
Left-click button Performs standard single-click and
3
double-click functions.
Battery compartment Two rechargeable AA batteries must be
4
properly inserted in this compartment for the
Bluetooth mouse to operate in wireless mode.
Connect button k Activates the Bluetooth mouse in wireless
5
mode.
USB recharge
6
receptacle
User Guide www.hp.com 5–5
q
Connects the USB cable (included in the kit
with the Bluetooth mouse) to the computer
when recharging the Bluetooth mouse
batteries.
Page 45

Converting the Modular Keyboard to a Wireless Solution
Identifying the Bluetooth Transceiver Components
USB plug Plugs into a USB receptacle on the computer
1
for the modular keyboard and Bluetooth
mouse to operate in wireless mode.
Connect button k Activates the Bluetooth transceiver when
2
pressed to set up the modular keyboard
and/or Bluetooth mouse in wireless mode.
Bluetooth indicator
3
light
5–6 www.hp.com User Guide
Indicates the Bluetooth transceiver is plugged
in and recognized by the system, and the
Bluetooth radio is on.
Page 46

Converting the Modular Keyboard to a Wireless Solution
Setting Up the Wireless Solution
The wireless solution can function in either USB wireless mode
or Bluetooth wireless mode.
■ USB wireless mode: Setting up the wireless solution before
the Bluetooth drivers are installed.
■ Bluetooth wireless mode: Setting up the wireless solution
after installing the Bluetooth drivers. In this mode, you can
add other Bluetooth devices to the wireless solution.
When setting up the wireless solution you must:
■ Connect the Bluetooth components as described in the
“Connecting Wireless Devices” section to function in either
USB wireless mode or Bluetooth wireless mode.
■ Install the Bluetooth drivers as described in the “Installing the
Bluetooth Software” section to function in Bluetooth wireless
mode. The Bluetooth drivers are located on the I/O and
Security Software & Documentation CD included with the
Bluetooth adapter kit.
To save battery power, the Scroll Lock, Caps Lock, and Num
✎
Lock indicator lights on the keyboard and numeric keypad do not
operate in wireless mode. However, the supplied Broadcom
Bluetooth Control Suite (BBCS) software displays whether these
locks are on or off.
User Guide www.hp.com 5–7
Page 47

Converting the Modular Keyboard to a Wireless Solution
Connecting Wireless Devices
To connect the Bluetooth USB transceiver, Bluetooth keyboard
adapter, and Bluetooth mouse:
1. Push in the release latch on the Bluetooth keyboard adapter
battery compartment 1, lift the battery compartment door 2,
and install two of the supplied rechargeable batteries 3.
Installing the Bluetooth Keyboard Adapter Batteries
CAUTION: Risk of explosion if battery is replaced by an incorrect
Ä
type. Only NiMH and NiCad batteries are supported in the Bluetooth
keyboard adapter. Dispose of used batteries according to
instructions. Refer to Appendix B, “Regulatory Compliance Notices”
for disposal instructions.
5–8 www.hp.com User Guide
Page 48

Converting the Modular Keyboard to a Wireless Solution
2. Attach the Bluetooth keyboard adapter to either side of the
keyboard. (If the numeric keypad is attached to the right side,
attach the Bluetooth keyboard adapter to the left side.)
Attaching the Bluetooth Keyboard Adapter to the Modular
Keyboard
3. Connect the Bluetooth keyboard adapter’s RJ-45 cable to the
RJ-45 connector on the modular keyboard labeled
h.
Connecting the Bluetooth Keyboard Adapter’s RJ-45 Cable
User Guide www.hp.com 5–9
Page 49

Converting the Modular Keyboard to a Wireless Solution
4. Press the RJ-45 cable into the routing channel on the bottom
side of the modular keyboard.
Placing the RJ-45 Cable in the Routing Channel
5–10 www.hp.com User Guide
Page 50

Converting the Modular Keyboard to a Wireless Solution
5. Push in the release latch on the Bluetooth mouse battery
compartment 1, lift the battery compartment door 2, and
install the other two supplied rechargeable batteries 3.
Installing the Bluetooth Mouse Batteries
CAUTION: Risk of explosion if battery is replaced by an incorrect
Ä
type. Only NiMH and NiCad batteries are supported in the Bluetooth
mouse. Dispose of used batteries according to instructions. Refer to
Appendix B, “Regulatory Compliance Notices” for disposal
instructions.
User Guide www.hp.com 5–11
Page 51

Converting the Modular Keyboard to a Wireless Solution
6. To continue with this procedure:
❏ If the computer is turned off, or if the pre-installed
operating system has not been unbundled, proceed to
step 7.
❏ If the computer is turned on and the Microsoft Windows
operating system is completely installed and running,
proceed to the “Installing the Bluetooth Software”
section.
7. If the modular keyboard was previously used in a
non-wireless mode, disconnect the USB cable from the
modular keyboard and computer.
8. Insert the Bluetooth transceiver into a USB receptacle on the
computer.
Your computer may look different than the one shown in the
✎
illustration below.
Connecting the Bluetooth Transceiver
9. Turn on the computer if it is not already on.
5–12 www.hp.com User Guide
Page 52

Converting the Modular Keyboard to a Wireless Solution
10. Press the Connect button k on the Bluetooth transceiver 1
for two seconds. The blue indicator light on the transceiver
begins flashing.
11. Press the Connect button
k on the Bluetooth keyboard
adapter 2 for two seconds.
Pressing the Connect Button on the Bluetooth Transceiver and on the
Bluetooth Keyboard Adapter
User Guide www.hp.com 5–13
Page 53

Converting the Modular Keyboard to a Wireless Solution
12. Press the Connect button k on the Bluetooth mouse for two
seconds. The indicator light on the transceiver flashes rapidly
then becomes solid blue.
Pressing the Connect Button on the Bluetooth Mouse
The modular keyboard and Bluetooth mouse are now functioning
✎
in the USB wireless mode. After installing the Bluetooth drivers,
the modular keyboard and Bluetooth mouse will function in
Bluetooth wireless mode.
5–14 www.hp.com User Guide
Page 54

Converting the Modular Keyboard to a Wireless Solution
Installing the Bluetooth Software
The Bluetooth software is available on the I/O and Security
Software & Documentation CD included with the Bluetooth
keyboard adapter kit.
For the modular keyboard and Bluetooth mouse to operate in
Bluetooth wireless mode, you must install Bluetooth drivers. To
obtain a user interface for viewing information about the
Bluetooth devices, you must install the BBCS software.
To obtain the full benefits of Bluetooth wireless mode, install the
following software packages:
■ WIDCOMM Bluetooth software (drivers)
■ Broadcom Bluetooth Control Suite (BBCS)
WIDCOMM Bluetooth Software
The WIDCOMM Bluetooth software package contains Bluetooth
drivers required for operating the modular keyboard and
Bluetooth mouse in Bluetooth wireless mode.
It is recommended that you install the WIDCOMM software to
✎
get optimal Bluetooth functionality. However, if you do not want
to install the WIDCOMM software, you can install the Microsoft
Bluetooth drivers instead. Refer to the “Enabling Microsoft
Bluetooth Drivers” section for instructions.
To install the WIDCOMM Bluetooth software:
1. Insert the I/O and Security Software & Documentation CD
into the computer’s optical drive.
2. Go to D:\Modular\Bluetooth\WIDCOMM\setup.exe
(where D: is the drive letter of the computer’s optical drive).
3. Double-click the setup.exe file.
4. Follow the on-screen instructions to install the software.
User Guide www.hp.com 5–15
Page 55

Converting the Modular Keyboard to a Wireless Solution
5. When prompted, insert the Bluetooth transceiver into a USB
connector on the computer (if it is not already inserted) and
click the OK button.
6. After the software installation is complete, a Bluetooth icon
will appear on the desktop and in the system tray.
Double-click either one of the icons to launch the Initial
Bluetooth Configuration Wizard.
7. Follow the on-screen instructions in the Initial Bluetooth
Configuration Wizard.
8. During the configuration process in the Initial Bluetooth
Configuration Wizard, the system will search for Bluetooth
devices. While the system is searching:
a. Press the Connect button on the Bluetooth keyboard
adapter for two seconds.
You do not need to press the Connect button on the Bluetooth
✎
USB transceiver.
b. Press the Connect button on the Bluetooth mouse for two
seconds.
9. If the system does not locate the modular keyboard and/or
Bluetooth mouse, click the Search Again button and repeat
step 8 above.
10. Once the modular keyboard and Bluetooth mouse are
displayed in the Bluetooth Device Selection window, select
the modular keyboard from the list and click the Next button.
Follow the on-screen instructions.
11. After the modular keyboard pairing has been established, you
will return to the Bluetooth Device Selection window. Select
the Bluetooth mouse, click the Next button, and follow the
on-screen instructions.
5–16 www.hp.com User Guide
Page 56

Converting the Modular Keyboard to a Wireless Solution
Refer to the Help in the WIDCOMM software for information on
✎
enhancing the wireless solution.
Broadcom Bluetooth Control Suite (BBCS)
The BBCS software provides a user interface for viewing
information about Bluetooth devices. To install the BBCS
software:
1. Insert the I/O and Security Software & Documentation CD
into the computer’s optical drive.
2. Go to D:\Modular\Bluetooth\Broadcom\setup.exe (where
D: is the drive letter of the computer’s optical drive).
3. Double-click the setup.exe file.
4. Follow the on-screen instructions to install the software.
Refer to the Help in the Broadcom Bluetooth Control Suite
✎
(BBCS) software for information on enhancing the wireless
solution.
If the modular keyboard was previously used in a non-wireless
✎
mode, disconnect the USB cable from the modular keyboard and
computer.
The Broadcom Bluetooth Control Suite (BBCS) battery level
✎
indicator may be less accurate when using NiCad batteries.
Recharging less frequently will extend the life of NiCad batteries.
User Guide www.hp.com 5–17
Page 57

Converting the Modular Keyboard to a Wireless Solution
Enabling Microsoft Bluetooth Drivers
If you chose not to install the WIDCOMM software, you can
install the Microsoft Bluetooth drivers so that the Bluetooth
components function in Bluetooth wireless mode.
Limited Bluetooth profiles are supported by Microsoft Bluetooth
✎
drivers. Check the Microsoft web site
updated listings.
The Microsoft Bluetooth drivers found in Microsoft Windows XP
Service Pack 2 do not provide first boot or recovery capabilities.
For recovery and first boot requirements, a wired USB keyboard
and/or mouse should be readily available.
■ “First boot” capability refers to using a Bluetooth wireless
keyboard and Bluetooth mouse in USB wireless mode then
switching to Bluetooth wireless mode (once the operating
system has loaded) without connecting a wired keyboard for
the system to recognize the keyboard.
www.microsoft.com for
■ “Recovery” capability refers to replacing a faulty Bluetooth
wireless keyboard with a functioning Bluetooth wireless
keyboard without connecting a wired keyboard for the system
to recognize the keyboard.
To enable the Microsoft Bluetooth drivers, you must install the
software packages as described in the “Preparing the Bluetooth
Transceiver to Work with Microsoft Bluetooth Drivers” and
“Installing the Microsoft Bluetooth Drivers” sections below.
The Connect button on the Bluetooth USB transceiver does not
✎
function if the Microsoft Bluetooth drivers are used.
5–18 www.hp.com User Guide
Page 58

Converting the Modular Keyboard to a Wireless Solution
Preparing the Bluetooth Transceiver to Work with Microsoft Bluetooth Drivers
1. Insert the I/O and Security Software & Documentation CD
into the computer’s optical drive.
2. Go to D:\Modular\Bluetooth\Microsoft\dfu\setup.exe
(where D: is the drive letter of the computer’s optical drive).
3. Double-click the setup.exe file.
4. Follow the on-screen instructions to install the software.
Installing the Microsoft Bluetooth Drivers
The Microsoft Bluetooth drivers are included in Microsoft
Windows XP Service Pack 2. Before installing the Microsoft
Bluetooth Drivers, install the software as described in the
previous section, “Preparing the Bluetooth Transceiver to Work
with Microsoft Bluetooth Drivers.”
1. Download the Microsoft Windows XP Service Pack 2 from
www.microsoft.com (if the service pack has not already been
installed).
2. Follow the on-screen instructions to install the software.
Install the Broadcom Bluetooth Control Suite (BBCS) software to
✎
view information about the Bluetooth devices, such as battery
charge status and keyboard LED status.
User Guide www.hp.com 5–19
Page 59

Converting the Modular Keyboard to a Wireless Solution
Adjusting the Slope
The feet on the bottom side of the Bluetooth keyboard adapter
can be adjusted to match the slope of the modular keyboard.
It can sit flat on the workspace surface (0° angle) 1, sit at a 6°
angle 2, or sit at a 12° angle 3.
Adjusting the Slope of the Bluetooth Keyboard Adapter
When adjusting the slope of the Bluetooth keyboard adapter, be
✎
sure to extend all the feet on each connected device to the same
position.
5–20 www.hp.com User Guide
Page 60

Converting the Modular Keyboard to a Wireless Solution
Recharging the Bluetooth Keyboard Adapter and Bluetooth Mouse Batteries
The AA NiMH batteries included with the Bluetooth wireless kit
are rechargeable. You can continue to use the modular keyboard
and Bluetooth mouse while the batteries are recharging.
Only NiMH and NiCad rechargeable batteries are supported.
✎
Standard AA non-rechargeable batteries are not supported.
CAUTION: DO NOT attempt to recharge standard non-rechargeable AA
Ä
batteries. Doing so can cause the batteries to explode.
When the battery charge becomes low for the Bluetooth keyboard
adapter or Bluetooth mouse, the Broadcom Bluetooth Control
Suite (BBCS) software displays a message to recharge the
batteries. Another message is displayed when the batteries
become fully charged.
The Broadcom Bluetooth Control Suite (BBCS) battery level
✎
indicator may be less accurate when using NiCad batteries.
Recharging less frequently will extend the life of NiCad batteries.
The computer must be turned on and can not be in Hibernate
✎
mode for the batteries to recharge. If the Broadcom Bluetooth
Control Suite (BBCS) software is installed, the computer will not
enter Hibernate mode until recharging is complete. If the BBCS
software is not installed, make sure the Control Panel’s Power
Options Properties has System hibernates set to Never while
recharging.
User Guide www.hp.com 5–21
Page 61

Converting the Modular Keyboard to a Wireless Solution
To recharge the Bluetooth keyboard adapter rechargeable
batteries:
1. Connect the Type Mini-B end of the USB cable included with
the HP Modular Keyboard kit to the USB connector
Bluetooth keyboard adapter. Connect the Type A end of the
USB cable to a USB connector on the computer.
q on the
Recharging the Bluetooth Keyboard Adapter Batteries
2. Let the batteries recharge until the Broadcom Bluetooth
Control Suite (BBCS) software displays a message that they
are fully charged, then remove the USB cable from the
Bluetooth keyboard adapter and computer.
The Broadcom Bluetooth Control Suite (BBCS) battery level
✎
indicator may be less accurate when using NiCad batteries.
Recharging less frequently will extend the life of NiCad batteries.
5–22 www.hp.com User Guide
Page 62

Converting the Modular Keyboard to a Wireless Solution
To recharge the mouse rechargeable batteries:
1. Plug the mouse recharge end of the USB cable included with
the Bluetooth adapter kit into the recharge receptacle
the mouse. Connect the Type A end of the USB cable to a
USB connector on the computer.
q on
Recharging the Bluetooth Mouse Batteries
2. Let the batteries recharge until the Broadcom Bluetooth
Control Suite (BBCS) software displays a message that they
are fully charged, then remove the USB cable from the
Bluetooth mouse and computer.
The Broadcom Bluetooth Control Suite (BBCS) battery level
✎
indicator may be less accurate when using NiCad batteries.
Recharging less frequently will extend the life of NiCad batteries.
User Guide www.hp.com 5–23
Page 63

Converting the Modular Keyboard to a Wireless Solution
Identifying Compatible Bluetooth Devices
The Bluetooth USB transceiver can connect up to seven
Bluetooth-compliant devices. The following Belkin Bluetooth
devices are vendor-tested as compatible with the HP USB
transceiver. For an updated list of tested Belkin Bluetooth
devices, check the Tested Products List (TPL) at
The following Bluetooth devices are Belkin qualified and
✎
approved. Contact Belkin Corporation at
technical support questions.
Belkin Bluetooth Device Belkin Part Number
Bluetooth PDA & PC Combo Card F8T006-PC
Bluetooth GPS Navigation System F8T051
Bluetooth Hands-Free Headset F8T061
Bluetooth Acess Point with Printer
Adapter
Bluetooth USB Printer Adapter F8T031
www.belkin.com for
F8T030
www.hp.com
5–24 www.hp.com User Guide
Page 64

6
Installing the Bluetooth Mouse
as a Stand-Alone Device
Bluetooth Mouse Features
Features of the Bluetooth mouse kit include:
■ Rechargeable Bluetooth wireless optical mouse
■ Rechargeable batteries for the Bluetooth mouse
An HP USB transceiver is required for the Bluetooth mouse to
✎
function.
For optimal performance, use the Bluetooth mouse with a mouse
✎
pad. Using the Bluetooth mouse on a transparent or reflective
surface will inhibit the ability of the optical sensor to track the
cursor.
Refer to Appendix C, “Ordering Kits” for modular keyboard and
✎
accessory part numbers and ordering information.
User Guide www.hp.com 6–1
Page 65

Installing the Bluetooth Mouse as a Stand-Alone Device
Supported Operating Systems
The Bluetooth mouse requires one of the following operating
systems:
■ Microsoft Windows XP Professional
■ Microsoft Windows XP Home
■ Microsoft Windows 2000 Professional (must install
WIDCOMM Bluetooth drivers, which are included with the
HP USB Bluetooth Transceiver 1.2 Software &
Documentation CD that is shipped with the HP USB
transceiver)
Bluetooth Mouse Kit Contents
USB cable (connects the mouse
1
to the computer for recharging
the mouse batteries)
Bluetooth wireless optical
2
mouse
6–2 www.hp.com User Guide
Two AA rechargeable batteries
3
for the Bluetooth mouse
Page 66

Installing the Bluetooth Mouse as a Stand-Alone Device
Identifying the Bluetooth Mouse Components
Right-click button Performs standard right-click functions.
1
Scroll wheel Scrolls through documents or Web pages (not
2
supported by all software applications).
Left-click button Performs standard single-click and
3
double-click functions.
Battery compartment Two rechargeable AA batteries must be
4
properly inserted in this compartment for the
Bluetooth mouse to operate in wireless mode.
Connect button k Activates the Bluetooth mouse in wireless
5
mode.
USB recharge
6
receptacle
User Guide www.hp.com 6–3
q
Connects the USB cable (included in the kit
with the Bluetooth mouse) to the computer
when recharging the Bluetooth mouse
batteries.
Page 67

Installing the Bluetooth Mouse as a Stand-Alone Device
Setting Up the Bluetooth Mouse
The Bluetooth mouse can function in either USB wireless mode
or Bluetooth wireless mode.
■ USB wireless mode: Setting up the wireless solution before
the Bluetooth drivers are installed.
■ Bluetooth wireless mode: Setting up the wireless solution
after installing the Bluetooth drivers. In this mode, you can
add other Bluetooth devices to the wireless solution.
When setting up the wireless solution you must:
■ Connect the Bluetooth components as described in the
“Connecting the Bluetooth Mouse” section to function in
either USB wireless mode or Bluetooth wireless mode.
■ Install the Bluetooth drivers as described in the “Installing the
Bluetooth Software” section to function in Bluetooth wireless
mode. The Bluetooth drivers are located on the HP USB
Bluetooth Transceiver 1.2 Software & Documentation CD
included with the Bluetooth USB transceiver kit.
6–4 www.hp.com User Guide
Page 68

Installing the Bluetooth Mouse as a Stand-Alone Device
Connecting the Bluetooth Mouse
To connect the Bluetooth USB transceiver and Bluetooth mouse:
1. Push in the release latch on the Bluetooth mouse battery
compartment 1, lift the battery compartment door 2, and
install the two supplied rechargeable batteries 3.
Installing the Bluetooth Mouse Batteries
CAUTION: Risk of explosion if battery is replaced by an incorrect
Ä
type. Only NiMH and NiCad batteries are supported in the Bluetooth
mouse. Dispose of used batteries according to instructions. Refer to
Appendix B, “Regulatory Compliance Notices” for disposal
instructions.
User Guide www.hp.com 6–5
Page 69

Installing the Bluetooth Mouse as a Stand-Alone Device
2. To continue with this procedure:
❏ If the computer is turned off, or if the pre-installed
operating system has not been unbundled, proceed to
step 3.
❏ If the computer is turned on and the Microsoft Windows
operating system is completely installed and running,
proceed to the “Installing the Bluetooth Software”
section.
3. Insert the Bluetooth transceiver into a USB receptacle on the
computer.
Your computer may look different than the one shown in the
✎
illustration below.
Connecting the Bluetooth Transceiver
4. Turn on the computer if it is not already on.
6–6 www.hp.com User Guide
Page 70

Installing the Bluetooth Mouse as a Stand-Alone Device
5. Press the Connect button k on the Bluetooth transceiver 1
for two seconds. The blue indicator light on the transceiver
begins flashing.
6. Press the Connect button
two seconds. The indicator light on the transceiver flashes
rapidly then becomes solid blue.
Pressing the Connect Button on the Bluetooth Transceiver and on the
Bluetooth Mouse
The Bluetooth mouse is now functioning in the USB wireless
✎
mode. After installing the Bluetooth drivers, the Bluetooth mouse
will function in Bluetooth wireless mode.
k on the Bluetooth mouse 2 for
User Guide www.hp.com 6–7
Page 71

Installing the Bluetooth Mouse as a Stand-Alone Device
Installing the Bluetooth Software
The Bluetooth software is available on the HP USB Bluetooth
Transceiver 1.2 Software & Documentation CD included with the
Bluetooth USB transceiver kit.
For the Bluetooth mouse to operate in Bluetooth wireless mode,
you must install Bluetooth drivers. To obtain a user interface for
viewing information about the Bluetooth devices, you must
install the BBCS software.
To obtain the full benefits of Bluetooth wireless mode, install the
following software packages:
■ WIDCOMM Bluetooth software (drivers)
■ Broadcom Bluetooth Control Suite (BBCS)
WIDCOMM Bluetooth Software
The WIDCOMM Bluetooth software package contains Bluetooth
drivers required for operating the Bluetooth mouse in Bluetooth
wireless mode.
It is recommended that you install the WIDCOMM software to
✎
get optimal Bluetooth functionality. However, if you do not want
to install the WIDCOMM software, you can install the Microsoft
Bluetooth drivers instead. Refer to the “Enabling Microsoft
Bluetooth Drivers” section for instructions.
To install the WIDCOMM Bluetooth software:
1. Insert the HP USB Bluetooth Transceiver 1.2 Software &
Documentation CD into the computer’s optical drive.
2. Go to D:\Modular\Bluetooth\WIDCOMM\setup.exe
(where D: is the drive letter of the computer’s optical drive)
Greg Young to verify path
3. Double-click the setup.exe file.
6–8 www.hp.com User Guide
.
Page 72

Installing the Bluetooth Mouse as a Stand-Alone Device
4. Follow the on-screen instructions to install the software.
5. When prompted, insert the Bluetooth transceiver into a USB
connector on the computer (if it is not already inserted) and
click the OK button.
6. After the software installation is complete, a Bluetooth icon
will appear on the desktop and in the system tray.
Double-click either one of the icons to launch the Initial
Bluetooth Configuration Wizard.
7. Follow the on-screen instructions in the Initial Bluetooth
Configuration Wizard.
8. During the configuration process in the Initial Bluetooth
Configuration Wizard, the system will search for Bluetooth
devices. While the system is searching, press the Connect
button on the Bluetooth mouse for two seconds.
You do not need to press the Connect button on the Bluetooth
✎
USB transceiver.
9. If the system does not locate the Bluetooth mouse, click the
Search Again button and repeat step 8 above.
10. Once the Bluetooth mouse is displayed in the Bluetooth
Device Selection window, select the Bluetooth mouse from
the list and click the Next button. Follow the on-screen
instructions.
Refer to the Help in the WIDCOMM software for information on
✎
enhancing the wireless solution.
User Guide www.hp.com 6–9
Page 73

Installing the Bluetooth Mouse as a Stand-Alone Device
Broadcom Bluetooth Control Suite (BBCS)
The BBCS software provides a user interface for viewing
information about Bluetooth devices. To install the BBCS
software:
1. Insert the HP USB Bluetooth Transceiver 1.2 Software &
Documentation CD into the computer’s optical drive.
2. Go to D:\Modular\Bluetooth\Broadcom\setup.exe (where
D: is the drive letter of the computer’s optical drive). Greg
Young to verify path
3. Double-click the setup.exe file.
4. Follow the on-screen instructions to install the software.
Refer to the Help in the Broadcom Bluetooth Control Suite
✎
(BBCS) software for information on enhancing the wireless
solution.
The Broadcom Bluetooth Control Suite (BBCS) battery level
✎
indicator may be less accurate when using NiCad batteries.
Recharging less frequently will extend the life of NiCad batteries.
6–10 www.hp.com User Guide
Page 74

Installing the Bluetooth Mouse as a Stand-Alone Device
Enabling Microsoft Bluetooth Drivers
If you chose not to install the WIDCOMM software, you can
install the Microsoft Bluetooth drivers so that the Bluetooth
components function in Bluetooth wireless mode.
Limited Bluetooth profiles are supported by Microsoft Bluetooth
✎
drivers. Check the Microsoft web site
updated listings.
The Microsoft Bluetooth drivers found in Microsoft Windows XP
Service Pack 2 do not provide first boot or recovery capabilities.
For recovery and first boot requirements, a wired mouse should
be readily available.
■ “First boot” capability refers to using a Bluetooth mouse in
USB wireless mode then switching to Bluetooth wireless
mode (once the operating system has loaded) without
connecting a wired mouse for the system to recognize the
mouse.
www.microsoft.com for
■ “Recovery” capability refers to replacing a faulty Bluetooth
mouse with a functioning Bluetooth mouse without
connecting a wired mouse for the system to recognize the
mouse.
To enable the Microsoft Bluetooth drivers, you must install the
software packages as described in the “Preparing the Bluetooth
Transceiver to Work with Microsoft Bluetooth Drivers” and
“Installing the Microsoft Bluetooth Drivers” sections below.
The Connect button on the Bluetooth USB transceiver does not
✎
function if the Microsoft Bluetooth drivers are used.
User Guide www.hp.com 6–11
Page 75

Installing the Bluetooth Mouse as a Stand-Alone Device
Preparing the Bluetooth Transceiver to Work with Microsoft Bluetooth Drivers
1. Insert the HP USB Bluetooth Transceiver 1.2 Software &
Documentation CD into the computer’s optical drive.
2. Go to D:\Modular\Bluetooth\Microsoft\dfu\setup.exe
(where D: is the drive letter of the computer’s optical drive).
Greg Young to verify path
3. Double-click the setup.exe file.
4. Follow the on-screen instructions to install the software.
Installing the Microsoft Bluetooth Drivers
The Microsoft Bluetooth drivers are included in Microsoft
Windows XP Service Pack 2. Before installing the Microsoft
Bluetooth Drivers, install the software as described in the
previous section, “Preparing the Bluetooth Transceiver to Work
with Microsoft Bluetooth Drivers.”
1. Download the Microsoft Windows XP Service Pack 2 from
www.microsoft.com (if the service pack has not already been
installed).
2. Follow the on-screen instructions to install the software.
Install the Broadcom Bluetooth Control Suite (BBCS) software to
✎
view information about the Bluetooth devices, such as battery
charge status.
6–12 www.hp.com User Guide
Page 76

Installing the Bluetooth Mouse as a Stand-Alone Device
Recharging the Bluetooth Mouse Batteries
The AA NiMH batteries included with the Bluetooth mouse are
rechargeable. You can continue to use the Bluetooth mouse while
the batteries are recharging.
Only NiMH and NiCad rechargeable batteries are supported.
✎
Standard AA non-rechargeable batteries are not supported.
CAUTION: DO NOT attempt to recharge standard non-rechargeable AA
Ä
batteries. Doing so can cause the batteries to explode.
When the battery charge becomes low for the Bluetooth mouse,
the Broadcom Bluetooth Control Suite (BBCS) software displays
a message to recharge the batteries. Another message is displayed
when the batteries become fully charged.
The Broadcom Bluetooth Control Suite (BBCS) battery level
✎
indicator may be less accurate when using NiCad batteries.
Recharging less frequently will extend the life of NiCad batteries.
The computer must be turned on and can not be in Hibernate
✎
mode for the batteries to recharge. If the Broadcom Bluetooth
Control Suite (BBCS) software is installed, the computer will not
enter Hibernate mode until recharging is complete. If the BBCS
software is not installed, make sure the Control Panel’s Power
Options Properties has System hibernates set to Never while
recharging.
User Guide www.hp.com 6–13
Page 77

Installing the Bluetooth Mouse as a Stand-Alone Device
To recharge the Bluetooth mouse rechargeable batteries:
1. Plug the mouse recharge end of the USB cable included with
the Bluetooth mouse into the recharge receptacle
mouse. Connect the Type A end of the USB cable to a USB
connector on the computer.
q on the
Recharging the Bluetooth Mouse Batteries
2. Let the batteries recharge until the Broadcom Bluetooth
Control Suite (BBCS) software displays a message that they
are fully charged, then remove the USB cable from the
Bluetooth mouse and computer.
The Broadcom Bluetooth Control Suite (BBCS) battery level
✎
indicator may be less accurate when using NiCad batteries.
Recharging less frequently will extend the life of NiCad batteries.
6–14 www.hp.com User Guide
Page 78

Troubleshooting
If you encounter problems with the HP modular keyboard, smart
card adapter, or Bluetooth accessories, refer to the following
tables for possible causes and solutions.
HP Modular Keyboard
Problem Cause Solution
The MAK software does
not work on HP/Compaq
Easy Access Keyboards.
The numeric keypad does
not work after connecting
the RJ-45 cable to the
keyboard.
The smart card or
Bluetooth adapter does
not work after connecting
the RJ-45 cable to the
keyboard
MAK is not
backwards
compatible with
HP/Compaq Easy
Access Keyboards.
The numeric keypad
is not plugged into
the correct RJ-45
connector on the
modular keyboard.
The smart card or
Bluetooth adapter is
not plugged into the
correct RJ-45
connector on the
modular keyboard.
MAK only works on the HP
Modular Keyboards and
newer keyboards. EAK is
used for HP/Compaq Easy
Access Keyboards.
Make sure the RJ-45
connector from the numeric
keypad is connected to the
RJ-45 connector on the
modular keyboard
labeled
Make sure the RJ-45
connector from the smart
card or Bluetooth adapter
is connected to the RJ-45
connector on the keyboard
labeled
A
j.
h.
User Guide www.hp.com A–1
Page 79

Troubleshooting
Smart Card
Problem Cause Solution
There are two entries in
Device Manager
The RJ-45 cable is
not connected from
the smart card
adapter to the
modular keyboard.
• When using the smart
card reader in a
keyboard environment
(attached to the
modular keyboard),
make sure the RJ-45
cable is connected
from the smart card
adapter to the
modular keyboard
connector labeled
and the removable
USB cable from the
modular keyboard is
disconnected.
• When using the smart
card reader as a
stand-alone device,
connect the USB cable
from the smart card
reader to the computer
and make sure the
RJ-45 cable is not
connected to the
modular keyboard.
h
A–2 www.hp.com User Guide
Page 80

Smart Card (Continued)
Problem Cause Solution
F10 Setup shows a smart
card when HP
ProtectTools Smart Card
Security Manager is not
installed or has BIOS
enabled.
The smart card LED
occasionally turns red.
Smart card BIOS
support was
previously enabled
then removed.
A secure transaction
is taking place.
• Enter F10 Setup and
manually disable the
smart card feature.
• Or, re--enable BIOS
support via HP
ProtectTools Smart
Card Security
Manager.
• Or, leave the F10
Setup option enabled
for future BIOS enable
via HP ProtectTools
Smart Card Security
Manager.
The standard color for the
smart card reader
operation is amber when
data is being read by the
reader. However, whenever
a secure transaction is
enabled, the LED color
becomes red.
Troubleshooting
User Guide www.hp.com A–3
Page 81

Troubleshooting
Bluetooth
Problem Cause Solution
Unable to recharge
standard Alkaline
Duracell/Energizer AA
batteries.
Standard Alkaline
Duracell/Energizer AA
batteries work although
the documentation says
they are not supported.
There is a Yellow Bang in
Device Manager when
the Bluetooth USB
transceiver is attached
but the Bluetooth
keyboard and Bluetooth
mouse work.
The indicator light on the
Bluetooth USB transceiver
is not on.
Alkaline batteries are
not supported.
Alkaline batteries are
not supported for
recharging.
The current wireless
operation is in USB
wireless mode rather
than Bluetooth mode.
The transceiver is not
correctly seated, the
radio is in the off
state, or the
transceiver is faulty.
DO NOT attempt to
Å
recharge Alkaline
batteries. Doing so
can cause the
batteries to explode.
All AA type batteries
should work but only
rechargeable batteries
(NiMH and NiCad) are
fully supported in the
Bluetooth keyboard
adapter and Bluetooth
mouse while in wireless
and recharging modes.
Ensure the Bluetooth drivers
are installed and
functioning correctly
(WIDCOMM or Microsoft).
Otherwise, the Bluetooth
keyboard and Bluetooth
mouse function in USB
wireless mode. They will
not operate as Bluetooth
devices but as USB devices.
• Reseat the transceiver
in the USB port on the
computer.
• Or, turn on the
transceiver radio.
• Or, replace the faulty
transceiver.
A–4 www.hp.com User Guide
Page 82

Bluetooth (Continued)
Problem Cause Solution
The transceiver does not
find the Bluetooth
keyboard and/or mouse
when the connect button
of the transceiver is
pressed.
The LED on the
transceiver blinks faster
when a Bluetooth
keyboard or mouse is
detected.
“Invalid DFU file” error
message is displayed.
The connect button
on the Bluetooth
keyboard and mouse
must be pressed
within 1 minute.
The transceiver has
found and is pairing
with a Bluetooth
device and is waiting
for another device
before timing out.
The firmware is
corrupted.
After pressing the connect
button on the transceiver,
the LED will begin flashing.
Within 1 minute, press the
connect button on the
Bluetooth keyboard and/or
Bluetooth mouse. (You must
press the connect buttons
on the transceiver, mouse,
and keyboard for at least 2
seconds.) After pairing is
complete, the Bluetooth
keyboard and/or mouse
are operating in USB
wireless mode.
Once the connect button
has been pressed on the
transceiver, it will wait 1
minute to attach to a
Bluetooth keyboard and/or
mouse.
Once the connect button
on the keyboard or mouse
is pressed, the transceiver
pairs with it and is waiting
for the second device
during the remainder of the
1 minute interval.
If the 2nd device is found
within the 1 minute interval,
the blinking will stop and
the LED will turn solid since
both devices are
discovered.
Download a new firmware
update file and use the new
file to update the firmware.
Troubleshooting
User Guide www.hp.com A–5
Page 83

Troubleshooting
Bluetooth (Continued)
Problem Cause Solution
“This firmware is not for
this manufacturer’s
product” error message is
displayed.
“This firmware s not for
this product” error
message is displayed.
“Device has newer
firmware, the firmware
does not need to be
upgraded” error
message is displayed.
“Cannot find Widcomm
Bttdfuapp.exe. Please
install the Widcomm
Bluetooth stack” error
message is displayed.
The connect button does
not seem to work when
using the Microsoft
Bluetooth drivers.
The firmware file you
used is for another
manufacturer’s
product.
The firmware you
used is for the
manufacturer’s other
product.
The firmware that is
installed on your
Bluetooth wireless
controller is the same
version or a more
recent version than
the firmware update
file you are using.
No WIDCOMM
Bluetooth software is
detected.
The connect button
does not work for
Microsoft Bluetooth
drivers.
Check the product brand
name of the Bluetooth
wireless device and go to
that manufacturer’s Web
site to download the
appropriate firmware
update file.
Check the model number of
the Bluetooth wireless
controller and go to the
manufacturer’s Web site to
download the appropriate
firmware update file for that
model.
Download the latest version
of the firmware update file
and use it, unless you
already have the latest
firmware.
Install the latest
WIDCOMM Bluetooth
software.
The connect button only
works with the WIDCOMM
Bluetooth drivers since
Microsoft Bluetooth drivers
in the initial release of
Windows XP Service Pack
2 does not support first
boot or recovery modes.
A–6 www.hp.com User Guide
Page 84

Bluetooth (Continued)
Problem Cause Solution
In Windows, when the
connect button is pressed
on the transceiver,
WIDCOMM drivers are
enabled and can not use
USB Wireless mode.
A PIN number is required
when pairing the
Bluetooth keyboard.
The correct profiles may
or may not be
installed/enabled for the
Bluetooth devices
There is no USB
wireless mode in
Windows.
This is a security
requirement.
Possible Bluetooth
device is not able to
pair/connect.
If the WIDCOMM software
is installed, the connect
button on the transceiver
will initiate the pairing
process through
WIDCOMM Bluetooth
drivers.
Due to security reasons and
to avoid conflicts with other
Bluetooth devices (such as
a keyboard), you must
enter a randomly
generated PIN from the
keyboard that is intended
to be connected to the
transceiver.
The profiles supported
depend on the Bluetooth
drivers being used.
WIDCOMM has a wide
range of profiles it supports
and they are shown during
installation, in the
properties section of the
GUI, or their
documentation. Microsoft
has a certain number of
profiles it supports and they
are shown in their
properties and/or
documentation.
Troubleshooting
User Guide www.hp.com A–7
Page 85

Troubleshooting
Bluetooth (Continued)
Problem Cause Solution
Can I use my older HP
Bluetooth transceiver or
any other vendor’s
transceiver?
The Broadcom Bluetooth
Control Suite (BBCS)
does not report the
NiCad rechargeable
batteries charge level
correctly.
This depends on
transceiver
compatibility.
There is a memory
issue with NiCad
batteries.
In Bluetooth mode (in
Windows) with the
Bluetooth drivers installed,
almost any Bluetooth USB
transceiver can be used.
However, not all
transceivers will work
during reboot, first boot,
recovery, and other critical
modes. So for optimal
performance, it is
recommended that you use
the HP transceiver supplied
with this solution.
Due to the memory
capabilities of the NiCad
batteries, BBCS is not able
to know what stage the
NiCad battery is in. BBCS
can correctly show battery
levels for NiMH
rechargeable batteries. It is
recommended that you use
NiMH rechargeable
batteries but if NiCad
batteries are used, it is
recommended that you
NOT recharge as often.
A–8 www.hp.com User Guide
Page 86

Bluetooth (Continued)
Problem Cause Solution
Does the computer need
to be always on to
recharge the batteries?
Yes, depending on
computer condition
during battery
recharge mode.
The recharge mechanism
provided with the BT
keyboard and mouse is a
trickle charge through the
USB cable.
The USB ports on the
computer provide the
required power during
standby mode but not
during hibernation mode or
when computer is shut
down.
The computer can enter
standby and still recharge
but can not recharge
during hibernation; If the
BBSC application is
enabled, the software will
prevent the computer from
entering hibernation during
recharge mode. However,
if the BBCS software is not
enabled, you must disable
hibernation during
recharge mode. It takes
about 6 hours to full charge
a dead battery.
Troubleshooting
User Guide www.hp.com A–9
Page 87

Troubleshooting
Bluetooth (Continued)
Problem Cause Solution
Does it harm the batteries
if the recharge cable is
left on after they are fully
charged?
Can I interrupt the battery
charge session before the
end of the charge?
No, but it is not
recommended.
Yes, but it is not
recommended.
If the BBCS is installed, you
will get a message that
says the battery is fully
charged similar to the low
battery indicator.
It does not harm the battery
if the USB recharge cable
is still plugged in but to
enhance the wireless
experience, it is
recommended that you
remove the USB cable after
the batteries are fully
charged.
For NiCad batteries it is
recommended that you
wait until the battery is fully
charged because these
batteries types hold
memory.
For NiMH batteries, you
can interrupt the charge
session but the usage time
will be reduced since the
battery is not fully charged.
It is recommended that you
let the charge continue until
fully charged for all battery
types; the Bluetooth
keyboard and mouse will
continue to function via the
USB recharge cable.
A–10 www.hp.com User Guide
Page 88

Bluetooth (Continued)
Problem Cause Solution
Can I use any
rechargeable batteries
for my Bluetooth
keyboard and mouse?
Some battery types
are not supported.
Rechargeable NiMH and
NiCad batteries with a
rated capacity of 1200
mAh – 2100 mAh batteries
are supported with your BT
keyboard/mouse.
NiMH rechargeable
batteries are shipped and
recommended for use with
these products.
NiCad rechargeable
batteries will not report
accurately in BBCS but will
recharge and function as
designed.
Standard AA Alkaline
batteries are NOT
supported.
Troubleshooting
User Guide www.hp.com A–11
Page 89

Troubleshooting
Bluetooth Mouse
Problem Cause Solution
The Bluetooth mouse is
not tracking properly or
is acting jumpy/jerky.
How can I make sure the
mouse pairing is secure?
The surface under the
mouse is not
conducive to optimal
performance.
This is a security
concern.
When using the Bluetooth
wireless optical mouse on
transparent or translucent
surfaces, use a mouse pad.
Translucent surfaces will
confuse the mouse’s optical
sensor as well as reduce
the battery life.
Avoid deep dark surfaces
(such as a deep black
mouse pad or deep blue
mouse pad) and reflective
surfaces (such as a mirror,
or shiny metal plate).
Using WIDCOMM
Bluetooth drivers, there is
security and avoidance to
conflict with other Bluetooth
mice enabled.
Since there is not a way to
enter PIN numbers with the
mouse, there will be a pop
up window with a timer for
you to click on with the
found mouse to make sure
the correct mouse is paired.
A–12 www.hp.com User Guide
Page 90

Technical Support
Using the Worldwide Web
Before contacting customer services, refer to the support Web site
http://www.hp.com/support for online access to technical
at
support information and tools.
Preparing to Call Technical Support
If you cannot solve a problem using the troubleshooting tips in
this appendix, you may need to call technical support. Refer to
the Worldwide Telephone Numbers on the I/O and Security
Software & Documentation CD for the telephone number of the
technical telephone support center in your region.
Have the following information available when you call technical
support:
■ Model number
■ Serial number
Troubleshooting
■ Purchase date on invoice
■ Conditions under which the problem occurred
■ Error messages received
■ Hardware configuration (found on Microsoft Windows
Control Panel)
■ Hardware and software you are using
User Guide www.hp.com A–13
Page 91

Regulatory Compliance
Wireless Notices
In some environments, the use of wireless devices may be
restricted. Such restrictions may apply aboard airplanes, in
hospitals, near explosives, in hazardous locations, etc. If you are
uncertain of the policy that applies to the use of this device,
please ask for authorization to use it prior to turning it on.
WARNING: Exposure to Radio Frequency Radiation
Å
The radiated output power of this device is far below the FCC radio
frequency exposure limits. Nevertheless, the device should be used in
such a manner that the potential for human contact during normal
operation is minimized.
B
Notices
Batteries, battery packs, and accumulators should not be disposed of
N
together with the general household waste. In order to forward them
to recycling or proper disposal, please use the public collection
system or return them to HP, their authorized partners, or their agents.
User Guide www.hp.com B–1
Page 92

Regulatory Compliance Notices
The Taiwan EPA requires dry battery manufacturing or importing
firms in accordance with Article 15 of the Waste Disposal Act are
required to indicate the recovery marks on the batteries used in
sales, giveaway or promotion. Contact a qualified Taiwanese
recycler for proper battery disposal.
Canadian Regulatory Wireless Notice
Operation is subject to the following two conditions: (1) This
device may not cause interference, and (2) this device must
accept any interference, including interference that may cause
undesired operation of the device.
European Union Notice
Radio product for indoor use in Home and Office environment
operating in the 2.4 GHz band – Bluetooth.
Declaration of Conformity
This product complies with the following EU Directives:
■ Low Voltage Directive 73/23/EEC
■ EMC Directive 89/336/EEC
■ R&TTE Directive 1999/5/EC
Compliance with these directives implies conformity to the
following European Norms (in parentheses are the equivalent
international standards and regulations):
■ EN 55022 (CISPR 22) – Electromagnetic Interference
■ EN 55024 (IEC 61000-4-2, 3, 4, 5, 6, 8, 11) –
Electromagnetic Immunity
B–2 www.hp.com User Guide
Page 93

Regulatory Compliance Notices
■ EN 61000-3-2 (IEC 61000-3-2) – Power line harmonics
■ EN 61000-3-3 (IEC 61000-3-3) – Power line flicker
■ EN 60950 (IEC 60950) – Product safety
■ EN 300 328-2 – Data transmission equipment operating in
the 2.4 GHz ISM band and using 2.4 GHz radio equipment
using spread spectrum techniques
■ EN 301 489-1, -17 – General EMC requirements for radio
equipment
The radio functionality of this equipment may be used in the
following EU and EFTA countries:
Austria, Belgium, Cyprus, Czech Republic, Denmark, Estonia,
Finland, France, Germany, Greece, Hungary, Iceland, Ireland,
Italy, Latvia, Liechtenstein, Lithuania, Luxembourg, Malta,
Netherlands, Norway, Poland, Portugal, Slovak Republic,
Slovenia, Spain, Sweden, Switzerland and United Kingdom.
Notice for Use in France and Italy
Italy:
E’necessaria una concessione ministeriale anche per l’uso del
prodotto. Verifici per favore con il proprio distributore o
direttamente presso la Direzione Generale Pianificazione e
Gestione Frequenze.
License required for use. Verify with your dealer or directly with
General Direction for Frequency Planning and Management
(Direzione Generale Pianificazione e Gestione Frequenze).
France:
L'utilisation de cet equipement (2.4GHz Wireless LAN) est
soumise a certaines restrictions: Cet equipement peut etre utilise a
l'interieur d'un batiment en utilisant toutes les frequences de 2400
a 2483.5MHz (Chaine 1-13). Pour une utilisation en
environement exterieur, vous devez utiliser les frequences
User Guide www.hp.com B–3
Page 94

Regulatory Compliance Notices
comprises entre 2454-2483.5MHz (Chaine 10-13). Pour les
dernieres restrictions, voir
For 2.4 GHz Wireless LAN operation of this product certain
restrictions apply: This equipment may be used indoor for the
entire 2400-2483.5 MHz frequency band (channels 1-13). For
outdoor use, only 2454-2483.5 MHz frequency band (channels
10-13) may be used. For the latest requirements, see
http://www.art-telecom.fr.
http://www.art-telecom.fr.
Japanese Regulatory Wireless Notice
Brazilian Regulatory Wireless Notice
Este equipamento opera em caráter secundário, isto é, não tem
direito a proteção contra interferência prejudicial, mesmo de
estações do mesmo tipo, e não pode causar interferência a
sistemas operando em caráter primário.
B–4 www.hp.com User Guide
Page 95

Regulatory Compliance Notices
Federal Communications Commission Notice
This equipment has been tested and found to comply with the
limits for a Class B digital device, pursuant to Part 15 of the FCC
Rules. These limits are designed to provide reasonable protection
against harmful interference in a residential installation. This
equipment generates, uses, and can radiate radio frequency
energy and, if not installed and used in accordance with the
instructions, may cause harmful interference to radio
communications. However, there is no guarantee that interference
will not occur in a particular installation. If this equipment does
cause harmful interference to radio or television reception, which
can be determined by turning the equipment off and on, the user
is encouraged to try to correct the interference by one or more of
the following measures:
■ Reorient or relocate the receiving antenna.
■ Increase the separation between the equipment and the
receiver.
■ Connect the equipment into an outlet on a circuit different
from that to which the receiver is connected.
■ Consult the dealer or an experienced radio or television
technician for help.
Modifications
The FCC requires the user to be notified that any changes or
modifications made to this device that are not expressly approved
by Hewlett-Packard Company may void the user’s authority to
operate the equipment.
User Guide www.hp.com B–5
Page 96

Regulatory Compliance Notices
Cables
Connections to this device must be made with shielded cables
with metallic RFI/EMI connector hoods to maintain compliance
with FCC Rules and Regulations.
Declaration of Conformity for Products Marked with the FCC Logo (United States Only)
This device complies with Part 15 of the FCC Rules. Operation is
subject to the following two conditions: (1) this device may not
cause harmful interference, and (2) this device must accept any
interference received, including interference that may cause
undesired operation.
For questions regarding the product, contact:
Hewlett-Packard Company
P. O. Box 692000, Mail Stop 530113
Houston, Texas 77269-2000
Or, call 1-800-652-6672
For questions regarding this FCC declaration, contact:
Hewlett-Packard Company
P. O. Box 692000, Mail Stop 510101
Houston, Texas 77269-2000
Or, call 281-514-3333
To identify this product, refer to the Part, Series, or Model
number found on the product.
B–6 www.hp.com User Guide
Page 97

Canadian Notice
This Class B digital apparatus meets all requirements of the
Canadian Interference-Causing Equipment Regulations.
Avis Canadien
Cet appareil numérique de la classe B respecte toutes les
exigences du Règlement sur le matériel brouilleur du Canada.
Japanese Notice
Regulatory Compliance Notices
Korean Notice
User Guide www.hp.com B–7
Page 98

C
Ordering Kits
To order any of the adapter kits for the HP Modular Keyboard, go
http://www.hp.com.
to
Kit Order Number Contents
HP Modular
Keyboard
Smart Card
Adapter
HP USB Bluetooth
Transceiver
DT530A • Modular keyboard
• Numeric keypad
• USB cable
• I/O and Security
Software &
Documentation CD
DT531A • Smart Card Keyboard
Adapter
• HP ProtectTools Smart
Card
• RJ-45 cable
• I/O and Security
Software &
Documentation CD
DN650B • HP USB Bluetooth
Transceiver
• HP USB Bluetooth
Transceiver 1.2
Software &
Documentation CD
User Guide www.hp.com C–1
Page 99

Ordering Kits
Kit Order Number Contents
HP Bluetooth
wireless optical
mouse
✎
HP Bluetooth
Keyboard Adapter
The HP USB
Bluetooth
transceiver is
required for
the mouse to
function.
PA720A • Bluetooth wireless
optical mouse
• Two AA rechargeable
batteries
• USB mouse
recharging cable
DT532A • Bluetooth Keyboard
Adapter
• HP USB Bluetooth
Transceiver
• HP Bluetooth wireless
optical mouse
• USB mouse
recharging cable
• Four AA rechargeable
batteries
• I/O and Security
Software &
Documentation CD
C–2 www.hp.com User Guide
 Loading...