

Page 1
Translator™ 6
Version 6.0, Build 16
Page 1
Page 2

(This page is intentionally left blank.)
Page 2
Page 3

Translator™ Table Of Contents
Translator™ 6
Table Of Contents
Introduction...............................................
How To Make A Hard Thing Easy....................
Basic Operation...........................................
Windows
Main Screen...............................................
Container Pane...........................................
Object List.................................................
Instrument View.........................................
Sample View..............................................
Batch Convertor..........................................
Docking Dialogs..........................................
Master Translation Dialog.............................
Common Operations
Translating.................................................
Bulk Export................................................
SimpleTranslation™.....................................
Building Instruments...................................
Playing Instruments....................................
Auditioning Samples....................................
Special Features
Virtual Drives..............................................
Favorites....................................................
Lookups.....................................................
Creating Slice Formats - Beat Detection.........
Proprietary Floppy Support...........................
Miscellaneous Functionality...........................
...................................................................5
...................................................................7
...................................................................8
...................................................................9
.................................................................10
.................................................................11
.................................................................12
.................................................................13
.................................................................14
.................................................................15
.................................................................16
.................................................................17
.................................................................18
.................................................................20
.................................................................21
.................................................................23
.................................................................25
.................................................................25
.................................................................28
.................................................................29
.................................................................30
.................................................................32
.................................................................33
AutoSampler
Introduction................................................
Audio/MIDI................................................
Files/Folders...............................................
Placement..................................................
Recording...................................................
Processing..................................................
Parameters.................................................
Reference Manager
Overview ..................................................
Replace References.....................................
Preferences
General.....................................................
Destination Locations..................................
Single Sample Mapping................................
Stereo Management....................................
Bias / Filtering............................................
Data Processing..........................................
View Filter.................................................
Waveplayer................................................
Comment Tags...........................................
Fix References............................................
Effects.......................................................
Page 3
.................................................................35
.................................................................37
.................................................................37
.................................................................37
.................................................................38
.................................................................38
.................................................................39
.................................................................40
.................................................................43
.................................................................43
.................................................................45
.................................................................46
.................................................................48
.................................................................49
.................................................................50
.................................................................50
.................................................................51
.................................................................51
.................................................................52
.................................................................53
Page 4

Translator™Table of Contents
Special.......................................................
SimpleTranslation™.....................................
Audio/MIDI................................................
Format Preferences
Akai..........................................................
Akai MPC...................................................
Emu..........................................................
Emulator X.................................................
Ensoniq......................................................
EXS24 (Apple)............................................
Fantom......................................................
Fusion.......................................................
GigaStudio................................................
HALion......................................................
Independence............................................
Native Instruments Kontakt..........................
Native Instruments Kontakt Inst Options.......
Native Instruments Reaktor/Battery...............
Korg..........................................................
Kurzweil ...................................................
MOTU MachFive..........................................
Motif.........................................................
Reason......................................................
Recycle......................................................
Roland......................................................
SampleTank................................................
SFZ...........................................................
SoundFont.................................................
Structure/SampleCell..................................
Synclavier...................................................
WusikStation..............................................
.................................................................53
.................................................................55
.................................................................56
.................................................................57
.................................................................58
.................................................................59
.................................................................61
.................................................................62
.................................................................64
.................................................................65
.................................................................66
.................................................................67
.................................................................68
.................................................................69
.................................................................70
.................................................................72
.................................................................73
.................................................................73
.................................................................75
.................................................................76
.................................................................76
.................................................................77
.................................................................78
.................................................................79
.................................................................81
.................................................................83
.................................................................84
.................................................................85
.................................................................87
.................................................................87
Other
Supported Formats......................................
Formats Conversion Exceptions.....................
Menus
File...........................................................
Operations.................................................
View.........................................................
Help................................,,,.......................
Support
Technical Support........................................
FAQ..........................................................
Bug Reports - Sending Files..........................
Contacting Support.....................................
Updating....................................................
Contact Us.................................................
Credits.......................................................
.................................................................88
.................................................................89
.................................................................90
.................................................................90
.................................................................90
.................................................................91
.................................................................92
.................................................................93
.................................................................94
.................................................................95
.................................................................96
.................................................................97
.................................................................98
Page 4
Page 5
Translator™ Introduction
Translator™
Introduction
Translator™ is the original and
revolutionary Instrument format
convertor.
Translator™ takes most major
professional Instrument, Bank, and
Sample le and disk formats, such as
Kontakt, GigaStudio, EXS24, SFZ, Akai,
Roland, Emu, Kurzweil, Ensoniq, etc.
and translates between them. That means
you can read, interpret, or write between different
systems; whether reading a computer le like a .WAV le,
or converting a complex Kontakt Instrument to a proprietary
disk format on a ZipDrive, for example.
Because of its powerful interface and display features, Translator™ also contains excellent
management facilities; such as xing of sample references in les, auditioning of samples direct
from disk, and many other things within it’s menus and dialogs. Read through this document
- you will nd many useful things you might have not thought of. Some of these ancillary
capabilities are referenced in the Miscellaneous section of this document.
Translator™ is a true cross-platform Mac OSX and Windows program. Both versions look
similar, though there are differences. In this document the Mac version is usually pictured.
Translator™ also comes in Special Edition variations; their only difference is that they only
convert to one or a couple formats. All the information in this document applies to them equally.
Translator™ 6 is the latest version of Translator™ at the time of this writing. Any reference
to Translator™ also means Translator™ 6 in this document. All information applies to any
Special Edition of Translator (e.g. Translator EXS24 Edition).
This document is synced to the Translator version noted on the cover of this document. It is a
dynamic document and often is revised with every major, minor, or even build of Translator.
In this document, the term “right-click” also refers to “control-click” on a Mac. Only “rightclick” will be used. Similarly, “Preferences” is term for different optional parameters that can be
set in the program; on the Mac you will see the word “Preferences”, but on Windows you will
see “Options”. In this document, Preferences will be used. Graphics are all Mac, but look very
similar to the Windows version.
Translator™ works with many bank, instrument, le, and disk formats. Most US keyboards and
software regards middle C key on a keyboard (MIDI note 60) as C4, while most non-US styles
denote this as C3. By default Translator™ displays middle C as C4, but you can change this in
Preferences-General to align with your personal preference.
If you are a registered owner, you are qualied for free updates for the life of the program. You
can download these from the Chicken Systems web site.
Translator™ is consistently supported by Chicken Systems, with updates appearing on usually
a monthly basis.
Page 5
Page 6

(This page is intentionally left blank.)
Page 6
Page 7

Translator™ How To Make A Hard Thing Easy
Translator™ - How To Make A Hard Thing Easy
Translator™ is a powerful program. However,
this power can make a simple operation, such
as translating a sound, a difcult process.
Shoot, you just want to take this Roland
CD-ROM and translate it into EXS24 format!
But now you have to read about DeEmphasis
Filters, and Naming Conventions, and all
these things that you don’t want to worry
about. Yuuch.
Translation is a complicated process by
nature. Many times an internal parameter
decision can go a number of ways. How do we
enable total control for the user, while hiding
as much of the process as well?
Here’s a couple things that we feel you should remember, in order to make Translating an
Easy Thing:
Read the Manual - Refer to the Help le
We spent an inordinate time making a full length manual (when we could have been adding
features to the program) for the reason that it helps make a Hard Thing Easy. Use it! It’ll help.
We love hearing from our customers, and please do ONCE YOU HAVE tried the resources you
already have. This manual is the BEST WAY we know how to communicate the concepts of this
program. If you call us, please ask a question based on something you don’t understand within
the manual. Otherwise, we’ll just read the manual to you.
The Defaults Are Good for most cases
Check out the Preferences dialog. There are TONS of optional features in Translator™. If you
are confused by them, do the simple thing - ignore them. There generally isn’t any options in
there that are completely mandatory necessary to switch or set to enable things to go well. In
99% of the cases you should be able to stick in a CD, drag it over, go and eat a sandwich, and
come back with a bunch of translations. But if you need them, the options are there.
Call, E-mail, or Chat if you have questions or problems
When something goes wrong - and with a Hard Thing that is inevitable - that can make that
Hard Thing Hard. So, we make ourselves completely available. You can call us with toll-free
1-800 technical support. Or e-mail us - we’ll respond within 24 hours guaranteed. Even Chat
is available from our web site. We think we have the best support in the business - in order to
make a hard thing easy.
Send Files if there is a problem
Nothing is better for diagnostics than the actual source le the user is operating on. In
Translator, you can send us any source le you are looking at. Use our Bug Reports web page
at www.chickensys.com/translator/bugreports, or see the Sending Files section for more
information. We commonly address all issues within 24 hours.
See - it’s an Easy Thing!
Page 7
Page 8
Translator™Basic Concepts
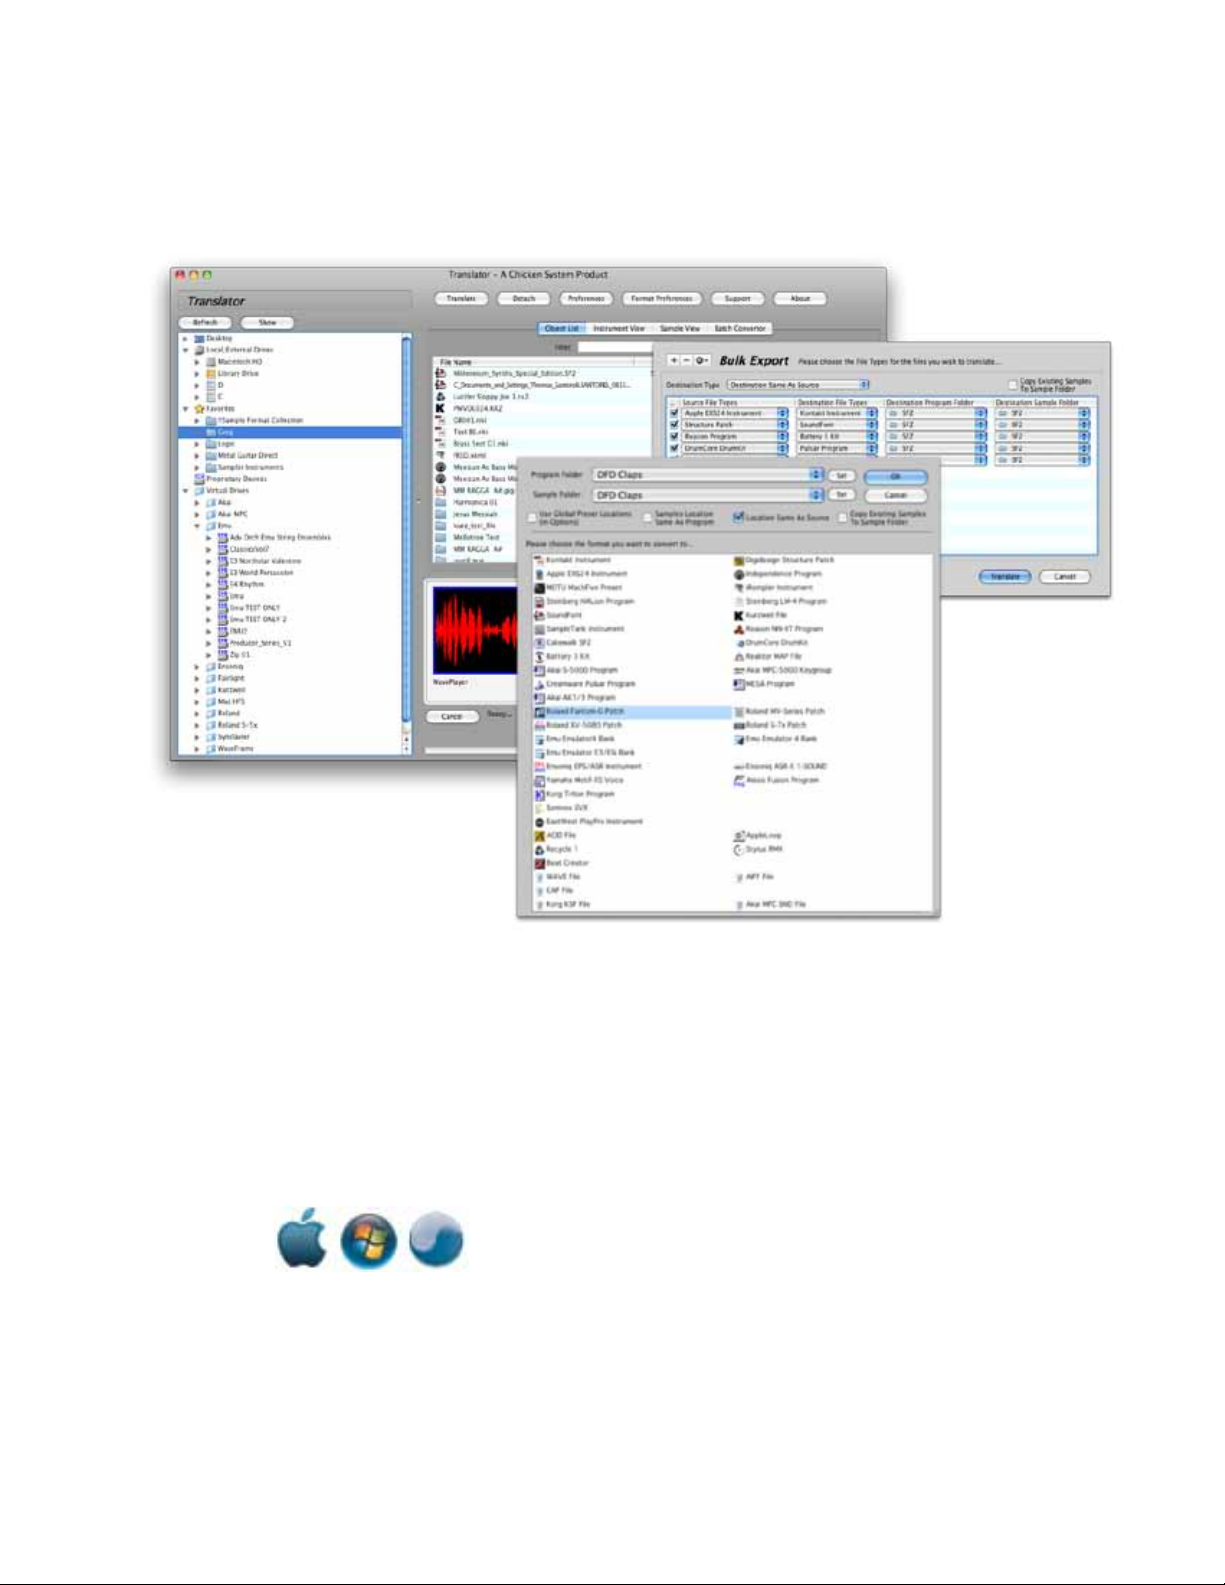
Basic Concepts
Translator™ uses a derivative of the familiar Finder window on the Mac and Explorer
(sometimes called My Computer) screen on Windows, for familiar and easy operation.
There are two panes, the Container
Pane and the Object List. The
Container Pane is on the left, and
the Object List is on the right.
The Container Pane shows the
“containers” - e.g. folders,
anything that holds objects.
When you select anything in the
Container Pane, the contained
objects show in the Object List.
Translations
You translate Instruments by
several methods.
Double Clicking an object in
the Object List.
Dragging (drag-and-drop) from the Object List to the Container Pane.
Right-Clicking on an object in either the Container Pane or the Object List. This invokes a
popup menu in which you can select to Convert As... into another format.
Clicking on the Translate button above the Object List. This will translate the objects
selected in the Object List.
Dragging le(s) or folder(s) from the Finder into the Object List. This starts Translator™ in
the background and offers you a choice of what to convert to.
Dragging a le or folder from the Finder onto the Translator icon. This starts Translator™ in
the background and offers you a choice of what to convert to.
Using the Batch Converter. It allows you to pre-select objects and then translate them in
groups into separate objects or combine them in any sort of ways into single objects.
Generally, anytime a translation operation is invoked, the Master Translation Dialog (MTD)
appears. This gives you the choice of determining what format you want to convert to, and
where the new les will go.
It does not appear when you drag an object from the right to a proprietary disk on the left.
Since by your operation you’ve already made a decision where your le is going and what
format it will be converted to, the MTD does not appear.
Translator™ will then start the conversion, give you status, and informs upon completion.
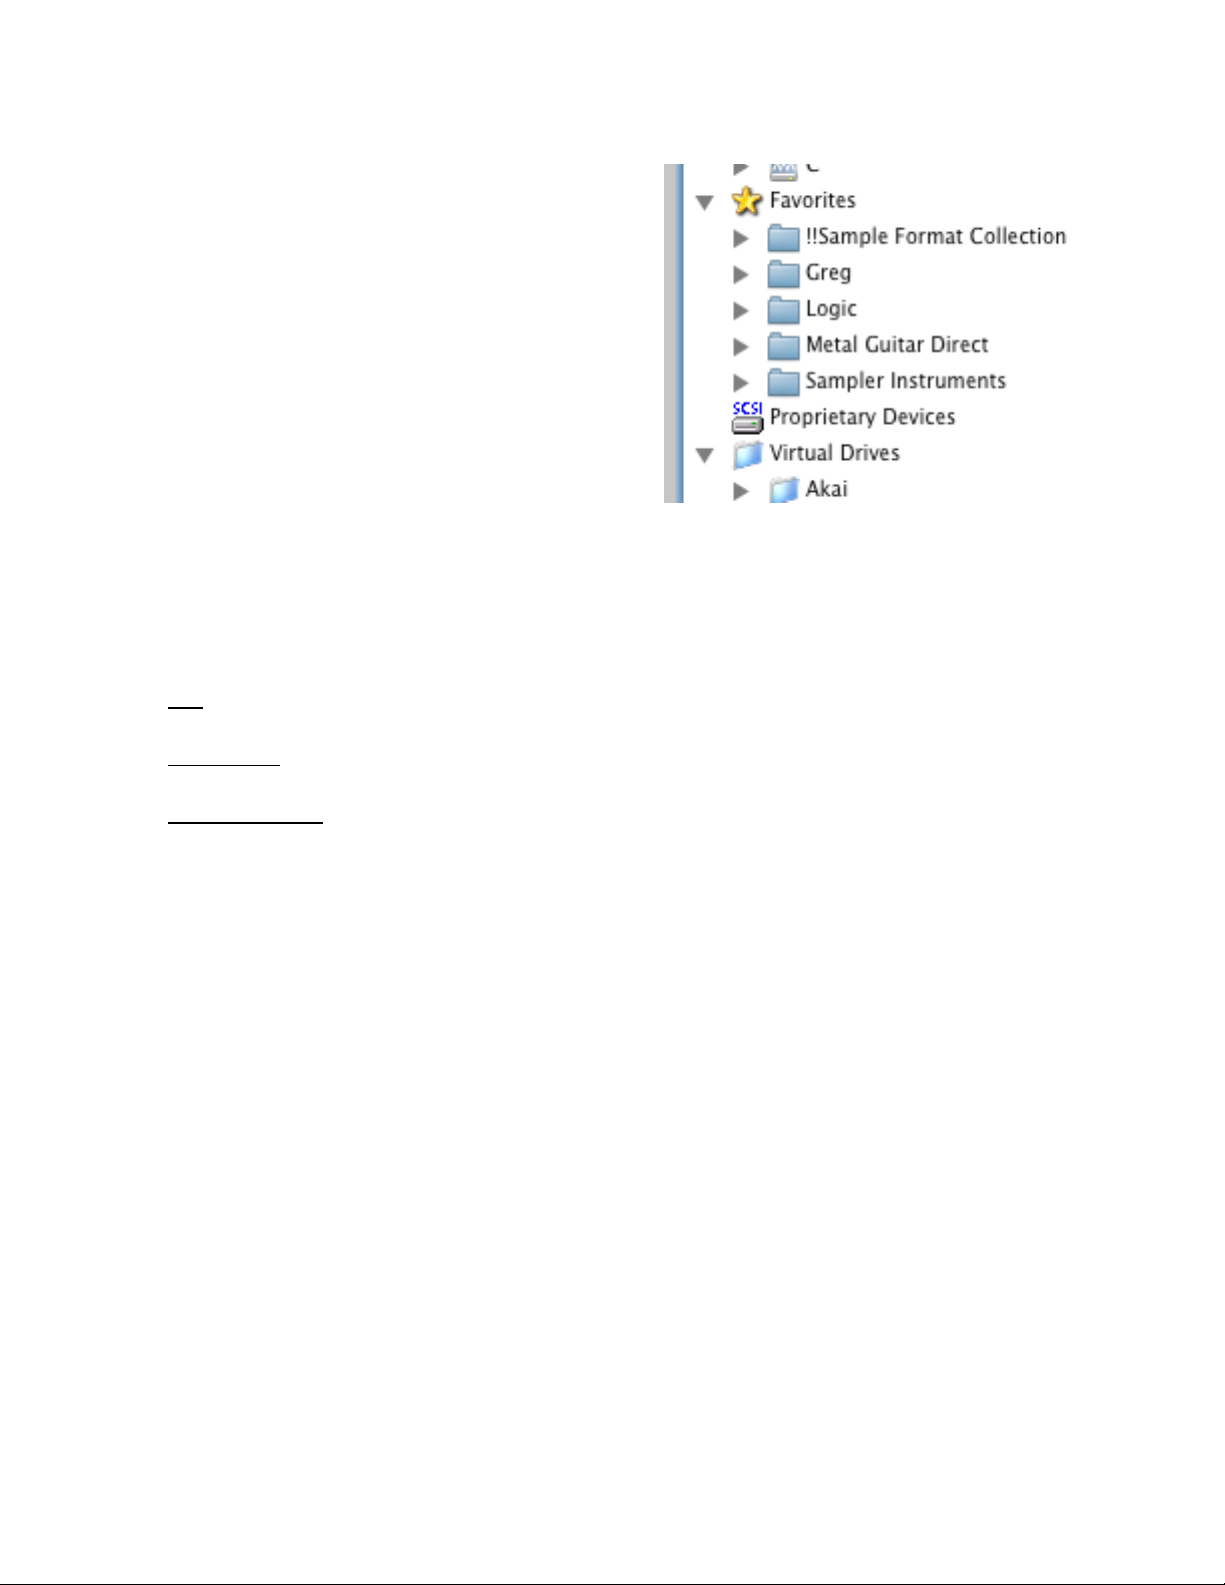
Favorites
Favorites are a special Container Pane section; they represent your heavily-used folders.
Virtual Drives
Virtual Drives are essentially image les of proprietary CD’s, such as Akai, Roland, etc.. They
show up as a “drive” under the Virtual Drives section in the Container Pane.
Docking Dialogs
You can detach any of the right-side screens (the Object List, Instrument View, Sample View,
or Batch Convertor) into it’s own dialog, enabling use in a large screen or multi-monitor
environment. See the Docking Dialogs section in this document for more information.
Page 8
Page 9
Translator™ Main Screen
Main Screen
When you start Translator™, the Main Screen appears. This is the center hub of Translator.
Everything is based around this
screen. You can detach dialogs and
work from “window-to-window”, but
all comes back to this dialog.
There are two main areas, the
Container Pane and the Right
Pane.
The Container Pane is on the left,
and the Right Pane is on the upper
right. The Container Pane displays
all the folders and “containers” on
your system and around it. The
Right Pane holds several Screens
which you mainly operate on.
Above the Container Pane are two
buttons:
Refresh: Clears the Container
Pane and re-lists everything.
Show: clicking on this shows the menu areas that the Container Pane shows.
Above the Right Pane are several buttons:
Translate: starts the translation process on whatever is selected in the Object List
Detach: detaches the currently selected screen - either the Object List, Instrument View,
Sample View, or the Batch Convertor - in the Right Pane. Click here to learn more about
Docking Dialogs.
Preferences: Opens the Preferences dialog.
Format Preferences: Opens the Format Preferences dialog.
About: Opens About Translator splash screen.
Below the Right Pane is the Sample View area. This may be visible or blank, depending if you
have the Sample View detached or selected or not.
Page 9
Page 10
Translator™Container Pane
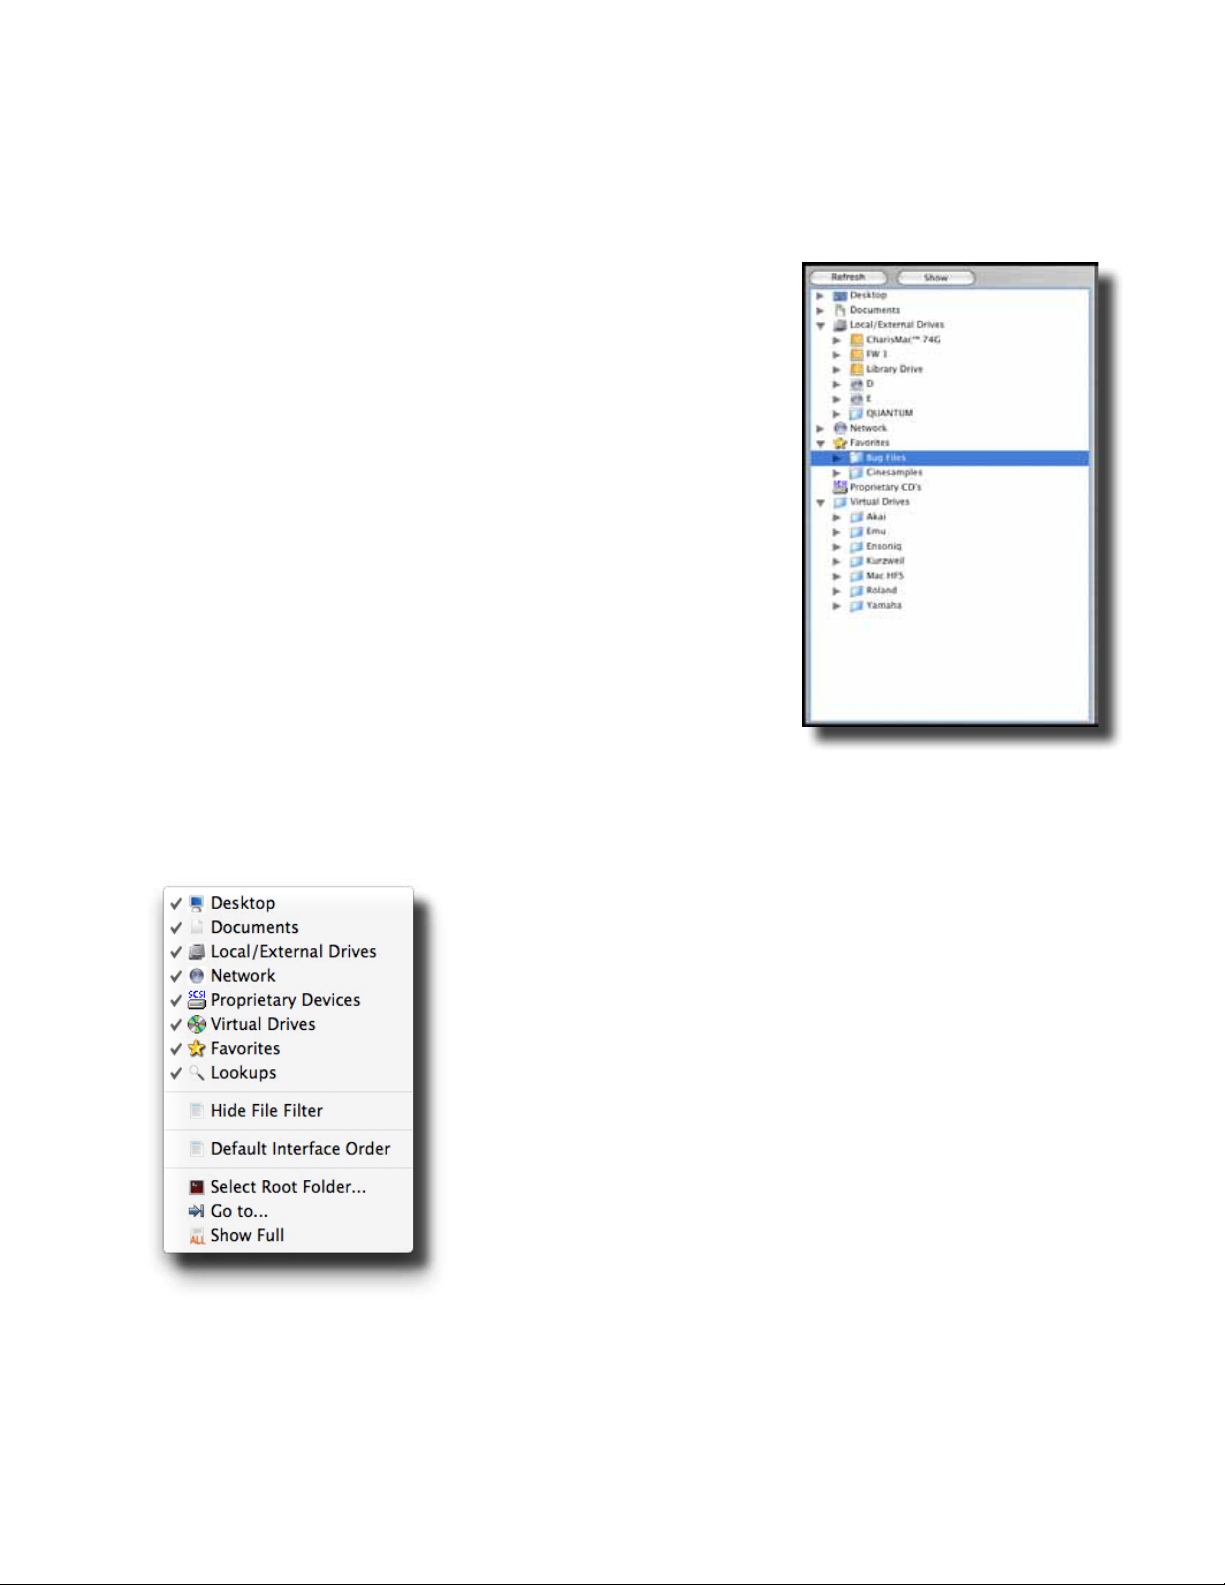
Container Pane
The Container Pane shows the “containers” that les or objects reside. Containers are
anything that contains an object. Obvious elements are hard drives, CD’s, and folders on these
containers. Less obvious ones are Virtual Drives, Favorites and Network.
There are six areas within the Container Pane, or can show
or not show these by clicking the Show button and selecting
what you want to see.
Desktop: Your desktop folder
Network: Your volumes as seen by your network
Local/External Drives: Your peripherals hooked up
physically to the computer you are working on.
Proprietary Drives: Your proprietary drives or CD’s that
Translator has identied.
Virtual Drives: Your Virtual Drives that Translator has
detected in your Images folder.
Favorites: Your Favorite folders, les, aliases, or shortcuts
that Translator has detected in your Favorites folder.
Only one object can be selected in the Container Pane at a
time. When you select an object, it’s child objects show in the
Object List.
Right-clicking on an object shows a contextual menu, which
expose most of the powerful features of Translator. You can
convert les by selecting Convert As.. and then the appropriate format. You can access the
Tools (Program Tools, Sample Tools, and File Tools) areas, and the various Utilities as well.
Last but not least, you have the basic Finder/Explorer functions, such as Open, Reveal In Finder,
Create Alias, Get Info/Properties, etc.
Advanced Navigation Functions
Under the Show button are two advanced functions, Show
Root Folder and Go to.... Show Root Folder allows you to
view only the items within a single folder. This allows you to
clear out the irrelevant items in the pane and decrease the
extreme amount of vertical latitude is showing. You can go
back to the regular view by clicking Show again and selecting
Hide Root Folder.
Go to... allows you to look at a folder without having to
manually drill down to it. Of course you have to select the
folder using the basic Finder Open dialog, but it allows
leveraging the power of the Open dialog.
Page 10
Page 11
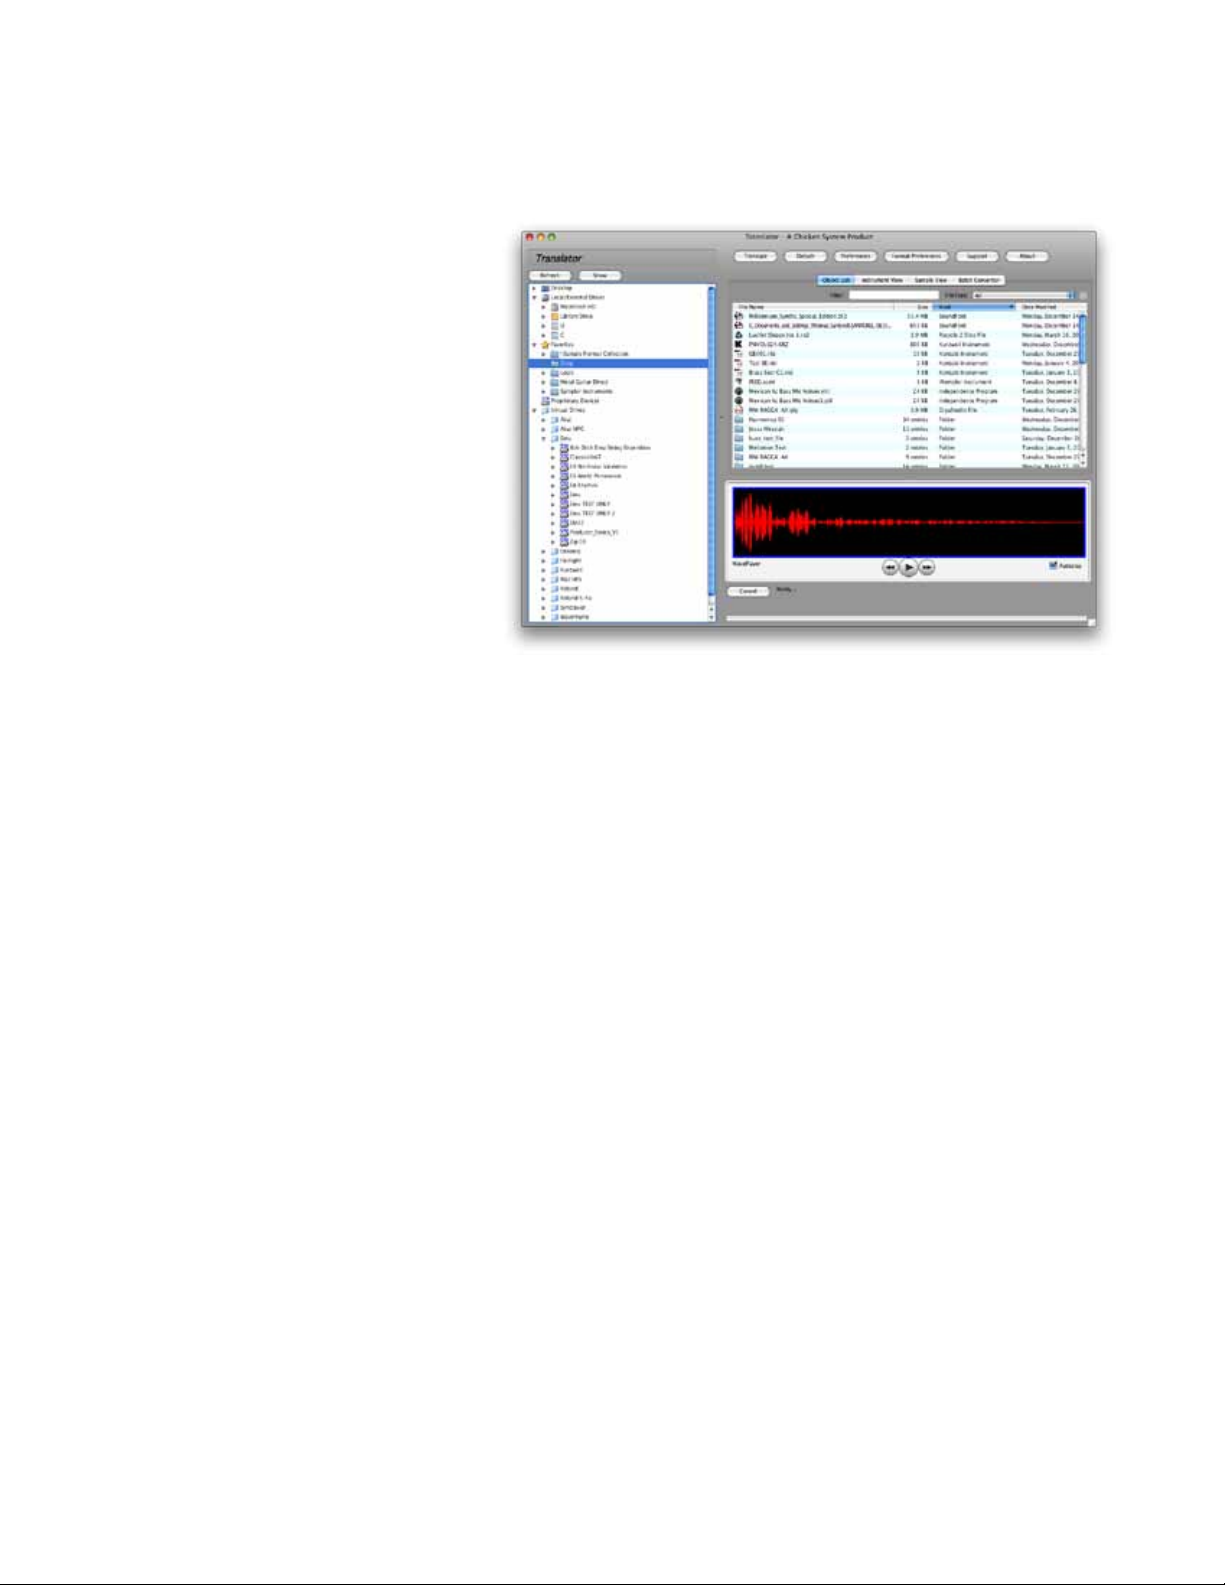
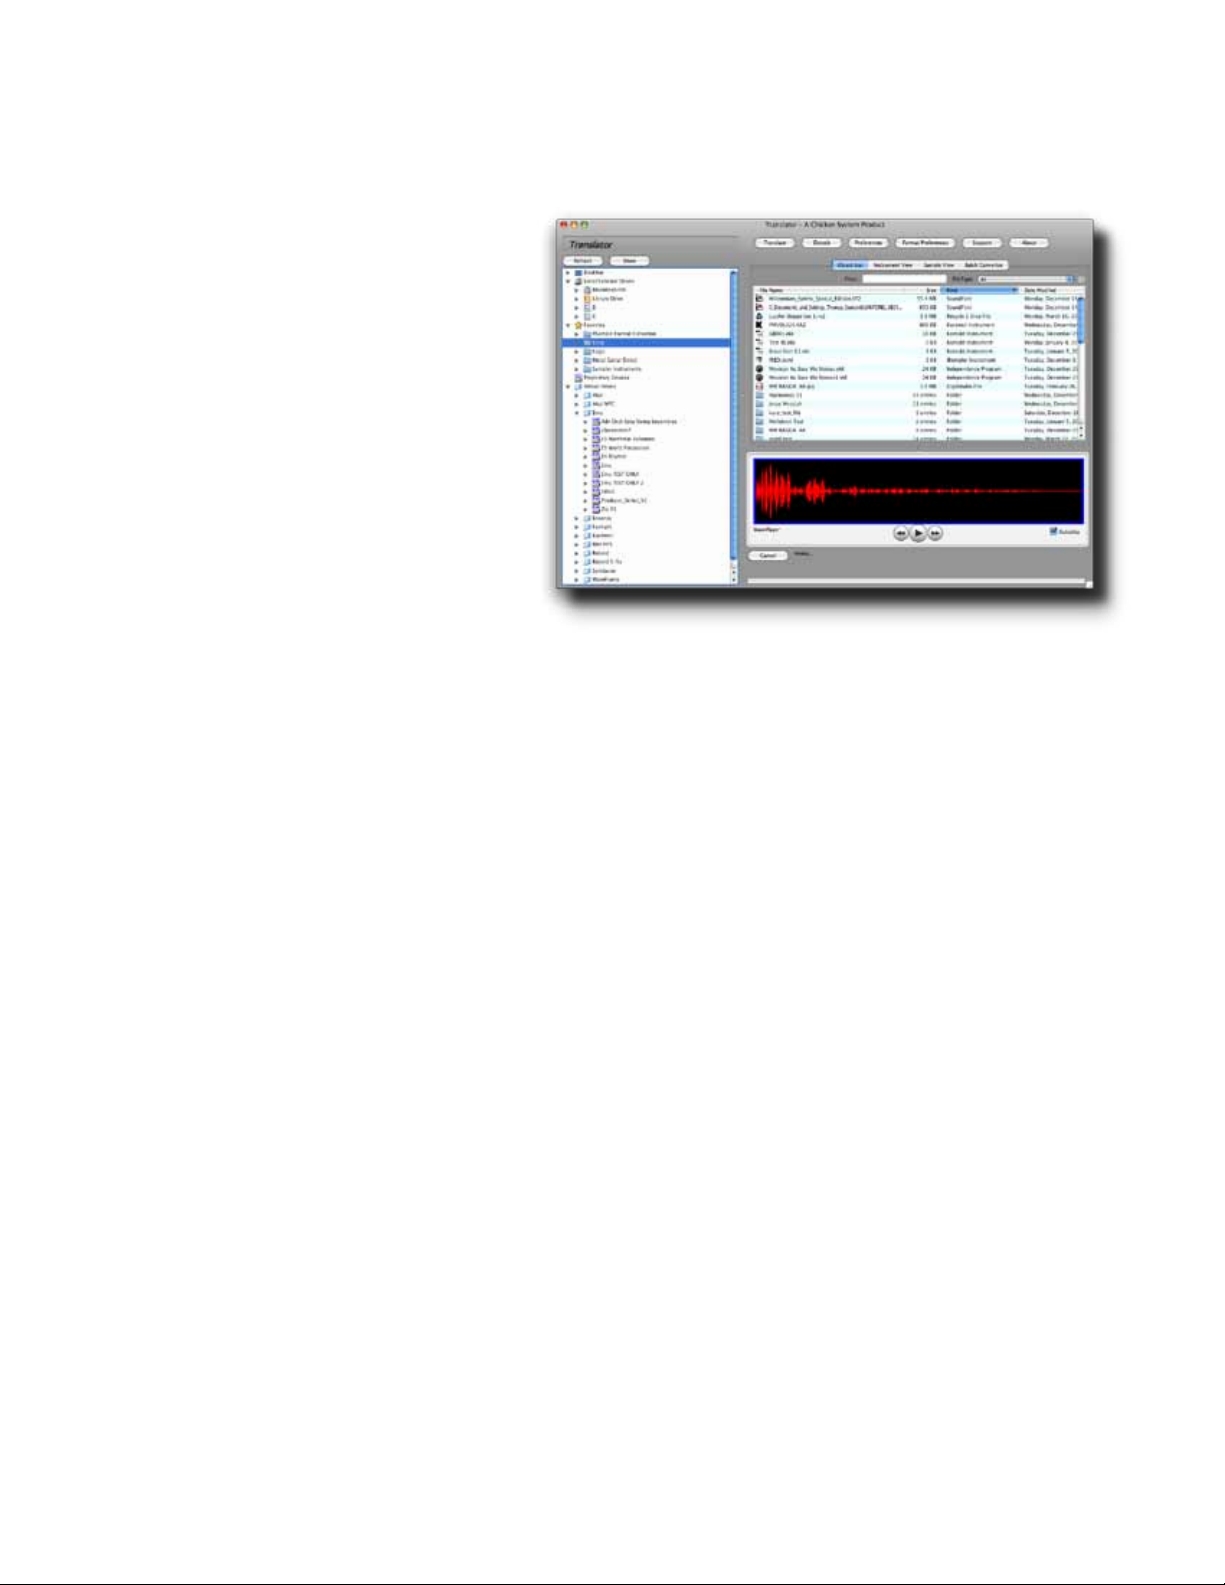
Translator™ Object List
Object List
The most heavily used screen in the right Pane is the Object List, which resides in the rst Tab
Panel. This shows the objects contained in whatever is selected in the Container Pane.
This screen can be detached from the main window by clicking the Detach button above the
right-pane. See Docking Dialogs for more information.
You can drag into and drag
out of the Object List. Doubleclicking on on object either
starts the translation process
or opens it in the Container
Pane (this can be chosen in
Preferences). You can convert
several objects by multiselecting them and clicking on
the Translate button above the
right-pane.
Right-clicking on an object
shows a contextual menu, which
expose most of the powerful
features of Translator. You
can convert les by selecting
Convert As.. and then the appropriate format. You can access the Tools (Program Tools, Sample
Tools, and File Tools) areas, and the various Utilities as well.
Last but not least, you have the basic Finder/Explorer functions, such as Open, Reveal In Finder,
Create Alias, Get Info/Properties, etc.
The Object List shows a variety of dynamic information on the les it shows, depending on what
they are. If they are samples that are referenced by control les (.exs, .nki, etc.) they show
where they are and if the reference is bad or not. It may show the size or properties of the
object.
The headers at the top of the Object List can be clicked to show ascending or descending sorts
of the list, on any column.
The Object List also has ltering parameters at the top. The rst box is a Text lter. Anything
you type in there, if contained in the le name, will make that object appear in the list.
The second box is a File Type parameter. If you choose SoundFont, for example, all SoundFonts
will appear in the list and nothing else. There is also an option for Folders only, or Files only.
You can hide the Filter area by clicking of the X next to the lter items. You can show it again
by selecting Show Filter under File-View.
Page 11
Page 12
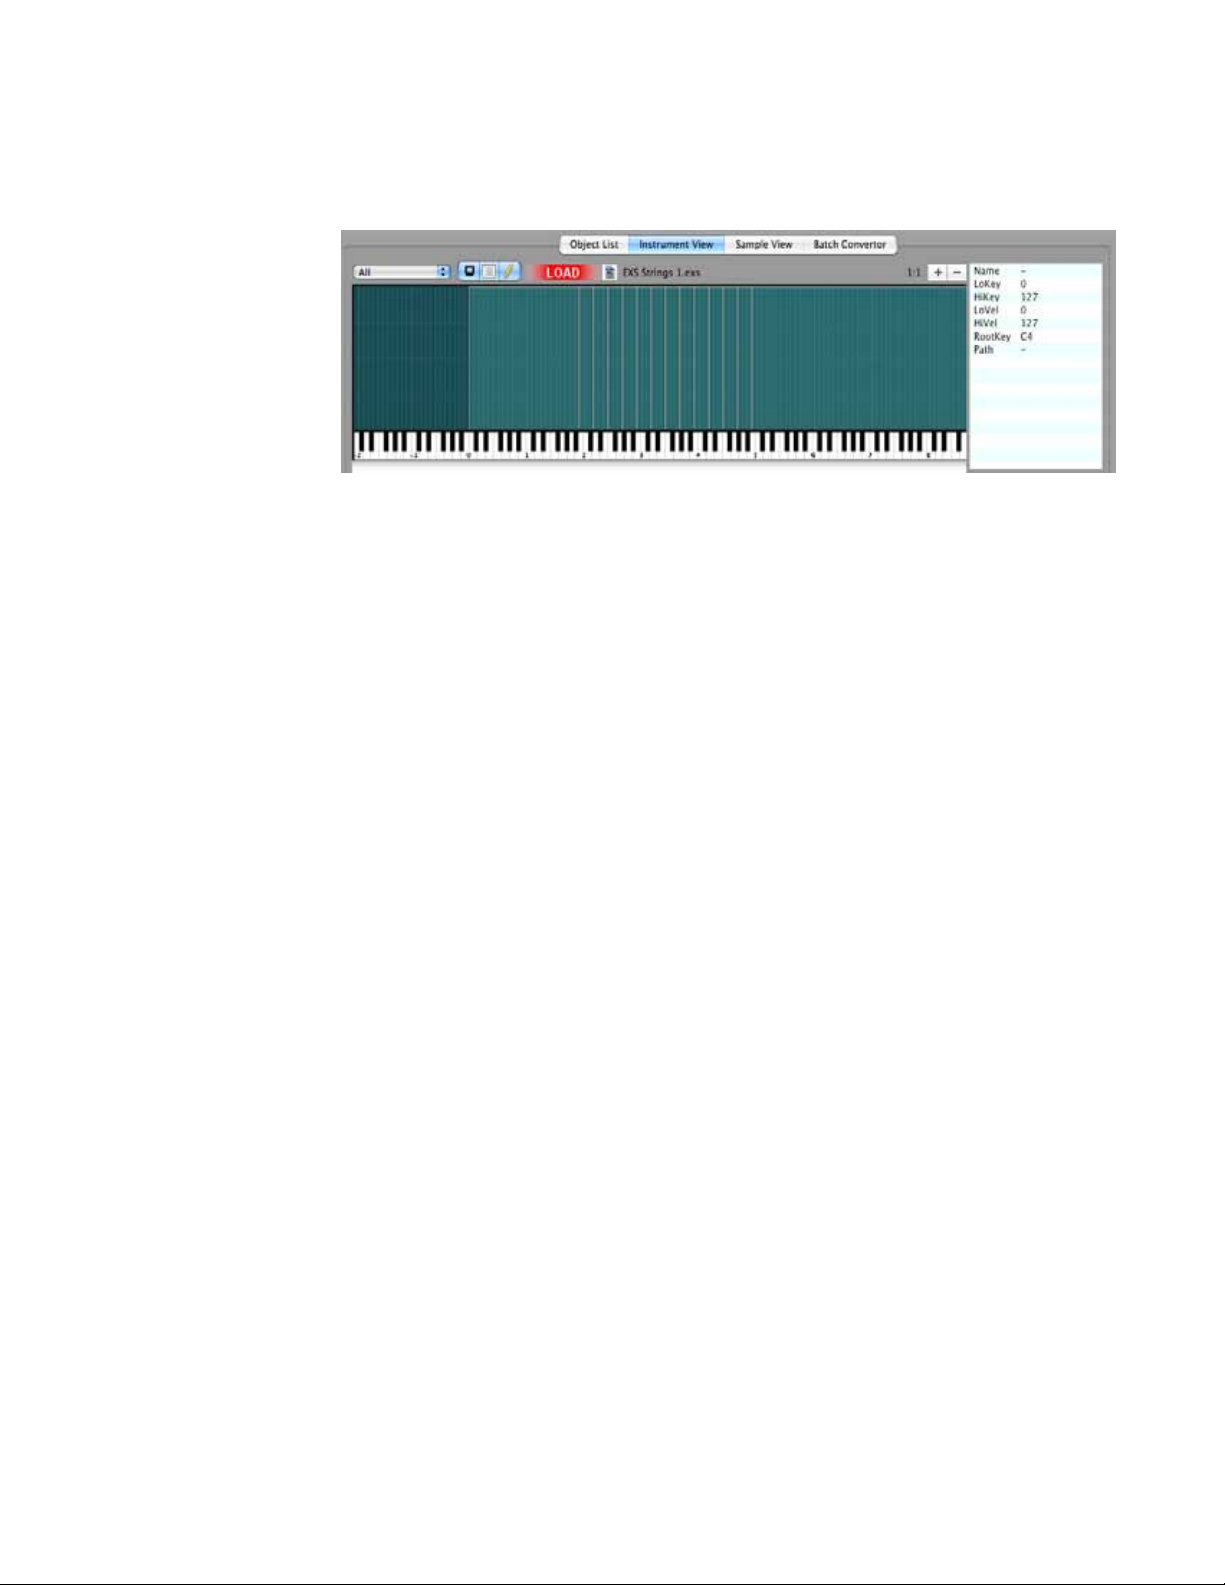
Translator™Instrument View
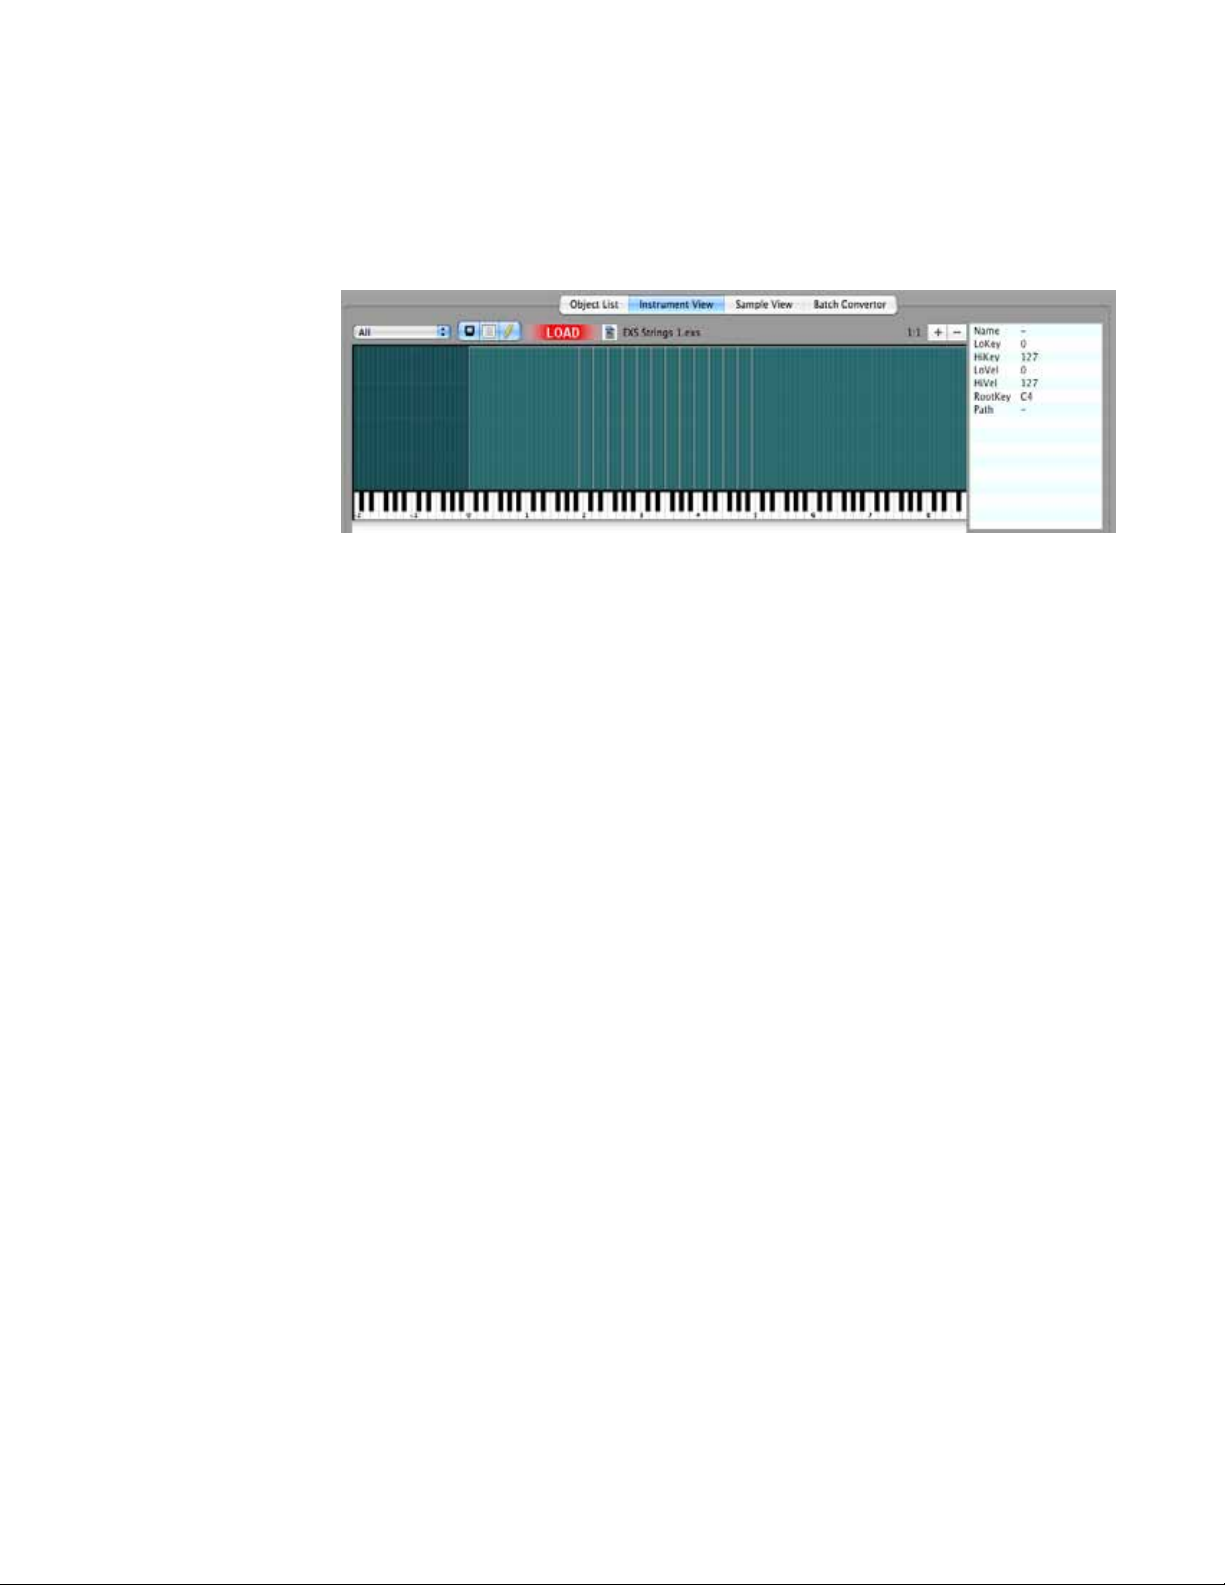
Instrument View
The Instrument View gives you a visual on how the Instrument that you have selected in the
Container Pane is mapped out across the keyboard.
By default, when
you select a
Instrument-type
of object in the
Container Pane,
this tab gets set
and the screen is
populated.
By clicking on
an area in the
graphical screen, it selects the samples assigned to that area and shows the waveform in the
Waveplayer. It also shows you some information about that sample in the List to the right.
Note: In cases of layered samples, you can only choose the topmost sample. This is just a
limitation of the interface.
To unclutter this screen in cases of Keyswitches, Round Robins, Controller-switching, etc. the
views are separated by Rule Areas and can be selected by the popup menu on the upper left.
A Rule Area is when samples are turned off or on depending on come circumstance other than
MIDI note number or Velocity value.
You can zoom in or out of the Screen using the (+-) buttons on the upper right. The Zoom label
shows the extent of the Zoom.
The triple-sticky-button allows you select certain options:
Auto-Display
When checked, this tab gets selected when selecting a Instrument-type object in the Container
Pane. Unchecking it defeats this auto-selection.
Show List
When checked, the information list on the right appears.
Compose
Calculating the mapping of an Instrument can take a little more time than just getting the
referenced samples of that Instrument. By unchecking this, the conversion engine will skip
calculating the mapping and your response may be a bit faster. Of course, you sacrice viewing
mapping on this screen.
The Instrument View also allows you to load the currently selected Instrument - NO MATTER
WHAT THE FORMAT - and play it by clicking on the keyboard or through your MIDI keyboard.
See the Playing Instruments section in this document for more information.
This screen can be detached from the main window by clicking the Detach button above the
right-pane. See Docking Dialogs for more information.
Page 12
Page 13
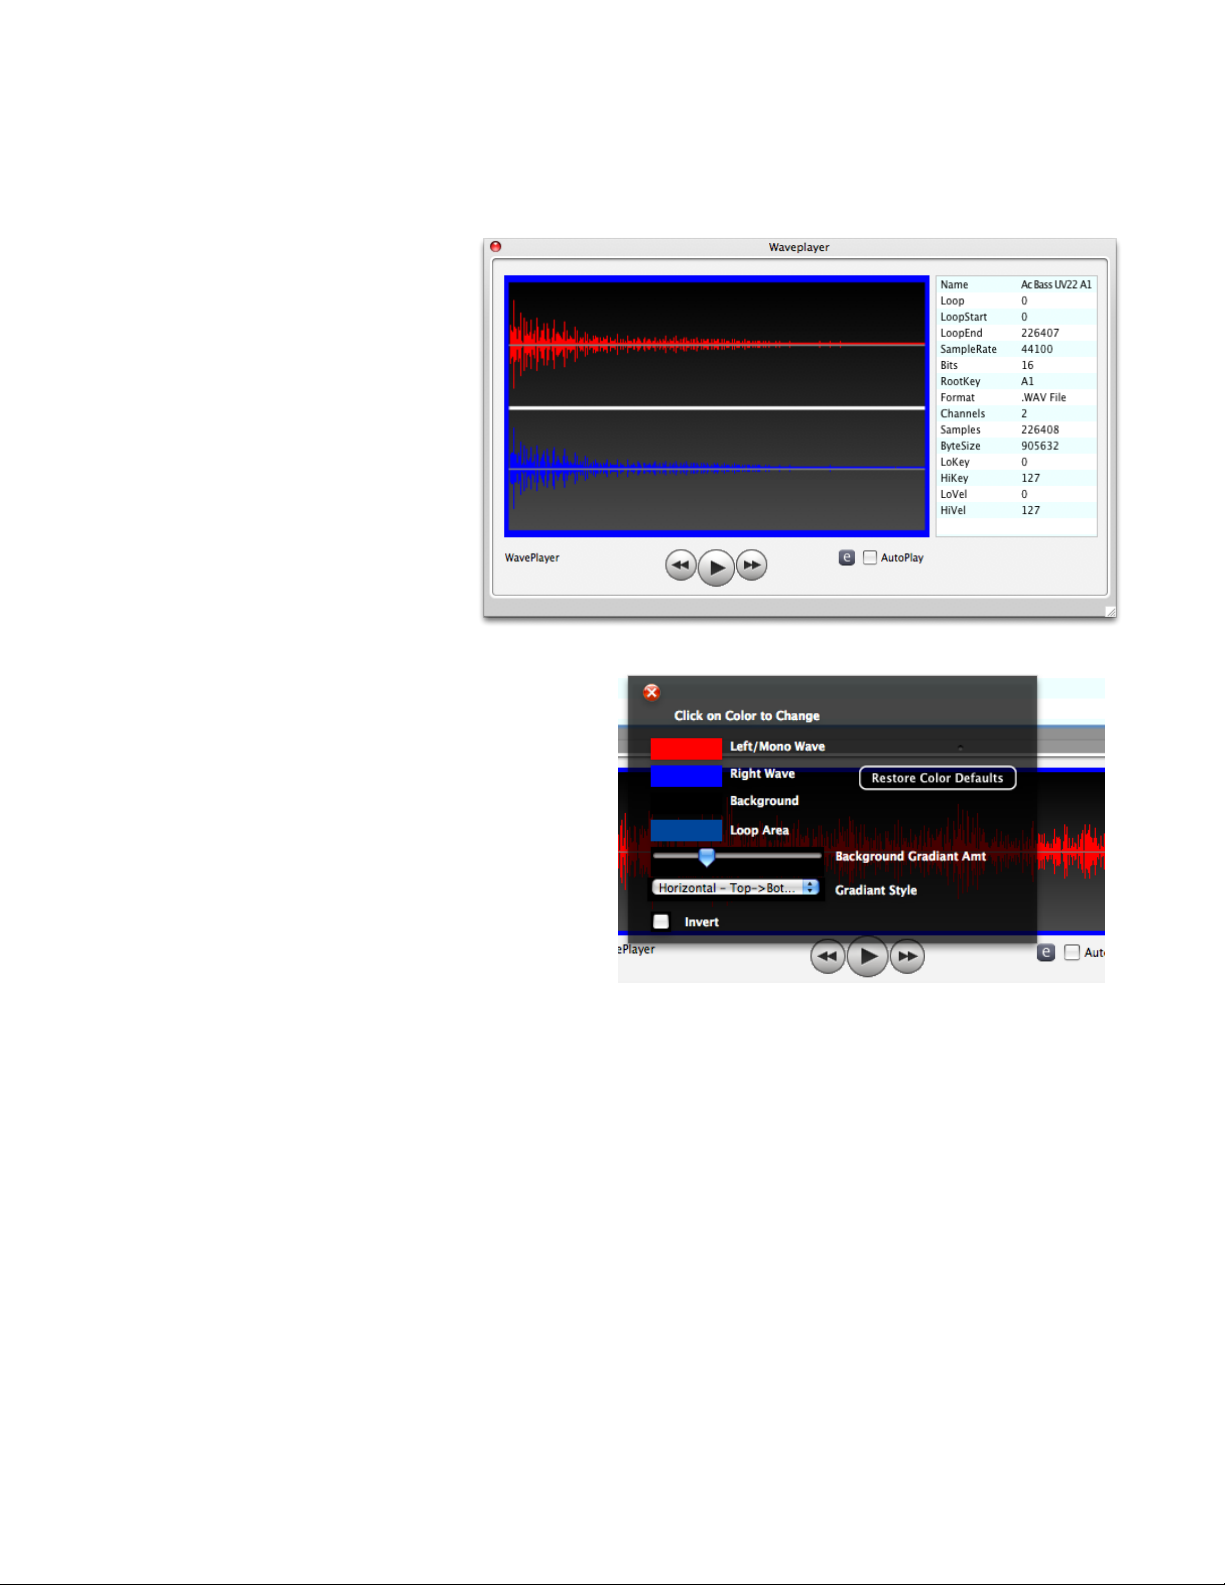
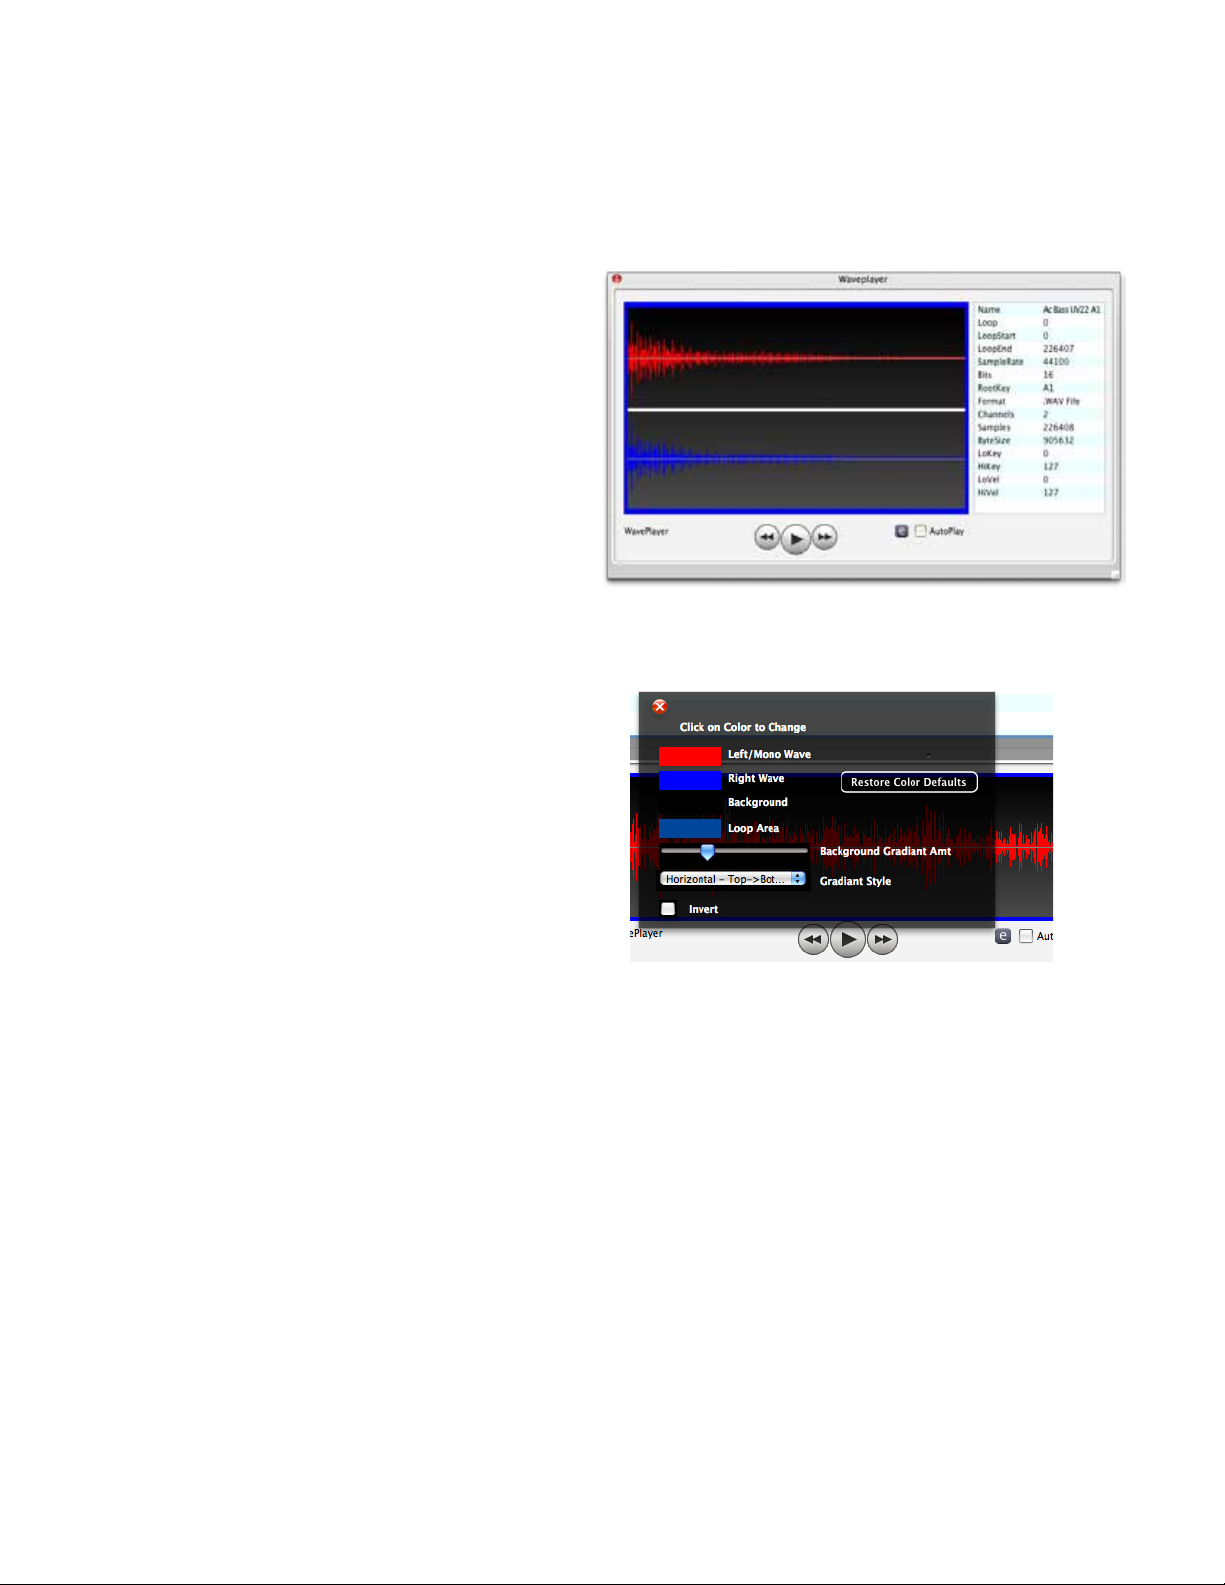
Translator™ SampleView
SampleView
The Sample View displays a waveform and allows playback, including the proper looping that
may be programmed into the sound. The waveform appears by selecting a sample in the Object
List.
There is an information box
that lists all the pertinent
information concerning the
sample (regardless where it
comes from) on the right.
Loop areas (dened by
the numLoops, Loop Start,
and Loop End parameters)
and Playback areas
(dened by the Start and
End parameters) are are
displayed using box outlines
on the screen.
The regular set of transport
controls is shown below the
waveform screen. A checkbox called
AutoPlay allows the player to play back a
sample when it is selected. You can also
unconditionally turn off loop playback by
selecting No Loop checkbox.
The e button shows you the properties of
the Sample View. You can choose the
color of each facet of the view, plus the
gradient of the background.
This screen can be detached from the
main window by clicking the Detach
button above the right-pane. See
Docking Dialogs for more information.
A special note concerning SampleView docking: Since it is usually located at the bottom of
the Main Screen, you need to select it in the right-pane, which moves it up to the right-pane.
Then you detach it; thus it is invisible in TWO places on the Main Screen. Reattaching it puts it
back to the right-pane, where when you click off of it, it puts it back to the bottom of the Main
Screen.
Page 13
Page 13
Page 14
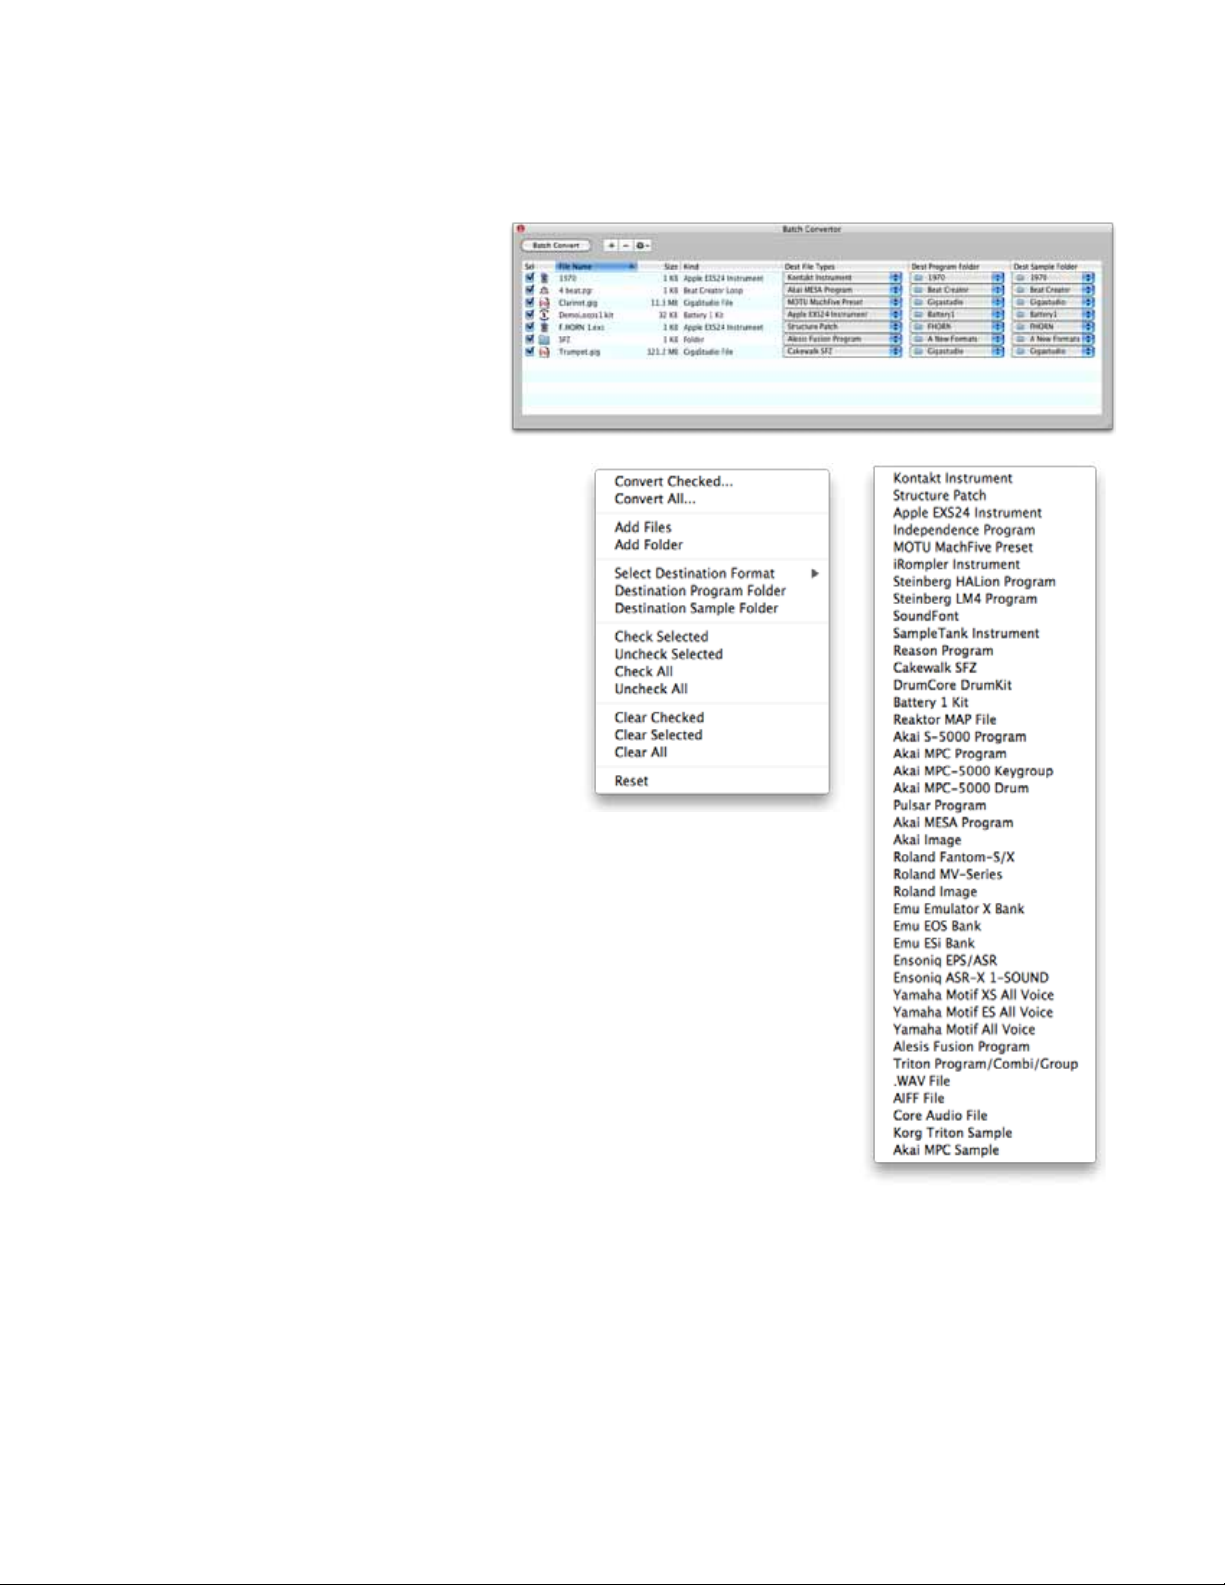
Batch Convertor
Translator™
Batch Convertor
The Batch Convertor gives you the special ability to grab a bunch of objects and convert them
in one swoop.
Of course you can do this in the
Object List by multi-selecting a
bunch of objects, but the Batch
Convertor allows you to get
objects from various locations
and add them to the dialog.
You can add objects to the list by
clicking the Add button (that is,
the + button), or by dragging objects
in from the Object List, Container Pane,
or even from the Finder. (Detaching this
dialog is helpful in this regard.)
Clear (that is, the - button) clears the
selected entires in the list.
Each entry has a checkbox so you can
select or deselect the objects you want
to convert even after you have put them
in the list.
The Batch Convert button starts the
batch conversion process.
The Action button drops down a menu
which allows various methods adding, selecting, deselecting items;
plus allows group modifying of Destination File Type.
This screen can be detached from the main window by clicking the
Detach button above the right-pane. See Docking Dialogs for
more information.
Page 14
Page 15

Translator™ Docking Dialogs
Docking Dialogs
All the right-pane screens - the Object List, Instrument View, Sample View, or the Batch
Convertor, can be detached into it’s own dialog, making it easy to use Translator in a large
screen or multi-monitor environment.
To detach a screen, simply click the Detach button above the right-pane when the desired
screen is in view. This jettisons the dialog and creates a blank spot on the Main Screen. You
can detach all the right-pane screens if you so desire. All the functionality is retained; all the
separated dialogs communicate with each other just as if they were located on the same dialog.
To reattach a dialog, simply close it, and the containing controls will go back to the Main
Screen.
Note: The Sample View carries with it a special exception. Since it is usually located at the
bottom of the Main Screen, you need to select it in the right-pane, which moves it up to
the right-pane. Then you detach it; thus it is invisible in TWO places on the Main Screen.
Reattaching it puts it back to the right-pane, where when you click off of it, it puts it back to the
bottom of the Main Screen.
Page 15
Page 16
Translator™Master Translation Dialog
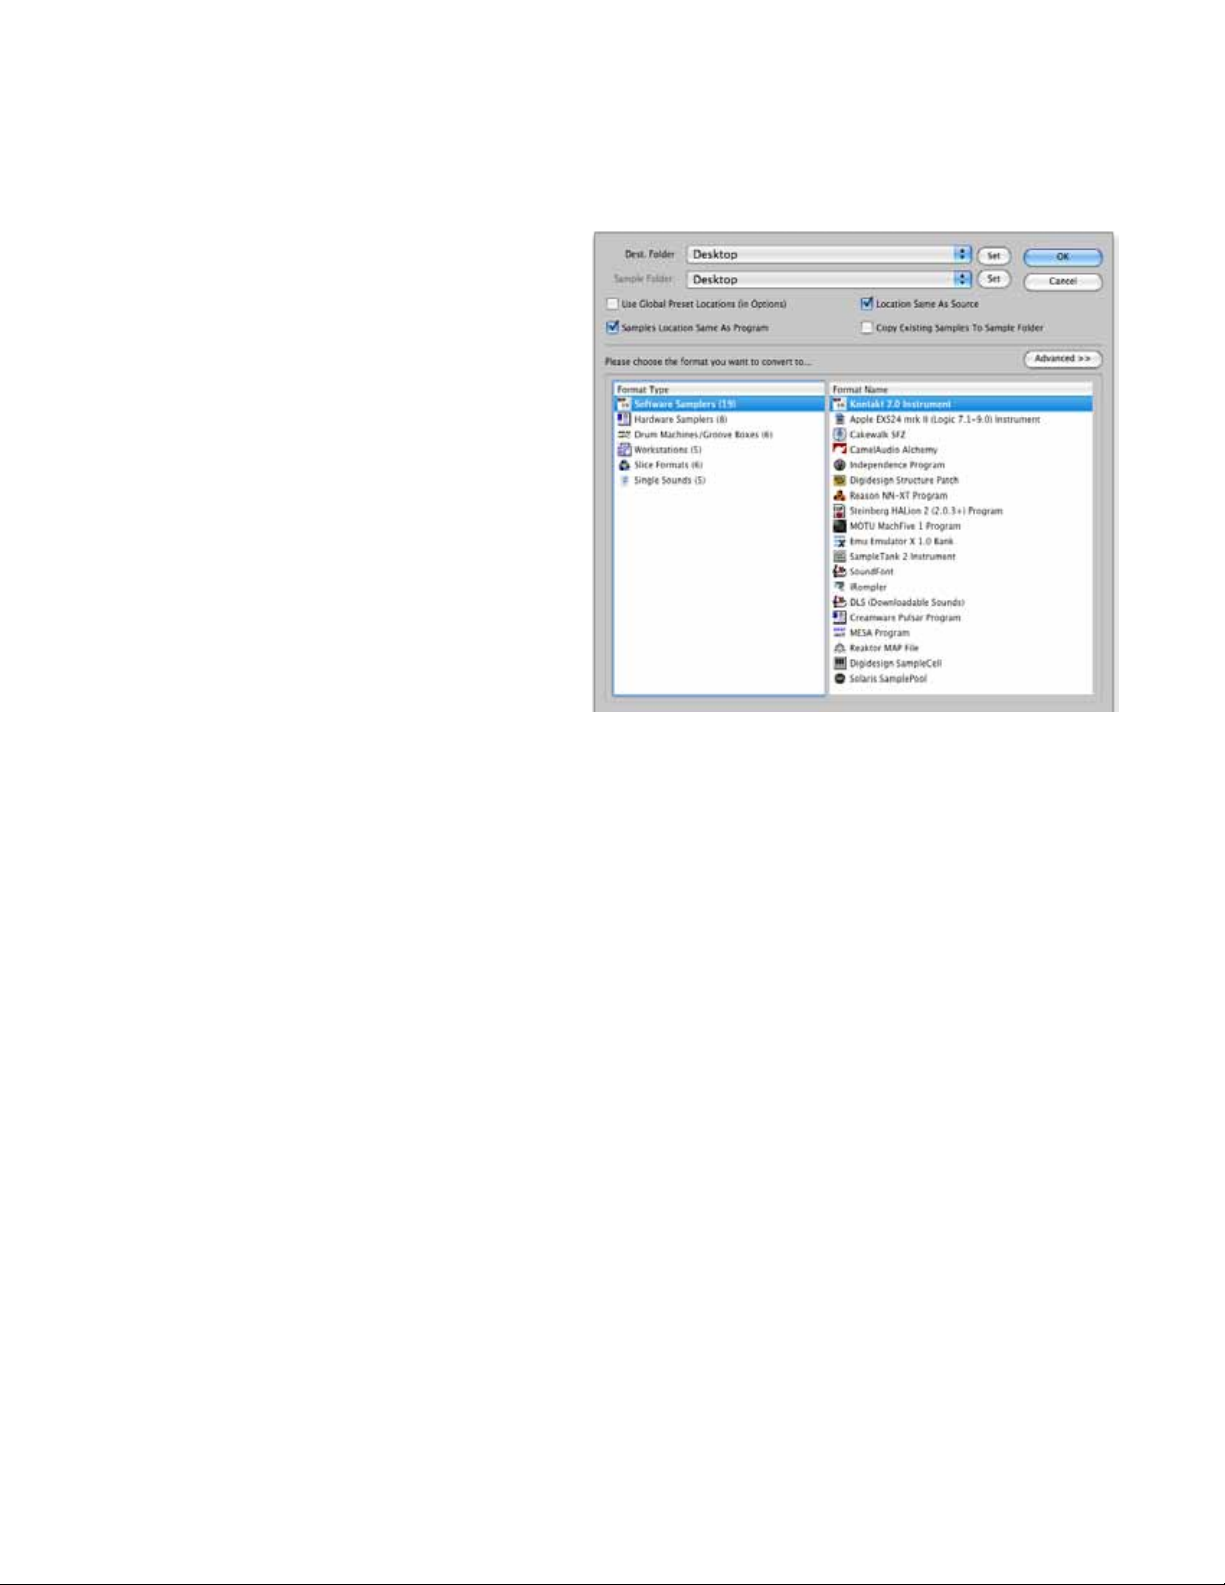
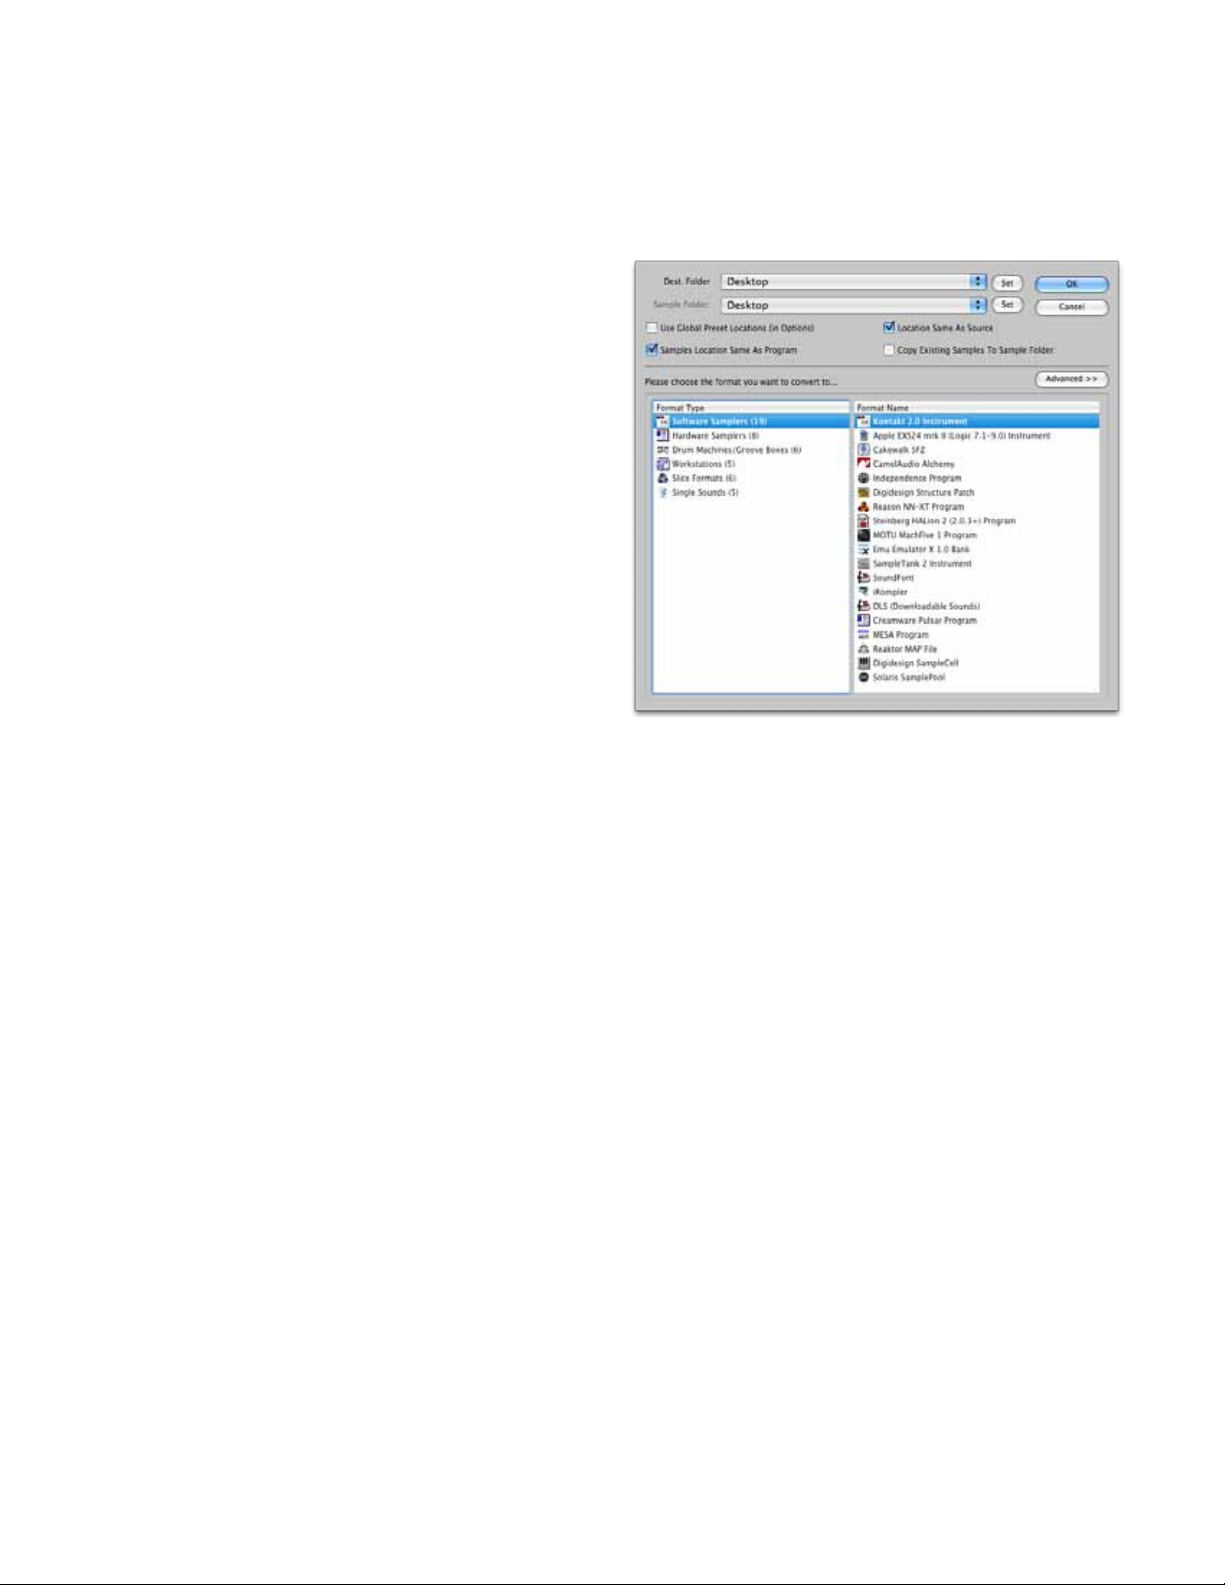
Master Translation Dialog
The Master Translation Dialog appears whenever you have started a translation process. This
dialog allows you to select what format you are converting to, where the sample les will be
written to, along with some other helper
functions.
The formats are divided into several
categories for easy tracking.
The OK button does not enable itself until
accurate information is selected in all
THREE areas; the Destination Program
Folder, the Destination Sample
Folder, and the Format Type list.
Note: Some destination formats do not
write separate sample les (such as Motif
or SampleTank), and sometimes you
are converting a separated leset (that
is, one that references external les) to
another separated leset (such as EXS to
Kontakt). In these cases, the Destination
Sample Folder will be unused; however,
you still need to enter something into this
area.
You can set destination folder locations by using the Set buttons, by selecting a parent folder in
the pulldowns, or by using the special checkboxes below these lists.
Use Global Preset Locations
Often times, for a particular format, there is a place you always want les to go. In Preferences,
there is a list where you can preset these. Checking this invokes the current path listed.
Sample Location Same As Program
This simply forces the samples setting to be the same as the program setting.
Location Same As Source
Instead of remembering the last settings, this forces both destinations to be the same as
where the source comes from. (This is ignored if the source is on a non-writable volume or a
proprietary volume that doesn’t support that le type.)
Copy Existing Samples To Sample Folder
When converting Instruments that rely on external WAVE or AIFF les, and you are converting
TO a format that also relies on external les, Translator by default does not copy the samples
but instead makes the new Instrument reference the same WAVE/AIFF les the source did.
However, sometimes you may want to duplicate the samples for organizational or portability
reasons. Checking this option creates new samples in the selected Sample Folder.
Advanced
This button reveals the Format Preferences for the currently selected format. This is extremely
handy for updating a certain option without the hassle of closing this dialog and going to Format
Preferences, and then coming back.
Page 16
Page 16
Page 17
Translator™ Translating
Translating
There’s a lot to Translator™, but it cannot be overemphasized that the main purpose of
Translator™ is to TRANSLATE! You start with one Instrument le format, and end up with
another one, hopefully one that can load into your sampler of choice.
Translator generally keeps it simple - just
select the object that you want to convert,
and either do three things:
Double-Click on the object to select it
for translation.
Click the Translate button to convert
any selected objects in the Object List.
Right-click on the object and choose
Convert As..->[whatever your format]
Remember, an object to convert can be a
whole Bank (like a SoundFont), a single
object within that Bank le (e.g. a Giga
instrument), or a single le that represents
an Instrument (e.g. an .exs le).
Those instructions apply to converting into
a le you write on your hard drive, but a
different set of circumstances apply when converting onto a Proprietary Drive. To do that, you
need to drag the object you want to convert from the Object List and drop it in the appropriate
location in the Proprietary Drive (disk or Virtual Drive) in the Container Pane.
Dragging also applies when you are converting into a Bank format, such as a SoundFont,
GigaStudio le, a EmulatorX bank, and others. Just drag the object you want to convert from
the Object List and drop on the Bank le you want to add it to in the Container Pane.
See Supported Formats for a complete list of support formats.
The Master Translation Dialog will appear. Put in your destination locations and format type
you want to convert to, then click OK.
A Status dialog will appear, showing you the progress of the conversion. The Cancel button on
this dialog is available to you so you can stop the process cleanly.
Once that’s complete (Translator is pretty fast), a Finished dialog will appear, telling you it’s
done and where the les ended up.
Note: Translation quality can vary, although it should be noted that Translator offers the
highest quality conversion routines of any operational software. Many things are taken
into account, and remember that certain parameters may not work or “t” properly in the
destination format you are converting to. It’s important to learn what you can about your
destination format AND the source format for you to know what converts and what doesn’t.
Page 17
Page 18
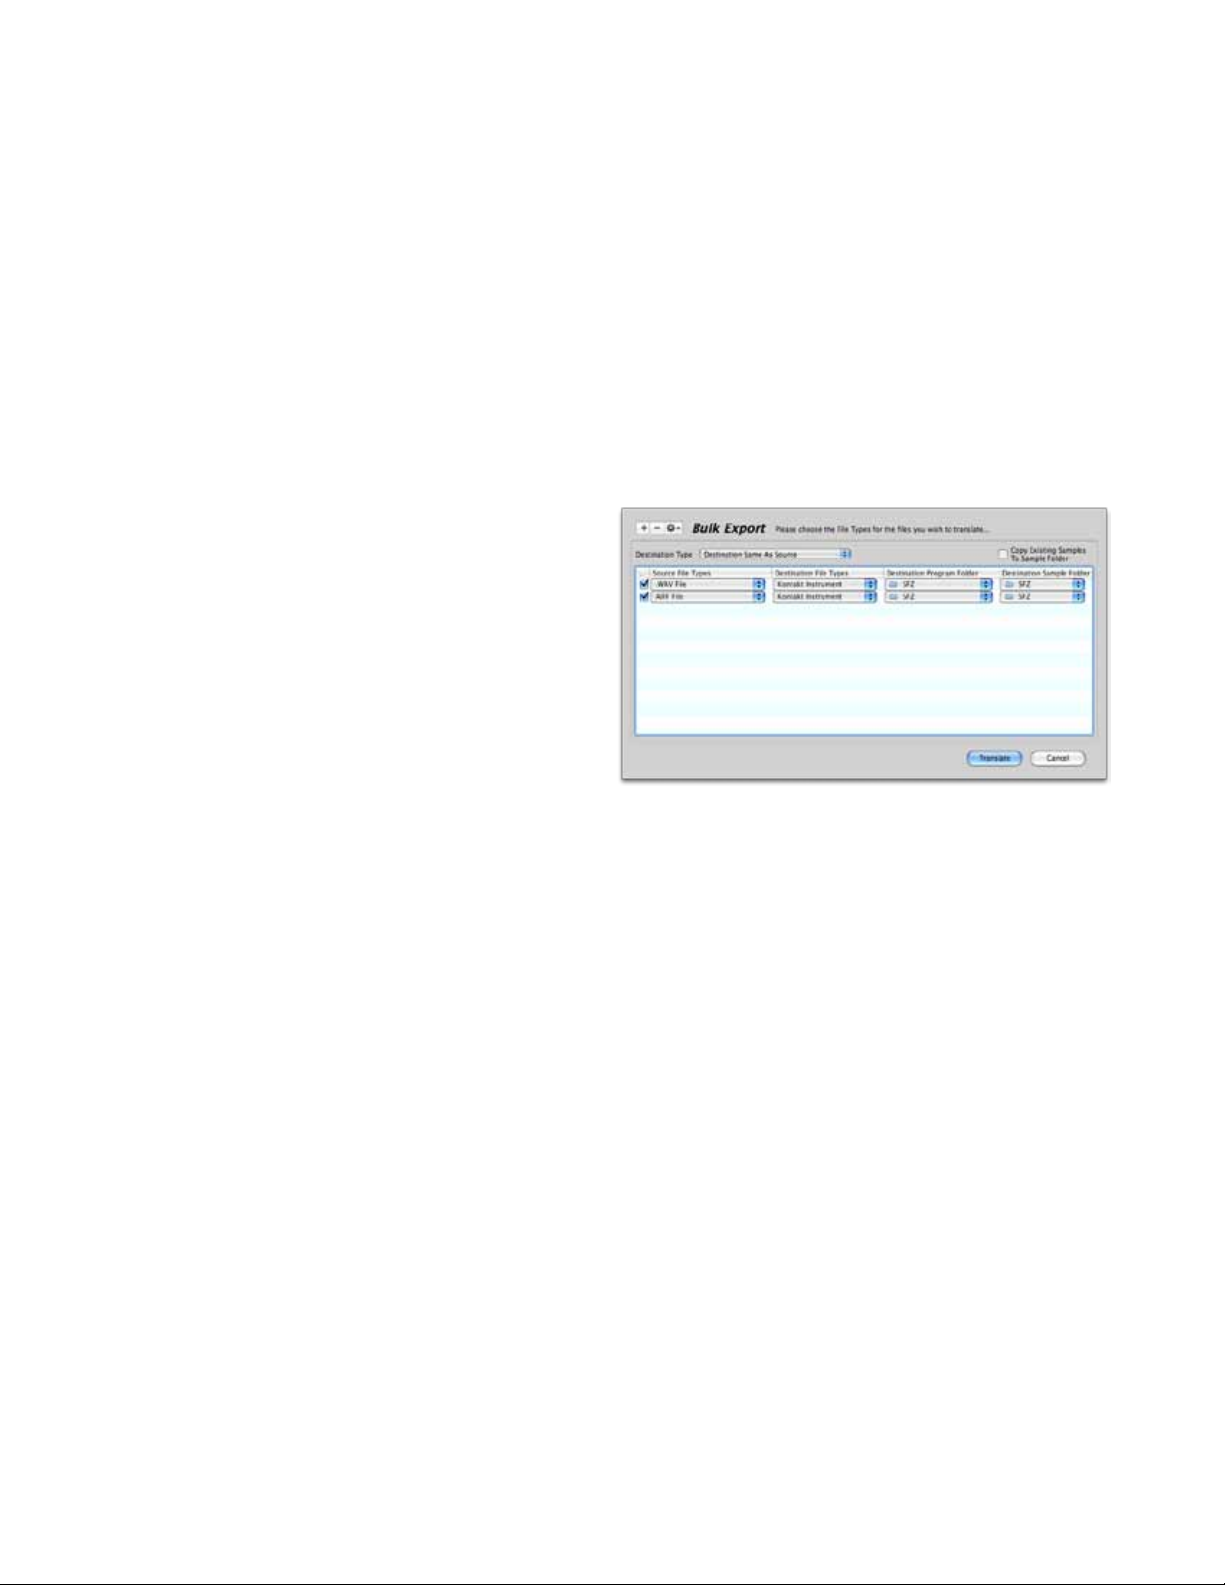
Translator™Bulk Export
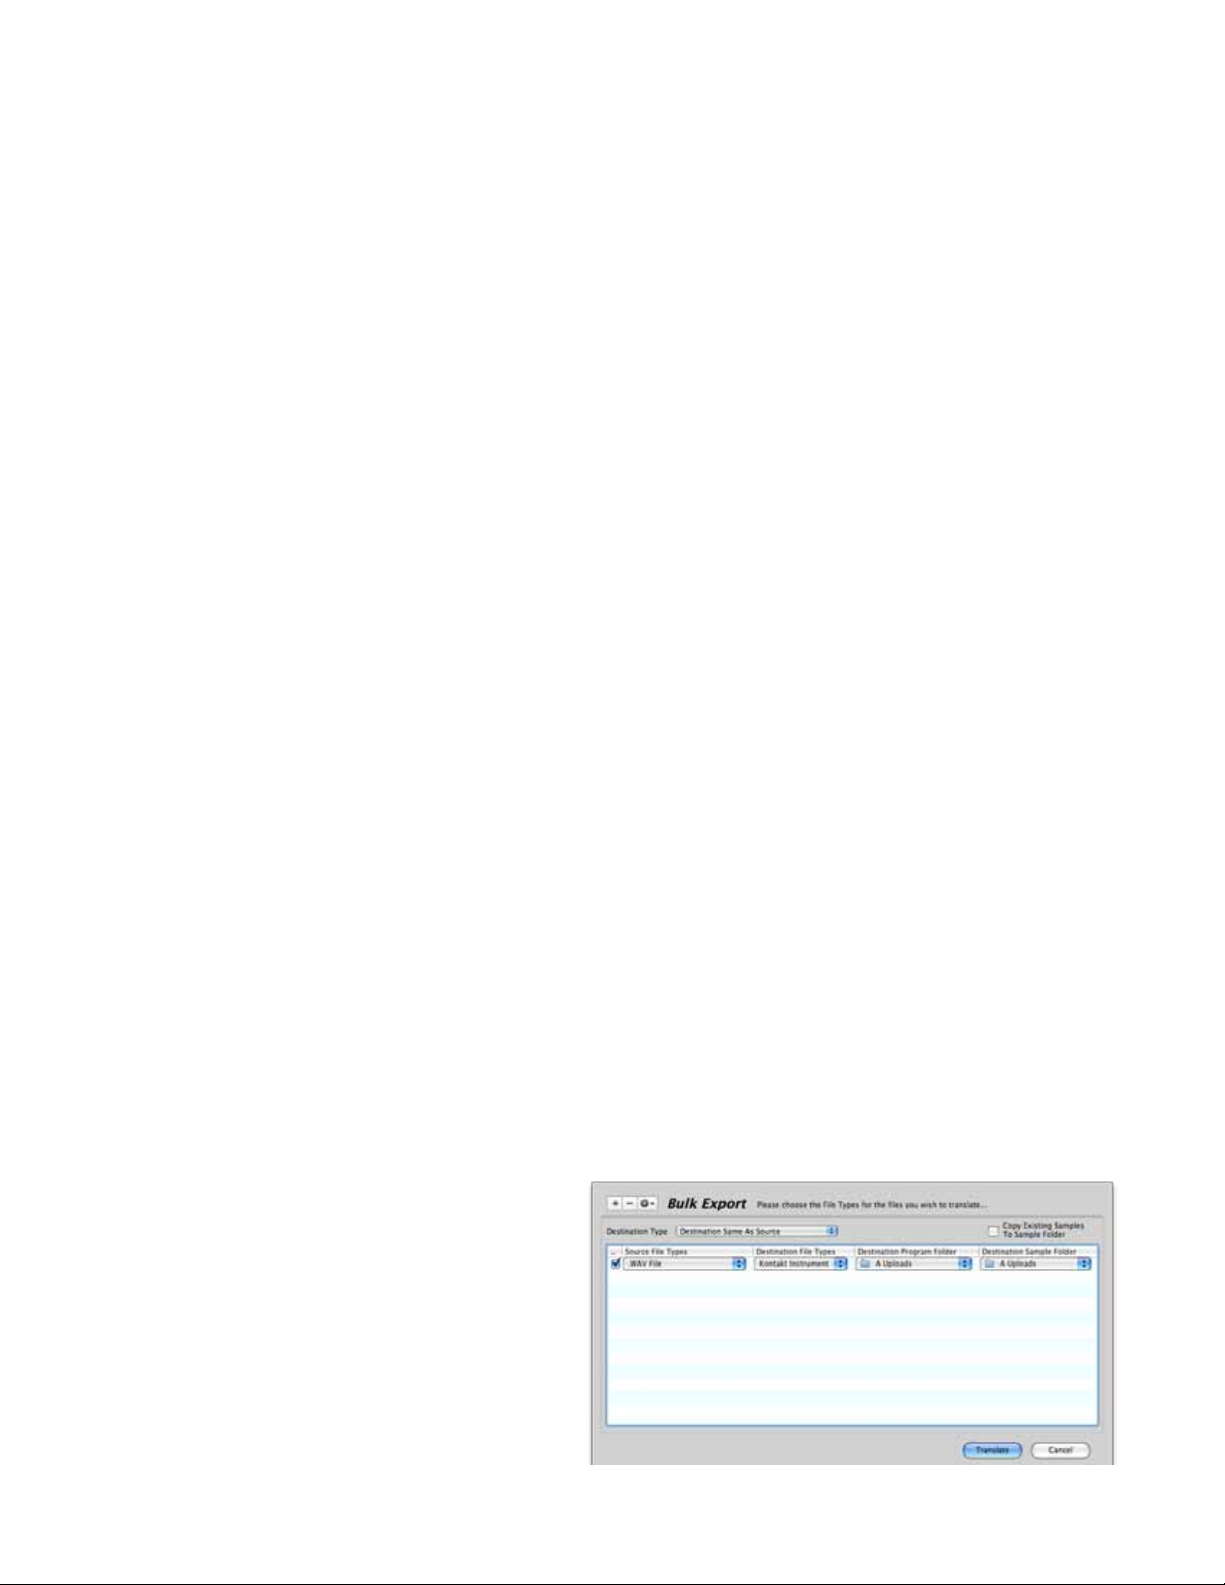
Bulk Export
In our terminology, Bulk Export is different than Batch Conversion. It is enabled when you
want to convert all (or some) objects in a folder without selecting all of them or using the Batch
Convertor.
The Bulk Export dialog at the right comes
up when you select a Folder to be translated,
either by double-clicking on the Folder in
the Object List, making a selection in the
Object List and clicking the Translate button,
or by dragging the Folder from the Object
List and onto a Folder, drive, or object on a
Proprietary Drive in the Container Pane.
Note: for dragging into a Proprietary Drive,
this dialog does not come up, because the
mere fact of dropping on a Proprietary Drive
answers all the choices the Bulk Export
dialog offers you.
You choose the type of objects that you want converted (Source File Types), what types you
want them converted to, and where the results are written.
You can choose Any if it doesn’t matter what type you want to convert. Any also renders other
choices as ignored.
You can add or remove entries using the + and - buttons. You can add objects by dragging
them in from the Object List, Container Pane, or even from the Finder. (Detaching this dialog is
helpful in this regard.)
Each entry has a checkbox so you can select or deselect the entries you want to apply. The
entries are persistent from operation to operation.
And, of course, the Translate button starts the translation process.
The Action button drops down a menu which allows various methods of selecting items; plus
allows group modifying of Destination File Type.
The Destination Type pulldown allows some master Options about where the translated les will
go.
Preset Destinations (as shown in Options): Uses the “per-format” selections as
noted in Preferences.
Destination Same As Source: Means that the transalted le will be written alongside
the source Instrument that was converted.
As Selected (see below): Pays attention to the Instrument and Sample custom
Destinations that were selected.
Copy Existing Samples is a global preference that refers to Instruments that use external
samples (.wav; .aif) such as Kontakt or EXS24. By default this is unchecked for efciency, if
you are converting Kontakt to EXS to just use the existing samples. (Why not?) However, there
are some instances where the user would want the existing les to be copied into a different
location, for reasons of portability or sample management. If you want this behavior, check this
option.
Page 18
Page 19
Translator™ Bulk Export
Instruments and Samples
By default Translator™ prefers Instruments. In other words, in you Bulk Export a folder that
has Instruments (like .nki, .exs, etc.) and Samples (.wav, .aif, etc.), Translator™ converts the
Instruments and ignores the Samples. However, there is a way to “convert” sample les too.
(Please note that Translator’s focus is to convert Already-Formed Instruments into AlreadyFormed Instruments of another format. For powerful functionality of Instrument Building,
please look at our Constructor™ product.)
Building Instruments from Samples
There are two ways to “build” Instruments from raw samples. One is by doing a Bulk Export on
a Folder that ONLY as sample les; such as .wav, .aif, or similar. If there are no instruments in
those folders, then Translator will assume you intend to build Instruments from Samples.
The other way is to explicitly create an entry or entries specifying WAVE or AIFF (see the gure
to the right). Then, even if there are Instruments in those folders, Instruments will be built
from the Samples.
Single Sample Mapping
Translator can build samples but only in
a simple random sort of way. Given a set
of samples, Translator will map them out
across the keyboard from left to right,
according to some parameters that you can
set in Preferences-Single Sample Mapping 1
and 2 tabs. See the Single Sample Mapping
option in Preferences for more information.
See the gure on the right - this setup
will take all the WAVE or AIFF les in the
selected folder and create instruments from them.
Page 19
Page 20

Translator™SimpleTranslation™
SimpleTranslation™
OK, let’s admit it. We’re just converting les. Do you REALLY need this large overbearing
Translation Program to simply convert le to le?
You may not. So try this: just
drag any le and drop it on
Translator’s icon - an alias or
on the dock. This dialog will
appear:
Simply select your destinations
and Format Type, and off you
go! No big unwieldy interface or
confusion.
And, if you want things even
easier, go into Preferences and
select the SimpleTranslation™
tab. There you can set up
automatically your destinations
and Format Type. Then this
dialog won’t even show - and
the conversion will commence
and nish and shut down
automatically!
Can’t get any easier then this...
Page 20
Page 21

Translator™ Building Instruments
Building Instruments
Translator™ is primarily a Instrument->Instrument convertor. That means if you have a
Instrument le, and you want to load it into another sampler
that doesn’t load that format, you can convert it within
Translator and it’ll be pretty much exactly the same as the
original format, but you can now use it in your destination
sampler.
“Converting” single samples, such as WAVE or AIFF les, into
an Instrument is a little different of an animal. Sure, it’s a
conversion, but you are actually BUILDING an instrument from
scratch rather than doing an instrument conversion. You are
adding information, not merely converting it.
Translator™ can build instruments; you can “convert” a
folder of single samples into an Instrument, but you have
no ne control about placement or similar things. Still, the
samples can be mapped from left to right across the keyboard
and given different spans, etc.
Here’s how:
Go into Preferences and select Single Sample Mapping
(see the gure to the right). The defaults should be ne. You
can select what the keyspan is and what your keyrange is,
plus there are couple of other parameters that can help in getting the sample where you may
want it. (Again, remember Constructor™ greatly expands on this.)
Chicken Systems has
another program,
Constructor™, that
specializes in this.
You can take single
samples, plus parts or
whole instruments, and
generically make a new
Instrument, while having
full control of how the
samples are mapped, what
their real-time parameters
are (envelopes, lters,
LFO’s), and how they are
organized. You have full
keymapping windows and
special graphical User
Interfaces for this purpose.
Once you nish that task, close out, and select a folder in the Object List and click the Translate
button on top. (Or just double-click on the folder, while the Expand Folder is not checked.) You
get the Bulk Export dialog. For Source Format, select WAVE (or whatever single sample you are
converting). For Destination Format, choose your destination Format. Then click OK. Your new
Instrument le should be in the same folder the single sample folder is (unless you changed it
in the Bulk Export dialog).
If your destination le format is monolith (internally containing the samples), you’ll just have
that one object. If your destination format references samples, by default the original WAVE
or AIFF les will be used - there actually will be NO conversion, unless the destination requires
specically formatted WAVE les, such as the Akai S-5000 or MPC.
Translator™ is handy for light Instrument building. Once you load the Instrument into your
sampler, you may edit them further.
Notes for Proprietary Destination Formats
To build Instruments or Banks on a proprietary format disk (Akai, Roland, etc.), drag the folder
from the Object List to the Proprietary disk or Virtual Drive in the Container Pane.
Writing a folder - or folder tree - to a proprietary drive presents some unique challenges that
Translator sorts out for you. You can make this easier by having some discipline about what you
are throwing at the Proprietary Drive - don’t include 300mb pianos, lay off of folders that have
100 Kontakt les, etc. (All the obvious things.)
Here’s how they work:
Rule for source folder contents: If the folder you are trying to convert has at least one
Page 21
Page 22

Translator™Building Instruments
Instrument or Bank le, Translator will convert all Instruments and Banks in that folder
but will ignore single samples (WAVE/AIFF/etc.). If the folder contains sample le but no
Instrument or Bank les, Translator will convert those samples in a All->One Single Sample
Map basis and create one Instrument or Bank based on those samples.
Akai Drive/Partition: For every source folder, a Volume will be written into the
destination Partition (on a Drive, this is Partition A) and the contents written into that
Volume. The exception is Bank formats, which will create their own Volumes. If the Volume
is too full to take in the needed objects, another Volume will be created and objects will
attempt to be created there. If there is no more dataspace left in the Partition, Translator
will move to the next Partition and attempt the conversion there; if it can’t, the the next
Partition and so on until all Partitions have been attempted. Translator will wrap around if
the dropped Partition is after Partition A.
Akai Volume: All created les will be dumped into that Volume unconditionally. See the
above rules regarding full Volumes or Partitions; if a new Volume is created, remaining les
will be created in there unconditionally, and so on.
Emu Drive (EOS): E3, ESi, and EOS share the same disk format. If it is deteted that EOS
Banks already exist on the disk and “Write E4” is set in Format Preferences-Emu, for every
Folder considered, a new Emu Folder will be written and Banks created in that folder.
Emu Drive (E3/ESi): E3/ESi does not have the concept of folders, so for every item
considered, a new Emu Bank will be created and written.
Roland Drive: Roland’s do not have any nesting conept, it’s all a at structure. So all
objects are simply written as Patches or Performances on the disk.
Ensoniq Drive/Sub-Directory: Ensoniq and Akai MPC are unique in that they have a full
nesting disk structure. When you drop a folder on a Ensoniq Drive or Sub-Directory, the
folder tree will be fairly exactly replicated. Ensoniq’s however only allow 38 objects per
Sub-Directory, so if there is a incoming Folder which eventually needs to write more than
38 les, a new Sub-Directory will be written alongside the one current one and the rest
dumped in there. Also of note is that Translator, in lling up a newly createdSub-Directory,
rst writes new Sub-Directories in that Sub-Directory to handle the nesting, then it will
transfer any .efe/.efa iles that appear, then it considers the rest of the les if they exist.
Akai MPC Drive/Folder: Akai MPC and Ensoniq are unique in that they have a full nesting
disk structure. When you drop a folder on a MPC Drive or Folder, the folder tree will be
fairly exactly replicated. Also of note is that Translator, in lling up a newly created Folder,
rst writes new folders within that folder to handle the nesting, then it will transfer any
MPC Programs that appear, then it considers the rest of the les if they exist.
Page 22
Page 23
Playing instrumentsTranslator™
Playing Instruments
You can play most if not all Instruments within the internal Instrument Player in Translator™.
This is format-independant.
It is done within the Instrument Screen. By default, when you select an Instrument in the
Container Pane,
the Instrument
Screen appears
and the mapping
shows up. The
Load button
shows LOAD,
click on it to load
the Instrument.
When it is
nished, the
button will show
LOADED. You
can then play it using the keyboard graphic below the mapping display, or you can play it using
a MIDI keyboard. Please be sure that your MIDI settings are correct in Preferences-Audio/MIDI.
The Instrument Player DOES NOT adhere to Audio part of the Preferences-Audio/MIDI tab, that
is for the Waveplayer. See below for notes on each platform.
Mac Audio Notes: The Instrument Player is xed on using the default Core Audio driver
and outputs out the Built-In Output. Currently that cannot be changed. Audio latency is
usually very good (below 5-10ms).
Windows Audio Notes: The Instrument Player is xed on using ASIO and the ASIO4ALL
driver (www.asio4all.com). Currently this cannot be changed. Audio latency is usually very
good (below 10ms), but there may be some MIDI latency. Both issues will be addressed in
future versions.
The Instrument Player works off memory, not disk streaming, so please be careful on what you
decide to load. There needs to be time to form the content, then time to load it into memory.
Loaded content is cached, even between sessions, so if you LOAD an Instrument that has been
cached, it will be faster to load. The cache folders are xed and are below.
Cache Folders
Mac
/Users/[username]/Library/Application Support/Chicken Systems/Translator 6/Playback
XP
%SYSTEMDRIVE%\Documents and Settings\[username]\Application Data\Chicken Systems\Translator 6\Playback
Vista/Win 7
%SYSTEMDRIVE%\Users\[username]\AppData\Chicken Systems\Translator 6\Playback
(note AppData may be hidden)
“Rule” Issues
While KeyRange and Velocity Ranges are supported, Keyswitching, Control Switching, and
Round Robin is not supported in the Instrument Player. What is played in the Instrument Player
is set in the Combo box on the upper left of the mapping area. When you switch that, you need
to load the new articulation. Support will be implemented in a future version of Translator.
Sample loops, tuning, volume, panning, and many realtime parameters (although only lowpass
ltering) are supported. Playback will usually be very close to the original, although perfect
replication cannot be guaranteed.
Page 23
Page 24
Auditioning Samples Translator™
Auditioning Samples
Translator™ uses the Sample View to play back samples, either single sample les (such as
WAVE, AIFF, SND, and more), samples that exist within monolith Bank les (.gig, SoundFont,
others), or samples that exist on proprietary media (Akai, Emu, Ensoniq, etc.).
The Sample View can be used within the
main window or undocked (detached) as
it’s own oating window.
Loops are supported, and any size le
can be played back, since it uses a disk
streaming mechanism. The Sample View
shows the waveform and the loop area if
one exists. Sample properties are shown
on the list to the right. The regular set
of transport controls are shown; the Play
button is what you think it is, the Back
button pushes playback back 2 seconds,
while the Forward button pushes it
forward 2 seconds. You can click on the
Waveform at any time while the sample is playing to reset where it plays from. Lastly, you can
use the Space bar to start and stop the playback.
Regarding the colors used for the Sample
View, you can use the e button below
the Sample View, or go to Preferences-
Waveplayer. You can choose the color of each
facet of the view, plus the gradient of the
background.
For more information, see the Sample View
area of this document.
Page 24
Page 25
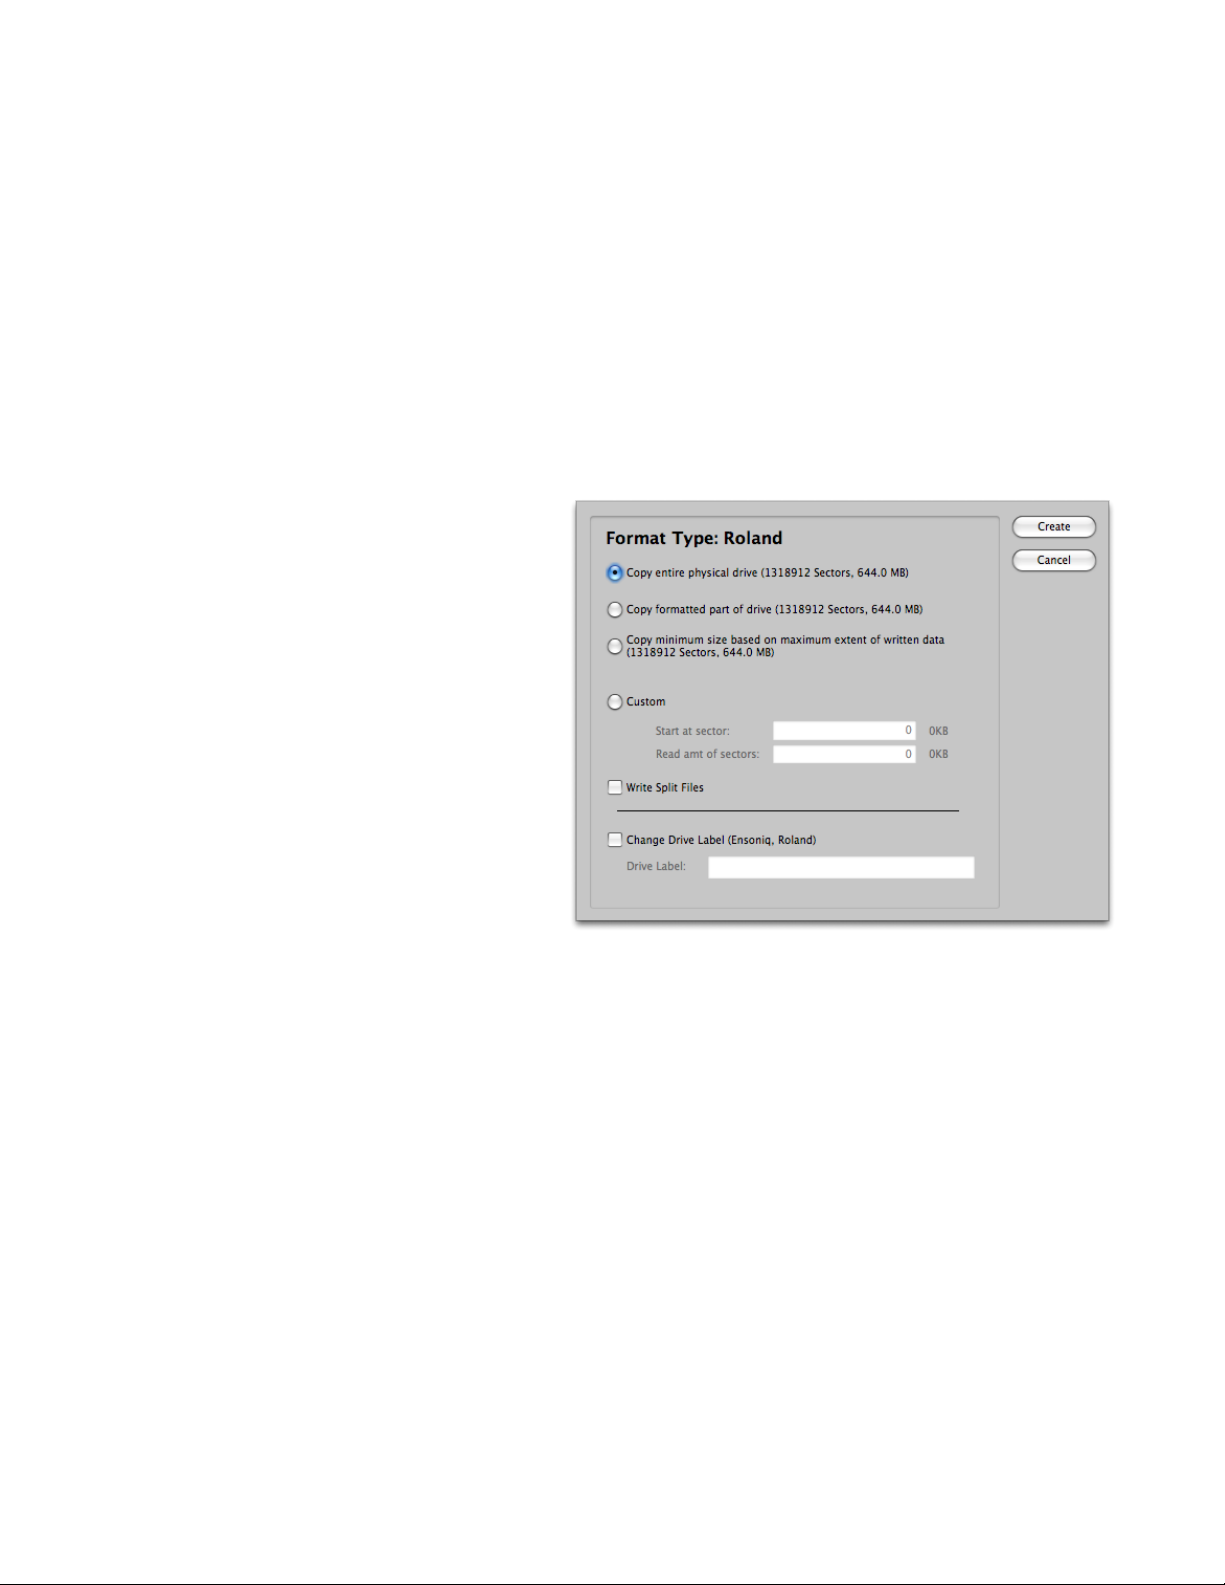
Virtual DrivesTranslator™
Virtual Drives
You can create, read, and write Virtual Drives with Translator™. Virtual Drives are large les
you create, but within Translator™ they appear as SCSI-ATAPI Drives formatted with whatever
proprietary format you want (Akai, Roland, Ensoniq, Emu, other).
Virtual Drives are the term we use for what most people call “Disk Images”. A disk image is NO
MORE than a bit-for-bit copy of a physical disk or CD-ROM. Translator uses Virtual Drives in the
context of dealing with proprietary disk formats. They are commonly used in two ways: reading
a CD/disk or creating your own CD’s.
Reading a CD or Disk
Although it is easy to access and convert off proprietary CD’s or disks directly in Translator, it is
often easier to make a Virtual Drive of that CD/disk rst, then convert off that. Not only does
the translation go much quicker, you get a backup “for free” of that CD/disk.
You can create Virtual Drives from
existing CD/disk’s using Translator.
Just right-click on the CD/disk under
Proprietary Drives in the Container
Pane, and select Create Virtual Drive.
The special Write Virtual Drive dialog
comes up, and you can read the disk in
any numbers of ways.
Copy Entire Physical Drive: Often
the le system on the CD/disk isn’t
built to take advantage of all the space
on the CD/disk. This option means that
the entire disk will be read and the
image will be that size no matter what.
Copy Formatted Part of Drive:
Translator reads how much space the
le system is taking and this option
means it’ll read that much space,
which is often LESS than the capacity of the CD/disk. (In rare cases it’s more, if the person who
created the CD/disk didn’t do their job right. In that case, choose the rst option.
Copy Minimum Size Based on Maximum Extent of Written Data: This goes one more than
just reading the le system size. Translator reads what is the maximum extent of the data on
that disk. This means you’ll get the smallest Virtual Drive possible. This may come in handy, but
we don’t recommend it because what if you want to write to the disk further, you won’t have
room.
Custom: You can choose where you start reading the CD/disk and how many sectors you want
to read. This is very handy for disk repair, if the reading gives you lots of problems at the end
or at the beginning of the disk.
Write Split Files: Some disks are HUGE! Emu proprietary drives get up to 18GB. You can
choose to split the images in 2GB parts.
You can also create Virtual Drives using your favorite CD-burning software. They usually have
a CD Copy feature where you can create an image on your hard drive. OSX’s Disk Utility can
make images from drives too.
Page 25
Page 26
Translator™Virtual Drives
Through the years we have optimized Translator’s Create Virtual Drive function
rather extensively. It’s isn’t uncommon to have trouble reading CD’s, in real life
they get scratched and beaten up some. Or perhaps the CD-ROM Drive you are
using isn’t the greatest.
Most disk reading programs tend to encounter read errors and react by aborting
the read and erasing any record of what they have already read; or if they do,
they don’t continue the read and you don’t get your whole image.
Translator has special features internally to try as hard as heck to get your data;
if it can’t, it’ll go on and read the whole disk, so at least you’ll wind up with a
whole image. Although a purist might recoil at the thought of a imperfect image,
we can deal with it. Since we are dealing with audio data, most of a CD is just
audio, and most often all the critical hears are at the START of the CD.
It may be confusing how you can create an image of a disk if your computer doesn’t recognize
the drive; or as some people word it “mount” the drive, or in Windows if it doesn’t have a drive
letter. The truth is that your computer always recognizes the drive or disk in some manner, it
just doesn’t recognize the FILE SYSTEM on that disk. So the Mac complains, or Windows tells
you “this disk is not formatted”. What Translator and other programs do is simply create an
non-intelligent image of the disk as a le on your hard drive. It reads byte 1 off the CD/disk
and writes byte 1 on the image, byte 2 off the CD/disk and writes byte 2 on image, and so on.
This would be fairly futile, except that Translator CAN read the le systems on these images.
Creating your own CD’s
Translator can create blank Virtual Drives and format them to any proprietary format (Akai,
Emu, etc.), You then can write to them freely. Once you are done, you can burn the Virtual
Drive to a CD. This is extremely powerful to make your own compilations.
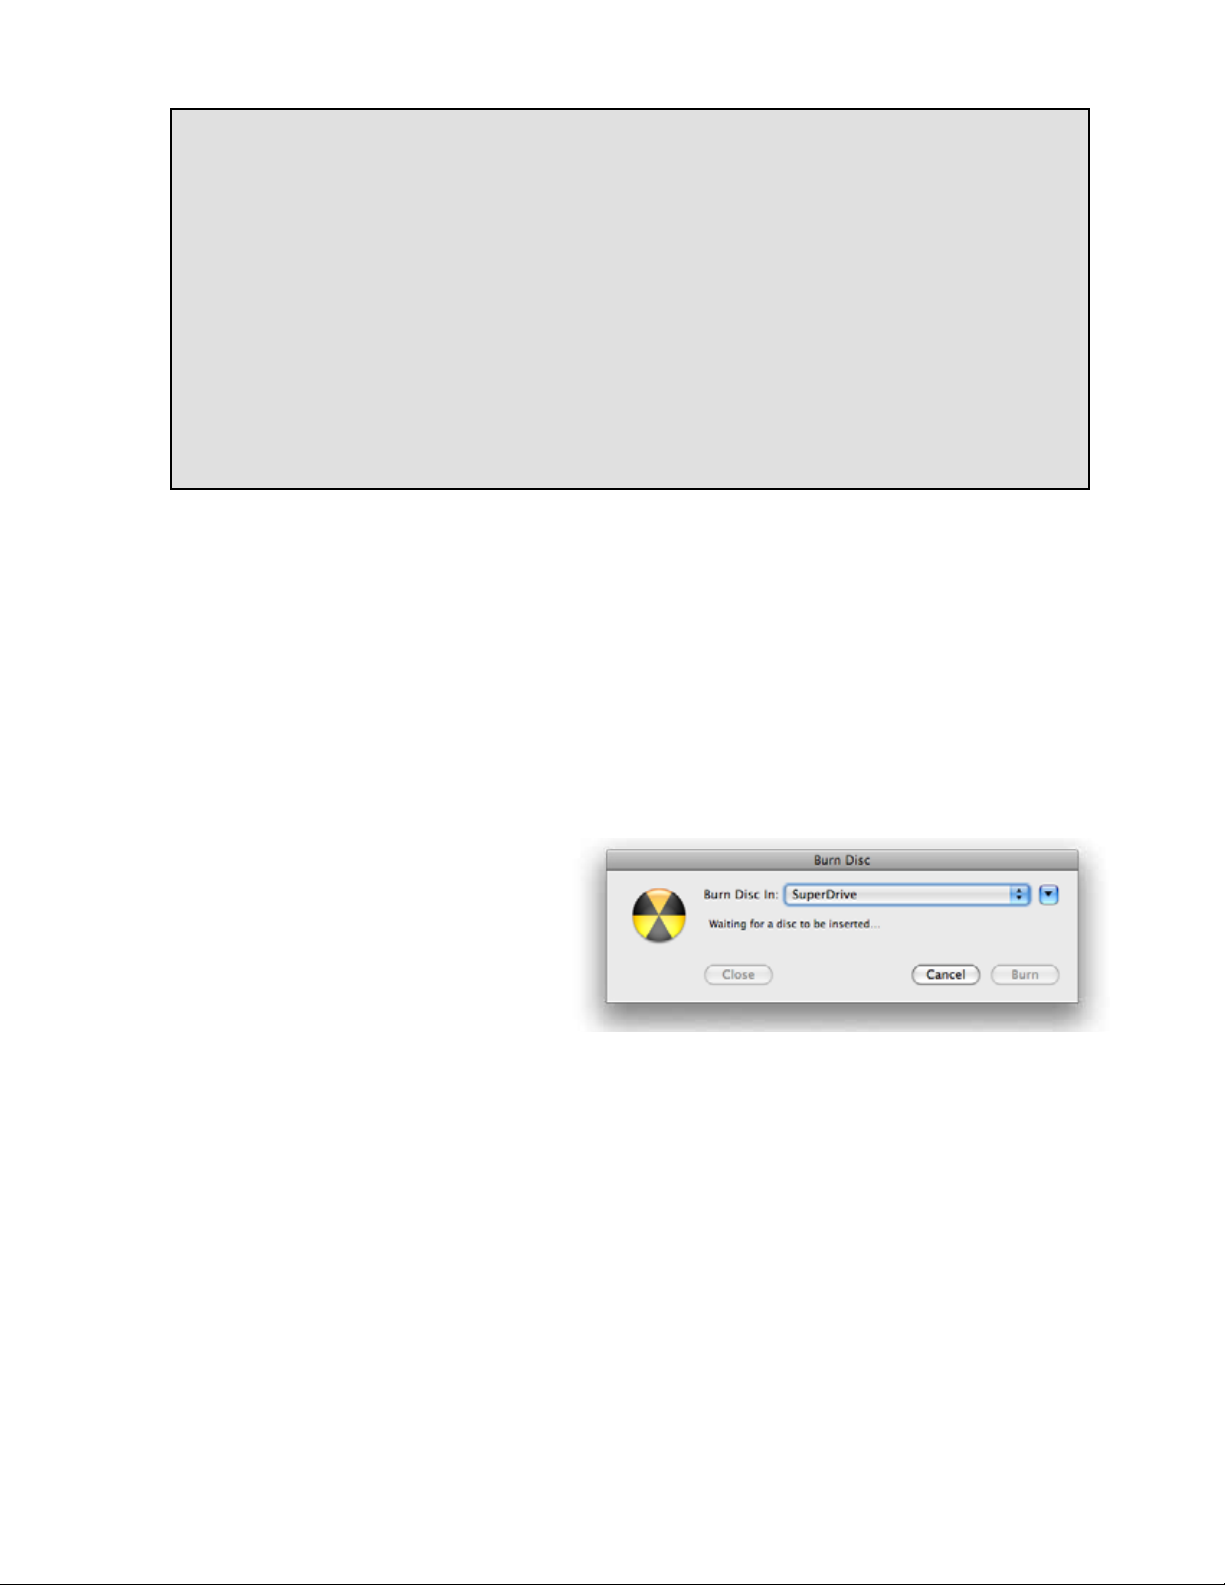
Mac only: Translator can burn
your CD, right-click on the Virtual
and select Burn CD... the OSX
Burn CD dialog comes up and you
can burn the Virtual Drive to disk.
If you are using Windows or would
rather use another burning program,
most CD-burning programs support
writing raw data images, which is what
Virtual Drives actually are. To put it into a visual picture, what you want to do is to burn the
Virtual Drive ONTO the entire CD, instead of as a le INSIDE the CD.
IMPORTANT! Check your burning software documentation, or their technical support
resources, for information on how to burn these type of les. Since we are not equipped
to support other company’s products, we are not qualied to answer any questions on how your
specic burning software burns raw data images. So please don’t ask us.
Toast for Mac and Nero for Windows are good CD-burning programs. Disk Utility on Mac
also can burn CD’s (it’s the same underlying calls Translator Mac uses). A common free one on
Windows is CDBurnerXP (it works on XP, Vista, and 7). But again, we are just trying to help. It
is not our place to assist you concerning other companies programs.
Virtual Drives are listed under the Virtual Drives category in the Container Pane. Each disk
format has it’s own category (e.g. Akai, Emu, etc.) with a folder icon.
Page 26
Page 27

Virutal DrivesTranslator™
You can add Virtual Drives (that is, disk images) to your Virtual Drives menu by moving those
les, or creating aliases or shortcuts of those les or the folders it resides in, and putting them
into your Images folder. This is located at:
Mac
/Users/[you]/Library/Application Support/Chicken Systems/Translator 6/Images
Windows XP
C:\Documents and Settings\[you]\Application Data\Chicken Systems\Translator 6\Images
Windows 7 / 8 / Vista
C:\Users\[you]\AppData\Roaming\Chicken Systems\Translator 6\Images
Then refresh your screen by clicking the Refresh button above the Container Pane, and your
Virtual Drives menu in the Container Pane will show your Virtual Drives.
You can drag in and drag out of your Virtual Drive just like you would any other drive.
Page 27
Page 28
Favorites Translator™
Favorites
Favorites are contained in a special section in
the Container Pane. It is a section you populate
yourself with commonly-used folders, or folders
you want quick access to.
Add a Favorite by selecting the folder or le in
the Container Pane or the Object List, rightclicking on it, and selecting Add To Favorites. Or
you can add one by selecting Add To Favorites
under the Operations top-level menu and
choosing it from the Open dialog. Or drag a
folder/le from an external source and drop it
on the Favorites icon in the Container Pane. In
all cases, it will automatically be added to the
Favorites List in the Container Pane.
You can remove a Favorite by selecting the Favorite in the Container Pane and right-clicking on
it, and selecting Remove From Favorites.
You can also add les or folders to your Favorites menu by creating aliases/shortcuts of those
folders and putting them into your Favorites folder, which is located here:
Mac
/Users/[you]/Library/Application Support/Chicken Systems/Translator 6/Favorites
Windows XP
C:\Documents and Settings\[you]\Application Data\Chicken Systems\Translator 6\Favorites
Windows 7/Vista
C:\Users\[you]\AppData\Roaming\Chicken Systems\Translator 6\Favorites
This is how the Add To Favorites works behind the scenes.
Page 28
Page 29
LookupsTranslator™
Lookups
You can perform a custom search on anywhere you choose, in Translator™ they are called
Lookups.
To perform a Lookup, go to View-Lookup or click
Ctl/Cmd-F. This brings up the Lookup dialog.
You can choose the following:
-Where you want to search (what disks,
folders, or Virtual Drives)
-What criteria you want to search for
Criteria can include the following:
Format Type
Text
Sample Properties (Channels, SampleRate,
BitRate, Data Size, Amount of Samples,
etc.)
You can name your Lookups, and they are stored under the Lookups area in the Container Pane
for possible later use. Any unnamed Lookups are not saved.
Don’t confuse Lookups to the Filter text box for the Object List.
Page 29
Page 30
Creating Slice Formats Translator™
Creating Slice Formats - Beat Detection
One of the very unique features of Translator is the ability to convert a single piece of audio into
a “Slice File”. Slice Files are explained below, but basically they are sample les that can played
back at slower or faster tempos without changing their pitch. The most popular examples are
Recycle, ACID les, AppleLoops, and Stylus RMX les. There are a couple other examples also.
Important Note: Translator can convert OUT of any Slice File format - Recycle,
AppleLoops, etc. However, Translator CANNOT convert INTO Recycle 2 format. This is
because Propellerheads, the format author, has made it encrypted so no one can write
one. Absolutely all programs that read them cannot do so on their own; they use what is
called the REX Shared Library, provided by Propellerheads. This READS any Recycle le,
but does not WRITE. Translator CAN convert to Recycle 1 format, but that is mono-only.
It is for this reason we recommend as little use of Recycle les on your part as possible.
ACID les and AppleLoops perform the same function without encrypting their les.
Recycle is popular only because of the name and “rst there” history. If you buy loop
libraries, buy or use the ACID or AppleLoop variants. As long as Propellerheads encrypts
their les, their format should be avoided if possible because they just make everyone’s
job harder. Hopefully they will change their position or including Recycle creation in the
Shared Library. Until then, please sponsor the more versatile and open formats.
What Is A Slice File
A WAVE or AIFF le is simply a piece of audio data. And any “slice le”, such as a Recycle le,
ACID le, AppleLoop, or Stylus RMX le, are just pieces of audio data as well.
The only difference between a regular sample le and a slice le is that a slice le has markers
written in a information chunk in the le. These markers are placed strategically where
transients (sharp sounds) in the le start, so a player that reads slice les knows where the
slices are. This is how a Slice File can be played back at various tempos: the player plays back
a slice at the position the tempo dictates. At faster tempos, the slices fade out to make way
for the next slice; at slower tempos, there is a gap between the slices. (However, some players
articially add sample data to “plug the holes”. Also, good Slice Files are originally recorded at
the slowest tempo reasonably allowed, so they never have to be played back at a slower tempo
than their “unity tempo”.)
To create a Slice File, one has to “slice” the audio into slices of energy (“beats”) so the playback
engine plays it back in a way that makes rhythmic sense. This requires a beat detector.
Slice editors, most notably Recycle, but also ACID itself and the AppleLoop Utility that Apple
provides, have beat detection. They do 2 things: They beat-detect a sound le, plus they can
play the slice les back at different tempos. They do this with the assistance of the detected
markers. Once you have what you want, then you save into a slice le, where the audio stays
constant but the markers are written
in the le. So when a slice player reads
the le, the slices are the secret to it’s
capability to play them back at any
tempo.
Translator 6’s Beat Detection
Translator 6 now has a Beat Detector,
giving the ability to create Slice Files, for
playback on slice engines like Stylus RMX
or other. This can also be done in bulk,
so you can take (say) 1000 WAVE les
and convert them into 1000 slice les
Page 30
Page 31

Beat DetectionTranslator™
without having to do them one at a time in (say) the Recycle application.
To convert one or more pieces of sample data to Slice File format, simply do it like you would
any other conversion. You can convert a folder of WAVE les, or another example would be to
convert a Giga le full of drum beats - each sample becomes a Slice File.
It is vitally important to pay
attention to the Beat Detector
preferences, under PreferencesData Processing. The defaults work
for most clear and simple beats,
but they denitely will not work
with everything. You will need to
experiment with these on a case-by-case basis, but keep trying, there usually is a solution to
any rhythmic piece of data.
Here is the explanation of the Beat Detectors parameters:
Type: The Beat Detector uses two passes through the audio to detect beats. The rst pass
does the best detection it can, then the second pass “checks” the results.
Threshold: This is like the Sensitivity control on Recycle and other slice editors. Higher
values produce less detection, lower values produce more detection.
Silence: This is terms of samples. This is the MINIMUM amount of samples that need to
exist between markers. If you are getting lots of “double beats”, raise this value.
Tempo: You can bypass the whole detection thing and just put slice points at beat values,
regardless of whether a burst of energy exists at that point.
So in contrast, converting to Slice Files is not as seamless nor as perfect as other Instrument or
Sample conversions are. But this ability can make the creation a bit easier, a bit faster, and a bit
more convenient.
Page 31
Page 32

Floppy Support Translator™
Proprietary Floppy Support
Translator™ 6 reads and writes most proprietary sampler oppy disks and their formats.
However, it does so only under the following circumstances:
Windows only: the Mac does not facilitate the ability to access these disks due to
hardware restrictions.
It must be a internal oppy drive driven by a standard oppy drive controller. USB
oppy drives will not work!
You must use the OmniFlop replacement oppy driver. At this writing, you can download
this driver at www.shlock.co.uk/Utils/OmniFlop/OmniFlop.htm
Your oppy drive must be assigned to the a: drive, not the b: drive.
(Please note that we are uncomfortable providing support for OmniFlop installation issues. Since
this is not our software, we cannot prioritize resources to handle their problems. Generally we
are more apt to help if you call us and youa re in front of your computer.)
Proprietary oppies show up under a heading of Floppy A under Proprietary Drives in the
Container Pane. You can read off of them and write to them.
Proprietary oppy formats include Ensoniq EPS/ASR, Akai S1000/3000, Roland S-5x/7x, and
Emu E3/E4. Kurzweil and MPC use (basically) the standard MS-DOS format can can be read
normally. NOTE: Translator does not show the A: or B: drive in Local/External Drives, you have
to move the les to your hard drive to access them.
A note about using oppies: We provide this function because we want to be the most
complete software in the world when it comes to sampler disk and le formats. We DO NOT
provide this function to encourage using oppy disks! Floppy disk technology is over 30 years
old and really you shouldn’t be using it under normal circumstances. Most samplers have SCSI
interface options, if not standard, and you should be using that to get decent performance and
workow out fo your sampler.
Multi-Disk Floppies
Multi-disk oppy sets are dened as les on oppies that are split up into several parts on other
oppy disks. Multi-disk support is not complete as of this version and is incomplete, so ofcally
we do not support reading or writing multi-disk les or disks.
Why Mac’s and USB oppy drives can’t read proprietary oppies
Mac’s with internal oppies (old Mac’s!) can’t read those type of oppies as their proprietary
controller does not allow physical modication thorough software. USB oppies do not work
because the USB connection only allows read and write commands, since the controller is within
the USB drive/casing. It does not allow control of the physical mechanism through software.
All these oppy controllers are hard-set to read and write the standard 9-sector DOS oppy
format, and can’t be modied via software to read and write the 10-sector Ensoniq/Akai/
Roland/other ones.
Windows with a internal oppy controller (on the motherboard or a card slot) work because
those oppy controllers have a standard method of controlling the physical mechanism of oppy
drive itself. We use a replacement oppy driver called OmniFlop (for XP, Vista, Win7/8 and
above) to accomplish this task.
Page 32
Page 33

Miscellaneous FunctionalityTranslator™
Miscellaneous Functionality
Translator can do quite a few other things besides than translating les.
Drag Files out of the Interface and onto your Software Sampler To Load Them
This is best used with Kontakt. Simply drag any .nki le from the Object List (onscreen or
detached) and drop it on the Kontakt rack. It loads! In fact, with Kontakt this works with
various other formats, such as EXS24 and HALion. (Ironically, this triggers the Chicken Systems
Conversion Engine within Kontakt itself, as they license Translator technology from us.)
Deleting and Renaming Objects On Proprietary Drives
You can delete any object of a proprietary drive by simply hitting DEL or BACKSPACE, or by
right-clicking on the le(s) and selecting Delete. (Don’t worry, you are asked to conrm your
decision.) You can also rename by clicking again on a object (or via right-click as before). You
need to have Preferences-General-Disallow Renaming unchecked for this to work. (The purpose
behind the option is so you aren’t renaming by accident by simply navigating around the drive.)
Move Any Type of File ON and OFF Proprietary Drives
This is especially useful for Kurzweil and MPC proprietary drives. Since later versions of the
Kurzweil OS read off regular FAT just ne, it can be desirable to simply move the les from
the disk onto your hard drive and abandon the proprietary CD/drive altogether. Likewise, later
MPC’s, starting with the MPC-1000, read older MPC les but don’t have drive hookups to allow
the proprietary drive to be attached. Just move the les off the drive and write them to a
Compact Flash card for reading with the new MPC.
To extend this concept further, perhaps you want to make compilation CD of various proprietary
les of the same format. Just make a blank Virtual Drive formatted for your format, then simply
move les from CD’s, disk, or other Virtual Drives onto the blank Virtual Drive. No translating
will be done, Translator is simply reading and writing. Since Translator is the only major or
minor program to read AND write proprietary drives, this is possible.
It should be noted that Translator allows moving of ALL les, not just the ones it deals with.
This is the case with Kurzweil and MPC, Kurzweil Macros and MPC
.SET and sequences les are all movable. Ensoniq disks have many
other le types than just Instruments - it includes Macroles,
Songs, Sequences, Effects, and more. All are available to be moved
(you must set Format Preferences-Ensoniq-Show All to see these
les to move them, however.)
Lastly, remember that all dragging within Translator goes from the
Object List to the Container Pane.
Access To System File Function (Windows-only)
When you right-click on a object in the Container Pane, under
Local-External Drives, you get the appropriate System Menu
for that object (along with some additional Translator-specic
functions). This enables you to do a great many system-related
functions to the object, such as opening, deleting, compressing,
getting le information from GetInfo (Mac) or Properties (Windows),
and more (depending on what is installed on your system).
Formatting Drives to Proprietary Format
Since Translator writes objects to proprietary drives, it certainly
can format them. Use the Operations-Format menu (or right-click
on the drive if you can see it under Proprietary Drives) to format a
drive to proprietary format.
Page 33
Page 34

Miscellaneous Functionality Translator™
Ejecting Drives
Sometimes it’s just
easier to eject from a
program instead of just
hitting the eject button
on the drive. And, that’s
only Windows - for Mac
you have to have some
way to eject a disk. Let
Translator do it. Just use
the Operations-Eject menu, or use the right-click menu on a drive, to eject it automatically.
Converting INTO Bank les
This is discussed in the Translating section, but it’s good to repeat it. Not only can you convert
INTO any other format and create new les, you can also convert INTO an existing le and add
to it’s contents.
For example, let’s say you have a SoundFont with a bunch of Presets of your favorite sounds,
and you want to add that great Kontakt electric piano you use. Just drag the .nki from the
Object List and drop it on the SoundFont in the Container Pane. Translator will convert the
Kontakt le to SoundFont format and add the Preset and the associated samples into that
SoundFont.
EXS24 31-Character Renamer
Translator™ has a clever little
feature regarding EXS24
instruments. Only Logic9 supports
sample le names larger than 31
characters in EXS24. Although Apple
designed Logic9 EXS24 les to be
loadable into EXS24’s of earlier
Logic versions, there is a possibility
that if you use sample le names
larger than 31 characters that you
won’t be able to load the samples.
Below is a full explanation:
An EXS le has a sample chunk
for every referenced sample, it’s
not a Zone, but a reference to a sample. For Logic 9 it holds 1) a Short File Name (31 or lower
characters) that indicates the name of the sample le, 2) the path to its folder, and 3) a Long
File Name, which is the sample le name in it’s full length.
In OSX, all les have an internal short le name and a displayed long le name. They are the
same if the name is 31 chars or less. If more than 31 chars, the long le name is the full name
and the short le name is that weird naming thing you see. IMPORTANT: The short le name is
NOT part of the le, it is part of the directory naming system on the disk. If you move this le
or send it to someone, the short le name will change; the random part after the “#” changes.
In Logic 8 the sample chunk does not have the Long le name, the Short le name is the only
name the sampler has to go on. This is how Logic 8 can read a Logic 9 EXS24 les, it just
recognizes the short le name, nds it if it’s still valid and loads it. But as you’ve seen, if it’s not
the original le and the Short le name has changed without you knowing it, you’re toast.
(The only exception to this is that Logic8 EXS24 les have 64 bytes dedicated to the Short le
name area, so you can put in a Long le name in there (of course using other software than
Logic) and EXS24 will load it. It just won’t save it as a Long le name, and EXS24 saves those
les sometimes without you knowing it.)
Page 34
Page 35

AutoSamplerTranslator™
So, in summary... on EXS24 les that reference >31 le names there is this problem. You can
choose to make the library Logic9-only or you can (with as little pain as possible) take the les
down to the 31char limit. That solution is to take those >31 les and rename them down to the
31char limit so the short name and long name match. That way they can load into Logic 8 and
Logic 9 with no issues.
Translator™ has a 31 Character Renamer as part of the Reference Manager routines. Get your
EXS24 in the Object List, right click and choose Reference Manager->Fix References.
Translator™ will look through the le rst and see if there are any >31 names. If there are, it
brings up a dialog with all the names. You can manually change the long names (or use the
Search-Replace thing), and the dialog informs you continually of the >31 name status. The last
column tells you the length of the long name.
Here is a typical workow:
Click the Long Names ->Short Names button
Sort the last column so you see the highest number of characters
Start renaming the >31 long names, until the dialog says you’re okay
Click Done; the function changes the references in the EXS24 le AND rename the sample les
Please use this with care, as if there are other les that depend on these renamed samples they
will lose their links.
Also note the Replace-With functions, where you can change the text on many entries without
having to do it manually.
AutoSampler
Translator™ has a spiffy plugin called
AutoSampler. This automatically sends
MIDI notes to internal and external
sound sources and record them,
all automatically, and then output
into any of the formats Translator™
supports.
To autosample an external or an
internal device, follow the following
steps:
Set your MIDI Out and Audio In devices appropriately. (Audio/MIDI page)
If you are sampling an internal device, open it and set the MIDI IN and Audio Out to the
corresponding MIDI In MIDI Out and Audio In preferences set in AutoSampler. Of course,
make sure the MIDI Channels are the same. If sampling an external device, make sure the
proper audio cables are going into the port specied in AutoSampler.
Set your Output Format, and destination folders to your preferences. (Folders/Format page)
Set your preferences concerning what notes you want sampled, and how many velocities you
want sampled. (Placement page)
Click Record, the tabs on AutoSampler shift to the Operating tab where the progress bars
exist, and sit back and watch.
Page 35
Page 36

AutoSampler Translator™
External MIDI and Audio devices are standard on Mac and Windows; the ports are embedded in
the operating system, and if you are using external gear, you’ve already installed those drivers.
But virtual MIDI and Audio cables aren’t standard in either the Mac or Windows, so you need
to get some additional software if you record software instruments such as Kontakt, EXS24,
MachFive, etc.
These are called Virtual Cables. Sometimes they are referred to a Ports, but we feel calling
them Cables is more precise, since we are talking about connecting two devices at two ends. A
Cable illustrates both “ends”.
You need to establish a Virtual MIDI Cable, so you can send MIDI from Autosampler to the
internal software application, plus set up a Virtual Audio Cable, so you can capture the internal
device’s audio.
NOTE: The following contains external links that may become bad over time. We will attempt to
keep these up to date. If any of them fail, please ask us for the latest information.)
Recording Internal Devices
Mac Virtual MIDI: Fortunately, OSX offers this natively, but you have to manually set it
up. Open the Audio/MIDI Utility applet in your Mac’s Utilities folder. Create a new virtual
MIDI port; by default this is called “IDC Output A”. After establishing this, it will then show
up in the AutoSampler’s MIDI Out list. You will also need to choose this in your internal
device’s MIDI In list.
Mac Virtual Audio: We recommend using Cycling74’s free SoundFlower system (download
it at Cycling74’s web site). SoundFlower is a inter-application audio device. After you install
it, a Audio In SoundFlower device will appear in Autosampler’s Audio In list. Again, you will
need to make sure that your internal device is outputting on SoundFlower’s output port.
Windows Virtual MIDI: Windows doesn’t provide this, but a free driver and app called
loopMIDI by Tobias Erichsen supplies this. Download it and install it. Open the app, that’s
all you have to do. After establishing this, it will then show up in the Autosampler’s MIDI
Out list. You will also need to choose this in your internal device’s MIDI In list.
Windows Virtual Audio: The one we use is VB-Audio Cable, which is free from VB-Audio
Software (download it at VB-Audio Software’s web site. After you install it, a “Virtual Audio
Cable” device will appear in Autosampler’s Audio In list. Again, you will need to make sure
that your internal device is outputting on Virtual Audio Cable’s output port.
Templates
Once you have used Autosampler a couple times, you’ll have some set note payouts and setups
you’ll want to save. You can do that in the Load/Save As... buttons to the right. Save As.. saves
your current work, Load saves templates you’ve saved earlier. They are contained as .ast les in
your Application Support folder:
Mac
/Library/Application Support/Chicken Systems/[appname]/AutoSampler Templates
XP: %SYSTEMDRIVE%\Documents and Settings\[username]\Application Data\Chicken Systems\[appname]\
AutoSampler Templates
Win8/7/Vista
%SYSTEMDRIVE%\Users\[username]\AppData\Roaming\Chicken Systems\[appname]\AutoSampler Templates (note
AppData may be hidden)
Windows XP
%SYSTEMDRIVE%\Documents and Settings\[username]\Application Data\Chicken Systems\[appname]\AutoSampler
Templates
Page 36
Page 37

AutoSampler - Audio/MIDITranslator™
Audio/MIDI
Choose your MIDI Out port and your Audio In ports here. Set your output MIDI Channel here
too. You can test the MIDI out with the MIDI Test
button. You can also test incoming audio by pressing
Audio Test, and looking at the meters above. You
may not be able to hear the audio coming in, but this
should be no worry.
Folders/Format
Here you will determine what output format you
want, plus the Destination Program Folder and
Destination Sample Folder. (Note: some formats
either store samples inside the Program le, or they
have to store the samples in the same folder as the
Program, or they go in a pre-ordained area. In those
cases the Destination Sample Folder will have no
effect.)
Destination Bank File: If you choose a Bank-type
output format, such as a SoundFont, Kontakt Multi
or Bank. Motif, or Korg Kronos, you can choose a
existing bank le/folder structure that you want the results to be written into.
Placement
This is where you will select what MIDI notes will be recorded and how many and at what
velocities. Simply choose the notes on the
buttons; the MIDI keyboard graphic will
show you what you have chosen. There is
also a KeyRange slider below the keyboard
graphic; this limits the keyrange extends
of the ultimate Program that is created.
Normally, AutoSampler lls in all spaces
between notes you choose not to record
(except when KeySpread is “Single Key”),
so this detemines the limits of the extreme
low and hight ranges. (Note: All velocity
spaces are always lled in.)
Number of Programs: This is the amount of programs you will record. If >1, a Program Change
is outputted, changing the Program that you are recording. Also, Start Number is enabled,
allowing you to set the beginning Program Change number that will be sent.
Start Number: See above.
Number of Velocities: This the amount of velocities that you will record. See Velocity Curve
below for the ranges this parameter enabled if >1.
Root Key Anchor: AutoSampler automatically sets keyranges to ll in all the notes that you
aren’t recording. This parameter determines hwo these are placed in respect to the note (Root
Key) that you recorded. Middle means half the keyrange goes down and half goes up. LoKey
means the record note is the lowest note of the range, whereas HiKey means the recorded note
is the highest note of the range. Hint: although Middle is a good compromise, usually HiKey is a
good selection because most audio sounds better transposed downward than upward; plus the
slower playback gives it more time before a possible loop.
Page 37
Page 38

AutoSampler Translator™
Key Spread: Most of the time you’ll select Full, which means all areas between LoKey-HiKey
are lled in. When set to Single Key, the keyranges are always 1 note in length and there is no
lling in of notes not recorded.
Velocity Curve: This determines the velocity ranges if you are recording >1 velocities. Linear
means that every range is equal in height. The Convex values mean that lower velocities are
larger and higher velocites are smaller (meaning you have to hit ahrder to get the high velocity
sounds), adn the Concave values are the opposite; higher velocity sounds are more likely to be
sounded. Note: to be specic, the velocities that are actually record are always the HIGHEST
velocity determined by the curve. This is because everyone wants to hear the velocity=127
sound, but no one wants to hear the Velocity=1 sound, mostly.
Recording
These are the parameters exclusively dealing with recording.
Input Level:
Recording Time: This is the amount of
time recorded. Please remember that any
silence BEFORE or AFTER the sound is
automatically trimmed, so the nal result
maybe not be this amount of time.
Start Threshold: This is the level of audio
required for the recording to actually
commence saving of the recorded audio.
Processing
Once the audio is recorded, there are a couple things that you might want to do with it. You
will likely want to loop it and probably
normalize it.
Add Loop: This turns on the loop in the
destination format. The slider sets the
approximate loop start area you want
to set. Note: This is approximate; if you
choose to loop, the engine will make some
decisions about the best place to loop
BASED ON this parameter.
CrossFade Loop: (Only available when
AddLoop is checked.) This hardcodes a crossfade loop into the recorded sample. The slider
determines the length of the crossfade; we recommend values around 4000 samples.
Crossfade As Parameter If Available: Some samplers have a XFade parameter that crossfades
a loop on the y without having to hardcode the crossfade in the data. Checking this puts the
crossfade lenth in this parameter and forgoes the hardcoding.
Proportional Normalize: This boosts all samples up to 0db level at highest, with one twist: it
takes the highest level in ALL the recorded samples, and normalizes all the samples regarding
that level. This way, the balance of levels is preserved.
Chop and Add Parameter Attack: Sometimes the data that is under a relatively slow attack is
the same as the sustained portion. Checking this tells AutoSampler to truncate all data up to
the highest level (before the loop start if there is one), calculate the time it took to get there,
and writes the AmpEnv Attack parameter accordingly.
Page 38
Page 39

AutoSampler - ParametersTranslator™
Create Release Triggers: If checked, AutoSampler will make separate samples of when it
releases the key, adn the output format will program and use these samples accordingly, plus
set the release parameter to around 150-300ms. Note: if the output format does not support
release triggers, AutoSampler will not create these samples, effectively ignoring this parameter.
Type: This is the type of sample le AutoSampler will write. If your output format uses WAVE,
AIFF, or CAF les, and this parameter is chosen, this is what it will use. (AutoSampler does
not recognize the usual Sample Type parameter in Format Preferences.) If you chose a Type
that the destination doesn’t support but supports one of the other ones, it will chose the one
it supports. If your output format uses it’s own sample type or stores it internally, this option
makes no difference.
Bits: This is the bitrate of the resulting sample. AutoSampler records in 32-bit oating point,
which has more resolution than 24/16/8-bit, so any selection in those ranges will be dithered
down. Most samplers only support 16-bit, and most software samplers support 24-bit, but
almost none support 32-bit oating point. Hint: for “lo-” audio, a trick is to choose 8-bit here,
than the recorded 32-bit will be dithered to 8-bit, then usually upgraded to 16-bit. This can give
a lo- sound to the recording.
Record Channels: This determines the output format of the samples, either Stereo or Mono.
Parameters
AutoSampler gives you a selection of default parameters that will be written into your output
format. Thi sis handy for including modulators like pitch bend or LFO->ModWheel->LFO, or just
the simple task of turning on the lter so
you don’t have to..
Page 39
Page 40

Reference Manager Translator™
Reference Manager
It’s become a common feature with software samplers to store a Multisampled Instrument as
a small le, dening the mapping and real-time parameters of the Instrument, and storing the
samples as industry-standard WAVE or AIFF les. Commonly the small le (such as .exs, .nki,
.sfz, and other le types) contains a absolute or
relative Path to the sample, so when the sampler
engine parses the le, it locates the external
sample le and loads it.
The great advantage to this is so a Instrument
can be edited easily and saved quickly without
any maintenance of the samples. (One of the
big hassles of GigaStudio, before version 3, was
that the samples had to exist in the same le as
the mapping parameters. So, when you made a
slight change to the structure of an Instrument,
the ENTIRE FILE had to be rewritten. Sometimes
those les were HUGE!)
The great disadvantage is that it’s easy to lose
track of where the samples are. If you use absolute paths, and you move the samples - the
sample les have to be re-linked. If you use relative paths, and you move either the samples or
instruments in relation to each other, again you have to re-link. Add to that the hassle of having
duplicate samples - what samples to you re-link to?
Typically software samplers offer just the very basic abilities to re-link their samples if need be.
This is where the Reference Manager comes into use.
You can invoke the Reference Manager with the top-level menu under Operations, or on a
specic folder or le using a right-click in the Container Pane or the Object List.
Reference Manager has several different types of re-linking techniques:
Fix References
Fixes any bad references. Scans an Bank/Instrument and veries the links. On rst detection of
a bad link, this function asks you to either nd the sample or to form a catalog of sub-folders
from a folder of your choosing. It then uses that path or catalog to repair any further bad
links. If it hits another bad link it can’t resolve, it asks you again, and you can add to the list of
folders to check.
Replace References
Changes references based on your criteria. Brings up immediately a Search-Replace-type
of dialog. You can textually change the reference le names (Name and/or Path, etc.). You
also have the ability to Fix References during or after this process. For more infromation and
instructions regarding the Replace References dialog, please see the Replace Reference area
in the next section.
Attract References
Fixes bad references by moving the les where the links dictate instead of changing the
references; that is, the opposite of Fix References. If any links point to a non-existent volume
name or drive letter, those links will be passed over.
Page 40
Page 41

Reference ManagerTranslator™
Collect References
Takes references (good or bad) and moves/copies them to a new user-dened location. If any
references are bad, it can x them during the process (see Fix References above). You can elect
to move the control le as well. Collect References is helpful for “weeding” out unused samples
or simply setting aside a control le/sample les for individual checking or use.
Verify References
Creates a text le of good and bad links. Scans an Bank/Instrument, and lists the links and
whether they are good or bad.
All Reference Manager options are in the Preferences dialog under the Reference Manager
tab.
Page 41
Page 42

Replace References Translator™
Reference Manager - Replace References
The Replace References function and the accompanying dialog is for textually and
mechanically edit the sample and object references in your Instrument le.
The general task is to compile a list of “nd
this, replace with that” entries. Type a set
and click the Add To List button. All entries
are considered sequentially. You can remove
entries or clear the list. The Import button
allows you to import a .txt le with entries,
comma or tab delimited.
The Opcodes popup menu simply puts the
support opcode in the “Upon nding...” box.
They are dened below.
<rootkey>
<replace>
<instname>
<add>
<delete>
<insert0>
When you are ready, click Rename. To cancel, click Cancel. If you don’t want to Rename, but
want to go on anyway, click Don’t Rename. Clicking the Advanced>> button reveals more
paramters to tweak exactly how you want Replace References to work.
Renaming
You can choose which part of the path you want to take under consideration. Options are: File
Name Only, Entire Path + File Name, Path Only, Parent Folder Only, Parent Folder +
File Name. You can also choose whether the search will be case sensitive or not.
Update References
Method
Sometimes you want to affect the external sample le names, sometimes you don’t. Method
allows different ways of dealing with the external le themselves.
Find Sample, then rename it Renames the originally referenced sample
Find already-renamed sample Finds the already-named sample and xes the
path to point to it
Do Not Find Sample Just textually rewrites the reference
File Operation
This is closely tied with Method. You can Rename the le, or Copy it, or Do Nothing to nullify
the operation.
Example
We worked on several ProjectSAM libraries. Often they would use the same programs for
different mic samples and simply change the samples. Their sample names would be the same
except for the single lowercase letter before the .wav extension. We used Replace References
to perform this. We added an entry “Upon nding c.wav, replace with f.wav”, and under method
we would choose Do Not Find Sample. That would rename the references. Then we would do a
Fix References to point them to the different location. Very handy!
Page 42
Page 43

Translator™ Preferences
Preferences
Translator has a massive amount of optional parameters you can invoke on everything from
the dialog view to the specics of the translations that you perform. It’s easy to get intimidated
by the sheer amount of preferences, but don’t be. They are logically laid out and hopefully
intuitive. MOST IMPORTANTLY remember that all of them are optional, they are not
necessary for successful basic operation.
There are two Preference dialogs. One applies to general preferences that apply to all formats,
that is called the Preferences dialog. Preferences for specic formats are in the Format
Preferences dialog.
Format Preferences also show up in the Master Translation Dialog, depending on which
destination format you select.
For both dialogs, clicking the top pulldown menu determines what shows in the pane.
The following pages go through the different Preference and Format Preference panes and
describe what each option does.
General
Interface
Object Look Ahead
Look ahead means that to determine if
a node should have a triangle/plus sign
on it, Translator looks inside the folder
represented by the node to see if there’s
anything in it. This slows down the
interface but it is helpful.
Default: Unchecked
Enable Disk and File Notications
Checking this turns on Translator’s notication engine and updates the interface when there’s a
le or drive change.
Default: Checked
Previous Location Return - Startup / Prompt
When checked, when you start up Translator, it returns to the last place you were when you
ended the last session.
Default: Checked
Dbl-click in Object List translates
Sometimes in the Object List you want to double-click to convert what you double-clicked on.
Sometimes you just want to open that folder to see what’s inside. This is the same as the
Expand Folders checkbox in the Object List itself.
Default: Checked
Filter Box - Case Sensitive
When searching for les using the Filter box on top of the Object List, this option forces the
searches to be case-sensitive.
Default: Checked
Page 43
Page 44

Translator™Preferences - General
Show Parent Total Sample Sizes
If checked, when showing Instrument/Bank les in the Object List, the size will represent the
total memory size of the samples connected with that Instrument/Bank.
Default: Unchecked
Delete Invalid Virtual Drive / Favorites
When checked, when Translator looks at the Virtual Drives or Favorites and cannot nd them
(bad shortcut or alias), it will delete the shortcut/alias.
Default: Unchecked
Disallow Renaming
When you click twice on a proprietary object that can be renamed, Translator will allow that
name to be renamed. If you nd this to be bulky or unwanted, check this option and nothing
will be allowed to be renamed.
Default: Unchecked
Check for Updates on startup
When checked, Translator will check for updates on the Chicken Systems server. If there is one,
a screen will appear telling you there is an update and allow you to directly download it, or it
can take you to the web page and download it using your browser. If you are not connected to
the Internet, this function fails silently.
Default: Checked
Recurse Sub-Folders on bulk
When making a bulk conversion (usually the Bulk Export dialog), when this option is checked, it
will search in the sub-folders in the folder you are bulk-operating on. Otherwise, it’ll just be the
contents of the folder.
Default: Checked
Temp Folder
Translator by default uses the operating systems temporary folder, but if you’d like to change
this, do it here.
Default: blank
Virtual Drive Extension
This is the default le extension given to any new Virtual Drive that is being created.
(Remember that le extensions do not change the contents of the Virtual Drive itself, but the
extension may make it easier for you to work with.)
Default: .dmg on Mac, .nrg on Windows
Interface File Checks for Unknown Files
Files, especially on the Mac, may not have le extensions to denote what type of le they
are. (A le extension is like “.wav”, or “.exs”; a 3 character (or less, or more) string after a
period.) Windows historically always used le extensions. Mac’s did not need it, the HFS disk
format allows for “le-typing”, which stores internally a 4 character code that “types” the le.
Nowadays, mainly for compatibility and cross-platform portability, Mac’s now advise and use
le extensions, although le typing is still supported and used, but much less so.
These options are the ways Translator looks for these types of les in a variety of situations,
such as Fix References, but mainly in populating the interface.
Do Not Check
Translator must see the le extension in the name; otherwise the le is ignored.
Test non-Ext Files
Translator will test any le that does not have an extension.
Page 44
Page 45

Translator™ Preferences - Destination Locations
Test all non-Reg Files
Translator will test any le that does not have an extension.
Test All Files
Translator will test any le that does not have an extension.
Interface List Order
You can rearrange the order which the major Container Pane object show up. use the Up/Down
buttons, or drag the items within the list. CLick Default to get back to the default arrangement.
The new order will occur next time you refresh the screen.
Default: Desktop, Documents, Local/External Drives, Favorites, Proprietary Drives, Virtual
Drives, Lookups
Destination Locations
Format: Program Destination Folder, Sample Destination Folder
This is the default that is referred to in the Master Translation Dialog for Preset Locations. Each
format you select here has it’s own set of
default locations for their Programs and
Samples, if they apply.
Create Folder for individual objects
Default: Unchecked
Write Parallel Trees
Default: Unchecked
Write Single Instruments to Banks on
a Folder basis
When converting in bulk, and the
destination is a Bank-type of object,
Translator will automatically convert all
indicated Instruments within a Folder into that one single Bank, instead of converting each
Instrument into a single Bank.
Default: Unchecked
Show Combiner on Bulk Conversions
Default: Unchecked
Reference Destination Samples to Source Samples (if applicable)
Default: Unchecked
Display Custom Locations Dialog on DOS->DOS translations
Default: Unchecked
Prex - Sufx Naming
Translator can write a pre-ordained prex string or sufx string to any Program or Sample that
it makes.
Write Prex, Write Sufx
When checked, it writes the prex or sufx listed in the adjoining box.
Page 45
Page 46

Translator™Preferences - Single Sample Map
Separator
Applies a separator string after a prex or before a sufx.
Apply to Programs, Samples
Applies the separator to programs and/or samples.
Single Sample Mapping
This panel is for when you are building an Instrument from scratch. (See Bulk Export for more
information.)
Mapping Type
One->One: this effectively turns off the
feature. It takes each sample le and
translates it to single instrument.
All->One: the most common setting.
This takes however many les and
maps them across the keyboard in
the destination format you selected.
If there are excessive amount of
samples, it wraps around and layers
them.
Folder->One: same as All->One, except
that it writes one Instrument per
Folder of single samples.
Prompt: Translator will prompt you each
time it attempts a translation/map.
Annoying, but needed in some cases.
Prompt for Directory: If checked,
Translator will ask you what directory
to put all the combined translated
les into. This provides you with a way to write the results to a different directory. This
is needed especially if you are converting off CD-ROM, as if you don’t have this option
checked, Translator will try to write the result in the directory it rst starts trying to write
the le to. (By the way, if you make a mistake in this regard, Translator will forgive you
and ask what directory you want to put the resulting le into.)
If Conict...
When Translator tries to map a sample into an area it has already ampped a sample, these
options determine what it does.
New File
Layer
Low Note (default)
High Note
Split Incoming Samples
This is a handy feature where Translator will analyze samples coming in and split them up given
a certain amount of silence, THEN maps them. So if you have a single WAVE le, with say 24
separate single sounds on them separated by silence, Translator will split them to 24 individual
samples and then map them across the keyboard.
Default: Unchecked
Quiet Time: This is the amount of time in milliseconds that Translator will look for. Default:
100ms
Page 46
Page 47

Translator™ Preferences - Single Sample Map
Threshold: This is the minimum level, in linear percent, under which Translator considers
silence. Default: 0%
Fixed Time: Default: 0
Beats: Default: 0
Split Recycle Files: Default: Unchecked
Range
LoKey/HiKey: Where Translator starts and ends mapping. Default: C2-C7
Keys Per Sample: how many keys Translator will give each sample. Default: 1
Spread Bias: Default: Centered
Root Key Place
So, once mapped, how are you going to set the Root Key? Checking this enables either checking
the embedded value in the sample, if there is one, or looks for a root key (like C#3) in the
name. Unchecking this entire option means the root key will be set to the LoKey of the sample.
Default: Checked
Embedded Value (default)
Name
Method
This is the method in which the sample is mapped.
White Keys: LoKey will always be a White Key.
Black Keys: LoKey will always be a Black Key.
Chromatic: LoKey can go on any key within the LoKey/HiKey parameters above.
File Name: Looks for LoKey-HiKey in FileName; ignores the LoKey/HiKey parameters above.
Use INST Chunk Info: If there is a INST (Mac)/inst (Windows) chunk in the WAVE/AIFF le,
uses that information for Key and Vel; ignores the LoKey/HiKey parameters above.
Combine Left and Right Samples, Prompt
If there is a -L and a -R sample to be considered, combines them. Only operational if the
destination format handles single object Stereo samples. The Prompt option allows you to do
this on a case by case basis.
Default: Checked
Combined Name
This is the name that your combined les will take on, plus a digit tacked on afterwards if
necessary.
Default: Combined
Write Trees
Default: Checked
Set as “Disable Pitch”
Sets KeyTracking to 0% for that sample, on the destination format.
Default: Unchecked
Consider ACID-AppleLoops as normal samples
If NOT checked, Translator will split up WAVE les that are ACID les (if they have the ACID
chunk) or AIFF les that are AppleLoops. Checking this option turns off Translator’s checking for
these les.
Default: Unchecked
Convert
In the case you want to convert the source les into a single type of format; for example if you
have WAVE, AIFF, and other types of les, and you only want WAVE les.
Default: checked
Page 47
Page 48

Translator™Preferences - Stereo Management
WAVE
AIFF
Delete Original
Stereo Management
Combine Dual Mono to Stereo - Combine Unconditionally
A source format may use two mono les to represent one stereo le. Checking this option
allows Translator to check a possible stereo
pair and possibly combine them into one
stereo le, if the destination supports it.
In checking a possible stereo pair,
Translator generally checks to see if these
les are the same length and have the
same playback mode in order to determine
if they should be combined. If Combine
Unconditionally is checked, Translator will
combine them no matter what.
Combine Dual Mono Stereo Default: Checked
Combine Unconditionally Default: Unchecked
In case of conict...
Do not combine to stereo
Combine non-conicting samples; keep conicting samples split
Combine all qualifying samples; write additional mono les to handle conicts (Default)
If panning matches conict, do not modify
Translator also checks in the program it is converting if the dual-mono samples are split hardleft and hard-right (that affects how “stereo” it is). If this option is checked, than the dualmono samples are not combined if panning is not hard-left/right.
Default: Unchecked
Bias
This page has two sets of functions; one is
Bias, where you can change the values of
incoming parameters to suits your needs.
You can get into the Conversion Engine and
add, delete, or alter parameters between
the time they are read from the source and
when they get into the destination.
The other is Filter References, where you
can lter out certain incoming sample
references, such as Release Trigger
samples, certain key ranges or velocity
settings, text in the sample names, and
more.
Page 48
Page 49

Translator™ Preferences - Data Processing
Bias
Perhaps you have a special penchant for having sounds brighter than they actually are. Maybe
you always want things 50 cents sharp. Maybe you are just crazy. Or maybe you are just
hungry.
Starving or not, Bias allows you to set a certain parameter to be adjusted a set amount or a
percentage than what the incoming format species.
For example, if you want tuning to be 442Hz instead of 440Hz, you would select Fine Tune and
set that to be 1 cent. All the resulting les would be set to 1 cent sharper than normal.
Another example could be that you want every thing 10% brighter. Select Filter Cutoff, select
Percentage, and enter in 10%.
Filter Parameters
This section allows you to determine any criteria for incoming references to be ltered out.
Data Processing
These parameters apply to ANY conversion
you do. Use with caution! Remember,
samples are often shared and might
affect another program as well. Plus it
may get the sample out of sync with the
original format, the operation occurs on
the sample itself, not a copy, unless the
sample for the new format is created,
not used or shared. Sometimes these
functions are really handy; often they
aren’t because most samples are preedited anyway.
Clip leading/trailing samples
Truncates the sample from the front or the
back. Respects loops - will not truncate to
a point inside a loop.
Default: Unchecked, 0%
Fade in/out
Fades the sample in or out, given the amount of samples specied. Respects loops - will not
truncate to a point inside a loop.
Default: Unchecked, 32 samples
Samples after loop end; if insuring samples after loop
Default: 0
Add fade-in envelope on -> computer-based samplers
Hardware samplers sound great, but often their D/A converters are slow on the uptake; they
don’t click on attack. Computer samplers are quicker, and can tick or clip on attack.
Defaults: Unchecked, Amt of Samples: 16
Maximum Destination Size
Forces the total allocated size of the destination format not to be above a certain size.
Extremely handy when converting into a limited size format such as Ensoniq or Akai or Triton
even. For example, when you have a 150mb Kontakt instrument, and you want to import it
Page 49
Page 50

Translator™Preferences - View Filter
into the Ensoniq ASR-10, it has to be below 16mb. This is an extreme example, but Translator
will do it’s best to make it happen. Different strategies are eliminating multiple keyranges and
merging ones, removing velocities, and cutting samples so they are not too long. Attrition helps
as well - if the Kontakt le had (say) 20% of the 150mb as release triggers, Translator will elect
to eliminate those, even though the EPS/ASR supports them. It is also recommended to set the
Maximum Size to slightly less than what you need, to allow for other factors.
Default: Unchecked, 30mb
XFade Loop Enable / Samples / Parameter
This adds a Crossfade in the converted loop of the sample amount you select. Write as
parameter avoids hardcoding the edit and simply writes the 220 sample xfade as a parameter
in the destination format, if it supports it (few do).
Default: Unchecked, 220 samples, Write as parameter=checked
The following are related to Slice Files. For more information on Slice Files, see the Slice Files
portion of this document.
Beat Detection Type 1
Energy-based: generic function to compute onset detection. This function calculates the
local energy of the input spectral frame.
Spectral Difference: Phase Based Method onset detection function.
Complex Domain Method: complex domain onset detection for musical signals.
High Frequency Content: this method computes the High Frequency Content (HFC) of the
input spectral frame. The resulting function is efcient at detecting percussive onsets.
Kullback-Liebler onset detection function.
Modied Kullback-Liebler onset detection function.
Default: Energy-based
Beat Detection Type 2
The same types, only for the second pass.
Default: 0
Beat Detection Threshold
Default: 0
Beat Detection Silence
Default: 0
Beat Detection Tempo / Beats / bpm
This is for xed amounts.
Default: Off
Pitch Detection Type
Selections are: YIN algorithm, Multi-comb ltering, Schmitt triggering, Fast comb lter, and
Spectral YIN.
Default: YIN algorithm
Beat Detection Threshold
Default: 0
View Filter
These are the formats that will be
displayed in the Translator™ Container
Pane and Object List. This comes BEFORE
any ltering done on the interface itself.
You can Select All or Clear all selections
using the buttons on the right.
Page 50
Page 51

Translator™ Preferences - Waveplayer
Waveplayer
Save Prompt After Playback
After the wave has stopped playing, a Save
As... dialog will appear, askign you to save
the waveform as some format and ask you
where you want to save it.
Default: Unchecked
Magnify Wave to Maximum Level
This displays the wave at maximum level,
so low-level waves appear with visual
accuracy.
Default: Checked
Show Sample Info on Selection
When you select a sample to show in the WavePlayer, an additional oating dialog with appear,
showing you the basic parameters of the sample.
Default: Unchecked
Launching Sample Editor
The sample editor you have selected in Options-General can be manually or automatically
launched when you select a sample.
Do Not Launch (Default)
Launch Upon Selection
Prompt to Resave Edited Samples (Default: checked)
Sample Rate Averaging for Playback
When a sample is near SampleRate of 44100Hz or 48000Hz, Translator will round it to that
common rate. This amount is the margin of error taken, in Hertz.
Default: 16
Colors
Select your own custom colors in the WavePlayer by double-clicking on the color in question.
Gradient Amt / Style / Invert
The Background color is subject to a gradient so it looks cool. This slider sets the amount of the
gradient, Style sets the direction, and the Invert check box allows you to invert it.
Comment Tags
These parameters are an ISO standard for a INFO chunk in RIFF les. This tab allows setting
these to write into created WAVE or .gig les. Note you can ll them out, yet have the writing
disabled with the check box below.
‘IART’ Artist
‘IENG’ Engineer
‘ICMS’ Commissioned By
‘ISRC’ Source
‘ISRF’ SourceForm
‘IPRD’ Product
‘IGNR’ Genre
‘ISBJ’ Subject
Page 51
Page 52

Translator™Preferences - Fix References
‘IKEY’ Keywords
‘ICOP’ Copyright
‘IMED’ Medium
‘ICMT’ Comment
‘ISFT’ Software
Include Comment Tags on .wav/.gig
les
Default: unchecked
Fix References
The Reference Manager is a powerful
feature of Translator. It allows full xing of
sample references for unlinked samples.
Catalog Option on Failed Sample Search
When checked, Translator will give you the full range of options concerning xing your
reference. If this is not checked, you just get a “where is the sample” Open dialog.
Default: Unchecked
Force Cataloging / Display Replace
Dialog
When checked, it assumes the rst sample
reference cannot be found (even though it
may be there). This enables you to redirect
to another location that the control le
may not even be pointing to. If Display
Replace Dialog is checked, then the Replace
References dialog is shown and even allows
you to look for a different set of samples
with different names!
Default: Unchecked (both)
Automatically change references of
source les if changed
Translator usually just changes the references on the y and doesn’t rewrite the source le.
When this option is checked, it does.
Default: Unchecked
Use Parent Folder Name to determine between duplicates
If you go looking for samples using Catalog, sometimes Translator may nd more than one
instance of the sample le. In cases like that, checking this option makes it prefer sample les
that have the same parent folder name as the reference.
Default: Checked
Use rst sample found unconditionally
Translator goes with the rst sample it nds and stops there.
Default: Checked
Custom Drive Letter
Default: Unchecked
Page 52
Page 53

Translator™ Preferences - Effects
Update Control Files if data in Sample File is different
Oftentimes, a control le doesn’t just hold the sample reference, it will also hold the loop points
and on/off data, root key, ne tune, etc. Checking this option and selecting what parameter you
want updated will update the control le so it is in sync with the newly referenced sample. Do
not prompt means that Translator will not prompt you when this happens.
Default: Unchecked
Do not require external Sample Files to be present for translation (if data not needed)
Sometimes you don’t care if the samples are there or not. Not all formats need information
from the sample; usually the control le has all the info they need. Checking this option makes
Translator simply pass the reference and not check for validity. The additional options are
mainly fpr EXS24, which needs to know certain things for the EXS24 le to be written correctly.
Default: Unchecked
Assume Mono Samples (for ->EXS)
Assume Stereo Samples (for ->EXS) (Default)
Assume bits (for -> EXS) (Default: 16)
Update external Sample Files if Master Chunk info is different; Default: unchecked
Effects
Translator™ gives you adding default
effects parameters to les Translator™
creates. This is of course dependent on
whether the destination has onboard
effects or not.
Note: this should not be confused with
Data Processing, where you can specify certain DSP to be performed on translated les while
they are being created, or with Bias, where you can tweak a certain parameter on the y. This
Option is simply for setting and enabling effects for each destination format that has effects.
Currently the samplers that have onboard effects are:
Kontakt, HALion 3, SampleTank, Ensoniq EPS, ASR-10, ASR-X, Kurzweil, Roland
Fantom Series, Roland XV-5080, Korg Triton/M3/Kronos, Yamaha A Series,
Yamaha Motif, Alesis Fusion
There are some other hardware samplers that can have effects as an option, such as the
S-3000 Series and S-5000 Series, but these are not supported as yet.
Special
Voice Allocation Parameter Default
Many samplers have a “number of Voices” parameter, and often the incoming format doesn’t
specify this. This is the default setting in case the incoming format doesn’t provide it.
Default: 32
Stereo to Mono
Whenever Translator converts a stereo le to a single mono le (destructive), this is the ratio it
uses to take data from the left and right channels.
Default: 100% Left, 0% Right
Page 53
Page 54

Translator™Preferences - Special
Velocity Grid (Global)
This is a global setting for all formats that
use Velocity Grid.
Default: Unchecked, 8
No alert on Disk Read Fails
It’s not unusual when you are making a
Virtual Drive out of a CD or hard drive that
there will be disk errors, whether the fault
of disk or reader. Usually Translator alerts
you when there’s an error when the error
happens. This option turns that notication
off, until the end of reading the disk.
Default: Checked
Try individual Sectors on failed reads
Translator reads disks and CD in about 128-sector chunks. If it receives an error, checking this
option tells Translator to try each sector to try to retrieve as much data as it can. A sector is
2048 bytes (CD) or more normally 512 bytes.
Default: Checked
Prompt for Drive Label when formatting
Ensoniq and Roland disks or Virtual Drives have a “label” on them, like Mac or Windows drives
or volumes do. (Akai, Kurzweil, and Emu do not.) Whenever you are creating a new Ensoniq or
Roland disk or volume, this option puts up a prompt on what label you want, instead of taking
the option out of the respective Format Option for that format.
Default: Unchecked
Use Virtual Drive Name As Label
Default: Checked
Write Log Files / Expiration in Days
Translator writes a log for every session, for debugging and analysis purposes. This disables or
enables this function, plus gives a expiration time so your Logs folder does not get too lled up.
Default: Checked, 7
Write DOS-Compatible File Names
On the Mac, you don’t have many limitations on how you can name things. But Windows does,
so if you are interested in portability - using your stuff on non-Mac computers or drives, check
this option. It insures that new les stay within the standard FAT/NTFS le system naming - no
leading spaces, certain characters not allowed, etc.
Default: Unchecked
Write Volume, Pan, and Tune in Master, Group, and Zone levels if possible
It is common for an incoming format to have tuning adjustments on all three common levels
- Master, Group, and Zone. If your destination format allows separating of these adjustments,
checking this will write them to the apporpriate location instead of summing them and applying
them on the sample level.
Default: Checked
On Comparison, Ignore...
The best formats have as little sharing forced on you as possible; if you want every sample to
have it’s own complete set of parameters, you can do so. But many formats force/encourage
some type of parameter sharing, so when certain samples may conict in which setting to
share, this set of options tells Translator what to consider or ignore to resolve the conict. Think
of these as sort of ner control of Parameter Tolerance, only it is a on/off sort of thing.
All Defaults: Unchecked
Page 54
Page 55

Translator™ Preferences - SimpleTranslation™
Fine Tune (less then 100 cents)
Pan
LFO
Volume
Modulators
Filter
Amp Envelope
Filter Envelope
Copy Existing Samples
This follows up on the Copy Samples option on the Master Translation Dialog.
Default: No enclosing folder
No enclosing folder
Writes the samples to the Samples Folder specied in the Master Translation Dialog.
Named Parent: Referenced
Writes the samples in a folder named after the Parent Folder where the control le said it was
(may not have been), in the Destination Samples Folder specied in the Master Translation
Dialog.
Named Parent: Actual
Writes the samples in a folder named after the Parent Folder where it actually was, in the
Destination Samples Folder specied in the Master Translation Dialog.
[Program Name] Samples
Writes the samples in a folder with the name “[the Program Name] Samples” in the
Destination Samples Folder specied in the Master Translation Dialog. This is similar to how
Kontakt writes it’s les by default if the samples don’t exist as non-temporary (like if you
convert a Giga Instrument in Kontakt itself and you want to save it).
SimpleTranslation™
These options are for the SimpleTranslation™ feature, where you aren’t opening Translator per
se, but just dropping a le on the icon.
Use automatic settings
If checked, Translator won’t even prompt
you; it’ll just make the conversion based
on these settings.
Default: Checked
Program Folder / Sample Folder
This is the Program Folder and Sample
Folders where the new les will go.
Use Global Preset Locations (in
Preferences -Destination Locations)
The Program/Sample Folders will be lifted on a format-by-format basis from the PreferencesDestination Locations settings.
Default: Unchecked
Samples Location sample as Program
Sets the samples folder to same location as the program folder.
Default: Unchecked
Page 55
Page 56

Translator™Preferences - Audio/MIDI
Location Same As Source
The Program and Sample folders will be the same folder as what the source is.
Default: Unchecked
Format
This is format the incoming source will be converted to.
Audio/MIDI
These are the standard Audio and MIDI settings for the Waveplayer. The Instrument Player uses
other means; always CoreAudio on Mac, and always ASIO4ALL on Windows. This is a current
limitation but will change in future versions.
Driver Types
These are driver types; typically on Mac
you only see CoreAudio, on Windows you
see DirectSound, ASIO, and WSAPI.
Default: ASIO
Outputs
These are the outputs for the particular
Driver Type that is selected.
Properties
These are the properties for the Output
that is selected. These include Name, Channels, SampleRate, Index, ErrCode, and Latency
settings.
MIDI In Drivers
These are the available MIDI input drivers on your system. To use the Instrument Player,
choose the right one for your needs.
Page 56
Page 57

Translator™ Format Preferences
Format Preferences
Translator has a massive amount of optional parameters you can invoke on everything from
the dialog view to the specics of the translations that you perform. It’s easy to get intimidated
by the sheer amount of preferences, but don’t be. They are logically laid out and hopefully
intuitive.
MOST IMPORTANTLY remember that all of them are optional, they are not necessary for
successful basic operation.
And this isn’t the only Preference dialog! This is only the ones for each source and destination
format. General Preferences (that is, ones that apply to Translator and for every format) are in
the Preferences dialog section.
Each Format Preference dialog represents a single format class. The preferences shown may
have to do with the format performing as a Source (what you are converting FROM) or as a
Destination (what you are converting TO). The context should make this obvious.
Akai
S-1000/3000 Type
This determines what specic Akai Program format is converted to, or when creating a Volume.
.AKP Type
This determines what specic Akai S-5000
Program format you convert to. Z-Series
has three lters, and the MPC-4000 has an
extra Pad assignment chunk.
Allow 24-bit samples for S-5000
Your source format may be in a higher
bit rate than 16-bit. Checking this allows
dithering to the higher 24-bit bit rate.
External Modulator
The Akai’s have an external modulator
source dened, and it is switchable as a
global parameter. You can select which
parameter will be represented as the “external modulator”.
Velocity Grid
Incoming source formats can be highly disorganized or staggered, which propagates messiness
when converting. Checking this parameter lines the velocity split values (if any) to a specic
grid without the randomness that the source format may be dening.
Auto Name Volumes
Auto Name Volumes.
Unique Program Number
When checked, on converting into Akai Volumes, the app makes sure that no Program Numbers
are duplicated. This insures that when you load the Volume as a Volume, no program will play
on top of each other.
Page 57
Page 58

Translator™Format Preferences - Akai MPC
Only 12-char names considered for stereo
Akai samples are dual-mono, they are dened as stereo when the names end with -L or -R. This
option makes the restriction that the name must be 12 characters long (the last two characters
being -L or -R) to be considered “stereo”; mostly for combining the samples into one single
interleaved stereo sample in the destination.
aksys lename restrictions
aksys™ is a program that Akai put out to communicate with the S-5000-series through USB. It
puts additional restrictions on program and sample naming; this option insures that it occurs on
newly created .akp and WAVE les.
Write MESA, Pulsar, S-5000 “where the samples are”
Checking this forces the new Program le to be written where the samples of the source format
are.
All Samples moved to Destination Folder for bulk
Checking this forces the new Program le to be written where the samples of the source format
are.
Bulk Akai Volume Options
An Akai Volume is technically a Bank format, containing possible multiple Programs. When
converting into a Bank format, this species if all Programs will go into one Bank le, or
separated Bank les.
Combine sample-numbered Programs
On an Akai, Programs that have the same program number, set on the same MIDI-Channel,
play simultaneously. Checking this merges these Programs when converting them into one
single Program, so the destination plays them just like the Akai did.
Parameter Tolerance
When converting INTO this format, there may be structural limitations where if you wanted to
ensure all parameters were converted perfectly, you’d end up with multiple Programs/Presets
being created, perhaps in more of a mess than you prefer. Setting Parameter Tolerance to a
higher percentage gives some grace to these parameters so the conversion will be a little exact
but you’ll wind up with a cleaner organization that will be more usable to you.
Pulsar Type
This selects the Pulsar or STS type you are converting to when you select the Pulsar conversion
option in the Master Translation Dialog or the right-click method.
S-5000 Sample Naming Length
Although the technical limit to a sample le name in the S-5000 Series is 31 characters (not
including the .wav extension), there are some factors where you might want to limit this.
Firstly, the Akai’s themselves only display 20 characters maximum. Also, some samplers that
import S-5000 Programs only recognize sample names to a certain length (NI’s Maschine is an
example). This option allows you to regulate this.
Akai MPC
Program Type
There are many MPC variants - this allows you to set which MPC program will be written when
you specify “Akai MPC Program”. Note if converting to MPC proprietary disk, choices are limited
to MPC-2000 and below. If something else is set, MPC2000XL will be selected for you.
Default: MPC-2000XL
Page 58
Page 59

Translator™ Format Preferences - Emu
Sample Type
It’s not always the case that the Sample
Type follows the Program Type. Some
Program Types have different ways to write
the samples e.g. MPC2000XL will handle
.snd les and WAVE les.
MPC2000XL Format Type
Everything prior to the MPC2000XL OS
1.2, Akai used a Partition type of disk
format, where you partitioned off a
disk into separate sections. This limited
certain abilities of the disk format, most
signicantly cluster size, which made these
disk formats somewhat inefcient. MPC2000XL introduced a more normal non-partitioned set
up where the cluster size was variable, allowing for a much more efcient system where more
information could be stored on the same-sized disk.
If you have the MPC2000XL OS 1.2, please use “PC”; for everything else, use Partition.
Velocity Grid
This option lines up Velocity values so the line up on a grid, so they aren’t all over the place sometimes older Programs shift them around so they overlap by mistake.
Default: Unchecked
Show all MPC les on proprietary drives
Translator can be used for simply moving les around, not just as a Translator. This option
enables non-Instrument les on an MPC disk, such as Sets, Sequences etc., to be shown so you
can move them around.
Default: Unchecked
Create Folder for each Program / Lowest Key
When checked, For every MPC Program (not on proprietary disk) that is created, it is written in
a separated folder with it’s WAVE les.
Default: Unchecked
Lowest Key
An MPC has only 64 available MIDI notes it can assign to. The option allows you to limit the
bottom key so any sample coming in from a imported format will no convert, thus saving Pads
Default: C2
Emu
Destination Type
This dictates what type of Emu les you will translate into. For example, if you are translating
an Akai Program and dropping it onto a Emu drive, your action does not imply what type of
Emu le you want written, since Emu disks are the same for every Emu le format. Translator
will translate the Akai Program into whatever you have selected.
Default: Write E4/EOS les
Fix Files
If you have lot’s of .eos les, or .esi les, you can convert them to the new EOS FAT format
automatically using this option.
Default: unchecked
Page 59
Page 60

Translator™Format Preferences - Emu
Disk Checksums
Older Emu’s, and older Windows operating
systems, tend to render disks unusable
because they miswrite or overwrite the disk
“checksum”, which insures the integrity
of the boot sector. This option gives you
different methods of xing it if there is a
problem.
Default: Warn if checksum needs repairing
(E3/ESi) Immediate Sample Read
Pre-EOS Emu formats do not list the
sample names in the Bank or Preset areas.
What this means is that if you are using the
Translator interface, and you are selecting
a Bank/Preset to see the sample names,
especially off a CD-ROM and its a large le - this can take a signicant period of time, since
Translator has to go all over the disk just to grab the sample names.
The default behavior is unchecked; so what comes up is something like {Sample 23} to
reference the sample. If you click on this - THEN Translator will go and get the sample name.
However, if this is checked, Translator takes the time at the beginning to go out and get all the
names.
Default: unchecked
Keep Emu le as is when no translation is required
Checking this insures that no cross-Emu translations will take place if it is not necessary.
Suppose you want to take an EOS le off an Emu disk and write it as an .eos le on your DOS
drive. If this is checked, and if the Write...les parameter is set to something other than EOS,
such as E3, Translator will not translate it and simply write it as the normal EOS le.
Default: checked
Use EOS FAT le type extensions (.e4b, .e3b, .e3x)
When converting into Emu DOS counterpart les, these type of les are used, instead of the
Translator-derived .eos and .esi (which preserve the real Bank name).
Default: unchecked
Use EOS FAT number/naming scheme (e.g. B.023-etc.)
The EOS 4.7 uses a numbering scheme to preserve it’s system of Bank numbers. This option
uses it when you are converting into EOS FAT style les.
Default: unchecked
Emu Disk Format - Rewrite ONLY Boot Sector
Emu programs Fades within the KeyRange and Velocity parameters. Sometimes in a translation
you do not want these to be considered, for polyphony issues, mainly. Checking these causes
Translator to ignore the Fade values in both the KeyRange and Velocity areas.
Default: unchecked
(EOS) Do not create Multisamples
An EOS Preset contains Voice, and those Voices can contain more than one Zone, and they may
overlap. Those Zones use the Voice parameters. If this option is checked, any conversion into
EOS will write one Zone only for each Voice.
Default: unchecked
Ignore Key And Vel Fades
Emu programs Fades within the KeyRange and Velocity parameters. Sometimes in a translation
Page 60
Page 61

Translator™ Format Preferences - Emulator X
you do not want these to be considered, for polyphony issues, mainly. Checking these causes
Translator to ignore the Fade values in both the KeyRange and Velocity areas.
Default: unchecked
Velocity Grid
This option lines up Velocity values so the line up on a grid, so they aren’t all over the place sometimes older Programs have them shifted around so they overlap or become incongruous by
mistake.
Emulator X
Type
Determines the Emulator X type you want to convert to. The big difference is between 1.0 and
the 1.5/2.0, as the newer ones support keyswitching and control switching.
Default: 1.0
Write enclosing .exb named folder
Emulator X, when it saves a Bank, writes
a folder with the BankName.exb, then
writes the actual Bank le BankName.exb
in that folder, along with a folder called
SamplePool which contains all the samples.
Translator only writes this enclosing folder
when this is checked. Sometimes this is
superuous, sometimes not. Often you
want to “protect” the SamplePool folders
for their own Bank les.
Default: Unchecked
EmuX 32-bit Export
Emulator X is one of those rare formats that supports 32-bit samples. In fact, it only supports
16-bit and 32-bit, NOT 24-bit. Many external samplers support 32-bit, but you may not exactly
want that because of editing issues and compatibility. This gives you the option of keeping them
or dithering them into something else. (Note: on samplers that only support 16-bit, this has no
effect.)
Default: Keep as 32-bit
Ignore Key and Vel Fades
Emu programs Fades within the KeyRange and Velocity parameters. Sometimes in a translation
you do not want these to be considered, for polyphony issues, mainly. Checking these causes
Translator to ignore the Fade values in both the KeyRange and Velocity areas.
Default: Unchecked
Do not create Multisamples
An Emulator X Preset contains Voices, and those Voices can contain more than one Zone,
and they may overlap. Those Zones use the Voice parameters. If this option is checked, any
conversion into Emulator X will write one Zone only for each Voice.
Default: Unchecked
Write exported lenames with Bank and Program Numbers
Every Emulator X Preset has a MIDI Bank number and Program Number on it. This option
makes Translator, when able to, to write those numbers into the lename; e.g. “002_024 Brass”
means the 3rd Bank and Program Number 24 for a Preset called Brass.
Default: Unchecked
Page 61
Page 62

Translator™Format Preferences - Ensoniq
Effect Type - Wet/Dry - Global Effects Selection - Main or Preset
Determines the default effect type that goes into all newly-created Presets, the Wet/Dry
balance it has, if it takes the value or uses the Global Effects option (in Options-Effects), and if
it sets it as the Main effect or individually among the Presets.
Ensoniq
Type
Determines what specic Instrument Type a newly-created EPS/ASR Instrument is. The EPS and
ASR-10 formats are almost identical, but what essentially makes them different is the type of
effect they contain. This option parameter dictates what type of le, and thus what effect type,
is created when translating into Ensoniq.
Default: ASR-10
Effects Algorithm / Wet:Dry
Determines the default effect type that
goes into all newly-created Instruments,
the Wet/Dry balances it’ll have, and if it it
takes the value or uses the Global Effects
option (in Options-General).
Drive Label
This is the Drive Label that is written by
default to a drive when you format it with
Translator, when the Prompt for Drive Label
is checked in the Options-General Tab.
Default: “TLR 001”
Velocity Grid
This option lines up Velocity values so the line up on a grid, so they aren’t all over the place sometimes older Programs have them shifted around so they overlap or become incongruous by
mistake.
Percussive Envelope Mode
An EPS/ASR Instrument is unique in that it has a Initial Level part to their envelopes, that
comes before the Attack Time. The wrinkle here is that there is a sound difference if the Initial
Level is 0 and Attack Time is 0, compared to when the Initial Level is 100% and the Attack
Time is 0. Checking this option guarantees the Initial Level is always 100%.
Default: Unchecked
Show all Ensoniq Files, not just Instruments and Directories
Translator can be used for simply moving les around, not just as a Translator. This option
enables non-Instrument les on an Ensoniq disk, such as Songs, Banks, Effects, etc., to be
shown so you can move them around.
Default: Unchecked
Do not show copied Wavesamples
Sometimes you don’t care about viewing copied Wavesamples in an Ensoniq instrument; most
of the time they are copied to exist in another Layer and often they are programmed the same,
and almost all the time they window the same wavedata.
Default: Unchecked
Page 62
Page 63

Translator™ Format Preferences - Apple EXS24
Operating System
Dictated by chosen Effect Type (Default)
Prompt for le during formatting
Always use below selection
Patch Select behavior when converting...
An Ensoniq Instrument can be programmed to take advantage of the patch Select buttons,
when different sets of the 8 Layers are enabled or disabled. When converting OUT of an Ensoniq
Instrument, you have some choices on how those are separated in the destination format.
If the destination doesn’t support “dimensions”, there is no issue and they are separated
regardless. But if the destination DOES support dimensions, then these are the four different
ways you can separate (or combine) the Patch Selects.
Separate Programs/Instruments (Default)
As Patch Select #70
As Other Controller...
As Keyswitch, Start Key
Patch Select OO only
Determines the default effect type that goes into all newly-created Presets, the Wet/Dry
balance it has, if it takes the value or uses the Global Effects option (in Options-Effects),
and if it sets it as the Main effect or individually among the Presets.
Apple EXS24
Destination Sample Type
This selects if the sample les rendered as a result of a conversion are WAVE, AIFF, or CAF les.
If the source uses WAVE or AIFF les, and some other formats is selected here, the samples will
be copied and rendered as the Destination
Sample Type that is selected.
Default: WAVE
Compress CAF to AAC / Bitrate
If CAF is selected above, the option tells
Translator to use the Apple Lossless (AAC)
format instead of straight PCM data. You
can also specify the bitrate of the AAC
encoding.
Default: Unchecked
Write Monolith
Writes EXS monolith les when converting
into EXS format. (Warning: we are not sure how accurate or worthy this function is.)
Default: Unchecked
EXS24 Type
If this is checked, directories, all generated les will be guaranteed a unique le name, instead
of prompting you when a pending lename already has been used. This is done by adding a
unique numeral to the end of the le name.
Default: Checked
Mark I (Logic 4.7): Fairly basic
Mark I (Logic 5.0; 5.1): Adds a couple parameters
Mark II (Logic 5.5-7.0) (default): Adds all the keyswitching and things
we’ve come to love
Page 63
Page 64

Translator™Format Preferences - Apple EXS24
Mark II (Logic 7.1-9.0): Adds Filter Envelope in Groups
Mark II (Logic 9.1+): Adds long le name support
XFade
This is the XFade value of the EXS-24. You can preset this parameter based on your personal
preference; db, linear, Eq Pwr.
Default: Equal Power
Platform Type
Most Mac’s are Intel now, so Mactel/Windows is the recommended setting. If PPC Mac is set,
those EXS24 les are more easily read by PPC Mac’s; however, any EXS24 can read them.
Default: Intel
Force Unique Files
If this is checked, directories, all generated les will be guaranteed a unique le name, instead
of prompting you when a pending lename already has been used. This is done by adding a
unique numeral to the end of the le name.
Default: Checked
Collapse Tuning
There are 3 levels of tuning; Instrument, Group, and Zone. Sometimes an incoming format
comes in with the tunings separated, sometimes not. If this option is checked, then any
separated tunings are collapsed into the Zone, instead of being spread into the Groups and
Instruments. Default: Unchecked
Use Internal Names for Export
When converting out of EXS-24 format, this option chooses whether the Master Name used in
the destination will be the Internal name stored in the le, or the .exs le name itself. Note:
this should be unchecked most of the time for EXS24.
Default: Unchecked
Group to Incoming Groups
Many new modern formats use the Group concept to contain their Zones, and often these
Groups are named. Again, Translator’s rst call is to obtain an exact translation of the incoming
format, but sometimes you also care about the cleanliness of organization of the new EXS24
le, because you often want to tweak it to taste afterwards. Check this option if you want
Translator to force the incoming Group structures to be preserved, and also named accordingly.
This may compromise a perfect translation, sometimes it doesn’t matter.
Default: Checked
Write Sample Selects in Groups
The EXS-24 uses the term “Select Range” to determine when a Zone plays, in relation to the
modulator that is set to Sample Select. These Ranges can be written into the Zones or the
Groups, depending on your preference. Writing them into the Zones enables less Groups to be
written, and enables the Zones to be more portable and in dependant. Writing the Selects into
the Groups sometimes allows a cleaner organization of structure.
Default: unchecked
Attack 0=Zero
When exporting out of EXS-24 into other formats, this determines whether the setting of 0
in the attack envelope REALLY means 0. The reason for this is because setting an EXS Attack
to 0 is not as snappy as other samplers; it doesn’t have a “click” associated with it - it is
always smoothed out. As a result, when exporting drums you won’t get optimum results in the
destination les. Checking this option results in the attack time set to 0ms; otherwise, it is set
to 10ms.
Default: unchecked
Page 64
Page 65

Translator™ Format Preferences - Roland Fantom
Parameter Tolerance
The EXS24 writes most of it’s parameters to a global parameter set, except some overrides
that are entered into the Groups. These are the amplitude envelope, the lter cutoff, and the
lter resonance. If many keygroups/zones that are being translated have widely differing amp
envelope values, etc., there will be many groups that are formed. To keep this at a minimum,
use this option to round together these values so not as many Groups are created. Higher
values have a greater effect. There is nothing wrong with lot’s of groups being created, but for
an organizational measure, this may be desired.
Default: unchecked
Voices
This determines the Voice Amount that will be written, IF the Voice amount is not determined
by the source format. Default is dependant on the maximum value of the destination
(EXS=”Max”, HALion=32, Reason=32, Kontakt=128)
Default: Default
Master Volume
This is the Master Volume written to a EXS24 instrument when a Master Volume is not specied
by the incoming format.
Default: -6 db
Roland Fantom
Type
Determines whether incoming formats are converted into Patches or Rhythm Kits.
Default: Patch
Velocity Grid
This averages incoming velocity ranges to
t a 16-part grid (out of 128 values). For
example, a velocity of 5-90 will become
0-95, and 29-120 will become 32-127. This
eases the pressure on the limited Fantom
format to accommodate staggered or
unusual velocity ranges.
Default: checked
Do not show INIT Objects
The Fantom has no concept of “blank” Patch or Performance. Anything conceived as “blank”
usually is named starting with the word “INIT”. When viewing Fantom Patches/Performances,
you may not want to be concerned with these objects messing up your view. Checking this
option stops those objects from being seen.
Default: Checked
Warn if complex
The Fantom has a rather limited structure. It’s not hard to force multiple Patches to be written if
your Parameter Tolerance is highly demanding. If this option is checked, a warning will be given
so you know something extreme is about to happen.
Default: Checked
Fantom Type
Determines if you are written S/X type of .svd and Fantom folder structures or Fantom-G types.
(Juno-G type is the same as S/X, except that the .svd is named fang.svd instead of fans.svd.)
Default: Fantom-S/X
Page 65
Page 66

Format Preferences - Alesis Fusion
Parameter Tolerance
When converting INTO this format, there may be structural limitations where if you wanted to
ensure all parameters were converted perfectly, you’d end up with multiple Programs/Presets
being created, perhaps in more of a mess than you prefer. Setting Parameter Tolerance to a
higher percentage gives some grace to these parameters so the conversion will be a little exact
but you’ll wind up with a cleaner organization that will be more usable to you.
Go To Comparison Options button
Takes you to the master Comparison Options area (under Options). This is Parameter Tolerance
from a different angle - on a parameter set basis, you can choose to ignore incoming values
when it comes to comparisons. The Parameter Tolerance value is applied to those parameter
sets that are not ignored.
FX Algorithm - Wet/Dry Balance - Use Global Effects Selection
Determines the default effect type that goes into all newly-created Patches, the Wet/Dry
balance it has, and if it takes the value or uses the Global Effects option (in Options-Effects).
Translator™
Alesis Fusion
Program Type
Determines if the Fusion Program will be a Multisample type or a Drum type (that is, the
Oscillators).
Default: Multisample
Destination Type
Determines what type of Fusion media you
will be writing this to.
Default: Hard Drive
Write Absolute Paths
Internally, Fusion Multisample les (.a)
reference their samples with relative paths;
they expect them to be in the same Bank.
But this doesn’t always have to be the case. The option allows you to expand on this feature.
Default: Unchecked
Drum Mode
Controls the release of the Envelopes.
Default: Unchecked
Velocity Grid
This option lines up Velocity values so the line up on a grid, so they aren’t all over the place sometimes older Programs shift them around so they overlap and are incongruous by mistake.
Effect Type - Wet/Dry - Global Effects Selection - Main or Preset
Determines the default effect type that goes into all newly-created Presets, the Wet/Dry
balance it has, and if it takes the value or uses the Global Effects option (in Options-Effects).
Parameter Tolerance
When converting INTO this format, there may be structural limitations where if you wanted to
ensure all parameters were converted perfectly, you’d end up with multiple Programs/Presets
being created, perhaps in more of a mess than you prefer. Setting Parameter Tolerance to a
higher percentage gives some grace to these parameters so the conversion will be a little exact
but you’ll wind up with a cleaner organization that will be more usable to you.
Page 66
Page 67

Translator™
Go To Comparison Options button
Takes you to the master Comparison Options area (under Options). This is Parameter Tolerance
from a different angle - on a parameter set basis, you can choose to ignore incoming values
when it comes to comparisons. The Parameter Tolerance value is applied to those parameter
sets that are not ignored.
Show Comparison Errors
Fusion is a limited format, and Translator uses many comparison averaging techniques to cram
more complicated formats into the Fusions limited scheme. This option allows a dialog to come
up to allow you to manually control how these comparison averaging functions are applied. This
option is handy, not just because it allows you to control the averaging, but it also tells you
when a more complicated format is incoming.
Default: Checked
Format Preferences - Tascam GigaStudio
Tascam Gigastudio
Type
Giga format 2.0 (GigaStudio only) allows for 8 layers, and supports extra LFO’s and crossfading.
Giga 1.0 (Gigasampler 1.0) only writes 4 layers maximum per Region.
Translator is the only program that writes
true Giga 2.0 les that do not need to be
resaved within Giga.
Perform Upgrade to Version 2.0
routine
Anyone can write true Giga 2.0 les, but
only Translator handles the complete task
of making a standard Giga le. First, it
registers the .gig le with Giga itself so
it shows up within Giga’s Quicksound
database. Next, it calls Giga itself to write
the acceleration tag necessary to load the
le quickly within Giga. It sometimes is
necessary to turn this phase off, as Giga sometimes is picky about what gets written into it’s
les. Turning this off does not change the translation of the le, it preserves it, the only side
effect will be that Giga loads it a little more slower. You can always resave this within Giga.
Default: checked
Restrict Incoming Sample Names to DOS naming convention
Default: checked
Remove Roland Prex for incoming Roland samples
Default: unchecked
Snappier attack
Default: unchecked
Immediate Sample Name Read
On .gig les, Translator has to step through the whole .gig le just to get the sample names to
display. On large .gig les, this can take some time. Checking this enables just a generic name
({Sample 4}) to appear so this isn’t necessary. Translator will make the actual name appear if
you click on the {Sample} shown after it’s displayed. This is simply a time-saving measure.
Default: unchecked
Page 67
Page 68

Format Preferences - Steinberg HALion
Fade out non-looped samples (last 16 samples)
Sometimes sample les have some extraneous information at the end of the le. This is usually
not heard on hardware samplers because their output lters are usually clamping down on the
outputs at this time. Giga is more responsive, so this appears as a click on non-looped sounds.
This feature, when checked, applies a 16-sample fade-out envelope to the data.
Default: checked
Eliminate extension if name is 28-31 chars long
Default: unchecked
Transfer Internal Comments to WAVE in all cases
When you export .gig wavesamples to WAVE les, this forces the internal comments of the .gig
le - not just the sample - to be written into the WAVE le.
Default: unchecked
Purge unused samples in translated .gig les
Default: unchecked
Giga ->; prompt for long names
Default: unchecked
Translator™
Steinberg HALion
Type
HALion I (Default)
HALion II (2.0.0)
HALion II (2.0.3)
HALion 3 (XML Format)
This is limited, only handles basic zone
parameters
Create Internal Folders Based On...
HALion can use a folder structure for
organizational purposes and also to ease editing chores. When Translator writes HALion
les, this option determine how those folders are written - either by velocity ranges, or by
“dimensional” (meaning keyswitches or modwheel-release triggers etc.) means. If there are no
velocities and/or “dimensions”, no folders will be written.
Default: Checked
Envelope Slope
HALion envelopes allow you to set the curve of the change in amplitudes of its envelopes. This
is the slope for envelopes IF the slope is not already specied.
Default: 30%
Use Current Amplitude Release Trigger Mode
HALion 2 has a neat feature where you can determine how loud the release trigger sample
reference will be. Current Amplitude sets the volume on how loud the normal trigger reference
is playing at the time. Checking this option enables this when release triggers are written.
However, there are certain times when this option may not be to your liking.
Default: checked
Waldorf Filter
Uses the Waldorf lter types instead of the standard ones.
Default: Unchecked
Page 68
Page 69

Translator™ Format Preferences - Independence
Master Volume
This is the Master Volume written to a HALion Program when a Master Volume is not specied
by the incoming format.
Default: -6 db
MW->Pitch Max Range / Vel->Amp Bias / Vel->Filter Bias
These are extra parameters that have no equivalent in any incoming format. You can set these
to your taste.
Default: -6 db
Yellow Tools Independence
Write Version 3
Translator will write Independence version
3 type Programs. These will not load in
Independence 2 or 3. This also makes
Basic Path / Root Folder and Copy/Alias
choices irrelevant.
Basic Path / Root Folder
This is the Basic Path (version 1
terminology) that Translator will write
to. This is termed Root Folder in
Independence 2/Pro. (The concept does
not exist in Independence 3.)
This is very important to set when
converting into Independence format;
even if you don’t set this initially, Translator will ask you if this information is needed when it is
necessary, and will be saved here.
The Basic Path / Root Folder concept makes guring out where you are going to create new (or
using current) sample les a little tricky. Below are the rules, we’ve tried to make this as simple
for you as possible.
First, a hint: create a Favorite of your BP/RF in Favorites; then, drag anything you want to
convert from the Object List on the BP/RF Favorite. This will automatically give you acceptable
results. If you have Create Alias/Shortcuts selected, any newly created SAMPLE les will be
created as additional folder in your BP/RF, which is okay.
Programs, or Samples - Writing/Copying Files
IMPORTANT: with these objects, it does not matter what you select in either Program or Sample
Destination Folders, nor where you drag on the Translator interface. Translator will always write
them to the root of their corresponding TPL folder (/layers/Third Party Libraries or /audio les/
Third Party Libraries). The single exception is if you choose a folder inside the TPL. So...
- These are always written in the corresponding TPL folder.
- If you destination selection is NOT the BP/RF or within it, Translator will default to the root
of the TPL.
- When you convert a Bank, a folder is created to house all the Programs that will be written
within.
- When you bulk translate; that is, when you convert a folder or a whole/partial Proprietary
Disk, the folder tree is imitated in the TPL or the selected sub-folder in the TPL.
Page 69
Page 70

Translator™Format Preferences - Kontakt
Samples - Creating Aliases/Shortcuts
Using aliases/shortcuts are nice because generally they shield you from managing samples
within the BP/RF. In Independence itself the alias/shortcut mechanism is transparent. However
you do need to know how it works in case you need to manage things at a later time.
- Samples are created normally; they get written in whatever you choose in a Sample
Destination Folder. Samples that already are WAVE or AIFF stay where they are (except if
you choose Copy Existing Samples in the Master Translation Dialog or Bulk Export). This
makes the Sample Destination Folder useful only when you are converting something that
doesn’t already use WAVE or AIFF.
- Aliases/shortcuts are written in the /audio les/Third Party Libraries/External References
folder. There is one alias/shortcut created for every program le created, and is always
called “[program name] Samples”. This may make for many aliases/shortcuts, but that
eliminates the possibility of breaking multiple program’s linking by deleting a single alias/
shortcut.
Copy Samples to Basic Path / Create Shortcut/Alias if possible
Any incoming format that has referenced samples will copy them to the “audio” folder in the
Basic Path, or a shortcut (Win) or Alias (Mac) will be written.
Default: Copy Samples
File Info
This is all the extra info that will be written into newly-created Independence Programs.
Native Instruments Kontakt
Type
Translator gives you the option to write to
most Kontakt types. This ensures that if
you are running a lower version of Kontakt,
you can write a le that it will load, as
any given version of Kontakt can’t read a
le written with a higher one. Although,
surprisingly, there isn’t a whole lot of
difference between 2.0 and 4.1 les.
Default: 3.5
Write Default Chunks
When writing a Kontakt le, there are
chunks (that is, usually modulators) that
an incoming format may not dictate but
perhaps you want the modulators to exist
anyway for later editing. This option forces
those chunks to be written, set to BYPASS,
regardless if the incoming format requires them or not.
Default: Unchecked
Write K2 Insts as Small Racks / Write Insts in Multis as Small Racks
A Kontakt le species a lot about how the rack looks like and what windows are open.
Checking this option forces the entire instrument to be one “single space” rack when it is
loaded, whether it is in a Multi or by itself.
Default: Unchecked
Page 70
Page 71

Translator™ Format Preferences - Kontakt
Slopes
Most incoming formats don’t specify a slope curve between envelope points; these three
parameters specify what they will be in not specied.
Master Volume
This is the Master Volume written to a Kontakt instrument when a Master Volume is not
specied by the incoming format.
Default: -6 db
Kontakt Factory Library Location
If specied, all Kontakt sample paths written in Kontakt les will reference this as the relative
path location, and all samples will be written there.
Enable DFD
This enables DFD (Direct From Disk) setting in all Groups. There are also three options that
dictate how Kontakt 2 les deal with DFD, since certain parameters conict with DFD in Kontakt
2 (Kontakt 3 and up eliminates this restriction).
Non-Ext Sample Options
Newer version of Kontakt do not like sample les without extensions, which happen often on the
Mac due to it’s older deprecated File Typing system. When converting a format that references
samples without le extensions in the name, this option tells how Translator will write the le so
it is okay with Kontakt.
Include Effect
Determines the default effect type that goes into all newly-created Kontakt les and also
determines if it will use the Global Effects option (in Options-General).
Templates
Since Kontakt is such a big format, encompassing many parameters beyond what other
incoming formats offer plus it’s own large set of Kontakt-specic parameters, perhaps you want
to set a “base template” for a new Instrument, or Script or Group inside any new Kontakt les,
instead of just starting with the default “nothing”. These options allow you to set this. Checking
Post-Conversion overwrites any parameters set by the incoming format.
Write Bank Files As Multi
This option allows you to, for example, make an incoming SoundFont convert into a single .nkm
le, instead of separate .nki les for each Preset.
Default: Unchecked
Write Relative Paths
Checking this option writes relative paths for the sample les, instead of absolute paths.
Default: Checked
Consider Velocity In Group Division
In Kontakt, Groups are containers for Zones and they provide the parameters for the Zones. All
Zones in a Group share those parameters. Translator’s rst call is to obtain an exact translation
of the incoming format, but sometimes you also care about the cleanliness of organization of
the new Kontakt le, because you often want to tweak it to taste afterwards. Sometimes an
incoming format will shove Zones with different velocities into the same Group just because
it shares the same parameters. However, if you want to edit this Group according to velocity,
you wind up altering Zones set to different Velocity values. If this option is checked, Translator
makes sure that no Group contains Zones of different velocity values. This makes editing after
the fact easier.
Default: Checked
Page 71
Page 72

Format Preferences - Kontakt Instrument
Write as Mac-Type les
When Kontakt ran on PPC Mac’s, it wrote header information in Motorola (Big-Endian) format.
Although any Kontakt can read any Kontakt le regardless of endian, PPC Kontakt’s can read in
PPC-type (above, Mac-Type) les much faster. Check this if you want to create Kontakt les of
this sort.
Default: Unchecked
Reference Source Giga/SF Files
Before Kontakt 2, Kontakt had a cool feature that no user could get to, to reference samples
in other containers - in this case .gig les and .sf2 les. Checking this option references those
containers and does not write new sample les; remember this only applies if you have Type
set to Kontakt 1.5 or less.
Default: Unchecked
Group to Incoming Groups
Many new modern formats use the Group concept to contain their Zones, and often these
Groups are named. Again, Translator’s rst call is to obtain an exact translation of the incoming
format, but sometimes you also care about the cleanliness of organization of the new Kontakt
le, because you often want to tweak it to taste afterwards. Check this option if you want
Translator to force the incoming Group structures to be preserved, and also named accordingly.
This may compromise a perfect translation, sometimes it doesn’t matter.
Default: Checked
Translator™
Collapse Tuning
There are 3 levels of tuning; Instrument, Group, and Zone. Sometimes an incoming format
comes in with the tunings separated, sometimes not. If this option is checked, then any
separated tunings are collapsed into the Zone, instead of being spread into the Groups and
Instruments.
Default: Unchecked
Native Instruments Kontakt Instrument Options
All these options are information that gets
written into the header of any Kontakt le
you write. This helps with organization and
other things. Please remember that the
Category selections are ignored in newer
versions of Kontakt such as Kontakt 4.1.
Author: This is the Author of the le,
limit is 8 characters.
Weblink: The Website of the
manufacturer, limit 85 characters.
Info: Anything you want to type in,
unlimited room.
Wallpaper: A wallpaper le you want to
attach to your new Kontakt les.
Icon: The icon you want to attach to your new Kontakt les.
Category 1: Usually the type of Instrument it is (e.g. Piano).
Category 2: Usually the sub-type of Instrument it is (e.g. Acoustic [Piano]).
Category 3: Usually the timbre of the sound (e.g. Dark [Acoustic] [Piano]).
Write to newly-created Kontakt Files
Enables the option, this way you can set them and yet disable the process temporarily.
Default: Checked
Page 72
Page 73

Translator™ Format Preferences - Reaktor/Battery
Native Instruments Reaktor and Battery
Reaktor
Windows/Mac
Writes the Reaktor MAP le in little-endian
format (Windows) or big-endian format
(Mac). Please use Windows if you are using
a Intel Mac.
Default: Windows
Reference External Files
When checked, Translator will write Reaktor
les that reference external WAVE les and
will write WAVE les. Otherwise, all Reaktor MAP les will contain their own samples.
Default: Checked
Battery
Write samples in repository / Create “samples” folder (Battery 1 standard) (Battery 1
only)
When checked, Translator will write Reaktor les that reference external WAVE les and will
write WAVE les. Otherwise, all Reaktor MAP les will contain their own samples.
Default: Checked
Do not move WAV-AIFF les if necessary (Battery 1 only)
When checked, Translator will write Reaktor les that reference external WAVE les and will
write WAVE les. Otherwise, all Reaktor MAP les will contain their own samples.
Default: Checked
Write Relative Paths (Battery 2 or 3 only)
When checked, Translator will write the paths to their samples with relative paths; otherwise,
they use absolute paths.
Default: Checked
Version
Selects which Battery version you want to write to.
Default: Battery 1
Write Monoliths (Battery 3 only)
When checked, Translator will write Battery 3 les (.kt3) that contains it’s own samples
(monolith format).
Default: Unchecked
Korg
Type
Selects whether you convert to Triton, M3,
or Kronos 2.0. (Kronos version 1 is not
supported as the update from version 1 to
version 2 is free.)
Combi/Program Bank
Translator, when converting les into the
Triton format, creates a .pcg le contains
a Program Bank (with 128 Programs) that
loads into Bank E. It also may contain a
Page 73
Page 74

Translator™Format Preferences - Korg
Combi Bank, if deemed necessary. On the Triton Rack it’s convenient to have this load into Bank
E, but the Triton Keyboard does not have Bank E. So an option is which Bank you’d like the
Combi’s loaded into.
Default: D, E
Parameter Tolerance
The Triton has a narrow sound structure in which to t things into. For a fairly complex
instrument, Translator may have to make lot’s of kmp les, and most critically Programs, to
adequately distribute the objects so they can have their own parameter set.
For example, if you have a drum kit to translate, and say that each drum component is panned
to a different spot in the stereo eld, Translator will have to form one Program for every two
waves - because the Pan control is not in the KMP le; it’s only in the Program. A Combi will
likely be formed, and since a Combi can only handle 8 Programs, you’ll run out of space quickly.
This parameter handles problem situation like this. On higher values (50%), parameters like
Pan are rounded together so this slight compromise will result in many waves occupying one
KMP, instead of them having to be separated.
Default: 0%
Go To Comparison Options button
Takes you to the master Comparison Options area (under Options). This is Parameter Tolerance
from a different angle - on a parameter set basis, you can choose to ignore incoming values
when it comes to comparisons. The Parameter Tolerance value is applied to those parameter
sets that are not ignored.
Use Korg Naming Conventions
Korg, in the Triton manual, describes how they names their .ksc, .kmp, and .ksf les. It’s
generic, which is nice for organization, but they aren’t descriptive.
KMP STRIN004 rst ve letters of MS name, MS number; 3 digits including zeros
KSF MS013044 “MS”, plus MS number, plus sample number; both 3 digits including zeros
If this is unchecked, Translator will use the actual sample names.
Default: Checked
Write to Triton LE banks
Default: Unchecked
Velocity Grid
This averages incoming velocity ranges to t a 16-part grid (out of 128 values). For example, a
velocity of 5-90 will become 0-95, and 29-120 will become 32-127. This eases the pressure on
the limited Triton format to acclimate staggered or unusual velocity ranges.
Default: Checked
Add Effect
There are 5 Effects to be added to any Triton/M3/Kronos Program or Combi. This section allows
setting of these effects for your newly-created Programs or Combis.
Default: Checked
Effect Type - Wet/Dry - Global Effects Selection
Determines the default effect type that goes into all newly-created Programs/Combis, the
Wet/Dry balance it has, and if it takes the value or uses the Global Effects option (in OptionsEffects).
Page 74
Page 75

Translator™
Format Preferences - Kurzweil
Kurzweil
Add Sample Number to Kurzweil Sample Name
This is the Kurzweil sample number in which it is assigned. This may help you with editing later.
Default: Unchecked
Do not use Kurzweil Sample
Envelopes
When converting OUT OF Kurzweil
Programs, sometimes the envelope
settings are set to Natural/Sample.
These are set up to track the
sample itself. We convert these
settings but we are a little unsure
how they work. Checking this stops
us form guessing and just puts a
default envelope in it’s place.
Default: Unchecked
Assume all Untyped Drives as Kurzweil Type
When Translator looks at proprietary drives and Virtual Drives, it may not recognize some of
them. If this option is checked, it will assume it’s Kurzweil and read it like a Kurzweil disk.
Default: Unchecked
Ignore Split File Checks
A Kurzweil header is SUPPOSED TO tell us if a .krz le is part of a split hierarchy. Sometimes
this information is misleading. Checking this option stops us from checking.
Default: Unchecked
FX Algorithm - Wet/Dry - Global Effects Selection
Determines the default effect type that goes into all newly-created Presets, the Wet/Dry
balance it has, and if it takes the value or uses the Global Effects option (in Options-Effects).
Parameter Tolerance
When converting INTO this format, there may be structural limitations where if you wanted to
ensure all parameters were converted perfectly, you’d end up with multiple Programs/Presets
being created, perhaps in more of a mess than you prefer. Setting Parameter Tolerance to a
higher percentage gives some grace to these parameters so the conversion will be a little exact
but you’ll wind up with a cleaner organization that will be more usable to you.
Velocity Grid
This option lines up Velocity values so the line up on a grid, so they aren’t all over the place sometimes older Programs shift them around so they overlap or incongruous by mistake.
Default: Unchecked
Allow Drum Programs
A K2000 Program typically allows 3 Layers maximum. If more than that, it becomes a Drum
Program. If this is checked, then Translator will write more than 3 Layers in a Program; if not,
then it will make multiple Programs. (See Parameter Tolerance for another way to limit the
Programs Translator may create.)
Default: Unchecked
Kurzweil Type
This determines what type of Kurzweil Program and File will be written. Basically, there is no
internal difference of the Kurzweil les we create except for the le name extension (K2000:
.krz, K2500: .k25, K2600: .k26.
Default: K2000
Page 75
Page 76

Translator™Format Preferences - MachFive
MOTU MachFive
Type
Converts into MachFive 1, MachFive 2, or MachFive 3 les. (MachFive 2 or MachFive 3 are not
available yet.)
Default: MachFive 1
Bulk Convert to single SoundBank
Checking this make any Bulk conversion
dump everything into a single SoundBank
(>M5B folder).
Default: Checked
Group to Incoming Groups
Many new modern formats use the Group concept to contain their Zones, and often these
Groups are named. Again, Translator’s rst call is to obtain an exact translation of the incoming
format, but sometimes you also care about the cleanliness of organization of the new MachFive
le, because you often want to tweak it to taste afterwards. Check this option if you want
Translator to force the incoming Group structures to be preserved, and also named accordingly.
This may compromise a perfect translation, sometimes it doesn’t matter.
Default: Checked
Yamaha Motif and Tyros
Type
Choose between Motif XF, XS, ES, or Original. Remember that XF can read XS or ES, XS can
read ES.
Default: XS
Parameter Tolerance
When converting INTO this format, there
may be structural limitations where if you
wanted to ensure all parameters were
converted perfectly, you’d end up with
multiple Programs/Presets being created,
perhaps in more of a mess than you prefer.
Setting Parameter Tolerance to a higher
percentage gives some grace to these
parameters so the conversion will be a little
exact but you’ll wind up with a cleaner organization that will be more usable to you.
Category - Sub-Category
The Motif has a great system that categorizes Voice and Performances. Each Voice/Performance
can be categorized into one or two Categories, and each Category has Sub-Categories. Select
these for your incoming formats.
Do not show INIT Objects
The Motif has no concept of “blank” Voice or Performance. Anything conceived as “blank”
usually is named starting with the word “INIT”. When viewing Motif Voices/Performances, you
may not want to be concerned with these objects messing up your view. Checking this option
stops those objects from being seen.
Default: Checked
Write VelRanges to Elements
A Motif Voice uses it’s 4-8 Elements to reference group/keymaps of samples, called Waveforms.
A Velocity split can be dened in the Waveform or in the Element. Doing it in the Waveform
Page 76
Page 77

Translator™ Format Preferences - Reason NNXT
gives you ne-grained control with the velocity values being set on the sample level, which is a
good thing. But you may want to make sure that an Element has all the samples of one certain
velocity setting. That way, for example, if you have an incoming 4 Velocity Split format, it will
create 4 Elements and the Element will dene the split setting.
Default: Unchecked
Group to Incoming Groups
Many new modern formats use the Group concept to contain their sample references.
Translator’s rst call is to obtain an exact translation of the incoming format, but sometimes
you also care about the cleanliness of organization of the new le, because you often want
to tweak it to taste afterwards. Check this option if you want Translator to force the incoming
Group structures to be mapped to Motif Elements. This may compromise a perfect translation,
but often it doesn’t matter so you can capitalize on better organization.
Default: Checked
FX Algorithm - Wet/Dry - Global Effects Selection
Determines the default effect type that goes into all newly-created Presets, the Wet/Dry
balance it has, and if it takes the value or uses the Global Effects option (in Options-Effects).
Write As Banks
If you have an incoming multi-Instrument format (a Bank format), this insures a single Motif
le set gets created, instead of several.
Default: Checked
Category Auto-Detect
Translator has a clever feature that looks at the incoming Voice names and makes a decision on
which Category(s) it’ll set for that Voice. You may or may not want to use this.
Default: Unchecked
Tyros Type
Determines the Tyros format that is converted when selecting Tyros as the the destination
format. Selecting Tyros 3 also works on Tyros 4.
Default: Tyros 3-4 (.uvn)
Propellerheads Reason
Zone Sort
Sorting is important in NNXT because it helps in editing on the NNXT itself. You can order them
via Note, Velocity, or None.
Default: No Sorting
Hi-Quality Interpolation
Turns this parameter on in any NNXT
program that is written.
Default: Checked
Combine mono -L and -R
If by chance an incoming format has
separated -L and -R les, Translator will combine them for Reason. Usually this does not happen
since Translator does this all the time anyway.
Default: Checked
Group to Incoming Groups
Many new modern formats use the Group concept to contain their Zones. Again, Translator’s
rst call is to obtain an exact translation of the incoming format, but sometimes you also care
about the cleanliness of organization of the new le, because you often want to tweak it to taste
Page 77
Page 78

Translator™Format Preferences - Recycle
afterwards. Check this option if you want Translator to force the incoming Group structures to
be preserved. This may compromise a perfect translation, but sometimes it doesn’t matter.
Default: Checked
Propellerheads Recycle
Recycle Export
When converting into a non-Slice Instrument format, you keep the sample as-is (and separate
via Sample Start and Sample End windows), or you can separate the slices, or both.
Use Single Piece of data and split using
Start/End markers
When converting into a non-Slice
Instrument format, you keep the sample
as-is and separate via Sample Start and
Sample End windows.
Export Style
Translator has very advanced and
researched methods in converting Recycle
les. There are two methods we use, one
based on the Preview system that the
Recycle application uses, or we can use the
Slice method that most other applications use to extract the slices. What style you use affects
certain other factors, like if you are changing the original tempo, or other things.
LoKey / HiKey
When converting into a non-Slice Instrument format, these options set where the key range
starts and ends.
Spread
Dictates where each new separated slice is ranged on the keyboard.
Write MIDI File
When checked, a MIDI le is written also, which you can use to play the split slices back to
imitate the original loop.
->Slice File Tempo Change
Conceptually, a Slice File is one set of sample data with markers where the transients are. That
recorded tempo is the Original Tempo.Plus, if your Preview is a slower tempo than the original
tempo, Recycle actually synthesizes information for you. So, since you can’t view a Recycle le’s
sample data, you can only assume what it exactly is.
Other slice les formats have a permanent set of sample data, in a WAVE or AIFF format. There
are times when you may want to have your new non-Recycle slice les at a certain Tempo -
they can sound better that way instead of being played faster or slower. This option allows for
this; otherwise it simply writes Recycle information in full at the Original Tempo.
Include Tempo in Name
If you are changing the hardcoded tempo (see above), this option has the new tempo added to
the name.
Slice Fade Out
Species a user-dened hardcoded fade-out at the end of every slice; this can cut down on
clicks.
Page 78
Page 79

Translator™ Format Preferences - Roland
End Fade Out
Species a user-dened hardcoded fade-out at the end of the entire loop; this can cut down on
clicks when the loop is turned around.
Normalize Samples during translation
Since Recycle uses sample slices, many single samples can be less than at a optimum level.
Translator will automatically normalize these samples if this is checked.
Recycle Playback Tempo
The Waveplayer actually plays back Recycle les at different tempos; this sets what it will be.
Nudge Factor
Sometimes you might what to slightly “nudge” the transient points in a Recycle le; use this
option for that.
Roland S-5x, S-7x, and XV-5080
Roland Bulk Conversion
If converting disk, convert only...
If you are translating an entire Roland disk, this determines if Translator will convert the
entire Performances folder or the entire Patches folder.
Default: Patch
Roland->Giga; Bulk Convert into Groups
Roland’s use an efcient method of
handling samples on their disks - they
use one sample pool. Many Patches or
Performances can share references to
the same samples - using only one set
of data. As a result, many times when
you convert a Roland disk, for example
if you are converting to GigaStudio
format - from a 650mb CD you might
wind up with 2mb of data, because the
referenced samples grab the same data
over and over again, make redundant
copies of the data.
This option is in effect when you convert
a whole disk. It will group Patches or
Performances in groups, where the members have the same referenced samples in common.
You will wind up with, in the GigaStudio example, with 30-40 large .gig les, maybe 10-20mb
apiece. They will have the Patches/Performances that share the same samples - this way there
is not much chance of samples being copied more than once. The advantage of this is that you
make the best use of your disk space, with the least amount of .gig les as possible.
Default: Unchecked
Write Shortcuts for duplicate samples
Roland disks use whole large sample pool for the Performances and Patches to draw from; as a
result, many objects share samples. When converting, you may be putting the resulting control
les into different areas, but you don’t want to rewrite the samples just so you can see which
samples go with which control les. This option enables shortcuts to be written so you can see
what samples are being referenced without rewriting the samples.
Page 79
Page 80

Translator™Format Preferences - Roland
Prevent Performance Compression
Translator, unlike any other translation software, converts Roland Performances just as they are
set up on the Roland. If two or more “parts” in the Performance share the same MIDI Channel,
they will be combined into one conglomerate Program/Preset/Instrument. This is called
Performance Compression. If you do not want this to occur, check this option.
Default: Unchecked
Do Not Read Disabled Patches In Performances
Many Performances reference more than one Patch, except enable the rst and disable the rest,
with the intention of toggle the enabling in order to audition a range of Patches for your liking.
When this is checked, these Patches are not read or converted, even into disabled states. When
unchecked, the Patches are read and converted regardless of being enabled or not.
Default: Checked
Show Partials Folder
Partials are the object that Roland uses to reference samples and store a keyranges
parameters. Patches use Partials in a keymap to reference samples. Partials are never intended
to be played in and of themselves, so there’s little use of translating them in and of themselves.
Thus. there’s not much reason to show them in the Translator interface. Checking this option
shows the Partials folder.
Default: Checked
Show Object Location Dialog
Partials are the object that Roland uses to reference samples and store a keyranges
parameters. Patches use Par
Strip 3-Character Category Preferences
The Roland, for the rst 4 characters of an object name, lists a three character code plus a
colon. If this option is checked, Translator, when exporting or importing a Roland object, will
ignore the rst 4 characters and simply name the object as the following 12 characters.
Default: Unchecked
Only Strip in cases of 16->12 or 8 Character Truncations
(Only enabled when “Strip” above is checked) If checked, Translator will only strip the category
Prex if it needs to truncate the name down to less than 16 characters; otherwise, it will
preserve it.
Default: Checked
Disallow translating Label Names
Designers of popular Roland CD-ROM’s use many “blank” objects to list categories, in order
to make lists more understandable. These are real objects you would load - but they are just
blank. If checked, Translator will ignore these type of objects. Unfortunately, the only way to
recognize these is to look at the “ID”; that is the three characters that come before the colon
(:) in the le name.
Here is the current list of ID’s that are considered: “---:” “AAA::” “___:” “===:” “***:”
Default: Checked
Enable Roland Digital Emphasis Filter
Roland’s use a special lter on input and output for their samples. Translator simulates this,
with three different settings depending on your taste. See the Roland Emphasis/DeEmphasis
article in the Miscellaneous section for specics on these controls.
Default: Checked
Drive Label
This is the Drive Label that is written by default to a drive when you format it with Translator,
when the Prompt for Drive Label is checked in the Options-General Tab.
Default: “Formatted”
Page 80
Page 81

Translator™ Format Preferences - SampleTank
Parameter Tolerance
Roland S-7x and XV-5080 share envelopes, LFO and lter settings for all the velocity ranges
within a keyrange, and Fantom’s share things on a more general basis. There cannot be unique
settings for every sample reference. Thus, if incoming references require unique values,
Translator is either going to write new Patches that accommodate this (and put them together
as a Performance when nished), or you can use the Parameter Tolerance value (in a percent)
to “tolerate” certain values and trade off complexity for the convenience of having a single
Patch represent your incoming Program, rather than a unwieldy Performance.
Default: 0%
Go To Comparison Options button
Takes you to the master Comparison Options area (under Options). This is Parameter Tolerance
from a different angle - on a parameter set basis, you can choose to ignore incoming values
when it comes to comparisons. The Parameter Tolerance value is applied to those parameter
sets that are not ignored.
Show Comparison Errors
The Fantom format, and to a lesser degree the S-7x and XV-5080 formats, are limited formats,
and Translator uses many comparison averaging techniques to cram more complicated formats
into their structures. This option allows a dialog to come up to allow you to manually control
how these comparison averaging functions are applied. This option is handy, not just because it
allows averaging control, but it tells you when more complicated formats are incoming.
Default: checked
FX Algorithm - Wet/Dry - Global Effects Selection
Determines the default effect type that goes into all newly-created Patches, the Wet/Dry
balance it has, and if it takes the value or uses the Global Effects option (in Options-Effects).
Prompt for Category
Determines the category type that will go in all MV-8000 Series .mv0 les.
Write Category in MV Name
The MV has two places the category goes; one is a byte ag, the other is the name itself. This
option puts the category string into the name.
SampleTank
Write as SampleTank 1/2
This option determines what SampleTank format your les will be converted as.
Default: 2
SampleTank Parameter Tolerance
SampleTank Instruments share their
envelopes, LFO’s, and modulators with all
velocities in a keyrange.
Thus, if incoming references require unique
values in a keyrange, Translator is either
going to write new SampleTank Instruments
that accommodate this, or you can use the
Parameter Tolerance value (in a percent)
to “tolerate” certain values and trade off
complexity for the convenience of having a
single Instrument represent your incoming
Program, rather to load multiple instances
of SampleTank for multiple Instruments. Default: 0%
Page 81
Page 82

Translator™Format Preferences - SampleTank
Fine Tune Tolerance
One particular limitation of SampleTank 1, and 2, is that every sample within a keyrange was to
have the same ne tuning offset. This parameter allows you to specify any differences that will
be ignored in order to be included in the keyrange without having to create another Instrument.
This results in SLIGHTLY out of tune samples - moreso if you set this to high values, less so if
you choose to just tolerate small values (which is the intent). The reason for this parameter is
that Tuning is not included in the Parameter Tolerance options, and must be handled separately.
Default: 0
Go To Comparison Options button
Takes you to the master Comparison Options area (under Options). This is Parameter Tolerance
from a different angle - on a parameter set basis, you can choose to ignore incoming values
when it comes to comparisons. The Parameter Tolerance value is applied to those parameter
sets that are not ignored.
Show Comparison Errors
SampleTank is a limited format, and Translator uses many comparison averaging techniques to
cram more complicated formats into SampleTank’s limited scheme. This option allows a dialog
to come up to allow you to manually control how these comparison averaging functions are
applied. This option is handy, not just because it allows you to control the averaging, but it also
tells you when a more complicated format is incoming.
Default: Checked
Velocity Grid
This averages incoming velocity ranges to t a 16-part grid (out of 128 values). For example, a
velocity of 5-90 will become 0-95, and 29-120 will become 32-127. This eases the pressure on
the limited SampleTank format to accommodate staggered or unusual velocity ranges.
Default: Checked
One Region per Key
A Region is a keyrange. Sometimes in SampleTank you may want one Region for every key;
so if a keyrange comes in that is multiple keys, it will make multiple Regions instead of just
sharing a single one.
Default: Unchecked
Turn on Stretch
Checking this option turns on the Stretch parameter in SampleTank 2, with a value of 0. This is
because SampleTank LE does not allow the user to do this, although it does allow changing the
value.
Default: Unchecked
RegionSet Optimize
The less RegionSets (in contrast to Regions)
Default: Unchecked
RegionSet Optimize
Checking this option turns on the Stretch parameter in SampleTank 2, with a value of 0. This is
because SampleTank LE does not allow the user to do this, although it does allow changing the
value.
Default: Unchecked
Drum Envelope Mode
SampleTank does not have a parameter that ignores the note-off when it comes to envelopes,
whcih is essential for drum sounds. Checking this option forces SampleTank envelopes to have
parameters that simulate this (no attack, max sustain, long release).
Default: Unchecked
Page 82
Page 83

Translator™ Format Preferences - SFZ
Custom ID Name
This enables the Tank Name and Author elds to be enabled.
Default: Unchecked
Prompt for Tank Name
When converting into SampleTank, checking this will pull up a dialog asking you for the phrase
to name the Tank. The Tank Name appears in SampleTank in the information section.
Default: unchecked
Effect Slots/Effect Type/FX Params
You can pre-program what destination SampleTank les will have concerning effects. There
are four of them and you can choose what they will be an whether they will be enabled or not.
(Note: many versions of SampleTank do not show disabled effects names. Just a warning!).
Currently, the FXParams values are 0-127. In future versions,these will be more useful, as they
will show what the parameter is and what it’s “real” value is (based on a 0-127 range).
Enable Macro Knobs
This enables the Macro Knobs of converted SampleTank instruments.
Default: Unchecked
SFZ
Collapse To Groups
In the most basic mode, a SFZ le is formed as a Region for every sample reference. SFZ
also has a concept of Groups, and parameters can be written there so they don’t have to be
repeated in every Region. When this option is checked, Groups will be created to perform this
function.
Default: Checked
Opcode Exceptions
You can set any amount of opcodes that
WILL NOT be collapsed into Groups if the
above is checked. The common ones are
lokey, hikey,key,and pitch_keycenter.
Default: Checked
Do not group unless over [X] Regions
This sets a threshold on how many Regions
are needed for Group collapsing to occur.
Default: 1 region
Write Group Names
Other formats allow you to name your Groups - why not SFZ? When incoming formats that
have named Groups want to be converted into SFZ, this writes a special “name” opcode in the
Group to carry the name. THIS IS NOT IN THE SPEC, but it is enormously convenient.
Default: Checked
Group to Incoming Groups
Many new modern formats use the Group concept to contain their Zones, and often these
Groups are named. Again, Translator’s rst call is to translate exactly the incoming format, but
sometimes you also care about the cleanliness of organization of the new SFZ le, because you
often want to tweak it to taste afterwards. Check this option if you want to force the incoming
Group structures to be preserved, and also named accordingly. This may compromise a perfect
translation, sometimes it doesn’t matter.
Default: Checked
Page 83
Page 84

Translator™Format Preferences - SoundFont
Use “key” opcode when lokey=hikey
SFZ has a opcode named “key” which is usually misused because the SFZ published public spec
is too vague about it. We don’t want anyone to use it, but if you REALLY want to, checking this
option will use the “key” opcode when the lokey and hikey are the same.
Default: Unchecked
Write Ogg Vorbis les as the destination sample type
SFZ supports .ogg samples, for new SFZ samples to be Ogg ones, check this option.
Default: Unchecked
Write All Opcodes
If a parameter comes in and it is the default value, Translator doesn’t write an opcode. But
something you want the opcode to be written so editing is easier. This option writes all the
popular opcodes regardless of if they are the default value.
Default: Unchecked
Header Text Compositions
SFZ has the ability to write comment lines. Our SFZ les have a default header text at the top,
but this option allows that to be changed to one you select, and you can comment your Groups
and Regions too.
Opcode Separator
The SFZ spec says that opcodes have to be separated by whitespace. (Actually it’s slightly
more complicated, but that’s the general idea.) This option gives you four types of white space
to separate your Opcodes - a Space, a Carriage Return and Line Feed (CRLF, typically for
Windows), just a Carriage Return (CR), or a Line Feed (Mac typical).
Default: Space
Sample Opcode Placement
Every Region has a “sample” opcode. (We do not write samples in Groups, although you can if
you want.) This option determines if it is placed at the beginning or the end of a Region, or if it
doesn’t matter.
Default: Doesn’t Matter
SoundFont
Translate Type
When you translate a SoundFont le, this determines whether you translate all the Instruments
or all the Presets (which are collections of Instruments).
Default: Presets
Naming
SoundFonts have an internal Bank name.
Some programs ignore this and make it
irrelevant; some pay attention to it. As a
result, the “name” of the SoundFont could
be considered the internal name, or the
le name, depending on which program
made the SoundFont. This option gives you
control of how the destination les or folder
are named.
Default: Based on File Name
Page 84
Page 85

Translator™ Format Preferences - Structure
Include non-reference source samples when -> SoundFont
After it is nished composing a SoundFont, Translator looks through the new le and deletes all
unreferenced samples within the le. This option prevents this from happening, in the case that
you want your new SoundFont to include non-referenced samples that you might like to use
later on.
Default: Unchecked
Show Instruments on Interface
Although Presets are the primary Instrument unit in a SoundFont (history trumps idealism),
sometimes you may like to see the Instruments in a SoundFont. Checking this option enables
this.
Default: Unchecked
Write 24-bit SoundFonts
Checking this option will write a 24-bit SoundFont if the incoming format requires it.
Default: Unchecked
Export 24-bit SoundFonts as 16-bit unconditionally
When translating a 24-bit SoundFont, even though the destination format may handle 24-bit or
higher bitrates, Translator will not write it as 24-bit but as 16-bit if this option is checked.
Default: Unchecked
Write exported lenames with Bank and Program Numbers
Every SoundFont Preset has a MIDI Bank number and Program Number on it. This option makes
Translator, when able to, to write those numbers into the lename; e.g. “002_024 Brass” means
the 3rd Bank and Program Number 24 for a Preset called Brass.
Default: Unchecked
Digidesign Structure and SampleCell
Create Monolith
When converting into Structure, this creates a monolith le where the .patch le contains all
the samples internally.
Compress Path Data
A Structure le is pretty messy inside;
it contains a lot of information. It has
methods to cut down on this information,
but including these slows down the
conversion time. This options allows turning
this on or off. It does not in anyway affect
the nal sound product.
Effect Type
A Structure Patch can include one or more
effects. Often an incoming sound does not
include an effect, so this is handy to include
a basic reverb, for example. Or perhaps
you have something specic you want to
put on all you new Structure les. You can also set the Wet:Dry balance of this effect.
Program Icon
In the Structure interface, a Program can have it’s own icon, usually this is author/company
that produced the le. This enables you to use your own in newly-created Structure patches.
Page 85
Page 86

Translator™Format Preferences - Structure
Keywords, Ranking, Category, Manufacturer
Structure has a fairly powerful database in which you can nd your patches and sounds. These
options enable you to write into your newly-created Structure patches database information so
it can slide right into your current setup, so you don’t have to manually do it later.
Knobs, Initial, Label
Structure has some “realtime knobs” that allow you to connect them to internal functions.
These options enable the routing of these, what their initial values are, and how they are
labeled.
Size Threshold for identifying “Blank” Sample
SampleCell Instruments have one “keymap” of samples it references. The twist is that every
key must have a reference. In cases of keys or velocities that are not meant to reference
any sample, programmers have used a “blank” sample that is either with no data in it or a
very short one. Since there is no real way of determining if a sample is “blank” or not, this
determines what is the minimum length of sample that can be judged as “not blank” and
allowed in as a reference and not ignored.
Default: 200
Only translate SampleCell Instruments and Banks when translating in bulk (ignore
single samples)
Self-explanatory - converting a whole disk or folder of SampleCell Instruments, Translator will
only convert the Instruments and Banks (and with it the Samples) and ignore converting the
Samples in-and-of themselves as unique units.
Default: checked
Force 44.1kHz sample rate
SampleCell came in two avors -the ones that used the SampleCell card, and SoftSampleCell -a
program that could use any soundcard. Apparently, the card only played back at 44.1kHz and
thus there was tuning offsets applied that simulated 44.1kHz playback for non-44.1 samples.
This option can be enabled if you encounter these types of sounds.
Default: Unchecked
Force NULL SYMBOL replace
For some strange reason (and SampleCell, because of its age, can be really strange) certain
SampleCell libraries reference samples that have a NULL SYMBOL at the end of their name.
Hans Zimmer Guitars Vol. 1 is an example of this. Now, there is a difference between a
NULL character (the number 0) and the NULL SYMBOL character (Unicode symbol 0x2400).
SampleCell is hardwired to look for NULL and NULL SYMBOL when a zero is in the sample name
within the Instrument le. Checking this option forces this for all libraries.
Default: Unchecked
“Blank” Mono sample location
When converting into SampleCell, Translator may need to write a “blank” sample to cover a
non-sounding key or velocity. This enables one consistent mono “blank sample” instead of
having to write millions of them around your disk.
“Blank” Stereo sample location
See above. There two separate blank les - mono and stereo, because SampleCell Instruments
can be either mono or stereo - not both.
Parameter Tolerance
SampleCell Instruments share their envelopes, LFO’s, and modulators with one global set.
There cannot be settings for every reference. Thus, if incoming references require unique
values, Translator is either going to write new Instruments that accommodate this (and put
them together as a Bank when nished), or you can use the Parameter Tolerance value (in a
percent) to “tolerate” certain values and trade off complexity for the convenience of having a
Page 86
Page 87

Translator™
single Instrument represent your incoming Program, rather than a multi-Instrument Bank.
Default: 0%
Go To Comparison Options button
Takes you to the master Comparison Options area (under Options). This is Parameter Tolerance
from a different angle - on a parameter set basis, you can choose to ignore incoming values
when it comes to comparisons. The Parameter Tolerance value is applied to those parameter
sets that are not ignored.
Format Preferences - Synclavier
Synclavier (Hi-Tech Edition only)
Show selected disk in terms of Categories
Synclavier Optical Drives only hold samples. Synclavier samples have categories set on them.
Checking this option forces the interface to view the samples under folders that represent their
categories.
Default: Checked
Transpose
A global transposition parameter to add to
any outgoing conversion.
Default: 0
Check Source Winchester initially
When looking for samples from a Timbre,
when this option is checked, it will favor
any samples found on the Winchester the
Timbre exists on.
Default: Checked
Drives to index for Samples
These are the images that Translator will look for samples on for the Timbres you want to
convert. The Add and Delete buttons enable adding and deleting; you can also INSERT and DEL
selected les, plus the list allows dropping from the Finder/Explorer.
WusikStation
Version
Choose between WusikStation 3 or 4 les.
Default: Version 4
Parameter Tolerance
When converting INTO this format, there
may be structural limitations where if you
wanted to ensure all parameters were
converted perfectly, you’d end up with
multiple Programs/Presets being created, perhaps in more of a mess than you prefer. Setting
Parameter Tolerance to a higher percentage gives some grace to these parameters.
WusikData Path
This is the hardcoded path where Wusik Programs and Samples are written, so the Wusik
pulldown menu sees them. This enables Translator to know where it is when you select
WusikStation in the Master Translation Dialog.
Page 87
Page 88

Supported Formats
Translator™Supported Format
Software Samplers
SOURCE FORMATS
Native Instruments Kontakt(.nki, .nkm, .nkb)
Apple EXS24 Mrk I and Mark II (.exs)
Tascam GigaStudio (.gig)
Cakewalk SFZ (.sfz)
CamelAudio Alchemy (.acp)
Digidesign Structure (.patch)
Propellerheads Reason NN-XT (.sxt)
Steinberg HALion 1 and 2 (.fxp)
MOTU MachFive 1 (.m5p; .m5m)
Native Instruments Reaktor (.map)
Creamware Pulsar/STS (.p;..sts; s; .wav)
Akai MESA 1 and 2 (.prg;.s3p)
SoundFont (.sf2)
Downloadable Sounds (DLS) (.dls)
Bitheadz Unity DS-1 (.uds)
Speedsoft VSampler (.vbs)
Digidesign SampleCell
Software Drum Machines/Groove Boxes
Native Instruments Battery (.kit; .kt2; .kt3)
Steinberg LM-4 mrk I & II (.txt;.fxp)
FXpansion DR-008
Workstations
Yamaha Motif (all versions)
Yamaha Tyros 2-3-4 (.tvn; .uvn)
Alesis Fusion (.afp;.a;.afs)
Korg Triton/M3/Kronos (.pcg;.ksc;.kmp;.ksf)
Roland Fantom-S/X/G (.svd)
Hardware Drum Machines/Groove Boxes
Akai MPC-60/3000/2000/1000/2500/500/5000
Akai MPC-4000
Roland MV-8000/8800 (.mv0)
Hardware Samplers
Akai S-1000/3000
Akai S-5000/Z-Series
Roland S-5x, Roland S-7x
Emu Emax II, Emu E3/ESi, Emu E4/EOS
Ensoniq EPS/ASR (.efe;.efa)
Kurzweil (.krz;.k25;.k26)
Yamaha A-3000/4000/5000 (non-proprietary only)
John Bowen Solaris
Synclavier (Hi-Tech Edition only)
Fairlight (Hi-Tech Edition only)
Waveframe (Hi-Tech Edition only)
Slice Formats
Recycle 1 and 2 (.rcy; .rex; .rx2)
ACID Files (.wav)
AppleLoops (.aif; .aiff; .caf)
Stylus RMX (no Core Library)
Zero-X BeatQuantizer (.zgr; .wav)
NI Kontakt (Beat Machine mode)
Emu EmulatorX Twista-Loop
Single Samples
WAVE (.wav)
AIFF (.aif;.aiff)
CAF Files (.caf) (Windows: Uncompressed only)
Akai MPC (.snd)
Korg Sample (.ksf)
MP3 (.mp3)
Ensoniq PARIS (.pat)
DESTINATION FORMATS
Software Samplers
Native Instruments Kontakt(.nki, .nkm, .nkb)
Apple EXS24 Mrk I and Mark II (.exs)
Tascam GigaStudio (.gig)
Cakewalk SFZ (.sfz)
CamelAudio Alchemy (.acp)
Propellerheads Reason NN-XT (.sxt)
Steinberg HALion 1 and 2 (.fxp)
MOTU MachFive 1 (.m5p; .m5m)
Digidesign Structure (.patch)
Native Instruments Reaktor (.map)
Akai MESA 1 and 2 (.prg;.s3p)
Creamware Pulsar/STS (.p;..sts; s; .wav)
SoundFont (.sf2)
Downloadable Sounds (DLS) (.dls)
Ableton Live Drumracks (.adg)
Software Drum Machines/Groove Boxes
Native Instruments Battery (.kit; .kt2; .kt3)
Steinberg LM-4 mrk I & II (.txt;.fxp)
Workstations
Yamaha Motif (all versions)
Yamaha Tyros 2-3-4 (.tvn; .uvn)
Alesis Fusion (.afp;.a;.afs)
Korg Triton/M3/Kronos (.pcg;.ksc;.kmp;.ksf)
Roland Fantom-S/X/G (.svd)
Hardware Drum Machines/Groove Boxes
Akai MPC-60/3000/2000/1000/2500/500/5000
Akai MPC-4000
Roland MV-8000/8800 (.mv0)
Hardware Samplers
Akai S-1000/3000
Akai S-5000/Z-Series
Roland S-7x
Emu E3/ESi
Emu E4/EOS
Ensoniq EPS/ASR (.efe;.efa)
Kurzweil (.krz;.k25;.k26)
John Bowen Solaris
Slice Formats
ACID Files (.wav)
AppleLoops (.aif; .aiff; .caf)
Stylus RMX
Recycle 1 (.rcy; .rex)
Zero-X BeatQuantizer (.zgr; .wav)
NI Kontakt (Beat Machine mode)
Emu EmulatorX Twista-Loop
Single Samples
WAVE (.wav)
AIFF (.aif;.aiff)
CAF Files (.caf) (Windows: Uncompressed only)
Akai MPC (.snd)
Korg Sample (.ksf)
MP3 (.mp3)
Ensoniq PARIS (.pat)
Page 88
Page 89

Translator™
Format Conversion Exceptions
Format Conversion Exceptions
It is a recent development over the last
10 or so years to “encrypt” audio samples
to enforce a copy-protection scheme.
Since developers started making their own
samplers, they use this connection to allow
only licensed users to play their sounds. If
it was possible to translate these samples to
other formats, it would defeat their copyprotection schemes. Thus, Translator can’t
and won’t be able to convert out of these
formats, as we respect the developer’s
intent.
Kontakt: Non-encrypted only. Kontakt .nki’s
that read .nks or .nkx les are classied as
encrypted. Kontakt 4.2 can read and write
everything EXCEPT modulators and lters.
Kontakt 4.2 Banks are not supported yet.
Kontakt 5 is not supported yet; reading or
writing.
Structure: Non-encrypted only; as of this
writing that only involves the factory library.
Any Structure le that references a .big le
is encrypted.
can read .ytil les to show their mappings and
audition their samples, with the exception of
.ytil les that reference samples in the large
.ytif images.
SampleTank: Translator does not convert
SampleTank les, but Translator can create
them. Translator can read SampleTank
Instruments to show their mappings and
audition their samples, with the exception of
2-Pak compressed samples.
Reason Rells (.r les): Not supported. Any
Reason .sxt le that references anything in a
Rell cannot be translated.
Recycle: Recycle 2 les cannot be written by
anything other than Recycle itself.
Stylus RMX: Only includes User Libraries; any
Core Library or XPander les are encrypted and
are not supported.
CAF: On Windows, Translator can only read or
write uncompressed types of CAF les.
Giga: Non-encrypted only; this includes GVI
Virtual Instruments.
SFZ: Non-encrypted only; as of this writing
that only involves the Garritan Aria libraries.
Any SFZ le that references an .audio le is
encrypted.
HALion: Non-encrypted only; as of this
writing this is HALion 3 and upwards.
ALL HALion 3 and up les are completely
encrypted.
Mach Five: Mach Five 1 is only supported
thus far. When Mach Five 2 is supported, it
will be non-encrypted only. As of this writing
this only involves the factory library. All
user-written Mach FIve 2 and 3 les will be
supported.
Emulator X: All .exb banks that reference
.ebl les are supported. Any sample les
that are not .ebl are encrypted and cannot
be converted.
Hybrid formats: A hybrid format is one that
can reference RAM samples and samples
indexed in ROM (e.g. a Kurzweil le that loads
samples as well as uses the ROM banks.)
Translator will convert the RAM sections but not
the ROM sections.
Proprietary formats on computer: All
proprietary formats, such as Akai Programs,
E4 Banks, have counterpart les that can exist
on computer-type drives. These extensions are
shown above. A counterpart le may or may
not be able to be written or read by the native
hardware sampler. Translator can convert into
or out of these formats.
Independence: All Independence .ytil
les are encrypted and cannot be read,
but Translator can create them. Translator
Page 89
Page 90

Menus - File Translator™
Menus - File
Translate
Performs a translation in the Object List, on whatever is selected.
Sample functionality as the Translate button on the interface.
Exit (Windows Only)
Quits the whole mess.
Menus - Operations
Create Virtual Drive
This allows you to create a new Virtual Drive form scratch, or
a Virtual Drive from a current drive.
Open Images Folder
Opens the Images folder where Virtual Drive’s or their
Aliases/Shortcuts are stored.
Format
This shows you a list of drives that you can format into a proprietary format (Akai, Emu, etc.)
Be careful with this function, but there are plenty of warnings along the way.
Eject
This shows you a list of drives where you can eject their contents or remove them from the
system. Very handy for the Mac, and even Windows.
Reference Manager
Allows you to start a Reference Manager function on the selected les listed in the Object List.
For more information, please see the Reference Manager section in this document.
Audio Processor
This opens the Audio Processor. For more information, please see the Reference Manager
section in this document.
Preferences
This opens the Preferences dialog. For more information, please see the Preferences section in
this document.
Format Preferences
This opens the Format Preferences dialog. For more information, please see the Format
Preferences section in this document.
Restore Default Settings
This erases your user preferences and restores the default set. This is equivalent to “trashing
your preferences” on the Mac. This does not erase your
registration information.
Menus - View
Show/Hide File Filter
Removes all the Mutes enabled in the Main Interface.
Show Instrument Player
Shows the Instrument Player.
Page 90
Page 91

Menus - HelpTranslator™
Select Root Folder...
This allows you to view only the items within a single folder. This allows you to clear out the
irrelevant items in the pane and decrease the extreme amount of vertical latitude is showing.
You can go back to the regular view by clicking Show and selecting Hide Root Folder.
Go to...
This functions allows you to look at a folder without having to manually drill down to it. Of
course you have to select the folder using the basic Open dialog, but it allows leveraging the
power of the Open dialog.
Show Full
Restores the full viewing behavior of the interface, in case you restricted it (see above).
Refresh
This refreshes the entire Translator screen. This is the same as clicking Refresh on the interface.
Menus - Help
Contents
Opens the Translator Help File.
Troubleshooting
Opens the Translator Help File to the Troubleshooting page.
Bug Reports
Opens your default browser and through the Internet goes
to the Translator 6 Bug Reports page.
Sending Files
Opens the Translator Help File and goes to the Sending Files section.
Translator 6 Home Page
Opens your default browser and through the Internet goes to the Translator 6 Product page.
Check For Updates
Connects to the Chicken Systems Update Server to check for any updates.
Format Status
Opens your default browser and goes to the Translator 6 Format Status page.
Online Documentation
Opens your default browser and through the Internet goes to the Translator 6 Documentation
page. This may have more update to date documentation than what is on your computer.
Support - Email
Opens an Email dialog to automatically send an email to Chicken Systems Translator 6
support.
Support - Forum
Opens your default browser and goes to the SamplerZone Translator Forum.
Support - Chat
Starts a chat with a Chicken Systems Engineer (during business hours)
Support - Movies
Opens your default browser and goes to the Translator 6 Product Video page.
About Translator 6
Shows the Splash Screen, which shows you your registration information and the current
version number you are using.
Page 91
Page 92

Troubleshooting Translator™
Troubleshoooting
Your Translator™ program should be rock-solid and give you no problems. However, there is
always stuff that can go wrong.
Below are some techniques on wiggling Translator™ out of a crashing or sticky state. If none
of these help, please contact Chicken Systems Technical Support at support@chickensys.
com or call 320-235-9798.
Authorization Issues
When you start up Translator for the rst time, you are greeted with the usual Code Entry
screen. We call it the “Reg App”.
If You Have Not Received Your CD Yet
If you do not have your CD yet - if you have never received it - enter your UnlockCode
and Email Address , leave the KeyCode eld be, and click Submit. The Chicken Systems
Authorization Server will give you a new KeyCode for that computer.
If You Have Your CD
Put in your UnlockCode, KeyCode and Email Address, with your CD inserted. It should authorize
off the CD and start up the program. As long as your computer remains consistent, this
authorization will last the life of your computer.
If you have your UnlockCode and Email Address, but do not have your KeyCode, you can
retrieve it at www.chickensys.com/translator/register as long as your registered email
address is one you can receive your email on. If you lost any of your codes, please email
support@chickensys.com and we will dig them up for you. If your email has changed, just use
the old, but registered, email address. It’s just for ID anyway. If you’d like us to change your
registered email address to your new one, just email support@chickensys.com and let us know.
Chicken System products use the CD as a dongle to authorize the software. Authorization
is only mandatory upon initial installation. Further authorizations are required if you are
reinstalling or installing on another computer. Otherwise, re-authorizing should never be
necessary, although it possibly may be due to computer unknowns or similar. In other words,
your CD is necessary to retain in order to insure continual usage of the software. If you lose
or damage your CD, it can jeopardize future use of the software. If you have lost or damaged
your Translator CD, you need to purchase a replacement for a nominal cost. You can order it at
SamplerZone.com; go to this URL:
www.samplerzone.com/catalog/product_info.php?manufacturers_id=10&products_id=47
Please store your Translator CD away for access when you need it, and make a CD copy of it for
greater security.
Startup And Operation Issues
The rst thing you should do if you are stumped on a problem is to trash your preferences.
Many issues are related to that. Here’s how:
Selecting Operations-Restore Default Options and restarting Translator™, or
Press the SHIFT button during start up, or
(Mac-only) Go to /Users/[you]/Library/Preferences and delete the com.chickensys.
translator6.plist le
(Windows-only) Go into the Registry (use RegEdit) and delete the HKEY_CURRENT_
USER/Software/Chicken Systems, Inc./Translator 6 key.
These techniques delete your user preferences; it does not trash your registration codes etc.
Page 92
Page 93

Translator™ FAQ
Another start up issue is that Translator™ remembers the last location you were at in the
browser. Pressing the CONTROL key during startup allows Translator to ignore this setting and
just start up without drilling and selecting the last position.
Translator also supports a series of key pressing during start up that can help. These can be
pressed in any combination.
On Windows, there are several similar “switches” you can add to your shortcut to enable these
types of options. An example of this usage is in the Target eld of your shortcut, disabling MIDI
would look like this:
“c:\Program Files\Chicken Systems\Translator 6\Translator 6.exe” /NOMIDI
/NOMIDI Disregards enumerating MIDI Devices
/NOSOUND Disregards enumerating Sound Devices
/NOSCSI Does not search for proprietary drives or devices (Akai, Emu, etc.)
/NOVIRTUALDRIVE Does not enumerate Virtual Drives
/NOPREF Erases your user preferences
/NOBROWSERUPDATE Disables automatic browser updating (changed/added/deleted les
on your drive) during your session
Other Operation or Translation Issues
Most other issues occur during the conversion stage. Almost always, to report this, use the
Bug Reports page and zip up and submit the le you are trying to convert. If that le is on a
proprietary disk, use these techniques from the Sending Files section of this document to make
a le that can be sent to Bug Reports.
For all other queries, please contact Chicken Systems Techinical Support at support@
chickensys.com or call 320-235-9798 for any questions you have.
FAQ
Your Translator™ program should be rock-solid and give you no problems. However, if you
encounter any problems, here’s a list common answers to common questions. Past that, feel
free to contact Technical Support at support@chickensys.com or call at 320-235-9798.
Currently there are no entries in this printed FAQ. There is a Translator™ FAQ up on the
Chicken Systems Web site: www.chickensys.com/support/software/translator/faq. It is
extremely LIKELY that your question is answered here! PLEASE do not contact us until you have
read completely through this resource. It probably will answer your question.
Page 93
Page 94

Translator™Bug Reports
Bug Reports
Translator should not crash or show errors, but reality insists that all programs do at some
point. Translator, since it deals with many undocumented formats and les created from many
sources, can be especially vunerable.
If you have a problem with a translation, or receive an error within Translator concerning a
le, the BEST way to communicate that is to le a Bug Report and send us the source le - the
initial le, not the translated le - with a brief description of what the problem is.
To use the Bug Reports system, go to HelpBug Reports in the program. It connects you
to our Bug Reports website, has a form you
ll out that gets the information we need from
you, and permits you to send us the source le
directly from that web page.
We recommend you to use the page
rst. We do invite you to email us or call us
with a problem, but most of the time we just
direct people to the Bug Reports web site to
document the information in writing and for
them to send us the le. Translator has 50,000
users across the globe, and it is not possible
to track all our users particular questions and
issues through personal correspondence.
Once you establish an issue with the Bug
Reports web site, you get an email back with
a link to your issue that you can consistently
check on. We try to address and close issues
within 24-48 hours.
THE IMPORTANT THING IS TO ENABLE US TO EXACTLY REPLICATE YOUR ISSUE!
THIS IS WHY WE NEED THE SOURCE FILE IN ALL CASES. PLEASE REMEMBER THIS!
Bug Reports Page: www.chickensys.com/translator/bugreports
Email: support@chickensys.com
FTP: ftp.chickensys.com
(please make sure le names DO NOT have spaces in them!)
User: incoming@samplerzone.com
Pass: lesend123
You Send It: www.yousendit.com
How To Create Files To Send Us
If you are translating a DOS le (e.g. SoundFont), this is easy - zip up the le and submit it.
But, what if, for example, if you are trying to convert an Akai Program into a GigaStudio .gig
le, and you get an error, you would want to send the actual Akai program (plus the samples)
to us. But the Akai les are on an Akai-formatted disk - how do you send that? The way you
can do it is through a DOS Counterpart le. In this Akai case, this would be an .ak1/.ak3 le.
You don’t necessarily have to make counterpart les; Translator makes them for you in-process.
With all proprietary conversions, Translator dumps the le into this folder:
Page 94
Page 86
Page 95

Contacting Technical SupportTranslator™
Mac
/Users/[you]/Library/Application Support/Chicken Systems/Translator 6/Temporary Files
Windows XP
C:\Documents and Settings\[you]\Application Data\Chicken Systems\Translator 6\
Windows 7/Vista
C:\Users\[you]\AppData\Roaming\Chicken Systems\Translator 6\
You can also create a DOS Counterpart le by simply “converting” the proprietary Bank or
Program to the appropriate counterpart le.
Akai S-1000 Volume or Program .ak1
Akai S-1000 Volume or Program .ak3
Roland Performance or Patch .rol
Emu E3/ESi Bank .esi
Emu E4 Bank .eos/.e4b
Ensoniq EPS/EPS 16-Plus Instrument .efe
Ensoniq ASR-10 Instrument .efa
Instead of selecting your destination format, select the appropriate counterpart le. For
instance, in the above you would choose Akai Image (.ak1, .ak3). Your Akai le will then be
saved as xxxx.ak1 (or.ak3, in case of S-3000 Programs). Zip that up and send that to us.
Temporary Files
Temporary Files
Additional Notes
Again, we make a special effort to analyze les and comment or x the problem with 24
business hours through our Bug Reports page listed above.
Regarding larger les: they are easier to FTP than to e-mail, although our systems can handle
either method of any size without problem. The Bug Reports web site can handle any size. Any
email limitation is usually on your end. If you FTP a le, make sure that the lename DOES NOT
have spaces in it. This is a natural limitation of the Internet and FTP servers in general.
Please give us a brief complete explanation of the problem. We try to answer all emails within
24 hours. Please be patient if the answer does not arrive immediately.
Contacting Technical Support
Chicken Systems Technical Support can be reached in many ways: Phone, Email, Chat, or via
our SamplerZone.com Forum. Please give us a brief complete explanation of the problem. With
Email and Forum questions, we try to respond within 24 hours, Please be patient if the answer
does not arrive immediately.
You may Phone or Chat with us also if, after reading and looking at the documentation, you
are stumped. Our usual ofce hours are 8am-6pm Monday-Friday. We are often in the ofce on
weekends and holidays on an infrequent basis.
Phone: 800-877-6377 United States, 320-235-9798 elsewhere. Please do not mind the
crabby technical support engineers.
Email: support@chickensys.com
Chat: www.chickensys.com, use the Chat link on the left
Forum: www.samplerzone.com/forums/translator
Please give us a brief complete explanation (how’s that for non-sequiturs?) of the problem.
We try to answer all emails within 24 hours. Please be patient if the answer does not arrive
immediately.
Page 95
Page 96

Updating Translator™
You may call us also if, after reading and looking at the documentation, you are stumped. Our
ofce hours are 8am-6pm Monday-Friday. We are often in the ofce on weekends and holidays
on an infrequent basis.
In the US and anywhere in the world: 320-235-9798. Please do not mind the crabby technical
support engineers.
Updating
We update Translator™ as needed, for bug xes, improvements, and additions to the
library.
Translator™ automatically checks if there is a update available when you start it up. (If
desired, you can turn this checking off in Preferences.) You can also check for updates by
selecting Check for Updates under the Help menu. (This only works, of course, if you are
connected to the Internet on that computer.)
If your Translator™ computer is not connected to the Internet, or for some reason you
can’t run Translator™, you can check for updates at:
www.chickensys.com/translator/userupdates
You can check what is your Translator™ version number by checking the About Box (under
Help in Windows and under the App Menu on Mac), or by checking Get Info [Mac] or Properties
[Windows].
Page 96
Page 97

Contact Us
Chicken Systems, Inc.
714 5th Street SE
Willmar, MN 56201
Phone: 800-877-6377 United States, 320-235-9798 elsewhere.
Email: support@chickensys.com
Chat: www.chickensys.com, use the Chat link on the page
Forum: www.samplerzone.com/forums/translator
Contact UsTranslator™
Page 97
Page 98

Credits Translator™
Credits
Developing software is at the core a one-man process, but making it good requires a team.
Translator™ 6 really benetted from good teamwork and solid commitment to quality
software. The Translator™ 6 team is:
Garth Hjelte: Project Lead
Jeff Godbloch: Programming and Technical Writer
Roger Weingarten: Programming
And thanks to:
Cheryl Ann Mays at SamplerZone for the best sales team ever
Mike Acosta at RolandUS for the encouragement
Christian Schmitz, Glenn Austin, Joe Strout for prompt, clear, concise technical assistance
Dan Dean and Ernest Cholakis for timely feedback and friendship
David Viens at Plogue for SFZ assistance
Kyle Zambora at Nine Volt Audio for great ideas and partnership
Larry Hopkins for more great ideas and hospitality
Native Instruments, Digidesign, Eastwest, Akai/Alesis, Kurzweil, and Emu product
managers and technical support crews for their thoroughness and assistance.
Page 98
 Loading...