

Page 1

MV Kit Creator™
Version 1.5, Build 1
Page 1
Page 2

(This page is intentionally left blank.)
Page 2
Page 3

MV Kit Creator™ Table Of Contents
MV Kit Creator™
Table Of Contents
Introduction.......................................
Basic Concepts...................................
Windows and Operation
Main Interface....................................
Main Screen......................................
Pads.................................................
Pad Contents.......................................
Partial/Patch Editor................................
Playback/Auditioning............................
Sound Database...................................
Sound Database Editor.........................
Common Operations
Working With Projects...........................
Importing Samples To Pads......................
Importing Recycle Files........................
Importing Akai MPC............................
Using The Database............................
Extracing .mv0 Files............................
Using the MV Viewer............................
.....................................................5
.....................................................6
......................................................8
......................................................9
....................................................10
....................................................11
....................................................12
....................................................14
....................................................15
....................................................16
....................................................17
....................................................18
....................................................19
....................................................20
....................................................21
....................................................22
....................................................23
Menus
File...................................................
Function Buttons.................................
Pads.................................................
Tools................................................
Help...................................................
Other
Preferences.......................................
Tutorials............................................
Support
Troubleshooting...................................
FAQ...................................................
Bug Reports.......................................
Contacting Technical Support...................
Updating............................................
Contact Us.........................................
Credits..............................................
Page 3
....................................................24
....................................................25
....................................................26
....................................................27
....................................................28
....................................................28
....................................................31
....................................................32
....................................................32
....................................................32
....................................................34
....................................................35
....................................................36
....................................................37
Page 4

(This page is intentionally left blank.)
Page 4
Page 5
MV Kit Creator™ Introduction
MV Kit Creator™
Introduction
MV Kit Creator™ is a Mac and Windows
application that creates and edits MV8000/8800 kits (Instruments), and
manages your sounds and samples.
There are three versions: Pro, LE, and
Free. MV Kit Creator Pro contains all the
features described in this document. MV
Kit Creator LE sports many of the Pro
features but imposes several limitations,
such as composing instruments and MV0
export, You can view the other features
but you can’t take advantage of them. MV Kit Creator Free is
purely for demonstration and cannot save anything.
Features include:
* Create new MV-8000 Series Patches (.mv0 les) or modify existing ones
* Easy-to-use drag-drop “Virtual MV” interface. Allows dropping any sample on a pad, from
the desktop/hard drive or included Sound Database
* Operates independently of the actual MV-8000/8800
* Real-time auditioning with included audio streaming playback engine
* Waveform display and Zone/Partial display
* Powerful integrated Sound Database with user-dened categories, keywords, and grouping
* Edit all Roland MV Patch, Partial and Sample parameters, plus full naming ability
* Powerful Functions and Macros allow mapping samples with grace and ease
* Playable via onscreen Pads or via MIDI
* Macintosh and Windows compatible
This document assumes the Pro version in it’s writing. MV Kit Creator Pro and MV Kit
Creator LE can be purchased at SamplerZone.com.
This document is synced to the MV Kit Creator™ version denoted on the cover of this
document. It is a dynamic document and often is revised with every build of MV Kit Creator™.
In this document, the term “right-click” also refers to “control-click” on a Mac. Only “right-click”
will be used. Similarly, “Preferences” is term for different optional parameters that can be set
in the program; on the Mac you will see the word “Preferences”, but on Windows you will see
“Options”. In this document, Preferences will be used. Graphics are all from the Mac, but look
very similar to the Windows version.
Since the Roland MV regards the middle C key on a keyboard (MIDI note 60) as C4, by
default MV Kit Creator™ shows the textual representation of MIDI note 60 as C4. This is the
US representation. However, if you are more used to seeing C3 as middle C (like Kontakt or
EXS24), you can change this in Preferences-General.
If you are a registered owner, you are qualied for free updates for the life of the program.
You can download these from your program using the Check for Update feature, or from the
Chicken Systems Update Area.
Page 5
Page 6
Basic Concepts
Basic Concepts
The fundamental goals of the MV Kit Creator are:
* Create custom drum kits, loops,
and chromatic instruments for the MV8000/8800
* Maintain an organized database
structure of percussive and chromatic
sounds
* Allow a more organized way of viewing
MV-8000/8800 Instruments
* Allow ofine methods to handle and
audition .mv0 les
* Reduce the natural duplication of MV8000/8800 samples due to the monolithic
format
In this document, “MV-8000” will refer to
both the Roland MV-8000 and the MV-8800.
.mv0 les used on both instruments are the
same.
MV Kit Creator™
The term “right-click” is used for both
control clicking on the Mac and right clicking
on both the Mac and Windows.
Also, most of the screenshots in this document are from the Mac - the Windows versions look
very similar so this shouldn’t be an inconvenience.
Lastly, for brevity, the acronym MV Kit Creator™ will be used for MV Kit Creator.
Projects
When you start up MV Kit Creator™, you are always building a Project. (Don’t confuse this with
an MV-8000 Project, which is a song and instrument setup on the MV itself.)
A Project is simply the equivalent of a MV-8000 Instrument, only it can access any WAVE or
AIFF le on your computer, or any sample inside a .mv0 le.
Projects can be saved on your disk as small les, since they reference external samples.
Important Concept: you are NEVER working with a .mv0 le in MV Kit Creator™. When you load
a .mv0 le, you are loading it into a Project. Although a Project is mostly the equivalent of a
.mv0 le, it is a Project and NOT a .mv0 le. When you click the menu File-Save, you are saving
a MV Kit Creator™ Project (.mv8porject).
What does this mean? It means that when you use MV Kit Creator™, feel comfortable working
with Projects. When you want to output to .mv0, select Export to .mv0 under File.
Each Project has a name, which is printed in main screen at the top of the interface. You can
rename it using Tools-Rename Project or right-click on the Project name itself.
For more information on Projects, go to the Project chapter in this document.
Page 6
Page 7

MV Kit Creator™ Basic Concepts
Building Instruments
The purpose of a Project is to build an Instrument (that is, an .mv0 le) to use in your MV-
8000. You use the Pads on the Main Interface to arrange samples in the fashion you want them
to appear.
You can import samples using a variety of methods - dragging samples from outside or inside
your application, using the database, using right-click menus, or importing an entire .mv0 le.
The Sound Database in particular is well integrated into MV Kit Creator™ and offers an excellent
way to organize and build your Instruments.
For more information on importing samples to build Instruments, go to the Importing Samples
To Pads chapter in this document. For more information on the Sound Database, go to the
Sound Database Editor chapter in this document.
Playing Back Projects/Instruments
MV Kit Creator™ comes with an integrated multisample streaming playback engine. “Streaming”
means that it does not rely wholly on loading samples into memory like the MV-8000 does, but
plays the sample back from the disk as needed. This is very handy as it reduces load time to
nothing, and you are more able to build and work with instruments without the engine trying to
“keep up”.
This is the rst generation of the streaming engine, and as a result simply plays back
the samples and reproduces the tuning, looping, level, and playback attributes. Realtime
parameters such as Envelopes, LFO’s, Filtering, and similar partial parameters will not be
reected when playing the pads via MIDI or by clicking on the Pads. The streaming playback
engine has not been developed to that point yet, although we are working toward it and will be
implemented in later versions of this software.
For more information on Playback, go to the Playback/Auditioning chapter in this document.
Editing Partial and Patch Parameters
The MV-8000 has a full complement of parameters that affect your sounds, and the MV Kit
Creator™ is fully able to edit these parameters. For more information on editing Partials,
Patches, and other parameters, go to the Partial/Patch Editor in this document.
Saving MV-8000 .mv0 Files for use in the MV-8000
When you are all done and happy with your Project, it should be time to export it to a .mv0 le
to use in your MV-8000. Use File-Export to .mv0 to create a new .mv0 le from your Project.
Page 7
Page 8
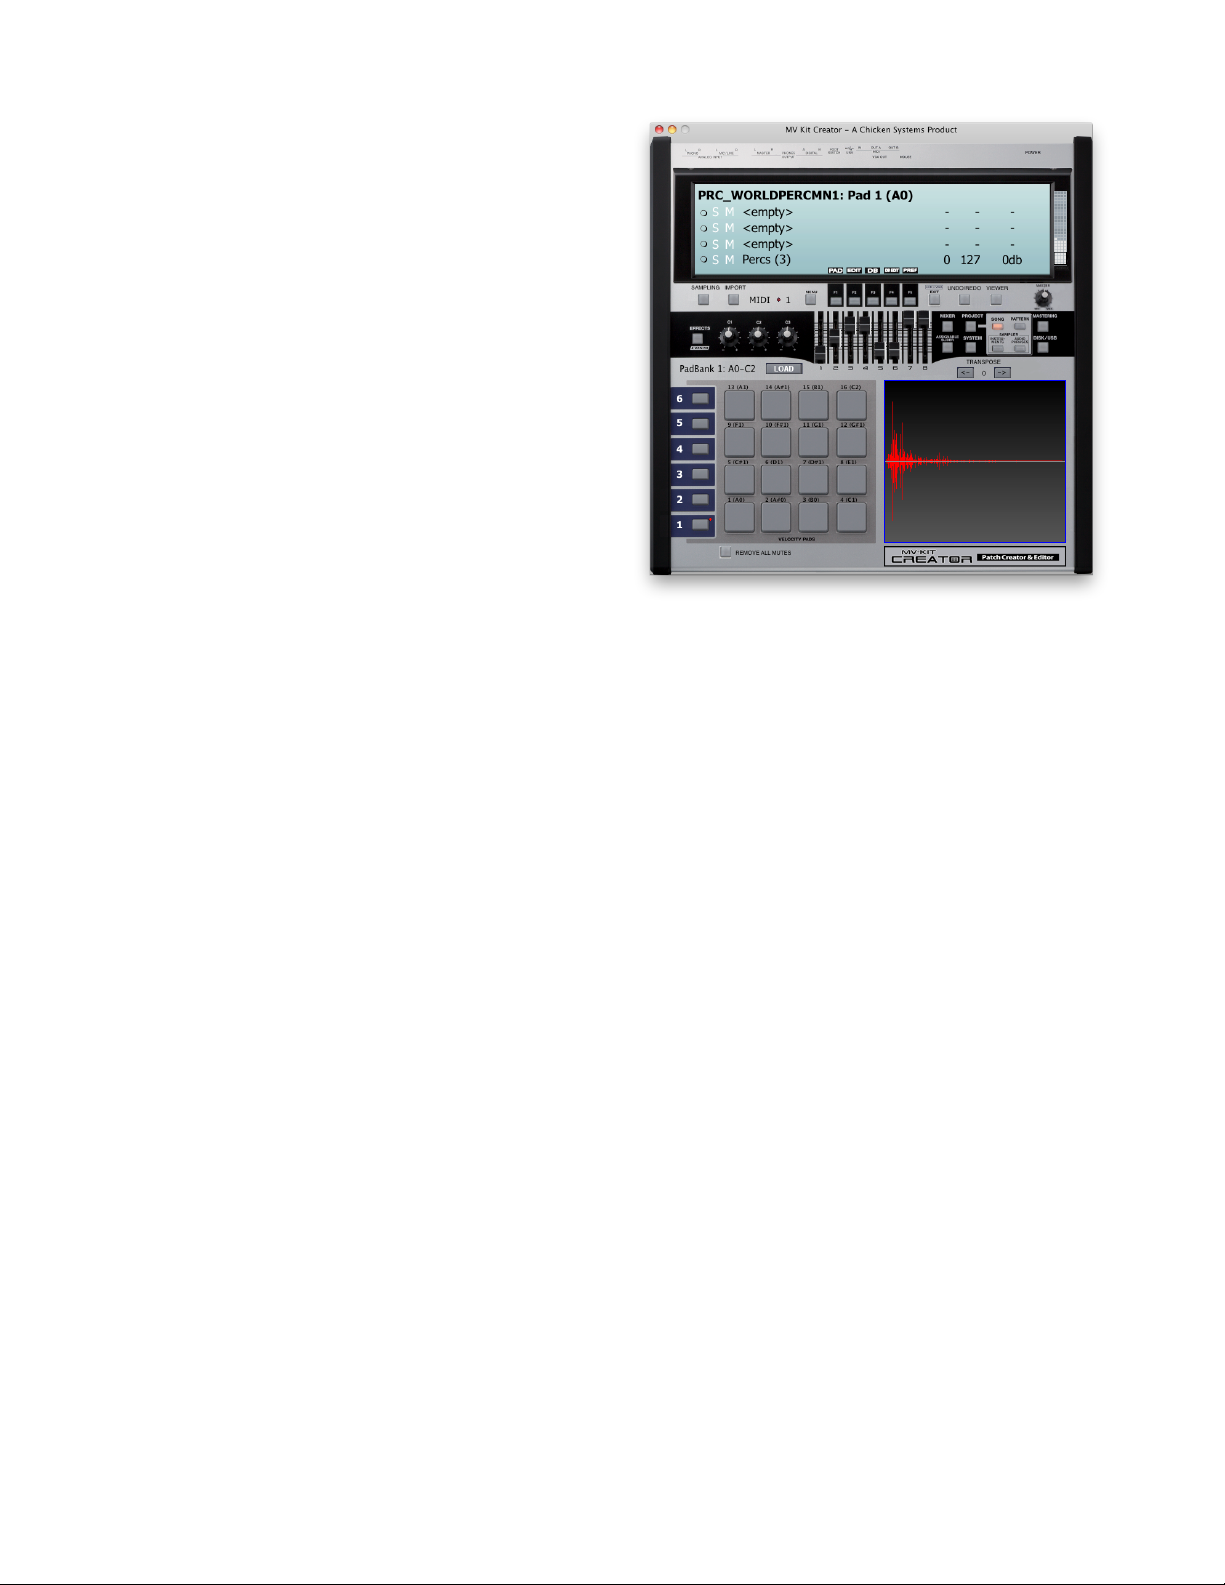
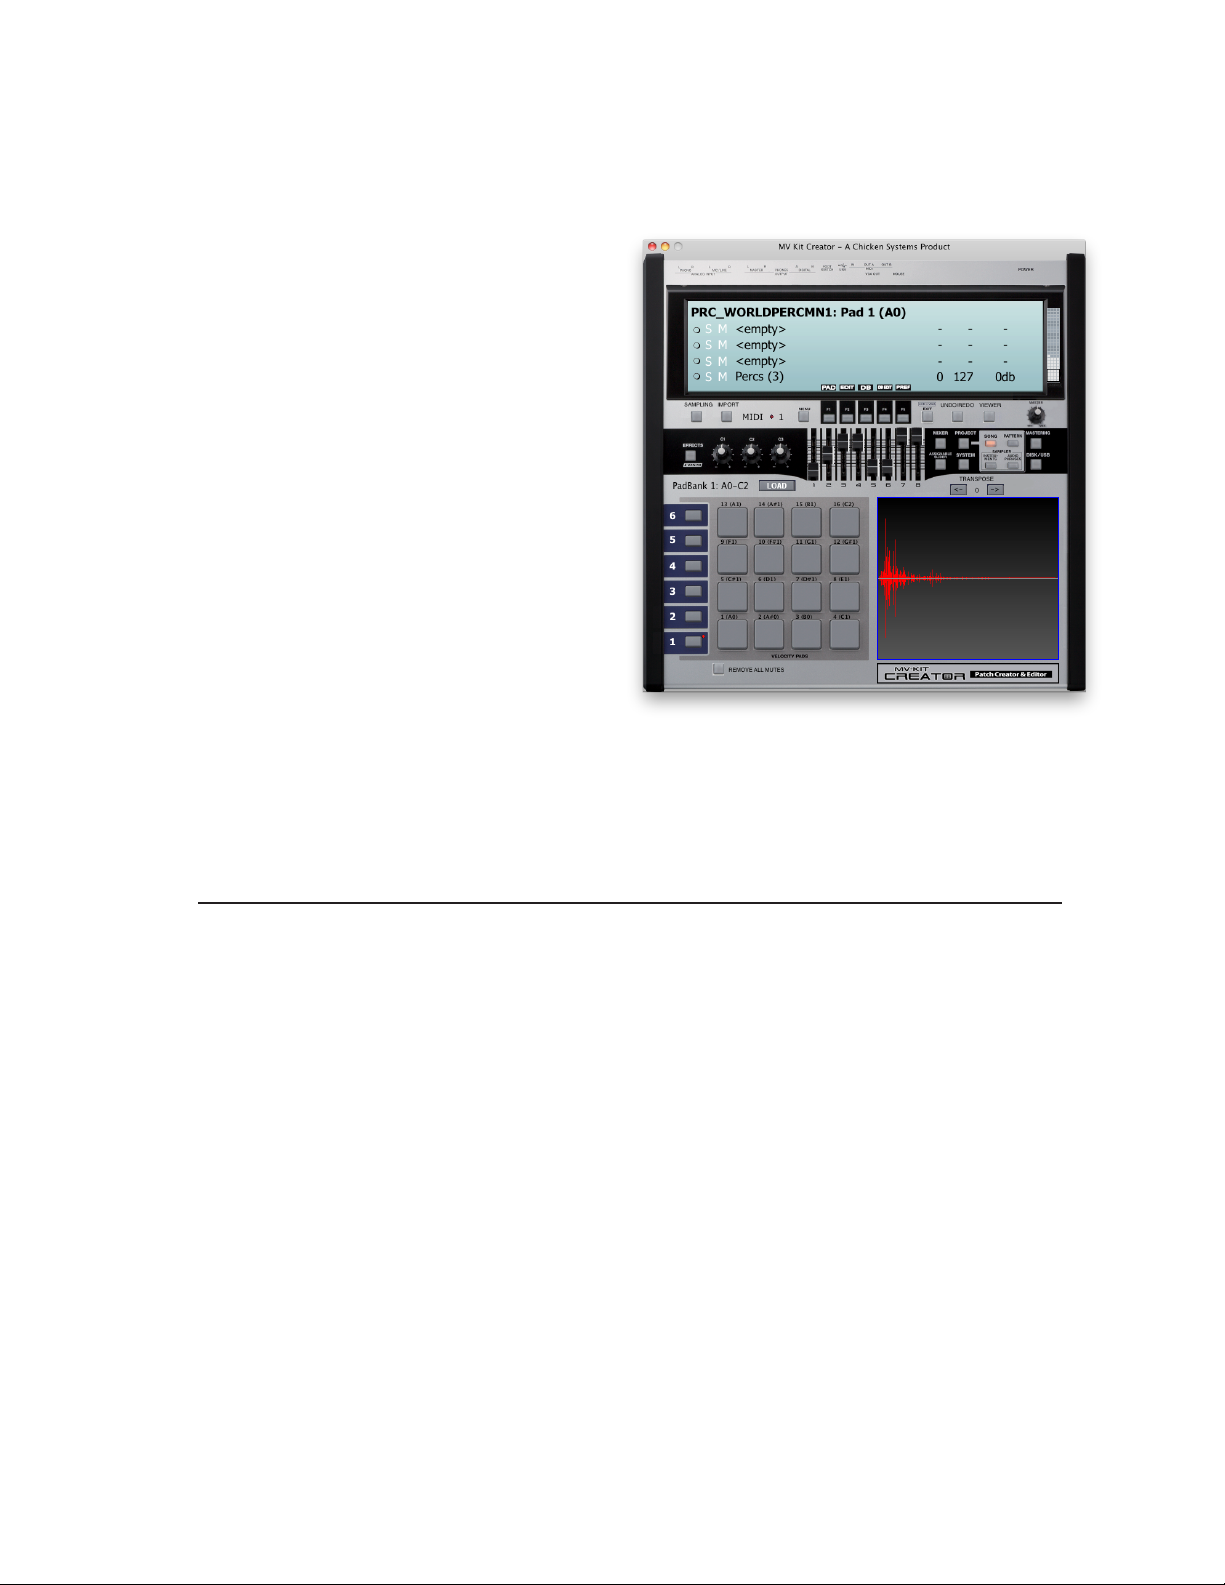
Main Interface
MV Kit Creator™
Main Interface
Look familiar? Looks like your MV-8000? It is
one!
Getting some caveats over with, this type of
interface is nice to look at but is generally
inefcient because of large amounts of space
unused and buttons we do not use. But, it is
what it is and it’s nice to look at.
The Main Screen is at the top of the
screen. This includes the Zones and several
important parameters. You can drop samples
on each Zone and right-clicking and clicking
each Zone exposes varies functions. Solo
and Mute labels allow you to solo and mute
specic Zones. Indicators are to the far left
that show you when the Zone is played via
the Pad or via MIDI.
The Function Buttons reside below this, allowing access to ve common windows (Pad Contents,
Partial/Patch Editor, two Sound Database views, and Preferences) to appear.
Eight Sliders appear below this. They do... nothing. But they slide and you can have fun with
them on days when you have nothing else better to do. Maybe one day we’ll hook them up to...
something.
Below this to the left are the Pads, separated into 6 Pad Banks. You can switch the Pad Banks
by selecting the proper button on the left.
Clicking on the Pads plays whatever is programmed into them. Right-clicking on a Pad exposes
several pertinent functions.
To the right of the Pads is the Graphical Wave Viewer. This shows the current sample being
played, or if none are played, it just shows the screen contents as they exist on the MV-8000
itself. Since it is understood that you can play several samples at once in MV Kit Creator™, this
simply shows the last one in the chain that was played. If you are playing MV Kit Creator™ via
MIDI, you might consider turning this viewer off in Preferences.
The Load button above the Pads reloads the current state of all the PadBanks into the internal
player. When importing individual samples MV Kit Creator may not update the player, so clicking
Load is a “free” thing to do and always completely updates the player so it is playing accurately.
Most of the time, when you load a .mvo le or a .mv8project, the player is updated.
There is also a MIDI Channel control and a Transpose control. You can change the reception
MIDI Channel by clicking on the MIDI Channel number. For Transpose, lower it by a semitone
by clicking on the <- button and raise it by clicking the -> button. Hold down SHIFT increments
or decrements by an octave, and you can reset it to 0 by clicking on the Transpose amount
number.
Lastly, there is a VIEWER button, which displays the MV Viewer dialog.
Page 8
Page 9
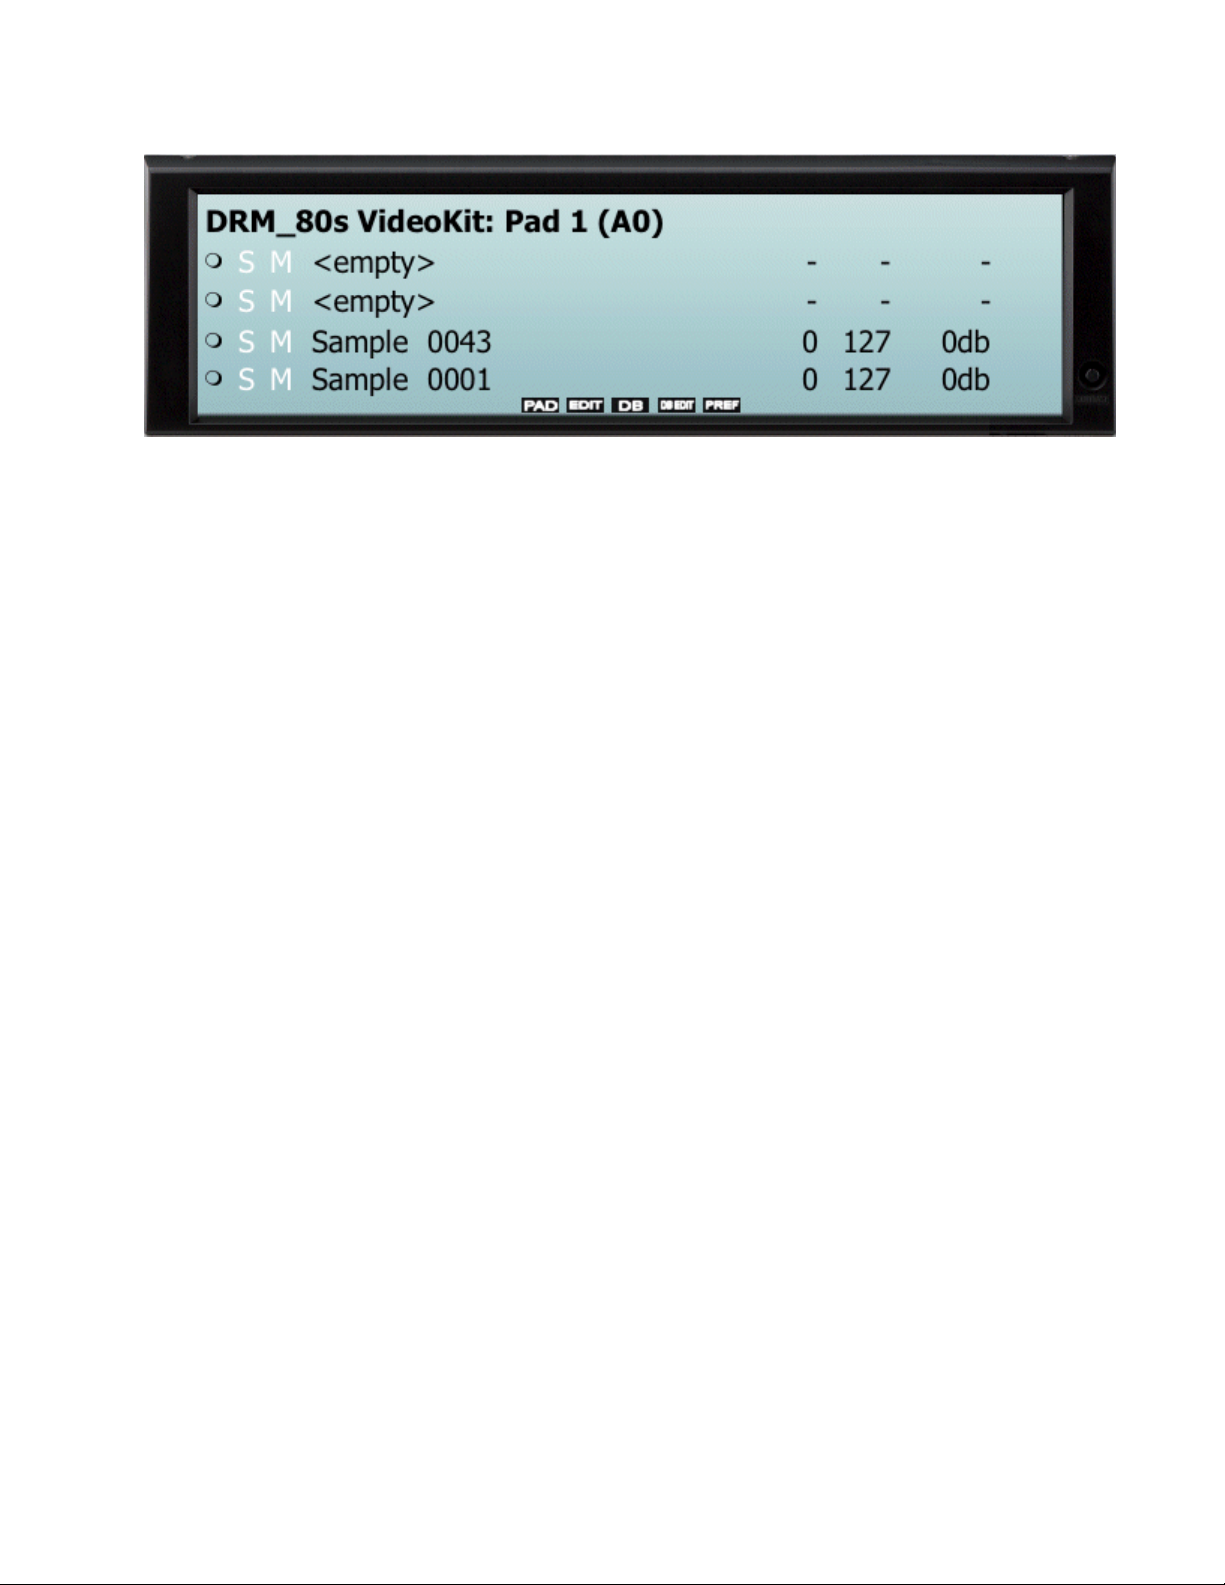
MV Kit Creator™ Main Screen
Main Screen
The Main Screen shows the current Project Name, what Pad is currently selected and showing,
and the contents of each Zone.
Each Zone has the following information:
* A MIDI or Pad-Play indicator. This shows when the pad is stuck and released, via MIDI or
via clicking it on the interface.
* A Solo/Mute function. Clicking the S solos the Zone and mutes the rest. Clicking the M
mutes or unmutes the Zone.
* The name of the sample assigned to that Zone. “<empty>” means no sample is assigned
to that Zone. Clicking on this area enables you to choose another sample (WAVE or AIFF) to
occupy this area. Right-Clicking allows importing or deleting of that Zone.
* LoVel, HiVel, and Volume from left to right. Vels are 0-127, Volume is -96db to +12db.
The ve function labels on the bottom are for the ve Function Buttons below them.
Page 9
Page 10
Pads
MV Kit Creator™
Pads
Just like the MV-8000, MV Kit Creator™ has
6 Pad Banks of 16 Pads each. Each PadBank
corresponds to 16 consecutive keys on a
keyboard, starting with A0 (MIDI note 21,
MV Kit Creator™ regards middle C as C2).
When clicking on a Pad (or accessing it via
MIDI), the basic setup of that Pad appears
on the Main Screen. This includes the sample
assigned to each of the 4 Zones, the velocity
values, and the volume.
When you click on a Pad, it becomes the
Current Selected Pad. It is on this pad that you perform operations on (with the exception of a
drop from an external source or from the database).
There several different ways of assigning samples to Pads:
* Drop sample les from outside the application onto a Pad.
* Drop samples from the Sound Database or Sound Database Editor onto a Pad.
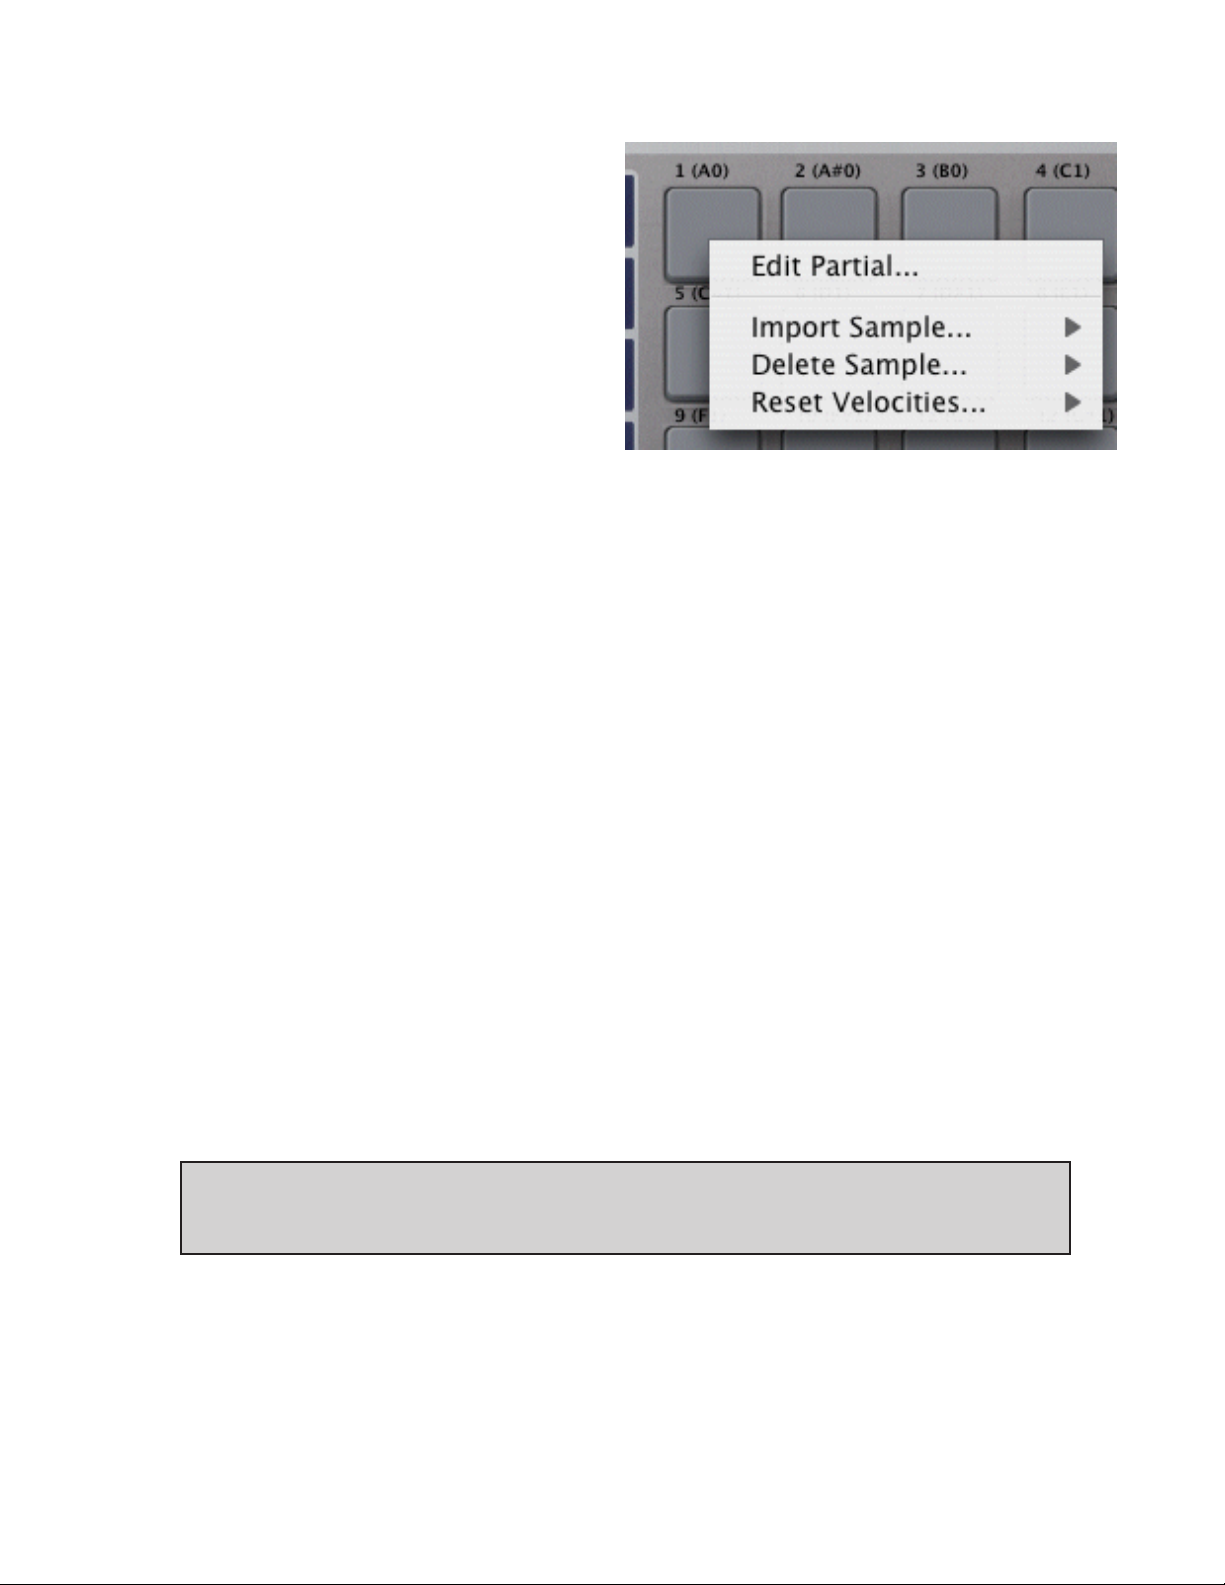
* Right-click on a Pad and choose Import Sample..., from there you choose which Zone
you are importing to, and then you choose Browse... or a sound from the Database.
* Click on a Zone on the Main screen
Each Pad can hold it’s own set of Partial parameters.
Edit Partial...
Clicking this right-click option displays the Partial/Patch Editor page, and allows you to edit the
Partial assigned to that Pad.
Import Sample
Import any samples into one of the 4 Zones of the Pad. You can Browse for a samples, or
choose one that is already in your Sound Database.
Delete Sample
Clear one of the Zones of the sample assignment. Note: this does not delete the sample le!
(Thankfully.)
Reset Velocities
In Preferences - General, there are 4 Velocity modes. Using this right-click option automatically
sets the Zones to the selected Velocity Mode.
MV Kit Creator™ LE Limitations: You can import samples using Browse... and
by dropping samples from outside the interface, but you cannot import from
your database. You can only play a Pad by clicking on it; MIDI is disabled.
Page 10
Page 11
MV Kit Creator™ Pad Contents
Pad Contents
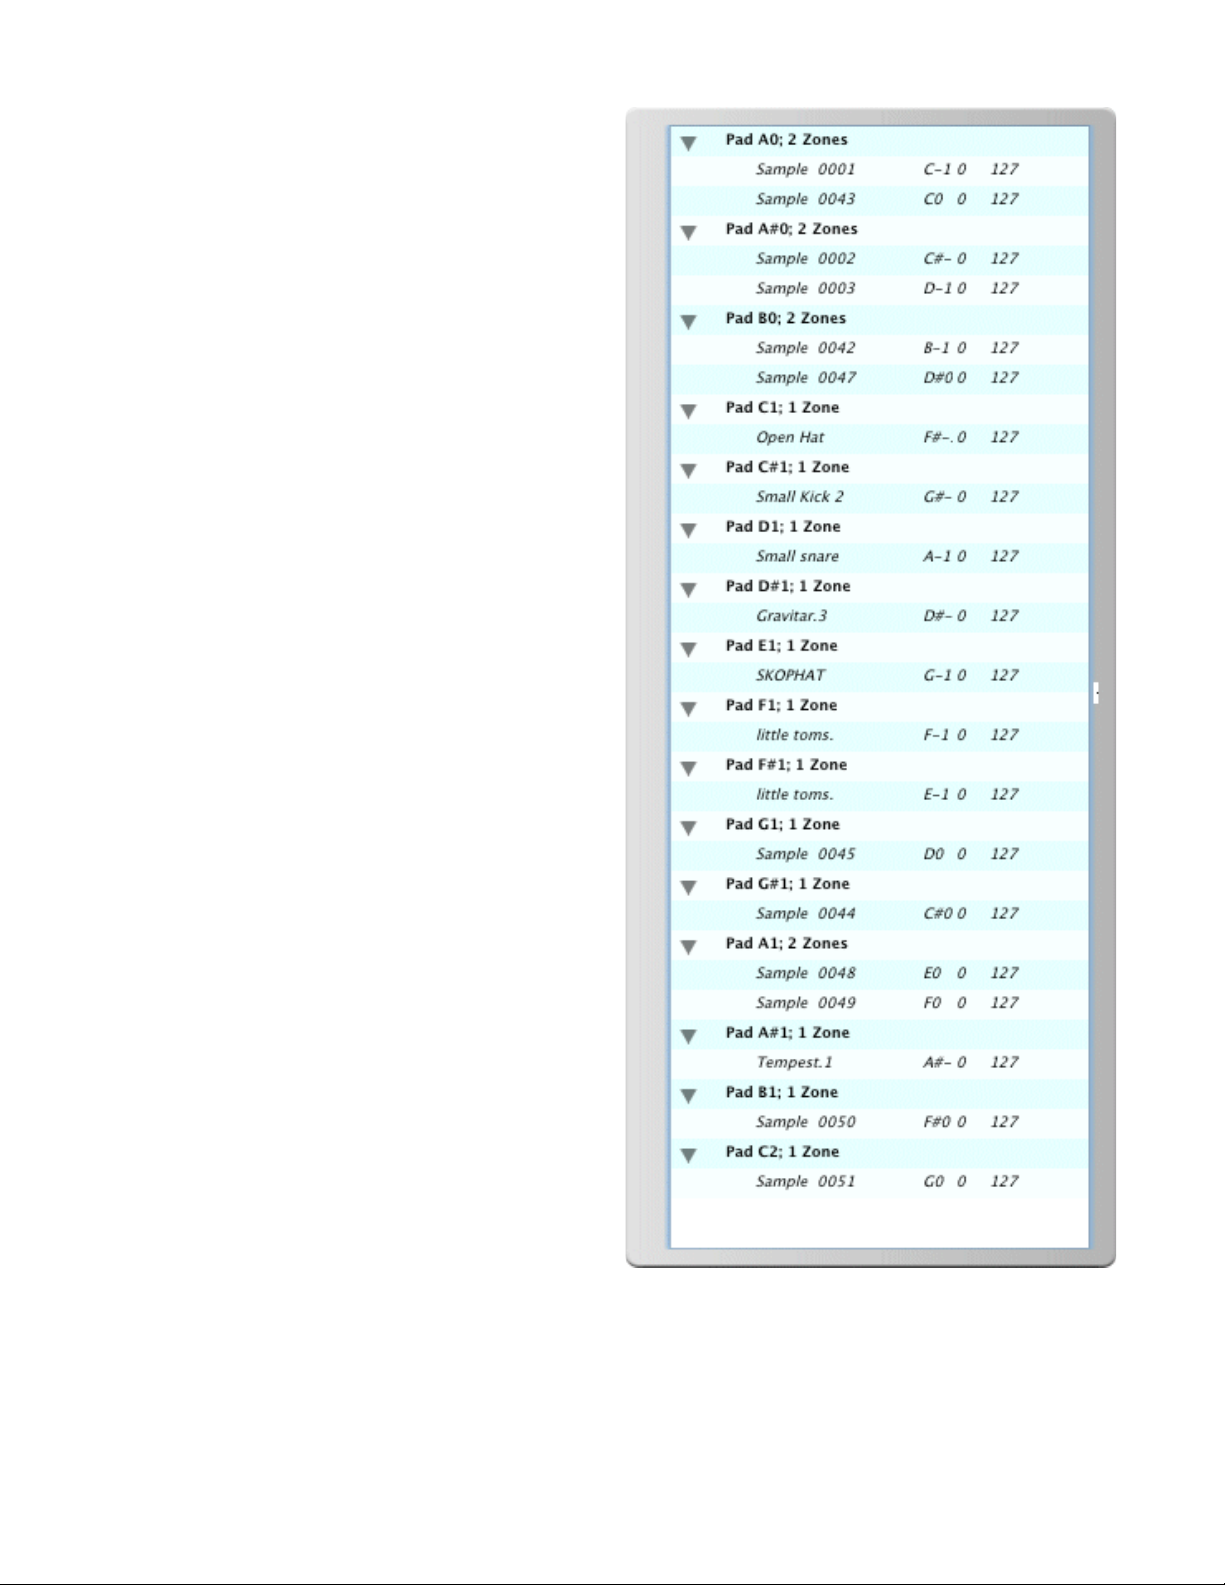
The Pad Contents dialog allows you to view
the status of all the Pads with one look. You
can display this screen by hitting Ctl-F1 on
the Main Interface, or by clicking on the
Menu-Functions-Pad Contents menu.
On Mac, this appears as a Drawer window on
the right side of the interface. You can close
it by hitting F1 again, or by clicking on the
Close icon on the far right side of the dialog.
On Windows, this appears as a oating
window. You can close it by hitting Ctl-F1
again, or clicking on the Close icon.
Selecting one of the nodes selects the
appropriate Pad.
The Zones list the current Velocity setting
and the Root Key.
Page 11
Page 12
Patch/Partial Editor
MV Kit Creator™
Partial/Patch Editor
Just like the MV-8000, MV Kit Creator™ has 6 Pad Banks of 16 Pads each. Each PadBank
corresponds to 16 consecutive keys on a keyboard, starting with A0 (MIDI note 21, MV Kit
Creator™ regards middle C as C2). When clicking on a Pad (or accessing it via MIDI), the basic
setup of that Pad appears on the Main Screen. This includes the sample assigned to each of the
4 Zones, the velocity values, and the volume.
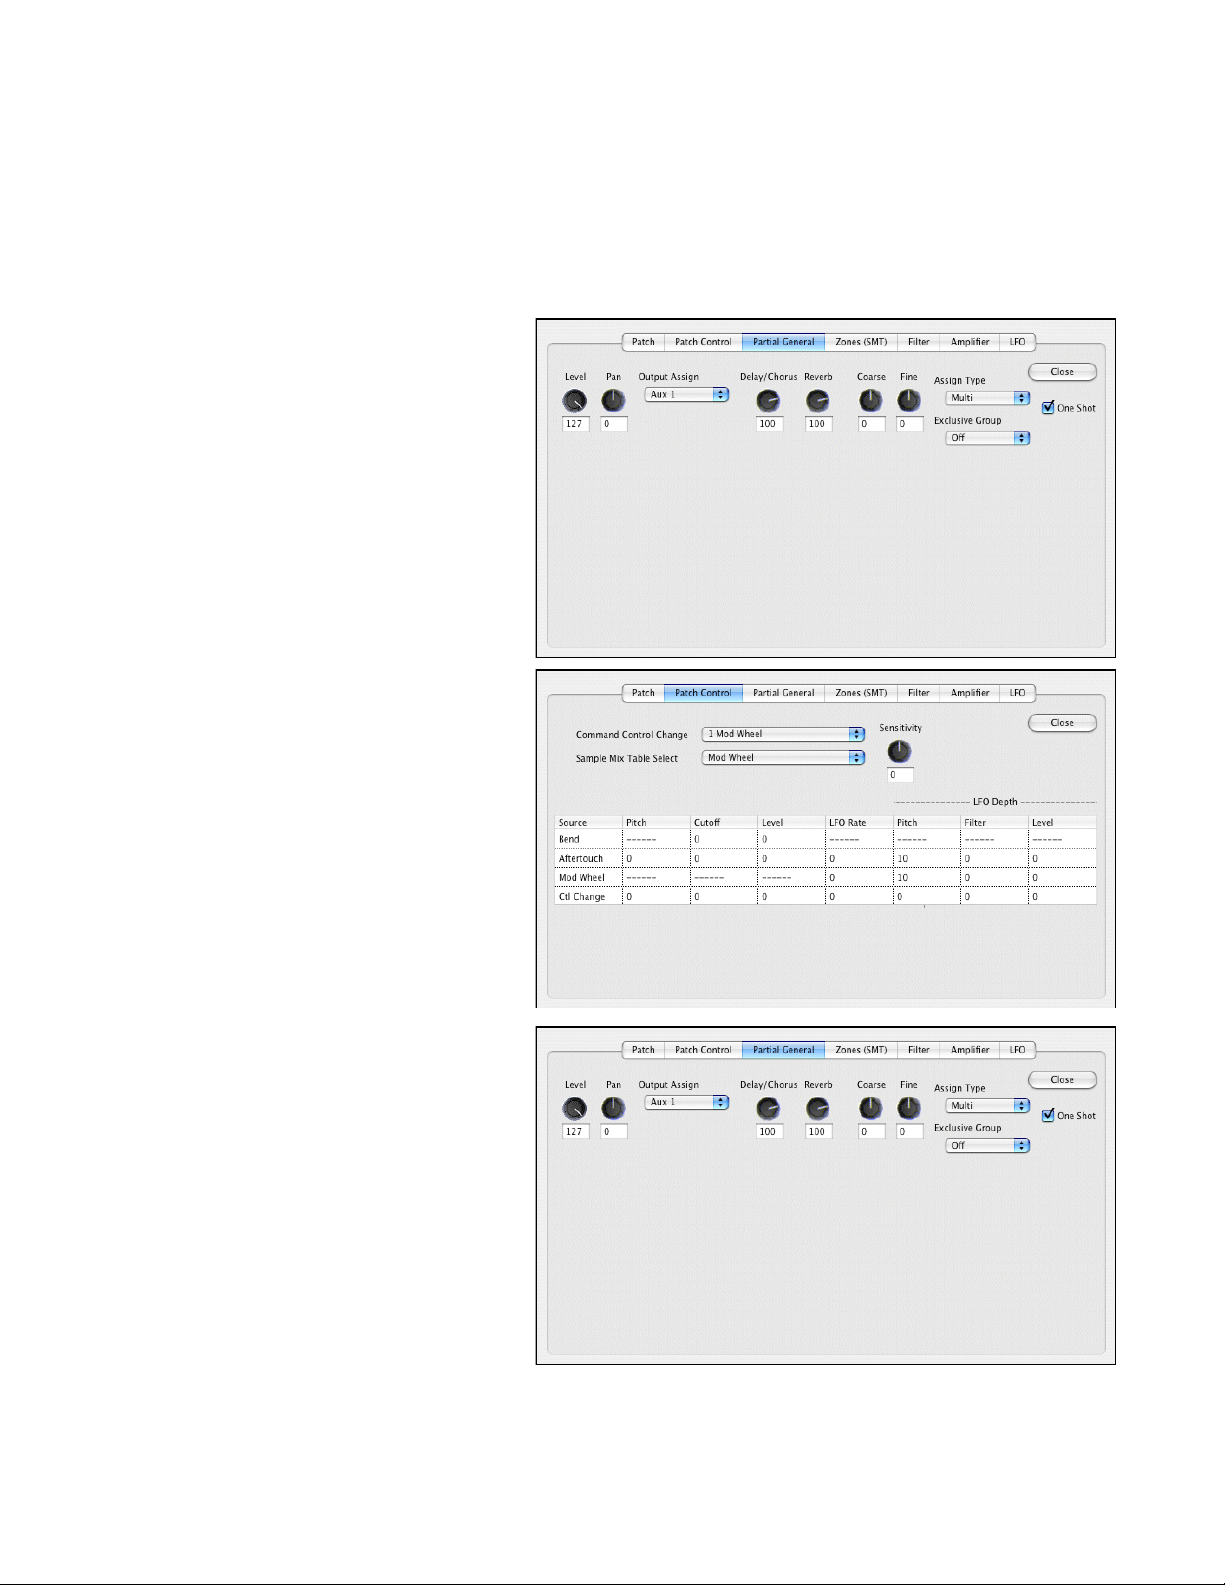
Patch
This page matches the Patch Editor
page in the MV-8000. Parameters
are editable with the knob or the
text eld below the knob.
Patch Control
This page matches the Control
page in the MV-8000. Parameters
are editable with the knob or the
text eld below the knob. For the
grid, simply click on the desired
parameter and type in the correct
value. Valid values are -63 to +63.
Partial General
This page matches the Partial
General page in the MV-8000.
Parameters are editable with the
knob or the text eld below the
knob.
Page 12
Page 13
MV Kit Creator™ Patch/Partial Editor
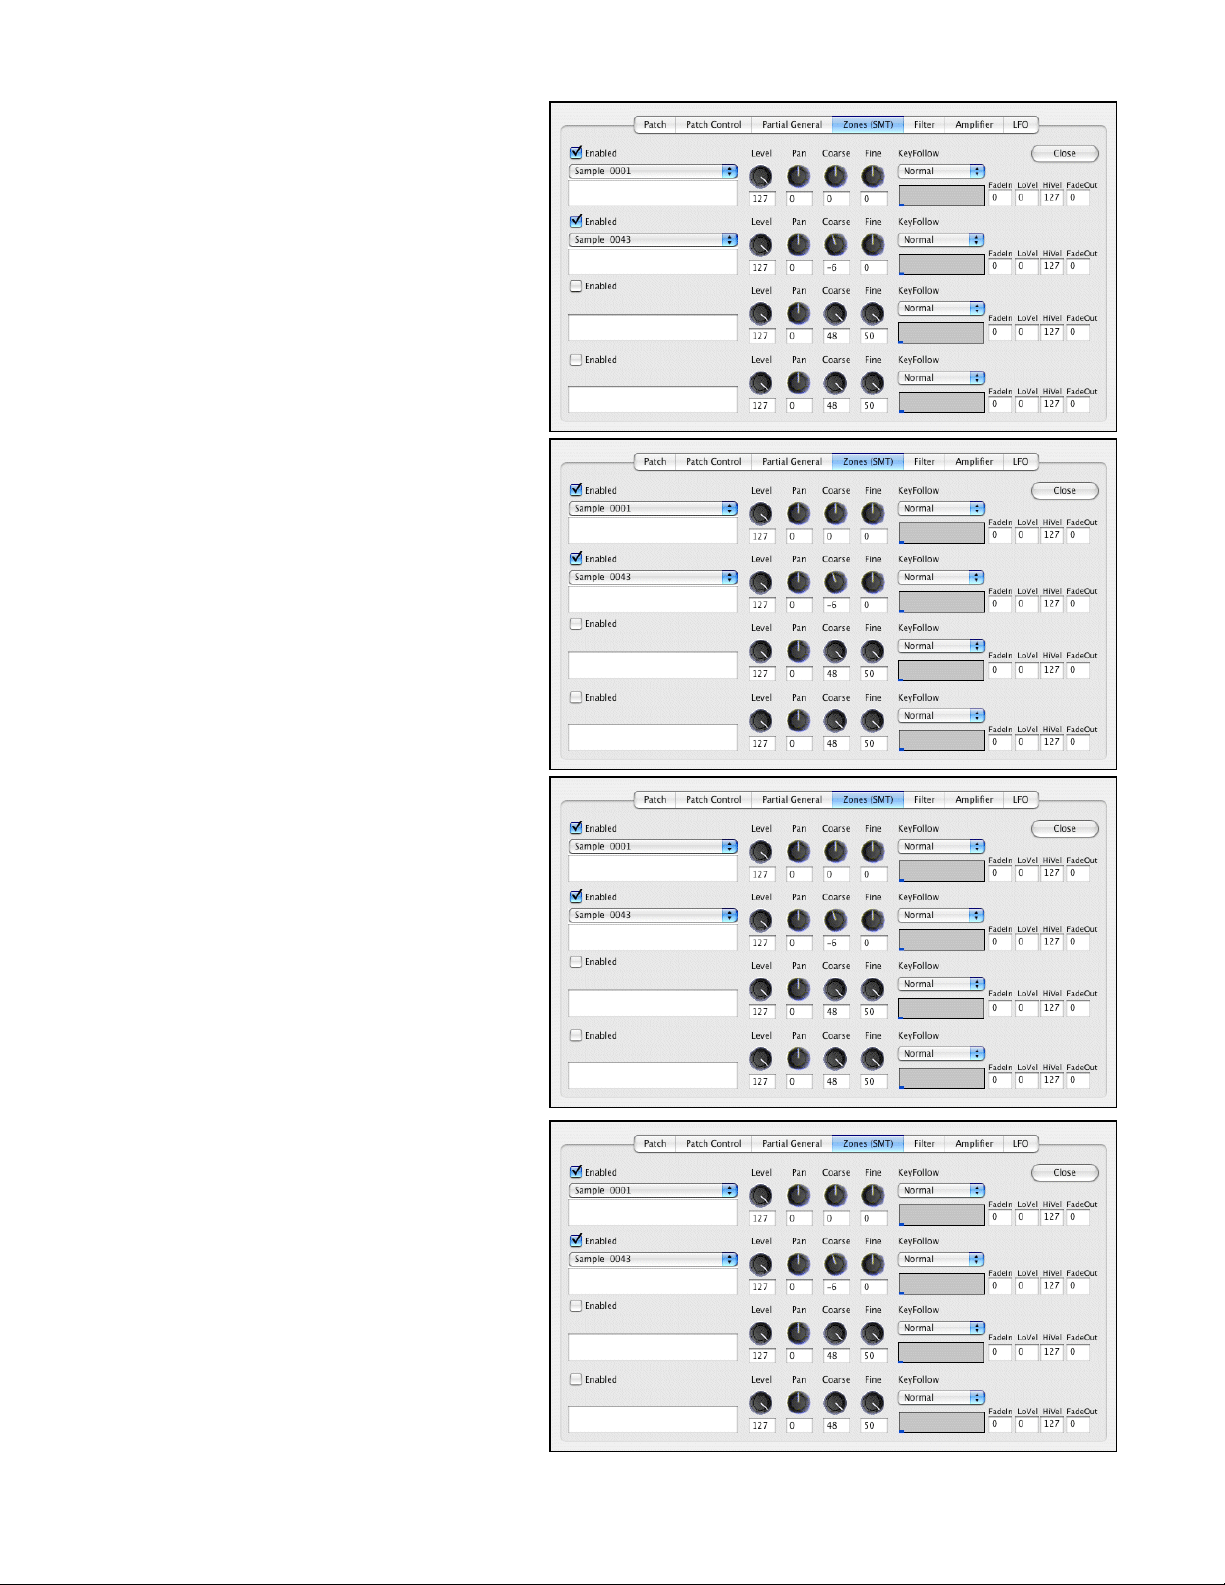
SMT
This page is similar to the SMT page in
the MV-8000.
You can replace the samples by rightclicking on the pulldown menu under
the Enabled checkbox on each Zone.
Parameters are editable with the knob
or the text eld below the knob. The
Velocity Graph is editable via the
mouse and the text elds to the right
of them.
Amp
This page matches the Amp page,
under Partial Edit, in the MV-8000.
The Envelope Graph is editable via the
mouse and the text elds to the right
of it. Parameters are editable with the
knob or the text eld below the knob.
Filter
This page matches the Filter page,
under Partial Edit, in the MV-8000.
The Envelope Graph is editable via the
mouse and the text elds to the right
of it. Parameters are editable with the
knob or the text eld below the knob.
LFO
This page matches the LFO page,
under Partial Edit, in the MV-8000.
Parameters are editable with the knob
or the text eld below the knob.
Please remember that the many LFO
parameters are related to the Patch
Control page parameters.
Page 13
Page 14

MV Kit Creator™Playback/Auditioning
Playback/Auditioning
MV Kit Creator™ comes with an integrated
multisample streaming playback engine.
You can playback your Project by clicking on
a Pad or by playing MV Kit Creator™ from
an external controller keyboard/padbank.
MIDI and Audio controls are available in the
Preferences dialog.
MV Kit Creator™ comes with an integrated
multisample playback engine. You can
playback your Project by clicking on a Pad or
by playing MV Kit Creator™ from an external
controller keyboard/padbank. MIDI and Audio
controls are available in the Preferences Audio/MIDI dialog.
The Load button above the Pads reloads the
current state of all the PadBanks into the
internal player. When importing individual
samples MV Kit Creator may not update the
player, so clicking Load is a “free” thing to do
and always completely updates the player so it is playing accurately. Most of the time, when
you load a .mvo le or a .mv8project, the player is updated.
There is also a MIDI Channel control and a Transpose control. You can change the reception
MIDI Channel by clicking on the MIDI Channel number. For Transpose, lower it by a semitone
by clicking on the <- button and raise it by clicking the -> button. Hold down SHIFT increments
or decrements by an octave, and you can reset it to 0 by clicking on the Transpose amount
number.
MV Kit Creator™ LE Limitations: MIDI playback is disabled; you can only play
sounds by clicking on the Pads on the Main Interface.
Page 14
Page 15

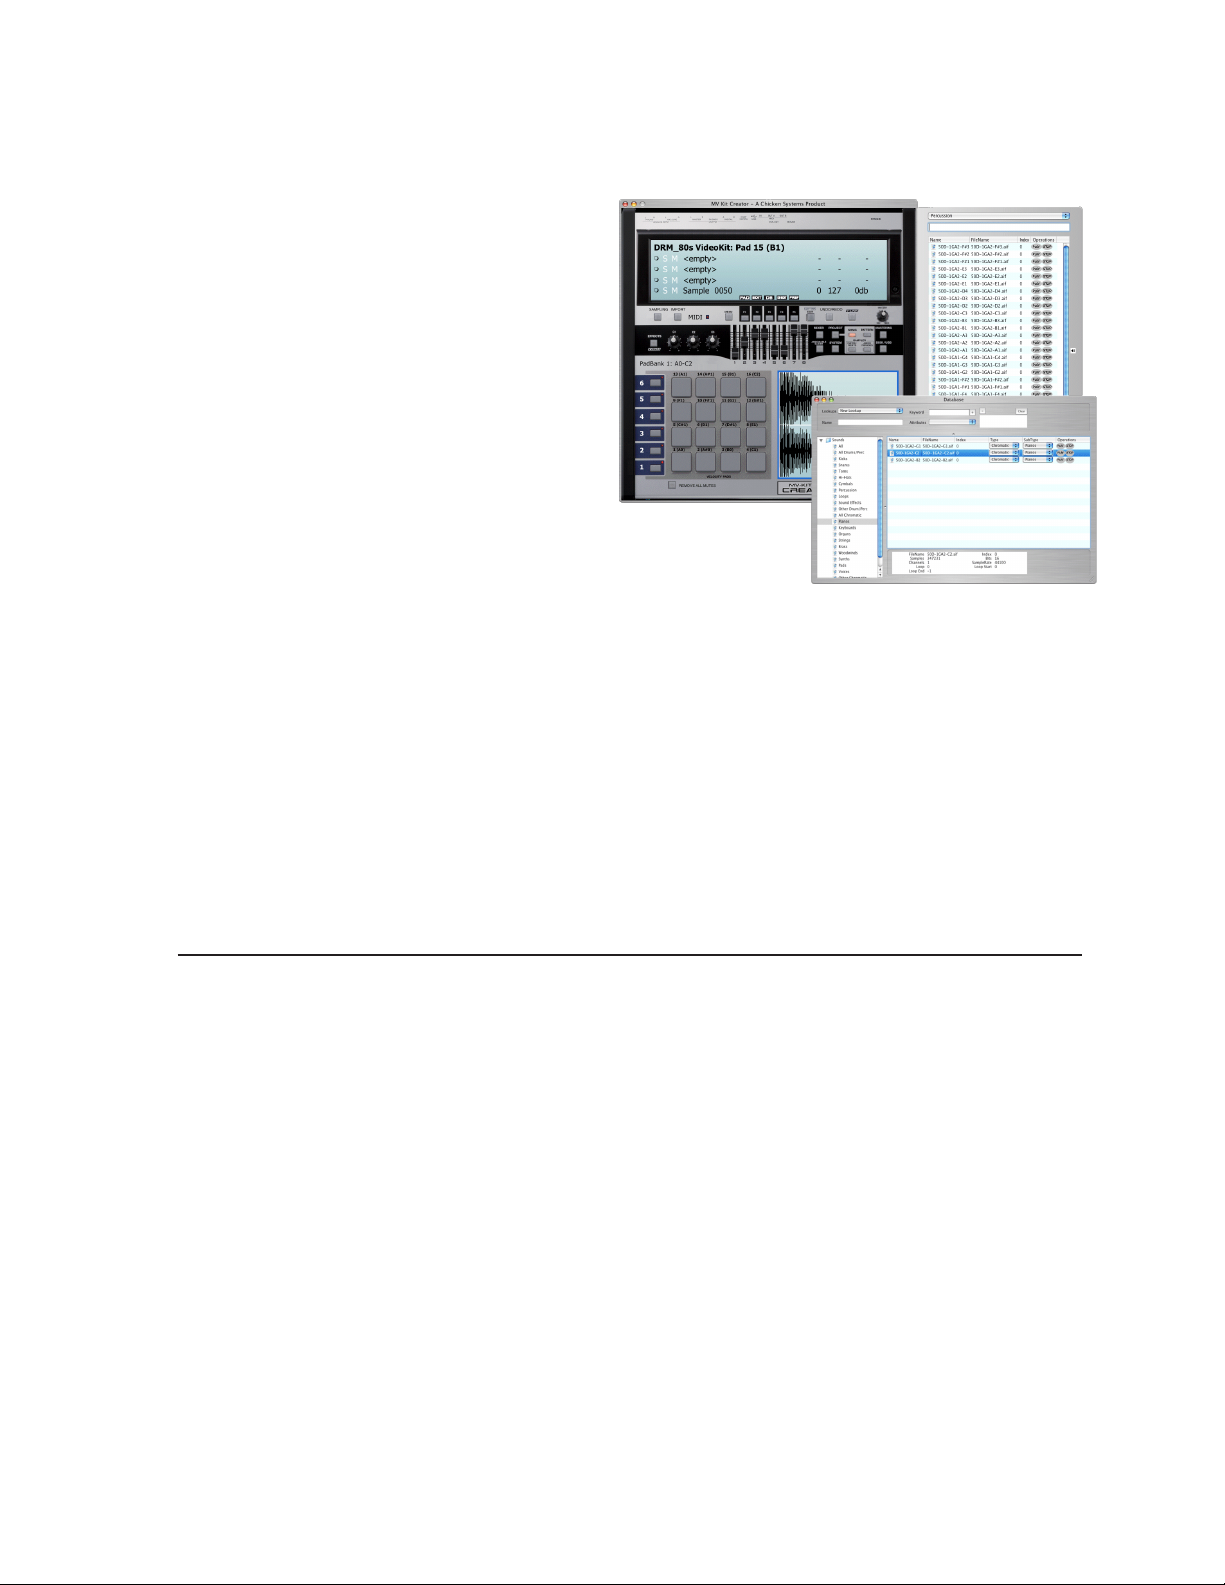
MV Kit Creator™ Sound Database
Sound Database
The Sound Database allows you to view items
in your database, and drag items out of the
window into the Pads on the Main Interface.
The pulldown menu at the top allows you to
choose the preset areas, or all the entries.
The text area below allows you to include
keywords in your ltering.
The list has four columns:
* Name: the name of the sample
* FileName: the le name the sample data
comes from.
* Index: In the case of .mv0-based
samples, this is the index within the le.
* Operations: you can Play and Stop that
certain le.
The Sound DataBase Editor allows you to
manipulate your Database in more powerful
ways.
For more specic information on how to use
the Sound Database, see the article Using
Your Sound Database.
MV Kit Creator LE Limitations: You can view your database, but you cannot use
it to import samples into your current Project.
Page 15
Page 16

MV Kit Creator™Sound Database Editor
Sound Database Editor
The Sound Database Editor allows
you to add and delete items from your
database. You can also form Lookups,
which are specialized queries based
on specic criteria. You can also drag
samples out of this screen too, just
like the Simple Interface.
The top half enables you to create
your own Lookups. (Note: this is not
available in this version of MV Kit
Creator™.)
The bottom half of this interface shows
the different preset you can view, plus
additional information on each sample.
You can also audition each sample
from this screen.
For more specic information on how to use the Sound Database Editor, see the article Using
Your Sound Database.
Page 16
Page 17

MV Kit Creator™ Working With Projects
Working With Projects
In MV Kit Creator™, you are always working with a Project.
An MV Kit Creator™ Project is made up of three distinguishable elements:
* A Name, such as “My MV Kit Creator™ Project”. Names can be of any length and
character set. HOWEVER, what gets written into a .mv0 is limited to 12 characters and the
limited ASCii set.
* A set of Patch Parameters that apply to all Pads
* A set of 96 Pads divided into 6 Pad Banks, just like the MV-8000. Each Pad has it’s own
Partial Parameter Set and can access up to 4 samples. These can be WAVE les, AIFF les,
or a sample that exists inside a .mv0 le.
Projects can be saved anywhere as .mv8project les for later work. .mv8project les are small
since they do not contain samples, like .mv0 les, they only reference other les.
Since the MV-8000 is marketed as being a “groove box”, we assume that people use the Roland
MV-8000 to playback drums, percussion, and loop elements. That’s probably true, but the MV8000 is capable of much more then that; it can be used to program full-featured Chromatic
instruments such as a piano, lead trumpet, solo violin, or other multisampled chromatic
sources. In fact, the MV-8000 resembles very closely the old Roland S-7x sampler, which was
used on countless movies, commercials, and TV shows throughout the 1990’s.
Still, MV Kit Creator™ is setup more to encourage a drum/perc/loop paradigm. But that
shouldn’t stop you from making Chromatic instrument using MV Kit Creator™. Future versions
will encourage this use more.
With that in mind, lets go over the last two elements of the three elements that make up a
Project. We will NOT try to repeat what is in the MV-8000 manual about specic parameters.
Patch Parameters
These parameters affect all Pads, and all Zones with those pads. These include the Modulation
Matrix and overall tuning, level, and panning parameters. Please remember that there are
tuning, panning, and tuning parameters for every level - Patch, Partial, and Zone. These are
summed up to affect the original sample being played. Please note that the Key-Follow (KF) in
the Zones turns off the effect the keyboard (or Pad placement) has on the tuning of the sample
being played, and the Offsets on the Patch level affect every corresponding parameter below it.
Partial Parameters
Each Pad has a set of Partial Parameters. Each Zone in the Pad shares these parameters, which
include level, panning, tuning, ltering, one LFO, and two Envelopes, one for the lter and one
for the amplier section. Each Partial contains 4 Zones, which are specically addressed in the
SMT (Sample Mix Table). Each Zone has level, tuning, panning, and other parameters that only
apply to the sample it references.
You can edit these parameters in the Partial/Patch Editor. Please remember that except for
tuning, panning, and looping, these parameters will not be reected when playing the pads via
MIDI or by clicking on the Pads. The streaming playback engine is has not been developed to
that point yet, although we are working toward it.
Page 17
Page 18

MV Kit Creator™Importing Samples To Pads
Importing Samples To Pads
The most operation of the MV Kit Creator is
importing Samples from various locations
to the Pads. There are many ways of doing
this:
* You can drag a sample le from outside
the interface and drop it on a Pad
* You can drag a sample listing from the
Sound Database (either the Simple
Interface or the Sound Database Editor)
and drop it on a Pad.
* You can right-click on a Pad or on a Zone
in the Main Screen and get a Import
menu. From there you can Browse for a sample, or choose a listing from the Database, as
they will be listed in a series of pull-down menus.
Dragging Samples To Pads
When you drag a sample onto a Pad, the Pad will light up and show you which Zone that
dragged Sample will go in via a small red rectangle. Remember, a Pad can access up to 4
samples and it’s up to you how those samples are played. Each Zone can be set to play to a
certain velocity range (that is, how hard you hit the Pad or via MIDI).
Via Preferences-General, you can set up if the Zones are “lined up” on the Pad up-down, downup, left-right, or right-left, or simply all layered.
Via Preferences-Pad, you can set up different ways of splitting up the Zones to reect different
velocity splits.
When you drop the sample, the Main Screen will be updated with the new sample and will play
on that Pad.
Using Right-Click Import Menus
If you right-click on a Pad, you will get a Import menu for every Zone. Viewing the sub-menu
under each shows Browse.. and the entry points of the Sound Database. Selecting Browse...
opens a Open dialog allowing you to choose an external WAVE or AIFF to import. (Note you
cannot import .mv0-samples this way.)
Importing .mv0-based Samples
Once you’ve worked with MV Kit Creator for awhile, many of your samples will reside in .mv0
les rather then existing in external WAVE or AIFF les. You can access these les in two ways:
via the Sound Database or by simply loading in a .mv0 le into the current Project.
However, remember that once samples are in .mv0 format, they are 16-bit only; any 24-bit
resolution will be lost. Sample Rates are retained.
MV Kit Creator LE Limitations: You can import samples using Browse... and
by dropping samples from outside the interface, but you cannot import from
your database.
Page 18
Page 19

Importing Recycle FilesMV Kit Creator™
Importing Recycle Files
MV Kit Creator™ can import Propellerheads Recycle les into a Project.
Recycle les are les with the extension .rex, .rcy, and .rx2. They can be of any bitrate, version,
or sample rate.
You can do this by dropping one or more on a Pad, or by selecting Import... when right-clicking
a Pad.
There are 3 main options when importing a Recycle le; Loop only, Slices only, and
Loop+Slices.
Loop
When choosing Loop, you get the entire sample at one of 3 Tempos - the original Tempo of the
Recycle le (which is what it estimates when it imports the sample data itself), the Preview
Tempo (a Tempo written into the Recycle le by the Recycle editor to set a user-dened
Tempo), or a Tempo listed within Preferences itself.
The Loop will be extracted and assigned to the Pad that you dropped or selected.
Slices
When choosing Slices, the individual slices will be extracted from the Recycle le and mapped
starting on the Pad you selected or dropped on. If there are more slices than ascending Pads,
it will either not assign those slices, wrap around, or use multiple Zones, depending on your
choice in Preferences.
Loop+Slices
This is a combination of both methods. The Loop will be mapped on the Pad you dropped on;
the Slices mapped to the next pads.
Repository for Extracted Recycle waves
The importing results in WAVE les being created so MV Kit Creator can access them quickly for
the Project, allow full access to the sample data, and to make them ready for when you export
into a .mv0. Those WAVE les are stored in the following folder:
Mac
/Users/[you]/Library/Application Support/Chicken Systems/MV Kit Creator/Recycle File Repository
Windows 7/Vista
%SYSTEMDRIVE%/Users/[you]/AppData/Roaming/Chicken Systems/MV Kit Creator/Recycle File Repository
Windows 7/Vista
%SYSTEMDRIVE%/Documents and Settings/[you]/Application Data/Chicken Systems/MV Kit Creator/Recycle File Repository
Each Recycle le gets it’s own folder. If you attempt to import the same Recycle folder, it may
not import it but use the existing les already imported. The exception is if you are importing it
a different way; then it will use the same folder but create different les.
MV Kit Creator™ LE Limitations: Not included.
Page 19
Page 20

MV Kit Creator™Importing Akai MPC Programs and Samples
Importing Akai MPC Programs and Samples
MV Kit Creator™ can import most computer-stored MPC Programs or Samples into a Project.
Note: MV Kit Creator™ cannot read proprietary Akai MPC-60/3000/2000 CD’s, ZipDrives, or
hard drives. It can only read les stored on computer-recognized hard drives. MPC support also
does not include MPC-4000 .akp les, which are actually Akai S-5000 les. To convert those
formats into MV-8000 format (.mv0), please use Chicken Systems Translator product.
An Akai MPC program has the extension .pgm, or if it’s a MPC-5000 program, it’s either a .50s
(Drum Program) or a .50k (Keygroup Program). It can be imported AS a Project, or into an
existing Project. Most of the time you will import MPC programs AS a Project, since it usually
represents what we would consider a whole Kit.
Use File-Import... to import MPC programs.
Older Akai MPC’s used a sample format called .snd. MV Kit Creator now supports importing
these in singly, and also supports them in the Sound Database.
MV Kit Creator™ LE Limitations: Not included.
Page 20
Page 21

MV Kit Creator™ Using The Database
Using The Database
The powerful Sound Database lists all
your entered samples in a list. It can
contain WAVE, AIFF, or .mvo-based
Samples of any bitrate, samplerate, or
length.
There is only one Database for you to use.
In future versions there will be the ability
to have multiple Databases.
You can access the Database with the
Sound Database Simple Interface, the
Sound Database Editor, or via any Import
context menu.
Each Sample File, or sample within a .mv0 le, can only
have one listing.
There are two main categories, Drum/Percussion
and Chromatic. Most sounds t into one or the other
category. Chromatic are sounds that are pitched and
rise in pitch up and down the “keyboard”. Drums/
Percussion are “non-pitched” sounds that usually play
on one key.
(For the purists out there, all sounds are “pitched” to
some degree, but we are using the term in the sense of
playing the sound in equal-tempered increments.)
Each of these two categories have several xed sub-
categories. You can view one of these sub-categories,
or you can choose to look at ALL in a certain category.
Or, there is an ALL listing where you can simply see all
your samples without breaking them down.
Each column gives you this information:
* Name: This is the name of the sample.
* File Name: This is the le name of the sample.
This can be different then Name because you can
access named samples within a .mv0.
* Index: Only regards .mvo-based samples, this is the Index it is in within the .mv0 le
* Category: Drums/Percussion or Chromatic
* Sub-Category: A sub-category.
* Operations: A PLAY and STOP button.
Note that you can change what category/subcategory your listing is led under by selecting
another cat/subcat in the listing. Clicking on the headers sorts according to each column.
Importing
You can add to your database by right-clicking on the Treeview to the left, on a category or
sub-category. You can choose Add File or Add Folder. Add File simply adds a single le to your
database, in the category/subcategory you right clicked on. Add Folder will add all samples in
that folder (and under it as well) to your database.
Page 21
Page 22

Extracting Samples from .mv0 Files
MV Kit Creator™
Extracting Samples from .mv0 Files
MV Kit Creator™ offers a handy utility to extract samples from any .mv0 le. Click on the
Tools menu and select Extract Samples from .mv0. This brings up the Extract dialog, where
you can specify the location where the samples will go, what format (WAVE, AIFF, CAF - with
compression options (Mac only)), and bitrate.
Looping information is NOT included with the samples in a .mv0 le, they are included with the
Zones in the Partials. This is a good thing because you can have different loop settings on the
same sample. This isn’t usual, but it’s handy. Regarding extracting, the Extract dialog includes
looping options. It lists all loop settings from the Zone, plus Full Loop and No Loop if they
weren’t set. The most common setting will be highlighted and defaulted so you know what it is.
MV Kit Creator™ LE Limitations: Not included.
Page 22
Page 23

Using the MV ViewerMV Kit Creator™
Using the MV Viewer
Since MV Kit Creator™ is primarily concerned with CREATING .mv0 les, viewing the innards of
a .mv0 is an auxiliary function. Nevertheless, the MV Viewer is very handy on viewing a .mv0
le and seeing exactly what it’s capable of.
The MV Viewer has four
areas; the Pad Area, the
Data Area, the Keyboard
Area, and the Waveform
Area. Each can be
displayed or hidden.
Basically when you select
a .mv0 le, you see the
Partials listed in the Path,
and when you select
the Partial you see the
Samples listed in that
partial. You see the key
ranges for each Partial.
You can select the Partial
by clicking on one of the pads; and like the MV, it has 6 Pad Banks.
Pad Area
Click on one of these to see it’s contents
Data Area
These are the lists for the Partials, Samples, and other Data.
Keyboard Area
This shows in color what keyranges are taken up. Click on any note and the proper Partial will
be selected in the list.
Waveform Area
When you select a Sample, the waveform shows up here.
Page 23
Page 24

Menus - File
Menus - File
Note: Close, Revert To Saved, and Show Properties are not
implemented yet.
Open
Displays a common Open dialog where you can open a
previously saved Project or a .mv0 le. Opening a .mv0
le erases the current Project starts a new Project with the
information that exists in the .mv0 le being loaded.
Open Recent
A list of previously selected and saved Projects and .mv0
les.
Save
Saves the current Project, overwriting any previous
information.
Save As...
Saves the current Project, allowing you to write it anywhere.
MV Kit Creator™
Export to .mv0
Exports the current Project into a .mv0 le, written wherever you choose.
Clear Project
Clears the current Project, retaining the Name put starting with a default set of Patch
parameters and initialized Pads.
Rename Project
Makes a TextBox eld appear in the Main Screen, allowing you to rename the Project.
Exit
Quits the whole mess.
Page 24
Page 25

MV Kit Creator™ Menus - Function Buttons
Menus - Function Buttons
These Functions are also accessible via the Function
Buttons on the Main Interface on the bottom of the Main
Screen.
Pad Contents
This opens the Pad Contents window. (Clicking the F1
Function Button causes it to close.) Note: this is set to
Ctl-F1 on Windows, since F1 is commonly used to open the
Help File.
Partial/Patch Editor
This opens the Partial/Pad Editor of the currently selected Pad.
Sound Database
This opens the Sound Database Simple Interface. (Clicking the F3 Function Button causes it to
close.)
Sound Database Editor
This opens the Sound Database Editor. (Clicking the F4 Function Button causes it to close.)
Preferences
This opens the Preferences dialog.
Page 25
Page 26

MV Kit Creator™Menus - Pads
Menus - Pads
These Functions are also accessible via the Function
Buttons on the Main Interface on the bottom of the Main
Screen.
Pad Contents
This opens the Pad Contents window. (Clicking the F1
Function Button causes it to close.) Note: this is set to
Ctl-F1 on Windows, since F1 is commonly used to open the
Help File.
Partial/Patch Editor
This opens the Partial/Pad Editor of the currently selected Pad.
Sound Database
This opens the Sound Database Simple Interface. (Clicking the F3 Function Button causes it to
close.)
Page 26
Page 27

Menus - Tools
Remove All Mutes
Removes all the Mutes enabled in the Main Interface.
Extract WAVE from .mv0
This functions allows you to choose a .mv0 and extract the
samples out of it. Currently it only supports extracting to
WAVE as-is, and will be improved in later versions of this software.
Menus - ToolsMV Kit Creator™
Page 27
Page 28

Menus - Help
Search
Hey, OSX puts this there automatically. We really don’t know what it is.
Contents
Displays the Help File; that is the
manual. Hey, READ IT!!! =)
Bug Reports
Opens a browser window (your
default browser) and routes it to the
Chicken Systems Bug Reports page
for MV Kit Creator™.
MV Kit Creator™ Home Page
Opens a browser window (your
default browser) and routes it to
the MV Kit Creator™ Home Page
(the product page) at the Chicken
Systems web site.
MV Kit Creator™Menus - Help
Check For Updates
Connects to the Internet and checks the version/build number of the running application
against the latest build available from the Chicken Systems web site. This is a manual way of
doing what MV Kit Creator™ automatically does when the program is started.
Online Documentation
Opens a browser window (your default browser) and routes it to the Chicken Systems MV Kit
Creator™ Online Documentation. Sometimes this has more up to date information then your
current applications Help File. If you are running the latest version, your Help File should be an
exact replica of the Online Documentation.
Support::Forum
Opens a browser window (your default browser) and routes it to the SamplerZone.com MV Kit
Creator™ forum. Check here for a larger FAQ, and use the forum to look for answers that other
people may have come across, or post a comment about the program on the forum.
Support::Chat
Opens a browser window (your default browser) and routes it to a special Chat service where
you can immediately talk to a Chicken Systems support engineer. This is monitored by Chicken
Systems during business hours and often at night when the second shift is doing their cleanup
work. If there is no one available, you can leave a message.
Support::Email
Allows you to send a direct email to a Chicken Systems support engineer.
Support::Movies
Opens a browser window (your default browser) and routes it to the Chicken Systems Movie
area, specically to the MV Kit Creator™ section. You can watch all the MV Kit Creator™
product videos here.
About MV Kit Creator™
Shows the Splash Screen, which shows you your registration information and the current
version number you are using.
Page 28
Page 29

MV Kit Creator™ Preferences
Preferences
The Preferences dialog is viewed by clicking on (Windows) Tools-Preferences top menu, or
(Mac) App Menu-Preferences.
For each Preference, hovering the mouse over the title or checkbox/item displays a Tool Tip that
describes the functionality of that particular Preference.
General Tab
Play Pad Velocity
This determines where on the Pad a “zone” lies by where you drop on the pad, or click the pad
to play it.
Show Wave Display
Checking this causes the Wave
Display to show on the Main
Interface when you play a Pad, via
MIDI or by clicking on it.
Show Progress Pointer
When a wave plays, a progress
pointer will travel across it.
Unchecking this removes the
Progress Pointer.
Extract Samples As...
For the Export WAVES From .MV0
fucntion; determines if the output is WAVE, AIFF, CAF (Core Audio Format), or SND (old-style
MPC format).
Middle C Displays As:
On some samplers/keyboards, middle C is dened as C4 (usually U.S.) while others it is C3. The
MV-8000 shows it as C3, and by default this is what is shown throughout the program through
any Note Number (i.e. A#5, E1, etc.) However, you may feel comfortable seeing it as C4. This
control sets the display of Note Numbers program-wide.
Check for Updates
Checking this enables the program to automatically check for updates from the Chicken
Systems web site upon startup. This can always be done manually from the Check for Updates
menu option under Help.
Create Folder when extracting samples from .MV0
If you extract the samples out of a .mv0 le, this will write a folder with the same name as the
.mv0 le and write the samples in there.
Expand Pad Contents when Opening
This pulls out the Pad Contents drawer when you open any type of le.
Show Velocity Meter
This enables the red Velocity meter, next to the Pads, to respond on strikes. The associated
parameters determine the behavior of the display.
On .MV0 File Export
These options determine the resulting state of the Project after you export a .MV0 le. You may
Page 29
Page 30

MV Kit Creator™Preferences - Pads
have samples that previously referenced themselves to external WAVE les or others to the
new samples contained in the created .MV0 le.
Pads Tab
Since a Pad can hold up to 4 samples, you may want to split them via velocity, or layer the
sounds, or (rarely) a combination of both.
Velocity Split Type
MV Kit Creator™ provides 4 methods
of automatically splitting up your
samples on Pad:
* Separated Linear: These are
big words for a simple concept.
This simply splits your samples
in equal sizes over the entire
velocity range.
* Velocity Curve: Using the
slider on the right, you can split
your samples in a “curved” way
as to favor softer or harder
approaches.
* Manual: Input your own custom values.
* None: Everything is layered.
LoVel, HiVel
These either show your velocities, or in the case of Manual, allow you to ll in your own.
Velocity Curve
Enabled when “Use Velocity Curve” is selected under Vel Split Type. Moving the sliders changes
the numbers within the LoVel-HiVel boxes.
Import Tab
The samples that you import into your Project may have some embedded information in them
that you may want to use: Root Key, Tunings, or Loop information. The rst three checkboxes
determine which you want to use.
Apply One Shot
Since the MV8000 is primarily a
drum/percussion player (although
it doesn’t have to be), many times
you want the incoming sample to be
programmed in it’s Partial to play as
One Shot (meaning, once you play
it, it plays all the way to the end
without regard to pad/key release).
Checking this makes sure One Shot
is applied. (Note: if One Shot is
applied, loops are ALWAYS turned
off.)
Page 30
Page 31

MV Kit Creator™ Preferences - Import Recycle
Dropped Samples go to Next Available Zone
Shows the Properties of the Output you selected on the left.
Import ACID and AppleLoops As Such
ACID les and AppleLoops are the same as Recycle les - one or two channels of audio, along
with a set of markers to dene where the transients start, so a slice player can play them back
at different tempos without changing the pitch.
MV Kit Creator now imports slice formats - Recycle, as well as ACID and AppleLoops.
Unfortunately, ACID les use the .wav extension and AppleLoops most often use the .aif or
.aiff extension, so they are disguised as WAVE/AIFF les. MV Kit Creator assumes these les
are WAVE/AIFF UNLESS this is checked. When checked, MV Kit Creator imports ACID and
AppleLoops like it imports Recycle les.
Mapping
These dene how imported samples are placed in your Project, start from which Pad gets the
assignment, how they get spread out (chromatically or on only black or white “keys”), and what
range handles the import.
Recycle Import Tab
(Note: this also applies to ACID les
and AppleLoops.)
Export Style
(Recycle only) This is a little
technical, but thsi relates to
the Recycle internal methods of
extracting slices. If you get “clicks”
on the start of certain slices, try the
other method.
Method
Loop Only simply extracts the
entire loops as one le, BASED ON
THE TEMPO FUNCTION. Slices Only
extracts the slices from the lowest to the highest, and Loop and Slices does both - the loop
precedes the slices.
Tempo
This involves when you extract the entire loop. Use Original Tempo extracts the sample data
as-is. Use Preview Tempo applies to Recycle only and it pays attention to the Preview Tempo
parameter inside the Recycle le. Use Custom Tempo allows you to customize the tempo so
the extracted loop will be that tempo.
Slice File Repository
This is the area on your system where the extract loops or slices will be stored. They are
needed post-use because your Projects need them for later usage, or you may want them for
other reasons. (You do not need them if your goal is to simply create .MV0 les in the same
session.)
Page 31
Page 32

MV Kit Creator™Preferences - Data Processing
Data Processing Tab
To confuse the sample vs. loop issue further, you can import WAVE/AIFF les that have not
been beat detected (that is, the
transients have not been calculated)
and MV Kit Creator will detect those
transients and import them like
Recycle/ACID/AppleLoops.
First, let’s talk about what a “slice
le” is.
What Is A Slice File
A WAVE or AIFF le is simply a piece
of audio data. And any “slice le”,
such as a Recycle le, ACID le,
AppleLoop, or Stylus RMX le, are
just pieces of audio data as well.
The only difference between a regular sample le and a slice le is that a slice le has markers
written in a information chunk in the le. These markers are placed strategically where
transients (sharp sounds) in the le start, so a player that reads slice les knows where the
slices are. This is how a Slice File can be played back at various tempos: the player plays back
a slice at the position the tempo dictates. At faster tempos, the slices fade out to make way
for the next slice; at slower tempos, there is a gap between the slices. (However, some players
articially add sample data to “plug the holes”. Also, good Slice Files are originally recorded at
the slowest tempo reasonably allowed, so they never have to be played back at a slower tempo
than their “unity tempo”.)
To create a Slice File, one has to “slice” the audio into slices of energy (“beats”) so the playback
engine plays it back in a way that makes rhythmic sense. This requires a beat detector.
Slice editors, most notably Recycle, but also ACID itself and the AppleLoop Utility that Apple
provides, have beat detection. They do 2 things: They beat-detect a sound le, plus they can
play the slice les back at different tempos. They do this with the assistance of the detected
markers. Once you have what you want, then you save into a slice le, where the audio stays
constant but the markers are written in the le. So when a slice player reads the le, the slices
are the secret to it’s capability to play them back at any tempo.
MV Kit Creator’s Beat Detection
MV Kit Creator now has a Beat Detector, giving the ability to create Slice Files, for playback on
slice engines like Stylus RMX or other. This can also be done in bulk, so you can take (say) 1000
WAVE les and convert them into 1000 slice les without having to do them one at a time in
(say) the Recycle application.
To convert one or more pieces of sample data to Slice File format, simply do it like you would
any other conversion. You can convert a folder of WAVE les, or another example would be to
convert a Giga le full of drum beats - each sample becomes a Slice File.
It is vitally important to pay attention to the Beat Detector preferences, under Preferences-
Data Processing. The defaults work for most clear and simple beats, but they denitely will not
work with everything. You will need to experiment with these on a case-by-case basis, but keep
trying, there usually is a solution to any rhythmic piece of data.
Page 32
Page 33

MV Kit Creator™ Preferences - Database
Here is the explanation of the Beat Detector’s parameters:
Type: The Beat Detector uses two passes through the audio to detect beats. The rst pass
does the best detection it can, then the second pass “checks” the results.
Threshold: This is like the Sensitivity control on Recycle and other slice editors. Higher
values produce less detection, lower values produce more detection.
Silence: This is terms of samples. This is the MINIMUM amount of samples that need to
exist between markers. If you are getting lots of “double beats”, raise this value.
Tempo: You can bypass the whole detection thing and just put slice points at beat values,
regardless of whether a burst of energy exists at that point.
So in contrast, converting to Slice Files is not as seamless nor as perfect as other Instrument or
Sample conversions are. But this ability can make the creation a bit easier, a bit faster, and a bit
more convenient.
Pitch Detection
As has been cited before, the Roland MV-8000 isn’t just a drum/groove box that plays back
drum sounds at unity pitch when hitting a pad. It is also designed under the hood as a sampler
that plays back chromatic sounds like a piano, trumpet, or electric guitar across a keybaord.
This enables you to use the MV-8000 as an all-in-one song creation tool.
Pitch Detection is helpful making a chromatic instrument out of bunches of WAVE/AIFF les. Try
dropping a host of WAV les of a multisampled trumpet, and MV Kit Creator detects the pitch of
each sample and places it on the appropriate Note (pad) for it’s pitch, and then sets KeyRanges
to ll up the spaces in-between the notes. All of a sudden, you have a trumpet sound on your
MV without the work of applying the proper rootkey and keyranges.
The Pitch Detection parameters
determine how accurate or precise
the pitch detection is. Pitch
detection does rely on certain
variables so different types and
styles of pitch detection do a better
or worse job than others. Try what
seems best for you.
Database Tab
Search Conditions
When searching for a le, or how
a le is tagged, these are the
search conditions that apply to your
criteria.
Colors Tab
Might as well make your Wave
Display look great, right? These
are the options you have on what
your Wave Display looks like.
Page 33
Page 34

MV Kit Creator™Preferences - Audio/MIDI
Audio/MIDI Tab
Audio Driver Types
These are the Sound Driver types on your system. Selecting one shows the Audio Outputs and
Audio Inputs on the lists to the
right.
Audio Outputs
These are the outputs on your
system for the selected Audio Driver
Type. Selecting one selects the
audio output for your app.
Audio Inputs
These are the inputs on your system
for the selected Audio Driver Type.
Selecting one selects the audio input
for your app.
Audio Properties
Shows the Properties of the Output or Input that is selected on the left.
MIDI In Drivers
Allows you to select the current MIDI In driver that will drive the player in MV Kit Creator™.
(Note: not applicable in MV Kit Creator™ Free.)
MIDI Out Drivers
Allows you to select the current MIDI Out driver that your application will send MIDI out from.
(Note: not useful in MV Kit Creator™ LE or MV Kit Creator™ Free.)
Enable MIDI
Enables MIDI communication. (Does not have any effect in Free version.)
Enable MIDI Velocity
When unchecked, all MIDI notes coming in will be 127 in value.
Page 34
Page 35

TutorialsMV Kit Creator™
Tutorials
Your MV Kit Creator™ program should be rock-solid and give you no problems. However, there
is always stuff that can go wrong.
Page 35
Page 36

Troubleshooting MV Kit Creator™
Troubleshooting
Your MV Kit Creator™ program should be rock-solid and give you no problems. However, there
is always stuff that can go wrong.
You can start from scratch as far as Preferences go by trashing your preferences. You can do
that by going to:
Mac
Go to:
/Users/[you]/Library/Preferences, delete
com.chickensys.mvkitcreator.plist
Windows
Go into the Registry and delete the HKEY_CURRENTUSER/Software/Chicken
Systems, Inc/MV Kit Creator key.
Mac and Windows
Press SHIFT when starting the program.
(NOTE: For MV Kit Creator™ LE, add “LE” to the ends of the names above.)
This only trashes your working preferences; it does not trash your registration codes etc.
For all other queries, please contact Chicken Systems Technical Support at the contact
points listed under Contacting Technical Support in this document.
FAQ
There is a MV Kit Creator™ FAQ up on the Chicken Systems Web site:
www.chickensys.com/support/software/mvkitcreator/faq
We revise this as needed, based on common questions previously asked about MV Kit Creator™.
It is extremely LIKELY that your question is answered here! Please do not contact us until you
have read completely through this resource. It probably will answer your question.
Bug Reports
MV Kit Creator™ should not crash or show errors, but reality insists that all programs do fail at
some point.
If you have a problem with building a kit, or receive an error within MV Kit Creator™ concerning
a le, the BEST way to communicate that is to le a Bug Report and send us the le in question
with a brief description of what the problem is.
To use the Bug Reports system, go to Help-Bug Reports in the program. It connects you to our
Bug Reports website, has a form you ll out that gets the information we need from you, and
permits you to send us the source le directly from that web page.
Page 36
Page 37

MV Kit Creator™
We strongly recommend you to use the
Bug Reports page rst! We do invite you
to Email or Chat us or call us with a problem,
but most of the time we just direct people to
the Bug Reports web site to document the
information in writing and for them to send
us the le. MV Kit Creator™ has many users
across the globe, and it is not possible to track
all our users particular questions and issues
through personal correspondence.
Once you establish an issue with the Bug
Reports web site, you will get an email
back with a link to your issue that you can
consistently check. We try to address issues
within 24-48 hours.
BUT, THE IMPORTANT THING IS TO
ENABLE US TO EXACTLY REPLICATE YOUR
ISSUE ON OUR END! THIS IS WHY WE
NEED THE SOURCE FILE IN ALL CASES.
PLEASE REMEMBER THIS!
Bug Reports
Bug Reports Page: www.chickensys.com/mvkitcreator/bugreports
Email: support@chickensys.com
FTP: ftp.chickensys.com
(please make sure le names DO NOT have spaces in them!)
User: incoming@chickensys.com
Pass: les2chicken
You Send It: www.yousendit.com
Page 37
Page 38

Contacting Technical Support MV Kit Creator™
Contacting Technical Support
Chicken Systems Technical Support can be reached in many ways: Phone, Email, Chat, or via
our SamplerZone.com Forum. Please give us a brief complete explanation of the problem. With
Email and Forum questions, we try to respond within 24 hours, Please be patient if the answer
does not arrive immediately.
You may Phone or Chat with us also if, after reading and looking at the documentation, you
are stumped. Our usual ofce hours are 8am-6pm Monday-Friday. We are often in the ofce on
weekends and holidays on an infrequent basis.
Phone: 800-877-6377 United States, 320-235-9798 elsewhere. Please do not mind the
crabby technical support engineers.
Email: support@chickensys.com
Chat: www.chickensys.com, use the Chat link on the left
Forum: www.samplerzone.com/forums/mvkitcreator
Please give us a brief complete explanation (how’s that for non-sequiturs?) of the problem.
We try to answer all emails within 24 hours. Please be patient if the answer does not arrive
immediately.
You may call us also if, after reading and looking at the documentation, you are stumped. Our
ofce hours are 8am-6pm Monday-Friday. We are often in the ofce on weekends and holidays
on an infrequent basis.
Page 38
Page 39

MV Kit Creator™
Updating
Updating
We update MV Kit Creator™ as needed, for bug xes, improvements, and additions to the
library.
MV Kit Creator™ automatically checks if there is a update available when you start it up.
(If desired, you can turn this checking off in Preferences.) You can also check for updates
by selecting Check for Updates under the Help menu. (This only works, of course, if you
are connected to the Internet on that computer.)
If your MV Kit Creator™ computer is not connected to the Internet, or for some reason you
can’t run MV Kit Creator™, you can check for updates at:
www.chickensys.com/mvkitcreator/userupdates
You can check what is your MV Kit Creator™ version number by checking the About Box (under
Help in Windows and under the App Menu on Mac), or by checking Get Info [Mac] or Properties
[Windows].
If there is an update available, you can download it and then move it to your program’s
computer (if from a different computer). Run the updater and your program should be updated.
Page 39
Page 40

Contact Us
Contact Us
Chicken Systems, Inc.
714 5th Street SE
Willmar, MN 56201
Phone: 800-877-6377 United States, 320-235-9798 elsewhere.
Email: support@chickensys.com
Chat: www.chickensys.com, use the Chat link on the left
Forum: www.samplerzone.com/forums
MV Kit Creator™
Page 40
Page 41

CreditsMV Kit Creator™
Credits
MV Kit Creator™ really benetted from good teamwork and solid commitment to quality
software. The MV Kit Creator™ team is:
Garth Hjelte: Project Lead
Jeff Godbloch: Programming and Technical Writer
Roger Weingarten: Programming
And thanks to:
Cheryl Ann Mays at SamplerZone for the best sales team ever
Mike Acosta at RolandUS for the encouragement and idea for the project
Shawn for the logo and icon and other artwork - and ideas
Everyone at MV-Nation for their ideas and encouragement
And...
Sandi Tepper with Provare Technology
Christian Schmitz, Glenn Austin, Joe Strout for prompt, clear, concise technical
assistance
Dan Dean and Ernest Cholakis for timely feedback and friendship
David Viens at Plogue for SFZ assistance
Kyle Zambora at Nine Volt Audio for great ideas and partnership
Larry Hopkins for more great ideas and hospitality
Native Instruments, Digidesign, Eastwest, Akai/Alesis, Kurzweil, and Emu product
managers and technical support crews for their thoroughness and assistance.
Page 41
 Loading...