

Page 1
Other Sampler products from Chicken
Systems - Rubber Chicken Software
SIMMS Memory
Upgrade the memory in your sampler to the fullest! We guarantee the best
price - do it cheep - do it Rubber Chicken!
Sounds and more Sounds!
We've been doing sounds for eight years - as long as samplers have been
around! Checkout the Ultimate Organ Library, or the PIANO! Pak, or the
new "XP meets ASR" set. Get sounds on CD, Zip, or Syquest cart - the
possibilities are endless!
For
Jan's
Samplers
Millennium
Editing Software
Hard Drives and CD-ROM Drives!
We sell all types of SCSI peripherals to work with your sampler. Iomega Zip and
Syquest drives, as well as our best-selling Chicken CD-ROM Drives.
Blank Floppies and Blank Tapes!
Essentials of your trade available at low low prices!
Future Products!
At Rubber Chicken, we're always developing
new products! Check out our Web Site for the
latest information:
www.chickensys.com
For the...
S-300 Series, S-200 Series
for Windows
MacOS Parameter Editing and Archival Software
for the Akai S-3000 and S-2000 Series
Distributed exclusively by
Manual copyright ©2000 Rubber Chicken
Software Co. All Rights Reserved
Manual copyright ©2000 Rubber Chicken Software Co. All Rights Reserved. No reproduction without permission.
Page 2

Credits
PLEASE WAIT’
- please do not touch any of the buttons on the sampler and wait. transfer will continue
normally in a few seconds.
while using Millennium in combination with my sequencer, drop-outs and other
artifacts occur
- while the sampler is communicating with your PC via SCSI, it will temporarily ignore
all MIDI messages. It is fine to run a sequencer alongside Millennium, as long as you
don’t play a sequence while working with Millennium. Similarly , it is important that
you do not press any buttons on your sampler while Millennium is communicating with
your sampler (particularly when sending/receiving samples).
when I load a previously saved program in Millennium, it doesn’t load any of the
related samples, or the samples do not play
- this can happen when the samples have a space at the start of their name. Windows
does not support spaces at the start of filenames, and therefore the spaces will be
truncated. If the program still contains samplenames with the spaces in them, Millennium will not be able to find those samples.
when loading a program from an S1000 or S3000 format CD, some of the program parameters such as filter settings aren’t read properly
- because the data format differs slightly depending on which type of sampler the CD
was intended for, some settings (such as filter frequence range) can differ. When
loading the programs via your sampler, the sampler will automatically convert the file
format. Millenniun can’t do this, so therefore some of the parameters may need
adjusting after loading.
Credits
Programming and concept: Jan van Valburg
Graphics and design: Konstantine Stamatis
Testing: Clive Loseby
Thanks to everyone at the Akai mailing list
Distributor Contact information
Rubber Chicken Software Co.
714 5th Street SE
Willmar , MN 56201 USA
T oll Free Order Line: 1-800-8-PRO-EPS (800-877-6377)
T ech Line, Fax, and Int’l: 1-320-235-9798
E-mail: support@chickensys.com
Web Page: www.chickensys.com
Page 20
Page 3

Troubleshooting Table of Contents
If auto-extract has created a marker where there shouldn’t be one, you can delete the
marker by selecting the ‘X’ tool from the top left of the window. Select the X and then
click on the marker. The marker will shrink and the red line will disappear , signifying
that the marker has been disabled. Clicking on it again using the delete tool will reactivate it.
Table of Contents
If auto-extract has left out a marker where you would like one to be, click on the
‘pencil’ tool, and then click somewhere on the waveform. However, it’s usually better
to make the auto-extract function very sensitive.
You might find that a marker only shows up when the slider’s sensitivity is very high.
This makes it unusable though, because so many other markers will appear at high
sensitivity . When this happens, you can ‘lock’ the marker. Click on the ‘lock’ tool and
then click the marker you want to lock. Now this marker will never disappear, even
when you decrease the sensitivity . To ‘unlock’ the marker, click on it again using the
lock tool.
Once you are happy with the placing of all the markers, click ‘extract’. Millennium will
make samples with the original name with ‘-1’, ‘-2’, etc. added to the end.
note: this works with stereo samples, too.
T roubleshooting
Below is a list of problems that you may encounter, their possible causes and solutions.
.wav files aren’t being saved, or aren’t being saved in the right place.
- Check that there is enough free space on the drive you are saving to.
- The sample path feature in settings might force the samples to be saved elsewhere
1 - Introduction Page 1
2 - Installation Page 2
3 - The Memory View Page 3
4 - Editing Programs Page 9
5 - The Multi Mixer Page 13
6 - Loading and Saving Page 14
7 - The Auto Extract function Page 18
8 - Troubleshooting Page 19
9 - Credits Page 20
when using the ‘send to’ facility, windows reports ‘access denied’
- You are trying to ‘send’ too many files at once. This is a limitation of Windows. T ry
selecting less files and then try again.
when I change a program’s parameters, the changes do not seem to take effect
- In multi mode, some changes only take effects once the program you make them to
has been re-selected. Try switching your sampler into single mode and then back into
multi mode. Alternatively , try sending a program change from your sequencer to reselect the program, or simply edit the program in single-mode.
Millennium has stopped responding and the sampler displays a message ‘BUSY
Page 19
Page 4
Introduction The Auto-Ext ract Function
Introduction
Thank you for purchasing Millennium Pro. Millennium is a program for Windows 95,
designed to give you the power to effortlessly control the many functions of your
sampler through a rich, comprehensive graphical interface. Apart from allowing you to
remotely control your sampler, Millennium offers a wide range of features that will
make working with your sampler much easier and much more fun. Below are some of
Millennium’s key features:
Fast and reliable sample transfers.
Millennium allows you to send multi files, programs and samples to your sampler, at
speeds that can even exceed loading them from harddisk. Because the samples are
stored in .wav format on your PC’s harddisk they are easy to edit, and together with the
.prg and .mlt files they are easy to organize.
Intuitive, fast graphical interface.
Millennium offers you pleasing graphical interfaces for editing programs, keygroups
and multi files. Instead of many presses on the page up and down buttons, simply point
at the parameter you want to change and drag it to it’s right setting. The graphical
envelope display gives a clear representation of what the envelope will sound like, and
the Multi Mixer view lets you see all the important multi settings for all your parts in
on one convenient screen.
Full sample editor integration.
Millennium allows you to integrate sample editors such as Cool Edit or Sound Forge
into your sampler. Simply double-click on the sample you want to edit, and it will be
loaded into your editor. Once you are done, the sample will automatically be sent back
into your sampler. It’s almost as if your favorite sample editor is inside your sampler.
Advanced editing features.
Millennium has many advanced features such as automatic pitch detection, automatic
BPM detection, automatic generation of drum-map programs, keygroup sorting and
removing of unused samples. Tedious operations that would normally take a long time
can be done in a matter of seconds, leaving more time to get on with the fun part of
making music.
Page 1 Page 18
The Auto-Extract Function
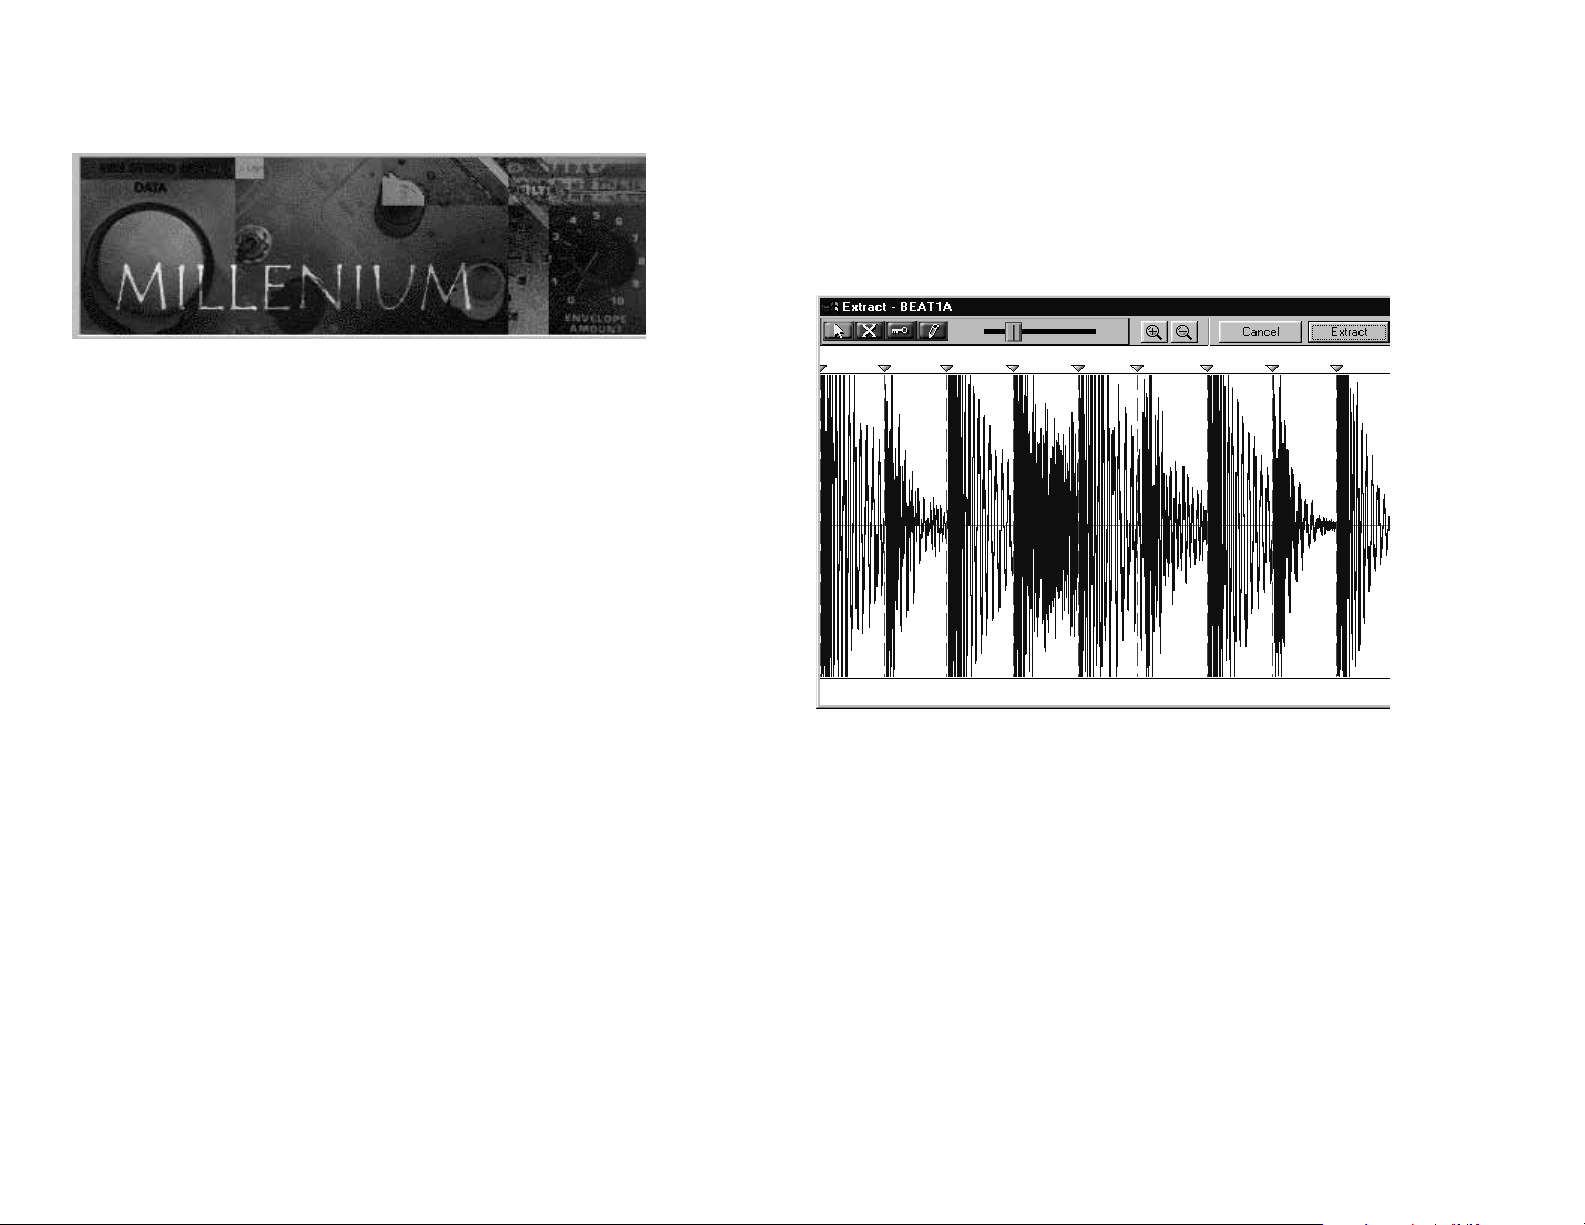
The auto-extract function allows you to chop a sample up into smaller pieces. It can be
useful for chopping up a drum-loop into individual drum hits, or to chop up a
multisampled instrument into individual notes. This function can be accessed by rightclicking on a sample and selecting ‘auto-extract’. A window like this will be displayed:
The auto-extract function can divide a sample up into chunks. The positions that
divides one chunk from the other is called a marker. The auto-extract function will load
the sample into the PC’s memory and analyze it’s volume, placing markers at the start
of parts with high volume. The idea is that the markers will be placed at the start of
drum hits.
The markers show up on the display as red dotted lines with a small triangle at the top.
You can listen to the individual chunks by clicking on the sample between them.
You can zoom in and out of the waveform by using the + and - icons at the top of the
window .
You will see a slider at the center top of the screen. Moving this slider around will
make the auto-extract function more or less sensitive, making more or less markers
appear.
Page 5

samples. If no pathname is specified, Millennium will save and load to the default path
only. If you do specify a path, Millennium will save all samples to this path instead of
the default path, or the path you might have selected. Additionally, if a sample can’t be
found in the default path, it will look for it in this path.
Use Desktop Windows. By default, sub-windows in a program are confined to the
program’s own space. Sometimes it can be useful to see one of Millennium’s windows
while viewing another program. This can be accomplished by checking the ‘use
desktop windows’ checkbox in front of the type of window that you would like to
activate this feature for.
Select active program in sampler. When this checkbox is enabled, double-clicking on
a sampler will automatically select that sample as the active sample. This only has an
effect when your sampler is in ‘single mode’.
Use load mode to clear memory. Normally, clearing the memory of your sampler
involves sending a delete command for every sample and program in it’s memory. T o
speed up the process of clearing the entire memory of your sampler, you can activate
this box. When it is checked, Millennium will send a ‘load from disk, clear all’
command to the sampler. The sampler will then clear it’s memory and load the first
sample on the disk in your sampler’s diskdrive. This is a faster way of clearing your
memory , but if for some reason you choose not to use it, you can turn it off here.
Load/Clear automation. Millennium can be configured to perform certain tasks when
loading and saving programs. By default these actions will all be turned off, but you
can choose to turn them on, so Millennium always performs them without asking, or to
be prompted wether you want Millennium to use them or not. The actions are as
follows:
Clear memory when loading a multi: When you have chosen ‘load’ or ‘load
individual’, and the multi file is selected, this will clear your sampler’s memory
before loading the multi. This can be useful to avoid duplicate program numbers.
InstallationLoading and Saving
Installation
In order to install Millennium Pro, you will need an AKAI Sampler (S2000, S3000XL
or CD3000XL), a PC running Windows 95 or 98, a CD-Rom drive, 4MB of harddisk
space, and a SCSI-card that is connected to your sampler.
T o install Millennium Pro, simply insert the CD into your CD-Rom drive. If the
Millennium installation program does not start automatically, click on the ‘Start’ button
in the bottom left of your screen, and then click ‘Run...’. Now type ‘D:setup’ (if the
letter for your CD-Rom drive is not D, replace it with the right letter) and click ‘OK’
Once the installation has started, follow the instructions on screen. When the installation is finished you will be able to start the program by clicking on your Start button,
and selecting ‘Millennium Pro’ from your programs menu.
In order for Millennium to recognize your sampler, you must make sure that the
sampler is properly connected to your SCSI card, and that the software for your SCSI
card is installed properly. It is important that the sampler is fully booted up before
turning on your PC, in order for the PC to recognize the sampler.
Dynamically assign program numbers: When you load a new program, either via
‘load’, ‘load individual’, or ‘open from akai CD’, it can happen that the program
you load uses the same program number as another program that already exists.
This option offers an alternative to selecting ‘renumber programs’. When a new
program is loaded it is automatically assigned the lowest unused program number.
Note: this function is automatically ignored when loading multis
Purge samples on program deletion: When deleting a program, this option will
make Millennium automatically analyze which samples are now unused and delete
them. If the samples in the program you deleted are still in use in another program
they won’t be deleted. Similarly , it won’ t delete any other unused samples that
weren’t in the program.
Page 17 Page 2
Page 6

The Memory View Loading and Saving - Settings
It is also possible to select a volume and click ‘export’. This will create a folder with
The Memory View
Viewing
Once Millennium has started you will see a screen similar to this:
the name of the volume, containing all the programs and samples in that volume. The
same is possible with partitions, and it is even possible to export an entire disk in one
go, by selecting the drive it is in and clicking ‘export’.
Note: The AKAI disk format is quite wasteful, and it can be possible to fit the (exported) contents of over 3 AKAI format CDs on one normal CD.
Settings
T o adjust Millennium’s settings, select ‘settings’ from the file menu. It will bring up the
following dialog box:
This screen display basic information about the contents of your sampler’s memory ,
which is why it is called the ‘memory view’. This screen contains the following
important information:
1: The name and type of your sampler.
2: The current multi file
3: A program
4: A sample
By default, Millennium will display this view in ‘list view’ form, but you can switch to
a ‘details view’. The options for this is in the ‘View’ menu. The ‘details view’ displays
more information about each item in the samplers memory. However, it does take
longer to display because the amount of information that has to be gathered from the
sampler is much larger . The details view could look like this:
Sample Editor. Please enter the path and filename of your favorite sample editor in
this box. Once you have entered the filename, you can invoke the editor with a sample
from the sampler’s memory (either stereo or mono), by double clicking on it in the
‘memory view’.
Sample Path. In this space you can specify a fixed pathname for Millennium’s
Page 3 Page 16
Page 7

Double click on the drive you wish to access and you will see a list of partitions. Click
on a partition and you will see the volumes it contains. Click on a volume and the
contents of the volume will appear. To go back one step at any time, click the ‘back’
button.
The Memory ViewLoading and Saving
As you can see, the contents is now displayed in columns. The information displayed
in these colums is (from left to right):
The name of the object, The type of object (multi, program, sample, or stereo
sample), the program number, the program channel, the number of keygroups, the
sample length and the sample loop type.
Loading from AKAI CD into the sampler. To load a sample or program from the
AKAI format disk into your sampler, simply select the programs/samples you wish to
load and choose ‘open’. This will read the files into your PC’s memory and then
transfer them to your sampler.
Note: because the data has to pass through your PC this is considerably slower than
reading the data directly from your sampler.
By the way , even though additional files such as drum inputs, multi files, etc. are
displayed, they cannot be laoded this way. Only programs and samples can be loaded
(or exported) using this feature.
Previewing a sample. To hear a sample before you load it, select the sample and click
‘preview’. Millennium will load the sample into the PC’s memory and play it back at
44khz.
Exporting AKAI CD contents to your harddisk. It is possible to ‘export’ an entire
AKAI format disk, or part of it, to your local harddisk. Simply select the sample or
programs you wish to save to your local harddisk and select ‘export’. You will be
prompter for a folder to save a file to.
Page 15 Page 4
It is possible to sort according to any of the parameters by clicking on their headers.
For example, you could sort all the programs by program number by clicking on the
‘num’ column (circled in red).
Millennium has the option to show two mono samples as one stereo sample. This can
be turned on and off in the view menu, ‘combine stereo pairs’. In the above picture it is
turned on. When turned off, the screen would look like this:
Page 8

The Memory View - Editing Loading and Saving
Editing. The most convenient way to edit any object is by double-clicking it. Double
clicking the multi file will access the Multi Mixer. Double clicking a program will
bring up the ‘Keyspan View’ and double clicking on a sample will start the selected
sample editor. In order for this last feature to work you must specify which program
you would like to use to edit your samples. This is done in the File menu under
‘options’.
Loading and Saving
Millennium contains five function for loading and saving, which all reside in the ‘File’
menu. They are:
Deleting programs/samples. T o delete one or multiple programs/samples, select them
and press the delete key or select ‘delete’ from the edit menu. The multi file cannot be
deleted.
Renaming multis/programs/samples. T o rename any object, simply click on it twice
(slowly), and then enter the new name. You can also press F2, or select ‘rename’ from
the edit menu. You cannot rename an object to the same name as an object that already
exists. The maximum amount of characters for a name is 12. For stereo samples the
maximum is 10. (this is because the last two characters are occupied by the ‘-L’ or ‘-R’
extension).
Program editing. To edit a program’s global parameters, right-click on it and select
‘Settings’. This will bring up the ‘program view’ for that program. T o edit the parameters for it’s individual keygroups, right-click on the program and select ‘edit
keygroups. This will bring up the ‘keyspan editor’. Y ou can also double-click on the
program.
Duplicating programs. To duplicate an existing program, right click on it and select
‘duplicate’. A dialog box will appear asking for you to enter a new name and change
any parameters if you wish.
This function also works with multiple programs. If you duplicate multiple programs,
the duplicated program will contain all the keygroups of the programs you duplicated,
put together in the one new program. Basically this means that the duplicate function
doubles as a ‘combine’ function.
Open: Opens a file/files and files that it references.
Open individual: Opens a file/files on it’s own.
Save: Saves all files selected in the ‘memory view’ and all files that they
reference. You will be prompted for a folder to save the files to.
Save individual: Saves just the files selected in the ‘memory view’
Open from AKAI CD: Allow to read an AKAI format disk (see below).
T o clarify the dif ference between individual and normal opening/saving here is an
example:
In order to save the entire contents of the sampler, you could select everything in the
memory view and use ‘save individual’. However, you could also just select the multi
file and choose ‘save’. This will save the multi file, all programs currently in memory
and all samples that are referenced by any programs.
Open works the same way. If you open a program, that will also automatically load all
it’s associated samples. If you open a program using ‘open individual’, only the
program will be loaded.
Loading from AKAI format disks
Millennium has the capability to read AKAI-format disks. This function works with
CDs and ZIP disks. Choose the ‘Open from AKAI CD’ and you will see a menu that
lists all your compatible devices. They don’t have to be SCSI devices, normal IDE CDDrives will work too.
Program properties. To change a program’ s number or channel, right-click on it and
select ‘properties’. This will bring up a dialog box where you can change the
program’s parameters.
Renumbering Programs. T o automatically reor ganize all the program numbers,
choose ‘renumber programs’ from the ‘tools’ menu.
Create Drum-map. This function is available by first selecting a few samples that
you would like to make a new program with, and then clicking ‘create drum map
program’ in the tools menu. First, you will be prompted to enter a name for the new
program, then a dialog will appear with these settings:
Page 5 Page 14
Page 9

The Multi Mixer
The Multi Mixer allows you to edit the parameters stored in your multi file. T o access
the mixer, double-click on the multi file in your memory view. The window will look
something like this:
The Memory View - Drum Map WizardThe Multi Mixer
Here you can select the first key to map a sample to, the number of keys to map each
Each row of controllers represents one of the multi parts. The large slider controls the
volume for each part, while just below the slider is the program name assigned to each
part. This space can only hold 10 characters, so for example in this case the program
name ‘PO-TEKNOMAN’ on part 6 has been shortened to ‘PO-TEKNOMA’. It is
possible to change the program assigned to a part by clicking on it.
Note: when sending parameter changes over SCSI, the sampler’s MIDI I/O is temporarily disabled. Because of this, making changes to any of these parameters while
playing a song from a sequencer can result in loss of notes, making some notes
disappear and others ‘hang’. This goes for all other views too, but is especially
apperent in the Multi Mixer.
Page 13 Page 6
sample to (counting black keys is optional). Other options are to enable all mute
groups and play samples to the end. If you decide to have variable pitch, the pitch will
be corrected depending on the place on the keyboard. So wether the sample is mapped
to the very last key or the very first few , the middle key will always play the sample’s
default pitch.
After clicking ‘finish’ the new program will be created.
Sample editing. T o edit a sample, double-click on it, or right-click on it and select
‘open in wave-editor’. To access the sample-extract function, right-click on the sample
and select ‘auto extract’. For more information about this function see the chapter
titled ‘auto extract function’
Sample properties. To edit the pitch, tuning and loop type of a sample, right-click on
it and select ‘properties’. This will bring up a dialog box where you can change these
parameters.
Page 10

The Memory View - Properties Editing Programs - Keygroups
The ‘program editor’ can be accessed by right-clicking on a program and selecting
‘settings’. This window displays the settings that affect the entire program and aren’t
keygroup specific. Editing these parameters works in the same way as editing parameters in the ‘keygroup editor’.
For a more detailed description of all the different parameters please refer to your
sampler’s manual.
In this dialog, you will also find Millennium’s ‘auto tune’ function. Clicking the ‘auto
tune’ button will make Millennium transfer the sample into the PC’s memory. It will
then perform a fast fourier transform to analyze it’s spectrum. Millennium will calculate the most prominent frequency in the sample, and from that it will calculate
appropriate pitch and tune settings. In order to apply this function to a group of
samples at once, select the samples you wish to ‘auto tune’ and select ‘autodetect
pitch’ from the ‘tools’ menu.
Note: This function is not always guaranteed to give the right results.
BPM Adjustment. For samples that contain a drum loop, pitch and tune is not a very
good representation of how the sample should be tuned. If you would like to adjust the
tempo of a drum-loop sample by changing it’s pitch, right-click on the sample and
select ‘adjust BPM’. This will bring up the following window:
In this window, you can enter the current BPM of the sample, and the BPM that you
would like it to be. Millennium then calculates the difference between the to tempos
and adjusts the tuning and pitch accordingly.
Page 7 Page 12
Page 11

The ‘zone assign’ section applies changes to one of the 4 zones within the keygroup.
Using the 1.2.3.4 buttons it is possible to switch to a different zone.
T o use the envelope editor, simply click and drag the points to their new position. By
default the envelope view will display the graph for envelope 1. You can switch back
and forth between the two by clicking on the ‘env 1’/’env 2' buttons.
For a more detailed description of all the different parameters please refer to your
sampler’s manual.
Program Editor
The Memory ViewEditing Programs - Keygroups
Millennium contains a function which will transfer a sample to the PC’s memory and
analyze it’s volume to find the most prominent distance between it’s peaks. This is
work a lot like BPM counters used in some newer DJ mixers. You can make Millennium ‘guess’ your sample’s BPM by clicking the ‘detect’ button.
note: This function is does not always produce reliable results.
Purge Unused Samples. You can activate this function by clicking ‘purge unused
samples’ in the tools menu. This function will look through all the programs in
memory , and then delete all the samples that are in memory, but that are not in use by
any programs.
Page 11 Page 8
Page 12

Editing Programs Editing Programs - Keygroups
Keygroup Editor
Editing Programs
Keyspan Editor
When you double-click on a program, the keyspan editor will be displayed. It will look
something like this:
At the top of the screen is a virtual keyboard. Below the keyboard are the keygroups.
Each keygroup’s number is displayed on the left, followed by the samples that have
been assigned. By default only the first two samples are displayed, but more or less
samples can be displayed by clicking on the ‘1.2.3.4’ buttons in the top left corner. Yo u
can select a keygroup by clicking on it. This will make it light up, and it will light up
the keys it has been mapped to on the virtual keyboard.
You can change the mapping by clicking the edges or the middle of the keygroup’s bar
and dragging it left and right. You can change the samples that are assigned to a
keygroup by clicking on the sample name.
This will bring up a list containing all the samples present in the sampler’s memory .
You can choose a new sample to assign, or choose ‘none’ to assign no sample.
The low volume, high volume and pitch type parameters to the right of the window are
purely for information purposes and cannot be changed.
You can edit the parameters of a keygroup by double-clicking on it’s bar. This will
bring up the ‘keygroup editor’:
Page 9 Page 10
T o change the knobs in this window, simply click and drag them to their new position.
T o change the buttons, simply click on the button you wish to activate/deactivate.
Normally, any changes will only af fect the keygroup which’ name is displayed in the
name of the window. Selecting the ‘ALL KG’ button will apply the changes too all the
keygroups within the program.
 Loading...