

Page 1
Instrument Manager™
Version 1.1, Build 1
Page 2

(This page is intentionally left blank.)
Page 2
Page 3

Instrument Manager™ Table Of Contents
Instrument Manager™
Table Of Contents
Introduction............................................
Basic Concepts........................................
Windows
Main Screen............................................
Proprietary Dialog.....................................
Launch Pad..............................................
Views
Database View........................................
Category View.........................................
Column View............................................
Folder View.............................................
Content View............................................
Common Operations
Organization....................................
Add/Delete/Edit.............................
Search..........................................
Management....................................
Sample Relinking............................
Object Naming...............................
Operations.......................................
Compilation......................................
Bank Builder..................................
Object Merger................................
...........................................................5
...........................................................7
...........................................................8
...........................................................9
..........................................................10
.........................................................11
.........................................................12
.........................................................12
.........................................................13
.........................................................13
.........................................................14
.........................................................15
.........................................................16
.........................................................17
.........................................................18
.........................................................21
.........................................................22
..........................................................23
.........................................................24
.........................................................26
Menus
File........................................................
Tools......................................................
Help......................................................
Preferences
Preferences.............................................
Support
Troubleshooting.......................................
FAQ.......................................................
Bug Reports............................................
Contacting Technical Support....................
Updating................................................
Contact Us..............................................
Credits...................................................
Page 3
.........................................................27
.........................................................28
.........................................................29
.........................................................30
.........................................................33
.........................................................33
.........................................................33
.........................................................35
..........................................................36
.........................................................37
.........................................................38
Page 4

(This page is intentionally left blank.)
Page 4
Page 5
Instrument Manager™ Introduction
Instrument Manager™
Introduction
Instrument Manager™ is a Mac and
Windows application that organizes,
manages, and views properties of any
Instrument or Sample le. This includes
most every software samplers and
hardware samplers, must most every
commonly used sample format, either as a
stand-alone le or embedded sample.
Instrument Manager™ is designed
to meet every real-world need related
to instrument management with ANY software/hardware sampler. It supports practically
all Instrument le formats: Kontakt, Structure, EXS24, Reason NNXT, HALion, MachFive,
Independence, GigaStudio, SFZ/Dimension, workstations such as Motif, Fusion, and Fantom,
and old samplers such as Akai, Roland, Emu, Ensoniq, Kurzweil, and many more.
Use as a Browser.
Type in a simple search query in the iTunes-ish interface and your results come right up,
reminiscent of Giga’s QuickSound but more powerful. Drag anything off the interface and drop
it onto any software sampler that supports dropping of les (Kontakt, Structure, etc.). Four
individual customizable views allow total complete ease of use.
Windows and Mac. Any Instrument Format.
Whether you use a Windows or a Macintosh, Instrument Manager™ is compatible. No matter
what sampler, or what le, Instrument Manager™ supports it. There isn’t a computer or a
instrument le that Instrument Manager™ can’t handle.
No more bad links.
Using brand new innovative technology just developed, Instrument Manager™ can re link
samples quickly and easily when the links are broken. But that’s not all: redirect links to new
samples, or change link/sample names using Find-Replace techniques, plus other innovative relinking schemes.
Power Databasing.
Any Instrument can be given metadata tags, and searched upon using those tags. Instruments
can be grouped under user-dened groups for later access. Multiple databases are supported.
Instrument Manager™ databasing can be synchronized with other sampler’s database
schemes.
The other stuff.
Use the Bank Builder to make your own custom Banks. Merge Instruments using the Object
Merger. Rename Instruments, whether they are les or objects within a le. Audition sounds.
Read, write, and browse proprietary disks such as Akai, Roland, Emu, Ensoniq, and Kurzweil.
Unlike other management programs, Instrument Manager™ works with all formats, including
those on proprietary disks such as Akai, Emu, Roland, Ensoniq, Kurzweil, etc. And when
combined in Chicken System’s SamplerTools™ bundle, you can convert sounds on the y.
Page 5
Page 6

Introduction Instrument Manager™
Features include:
Database any sampler le and disk format
Integrated intelligent Search Engine; search for sounds or categories of sounds using
keywords and regular expressions
Create Groups and assign Instruments or Samples to those Groups
Multiple views: List, Category, Column, and Folder
Sample Reference Management - x broken Instrument-Sample links, assign new sets of
samples to Instruments with different names, remove duplicate samples and sample data
Read and Write to Proprietary disks (Akai, Roland, Ensoniq, Emu, etc.), create your own
compilation disks
Drag-n-Drop loading of sounds from the main interface
Auditioning ability
Macintosh and Windows-compatible
Some notes regarding the documentation:
This document is synced to the Instrument Manager™ version denoted on the cover of this
document. It is a dynamic document and often is revised with every major, minor, or even build
of Instrument Manager™.
Some of Instrument Manager™’s dialogs are “sheets” on the Mac, meaning that they
animate down from the title bar and are attached to the dialog which they correspond to. Some
screenshots reect this in the document. On Windows these dialogs are separated but they still
are “modal”, meaning that they must be worked with or cancelled to return control back to the
parent dialog.
Instrument Manager™ works with many formats. Most US keyboards and software regards
middle C key on a keyboard (MIDI note 60) as C4, while most non-US styles denote this as
C3. By default Instrument Manager™ displays middle C as C4, but you can change this in
Preferences-General to align with your personal preference.
If you are a registered owner, you are qualied for free updates for the life of the program.
You can download these from your program using the Check for Update feature, or from the
Chicken Systems Update Area.
Page 6
Page 7
Instrument Manager™ Basic Concepts
Basic Concepts
Instrument Manager™’s features can be
broken down into four different areas.
Organization
List your Instruments and Samples of any
format; search and display small or large
subsets of entries, attach properties to these
entries for easy recognition and information
value. For more information, go to the
Organization page.
Management
Fix Sample References in Instruments, update Sample Parameters, or reassign new samples.
For more information, go to the Management page.
Operations
Drag Instruments or Samples off the interface and onto external areas, such as external
Samplers, the Finder/Explorer, or DAW “bins” - anything that takes an external le drag. For
more information, go to the Operations page.
Compilation
Create custom Banks, such as Giga les, SoundFonts, or any other “Bank” format from single
Presets. Read and write from Proprietary disks (Akai, Roland, etc.) For more information, go to
the Compilation page.
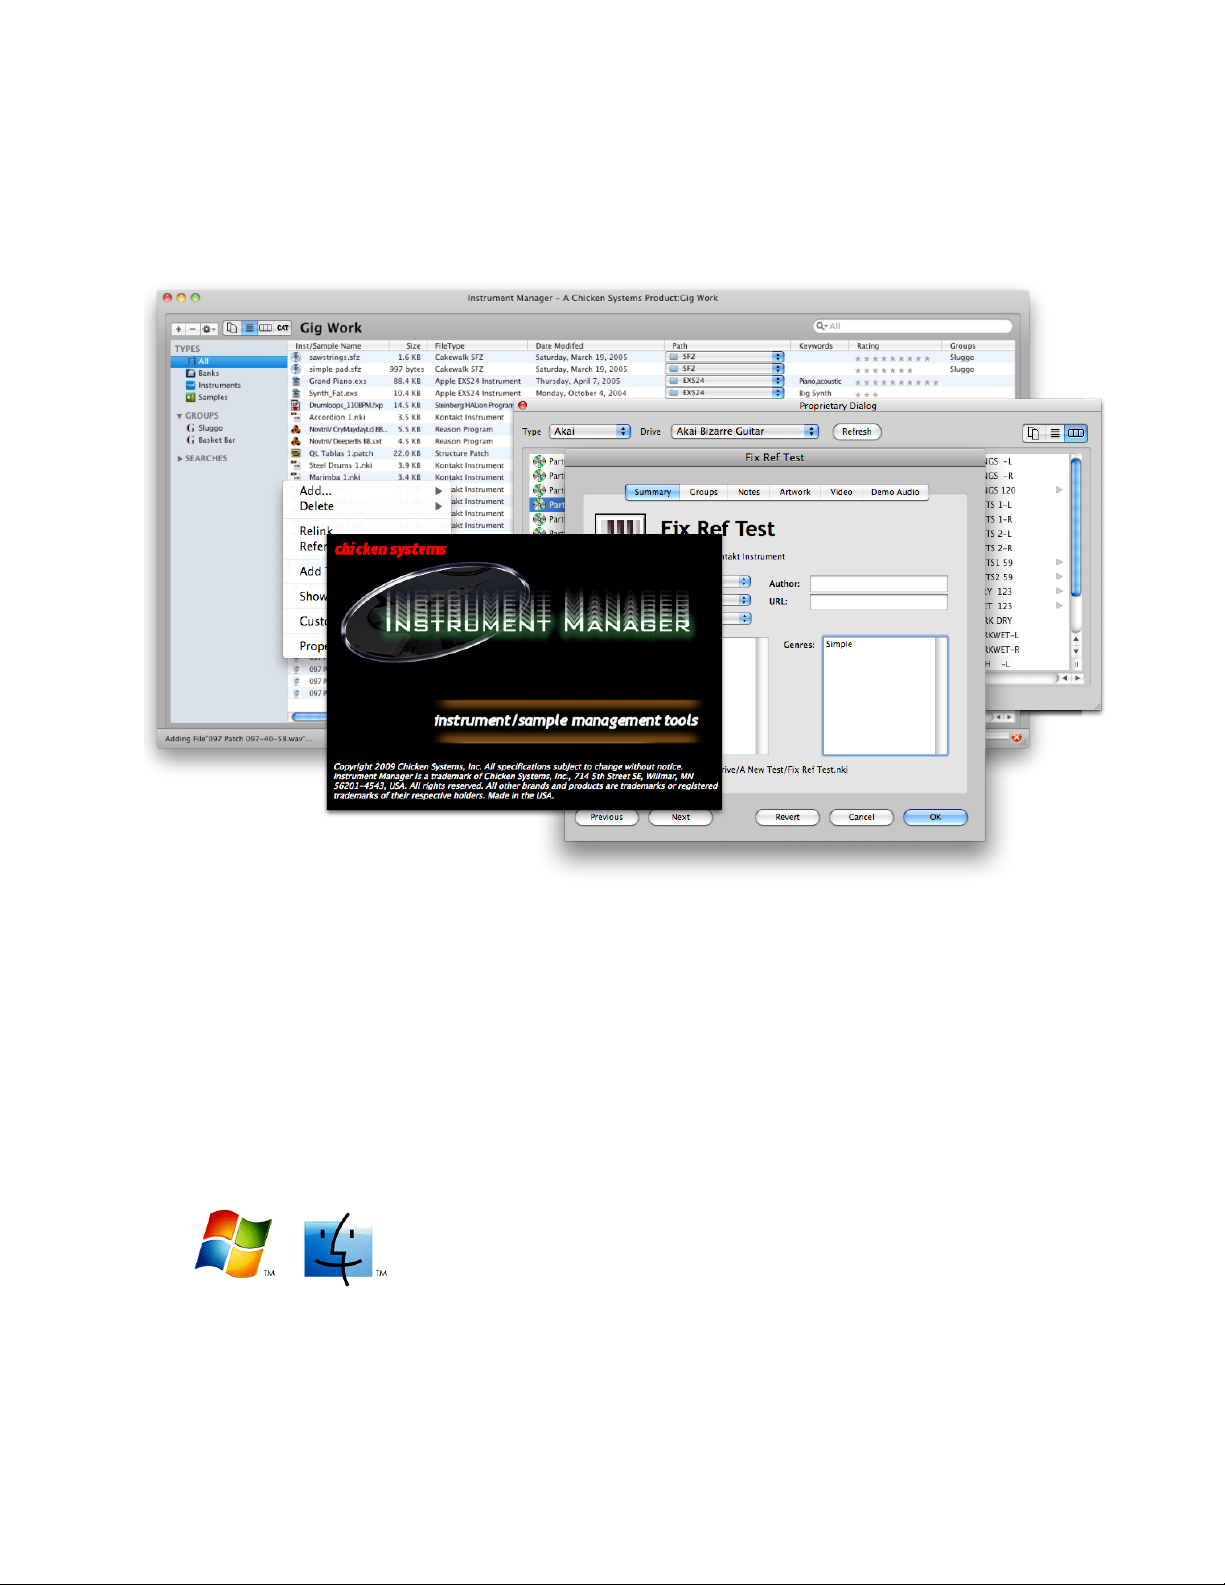
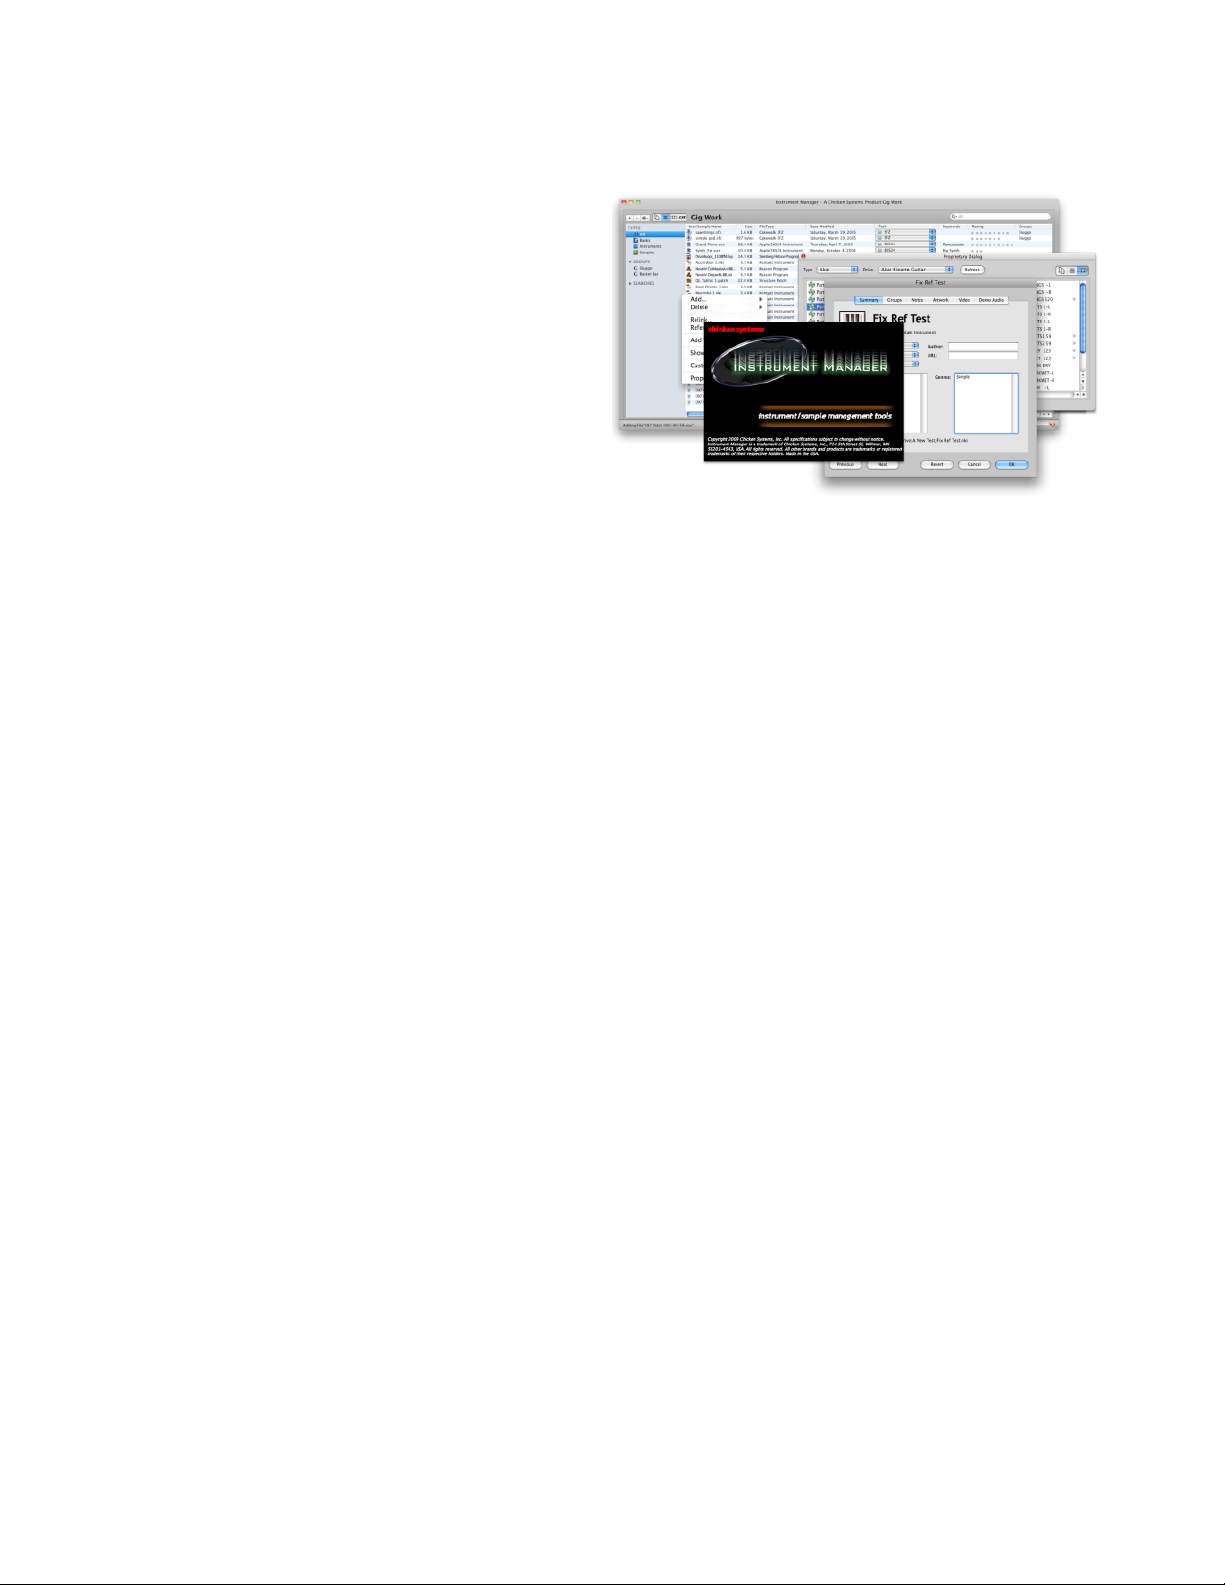
The principal interface for Instrument Manager™ is the Main Screen, shown above.
Each Main Screen hooks into a database. There can be multiple databases created, and several
databases can be open at one time.
You can add, delete, and edit entries in the database. You can add entries (Banks, Instruments,
or Samples) by dragging them onto the Main Screen, or by adding them using the menu or
popup menu operations. You can operate (add, delete, edit) entries one at a time or in bulk.
You can view entries via the large list on the Main Screen. You can customize the columns to
see what you want to view. Each entry shows you it’s inherent properties, along with some
parameters you set yourself, like Category, Genre, Keywords. Entries can be assigned a picture,
a movie, and/or a demonstration sound.
Page 7
Page 8
Instrument Manager™Main Screen
Main Screen
The Main Screen in Instrument Manager™
is the interface to a single Database
which you attach to the dialog. You can
have multiple screens up within a single
Instrument Manager™ application, to edit
multiple Databases.
A Main Screen shows:
Sound Object Lists
The Main Screen contains four different lists.
Two of them (Database View and Category View) relate to Sound Objects in the Database.
Folder View lists the les on your system (local disks or network drives), and Column View
allows you to make your own custom “virtual volume”.
A Database shows all the entries or a portion of them. This can be based on a Search lookup,
the contents of a Group, a modied list based on adding or removing from the list. You can drag
out of the list and drop into it.
For more information on the Lists and their function, please see the Main Screen Lists section in
this document.
Search Field
This works similarly to the standard iTunes or other applications Search Field. Use this to
increase or decrease the entries you see in the List. For more information on searching, please
see the Search section in this document.
Operation Popup
This gives you easy access to common operations, like adding, deleting, relinking, the
Reference Manager, Properties, etc.
Page 8
Page 9
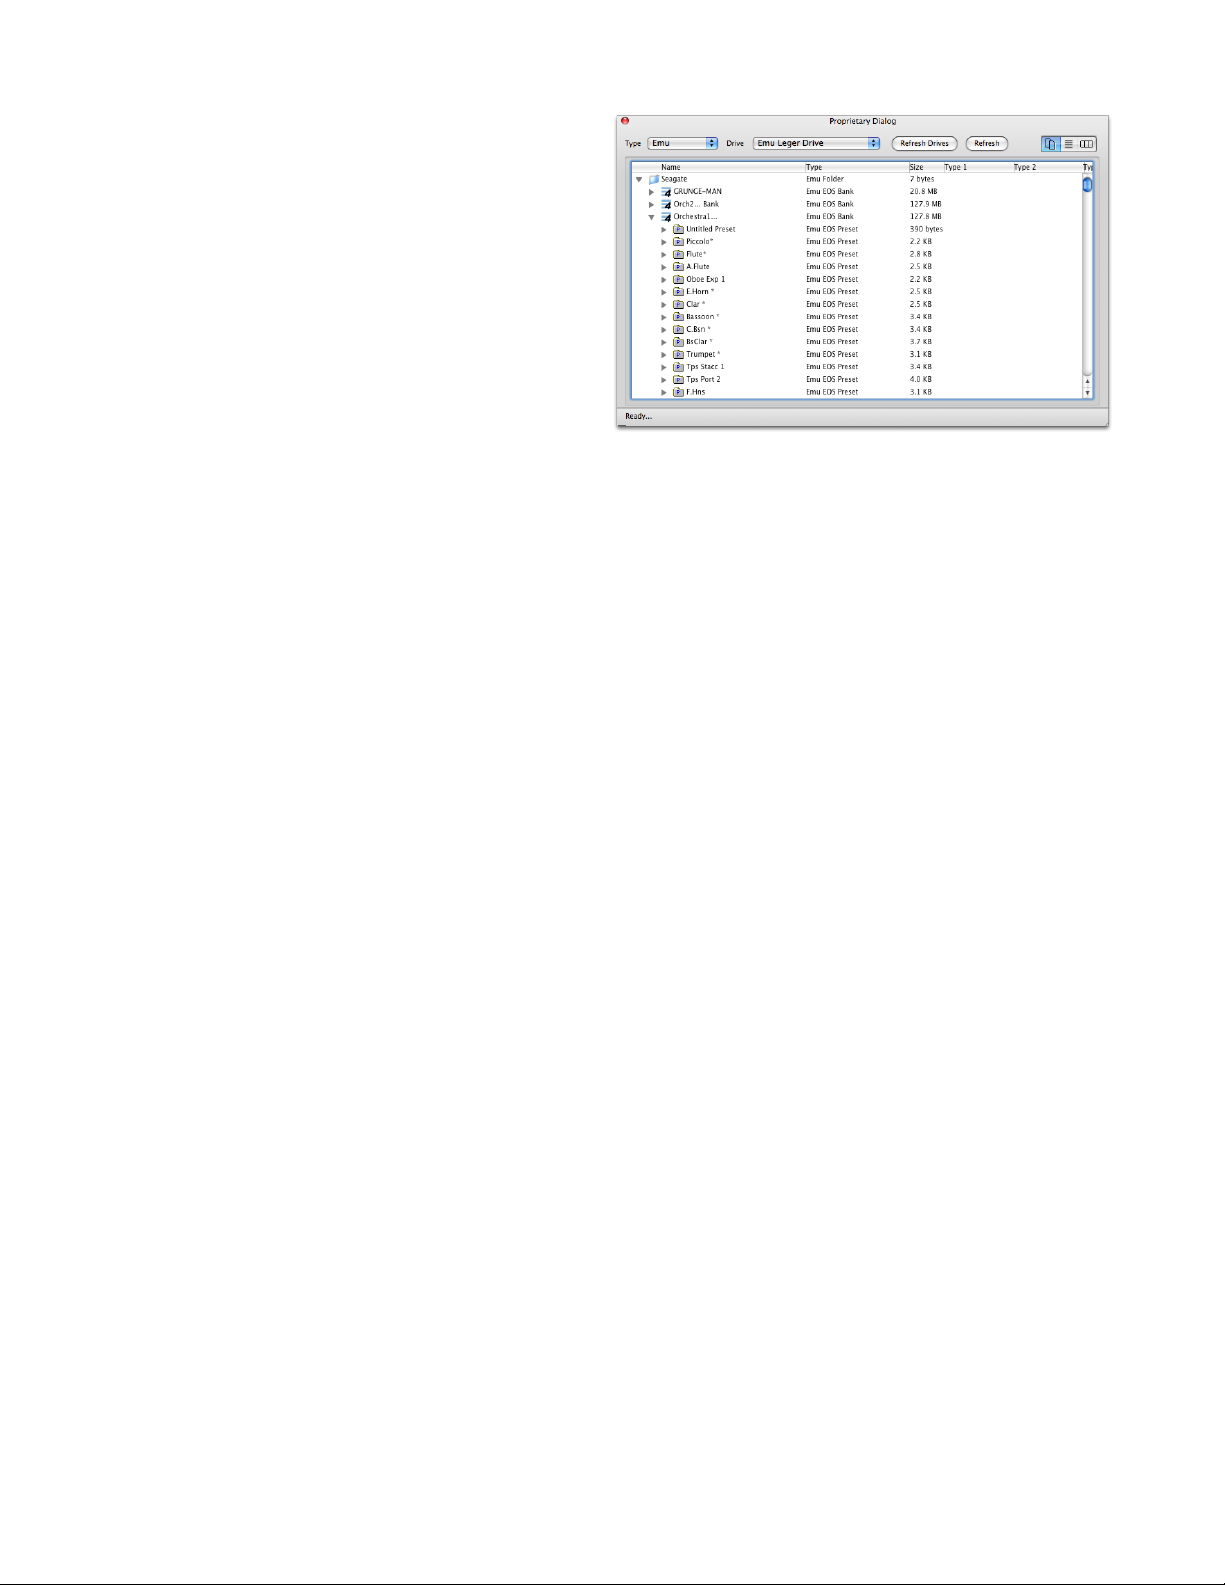
Instrument Manager™ Proprietary Dialog
Proprietary Dialog
Proprietary disks can’t be read with a
computer, so Instrument Manager™
provides a Proprietary Dialog so you can
view the contents of your Akai, Roland, and
other CD’s and disks.
Proprietary disks can include CD’s, disks,
and Virtual Drives. Virtual Drives are
(usually large) Image les that exist on
your computer. The Proprietary Dialog can
navigate these as well.
Virtual Drives are seen by Instrument
Manager™ when they are in, or aliased/shortcutted to, the Images folder. This is in the
following locations:
Mac: /Users/[username]/Library/Application Support/Chicken Systems/Instrument Manager/Images
WinXP:
Vista/Win 7:
(note: AppData may be hidden)
%SYSTEMDRIVE%\Documents and Settings\[username]\Application Data\Chicken Systems\Instrument Manager\Images
%SYSTEMDRIVE%\Users\[username]\AppData\Chicken Systems\Instrument Manager\Images
If you are just reading your Proprietary disks, we strongly suggest making Virtual Drives out of
all of them. You can use Disk Utility or Toast (Mac), or most CD-burning softwares on Windows.
Select your desired peripheral or Virtual Drive in the popup menu above the dialog. You can
Refresh using the Refresh button next to it. You have 3 views to select from - Tree, List, and
Column View.
Tree View
This view shows your drive in hierarchal indented form. Click the +/-/triangles to expand
or collapse a node.
List View
This view shows the “current working folder” on your drive. Back up by clicking on the “Up
to [xxx]” entry at the top, and go forward by double-clicking on a folder-type object on the
list (they are listed rst). By using the popup menu up top, you can navigate back several
steps.
Column View
This view borrows for the popular Mac Finder concept. It is similar to the List View only you
expand into horizontal lists to the right of the parent.
You can drag in and drag out of the Proprietary Dialog to add or replace objects in the drive,
just like a normal computer drive. (Of course, you cannot write to a CD, but you can write to
a Virtual Drive, which you can later burn to a CD.) Sound Object drops are subject to the rules
the drive imposes, for instance you can’t drop a Instrument on a Akai Partition (they go in Akai
Volumes).
Under normal stand-alone operation, you can only transfer Sound Objects of the same type
into your proprietary disk. For example, you can only drop a Ensoniq .efe/.efa/.ins le onto
a Ensoniq disk. However, if you have SamplerTools™ installed, you can also translate your
object movements on the y. For example, if you drag a Kontakt Instrument onto your Akai
proprietary drive, it will convert the Kontakt Instrument into a Akai Program and Samples,
THEN write the le to your proprietary disk.
Page 9
Page 10

Instrument Manager™Launch Pad
You can also rename objects by selecting and single-clicking on the object after 1 second of the
original selection. All names are subject to the rules the drive imposes, such as name length,
case, and identical name rules.
Launch Pad
One of Instrument Manager™’s design goals is to do something with the objects that you’ve
organized and databased. A well organized instrument and sample library wants you to DO
something with it.
The Launch Pad is a way to prepare your objects for “launch”. The most useful operational
function of Instrument Manager™ is to drag objects off the interface and onto a waiting
sampler that is open on your system. For example, Instrument Manager™ makes for an
excellent Kontakt “Super Browser” - just have it open alongside Kontakt, or on another monitor.
Of course, you can always drag off of the Main Screen, but often you want some preparation
before “launch”. If you have SamplerTools™, a good example of this is to drag several objects
of different formats to the Launch Pad. Then, simply perform a conversion into (say) Kontakt
format. Then, you can drag the objects off the Launch Pad and onto Kontakt. (This is necessary,
because Kontakt does not allow drops of non-Kontakt les onto it’s rack, except from it’s own
browser.)
Another example is to simply drag off assorted objects and do a mass operation on them.
Again, it is true that this can be done in the Main Screen, but the Launch Pad alllows a
uncluttered environment in which to do bulk operations.
Page 10
Page 11
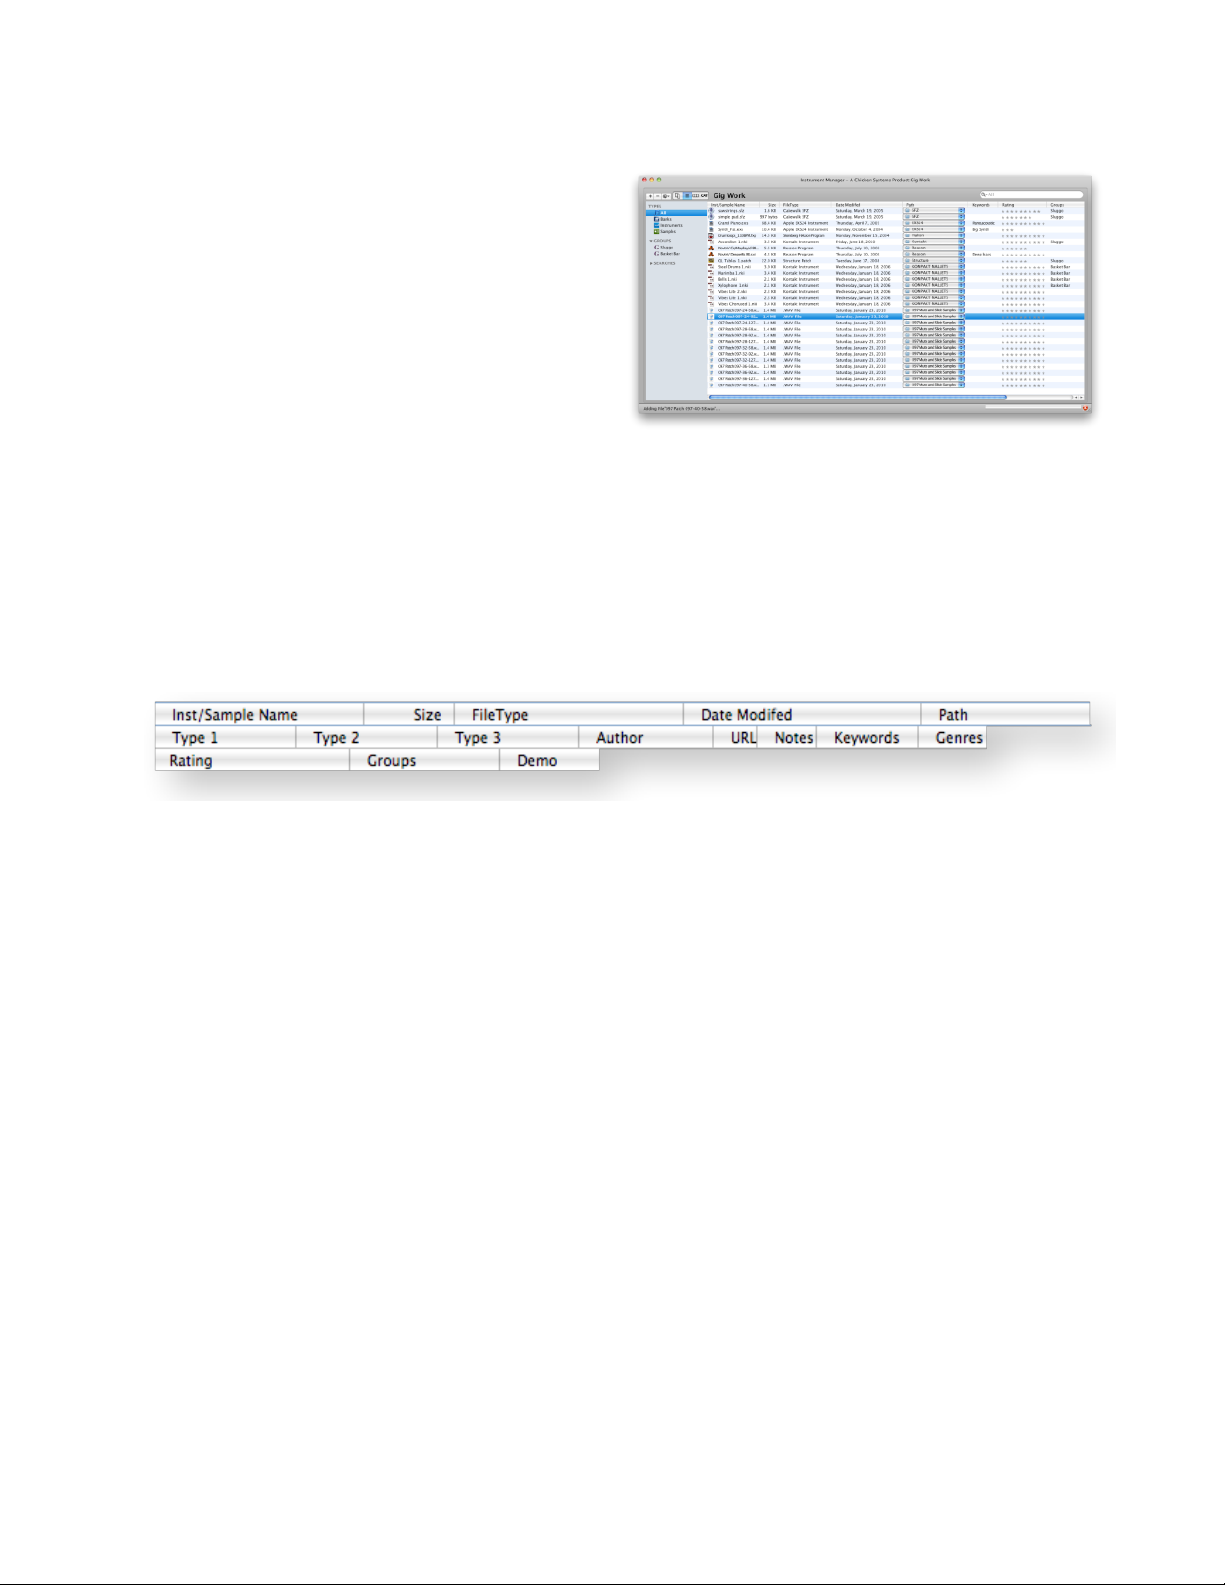
Instrument Manager™ Views - Database View
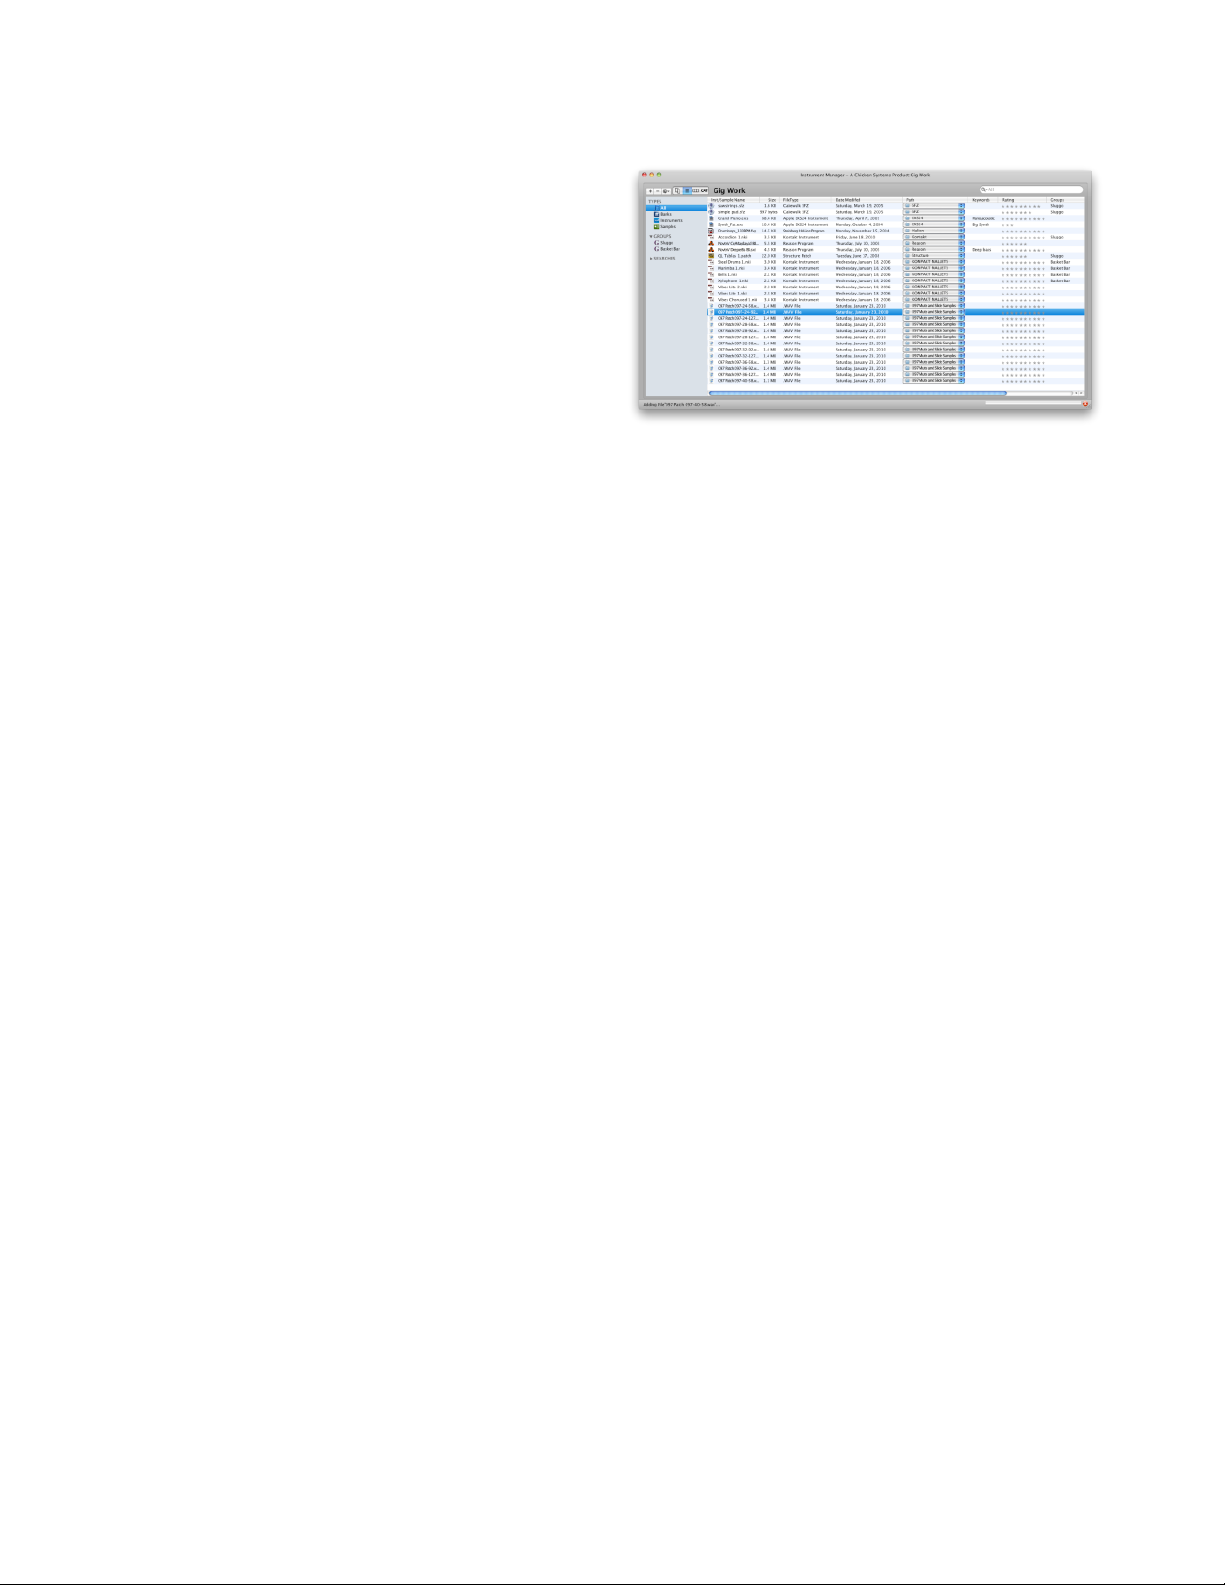
Views - Database View
The Database View in the Main Screen
reects the current lookup of the Database
attached to the Main Screen. The Master List
is highly powerful, making it effortless for
you to manage your entries and view the
information that you want to see.
The Database View has Columns which
reveal various pieces of information. Like
most lists, clicking on the heading enables
you to sort according to that Column’s piece
of information.
You can customize the Columns to limit what gets shown, to de-clutter the interface. The Name
eld is the only column that is required to be shown. Customize the Columns by right-clicking
on the List or by clicking on the Gear on the Interface and choosing Customize List... The
Customize List dialog comes up and allows you to customize the list, where you can determine
what columns get shown and in what order.
The columns, which are parallel to the properties of a Sound Object in the Database, are as
follows:
Name The Name or File Name of the object. Read-only.
Size The File Size of this object. It is NOT the cumulative memory size
of the object with samples.
File Type The File Type of an object; e.g. EXS24 Instrument for an exs le.
Read-only.
Location/Path The location of the le on the hard drive, Virtual Drive, or CD/DVD. The
disk does not have to be present, If it is not, the text will be red. Clicking
this box enables you to nd a non-linked le or reassign it to another
object. This new object can be any object - only the attributes will now be
assigned to this new le.
Author The Author of this object.
Website/URL A Website that is associated with this object.
Notes Any user-written notes desired about this object.
Type 1, 2, and 3 A pre-set list of Categories an object may be assigned to. The Categories
are hierarchical, 3 follows 2 which follows 1. These types are what dene
the Category List.
Keywords A list of keywords to attach to the object.
Rating The rating of the object, from 1-10.
Groups The list of Groups that this object is a member of.
Demo You can attach a sound le to this object; this plays it and stops it.
Like all other lists, you can drag items out of the list to load them onto a software sampler, or
drop them on the Proprietary Dialog, Launch Pad, Bank Builder, or Object Merger to operate on
or move them.
Page 11
Page 12

Views - Category View
The Category View shows your Database
from another viewpoint, based on the three
category Types pre-dened.
Used Categories are in BOLD and a short
Properties pane shows on the far right. The
Category List is ganged to the Master List, so
the Search Field is operable and updates the
Category List to reect changes made in the
Master List, and vis-versa.
Like all other lists, you can drag items out
of the list to load them onto a software
sampler, or drop them on the Proprietary
Dialog, Launch Pad, Bank Builder, or Object
Merger to operate on or move them.
Views - Column View
Instrument Manager™Views - Category View
The Instrument Manager™ Column View
simulates the OSX Column View, but it puts
forward a specic functionality. It allows
you to make your own “virtual volume” by
making your own folders, naming them, and
inserting your own objects in them.
You start off with a set of blank lists, aligned
horizontally. You can add anything to the
lists by dragging an object onto one of the
lists. Each list from left to right is heirarchial;
meaning that making a folder in a list
activates the next right list, which will display the contents of that folder.
You can right-click on any list to add, delete, or operate on objects. Double-clicking on an object
allows you to rename it.
The information in the Column List is stored in that screen’s Database.
Like all other lists, you can drag items out of the list to load them onto a software sampler, or
drop them on the Proprietary Dialog, Launch Pad, Bank Builder, or Object Merger to operate on
or move them.
Page 12
Page 13

Instrument Manager™ Views - Folder View
Views - Folder View
The Folder List is a simple hierarchical Folder View
of your system. The nice feature of the Folder
List is that you can zoom in on a group of folder
by using the Root Folder popup at the top of the
Folder List. This reduces clutter. (Note: the Folder
List only applies to non-Proprietary Disks. To use
Proprietary Disks, use the Proprietary Dialog.)
Like all other lists, you can drag items out of the
list to load them onto a software sampler, or drop
them on the Proprietary Dialog, Launch Pad, Bank
Builder, or Object Merger to operate on or move
them.
Views - Content View
Instrument Manager™ gives you the ability to view the “innards” of the Instruments, Banks,
and Samples you have. This is through through Content View screen.
You can have the Content View on the Main Screen, or as a oating window, or hidden. You can
choose this option in the Main Screen Gear Menu.
To view the contents of any object on any List, select it and the Content View will appear to the
right of the List, or on a oating window.
Instruments
LoKey, HiKey, LoVel, HiVel, Root Key
Banks
All Programs/Presets/Instruments contained in the Bank
Samples
Shows the Waveplayer and the waveform display of the sample, plus the samplerate, bitdepth,
rootkey, loop mode, loop start, and loop end.
Page 13
Page 14

Organization
Instrument Manager™
Organization
Instrument Manager™ offers powerful organizational features. That main purpose is to nd
Sound Objects quickly, easily, and efciently.
Each Instrument Manager™ Main Screen represents a Database. This Database contains
entries of Sound Objects. The Main Screen shows a list of those entries, serving as an interface
for the Database.
In a Database you can add, delete, and edit entries. You can also create any amount of Groups
to section off certain Sound Objects. On any list of Sound Objects, you can search through
them in very powerful ways.
- For more information on how to add, delete, and edit entries, see the Add/Delete/Edit to
Database section.
- For more information on Groups, see the Groups section.
- For more information on searching for entries, see the Search section.
Page 14
Page 15

Instrument Manager™ Organization - Add/Delete/Edit Entries
Organization - Add/Delete/Edit Entries
There are many way to add, delete, and edit entries in Instrument Manager™.
Adding Entries
You can drag any folder, le, or multiple les and drop
them on the list on the Main Screen, and this will add
them to the database for that window. If you drop a
folder(s), SHIFT-dropping will only include the les in
that folder and will not drill down.
When you try to add Sound Objects that are already
in the Database, Instrument Manager™ will alert
you and ask if you want to replace them or not
include them. The reason you may want to replace
an entry is so you can remove all user-dened
attachments, like Notes or keywords, etc.
To add Sound Objects form proprietary disks/Virtual
Drives, open the Proprietary Dialog and interact with that.
Deleting Entries
Simply select the entries in the list, and click DEL or right-click and select Delete in the popup
menu. Instrument Manager™ will conrm that this is your choice and give you the opportunity
to back out.
Editing Entries
Right-click one or more entries and select Properties. The Single-Edit or Multi-Edit Properties
dialog will apear.
When you have one entry selected, the full
scope of data for that entry will appear,
and you can edit whatever you want in that
entry. Clicking OK will save that data to the
actual entry. You can also scan through the
current lookup - if you change an entry,
and then click Previous-Next, Instrument
Manager™ will ask you if you want to save
the changes to the entry.
When you have multiple entries selected,
the Multi-Edit Properties dialog will appear.
Edit the individual elds, but you the
checkbox next to the eld must be checked
to incur the change to the entries. All the
entries subject to edit are shown on the list
on the rst tab. Clicking OK saves the data
to the entries selected.
Page 15
Page 16

Instrument Manager™Organization - Search
Organization - Search
Often you want to only see the objects you want to
work with. This is where Instrument Manager™’s
powerful Search feature comes in handy.
At the top of the Main List is a standard Search Field,
similar to what you see on the web or on iTunes. By
clicking on the magnifying glass, you can choose
under what type you want to perform your search.
For example, if you want to search for entires with
the phrase “trumpet” in the actual name, you would
choose “Name” as the type and you would enter in
“trumpet” in the text eld. All entries with “trumpet”
in the Name will appear.
Search also honors the category that is selected in the Blue Tree; Bank, Instrument, Samples,
or a Group if it is selected.
Under Preferences you can choose whether the list will update as you type, or if you want the
search to invoke when you hit the ENTER key on your computer keyboard. This can come in
handy when you have a large list and you want to go easy on the program.
Here is a list of the different search types:
Keywords: Each entry has a list of keywords you can assign to it. Type in a comma-
delimited list of search words to match the entries you want.
Name: This is the name of the object. Sometimes this is the le name of the object, if it’s a
le. Sometimes it is not.
File Type: This is the File Type of the entry. Type in the File Type name as shown in the
File Type column. Partial entries work as well, but may not be entirely accurate (false
positives).
Category: Each entry has 3 Category elds. You must enter at most three delimited terms.
For categories you want to choose all categories, use a asterisk (*) or leave blank. If you
do not use a delimiter or use two elds, Instrument Manager™ will start from Category 1
and move forward.
URL: The website address of the entry.
Author: The author of the entry.
Notes: Each entry can have a user-written description, explanation, history, or any other
text the user wants to attach to the entry.
Groups: Searches the TEXT of the Groups they belong to.
Rating: Searches ratings - enter in 1-10 as text.
Custom: Sometimes you want to search based on several different types of search criteria.
This is where the Custom search type comes in.
With textual searches, you have some different choices: Contains, Is, Starts With, In Middle,
and Ends With. You can also stipulate if the search is case-sensitive or not. Lastly, you can enter
in a delimited set of search terms and select Match All and Match Any. Match All means that an
entry must have all the search keywords you’ve entered. Match Any means just one needs to
be matched. You can choose the delimiter in Preferences; the default is comma-delimited.
Page 16
Page 17

Instrument Manager™ Management
Management
It’s bad enough that us as musicians have to play our music! That’s time-consuming enough.
Even if we have Instruments to play in our computer, there are still many things required to
make sure those Instruments work properly and are originized within themselves that they
aren’t a hindrance.
Instrument Manager™ has two critical management tools: Sample Relinking and Object
Naming.
Sample Relinking gives you options to relink sample les to your Instruments if they are bad,
or you can replace a set of samples with another, in part or as a whole. That’s just the tip of the
iceberg though!
Object Renaming gives you the ability to rename certain objects within an Instrument or
a Bank. For example, you can rename the Groups within a Kontakt Instrument, or you can
rename the Presets in a SoundFont or the Instruments in a Giga le.
For more information on Sample Relinking, see the Object Relinking section.
Page 17
Page 18

Management - Object Relinking/Reference Manager
Instrument Manager™
Management - Object Relinking/Reference
Manager
It’s become a common feature with software
samplers to store a Multisampled Instrument
as a small le, dening the mapping and real-
time parameters of the Instrument, and storing
the samples as industry-standard WAVE or AIFF
les. Commonly the small le (such as .exs, .nki,
.sfz, and other le types) contains a absolute or
relative Path to the sample, so when the sampler
engine parses the le, it locates the external
sample le and loads it.
The great advantage to this is so a Instrument can be edited easily and saved quickly without
any maintainance of the samples. (One of the big hassles of GigaStudio, before version 3,
was that the samples had to exist in the same le as the mapping parameters. So, when you
made a slight change to the structure of an Instrument, the ENTIRE FILE had to be rewritten.
Sometimes those les were HUGE!)
The great disadvantage is that it’s easy to lose track of where the samples are. If absolute
paths are used, and the samples are moved - they have to be relinked. If relative paths are
used, and either the samples or the instruments are moved in relation to each other, again
relinking is necessary. And what about duplicate samples - which sample should be relinked?
Typically software samplers have not done a good job giving their customers utilities to relink
their samples if need be. This is where Instrument Manager™ comes into use.
Instrument Manager™ has several different types of relinking techniques it employs:
Fix References
Fixes any bad links. Scans an Bank/Instrument, and veres the links. On rst detection
of a bad link, Instrument Manager™ asks you to form a catalog of les from a folder of
your choosing. It then uses that catalog to repair any further bad links.
Replace References
Changes references based on your criteria. Brings up immediately a Search-Replace-type
of dialog. It allows you to textually change the reference les names (Name and/or Path,
etc.). You also have the ability to Fix References during or after this process. For more
information on Replace References and it’s special dialog, see the Replace References
section.
Attract References
Fixes bad links by moving the les instead of changing the references. (Opposite of Fix
References.) Scans an Bank/Instrument, and veres the links. On rst detection of a bad
link, Instrument Manager™ asks you to form a catalog of les from a folder of your
choosing. It then uses that catalog to repair any further bad links by moving the les to
the location indicated by the source le.
Collect References
Takes links (good or bad) and moves/copies them to a new user-dened location. If
any links are bad, Instrument Manager™ does the Fix References operation during
the process. You can also elect to move the control le as well. This function is helpful
for “weeding” out unused samples or simply setting aside a control le/sample les for
individual checking or use.
Page 18
Page 19

Instrument Manager™
Verify References
Creates a text le of good and bad links. Scans an Bank/Instrument, and lists the links and
whether they are good or bad.
It’s important to keep in mind that a Mac has an additional facility, related to the capability of
the HFS disk format, that helps in object relinking. The HFS disk does not categorize a le by
it’s location; rather, it lists it by a number. When you move a le, it simply links it to a different
folder. Instrument Manager™ takes advantage of this capability and uses it to dramatically
speed up relinking - it doesn’t have to search, by using the HFS disk it already knows where the
le went to.
Instrument Manager™ usually uses the Sample or Instrument File Name, without the
extension, as a hinge point. So if a le references “Trumpet C4.wav”, and it doesn’t nd it but
it does nd “Trumpet C4.aif”, Instrument Manager™ will x the reference using the AIFF le
instead. Or, you can instruct Instrument Manager™ to, instead of xing the reference, you
can convert the sample le to a WAVE le and write a new le.
All Relinking options are in the Preferences dialog under the Object Relinking tab.
Replace References
Replace References
The Replace References function and it’s accompanying dialog is meant for you to textually and
mechanically edit the sample (and object) references in your le.
The general task is to compile a list of “nd this, replace with that” entries. Type a set and
click the Add To List button. All entries are
considered sequentially. You can remove
entries or clear the list. The Import button
allows you to import a .txt le with entries,
comma or tab delimited.
The Opcodes popup menu simply puts the
support opcode in the “Upon nding...” box.
They are dened below.
<rootkey>
<replace>
<instname>
<add>
<delete>
<insert0>
When you are ready, click Rename. To
cancel, click Cancel. If you don’t want to Rename, but want to go on anyway, click Don’t
Rename.
Clicking the Advanced>> button reveals more paramters to tweak exactly how you want
Replace References to work.
Renaming
You can choose which part of the path you want to take under consideration. Options are:
File Name Only Entire Path + File Name Path Only
Parent Folder Only Parent Folder + File Name
You can also choose whether the search will be case sensitive or not.
Page 19
Page 20

Maangement - Object Naming
Update References
Method
Sometimes you want to affect the external sample le names, sometimes you don’t. Method
allows different ways of dealing with the external le themselves.
Find Sample, then rename it Renames the originally referenced sample
Find already-renamed sample Finds the aleady-named sample and xes the
path to point to it
Do Not Find Sample Just textually rewrites the reference
File Operation
This is closely tied with Method. You can Rename the le, or Copy it, or Do Nothing to nullify
the operation.
Instrument Manager™
Example
We worked on several ProjectSAM libraries. Often they would use the same programs for
different mic samples and simply change the samples. Their sample names would be the same
except for the single lowercase letter before the .wav extension. We used Replace References
to perform this.
We added an entry “Upon nding c.wav, replace with f.wav”, and under method we would
choose Do Not Find Sample. That would rename the references. Then we would do a Fix
References to point them to the different location. Very handy!
Page 20
Page 21

Instrument Manager™ Management - Object Naming
Management - Object Naming
Names are the backbone of organization.
Many of us remember the days of hardware samplers and synthesizers where the names of
your Patches could only be 8, 12, or 16 characters. (It’s interesting to think about why this
was - and still is. Mostly it’s because of the size of the hardware screen. Why have a long
name when it doesn’t t on the screen?) Even these days there are limits to names, but for the
better reason of “you can remember shorter names”. Still, the sound world is FULL of cryptic
abbreviations, just for this reason.
Instrument Manager™ wouldn’t be a Manager unless it allows you to change names. There
are two levels of renaming: File Renaming and Object Renaming.
As you probably have gured out, there are 3 major levels of sound les: Banks, Instruments,
and Samples. Banks contain Instruments, and Instruments contain Samples. So thus there are
2 levels of renaming: Samples in Instruments, and Instruments in Banks.
Instrument Manager™ uses it’s Database to enable smart renaming - if you rename a
sample le, within Instrument Manager™, it uses the database to change the name in the
Instruments that reference it. (Please remember that the data must be in the Database - if it’s
not, it won’t get changed.)
To rename an object, right-click on the object and select Rename. A Rename dialog appears,
allow you to rename the object. Instrument Manager™, depending on the object, will
automatically update all upward objects to reect the new name.
Naming can alter the File Name of an object, for example a WAVE le, or an internal name (for
example a SoundFont Preset).
Page 21
Page 22

Instrument Manager™Operations
Operations
Instrument Manager™ just doesn’t organize and manage your Sound Objects. If your
software sampler allows the ability to drop objects on it in order to load, Instrument
Manager™ can serve as a Super Browser of sorts.
Just as you can add entries into a Database by dragging into a Main Screen, you can copy,
move, or load entries by dragging out of them.
For example, you can view a certain set of Sound Objects on a Main Screen, and drag them
out in order to copy or move them to another area on your hard drive. Dragging copies a le,
SHIFT-dropping moves a le. This is handy for collecting a set of les in one certain area to, for
example, put them on an external drive to take to another location.
There are several subtleties to copying/moving Sound Objects, and Instrument Manager™
takes care of all of them. Any copy/move operation updates the database automatically. Also,
any copying operation will prompt you IF you want to add the new les to the Database (you
may not want to). You can turn the prompt off in Preferences. Also, Instrument Manager™
will update the sample links in the new les if needed.
Communication with proprietary disks (Akai, Roland, etc.) is done with the Proprietary Dialog.
You can drag and drop both ways between the list on a Main Screen and the Proprietary Dialog.
For more information on proprietary disks and the Proprietary Dialog, see the Proprietary Dialog
section in this document.
Page 22
Page 23

Instrument Manager™
Compilation
Compilation
Sound Objects often “want to be” merged into collections, or even merged into each other.
For example, you may want to create a Bank that contains some Instruments. Or, you have
a several Instruments that you want merged into a single Instrument. Or, you want several
samples mixed together.
Instrument Manager™ includes the Bank Builder and the Object Merger. The Bank Builder
offers a way to create Banks from scratch, or modify existing ones, from existing Instruments.
The Object Merger allows elements to be combined with each other.
For more information on the building Banks, see the Bank Builder section.
For more information merging Objects, see the Object Merger section.
Page 23
Page 24

Instrument Manager™Compilation - Bank Builder
Compilation - Bank Builder
The Bank Builder is a dialog where you can collect Instruments into a Bank and compile a
Bank le of any format.
Note: under standard operation,
you can only work within the same
type, for example, you can only
collect Kontakt Instruments to
make a Kontakt Bank. If you have
SamplerTools™ installed, you can
collect any Instrument format and
Instrument Manager™ will translate
it on the y.
A Bank is essentially a separate object
that loads one or more Instruments at
the same time. Each Instrument usually has it’s own MIDI Channel and Bank/Program Number
assigned to it. A Bank Number and Program Number are ganged terms leftover from the MIDI
spec: there are a maximum 16,384 possible programs in a Bank (unless the format denes
less), in 128 sets of 128. The sets are Bank Numbers, the nubmers within a set are Program
Numbers.
Equivalent terms for a Bank are Performance, Multi, Folder, Group, Volume, SoundBank, or Mix.
Banks come ina variety of format. Bank Types include:
* GigaStudio les (.gig)
* SoundFonts (.sf2)
* Kontakt Multis (.nkm) or Banks (.nkb)
* MachFive SoundBanks (folders with a .M5B extension on them)
* SampleTank inst les
* Korg Triton .pcg les
* Roland Fantom fans.svd and .fangsnd.svd les
* Roland XV-5080 (.svd)
* Yamaha Motif All/All Voice les (.w2/3v/a, .w7/8v/a, .xov/a, .x3v/a)
* Fusion Banks (named folder inside a Fusion volume folder, called “Volume”)
* Emu Banks (E3, ESi, EOS/E4, EmulatorX .exb les)
* Roland S-7x Performances
* Ensoniq EPS/ASR-10 Banks
* Kurzweil (.krz, .k25, .k26)
* Reason Combinator (.cmb)
* DirectWave .dwb
The Bank Builder collects the Instruments you want to include in your Bank. Launch the Bank
Builder from the Tools menu, or open an existing one by right clicking on a Bank-type entry on
the list on a Main Screen.
To start building a Bank, drag any Instrument entry from a Main Screen into the Bank Builder
list. You can edit the MIDI Channel and Bank/Program Number. You will notice that the Compile
button will light up as soon as you’ve made a change to the list or if there are no entries in the
list.
Once you are nished, click the Compile button. Instrument Manager™ will ask you where you
want to put the new Bank File; select that and your Bank will be created and written to disk,
and add to the Database attached to the parent Main Screen.
Page 24
Page 25

Instrument Manager™ Compilation - Bank Builder
Note: To compile a Bank onto a Proprietary Disk, use the icon on the Bank Builder which says
Drag and Compile to Proprietary Dialog. Simply open the Proprietary Dialog, and drag off of the
icon in the Bank Builder onto the Proprietary Dialog.
After compilation is completed, the Compile button will disable until you’ve made another
change.
Page 25
Page 26

Instrument Manager™Compilation - Object Merger
Compilation - Object Merger
Instrument Manager™ has a set of functions where you can merge certain objects together.
This set is not wholly complete, but other programs like Constructor or Translator can do the
job completely.
Bank Merge
Merge two Banks of the same type to create one whole Bank. If there are Bank/Program
Number collisions, you have the option of eliminating parts of the merge or making way by
assigning unused Bank/Program Numbers. Options for allowing duplicates are provided as well.
Instrument Merge
Merge two Instruments together to create one Instrument. Options included are KeySplit,
VelSplit, Layer, and Dimension Assign.
Sample Merge
Merge two Samples together in various ways. Options include crossfade, relooping, mix, stereo
mix, and other helpful functions.
Note: under standard operation, you can only merge Sound Objects of the same type.
However, if you have SamplerTools™ installed, you can merge any type Bank and any
type Instrument, and Instrument Manager™ will do all necessary conversions on the
y. You will be given the option of what destination format you want to merge into.
Page 26
Page 27

Instrument Manager™ Menus - File
Menus - File
New
Creates a new Database which will be attached to the
current Main Screen.
New Group
Creates an empty new Group.
New Group From Selection
Creates a new Group from the selection in the current
List.
Open
Allows you to attach a existing Database to the
current Main Screen.
Open Proprietary Dialog
This opens the Proprietary Dialog.
Open Recent
A list of previously selected and saved Databases.
Save
Saves the Database in the current Main Screen.
Save As...
Saves the Database in the current Main Screen as a new or existing Database le.
Revert to Saved
Reverts the database and interface to the last saved state.
Add::File
Opens an open dialog to choose one or more les to add to the Database.
Add::Folder
Opens an Open Folder dialog to choose a folder in which to scan to add les to the Database.
Quit/Exit
Quits the whole mess.
Page 27
Page 28

Menus - Tools
Bank Builder
Opens the Bank Builder dialog.
Object Merger
Opens the Object Merger dialog.
Groups
Opens the Groups dialog.
Instrument Manager™Menus - Tools
Page 28
Page 29

Instrument Manager™
Menus - Help
Contents
Opens the Instrument Manager™
Help File.
Bug Reports
Opens a browser window (your default
browser) and routes it to the Chicken
Systems Bug Reports page for
Instrument Manager™.
Instrument Manager™ Home Page
Opens a browser window (your
default browser) and routes it to the
Instrument Manager™ Home Page
(the product page) at the Chicken Systems web site.
Check For Updates
Connects to the Internet and checks the version/build number of the running application
against the latest build available from the Chicken Systems web site. This is a manual way of
doing what Instrument Manager™ automatically does when the program is started.
Online Documentation
Opens a browser window (your default browser) and routes it to the Chicken Systems
Instrument Manager™ Online Documentation. Sometimes this has more up to date
information then your current applications Help File. If you are running the latest verison, your
Help File should be an exact replica of the Online Documentation.
Support::Forum
Opens a browser window (your default browser) and routes it to the SamplerZone.com
Instrument Manager™ forum. Check here for a larger FAQ, and use the forum to look for
answers that other people may have come across, or post a comment about the program on
the forum.
Support::Chat
Opens a browser window (your default browser) and routes it to a special Chat service where
you can immediately talk to a Chicken Systems support engineer. This is monitored by Chicken
Systems during business hours and often at night when the second shift is doing their cleanup
work. If there is no one available, you can leave a message.
Support::Email
Allows you to send a direct email to a Chicken Systems support engineer.
Support::Movies
Opens a browser window (your default browser) and routes it to the Chicken Systems Movie
area, specically to the Instrument Manager™ section. You can watch all the Instrument
Manager™ product videos here.
About Instrument Manager™
Shows the Splash Screen, which shows you your registration information and the current
version number you are using.
Page 29
Page 30

Preferences
Instrument Manager™
Preferences
The Preferences dialog is viewed by clicking on the Application Menu-Preferences (Mac), or FileOptions... (Windows) top menu.
For each Preference, hovering the mouse over the title or checkbox/item displays a Toop Tip
that describes the functionality of that particular Preference.
General Tab
Check For Updates
When checked, when Instrument Manager™ starts, it checks for Updates from the Internet.
If there is a newer version or
build, Instrument Manager™
will tell you and offer you a
chance to download it directly.
If this option is unchecked,
you can still Check For Updates
by selecting the Menu option
under Help.
Show Results immediately
while typing Search
When checked, Instrument
Manager™ tries to make the
results known as you type
each character. This can stress
the system a little. When
unchecked, you need to hit ENTER for the search results to be checked.
Search Conditions::Exact
The exact textual needs to match the destination.
Search Conditions::Contains
The search text needs to match the destination if the destination contains the text desired.
Search Conditions::Starts With
The search text needs to match the destination if the destination starts with the text desired.
Search Conditions::Ends With
The search text needs to match the destination if the destination ends with the text desired.
Update Database::At Close
The Database les are updated only when you close the window you are working on the
database on. If the contents have been changed, Instrument Manager™ will prompt you.
Update Database::Immediately
The Database les are updated immediately, when you make a change.
Page 30
Page 31

Instrument Manager™
Preferences - Default Attributes Tab
Default Attributes Tab
When checked, Instrument Manager™ will use this set of Attributes for every entry that gets
added, with the exception
of les that already have
database elements in them
(Kontakt or Structure, for
example).
Checking each attribute
determines whether they will
be included or not.
Reference Manager Tab
These options relate to the Reference Manager, accessible form the Reference Manager
contextual menu option.
Search For::Same
Extension
When a link is being re
referenced, Instrument
Manager™ will look for the
same sample name if it has
the same extension (eg. .wav
or .aif).
Search For::Opposite
Extension
When a link is being re
referenced, Instrument
Manager™ will look for the same sample name if it has the opposite extension (if .wav, then
.aif, or if .aif, then .wav).
Search For::No Extension
When a link is being re referenced, Instrument Manager™ will look for the same sample name
if it has the no extension (for example, the le “TrumpetC4” will be included for “TrumpetC4.
wav”).
Search For::Prefer Exact Matches
Reference Manager favors two folders before checking anything else - the same folder as
the source, and the folder alongside the source le that is named “[source name] Samples”.
Checking this option tells Instrument Manager™ not to consider these folders.
Look automatically in “obvious” areas
Reference Manager favors two folders before checking anything else - the same folder as
the source, and the folder alongside the source le that is named “[source name] Samples”.
Checking this option tells Instrument Manager™ to consider these folders.
Force Cataloging
When xing references, Instrument Manager™ waits until it nds a bad link before it asks you
Page 31
Page 32

Preferences - Audio/MIDI Tab
to catalog. When this option is checked, Instrument Manager™ automatically asks you to create
a catalog.
Update control le with sample information
Often a control le stores it’s own looping and tuning information. Usually the information found
in a sample le matches this, but often it does not. Checking this option tells Instrument
Manager™ to write this information into the control le.
Prefer Same Parent Folder Name
When this option is checked, Instrument Manager™ will favor folders that have the same
Parent Folder name as the bad link had.
Use First Sample Found
There can be many instances where there will be more then one le with the same name.
Checking this option forces Instrument Manager™ to use the rst sample it nds and not look
any further.
Instrument Manager™
Audio/MIDI Tab
Driver Types
These are the Sound Driver
types on your system. Selecting
one shows the Outputs on the
list to the right.
Audio Outputs
These are the audio outputs
on your system for the
selected Driver Type on the
left. Selecting one selects your
audio output.
Audio Inputs
These are the audio inputs on your system for the selected Driver Type on the left. Selecting
one selects your audio input.
Properties
Shows the Properties of the Output or Input you selected on the left.
MIDI In Drivers
Allows you to select the current MIDI In driver that will drive your application.
MIDI Out Drivers
Allows you to select the current MIDI Out driver that your application will send MIDI out on.
Enable MIDI
Enables MIDI to be sent or received.
Enable MIDI Velocity
Allows MIDI Velocity to be sent or received; if unchecked and Enable MIDI is checked, incoming
and outgoing MIDI notes will always have velocity set to maximum (127).
Page 32
Page 33

Instrument Manager™
TroubleShooting
Troubleshoooting
Your Instrument Manager™ program should be rock-solid and give you no problems. However,
there is always stuff that can go wrong.
You can start from scratch as far as Preferences go by trashing your preferences. You can do
that by going to:
Mac
Go to:
/Users/[you]/Library/Preferences, delete
com.chickensys.instrumentmanager.plist
Windows
Go into the Registry and delete the HKEY_CURRENTUSER/Software/Chicken
Systems, Inc/Instrument Manager key.
Mac and Windows
Press SHIFT when starting the program.
This only trashes your working preferences; it does not trash your registration codes etc.
For all other queries, please contact Chicken Systems Technical Support at the contact
points listed under Contacting Technical Support in this document.
FAQ
There is a Instrument Manager™ FAQ up on the Chicken Systems Web site:
www.chickensys.com/support/software/instrumentmanager/faq
We revise this as needed, based on common questions asked about Instrument Manager™.
It is extremely LIKELY that your question is answered here! Please do not contact us until you
have read completely through this resource. It probably will answer your question.
Bug Reports
Instrument Manager™ should not crash or show errors, but reality insists that all programs do
at some point. Instrument Manager™, since it deals with many undocumented formats and les
created from many sources, can be especially vunerable.
If you have a problem with a translation, or receive an error within Instrument Manager™
concerning a le, the BEST way to communicate that is to le a Bug Report and send us the le
in question with a brief description of what the problem is.
To use the Bug Reports system, go to Help-Bug Reports in the program. It connects you to our
Bug Reports website, has a form you ll out that gets the information we need from you, and
permits you to send us the source le directly from that web page.
Page 33
Page 34

Bug Reports
We strongly recommend you to use the
Bug Reports page rst! We do invite you
to Email or Chat us or call us with a problem,
but most of the time we just direct people to
the Bug Reports web site to document the
information in writing and for them to send us
the le. Instrument Manager™ has many users
across the globe, and it is not possible to track
all our users particular questions and issues
through personal correspondence.
Once you establish an issue with the Bug
Reports web site, you will get an email
back with a link to your issue that you can
consistently check. We try to address issues
within 24-48 hours.
BUT, THE IMPORTANT THING IS TO
ENABLE US TO EXACTLY REPLICATE YOUR
ISSUE ON OUR END! THIS IS WHY WE
NEED THE SOURCE FILE IN ALL CASES.
PLEASE REMEMBER THIS!
Instrument Manager™
Bug Reports Page: www.chickensys.com/instrumentmanager/bugreports
Email: support@chickensys.com
FTP: ftp.chickensys.com
(please make sure le names DO NOT have spaces in them!)
User: incoming@chickensys.com
Pass: les2chicken
You Send It: www.yousendit.com
How To Create Files To Send Us
If you are rading or writing a computer-based le such as a SoundFont, than this is easy - just
zip up the le and e-mail it.
But, what if, for example, if you are trying to read in an Akai Program, and you get an error,
you would want to send the actual Akai program (plus the samples) to us. But the Akai les
are on an Akai-formatted disk - how do you send that? The way you can do it is through a DOS
Counterpart le. In this Akai case, this would be an .ak1 or a .ak3 le.
You don’t have to make counterpart les; Instrument Manager™ makes them for you inprocess. With all proprietary conversions, Instrument Manager™ dumps the le into this folder:
/Users/Shared/Chicken Systems/Instrument Manager
Akai S-1000 Volume or Program .ak1
Akai S-1000 Volume or Program .ak3
Roland Performance or Patch .rol
Emu E3/ESi Bank .esi
Emu E4 Bank .eos/.e4b
Ensoniq EPS/EPS 16-Plus Instrument .efe
Ensoniq ASR-10 Instrument .efa
Zip that up and send that to us.
Page 34
Page 35

Instrument Manager™ Contacting Technical Support
Contacting Technical Support
Chicken Systems Technical Support can be reached in many ways: Phone, Email, Chat, or via
our SamplerZone.com Forum. Please give us a brief complete explanation of the problem. With
Email and Forum questions, we try to respond within 24 hours, Please be patient if the answer
does not arrive immediately.
You may Phone or Chat with us also if, after reading and looking at the documentation, you
are stumped. Our usual ofce hours are 8am-6pm Monday-Friday. We are often in the ofce on
weekends and holidays on an infrequent basis.
Phone: 800-877-6377 United States, 320-235-9798 elsewhere. Please do not mind the
crabby technical support engineers.
Email: support@chickensys.com
Chat: www.chickensys.com, use the Chat link on the left
Forum: www.samplerzone.com/forums/instrumentmanager
Please give us a brief complete explanation (how’s that for non-sequiturs?) of the problem.
We try to answer all emails within 24 hours. Please be patient if the answer does not arrive
immediately.
You may call us also if, after reading and looking at the documentation, you are stumped. Our
ofce hours are 8am-6pm Monday-Friday. We are often in the ofce on weekends and holidays
on an infrequent basis.
Page 35
Page 36

Updating Instrument Manager™
Updating
We update Instrument Manager™ as needed, for bug xes, improvements, and additions to
the library.
Instrument Manager™ automatically checks if there is a update available when you start
it up. (If desired, you can turn this checking off in Preferences.) You can also check for
updates by selecting Check for Updates under the Help menu. (This only works, of course,
if you are connected to the Internet on that computer.)
If your Instrument Manager™ computer is not connected to the Internet, or for some
reason you can’t run Instrument Manager™, you can check for updates at:
www.chickensys.com/instrumentmanager/userupdates
You can check what is your Instrument Manager™ version number by checking the About Box
(under Help in Windows and under the App Menu on Mac), or by checking Get Info [Mac] or
Properties [Windows].
If there is an update available for you, you can download it and then move it to your program’s
computer (if from a different computer). Run the updater and your program should be updated.
Page 36
Page 37

Instrument Manager™ Contact Us
Contact Us
Chicken Systems, Inc.
714 5th Street SE
Willmar, MN 56201
Phone: 800-877-6377 United States, 320-235-9798 elsewhere.
Email: support@chickensys.com
Chat: www.chickensys.com, use the Chat link on the left
Forum: www.samplerzone.com/forums
Page 37
Page 38

Credits Instrument Manager™
Credits
Developing software is at the core a one-man process, but making it good requires a team.
Instrument Manager™ really benetted from good teamwork and solid commitment to quality
software.
Garth Hjelte: Project Lead
Jeff Godbloch: Programming and Technical Writer
Christian Schmitz and Joe Strout for prompt, clear, and concise technical assistance
David Das, Dan Dean, Ernest Cholakis, and Dave Kerzner for brilliant ideas along the way
Page 38
 Loading...