

Page 1
Other great EPS/ASR Series
products from Rubber Chicken!
Translator!
This multi-platform program (Windows and Mac) allows you to convert any
sound format into Ensoniq format for playback in your EPS or ASR-10.
714 5th Street SE
Willmar, MN 56201
1-320-235-9798
"The Human Company"
Sounds and more Sounds!
We've been doing sounds for at least thirteen years - as long as samplers have
existed! Check out the Ultimate Organ Library, or the PIANO! Pak, or the new
"XP meets Sampler" set. Get sounds on CD-ROM, oppy, or ZipDisk.
The possibilities are endless!
Hard Drives and CD-ROM Drives!
We sell all types of SCSI peripherals to work with your keyboard. Iomega Zip-
Drives, as well as our best-selling Chicken CD-ROM Drives.
Great Computer Programs!
We program the best utilities that are USEFUL for
your needs - get better sounds from your sampler!
See www.chickensys.com/software
Future Products!
At Rubber Chicken, we're always developing new
products! Check out our Web Site for the latest:
www.chickensys.com
For the...
™
Ensoniq Disk Tools
for Windows
Windows Disk Utility and Conversion Software for
the EPS, EPS 16-Plus, & ASR 10/88 Samplers
and TS - Series Keyboards
Copyright ©1994-2007 Rubber Chicken
Software Co. All Rights Reserved
Copyright ©1994-2008 Rubber Chicken Software Co. All Rights Reserved
Page 2

Page 3

Glossary Table of Contents
LAYER
A unit on the EPS/ASR that holds wavesamples across one keymap of the keyboard. You can
have up to 8 layers in an INSTRUMENT.
OBJECT
A unit within an Ensoniq le - for Instruments, a Layer or Wavesample; for Songs, a Sequence or
Track; for Banks, a Slot Location.
PATCH SELECT
A Ensoniq innovation that selects a pre-programmed group of layers from a pair of momentary
onboard buttons.
RUBBER CHICKEN SOFTWARE CO.
The makers, developers, sole distributors or Ensoniq MIDI-Disk Tools for Windows. They also
make samples for the EPS/ASR series, and other items, specically for Ensoniq samplers.
SAMPLER NAME
This area tells you what kind of sampler the computer is expecting. Once you read the EPS/ASR
through MIDI, the computer nds out for itself and changes this automatically.
SOUNDVERT
The original .WAV-to-Ensoniq program. Developed by Tim Dorcas, it inspired this program.
SYS-EX (or, more properly, System Exclusive)
A MIDI standard that communicate specic messages to specic instruments. Ensoniq MIDI-Disk
Tools uses this to changes just about any parameter in the EPS/ASR.
TOOLBAR LIGHTS
These lights tell you (from the left) if the MIDI is turned on so the computer can receive MIDI signals, if MIDI is coming into the computer, and if MIDI is transmitting out of the computer.
.WAV FILES
This format was developed by Microsoft (who else). It is sometimes called RIFF (Resource Interchange
File Format), in contrast to AIFF (Audio Interchange File Format). The Windows-Intel platform (PC)
uses mostly .WAV les. Think of it this way - it is the “PC’s sound le format. .WAV Files cannot be
looped, nor do they contain multiple wavesamples. There is another .WAV type called ADPCM, which
is a compressed type of .WAV le. These are usually low-quality, and are very small in size. Ensoniq
Disk Tools does not support these les - convert them using a Sample Editor such as SoundForge
or CoolEdit, or Awave.
WAVE OVERVIEW
A function where you can view the entire waveform, as opposed to just part of it.
WAVESAMPLE
A unit on the EPS/ASR that holds a set of parameters affecting the wavedata, and also either the
actual sample data or pointers to another wavesample that actually holds the data.
COPYRIGHT NOTICE AND DISCLAIMER
Ensoniq Disk Tools for Windows is the sole property of Rubber Chicken
Software Co. You are granted a license to use Ensoniq Disk Tools
for Windows for your own personal use but YOU MAY NOT COPY
OR DISTRIBUTE any version of Ensoniq Disk Tools for Windows.
All rights reserved. Unauthorized use, duplication, or distribution is
prohibited by law.
Table of Contents
Introduction Page 2
Installation Instructions Page 3
List of Files Page 3
Screen Description Page 4
Menus Page 7
Ensoniq Explorer Page 8
Settings Page 9
Instruments Page 9
Sequences Page 11
File-Type Conversions Page 12
Unformatter Page 13
Bank Builder Page 14
Wave Creator Page 16
Find Utility Page 17
Viewing Ensoniq Devices Page 18
Ensoniq CD-ROM's and ATAPI/IDE CD-ROM Drives Page 19
Waveplayer Page 21
Batch Write Page 22
Information Screens Page 23
Options Page 24
How To's Page 27
Tutorials Page 42
Troubleshooting Page 47
Contact Information Page 47
Update Policy Page 48
Final Notes Page 49
Thank You's and Legal Notices Page 50
Glossary Page 51
Page 52 Page 1
Page 4

Introduction Glossary
DISK IMAGE
Introduction
Ensoniq Disk Tools for Windows is the ultimate Ensoniq disk utility. Since
Ensoniq uses a proprietary disk format with the EPS/ASR samplers, you can’t
use standard Windows and DOS functions with the disks and les - they simply aren’t recognized. Thus the need for a program.
Ensoniq Disk Tools for Windows not only reads, writes, and formats any oppy
or SCSI device, it also performs a number of le transfer, le converting,
and le building operations. You can transfer any amount of les to and from
Ensoniq oppy disks, DOS hard drives, SCSI hard drives, and any CD-ROM
drive. You can convert other le formats, such as the standard .WAV and AIFF
formats, and transfer them to and from Ensoniq les. And lastly, you can create and edit your own Ensoniq les - build them from scratch, add or subtract
the amount of objects, and edit any paramter within. Powerful? You bet!
Ensoniq Disk Tools for Windows was conceived from and handy little util-
ity called SoundVert 1.03, a nifty .WAV to Ensoniq le conversion utility. We
knew it could go a lot farther. After the rst development, it used to be called
TS Tools, since the program was originally designed for TS-series owners to
sample and edit their own sounds. (in fact, the name of the main executable
still bears it’s name.) But since the program does have a wider scope, the
name was changed to Disk Tools.
Ensoniq Disk Tools for Windows is also part of our agship program, Ensoniq
MIDI-Disk Tools for Windows. It is sold separately as well, since TS-Series
owners cannot take benet of the EPS/ASR MIDI functions implemented in
that program.
If you are a registered owner, you are qualied for free updates for the life of
the program, which will be sent to you automatically from Rubber Chicken
Software Co. There are many things we intend to add to this program to
make it more versatile for you to use.
This is an Image of an entire disk of les, as dened in the EPS/ASR. The les contained within
can be Instrument, Bank, Sequence, Song, MacroFile, System-Exclusive, Effects, or Backup Files.
It comes in Giebler format (.ede or .eda), or GKH format (.gkh).
EFFECTS
The Ensoniq 16-Plus and ASR-10/88 have a built-in effects chip, which you can assign param-
eters per instrument and bank.
ENSONIQ DEVICE
Refers to a oppy disk or SCSI drive that is formatted to be read by the EPS/ASR/TS equipment.
FILE IMAGE
This is an Image of a single le as dened in the EPS/ASR. It can be an Instrument, Bank, Sequence, Song, MacroFile, System-Exclusive, Effects, or Backup File. It comes in Giebler format
(.efe or .efa), or .GKH format (.ins or .gkh). These images can exist on their own, or reside inside
a Disk Image le.
FRAGMENTATION
In most les, the data is arranged with the data being read one byte after the other; in other words,
the information is in order. But certain les may have been worked with in such a way that the le
is disarranged. The le works because there is a “table of contents” (called the FAT, or File Allocation Table) that arrange it. Such a le is called a Fragmented.
GIEBLER DISK IMAGE FORMAT
Giebler Enterprises introduced this le format. It really is a 512 byte header, and afterwards it contains the exact byte contents of the Ensoniq Disk File. Within the header there is a table that lists
which blocks have all zeros, and which don’t. That way the le is only as large as it as to be. EPS
images use the .EDE extension (max 1585 blocks); ASR images use .EDA (max 3167).
GIEBLER FILE IMAGE FORMAT
Giebler Enterprises introduced this le format. It really is a 512 byte header, and afterwards it contains the exact contents of the Ensoniq File. It can be an Instrument, Bank, Sequence, Song, Macro,
System-Exclusive, Effects, or Backup File. EPS les use the .EDE extension, and ASR les use the
.EDA extension. NOTE: the differences between an EPS and ASR le-type are minimal. Really, it
species if the le has pertinent information relating to new parameters within the 16-Plus/
ASR, or that the type of effect is and ASR or 16-Plus.
.GKH IMAGE
This format is the oldest, developed by a guy named Goh King Wah (what a name - thus the G K H
format). It is a short header, followed by the exact contents of the Ensoniq le. There is no skip table,
and the bytes do not follow 512 byte boundaries. To make it more confusing, les with this extension
MAY BE A DISK IMAGE OR FILE IMAGE OF EPS OR ASR TYPE. Ensoniq Disk Tools’ rule is that
.GKH should be Disk Images, and .INS les are File Images, and converts things that way. However,
Ensoniq Disk Tools will recognize both types.
.INS FILE IMAGE
The .ins le extension was implemented by Michael Chen, the author of EPSDisk, a program that put
together many of Goh King Wah’s programs. Michael needed a le type that would represent a File
Image, and since by that time the Giebler utilities had come, he adapted the exact same header, but
used a different extension. So a .ins le is exactly the same format as the Giebler .efe./,efa format.
INSTRUMENT
A unit on the EPS/ASR that contains up to 8 Layers and up to 127 wavesamples.
Page 2 Page 51
Page 5

Thank You's and Legal Notices
Thanks to the excellent set of beta-testers involved with this project (in particular Ted Bicknell, Fred Hoover, Nathaniel Gillette). You can be a pseudobeta-tester too - just contact us and give us your opinion!
Thanks to Michael Hyman for the clever designer icon.
Thanks also to Robby Berman, Steve Coscia, Al Blake, Tony Ferrera and Bert
Nuskirk of Ensoniq, whom we always count on for assistance and friendship,
and Eric Geislinger and Jane Talisman of the Transoniq Hacker, whom it only
seems days ago when we had a Mirage and we picked up our rst Hacker and
read it cover to cover.
Installation Instructions
Installation Instructions
1. Take your CD-ROM and insert it into your CD-ROM Drive. The setup program should start up; otherwise type d:\setup in START-RUN, where “d” is the
drive letter of your CD-ROM Drive.
2. Double-cluck on the Chicken icon within the new Ensoniq Disk Tools Program Group, and you are ready to roll! If the program has problems at any
point, don’t hesitate to call or write Rubber Chicken Software Co. at contact
addresses.
And nally thanks to the programs of CoolEdit (David Johnston), WinZip,
EPSSENSE (Jeffery Richter), and the Ensoniq Disk Manager (Gary Giebler)
for the creative genius and inspiration these programs gave ours.
Legal Notices
Ensoniq Disk Tools for Windows was compiled using Microsoft Visual Basic
3.0, 4.0, and 5.0 Professional Version, Microsoft Word 7.0 for Windows 95, and
the Ensoniq ASR-10, EPS 16-Plus, and Original EPS (no TS was used!).
ENSONIQ, EPS, EPS-16 PLUS, TS-10, TS-12, and ASR-10 are trademarks
of ENSONIQ Corp.
“GIEBLER”, GIEBLER ENTERPRISES, ENSONIQ DISK MANAGER, ENSONIQ DISK EXTRACTOR, “EDA”, “EDE”, “EFE”, and EFA are trademarks of
Giebler Enterprises.
Glossary
.AIFF FILES
This format is usually used with Apple computers. It stands for Audio Interchange File Format. The
format is actually better used with Ensoniq wavesamples because the byte-ordering (the way the
bytes are arranged in the le) is the same, whereas .WAV orders the bytes in an opposite way.
Think of AIFF this way - it is “Apples sound le format.”
4. If you are updating this program, don’t hesitate to delete the old les or
directories.
After this, you’re set!
LIST OF FILES
Program Files
dt32.exe
rcsfx.efx
Text and Help les
readme.txt
disktool.hlp
ActiveX Controls
tabctl32.ocx
msoutl32.ocx
msghoo32.ocx
Operating Systems and Templates
eps249os.efe
eps13os.efe
asr353os.efa
Dynamic Link Code Libraries
msvbvm50.dll System directory
esd32.dll App directory
.DLL OLE les (all in system directory)
(note: these are all 16-bit versions of the le. In the
shipping version of Windows 95, there are 32-bit
versions of the same les, with the same names.
That is why they are not necessary to be included
with the 32-bit version of Tools.)
typelib.dll storage.dll
oc25.dll compobj.dll
ole2.dll ole2disp.dll
ole2nls.dll
If the program has problems at any
point, don’t hesitate to call or fax us at
our contact addresses.
COMMON DIALOG
A standard Open or Save As Windows dialog that navigates Drives, Directories, and Files within
DOS devices. Ensoniq Disk Tools uses these whenever possible; however, it uses a replacement
when it becomes necessary to navigate Ensoniq devices as well.
DISK FILE
A le saved to your hard drive that stores all the parameters of an instrument read by Tools. See
File Image.
Page 50 Page 3
Page 6
Screen Description Final Notes
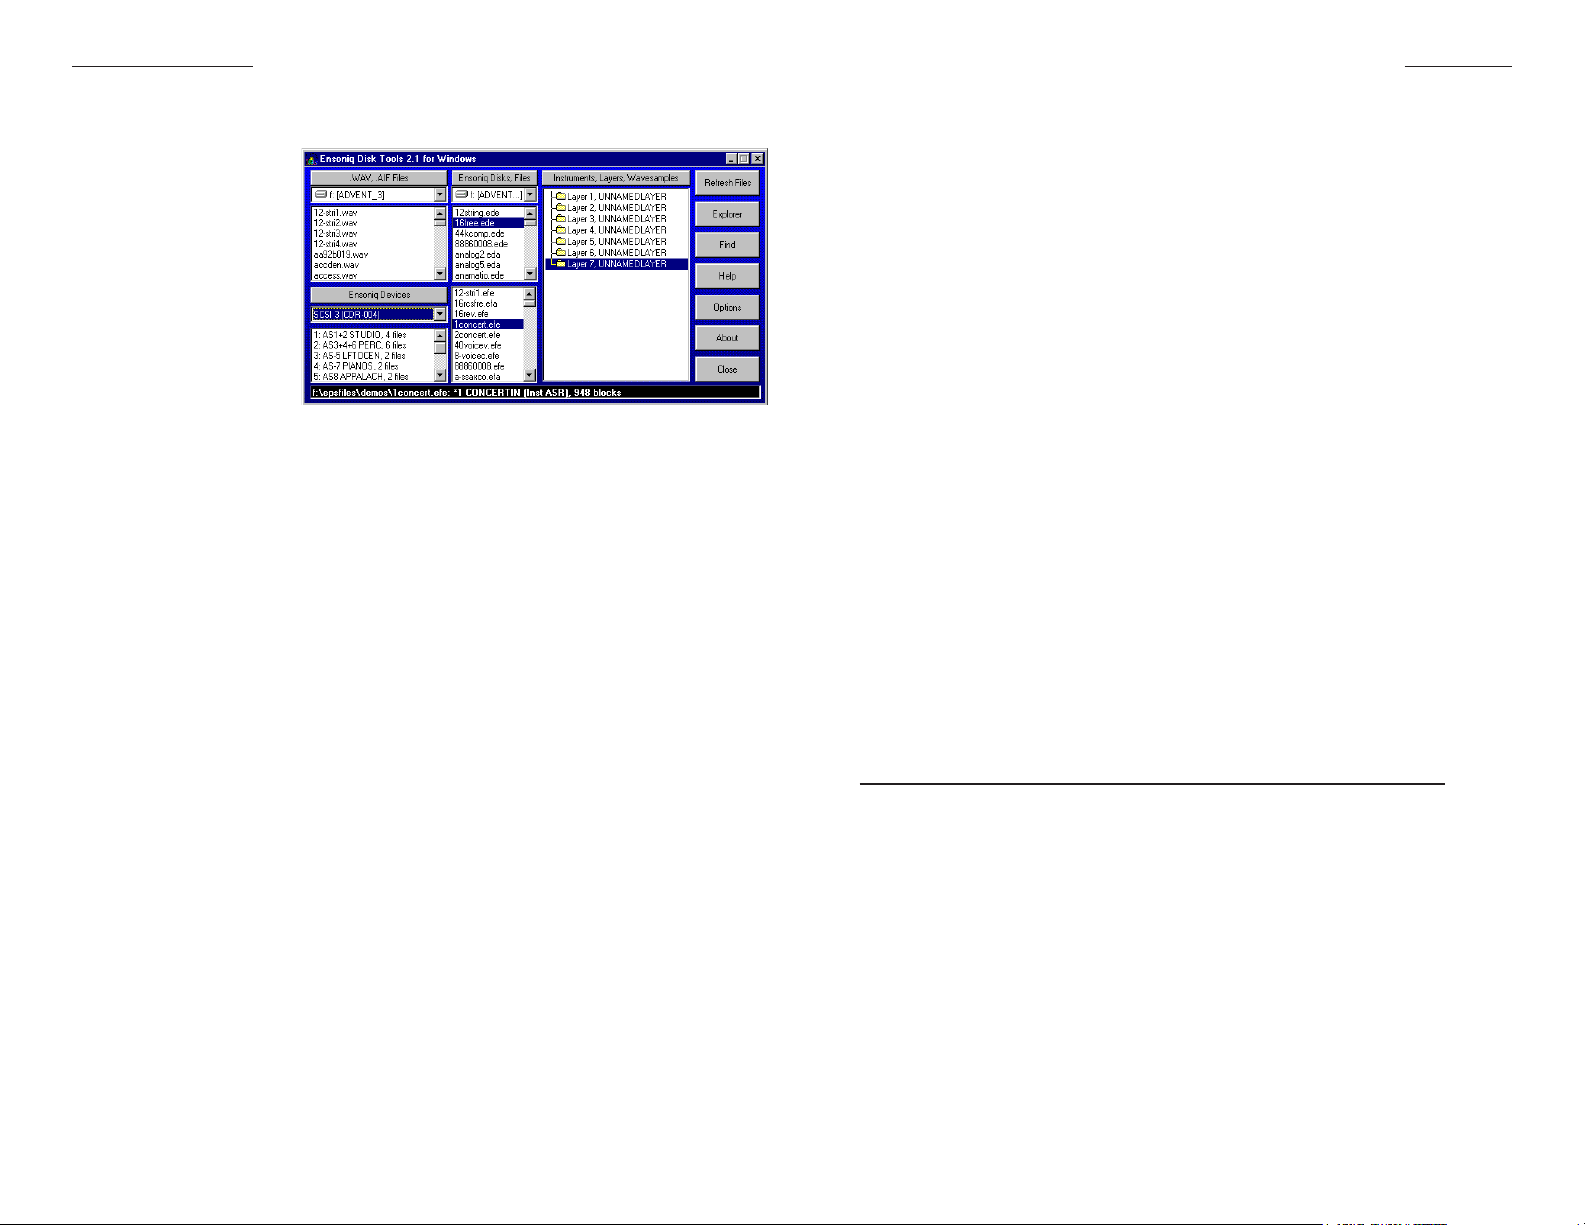
Screen Description
The Main Screen of
Ensoniq Disk Tools is
designed for most of
your major functions. It
can be used as a starting point for almost all
operations. Please note
that it can be resized,
to offer a wider view to
your screen. However,
you will notice it has
a minimum size. The program will show properly down to a 640x480 screen
resolution.
.WAV-AIFF List Box
This displays all or some of the .WAV Files on the drive marked above in the
drive box. In the Options dialog, you can set whether this box shows all the les
in a particular directory, or all the les in the drive itself. Ensoniq Disk Tools stores
the path information, so it isn’t shown.
Typical Functions:
Click to select a .WAV-AIFF le, or select multiple les
Press Space Bar to hear the .WAV le (if you have a sound card)
Right-click selected .WAV-AIFF le(s) to perform operations
Drag a selected .WAV le to another Box to convert or transfer it
Disk List Box
This displays all or some of the Disk Images on the drive marked above. In the
Options dialog, you can set whether this box shows all the les in a particular
directory, or all the les in the drive itself. Ensoniq Disk Tools stores the path information, so it isn’t shown. If the Disk Image is invalid, it will give you a warning
when you click on the selection. If there is fragmentation, Disk Tools automatically
defragments it when selected.
Typical Functions:
Click to see the contained les in the Instrument/Layer/WS box
Right-click selected Disk Image(s) to perform operations
Drag to extract les to File Images or .WAV/AIFF Files
Final Notes
A couple of things to keep in mind. Please report any alleged bugs that you might
come in contact with. Also, if you have any ideas about how to make Ensoniq Disk
Tools for Windows better or easier to use let me know. Here are a few numbers to
keep in mind.
EPS/ASR/TS Internet users Group
epsasrts@soundcentral.com
Send subscribe requests to epsasrts-request@soundcentral.com
Essential for in-depth Ensoniq probing
These next two numbers may not be available anymore. Ensoniq does not exist, and the Transoniq Hacker ceased publication a couple years ago.
Ensoniq Corp.
155 Great Valley Parkway
Malvern, PA 19355
Customer Service (610)-647-3930
Customer Service e-mail: music-support@ensoniq.com
Transoniq Hacker
1402 SW Upland Dr.
Portland, OR 97221
(503)227-6848
E-mail: interface@transoniq.com
Thank You’s and Legal Notices
Thanks very much to John Bodenstein, whose extra patience and helpful assistance made this project possible.
Thanks to James Olsen for his generous help and partnership in SoundCentral.
File List Box
This displays all or some the File Images on the drive marked above. In the
Options dialog, you can set whether this box shows all the les in a particular
directory, or all the les in the drive itself. Ensoniq Disk Tools stores the path information, so it isn’t shown. If the File Image is invalid, it will give you a warning
Page 4 Page 49
Thanks also to Stephan Sprenger of Prosoniq, who helped us immensely with
the effects le format.
Thanks to everyone who gave their comments and help, especially on the Internet
Ensoniq mailing list; especially Dietmar Tinhof and Paul Najar.
Page 7

Update Policy
Updates to this program are free for the lifetime of the program. Starting with
updates after Version 2.2, Revision/Build 22, Ensoniq Disk Tools updates will
be available again on our Web Site. They will be in the form of "Patches", les
you download to update your currently installed program.
You will need at least Version 2.2, Revision/Build 22 to use this system. You
will simply click the Update Button on the main screen in the program - that
will bring up your browswer, dial the Internet, and take you to a Web page that
will inform you on the availability of an update. If there is one, it will display a
link for you to download it. You will not need to incrementally update. Your only
concern is to update your version to the current one displayed.
Screen DescriptionUpdate Policy
when you click on the selection. Unlike the other boxes on the Main Screen, you
can only select one File Image at a time.
Typical Functions:
Click to select a File Image
Right-click the selected File Image to perform operations
Drag to extract waves, include in a Disk Image, or write to Ensoniq volume
Objects List Box
This displays the Objects (Layers, Waves, Sequences, Bank Listings, etc.)
contained within a Disk Image or File Image, depending on what is currently
selected in the other boxes.
Typical Functions:
Click on a Layer (Sequence) to see the Wavesamples (Tracks)
Right-click the current selection to perform operations
Drag to convert Objects into les
Click on [space bar] to hear Wavesample over sound card
These "Patches" ARE NOT COMPLETE PROGRAMS. They only update your
current installation. If you need another complete version, it will need to be
snail-mailed to you at a $5.00 ($8.00 international) charge.
You can always be fully updated; that is, get all the les needed for a full installation, by following these steps:
Download the Disk Tools Setup File and install it on your computer. Make
sure you note the directory you installed it in.
Start the Disk Tools program le, named dt32.exe (it must be version 2.2
revision 22 or later) from within the directory you specied when installing
the Disk Tools Setup File.
IF YOU CAN CONNECT TO THE INTERNET FROM THIS COMPUTER
Click the Update button on the Disk Tools main screen, and follow the
prompts from the web page that it dials.
IF YOU CANNOT CONNECT TO THE INTERNET FROM COMPUTER
Click Help, and go to the About box. Note the Version number and the
Revision number (such as 2.2.25). When you can connect to the Internet,
use this syntax to get to the correct web page:
www.chickensys.com/cgibin/update.cgi?type=Disk%20Tools&maj=[Major
Version Number]&min=[Minor Version Number}&rev=[Build Number]
For example, for Version 2.2, Revision/Build 29, you would go to: www.chick-
ensys.com/cgibin/update.cgi?type=Disk%20Tools&maj=02&min=02&rev=29
Save your update le to oppy disk or other backup medium.
Ensoniq Devices List Box
This displays the current contents of the selected device in the Drive Box for
Ensoniq volumes. You may drag items to any other List Box to exchange les.
Typical Functions:
Status Bars
This displays critical info you need to know as you work with the program.
Drive Box for .WAV Files
Click on this to change the Drive for the .WAV-AIFF List Box
Drive Box for Disk and File Images
Click on this to change the Drive for the Disk List Box and the File List Box
Drive Box for Ensoniq Devices
This selects which device you want to see Ensoniq-format information for.
Object Button
This reloads the contents of the Objects List Box.
Ensoniq Devices Button
Reloads the contents of the selected device the Drive Box, and displays it in the
Ensoniq List Box.
.WAV-AIFF Button
Adds to the WAV-AIFF List Box. Displays a Common Dialog where you can nd
a particular le from any directory or drive.
Right-click the selected le(s) to perform operations
Drag to write a le to DOS hard drive
Page 48 Page 5
Page 8

Screen Description Troubleshooting/Support
Disk, Files Button
Adds to the WAV-AIFF List Box. Displays a Common Dialog where you can nd
a particular le from any directory or drive.
Refresh Files
Clicking the Refresh Button on the Main Screen refreshes the contents of all the
List Boxes with their current les.
Explorer
This displays the Ensoniq Explorer screen. You may do intensive Ensoniq oppy
disk and SCSI management here. For more information see Page 8
Find
This enables you to nd an Instrument le within a Drive’s worth of Disk Images
or File Images. Click to bring up the Find dialog to start your search. For more
information see Page 17
Options
Displays the Options dialog, where your major program preferences are made.
See Page For more information see Page 24
About
This tells you how to reach us, and what version:revision the program le is.
Troubleshooting/Support
At Rubber Chicken we pride ourselves for the personal support we can give,
because we believe the only important problem to you is your own problem!
(Makes sense, doesn’t it?)
But before you call/write in for support, we do ask you of some requirements.
a) Please describe the problem specically (what screens come up,
what do they say VERBATIM, any repeatable steps we can describe
so we can duplicate the error here). If you say “it doesn’t work”,
we’re sorry, that just isn’t enough for us to go on. IT IS VITAL THAT
WE CAN REPLICATE THE ERROR. We need to know what is the dif-
ference in your computer that is causing the conict.
b) It is VERY HELPFUL, in case of errors in reading parameters, to
send us the File Image le that your are reading. Zip the le up using WinZip or related program (it will compress to a very small size)
and attach it in an e-mmail message to us. These are very helpful in
determining what the problem is.
d) Tell us which revision of the program you are using, what platform
(Win95 or Win 3.x).
e) If the program “crashes”, please be specic - does the computer
freeze, or do you get an error dialog? What does the dialog say?
Contact information
Rubber Chicken Software Co.
714 5th Street SE
Willmar, MN 56201 USA
Toll Free Order Line: 1-800-8-PRO-EPS (800-877-6377)
Tech Line, Fax, and Int’l: 1-320-235-9798
E-mail: support@chickensys.com
Web Page: www.chickensys.com
Page 6 Page 47
Page 9

Tutorial - Building a directory & saving files to Ensoniq SCSI Drive
the left-hand box again, and selecting Write Directory.
7) You may enter a directory just like you do a regular dialog box - double-click
on the name or icon.
8) After you are nished writing the directories, start adding your les.
9) Click on the DOS option on the screen - then you will nd the standard
DOS directory-le structure.
10) Find your File Image - a double-click on it - a button will appear that will
be ashing Write…
11) Click again on the Ensoniq option, and nd the directory where you want
the File Image.
12) Click on the ashing Write… button - the File Image will be written there.
13) Continue until you are done.
Automatic Method: This is a more efecient method, especially for large op-
erations.
1) Prepare yourself - have a piece of paper written out (or text le written
out) saying exactly where you want to put things.
2) Make a directory that will hold all the sounds you intend to put on your
hard drive - give it any name you want.
3) Within that directory, make your total directory structure, like want you
wrote down, and follow the rules below:
a) Do not put more than 38 les and directories within a single directory
- since Ensoniq only allows 38 les in a directory, Disk Tools will ignore
all les after writing 38.
b) To make a directory, create a DOS directory, and name it with a digit
between 1-38; this will be the le number of the directory when it is written
on your hard drive. Then make a text le named x.rcs (x representing
the same number as your directory), and write within it the name of that
directory. This method is required because a directory require two pieces
of information: the le number and name.
4) After you are nished, use the Restore SCSI Drive function to “restore”
your volume setup into the SCSI Drive.
Menus
Menus
Ensoniq Disk Tools holds a lot of power behind right-clicks. That’s the way of
Windows! The following are a list of menu items. NOTE: Not all options may be
available, depending the status of your settings. For example, if you have a Song
File Image selected in the File List Box, your options will be slightly different than
if you had a Instrument File Image selected. Please see the correspoding Page
number For more information see Page on a certain menu item.
Pop-up for .WAV-AIFF List Box
Write to Disk -Single Inst Page 34
Write to Disk - Multi Inst Page 34
Convert to File Image Page 34
Convert to Multiple Images Page 34
Edit
Normalize Gain Page 38
Sample Rate Page 39
Sample Editor Page 38
Info Page 23
Pop-up for Disk List Box
Write to Floppy Page 29
Read From Floppy Page 28
Batch Write Page 22
GKH -> Giebler Page 42
Extract Page 35
Edit Disk Image Page 35
Create Disk Image Page 35
Settings… Page 9
Test Disk Image Page 42
Info Page 23
Pop-up for File List Box
Write to Floppy Page 29
Create Disk Image Page 37
Add To TS Disk Image Page 41
Create Bank Page 14
Optimize Song Page 36
Import SMF Page 39
Export to SMF Page 39
Settings… Page 9
Test
File Page 41
Directory Page 41
Drive Page 41
Info Page 23
Pop-up for Object List Box
Create Layer Page 37
Create Wavesample Page 37
Delete Page 37
Copy Page 37
Edit
Normalize Gain Page 38
Sample Rate Page 39
Sample Editor Page 38
Rename Page 37
Settings… Page 9
Pop-up for Ensoniq Devices List Box
Format Device Page 29
Write to Disk Image Page 28
Write to File Image Page 28
Save As… Page 28
Write Operating System Page 41
Write Directory Page 33
Format Page 29
Delete File Page 37
Create Bank Page 14
View Blocks Page 18
Check Disk Page 38
Unformatter Page 13
Info Page 23
Pop-up for Ensoniq Explorer (DOS-Mode)
Disk Image to Floppy Page 29
File Image to Floppy Page 29
File Image to SCSI Page 31
.IMG to SCSI Page 31
Save As…
Pop-up for Ensoniq Explorer (Ensoniq-Mode,
Directory Tree)
SCSI to .IMG Page 31
DOS Batch to Ensoniq Page 31
Write Operating System Page 41
Write Directory Page 33
Format x Page 29
Delete File/Directory Page 37
Check Disk Page 38
Modify Banks Page 14
Backup SCSI Device Page 32
Restore SCSI Device Page 32
Print Page 42
Info Page 23
Pop-up for Ensoniq Explorer (Ensoniq-Mode,
File Tree)
Floppy to Disk Image Page 28
File Image to SCSI Page 31
Save As… Page 28
Write Operating System Page 41
Info Page 23
Page 46 Page 7
Page 10

Ensoniq Explorer Tutorial: Altering parameters directly to disk
7) When you are nished, right-click on the File List Box, and select the
Ensoniq Explorer
Although the Main Screen may do
all you want out of Ensoniq Disk
Tools, you may need a tool that gives
you ultimate control of your Floppy
or SCSI Drive. This is the Ensoniq
Explorer.
Write To Floppy option, write it to disk, and pop it into your Ensoniq
instrument.
You should have a full-edged Instrument!
Tutorial: Altering parameters directly to disk
Let’s take an example where you have a EPS/ASR disk you have been using,
and want to change the release time a sample.
The Ensoniq Explorer provides a
way of seeing your whole heirarchy
of les on your SCSI Drive at the
same time. It also enables batch moving and copying of les from one platform
to another.
There are two modes: DOS and Ensoniq, selectable with the option control on
the right. DOS Mode is mostly identical to the standard Common Dialog box.
Ensoniq Mode shows the Disk Label text box above the Mode Selector, and a
space information box. Also, the Drives box shows Floppy (for the oppy drive), the
corresponding SCSI numbers, and ATAPI Drive 0 for ATAPI/IDE CD-ROM Drives.
SCSI Compatibility
Ensoniq Disk Tools for Windows is equipped to communicate through ASPI
compatible SCSI devices on your computer. This requires two things:
ASPI software drivers
ASPI (Adaptec SCSI Protocol Interface) was produced by Adaptec, a major
leader in SCSI technology, and is pretty much the de facto standard with
SCSI interfaces. Adaptec has made the ASPI-protocol public, and would
like all SCSI interface manufacturers to make their SCSI interfaces and their
drivers compatible with the ASPI specication. If your SCSI Interface is an
Adaptec, then the card and the drivers are fully ASPI compliant. Many other
drivers are fully, or at least partially, ASPI compliant. If you have a question,
contact your SCSI interface manufacturer. Disk Tools uses standard ASPI
calls, thus it requires ASPI-compliant drivers to communicate to.
An ASPI-compatible SCSI interface
Obviously, the drivers don’t do any good if the Interface doesn’t understand
what the drivers say. Again, contact your SCSI Interface manufacturer on
ASPI-compatibility.
Page 8 Page 45
1) Put the disk in your computer’s oppy drive, right-click on the Disk List
Box, and select Read From Floppy.
2) Once the Disk Image is nished being written, use the Extract… option to extract the desired Instrument as a File Image. (Note: this will
not be necessary in future versions of this program - you will be able
to modify the actual Disk Image.)
3) Go to the File List Box, and select the new File Image.
4) Right-click on the selection in the File List Box, and select the Set-
tings… option. The Settings dialog will come up.
5) From there, nd the WaveSample that you want to modify, and click
the ENV3 tab.
6) Change the Release parameter setting to the desired length.
7) Close the Settings dialog with the OK button, and right-click the selection in the File List Box, and select Write To Floppy - this will write the
File Image onto your diskette again (note: it will ask you to Overwrite
- do so).
Tutorial: Building a directory structure and saving
les onto a Ensoniq SCSI Drive
Major project, but Ensoniq Disk Tools gives you the “tools” to do so. You can
do this manually, writing the les one by one, or do it automatically, which for
most medium or large operations, is more efcient.
Manual Method: This is good for small operations. For larger operations, see
the Automatic method.
1) Prepare yourself - have a piece of paper written out (or text le written out)
saying exactly where you want to put things.
2) You must have all the les ready on your computer in File Image format
(this will change in future versions of Ensoniq Disk Tools).
3) Click on the Explorer button. This brings up the Ensoniq Explorer.
4) Right-click on the left-hand box, and select the Format SCSI Device option.
5) The prompts will guide you through the formatting process.
6) Once it is nished, start by writing all your directories - do this by right-clicking
Page 11

Tutorial: Editing an Ensoniq Wavesample with an
external Sample Editor
This is a powerful feature of Ensoniq Disk Tools. Directly from Disk Tools, you
can open up your favorite Sample Editor and edit a .WAV-AIFF le, or even an
Ensoniq wavesample, and directly do edits on it. Works with great programs
like CoolEdit and SoundForge. This is a great way to truncate waves exactly,
or normalize their gain, add amplitude envelopes, create effects within the
sample, and many other features.
1) Open the Options dialog, and under the Sampler Editor frame, browse
to nd the executable le (.exe) which is your Sampler Editor.
2) If your Sampler Editor supports AIFF les, select the AIFF button.
Otherwise, select .WAV.
3) Type 44100 in the Sample Rate box. This ensures that your le will
play back at a rate which your Editor can play back at.
4) Close the Options dialog, and select the desired Wavesample you
want to edit.
5) Right-click, and select Edit…Sample Editor
6) Your Sample Editor will start, and load in your wavesample.
7) Perform any edit with it - truncate, normalize, compress, chorus, what-
ever.
8) Close the Editor; at that point control will turn over to Disk Tools, which
will write the new le information back to the File Image where the
Wavesample existed. NOTE: If you changed the length in anyway,
the looping information will be incorrect. You will need to re-loop the
sample.
SettingsTutorial: Editing an Ensoniq Wave with an external Sample Editor
Settings
Viewing and Changing Disk, Instrument, and Sequence Parameters
This is where you can change
individual settings of any Instrument. Below is an explanation of
the Tabs.
General
Information: Tells you the size in
bytes on the disk, block size, how
many layers, wavesamples. In the
case of Disk Files, it also tells you what les are within the Disk Image.
Instrument List Box (Disk Files only): Shows you what les are contained
within the Disk Image. Click on any one to show the Layers and Waves in their
respective boxes, and to edit the individual parameters within.
Layer List Box: Shows the Layers within the presently selected Instrument.
Selecting a Layer will automatically select the rst Wave within the Wavesample List Box, if there is one.
Wavesample List Box: Shows you the Waves contained within the currently
selected Instrument. Selecting the Wave will also automatically select the
proper Layer in the Layer List Box.
Tutorial: Building new Ensoniq instruments
This is a little tougher, but let’s stick it out.
1) Find several .WAV or AIFF les in the WAV-AIFF List Box, and select
them.
2) Right-click on the WAV-AIFF List Box.
3) Click on Convert to File Image option.
4) Your les will start converting, but after the rst wavesample, the KeyRange dialog will appear, asking you to select the keyrange in the Layer
for that specic wavesample. Select it using the mouse and the keyboasrd, and select Save Changes.
5) After you are done with that, if you need to create a New Layer in the
new Instrument, right-click on the Inst-Layer-WS List box, and click on
the Create Layer selection.
6) If you wish to change any of the default parameters, right-click on the
Inst-Layer-WS List Box, and choose the Settings… option. This will bring
up the Settings dialog, where you can edit the parameters.
Page 44 Page 9
Instrument
You can edit the Instrument’s Name, Key Range, Pitch, Transposition, Pressure Mode, and MIDI Status from here.
Layer
You can edit the selected Layer’s Name, Delay, Glide Mode, Glide Time, Legato Layer, and Delay from here.
Pitch
You can edit the selected Wave’s Root Key and Key Range from here. You
can access to the KeyRange dialog from this Tab:
Page 12

Settings Tutuorial: Saving File Images to Floppy Disk
Filter
You can edit the selected Wave’s Filter Cut-Off’s and Env2 Amounts from
here.
Tutorial: Saving File Images to Floppy disk
There are many of these les on the Internet. This is how you can write them
to a oppy disk to use with your Ensoniq.
Amplitude
You can edit the selected Wave’s Volume, Pan, and Output Bus from here.
Env 1, 2, and 3
You can edit the selected Wave’s envelopes from here. NOTE: This is not
available in the current version.
Wave
You can edit the selected Wave’s Loop Mode, Sample Start, Sample End,
Loop Start, Loop End from here.
LFO
You can edit the selected Wave’s Mode, Speed, Delay, Speed Mod Source,
and Speed Mod Amount from here.
Effect
You can edit whichever effect is selected effects. WARNING: This does not
work with 3rd-party effects, such as Waveboy’s.
Lists
These record the contents of the currect File Image or Disk Image. By clicking
on these you determine which object you are working with. There is a Layer
List, Wavesample List, and in the case of Disk Images, a File List.
OK
This closes the Settings box, saving all your edits that have not been applied
already.
Close
This closes the Settings box, but reverts all your edits back to the original settings, except the ones saved by Apply.
Apply
This permanently saves your edits made so far without closing the dialog.
1) Find the proper le in the File List Box, and select it.
2) If you can’t nd the le, click on the Disk, Files Button, which brings up
a Common Dialog, where you can nd it
3) Right-click on the Disk List Box.
4) Click on Write To Floppy option - the prompts will lead you from there.
If the le is larger than the space available on the diskette that is inserted, the
program will let you know. If the le is larger than the capacity of the disk, Disk
Tools will split the le into however many disks is required.
Tutorial: Converting .WAV or AIFF les directly to
Ensoniq Floppy/SCSI Device
Again, we have tried to make this as easy as possible.
1) Find the .WAV or AIFF le in the WAV-AIFF List Box, and select it.
2) Right-click on the WAV-AIFF List Box.
3) Click on Write To Disk - Single Inst option
4) A Save As… Dialog will display - you will be able to choose what En-
soniq device you want to write to.
Tutorial: Converting Ensoniq wavesamples into
.WAV or AIFF les
Right now, you are able to extract WaveSamples only from File Images - in the
future you will be able to do this from Disk Images as well.
1) Locate the File Image in the File List Box, and select it - note the hier-
archy of the Instrument comes up.
2) Find the WaveSample you want to convert to a .WAV or AIFF le
3) Drag that WaveSample over to the .WAV-AIFF List Box, and drop it.
4) A Common Dialogwill come up, asking you which directory to place
that WaveSample. If you wish to rename or change the type of le you
want to write, you may do so here.
5) Click OK on the Common Dialog, and there you have your le! It will
be 16-bit, since all Ensoniq wavesamples are 16-bit. You now can play
the le from the Windows Media Player or other utility. This function
supports both Mono and Stereo WaveSamples.
Page 10 Page 43
Page 13

Converting GKH to Giebler/Tutorial Viewing Ensoniq Disk Directories Settings - Song and Sequences
Converting .GKH les to .EDE/EDA (Giebler) les
Methods
Right-Click in Disk List Box, if .gkh le is selected, select GKH -> Giebler
A .GKH le has a slightly different format than the Giebler le format (which is
the more popular, and is which this program uses). You can convert a .GKH
le type to a Giebler type using this feature.
Writing Ensoniq Volume Listings
Methods
Right-Click in Ensoniq Explorer Directory List, select Print
Writes a Tab-delimited le called Rcvolume.txt to the Tools application directory.
Doesn't print anything to the Printer.
Tutorial: Viewing Ensoniq Disk Directories
This is where you can view and modify Song and Sequence
information.
Song Name
Displays the selected Song Name.
You may edit this to be changed.
Sequence Name
Show the Name of the selected
Sequence within the Song. You may
edit this as well.
Time Signature
Edit the Time signature for the selected Sequence.
Tempo
Edit the Tempo of the selected Sequence.
1) Put the Ensoniq Disk in your oppy drive.
2) Click on the Ensoniq Devices button
3) The Root directory will display.
Tutorial: Saving Ensoniq Floppies to your Computer
You do not need to view the Ensoniq directories before this operation.
1) Insert the Ensoniq oppy into your drive.
2) Right-click on Ensoniq Devices List Box, and select Write To Disk Image
3) You will get a Common Dialog so you can name your disk image
and select the directory where it will go. Your named extension must
be .eda (for HD disks) or .ede (for DD disks). If it is not, it will use the
Default File Type as noted in the Options dialog.
Tutorial: Saving Disk Files to Floppy
We have tried to make this as easy as possible.
1) Find the proper le in the Disk List Box, and select it.
2) If you can’t nd the le, click on the Disk, Files Button, which brings up
a Common Dialog, where you can nd it
3) Right-click on the Disk List Box.
4) Select the Write To Floppy Disk option - the prompts will lead you.
The program will know if you will need a low-density or a high-density diskette,
based on what the Disk Image requires.
Loop
Turns on or off the Loop for the selected Sequence.
Time Display
Shows how many bars and how long in minutes and seconds for the selected
Sequence.
Tracks
Select the Track you wish to view and edit the Event Information for, per the
selected Sequence. All unused Tracks are grayed out.
Event Screen
Shows all the events, in chronological order, of the selected Track for the selected Sequence. Double-clucking on the event allows you to edit all aspects
of it. INSERT allows you to add an event, and DELETE allows you to delete
the selected event.
File Name
Displays the DOS le name that you are editing.
Page 42 Page 11
Page 14

File-Type Conversions How To: Testing Files
FileType Conversions
Testing Files
Methods
Ensoniq Disk Tools for Windows can convert File Image to many different
formats - Original EPS, EPS 16-Plus, and ASR-10/88 format. With the EPS/
ASR’s themselves, there are certain restrictions - you can’t load an ASR Song
in a Original EPS; you lose the effects that are programmed in an ASR sounds
when you load them into and 16-Plus, and so on. Ensoniq Disk Tools can convert les to different platforms with the minimum of quality loss.
File conversions are made using the
Restore SCSI Device command, or on the
Main Screen level by choosing Convert…,
which brings up the dialog on the right:
Right-Click in Disk List Box, select Test Disk Image
Right-Click in File List Box, select Test…
This operation tests the selected le thoroughly and checks if it is a error-free
le to run in a EPS/ASR without crashing.
Within the File List Box, you may test the selected le to test only, or all the
Instrument les in a directory or Drive. Currently only Instrument les and Disk
Images are testable. Other les will be testable in a later version.
Splitting Large Files to Multiple Floppies, Combining
Presently only these File-Types can be
translated:
ASR Inst to 16+ Inst
ASR Bank to 16+ Bank
ASR Song to 16+ Song
ASR Seq to 16+ Seq
16+ Inst to ASR Inst
16+ Bank to ASR Bank
16+ Song to ASR Song
16+ Seq to ASR Seq
For example, if you have a backup of a CD-ROM that was done with ASR FileTypes, you can do a Restore, and select the 16-Plus File Type. All the ASR Banks,
Instruments, and Songs/Seqs will be translated to 16-Plus format. Otherwise,
these les would not even show up for loading on a 16-Plus!
When translating ASR Instruments, the Effects les are switched and the parameters preserved whenever possible - when an ASR effect does not have a
16-Plus counterpart, the closest possible effect is selected.
When 16-Plus les are translated to ASR format, they are actually changed to
the ASR File-Type (as if the ASR actually wrote them). It may be true that the
ASR shows the 16-Plus le-types, but there is some small translations as they
come in (effects, one or two additional parameters). If you change a 16-Plus le
to ASR File-type, and then change it back to 16-Plus File-type, you will have the
exact same le.
Splitting
If you have a File Image that is bigger than the oppy that you are attempting
to write it to, Disk Tools will erase all the contents of that disk and write all the
possible blocks of information. It then will continue to prompt you for oppy
disks until the le is written.
Combining
When Disk Tools encounters a le that is Part 1 of a multi-part le (formed by
the above), it will write that le as normal. If it encounters a multi-part le that
is above Part 1, it will prompt you to select the le it is to append itself to. Disk
Tools will not write a Part 2+ le to your computer - it must append it to Part
multi-part le.
Writing Operating Systems to Ensoniq Volumes
Methods
Right-Click Ensoniq Devices List Box, select Write Operating System
Right-Click Ensoniq Explorer Directory List, select Write Operating System
This will write an Operating System to your selected Ensoniq volume. You
will be prompted on which OS you want to write (EPS, 16-Plus, or ASR). The
exception is if it is a DS/HD, then it will write the ASR OS. Note that it is NOT
required that the volume be empty, as the Ensoniq requires.
The OS les are provided along with the program, and their locations are determined by what is inputted in the Options dialog.
Eventually, all File-types will be made available for conversion, and in addition,
cross-conversions will be available (such as ASR Sequence to a EPS Song).
Page 12 Page 41
Page 15

How To: Working with TS-type files and disks Unformatter
Standard MIDI File (SMF) Conversions
Unformatter
Methods
Right-Click File List Box while a Song File selected, and select Import SMF
Right-Click File List Box while nothing is selected, and select Import SMF
Right-Click File List Box while Song/ Seq File is selected, select Export SMF
Right-Click in Object List Box while a Song or Sequence File, or Track Ob-
ject is selected, select Export SMF
Standard MIDI Files are what we Ensoniq-ers would consider Sequence les
with an innite amount of tracks. The Ensoniq format supports Song les,
which are les that contain up to 80 Sequence les, with 8-10 Track objects
inside them.
Importing
You can import a SMF and make a new File Image by right-clicking the
File List Box while nothing or something other than Song File Image is
selected. You can insert a SMF as a new Sequence le in a Song le
(provided that there is less then 80 within the le) by choosing Import SMF
while a Song le is selected.
Exporting
You can export a Song or Sequence le into a SMF. With Sequence les,
the le is simply converted into a single SMF. With Song les, you are given the option of creating separate SMFs for every Sequnce le contained,
or you can make one SMF that has all the Sequences linked together.
This is accessed by right-clicking on the Ensoniq Devices List Box on the Main
Screen when no device is selcted. This powerful feature can restore previously
erased les due to formatting, accidental (or purposeful) damage or erasure.
Files are really magnetically erased when they are deleted. Instead, the Directory entry is simply cleared so the le isn’t available anymore, and the blocks
in the File Allocation Table (FAT) are set to empty. The magnetic data is still
there, until the space is needed by another le being written.
Running the Unformatter scans your Ensoniq device (be it oppy or SCSI
Drive) and grabs the contiguous Ensoniq les it sees. (Contiguous means
that the le is all in one place, and not scattered around the disk.) It then tests
them for integrity, to make sure they are valid contiguous les, sorts them out,
and writes them to your computer’s hard drive as File Images. It then takes the
used leftover blocks (not the empty ones, of course), and tries to piece together as many les as it can. Lastly, it looks in all possible recoverable directories
and tries to guess the entire original directory structure, and sorts it out on
your computer’s hard drive.
After that is nished, you can perform a Restore SCSI Device command from
the Ensoniq Explorer and restore your hard drive, either the original one or
another or a another cartridge (if it is removable).
Working with TS-type les and disks
Methods
Select le in File List Box, if TS 1-SEQUENCE le, select Write to Floppy
Drag TS 1-SEQUENCE File Image from File List Box, drop on Ensoniq
Devices List Box
TS 1-Sequence les are integrated into the Disk Tools paradigm. They have
the extension .eft in the File List Box; you may Export them to SMF, or you can
import a SMF to a TS 1-SEQUENCE le. You also may save them to a TSformatted oppy disk.
TS-type oppy disks are readable, writable, and can be viewed in Ensoniq
Disk Tools.
Page 40 Page 13
Page 16

Bank Builder How To: Editing Sample Rate
Bank Builder
Editing Sample Rate
Methods
One of Ensoniq Disk
Tools most exciting fea-
tures, the Bank Builder
allows you to create and
edit any EPS or ASR Bank
le and supplement it with
your own parameters. This
is an incredibly powerful
tool that enables you to
avoid the tedious process
of blindly building the bank
from within the EPS/ASR.
Right-Click in .WAV-AIFF List Box or Object List Box, and select Edit…
Sample Rate
Displays a dialog showing the present Sample Rate and a box asking you
what rate you want to convert it to. NOTE: This function does not affect the
wavedata in any way - it simply changes the parameter of the .WAV/AIFF le
or Wavesample Object. Sample Rate is NEVER a function of wavedata itself.
With Ensoniq’s CONVERT SAMPLE RATE, they change the wavedata to preserve the pitch of the sample at the Root Key. We don’t, since the root key can
be changed to accommodate this function - and even better, you can change
the rate and be non-destructive about it.
Playing .WAV les
Bank Name
This shows the bank name and it’s path. With Ensoniq volumes, this makes
a template le called tempbank.efe (or tempbank.efa for ASR banks). It is
removed after editing or cancelling.
Methods
Hit [space bar] while le in the .WAV-AIFF List Box is selected
Hit [space bar] while an Ensoniq Wavesample in Object List Box is selected
Bank Type
Each Ensoniq sampler has a different type of bank le. The Original EPS did not
use bank labels, so it did not take those into account. The 16-Plus used bank
labels, plus the idea of individual tracks and effects were taken into account.
Finally, the ASR implemented a longer bank entry, in order to store longer paths
(in cases of hard drives). This allows you to select the bank type.
Close
This cancels any edits you have done, or in case of creating a new Bank le,
does not write the Bank le in the selected device.
Presets
Opens or closes the screen to include the Preset information.
Drive (edit)
This allows you to select the drive that the selected entry will point to.
Label (edit)
This allows you to specify the disk label you want the selected entry to point
to.
Path (edit)
This allows you to specify the Ensoniq le path for the selected entry.
Be careful to press the [space bar] again after the sound has nished, whether
you are in Loop mode or not. For more information see Page
Converting Different Ensoniq File-Types
Methods
Right-Click in File List Box, select Convert…
Ensoniq made three related samplers - the Original EPS, the EPS 16-Plus,
and the ASR-10/88. Each improved on a basic le structure. Disk Tools allows
you to translate each le format to work with a different sampler. For more
information see Page 12
Page 14 Page 39
Page 17

How To: Check Disk Bank Builder
Check Disk
Methods
Right-Click in Ensoniq Explorer Directory List (when in Ensoniq Mode),
select Check Disk
This scans the entire Ensoniq volume, verifying the location and integrity. Errors are given with a message dialog at the end of the scan.
Entry List
This shows you the specic entries that the bank contains. There are 8 slots,
plus one for the Song.
Volume (edit), Pan (edit), or Output Bus (edit)
This allows you to specify the volume, panning, or Output for the selected entry.
Bank Effect
This allows you to specify the Effect that is stored within the Bank le.
Editing Samples with an external Sample Editor
Methods
Right-Click in .WAV-AIFF or Object List Box, select Edit…Sample Editor
Preset Volume
This allows you to specify the Volume that is stored within the selected Preset.
This is a powerful feature of Ensoniq Disk Tools. Directly from Disk Tools, you
can open up your favorite Sample Editor and edit a .WAV-AIFF le, or even an
Ensoniq wavesample, and directly do edits on it. Works with great programs
like CoolEdit and SoundForge. This is a great way to truncate waves exactly,
or normalize their gain, add amplitude envelopes, create effects within the
sample, and many other features.
Selecting the above method opens up the Sample Editor chosen in the Options
dialog. Perform your edits, and then close the Sample Editor application. This
will write the edited data back to the le automatically. You also have the option
of predetermining the sample rate of the sample as edited in the Sample Editor
- this will NOT be permanent, as the original Sample Rate is written back to the
le upon closing. It is also advised that you select the AIFF option in the Options
dialog; as it is much faster to translate the Ensoniq wavesample into an AIFF le
than it is a .WAV le for the Sample Editor to edit.
Normalizing Gain
Methods
Right-Click in .WAV-AIFF or Object List Boxes, select Edit…Normalize Gain
Depending on which you select, this will modify the wavedata so it will output at the maximum possible level. This does not basically affect the sound,
although there is some argument on whether a low-level-recorded wavesample “sounds” better than high-output wavesample with the Volume parameter
down. Just like the Ensoniq Normalize Gain parameter, this function does not
have an Audition or Undo - since it is hardly necessary. (If you think the function adds noise to the sample - it doesn’t; it just raises the perceptible audible
level of the noise. Simply lower the volume using the appropriate Volume
parameter, or better yet, resample the sound at a better signal-to-noise ratio
(or get rid of that hum!!!).
Preset Pan
This allows you to specify the Panning that is stored within the selected Preset
for the selected Instrument.
Preset Output Bus
This allows you to specify the Output Bus that is stored within the selected
Preset for the selected Instrument.
Preset Key Range
This allows you to specify the Key Range that is stored within the selected
Preset for the selected Instrument.
Preset Transpose
This allows you to specify the Transposition that is stored within the selected
Preset for the selected Instrument.
Preset FX Control
This allows you to specify the Effect Control parameter that is stored within the
selected Preset for the selected Instrument.
Instrument for Preset
This selects the Instrument Slot in which the the selected Preset is pointing to.
Preset Number
This selects Preset Number.
Effects Control (edit)
This allows you to specify the Effects Control parameter for the selected entry.
Page 38 Page 15
Page 18

Wave Creator How To: Deleting Files/Directories
Wave Creator
The Ensoniq Disk Tools ex-
clusive enables you to make
your own waveforms. It is quite
primitive at the moment, it only
supports basic waveforms,
which you can mix and match
in differing ways.
Image. Upon choosing Settings when a Layer is selected, it will route you to
the Layer tab, while when a Wavesample is selected, it will route you to the
Pitch Tab. Of course, once you are in the Settings dialog, you can route yourself anywhere within the Image you want. For more information see Page 9
Deleting Files/Directories
Methods
Select desired les, Right-Click on any List Box, select Delete File/Dir
Select desired les, press DELELTE
Harmonics
Set the various harmonics
levels that current wavesample will have.
Waveshapes
This is the list available waveforms that can be written.
Add
Adds a waveshape to the list.
Clear
Clears the waveshape list.
Waveshape List
These are the waveforms that will be added together and mixed harmonically
using the Harmonics frame to form your nished waveform.
Play
If you have a sound card on your system, it will play the current waveform as
composed on the dialog.
Create
Displays a Common Dialog so you can name your composed waveform, and
save it as a .WAV or AIFF le.
Single les, multiple les, and whole directories (including contained les).
Working with Banks
Methods
Double-Click on any Bank le on a Ensoniq volume or a File Image
Displays the Bank Builder dialog, and shows the current parameters of your
Bank le. For more information see Page 14
Working with Objects ( Layers and Wavesamples)
Methods
Right-Click in Object List Box, select Create, Delete, Copy, or Rename
Layer or Wavesample (depends on current selection)
Create
Create Layer makes a blank layer within a File Image, while Create Wavesample
makes a new Wavesample within the selected Layer. This will be a 1 block (128
sample) wave. The waveshape can be selected in the Options dialog box.
Delete
This works seemlessly with Layers and Wavesamples. If there are any original
wavesamples in the deleted Object, Disk Tools passes the data to the lowestnumbered copy that exists; if not, then the wavedata is deleted.
Copy
The Copy dialog will appear, giving you the option of making parameter-only
copies, or parameter+data copies.
Rename
This creates a text box over the Object in the Object List Box, allowing you to
rename it. Pressing Enter saves the operation.
Page 16 Page 37
Page 19
How To: Automatically Adding File Images to Disk Images Find Utility
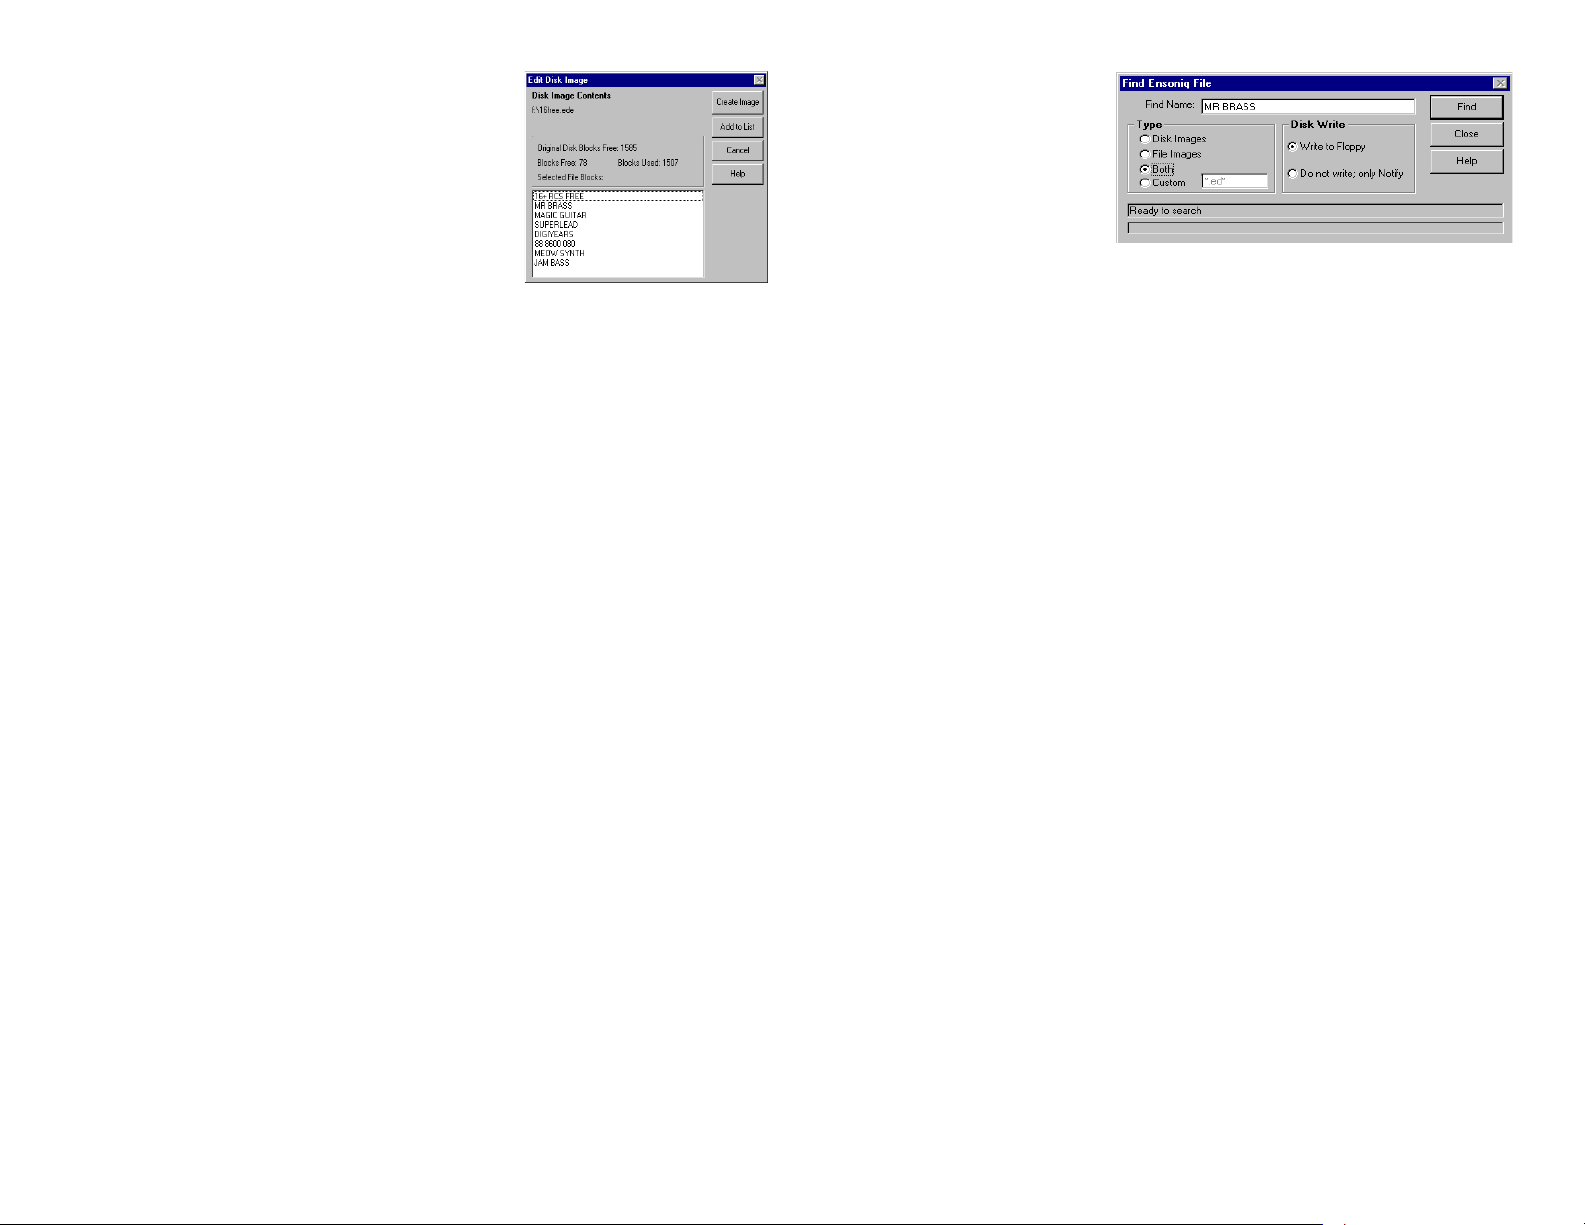
Create Image
Creates a Disk Image with all the listed les in it.
Add to List
Brings up a Common Dialog, asking you to insert a le.
You can delete a le by selecting it & pressing DELETE.
File List
Shows the current les contained in the Disk Image.
Pressing INSERT allows you to add a le, pressing
DELETE deletes the selected le.
Status
Shows how many free and used blocks in the Disk Image.
Cancel
Stops operation and does not create an image or edit the
selected Disk Image.
Find Utility
What if you don’t know where a
certain Ensoniq le is, and you
don’t know the DOS le name
- you just know the Ensoniq
12-character name? This is a
common situation - especially if the le is in a Disk Image - how can you nd it?
The Find Utility looks in the selected drive, and checks all the Disk image
directories and File Images, looking for the le in question.
Automatically Adding File Images to Disk Images
Methods
Drag File Image from FileList Box, drop on desired Disk Image in Disk List Box
This will put a File Image into the Disk Image you have dropped it on. Disk Tools
will then prompt you, asking you if this is what you want to do. In the case that
the File Image is too large to t in the Disk Image, Disk Tools will inform you, and
cancel. This works with fragmented or unfragmented Disk Images.
Optimizing Song Files
Right-Click in File List Box, when a Song is selected, select Optimize Song
All Ensoniq OS's have a bug where a Song will grow to consume a large
amount of memory. This function wil take a Song le and erase the unnecessary data, shrinking it ot it's smallest possible size.
Batch Writing
Methods
Right-Click in Disk List Box, select Batch Write
This invokes the Batch Write function, where you can write multiple Disk Images to oppies very easily. For more information see Page 22
Parameter Editing
Methods
Right-Click in Disk, File, or Object List Boxes, select Settings…
Name
Ensoniq 12-character (maximum) names you are looking for. They can be
ANY name - Instrument, Directory, Song, Sequence, Effect, etc. For multiple
names, separate using a semi-colon (;) and DO NOT include a space. Leftand Right-leading spaces are ignored by the Find Utility; in other words, { MR
BRASS} and {MR BRASS} are the same. However, spaces within a name are
essential to the name.
Type
To shorten your search, you can specify what le extensions you want to look
under. Options are provided for Disk Images (.ede, .eda, and .gkh) and/or File
Images (.efe, .efa, .ins), or even your own custom extension.
Write to Floppy
During or at the end of your search, you can have the Find Utility attempt to write
the le to oppy. If the le is in a Disk Image, it will be extracted and written.
Find
Starts the operation.
Status Bars
Shows you the status of the operation and what directories are being checked.
This is your access to editing parameters in a File Image or Disk Image. On a
Disk Image, this will route you to the General tab, where you can choose the
File you want to edit. On a File Image, it will take you to the General tab as
well, which will be slightly different due to the unique characteristics of a File
Page 36
Page 17
Page 20

View Ensoniq Devices How To: Converting Ensoniq Wave(s) to .WAV/AIFF file(s)
View Blocks on Ensoniq Devices
Ensoniq Disk Tools enables you to
view and edit the byte contents of an
Ensoniq oppy disk or SCSI Drive. This
viewer also shows the locations of the
objects within a le, and allows you to
directly access them. Three viewing
preferences are available; Hex, Dec,
or ASCii (Hexadecimal-base16, Decimal-base 10, alphanumeric characters). The PageUp and PageDown
buttons on your keyboard increment or
decrement the current Block. A Block
is 512 bytes.
Read Block
Reads the block (512 bytes) indicated
in the text box below, and displays
the contents on the Byte Screen.
Save
This saves the changes you have made, and continues the process.
Restore
Restores the original settings when the dialog appeared.
Key Range Keyboard
Drag across the keyboard to select keyranges for wavesample selected on the WS List.
Status
Shows you the current layer in which you're editing the key map, and the current Wave selected.
Wavesample List
This shows the current Wavesamples within the Layer listed in the Status area.
Converting Ensoniq Wave(s) to .WAV-AIFF le(s)
Methods
Drag selected Layer or Wavesample from the Object List box, drop on
.WAV/AIF List Box
Dragging a layer will extract all wavesamples within that layer to individual .WAV
or AIFF les. Copied wavesamples will get their wavedata from the original
wavesample, so there is a possibility of having many wavesamples with the same/
redundant data. A Common Dialog will display, giving you the option to change
the default names and le-type. The default name given the new .WAV-AIFF le
will be the Instrument Name plus the Wavesample number; and the type will
depend on what is selected under the Sample Editor option in the Options dialog.
Block Number
The Block (512 bytes) that is being read.
View Type
When Hex is selected, all values in the Byte Screen are in Hexadecimal notation (0-F). If selected to Dec, everything is notated in Decimla notation (0-9).
If selected to ASCii, everything is displayed in Character notation. Standard
ASCii charcters are shown (32-127), and spaces are indicated by dots.
Device
The device that is being read. This must be an Ensoniq device.
Extracting File Images from Disk Images
Methods
Right-Click in Disk List Box, select Extract
Drag selected object from Object List Box (when a Disk Image is selected),
drop on File List Box
With the Extract method,you will be prompted for the DOS directory in which
to put the new File Images in. All the les within that Disk Image will be extracted. This works on fragmented and unfragmented Disk Images.
The Drag method allows individual les to be extracted.
Byte Number
The current starting byte of the line.
Creating and Editing Disk Images
Methods
Byte Screen
Shows the bytes in the current Block (512 bytes) as indicated in the Text Box
to the right.
Page 18 Page 35
Right-Click in File List Box, select Create Disk Image
Right-cluck on Disk List Box, select Edit Disk Image or Create Disk Image
This allows you to create a New Disk Image, or edit a Disk Image with the
selected File Images contained within. Create Disk Image starts a new Disk
Image, while Edit Disk Image shows the current state of the Disk Image. Create Disk Image within the File List Box starts a new Disk Image with that File
Image contained automatically.
Page 21

How To: Converting .WAV/AIFF files to Ensoniq format Ensoniq CD-ROM's on ATAPI/IDE CD-ROM Drives
Converting .WAV or .AIF les to Ensoniq format
Ens
oniq CD-ROM’s on ATAPI/IDE Drives
Methods
Right-Click in .WAV-AIFF List Box, select Write to Disk - Single or Write to
Disk - Multi
Right-Click in .WAV-AIFF List Box, select Convert to File Image or Write
to Multiple Images
Drag selected .WAV-AIFF le, drop on Object List Box
Ensoniq Disk Tools supports reading Ensoniq CD-ROM’s on both SCSI CDROM Drives and ATAPI (IDE) CD-ROM Drives. CD-ROM Drives are treated
just like hard drives, although you cannot write to them. ATAPI/IDE CD-ROM
Drives appear just like SCSI Drives, underneath the Ensoniq Devices List Box
on the Main Screen.
The Write To Disk methods enable a no-hassle way of getting .WAV of .AIF
les directly to a oppy disk. This can be helpful for TS owners who use EPS/
ASR samples. You may make multiple selections on the .WAV-AIFF List Box.
The Convert to File Image and Convert to Multiple Images options simply
makes a File Image(s) from the les you have selected.
Write to Disk - Single means that all the .WAV-AIFF les selected will go into
one Instrument File on the oppy disk, and Write to Disk - Multi means that 1
Instrument File will be made for every .WAV-AIFF le selected. The Convert x
functions work the same way, only they refer to File Images.
Process: Select the .WAV-AIFF le(s) you want to convert. Right-click on the
appropriate option. If you are only converting one le, the conversion will do
it’s thing, and then complete (if you choose a Write to Disk option, it will write
to disk). However, if you are converting multiple les, a KeyRange dialog will
appear, looking like this:
Select the wavesample you want to select the keyrange for on the List Box,
and then drag the cursor across the keyboard to denote the key range. When
you release the cursor, the keyranges in the List Box will be updated, with
even the other keyranges reecting the changes you made on the wavesa-
mple you selected. BE CAREFUL! You can make it so a wavesample you are
not editing be without a keyrange at all - if this happens, it will disappear from
the List Box.
Select Save Changes to continue converting - or if you made a mistake, press
Restore Original Settings, and try again.
The information below is included for completeness; the information is
obsolete, however.
Ensoniq CD-ROM’s, ATAPI Drives, and Win95
In it’s innite wisdom, Microsoft chose in Win95 to disallow any low-level access to CD-ROM drives. Yikes! That’s the way we can read Ensoniq-formatted
CD-ROM’s on Disk Tools. But you can still make this happen - you will have to
follow these steps to go back to the 16-bit (Win 3.x) way of accessing the CDROM drive. This way, the CD-ROM drive is open to low-level access.
INSTALLING THE CD-ROM DRIVER and MSCDEX.EXE
Older versions of Windows (called Win 3.x), treated IDE/ATAPI CD-ROM’s
like this: since the Operating System (MS-DOS) didn’t support CD-ROM
Drives, it had to use an OS extension. This le is MSCDEX.EXE. A typical
MSCDEX.EXE line in AUTOEXEC.BAT goes something like this:
C:\WINDOWS\MSCDEX.EXE /S /D:ASPICD0 /V /L:L /M:12
(NOTE: new Win95 users may not have a AUTOEXEC.BAT or CONFIG.
SYS le. This is the le that older Windows versions used to load startup
programs automatically. Win95 still supports it - if you don’t have one
in your Root directory, make one using NotePad.) This tells DOS to run
MSCDEX.EXE, placed in the C:\WINDOWS directory. The following switch
is very important:
/D:ASPICD0
This is very important. There is one other le that must be loaded BEFORE MSCDEX.EXE, in CONFIG.SYS, in order for MSCDEX to work.
This is the CD-ROM driver itself. This is usually supplied by the CD-ROM
Drive maker - or it comes with the computer, if your CD-ROM Drive came
with your
Page 34 Page 19
Page 22

Ensoniq CD-ROM's on ATAPI/IDE CD-ROM Drives How To: Writing Directories to SCSI Drives or Floppies
computer. Part of the standard protocol of a CD-ROM Driver is that it
names itself, like this:
DEVICEHIGH=C:\SCSI\ASPICD.SYS /D:ASPICD0
MSCDEX must refer to the same name you specify in the driver line in
order to connect them up.
To summarize, you must have:
1) Both MSCDEX.EXE and the proper CD-ROM Driver on your system.
2) An AUTOEXEC.BAT and CONFIG.SYS le in your Root Directory on
your Boot drive (usually c:)
with a name that is similar to the actual Instrument Name. This way you can
identify the le in DOS easier. However, the .RCS extension for the directory are retained, because otherwise you would lose the last 4 letters in the
directory name, because DOS only permits 8 character directory names.
The .RCS le contains the full Ensoniq 12-character name, for reference
upon Restore.
Remember that if you back up using this method, you will lose the order in
which the les are placed within the directory. Files are given the appropriate
extension according to their le type (ASR-type gets .efa, EPS gets .efe).
You may make multiple selections, and copy to a single DOS directory.
Please see Page 8 (Ensoniq Explorer section) for further information about
what Ensoniq Disk Tools requires from your computer to work via SCSI.
DISABLING THE WIN95 CD-ROM DRIVER
But Win95 is more evil than this! Upon startup, by default, Win95 unloads
this CD-ROM Driver/MSCDEX stuff and loads it’s own CD-ROM Driver,
called CDFS.VXD. Very evil! This driver says “NO” to ddling, and so far
we have not found a way to directly access the drive, and Windows95
does not let us read a non-standard format like Ensoniq’s from it’s CDFS.
VXD system. So we are back to square 1.
The solution is to turn off the 32-bit CD-ROM Driver system (CDFS.VXD)
from within Windows95, thus allowing the CD-ROM Driver/MSCDEX com-
bination to stay in effect. To turn off CDFS.VXD, go to CONTROL PANEL-
SYSTEM-DEVICE MANAGER-CD-ROM’s. Uncheck the CD-ROM from it’s
normal conguration.
If this doesn’t work for you, or if you don’t see this prompt or checkbox, you
can also rename the CDFS.VXD le in the windows\system\iosubsys directory. This causes an invisible error when Win95 loads up, and in turn does
not unload the CD-ROM Driver/MSCEDEX drivers.
To summarize: Windows 3.x used a somewhat elaborate system to get CDROM Drives to work in the system. It also is open to ddling - which is good for
programmers like us. Ensoniq Disk Tools can import les Ensoniq CD-ROM’s
in a IDE/ATAPI CD-ROM Drive only if it uses the Driver/MSCDEX system.
Currently, most computers we have tested will work with the CD-ROM Driver/
MSCDEX approach, as far as Ensoniq Disk Tools reading Ensoniq CD-ROM’s.
If you encounter, please contact us.
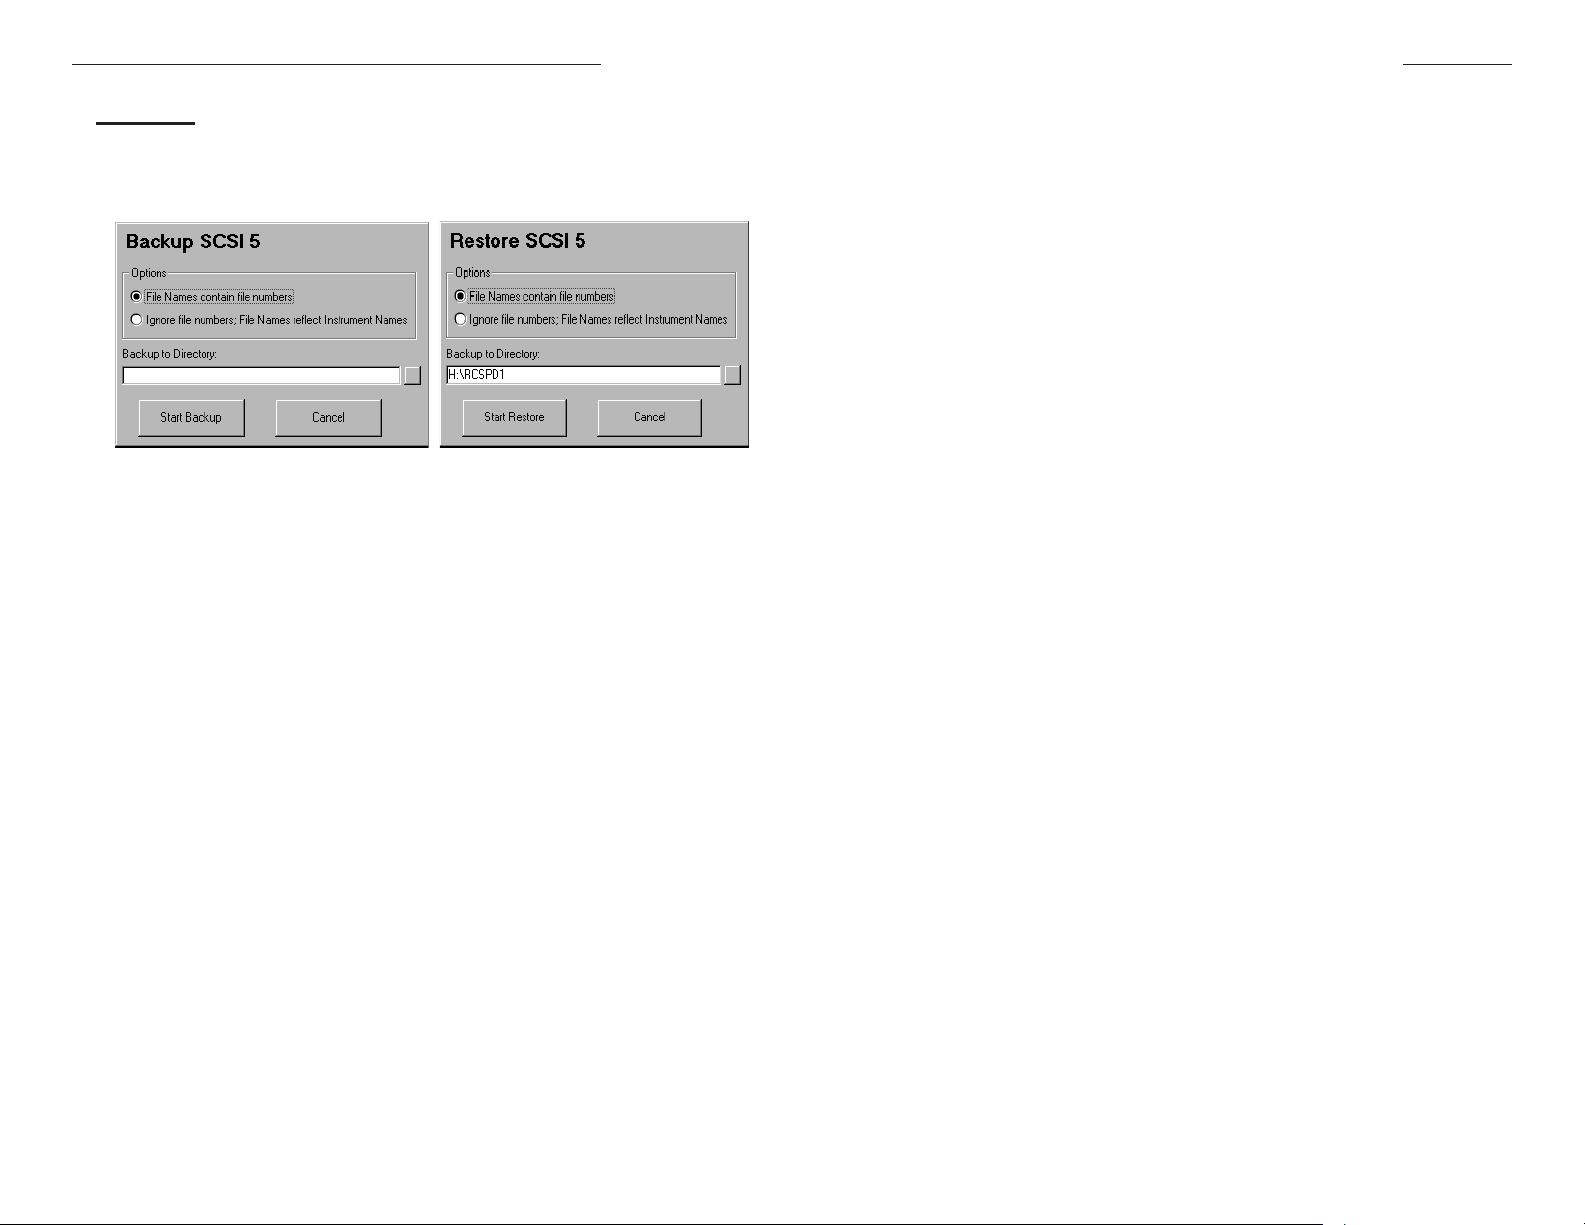
SCSI Mapper
When perform the Restore SCSI Drive command, Ensoniq Disk Tools al-
lows you to change certain aspects of the les written to the SCSI Drive, in
order to t a specic requirement.
Bank Mapping
You can change the Disk Label and the SCSI numbers on each Bank
le that is written. This can preserve the locations the Bank le points to,
so it will work with the new SCSI ID of the drive and the new Disk Label.
Each SCSI ID can be mapped to another.
File Type Conversions
You are given the option of translating each le type to correspond to
another, ensuring the best possible compatibility with the Ensoniq sampler that will be using it.
For more information see Page 12 on converting File-types.
Writing Directories to SCSI Drives or Floppies
Methods
Right-Click in Ensoniq Devices List Box (when a SCSI Device is selected),
select Write Directory
Right-Click in Ensoniq Explorer Directory List (in Ensoniq Mode when SCSI
is selected), select Write Directory
Writes a Directory in the currently selected Directory. A dialog comes up,
asking you to name the Directory.
Page 20 Page 33
Page 23
How To: Backing up and Restoring Ensoniq SCSI Drives Waveplayer
Backing up and Restoring SCSI Drives
Methods
Right-Click in Ensoniq Explorer Directory List (in Ensoniq Mode when SCSI
is selected), select Backup SCSI Drive
Right-Click in Ensoniq Explorer Directory List (in Ensoniq Mode when SCSI
is selected), select Restore SCSI Drive
WavePlayer
Ensoniq Disk Tools supports the playing of .WAV les and Wavesamples
within Ensoniq File Images.
Playing .WAV les from the .WAV-AIFF List Box
Select a .WAV les from the .WAV-AIFF List Box. The le must be the only
one selected. Hit the [space] bar, and the .WAV le will start playing.
Playing Ensoniq Wavesamples
Select a Wavesample from the Instruments, Layers, and Waves List Box.
Press on the [space] bar, and the wavesample will convert itself to a temporary .WAV le, and begin playing.
This is for le-by-le backup of your SCSI drive. Takes the les one by one off
your drive, and makes File Images under the proper DOS directories on your
DOS drive, in the same conguration as organized on your SCSI drive. It is
recommended that you use a fresh drive, as well as with the Restore command.
We wanted to improve on the Giebler EDM method of backing up - EDM’s
method is to make a big proprietary .EFE le (notice that with EDM it doesn’t
become EFA with ASR - it stays EFE). The problem with that is that you can’t
view the contents nor modify it.
Our method is an improvement. Within the destination directory, Disk Tools
creates an identical directory structure within DOS. This way you can edit the
directory placements and move the instruments around as you please.
There are two methods of backing up and restoring.
File Numbers
This looks a little tricky, but there are reasons for it. Since DOS has no “le
numbers” within a directory, but the Ensoniq le system does, what we do is
make the File Image le names the le number (e.g.; if MR BRASS is File
#2, it becomes 2.efa). The instrument names are kept intact. In the case of
directories, there are two possible problems - 1) DOS le names are 8 characters, and that is not enough for a 12 character Ensoniq directory, and 2)
directories are stored within le numbers as well. So, we name the directory
with a number as well (for example, 3), and store the name in a le with the
extension *.rcs.
File Names
This does what you would expect - extract each le and name it under DOS
Page 32 Page 21
Within the Options dialog there is a prompt named Loop Played Sounds. If
this is selected, the .WAV le will loop continually until you press the [space]
bar again. Then it will play once more, and stop. If it is not selected, the .WAV
le will play only once, but the [space] bar still needs to be pressed again to
clear the system.
NOTE: The .WAV le MUST have a sampling rate that is supported by your
sound card/driver in order to play. Otherwise, it will not sound. For example,
if DOG.WAV is sampled at 30K, and your sound card only supports 44.1, the
.WAV File will not play.
Also, remember that using Edit…Sample Editor on a Ensoniq wavesample
transports it to an external Sample Editor, where the wavesample can be
played.
Page 24
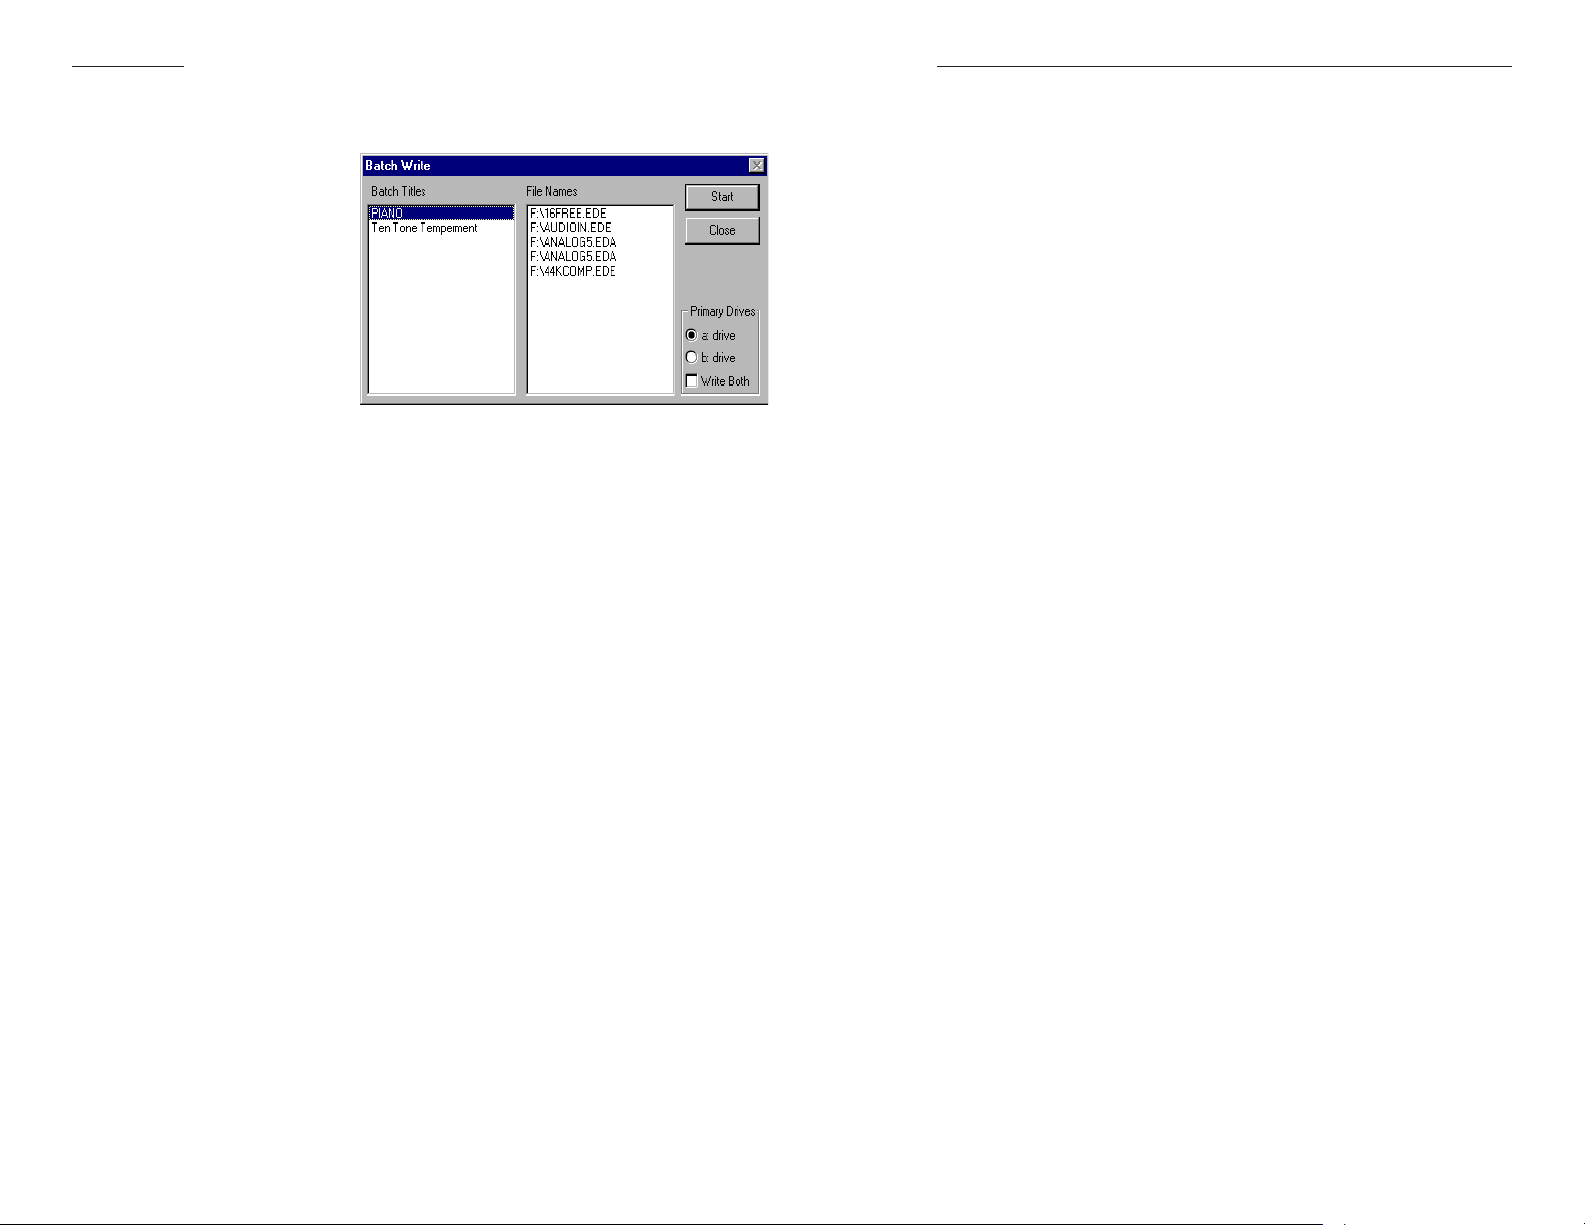
Batch Write How To: Copying Ensoniq Files from SCSI Drive to Computer
Copying Ensoniq Files from SCSI Drive to Computer
Batch Write
Ensoniq Disk Tools includes a
handy Batch Writer, for you to
specify groups of Disk Images
that you want to write to oppy
without the hassle of selecting
them all the time.
Admittingly, this is something
we use at Rubber Chicken
Software Co. for mass disk
duplication - it makes the job
much easier. Hopefully you
will have a use for it as well.
Titles
This is a name that you give to each category of File Names. Pressing INS
enables you to add Titles, while pressing DEL enables you to erase Titles.
(File Images)
Methods
Double-Click on File in the Ensoniq Explorer
Right-Click in Ensoniq Explorer File List (in Ensoniq Mode), select Ensoniq
to File Image
Files are given the appropriate extension according to their le type (ASR-type
gets .efa, EPS gets .efe).You may make multiple selections, and copy to a
single DOS directory.
Please see Page 8 (Ensoniq Explorer section) for further information about
what Ensoniq Disk Tools requires from your computer to work via SCSI.
Copying File Images to Ensoniq SCSI Drives
Methods
Double-Click on a File Image in the Ensoniq Explorer (in DOS mode)
Right-Click in Ensoniq Explorer File List (in Ensoniq Mode), select DOS
Batch to Ensoniq
Files Names
These are the File Names that are associated with the Title selected. Pressing INS enables you to add Files Names, while pressing DEL enables you to
erase File Names.
Start
This starts the process of writing the Disk Images to oppy.
With the Double-Click method, the dialog will automatically switch to Ensoniq
Mode, and uncover a blinking Write button - select the directory you want to
the File Image to go to, and the le will be written to that directory.
The DOS Batch to Ensoniq function is for when you want all the File Images
in a DOS directory to go to a single directory within the SCSI Drive.
1) In Ensoniq mode, select the Ensoniq directory you want the les to go.
2) Perform the Method above.
3) You then will be prompted for the name of the directory you want created to put the les in. If you do not want a directory created, select
Cancel. Note: If the le number chosen is 5, Tools will warn you that a
MacroFile is best placed on that File Number, for boot reasons.
Please see Page 8 (Ensoniq Explorer section) for further information about
what Ensoniq Disk Tools requires from your computer to work via SCSI.
Reading/Writing Raw Images of SCSI Drives
Right-Click in Ensoniq Explorer Directory List, select SCSI to .IMG
Right-Click in Ensoniq Explorer Directory List, select .IMG to SCSI
Simply reads or writes a raw image le (stored as an .IMG le). Everything
stays as it was stored.
Page 22 Page 31
Page 25
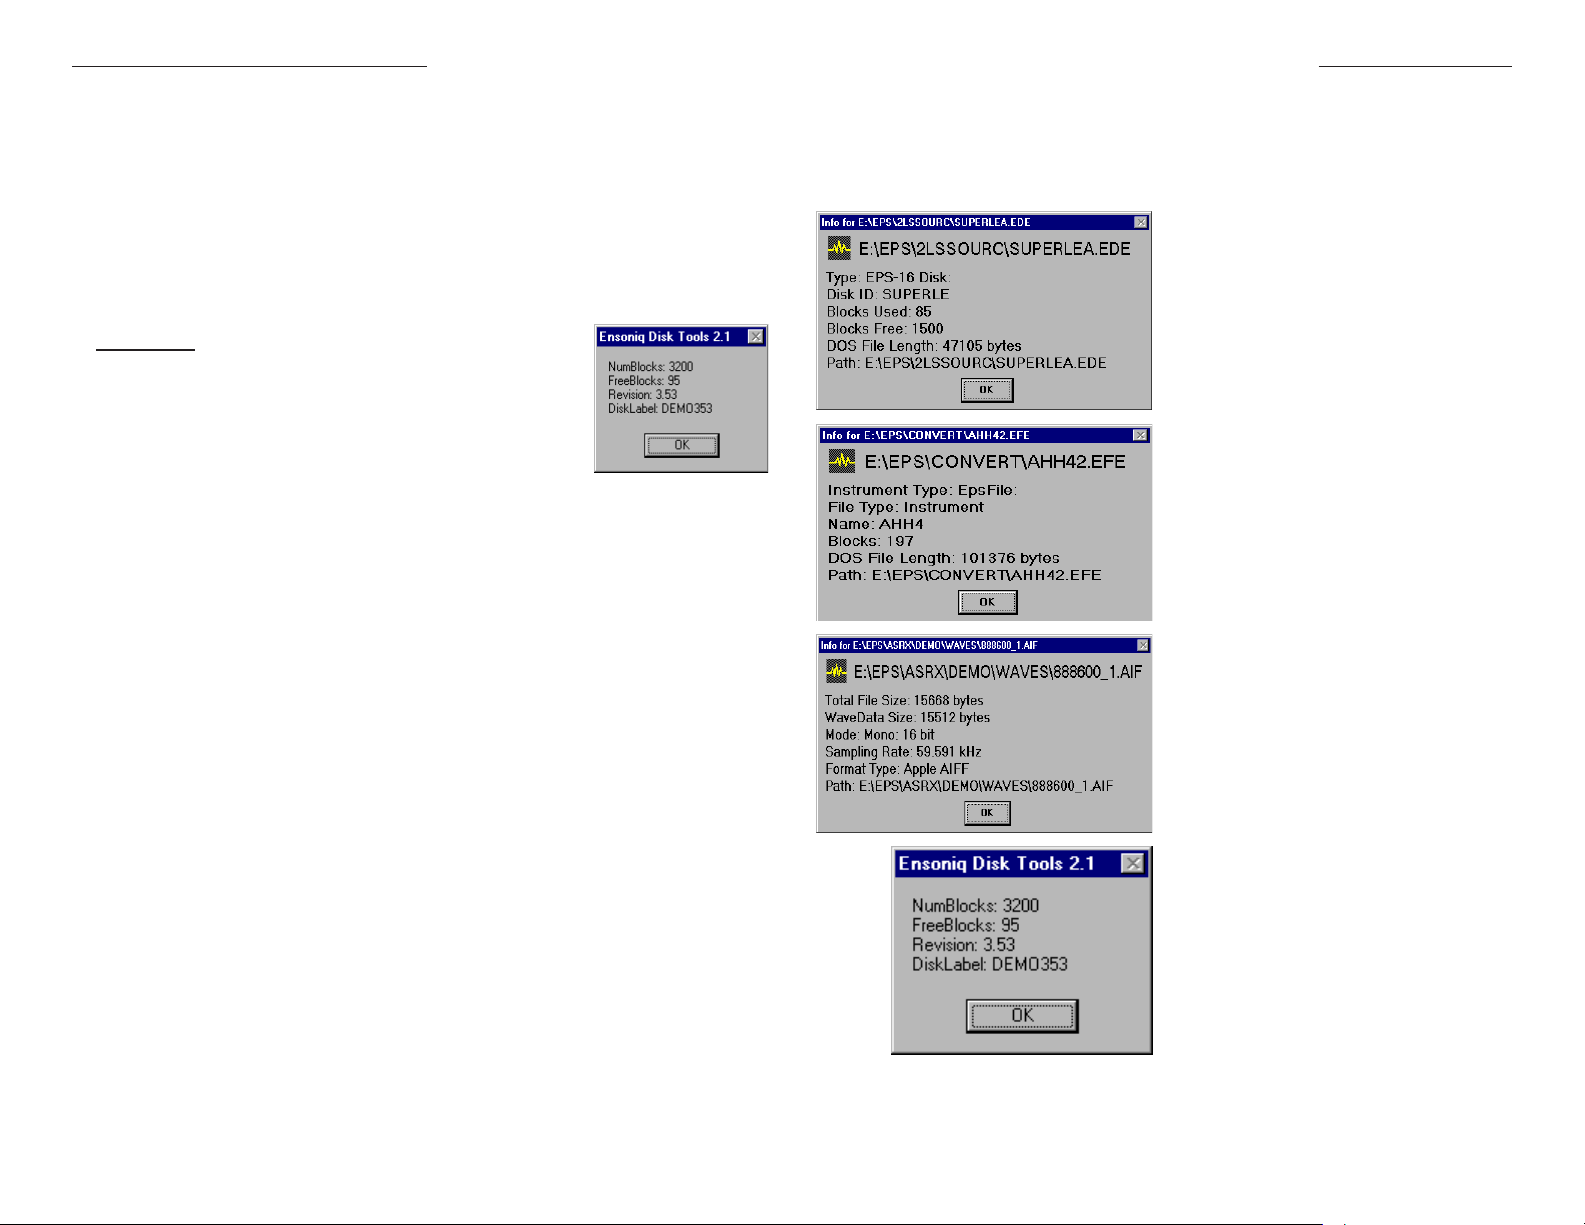
How To: Viewing Ensoniq Device Info Information Screens
Operating System
If checked, will write the Operating System le; which one depending on the radio button
selection.
Information Screens
Type
Choose the proper media you want to format.
Please see Page 10 for further information about what Ensoniq Disk Tools
requires from your computer to work via SCSI.
Viewing Ensoniq Device Info
Methods
Right-Click in Ensoniq Devices List Box, select Info
This shows the amount of blocks available on a non-formatted disk, the amount of free blocks to be used on the
disk, the revision, and the disk label.
Viewing Disk Image and File Image Info
Methods
Right-Click in File List Box, select Info
Right-Click in Disk List Box, select Info
For Disk Images, this shows Disk Type, Disk Label, Blocks Used, Blocks
Free, the DOS File Size, and the full path of the Disk Image. For File Images,
this shows the Instrument Type, the File Type, the Name, how many Blocks it
occupies, the DOS File Size, and the full DOS path.
When you select Info on a Menu, you will get one of the corresponding Info
screens describing the object you want Information for.
This is the Information screen for
Disk Images.
This is the Information screen for
File Images.
This is the Information screen for
.WAV and AIFF les.
Navigating through Ensoniq SCSI Drives
You will nd this limited within the Main Screen - the Ensoniq Devices List Box
only shows you the one directory at a time. For full, expanded viewing, use the
Ensoniq Explorer.
The Ensoniq Explorer functions like the Win 3.x Common Dialog screen. You
may peruse through many directories of a Ensoniq SCSI drive (hard drive and
CD-ROM), and identify any le you desire. You may make multiple selections
from the le box, and use a number of operations to write the les to your
computer.
For more information, see the Ensoniq Explorer menu options, or see Page 8,
the section on Detailed SCSI Drive Navigation, or for further information about
what Ensoniq Disk Tools requires from your computer to work via SCSI.
Page 30 Page 23
This is the Information screen for
Ensoniq volumes.
Page 26

Options How To: Copying File Images to Floppies
Copying File Images to Floppies
Options
Of course, there are many
ways of setting up Ensoniq
Disk Tools to fit your own
personal needs. This is what
the Options dialog is all about.
Default File Extension
and Effect
This the File Extension given
when creating new Instruments, or the defaults in
Common Dialogs when they are accessed. The Effects box contents are different with each File Type, since different effects are available for the EPS and
ASR, and even when they are the same they use different le information.
Methods
Right-Click in File List Box, select Write To Floppy
Drag selected le in File List Box, drop on Ensoniq Devices List Box
If the disk you insert is not formatted, Ensoniq Disk Tools will prompt you to
format the disk. Files may span across multiple disks - the rst disk must be
completely full, and further les may be broken up in any size on any amount
of disks. Multiple selections may be made only from the Ensoniq Explorer. If
the le will not t on the oppy, Ensoniq Disk Tools will prompt you.
Copying Disk Images to Floppies
Methods
Right-Click in Disk List Box, select Write To Floppy
Right-Click in Ensoniq Devices List Box (when Floppy is selected), select
Write To Floppy
Drag selected le from Disk List Box, drop on Ensoniq Devices List Box
Loops
When new Ensoniq wavesamples are created (either from scratch or from
WAV-AIFF les), this determines whether they will be looped, and by how
much. You may indicate a percentage - 100% means the entire wavesample
will be looped; while 1% usually means a short loop.
Primary Drives
You have the option of selecting the a: drive as your Floppy Drive, or the b:
drive. You can select both drives, for writing Disk Images.
Initial Wavesample Key Range
When new Ensoniq wavesamples are created (either from scratch or from
WAV/AIFF les), this determines what KeyRange they will occupy.
Operating System Locations
This species what File Image Ensoniq Disk Tools will read out of when writing a OS to a oppy or SCSI device. The three most current Ensoniq operating systems come with the program - EPS249OS.EFE, EPS13OS.EFE, and
ASR353OS.EFA.
New Wavesample Waveshape
This determines the waveshape of new wavesamples that are created from
scratch. You have the option of Triangle, Square, Sine, Sawtooth Forward,
Sawtooth Backward, and Pulse.
You may unformatted or formatted oppy disks - the Ensoniq formatting is
dovetailed while the Disk Image is being written. You may select which oppy
drive (a or b) that is written to in the Options dialog. You may select the a:
drive, the b: drive, or both if you wish. You may make multiple sections in
the Disk List Box (drag-and-drop is not available then)and the program will
consecutively write them to the oppy drive, or you may use the Batch Write
feature to organize specic groups of Disk Images to write. .EDE, All Disk Image types are supported.
Formatting Floppies and SCSI Drives
Methods
Right-Click in Ensoniq Devices List Box,, select Format x
Right-Click in Ensoniq Explorer, select Format x
Displays the Format dialog.
Disk Label
Enter in the Disk Label of the disk
you want to format, maximum
7 characters. Does not apply to
Original EPS disks.
Quick Format
Will simply erase the root directory and FAT table of already-Ensoniq-formatted disks. Hard
Drives are always Quick-formatted; there is no low-level formatting, as it is usually not
necessary.
Page 24 Page 29
Page 27

How To: Copying Floppies to Computer (Disk Images) Options
Copying Floppies to Computer (Disk Images)
Methods
Right-Click in Disk List Box , select Write To Disk Image
Right-Click in Ensoniq Device List Box (when Floppy is selected), select
Write To Disk Image
Drag mouse from Ensoniq Device List Box (when Floppy is selected), drop
on File List Box
Error Protection
This is for debugging purposes only - we suggest that you leave this on; otherwise, the program will not work as designed.
Loop While Play
When playing a sound with the space bar, this species if the sound will keep
on looping innitely, or stop when it comes to an end.
Ensoniq Disk Tools will automatically select the proper extension for you
in the Common Dialog that comes up. .GKH les cannot be created in Disk
Tools; however, they can be read.
Copying Ensoniq Files from Floppy to Computer
(File Images)
Methods
Double-Cluck on a le in the Ensoniq Devices List Box
Double-Cluck on a le in the Ensoniq Explorer
Drag selected le in Ensoniq Devices List Box, drop on File List Box
Ensoniq Disk Tools will automatically select the proper extension for you in
the Common Dialog or Save As… dialog that comes up. .INS les cannot be
created (they can be read from); however, you can always rename the exten-
sion from efe/efa to .ins yourself.
Copying Files between Ensoniq Devices
Methods
Right-Click in Ensoniq Devices List Box, select Save As…
Double-Cluck on selected le in Ensoniq Devices List Box
Only Ensoniq Disk Tools allows you to write an Ensoniq File from an Enso-
niq Device to another Ensoniq Device. The Save As… Common Dialog is an
imitation of the stand Common Dialog, but adds several options in the Drives
box (Flop a for Ensoniq oppy, and SCSI x for Ensoniq SCSI drives), and is
more specic when an Ensoniq drive is selected to save to (since a File Number has to be specied). You can change the Instrument Name by changing it
in the File Name box. When an Ensoniq Device is selected as the one to save
to, you must specify a File Number to write to (by selecting it in the File list), or
the OK button will not be available.
Sample Editor
Location: This identies the location of the .exe le of your external Sample
Editor (CoolEdit, SoundForge, etc.). When this is not blank, the Edit…
context menu will come up when you right-cluck the Objects List Box when
a File Image is chosen.
Sample Rate: Since most sound cards play back at limited rates (usually
only 44.1K), this options allows the Edit-Sample Editor function to change
the Sample Rate for you before the temporary copy is sent to the external
Sample Editor. This way the Sample Editor will audibly play it without giving
your a “invalid sample rate” message.
.WAV/AIFF: This is the format in which the external Sample Editor will use to
edit. If your Editor supports AIFF, use this option - it imports much faster.
Test Files
Brings up a Common Dialog, allowing you to select any Instrument File Image
or Disk Image to test for validity. If there are errors, a dialog box shows up to
tell you what they are.
View Blocks
This allows you to view the individual contents on a Ensoniq oppy disk or
SCSI Drive. For more information see Page 18
Adjust efe/a
If this box is checked, during a Refresh Files command, Disk Tools will check if
the actual File Type is and EPS or and ASR type le. If the extension is wrong
(efe should be EPS, and efa should be ASR), the extension is changed and
the records updated.
Main Screen List Mode
The Disk Tools Main Screen can view either a Drive’s worth of information,
or only a Directories worth. Sometimes a Drive can have thousands of .WAV
les, or File Images, for example. Selecting Directory List Mode allows you
to simply look at a Directories’ worth of les at a time. You will notice that the
Drive Buttons disappear for the appearance of Directory Labels.
Page 28
Page 25
Page 28

Options How To Table of Contents
Wave Create
This gives you the ability to create your own waves. In the furture, this area
will house a Transwave maker, more complex Csound-type of sound creation,
among other things.
Command Line Options
Ensoniq Disk Tools supports opening up les directly from the Win95 Explorer.
Here’s how to change your set up to accomplish this:
1) Within Explorer, double-click on any one of these
les: *.EDE; *.EDA; *.EFE; *.EFA; *.GKH; *.INS.
2) You will get a dialog like the one on the right:
3) Type a description of the le in the top box (e.g.
Ensoniq File image, Ensoniq ASR Disk Image,
etc.)
4) Click the Other… button and select tstools.exe
for the program to open the le.
5) Repeat this step with the other extensions.
Now, each time you double click on any of those extension, Ensoniq Disk
Tools will go immediately to that le upon starting up.
Other Command Line options
/D: {ab[ab][ba]}
The parameter a species that the Primary Floppy Drive to be used is the a:
drive, and that Ensoniq Disk Tools will not write to both drives. The parameter b
species that the Primary Floppy Drive to be used is the b: drive, and that Ensoniq Disk Tools will not write to both drives. The parameter ab species that the
Primary Floppy Drive to be used is the a: drive, and that Ensoniq Disk Tools will
write to both drives. The parameter ba species that the Primary Floppy Drive to
be used is the b: drive, and that Ensoniq Disk Tools will not write to both drives.
How To:
Ensoniq Disk Tools for Windows has many functions - use this guide to learn
about main uses of the program.
Floppys
Copying Floppies to Computer (Disk Images) Page 28
Copying Files to Computer (File Images) Page 28
Copying File Images to Floppies Page 29
Copying Disk Images to Floppies Page 29
Copying Files of Floppy to Ensoniq SCSI Devices Page 28
Formatting Floppies Page 29
Viewing Floppy Disk Info Page 30
Viewing Instrument Info Page 30
SCSI Drives
Navigating through SCSI Drives Page 30
Copying SCSI Drive Files to Computer Page 31
Copying File Images to SCSI Drives Page 31
Copying Ensoniq Files to other Ensoniq SCSI Drives or Floppies Page 28
Backing up and Restoring SCSI Drives Page 32
Reading/Writing Raw Images to/from SCSI Drives Page 31
Writing Directories Page 33
Conversions
Converting .WAV or AIFF les to Ensoniq Files Page 34
Converting Ensoniq Wavesamples to .WAV or AIFF les Page 35
Extracting File Images from Disk Images Page 35
Creating Disk Images Page 35
Converting Ensoniq File Types Page 39
Optimizing Song Files Page 36
Converting to/from SMF les Page 39
Other Subjects
Parameter Editing Page 36
Batch Writing of Disk Images to Floppies Page 36
Deleting Files or Directories Page 37
Working with Banks Page 37
Working with Objects (Layers and Wavesamples) Page 37
Normalizing Gain Page 38
Editing .WAV-AIFF or Ensoniq Waves with an external Sample Editor Page 38
Playing .WAV les Page 39
Working with TS-type les Page 40
Testing Files for Integrity Page 41
Splitting Large Files to Floppy, Combining Multi-Part Files from Floppy Page 41
Writing Operating Systems to Ensoniq volumes Page 41
Converting .GKH to Gielber le format Page 42
Writing Ensoniq Volume Listings Page 42
Tutorials
Viewing Ensoniq Disk Directories Page 42
Saving an Ensoniq Disk on your computer Page 42
Writing Disk Images to Floppy Disk Page 42
Writing File Images to Floppy Disk Page 43
Converting .WAV les into Ensoniq format Page 43
Converting Ensoniq les to .WAV format Page 43
Editing Ensoniq wavesamples using an external Sample Editor Page 44
Ensoniq File Building Page 44
Altering Ensoniq Parameters directly to disk Page 45
Making a Ensoniq volume on computer, transferring to SCSI device Page 46
Page 26 Page 27
 Loading...