

Page 1
Read all instructions BEFORE
assembly and USE of product.
KEEP INSTRUCTIONS FOR
FUTURE USE.
Lea todas las instrucciones ANTES
de armar y USAR este producto.
CONSERVE LAS INSTRUCCIONES
PARA USO FUTURO.
IS0137.1ES
TM
Viaro
Stroller
Owner's Manual
Manual del propietario
©2015 Artsana USA, INC. 12/15
Page 2
WARNINGWARNING
Failure to follow all warnings and instructions may result in
serious injury or death. For your child's safety, read the labels
and owner's manual before using the product.
• PLEASE SAVE OWNER'S MANUAL
FOR FUTURE USE.
• ADULT ASSEMBLY REQUIRED.
• NEVER LEAVE CHILD
UNATTENDED. Always keep child
in view while in the stroller.
• AVOID SERIOUS INJURY from
falling or sliding out. Always use
seat belt. After fastening buckles,
adjust belts to get a snug fit around
your child.
• AVOID FINGER ENTRAPMENT: Use
care when folding and unfolding
the stroller. Be certain the stroller
is fully opened and latched before
allowing your child near the
stroller.
• USE OF THE STROLLER with a
child weighing more than 50 lbs
(22.7 kg), will cause excessive wear
and stress on the stroller. Use the
stroller with only one child at a
time.
• STROLLER TO BE USED only
at walking speed. Product not
intended for use while jogging,
skating, etc.
• TO PREVENT A HAZARDOUS,
UNSTABLE CONDITION, never
place purses, shopping bags,
parcels or accessory items on the
canopy or handle. Do not place
more than 10 lbs (4.5 kg) in the
storage basket.
• DO NOT use storage basket as a
child carrier.
• Avoid burns. Never put hot liquids
in cup holder. Do not place more
than 2 lbs (0.9 kg) on the parent
tray/cup holder.
• Avoid burns. Never put hot liquids
in cup holder. Max weight in
cupholder 1lb (0.5 kg).
• NEVER ALLOW YOUR STROLLER to
be used as a toy.
• DISCONTINUE USING YOUR
STROLLER should it become
damaged or broken.
• AVOID STRANGULATION. DO
NOT place items with a string
around your child's neck, suspend
strings from this product, or attach
strings to toys.
• NEVER USE STROLLER ON STAIRS
or escalators. You may suddenly
lose control of the product and
your child may fall out. Also, use
extra care when going up or down
a step or curb.
• Do not attempt to attach any
infant car seat to the stroller
other than the Chicco KeyFit.
Injury or death may result when
attempting to use this stroller in
conjunction with infant car seats
from other manufacturers.
• Before use, remove and dispose
of all plastic bags and packaging
materials and keep them out of
2 3
reach of children.
Failure to follow all warnings and instructions may result in
serious injury or death. For your child's safety, read the labels
and owner's manual before using the product.
• Before assembly, check that the
product and all of its components
have not been damaged during
transportation.
• Do not use accessories, spare
parts, or any component not
supplied or approved by Chicco
as they may make the stroller
unsafe.
Using Chicco Infant Carrier with
stroller:
• Child's Tray must be properly
attached to use the Chicco
KeyFit®or KeyFit® 30 infant car
seat.
• ONLY USE the Chicco KeyFit®or
KeyFit® 30 infant car seat with this
stroller.
• Only use this product to transport
infants that are within the size and
weight limitations of the infant car
seat.
• FALL HAZARD: Always check that
infant car seat is securely attached
to stroller frame by pulling up on
the infant car seat.
• ALWAYS SECURE your child with
the carrier harness. Always make
sure child is properly harnessed in
the car seat.
• Refer to your infant car seat
owner's manual for additional
warnings and use instructions
before using this product.
Page 3
ADVERTENCIAADVERTENCIA
El incumplimiento de todas las advertencias e instrucciones
puede provocar lesiones graves o la muerte. Por la seguridad
de su hijo, lea las etiquetas y el manual del propietario antes
de utilizar el producto.
• CONSERVE EL MANUAL DE
PROPIETARIO PARA USO FUTURO.
• SE REQUIERE EL ARMADO DE UN
ADULTO.
• NUNCA DEJE AL NIÑO
DESATENDIDO. Cuando el niño
esté en el cochecito, vigílelo en
todo momento.
• EVITE LAS LESIONES GRAVES que
podrían producirse a causa de la
caída o deslizamiento del producto.
Recuerde siempre utilizar el
cinturón de seguridad. Después de
sujetar las hebillas, ajuste bien los
cinturones alrededor del niño.
• EVITE APRETARSE LOS DEDOS:
Tenga cuidado al plegar y desplegar
el cochecito. Asegúrese de que la
silla de paseo esté completamente
abierta y segura antes de permitir
que su hijo se acerque a ella.
• SI USA EL COCHECITO PARA un
niño que pese más de 50 libras
(22.7 kg), causará desgaste y
tensión excesiva en el cochecito.
Empléelo solamente con un niño a
la vez.
• EL COCHECITO DEBE USARSE sólo
a velocidad de caminata. No debe
usar este producto mientras está
corriendo, patinando, etc.
• PARA EVITAR UNA INESTABILIDAD
PELIGROSA, nunca coloque
carteras, bolsas de compras,
paquetes o accesorios en la manija
o en la capota. No cargue más
de 10 libras (4.5 kg) en el cestillo
portaobjeto.
• NO utilice el cestillo portaobjeto
para transportar al niño.
• EVITAR QUEMADURAS, nunca
coloque líquidos calientes sobre
la bandeja soportes de vasos. No
coloque más de 2 libras (0.9 kg)
sobre la bandeja para padres/
soporte para vasos.
• Evitar quemaduras, nunca coloque
líquidos calientes sobre la bandeja
soportes de vasos. Peso máximos
de dispositivo de soporte para tazas
1 libra (0.5 kg).
• NUNCA PERMITA QUE EL
COCHECITO se utilice como
juguete.
• SUSPENDA EL USO DEL
COCHECITO si se daña o se rompe.
• EVITE LA ESTRANGULACIÓN. NO
coloque elementos con cuerdas
alrededor del cuello del niño, no
suspenda cuerdas de este producto
ni coloque cordones en los
juguetes.
El incumplimiento de todas las advertencias e instrucciones
puede provocar lesiones graves o la muerte. Por la seguridad
de su hijo, lea las etiquetas y el manual del propietario antes
de utilizar el producto.
• NUNCA UTILICE EL COCHECITO
EN ESCALERAS, ya sean comunes
o mecánicas. Puede perder
repentinamente el control de
la silla de paseo y su hijo puede
caerse. Asimismo, tenga extremo
cuidado cuando suba o baje un
escalón o cordón de vereda.
• No intente sujetar ningún
asiento de seguridad infantil al
cochecito que no sea el Chicco
KeyFit. Utilizar este cochecito con
asientos de seguridad infantil de
otros fabricantes puede provocar
lesiones o la muerte.
• Antes del uso, retire y deseche
todas las bolsas de plástico y
los materiales de embalaje y
manténgalos fuera del alcance de
los niños.
• Antes del armado, verifique que
no se hayan dañado el producto
ni sus componentes durante el
transporte.
• No utilice accesorios, piezas de
repuesto ni componentes que
no hayan sido suministrados
o aprobados por Chicco, ya
que podrían comprometer la
estabilidad del cochecito.
Uso del portabebés Chicco en el
cochecito:
• La bandeja para el niño se debe
sujetar correctamente para usar el
asiento de seguridad infantil Chicco
KeyFit® o KeyFit® 30.
• SÓLO UTILICE este cochecito
con el asiento para automóvil
para niños Keyfit® o Keyfit® 30
de Chicco. No utilice ningún otro
asiento para automóvil para niños
con este cochecito.
• Utilice este producto sólo para
transportar bebés que no superen
el tamaño o el peso permitido por
el producto.
• RIESGO DE CAÍDAS: Controle
siempre que el asiento para
automóvil para niños esté bien
sujetado a la estructura de la silla
de paseo, tirando del asiento hacia
arriba.
• ASEGURE SIEMPRE al niño con el
arnés del portabebés cuando utilice
este accesorio en el cochecito.
Si el niño ya se encuentra en el
portabebés, verifique que esté
asegurado con el arnés.
• Lea el manual incluido con el
portabebés Chicco antes de usarlo
en su cochecito.
4 5
Page 4
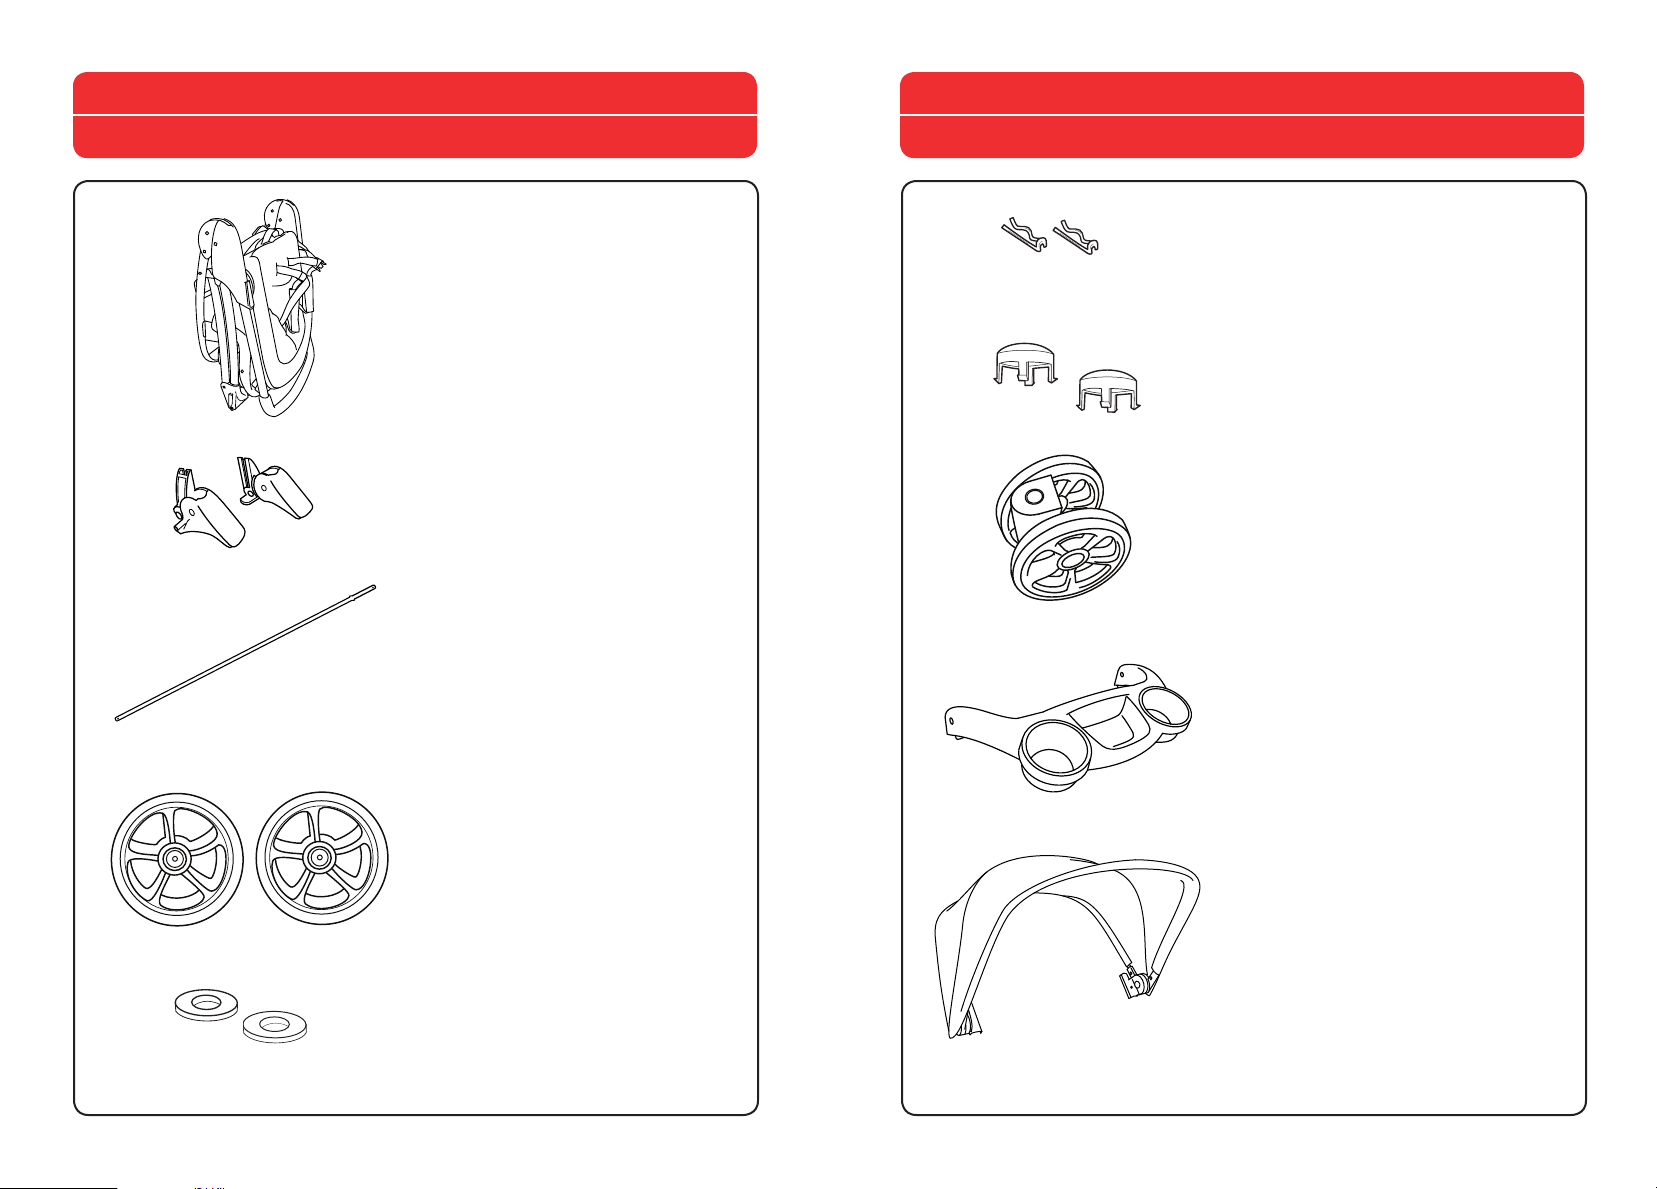
Components
Components
A.
B.
C.
Componentes
A. - Stroller Frame
A. - Estructura de la silla de paseo
B. - Left and Right Rear Brakes
B. - Frenos traseros izquierdo
y derecho
C. - Rear Axle
C. - Eje trasero
F.
G.
H.
Componentes
F. - Pins
F. - Clavijas
G. - Hubcaps
G. - Tapacubos
H. - Front Swivel Wheels
H. - Ruedas delantera
I.
I. - Child's Tray
I. - Bandeja para el niño
D.
D. - Rear Wheels
D. - Traseras Ruedas
J.
J. - Canopy
J. - Capota
E.
E. - Washers
E. - Arandelas
6 7
Page 5
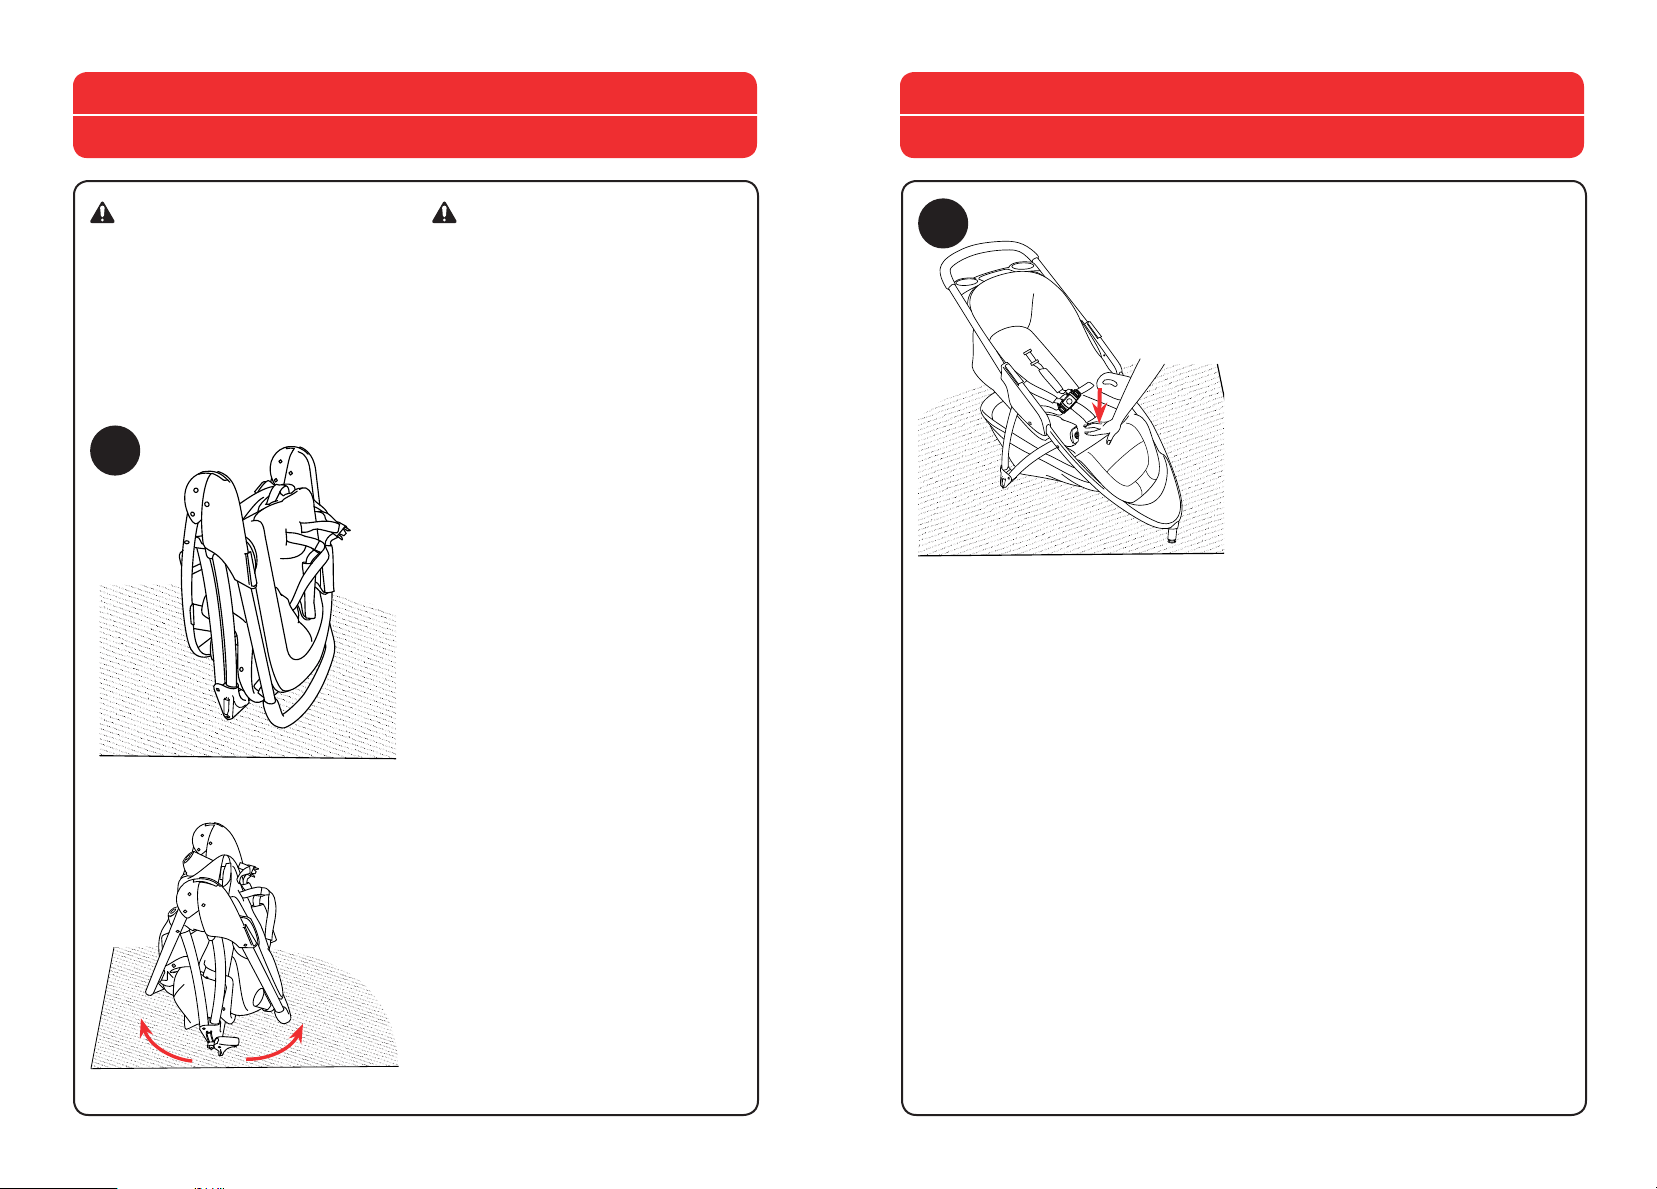
How to Assemble Stroller
How to Assemble Stroller
Cómo armar el cochecito
WARNING
When opening the Stroller, ensure
that your child, or other children,
are at a safe distance. Ensure
that during these operations, the
movable parts of the Stroller do not
come into contact with your child.
1A
ADVERTENCIA
Al abrir la silla de paseo, asegúrese
de que su hijo, u otros niños, se
encuentren a una distancia segura.
Asegúrese de que cuando realice
estas operaciones, las partes móviles
de la silla de paseo, no entren en
contacto con su hijo.
If you have hardwood floors or
linoleum you may want to perform
this step on carpeting or lay down
some protection for your floors.
1A. Stand the Stroller Frame (A) on
end and unfold the frame as shown.
Si tiene pisos de madera o linóleo tal
vez quiera realizar este paso sobre
una alfombra o colocar alguna
protección para sus pisos.
1B
Cómo armar el cochecito
1B. Press down on the seat to make
sure that the frame is locked.
“CLICK!”
“¡CLIC!”
1B. Presione hacia abajo el asiento
para asegurarse de que la estructura
esté bloqueada.
1A. Coloque la estructura del
cochecito (A) en posición vertical
sobre los extremos y despliegue la
estructura, como se muestra.
8 9
Page 6
How to Assemble Stroller
How to Assemble Stroller
2A
Cómo armar el cochecito
2A. Slide the Left and Right Brakes
(B) onto the ramps on either side of
the rear frame.
Make sure that the Tabs are seated
into the opening on the bottom of
the Brakes (2B), as shown.
2A. Deslice los frenos izquierdo y
derecho (B) en las rampas a ambos
lados del armazón trasero.
Asegúrese de que las Lengüetas
se apoyen en el orificio en la parte
inferior de los frenos (2B), como se
muestra.
Tabs
Lengüetas
3A
3B
Cómo armar el cochecito
3A. Insert the Rear Axle (C) into the
opening on the Right Rear Brake and
slide it through. Keep sliding the
Rear Axle until the end comes out
of the Left Rear Brake. Make sure
the Axle is centered between both
brakes.
3A. Inserte el eje trasero (C) en el
orificio en el freno trasero derecho y
deslícelo a través de este. Continúe
deslizando el eje trasero hasta que
el extremo salga por el freno trasero
izquierdo. Asegúrese de que el eje
esté centrado entre ambos frenos.
2B
3B. Attach the Stroller Basket to the
Rear Axle. Thread the Basket fabric
strap between the frame and Rear
Axle. Fold the Basket fabric strap
under and secure the hook and loop
tab to the bottom of the basket.
3B. Fije el cestillo del cochecito al eje
trasero. Pase la correa de tela del
cestillo entre la estructura y el eje
trasero. Pliegue la correa de tela del
cestillo hacia debajo y asegure la
lengüeta de gancho y bucle a la parte
inferior del cestillo.
10 11
Page 7
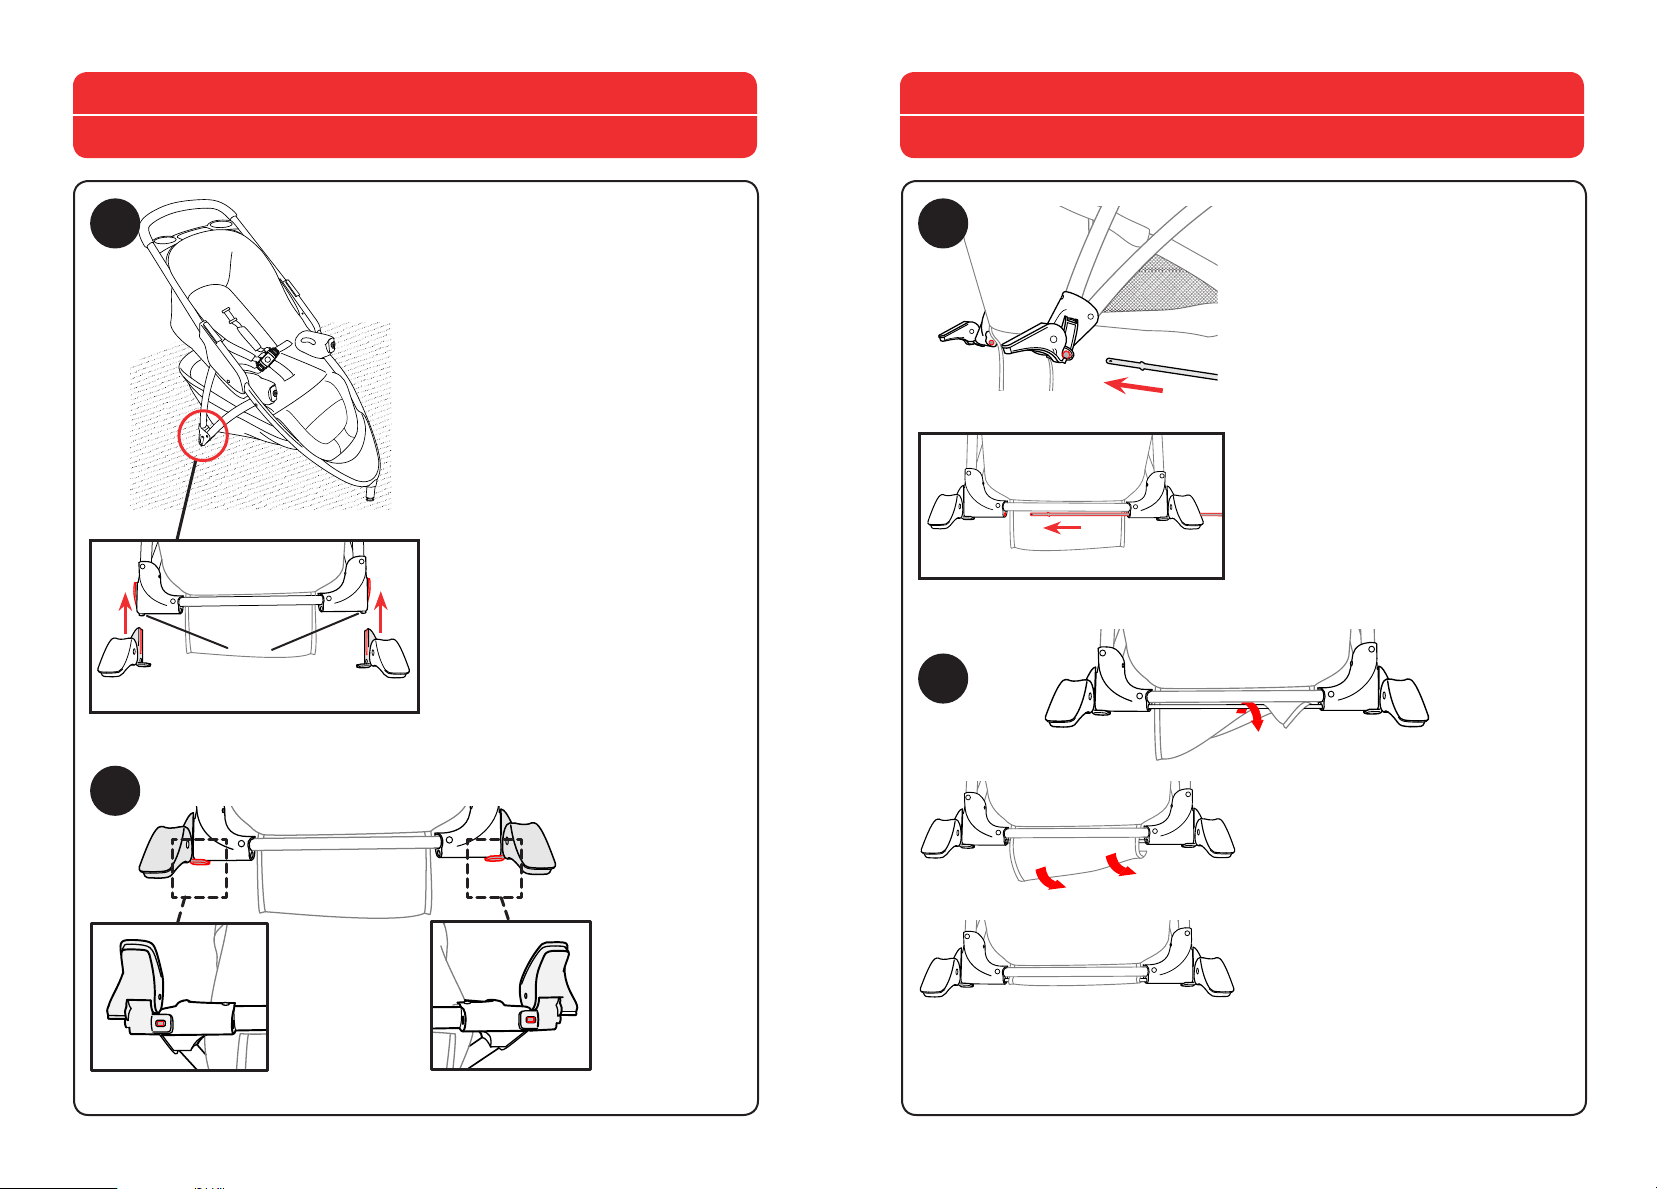
How to Assemble Stroller
How to Assemble Stroller
4A
4B
Cómo armar el cochecito
4A. On one side of the Rear Axle,
slide a Rear Wheel (D), and turn the
Wheel until the brake tab fits into
one of the grooves on the Wheel.
4A. En un lado del eje trasero, deslice
una rueda trasera (D) y gire la rueda
hasta que la lengüeta del freno
encaje en una de las ranuras de la
rueda.
4B. On the same side slide a Washer
(E) onto the Rear Axle.
4B. En el mismo lado, deslice una
arandela (E) en el eje trasero.
4C
Cómo armar el cochecito
4C. Secure the Wheel to the Rear
Axle using the Pin (F). Push the
straight side of the Pin through the
hole on the Rear Axle. The curve
on the Pin must curve around the
outside of the Rear Axle, as shown.
Make sure Washer is between the Pin
and Wheel.
4C. Fije la rueda al eje trasero con la
clavija (F). Empuje el lado recto de
la clavija dentro del orificio en el eje
trasero. La parte curvada de la clavija
debe quedar sobre la parte externa
del eje trasero, como se muestra.
Asegúrese de que la arandela se
encuentre entre la clavija y la rueda.
12 13
Page 8
How to Assemble Stroller
How to Assemble Stroller
Cómo armar el cochecito
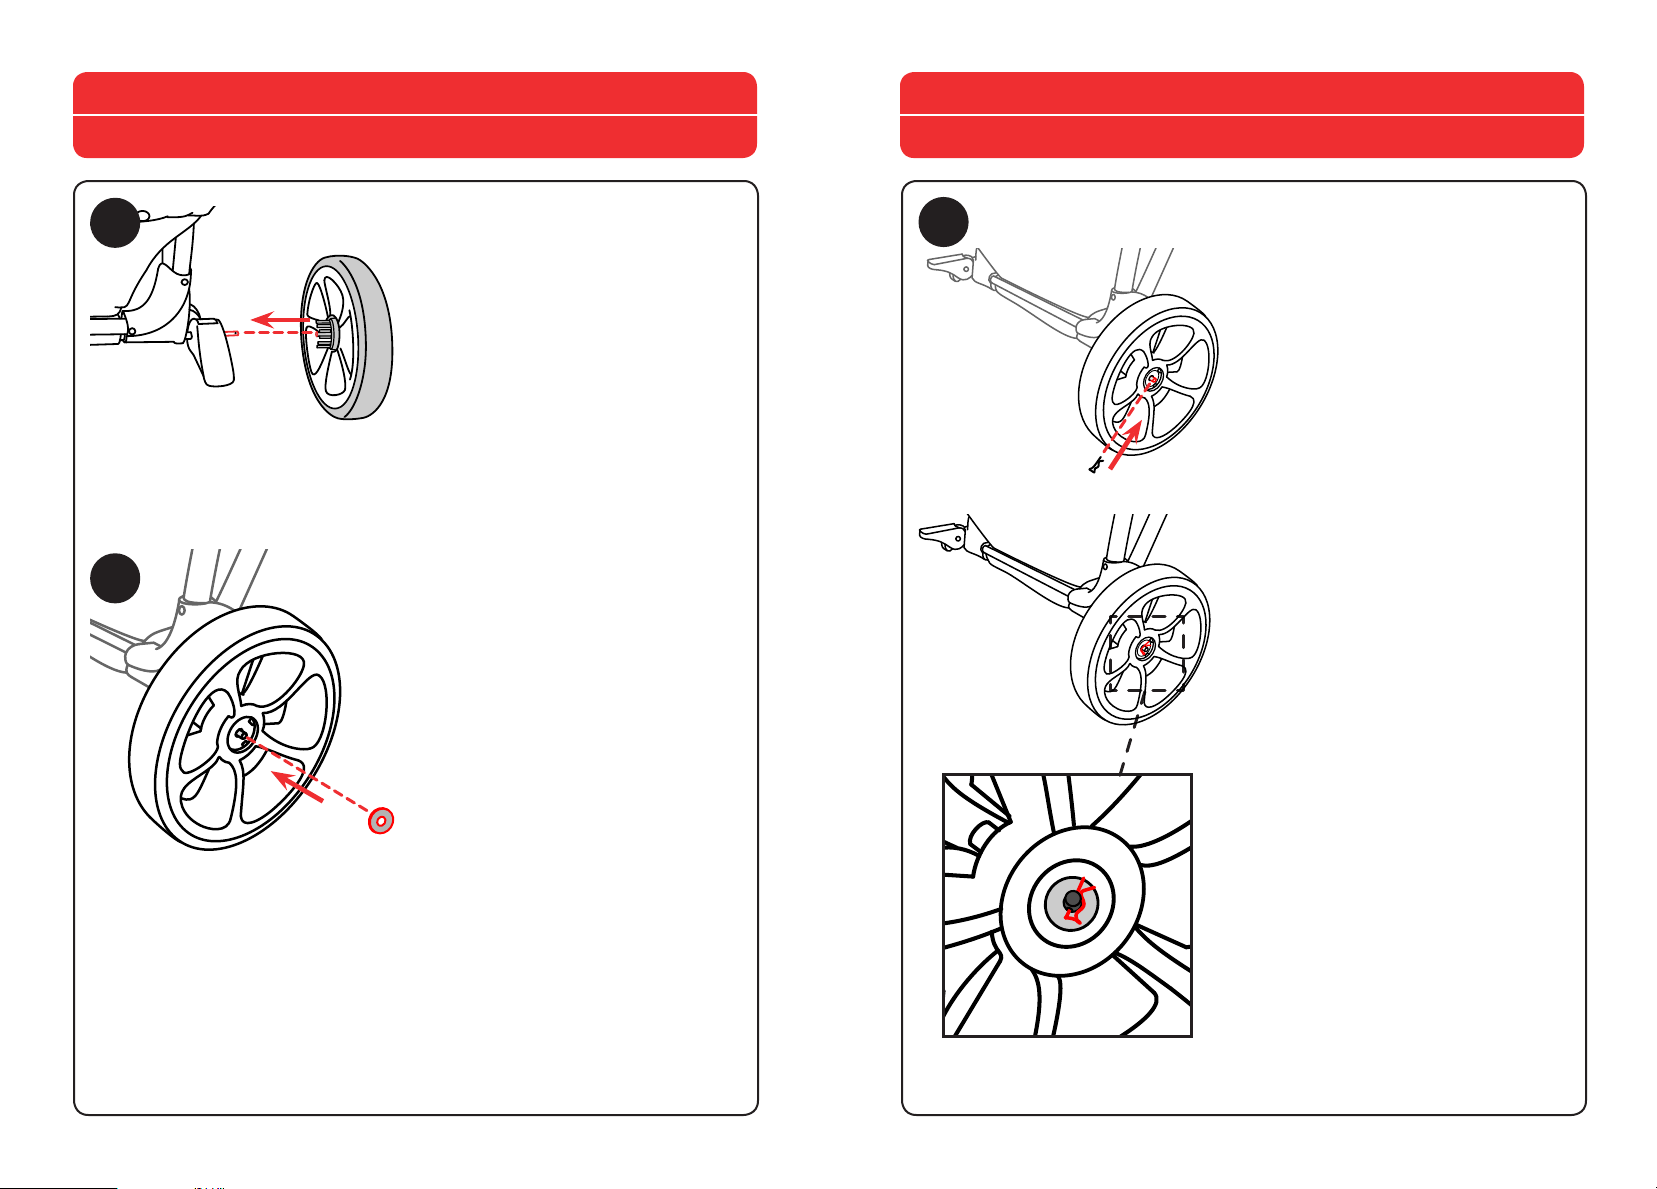
WARNING
Check that the wheels are
fitted correctly.
4D
ADVERTENCIA
Asegúrese de que las ruedas estén
colocadas correctamente.
4D. Line up the tabs on the Hubcaps
(G) with the holes on the Wheel.
Snap the Hubcap onto the Wheel to
cover the Washer and Pin. Repeat
step 4 for other side.
4D. Alinee las lengüetas de los
tapones (G) con los orificios de la
rueda. Trabe el tapón en la rueda
para cubrir la arandela y la clavija.
Repita paso 4 del otro lado.
5
“CLICK!”
“¡CLIC!”
Cómo armar el cochecito
5. Attach the Front Wheel (H) to the
Stroller Frame by lining up and
inserting the Front Wheel Post into
the corresponding opening on the
Front Wheel, as shown. Check that
ALL Wheels are securely attached.
Pull out on the Rear Wheels, and pull
down on the Front Wheel. To check
that they are fitted correctly.
5. Fije la rueda delantera (H) al
armazón del cochecito alineándola
e insertando el poste de la rueda
delantera en el orificio
correspondiente en la rueda
delantera, como se muestra. The
Verifique que TODAS las ruedas
queden sujetas de forma segura.
Tire de las ruedas traseras hacia
afuera y de la rueda delantera hacia
abajo. Asegúrese de que las ruedas
estén colocadas correctamente.
14 15
Page 9
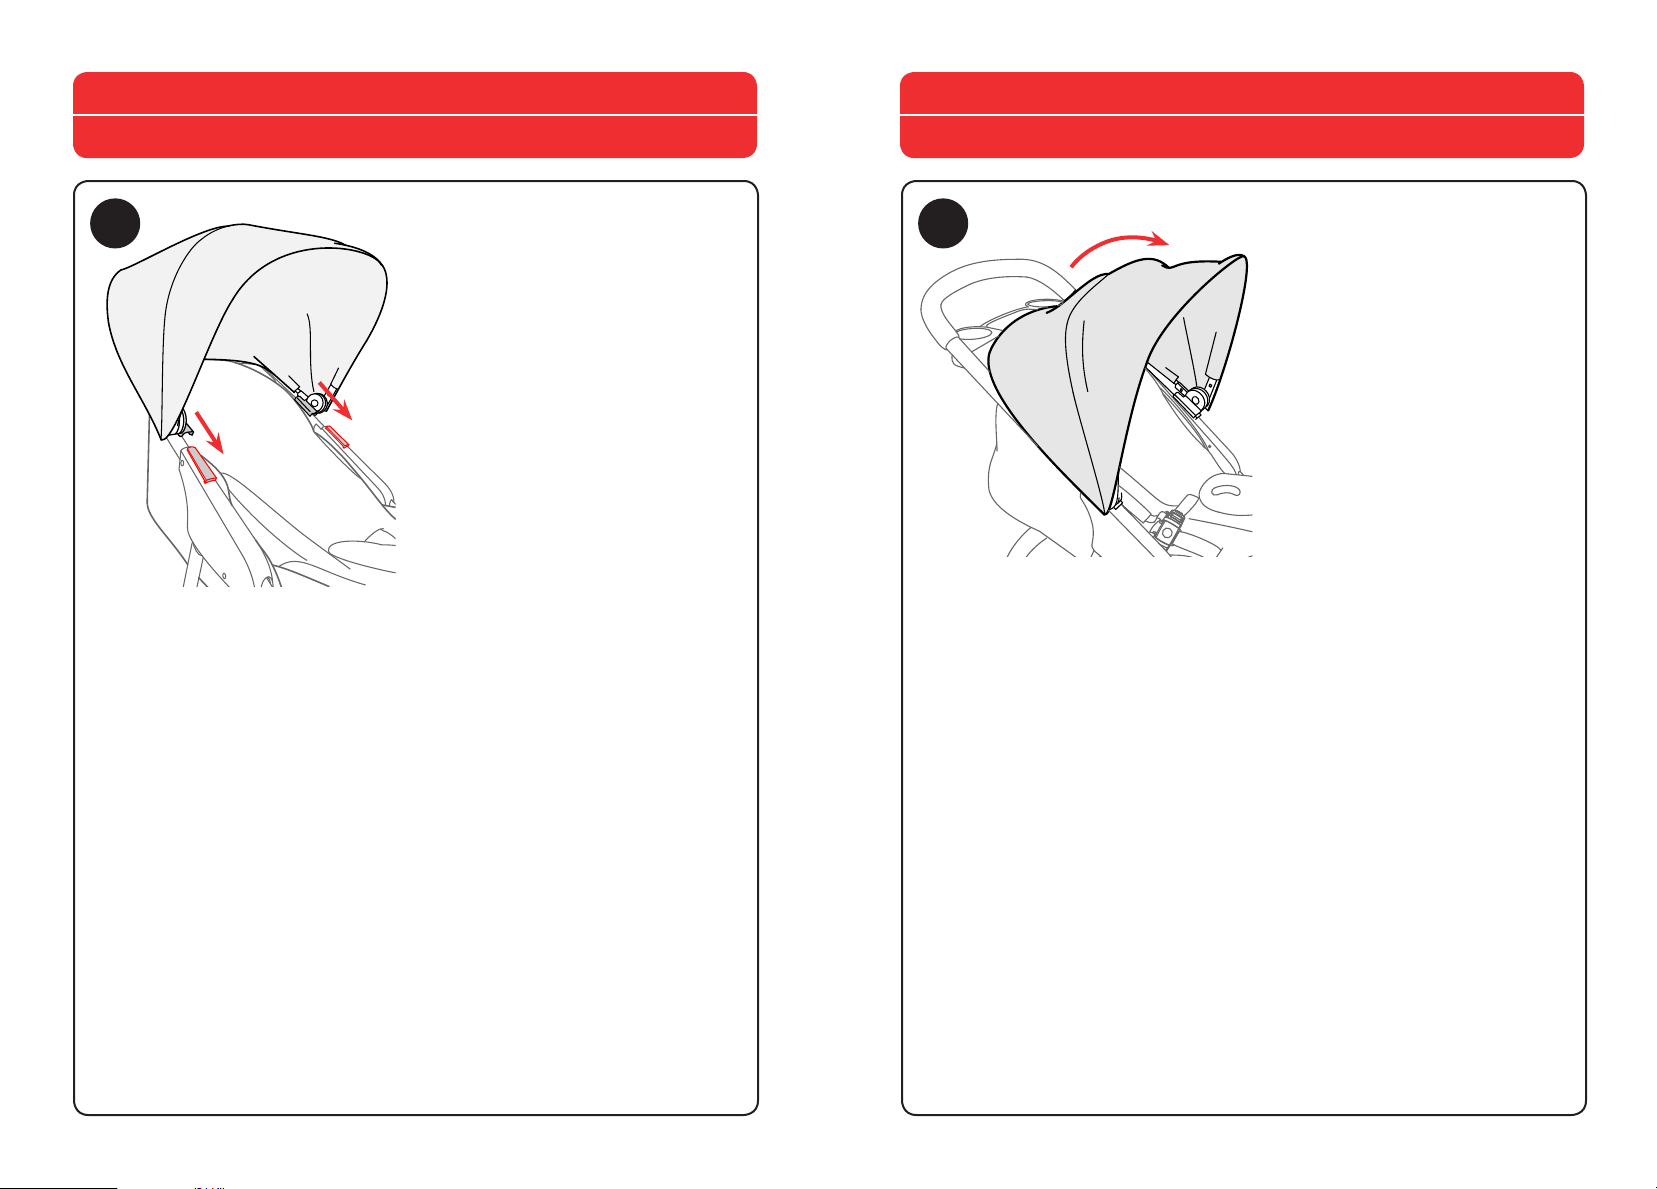
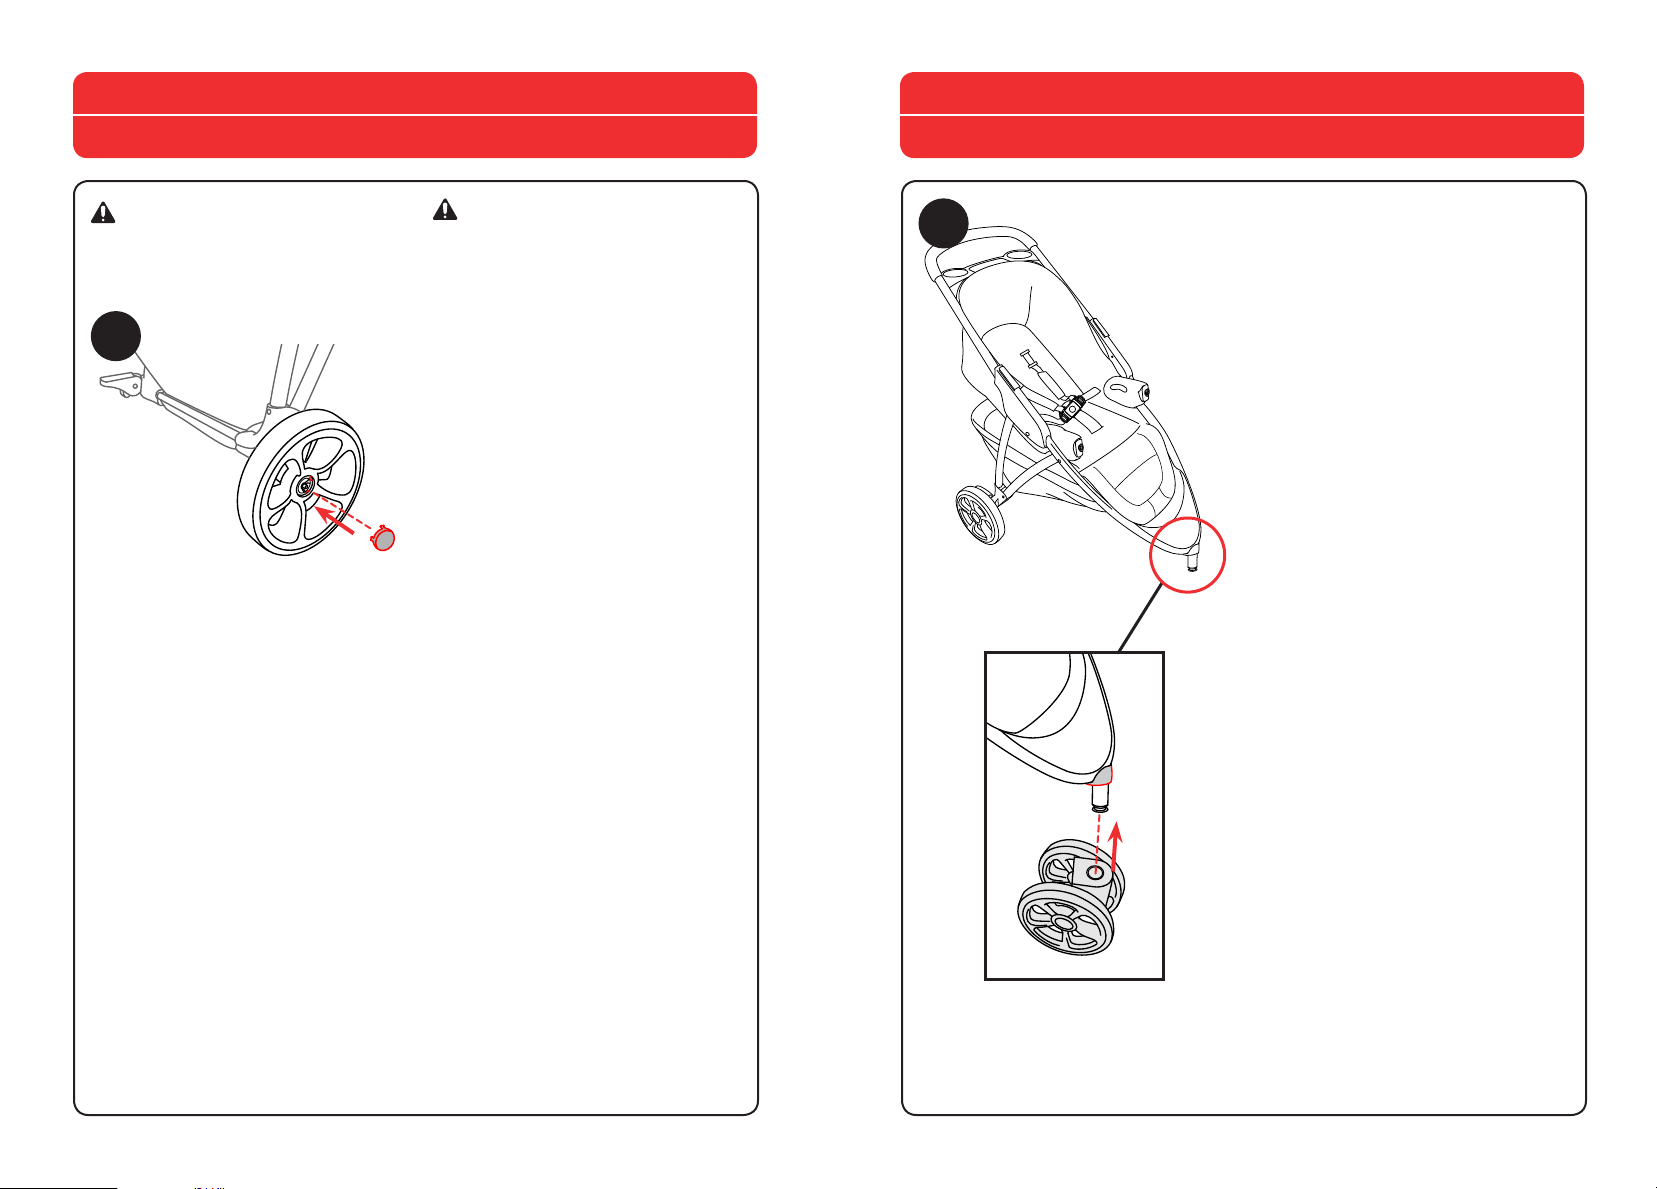
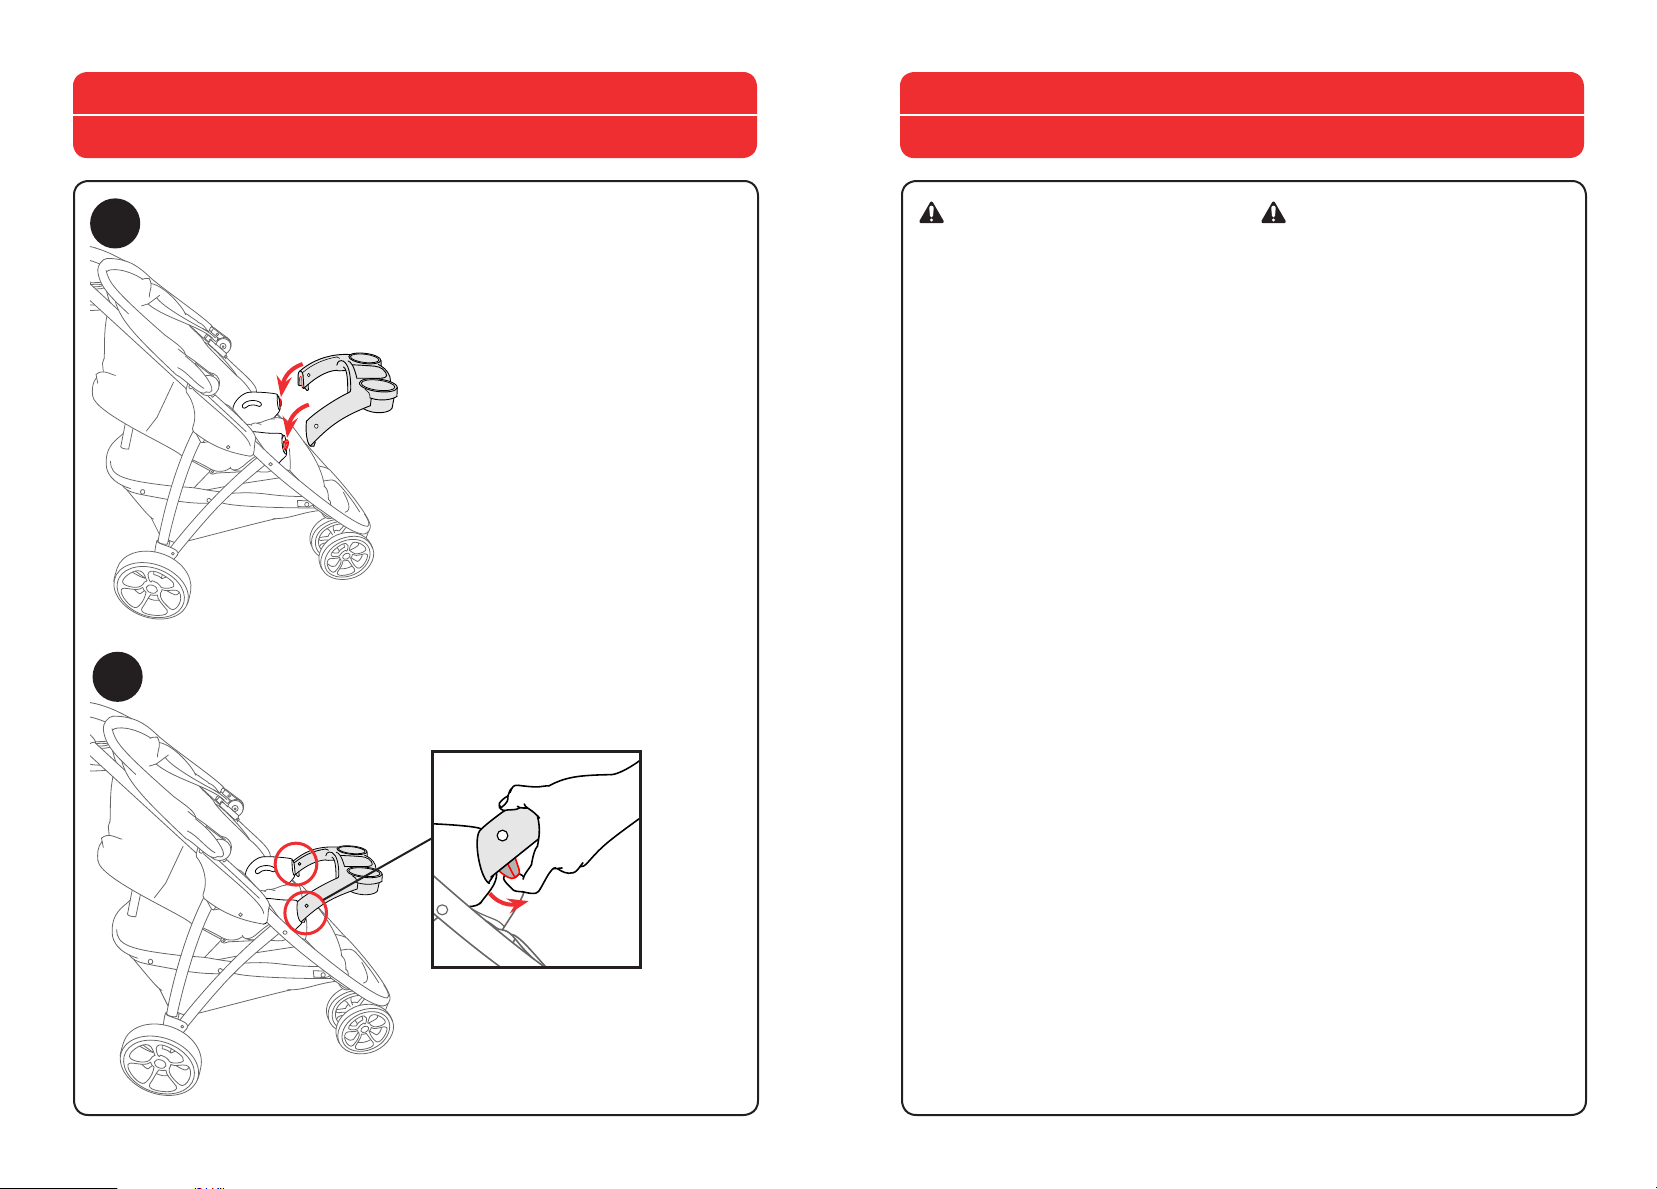
How to Use the Canopy
How to Use the Canopy
6
Cómo utilizar la capota
6. Attach the Canopy (J), slide the
Canopy connectors onto the Stroller
Frame as shown.
6. Sujete la capota (J), deslice los
conectores de la capota en el
armazón del cochecito, como se
muestra.
7
Cómo utilizar la capota
7. Pull the front edge of the Canopy
forward to open the Canopy.
Reverse this step to close the
Canopy.
7. Tire del borde delantero de la
capota hacia delante para abrirla.
Invierta este paso para cerrar la
capota.
16 17
Page 10
How to Recline the Seat
How to Use the Brakes
8
Cómo utilizar el cochecito
8. To Recline the Backrest, squeeze
together both levers on the Recline
Clip. Adjust the Backrest by sliding
the Recline Clip up or down into the
desired position, and release.
8. Para reclinar el respaldo, presione
ambas palancas a la vez en el broche
de reclinado. Deslice el broche de
reclinado hacia arriba o hacia abajo
hasta la posición deseada, y suelte,
para ajustar el respaldo.
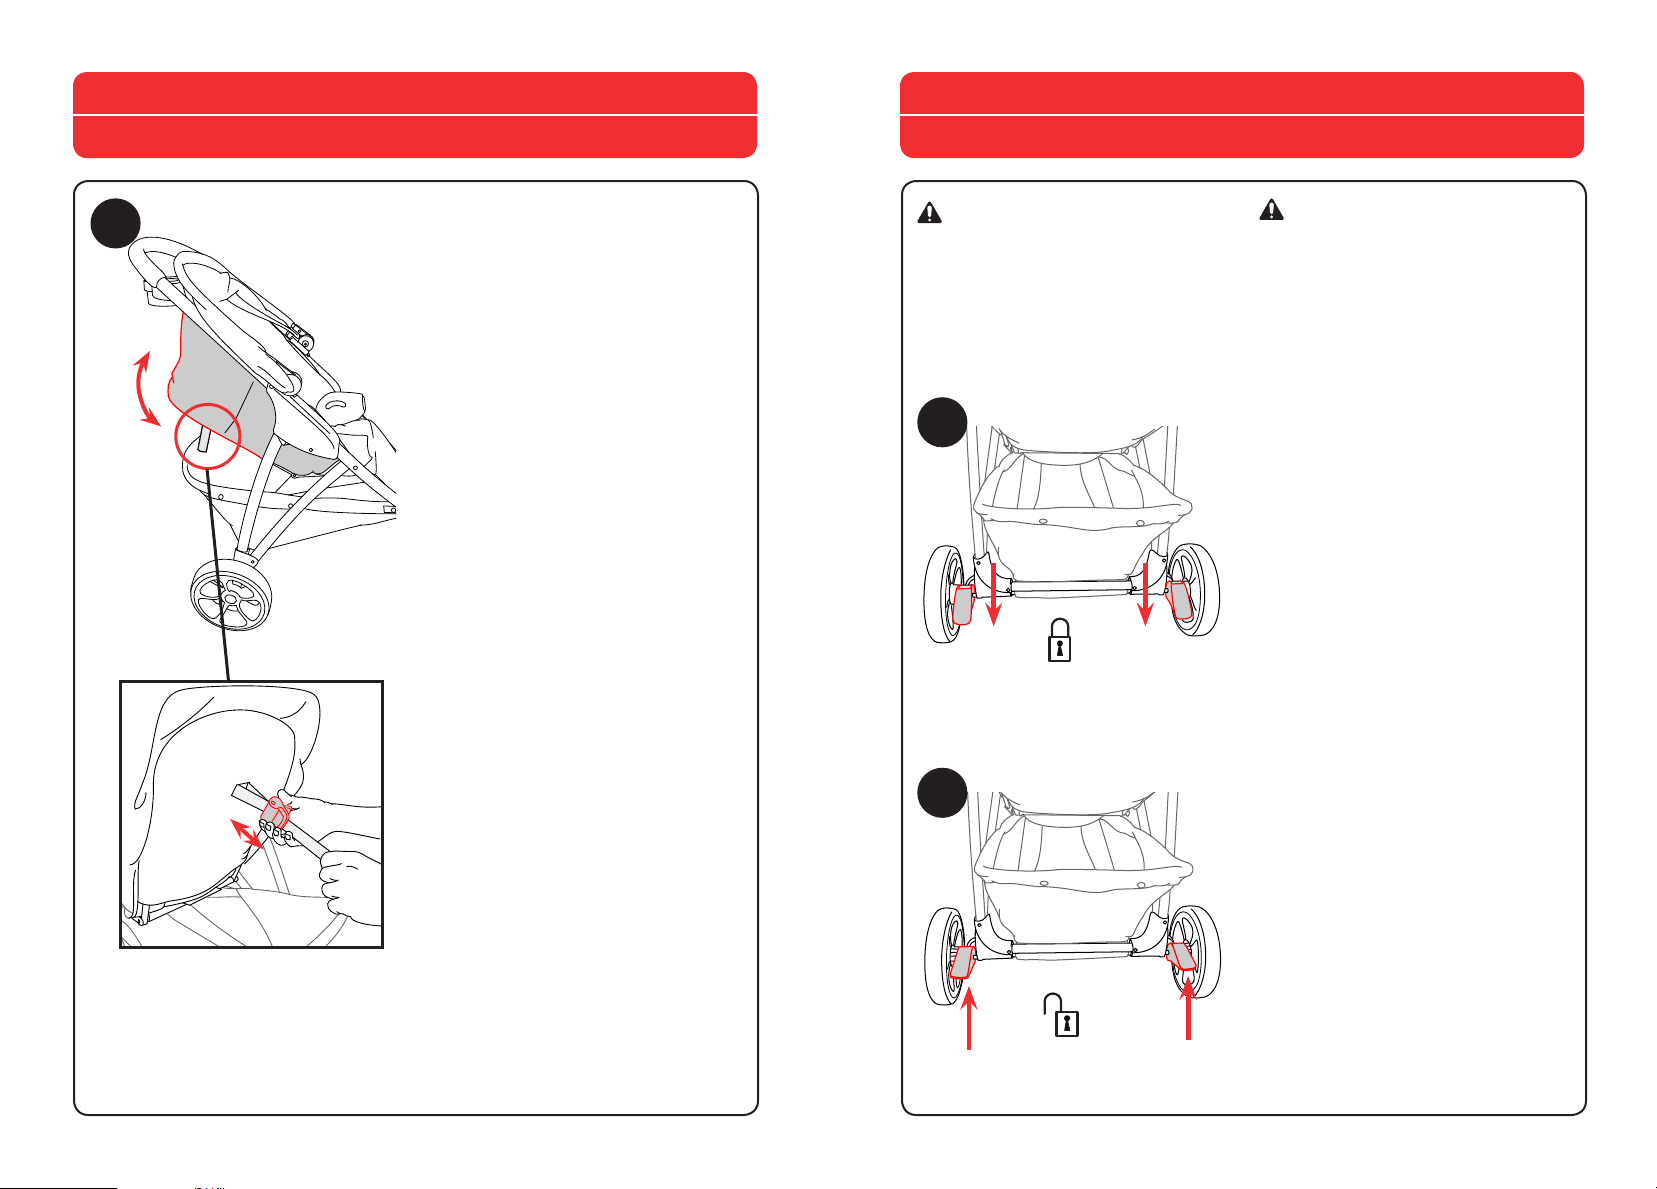
Cómo utilizar los frenos
WARNING
Always apply both brakes whenever
the stroller is stationary. Never
leave the stroller on a sloped surface,
with a child onboard, even with the
brakes applied.
9A
ADVERTENCIA
Siempre utilice ambos frenos
cuando el cochecito esté detenido.
No deje nunca la silla de paseo en
una superficie inclinada con el bebé
dentro, ni siquiera con los frenos
accionados.
9A. Push down on the Brake Lock
Levers located on each side of the
Rear Wheel assembly, to lock the
Rear Wheels.
9A. Empuje hacia abajo las palancas
de bloqueo de los frenos que se
encuentran a cada lado del conjunto
de las ruedas traseras para bloquear
las ruedas traseras.
9B
9B. Pull up on the Brake Lock Levers
to unlock the Rear Wheels.
9B. Levante las palancas de bloqueo
de los frenos para desbloquear las
ruedas traseras.
18 19
Page 11
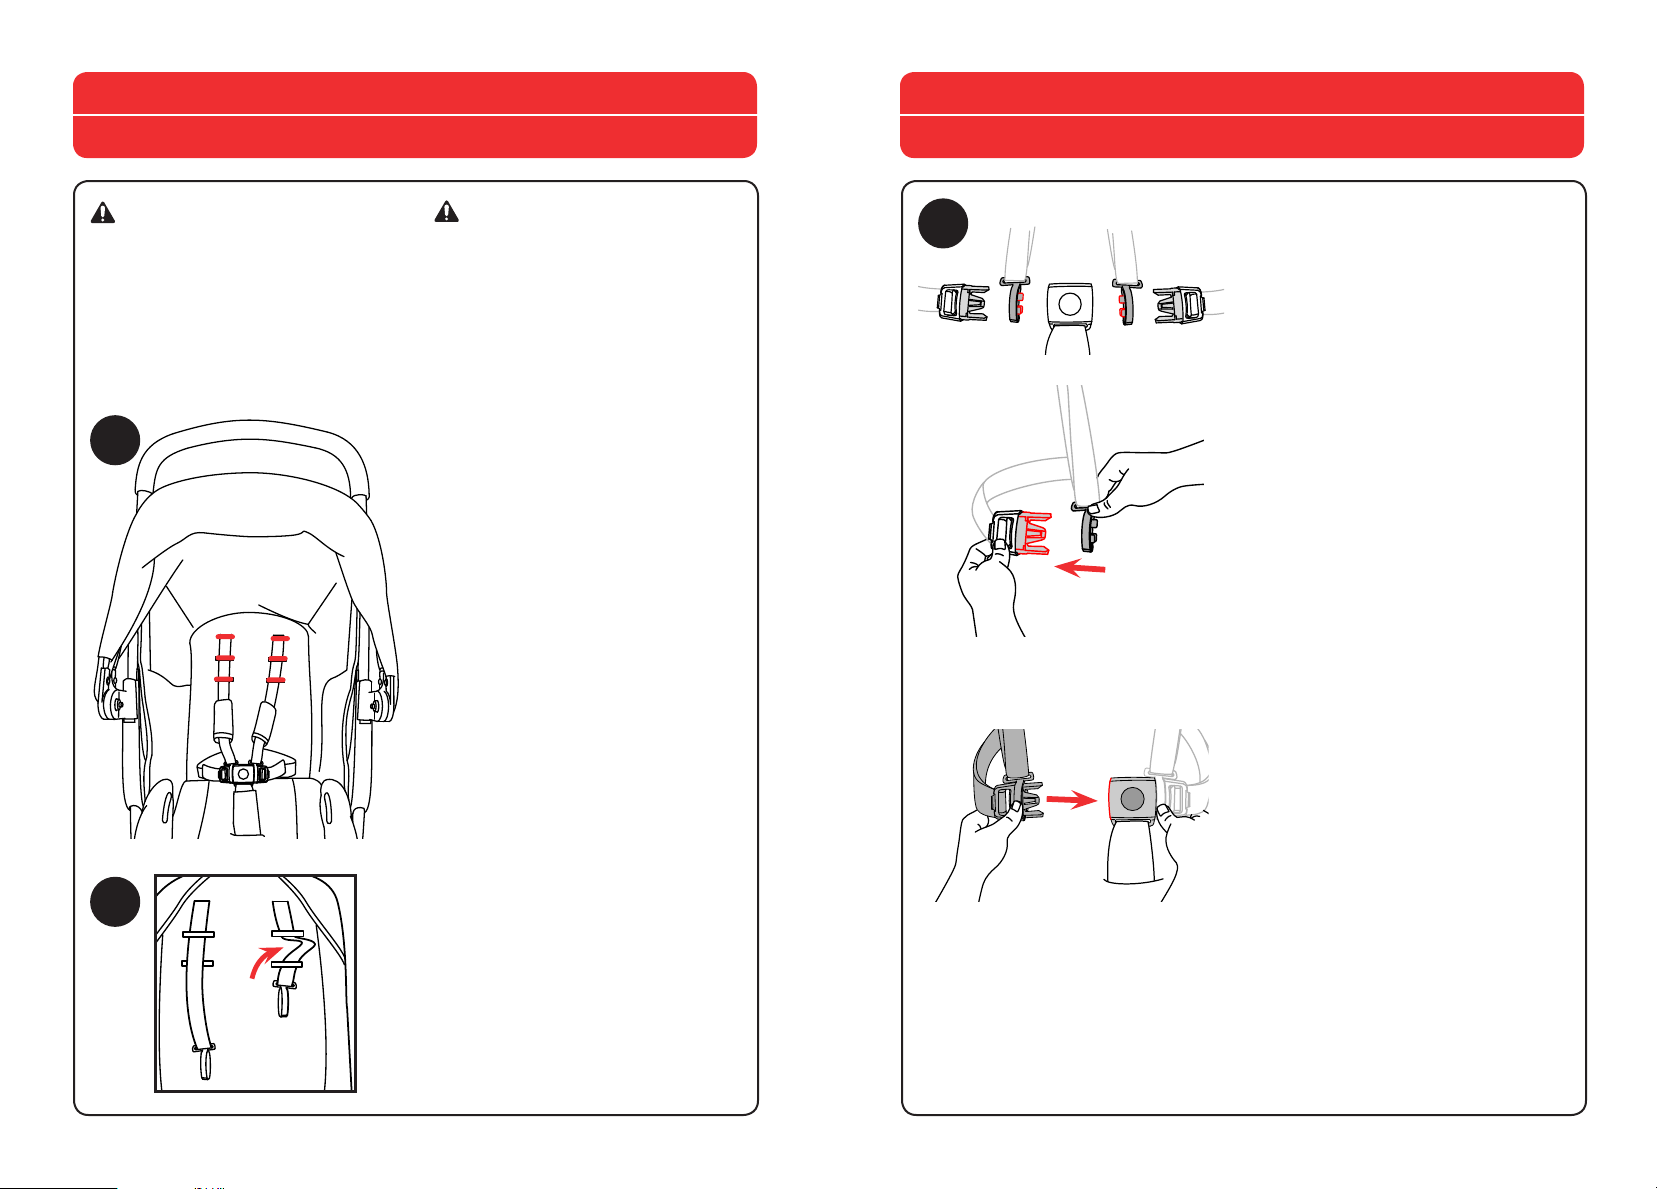
How to Use 5-point Safety Harness
How to Use 5-point Safety Harness
Cómo utilizar el cinturón de seguridad
WARNING
This stroller features three harness
positions. Always use a harness position
located ABOVE the child's shoulder line.
If multiple harness positions are above
the child's shoulder line, use the one
closest to it.
10A
3
2
1
10B
ADVERTENCIA
Este cochecito tiene tres posiciones de
cinturón. Use siempre el cinturón en la
posición ENCIMA de la línea del hombro
del niño. Si múltiples posiciones del
cinturón están por encima de la línea del
hombro del niño, use la más cercana a
ésta.
It is recommended that a child under
6 months old ride in the KeyFit® or
KeyFit® 30 infant car seat as part of
the travel system.
10A. The Shoulder Straps can be
adjusted to 3 height positions as
shown. To adjust the Shoulder
Harness slide the strap through the
loop. Always use the same loop
position for both straps (10B).
Se recomienda que sólo niños
menores de 6 meses de edad utilicen
el asiento para automóvil para niños
KeyFit® o KeyFit® 30 de como parte
del sistema de viaje.
10A. Los cinturones para hombros se
pueden ajustar en 3 alturas
diferentes como se indica. Para
ajustar el cinturón para hombros,
pase la correa por el bucle. Siempre
use la misma posición del bucle para
ambas correas (10B).
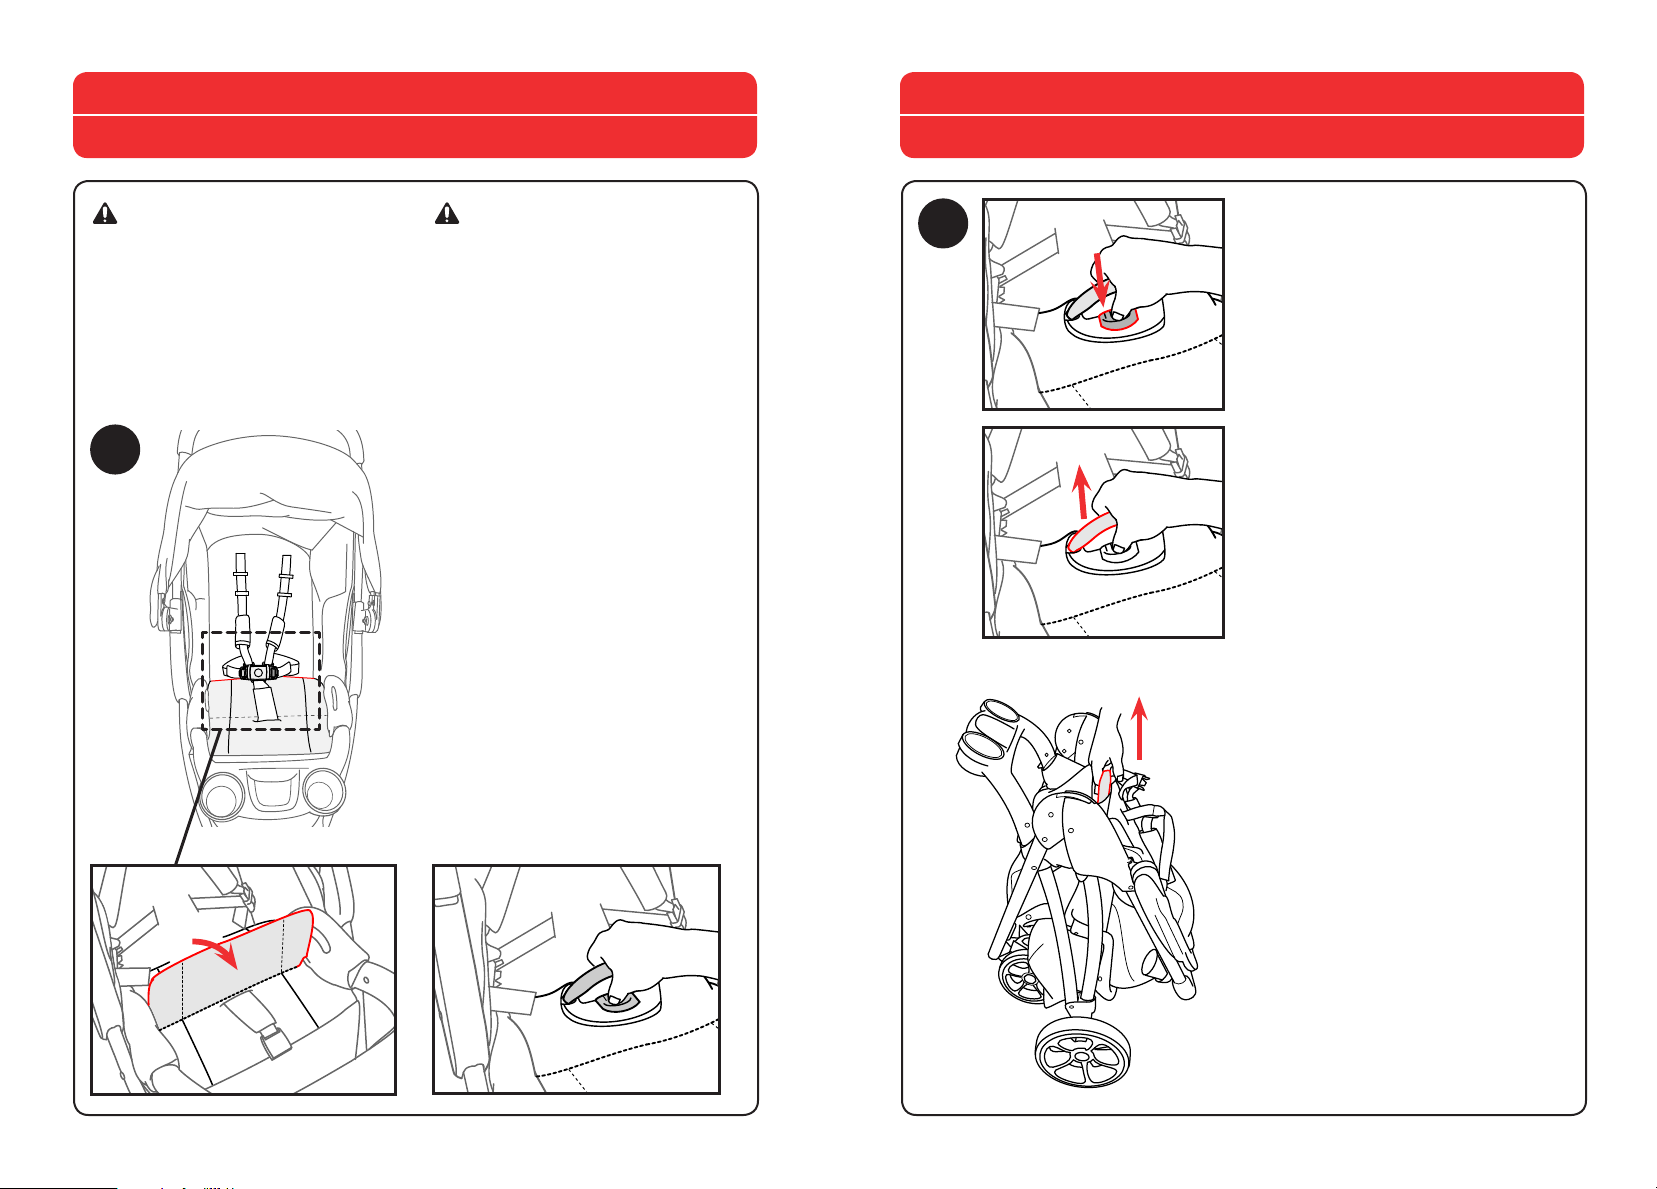
11
Cómo utilizar el cinturón de seguridad
11. This stroller has a 5-point safety
harness.
Make sure the Shoulder Strap
Connector is in the correct position,
as shown. Slide the Shoulder Strap
Connector onto the Waist Strap Clip
and repeat for the other side.
Then slide both Waist Clips into the
Crotch Strap Buckle, as shown. Pull
on both sides to make sure the Clips
are secured to the Buckle.
11. Este cochecito tiene un cinturón
de seguridad de con 5 puntos.
Asegúrese de que el conector de la
correa del hombro esté en la posición
correcta como se indica. Deslice el
conector de la correa de los hombros
en la presilla de la correa de la cintura
y repita en el otro lado.
Luego, deslice ambas presillas de la
cintura en la hebilla de la correa de la
entrepierna, como se muestra. Tire de
ambos lados para asegurarse de que
las presillas estén aseguradas en la
hebilla.
20 21
Page 12
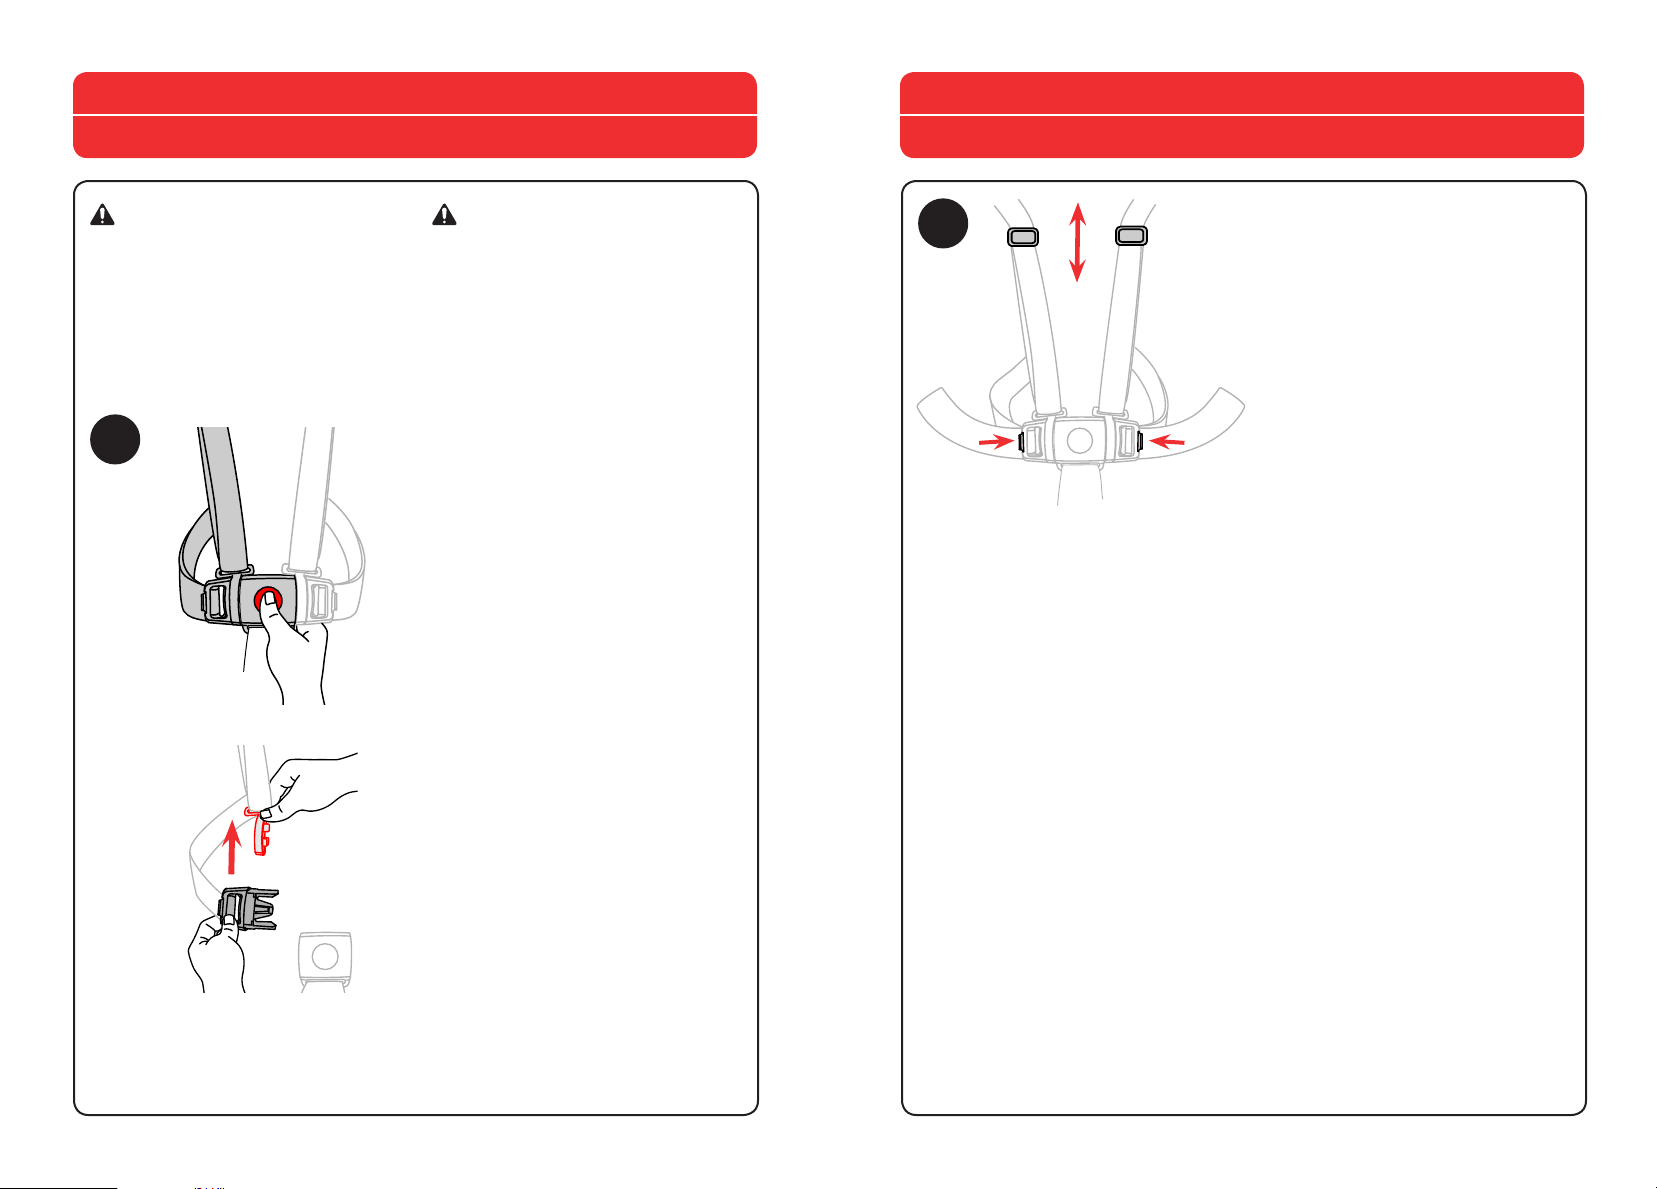
How to Use 5-point Safety Harness
How to Use 5-point Safety Harness
Cómo utilizar el cinturón de seguridad
WARNING
Never leave child unattended. Avoid
serious injury from falling or sliding
out. Always use seat belt.
12
ADVERTENCIA
Nunca deje al niño desatendido.
Evite las lesiones graves que
podrían producirse a causa de la
caída o deslizamiento del producto.
Recuerde siempre utilizar el cinturón
de seguridad.
12. The Safety Harness can be
released by pressing the button on
the center of the Crotch Strap Buckle
and pulling both Waist Clips out.
Pull up on the Shoulder Strap
Connector to remove it from the
Waist Strap Clip.
12. Puede presionar el botón que se
encuentra en el centro de la hebilla
de la correa de la entrepierna y tirar
de ambas presillas de la cintura
hacia afuera para liberar el arnés de
seguridad.
13
Cómo utilizar el cinturón de seguridad
13. The length of the Shoulder Straps
can be adjusted by pulling on the
adjustment buckles to tighten or
loosen.
The length of the Waist Straps can
beadjusted by pressing the tab at the
end of the Waist Strap Clip and
pulling on the strap to tighten or
loosen to better fit your child.
13. Tire de las hebillas de ajuste para
ajustar o aflojar la longitud de las
correas de los hombros.
Presione la lengüeta que se
encuentra en el extremo de la presilla
de la correa de la cintura y tire de la
correa para ajustar o aflojar la
longitud de la correa de la cintura
para que se adapte mejor a su niño.
Tire del conector de la correa de los
hombros para retirarlo de la presilla
de la correa de la cintura.
22 23
Page 13
How to Use the Child's Tray
Cómo utilizar la bandeja para el niño
Using the KeyFit® Infant Seat
Cómo utilizar el asiento de seguridad infantil KeyFit
®
14A
14B
“CLICK!”
“¡CLIC!”
14A. Line up the Child's Tray (I) to the
corresponding attachment posts and
attach to Stroller Frame, as shown. To
release the Child's Tray, pull back on
the levers located under the Child's
Tray, and lift up (14B).
14A. Alinee la bandeja para niños (I)
con los puestos de sujeción
correspondientes y sujete la
estructura del cochecito, como se
muestra. Para liberar la bandeja para
niños, tire de las palancas ubicadas
debajo de la bandeja para niños y
levántela (14B).
WARNING
ONLY USE a Chicco KeyFit®
infant car seat with this product.
Make sure to properly install the
Child's Tray prior to using the
KeyFit®. Always make sure child is
properly harnessed in the car seat.
Only use this product to transport
infants that are within the size and
weight limitations of the infant car
seat. Refer to your infant car seat
Owner's Manual for additional
warnings and use instructions before
using this product.
ADVERTENCIA
UTILICE ÚNICAMENTE un asiento
de seguridad infantil Chicco KeyFit®
con este producto. Asegúrese de
que la bandeja para el niño esté
correctamente instalada antes de
utilizar el KeyFit®. Siempre verifique
que el niño esté correctamente
asegurado en el asiento de
seguridad. Utilice este producto
únicamente para transportar bebés
que no superen el tamaño o el peso
permitidos por el asiento de
seguridad infantil. Antes de utilizar el
producto, consulte el manual
del propietario del asiento de
seguridad infantil para familiarizarse
con las advertencias adicionales y las
instrucciones de uso.
24 25
Page 14
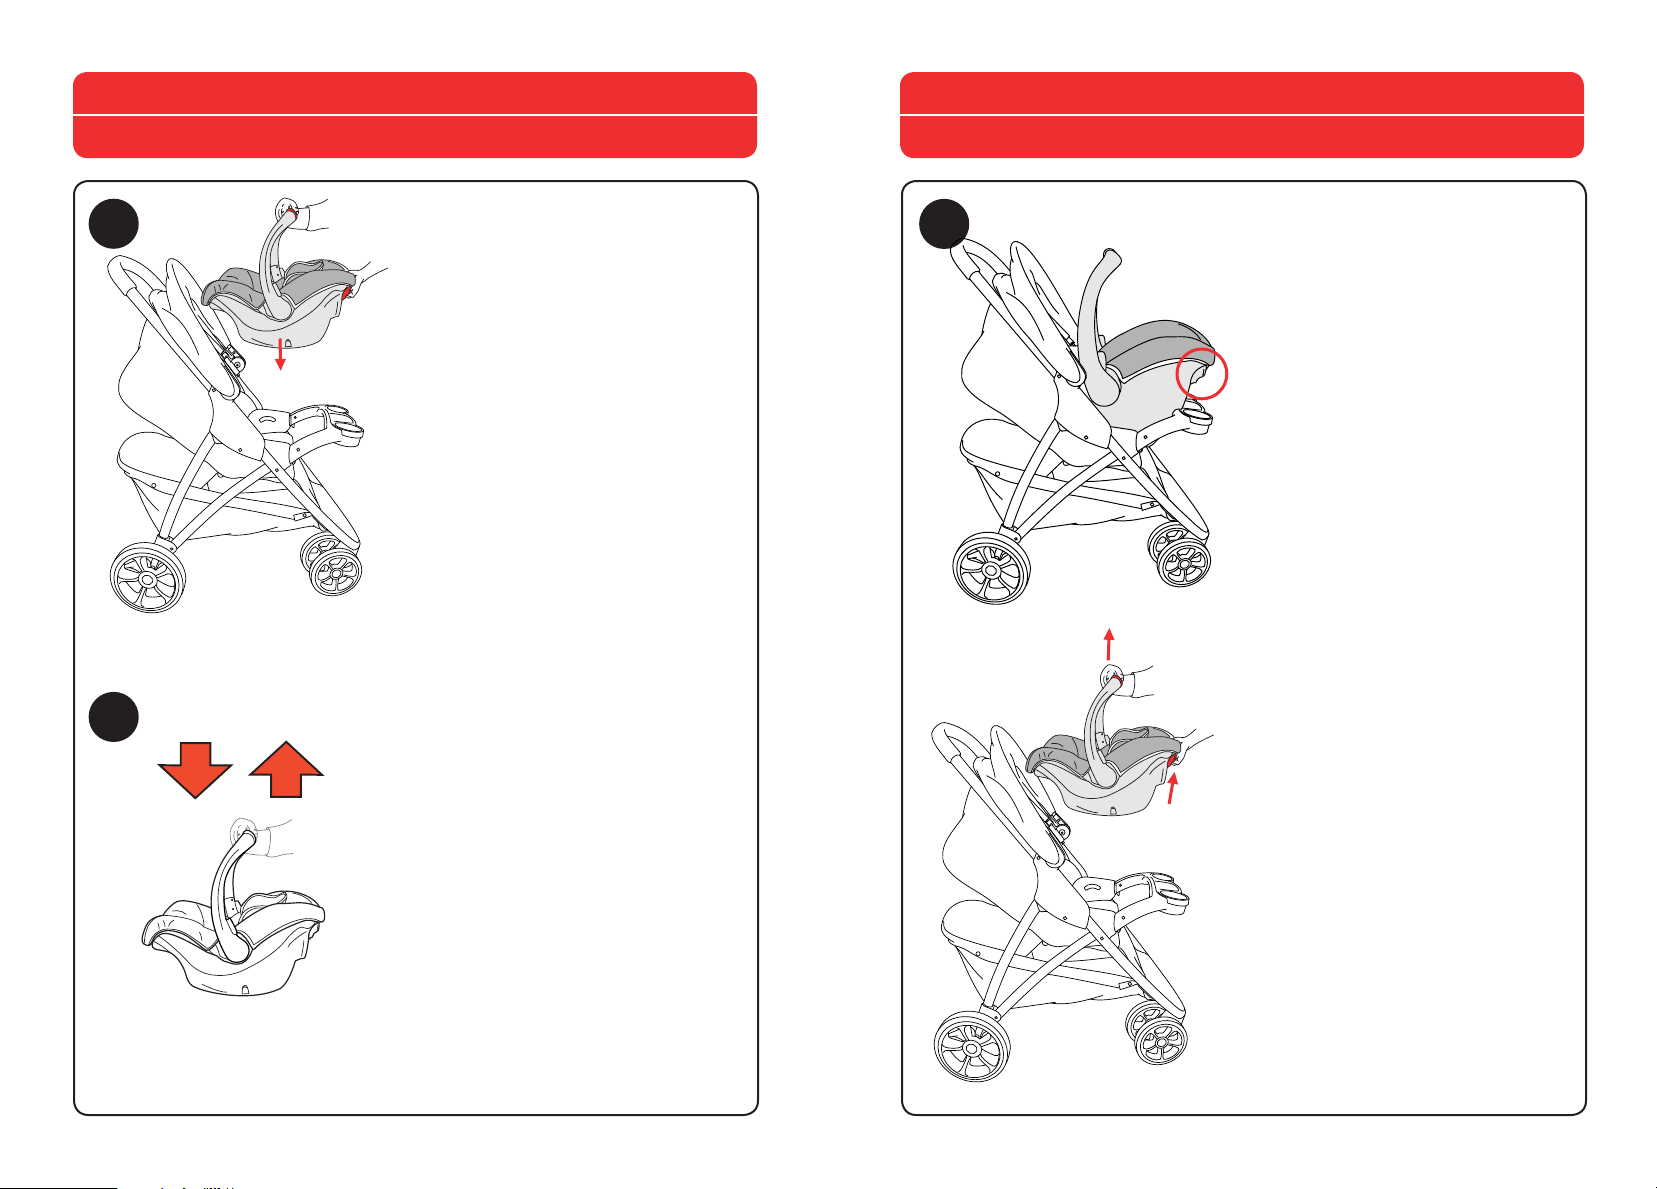
Using the KeyFit® Infant Seat
Cómo utilizar el asiento de seguridad infantil KeyFit
Using the KeyFit® Infant Seat
®
Cómo utilizar el asiento de seguridad infantil KeyFit
®
15A
15B
CLICK!
CLIC!
15A. With the Child's Tray attached
and the Stroller Backrest FULLY
RECLINED, place the KeyFit® infant
carrier into the Stroller Frame. The
carrier will only fit into the frame
"REAR FACING ONLY". The baby
“CLICK!”
“CLIC”
1
2
CHECK!
!
VERIFICAR!
will be facing you when pushing the
stroller. Make sure infant carrier
clicks into the stroller frame on both
sides.
Note: Pull up on the infant carrier;
make sure it is secured to stroller
frame (15B). If using the Canopy with
the KeyFit®, rotate the handle down,
to allow the Canopy to fully extend
open.
15A. Con la bandeja para el niño
instalada y el respaldo del cochecito
TOTALMENTE RECLINADO, coloque
el portabebés KeyFit® en la estructura
del cochecito. El portabebés solo se
ajustará a la estructura si se lo
coloca "MIRANDO HACIA ATRÁS
ÚNICAMENTE". Cuando haga andar
la silla de paseo, el bebé quedará
mirando hacia usted. Asegurarse de
que el portabebés haga clic en la
estructura de la silla de paseo en
ambos lados.
16
16. Squeeze the Release Handle on
the back of the infant carrier and lift
up on the carrying handle, to remove
the KeyFit® Infant Seat.
16. Presione la manija de liberación
ubicada en la parte trasera del
portabebés y levante del mango de
transporte, para quitar el portabebés
KeyFit®.
Nota: Tire hacia arriba del
portabebés para asegurarse de que
esté fijado firmemente a la estructura
de la silla de paseo (15B). Si se usa la
capota con el asiento KeyFit®, girar la
manija hacia abajo para que la capota
pueda extenderse y abrirse
completamente.
26 27
Page 15
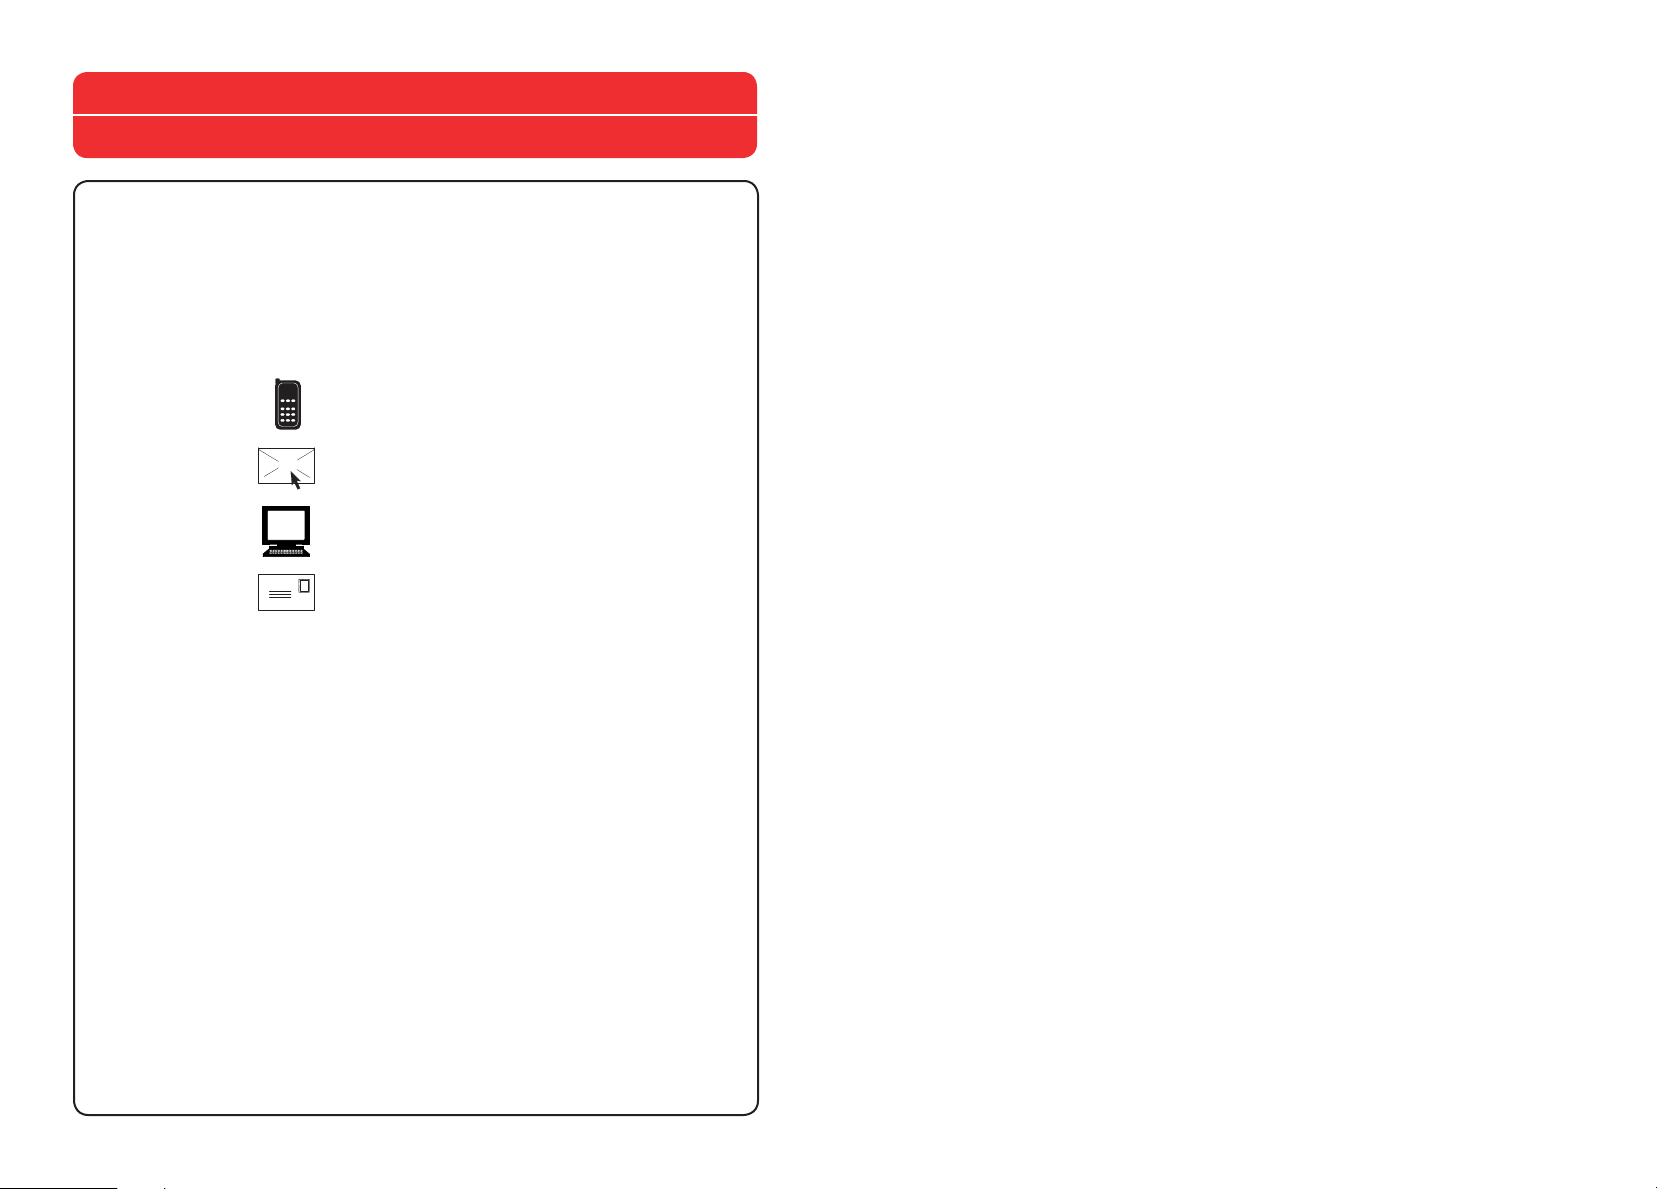
How to Close the Stroller
How to Close the Stroller
Cómo cerrar la silla de paseo
WARNING
When folding the Stroller, make sure
that your child and other children
are at a safe distance. Ensure that
during the operations, the movable
parts of the Stroller do not come in
contact with your child.
17A
ADVERTENCIA
Al plegar la silla de paseo, asegúrese
de que su hijo y otros niños se
encuentren a una distancia segura.
Asegúrese de que mientras realice
estas operaciones las partes móviles
de la silla de paseo no entren en
contacto con su hijo.
17A. Remove the KeyFit® infant
carrier and undo the harness buckle.
Flip the Seat Fabric forward and
locate the Release Button and Fold
Handle, as shown.
17A. Retire el portabebé KeyFit® y
abra la hebilla del arnés. Deslice la
tela del asiento hacia adelante y
localice el botón de apertura y la
manija de plegado, como se muestra.
17B
Cómo cerrar la silla de paseo
17B. Press in on the Release Button
and pull up on the Fold Handle, the
Stroller Legs and Seat back will fold
down to make the Stroller compact.
17B. Presione el botón de apertura
y tire hacia arriba de la manija de
plegado, las patas del cochecito y el
respaldo del asiento se plegarán para
hacer el cochecito compacto.
28 29
Page 16

Cleaning and Maintenance
Limpieza y mantenimiento
This product requires regular maintenance. The cleaning and maintenance of the stroller must only be
carried out by an adult.
CLEANING
Please refer to the care label for instructions on cleaning the fabric parts of the stroller.
Periodically wipe clean plastic parts with a soft damp cloth. Always dry the metal parts to prevent the
formation of rust if the stroller has come into contact with water.
MAINTENANCE
Lubricate the moving parts only if necessary, with a light application of a silicone based lubricant.
Periodically check the condition of the wheels, and keep them clean of dust and sand. To avoid friction
that may prevent the correct operation of the stroller, ensure that all the movable plastic parts placed
along the metal frame are clean of dust, dirt or sand. Keep the stroller in a dry place. Prolonged
exposure to direct sunlight may cause the fabric to fade.
Este producto requiere un mantenimiento regular. Las operaciones de limpieza y mantenimiento
deben ser efectuadas exclusivamente por un adulto.
LIMPIEZA
Para limpiar las partes de tela consultar las etiquetas de lavado.
Limpiar periódicamente las partes de plástico con un paño húmedo. Si la silla entra en contacto con
agua salina, secar siempre las partes metálicas para evitar que se oxiden.
MANTENIMIENTO
Si fuera necesario, lubricar las partes móviles con aceite seco a la silicona. Controlar periódicamente el
estado de desgaste de las ruedas y mantenerlas limpias de polvo y arena. Asegurarse de que todas las
partes de plástico que se deslizan sobre los tubos de metal estén limpias de polvo, suciedad y arena,
para evitar roces que puedan comprometer el correcto funcionamiento de la silla de paseo. Mantener
la silla de paseo en un lugar seco. La exposición prolongada del sistema de seguridad para niños a la luz
directa del sol puede hacer que los materiales o la tela pierdan el color.
30 31
Page 17
For More Information
@
Más información
If you have any questions or comments about this product, or are missing any of
the parts please do not return this product to the store. Contact us in one of the
following ways:
Si tiene preguntas o sugerencias sobre este producto, o falta alguna de las partes,
no devuelva este producto a la tienda. Comuníquese con nosotros por alguno de
los siguientes medios:
(877)-424-4226
info.usa@artsana.com
www.chiccousa.com
1826 William Penn Way
Lancaster, PA 17601
32
33
Page 18

www.chiccousa.com
Page 19
User Guide
For future use, STORE USER GUIDE
in location on bottom of base.
Car Seat
©2016 Artsana USA, Inc.
www.chiccousa.com
IS0150.1E
Page 20
If you have any problems with your Chicco Child Restraint,
or any questions regarding installation or use, please call:
Chicco Customer Service
1-877-424-4226
Please have Model and Serial Number available when you call.
These are located on a label on the bottom of the Child Restraint.
For future reference, fill in the information below. The information can be found on the label
on the bottom of the Child Restraint.
Model Number:
Serial Number:
Manufactured In:
Page 21

TABLE OF CONTENTS
Registration 2
Child Guidelines 4
Safe Use Checklist 6
Important Warnings 8
Best Practices 14
Need Help? 15
VEHICLE INFORMATION
Vehicle Seating Positions 16
Vehicle Seat Belts 18
What is LATCH? 20
CHILD RESTRAINT OVERVIEW
Child Restraint Components 22
Child Requirements 26
BASE INSTALLATION
Install with Base Setup 28
Install Using LATCH 30
Install Using LAP-SHOULDER BELT 36
Install Using LAP BELT ONLY 42
Install Carrier to Base 46
WITHOUT BASE INSTALLATION
Install without Base Setup 50
Install Using LAP-SHOULDER BELT 52
Install Using LAP BELT ONLY 56
SECURING YOUR CHILD
Adjusting Harness Height 60
Securing Child with Harness 64
Secure Child Checklist
ADDITIONAL INFORMATION
Base Release Handle 74
LATCH Storage 75
Newborn Positioner 76
Head Rest Insert 78
Handle Positions 79
Canopy 80
Installation on an Aircraft 81
Cleaning and Maintenance 82
72
Page 22
REGISTRATION
Please complete the Registration Card that came with
your Child Restraint and mail it promptly.
Child Restraints could be recalled for safety reasons. You must register this restraint to be reached in
a recall. Send your name, address, e-mail address if available, and the restraint’s model number and
manufacturing date to:
Artsana USA, Inc.
1826 William Penn Way
Lancaster, PA 17601
or call 1-877-424-4226
or register online at http://www.chiccousa.com/carseatregistration.aspx
For recall information, call the U.S. Government’s Vehicle Safety Hotline at
1-888-327-4236 (TTY: 1-800-424-9153), or go to http://www.NHTSA.gov.
2
Page 23

REGISTRATION
PAGE INTENTIONALLY LEFT BLANK
3
Page 24
4
CHILD GUIDELINES
This Child Restraint is designed for children ages Birth to at least 2 years old.
ONLY use this Child Restraint if the child meets BOTH of the following
Weight and Height requirements:
• Weight is between 4 and 30 pounds (2 and 13.5 kg).
• Height is 30 inches (76 cm) or less and child's head is no less than
1" below the top of the head rest.
The Newborn Positioner is only for infants who weigh between 4 and 11
pounds (2 and 5 kg). See Newborn Positioner on page 76.
For premature infants, you must consult the infant's doctor before
using this Child Restraint. A premature infant may have difficulty breathing
or have other medical problems when placed in a seated position.
Page 25
CHILD GUIDELINES
WARNING! Use of this Child Restraint is ONLY for children who meet ALL
of the requirements shown here. If the child is not within these requirements,
select a different car seat (such as a convertible car seat).
NEWBORN POSITIONER
4 lbs. 11 lbs. 30 lbs.
(2 kg) (5 kg) (13.5 kg)
• Chicco and the American Academy of Pediatrics recommend all
children ride REAR-FACING until age 2 or they reach the weight/
height limits of this seat.
• NEVER turn this Child Restraint FORWARD-FACING.
5
Page 26
SAFE USE CHECKLIST
YOUR CHILD’S SAFETY DEPENDS ON YOU! You MUST follow the
detailed instructions in this User Guide to ensure the steps below are
performed correctly!
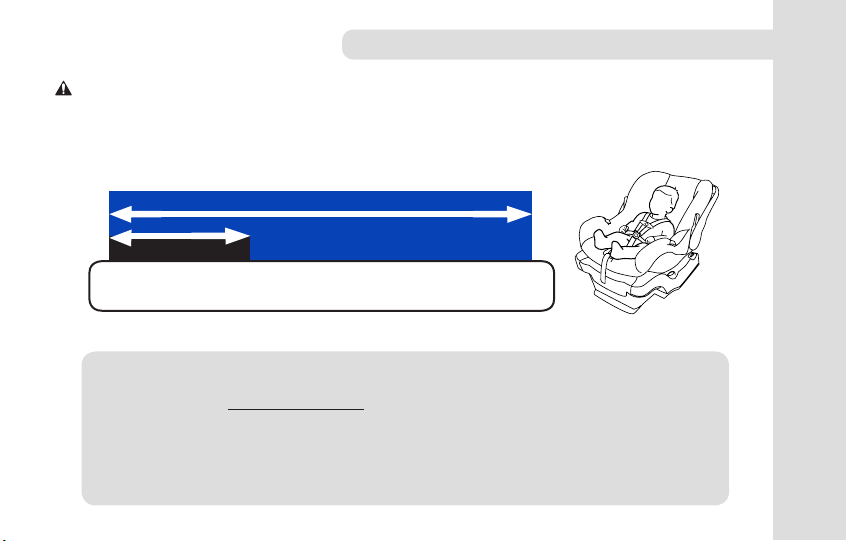
Make sure your child meets the age, weight, and height requirements:
Refer to the “Child Guidelines” section on page 4.
If using Base, make sure Carrier is securely attached to Base:
Refer to the “Install Carrier to Base” section on page 46.
Select a safe seating location in your car:
Refer to the “Vehicle Seating Positions” section on page 16 and 17.
Install Base or Carrier Rear-Facing ONLY:
6
Refer to the “Child Guidelines” section on page 4.
Page 27

SAFE USE CHECKLIST
Ensure that the Child Restraint is properly leveled when installed.
Check Child Restraint for a snug t in your car:
While holding Child Restraint near belt path used, pull side to side and forward.
Belt should remain tight and Child Restraint should not move more than
1” (25 mm) from vehicle seat back or side-to-side.
Secure your child:
Refer to the “Securing Child with Harness” section on page 64.
7
Page 28

8
IMPORTANT WARNINGS
WARNING
DEATH or SERIOUS INJURY CAN OCCUR
FAILURE TO FOLLOW THESE INSTRUCTIONS AND THE PRODUCT
LABELS CAN RESULT IN SERIOUS INJURY OR DEATH TO YOUR CHILD.
Take Time to Read This User Guide
• Carefully read and understand all instructions and warnings in this User Guide. Your child’s safety depends on
you knowing how to setup, install and use this Child Restraint properly.
• Before installing this Child Restraint in a vehicle, be sure to also check the vehicle owner’s manual for
information on proper installation.
• NEVER allow others to use this Child Restraint until they have read and understood all instructions in this
User Guide.
Make Sure Child Fits This Child Restraint
• Use only with children who weigh between 4 and 30 lbs (2 kg to 13.5 kg) and whose height is 30 inches
(76 cm) or less.
• Do Not use this child restraint if top of child's head is within 1 inch of the top of the headrest.
• Only use the NEWBORN POSITIONER provided for infants who weigh between 4 and 11 lbs (2 and 5 kg).
Page 29
IMPORTANT WARNINGS
WARNING
DEATH or SERIOUS INJURY CAN OCCUR
Secure Child Properly
• Snugly adjust the belts provided with this child restraint around your child. A loose harness could cause the
child to be ejected in a sharp turn, sudden stop or crash, resulting in serious injury or death.
A snug strap should not allow any slack. It lies in a relatively straight line without sagging.
It does not press on the child’s flesh or push the child’s body into an unnatural position.
• NEVER use clothing or blankets that interfere with fastening or tightening the harness. An unsecured child
could be ejected in a sharp turn, sudden stop or crash!
To keep child warm, place a blanket over child and restraint AFTER you have properly secured
child in harness.
• ALWAYS check to make sure buckle is securely latched. If buckle separates, child could be killed or seriously injured.
• NEVER leave child unattended. Do not allow children to play in or around the Child Restraint.
• ALWAYS keep child properly secured in harness whenever child is in carrier.
9
Page 30
10
IMPORTANT WARNINGS
WARNING
DEATH or SERIOUS INJURY CAN OCCUR
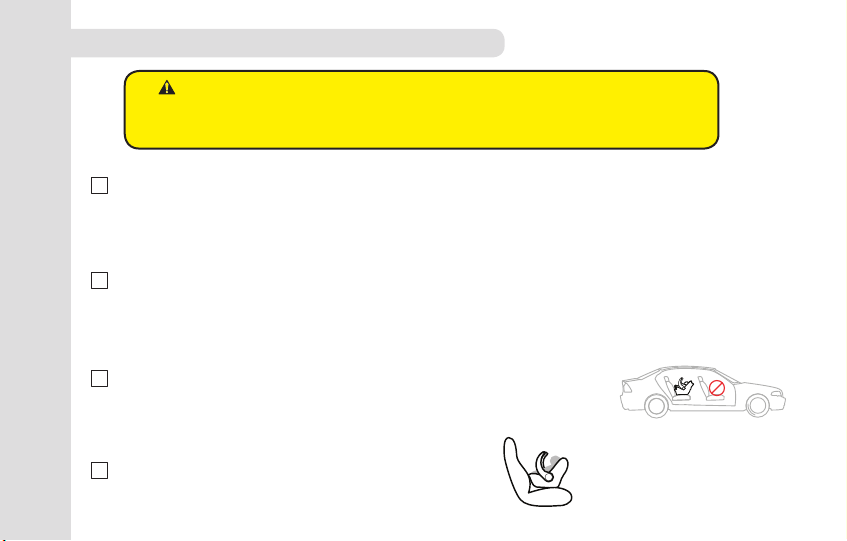
Install Child Restraint Correctly
• NEVER PLACE THIS CHILD RESTRAINT IN VEHICLE SEATING LOCATION
WITH A FRONTAL AIR BAG, UNLESS THE AIR BAG CAN BE TURNED OFF.
If the airbag inflates, it can cause serious injury or death to your child. For vehicles
with side air bags, refer to your vehicle owners manual for information on your
child restraint installation.
• ALWAYS install this Child Restraint in a back seat if possible.
According to accident statistics, children are safer when properly restrained in the rear seating
positions rather than in the front seat.
• NEVER install in a rear facing, side facing or on the back of a folded down vehicle seat.
• ALWAYS secure this Child Restraint with the vehicle’s child restraint anchorage system (LATCH) if available
OR with a vehicle seat belt.
• ALWAYS install rear-facing when using this Child Restraint in a vehicle. Your child could be killed or seriously
injured if you install this restraint forward-facing.
Page 31

IMPORTANT WARNINGS
WARNING
DEATH or SERIOUS INJURY CAN OCCUR
Install Child Restraint Correctly
• BEFORE each use, ALWAYS check to make sure restraint is tightly secured in the vehicle seat.
• NEVER use Child Restraint in a vehicle seating position where it cannot be secured tightly. A loosely
installed child restraint will not protect your child in a crash.
• Never leave carrier or base unsecured in your vehicle even when it is unoccupied. It could injure other
occupants in a sharp turn, sudden stop or crash.
• DO NOT install this child restraint using an inflatable seat belt. The interaction of the inflatable portion
of the vehicle’s belt with this child restraint can result in serious injury or death. Install using LATCH
instead, or move the car seat to a position with a suitable seat belt type.
• To prevent ejection or breathing difculties, proper recline is required. When installing the Child
Restraint, check the bubble level on the base. Refer to pages 26-27 to make sure your child meets the
requirements.
• Make sure nothing interferes with carrier attachment to base. ALWAYS check attachment.
• ONLY use Chicco KeyFit/KeyFit 30 infant carriers with KeyFit/KeyFit 30 bases.
• DO NOT use Chicco KeyFit/KeyFit 30 infant carriers with Chicco Fit 2 bases.
11
Page 32

IMPORTANT WARNINGS
WARNING
DEATH or SERIOUS INJURY CAN OCCUR
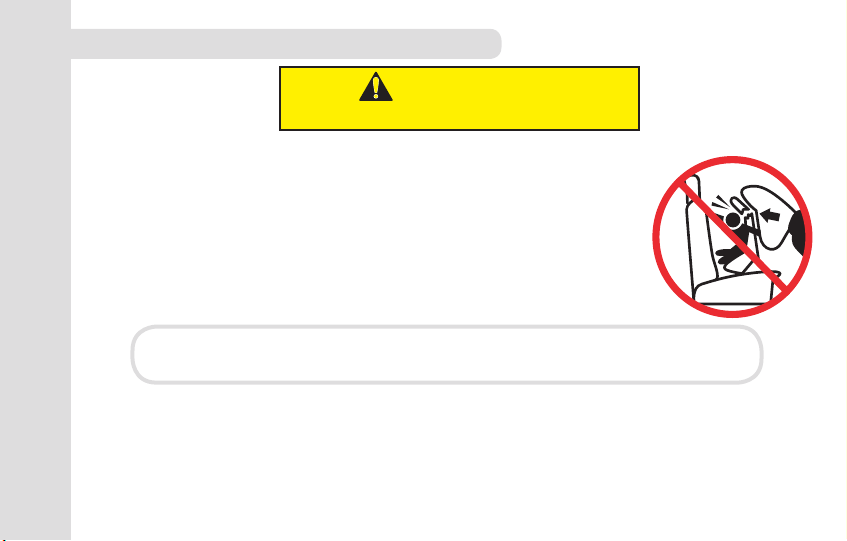
Ensure Child’s Safety When Using Child Restraint
• NEVER leave child unattended.
• SUFFOCATION HAZARD: Infant carrier can roll over on soft surfaces and suffocate child. NEVER place
carrier on beds, sofas or other soft surfaces.
• STRANGULATION HAZARD: Children have STRANGLED in loose or partially buckled harness straps.
Fully restrain the child even when carrier is used outside the vehicle.
• Fall Hazard: Child's activity can move carrier. NEVER place carrier on counter tops, tables, or any other
elevated surface.
• Do not use the infant carrier if it is damaged or broken.
• BE SURE handle is locked in the “carry position” before lifting carrier by handle. An unlocked handle could
move unexpectedly, causing injury to child.
• NEVER place carrier in top of shopping cart. Carrier will not be secure and could fall causing injury to child.
• ALWAYS check buckle and other parts for hot surfaces. A hot surface could burn child! Cover unoccupied
12
carrier with blanket when leaving in a vehicle exposed to sunlight or high temperatures.
Page 33

IMPORTANT WARNINGS
WARNING
DEATH or SERIOUS INJURY CAN OCCUR
Check Condition of Restraint
• DO NOT use if the Harness or LATCH straps are cut, frayed or damaged.
• DO NOT use this Child Restraint if it is more than 6 years old. Check manufacturer’s label on
underside of Child Restraint for the “Do Not Use After” date.
• DO NOT use any accessories, pads or products not included with this Child Restraint, unless
approved by Chicco USA. Doing so will void the warranty of this Child Restraint.
• You MUST replace this Child Restraint if it has been involved in a crash, even if you cannot see visible
damage. A damaged Child Restraint may not protect your child in a future crash.
• Do not modify your Child Restraint.
• For proper removal and installation of the harness straps contact Chicco USA for additional instructions.
• Do not use Child Restraint if any component is damaged, broken, or missing parts.
Call 1-877-424-4226 to find out if the damaged part or parts can be replaced.
13
Page 34

BEST PRACTICES
• Ensure all vehicle occupants are properly restrained before traveling. Unrestrained
occupants can be thrown around and may be seriously injured or seriously injure other
occupants in a sharp turn, sudden stop or crash.
• Do not leave loose objects, such as books, bags, etc., in the back of the vehicle. In the
event of a sharp turn, sudden stop, or crash, loose objects can be thrown around and
possibly cause serious injury to vehicle occupants.
• Cover the Child Restraint when the vehicle is parked in sunlight. Parts of a Child Restraint
can become very hot if left in the sun. Contact with these parts can burn a child’s skin.
Always check the surface of any metal or plastic parts before putting your child in the
Child Restraint.
• To avoid strangulation, Do not allow children to play with vehicle seat belts. If possible,
move unused belts out of reach.
• Do not use anything to raise the Child Restraint off the vehicle seat. In a sharp turn,
sudden stop, or crash, the Child Restraint could slide and potentially cause serious injury.
• Never use a second-hand Child Restraint with an unknown history.
• Never use any accessories that are not included with this child restraint, unless specifically
14
approved by Chicco. For more information, go to www.chiccousa.com/accessories.
Page 35

NEED HELP?
Need Help Securing Your Child Restraint?
The following sources are available to help ensure your Child Restraint is
properly installed:
• Contact Chicco USA by visiting our website at www.chiccousa.com or
calling our Customer Service 1-877-424-4226. Please have Model and
Serial Number available when you call. These are located on a label on
the bottom of the Child Restraint.
• Refer to your vehicle manual for Child Restraint installation tips.
• Contact a certified Child Passenger Safety Technician in your area by
visiting safercar.gov and select “Find Local Child Seat Help” or call
1-866-SEAT CHECK (1-866-732-8243) or visit seatcheck.org.
15
Page 36

VEHICLE SEATING POSITIONS
VEHICLE INFORMATION
The back seat is the safest place for children 12 and under. See your
16
vehicle owner’s manual for Child Restraint installation and instructions.
WARNING! NEVER PLACE THIS CHILD RESTRAINT IN A
VEHICLE SEATING LOCATION WITH A FRONTAL AIR BAG,
UNLESS THE AIR BAG CAN BE TURNED OFF.
Page 37

VEHICLE SEATING POSITIONS
Some vehicles have no seating positions which are compatible with this Child
Restraint. If in doubt, contact the vehicle manufacturer for assistance. Only
forward-facing vehicle seats can be used with this Child Restraint.
Make sure no more than 4 inches of the
Child Restraint base is past the edge of
the vehicle seat.
Do not use on a folded down
vehicle seat back.
VEHICLE INFORMATION
17
Page 38

The information in this section only applies to installation with vehicle seat belts.
For simplest installation use LATCH
Vehicle seat belts differ from vehicle to vehicle. Refer to your vehicle owner’s
manual for specific information about seat belts and their use with Child
Restraints.
Shoulder belt with switchable retractor:
Putting the shoulder belt in the locked/switched mode as the last step is
optional. The shoulder belt Lock-Off replaces the need for the locked/switched
mode. Using the locked/switched mode may cause Child Restraint to tilt.
VEHICLE INFORMATION
18
VEHICLE SEAT BELTS
Page 39

VEHICLE SEAT BELTS
The following types of vehicle belts MUST NOT be used to install this Child Restraint.
If any of the belt types listed below are in the chosen seating position, choose another
vehicle seating position or use LATCH if available.
1
4 5
1.
Motorized (automatic) vehicle belts.
2.
Door mounted vehicle belts.
3.
Lap-shoulder Belts with 2 retractors (unless Lap Belt has a “Lock Mode”).
2 3
4.
Non-Locking (ELR) Lap Belts.
5.
Inflatable seat belts.
VEHICLE INFORMATION
19
Page 40

WARNING: This Child Restraint is designed to be used with lower LATCH
anchors at the standard spacing (11 inches) ONLY! Refer to vehicle owner’s manual
for information about LATCH and Child Restraint installation positions.
LATCH = Lower Anchors and Tethers for CHildren
United States Motor Vehicle Safety Standards have defined a system for installing
Child Restraints in vehicles called LATCH. LATCH may ONLY be used IN PLACE
OF vehicle belt if the vehicle is equipped with LATCH anchor points. DO NOT
use both the seat belt and LATCH at the same time. Please refer to the vehicle
owner’s manual for designated LATCH locations in vehicles.
LATCH in the vehicle consists of a top tether anchor point, which is not used with
this child restraint, and two lower anchor points. Some vehicles owner’s manual use
VEHICLE INFORMATION
the term “ISOFIX”. LATCH can also be used in vehicle seating positions equipped
with ISOFIX.
If the vehicle is equipped with LATCH, the vehicle lower anchor points may be visible at
the seat crease. If not visible, the seating position may be marked with a symbol (fig. a) or a
20
colored dot.
WHAT IS LATCH
Page 41

Vehicle
Lower Anchor
Points
Vehicle
Seat Crease
(fig. a)
WHAT IS LATCH
VEHICLE INFORMATION
21
Page 42

CARRIER COMPONENTS
Handle
Release
Button
Shoulder
Pads
Harness
Straps
Newborn
Positioner
CHILD RESTRAINT OVERVIEW
Harness
Adjuster Strap
22
Canopy
Head Rest
Insert
Chest Clip
Buckle
Seat Belt Guides
(when installing carrier
without the base)
Harness
Adjuster Button
Page 43

CARRIER COMPONENTS
Harness Strap
Adjustment Slots
Harness
Straps
Harness
Splitter Plate
Crotch Strap
Retainer
Base Release
Handle
Carry
Handle
Headrest
Insert Straps
CHILD RESTRAINT OVERVIEW
23
Page 44

BASE AND LATCH COMPONENTS
User Guide
Storage
(Inside Base)
Bubble
Level
Indicator
Foot
CHILD RESTRAINT OVERVIEW
Adjuster
Buttons
24
Shoulder Belt
Lock-Off
LATCH
Pull Strap
Recline
Foot
LATCH
Release
Lever
Carrier
Attachment
Hook
LATCH
Connector
Page 45

BASE AND LATCH COMPONENTS
PAGE INTENTIONALLY LEFT BLANK
CHILD RESTRAINT OVERVIEW
25
Page 46

CHILD REQUIREMENTS
*
WEIGHT REQUIREMENTS:
4 – 30 lbs (2 – 13.5 kg)
Use with children:
•Who weigh between 4 and 30 lbs (2 –13.5 kg).
•And height is less than 30 inches (76 cm).
•And top of head is at least 1 inch below top of
seat back.
•When Harness Straps can be positioned at
or just below the child’s shoulders*.
See Adjusting Harness Height
CHILD RESTRAINT OVERVIEW
on page 60.
26
WEIGHT REQUIREMENTS
4 lbs. 30 lbs.
(2 kg) (13.5 kg)
Page 47

CHILD REQUIREMENTS
For premature infants, you must consult the infant's doctor before
using this Child Restraint. A premature infant may have difficulty breathing
or have other medical problems when placed in a seated position.
Install Child Restraint:
• Base installation continued on page 28.
• Without Base Installation continued on page 50.
CHILD RESTRAINT OVERVIEW
27
Page 48

INSTALL WITH BASE SETUP
SL OP E
Infants may have difficulty breathing when in a sitting position.
Make sure the seat is reclined properly so that your child’s head does
not fall forward. Failure to properly recline the Child Restraint
could increase the child’s risk of serious injury or death.
1
LEVEL
Locate the Bubble Level Indicator and adjust the Recline Foot by pushing in on
2
both Foot Adjuster buttons and lifting or lowering the base until the Bubble
falls between the arrows on the Bubble Level Indicator (2b).
BASE INSTALLATION
28
See page 16 for “Vehicle Seating Positions” before installing. Make
sure the vehicle is on a level surface. Place Base on selected vehicle
seat. Make sure it is not blocking the vehicle seat belt buckle.
Installation Options:
• LATCH installation continued on page 30.
• Lap-Shoulder Belt installation continued on page 36.
• Lap Belt Only installation continued on page 42.
Page 49

2b
INSTALL WITH BASE SETUP
BASE INSTALLATION
29
Page 50

INSTALL USING LATCH
not using for installation - See page 75.
be buckled behind the Child Restraint System as this will engage
the inflatable portion of the belt.
Pull up on the LATCH Release Lever and loosen LATCH straps to their full
1
length.
Locate the LATCH Connector storage compartments. Remove both LATCH
2
Connectors.
BASE INSTALLATION
30
Store LATCH Connectors properly in the compartments when
When installing with LATCH, the unused seat belt should not
Page 51

1 2
INSTALL USING LATCH
BASE INSTALLATION
31
Page 52

INSTALL USING LATCH
Locate the LATCH anchor bars in your vehicle. Attach both LATCH
3
Connectors to the vehicle LATCH anchor bars.
Tighten LATCH straps by pulling up on LATCH Pull Strap while pressing Base
4
firmly into vehicle seat.
BASE INSTALLATION
32
Page 53

INSTALL USING LATCH
43
BASE INSTALLATION
33
Page 54

INSTALL USING LATCH
Roll LATCH Pull Strap and store in Pull Strap Storage Slot, as shown.
5
CHECK YOUR WORK
Hold Base at each side and pull side to side and forward. Base should not
move more than 1” (25 mm) from vehicle seat back or side-to-side.
Check installation before every use!
BASE INSTALLATION
34
Install Child Restraint:
• Installation continued on page 46.
Page 55

5
INSTALL USING LATCH
CHECK YOUR WORK
BASE INSTALLATION
35
Page 56

INSTALL USING LAP-SHOULDER BELT
Thread vehicle seat belt up through the belt path on the side of the Base.
1
Pull vehicle seat belt down through the vehicle seat belt path on opposite
2
side of the Base. Buckle the vehicle seat belt.
BASE INSTALLATION
36
Page 57

INSTALL USING LAP-SHOULDER BELT
1 2
Belt
Path
BASE INSTALLATION
CLICK!
37
Page 58

INSTALL USING LAP-SHOULDER BELT
While pushing down on the Base, pull up on the vehicle shoulder belt to
3
remove all slack from the vehicle lap belt.
BASE INSTALLATION
38
Page 59

3
INSTALL USING LAP-SHOULDER BELT
BASE INSTALLATION
39
Page 60

INSTALL USING LAP-SHOULDER BELT
While holding the shoulder belt tight, slide the shoulder belt strap
4
firmly into Shoulder Belt Lock-Off. Always use the Lock-Off on the
opposite side of where the vehicle seat belt is buckled.
Do NOT pull on shoulder belt after it is positioned in Lock-Off.
This could damage the Lock-Off and/or the vehicle belt
CHECK YOUR WORK
Hold Base at each side and pull side to side and forward. Base should not
move more than 1” (25 mm) from vehicle seat back or side-to-side.
Check installation before every use!
BASE INSTALLATION
40
Install Child Restraint:
• Installation continued on page 46.
Page 61

4
INSTALL USING LAP-SHOULDER BELT
CHECK YOUR WORK
BASE INSTALLATION
41
Page 62

INSTALL USING LAP BELT ONLY
Thread vehicle seat belt up through the belt path on the side of the Base.
1
Pull vehicle seat belt down through the vehicle seat belt path on opposite
2
side of the Base. Buckle the vehicle seat belt.
BASE INSTALLATION
42
Page 63

INSTALL USING LAP BELT ONLY
1 2
Belt
Path
BASE INSTALLATION
CLICK!
43
Page 64

INSTALL USING LAP BELT ONLY
While pushing down on the Base, pull up on the loose end of the
3
vehicle lap belt to remove all slack.
CHECK YOUR WORK
Hold Base at each side and pull side to side and forward. Base should not
move more than 1” (25 mm) from vehicle seat back or side-to-side.
Check installation before every use!
BASE INSTALLATION
44
Install Child Restraint:
• Installation continued on page 46.
Page 65

3
INSTALL USING LAP BELT ONLY
CHECK YOUR WORK
BASE INSTALLATION
45
Page 66

Insert the Carrier into the Base.
1
Push down on the Carrier to make sure it locks onto the Carrier
2
Attachment Hooks on the Base.
BASE INSTALLATION
46
INSTALL CARRIER TO BASE
Page 67

INSTALL CARRIER TO BASE
1
Carrier
Attachment
Hook
2
BASE INSTALLATION
47
Page 68

3
Check to make sure the Carrier is securely attached to the Base.
ALWAYS lift up on Carrier to verify it is properly attached to the Base.
CHECK YOUR WORK
Hold Base at each side and pull side to side and forward. Child Restraint
should not move more than 1” (25 mm) from vehicle seat back or
side-to-side.
Make sure Child Restraint is level by confirming that the bubble on the
BASE INSTALLATION
level indicator is between the level lines. Make sure infant’s head does
not fall forward. If necessary, re-adjust recline and repeat installation
steps to make sure Child Restraint is installed properly.
Check installation before every use!
48
INSTALL CARRIER TO BASE
Page 69

3
INSTALL CARRIER TO BASE
BASE INSTALLATION
49
Page 70

INSTALL WITHOUT BASE SETUP
SL OP E
Infants may have difficulty breathing when in a sitting position. Make sure the seat
is reclined properly so that your child’s head does not fall forward. Failure to properly
recline the Child Restraint could increase the child’s risk of serious injury or death.
NEVER install Child Restraint without Base using a non-locking vehicle belt. The installation
will NOT be secure. Refer to your vehicle owner's manual for detailed vehicle belt information.
WITHOUT BASE INSTALLATION
50
1
LEVEL
Position Child Restraint so that the Level Line (located on the seat label) is
2
LEVEL with the ground.
If needed, use a rolled up towel to help level the Child Restraint properly.
3
See page 16 for “Vehicle Seating Positions” before installing. Make sure
the vehicle is on a level surface. Place Child Restraint on selected vehicle
seat with child properly secured in Child Restraint
on page 64)
. Make sure it is not blocking the vehicle seat belt buckle.
(See securing your child
Installation Options:
• Lap-Shoulder Belt installation continued on page 52.
• Lap Belt Only installation continued on page 56.
Page 71

INSTALL WITHOUT BASE SETUP
2
3
WITHOUT BASE INSTALLATION
Level Line
(Seat Label)
51
Page 72

WITHOUT BASE INSTALLATION
52
INSTALL USING LAP-SHOULDER BELT
Thread vehicle seat belt up and slide into the Seat Belt Guide on the side of
1
the Child Restraint.
Pull vehicle seat belt down and slide into the Seat Belt Guide on opposite
2
side of the Child Restraint. Buckle the vehicle seat belt. Pull out all of the
shoulder belt webbing and activate the locking mode of the vehicle belt.
If belt does not lock, do not use that seating position to install the carrier.
Page 73

Seat Belt
Guide
INSTALL USING LAP-SHOULDER BELT
21
CLICK!
WITHOUT BASE INSTALLATION
53
Page 74

WITHOUT BASE INSTALLATION
54
INSTALL USING LAP-SHOULDER BELT
Put the vehicle seat belt in the locked mode, see vehicle owner's manual for more
information. A tightly rolled towel may be used under the front edge of the
Carrier if needed to adjust the angle of the Carrier. Angle is correct when level line
on Carrier is level with ground.
While pushing down on the Carrier, pull up on the vehicle shoulder belt to
3
remove all slack from vehicle lap belt.
CHECK YOUR WORK
Hold Child Restraint at each side and pull side to side and forward.
Child Restraint should not move more than 1” (25 mm) from vehicle seat
back or side-to-side.
Make sure Child Restraint is level. Make sure infant’s head does not fall
forward. If necessary re-adjust recline and repeat installation steps to
make sure Child Restraint is installed properly.
Check installation before every use!
Page 75

3
INSTALL USING LAP-SHOULDER BELT
CHECK YOUR WORK
WITHOUT BASE INSTALLATION
55
Page 76

WITHOUT BASE INSTALLATION
56
INSTALL USING LAP BELT ONLY
Thread vehicle seat belt up and slide into the Seat Belt Guide on the side of
1
the Child Restraint.
Pull vehicle seat belt down and slide into the Seat Belt Guide on opposite
2
side of the Child Restraint. Buckle the vehicle seat belt.
Page 77

INSTALL USING LAP BELT ONLY
21
Seat Belt
Guide
CLICK!
WITHOUT BASE INSTALLATION
57
Page 78

WITHOUT BASE INSTALLATION
58
INSTALL USING LAP BELT ONLY
Put the vehicle seat belt in the locked mode, see vehicle owner's manual for more
information. A tightly rolled towel may be used under the front edge of the
Carrier if needed to adjust the angle of the Carrier. Angle is correct when level line
on Carrier is level with ground.
While pushing down on the Child Restraint, pull up on the loose end of the
3
vehicle lap belt to remove all slack.
CHECK YOUR WORK
Hold Child Restraint at each side and pull side to side and forward.
Child Restraint should not move more than 1” (25 mm) from vehicle seat
back or side-to-side.
Make sure Child Restraint is level. Make sure infant’s head does not fall
forward. If necessary re-adjust recline and repeat installation steps to
make sure Child Restraint is installed properly.
Check installation before every use!
Page 79

3
INSTALL USING LAP BELT ONLY
CHECK YOUR WORK
WITHOUT BASE INSTALLATION
59
Page 80

SECURING YOUR CHILD
60
ADJUSTING HARNESS HEIGHT
With child seated correctly in the Carrier, resting against back and
1
bottom of carrier and not slouched, locate the Harness Strap Adjustment
Slot closest to AT or JUST BELOW top of child's shoulders.
Remove your child from the carrier and loosen the Harness Straps. Turn
2
the Carrier over and locate the splitter plate. Unhook one Harness Strap
from the Splitter Plate.
Page 81

ADJUSTING HARNESS HEIGHT
*
21
AT OR JUST BELOW
SECURING YOUR CHILD
Splitter
Plate
61
Page 82

SECURING YOUR CHILD
62
ADJUSTING HARNESS HEIGHT
Pull Harness Strap out through the front of the Carrier. Then re-thread the
3
Harness Strap through the desired Harness Strap Adjustment Slot.
Re-attach Harness Strap to the Splitter Plate. Repeat steps 1-4 of
4
Adjusting Harness Height for the other Harness Strap. Make sure both
Harness Straps are at positioned at the same height, as shown.
WARNING - Make sure Harness Straps are NOT twisted and
both Harness Straps are securely attached to the Splitter Plate.
Page 83

ADJUSTING HARNESS HEIGHT
43
SECURING YOUR CHILD
63
Page 84

SECURING CHILD WITH HARNESS
For a better fit in the Carrier with smaller infants, the provided Newborn
Positioner may be needed. See page 76 for more details.
Loosen harness by pressing the Adjuster Button and pulling out on both
1
Harness Straps.
2
Press the button on the buckle and release both buckle tongues.
Separate chest clip and spread Harness Straps apart. Place child in carrier
3
in seated position.
SECURING YOUR CHILD
64
Child must be resting against back and bottom of carrier. Make sure
child is not slouched.
Page 85

SECURING CHILD WITH HARNESS
1
3
2
SECURING YOUR CHILD
65
Page 86

SECURING CHILD WITH HARNESS
Make sure harness straps are AT or JUST BELOW top of child's
4
shoulders. If not, refer to page 60 for Adjusting Harness Height.
NEVER use clothing or blankets that interfere with fastening or
tightening the harness. An unsecured child could be ejected in a
sharp turn, sudden stop or crash!
Pull Harness Straps over child's shoulders and pull waist straps around
5
their waist.
SECURING YOUR CHILD
66
Never secure child in Carrier with child dressed in bulky garments or heavy clothing.
Heavy clothing can prevent harness from being properly tightened around child.
Page 87

SECURING CHILD WITH HARNESS
*
4 5
AT OR JUST BELOW
SECURING YOUR CHILD
67
Page 88

SECURING YOUR CHILD
68
SECURING CHILD WITH HARNESS
Insert each Buckle Tongue into Harness Buckle; listen for a click (6a). Pull
6
up firmly on both Buckle Tongues to make sure that they are securely
latched (6b).
Fasten Chest Clip by snapping both sides together.
7
Harness Straps must be laying flat, free of twists and on top of child's shoulders.
Page 89

CLICK!
SECURING CHILD WITH HARNESS
6b6a
7
SECURING YOUR CHILD
CLICK!
69
Page 90

SECURING YOUR CHILD
70
SECURING CHILD WITH HARNESS
Pull excess strap up through buckle tongues so that harness is snug around
child's thighs.
Tighten the harness by pulling slowly on Harness Adjuster Strap while
8
pulling up on both shoulder straps to remove all slack from below (8a).
Make sure the Harness Straps are snug on child. If you can pinch a fold in
the Harness Strap at the child’s shoulders, harness is too loose (8b). If the
Harness Straps are too loose pull the Harness Adjuster Strap more.
Move the Shoulder Pads up to the child’s shoulders. Slide Chest Clip up to
9
center of child’s chest, level with the armpits.
WARNING - If harness is not snug around your child, child could be ejected
in a sharp turn, sudden stop or crash resulting in serious injury or death.
Page 91

SECURING CHILD WITH HARNESS
8a
8b
9
SECURING YOUR CHILD
71
Page 92

SECURING YOUR CHILD
*
72
SECURING CHILD CHECKLIST
Harness Straps must be snug. If you can pinch a fold in the strap at the shoulders, the
harness is too loose. A snug strap should not allow any slack. It lies in a relatively straight
line without sagging. It does not press on the child’s flesh or push the child’s body into an
unnatural position.
To ensure a better fit for smaller infants, the Newborn Positioner may be needed. Never
place extra padding under or behind the child. Only use the Newborn Positioner. Never use
Newborn Positioner if child weighs more than 11 pounds.
Straps must lay flat, free of twists and centered on top of the child’s shoulders.
Check the height of the Harness Straps: Position the Harness Straps
at or just below the child’s shoulders.
Page 93

SECURING CHILD CHECKLIST
Check the position of Chest Clip: Chest Clip should be centered on the child’s chest, level
with the armpits.
Never secure child in Carrier with child dressed in bulky garments or heavy clothing.
Heavy clothing can prevent harness from being properly tightened around child.
Never secure child in Carrier with child wrapped in a blanket. To keep child warm, place a
blanket over child AFTER you have properly secured and tightened harness around child.
NO Bulky Clothing
SECURING YOUR CHILD
73
Page 94

BASE RELEASE HANDLE
RELEASE CARRIER FROM BASE:
To unhook the Carrier from the Base, squeeze the Base Release Handle
on the back of the Carrier then lift up on the Carry Handle.
ADDITIONAL INFORMATION
74
Page 95

LATCH STORAGE
Store LATCH Connectors properly in the compartments when
not using for installation.
Store both LATCH Connector in compartments on either side of the Base when not in use.
Insert LATCH Connectors into the LATCH Connector storage compartments.
1
Pull on the LATCH Pull Strap to secure LATCH Connectors in the
2
compartments.
Roll LATCH Pull Strap and store in Pull Strap Storage Slot.
3
1 2 3
ADDITIONAL INFORMATION
75
Page 96

NEWBORN POSITIONER
WARNING - Use the NEWBORN POSITIONER provided
for infants who weigh between 4 and 11 lbs (2 and 5 kg).
To ensure a better t for smaller infants the Newborn Positioner may be needed.
Do NOT use any other newborn positioner or pillows. Only use the one provided
by Chicco for this Child Restraint.
1
Place the Newborn Positioner in the Carrier seat. Then pull the Buckle
through slot in the bottom of Newborn Positioner.
Pull both Harness Straps over the side panels of Newborn Positioner.
2
Push Newborn Positioner firmly into Carrier to make sure it is properly
3
ADDITIONAL INFORMATION
positioned against the back of the seating area.
76
Page 97

3
NEWBORN POSITIONER
21
ADDITIONAL INFORMATION
77
Page 98

HEAD REST INSERT
To provide head support for smaller infants the Head Rest Insert may be used.
The Head Rest Insert can be used with or without the Newborn Positioner.
To Install Head Rest Insert, thread the Head Rest Straps through the
1
Harness Strap Adjustment Slots on the seat back.
Attach Head Rest hook and loop straps together.
2
1 2
ADDITIONAL INFORMATION
NEVER use Head Rest Insert with harness in upper slots. Head Rest Insert
78
could interfere with harness adjustment.
Page 99

HANDLE POSITIONS
To Adjust the Handle, press both of the Handle Release Buttons and rotate the
handle. There are 3 positions:
Carrying Position Rocking Position
Stationary Position
ADDITIONAL INFORMATION
79
Page 100

ADJUSTING CANOPY:
The Canopy can be adjusted by rotating the canopy forwards or backwards.
REMOVING CANOPY:
Pull back the fabric and press the button
1
on Canopy Mount and pull up to remove.
ADDITIONAL INFORMATION
80
Repeat for the other side.
ATTACHING CANOPY:
2
Re-attach both of the Canopy Mounts into
the slots on the side of the Carrier.
CANOPY
1
 Loading...