

Page 1
GR. 0+
0-13Kg
• Istruzioni d’uso
• Instructions for use
• Mode d’emploi
• Gebrauchsanleitung
• Instrucciones de uso
• Instruções de utilização
• Gebruiksaanwijzing
• Οδηγίες χρήσης
• Brugsanvisning
• Käitöohjeet
• Návod K Použití
• Bruksanvisning
• Instrukcja sposobu użycia
• Használati Utasítás
• Upute Za Uporabu
• Инструкция по использованию
• Návod K Použitiu
• Navodila Za Uporabo
• Kullanım bilgileri
• Instrucţiuni de folosire
• Инструкции за употреба
• Інструкція з використання
• Instruções de utilização
Page 2

I
Istruzioni d’uso Pag. 8-13
GB
Instructions for use Pag. 14-19
F
Mode d’emploi Pag. 20-25
D
Gebrauchsanleitung Pag. 26-31
E
Instrucciones de uso Pag. 32-37
P
Instruções de utilização Pag. 38-43
NL
Gebruiksaanwijzing Pag. 44-49
GR
Οδηγίες χρήσης Pag. 50-55
DK
Brugsanvisning Pag. 56-61
FIN
Käitöohjeet Pag. 62-67
CZ
Návod K Použití Pag. 68-73
S
Bruksanvisning Pag. 74-79
PL
Instrukcja sposobu użycia Pag. 80-85
H
Használati Utasítás Pag. 86-91
HR
Upute Za Uporabu Pag. 92-97
RUS
Инструкция по использованию Pag. 98-103
SK
Návod K Použitiu Pag. 104-109
SLO
Navodila Za Uporabo Pag. 110-115
TR
Kullanım bilgileri Pag. 116-121
R
Instrucţiuni de folosire Pag. 122-127
BG
Инструкции за употреба Pag. 128-133
UA
Інструкція з використання Pag. 134-139
BR
Instruções de utilização Pag. 140-145
2
Page 3
3
2
1
A
2
D
C
E
3
5
4
6
3
Page 4
7
8
9b 10b
10a9a
9c
11
12
4
Page 5
13
14
15
17
16
18
5
Page 6
19
20
21
CLACK
23a 23b
22
24
6
Page 7
25 26
27a 27b
28
3029
7
Page 8

I
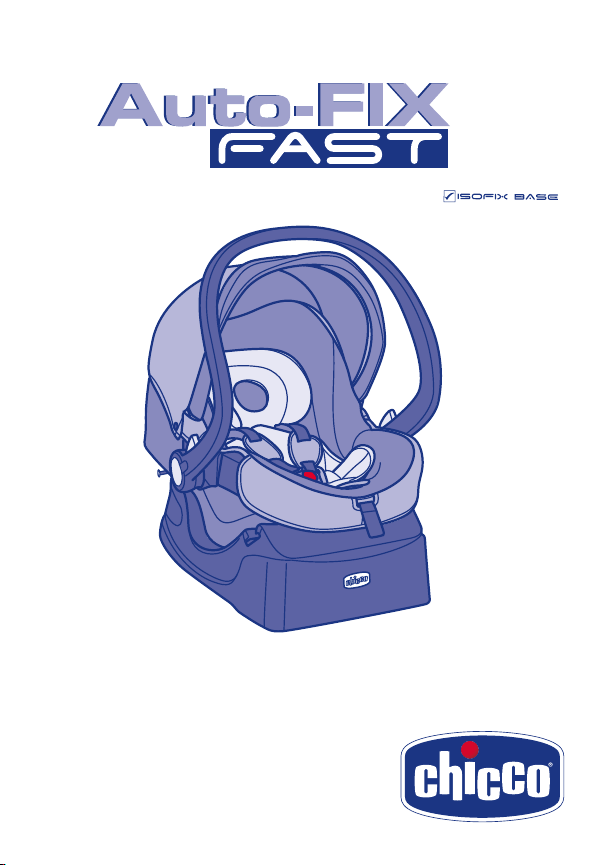
CHICCO
AUTO-FIX FAST
G. 0+ (0-13)
ISTRUZIONI D’USO
INDICE:
1. INTRODUZIONE
1.1 AVVERTENZE
1.2 CARATTERISTICHE DEL PRODOTTO
1.3 DESCRIZIONE COMPONENTI
1.4 POSIZIONI DEL MANIGLIONE
1.5 LIMITAZ IONI E REQUIS ITI D’USO REL ATIVI AL PRODOTTO E AL SEDILE AUTO
2. INSTALLAZIONE IN AUTO
2.1 CONFIGURAZIONE INIZIALE DEGLI
SPALLACCI
2.2 INSTALLAZIONE CON BASE
2.3 INSTALLAZIONE SENZA BASE
3. ULTERIORI OPERAZIONI
3.1 ALLOGG IAMENTO DEL BAMB INO NEL
SEGGIOLINO
3.2 REGOLAZIONE DELLA POSIZIONE
DELLE CINTURE
3.3 POSIZIONE FISSA O BASCULANTE
DEL SEGGIOLINO (USO SDRAIETTA)
3.4 UTILIZZO CON PASSEGGINO
3.5 PULIZIA E CONSERVAZIONE
1. INTRODUZIONE
1.1 AVVERTENZE
IMPORTANTISSIMO: DA LEGGERE SUBITO
• C O N S E R V A R E Q U E S T O M A N U A L E P E R
UTILIZZI FUTURI.
• P e r i l m o n t a g g i o e l ’ i n s t a l l a z i o n e d e l p r o -
dotto segui re scrupolosam ente le istruzioni. Evitare c he qualcuno utiliz zi il prodotto
senza aver letto le istruzioni.
• A T T E N Z I O N E ! I n b a s e a l l e s t a t i s t i c h e s u g l i
incidenti, generalmente i sedili posteriori
del veicolo sono più sicuri di quello anteriore: si consiglia pertanto di installare il
Seggiolino sui sedili posteriori. In par ticolare il sedile più sicuro è quello centrale
posteriore, se dotato di cintura a 3 punti.
• A T T E N Z I O N E ! G R A V E P E R I C O L O ! N o n
ut ili zz are m ai q ue sto S eg gio lin o su un s e-
dile anteriore dotato di airbag frontale. E’
possibile installare il Seggiolino sul sedile
anteriore soltanto se l’airbag frontale è
stato disattivato: verifi care con la casa
automobi listica o sul manua le d’istruzioni
dell’auto la possibilità di disinserire l’airbag.
Si consiglia in ogni caso di arretrare il più
possibile il sedile compatibilmente con
la presenza di altri passeggeri sul sedile
posteriore.
• S i r a c c o m a n d a c h e t u t t i i p a s s e g g e r i o c cupanti siano informati della modalità di
sgancio del b ambino in caso di em ergenza.
• P r e s t a r e a t t e n z i o n e a c o m e s i i n s t a l l a i l
Se ggi oli no i n au to in mod o da evit are che
un sedile mobile o la portiera possano
interferire con esso.
• N e s s u n S e g g i o l i n o p u ò g a r a n t i r e l a t o t a l e
sicurezza del bambino in caso d’incidente,
ma l’utilizzo di questo prodotto riduce il
rischio di lesioni gravi o di morte.
• I l r i s c h i o d i s e r i d a n n i a l b a m b i n o , n o n
solo in caso d’incidente, ma anche in altre
circostanze
(per es. brusche frenate, ecc.) aumenta se
le indicazioni riportate in questo manuale
non vengono seguite in modo scrupoloso:
verifi care sempre che il Seggiolino sia agganciato correttamente al sedile.
• N e l c a s o i n c u i i l S e g g i o l i n o f o s s e d a n n e g giato, deformato o fortemente usurato,
questo deve essere sostituito, potrebbe
aver perso le caratteristiche originali di
sicurezza.
• N o n e f f e t t u a r e m o d i fi che o aggiunte al
prodotto senza l’approvazione del costruttore.
• N o n i n s t a l l a r e a c c e s s o r i , p a r t i d i r i c a m b i o
e componenti non forniti dal costruttore.
• N o n l a s c i a r e m a i i l b a m b i n o i n c u s t o d i t o
nel Seggiolino per nessun motivo.
• N o n l a s c i a r e m a i i l S e g g i o l i n o s u l s e d i l e
dell’auto non agganciato, potrebbe urtare
e ferire i passeggeri.
• N o n i n t e r p o r r e n u l l a , c h e n o n s i a u n a ccessorio approvato per il prodotto, né tra
il sedile auto e il seggiolino, né tra il Seggiolino e il bambino: in caso di incidente
il Seggiolino potrebbe non funzionare
correttamente.
• N e l c a s o i n c u i l ’ a u t o v e n i s s e l a s c i a t a s o t to il sole diretto si consiglia di coprire il
8
Page 9

Seggiolino.
• I n s e g u i t o a d u n i n c i d e n t e a n c h e l i e v e i l
Seggiolino può subire danni non sempre
visibili a occhio nudo: è pertanto necessario sostituirlo.
• N o n u t i l i z z a r e S e g g i o l i n i d i s e c o n d a m a n o :
potrebbero avere subito danni strutturali
non visibili a oc chio nudo, ma compromettenti la sicurezza del prodotto.
• L a f o d e r a p u ò e s s e r e s o s t i t u i t a e s c l u s i v a mente con una a pprovata dal costrut tore,
poichè costituisce una parte integrante
del Seggiolino. Il Seggiolino non deve essere mai usato senza la fodera, per non
compromet tere la sicurezza d el bambino.
• C o n t r o l l a r e c h e i l n a s t r o d e l l a c i n t u r a n o n
risulti at torcigliato ed evitar e che quest’ultimo o parti del Seggiolino vengano pizzicate tra le portiere o sfreghino contro
punti taglienti. Qualora la cintura presenti
tagli o sfi lacciature è necessario sostituirla.
• V e r i fi care che non vengano t rasportati, i n
parti colare sul ripiano p osteriore all’interno del veicolo, oggetti o bagagli che non
siano stati fi ssati o posizionati in manie ra
sicura: in c aso di incidente o br usca frenata
potrebbero ferire i passeggeri.
• A s s i c u r a r s i c h e t u t t i i p a s s e g g e r i d e l l ’ a u t o
utilizz ino la propria cint ura di sicurezz a sia
per la pro pria sicurezza si a perché durante
il viaggio, in caso di incidente o brusca
frenata, potrebbero ferire il bambino.
• I n c a s o d i l u n g h i v i a g g i f a t e d e l l e s o s t e
frequenti. Il bambino si stanca molto facilmente. Per nessuna ragione estrarre il
bambino d al Seggiolino me ntre l’auto è in
movimento. Se il bambino ha bisogno di
attenzi one, è necessar io trovare un posto
sicuro e accostare.
• N e o n a t i p r e m a t u r i n a t i c o n m e n o d i 3 7
settimane di gestazione possono essere a
rischio nel Seggiolino. Tali neonati possono
avere diffi coltà respiratorie mentre sono
seduti nel S eggiolino. Consigl iamo quindi
di rivolgervi al vostro medico o al personale
dell’ospedale affi nché possano valutare il
vostro bamb ino e raccomandare il Se ggiolino adatto prima di lasciare l’ospedale.
• L a s o c i e t à A r t s a n a d e c l i n a o g n i r e s p o n s a bilità per un uso improprio del prodotto.
1.2 CARATTERISTICHE DEL
PRODOTTO
• Q u e s t o S e g g i o l i n o è o m o l o g a t o “ G r u p p o
0+”, per il trasporto di bambini dalla nascita fi no a 13 kg di pes o (da 0 a 10 me si/1
anno circa), nel rispetto del regolamento
europeo ECE R44/04.
• L ’ o m o l o g a z i o n e è d i t i p o “ U n i v e r s a l ” , q u i n d i
il Seg gi oli no p uò e sse re u til iz zat o su qua ls iasi model lo di automobile. ATTEN ZIONE!
“Universal” signifi ca che è compatibile
con la maggior parte, ma non con tutti
i sedili auto.
AVVISO I MPORTANTE
1. Ques to è un dispositivo di rite nuta bam-
bini “Universale”, omologato secondo
Regolamento ECE R44/04 e compatibile con la maggior parte, ma non tutti,
i sedili auto.
2. La perfe tta compatibilit à è più facilmente
ottenibile n ei casi in cui il costrut tore del
veicolo dichia ra nel manuale veicol are che
il veicolo prevede l’installazione di disposi tiv i di rit enu ta b amb ini “Un ive rs ali ” pe r
la fascia d’età in questione.
3. Questo dispositivo di ritenuta è stato
classifi cato “Universale” secondo criteri
di omologazione più severi rispetto a
modelli precedenti che non dispongono
del presente avviso.
4. Adatto per l’impiego nei veicoli dotati
di cintura di sicurezza a 3 punti, statica
o con arrotolatore, omologata in base
al Regolamento UN/ECE N°16 o altri
standard equivalenti.
5. In caso di dubbio, contattare il produt-
tore del dispositivo di ritenuta oppure il
rivenditore.
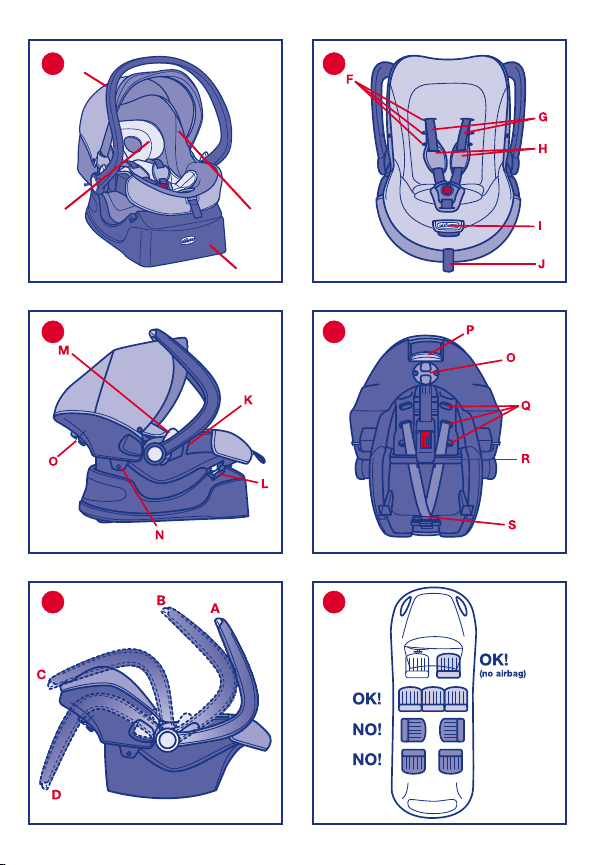
1.3 DESCRIZIONE COMPONENTI
Fig. 1 (3/4)
A. Maniglione
B. Capote parasole
C. Rivestimento tessile
D. Cuscino riduttore (*)
E. Base (**)
Fig. 2 (Fronte)
F. Asole di passaggio delle cinture
G. Cinture del Seggiolino
H. Spallacci (*)
9
Page 10

I. Pulsan te di regolazione de lle cinture (sotto
la patella in tessuto)
J. Nastro di regolazione delle cinture
Fig. 3 (Profi lo)
K. Guida cintura auto addominale sul Seg-
giolino
L. Guida cintu ra auto addominale s ulla base
M. Pulsanti per la rotazione del maniglione
N. Perni Clik Clak (per aggancio a passeg-
gino)
Fig. 4 (Dietro)
O. Guida cintura auto diagonale
P. Maniglia di sgancio (dalla base e dal pas-
seggino)
Q. Asole di passaggio delle cinture
R. Elemento di guida delle cinture del Seg-
giolino
S. Fermo stabilizzatore
(*) Forma e modello possono differire a
seconda delle versioni di Seggiolino.
(**) Opzionale
1.4 POSIZIONI DEL MANIGLIONE
Il maniglione del Seggiolino è regolabile in
4 posizioni (Fig. 5).
A. Posizione di trasporto in auto (ATTEN-
ZIONE: questa è l’unica posizione con-
sentita durante il trasporto in auto).
B. Posizione trasporto a mano.
C. Posizione uso sdraietta a dondolo o per
aggancio a passeggino Chicco predi-
sposto.
D. Posizione uso sdraietta fi ssa.
Per effettuare la regolazione premere contempor aneamente i puls anti (M) sul maniglione ruotandolo nella posizione prescelta
fi no a udire uno scatto.
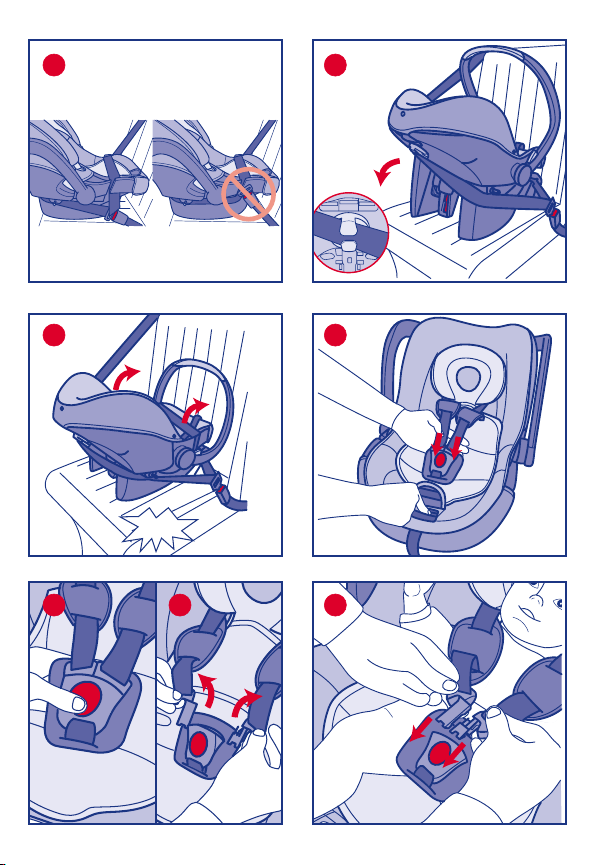
1.5 LIMITAZIONI E REQUISITI D’USO
RELATIVI AL PRODOTTO E AL
SEDILE AUTO
AT TENZ ION E! R ispe tta re sc rup olo sam ente le seguenti limitazioni e requisiti d’uso
relativi al prodot to e al sedile auto: in c aso
contrario non è garantita la sicurezza.
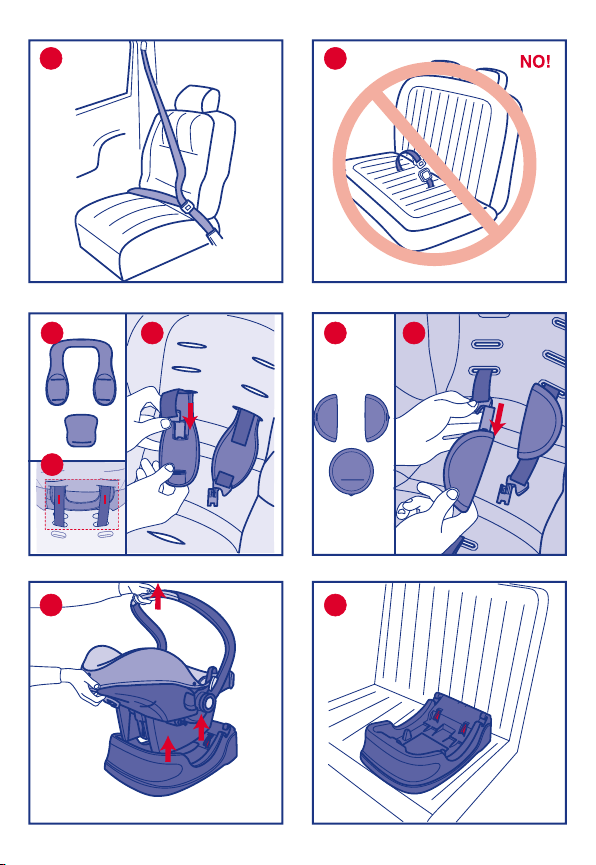
• I l S e g g i o l i n o p u ò e s s e r e i n s t a l l a t o s u l s e -
dile anteriore lato passeggero o su uno
qualsiasi dei sedili posteriori. In ogni caso
il sedile dell’auto deve essere rivolto in
senso di ma rcia. Non utiliz zare mai questo
Seggiolino su sedili rivolti lateralmente o
opposti al senso di marcia (Fig. 6).
• I l s e d i l e d e l l ’ a u t o d e v e e s s e r e d o t a t o d i
cintura di si curezza a 3 punti, s tatica o con
arrotolatore, omologata in base al Regolamento UNI/ECE N°16 o altri standard
equivalenti (Fig. 7).
• A T T E N Z I O N E ! N o n i n s t a l l a r e m a i i l S e g giolino con l a cintura dell’auto a due punti
di ancoraggio (Fig. 8).
• N o n u t i l i z z a r e m a i i l c u s c i n o r i d u t t o r e s e
il bambino ha un peso superiore a 6 kg.
• A s s i c u r a r s i c h e l a fi bbia della cintu ra a tre
punti dell’auto no n sia troppo alta (fi g. 13-
19) . In ca so co ntra rio, provare a i nsta llar e
il seggiolino in un altro sedile dell’auto.
2. INSTALLAZIONE IN AUTO DEL
SEGGIOLINO
Il Seggi olino può essere ins tallato sia con la
base (opzionale) che senza. In entrambe le
confi gurazioni, deve essere installato solo
in senso contrario rispetto alla direzione
di marcia.
2.1 CONFIGURAZIONE INIZIALE DE-
GLI SPALLACCI
Il Seggiolino è dotato di 2 differenti tipologie
di spallacci (A e B) a seconda delle ve rsioni.
Prima di pro cedere all’utilizzo de l Seggiolino,
per prov vedere al montaggio d egli spallacci,
procedere come segue:
• S p a l l a c c i v e r s i o n e A ( F i g . 9 A , 9 B e 9 C ) : f a r
passare g li spallacci attr averso le asole del
rivestimento tessile (non della struttura
sottostante) in modo che le cinture rimangano p osizionate sopra d i essi. Infi lare
la patella infragambe attraverso la fi bbia
delle cinture.
• S p a l l a c c i v e r s i o n e B ( F i g . 1 0 A e 1 0 B ) : f a r
passar e le cinture del Seggio lino attravers o
i due spallacci. Infi lare la patella infragambe attraverso la fi bbia delle cinture.
2.2 INSTALL AZIONE CON BASE
Per installare il Seggiolino con la base sul
sedile dell’auto, procedere come segue:
1. Sganciare il Seggiolino dalla base tiran-
do la maniglia di sgancio posta dietro lo
schienale e contemporaneamente sollevarlo attraverso il maniglione (Fig. 11).
10
Page 11

2. Posizionar e la base sul sedile pre scelto per
l’installazione, orientandola come in Fig.
12, facendo in modo che sia a contatto
con lo schienale del sedile dell’auto.
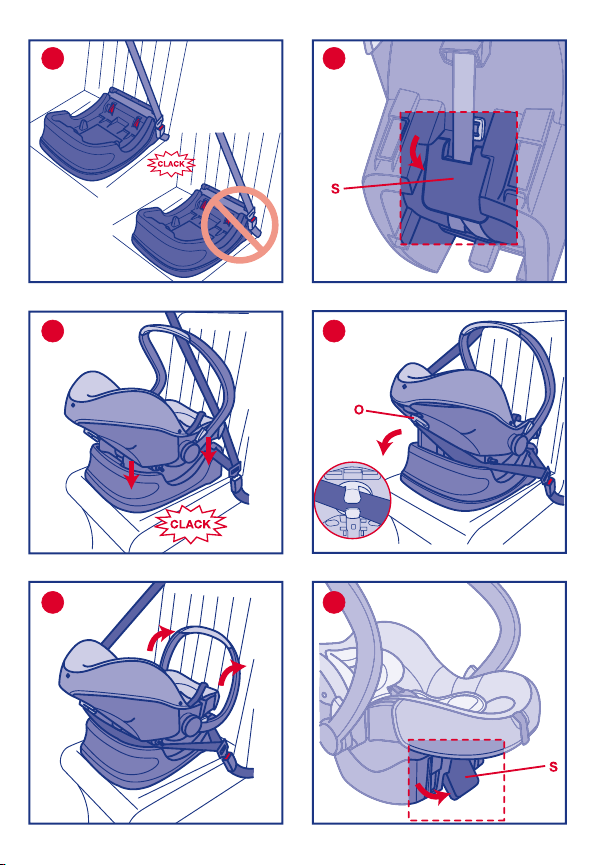
3. T irare la cintura di sicurezz a dell’auto ed
agganciarla alla corrispondente fi bbia,
facendo passare la parte orizzontale
(addominale) nelle due apposite guide
(L) contrassegnate dalla freccia azzurra
e tenderla il più possibile (Fig. 13).
4. Prima di inse rire il Seggiolino nella bas e,
verifi care che il fermo stabilizzatore sia
chiuso (Fig. 14).
5. Inserire il Seggiolino nella base (rivolto
in senso cont rario di marcia) spingen dolo
verso il bas so fi no ad ottenere l’aggancio
(udirete un “clack” di fi ssaggio) (Fig. 15).
6. Verifi care il corretto aggancio del Seggiolino alla base tentando di sollevarlo
sia dalla parte anteriore che posteriore.
7. Impug nare la cintura diago nale dell’auto
e farla passare nell’apposita guida (O)
posta sul retro dello schienale del Seggiolino (Fig. 16). ATTENZIONE! La cintura diagonale durante il trasporto deve
SEMPRE rimanere inserita all’interno di
questa guida.
8. Tendere il più possibile la cintura, senza
lasciare eccessi di nastro ed assicurandosi
che non risulti attorcigliata.
9. Ruotare il maniglione in posizione A
verifi cando che appoggi contro il sedile
dell’auto (Fig. 17).
ATTENZIONE! dopo l’installazione verifi care SEMPRE che la cintura dell’auto sia
correttamente in tensione e che sia distribuita unifor memente in tutti i pu nti, senza
present are attorcigliam enti. Non far pas sare
MAI la cint ura dell’auto in posizioni dive rse
da quelle indicate.
Per disinstallare il seggiolino mantenendo
la base installata sull’auto:
1. Sfi lare dalla guida s ullo schienale la ci ntura
diagonale senza sganciarla dalla fi bbia.
2. riportare il maniglione in posizione verticale B (Fig. 5).
3. Sganciare il Seggiolino come illustrato
in precedenza.
2.3 INSTALL AZIONE SENZA BASE
Per installare il Seg giolino senza bas e, procedere come segue:
1. Estrarre il fermo stabilizzatore e posizionare il Seggiolino sul sedile dell’auto
prescelto (Fig. 18).
2. T irare la cintura di sicurezza dell’auto ed
agganciarla alla corrispondente fi bbia,
facendo p assare la par te orizzontale (ad dominale) de lla cintura nelle d ue apposite
guide (K) del seggiolino contrassegnate
dalla freccia azzurra (Fig. 19).
3. Impugnar e il ramo diagonale de lla cintura
dell’auto e farlo passare nell’apposita
guida (O) posta sul retro dello schienale
del Seggiolino (Fig. 20). ATTENZIONE!
La cintur a diagonale durante i l trasporto
deve SEMPRE rimanere inserita all’interno
di questa guida.
4. Tendere il più possibile la cintura, senza
lasciare eccessi di nastro ed assicurandosi
che non risulti attorcigliata.
5. Ruotare il maniglione in posizione A
verifi cando che appoggi contro il sedile
dell’auto (Fig. 21).
Per disinstallare il seggiolino:
1. Sganciare la cintura dell’auto premendo
la fi bbia.
2. Riportare il maniglione in posizione B
(verticale).
3. Sfi lare la cintura dalla guida diagonale e
da quelle orizzontali.
2.4 I NSTALLA ZIONE CON BA SE ISOFIX
(in dotazione o acquistabile separatamente)
Per l’installazione con base ISOFIX fare
riferimento al relativo libretto d’istruzioni
allegato al prodotto.
Per l’utilizzo del sistema ISOFIX SEMIUNIVERSALE è assolutamente necessario
leggere il manuale dell’autoveicolo prima
dell’installazione del Seggiolino. Il manuale
indicher à i posti compatibili co n la classe di
taglia del seggiolino auto.
La Base Isofi x di Chicco ha un’omologazione di tipo “SemiUniversale” per cui non è
compatibi le con tutti i modelli d’auto, be nsì
solame nte con quelli specifi cati nel libretto
allegato al p rodotto “List a delle autovetture
omologate”.
11
Page 12

3. ULTERIORI OPERAZIONI
3.1 ALLOGGIAMENTO DEL BAMBINO
NEL SEGGIOLINO
1. Sollevar e la patella in tessuto, ma ntene-
re premuto il pulsante di regolazione e
tirare le cinture del Seggiolino in modo
da allentarle (Fig. 22).
2. Aprire la fi bbia, premendone il botto-
ne rosso, e tenere divaricate le cinture
(Fig. 23).
3. Alloggiare il bambino.
4. Sovrapp orre le due linguette d ella fi bbia e
inserir le una volta unite nella fi bbia fi no a
sentire un “cli ck” (Fig. 24). ATTENZION E!
Non infi lare mai le linguette nella fi bbia
una alla volta o una sola.
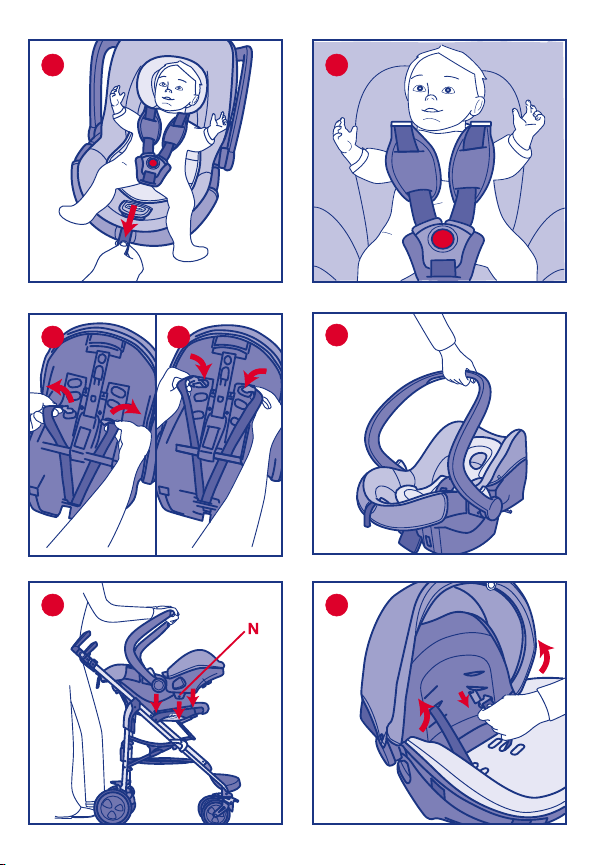
5. Tensionare le cinture di sicurezza del
Seggiolino tirando l’apposito nastro di
regolazione (Fig. 25).
3.2 REGOLAZIONE DELLA
POSIZIONE DELLE CINTURE
ATTENZIONE! Le cinture devono sempre
essere adattate alla crescita del bambino.
Prima di installare il Seggiolino in auto bisogna posizionarle all’altezza corretta.
Per una corre tta regolazione, le c inture devono uscire dallo schienale all’altezza delle
spalle del bambino (Fig. 26).
Il seggiolino dispone di 3 posizioni in altezza.
Per effett uare lo spostamento de lle cinture
procedere come segue:
1. Rimuovere gli spallacci sfi landoli dalle
asole del rivestimento tessile.
2. Aprire la fi bbia delle cinture premendone
il bottone rosso.
3. Sfi lare le cinture da dietro lo schienale e
infi larle nell’asola più adatta all’altezza
del bambino (Fig. 27A e 27B).
ATTENZIONE! Assicurarsi che le cinture
passino sempre tra l’elemento di guida (R)
e il guscio.
ATTENZIONE! Il cuscino riduttore garantisce al bambino dalla nascita fi no a 6 kg il
corretto contenimento e la posizione ideale
per collo e schiena.
3.3 POSIZIONE FISSA O
BASCULANTE DEL SEGGIOLINO
(USO SDR AIETTA)
Quando non viene utilizzato in auto, il
Seggiolino può anche essere usato come
dondolino o sdraietta.
Per renderlo basculante, chiudere il fermo
stabilizzatore (Fig. 14) e posizionate il maniglione in posizione C (Fig. 5).
Per utilizzarlo in posizione fi ssa, estrarre il
fermo st abilizzatore e po sizionare il manico
nella posizione D (Fig. 5).
Posizionare solo su superfi ci stabili ed orizzontali.
ATTENZIONE! Prima di trasportare il Seggiolino, riportare sempre il maniglione in
posizione B (verticale).
AVVERTENZA! Non lasciare il
bambino incustodito.
AVVERTENZA! Utilizzare sempre
il sistema di ritenuta.
AVVERT ENZA! E’ pericolos o uti lizza re il S egg iolin o su un a super fi cie
sopraelevata, come tavoli, sedie,
ecc.
AVVERTENZA! Questo Seggiolino
non è inteso per prolungati periodi
di sonno.
AVVERTENZA! Non utilizzare il
Seggiolino se il bambino è in grado
di stare seduto da solo.
Il Seggiolino non sostituisce un letto o una
culla. Se il bambino necessita di dormire,
dovrebbe essere posto in un letto o in una
culla adatta.
Non usare il Seggiolino se qualsiasi parte
fosse rotta o mancante.
3.4 UTILIZZO CON PASSEGGINO
ATTENZI ONE! La poltron cina Auto-Fi x può
essere fi ssata sui passeggini Chicco dotati
degli appositi sistemi di aggancio di serie o
acquistabili separatamente.
ATTENZIONE! Per l’utilizzo insieme al
passeggino fare riferimento alle istruzioni
del passeggino. I Passeggini CHICCO dotati di sistema CLIK CLAK hanno braccioli
con speciali dispositivi che permettono di
agganciare il Seggiolino direttamente sul
12
Page 13

passeg gino, senza dover utilizzare ulteriori
accessori.
Prima di agganciare la poltroncina auto
rimuovere com pletamente i copri br accioli.
Per agganciare il Seggiolino al passeggino
procedere come segue:
1. Impugnare il seggiolino con il maniglione
in posizione verticale (B) (Fig. 28).
2. Agganciare i due perni di aggancio Clik
Clak del S eggiolino (N) ai bra ccioli del passeggino o al sistema di aggancio acquistato separatamente, prestando particolare
attenzione al fatto che si aggancino su
entrambi i lati. Si udirà un clik di aggancio
(Fig. 29).
AVVERTENZA Prima dell’uso controllare
che i dispositivi di fi ssaggio del Seggiolino
siano correttamente innestati.
Per sganciare il Seggiolino dal passeggino:
1. Riportare il maniglione in posizione ver-
ticale (B).
2. Tirare la maniglia di sgancio posteriore.
3. Spostare e appoggiare il Seggiolino su
una superfi cie piana.
ATTENZIONE: L’aggancio e lo sgancio si
possono ef fettuare anche co n il bambino nel
Seggiol ino anche se con il pes o del bambino
le operazioni suddette potrebbero risultare
me no a gev oli . In que st o ca so s i ra cco man da
attenzione nell’effettuare le operazioni di
cui sopra.
3.5 PULIZIA E CONSERVAZIONE
PULIZIA DELLA FODERA
Il rivestimento tessile del Seggiolino è completame nte sfoderabile e lava bile a mano o
in lavatrice a 30°C.
Per lavarlo, slacciare le cinture ed estrarre
il rivestimento tessile dopo aver sfi lato i
due rami cinture e la fi bbia dalle rispettive
asole (Fig. 30).
Per il lavag gio seguire le istruzio ni riportate
sull’etichetta del rivestimento contenente i
seguenti simboli per il lavaggio:
30° C
Lavaggio in lavatrice a 30°C
Non candeggiare
Non asciugare in asciugatrice
Non stirare
Non lavare a secco
Non usare mai detergenti abrasivi o solventi. Non centrifugare la fodera e lasciarla
asciugare senza strizzarla.
PULIZIA DELLE PARTI PLASTICHE E
DI METALLO
Per la pulizia delle parti in plastica o in
metallo verniciato utilizzare solamente un
panno um ido. Non utilizz are mai detergenti
abrasivi o solventi.
Le parti mobili del Seggiolino non devono
essere in alcun modo lubrifi cate.
CONTROLLO DELL’INTEGRITA’ DEI
COMPONENTI
Si raccomanda di verifi care regolarmente
l’integrità e lo stato di usura dei seguenti
componenti:
• R i v e s t i m e n t o t e s s i l e : v e r i fi care che non
fuoriescano imbottiture o che non ci sia
rilascio di parti di esse. Verifi care lo stato
delle cuciture che devono essere sempre
integre.
• C i n t u r e : v e r i fi care che non ci sia un anomalo sfi bramento della trama tessile con
evidente riduzione dello spessore in corrisponde nza del nastro di rego lazione, dello
spartigambe, sui rami spalle e nella zona
della piastra di regolazione delle cinture.
• P l a s t i c h e : v e r i fi care lo stato di usura di
tutte le parti in plastica che non devono
presentare evidenti segni di danneggiamento o di scolorimento.
ATTENZI ONE! Nel caso in cui i l Seggiolino
risultas se deformato o for temente usurato
deve essere sostituito: potrebbe aver perso
le caratteristiche originali di sicurezza.
CONSERVAZIONE DEL PRODOTTO
Quando non installato sull’auto si raccomanda di conservare il Seggiolino in un
posto asciutto, lontano da fonti di calore e
al riparo da polvere, umidità e luce solare
diretta.
SMALTIMENTO DEL PRODOTTO
Raggiunto il limite di utilizzo previsto per il
Seggio lino, interrompe re l’uso de llo stesso e
deposita rlo tra i rifi uti . Pe r mot iv i di r is pet to
dell’ambiente, separare i diversi tipi di rifi uti
secondo quanto previsto dalla normativa
vigente nel proprio Paese.
13
Page 14

GB
CHICCO
AUTO-FIX FAST
G. 0+ (0-13)
INSTRUCTIONS FOR USE
INDEX
1. INTRODUCTION
1.1 WARNINGS
1.2 PRODUCT FEATURES
1.3 DESCRIPTION OF THE PARTS
1.4 POSITIONS OF THE HANDLE
1.5 RESTRICTIONS AND REQUISITES REGARDI NG THE USE OF TH E PRODUCT
AND CAR SEAT
2. CAR INSTALLATION
2.1 INITIAL CONFIGURATION OF THE
SHOULDER STRAPS AND PADS
2.2 INSTALLATION WITH THE BASE
2.3 INSTALLATION WITHOUT THE BASE
3. OTHER OPERATIONS
3.1 S EATING THE CHI LD IN THE CAR S EAT
3.2 ADJUSTING THE POSITION OF THE
HARNESS STRAPS
3.3 FIXED OR ROCKING POSITION OF
THE C AR SEAT (ROCKER CHAI R MODE)
3.4 USE WITH THE STROLLER
3.5 CLEANING AND STORAGE
1. INTRODUCTION
1.1 WARNINGS
VERY IMPORTANT: TO BE READ IMMEDIATELY
• KEEP THIS MANUAL FOR FUTURE REF-
ERENCE.
• Read these instructions carefully before
fi tting and installing the product. The
product must not be used by anybody
who has not read these instructions.
• W A R N I N G ! A c c o r d i n g t o c a r a c c i d e n t
statistics, the rear seats of a vehicle are
generally safer than the front seat: it is
therefore recommended to fi t the child
car seat into the rear seats of the car. In
particular, the central rear seat is the safest, when fi tted with a 3- point safety str ap.
• W A R N I N G ! S E R I O U S D A N G E R ! N e v e r u s e
this child car seat fi tted on front vehicle
seats fi tted with front airbags. The child
car seat can only be installed on a front
vehicle seat if the front airbag has been
disabled : check with the car m anufacturer
or the relative user manual for instructions
on how to disable the airbag. It is always
recommen ded to slide the vehicle se at as
far back as p ossible, according to whet her
passengers are travelling in the back.
• It is re commended to ensure that all passengers k now how to release the ch ild from
the car seat in the case of an emergency.
• Pay close at tention on how to fi t the child
car seat inside the vehicle, to prevent a
loose seat or car door from interfering
with it.
• N o c h i l d c a r s e a t c a n g u a r a n t e e t h e t o t a l
safety of your child in the event of an accident, bu t the use of this produc t reduces
the risk of serious injuries or death.
• T h e r i s k o f s e r i o u s i n j u r i e s t o t h e c h i l d
increases, not only in the case of accidents, but also in other circumstances
(e.g. sudden braking, etc.) if the instructions provided in this manual are not followed carefully: always check that the
child car seat is fi tted correctly onto the
vehicle seat.
• If the child c ar seat is damaged, d eformed
or worn out, it must be replaced, as its
original safety features may have been
compromised.
• T h i s p r o d u c t m u s t n o t b e m o d i fi ed in any
way, unless the modifi cation is approved
by the manufacturer.
• Do not install accessories, spare parts,
or any component not supplied by the
manufacturer.
• Never leave your child unattended in the
car seat.
• N e v e r p l a c e t h e c h i l d s e a t o n a v e h i c l e
seat without fastening it securely in place;
it could hurt or injure other passengers
in the car.
• Never place anything except an approved
accessory between the vehicle seat and
the child car seat or between the child
car seat and the child: in the event of an
accident , the child car seat may no t operate correctly.
• I t i s r e c o m m e n d e d t o c o v e r t h e c h i l d c a r
14
Page 15

seat if the vehic le is left exposed to direct
sunlight.
• After an accident, even a minor one, the
child seat incurs damage, even if it is not
visible to the n aked eye. It must therefor e
be replaced.
• Do not use second hand child car seats:
they may have suffered structural damage which is not visible to the naked eye
but however compromise the safety of
the product.
• Th e se at f abr ic m us t on ly b e re pla ced wit h
another approved by the manufacturer as
it constitutes an integr al part of the child
car seat. To ensure the safety of the child
car seat, never use it without its fabric
cover.
• Check that the harness straps are not
twisted and try to prevent them, or any
other part of the car seat from getting
trapp ed in the car door or r ubbing against
sharp objects. Should the belt be slashed
or frayed it must be replaced.
• D o n o t t r a n s p o r t l o o s e o r u n s e c u r e d
objects or baggage on the back shelf of
the vehicle: in the event, of an accident
or sudden braking, they may injure the
passengers.
• Ensure that all the car passengers fasten
their seat belts, for their own safety and
because, during the journey, they may
injure the ch ild in the event of an accide nt
or sudden braking of the car.
• On long journeys make frequent stops.
Children tire e asily. Never, for any reason,
remove your child from the child car seat
whilst t he car is moving. If your c hild needs
attention, fi nd a safe place and pull over.
• P r e m a t u r e b a b i e s b o r n b e f o r e t h e 3 7 t h
we ek of preg nan cy c an b e at r isk i f pl aced
in a child car seat. These newborn babies may encounter breathing problems
when sat in a child car seat. We therefore
recommend you contact your doctor or
hospital s taff, before leaving the h ospital,
so they can evaluate your baby properly
and recommend the most suitable type
of child car seat.
• Artsa na declines all responsibility in cases
of incorrect use of this product.
1.2 PRODUCT FEATURES
• T h i s c h i l d c a r s e a t i s a p p r o v e d f o r “ G r o u p
0+”, for the transp ort of babies fro m birth
up to 13 Kg in weight (from 0 to 10/12
months approximately), and conforms to
European Standard ECE R 44/04.
• T h i s a p p r o v a l i s “ U n i v e r s a l ” , w h i c h m e a n s
that the child car seat can be used on all
types of ve hicles. WARNING! “ Universal”
me ans tha t it is c omp ati ble wit h mo st, but
not all car seats.
IMPORTANT INFORMATION
1. This is a “Universal” child restraint de-
vice. It is approved to ECE Regulation
No. 44.04, and it will fi t most, but not
all car seats.
2. A correct fi t is likely if the vehicle manu-
facturer has declared that the vehicle is
capable of accepting a “Universal” child
restraint device for this age group.
3. This child res traint device has b een classi-
fi ed as “U niversal” under mo re stringent
conditions than those that were appl ied
to earlier designs that do not display this
notice.
4. It is only suitable if the vehicle is fi tted
with a 3-point static or 3-point retractor
sa fet y b elt s ap pro ved to U N/E CE R egu lation No.16, or other equivalent standards.
5. If in doubt, consult either the child re-
straint device manufacturer or your
retailer.
1.3 DESCRIPTION OF THE PARTS
Diag. 1 (3/4)
A. Carry Handle
B. Sun hood
C. Fabric lining
D. Booster cushion (*)
E. Base (**)
Diag. 2 (Front)
F. Belt threading slots
G. Child car seat restraint harness
H. Shoulder pads (*)
I. Restraint harness adjustment button
(under the fabric fl ap)
J. Restraint harness adjustment strap
15
Page 16

Diag. 3 (Profi le)
K. Abdominal car safety belt slot on the
child car seat
L. Abdominal car safety belt slot on the base
M. Buttons to rotate the carry handle
N. C lik Cla k pi ns ( to fa ste n it to t he s tro lle r)
Diag. 4 (Back)
O. Release handle (from the base and the
stroller)
P. Diagonal car safety belt slot
Q. Belt threading slots
R. Slot elements for the child car seat har-
ness straps
S. Stabiliser block
(*) Shape and model can differ according
to the child car seat version being used.
(**) Optional
1.4 POSITIONS OF THE HANDLE
The child car seat carry handle can be adjusted to 4 positions (Diag. 5)
A. Position when travelling by car (WARN-
ING: this is the only position allowed
when travelling by car).
B. Position when carried by hand.
C. Rocker chair mode position or when
you need to fasten it to an appropriate
Chicco stroller.
D. Fixed rocker chair position.
To adjust the position, press both buttons
(M) on the handle bar together and rotate
it to the desired position until you hear it
click into place.
1.5 RESTRICTIONS AND REQUISITES
REGARDING THE USE OF THE PRODUCT AND CAR SEAT
WARNING! Read these restrictions and
requisites carefully to ensure the product
and car seat are used safely: if you don’t,
the safety levels cannot be guaranteed.
• T h e c h i l d c a r s e a t c a n b e fi tted onto the
front passenger seat or any other back
seats. In any case the vehicle seat must
be facing forwards. Never use this child
car seat on vehicle seats which are facing sideways or facing rearwards (diag. 6)
• T h e v e h i c l e s e a t m u s t b e fi tted with a
3-point static or 3-point retractor safety
belts approved to UN/ECE Regulation
No.16, or other equivalent standards
(Diag. 7).
• W A R N I N G ! N e v e r fi t the child car seat to
a vehicle seat th at is only equipped wit h a
2-point safety belt (Diag. 8)
• N e v e r u s e t h e b o o s t e r c u s h i o n i f t h e c h i l d
weighs more than 6 kg.
• M a k e s u r e t h a t t h e b u c k l e s e a t b e l t i s n o t
too high (Diag 13-19). Otherwise, try to
install the car seat for your child on another car seat in the car.
2. CAR INSTALLATION
The child car seat can be installed with or
without the base (optional). In both cases,
the child car seat must always be installed
facing rearwards.
2.1 INITIAL CONFIGURATION OF
THE HARNESS STRAPS AND
SHOULDER PADS
The child car seat is fi tted with 2 different
types of shoulder straps (A and B) according to the version being used. Before using
the child car seat, assemble the shoulder
straps as follows:
• S h o u l d e r s t r a p s v e r s i o n A ( D i a g . 9 A , 9 B
and 9C): th read the harness st raps through
the slots in the fabric cover (not through
the seat structure below) so that they are
visible on the seat. Thread the harness
buckle through the crotch pad.
• S h o u l d e r s t r a p s v e r s i o n B ( D i a g . 1 0 A a n d
10B): thread the harness straps though
the two sh oulder pads. Th read the harness
buckle through the crotch pad.
2.2 INSTALLATION WITH THE BASE
To install the chi ld car seat with base o n the
vehicle seat, proceed as follows:
1. Remove the child car seat from the base
by pulling the release lever behind the
backrest whilst using the carry handle
to lift it upwards (Diag. 11).
2. Position the base on the chosen vehicle
seat, position it as seen in Diag. 12 so
that it touches the vehicle seat backrest.
3. Pull the vehicle safety belt and connect
it to the relative buckle, threading the
abdomin al belt through the t wo slots (L)
indicated by the light blue ar rows; pull it
as tight as possible (Diag. 13).
4. Before attaching the child car seat onto
16
Page 17

the base, check that the stabiliser block
is closed (Diag. 14).
5. Attach the child car seat onto the base
(in a rear facing position) and push it
downwards until you hear it click into
place (Diag. 15).
6. Check that the child car seat is correctly
fi tted to th e base by lifting the f ront and
rear sections.
7. P ull the diagonal car s afety belt and thr ead
it through th e relative slot (O) on the back
of the child car seat backrest (Diag. 16)
WARNING! When travelling by car, this
diagonal safety belt must ALWAYS be
threaded through this slot.
8. Pull the b elt as tight as possible , without
leaving any slack and making sure it is
not twisted.
9. Turn the carr y handle to position A ch ecking it rest s against the vehicle sea t (Diag.
17).
WARN ING!
After installing the child car seat, ALWAYS
check that the vehicle safety belt is tightened properly along the entire length of the
belt and no p arts are t wisted. NEVER fi t the
car safety belt in any way other than that
indicated in these instructions.
To remove the child car seat leaving the
base on the vehicle seat:
1. Unthread the diagonal belt through the
slots in the b ackrest without r emoving it
from the buckle.
2. B ring the handle bar into a vertical position (Diag. 5).
3. Remove the child car seat as illustrated
above (Diag. 5).
2.3 INSTALLATION WITHOUT THE
BASE
To install the chi ld car seat without th e base,
proceed as follows:
1. Fold out th e stabiliser block a nd position
the child car seat on the desired vehicle
seat (Diag. 18).
2. Pull the vehicle safety belt and connect
it to the relative buckle, threading the
horizontal abdominal belt through the
two slots (K) indicated by the light blue
arrows (Diag. 19).
3. Take the diagonal car safety belt and
thread it through the relative slot (O)
on the bac k of the child car seat bac krest
(Diag. 20) WARNING! When travelling
by car, this diagonal safety belt must
ALWAYS be threaded through this slot.
4. Pull the b elt as tight as possible, w ithout
leaving any slack and making sure it is
not twisted.
5. Turn the carr y handle to position A c hecking it rest s against the vehicle sea t (Diag.
21).
To remove the child car seat:
1. Release the car safety belt by pressing
the buckle.
2. Bring the carry handle into a vertical
position (B).
3. Unthread the belt through the diagonal
and horizontal slots.
2.4 INSTALLATION WITH THE ISOFOX
BASE
(supplied or purchased separately)
For insta llation with the ISO FIX base, please
refer to the related instructions provided
with the product.
For use with t he ISOFIX SEMI -UNIVERS AL
system, it is absolutely necessary to read
the vehicle manual before fi tting the child
car seat. The manual will show which cars
seats are co mpatible with the chi ld car seat
size class.
The Chicco ISOFIX BASE is “SEMI-UNIVERSAL” approved and is therefore NOT
compatible with all car models, but only
with those specifi ed in the “Approved vehicle list” booklet provided with the product.
3. OTHER OPERATIONS
3.1 SEATING THE CHILD IN THE CAR
SEAT
1. Raise the fabric fl ap, whilst pressing the
adjuster bu tton and pull the ch ild car seat
harness straps to loosen them (Diag. 22).
2. Press the red button to open the buckle
and release the harness straps (Diag. 23).
3. Sit the baby inside.
4. Overlap the two ends of the harness
straps, insert them together inside the
buckle until yo u hear them click into pl ace
17
Page 18

(Diag. 24) WARNING! Never insert just
one end of the harness into the buckle
and do not insert them one at a time.
5. Tighte n the safety harn ess by pulling the
adjuster strap (Diag. 25)
3.2 ADJUSTING THE POSITION OF
THE HARNESS STRAPS
WARNING ! The harness s traps must always
be adjusted to adapt to the child’s growth
phase. Before installing the child car seat
inside the vehicle, adjust the harness straps
to the right height.
To a dju st t hem cor rec tly , th e ha rne ss s tr aps
must come out from the backrest at the
height of the child’s shoulders (Diag. 26)
The child c ar seat straps c an be adjusted to
3 height positions.
To adjust the harness straps, proceed as
follows:
1. Remove the shoulder pads by unthreading
them throug h the slots in the fabric cove r.
2. Press the red button to open the harness buckle.
3. Slide th e harness stra ps out from behind
the backrest and thread them though the
slot which is mo st suitable for the child ’s
height (Diag. 27A and 27B).
WARNING! Make sure that the harness
straps are always threaded between the
slot element ( R) and the shell.
WARNIN G! The booster cus hion guarantee s
correct co ntainment and the i deal position
for the neck and back of babies from when
they are born until they weigh about 6 Kg.
3.3 FIXED OR ROCKING POSITION
OF THE CHILD SEAT (ROCKER
CHAIR MODE)
When the child car seat is not used inside
the vehicle, it can be used as a rocking or
static chair.
To allow it to rock, close t he stabiliser bloc k
(Diag. 14) and move the carry handle to
position B (Diag. 5).
To u se i t in fi xed mode, fold out th e stabiliser
block and move the handle bar to position
D (Diag. 5).
Only place the child seat on stable horizontal surfaces.
WARNING! Before carrying the child car
seat, always bring the carry handle into a
vertical position (B).
WARNING! Never leave your child
unattended.
WARNING! Always use the restraint harness.
WARNING! Using the child car seat
on raised surfaces such as tables,
chairs etc can be very dangerous.
WARNING! This child car seat is
not designed for long periods of
sleep.
WARNING! Do not use the seat
when the child is able to sit up on
his own.
This child c ar seat is not a replace ment for a
bed or cot. If the child needs to sleep, they
should be moved to a bed or a cot.
Do not use th e child seat if some of its p arts
are broken or missing.
3.4 USE WITH THE STROLLER
WARNING! The Auto-Fix car seat can be
fi tted to Chicco strollers equipped with
the specifi c fi xing system as standard or
a fi tting adaptor system can be purchased
separately.
WA RNI NG ! Ple as e rea d th e St rol ler ins tr uction manual when using the child car seat
on the stroll er. The CH ICCO strollers, which
use the CLIK CLAK system, have armrests
with spec ial devices that allow you to f asten
the child sea t to the stroller fram e without
any need for additional fi xtures.
Before fi xing the car seat, remove the arm
covers completely.
To install the child s eat on the stroller, proceed as follows:
1. Bring the ca rry handle into a ve rtical position (Diag. 28).
2. Attach the two Clik Clak fi xing hooks of
the Car seat (N) to the armrests of the
stroller or to the fi xing system purchased
separately, making sure that they are correctly fi xed on both sides . A click will be
heard confi rming fi xing (fi g. 29).
WARN ING!
Before use, e nsure that all the ch ild seat-fastening devices are correctly fi tted in place.
18
Page 19

To remove the child seat from the stroller:
1. Bring the carry handle into a vertical
position (B).
2. Pull the rear release handle.
3. Remove and place the chi ld seat on a fl at,
stable surface.
WARNING : The child seat can be f astened
and unfas tened with the baby ins ide; these
procedures could prove to be more diffi cult
due to the weight of t he baby. Be very care ful when performing the above-indicated
procedures.
3.5 CLEANING AND STORAGE
HOW TO CLEAN THE FABRIC COVER
The child sea t’s fabric cover can be rem oved
and cleaned by hand or in a washing machine at 30°C.
To wash it, undo the harness straps, unthread the two straps and buckle through
the relati ve slots and then remove th e fabric
cover (Diag. 30).
Please refer to the cleaning instructions
on the fabric label, which illustrates the
following washing symbols:
Machine washable at 30°
Do not bleach
Do not spin dry
Do not iron
Do not dry clean
Never use abrasive detergents or solvents.
Do not spin dry the fabric cover; let it dry
without wringing it.
HOW TO CLEAN THE PLASTIC OR
METAL PARTS
Clean the plastic and coated metal parts
with a damp clot h only. Never use abrasive
detergents or solvents.
The mova ble parts of the c hild car seat must
not be lubricated.
CHECKING THE CONDITION OF THE
COMPONENTS
It is recommended to regularly check the
condition of the following components
to ensure that they are not damaged or
worn out:
• F a b r i c c o v e r : c h e c k t h a t t h e p a d d i n g d o e s
not come out from the seams. Check the
condition of th e seams: they must alway s
be intact and undamaged.
• H a r n e s s s t r a p s : c h e c k t h a t t h e f a b r i c w e f t
is not frayed o r the harness str ap worn out
in the parts corresponding to the adjustment str ap, crotch, shoulder s and harness
adjustment plate.
• P l a s t i c p a r t s : c h e c k t h a t t h e p l a s t i c p a r t s
are not worn out, damaged or faded.
WARNIN G! If the child car seat is d eformed
or worn out, it must be replaced: it may
no longer comply with the original safety
standards.
STORING THE PRODUCT
When it is not fi tted into the car, it is recommended to store the child car seat in a
dry place, away from sources of heat and
to protect it f rom dust, humidit y and direct
sunlight.
DISPOSING OF THE PRODUCT
When the child car seat no longer complies
with the original safety standards, stop using
it and dispos e of it at an appropriate col lection point. Dispose of the product as laid
down in the environmental regulations in
force in the country of use.
19
Page 20

F
CHICCO
AUTO-FIX FAST
G. 0+ (0-13)
MODE D’EMPLOI
TABLE DES MATIÈRES :
1. INTRODUCTION
1.1 AVERTISSEMENTS
1.2 CARACTÉRISTIQUES DU PRODUIT
1.3 DESCRIPTION DES COMPOSANTS
1.4 POSITIONS DE L A POIGNÉE
1.5 LIMITATIONS ET CONDITIONS D’UTILISATION RELATIVES AU SIÈGE-AUTO
2. INSTALLATION DANS LA VOITURE
2.1 MISE EN PLACE DES COUVRE-HARNAIS
2.2 INSTALLATION AVEC LA BASE
2.3 INSTALLATION SANS LA BASE
3. AUTRES OPÉRATIONS
3.1 INSTALLATION DU BÉBÉ DANS LE
SIÈGE-AUTO
3.2 RÉGLAG E DE LA HAUTEUR DES HAR-
NAIS
3.3 POSITION FIXE OU À BASCULE DU
SIÈGE-AUTO (UTILISATION TRANSAT)
3.4 FIXATION SUR LA POUSSETTE
3.5 NETTOYAGE ET CONSERVATION
1. INTRODUCTION
1.1 AVERTISSEMENTS
TRÈS IMPORTANT : À LIRE IMMÉDIATEMENT
• CONSERVER CE M ODE D’EMPLOI POUR
TOUTE UTILISATION FUTURE.
• Pour le montage et l’installation du
produit, suivre attentivement le mode
d’emploi. Ne pas utiliser le produit avant
d’avoir lu le mode d’emploi.
• ATT ENTION ! D’après les statistiques sur
les accident s, les sièges arrière d u véhicule
sont en général plus sûrs que les sièges
avant : il est p ar conséquent cons eillé d’installer le siège-auto sur les sièges arrière.
Plus précisém ent, le siège le plus sûr est le
siège central arrière, s’il est équipé d’une
ceinture à 3 points.
• ATTENTION ! GRAVE DANGER ! Ne
jamais utiliser ce siège-auto sur un siège
avant équipé d’un airbag avant. Il est
possible d’installer le siège-auto sur le
siège avant que si l’airbag avant a été
désactivé : vérifi er avec le fabricant du
véhicule ou dans le mode d’emploi qu’il
est possible de désactiver l’airbag. Il est
dans tous les cas conseillé de reculer au
ma xim um l e si ège , to ut e n ten an t com pte
de la présence d’autres passagers sur le
siège arrière.
• Il est conseillé d’informer tous les passagers de la modalité de décrochage du
siège-auto en cas d’urgence.
• Faire attention à l’installation du siègeauto dans la voiture afi n d’éviter qu’un
siège pivotant o u que la portière p uissent
interférer avec celui-ci.
• Au cun siè ge- aut o ne peu t ga ra nti r la s éc uri té to tal e du béb é en ca s d’a cci den t, m ais
l’utilisation de ce produit réduit le risque
de graves blessures ou de décès.
• Le risque de dommages sérieux pour le
bébé augmente, en cas d’accident, mais
aussi dans d’autres circonstances (par ex.
freinage brusque, etc…) si les indications
contenues dans ce mode d’emploi ne sont
pas suivies scrupuleusement : toujours
vérifi er que le siège-auto est fi xé correctement au siège du véhicule.
• Si l e si ège -a uto e st e nd omm agé , dé for mé
ou for tem en t us é, il doi t êt re r emp la cé c ar
il pourrait avoir perdu ses carac téristiques
d’origine en matière de sécurité.
• Ne pas apporter de modifi cations ou
d’ajouts au produit sans l’approbation du
fabricant.
• Ne pas in staller d’accessoires , de pièces de
rechange et de composants non fournis
par le fabricant.
• Ne laisser en aucun cas le bébé sans surveillance dans le siège-auto.
• Ne jamais laisser le siège -auto sur le siège
de la voiture sans l’attacher, il pourrait
heurter et blesser les passagers.
• Ne rien mettre, sauf un accessoire approuvé pour le produit, entre le siège de
la voiture et le siège-auto, ou entre le
siège-auto et le bébé : en cas d’accident,
le siège-auto pourrait ne pas fonctionner
correctement.
• Si la voiture es t laissée en plein solei l, il est
conseillé de couvrir le siège-auto.
20
Page 21

• Suite à un accident, même léger, le siègeauto peut subir des dommages qui ne sont
pas toujours visibles à l’œil nu : il est par
conséquent nécessaire de le remplacer.
• Ne pas utiliser de siège-auto d’occasion
: ils pourraient avoir subi des dommages
structuraux invisibles à l’œil nu, mais qui
peuvent compromettre la sécurité du
produit.
• La hou sse ne p eut êtr e re mpl acé e qu e pa r
une autre approuvée par le fabricant, car
el le f ait par ti e in tégr an te du siè ge -au to. L e
siège -au to ne doit jama is êt re ut ilis é sans
sa housse pour ne pas compromettre la
sécurité du bébé.
• Contrôler que les bretelles du harnais ne
sont pas entortillées et éviter que cellesci ou que des parties du siège-auto se
coincent entre les portières ou se frottent contre des parties coupantes. Si les
bretelles présentent des coupures ou des
effi lochures, il faut les remplacer.
• Vérifi er qu’aucun objet ou bagage non fi xé
ou non positionné en toute sécurité n’est
transporté, tout particulièrement sur la
plage arrière à l’intérieur du véhicule : en
cas d’accident ou de freinage brusque, ils
pourraient blesser les passagers.
• Vérifi er que tous les p assagers de la voitu re
mettent leur ceinture de sécurité, pour leur
propre sécurité et parce que pendant le
voyage, en cas d’accident ou de freinage
brusque, ils pourraient blesser le bébé.
• En cas de lo ngs voyages, s’arrêter so uvent.
L’enfant se fatigue très facilement. Ne pas
enlever le bébé du siège-auto lorsque la
voiture est en marche. Si le bébé a besoin
d’a tte nti on , il e st néc ess air e de tro uve r un
lieu sûr et de s’arrêter.
• Les nouveau-nés prématurés, nés après
moins de 37 semaines de gestation,
peuvent courir un risque dans le siègeauto. Ils peuvent avoir des diffi cultés
respiratoires lorsqu’ils sont assis dans le
siège-auto. Nous vous conseillons donc
de v ous ad ress er à un mé deci n ou au personnel de l’hôpital pour recommander le
siège-auto le plus adapté à votre bébé
avant de quitter l’hôpital.
• La société Chicco décline toute responsabilité en cas d’utilisation incorrecte du
produit.
1.2 CARACTÉRISTIQUES DU
PRODUIT
Ce siège-au to est homologué “Group e 0+”,
pour le transport d’enfants de la naissance
jusqu’à 13 kg (de 0 à 10 mois/12 mois environ), conformém ent à l’homologation ECE
R44/04.
L’homologation est de type “Universel”, le
siège-au to peut par conséque nt être utilisé
dans n’impo rte quelle voiture. AT TENTION !
“Universel” signifi e qu’il est compatible
avec la majorité des sièges-auto (sauf
exceptions).
AVERTISSEMENT IMPORTANT
1. C eci est un d isp osi tif d e re ten ue “ Un ive r-
sel” pour enfant, homologué conformémen t à la norme ECE R4 4/04 e t compatible avec la majorité (sauf exceptions)
des sièges auto.
2. La parfaite compatibilité est plus faci-
lement obtenue lorsque le fabricant du
véhicule déclare dans le mode d’emploi
que le véhicule prévoit l’installation de
dispositifs de retenue “Universel” pour
la tranche d’âge en question.
3. Ce dispositif de retenue est classé “Uni-
versel” sur la base de critères d’homologation plus stricts par rapport à des
modèles précédents qui ne disposent
pas de cet avertissement.
4. Adapté uniquement pour l’utilisation
dans des véhicules dotés de ceinture de
sécurité à 3 points, statique ou à enrouleurs, homologuée conformément à la
no rm e UN /EC E N° 16 ou a utr es s ta nda rds
équivalents.
5. En cas d’inc ertitude, contac ter le fabricant
du disp ositif de retenue ou le reven deur.
1.3 DESCRIPTION DES
COMPOSANTS
Fig. 1 (3/4)
A. Poignée
B. Canopy pare-soleil
C. Revêtement textile
D. Coussin réducteur (*)
E. Base (**)
Fig. 2 (Avant)
F. Passants des harnais
G. Harnais de sécurité du siège-auto
21
Page 22

H. Couvre-harnais (*)
I. Bouton de réglage des harnais (sous le
revêtement textile)
J. Sangle de réglage des harnais
Fig. 3 (Profi l)
K. Guide de la ceinture abdominale de la
voiture sur le siège-auto
L. Guide de la ceinture abdominale de la
voiture sur la base
M. Boutons de rotation de la poignée
N. Pivots de fi xation (pour la fi xation sur
la poussette)
Fig. 4 (Profi l)
O. Guide de la ceinture diagonale de la
voiture
P. Poignée de décrochage (depuis la base et
depuis la poussette)
Q. Passants des harnais
R. Passants des guides ceintures du siège-
auto
S. Blocage stabilisateur
(*) La forme et le modèle peuvent différer
en fonction des modèles de sièges-auto.
(**) Optionnel
1.4 POSITIONS DE LA POIGNÉE
La poign ée du siège-auto est r églable sur 4
positions (Fig. 5).
A. Position de transport en voiture (ATT EN-
TION : c’est la seule position autorisée
pendant le transport en voiture).
B. Position de transport à la main.
C. Position confi guration tran sat à bascule
ou à fi xer à la poussette Chicco prévue
à cet effet.
D. Position confi guration transat fi xe.
Pour effectuer le réglage, appuyer simultanément sur les boutons (M) de la poignée en la tournant sur la position choisie
jusqu’au clic.
1.5 LIMITATIONS ET CONDITIONS
D’UTILISATION REL ATIVES AU
SIÈGE-AUTO
ATTENTION ! Respecter particulièrement
les limitatio ns et les conditions d’utilisati on
suivantes relatives au siège-auto : dans le
cas contr aire, la sécurité n’est pa s garantie.
• Le siè ge- aut o pe ut ê tre ins tal lé s ur l e siè ge
avant côté pas sager ou sur n’impor te quel
siège arri ère. Dans tous les cas , le siège de
la voi tur e do it êt re o rie nté dan s le sen s de
la mar che . Ne jam ais uti lis er c e si ège -a uto
sur des sièges orientés latéralement ou
da ns l e se ns c ont rai re d e la mar ch e (Fi g. 6 ).
• Le siège de la voiture doit être doté d’une
ceinture de sécurité à 3 points, statique
ou à enrouleurs, homologuée conforméme nt à la norm e UN/ ECE N °16 o u aut res
standards équivalents (Fig. 7).
• ATTENT ION ! Ne jamais insta ller le siègeauto avec la ceinture de la voiture à deux
points de fi xation (Fig. 8).
• Ne pas utiliser le coussin réducteur si le
bébé pèse plus de 6 kg.
• Vérifi er que la boucle de la ceinture trois
points de la voiture n’est pas trop haute
(fi g. 13-19). Sinon, essayer d’installer le
siège-auto sur un autre siège.
2. INSTALLATION DU SIÈGE-AUTO
DANS LA VOITURE
Le siè ge- aut o pe ut ê tre ins tal lé a vec la b ase
(option) ou sans. Dans les deux confi gurations, il doit être inst allé uni quement da ns
le sens contraire de la marche.
2.1 CONFIGUR ATION INITIALE DES
COUVRE-HARNAIS
Le siège- auto est équipé de 2 t ypologies de
couvre-harnais (A et B) en fonction des modèles. Avant d’utilise r le siège-auto, monter
les couvre-harnais de la façon suivante :
• Couvre-harnais version A (Fig. 9A, 9B
et 9C) : faire passer les couvre-harnais
da ns l es p ass ant s d u tis su ( pa s cel les de l a
structure se trouvant en-dessous) afi n que
les bretelles harnais reste positionné audessus de celles-ci. Enfi ler l’entrejambes
dans la boucle du harnais.
• Couvre -harnais versio n B (Fig. 10A et 10B):
faire passer les bretelles du harnais du
siège-auto dans les deux couvre-harnais.
Enfi ler l’entrejambes dans la boucle du
harnais.
2.2 INSTALL ATION AVEC LA BASE
Po ur i nst all er l e siè ge -au to av ec l a ba se s ur
le siège de la voiture, il faut :
1. Décrocher le siège-auto de la base en
tirant la poignée de décrochage située
derrière le dossier et le soulever à l’aide
de la poignée (Fig. 11).
22
Page 23

2. Positionner la base sur le siège choisi
pour l’installation, en l’orientant comme
sur la Fig. 12, en faisant en sorte qu’elle
soit en contact avec le dossier du siège
de la voiture.
3. Tir er la c eint ure de sécu rité d e la vo itur e
et l’accrocher à la boucle correspondante,
en faisant passer la partie abdominale
dans les deux guides (L) caractérisés par
la fl èche bleue et la tendre le plus possible (Fig. 13).
4. Avant d’inst aller le siège-auto sur l a base,
vérifi er que le blocage stabilisateur est
fermé (Fig. 14).
5. Mo nter le siège- auto su r la base (tour né
dos à la route) en le poussa nt vers le ba s
jusqu’à ce qu’il soit fi xé (vous entendrez
un clic de fi xation) (Fig. 15).
6. Vérifi er que le siège-auto est correcte-
ment fi xé à la base en essayant de le
soulever par l’avant et par l’arrière.
7. Saisir la ceinture diagonale de la voiture
et la faire passer dans le guide (O) situé
à l’arrière du dossier du siège-auto (Fig.
16). ATTENTION ! Pendant le transport,
la ceinture diagonale doit TOUJOURS
rester insérée dans ce guide.
8. Tendre la ceinture le plus possible, sans
en laisser en trop, et vérifi er qu’elle n’est
pas entortillée.
9. Mettre la poignée en position A en vérifi ant qu’elle s’appuie con tre le siège de la
voiture (Fig. 17).
ATTENTION ! Après l’installation, TOUJOURS vérifi er q ue l a ce int ure de l a vo itu re
est corre ctement tendue e t qu’elle es t uniforme à tous les endroits, sans entortillements. Ne JAMAIS faire passer la ceinture
de la voiture p ar d’autres endroits qu e ceux
indiqués.
Pour enlever le siège-auto tout en laissant
la base dans la voiture :
Retirer la ceinture diagonale du guide se
trouvant sur le dossier sans la décrocher de
la boucle. Remettre la poignée en position
verticale B (Fig. 5).
Décrocher le siège-auto comme illustré
précédemment.
2.3 INSTALL ATION SANS LA BASE
Pour installer le siège-auto sans la base,
il faut :
1. Extraire le blocage stabilisateur et positionner le siège-auto sur le siège de la
voiture choisi (Fig. 18).
2. Tirer la ceinture de sécurité de la voiture
et l’accrocher à la boucle correspondante,
en faisant passer la ceinture abdominale
dans les deux guides (K) du siège-auto
caractérisés par la fl èche bleue (Fig. 19).
3. Saisir la ceinture diagonale de la voiture
et la faire passer dans le guide (O) situé
à l’arrière du dossier du siège-auto (Fig.
20). ATTENT ION ! Pendant le tra nsport,
la ceinture diagonale doit TOUJOURS
rester insérée dans ce guide.
4. Tendre la ceinture le plus possible, sans
qu’elle dépass e et en vérifi ant qu’elle n’est
pas entortillée.
5. Tourner la poignée en position A en vérifi ant qu’elle s’appuie con tre le siège de la
voiture (Fig. 21).
Pour enlever le siège-auto :
1. Décrocher la ceinture de la voiture en
appuyant sur la boucle.
2. Remettre la poignée en position B (verticale).
3. Retirer la ceinture du guide diagonal et
des guides horizontaux.
2.4 INSTALLATION AVEC UNE BASE
ISOFIX
(fournie ou vendue séparément)
Pour installer le siège auto avec une base
ISOFIX , consulter le mode d’emploi accompagnant le produit.
Afi n d’utiliser le système ISOFIX SEMI-UNIVERSEL, i l est absolument néce ssaire de lire
la notice du véhicule avant d’installer le
siège-auto. Elle in diquera les places comp atibles avec la classe de taille du siège auto.
La Base Isofi x de Chicco a une h omologation
du type “Semi-Universel” ; elle n’est donc
pas compatible avec tous les modèles de
voiture, mais seulement avec ceux qui sont
spécifi és dans la notice accompagnant le
produit “Liste des voitures homologuées”.
3. AUTRES OPÉR ATIONS
3.1 INSTALL ATION DU BÉBÉ DANS
LE SIÈGE-AUTO
1. Soulever la housse, a ppuyer sur le bouton
de réglage e t tirer le harnais du sièg e-auto
23
Page 24

afi n de les desserrer (Fig. 22).
2. O uvr ir l a b ouc le, en a ppu yan t su r le bou ton rouge, et tenir les sangles d u harnais
écartées (Fig. 23).
3. Installer le bébé.
4. Superposer les deux languettes de la
boucle et les insérer une fois unies dans
la boucle jusqu’au clic de fi xation (Fig.
24). ATTENTION ! Ne jamais enfi ler les
languettes dans la boucle l’une après
l’autre ou une seule uniquement.
5. Tendre les ceintures de sécurité du siègeau to e n ti ran t la san gle de r égl age pré vue
à cet effet (Fig. 25).
3.2 RÉGLAGE DE LA POSITION DU
HARNAIS
ATTENT ION ! Le harnais do it toujours être
adapté à la croissance du bébé. Avant d’installer le siège-auto dans la voiture, il faut
régler le harnais à la bonne hauteur.
Pour un bon rég lage, les bretelles du har nais
doivent être à la hauteur des épaules du
bébé (Fig. 26).
Le siège-auto dispose de 3 hauteurs de
harnais.
Pour ajuster le s bretelles du harnais , il faut:
1. Enlever les couv re-harnais en les retirant
des passants du tissu.
2. Ou vri r la b ouc le d u har nai s en a ppu yan t
sur le bouton rouge.
3. Retirer le s bretelles du harnais de l’arr ière
du dossier et les enfi ler dans le passant
le plus adapté à la taille du bébé (Fig.
27A et 27B).
ATTENTION ! Vérifi er que les bretelles du
harnais passent toujours entre la barre de
positionnement (R) et la coque.
ATTENT ION ! Le coussin réduc teur garantit
au bébé, de l a naissance jusqu’à un po ids de
6 kg, un bon maintien et la position idéale
pour le cou et le dos.
3.3 POSITION FIXE OU À BASCULE
DU SIÈGE-AUTO (UTILISATION
TRANSAT)
Quand il n’est p as utilisé en voiture, le siè geauto peut également être utilisé comme
bascule ou comme transat.
Po ur l e re ndr e ba scu lan t, f erm er l e bl oca ge
stabilisateur (Fig. 14) et mettre la poignée
en position C (Fig. 5).
Pour l’utiliser en position fi xe, enlever le
blocage stabilisateur et mettre la poignée
en position D (Fig. 5).
Ne le positionner que sur des surfaces
stables et horizontales.
ATTENTION ! Avant de transporter le
siège-auto, toujours remettre la poignée
en position B (verticale).
AVERTISSEMENT: Ne jamais laisser
l’enfant sans surveillance.
AVERTISSEMENT: Il est dangereux
d’utiliser ce transat sur une surface
en hauteur: par exemple, une table,
chaise, etc.
AVERTISSEMENT: Ce transat n’est
pas prévu pour de longues périodes
de sommeil.
AVERTISSEMENT: Toujours utiliser
le système de retenue.
AVERTISSEMENT ! Ne pas utiliser
le siège-auto si le bébé arrive à se
tenir assis tout seul.
Le siège-auto ne remplace pas un lit ou un
berceau. Si le bébé a besoin de dormir, il
do it ê tre mis dan s un l it o u da ns u n be rce au
adaptés.
Ne pas utiliser le siège-auto s’il comporte
une partie cassée ou manquante.
3.4 UTILISATION AVEC POUSSETTE
ATTENT ION ! Le siège-au to Auto-Fix peut
être fi xé sur les poussettes Chicco équipées
des systèmes de fi xation de série prévus à
cet effet ou bien vendus séparément.
ATTENTION ! Pour l’utilisation avec la
po uss et te, c on sult er l e mo de d ’em plo i de la
poussette. Les Poussettes CHICCO équipées
d’un système CLIC CLAC ont des accoudoirs dotés de dispositifs spéciaux qui permettent de fi xer le siège-auto directement
sur la poussette, sans devoir utiliser d’autres
accessoires. Avant de fi xer le siège-auto,
ôter complètement le s protège-accoudoirs.
Pour fi xer le siège-auto à la poussette, il
faut :
1. Saisir le siège-auto par sa poignée en
24
Page 25

position verticale (B) (Fig. 28).
2. Accrocher les deux tiges de fi xation Clik
Clak du siège (N) aux accoudoirs de la
pousset te ou au système de fi xation vendu séparément, en veillant à ce qu’elles
soient accrochées des deux côtés. Un
déclic indiquera que le siège est correctement fi xé (Fig. 29).
AVERTISSEMENT Avant l’utilisat ion, contrôler que les dispositifs de fi xation du siègeauto sont correctement enclenchés.
Pour décrocher le siège-auto de la poussette :
1. Remettre la poignée en position verti-
cale (B).
2. Appuyer sur la manette de décrochage
arrière.
3. Décrocher et mettre le siège-auto sur
une surface plane.
ATTENTION : La fi xation et le décrochage
peuvent également être effectués si le bébé
est dans le siège-auto, même si le poids
du bébé peut rendre les opérations moins
faciles. Dans ce cas, il est conseillé de faire
attention lors des opérations ci-dessus.
3.5 NETTOYAGE ET CONSERVATION
NET TOYAGE DE LA HOUSSE
La hou ss e du s ièg e- aut o es t co mpl ète men t
am ovi ble et l ava ble à la mai n ou en m ac hin e
à 30°C.
Pour le laver, détacher les ceintures et
extraire la housse après avoir retiré les
deux sangles et la boucle de leurs fentes
respectives (Fig. 30).
Pour le lavage, suivre les instructions se
trouvant sur l’étiquette du revêtement
contenant les s ymboles de lavage suiv ants :
30° C
Lavage en machine à 30°C
Ne pas blanchir
Ne pas utiliser de sèche-linge
Ne pas repasser
Ne pas laver à sec
Ne jam ais uti lis er d e dé ter gen ts a bra sif s ou
de solvants. Ne pas essorer la housse et la
faire sécher sans la tordre.
NET TOYAGE DES PARTIES EN PL ASTIQUE ET EN MÉTAL
Pour le nettoyage des parties en plastique
ou en m éta l ve rn i, u til ise r un chi ffo n hu mi de.
Ne jam ais uti lis er d e dé ter gen ts a bra sif s ou
de solvants.
Les par ties mobiles du siège -auto ne doivent
en aucun cas être lubrifi ées.
CONTRÔLE DE L’ÉTAT DES
COMPOSANTS
Il est conseillé de vérifi er fréquemment
l’état et l’usure des composants suivants :
• Revêtement textile : vérifi er que le rembou rrag e ne sort pas ou qu’aucu ne par tie
n’est effi lochée. Vérifi er l’état des coutures
qui doivent toujours être parfaites.
• Harnais de sécurité : s’assurer que le tissu
n’est pas effi loché, entraînant une réduction évidente de l’épaisseur au niveau de
la san gle de r égl age , de l’en tre jam bes , au dessus des épaules et au niveau des passants de réglage des bretelles du harnais.
• Plastiques : vérifi er l’ éta t d’u sur e de tou tes
les parties en plastique qui ne doivent
présenter aucun signe d’endommagement
ou de décoloration.
ATTENT ION ! Si le siège-auto es t déformé
ou trè s us é, i l do it ê tre r em pla cé : il p our rai t
avoir perdu s es caractéris tiques d’origine en
matière de sécurité.
CONSERVATION DU PRODUIT
Quand il n’est p as installé dans la voi ture, il
est conseillé de con server le siège-auto dan s
un endroit sec, loin des sources de chaleur
et à l’abri de la poussière, de l’humidité et
des rayons du soleil.
ÉLIMINATION DU PRODUIT
Une fois la limite d’utilisation prévue pour
le siè ge- aut o at tei nte, ne p lus l’ut ili ser et l e
jeter. Pour des motifs de respect de l’environnement, séparer les différents types de
déchets conformément à la réglementation
en vigueur dans le Pays.
25
Page 26

D
CHICCO
AUTO-FIX FAST
G. 0+ (0-13)
GEBRAUCHSANLEITUNG
INHALTSVERZEICHNIS:
1. EINFÜHRUNG
1.1 HINWEISE
1.2 PRODUKTEIGENSCHAFTEN
1.3 BESCHREIBUNG DER BESTANDTEILE
1.4 POSITION DES TRANSPOSTBÜGELS
1.5 FÜR DAS PRODUKT UND DEN FAHRZEUGSITZ GELTENDE EINSCHRÄNKUNGEN UND NUTZUNGSBESTIMMUNGEN
2. BEFESTI GUNG IM AUTO
2.1 ERSTE EINSTELLUNGEN DER SCHUL-
TERPOLSTER
2.2 BEFESTIGUNG MIT STANDBASIS
2.3 BEFESTIGUNG OHNE STANDBASIS
3. WEITERE MANAHMEN
3.1 HINEINSETZEN DES KINDES IN DEN
KINDERAUTOSITZ
3.2 VERSTELLEN DER GURTPOSITION
3.3 FIX- ODER SCHWENKPOSITION DES
KINDERAUTOSITZES (VERWENDUNG
ALS WIPPE)
3.4 VERWENDUN G MIT DEM SPOR TWAGEN
3.5 REINIGUNG UND AUFBEWAHRUNG
1. EINFÜHRUNG
1.1 HINWEISE
SEHR WICHTIG: BITTE UNBEDINGT LESEN
• DIESE GEBRAUCHSANLEITUNG FÜR ZU-
KÜNFTIGEN NACHSCHLAGEN AUFBEWAHR EN.
• Halten Sie sich bei der Montage und der
Befestigung dieses Produkts streng an die
Anweisungen. Verwenden Sie das Produkt
nicht, ohne zuvor die Anweisungen gelesen
zu haben.
• WARNUNG! Auf der Grundlage der Unfall-
statistiken sind die Hintersit ze des Autos im
Allgemeinen sicherer als die Vordersitze: Es
wird daher dazu geraten, den Kinderautositz
auf den Hintersitzen zu befestigen. Insbesondere der Sitz in der Mitte hinten ist am
sichers ten, wenn dieser m it einem 3-Pun ktSicherheitsgurt ausgestattet ist.
• WARNUNG! GROSSE GEFAHR! Verwenden Sie diesen Kinderautositz niemalsmals
auf einem mit Frontairbag ausgestatteten
Vordersitz. Es ist nur dann möglich, einen
Kinderautositz auf dem Vordersitz zu befestigen, wenn das Frontairbag deaktiviert
wurde: Prüfen Sie mit dem Autohersteller
oder in dem Kfz-Handbuch die Möglichkeit
einer Deaktivierung des Airbags. Es wird in
jedem Fall dazu geraten, den Fahrzeugsitz so
weit wie möglich nach hinten zu schieben,
sofern dies mit den anderen Mitfahrern auf
den Hintersitzen vereinbar ist.
• Es wird empfohlen, dass alle Mitfahrer darüber informiert werden, wie das Kind im
Notfall abgeschnallt werden soll.
• Achten Sie a uf die Befestigung d es Kinderautositzes im Auto und ver meiden Sie es, dass
ein verstellbarer Autositz oder die Autotür
mit diesem in Berührung kommen.
• Ke in K ind era uto sit z k ann für die abs ol ute S icherh eit des Kindes b ei Unfällen gara ntieren,
allerdings verringert der Gebrauch dieses
Produkts das Risiko schwerer oder tödlicher
Verl etzu ngen.
• Das Risiko schwerer Schäden am Kind wird
- nicht nur b ei Unfällen, so ndern auch in an deren Situati onen (zum Beispi el bei plötzlic hem
Bremsen, etc.) - erhöht, wenn die in dieser
Gebrauchsanleitung aufgeführten Anweisungen nicht gewissenhaft befolgt werden:
Überprüfen Sie stets, dass der Kinderautositz
richtig am Sitz festgemacht ist.
• Sollte der Kinderautositz beschädigt, verformt oder stark abgenutzt sein, ist er zu
ersetzen, denn die ursprünglichen Sicherheitseigenschaften könnten nicht mehr
gegeben sein.
• Keine Änderungen oder Ergänzungen am
Produk t ohne die Zustim mung des Hers tellers
vornehmen.
• Mon tieren Sie weder Z ubehör noch Er satzteile und Kompo nenten, die nicht vo m Hersteller
geliefert wurden.
• Lassen Sie das Kind niemalsmals und aus
keinem Grund unbeaufsichtigt im Kinderautositz sitzen.
• Der Kinderautositz muss stets angeschnallt
auf dem Fahr zeugsitz steh en (sowohl mit als
au ch o hn e Ki nd) , er kön nte geg en die Ins as sen
stoßen und diese verletzen.
• Legen Sie keine Gegenstände zwischen den
Autositz und den Kinderautositz oder zwischen de n Kinderautosit z und das Kind, was
26
Page 27

kein geneh migtes Zubehö rteil für das Pr odukt
ist: Bei Unfällen könnte der Kinderautositz
nicht richtig funktionieren.
• Sollte das Auto unter direkter Sonneneinstrahlung stehen gelassen werden, wird
empfohlen, den Kinderautositz abzudecken.
• Infolge eines auch nur leichten Unfall s kann
der Kinderautositz Schäden davontragen, die
nicht mit blo ßem Auge sichtbar sind: Daher
ist es erforderlich, diesen zu erset zen.
• Verwenden Sie keine Kinderautositze aus
zweiter Hand: Sie könnten Strukturschäden
davongetr agen haben, die mit b loßem Auge
nicht sichtbar sind, jedoch die Sicherheit des
Produkts beeinträchtigen könnten.
• Der Bezug kann ausschließlich durch einen
vom Hersteller genehmigten Bezug ersetzt
werden, da er ein Bestandteil des Kinderautositzes ist. Der Kinder autositz darf niemals
ohne den Bezug verwendet werden, damit
die Sicherheit des Kindes nicht beeinträchtigt wird.
• Überprüfen Sie, dass das Gurtband nicht
verdreht is t und vermeiden S ie es, dass diese s
oder Teile vom Kinderautositz in die Autotüren geklemmt werden oder an scharfen
Stellen streifen. Sollte der Gurt Schnitte
aufweisen oder ausgefranst sein, ist er zu
ersetzen.
• Überprüfen Sie, dass insbesondere auf der
Hutabl age des Autos keine G egenstände o der
Gepäck abgelegt werden, die nicht befestigt
oder sicher positioniert wurden: Bei Unfällen
oder plötzlichem Bremsen könnten diese die
Insassen verletzen.
• Vergewiss ern Sie sich, dass a lle Mitfahrer i m
Auto ihren eigenen Sicherheitsgurt angesc hna llt ha ben , un d z war sow oh l zu r ei gen en
Sicherheit als auch aufgrund der Tatsache,
dass sie bei Unfällen oder plötzlichem Bremsen das Kind verletzen könnten.
• Machen Sie während einer langen Autofahrt
öfters Pa use: Das Kind erm üdet sehr schn ell.
Das Kind in keinem Fall während der Fahrt
aus dem Kinderautositz nehmen. Wen n das
Kind Ihre Aufmerksamkeit benötigt, ist es
erforderlich, dass Sie einen sicheren Platz
fi nden und anhalten.
• Frühgeborene, die vor der 37. Schwangerschaftswoche zur Welt gekommen sind,
könnten im Kinderautositz einem Risiko
ausgesetzt sein. Diese Säuglinge können
Atembeschwerden haben, während sie im
Kinderautositz sitzen. Wir empfehlen Ihnen
daher, sich an Ihren Arzt oder an das Krankenhausp ersonal zu we nden, damit die se Ihr
Kind unte rsuchen und Ih nen einen geeign eten
Kinderautositz empfehlen können, bevor Sie
das Krankenhaus verlassen.
• Die Gesellschaft Artsana übernimmt keine
Haftu ng für die unangem essene Verwe ndung
des Produkts.
1.2 PRODUKTEIGENSCHAFTEN
Dieser K inderautosit z ist für die „Grupp e 0+”
zur Beförd erung von Kinder n ab der Gebur t bis
zu 13 kg Körp ergewicht (von 0 bis 10 M onaten/
ca.1 Jahr) unter Einhaltung der Europäischen
Norm ECE R44/04 zugelassen.
Die Zulassung ist „Universell“, d.h. der Kinderautositz kann in allen Automodellen verwendet werden. WARNUNG! “Universell“
bedeutet, dass er für die meisten, jedoch nicht
alle PKW-Sitze passend ist.
WICHTIGER HINWEIS:
1. Dies ist eine „Univ ersal“ - Rückhalte einrich-
tung für Kinder, die gemäß der Norm ECE
R44/04 zugelassen und für die meisten,
jedoch nicht alle PKW-Sitze passend ist.
2. Der ordnungsgemäße Sit z der Einrichtung
kann vorausgesetzt werden, wenn der
Fahrzeughersteller im Fahrzeughandbuch
erklärt, dass das Fahrzeug für den Einbau
einer „Universal“ - Rückhalteeinrichtung
für Kinder der jeweiligen Altersgruppe geeignet ist.
3. Diese Rückhalteeinrichtung für Kinder
wurde nach strengeren Bedingungen in
die Kategor ie „Universal“ ein gestuft als di e
früheren Ausführungen, die diese Aufschrift
nicht tragen.
4. Nur ge eignet, wenn das Fah rzeug mit Drei -
punkt-/Statik-/Retraktor-Sicherheitsgurten
ausgerüstet ist, die nach ECE-Regelung Nr.
16 oder anderen vergleichbaren Normen
zugelassen sind.
5. Sollten Zweifel b estehen, den H ersteller der
Rückhalteeinrichtung oder den Fachhändler
befragen.
1.3 BESCHREIBUNG D ER
BESTANDTEILE
Abb. 1 (3/4)
A. Tragebügel
B. Verdeck
C. Stoffbezug
D. Sitzverkleinerer (*)
27
Page 28

E. Standbasis (**)
Abb. 2 (Vorderseite)
F. Gurtführungsschlitze
G. Gurte des Kinderautositzes
H. Schulterpol ster (*)
I. Gurtlängen-Verstelltaste (unter der Stoff-
scheibe)
J. Gurtlängen-Verstellband
Abb. 3 (Seitlich)
K. Beckengurtführung im Kinderautositz
L. Beckengurtführung auf der Standbasis
M. Tasten für die Neigung des Tragebügels
N. Andock-Stifte „Clik Clak“ (zum Andocken
am Sportwagen)
Abb. 4 (Rückseite)
O. Diagonale Gurtführung
P. Entriegelungsgriff (von der Standb asis und
vom Sportwagen)
Q. Führungsschlitze für die Gurte
R. Positionsstange für die Gurte des Kinder-
autositzes
S. Schaukelsperre
(*) Je n ac h Mo del l ka nn der Kin de rau tos itz mit
Schulterpolster A oder B ausgestattet sein.
(**) Optional
1.4 POSITION DES TR AGEBÜGEL S
Der Tragebü gel des Kinder autositzes kan n in 4
Positionen verstellt werden (Abb. 5).
A. Transportposition im Auto (WARNUNG:
Dies ist die einzige erlaubte Position wäh-
rend der Beförderung im Auto).
B. Position zur manuellen Beförderung.
C. Position zur Verwendung als Wippe oder
zum Andocken an den entsprechenden
Chicco-Sportwagen.
D. Position zur Verwendung als Wippe in
Fix-Position.
Um den Tragebügel zu verstellen, die Tasten
(M) auf dem Griff gleichzeitig drücken und
diesen bis zum hörbaren Einrasten in die gewünschte Position drehen.
1.5 FÜR DAS PRODUKT UND DEN
FAHRZEUGSIT Z GELTE NDE
EINSCHRÄNKUNGEN UND
NUTZUNGSBESTIMMUNGEN
WARNUNG! Folgende Einschränkungen und
Nutzungsbestimmungen in Bezug auf das
Produkt und den Fahrzeugsitz aufmerksam
befolgen: Andernfalls wird die Sicherheit nicht
gewährleistet. Der Kinderautositz kann auf
dem vorderen Beifahrersitz oder auf jedem
der Rück sitze montier t werden. In jed em Fall
muss der Fahrzeugsitz in Fahrtrichtung ausgerichtet sein. Den Kinderautositz niemals
auf Sitzen verwenden, die seitlich oder gegen
die Fahrtrichtung ausgerichtet sind (Abb. 6).
Der Fahrzeugsitz muss mit Dreipunkt-/Statik-/Retraktor-Sicherheitsgurten ausgerüstet
sein, die nach UNI/ECE-Norm Nr. 16 oder
anderen vergleichbaren Normen zugelassen
sind (Abb. 7).
WARNUNG! Den Kinderautositz niemals mit
dem Zwei-Punkt-Sicherheitsgurt des Autos
(Abb. 8) befestigen.
Niemals den Sitzverkleinerer verwenden,
wenn das Kind mehr als 6 kg wiegt.
Stellen Sie sicher, dass das Gurtschloss des
3-Punkt-Gurts des Autos nicht zu hoch ist
(Abb. 13-19) Anderenfalls ve rsuchen Sie, der
Babysch ale auf einem ander en Sitz des Fahrzeugs zu installieren.
2. BEFEST IGUNG DES
KINDERAUTOSITZES IM AUTO
Der Kin derautositz ka nn sowohl mit als au ch
ohne Standbasis (optional) befestigt werden.
In beiden Konfi gurationen darf dieser nur
gegen die Fahr trichtung befestigt werden.
2.1 ERSTE EINSTELLUNG EN KONFIGU-
RATION DER SCHULTERPOLSTER
Der Kinderautositz ist je nach Ausführung
mit 2 unterschiedlichen Schulterpolster (A
oder B) ausge stattet. Bevor d er Kinderautosi tz
verwendet wird, müssen die Schulterpolster
folgendermaßen befestigt werden:
• Schulterpolster Version A (Abb.en 9A, 9B
und 9C): Die Schulterpolster so durch die
Schlitze des Stoffbezugs (nicht der Schale
darunter) laufen lassen, dass die Gurte über
diesen positioniert bleiben. Das Gur tschloss
durch das Schlosspolster führen.
• Schulterpolster Version B (Abb.en 10A und
10B): Die Gurte des Kinderautositzes durch
die zwei Schulterpolster führen. Das Gurtschloss durch das Schlosspolster führen.
2.2 BEFESTIGUNG MIT STANDBASIS
Um den Kinderautositz mit der Standbasis
auf dem Fahrzeugsitz zu befestigen, folgendermaßen vorgehen:
1. Lösen Sie den Kinderautositz von der
Standbasis, indem Sie den Entriegelungs-
28
Page 29

griff hinter der Rückenlehne ziehen und
den Kinderautositz gleichzeitig durch den
Tragebügel anheben (Abb. 11).
2. Positionieren Sie die Standbasis auf dem
ausgewählten Fahrzeugsitz. Drehen Sie
sie hierbei wie in Abb. 12 dargestellt und
sorgen Sie dafür, dass sie die Rückenlehne
des Autositzes berührt.
3. Ziehe n Sie an dem Sicher heitsgur t des Autos
und schn allen Sie es an. Dab ei den horizon talen Teil (Becken) durch die beiden dafür
vorgesehenen, durch einen blauen Pfeil
gekennzeichneten Führungen (L) gezogen
wird und ihn korrekt spannen (Abb. 13).
4. Bevor Sie den Kinderautositz in die Standbasis einsetzen, überprüfen Sie, dass die
Schaukel sperre geschlossen ist (Abb. 14).
5. Den Kinderautositz in die Standbasis einsetzen (gegen die Fahrtrichtung gerichtet) und
nach unten d rücken, bis er hö rbar einras tet
(„Klack“-Geräusch) (Abb. 15).
6. Überprüfen Sie, dass der Kinderautositz korrekt auf d er Standbasis ei ngehakt ist, i ndem
Sie versuc hen, diesen sowo hl an der Vorderals auch an der Rückseite hochzuheben.
7. Nehmen Sie den diagonalen Autogurt in
die Hand und ziehen Sie diesen durch die
eigens dafür vorgesehene Führung (O) auf
der Rückseite der Rückenlehne des Kinderautositzes (Abb. 16). WARNUNG! Der
diagonale Gurt muss während des Autotransp orts STE TS in dieser Führ ung bleiben.
8. Der Fahrzeuggur t so weit wie möglich um
den Kinderautositz spannen, ohne dass er
locker und vergewissern Sie sich, dass er
nicht verdreht ist.
9. Den Tragebügel in Position A drehen und
dabei überprüfen, dass dieser den Fahrzeugsitz berührt (Abb. 17).
WARNUNG! Vergewissern Sie sich nach der
Befestigung STETS, dass der Autogurt korrekt
gespan nt ist und dass dies er gleichmäßig auf
alle Punkte verteilt und nicht verdreht ist.
Lasse n Sie den Autogur t NIEMALS in a nderen
als den angegebenen Positionen verlaufen.
So wird der K inderautosit z aus der Standb asis
genommen ohne diese vom Auto zu lösen:
1. Den diagonalen Gurt aus der Führung der
Rückenleh ne ziehen, oh ne ihn abzuschn allen.
2. Den Transpo rtbügel in die ver tikale Position
B zurück setzen (Abb. 5).
3. Den Kinderautositz wie zuvor aufgeführt
entriegeln.
2. 3 BEFESTIG UNG OHNE S TAND BASIS
Um den Kinderautositz ohne Standbasis zu
befestigen, gehen Sie folgendermaßen vor:
1. Die Schaukelsperre herausziehen und den
Kinder autositz auf dem g ewünschten Fahrzeugsitz positionieren (Abb. 18).
2. Ziehe n Sie an dem Sicher heitsgurt d es Autos
und schn allen Sie es an. Dab ei den horizon talen Teil (Becken) durch die beiden dafür
vorgesehenen, durch einen blauen Pfeil
gekennzeichneten Führungen (K) laufen
lassen (Abb. 19).
3. Nehmen Sie den diagonalen Autogurt in die
Hand und z iehen Sie diesen d urch die eigens
dafür vorgesehene Führung (O) auf der
Rückse ite der Rückenlehn e des Kindera utositzes (A bb. 20). WARNUNG ! Der diagonale
Gurt muss während des Transports STE TS
in dieser Führung bleiben.
4. Der Fahrzeug gurt so weit wie möglich um
den Kinderautositz spannen, ohne dass er
locker und vergewissern Sie sich, dass er
nicht verdreht ist.
5. Den Transportbügel in Position A drehen
und dabei ü berprüfen, das s dieser den Autositz berührt (Abb. 21).
Um den Kinderautositz zu entfernen:
1. Schnallen Sie den Autogurt ab, indem Sie
auf das Schloss drücken.
2. Setzen Sie den Transportbügel in Position
B zurück (vertikal).
3. Ziehen Si e den Gurt aus d er diagonalen Füh -
rung und a us den horizont alen Führungen .
2.4 BEFESTIGUNG MIT BASIS ISOFIX
(im Lieferumfang enthalten oder separat
erhältlich).
Zur Befestigung mit Basis ISOFIX siehe die
entsprechende Gebrauchsanleitung, die
dem Produkt beiliegt.
Für die Verwendung eines ISOFIX SEMIUNIVERSAL-Systems ist es unbedingt erforderlich, vor der Befestigung des Kinderautositzes das Betriebshandbuch des Fahrzeugs
zu lesen. Das Handbuch gibt die Plätze an,
die mit der Altersgruppe des Kindersitzes
kompatibel sind. Die Isofi x-Basis von Chicco
hat eine “semi-universale” Zulassung und
ist daher nicht mit allen Fahrzeugmodellen
kompatibel, sondern nur mit den im beiliegenden Heft “Liste der zugelassenen Fahrzeuge” aufgeführten.
29
Page 30

3 WEITERE MA NAHMEN
3.1 HIN EINSETZEN DES K INDES IN DEN
KINDERAUTOSITZ
1. Heb en Sie die Stoffpol sterung hoch , halten
Sie die Verstel ltaste gedrück t und ziehen Sie
an den Gur ten des Kinde rautositzes , bis sich
diese lockern (Abb. 22).
2. Das Schloss durch Drücken auf den roten
Knopf öf fnen. Halten Sie di e Gurte gesprei zt
(Abb. 23).
3. Das Kind in den Kinderautositz setzen.
4. Die zwei Teile des Schlosses übereinan-
derlegen und zusammen in das Schloss
einführe n, bis es hörbar ei nrastet (Abb. 24).
WARNUNG! Führen Sie die Schlossteile
niemals nacheinander oder einzeln in das
Schloss ein.
5. Die Sicherheitsgurte des Kinderautositzes
spanne n, indem Sie an dem da für vorgesehenen Verstellband ziehen (Abb. 25).
3.2 VERSTELLEN DER G URTPOSITION
WARNUN G! Die Gurte müs sen sich stets de m
Wachstum des Kindes anpassen. Bevor der
Kinderautositz im Auto befestigt wird, sind
die Gur te auf der korrekte n Höhe einzuste llen.
Die Gur te sind dann richtig eingeste llt, wenn
sie in Schulterhöhe des Kindes aus der Rükkenlehne kommen (Abb. 26).
Der Kinderautositz verfügt über 3 Höhenpositionen.
Um das Verstellen der Gur te durchzuführen ,
gehen Sie folgendermaßen vor:
1. Die Schulterpolster entfernen. Diese hierzu
aus den Schlitzen des Stoffbezugs ziehen.
2. Das Schloss durch Drücken auf den roten
Knopf öffnen.
3. Die Gur te hinter der Rücken lehne heraus zie-
hen und sie durch die zur H öhe des Kindes
passende Öffnung durchziehen (Abb.en
27A und 27B).
WARNUNG! Vergewissern Sie sich, dass die
Gurte s tets zwische n der Positionssta nge (R)
und der Schale geführt sind.
WARNUNG! Der Sitzverkleinerer garantiert
dem Kind von dessen Geburt a n bis zum Gewicht von 6 kg die korrekte Haltung und die
ideale Position für Hals und Rücken.
3.3 FIX- ODER SCHWENKPOSI-
TION DES KINDERAUTOSITZES
(VERW ENDUNG AL S WIPPE)
Wenn der Kinderautositz nicht im Auto verwendet wird, kann der Kinderautositz auch
als Wippe verwendet werden.
Damit der Kinderautositz wippt, schließen
Sie die Schaukelsperre (Abb. 14) und drehen
Sie den Transp ortbügel in Posit ion C (Abb. 5).
Um ihn in Fix-Position zu verwenden, ziehen
Sie die Scha ukelsperre h eraus und drehe n Sie
den Tragebügel in Position D (Abb. 5).
Positionieren Sie den Kinderautositz ausschließlich auf stabilen und horizontalen
Oberfl ächen.
WARNUN G! Setzen Sie den Trag ebügel immer
in Position B (vertikal) zurück, bevor Sie den
Kinderautositz transportieren.
WARNUNG! Lassen Sie das Kind
niemals unbeaufsichtigt.
WARNUNG! Verwenden Sie stets
das Rückhaltesystem.
WARNUNG! Es ist gefährlich, den
Kinderautositz auf einer erhöhten
Oberfl äche wie Tische, Stühle, etc.
zu stellen.
WARNUNG! Dieser Kinderautositz
ist nicht für längere Schlafzeiten
geeignet.
WARNUNG! Verwenden Sie den
Kinderautositz nicht, wenn das
Kind selbständig sitzen kann.
Der Kin derautositz ist ke in Ersatz für ein B ett
oder eine Wiege. Wenn das Kind schlafen
möchte, sollte es in ein Bett oder in eine geeignete Wiege gelegt werden.
Verwenden Sie den Kinderautositz nicht,
wenn ein Teil davon defekt oder verloren
gegangen ist.
3.4 VERWENDUNG M IT DEM
SPORTWAGEN
WA RNU NG ! Di e Ba bys ch ale Aut o- Fix kan n an
Sportwagen, die mit speziellen serienmäßigen
oder separat zu erwerbenden Andocksystemen ausgestattet sind, befestigt werden.
WARNUNG! Beziehen Sie sich auf die Gebrauchsanleitung des Sportwagens, wenn
Sie den Kinderautositz zusammen mit dem
Sportwagen verwenden. Die CHICCO Sportwagen, die mit einem CLIK CLAK Andock-
30
Page 31

System ausges tattet sind, habe n Armlehnen
mit Spezialvorrichtungen, die es ermöglichen,
den Kinderautositz ohne weitere Zubeh örteile
direkt auf dem Sportwagen zu befestigen.
Bevor man den Kinderautositz befestigt, die
Armlehnenabdeckungen ganz abnehmen.
Um den Kinderautositz am Sportwagen festzumachen, gehen Sie folgendermaßen vor:
1. Den Kinderautositz mit dem Tragebügel
in vertikaler Position (B) (Abb. 28) in die
Hand nehmen.
2. Die beide n Clik Clak Andoc k-Stifte de r Baby-
schale (N) an d en Armlehnen d es Sport wagens oder dem separat erworbenen Adapter
befestigen, dabei darauf achten, dass sie
auf beiden Seiten befestigt werden. Beim
Einrasten ist ein Klick zu hören (Abb. 29).
WARNUNG! Kontrollieren Sie vor dem Gebrauch, dass die Feststellvorrichtungen des
Kinderautositzes korrekt eingeführ t wurden.
Um den Kinderautositz vom Sportwagen zu
lösen:
Bringen Sie den Tragebügel in vertikale Position (C) zurück.
An dem hinteren Entriegelungsgriff ziehen.
Den Kin derautositz au f eine ebene Ob erfl äche
bringen und abstellen.
WARNUNG: Die Befestigung und das Lösen
können auch mit dem Kind im Kinderautositz durchgeführt werden, auch wenn die
genannten Maßnahmen durch das Gewicht
des Kindes erschwert werden. In diesem Fall
wird darauf hingewiesen, dass beim Durchführen de r genannten Maßn ahmen vorsichti g
vorzugehen ist.
3.5 REIN IGUNG UND
AUFBEWAHRUNG
REINIGUNG DES BE ZUGS
Der Stoffbezug des Kinderautositzes kann
komplett abgenommen und von Hand oder
in der Maschine bei 30°C gereinigt werden.
Um den Stoffbezug zu reinigen, öffnen Sie
die Gur te und ziehen Sie ihn a b, nachdem Sie
die zwei G urtsträ nge und das Schlos s aus den
jeweiligen Schlitzen herausgezogen haben
(Abb. 30).
Zur Reinigu ng befolgen Sie die au f dem Etikett
des Bezugs aufgeführten Anweisungen, die
folgende Waschsymbole enthalten:
In der Maschine bei 30°C waschen
Nicht bleichen
Nicht im Trockner trocknen
30° C
Nicht bügeln
Nicht chemisch Reinigen
Verwend en Sie keine Scheu er- oder Lösungsmittel . Den Bezug nich t schleudern un d ohne
Auswringen trocknen lassen.
REINIGUNG DER KUNSTSTOFFUND METALLTEILE
Für die Reinigung der Kunststoff- oder der
lackierten Metallteile, verwenden Sie nur ein
feuchtes Tuch. Ver wenden Sie keine S cheueroder Lösungsmittel.
Die beweglichen Teile des Kinderautositzes
dürfen in keiner Weise geschmiert werden.
KONTROLLE DER UNVERSEHRTHEIT
DER BESTANDTEILE
Es wird empfohlen, regelmäßig die Unversehrtheit und den Verschleiß folgender Bestandteile zu überprüfen:
Stoffbezug: Überprüfen Sie, dass keine Füllung
heraus tritt oder das s Teile von die ser verloren
gehen. Überprüfen Sie die Beschaffenheit der
Nähte, die stets unbeschädigt sein müssen.
Gurte: Vergewissern Sie sich, dass am Verstellband, am M ittelsteg , an den Schulterb ändern
und im Bereich der Verstellplatte der Gurte
kein unnormales Zerfransen des Stoffs mit
sichtbarer Ausdünnung auftritt.
Kunststoffteile: Kontrollieren Sie den Verschleiß al ler Kunststoff teile, die nicht be schädigt oder entfärbt sein dürfen.
WARNUNG! Sollte der Kinderautositz verformt oder stark abgenutzt sein, ist er zu ersetzen, denn die ursprünglichen Sicherheitseigenscha ften könnten nich t mehr gegeben se in.
AUFBEWAHRUNG DES PRODUKTS
Wenn der Ki nderautosit z nicht im Auto montiert ist, wird empfohlen, diesen an einem
trockenen Ort, von Wärmequellen entfernt
und vor Staub, Feuchtigkeit und direktem
Sonnenlicht geschützt aufzubewahren.
ENTSORGUNG DES PRODUKTS
Bei Erreichen der vorgesehenen Gebrauchsgrenze des Kinderautositzes stellen Sie den
Gebra uch ein und entso rgen Sie ihn. Trenne n
Sie der Umwelt zuliebe die verschiedenen
Arten vo n Müll je nachdem, wa s von der geltenden Regelung Ihres Landes vorgeschrieben
wird.
31
Page 32

E
CHICCO
AUTO-FIX FAST
G. 0+ (0-13)
INSTRUCCIONES DE USO:
ÍNDICE
1. INTRODUCCIÓN
1,1 ADVERTENCIAS
1.2 CARACTERÍSTICAS DEL PRODUCTO
1.3 DESCRIPCIÓN COMPONENTES
1.4 POSICIONES DEL ASA
1. 5 L IMI TACI ON ES Y REQ UIS ITO S DE USO
RELATIVOS A L PRODUCTO Y AL ASI ENTO DEL AUTOMÓVIL
2. INSTALACIÓN EN EL AUTOMÓVIL
2.1 CONFIGURACIÓN INICIAL DE LAS
HOMBRERAS
2.2 INSTALACIÓN CON BASE
2.3 INSTALACIÓN SIN BASE
3. OTRAS OPERACIONES
3.1 ALOJAMIENTO DEL NIÑO EN LA SILLITA
3.2 REGULACIÓN DE LA POSICIÓN DE
LOS CINTURONES
3. 3 PO SIC IÓN FIJ A O B AS CUL AN TE D E L A
SILLITA (USO HAMACA)
3.4 UTILIZACIÓN CON SILL A DE PASEO
3.5 LIMPIEZA Y MANTENIMIENTO
1. INTRODUCCIÓN
1,1 ADVERTENCIAS
IMPORTANT ÍSIMO: PARA LEER IN MEDIATAM ENT E
• G U A R D A R E S T E M A N U A L P A R A F U T U R A S
CONSULTAS.
• P a r a e l m o n t a j e y l a i n s t a l a c i ó n d e l p r o d u c -
to seguir estrictamente las instrucciones.
Evitar que alguien utilice el producto sin
haber leído las instrucciones.
• ¡ A T E N C I Ó N ! S e g ú n l a s e s t a d í s t i c a s s o b r e
los accidentes, generalmente los asientos
posteriores del vehículo son más seguros que los delanteros: por tal motivo, se
aconseja instalar la sillita en los asientos
trasero s. En especial, el as iento más seguro
es el centr al posterior, siempre q ue disponga de cinturón de seguridad de 3 puntos.
• ¡ A T E N C I Ó N ! ¡ P E L I G R O G R A V E ! N o u t i l i z a r
nunca esta sillita en un asiento delantero
que disponga de airbag frontal. Se puede
instalar la sillita en el asiento delantero
só lo si e l air bag fron tal h a sid o des acti vado: comprobar con el concesionario del
coche o en el manual de instrucciones
del autom óvil la posibilidad d e desactivar
el airbag. Se aconseja igualmente tirar
hacia atrás lo máximo posible el asiento
haciéndolo compatible con la presencia
de otros pasaj eros en el asiento posterio r.
• S e a c o n s e j a q u e t o d o s l o s p a s a j e r o s q u e
viajen en el automóvil estén informados
sobre la forma de desenganche del niño
en caso de emergencia.
• P r e s t a r a t e n c i ó n a l a p o s i c i ó n e n q u e d e b e
instalarse la sillita en el automóvil para
evitar interferencias entre ésta y un asiento
móvil o la puerta.
• N i n g u n a s i l l i t a p u e d e g a r a n t i z a r l a s e g u ridad total del niño en caso de accidente,
pero el uso de este producto reduce el
riesgo de lesiones graves o de muerte.
• E l r i e s g o d e s e r i o s d a ñ o s a l n i ñ o , n o s ó l o
en caso de accidente, también en otras
circunstancias (por ej, frenadas bruscas,
etc) aumenta si no se siguen estrictame nte
las indicaciones presentes en este manual:
comprobar siempre que la sillita esté enganchada correctamente en el asiento.
• E n e l c a s o d e q u e l a s i l l i t a s e h u b i e r a d a ñ a do, deformado o si está desgastada, se
aconseja su sustitución puesto que podría
haber pe rdido las carac terísticas origi nales
de seguridad.
• N o r e a l i z a r m o d i fi caciones o elementos
adicionales al producto sin la aprobación
del fabricante.
• N o i n s t a l a r a c c e s o r i o s , r e c a m b i o s y
componentes no proporcionados por el
fabricante.
• N o d e j a r n u n c a e l n i ñ o s i n v i g i l a n c i a e n l a
sillita por ningún motivo.
• N o d e j a r n u n c a l a s i l l i t a e n e l a s i e n t o d e l
automóvi l sin enganchar pue s podría golpear y herir a los pasajeros.
• No interponer nada, que no sea un accesorio aprobado para el producto, ni entre
el asiento de l automóvil y la sillit a, ni entre
la sillita y el niño: en caso de accidente la
sillita podría no funcionar corre ctamente.
32
Page 33

• E n e l c a s o d e q u e s e d e j e e l a u t o m ó v i l
bajo los rayos directos del sol se aconseja
cubrir la sillita.
• A c a u s a d e u n a c c i d e n t e t a m b i é n l e v e l a
sillita puede sufrir daños que no siempre
son visibles a simple vista: por lo tanto es
necesario sustituirla.
• N o u t i l i z a r s i l l i t a s d e s e g u n d o m a n o : p o drían hab er sufrido daños es tructurales n o
visibles a simple vista pero que comprometen la seguridad del producto.
• L a f u n d a p u e d e s u s t i t u i r s e e x c l u s i v a m e n t e
con la aprobación del fabricante porque
constituye parte integrante de la sillita. La
sillita no debe usarse nunca sin la funda,
para no comprometer la seguridad del
niño.
• C o n t r o l a r q u e l a c o r r e a d e l c i n t u r ó n n o
esté retorci da y evitar que ésta o p artes de
la sillita qu edan atrapada s entre la puert a
o rocen contra puntos cortantes. En el
caso de que el cinturón presente cortes
o deshilachados, es necesario sustituirlo.
• N o t r a n s p o r t a r , e s p e c i a l m e n t e e n l a p a r t e
trasera del vehículo, objetos o maletas
que no estén sujetadas o posicionadas
de modo seguro: en caso de accidente o
frenado b rusco podrían her ir los pasajeros.
• A s e g u r a r s e d e q u e t o d o s l o s p a s a j e r o s d e l
auto usen su cintu rón de seguridad tanto
por su seguridad como durante el viaje,
puesto qu e en caso de acciden te o frenado
brusco podrían herir al niño.
• E n c a s o d e v i a j e s l a r g o s , d e t é n g a s e f r e c u e n temente. Los niños se cansan muy fácilme nte . Po r ni ngú n mo tiv o sa que al n iño de
la sillita con el ve hículo en movimiento. Si
el niñ o re qui ere ate nci ón, bus que un l uga r
seguro y pare.
• L o s n i ñ o s r e c i é n n a c i d o s ( p r e m a t u r o s ) c o n
menos de 37 se manas de gestac ión pueden
correr riesgo en la sillita. Dichos bebés
pueden tener difi cultades respiratorias
mientras están sentados en la sillita. Por
lo tanto, acons ejamos dirigirse a su m édico
o al personal del hospital para que evalúen
a vuestro niño y le aconsejen el tipo de
sillita adecuada antes de dejar el hospital.
• L a s o c i e d a d A r t s a n a d e c l i n a t o d a r e sponsabilidad por un uso inapropiado
del producto.
1.2 CARACTERÍSTICAS DEL
PRODUCTO
• E s t a s i l l i t a h a s i d o h o m o l o g a d a c o m o
“Grupo 0+”, para el transporte de niños
desde su nacimiento hasta 13 kg de peso
(de 0 a 10 meses / alrededor de 1 año),
en conformidad con lo dispuesto por el
reglamento europeo ECE R44/04.
• L a h o m o l o g a c i ó n e s d e t i p o “ U n i v e r s a l ” ,
por lo tanto, la sillita puede utilizarse en
cualquier modelo de automóvil. ¡ATENCIÓN! “Universal” signifi ca que es compatible con la mayor ía, pero no con todos,
los asientos de los vehículos.
AVISO I MPORTANTE
1. É st e es un d isp osi tiv o de ret enc ión pa ra n i-
ños “Universal”, homologado de acuerdo
al Reglame nto ECE R44/04 y compatible
con la mayoría, pe ro no todos, los asientos
de vehículos.
2. La perfecta compatibilidad se obtiene
en aquellos casos en que el fabricante
del vehículo declare expresamente en el
ma nua l qu e ha sid o pr evi st a la ins tal aci ón
de dispositivos “Universales” de sujeción
para niños cuya edad esté comprendida
dentro del rango considerado.
3. Este dispositivo de retención es “Uni-
versal” según los más severos criterios
de homologación respecto de modelos
precedentes que no cuentan con la presente indicación.
4. Apto so lamente para su uso en ve hículos
que posean cinturón de seguridad de 3
puntos de sistema estático o inercial, homologado de acuerdo al Reglamento UN/
ECE N° 16 u otro estándar equivalente.
5. E n ca so d e du das , co nta ct ar a l fa bri can te
del disposi tivo de retención o con el pu nto
de venta.
1.3 DESCRIPCIÓN DE LOS
COMPONENTES
Fig. 1 (3/4)
A. Asa
B. Capota parasol
C. Funda textil
D. Cojín reductor (*)
E. Base (**)
33
Page 34

Fig. 2 (Frente)
F. Ranura de paso de los cinturones
G. Cinturones de la sillita
H. Hombreras (*)
I. Botón de regulación de los cinturones
(debajo de la solapa de tela)
J. Correa de regulación de los cinturones
Fig. 3 (Perfi l)
K . Gu ía c int uró n au to a bdo mi nal en l a Si lli ta
L. G uía cin tur ón a uto a bd omi nal en l a ba se
M. Botones para la rotación del asa
N. Pernos clik clak (para el enganche en la
silla de paseo)
Fig. 4 (Parte posterior)
O. Guía cinturón auto diagonal
P. Manill ar de desenganc he (de la base y de
la silla de paseo)
Q. Ranura de paso de los cinturones
R. Elemento de guía de los cinturones de
la sillita
S. Seguro estabilizador
(*) Forma y modelo pueden diferir según
las versiones de sillita.
(**) Opcional
1.4 POSICIONES DEL ASA
El asa de la sillita se puede regular en 4
posiciones (Fig. 5).
A. Posición de transporte en auto (ATEN-
CIÓN: ésta es la única posición permitida
durante el transporte en auto).
B. Posición transporte a mano.
C. Posición uso ha maca con balancín o pa ra
enganche en silla de paseo Chicco pre-
dispuesta para tal fi n.
D. Posición uso hamaca fi ja.
Para realizar la regulación presionar contempor áneamente los botone s (M) del asa
girándola hasta la posición deseada hasta
escuchar un clic.
1.5 LIMITACIONES Y REQUISITOS DE
USO RELATIVOS AL PRODUCTO Y AL
ASIENTO DEL AUTOMÓVIL
¡ATENCIÓN! Respetar estrictamente las
siguientes limitaciones y requisitos de uso
relativos al producto y al asiento del automóvil: de lo contrario no estará garantizada
la seguridad.
• L a s i l l i t a p u e d e i n s t a l a r s e e n e l a s i e n t o
delantero d el lado pasajero o e n uno cualquiera de los asientos traseros. Igualmente
el asiento de l automóvil debe e star dirigido
en sentido de marcha. No utilizar esta
sillita so bre asientos dirigid os lateralmente
u opuestos al sentido de marcha (Fig. 6).
• El asiento del automóvil debe disponer
de cinturón de seguridad de 3 puntos de
sistema estático o inercial, homologado
de acu erdo al R egla men to U N/E CE N ° 16
u otro estándar equivalente.
• ¡ A T E N C I Ó N ! N o i n s t a l a r l a s i l l i t a c o n e l
cinturón del auto de dos puntos de anclaje (Fig. 8).
• N o u t i l i z a r n u n c a e l c o j í n r e d u c t o r s i e l
niño pesa más de 6 kg.
• C o m p r o b a r q u e l a h e b i l l a d e l c i n t u r ó n
de tres puntos del automóvil no sea demasiado alta (Fig. 13-19). De lo contrario,
intenten instalar la sillita en otro asiento
del automóvil.
2. INSTALACIÓN DE L A SILLITA EN EL
AUTOMÓVIL
La sillita puede instalarse con la base (opcional) o sin la misma. En ambas confi gura cio ne s, d ebe ins tal ars e só lo e n el sen tid o
contrario a la dirección de marcha.
2.1 CONFIGURACIÓN INICIAL DE
LAS HOMBRERAS
La sillita dispone de 2 tipologías diferentes
de hombreras (A y B) en función de las versi one s. A nte s de usa r la sill ita , pa ra m ont ar
las hombreras realizar lo siguiente:
• H o m b r e r a s v e r s i ó n A ( F i g . 9 A , 9 B y 9 C ) :
hacer pasar las hombreras a través de las
ranuras del tejido (no de la estructura de
abajo) para q ue los cinturones per manezcan coloca dos sobre las misma s. Introducir
la solapa de la entrepierna a través de la
hebilla de los cinturones.
• H o m b r e r a s v e r s i ó n B ( F i g . 1 0 A y 1 0 B ) : h a c e r
pasar los cinturones de la sillita a través
de las dos hombreras. Introducir la solapa
de la entrepierna a través de la hebilla de
los cinturones.
2.2 INSTAL ACIÓN CON BASE
Pa ra i nst al ar l a si lli ta c on l a ba se e n el asi ento del auto, realizar lo siguiente:
34
Page 35

1. Desengancha r la sillita de la base tirando
la manill a de desenganche s ituada por detrás del respaldo y contemporáneamente
alzarla mediante el asa (Fig. 11).
2. Po sic ion ar l a ba se e n el asi ent o es cog ido
pa ra l a in st ala ció n, o rie nt ánd olo com o se
ilustra e n la Fig. 12, de modo tal que e sté
en contacto con el respaldo del asiento
del automóvil.
3. Tirar el cinturón de seguridad del auto
y engancharlo en la hebilla correspondiente, haciendo pasar la parte horizontal
(abdomina l) en las dos guías respe ctivas
(L) marcadas co n la fl echa azul y tensarla
todo lo máximo posible (Fig. 13).
4. Antes de coloca r la sillita en la base, co m-
probar que el retén estabilizador esté
cerrado (Fig. 14).
5. Introducir la sillita en la base (dirigida en
sentido cont rario de marcha) emp ujándola hacia abajo hasta que se enganche (se
escuchará un “clac” de fi jación) (Fig. 15).
6. Comprobar el enganche correcto de la
sillita en la base tratando de alzarla desde
la parte anterior y posterior.
7. Coger el cinturón diagonal del auto y
hacerlo pasar en la respectiva guía (O)
situada en l a parte traser a del respaldo de
la sillita (Fig. 16). ¡ATENCIÓN! El cinturón
diagonal durante el transporte debe estar
SIEMPRE colocado dentro de esta guía.
8. Tensar todo lo que s ea posible el cinturón
sin que queden excedentes de correa y
asegurándose de que no esté retorcido.
9. Girar el asa hacia la posición A compro-
bando que s e apoye contra el asien to del
automóvil (Fig. 17).
¡ATENCIÓN!
después de la instalación, comprobar SIEMPRE que el cinturón del auto esté tensado
correc tamente y que esté dis tribuido uniformemente e n todos los puntos, sin pre sentar
torsiones. Nunca pase el cinturón del coche
por otras p osiciones que non s ean aquellas
indicadas.
Para desmontar la sillita manteniendo la
base instalada en el auto:
1. Sacar el cinturón diagonal de la guía del
respaldo sin desengancharlo de la hebilla.
2. Volver a colocar el as a en posición vertic al
B (Fig. 5).
3. Desenganchar la sillita como ha sido
ilustrado anteriormente.
2.3 INSTALACIÓN SIN BASE
Para instalar la sillita sin la base, realizar
lo siguiente:
1. Extraer el seguro estabilizador y colocar
la sillita en el asiento escogido del coche
(Fig. 18).
2. Tirar el cinturón de seguridad del auto
y engancharlo en la hebilla correspondiente, haciendo pasar la parte horizontal
(abdomina l) del cinturón en las do s guías
respec tivas (K) de la sillita ma rcadas con
la fl echa azul (Fig. 19).
3. Coger el tr amo diagonal del cintu rón del
auto y hacer lo pasar en la resp ectiva guía
(O) situada en la p arte trasera d el respaldo de la sillita (Fig. 20). ¡ATENCIÓN! El
cinturón diagonal durante el transporte
debe SIEMPRE estar colocado dentro
de esta guía.
4. Tensar todo lo que sea p osible el cinturón
sin que queden excedentes de correa
y asegurándose que no esté retorcida.
5. Girar el asa hacia la posición A compro-
bando que s e apoye contra el asien to del
automóvil (Fig. 21).
Para desmontar la sillita:
1. Desenganchar el cinturón del coche presionando la hebilla.
2. Volver a colocar el asa en la posición B
(Vertical).
3. Sacar el cinturón de la guía diagonal y de
aquellas horizontales.
2.4 INSTALACIÓN CON BASE ISOFIX
(Previsto como equipamiento o a la venta
por separado)
Para la instalación con base ISOFIX tómese como referencia el libro de instrucciones correspondientes entregado con el
producto.
Para utilizar el sistema ISOFIX SEMI-UNIVERSAL es necesario leer el manual del
automóvil antes de instalar la sillita. El
manual indicará los asientos compatibles
con el tamaño de la sillita para automóvil.
La Base Isofi x de Chicco tiene una homologación de tipo “Semi-Universal”, por
tanto, no es compatible con todos los
modelos de automóvil, sino únicamente
35
Page 36

con los que se indican en el libro adjunto
al producto “Lista de automóviles homologados”.
3. OTRAS OPERACIONES
3.1 ALOJAMIENTO DEL NIÑO EN LA
SILLITA
1. Alzar la solapa de tela, mantener pre-
sionado el botón de regulación y tirar de
los cinturones de la sillita para afl ojarlos
(Fig. 22).
2. Abrir la hebilla, presionando el botón
rojo y mantener abiertos los cinturones
(Fig. 23).
3. Acomodar al niño.
4. Sobreponer las dos lengüetas de la hebilla
e introduci rlas, una vez que es tán unidas,
en la hebilla hasta oír un “clic” (Fig. 24).
¡ATENCIÓN! No introducir las lengüetas
en la hebilla una a una, o una sola.
5. Tensar los cinturones de seguridad de
la sillita tirando la respectiva correa de
regulación (Fig. 25).
3.2 REGULACIÓN DE LA POSICIÓN
DE LOS CINTURONES
¡ATENCIÓN ! Los cinturones de ben adaptarse siempre al crecimiento del niño. Antes
de ins tal ar l a si lli ta e n el coc he e s ne ces ar io
colocarlos en la altura correcta.
Para una regu lación correct a, los cinturones
deben salir del respaldo a la altura de los
hombros del niño (Fig. 26).
La sillita dispone de 3 posiciones en altura
de cinturones.
Para cam biar de lugar los cinturon es se debe
realizar lo siguiente:
1. Quitar las hombreras sacándolas desde
las ranuras de la funda de tela.
2. Abrir la hebilla de los cinturones presio-
nando el botón rojo.
3. Sacar los cinturones desde atr ás del res-
paldo e introducirlos en la ranura más
adecuada a la altura del niño (Fig. 27A
e 27B).
¡ATENCIÓN! Asegurarse de que los cinturones pasen siempre entre el elemento de
guía (R) y el armazón.
¡ATENCIÓN! El cojín reductor garantiza al
niño, desde el nacimi ento hasta los 6 kg de
peso, la contención correcta y la posición
ideal del cuello y de la espalda.
3.3 POSICIÓN FIJA O BASCULANTE
DE LA SILLITA (USO HAMACA)
Cuando la sillita no se la utiliza en el coche
puede usarse también como mecedora o
hamaca.
Para que se balancee, cerrar el seguro estabilizador (Fig. 14) y posicionar el asa en
la posición C (Fig. 5).
Para utilizarla en posición fi ja, extraer el
seguro estabilizador y colocar el manillar
en la posición D (Fig. 5).
Posicionar sólo sobre superfi cies estables
y horizontales.
¡ATENCIÓN! Antes de transportar la sillita, colocar siempre el asa en la posición
B (vertical).
¡ADVERTENCIA! No dejar al niño
sin vigilancia.
¡ADVERTENCIA! Utilizar siempre
el sistema de sujeción.
¡ADVERTENCIA! Es peligroso usar
la sillita sobre superfi cies altas
como mesas, sillas, etc.
¡ADVERTENCIA! Esta sillita no
debe utilizar se para períodos pro longados de sueño.
¡ADVERTENCIA! No utilizar la sillita si el niño puede sentarse solo.
La sillita n o sustituye una cam a o una cuna.
Si el n iño nec esi ta d or mir, ést e de be e st ar e n
una cama o en una cuna adecuada.
No usar la s illita si presenta rotu ras o faltan
piezas.
3.4 UTILIZ ACIÓN CON SILLA DE
PAS EO
¡ATENCIÓN! La sillita Auto- Fix puede sujetarse a las sillas de paseo Chicco provistas
de los sistemas de enganche específi cos
incluidos en el equipamiento o a la venta
por separado.
¡ATENCIÓN! Para su uso junto con la silla
de paseo, re mitirse a las instr ucciones de la
silla de paseo. Las sillas de paseo CHICCO
dotadas del sistema CLIK CLAK tienen brazos con disposi tivos especiales qu e permiten
enganchar la sillita directamente en la silla
36
Page 37

de paseo sin tener que emplear otros accesorios. Antes de enganchar la sillita para
automóvil retirar totalmente los cubreapoyabrazos.
Para enganchar la sillita a la silla de paseo,
realizar lo siguiente:
1. Agarrar la sillita con el asa en posición
vertical (B) (Fig. 28).
2. Enganchar los d os salientes del en ganche
Clik Clak de la Sillita (N) situados en los
apoyabr azos de la silla de pa seo o al sistema de enganche comprado por separado,
presta ndo especial aten ción a que estén
enganchados en ambos lados. Se oirá un
clic de enganche (Fig. 29).
ADVERTENC IA Antes del uso contro lar que
los dispositivos de fi jación de la sillita estén
acoplados correctamente.
Para desenganchar la sillita de la silla de
paseo:
1. Volver a colocar el asa en la posición
vertical (B).
2. Tirar el manillar de desenganche pos-
terior.
3. Desplazar y apoyar la sillita sobre una
superfi cie plana.
ATENCIÓN: El enganche o el desenganche
se pueden realizar también con el niño en
la sillita; las antedichas operaciones, con el
peso del n iño, podrían ser má s difi cultosas.
Se aconseja prestar atención al realizar las
operaciones citadas anteriormente.
3.5 LIMPIEZA Y MANTENIMIENTO
LIMPIEZA DE LA FUNDA
La funda de tela de la sillita es totalmente
desenfundable y lavable a mano o en lavadora a 30ºC.
Para lavarla, desabrochar los cinturones y
extraer la funda de tela después de haber
quitado los dos tramos de cinturones y la
hebilla de las respectivas ranuras (Fig. 30).
Para el lavado seguir las instrucciones presentes en la etiqueta de la funda que contiene los siguientes símbolos para el lavado:
30° C
Lavado en lavadora a 30°C
No decolorar
No secar en secadora
No planchar
No lavar a seco
No usar de tergentes abrasi vos o disolventes.
No centrifugar la funda y dejarla secar sin
escurrirla.
LIMPIEZ A DE LAS PARTES PLÁSTICAS
Y DE METAL
Para la limpieza de las partes plásticas o
metálicas barniz adas, utilizar sólo un paño
húmedo. No usar detergentes abrasivos o
disolventes.
Las partes móviles de la sillita no deben
lubricarse.
CONTROL DEL BUEN ESTADO DE
LOS COMPONENTES
Se aconseja comprobar regularmente el
buen estado y el estado de desgaste de los
siguientes componentes:
• F u n d a d e t e l a : c o m p r o b a r q u e n o s o b r e salga el relleno o que no escapen partes
del mismo. Comprobar el estado de las
costuras q ue deben estar si empre íntegras.
• C i n t u r o n e s : c o m p r o b a r q u e l a t r a m a d e l
tejido no esté deshilachada con una reducción evidente del grosor en correspondencia de la correa de regulación, del
separapiernas, en los tramos de los hombr os y en l a zo na de la p la ca d e reg ula ci ón
de los cinturones.
• P l á s t i c a s : c o m p r o b a r e l e s t a d o d e d e s g a s t e
de todas las partes plásticas que no deben
presentar signos evidentes de daño o de
decoloración.
¡ATENCIÓN! Si la sillita estuviera deformada o muy desgastada debe sustituirse:
podría haber perdido las características
originales de seguridad.
CONSERVACIÓN DEL PRODUCTO
Cuando no está instalada en el coche se
aconseja guardar la sillita en un lugar seco,
lejos de las fuentes de calor y al reparo del
polvo, de la humedad y de la luz solar directa.
ELIMINACIÓN DEL PRODUCTO
Alcanzado el límite de uso previsto para la
sillita, dejar de usarla y depositarla entre
los desechos. Por razones de respeto del
ambiente, separar los distintos tipos de
desecho según lo previsto por la norma
vigente en el propio país.
37
Page 38

P
CHICCO
AUTO-FIX FAST
G. 0+ (0-13)
INSTRUÇÕES DE UTILIZAÇÃO
ÍNDICE:
1. INTRODUÇÃO
1.1 ADVERTÊNCIAS
1.2 CARACTERÍSTICAS DO PRODUTO
1.3 DESCRIÇÃO DOS COMPONENTES
1.4 POSIÇÃO DA ALÇA
1.5 LIMITAÇÕES E REQUISITOS DE UTILIZAÇÃO RELATIVOS AO PRODUTO E
AO BANCO DO AUTOMÓVEL
2. INSTALAÇÃO NO AUTOMÓVEL
2.1 CONFIGURAÇÃO INICIAL DAS PRO-
TECÇÕES PARA OS OMBROS
2.2 INSTALAÇÃO COM BASE
2.3 INSTALAÇÃO SEM BASE
3. OUTRAS OPERAÇÕES
3.1 COLOCAÇÃO DO BEBÉ NA CADEIRA
AUTO
3.2 REGULAÇÃO DA ALTURA DAS COR-
REIAS
3.3 UTILIZAÇÃO COMO ESPREGUIÇADEI-
RA (POSIÇÃO DE BALOIÇO OU FIX A)
3.4 U TILIZAÇÃO N O CARRINH O DE PAS -
SEIO
3.5 LIMPEZA E CONSERVAÇÃO
1. INTRODUÇÃO
1.1 ADVERTÊNCIAS
MUITO IMPORTANTE. LEIA DE IMEDIATO
• C O N S E R V E E S T E M A N U A L P A R A F U T U -
RAS CONSULTAS.
• P a r a a m o n t a g e m e i n s t a l a ç ã o d o p r o d u t o ,
siga escrupulosamente as instruções. Não
permit a que alguém utilize o p roduto sem
ter lido as instruções.
• A T E N Ç Ã O ! S e g u n d o a s e s t a t í s t i c a s s o b r e
acidentes, de um modo geral os bancos
traseiros do veículo são mais seguros do
que o banco da frente: é aconselhável,
port anto, instalar a ca deira auto num dos
bancos de trás. Nomeadamente, o lugar
mais seguro é o do meio, se tiver cinto
de 3 pontos.
• A T E N Ç Ã O ! P E R I G O G R A V E ! N u n c a u t i l i z e
esta cadeira auto num banco da frente
equipado co m airbag frontal. Po de instalar
a cadeira auto no banco da frente, desde
que o airbag frontal tenha sido desactivado: verifi que no stand da marca ou
no manual de instruções do automóvel
se é possível desligar o airbag. Em todo
o caso, é aconselhável recuar o banco o
mais possí vel, tendo em conta a pre sença
de outros passageiros no banco de trás.
• É a c o n s e l h á v e l q u e t o d o s o s p a s s a g e i r o s
ocupantes do automóvel saibam como
libertar a criança, em caso de emergência.
• P r e s t e a t e n ç ã o à f o r m a c o m o i n s t a l a a
cadeira auto no automóvel, de forma a
evitar que um banco móvel ou a porta
possam interferir com ela.
• N e n h u m a c a d e i r a a u t o p o d e g a r a n t i r
a total segurança do bebé em caso de
acidente, mas a utilização deste produto
reduz o risco de lesões graves ou mor te.
• O r i s c o d e s é r i o s d a n o s p a r a o b e b é , n ã o s ó
em caso de acidente mas também noutras
circunstâncias (por ex. travagens bruscas,
etc.), aument a se as indicações da das neste
manual nã o forem rigorosamente r espeitadas: verifi que sempre se a cadeira auto
está correctamente fi xada no banco do
automóvel.
• S e a c a d e i r a a u t o e s t i v e r d a n i fi cada, deformada ou muito desgastada, deve ser
substituída, pois pode ter perdido as características originais de segurança.
• N u n c a i n t r o d u z a q u a i s q u e r a l t e r a ç õ e s n o
produto sem a aprovação do fabricante.
• N ã o i n s t a l e a c e s s ó r i o s , p e ç a s d e s u b s t i tuição ou componentes não fornecidos
pelo fabricante.
• N u n c a d e i x e o b e b é n a c a d e i r a a u t o s e m
vigilância, por motivo algum.
• N u n c a d e i x e a c a d e i r a a u t o n o b a n c o d o
automóvel sem estar fi xa, pois pode magoar ou ferir os passageiros.
• N ã o c o l o q u e n a d a q u e n ã o s e j a u m a c e s sório aprovado pelo fabricante nem entre
o banco do automóvel e a cadeira auto
nem entre a cadeira auto e a criança: em
caso de acidente, a cadeira auto poderá
não funcionar correctamente.
• S e o a u t o m ó v e l f o r d e i x a d o a o s o l , é a c o n -
38
Page 39

selhável tapar a cadeira auto.
• A p ó s u m a c i d e n t e , a i n d a q u e l i g e i r o , a
cadeira auto pode ter sofrido danos nem
sempre visíveis a olho nu: portanto, é necessário substituí-la.
• N ã o u t i l i z e c a d e i r a s a u t o e m s e g u n d a m ã o :
podem ter sofrido danos estruturais não
visíveis a olho n u mas que comprometem
a segurança do produto.
• O f o r r o s ó p o d e s e r s u b s t i t u í d o p o r o u t r o
aprovado pelo fabricante, dado ser uma
parte integrante da c adeira auto. A cadeir a
auto nunca deverá ser usada sem o forro,
para não co mprometer a segura nça do bebé.
• C e r t i fi que-se de que o cinto não fi ca torcido e evite que o mesmo ou partes da
cadeira auto fi quem presos nas portas ou
raspem em pontos cortantes. Se o cinto
estiver cortado ou desfi ado, é necessário
substituí-lo.
• C e r t i fi que-se de que não são transportados, nomeadamente na plataforma
do banco traseiro do carro, objectos ou
bagagens que não estejam presos ou
colocados de forma segura: em caso de
acidente ou travagem brusca podem ferir
os passageiros.
• C e r t i fi que-se de que todos os passageiros
do automóvel colocam o cinto de segurança, não só para sua própria segurança
mas também porque, durante a viagem,
em caso de acidente ou travagem brusca,
podem magoar o bebé.
• N o c a s o d e v i a g e n s l o n g a s f a ç a p a r a g e n s
frequentes. O bebé cansa-se muito facilmente. Por mot ivo algum retire o bebé d a
cadeira a uto com o carro em movime nto.
Se o bebé p recisar de atenção , procure um
local seguro e encoste.
• O s r e c é m - n a s c i d o s p r e m a t u r o s c o m m e nos de 37 semanas de gestação podem
correr perigo na cadeira auto porque podem ter difi culdade em respirar se forem ali
sentados . Assim, é aconsel hável consultar
o seu médic o ou o pessoal hospi talar antes
de deixar o hospital, para que observem
o seu fi lho e recomendem a cadeira auto
ou alcofa auto mais adequada.
• A e m p r e s a A r t s a n a d e c l i n a q u a l q u e r
responsabilidade pelo uso indevido do
produto.
1.2 CAR ACTERÍSTICAS DO PRODUTO
• E s t a c a d e i r a a u t o e s t á h o m o l o g a d a p a r a
o “G rupo 0 +”, p ara o tran spor te de cria nças desde o nascimento até aos 13 kg de
peso (de 0 a 10 me ses/1 ano, aproxi madamente), em conformidade com a norma
europeia ECE R44/04.
• A h o m o l o g a ç ã o é d o t i p o “ U n i v e r s a l ” ,
portanto, a cadeira auto pode ser utilizada em qualquer modelo de automóvel.
ATENÇÃO! “Universal” signifi ca que é
compatível com a maior parte mas não
todos os bancos de automóvel.
AVISO I MPORTANTE
1. Este é um dispositivo “Universal” de re-
tenção para crianças, homologado de
acordo com o Regul amento ECE R44/04 e
compatíve l com a maior parte dos ba ncos
de automóvel, mas não todos.
2. Obté m-se mais faci lmente a compati bilida-
de perfe ita nos casos em que o co nstrutor
do automóvel declara, no manual do veículo, que o mesmo prevê a instalação de
dispositivos “Universais” de retenção para
crianças, para a faixa etária em questão.
3. Este dispositivo de retenção foi classifi -
cado “Universal” de acordo com critérios
de homologação mais rigorosos relativamente a modelos anteriores, que não
incluem este aviso.
4. Adequado para a utilização em veículos
equipados com cinto de segurança de
3 pontos, estático ou com enrolador,
homologado segundo o Regulamento
UN/ECE N°16 ou outras normas standard
equivalentes.
5. Em caso de dúvida, contacte o fabri-
cante do dispositivo de retenção ou o
revendedor.
1.3 DESCRIÇÃO DOS COMPONENTES
Fig. 1 (3/4)
A. Alça de transporte
B. Capota de Sol
C. Revestimento têxtil
D. Almofada redutora (*)
E. Base (**)
Fig. 2 (Frente)
F. Ranhuras de passagem das correias dos
ombros
G. Cinto de 3 pontos da cadeira auto
39
Page 40

H. Protectores a colchoados dos om bros (*)
I. Botão de regulação do cinto (debaixo da
aba de tecido)
J. Correia reguladora central da tensão do
cinto
Fig. 3 (Perfi l)
K. G uia d e pa ssa gem d a co rre ia ab dom ina l
do cinto auto (na cadeira auto)
L. Guia de pas sagem da cor reia abdom inal
do cinto auto (na base)
M. Botões para regulação da alça
N. Pernos metálicos Clik Clak (para fi xação
no carrinho de passeio)
Fig. 4 (Trás)
O. Guia de passagem da correia diagonal
do cinto auto
P. Man ípu lo p ara sol tar a ca dei ra d a ba se o u
do chassis do carrinho de passeio
Q. Ra nhuras de passage m das correias dos
ombros
R. Guia posterior das correias da cadeira
auto
S. Estabilizador
(*) A forma e o modelo podem variar de
acordo com as versões da cadeira auto.
(**) Opcional
1.4 POSIÇÃO DA ALÇA
A alça da cadeira auto é regulável em 4
posições (Fig. 5):
A. Posição para transporte no automóvel
(ATENÇÃO: e sta é a única posiçã o permi-
tida dura nte o transpor te no automóvel).
B. Posição para o transporte à mão.
C. Posição para utilização como espreguiça-
deira de baloiço ou quando montada num
carrinho de passeio Chicco (compatível
com a mesma).
D. Posição para utilização como espregui-
çadeira, na posição fi xa.
Para regular a alça, pressione simultaneamente os botõe s (M) da mesma, rodando -
-a para a posição escolhida até ouvir um
estalido e bloqueio.
1.5 LIMITAÇÕES E REQUISITOS DE
UTILIZAÇÃO REL ATIVOS AO
PRODUTO E AO BANCO DO
AUTOMÓVEL
ATENÇÃO! Respeite escrupulosamente as
seguintes limitações e requisitos de utilização relativos ao produto e ao banco do
automóvel, pois c aso contrário a seguranç a
do bebé será comprometida.
• A c a d e i r a a u t o p o d e s e r i n s t a l a d a n o b a n c o
da frente, no lado do passageiro ou em
qualquer um dos bancos traseiros. Em
todo o caso, o banco do carro deve estar
virado no sentido da marcha. Nunca instale esta cadeira auto em bancos virados
lateralmente ou no sentido contrário à
marcha. (Fig. 6).
• O b a n c o d o a u t o m ó v e l d e v e e s t a r e q u i pado com cinto d e segurança de 3 pon tos
de fi xação, estático ou com enrolador,
homologado segundo o Regulamento
UNI/ECE N°16 ou outras normas standard
equivalentes. (Fig. 7).
• A T E N Ç Ã O ! N u n c a i n s t a l e a c a d e i r a a u t o
com um cinto de auto móvel de dois pontos
de fi xação (Fig. 8).
• N ã o u t i l i z e m a i s a a l m o f a d a r e d u t o r a q u a n do o bebé atingir um peso superior a 6 kg.
• C e r t i fi que-se de que o fecho do cinto de
seguran ça do carro não fi ca demasiado alto
(fi g. 13-19). Caso contrário, tente instalar a
cadeira auto noutro banco do carro.
2. INSTALAÇ ÃO DA CADEIRA AUTO
A cadeira auto pode ser instalada com ou
sem a base (opcional). Em ambas as confi gurações, deve ser instalada apenas no
sentido contrário à marcha.
2.1 CONFIGURAÇÃO INICIAL DOS
PROTECTORES DOS OMBROS
A cadeir a auto está equipada co m 2 tipos diferentes de p rotectores dos omb ros (A e B),
dependendo das versões. Antes de utilizar
a cadeira auto, para colo car os protectores
dos ombros, proceda da seguinte forma:
• P r o t e c t o r e s d o s o m b r o s v e r s ã o A ( F i g . 9 A ,
9B e 9C): pa sse os protectores d os ombros
através das ranhuras do revestimento têxtil
(não da estr utura por baixo), de mo do que
as correias fi quem colocadas sobre eles.
Passe o prote ctor da correia sepa radora de
pernas através do fecho do cinto.
• P r o t e c t o r e s d o s o m b r o s v e r s ã o B ( F i g . 1 0 A
e 10B): passe as correias da cadeira auto
através dos dois protectores dos om bros.
Passe o prote ctor da correia sepa radora de
pernas através do fecho do cinto.
2.2 INSTAL AÇÃO COM BASE
Para inst alar a cadeira a uto com a base no ban co do a uto mó vel , p roc eda da s eg uin te f or ma:
40
Page 41

1. Solte a cadeira auto da base, puxando
o manípulo situado atrás do encosto e,
ao mesmo tempo, erguendo-a pela alça
(Fig. 11).
2. Coloque a base sobre o banco escolhido
para a instalação, orientando-a como
indica a Fig. 12 e de modo que fi que em
contacto com o encosto do banco do
automóvel.
3. Puxe o cinto d e segurança do auto móvel
e prenda-o no fecho correspondente,
fazendo passar a correia horizontal (abdominal) pelas duas guias próprias (L),
assinaladas pela seta azul e estique-o o
mais possível (Fig. 13).
4. A ntes de colocar a cadeira auto na bas e,
verifi que se o estabilizador está bem fechado (Fig. 14).
5. Coloque a cadeira auto na base (virada
no sentido contrário à marcha), empurrando -a para baixo até fi car presa (ouvir á
um estalido indicando a fi xação) (Fig. 15).
6. Verifi que se a cadeira auto está bem fi -
xada na base, tentando levantá-la tanto
na frente como trás.
7. Pegue n a correia diagonal do auto móvel e
passe -a pela respec tiva guia (O) existente
na parte de trás do encosto da cadeira
auto (Fig. 16). ATENÇ ÃO! Durante o tran sporte, a co rreia diagonal deve per manecer
SEMPRE introduzida nesta guia.
8. Estiqu e o mais possível o cinto, se m deixar
folgas nas correias e certifi cando-se de
que não fi ca torcido.
9. Rode a alç a para a posição A , apoiando-a
no banco do automóvel (Fig. 17).
ATENÇÃO! Após a instalação, verifi que
SEMPRE se o cinto do automóvel está correcta mente esticado, s em ter fi cado torcido
e se a tensão e stá uniformeme nte distribuída. NUN CA passe o cinto do a utomóvel em
posições diferentes das indicadas.
Para retir ar a cadeira auto, ma ntendo a base
instalada no automóvel:
1. Retire a correi a diagonal da guia atrás do
encosto, sem abrir o cinto.
2. Coloq ue a alça na posição ver tical B (Fig. 5).
3. Solte a cadeira auto conforme ilustrado
anteriormente.
2.3 INSTAL AÇÃO SEM BASE
Para inst alar a cadeira auto sem base, proceda da seguinte forma:
1. Feche o e stabilizador e co loque a cadeira
auto no banco do automóvel (Fig. 18).
2. Puxe o cinto d e segurança do auto móvel
e prenda-o no fecho correspondente,
fazendo passar a correia horizontal (abdominal) pelas duas respectivas guias
(K) da cade ira auto, assinalad as pela seta
azul (Fig. 19).
3. Pegue na cor reia diagonal do automóvel
e passe -a pela respec tiva guia (O) situada
atrás do e ncosto da cadeir a auto (Fig. 20).
ATENÇÃO! Dur ante o transporte, a correia diagonal deve permanecer SEMPRE
introduzida nesta guia.
4. Estique o m ais possível o cinto, sem d eixar
folgas nas correias e certifi cando-se de
que não fi ca torcido.
5. Rode a alç a para a posição A , apoiando-a
no banco do automóvel. (Fig. 21).
Para retirar a cadeira auto:
1. Retire o cinto do automóvel abrindo-o
no fecho.
2. Coloque a alça na posição B (vertical).
3. Retire o cinto da guia diagonal e das
horizontais.
2.4 INSTALAÇÃO COM BASE ISOFIX
(incluída ou adquirida separadamente)
Para a inst alação com base ISO FIX, consulte
o r esp ec tiv o ma nua l de ins tr uçõ es f or nec ido
com o produto.
Para a utilização do sistema ISOFIX SEMI-
-UNIVERSAL é absolutamente necessário
ler o manual d o automóvel antes de ins talar
a cadeir a auto. O manual indicar á os locais
compatíveis com a classe de tamanho da
cadeira auto.
A Base Isofi x da Chicco tem uma homologação de tipo “Semi-universal” e, portanto,
não é compat ível com todos os modelos d e
automóvel ma s apenas com os especifi cados no manual fornecido com o produto,
na “Lista dos automóveis homologados”.
3. OUTRAS OPERAÇÕES
3.1 COLOCAÇÃO DO BEBÉ NA
CADEIRA AUTO
1. Levante a a ba de tecido, mantenh a pressionado o botão de regulação e puxe
as correias da cadeira auto de modo a
afrouxá-las (Fig. 22).
41
Page 42

2. Abra o fecho pressionando o botão
vermelho e mantenha as correias dos
ombros afastadas (Fig. 23).
3. Coloque a criança.
4. Sobreponha as duas linguetas e intro-
duza-as de uma vez no fecho, até ouvir
um es tali do (F ig. 2 4). ATE NÇÃ O! Nu nca
introduz a no fecho uma linguet a de cada
vez ou apenas uma.
5. Aperte o cinto de segurança da cadeira
auto, puxando a correia reguladora de
tensão (Fig. 25).
3.2 REGUL AÇÃO DA ALTURA DAS
CORREIAS DOS OMBROS
ATE NÇÃ O! A s cor rei as do s om bros deve m
estar se mpre adaptadas a o crescimento do
bebé. Antes de instalar a cadeira auto no
automóvel, dever á verifi car a altura cor recta
das correias. Para uma regulação correcta,
as correias devem sair do encosto à altura
dos ombros do bebé (Fig. 26).
A cadeira auto dispõe de 3 posições em
altura.
Para mudar a altura das correias, proceda
da seguinte forma:
1. Retire os p rotectores dos ombr os, desen-
fi ando-os das ranhuras do reve stimento
têxtil.
2. Abra o fecho do cinto, pressionando o
botão vermelho.
3. Retire as correias do lado de trás do encosto e volte a inseri-las nas ranhuras
mais adequadas à altura do bebé (Fig.
27A e 27B).
ATE NÇÃ O! Ce rti fi que-se de que as correias
passam sempre entre a guia (R) e o casco.
ATENÇÃO! A almofada redutora garante ao
bebé, desde o nascimento até aos 6 kg de
peso, uma re tenção correct a e uma posição
ideal para o pescoço e as costas.
3.3 POSIÇÃO FIXA OU DE BALOIÇO
DA CADEIRA AUTO (USO
ESPREGUIÇADEIRA)
Quando não é utilizada no carro, a cadeira auto também pode ser usada como
espreguiçadeira, nas posições de baloiço
ou fi xa. Para a posição de baloiço, feche o
estabilizador (Fig. 14) e coloque a alça na
posição C (Fig. 5).
Para a utiliz ar na posição fi xa, abra o estabi-
lizado r e coloque a alça na posiçã o D (Fig. 5).
Posicione a c adeira apenas s obre superfíci es
estáveis e horizontais.
ATENÇÃO! Antes de transportar a cadeira
auto, coloque sempre a alça na posição B
(vertical).
ADVERTÊNCIA! Não deixe o bebé
sem vigilância.
ADVERTÊNCIA! Utilize sempre
o cinto de segurança (da cadeira
auto).
ADVERTÊNCIA! É perigoso utilizar
a cadeira auto sobre superfícies
elevadas como mesas, cadeiras,
etc.
ADVERTÊNCIA! Esta cadeira auto
não é adequada para períodos de
sono prolongados.
ADVERTÊNCIA! Não utilize a cadeira auto (como espreguiçadeira)
se o bebé já for capaz de se sentar
sozinho.
A cadeira auto não substitui uma cama ou
um berço. Se o bebé precisar de dormir,
deverá deitá-lo numa cama ou num berço
adequado.
Não use a cadeira auto se houver alguma
peça partida ou em falta.
3.4 UTILIZAÇÃO NO CARRINHO DE
PAS SEIO
ATENÇÃO! A cadeira Auto-Fix pode ser
fi xada em carrinhos de passeio Chicco
equipados com os sistemas de fi xação específi co s, f orn eci dos de s éri e ou adq ui rid os
separadamente.
ATENÇÃO! Para utilizar com o carrinho de
passeio, consulte as ins truções do mesmo.
Os carrinhos de passeio CHICCO equipados com o sistema CLIK CLAK têm apoios
de braços com dispositivos especiais que
permitem fi xar a cadeira a uto directamen te no chassis, sem precisar de acessórios
adicionais. Antes de fi xar a cadeira auto,
remova completamente as coberturas dos
apoios dos braços.
42
Page 43

Para fi xar a cadeira auto no carrinho de
passeio, proceda da seguinte forma:
1. Segure na cadeira auto com a alça na
posição vertical (B) (Fig. 28).
2. Fixe os dois pernos de encaixe Clik Clak
da Cadeir a (N) nos apoios dos braços do
carrinho de passeio ou no sistema de fi xação adqu irido separada mente, prestan do
particular atenção para que encaixem
em ambo s os l ado s. O uvir á um e sta lido,
indicando o seu bloqueio (Fig. 29).
ADVERTÊNC IA! Antes de utiliza r, verifi que
se os dispositivos de fi xação da cadeira auto
estão cor rectamente bloq ueados. Para soltar a cadeira auto do carrinho de passeio:
1. Coloque a alça na posição vertical (B).
2. Puxe o manípulo posterior para soltar
a cadeira.
3. Retire a cadeira auto e coloque-a sobre
uma superfície plana e estável.
ATENÇÃO: as operações de montagem e
desmontagem também podem ser feitas
com a crianç a na cadeira auto, emb ora com
o seu peso, p ossam tornar-se mais difíceis.
Neste caso, é aconselhável ter o máximo
cuidado enquanto efectua estas operações.
3.5 LIMPEZA E CONSERVAÇÃO
LIMPEZA DO FORRO
O revestimento têxtil da cadeira auto é
completam ente removível e lavável, à mã o
ou na máqui na de lavar a 30°C (consoante
in dic aç ão d ada na e tiq uet a). P ar a la var, abr a
o cinto e retire o reve stimento têxtil d epois
de desenfi ar as duas correias dos ombros e
o fecho das respectivas ranhuras (Fig. 30).
Para a lavagem, siga as instruções que
constam na etiqueta do revestimento e
que podem incluir os seguintes símbolos
de lavagem:
Lavagem na máquina a 30°C
30° C
Não usar lixívia
Não secar na máquina
Não passar a ferro
Não limpar a seco
Nunca ut ilize detergentes ab rasivos ou sol-
ventes. Nã o centrifugue o forro e e stenda-o
sem o torcer.
LIMPEZA DOS COMPONENTES DE
PLÁSTICO E DE METAL
Para a limpeza dos componentes em plástico o u em m etal p inta do, util ize a pena s um
pano húmido. Nunca utilize detergentes
abrasivos ou solventes.
As partes móveis da cadeira auto não devem, de modo algum, ser lubrifi cadas.
CONTROLO DA INTEGRIDADE DOS
COMPONENTES
É aconselhá vel verifi car regul armente a integridade e o estado de desgaste dos seguintes
componentes:
• F o r r o : c e r t i fi que-se de que não estão a
desfazer-se nem a sair para fora do revestimento partes do enchimento. Verifi que
o estado das costuras, que devem estar
sempre intactas.
• C i n t o s : v e r i fi que se o materia l têxtil está a
desfaz er-se e se h á uma evidente reduçã o
da espessura na zona da correia reguladora,
na correia separadora de pernas, nas correias dos ombros e na zona das ranhuras
de regulação das mesmas.
• P l á s t i c o s : v e r i fi que o estado de desgaste
de todos os componentes em plástico que
não devem ap resentar evidente s sinais de
deterioração nem perda de cor.
ATENÇÃO! Se a cadeira auto estiver deformada ou muito desgastada deve ser
substituída, pois poderá ter perdido as características originais de segurança.
CONSERVAÇÃO DO PRODUTO
Quando não está instalada no automóvel,
é aconselhável conservar a cadeira auto
num local seco, longe de fontes de calor
e ao abrigo do pó, da humidade e da luz
solar directa.
ELIMINAÇÃO DO PRODUTO
Atingido o limite de utilização previsto para
a cadeira auto, deixe de a usar e coloque -a
no lixo. Por respeito pelo am biente, separe
os diferentes tipos de resíduos de acordo
com a legislação vigente no seu País.
43
Page 44

NL
CHICCO
AUTO-FIX FAST
G. 0+ (0-13)
GEBRUIKSAANWIJZING
INHOUDSOPGAVE:
1. INLEIDING
1.1 WAARSCHUWINGEN
1.2 KENMERKEN VAN HET PRODUCT
1.3 BESCHRIJVING VAN DE ONDERDELEN
1.4 STAND VAN DE HANDGREEP
1.5 BEPERKINGEN EN GEBRUIKSVEREISTEN VAN HET ARTIKEL EN DE AUTOZITTING
2. INSTALLATIE IN DE AUTO
2.1 BEGINUITVOERING VAN DE SCHOU-
DERBANDEN
2.2 INSTALLATIE MET BASIS
2.3 INSTALLATIE ZONDER BASIS
3. VERDERE HANDELINGEN
3.1 HET KIND IN HET AUTOSTOELTJE
ZETTEN
3.2 DE STAND VAN DE GORDELS AF-
STELLEN
3.3 VASTE OF SCHOMMELSTAND VAN
HET STOELTJE (GEBRUIK ALS LIGSTOELTJE)
3.4 GEBRUIK MET DE WANDELWAGEN
3.5 ONDERHOUD EN BEWARING
1. INLEIDING
1.1 WAARSCHUWINGEN
ZEER BELANGRIJK: METEEN LEZEN
• B E W A A R D E Z E H A N D L E I D I N G V O O R
EVENTUELE LATERE RAADPLEGING.
• V o l g d e i n s t r u c t i e s v o o r d e m o n t a g e e n d e
install atie van het produc t nauwgezet. L aat
niemand h et artikel gebr uiken zonder eers t
de instructies te hebben gelezen.
• L E T O P ! V o l g e n s d e s t a t i s t i e k e n o v e r o n -
gelukken is de achterbank van het voertuig veiliger dan de voorzittingen: daarom
wordt aangeraden het autostoeltje op de
ac hte rba nk t e in sta lle ren . De vei lig ste zitting is de middelste achterzitting, als deze
is uitgerust met een driepuntsgordel.
• L E T O P ! E R N S T I G G E V A A R ! G e b r u i k d i t
autostoeltje nooit op een voorzitting uitgerust m et een frontale airb ag. Het stoeltje
kan alleen op een voorzitting worden gein stal lee rd, a ls d e fro ntale a irb ag is uitg eschakeld: controleer bij de autofabrikant,
of in de gebruiksaanwijzing van de auto,
of de airbag kan worden uitgeschakeld.
Het wordt in ieder geval aangeraden de
zitting zover mogelijk achteruit te zetten,
voor zover de aanwezigheid van andere
passagiers op de achterbank dit toelaat.
• H e t w o r d t a a n b e v o l e n a l l e i n z i t t e n d e n t e
informeren over hoe het kind in geval van
nood kan worden losgekoppeld.
• L e t e r o p h o e h e t a u t o s t o e l t j e i n d e a u t o
wordt geïnstalleerd om te voorkomen dat
een mobiele zitting of het portier stoort.
• G e e n e n k e l a u t o s t o e l t j e k a n d e a b s o l u t e
veiligheid van het kind in geval van een
ongeluk garanderen, maar het gebruik
van dit ar tikel verminder t het gevaar voor
ernstig letsel of de dood.
• H e t g e v a a r v o o r e r n s t i g l e t s e l v a n h e t k i n d ,
en niet alleen bij een ongeluk, maar ook
in andere omstandigheden (bijv. bij hard
remmen, enz.) wordt groter, als de aanwijzingen die in deze handleiding worden
beschreven niet nauwgezet in acht worden
genomen: controleer altijd dat het autostoeltje corr ect aan de zitting is b evestigd.
• I n d i e n h e t a u t o s t o e l t j e b e s c h a d i g d , v e r vormd of ernstig versleten mocht zijn,
moet het word en vervangen . Het kan zijn
oorspronkelijke veiligheidskenmerken hebben verloren.
• V e r r i c h t g e e n w i j z i g i n g e n a a n h e t a r t i k e l e n
voeg er niet s aan toe zonder to estemming
van de fabrikant.
• B r e n g g e e n n i e t d o o r d e f a b r i k a n t g e l e verde accessoires, reserveonderdelen of
onderdelen aan.
• L a a t h e t k i n d n o o i t e n o m g e e n e n k e l e
reden zonder toezicht in het autostoeltje
achter.
• L a a t h e t a u t o s t o e l t j e n o o i t o n b e v e s t i g d
op de autozitting. Het kan tegen andere
passagiers stoten en deze verwonden.
• Z e t n i e t s d a t g e e n v o o r h e t a r t i k e l g o e d g e keurd access oire is tussen de autoz itting en
het autostoeltje, of tussen het autostoeltje
en het kind: in geval van een ongeluk kan
44
Page 45

het dan geb euren dat het autosto eltje niet
goed functioneert.
• A l s d e a u t o i n d e r e c h t s t r e e k s e z o n w o r d t
achtergelaten, wordt aangeraden het autostoeltje te bedekken.
• O o k n a e e n n i e t e r n s t i g o n g e l u k k a n h e t
autostoeltje schade opgelopen hebben,
die echter niet altijd met het blote oog
zichtbaar is: het moet daarom worden
vervangen.
• G e b r u i k g e e n t w e e d e h a n d s a u t o s t o e l t j e s :
deze kunnen voor het blote oog onzichtbare structurele schade hebben opgelopen, die zodanig is dat de veiligheid van
het art ikel niet langer gewaa rborgd wordt.
• D e h o e s k a n u i t s l u i t e n d w o r d e n v e r v a n g e n
met een door de fabrikant goedgekeurde
hoes, o mdat deze integraa l deel uitmaakt
van het auto stoeltje. Het autos toeltje mag
nooit zonder hoes worden gebruikt, om
de veiligheid van het kind niet op het spel
te zetten.
• C o n t r o l e e r d a t d e b a n d v a n d e g o r d e l n i e t
verdraaid zit en voorkom dat deze of een
gedeelte van het autostoeltje tussen de
portieren komt of over scherpe punten
wrijft. Als de gordel scheuren of rafels
vertoont, moet hij worden vervangen.
• C o n t r o l e e r o f e r g e e n v o o r w e r p e n o f b a gage, in het bijzonder op de hoedenplank
in het voertuig worden vervoerd, die niet
zijn vastgemaakt of veilig zijn geplaatst:
bij een ongeluk of hard remmen, kunnen
deze de passagiers verwonden.
• V e r z e k e r u e r v a n d a t a l l e p a s s a g i e r s v a n
de auto hun eigen veiligheidsgordel gebruiken, zowel voor hun eigen veiligheid,
als omdat zij tijdens de reis bij een ongeluk of bij hard remmen het kind kunnen
verwonden.
• S t o p v a a k t i j d e n s l a n g e r e i z e n . E e n k i n d i s
het al gauw beu. Haal het kind om geen
enkele reden uit het autostoeltje, terwijl
de a uto rijd t. Al s het kind a anda cht n odig
heeft, moet u een veilige plek zoeken en
stoppen.
• T e v r o e g g e b o r e n k i n d e r e n , d i e z i j n g e b o r e n
vóór de 37ste week zwangerschap, kunnen gevaa r lopen in het autostoe ltje. Deze
baby’s kunnen ademhalingsmoeilijkheden
hebben, terwijl ze in het autostoeltje zitten. We raden u dus aan u tot uw arts of
het ziekenhuispersoneel te wenden, zodat
uw kind kan worden beoordeeld en het
geschik te autostoeltje kan word en aangeraden, voordat u uit het ziekenhuis komt.
• D e fi rma Artsana wijst elke vorm van
aansprakelijkheid af voor een oneigenlijk
gebruik van het product.
1.2 KENMERKEN VAN HET PRODUCT
• D i t a u t o s t o e l t j e i s m e t i n a c h t n e m i n g v a n
de Europese voorschriften ECE R44/04
goedgekeurd voor “Groep 0+”, voor het
vervoer van kinderen vanaf de geboorte
tot 13 kg lichaamsgewicht (ongeveer van
0 tot 10 maanden/1 jaar).
• D e g o e d k e u r i n g i s v a n h e t “ U n i v e r s e l e ”
type, dus kan het autostoeltje in elke
model auto worden gebruikt. LET OP!
“Universeel” betekent dat het compatibel is met de meeste, maar niet met alle
autozittingen.
BELANGRIJKE MEDEDELINGEN
1. Dit is een “Uni verseel” kinderb eveiligings-
systeem , dat goedgekeurd is volge ns het
reglement ECE R44/04 en compatibel is
met de meeste, maar niet alle, autozittingen.
2. De perfecte compatibiliteit is eenvoudiger
te verkrijgen indien de fabrikant van het
voertuig in de handleiding ervan verklaart dat het voertuig geschikt is om er
“universele” kinderbeveiligingssystemen
voor kinderen van deze leeftijdsgroep in
te installeren.
3. Dit kinderb eveiligingssystee m is als “Uni-
verseel” geclassifi ceerd volgens goedkeuringscriteria die strenger zijn ten opzichte
van vorige modellen die niet met deze
mededeling zijn uitgerust.
4. Geschikt om te worden gebruikt in
voertuigen met vaste of oprolbare driepuntsgordel, die goed gekeurd is volgens
het reglement UN/ECE N°16 of andere
gelijkwaardige standaarden.
5. Neem in geval van twijfe l contact op met
de fabrikant van het kinderbeveiligingssysteem of met de dealer.
45
Page 46

1.3 BESCHRIJVING VAN DE
ONDERDELEN
Fig. 1 (3/4)
A. Handgreep
B. Zonnekap
C. Stoffen bekleding
D. Verkleinkussen (*)
E. Basis (**)
Fig. 2 (Voorkant)
F. Openingen waar de gordels doorheen
gehaald worden
G. Gordels van het autostoeltje
H. Schouderbanden (*)
I. Verstelknop van de gordels (onder het
stoffen paneel)
J. Verstelband van de gordels
Fig. 3 (Zijaanzicht)
K. Geleiding van de autobuikgordel op het
autostoeltje
L. Geleiding van de autobuikgordel op de
basis
M. Knoppen om de handgreep te draaien
N. Klikk lakpinnen (voor beve stiging aan de
wandelwagen)
Fig. 4 (Achterkant)
O. Geleiding van de diagonale autogordel
P. Loskoppelhandgreep (van de basis en van
de wandelwagen)
Q. Openingen waar de gordels doorheen
gehaald worden
R. Geleidingselement van de gordels van
het autostoeltje
S. Stabiliserend blokkeersysteem
(*) De vorm en het model kunnen afhankelijk van de ui tvoeringen va n het autostoeltje
verschillen.
(**) Optie
1.4 PLAATSEN VAN DE HANDGREEP
De handgreep van het autostoeltje kan op
4 standen worden versteld (Fig. 5).
A. Stand voo r vervoer in de auto (L ET OP: dit
is de enige stand, die tijdens het vervoer
in de auto toegestaan is).
B. Stand voor vervoer met de hand.
C. Stand voor gebruik als schommelend
ligstoeltje of om aan de Chicco wan-
delwagen te bevestigen, die hiervoor
gemaakt is.
D. Stand voor gebruik als vast ligstoeltje.
Om de handgreep te vers tellen, drukt u de
knoppen (M) op de handgreep tegelijk in
en draait u hem op de gekozen stand tot
u een klik hoort.
1.5 BEPERKINGEN EN GEBRUIKSVEREISTEN VAN HET ARTIKEL EN
DE AUTOZITTING
LET OP! Ne em de volgende bep erkingen en
gebruik svereisten betref fende het arti kel en
de autozitting nauwgezet in acht: anders is
de veiligheid niet verzekerd.
• H e t a u t o s t o e l t j e k a n v o o r i n o p d e p a s -
sagierszitting worden aangebracht, of op
één van de a chterzitti ngen. De autozitti ng
moet in elk geval met de rijrichting mee
worden gep laatst. Geb ruik dit autostoeltje
nooit op zittingen die zijdelings gekeerd of
tegen de rijrichting in staan (Fig. 6).
• D e a u t o z i t t i n g d i e n t u i t g e r u s t t e z i j n m e t
een vaste of o prolbare driepunt sgordel, die
goedgekeurd is volgens de Voorschriften
UNI/ECE N°16 of andere gelijkwaardige
standaarden (Fig. 7).
• L E T O P ! I n s t a l l e e r h e t a u t o s t o e l t j e n o o i t
met de tweepuntsgordel van de auto
(Fig. 8).
• G e b r u i k h e t v e r k l e i n k u s s e n n o o i t a l s h e t
kind meer dan 6 kg weegt.
• V e r z e k e r u e r v a n d a t d e g e s p v a n d e d r i e -
puntsgordel van de auto niet te hoog zit
(fi g. 13-19). Indien dit toch het geval is,
installeer het autostoeltje dan op een
andere zitting van de auto.
2. HET AUTOSTOELTJE IN DE AUTO
INSTALLEREN
Het autosto eltje kan zowel met basis (opti e)
als zonder worden geïnstalleerd. Bij beide
uitvoeringen mag het alleen tegen de rijrichting in worden geïnstalleerd.
2.1 BEGINUITVOERING VAN DE
SCHOUDERBANDEN
Het autostoeltje is afhankelijk van de uitvoeringen uitgerust met 2 verschillende
soorten schouderbanden (A en B). Voordat
u het autostoeltje gebruikt, handelt u als
volgt om de schouderbanden te monteren:
• S c h o u d e r b a n d e n u i t v o e r i n g A ( F i g . 9 A , 9 B
en 9C): laat de schouderbanden door de
openinge n in de stoffen bekle ding (niet door
het eronder liggende frame) lopen, zodat
de gordels erop blijven liggen. Steek het
tussenbeenstuk door de gesp van de gordels.
46
Page 47

• S c h o u d e r b a n d e n u i t v o e r i n g B ( F i g . 1 0 A
en 10B): haal de gordels van de het autostoeltje door de twee schouderbanden.
Steek het tussenbeenstuk door de gesp
van de gordels.
2.2 INSTALL ATIE MET BASIS
Om het autostoeltje met basis op de autozitting te installeren, handelt u als volgt:
1. Koppel het autostoeltje van de basis
door aan de loskoppelhandgreep aan de
achterkant van de rugleuning te trekken en het stoeltje tegelijkertijd aan de
handgreep op te tillen (Fig. 11).
2. Zet de basis op de voor de installatie
gekozen zitti ng en draai hem, zoal s in Fig.
12 wordt getoo nd, zodanig, dat h ij tegen
de rugleuning van de autozitting staat.
3. Trek aan de veilig heidsgordel van de auto
en haak hem aan zijn gesp vast. Laat het
horizontale gedeelte (buikgordel) door
de twee speciale geleidingen (L) lopen,
die gemerkt zijn met een blauw pijltje
en span hem zoveel mogelijk (Fig. 13).
4. Voordat u het autostoeltje op de basis
zet, controleert u of het stabiliserend
blokkeersysteem gesloten is (Fig. 14).
5. Zet het au tostoeltje (tegen de rijri chting in)
op de basis en duw het omlaag tot het vastzit
(u hoort een klik ter beve stiging) (Fig. 15).
6. Controleer of het autostoeltje goed aan
de basis vastzit, door te proberen het
zowel aan de voor- als de achterkant op
te tillen.
7. Pak de diagonale gordel van de auto vast
en laat hem door de speciale geleiding (O)
aan de achterkant van de rugleuning van
het autosto eltje lopen (Fig. 16). LE T OP! De
diagonale gordel moet tijdens het vervoer
ALTIJD in deze geleiding blijven zitten.
8. Span de gordel zo veel mogelijk zonder
te veel band over te laten en verzeker u
ervan dat hij niet verdraaid zit.
9. Draai de handgreep op stand A en con-
troleer of hij te gen de zitting van d e auto
steunt (Fig. 17).
LET OP! Cont roleer na de installatie A LTIJD
of de autogordel correct gespannen is en
of hij over alle punten gelijk is verdeeld,
zonder verd raaid te zijn. Laat d e autogordels
NOOIT op andere plaatsen lopen dan de
aangeduide.
Om het autostoeltje los te koppelen en
de basis in de auto geïnstalleerd te laten:
1. Haal de diagonale gordel uit de geleiding
op de rugleuning zonder hem uit de gesp
te nemen.
2. Zet de handgreep weer op de verticale
stand B (Fig. 5).
3. Koppel het autostoeltje los, zoals voor-
heen werd toegelicht.
2.3 INSTALL ATIE ZONDER BASIS
Om het autostoeltje zonder basis te installeren, handelt u als volgt:
1. Trek het stabiliserend blokkeersysteem
uit en zet het autostoeltje op de gekozen
autozitting (Fig. 18).
2. Trek aan de veili gheidsgordel van de auto
en haak hem aan zijn gesp vast. Laat het
horizontale gedeelte van de gordel (buikgordel) door de twee spec iale geleidingen
(K) van het autostoeltje lopen, die gemerk t zijn met een blauw pijltj e (Fig. 19).
3. Pak het diago nale gedeelte van de auto-
gordel vast en laat hem door de speciale
geleiding (O) aan de achterkant van de
rugleuning van het autostoeltje lopen
(Fig. 20). LET OP! De diagonale gordel
moet tijdens het vervoer ALTIJD in deze
geleiding blijven zitten.
4. Span de gordel zo veel mogelijk zonder
te veel band over te laten en verzeker u
ervan dat hij niet verdraaid zit.
5. Draai de handgreep op stand A en con-
troleer of hij te gen de zitting van d e auto
steunt (Fig. 21).
Om het autostoeltje los te koppelen:
1. Maak de autogordel los door op de gesp
te drukken.
2. Zet de handgreep weer op stand B (ver-
ticaal).
3. Haal de gordel uit de diagonale en hori-
zontale geleidingen.
2.4 INSTALLATIE MET ISOFIX BASIS
(bijgeleverd of apart verkrijgbaar)
Voor install atie met ISOFIX ba sis raadpleegt
u de bij het prod uct geleverde handleidin g.
Voor het gebru ik van het SEMI- UNIVERSEEL
ISOFIX systeem is het absoluut noodzakelijk de handleiding van het voertuig te
lezen, voord at u het autostoeltje inst alleert.
De handleiding duidt de plaatsen aan, die
compatibel zijn met de afmetingsklasse van
47
Page 48

het autostoeltje.
De Isofi x Basis van Chicco is go edgekeurd in
de “Semi-universele” categorie, daarom is
hij dus niet compatibel met alle modellen
van auto, maar alleen met die, die op de
“Lijst met goedgekeurde auto’s” staan, die
bij de bij het pro duct geleverde handleid ing
gevoegd is.
3. VERDERE HANDELINGEN
3.1 HET KIND IN HET AUTOSTOELTJE
ZETTEN
1. Til het stoffen pane el op, houd de verstel-
knop inge drukt en trek aa n de gordels van
het autostoeltje om ze losser te maken
(Fig. 22).
2. Open de gesp door op de rode knop te druk-
ken en houd de gordels uit elkaar (Fig. 23).
3. Zet het kind in het autostoeltje.
4. Leg de twee lipjes van de gesp op elkaar
en steek ze vervolgens in de gesp tot u
een klik hoort (Fig. 24). LET OP! Steek
de lipjes nooit één voor één in de gesp
of slechts één.
5. Span de veiligheidsgordels van het auto-
stoeltje door aan de speciale verstelband
te trekken (Fig. 25).
3.2 DE STAND VAN DE GORDELS
AFSTELLEN
LET OP! De gordels moeten altijd aan de
groei van het kind worden aangepast. Voordat u het autos toeltje in de auto instal leert,
moet u ze op de juiste hoogte plaatsen.
Voor een goede afstelling moeten de gordels ter hoogte van de schouders van het
kind uit de rugleuning komen (Fig. 26).
Het autosto eltje kan op 3 stand en in hoogte
worden versteld.
Handel als volgt om de gordels te verplaatsen:
1. Verwijder de schouderbanden door ze
uit de openingen in de stoffen bekleding
te halen.
2. Open de gesp van de gordels door op de
rode knop te drukken.
3. Haal de go rdels uit de achter kant van de
ru gle uni ng e n d oe z e in de vo or de g roo tte
van het kind meest geschikte opening
(Fig. 27A en 27B).
LET OP! Verzeker u ervan dat de gordels
altijd tussen het geleidingselement (R) en
het dragende element doorlopen.
LET OP! He t verkleinkussen gar andeert dat
het kind vanaf de geboorte tot 6 kg goed
onders teund wordt en dat de ne k en rug de
ideale houding hebben.
3.3 VASTE OF SCHOMMELSTAND
VAN HET STOELTJE (GEBRUIK
ALS LIGSTOELTJE)
Als het stoeltje niet in de auto wordt gebruikt, kan het ook worden gebruikt als
schommel- of ligstoeltje.
Om het te laten schommelen, sluit u het
stabiliserend blokkeersysteem (Fig. 14) en
zet u de handgreep op stand C (Fig. 5).
Om het op de vaste stand te gebruiken,
trekt u het stabiliserend blokkeersysteem
uit en zet u de ha ndgreep op stand D (F ig. 5).
Zet het alleen op een stevige en horizontale
ondergrond.
LET OP! Voordat u het stoeltje vervoert,
zet u de handgreep altijd weer op stand
B (verticaal).
WAARSCHUWING! Laat het kind
nooit zonder toezicht achter.
WAARSCHUWING! Gebruik altijd
het veiligheidssysteem.
WAARSCHUWING! Het is gevaarlijk het autostoeltje op een verhoging te gebruiken, zoals tafels,
stoelen, enz.
WAARSCHUWING! Dit autostoeltje is niet bedoeld om er lange tijd
in te slapen.
WAARSCHUWING! Gebruik het
autostoeltje niet als het kind in
staat is alleen te zitten.
Het autostoeltje vervangt geen bedje of
wieg. Als het kind moet slapen, moet het
in een bed of ge schikte wieg worden ge legd.
Gebruik het autostoeltje niet als er onderdelen stuk zijn of ontbreken.
3.4 GEBRUIK MET DE
WAND ELWAGEN
LET OP! Het Auto-Fix autostoeltje kan op
Chicco wandelwagens, die apart verkrijgbaar
zi jn e n z ijn uit ge rus t m et d e s pec ia le s ta nda ar d
koppelsystemen, worden vastgezet.
48
Page 49

LET OP! Om het autostoeltje samen met
de wandelwagen te gebruiken, raadpleegt
u de instructies van de wandelwagen.
De CHICCO wandelwagens, die met een
KLIK KLAK systeem uitgerust zijn, hebben
armleuningen met speciale mechanismen,
waardoor het autostoeltje direct op de wandelwagen kan worden bevestigd, zonder
verdere accessoires te moeten gebruiken.
Voordat u het autostoeltje vastkoppelt,
verwijdert u de bedekkingen van de armleuningen helemaal.
Om het autostoeltje aan de wandelwagen
te bevestigen, handelt u als volgt:
1. Neem het autostoeltje vast met de handgreep op de verticale stand B (Fig. 28).
2. Bevestig de twee Klik Klak bevestiging-
spinnen van het autostoeltje (N) op de
armleuningen van de wandelwagen of
op het apart aangeschafte koppelsysteem en let er goed op dat ze aan beide
kanten vast komen te zitten. U hoort een
bevestigingsklik (Fig. 29).
WAARSCHUWING Controleer voor het
gebruik of de bevestigingsmechanismen
van het auto stoeltje goed zijn va stgemaakt.
Om het autostoeltje van de wandelwagen
los te koppelen:
1. Zet de handgreep weer op de verticale
stand (B).
2. Trek aan de loskoppelhandgreep aan de
achterkant.
3. Verplaats het autostoeltje en zet het op
een vlak oppervlak.
LET OP: het autostoeltje kan ook met het
kind erin worden vast- en losgehaakt, ook al
kunnen deze handelingen door het gewicht
van het kin d echter minder gema kkelijk zijn.
In dit geval wordt aangeraden goed op te
letten bij het verrichten van bovenbeschreven handelingen.
3.5 ONDERHOUD EN BEWARING
DE HOES REINIGEN
De stoffen b ekleding van he t autostoeltje kan
geheel verwijderd en op de hand, of op 30°C in
de wasmachine gewassen worden. Om ze te
wassen , maakt u de gordel s los en verwijder t
u d e be kl edi ng , na de t we e go rd el s en de g es p
uit hun ope ningen te hebbe n gehaald (Fig. 30).
Volg bij het wassen de instructies op het
etiket van de bekleding, waar de volgende
wassymbolen op staan:
30° C
Op 30 °C i n de w as mac hin e wa sse n
Niet bleken
Niet in de droger drogen
Niet strijken
Niet chemisch reinigen
Gebruik nooit schuur- of oplosmiddelen.
Centrifugeer de hoes niet en hang ze op
zonder ze uit te wringen.
DE PLASTIC EN METALEN ONDERDELEN REINIGEN
Gebruik alleen een vochtige doek om de
kunsts tof of metalen delen te reinige n. Gebruik nooit schuur- of oplosmiddelen. De
bewegend e delen van het autosto eltje mogen op geen enkele wijze worden gesmeerd.
CONTROLE OP BESCHADIGING EN
SLIJTAGE
Aangeraden wordt de volgende onderdelen
regelmatig op beschadiging en slijtage te
controleren:
• S t o f f e n b e k l e d i n g : c o n t r o l e e r d a t d e v u l l i n g
ni et u itp uil t of d at e r ge en d ele n lo szi tte n.
Controleer de staat van de naden die altijd
intact moeten zijn.
• G o r d e l s : c o n t r o l e e r d a t d e s t o f n i e t r a f e l t
of duidelijk dun is geworden ter hoogte
van de afstelband, het tussenbeenstuk,
de schouderbanden en het gebied van de
afstelplaat van de gordels.
• K u n s t s t o f d e l e n : c o n t r o l e e r d e s l i j t a g e staat van alle kunststof delen, die geen
duidelijke beschadigingen of verkleuring
mogen hebben.
LET OP! Indien het autostoeltje vervormd
mocht zijn of ernstig versleten, dient het
te worden vervangen: het kan de originele
veiligheidskenmerken hebben verloren.
HET ARTIKEL OPBERGEN
Als het ni et in de auto geïnstallee rd is, wordt
aangeraden het autostoeltje op een droge
plaat s, uit de buurt va n warmtebronne n en
besche rmd tegen stof, vocht en rec htstreeks
zonlicht te bewaren.
49
Page 50

GR
CHICCO
AUTO-FIX FAST
G
R. 0+ (0-13KG)
ΟΔΗΓΙΕΣ ΧΡΗΣΗΣ
ΠΕΡΙΕΧΟΜΕΝΑ:
1. ΕΙΣΑΓΩΓΗ
1.1 ΠΡΟΕΙΔΟΠΟΙΗΣΕΙΣ
1.2 ΧΑΡΑΚΤΗΡΙΣΤΙΚΑ ΤΟΥ ΠΡΟΪΟΝΤΟΣ
1.3 ΠΕΡΙΓΡΑΦΗ ΕΞΑΡΤΗΜΑΤΩΝ
1.4 ΘΕΣΕΙΣ ΤΟΥ ΧΕΡΟΥΛΙΟΥ
1.5 ΠΕΡΙΟΡΙΣΜΟΙ ΚΑ Ι ΠΡΟΫΠΟΘΕΣΕΙΣ ΧΡΗΣΗΣ
ΣΧΕ ΤΙΚΕ Σ ΜΕ ΤΟ ΠΡ ΟΪΟΝ ΚΑ Ι ΜΕ ΤΟ Κ ΑΘΙΣΜΑ ΤΟΥ ΑΥΤΟΚΙΝΗΤΟΥ
2. ΕΓΚΑΤΑΣΤΑΣΗ ΤΟ Υ ΚΑΘΙΣΜΑΤΟΣ ΣΤΟ ΑΥ ΤΟΚΙ-
ΝΗΤΟ
2.1 ΑΡΧΙΚΗ ΔΙΑΜΟΡΦΩΣΗ ΤΩΝ ΕΠΩΜΙΔΩΝ
2.2 ΕΓΚΑΤΑΣΤΑΣΗ ΜΕ ΒΑΣΗ
2.3 ΕΓΚΑΤΑΣΤΑΣΗ ΧΩΡΙΣ ΒΑΣΗ
3. ΠΕΡΑΙΤΕΡΩ ΕΝΕΡΓΕΙΕΣ
3.1 ΤΟΠΟ ΘΕΤΗΣΗ ΤΟΥ ΠΑΙ ΔΙΟΥ ΣΤΟ ΚΑΘΙ ΣΜΑ
3.2 ΡΥΘΜΙΣΗ ΤΗΣ ΘΕΣΗΣ ΤΩΝ ΖΩΝΩΝ
3.3 ΣΤΑΘΕΡΗ Η’ ΛΙΚΝΙΖΟΜΕΝΗ ΘΕΣΗ ΤΟΥ ΚΑ-
ΘΙΣΜΑΤΟΣ (ΧΡΗΣΗ ΡΗΛΑΞ)
3.4 ΧΡΗΣΗ ΜΕ ΤΟ ΚΑΡΟΤΣΙ ΠΕΡΙΠΑΤΟΥ
3.5 ΚΑΘΑΡΙΣΜΟΣ ΚΑΙ ΣΥΝΤΗΡΗΣΗ
1. ΕΙΣΑΓΩΓΗ
1.1 ΠΡΟΕΙΔΟΠΟΙΗΣΕΙΣ
ΕΞΑΙΡΕΤΙΚΑ ΣΗΜΑΝΤΙΚΟ: ΔΙΑΒΑΣΤΕ ΑΜΕΣΩΣ
• Κ Ρ Α Τ Η Σ Τ Ε Α Υ Τ Ο Τ Ο Ε Γ Χ Ε Ι Ρ Ι Δ Ι Ο Γ Ι Α Μ Ε Λ Λ Ο -
ΝΤΙΚΗ ΧΡΗΣΗ.
• Γ ι α τ η σ υ ν α ρ μ ο λ ό γ η σ η κ α ι τ η ν ε γ κ α τ ά σ τ α σ η
του προїόντος ακολουθεί τε πιστά τις οδηγίες.
Μην επ ιτρέ πε τε σ ε καν έν α να χ ρησ ιμο ποι εί το
πρ οϊόν χωρ ίς πρ ιν ν α έχ ει δ ιαβ άσε ι τι ς οδ ηγίε ς.
• Π Ρ Ο Σ Ο Χ Η ! Μ ε β ά σ η τ ι ς σ τ α τ ι σ τ ι κ έ ς τ ω ν α τ υ -
χημάτων, εν γέ νει τα πίσω καθίσματα του οχήματος είναι πιο ασφαλή από το μπροστινό:
συνεπώς συνιστάται να τοποθετείτε το παιδικό
κάθισμα επάνω σ τα πίσω καθίσματα. Ιδιαί τερα,
το πίσω κεν τρικό κάθισμα είναι το πιο ασφαλές ,
εάν είναι εξοπλισμένο με ζώνη 3 σημείων.
• Π Ρ Ο Σ Ο Χ Η ! Σ Ο Β Α Ρ Ο Σ Κ Ι Ν ΔΥ Ν Ο Σ ! Μ η ν χ ρ η σ ι -
μοποιείτε ποτέ το παιδικό κάθισμα επάνω σε
ένα μπροστινό κάθισμα οχήματος που είναι
εξοπλισμένο με μετωπικό αερόσακο. Μπορείτε
να τοποθετ ήσετε το παιδικό κάθισμα επά νω σε
μπροστινό κάθισμα, μόνο όταν ο μετωπικός
αερόσακος έχει απενεργοποιηθεί: ελέγξτε με
τον κατασκευασ τή ή διαβάστε σ το εγχειρίδιο
οδηγιών του αυ τοκινήτου, τη δυνα τότητα αποσύνδεσης του αερ όσακου. Συνιστάται, για κάθε
πε ρίπ τωσ η, ν α τρ αβά τε π ίσω το κά θισ μα ό σο
το δυνατόν περισσότερο, προσεκτικά ώστε
να μην ενοχλούνται οι επιβάτες που μπορεί
να υπάρχουν στο πίσω κάθισμα.
• Ό λ ο ι ο ι ε π ι β ά τ ε ς τ ο υ ο χ ή μ α τ ο ς π ρ έ π ε ι ν α
είναι καλά πληροφορημένοι, για τον τρόπο
απελευθέρωσης του παιδιού, σε περίπτωση
έκτακτης ανάγκης.
• Π ρ ο σ έ χ ε τ ε τ ο π ώ ς τ ο π ο θ ε τ ε ί τ ε τ ο π α ι δ ι κ ό
κάθισμα στο αυ τοκίνητο ούτως ώστ ε να αποφύγετε τη παρ εμπόδιση κάποιου κινητού καθίσματος ή της πόρτας σε αυτό.
• Κ α ν έ ν α π α ι δ ι κ ό κ ά θ ι σ μ α δ ε ν μ π ο ρ ε ί ν α ε γ γ υ ηθεί την απόλυτη ασφάλεια του παιδιού σε
περίπτωσ η ατυχήματος, η χ ρήση όμως αυτού
του προϊόντος μειώ νει τον κίνδυνο σοβαρού
τραυματισμού ή θανάτου.
• Ο κ ί ν δ υ ν ο ς σ ο β α ρ ο ύ τ ρ α υ μ α τ ι σ μ ο ύ τ ο υ π α ι διού, όχι μόνο σε περίπτωση ατυχήματος,
αλλά και σε άλλες συνθήκες (π.χ. απότομα
φρεναρίσματα, κ.λπ.), αυξάνεται αν δεν ακολουθείτε πισ τά τις παρούσες οδηγίες χρήσης:
ελέγχετε πάντα ότι το κάθισμα είναι σωστά
τοποθετημένο στο κάθισμα του οχήματος.
• Σ τ η ν π ε ρ ί π τ ω σ η κ α τ ά τ η ν ο π ο ί α τ ο κ ά θ ι σ μ α
είναι κατεστραμμένο, παραμορφωμένο ή παρουσιάζει έντονη φθορά, πρέπει να αντικατασταθεί, γιατί μπορεί να έχει χάσει τα αρχικά
χαρακτηρισ τικά ασφαλείας.
• Μ η ν κ ά ν ε τ ε μ ε τ α τ ρ ο π έ ς ή π ρ ο σ θ ή κ ε ς σ τ ο
προϊόν χωρίς την έγκ ριση του κατασκευαστ ή.
• Μ η ν τ ο π ο θ ε τ ε ί τ ε α ξ ε σ ο υ ά ρ , α ν τ α λ λ α κ τ ι κ ά
και εξαρτήματα που δε ν παρέχει ο κατασκευαστής.
• Μ η ν α φ ή ν ε τ ε π ο τ έ , γ ι α κ α ν έ ν α λ ό γ ο , τ ο π α ι δ ί
χωρίς επίβλεψη στο παιδικό κάθισμα.
• Μ η ν α φ ή ν ε τ ε π ο τ έ τ ο π α ι δ ι κ ό κ ά θ ι σ μ α ε π ά ν ω
στο κάθισμα του αυτοκινήτου αποσυνδεδεμένο, θα μπορούσε να προσκρούσει και να
τραυματίσει τους ε πιβάτες.
• Μ η ν τ ο π ο θ ε τ ε ί τ ε τ ί π ο τ α π ο υ δ ε ν ε ί ν α ι ε γ κ ε κριμένο για το προϊόν αξεσουάρ, είτε μεταξύ
του καθίσμα τος αυτοκινήτου και του παιδ ικού
κα θίσ ματ ος ε ίτε μετ αξύ του π αιδ ικού καθ ίσμ ατος και του παιδιού: σε περίπτωση ατυχήματος το παιδικό κάθισμα θα μπορούσε να μην
λειτουργήσει σωστά.
• Σ τ η ν π ε ρ ί π τ ω σ η κ α τ ά τ η ν ο π ο ί α τ ο α υ τ ο κ ί νητο πρόκειται να μείνει κάτω από τον ήλιο,
συνιστάται να καλύψετε το παιδικό κάθισμα.
50
Page 51

• Μ ε τ ά α π ό έ ν α έ σ τ ω κ α ι μ ι κ ρ ό α τ ύ χ η μ α , τ ο
παιδικό κάθισμα μπορεί να υποσ τεί ζημιές οι
οποίες δεν είνα ι πάντα ορατές με γυμν ό μάτι: γι’
αυτό είναι α παραίτητο να το αν τικαταστήσ ετε.
• Μ η ν χ ρ η σ ι μ ο π ο ι ε ί τ ε κ α θ ί σ μ α τ α α π ό δ ε ύ τ ε ρο χέρι: μπορεί να έχουν υποστεί ζημιές μη
ορατές με γυμνό μά τι που μπορούν όμως να
επηρεάσουν την ασφάλεια του προϊόντος.
• Η ε π έ ν δ υ σ η μ π ο ρ ε ί ν α α ν τ ι κ α τ α σ τ α θ ε ί α π ο κλειστικά με μία άλλη εγκεκριμένη από τον
κατασκευασ τή, γιατί αποτελεί αναπόσ παστο
τμήμα του καθίσματο ς. Το κάθισμα δε ν πρέπει
να χρησιμοποιηθεί ποτέ χωρίς την επένδυσ ή
του, για να μην τεθεί σε κίνδυνο η ασφάλεια
του παιδιού.
• Ε λ έ γ χ ε τ ε ό τ ι η ζ ώ ν η α σ φ α λ ε ί α ς δ ε ν ε ί ν α ι μ π ε ρ δεμένη και μην αφήνε τε αυτή ή τμήματα του
καθίσματος, να σκαλώνουν σ τις πόρτες ή να
τρίβονται πάνω σε αιχμηρά σημεία. Στη περίπτωσ η που η ζώνη ασφαλείας παρουσιάζ ει
σχισίματα ή ξεφτίσματα είναι απαραίτητο να
την αντικαταστήσετε.
• Ε λ έ γ χ ε τ ε ό τ ι δ ε ν μ ε τ α φ έ ρ ο ν τ α ι , ι δ ι α ί τ ε ρ α
στο πίσω εσωτερικό μέρος του αυτοκινήτου,
αντικεί μενα ή αποσκευές που δεν έχουν σ τερεωθεί ή τοποθετηθεί με ασφαλή τρόπο: σε
περίπτωση ατυχήματος ή απότομου φρεναρίσματος θα μπορούσαν να τραυματίσουν
τους επιβάτες.
• Β ε β α ι ω θ ε ί τ ε ό τ ι ό λ ο ι ο ι ε π ι β ά τ ε ς τ ο υ α υ τ ο κινήτου χρησιμοποιούν τη δική τους ζώνη
ασφαλείας είτε για την ασφάλειά τους είτε γιατί
κατά τη διάρκ εια του ταξιδιού, σε περίπτω ση
ατυχήματος ή απότομου φρεναρίσματος, θα
μπορούσαν να τραυματίσουν το παιδί.
• Κ α τ ά τ η δ ι ά ρ κ ε ι α μ ε γ ά λ ω ν τ α ξ ι δ ι ώ ν σ υ ν ι σ τ ά τ α ι
να κάν ετε συχ νές στ άσε ις. Το παι δί κο υρά ζε ται
πολύ εύκολα. Για κανέ να λόγο μην βγάζετε το
παιδί από το παιδικό κάθισμα ε νώ το αυτοκίνητο βρίσκεται σ ε κίνηση. Αν το παιδί έχει ανάγκ η
από προσοχή, είναι α παραίτητο να βρείτε ένα
ασφαλές μέρος και να σταθμεύσετε.
• Π ρ ό ω ρ α ν ε ο γ ν ά π ο υ γ ε ν ν ή θ η κ α ν π ρ ι ν τ η ν 3 7 η
εβδομάδα κύησης , μπορούν να κινδυνεύουν
στο παιδικό κάθισμα . Αυτά τα νεογ νά μπορεί
να αντιμετωπίσουν δυσκολία στην αναπνοή
ενώ βρίσκον ται στο κάθισμα. Συνιστούμ ε λοιπόν να απευθυνθείτε στον γιατρό σας ή στο
προσωπικό του νοσοκομείου προκειμένου
να εξετάσουν το μωρό σας και πριν αφήσε τε
το νοσοκομείο, να σας συμβουλέψουν για το
κατάλ ληλο κάθισμα μεταφοράς.
• Η ε τ α ι ρ ε ί α A r t s a n a δ ε ν α ν α λ α μ β ά ν ε ι κ α μ ί α
ευθύνη για ακατάλ ληλη χρήση του προϊόντος .
1.2 ΧΑΡΑΚΤΗ ΡΙΣΤΙΚΑ ΤΟΥ ΠΡΟΪΟ ΝΤΟΣ
• Α υ τ ό τ ο κ ά θ ι σ μ α ε ί ν α ι ε γ κ ε κ ρ ι μ έ ν ο γ ι α τ η ν
“Ομάδα 0+”, για τη μεταφορά παιδιών από
τη γέννηση έως 13 κιλά βάρος (από 0 έως
10 μηνών/1 έτους περίπου), σύμφωνα με τον
ευρωπαϊκό κανονισμό ECE R44/04.
• Η έ γ κ ρ ι σ η ε ί ν α ι τ ύ π ο υ “ U n i v e r s a l ” ( Γ ε ν ι κ ή ς
χρήσης) συνε πώς το κάθισμα μπορεί να χρησιμοποιηθεί επά νω σε οποιοδήποτε μοντέ λο
αυτοκινήτου. ΠΡΟΣΟΧΗ! “Universal” (Γενικής
χρήσης) σημαίνει ότι είναι συμβατό με τα
περισσότερ α, όχι όμως με όλα, τα καθίσματα
αυτοκινήτων.
ΣΗΜΑΝΤΙΚΗ ΕΙΔΟΠΟΙΗΣΗ
1. Αυτή είναι μία συσκευή μεταφοράς παιδιών
“Universal” (Γενικής χρήσης), εγκεκριμένη
σύμφωνα με τον Κανονισμό ECE R44/04 και
συμβατή με τα περισσότερα, όχι όμως με
όλα, τα καθίσματα αυτοκινήτων.
2. Η τέλεια συμβατότητα αποκτάται πιο εύ-
κολα στις περιπτώσεις κατά τις οποίες, ο
κατασκευαστής του οχήματος δηλώνει στο
εγχειρίδιο του ιδίου, ότι το όχημα προβλέπει την εγκατά σταση συσκευών μ εταφοράς
παιδιών “Universal” (Γενικής χρήσης), για τη
συγκεκριμένη ηλικία.
3. Αυτή η συ σκευή μεταφοράς έ χει καταταχθεί
ως “Universal” (Γενικής χρήσης), σύμφωνα
με τα πιο αυστηρά κριτήρια έγκρισης, σε
σύγκριση με τα προηγούμενα μοντέλα που
δεν διαθέτουν τη παρούσα ειδοποίηση.
4. Κατάλληλη για χρήσ η σε οχήματα εξοπλισμέ-
να με ζώνη ασφαλείας 3 σημείων, στατική ή
με περιτύλιξη, ε γκεκριμένη βάσει του Κ ανονισμού UN/ECE Αριθ. 16 ή άλ λων ισοδύναμων
προτύπων.
5. Σε περίπ τωση αμφιβολίας, επικοι νωνήστε με
τον κατασκευαστή της συσκευής μεταφοράς
παιδιών ή με το κατάσ τημα πώλησης.
1.3 ΠΕΡΙΓΡΑΦΗ ΕΞΑΡΤΗΜ ΑΤΩΝ
Εικ. 1 (3/4)
A. Χερούλι
B. Κουκούλα ήλιου
C. Υφασμάτινη επένδυση
D. Μαξιλαράκι μειωτήρας (*)
E. Βάση (**)
Εικ. 2 (Μπροσ τά)
F. Σχισμές περάσματος ζωνών
G. Ζώνες Καθίσματος
H. Επωμίδες (*)
I. Πλήκτρο ρύθμισης ζωνών (κάτω από την
51
Page 52

υφασμάτινη πατ)
J. Ταινία ρύθμισης ζωνών
Εικ. 3 (Προφί λ)
K. Οδηγός κοιλιακής ζώνης αυτοκινήτου στο
παιδικό κάθισμα
L. Οδηγός κοιλιακής ζώνης αυτοκινήτου στη
βάση
M. Πλήκτρα για τ ην περιστροφή του χερουλιού
N. Αξόν ια Clik Cla k (για σύν δεση με το καρότσι
περιπάτου)
Εικ. 4 (Πίσω)
O. Οδηγός διαγώνιας ζώνης αυτοκινήτου
P. Λαβή αποσύνδεσης (από τη βάση και από το
καρότσι περιπάτου)
Q. Σχισμές περάσματος ζωνών
R. Στοιχείο οδήγησης των ζωνών του καθί-
σματος
S. Μηχανισμός σταθεροποίησης
(*) Το σχήμα και το μοντέλο μπορεί να διαφέρουν ανάλογα με τη παραλλαγή του καθίσματος.
(**) Προαιρετικό
1.4 ΘΕΣΕΙΣ ΤΟΥ ΧΕΡ ΟΥΛΙΟΥ
Το χερούλι του καθίσματος μπορεί να ρυ θμιστεί
σε 4 θέσεις (Εικ. 5).
A. Θέση μεταφοράς με αυτοκίνητο (ΠΡΟΣΟΧΗ:
αυτή είναι η μό νη θέση που επιτρέπετα ι κατά
τη διάρκεια μεταφοράς με αυτοκίνητο).
B. Θέση μεταφοράς με το χέρι.
C. Θέση χρήσης λι κνιζόμενου ρηλάξ ή για σύ ν-
δεση με το κατάλληλο καρότσι περιπάτου
της Chicco.
D. Θέση χρήσης σ ταθερού ρηλάξ.
Για να εκτελέσετε τη ρύθμιση πιέστε ταυτόχρονα τα πλήκτρα (M) επάνω στο χερούλι,
περιστρέφοντας το ίδιο στην προεπιλεγμένη
θέση έως ότου να ακουστεί ένα κλικ.
1.5 ΠΕ ΡΙΟΡΙΣΜΟΙ ΚΑΙ ΠΡΟΫ ΠΟΘΕΣΕΙΣ ΧΡΗΣΗΣ
ΣΧΕΤΙΚΕΣ Μ Ε ΤΟ ΠΡΟΪΟΝ ΚΑΙ ΜΕ ΤΟ Κ ΑΘΙΣΜΑ
ΤΟΥ ΑΥΤΟΚΙΝΗΤΟΥ
ΠΡΟΣΟΧΗ! Τηρήστε σχολαστικά τους ακόλουθους περιορισμούς και προϋποθέσεις χρήσης
σχετικές με το προϊόν και με το κάθισμα του
αυτοκινήτο υ: στην αντ ίθετη περίπ τωση η ασφάλεια δεν είναι εγγυημένη.
• Τ ο π α ι δ ι κ ό κ ά θ ι σ μ α μ π ο ρ ε ί ν α τ ο π ο θ ε τ η θ ε ί
επάνω σ το κάθισμα του συνοδηγού ή επάνω
σε ένα οποιοδήποτε πίσω κάθισμα. Σε κάθε
περίπτωση, το κάθισμα του αυτοκινήτου
πρέπει να είναι στραμμένο στην κατεύθυνση πορείας. Μην χρησιμοποιείτε ποτέ αυτό
το παιδικό κάθισμα επάν ω σε καθίσματα που
είναι στραμμ ένα στο πλάι ή προς την αν τίθετη
κατεύθυνση πορείας (Εικ. 6).
• Τ ο κ ά θ ι σ μ α τ ο υ α υ τ ο κ ι ν ή τ ο υ π ρ έ π ε ι ν α ε ί ν α ι
εξοπλισμένο με ζώνη ασφαλείας 3 σημείων,
στατική ή με περιτύλιξη, εγκεκριμένη βάσει
του Κανονισμού UN/ECE Αριθ. 16 ή άλλων
ισοδύναμων προτύπων (Εικ. 7).
• Π Ρ Ο Σ Ο Χ Η ! Μ η ν τ ο π ο θ ε τ ε ί τ ε π ο τ έ τ ο π α ι δ ι κ ό
κάθισμα, σε κάθισμα αυτοκινήτου με ζώνη
δύο σημείων σύνδεσης (Εικ. 8).
• Μ η ν χ ρ η σ ι μ ο π ο ι ε ί τ ε π ο τ έ τ ο μ α ξ ι λ α ρ ά κ ι μ ε ι ωτήρα αν το βάρος του παιδιού ξεπερνάει
τα 6 κιλά.
• Β ε β α ι ω θ ε ί τ ε ό τ ι η π ό ρ π η τ η ς ζ ώ ν η ς τ ρ ι ώ ν
σημείων του αυτοκ ινήτου δεν βρίσκεται πολύ
ψηλά (εικ.
εγκατασ τήστε το κάθισμα αυτοκινήτου σε
ένα άλ λο κάθισμα του οχήματος.
2. ΕΓΚΑΤΑΣΤΑΣΗ ΤΟ Υ ΚΑΘΙΣΜΑΤΟΣ ΣΤΟ ΑΥ ΤΟΚΙ-
Το παιδικό κάθισμα μπορεί να εγκατασ ταθεί είτε
με τη βάση (προαιρετική) είτε χωρίς τη βάση.
Σε αμφότερες τις διαμορφώσεις, πρέπει να
εγκατασταθεί μόνο σε αντίθετη κατεύθυνση σε
σύγκριση με την κατεύθυνση πορείας.
2.1 ΑΡΧΙΚΗ ΔΙΑΜΟΡΦΩΣΗ ΤΩ Ν ΕΠΩΜΙΔΩΝ
Το παιδικο κάθισμα διαθέτει 2 διαφορετικούς
τύπους επωμίδων (A και B) ανάλογα με την
παραλλα γή του καθίσματος. Πριν προχωρήσε τε
στη χρήσ η του καθίσματος, για την σ υναρμολόγηση των επωμίδων, ενεργήστε ως ακολούθως:
• Ε π ω μ ί δ ε ς π α ρ α λ λ α γ ή ς A ( Ε ι κ . 9 A , 9 B κ α ι 9 C ) :
περάστ ε τις επωμίδες ανάμεσα από τ ις σχισμές
της υφασμάτινης επένδυσης (όχι της υποκείμενης δομής) έτσι ώστε οι ζώνες να παραμένουν τοποθε τημένες πάνω τους. Περάστε τη
διαχωριστική για τα πόδια πατ ανάμεσα από
την πόρπη των ζωνών.
• Ε π ω μ ί δ ε ς π α ρ α λ λ α γ ή ς B ( Ε ι κ . 1 0 A κ α ι 1 0 B ) :
περάστε τις ζώνες του καθίσματος ανάμεσα
από τις δύο επωμ ίδες. Περάστε τη δ ιαχωριστική για τα πόδια πατ ανάμεσα από την πόρπη
των ζωνών.
2.2 ΕΓΚΑΤΑΣΤΑ ΣΗ ΜΕ ΒΑΣΗ
Για να τοποθε τήσετε το παιδικό κάθισμα με τ η
βάση επάνω στο κάθισμα του αυτοκινήτου,
ενεργήστε ως ακολούθως:
1. Αποσυνδέστε το παιδικό κάθισμα από τη
52
ΝΗΤΟ
13-19
). Σε αντίθετη περίπτωση,
Page 53

βάση τραβώντας τη λαβή αποσύνδεσης που
βρίσκεται πίσω από την πλάτη και ταυτόχρονα σηκώσ τε το πιάνοντας το ίδιο από το
χερούλι (Εικ. 11).
2. Τοποθετήστε τη βάση επάνω στο προεπιλεγμέ νο για την εγκατάσ ταση κάθισμα, προσανατολίζοντας την ίδια όπως στην εικόνα
Εικ. 12, έτσι ώστε να βρίσκεται σε επαφή με
την πλάτη του καθίσ ματος του αυτοκινήτου.
3. Τραβήξτε τη ζώνη ασφαλείας του αυτοκινήτου, συνδέστε την ίδια με την αντίστοιχη πόρπη, περνώντας το οριζόντιο τμήμα
(κοιλιακό) στους δύο ειδικούς οδηγούς (L)
που επισημαίν ονται με το γαλάζιο βέ λος και
τεντώ στε την όσο το δυνατόν περισσότερο
(Εικ. 13).
4. Πριν τοποθετήσετε το παιδικό κάθισμα στη
βάση, ε λέγξτε ότι ο μηχανισμός σ ταθεροποίησης είναι κλειστός (Εικ. 14).
5. Τοποθετήστε το κάθισμ α στη βάση (στραμμένο στην αντίθετη κατεύθυνση πορείας)
σπρ ώχν οντα ς το ίδι ο προς τα κάτ ω μέχ ρι να
συνδεθεί (θα ακούσετε ένα “κλακ” σ ταθεροποίησης) (Εικ. 15).
6. Ελέγξ τε τη σωστή σύνδ εση του καθίσματος
με τη βάση, προσπαθώντας να το σηκώσετε τόσο από το μπροστινό όσο και από το
πίσω μέρος.
7. Πιάστε τη διαγώνια ζώνη του αυτοκινήτου
και περάστε την στον ειδικό οδηγό (O) που
βρίσκεται στο πίσω μέρος της πλάτης του
παιδικού καθίσματος (Εικ. 16). ΠΡΟΣΟΧΗ! Η
διαγώνια ζώνη κατά τη διάρκεια μεταφοράς
πρέπει να παραμένει ΠΑΝΤΑ βαλμένη στο
εσωτερικό αυτού του οδηγού.
8. Τεντώστε τη ζώνη όσο το δυνατόν περισσότερο χωρίς να αφήσετε περισσεύματα
και βεβαιωθε ίτε ότι δεν είναι περιτ υλιγμένη.
9. Περιστρέψ τε το χερούλι στη θέση A ε λέγχο-
ντας ότι ακουμπάει κόν τρα στο κάθισμα του
αυτοκινήτου (Εικ. 17).
ΠΡΟΣΟΧΗ! Μετά την εγκατάσταση ελέγχετε
ΠΑΝΤΑ ότι η ζώνη του αυτοκινήτου είν αι σωστά
τεντωμένη , ότι είναι ομοιόμορφα διανεμημένη
σε όλα τα σημεία και ότι δεν έχει μπερδευτεί.
Μην περνάτε ΠΟΤΕ τη ζώνη του αυτοκινήτου
σε θέσεις διαφορετικές από εκείνες που ενδείκνυνται.
Για να μετατοπίσετε το παιδικό κάθισμα διατηρώντας τη βάση εγκατεστημένη στο αυτοκίνητο:
1. Βγάλτε από τον οδηγό στην πλάτη τη δι-
αγώνια ζώνη χωρίς να την αποσυνδέσετε
από την πόρπη.
2. Επαναφέρετε το χερούλι σ την κάθετη θέση
B (Εικ. 5).
3. Αποσυνδέστε το κάθ ισμα όπως περιγράφε ται
παραπάνω.
2.3 ΕΓΚΑΤΑΣΤΑΣ Η ΧΩΡΙΣ ΒΑΣΗ
Για να εγ καταστήσετε το πα ιδικό κάθισμα χωρίς
βάση, ενεργήστε ως ακολούθως:
1. Βγάλτε τον μηχανισμό σταθεροποίησης και
τοποθετήσ τε το παιδικό κάθισμα επάν ω στο
προεπιλεγμένο κάθισμα του αυτοκινήτου
(Εικ. 18).
2. Τραβήξτε τη ζώνη ασφαλείας του αυτοκινήτου και συνδέστε την με την αντίστοιχη
πόρπη, περνώντας το οριζόντιο τμήμα (κοιλιακό) της ζώνης στους δύο ειδικούς οδηγού ς
(K) του καθίσμα τος που επισημαίνονται μ ε το
γαλάζιο βέ λος (Εικ. 19).
3. Πιάστε το διαγώνιο τμήμα της ζώνης του
αυτοκινήτου και περ άστε το στον ειδικό οδη γό (O) που βρίσκεται στο πίσω μέρος της
πλάτης του καθίσματος (Εικ. 20). ΠΡΟΣΟΧΗ! Η
δι αγώ νια ζώνη κατ ά τη διά ρκει α με ταφ ορά ς
πρέπει να παραμένει ΠΑΝΤΑ βαλμένη στο
εσωτερικό αυτού του οδηγού.
4. Τεντώστε τη ζώνη όσο το δυνατόν περισσότερο χωρίς να αφήσετε περισσεύματα
και βεβαιωθε ίτε ότι δεν είναι περιτ υλιγμένη.
5. Περισ τρέψτε το χερούλι στη θέσ η A ελέγχοντας ότι ακουμπάει κόν τρα στο κάθισμα του
αυτοκινήτου (Εικ. 21).
Για να μετατο πίσετε το παιδι κό κάθισμα:
1. Λύστε τη ζώνη του αυτοκινήτου πιέζοντας
την πόρπη.
2. Επαναφέρετε το χερούλι σ τη θέση B (κάθετη).
3. Β γάλτε τη ζώνη από τον διαγώνιο οδηγό και
από τους οριζόντιους οδηγούς.
2.4 ΕΓΚΑΤΑΣΤΑ ΣΗ ΜΕ ΒΑΣΗ ISOFIX
(παρέχεται ή πωλείται ξεχωριστά)
Για την ε γκατάσταση με βάσ η ISOFIX, ανατρέξτε
στο σχετικό εγχειρίδιο οδηγιών που επισυνάπτεται σ το προїόν.
Για τη χρήση του ΗΜΙ-ΓΕΝΙΚΗΣ ΧΡΗΣΗΣ συστήματος ISOFIX, είναι απολύτως απαραίτητη
η ανάγνωση του εγχειριδίου του αυτοκίνητου
οχήματος, πριν από την εγκατάσ ταση του καθίσματος. Το εγ χειρίδιο θα υποδείξει τις θέσεις
που είναι συμβα τές με την κλάση μεγέ θους του
καθίσματος αυτοκινήτου.
Η Βάση Iso x της Chicco έχει μια έγκ ριση τύπου
“Ημι-Γενικής χρήσης”, γι’ αυτό δεν είν αι συμβατή
με όλα τα μοντέ λα αυτοκινήτου, είναι συμβατ ή
53
Page 54

μό νο μ ε εκε ίνα που υπο δει κν ύον ται στο βιβ λιά ριο που επισυν άπτεται στο πρ οїόν “Κατάλογος
των εγκεκριμένων αυτοκίνητων οχημάτων”.
3. ΠΕΡΑΙΤΕΡΩ ΕΝΕΡΓΕΙΕΣ
3.1 ΤΟΠΟΘΕΤΗΣΗ ΤΟΥ ΠΑΙΔΙ ΟΥ ΣΤΟ ΚΑΘΙΣΜΑ
1. Σηκώστε την υφασμάτινη πατ, κρατώντας
πατημέν ο το πλήκτρο ρύθμισης και τραβήξτε
τις ζώνες του καθίσματο ς για να τις χαλαρώσετε (Εικ. 22).
2. Ανοίξτε την πόρπη πατώντας το κόκκινο
κουμπί της και κρατήστε διευρυμένες τις
ζώνες (Εικ. 23).
3. Τοποθετήσ τε το παιδί.
4. Τοποθετήστε επάλληλα τις δύο γλωσσίτσες
της πόρπης και αφού ενω θούν βάλτε τις ίδιες
στην πόρπη μέ χρι να ακούσετε ένα “κ λικ” (Εικ.
24). ΠΡΟΣΟΧΗ! Μην βάζετε ποτέ τις γλωσσίτσες στην πόρπη μ ία κάθε φορά ή μία μόνο.
5. Τεν τώστε τις ζώνες ασφα λείας του καθίσμα-
τος τραβώντας την ειδική ταινία ρύθμισης
(Εικ. 25).
3.2 ΡΥΘΜΙΣΗ ΤΗΣ ΘΕΣΗΣ ΤΩΝ ΖΩΝΩΝ
ΠΡ ΟΣΟΧΗ ! Οι ζών ες πρ έπε ι να προ σαρ μόζ οντ αι
πάντα με την α νάπτυξη του παιδιού. Πρι ν τοποθετήσετε το παιδικό κάθισμα στο αυτοκίνητο
πρέπει να τις τοποθετήσετε στο σωστό ύψος.
Για μια σωστή ρύθμιση, οι ζώνες πρέπει να
βγαίνουν από την πλάτη στο ύψος των ώμων
του παιδιού (Εικ. 26).
Το κάθισμα διαθέτει 3 θέσεις ύψους.
Για να μετατοπίσετε τις ζώνες ενεργήστε ως
ακολούθως:
1. Αφαιρέστε τις επωμίδες βγάζοντας τις ίδιες
από τις σχισμές τ ης υφασμάτινης επέ νδυσης.
2. Ανοίξτε την πόρπη των ζωνών πατών τας το
κόκκινο κουμπί της.
3. Βγά λτε τις ζώνες από πίσ ω από την πλάτη και
βάλτε τις ίδιες σ την πιο κατάλληλη σ χισμή στο
ύψος του παιδιού (Εικ. 27A και 27B).
ΠΡΟΣΟΧΗ! Βεβαιωθείτε ότι οι ζώνες περνούν
πάντα ανάμεσα από το στοιχείο οδήγησης (R)
και το περίβλημα.
ΠΡΟΣΟΧΗ! Το μαξιλαράκι μειωτήρας εγγυάται
στο παιδί, από τ η γέννηση έως 6 κι λά, τη σωστή
συγκρά τηση και την ιδανική θέση για τον λαιμό
και την πλάτη.
3.3 ΣΤΑΘΕΡΗ Ή ΛΙΚΝΙΖΟΜ ΕΝΗ ΘΕΣΗ ΤΟΥ ΚΑΘΙΣΜ ΑΤΟΣ (ΧΡΗΣΗ ΡΗΛ ΑΞ)
Όταν δεν χρησιμοποιείται στο αυτοκίνητο, το
κάθισμα μπορεί επίσης να χρησιμοποιηθεί ως
ρηλάξ (σταθερό ή λικνιζόμενο).
Για να το καταστήσετε λικνιζόμενο, κλείστε
τον μηχανισμό σταθεροποίησης (Εικ. 14) και
τοποθετήστε το χερούλι σ τη θέση C (Εικ. 5).
Για να το χρησιμοποιήσ ετε στη στα θερή θέση,
βγάλτε τον μηχανισμό σταθεροποίησης και
τοποθετήσ τε τη λαβή στη θέση D (Εικ. 5).
Να το τοποθετείτε μόνο επάνω σε σταθερές
και οριζόντιες επιφάνειες.
ΠΡΟΣΟΧΗ! Πριν μεταφέρετε το παιδικό κάθισμα, επαν αφέρετε πάντα το χε ρούλι στη θέση
B (κάθετη).
ΠΡΟΕΙΔΟΠΟΙΗΣΗ! Μην αφήνετε
το παιδί χωρίς επίβλεψη.
ΠΡΟΕΙΔΟΠΟΙΗΣΗ! Χρησιμοποιείτε
πάντα το σύστημα συγκράτησης.
ΠΡΟΕΙΔΟΠΟΙΗΣΗ! Είναι επικίνδυνο να χρησιμοποιείτε το παιδικό
κάθισμα επάνω σε υπερυψωμένες
επιφάνειες, όπως τραπέζια, καρέκλες, κ.λπ.
ΠΡΟΕΙΔΟΠΟΙΗΣΗ! Αυτό το κάθισμα
δεν προορίζεται για παρατεταμένες περιόδους ύπνου.
ΠΡΟΕΙΔΟΠΟΙΗΣΗ! Μην χρησιμοποιείτε το κάθισμα αν το παιδί είναι
σε θέση να κάθεται από μόνο του.
Το παιδικό κάθισμα δεν αν τικαθιστά ένα κρ εβατάκι ή ένα λίκνο. Όταν το παιδί χρειάζεται ανάπαυ ση , θα πρέ πει ν α το βάζ ετ ε σε έ να κρε βατ άκι
ή σε ένα κατάλληλο λίκ νο.
Μην χρησιμοποιείτε το κάθισμα αν ένα οποιοδήποτε τμήμα του είναι σ πασμένο ή απουσ ιάζει.
3.4 ΧΡΗΣΗ ΜΕ ΤΟ Κ ΑΡΟΤΣΙ ΠΕΡΙΠΑΤΟΥ
ΠΡΟΣΟΧΗ! To κάθισμα αυτοκινήτου Auto-Fix
μπορεί να τοποθετηθεί στα καρότσια Chicco που
διαθέτουν τα κα τάλληλα συσ τήματα σύνδεσης
και είτε πωλούν ται μαζί (σαν σύστ ημα μετακίνησης) είτε μεμονωμένα.
ΠΡΟΣΟΧΗ! Για τη χρήση μαζί με το καρότσι περιπάτου, διαβά στε τις οδηγίες του καρο τσιού. Τα
καρότσια περιπά του της CHICCO που διαθέτουν
σύστ ημα CLIK CLAK, έχουν βραχ ίονες με ειδικούς
μηχανισμούς που ε πιτρέπουν την άμεση σύν δεση του κ αθί σμα τος με τ ο καρ ότσ ι, χ ωρί ς να είν αι
απαραίτητη η χρήση επιπλέον εξαρτημάτων.
54
Page 55

Για να συ νδέσετε το κάθισμα με το καρό τσι ενεργήστε ως ακολούθως:
1. Πι άσ τε το κάθ ισμ α με τ ο χε ρού λι σ την κάθ ετη
θέση (B) (Εικ. 28).
2. Συνδέστε τους δύο πείρους προσ αρμογής Clik
Clak του καροτσιού (N) στα στηρίγματα του
καροτσιού για τους αγκώνες ή στο σύστημα
σύνδεσης (β άση) που πωλείται ξεχωρισ τά και
φροντίσ τε επιμελώς να σ υνδεθούν και στ ις δύο
πλ ευρ ές. Θα α κούσ ετ ε το κ λι κ πο υ ση μαί νει ό τι
έχουν ασφαλίσει (Εικ. 29).
ΠΡΟΕΙΔΟΠΟΙΗΣΗ: Πριν από τη χρήση ελέγχετε
ότι οι μηχανισμοί στερέωσης του καθίσματος
είναι σωσ τά συνδεδεμένοι.
Για να αποσυνδέσετε το κάθισμα από το καρότσι:
1. Επαναφέρ ετε το χερούλι στη κάθε τη θέση (B).
2. Τραβήξτε τη λαβή της πίσω αποσύνδεσης.
3. Μετακινήστε και τοποθετήστε το κάθισμα
επάνω σε μια επίπεδη επιφάνεια.
ΠΡΟΣΟΧΗ: Η σύνδεση και η αποσύνδεση μπορούν να γίνου ν ακόμα και με το παιδί στο κάθισμα
έσ τω κ ι αν με τ ο βά ρος του παιδ ιού οι π αρα πάν ω
ενέργειες θα μ πορούσαν να προκύψουν λι γότερο
εύκολες. Σε αυτή την περίπτωση συνιστάται
προσοχή στην εκτέλεση των ενεργειών που
ανωτέρω αναφέρονται.
3.5 ΚΑΘΑΡΙΣΜΟΣ Κ ΑΙ ΣΥΝΤΗΡΗΣΗ
ΚΑΘΑΡΙΣΜΟΣ ΤΟΥ ΥΦΑΣΜΑΤΟΣ
Η υφασμάτ ινη επένδυση του καθίσμ ατος αφαιρείται εν τελώς και πλένετα ι στο χέρι ή στο πλυντήριο σ τους 30°C.
Για να την πλύνε τε, λύστε τις ζώνες και βγά λτε την
υφασμάτινη επένδυση αφού πριν έχετε βγάλει
τα δύο τμήματα ζωνών και την πόρπη από τις
αντίσ τοιχες σχισμές (Εικ. 30).
Για το πλύσιμο, ακολουθήσ τε τις οδηγίες που
αναγράφονται στην ετικέτα του υφάσματος, η
οποία φέρει τα ακόλουθα σύμβολα:
Πλύσιμο στο πλυν τήριο στους 30°C
30° C
Μην χρησιμοποιείτε χλωρίνη
Μην στεγνώνετε στο στεγνωτήριο
Μην σιδερώνε τε
Μην κάνετε σ τεγνό καθάρισμα
Μην χρησιμοποιεί τε ποτέ απορρυπα ντικά που χαρά ζουν ή διαλυ τικά. Μην στύβε τε το ύφασμα στο πλυ ντήριο και απ λώστε το χωρίς να το σ τύψετε μ ε το χέρι.
ΚΑΘΑΡΙΣΜΟΣ ΤΩΝ ΠΛ ΑΣΤΙΚΩΝ Κ ΑΙ ΜΕΤΑΛΛΙΚΩΝ
ΤΜΗΜΑΤΩΝ
Για τον καθαρισμό των πλαστικών ή των βερνικωμένων μεταλλικών τμημάτων, χρησιμοποιείτε
μόνο ένα υγρό πανί. Μην χρησιμοποιείτε ποτέ
απορρυπαν τικά που χαράζουν ή διαλυτικά.
Τα κινητά μέρη του καθίσματος δεν πρέπει, για
κανένα λόγο, να λιπαίνονται.
ΕΛΕΓΧΟΣ ΤΗ Σ ΑΚΕΡΑΙΟΤΗΤΑΣ ΤΩΝ ΕΞΑΡΤΗΜ ΑΤΩΝ
Συνιστάται ν α ελέγχετε τακ τικά την ακεραιότητα και την κατάσταση φθοράς των ακόλουθων
εξαρτημάτων:
• Υ φ α σ μ ά τ ι ν η ε π έ ν δ υ σ η : β ε β α ι ω θ ε ί τ ε ό τ ι δ ε ν
προεξέχουν ή βγαίνουν στοιχεία της εσωτερικής γέμισης. Β εβαιωθείτε για την ακερ αιότητα
των ραφών.
• Ζ ώ ν ε ς : ε λ έ γ ξ τ ε ό τ ι δ ε ν έ χ ε ι ξ η λ ω θ ε ί τ ο ύ φ α σ μ α
με εμφανή μείωση του πάχους στο ύψος της
ταινίας ρύθμισης, του διαχωριστικού των ποδιών, στα τμήματα των ώμων και στο σημείο
του κλιπ ρύθμισης των ζωνών.
• Π λ α σ τ ι κ ά τ μ ή μ α τ α : β ε β α ι ω θ ε ί τ ε γ ι α τ η ν α κ ε ραιότητα όλων των π λαστικών τμημάτων που
δεν θα πρέπει να παρουσιάζουν εμφανή ίχνη
ζημιάς ή αποχρωματισμού.
ΠΡΟΣΟΧΗ! Σε περίπτωση που το κάθισμα είναι
παραμορφωμένο ή πολύ φθαρμένο πρέπει να
αντικατασταθεί: μπορεί να έχει χάσει τα αρχικά
χαρακτηρισ τικά ασφαλείας.
ΑΠΟΘΗΚΕΥΣΗ ΤΟΥ ΠΡΟΪΟΝΤΟΣ
Όταν δεν είναι τοποθετημένο στο αυτοκίνητο
το κάθισμα, πρέπει να φυλάσσεται σε στεγνό
χώρο μακριά από πηγές θερμότητας και προστατευ όμενο από τη σκόνη, την υ γρασία και το
άμεσο ηλιακό φως.
ΑΠΟΡΡΙΨΗ ΤΟΥ ΠΡΟΪΟΝΤΟΣ
Όταν το κάθισμα δεν χρησιμοποιείται πλέον
πρέπει να απορρίπτεται. Για λόγους σεβασμού
προς το περιβάλλον, χρησιμοποιήστε τους ειδικούς κάδους ανακύκλωσης, σύμφωνα με τους
ισχύον τες κανονισμούς κάθε χώρας.
55
Page 56

DK
CHICCO
AUTO-FIX FAST
GRUPPE 0+ (0-13 KG)
BRUGSANVISNING
INDHOLDSFORTEGNELSE:
1. INDLEDNING
1.1 VIGTIGE OPLYSNINGER
1.2 PRODUKTE TS EGENSKABER
1.3 BESKRIVELSE AF DELENE
1.4 HÅNDTAGETS INDSTILLINGER
1.5 BEGRÆNSNINGER OG ANVENDELSESKRAV I FORBINDELSE MED PRODUKTET OG
BILSÆDET
2.MONTERING I BILEN
2.1 STARTINDSTILLING AF SKULDERSTYKKERNE
2.2 MONTERING MED BASE
2.3 MONTERING UDEN BASE
3. YDERLIGERE INDGREB
3.1 ANBRINGELSE AF BARNET I STOLEN
3.2 JUSTERING AF SELERNES INDSTILLING
3.3 FAST ELLER VIPPENDE INDSTILLING AF
STOLEN (SOM SKRÅSTOL)
3.4 ANVENDELSE MED KLAPVOGN
3.5 RENGØRING OG OPBEVARING
1. IND LEDNI NG
1.1 VIGTIGE OPLYSNINGER
MEGET VIGTIGT: LÆS DETTE FØRST
• O P B E V A R D E N N E B R U G S A N V I S N I N G T I L
SENERE BRUG.
• F ø l g a n v i s n i n g e r n e m e g e t o m h y g g e l i g t , n å r
produktet monteres og installeres. Undgå
at nogen anvender produk tet uden først at
have læst anvisningerne.
• V I G T I G T ! I h e n h o l d t i l u l y k k e s s t a t i s t i k k e r n e e r
bilens bagsæder som regel me re sikre end
forsædet: D et anbefales derfor at mo nteres
stolen på et af bagsæderne. Især er den
sikreste plads på de t midterste bagsæde, såfremt det er udst yret med en 3-punktss ele.
• V I G T I G T ! Y D E R S T FA R L I G T ! A n v e n d a l d r i g
denne stol på et forsæde, der er udstyret
med en frontal airbag. Stolen må kun in-
stalleres på forsædet, såfremt den frontale
ai rba g er b lev et d eak tiv ere t. F orh ør d ig ho s
bilforhandleren eller se bilens instruktionsbog med hensyn til muligheden for at deaktivere airbag’en. Det anbefales un der alle
omstændigheder at rykke sædet så langt
tilbage som muligt under hensyntagen til
andre passagerer på bagsædet.
• S ø r g f o r a t a l l e b i l e n s p a s s a g e r e r v e d , h v o r dan barnet frig øres fra stolen i nødstilf ælde.
• V æ r o m h y g g e l i g m e d , h v o r d a n s t o l e n m o n teres i bilen, så det undgås , at den kommer
i vejen for et ytbart sæde eller en bildør.
• I n g e n a u t o s t o l k a n g a r a n t e r e b a r n e t s s i k kerh ed fulds tændigt i til fælde af en ulykk e,
men dette produkt reducerer risikoen for
alvorlig tilskadekomst eller død.
• R i s i k o e n f o r a t b a r n e t k o m m e r a l v o r l i g t t i l
skade - ikke kun i til fælde af en ulykke, men
også under andre omstændigheder (f.eks.
ved hårde opbremsninger, osv.) - forøges,
såfremt anvisningerne i denne brugsanvisning ikke følges meget omhyggeligt.
Kontroller altid at autostolen er fastspændt
korrekt på sædet.
• S å f r e m t s t o l e n b e s k a d i g e s , d e f o r m e r e s e l ler er nedslidt, skal den udskiftes, da den
muligvis ikke længere opfylder de originale
sikkerhedsegenskaber.
• F o r e t a g i n g e n æ n d r i n g e r e l l e r t i l f ø j e l s e r t i l
produktet uden producentens godkendelse.
• M o n t e r i k k e t i l b e h ø r , r e s e r v e d e l e e l l e r a n d r e
dele, som ikke er leveret af producenten.
• E f t e r l a d a l d r i g u n d e r n o g e n o m s t æ n d i g h e der barnet i stolen uden opsyn.
• E f t e r l a d a l d r i g s t o l e n p å b i l s æ d e t u d e n a t
den er fastspændt, da den vil kunne støde
ind i og beskadige passagererne.
• A n b r i n g a l d r i g n o g e t , s o m i k k e e r t i l b e h ø r
godkendt af producenten, hverken mellem bilsædet og autostolen eller mellem
au tos tole n og bar net : I t ilf æld e af e n ul ykk e
vil stolen i så fald ikke kunne fungere på
korrekt måde.
• S å f r e m t b i l e n e f t e r l a d e s i d i r e k t e s o l s k i n ,
anbefales det at tildække autostolen.
• I t i l f æ l d e a f s e l v e t m i n d r e b i l u h e l d k a n
autostolen have fået skader, der ikke altid
er synlige med d et blotte øje: Det vil der for
være nødvendigt at udskifte den.
56
Page 57

• B r u g i k k e e n a u t o s t o l k ø b t b r u g t : D e n k a n
have været udsat for str ukturelle skader, der
ikke kan ses med det blotte øje, men som
nedsætter produktets sikkerhed.
• B e k l æ d n i n g e n m å k u n u d s k i f t e s m e d e n
anden, som er godkendt af producenten,
idet den er en integreret del af autostolen.
Autostolen må aldrig anvendes uden beklædningen for ikke at nedsætte barnets
sikkerhed.
• K o n t r o l l e r a t s i k k e r h e d s s e l e n s b å n d i k k e
er viklet om sig selv og pas på at denne
eller stolens dele ikke kommer i klemme i
bil døre n elle r gnid er op a d ska rpe p unkt er.
Såfremt selen er skåret eller osser, er det
nødvendigt at udskifte den.
• K o n t r o l l e r a t d e r u n d e r t r a n s p o r t e n i k k e
be nder sig genstande eller bagage, som
ikke er fastspændt eller anbragt på sikker
måde, især i forbindelse med pladen under bagruden: I tilfælde af en ulykke eller
hård opbremsning vil de kunne beskadige
passagererne.
• S ø r g f o r a t a l l e b i l e n s p a s s a g e r e r a n v e n d e r
deres sikkerhedssele, både af hensyn til
deres egen sikkerhed men også fordi de i
tilfælde af en ulykke eller hård opbremsning
vil kunne beskadige barnet.
• I t i l f æ l d e a f r e j s e r o v e r l a n g e a f s t a n d e b ø r
der ofte foretages ophold. Barnet bliver
meget hurti gt træt. Barnet må under ingen
omstændigheder tages op fra autostolen,
mens bilen er i bevægelse. Hvis barnet har
behov for opmærksomhed, er det nødvendigt at holde ind på et sikkert sted.
• D e t k a n v æ r e f a r l i g t f o r b ø r n , d e r e r f o r t i d l i g t
født inden 37 ugers graviditet, at anvende
autostolen. Disse ny fødte kan få åndedrætsproblemer ved anvendelse af autostolen.
Det tilrådes derfor at konsultere lægen eller hospitalspersonalet, inden hospitalet
forlades, for en v urdering af barnets tilst and
og anbefaling af, hvilken autostol de r egner
sig bedst.
• F i r m a e t A r t s a n a f r a l æ g g e r s i g e t h v e r t a n s v a r
for en forkert brug af produktet.
1.2 PRODUKTETS EGENSKABER
• D e n n e a u t o s t o l e r t y p e g o d k e n d t s o m
"Gruppe 0+" til transport af børn fra føds-
len og op til en væ gt på 13 kg (ca. fra 0 til 10
måneder/1 år) i henhold til den euro pæiske
norm ECE R44/04.
• Ty p e g o d k e n d e l s e n e r " U n i v e r s a l " , o g a u t o stolen kan der for anvendes i en hvilken som
helst bil. PAS PÅ! "Universal" indebærer, at
den kan anvendes på størsteparten af bilsæderne, men ikke på alle.
VIGTIG OPLYSNING
1. Det te er en ”Universal” autostol til børn o g
typegodkendt i henhold til normen ECE
R44/04 og den er kompatibel med størsteparten af bilsæder, men ikke med alle.
2. Der kan regn es med en perfekt t ilpasning,
såfremt bilkonstruktøren i instruktionsbogen for det pågæld ende køretøj erklærer, at
bilen er egnet til m ontering af en autostol
af typen ”Universal” til børn i den pågældende aldersgruppe.
3. Denne autostol til børn er klassi ceret
som ”Universal” i overenss temmelse med
typegodkendelseskriterier, der er mere
krævende i forhold til tidligere modeller,
der ikke er mærket med de nne oplysning.
4. Autostolen kan kun anvendes i køretøjer,
der er udstyret med en selvoprullende
statisk 3-punk ts sikkerhedssele, som er t ypegodkendt i h enhold til normen UN/ECE
Nr. 16 eller tilsvarende standarder.
5. I tvivlstilfælde bedes du kontakte autosto-
lens producent eller forhandleren.
1.3 BESKRIVELSE AF D ELENE
Fig. 1 (3/4)
A. Håndtag
B. Kaleche
C. Stofbeklædning
D. Reduktionspude (*)
E. Base (**)
Fig. 2 (Forsiden)
F. Huller til indføring af selerne
G. Autostolens sikkerhedsseler
H. Skulderstykker (*)
I. Trykknap til justering af selerne (under
stofpladen)
J. Bånd til justering af selerne
57
Page 58

Fig. 3 (Profi l)
K. Holder til bilens bækkensele på autostolen
L. Holder til bilens bækkensele på basen
M. Trykknapper til drejning af håndtaget
N. Clik-Clak tapper (til fastspænding på
klapvogn)
Fig. 4 (Bagsiden)
O. Holder til bilens diagonale sele
P. Frigørelsesgreb (fra basen og fra klapvog-
nen)
Q. Huller til indføring af selerne
R. Holder til autostolens seler
S. Stabilitetsblokering
(*) Udformning og mo del kan variere afhængigt af autostolens udgave
(**) Ekstraudstyr
1.4 HÅNDTAGETS INDSTILLINGER
Autostolens håndtag kan reguleres til 4 ind stillinger (Fig. 5).
A. Indstilling for transport i bilen (PAS PÅ!:
Dette er den eneste tilladte indstilling
under transporten i bil).
B. Indstilling når stolen skal bæres.
C. Indstilling som vippestol eller ved fast-
spænding på en dertil indrettet Chicco
klapvogn.
D. Indstilling som fast skråstol.
For at foretage inds tillingen trykker du samti digt på knapper ne (M) på håndtaget og drejer
det herefter ti l den ønskede indstilling, indtil
du kan høre, at det klikker fast.
1.5 BEGRÆNSNINGE R OG ANVENDELSESKRAV I
FORBINDELSE MED PRO DUKTET OG AUTOSTOLEN
PAS PÅ! De følge nde begrænsninger og anvendelseskrav i forbindelse med produktet
og autostolen skal overholdes nøje: I modsat
fald kan sikkerheden ikke garanteres.
• A u t o s t o l e n k a n m o n t e r e s p å f o r s æ d e t i
passagersiden eller på et af bagsæderne.
Bilsædet skal under alle omstændigheder
være vendt i kørs elsretningen. Anvend aldrig
denne autostol på sidestillede bilsæder eller
sæder, der vender modsat kørselsretningen
(Fig. 6).
• B i l s æ d e t s k a l v æ r e u d s t y r e t m e d e n s e l v o p -
rullende eller st atisk 3-punkts sikkerh edssele,
som er typ egodkendt i henhold til norm en
UN/ECE Nr. 16 eller tilsvarende standarder
(Fig. 7).
• PA S P Å ! M o n t e r a l d r i g a u t o s t o l e n m e d e n
2-punkts forankret sikkerhedssele i bilen
(Fig. 8).
• A n v e n d a l d r i g r e d u k t i o n s p u d e n , h v i s b a r n e t
vejer mere end 6 kg.
• K o n t r o l l é r a t s e l e n s t r e p u n k t s s p æ n d e i k k e e r
anbragt for højt ( g. 13-19). Prøv, i modsat
fald, at montere autostolen på et andet af
bilens sæder.
2. SÅDAN MONTERES AUT OSTOLEN I BILEN
Autostolen kan både monteres med en base
(ekstraudstyr) og uden. I begge tilfælde må
stolen kun monteres ve ndt i kørselsretningen.
2.1 STARTINDSTILLING AF SKULDERSTYKKERNE
Autostolen er udstyret med 2 forskellige
typer skulderstykker (A og B) afhængigt af
udgaven. Før autostolen anvendes, sk al skulderstykkerne monteres ved at følge denne
fremgangsmåde:
• S k u l d e r s t y k k e r v e r s i o n A ( F i g . 9 A , 9 B o g
9C): Før skulders tykkerne ind gennem hullerne i stofbeklædningen (men ikke i den
underliggende struktur), således at selerne
be nder sig over disse. Stik skridtremmen
ind gennem selernes spænde.
• S k u l d e r s t y k k e r v e r s i o n B ( F i g . 1 0 A o g 1 0 B ) :
Før autostolens seler ind gennem de to
skulderst ykker. Stik skridtremm en ind gennem selernes spænde.
2.2 MONTERING MED BA SE
Hvis autostolen skal monteres med basen
på bilsædet følges denne fremgangsmåde:
1. Frigør au tostolen fra basen ved at træk ke i
frigørelsesgrebet på bagsiden af ryglænet,
samtidigt me d at den løftes op i håndtag et
(Fig. 11).
2. Anbring basen på det ønskede bilsæde
med retning som vist på Fig. 12, og sørg
for at den er helt i kontakt med bilsædets
ryglæn.
3. Træk i bilens sikkerhedssele og sæt den
fast i det tilhørende spænde efter at have
ført den hor isontale del (bækkenselen) ind
gennem de to dertil indrettede holdere
58
Page 59

(L) angivet med den blå pil, stram selen
så meget som muligt (Fig. 13).
4. Før autostolen anbringes på basen, skal
det kontrolleres, at stabilitetsblokeringen
er lukket (Fig. 14).
5. A nbring autostolen på basen (vendt i kø rselsretningen) og tryk den nedad, indtil den
er spændt korrekt på (du vil kunne høre
et ”klik”, når den er fastspændt) (Fig. 15).
6. Kontroller om autostolen er spændt korrekt
på basen ved at for søge at løfte den opad
både i den forreste og i den bageste del.
7. Tag fat i bilens diagonale sikker hedssele og
før den ind gennem den dertil indrettede
holder (O), der be nder sig på bagsiden af
autostolens ryglæn (Fig. 16). PAS PÅ! Den
diagonale sikkerhe dssele skal ALTID be nde
sig inde i denne holde r under transporten.
8. Stram selen så m eget som muligt, der må
ikke være dele med frit spil, og se efter at
selen ikke er viklet om sig selv.
9. Drej håndtaget til p osition A og kontroller,
at det hviler mod bilsædet (Fig. 17).
PAS PÅ! Når stolen er monteret, skal det ALTID kontrolleres, at bilens sikkerhedssele er
strammet korrekt til, og at den er løber glat
ge nne m all e pu nk ter u den at v ære v ik let o m
sig selv. Før ALDRIG bilens sikkerhedssele
ind gennem andre punk ter end de angivne.
Sådan a fmontere s autostol en, hvis bas en skal
forbl ive montere t i bilen:
1. Træk den diagonale sele ud fra ho lderen på
ryglænet ud en at løsne selen fra sit spænde.
2. Før håndtaget op til l odret indstilling (Fig. 5).
3. Frigør autostolen som vist tidligere.
2.3 MONTERING UDEN BA SE
Hvis autostolen skal monteres uden base
følges denne fremgangsmåde:
1. Træk stabilitetsblokeringen ud og anbring
autostolen på det ø nskede bilsæde (Fig. 18).
2. Tr æk i bilens sikkerhedssele og s æt den fast
i det tilhørende spænde efter at have ført
selens horisontale del (bækkenselen) ind
gennem de to dertil indrettede holdere
(K) på autostolen, som angivet med den
blå pil (Fig. 19).
3. Tag fat i bilens diagonale sik kerhedssele og
før den ind gennem den dertil indrettede
holder (O), der be nder sig på bagsiden
af autostolens ryglæn (Fig. 20). PAS PÅ!
Den diagonale sikkerhedssele skal ALTID
be nde sig inde i denne holder under
transporten.
4. Str am selen så meget som muligt, de r må
ikke være dele med frit spil, og se efter at
selen ikke er viklet om sig selv.
5. Drej håndtage t til position A og kontroller,
at det hviler mod bilsædet (Fig. 21).
Sådan afmonteres autostolen:
1. Frigør bilens sikkerhedssele ved at trykke
på spændet.
2. Anbring håndtaget i position B (lodret).
3. Træk selen ud af den diagonale og den
horisontale holder.
2.4 INSTALLATION MED BASEN IS OFIX
(medfølgende, eller kan købes separat)
Indhent oplysninger om installation med
basen ISOFIX i produktets relevante brugsvejledning.
Det er strengt n ødvendigt at læse køret øjets
vejledning, inden installation af barnestolen,
ved brug af systemet ISOFIX SEMIUNIVERSEL.
Vejledningen anviser de kompatibl e pladser i
funk tion af autobar nestolens st ørrelsesklas se.
Basen Iso x fra Chicco har en typegodkendelse af typen “Semiuniversel” og er derfor
ikke kompatibel med alle bilmodeller, men
kun med dem, der er anført i produktets
vedlagte hæfte “Liste over typegodkendte
personbiler”.
3. YDERLIGERE INDGREB
3.1 ANBRINGELSE AF BARNET I STOLEN
1. L øft stofpladen, mens du holder justeringsknappen tr ykket ind, og træk i autostolens
seler for at løsne dem (Fig. 22).
2. Åbn spændet ved at trykke på den røde
knap og hold selerne ud til siden (Fig. 23).
3. Anbring barnet.
4. Anbring spændets to tapper over hinanden
og stik dem ind i spæn det, når de er samlet,
indtil du hører et ”klik” (Fig. 24). PAS PÅ!
Stik aldrig tapperne ind i spændet en ad
gangen eller kun den ene.
5. Stram autostolens sikkerhedsseler ved at
59
Page 60

trække i det dertil indrettede justeringsbånd (Fig. 25).
3.2 JUSTERING AF SELERNES IND STILLING
PAS PÅ! Selerne skal altid tilpasses barnet,
efterhånde n som det vokser. Før autostolen
monteres i bilen skal se lerne anbringes i den
rigtige højdeindstilling.
For at være korrek t justeret skal selerne føres
ud gennem ryglænet i barnets skulderhøjde
(Fig. 26).
Autostolen er udstyret med huller til 3 højdeindstillinger.
For at ytte selernes placering går du frem
som følger:
1. Fjern sk ulderstykkern e ved at trække dem
ud gennem hullerne i stofbeklædningen.
2. Åbn selernes spænde ved at trykke på
den røde knap.
3. Tr æk s el ern e ud fra bag sid en a f ry glæ net og
stik dem ind i det hul, der p asser til barnets
højde (Fig. 27A og 27B).
PAS PÅ! Sørg for at selerne altid føres ind
mellem holderen (R) og stellet.
PAS PÅ! Reduktionspuden sikrer, at barnet
fastholdes korrekt og i den ideelle position
for både hals og ryg fra fødslen og indtil en
vægt på 6 kg.
3.3 FAST ELLER VIPPENDE INDS TILLING AF STO-
LEN (SOM SKRÅ STOL)
Når stolen ikke anvendes i b ilen, kan den også
bruges som vippestol eller skråstol.
For at få stolen til at vippe, lukker du stabilitetsblokeringen (Fig. 14) og indstiller håndtaget til position C (Fig. 5).
For at anvende den i fast indstilling trækkes stabilitetsblokeringen ud og håndtaget
indstilles til position D (Fig. 5).
Stolen må kun anbringes på st abile og horisontale over ader.
PAS PÅ! Før stol en transporteres, skal håndta get altid indstilles i position B (lodret).
ADVARSEL! Efterlad aldrig dit barn alene
uden opsyn.
ADVARSEL! Brug altid fastspændingsselerne.
ADVARSEL! D et er farligt at an vende autostolen på hævede over fl ader, som f.eks. borde,
stole, osv.
ADVARSEL! Denne stol er ikke beregnet til,
at barnet sover i den i længere tid.
ADVARSEL! Brug ikke stolen, hvis barnet er
i stand til at sidde opret alene.
Stolen kan ikke erstatte en barneseng eller en
vugge. Hvis barnet har brug for at sove, bør
det anbringes i en passende seng eller vugge.
Brug ikke stole n, hvis der er beskadigede elle r
manglende dele.
3.4 ANVENDELSE MED KL APVOGN
GIV AGT! Stolen Auto-Fix kan monteres
på klapvogne fra Chicco med de egnede
seriemonterede eller separat erhvervede
fastspændingssystemer.
PAS PÅ! Hvis stole n sk al anvendes sammen
med en klapvogn henvises til klapvognens
brugsanvisning. CHICCO klapvogne, der er
udstyret med ”CLIK CLAK”-systemet, har
armlæn med særlige anordninger, således
at autostolen kan fastspændes direkte på
klapvognen uden b ehov for særligt tilbehør.
Tag armlænenes overtræk helt af inden autostolen spændes fast i køretøjet.
For at fastspænde autostolen på klapvognen
går du frem som følger:
1. Tag fat i autostolen i det lodretstillede
håndtag (B) (Fig. 28).
2. Sæ t barnestolens (N) to Clik Clak fæsteanordninger fast på klapvo gnens armlæn eller
i det separat erhver vede fæstesystem, og
udvis særlig opmærksomhed omkring at
disse fastgøres i be gge sider. Der skal lyde
et klik, som b ekræfter bloker ingen (Fig. 29).
ADVARSEL! Før du bruger klapvogn en, skal du
kontrollere, at stolens fastspændingsbeslag
er indsat korrekt.
Sådan frigøres autostolen fra klapvognen:
1. Før håndtaget op til lodret indstilling (B).
2. Træk i det bageste frigørelsesgreb.
3. Tag stolen op og anbring den på en jævn
over ade.
PAS PÅ!: Stolen kan tages af og sættes på,
mens barnet sidder i den, selv om det med
barnets væ gt i stolen kan være lidt vanskeligere at udføre ovenstående. Det anbefales
i dette tilfælde at være meget forsigtig, når
ovenstående udføres.
60
Page 61

3.5 RENGØRING OG V EDLIGEHOLDELSE
RENGØRING AF BEKLÆDNINGEN
Autostolens stof beklædning kan ta ges fuldstændigt af og k an vaskes i hånden eller i en
vaskemaskine på 30°C.
For at vaske beklæ dningen løsner du selerne
og trækker disse o g spændet ud gennem de
tilhørende huller, hvorefter du kan trække
stofbeklædningen af (Fig. 30).
Følg vaskeanvisningerne på beklædningens
mærkat, hvor du vil nde de følgende vaske symboler:
30° C
Vaskemaskine på 30°C
Må ikke hånden
Tør ikke i tørretumbler
Må ikke stryges
Ikke kemisk rensning
Anvend aldrig skrappe rengøringsmidler
eller opløsningsmidler. Beklædningen må
ikke centrifugeres og skal hænges til tørre
uden opvridning.
RENGØRING AF PLA STIK- OG METALDELE
Til rengøring af plastikdele og lakerede metaldele skal der k un anvendes en fugtig klud.
Anvend aldrig skrappe rengøringsmidler eller
opløsningsmidler.
Autostolens bevægelige dele må under ingen omstændigheder smøres.
KONTROL AF DELENES BES KAFFENHED
Det anbefales at foretage en regelmæssig
kontrol af, at de følgende dele er i god stand
og ikke er slidt:
• S t o f b e k l æ d n i n g : S e e f t e r a t b e k l æ d n i n g e n
ikke taber eller har mistet foringsmateriale.
Kontroller syningernes tilstand, som altid
skal være intakte.
• S e l e r : K o n t r o l l e r a t d e r i k k e f o r e k o m m e r s t e der med unormal t løse bre eller om selen
er synligt t yndere omkring justeringsbån det,
skridtremmen, skulderselerne og i området
omkring selernes justeringsplade.
• P l a s t i k d e l e : K o n t r o l l e r a l l e p l a s t i k d e l e n e f o r
slidtage, der må ikke forekomme synlige
tegn på beskadigelse eller a arvning.
PAS PÅ! Såfremt autostolen er deformeret
eller stærk t nedslidt, skal den skif tes ud: Den
kan have mistet sine oprindelige sikkerhedsegenskaber.
OPBEVARING AF PRODUKTET
Når autostolen ikke er monteret i bilen, anbefales det at opbevare den på et tørt sted,
borte fr a varmekilder og besk yttet mod st øv,
fugtighed og direkte sollys.
BORTSK AFFELSE AF PRODUK TET
Ved afslutningen af autostolens levetid bør
den ikke længere anvendes, men skal bortska es som a ald. Af hensyn til miljøet bør
den opdeles i de forskellige a aldsmaterialer
i henhold til gældende regler i brugslandet.
61
Page 62

FIN
CHICCO
AUTO-FIX FAST
R. 0+ (0-13KG)
G
KÄYTTÖOHJEET
SISÄLTÖ:
1. JO HDANT O
1.1 VAR OITUK SIA
1.2 TUOTTEEN OMINAISUUKSIA
1.3 OSIEN KUVAUS
1.4 KANTOKAHVAN ASENNOT
1.5 TUOTTEELLE JA AUTON ISTUIMELLE
ASETETTUJA KÄYTTÖÖN LIITTYVIÄ
RAJOITUKSIA JA VAATIMUKSIA
2. AUTOON SIJOITTAMINEN
2.1 OLKAINTEN MUOTO ALUSSA
2.2 ALUSTALLE ASENNUS
2.3 ASENNUS ILMAN ALUSTAA
3. LISÄTO IMENPITE ITÄ
3.1 LAPSEN ASETTAMINEN ISTUIMEEN
3.2 VÖIDEN ASENNON SÄÄTÖ
3.3 ISTUIMEN LIIKKUMATON TAI KEINUVA
ASENTO (SITTERIASENTO)
3.4 KÄYTTÖ LASTENRATTAISSA
3.5 PUHDISTUS JA SÄILYTYS
1. JO HDANT O
1.1 VARO ITUK SIA
ER IT TÄIN TÄR KEÄÄ: LUE TTAVA HE TI
• S Ä I LY T T Ä K Ä Ä N Ä M Ä K Ä Y T T Ö O H J E E T
MYÖS TULEVAA KÄYTTÖÄ VARTEN .
• S e u r a t k a a k ä y t t ö o h j e i t a t a r k a s t i k u n k o -
koatte ja asennatte tuotteen. Välttäkää
tuotteen käyttämistä jos käyttöohjeita
ei ole luettu.
• H U O M I O ! A u t o - o n n e t t o m u u s t i l a s t o j e n
mukaan takaistuimet ovat etuistuimia
turvallisempia: kehotamme että asennatte turvaistuimen auton takapenkille.
Nimenomaan keskimmäinen paikka takaistuimella on kaikista turvallisin, jos siitä
löytyy kolmikiinnitteinen turvavyö.
• H U O M I O ! V A K A V A V A A R A ! Ä l k ä ä k ä y t t ä -
kö koskaan tätä Turvaistuinta sellaisessa
etuistuimessa jossa on edestä laukeava
airbag. Istuin voidaan asentaa etuistuimeen vain jos airbag voidaan poistaa
käytöstä: tarkistakaa autotehtaalta tai
auton käyttöohjeista, voitteko poistaa
airbagin käytöstä. Siirtäkää istuinta joka
tapauksessa mahdollisimman paljon
taaksepäin, takaistuimella istuvien matkustajien tarpeiden mukaan.
• K a i k k i e n a u t o s s a m a t k u s t a v i e n o n t i e d e t tävä miten lapsi otetaan pois istuimesta
hätätilanteessa.
• H u o m i o i k a a e t t ä i s t u i n o n a s e n n e t t a v a
niin, että liikkuvat istuimet tai auton ovi
eivät häiritse sen käyttöä.
• E i v o i d a t a a t a e t t ä m i k ä ä n t u r v a i s t u i n s u o jaisi lasta täydellisesti onnettomuuden
sattuessa, mutta tämän istuimen käyttö
vähentää vakavien vaurioiden ja kuoleman vaaraa.
• V a a r a e t t ä l a p s i s a a v a k a v i a v a u r i o i t a , e i
ainoastaan onnettomuuden sattuessa,
vaan myös muissa tapauk sissa (esim. äkilliset jarrutt amiset, jne) lisääntyy, jos tämän
käyttöohjeen neuvoja ei seurata tarkasti:
tarkistakaa joka kerta että Turvaistuin on
kiinnitetty kunnolla auton istuimeen.
• J o s t u r v a i s t u i n o n r i k k i , m u o d o t o n t a i p a l josta käy töstä kulunut , se on vaihdettava
uuteen; voi olla että se on menettänyt
alkuperäiset turvaominaisuudet.
• Ä l k ä ä t e h k ö t u o t t e e s e e n m u u t o k s i a t a i
lisäyksiä ilman valmistajan lupaa.
• Ä l k ä ä a s e n t a k o l i s ä l a i t t e i t a , v a r a o s i a t a i
muita osia joita valmistaja ei toimita.
• Ä l k ä ä k o s k a a n j a m i s s ä ä n t a p a u k s e s s a
jättäkö lasta yksin Turvaistuimeen.
• Ä l k ä ä j ä t t ä k ö Tu r v a i s t u i n t a k o s k a a n a u t o o n
kiinnittämättä sitä istuimeen, se voi töytäistä tai haavoittaa autossa matkustajia.
• Ä l k ä ä l a i t t a k o m i t ä ä n h y v ä k s y m ä t ö n t ä
lisää auton istuimen ja Turvaistuimen
väliin tai lapsen ja Turvaistuimen väliin:
onnettomuuden sattuessa voi olla että
Turvaistuin ei toimikaan oikealla tavalla.
• Jos jätätte auton suoraan auringonpaisteeseen, peittäkää Turvaistuin.
• P i e n e n k i n o n n e t t o m u u d e n s e u r a u k s e n a
62
Page 63

Turvaistuin voi vioittua niin että sitä ei
silmämääräisesti huomaa: istuin on joka
tapauksessa vaihdettava.
• Ä l k ä ä k ä y t t ä k ö t o i s t e n j o k ä y t t ä m ä ä i s tuinta: voi olla että siinä on näkymättömiä vaurioita jotka voivat vähentää sen
turvallisuutta.
• P ä ä l l y s t e e n v o i v a i h t a a v a i n v a l m i s t a j a n
hyväksymällä päällysteellä, koska se on
välttämätön osa Turvais tuinta. Turvaist uinta ei saa koskaan käy ttää ilman päällystettä
lapsen turvallisuuden takia.
• T a r k i s t a k a a e t t ä t u r v a v y ö n n a u h a e i o l e
kierteellä ja välttäkää sen tai muiden istuimen osien joutumista ovien väliin tai
etteivät ne joudu hank aukseen leikkaavien
pintojen kanssa. Jos tur vavyössä on viiltoja
tai rispaantumisia, se on vaihdettava.
• T a r k i s t a k a a e t t ä a u t o s s a e i o l e , e n n e n k a i k kea takaikkunan tavaratilassa, irrallisia tai
huonosti asetettuja, kiinnittämättömiä
esineitä tai matkatavaroita, jotka voivat
vahingoittaa matkustajia jarrutuksen tai
onnettomuuden sattuessa.
• V a r m i s t a k a a e t t ä k u k i n a u t o n m a t k u s t a j i s t a
käyttää omaa turvavyötään oman turvallisuuden vuoksi, näin vältytään lapsen
loukkaantumiselta sekä ajon aikana että
onnettomuuden tai voimakkaan jarrutuksen yhteydessä.
• P i t k i e n m a t k o j e n a i k a n a o n p y s ä h d y t t ä v ä
usein. Lapsi väsy y helposti. Koskaan lasta
ei saa irrottaa Turvaistuimes ta ajon aikana.
Jos lapsi tarvit see huomiota, etsikää sopiva
paikka ja pysähtykää.
• E n n e n 3 7 r a s k a u s v i i k k o a s y n t y n e i l l e v a u voille Turvaistuin voi olla vaaralline n, koska
näin pienillä vastasy ntyneillä voi olla hengitysvaikeuk sia jos ne pannaan istumaan
Turvaistuimeen. Ennen kuin lähd ette kotiin laitokselta, kääntykää lääkärinne tai
sairaalan osaston henkil ökunnan puoleen,
he voivat määritellä, millaisen Turvaistuimen vauvanne tarvitsee.
• A r t s a n a e i v a s t a a t u o t t e e n v ä ä r ä s t ä k ä y töstä johtuvista vahingoista.
1.2 TUOTTEEN OMINAISUUKSIA
• T ä l l ä T u r v a i s t u i m e l l a o n “ R y h m ä 0 + ” - h y väksyntä, lasten kuljettamiseen syntymästä - 13 kg pain oon saa kka (0 k uuk aude st a
10 kuukauteen/noin yhteen vuoteen),
EU:n Säädöksen ECE R44/04 mukaan.
• H y v ä k s y n t ä o n “ U n i v e r s a l ” - t y y p p i n e n ,
Turvaistuinta voi siis käy ttää kaikissa automalleissa. HUOMIO! “Univers al” merkitsee
sitä että se soveltuu suurimpaan osaan,
muttei silti kaikkiin autojen istuimiin.
TÄRK EÄ TIE DOTUS
1. Tämä on lapsille tarkoitettu turvaistuin
“Universal”, jolla on EU:n Säädöksen ECE
R4 4/0 4 mu kai nen h yv äks ynt ä ja se s opii
melkein kaikkiin autojen istuimiin.
2. Paras mahdollinen sopivuus saadaan
kun auton valmistaja ilmoittaa auton
käsikirjassa että autoon voidaan asettaa kyseessä olevaan ikään kuuluva
“Universal”-tyyppinen lapsen turvaistuin.
3. Tämä turvaistuin on luokiteltu “Univer-
sal” -t yyppiseksi aik aisempia malleja tiukempien arvosteluperus teiden mukaan,
joissa ei ole tätä tiedotusta.
4. Se on sopiva käytettäväksi autoissa joissa
on kolmikiinnitteiset staattiset tai kokoonkelaajalla varustetut tu rvavyöt, joilla
on Säädöksen UN/ECE N°16 ja muiden
vastaavien Standardien hyväksyntä.
5. Tarpeen vaatiessa voitte kääntyä tur-
vaistuimen valmis tajan tai jälleenmyyjän
puoleen.
1.3 OSIEN KUVAUS
Kuva (Fig) 1 (3/4)
A. Kantokahva
B. Aurinkokuomu
C. Kangaspäällinen
D. Säätöty yny (*)
E. Alusta (**)
Kuva 2 (Edes tä)
F. Vö id en läpim enoreiät
G. Turvaistuimen vyöt
H. Olkaimet (*)
I. Vöiden säätönappi (kangasläpän alla)
J. Vöiden säätönauha
63
Page 64

Kuva 3 (Sivusta)
K. Turvaistuimen vatsan yli menevä auton
turvavyön ohjainlovi.
L. Alustassa oleva, vatsan yli menevän au-
ton turvavyön ohjainlovi.
M. Painonapit kantokahvan kääntämiseen.
N. Klik Klak-pultit (lastenrattaisiin kiinnittä-
mistä varten)
Kuva 4 (Takaa)
O. Viistossa olevan auton turvavyön oh-
jainlovi
P. Irroituskädensija (alustasta ja lastenrat-
taista)
Q. Vöiden läpimenoreiät
R. Turvaistuimen vöiden ohjainelementti
S. Tukilevy
(*) Muoto ja malli voivat vaihdella erilaisiss a
Tur v ais tu inv er si oi ssa .
(**) Valinnainen
1.4 KANTOKAHVAN A SENNOT
Turvaistuimen kantokahvan voi säätää 4
eri asentoon (Kuva 5).
A. As ento autossa kulj etuksen ai kana (HUO-
MI O: t ämä o n ai noa sal lit tu a sent o ku lje -
tuksen aikana autossa).
B. Asento käsin kannettaessa.
C. Keinuva sitteri-asento tai myös kun
halutaan kiinnittää sopiviin Chicco-
lastenrattaisiin.
D. Liikkumaton sitteri-asento.
Säädetään painamalla yhtä aikaa nappeja
(M) kantokahvalla, kääntäen halutun asennon suuntaan kunnes kuuluu napsaus.
1.5 TUOTTEELLE JA AUTON IS TUIMELLE ASETETTUJA KÄY TTÖÖN LIITTY VIÄ RAJOITUK SIA JA
VAATIMUK SIA
HUOMIO! Noudattakaa tarkasti seuraavia
tuotteelle ja auton istuimelle annettuja
rajoituksia ja v aatimuksia: ellei ohjeita noudateta, ei turvallisuutta voida taata.
• T u r v a i s t u i m e n v o i a s e n t a a e t u i s t u i m e l l e
matkustajan puolelle tai mille tahansa
takaistuimell e. Joka tapauksessa auton istuimen on oltava ajosuuntaan päin. Älk ää
käyttäkö tätä turvaistuinta koskaan auton
istuimissa jotka ovat si vulle tai ajosuuntaa
vastaan suunnattuja. (Kuva 6).
• A u t o n i s t u i m e s s a o n o l t a v a k o l m i k i i n nitteiset, staattiset tai kokoonkelaajalla
varustetut tur vavyöt, joilla on Säädöksen
UN /ECE N °16 ja mui den v asta avie n Stan dardien hyväksyntä. (Kuva 7).
• H U O M I O ! Ä l k ä ä k o s k a a n a s e n t a k o T u r v a istuinta sellaisella auton turvavyöllä jolla
on kaksi kiinnepistettä. (Kuva 8).
• Ä l k ä ä k o s k a a n k ä y t t ä k ö s ä ä t ö t y y n y ä j o s
lapsi painaa yli 6 kg.
• Varmista, et tä kolmipisteturvav yön solki ei
ole liian korkea (kuva 13-19). Päinvastaisessa tapaukse ssa kokeile asentaa turvaistuin
auton toiselle istuimelle.
2. TURVAISTUIMEN ASENTAMINE N AUTOON
Turvaistuimen voi asentaa sekä alustalla
(valinnainen) että ilman sitä. Kummassakin
tapauksessa se on asennettava yksinomaan
auton ajosuunnan vastaisesti.
2.1 OLKAINTEN MUOTO ALUSSA
Turvaistuimessa on 2 erilaist a olkaintyyppiä
(A ja B), istuimen mallin mukaan. Ennen
Turvaist uimen käyt töönotto a, asetta kaa ensin olkaimet seuraavien ohjeiden mukaan:
• O l k a i m e t v e r s i o A ( K u v a 9 A , 9 B j a 9 C ) :
työntäkään olkaimet kangaspäällysteessä olevien reikien läpi (mutta ei allaolevan
rakenteen läpi) niin että olkaimet jäävät
sen päälle. Työntäkää jalkojen väliläppä
vöiden solkien läpi.
• O l k a i m e t v e r s i o B ( K u v a 1 0 A j a 10 B ) : V i e k ä ä
Turvaistuimen vyöt kummank in olkaimen
läpi. Työntäkää jalkojen väliläppä vöiden
solkien läpi.
2.2 ALUSTALLE ASENNUS
Turvaistuimen asentamiseksi alustalle auton istuimelle, toimikaa seuraavasti:
1. Irrottakaa Tur vaistuin alustasta vetämällä
irrotuskädensijasta joka on selkänojan
takana ja nostakaa se samanaikaisesti
kantokahvalla ylös (Kuva 11).
2. Asettakaa alusta valitsemallenne istui-
melle, suunnaten se kuten Kuvassa 12,
toimien siten että se on kosketuksissa
64
Page 65

auton selkänojaan.
3. Vetäkää auton turvavyötä ja kiinnittäkää se siihen kuuluvaan solkeen, pankaa vaakasuora (vatsan yli menevä) osa
kulkemaan kahden ohjainloven kautta
(L) jotka on merkitty sinisellä nuolella
ja kiristäkää mahdollisimman tiukkaan
(Kuva 13).
4. Ennen kuin laitatte Turvaistuimen alustaan, varmistakaa että tukilevy on kiinni
(Kuva 14).
5. Asettakaa Turvaistuin alustaan (auton
ajosuunnan vastaisesti) työntäen alaspäin kunnes se lukkiutuu (kuuluu ”lukitusnapsaus” klik) (Kuva 15).
6. Tarkistakaa että Turvaistuin on asetettu
oikein alustaan, yrittämällä nostaa sitä
edestä ja takaa.
7. Ottakaa auton vinosti kulkeva turvavyö
käteen ja kuljettakaa se ohjainloven (O)
kautta joka on Turvaistuimen selkäpuolella (Kuva 16). HUOMIO! Vinosti kulkevan
turvavyön on AINA oltava tämän ohjainloven sisällä kun lasta kuljetetaan.
8. Kiristäkää vyö mahdollisimman tiukalle
jättämätt ä löysää ja huolehtikaa siitä ett ä
vyö ei ole kiertynyt.
9. Kääntäkää kantokahva asentoon A, tar-
ki sta kaa ett ä se on au ton ist uint a va ste n
(Kuva 17).
HUOMIO! Asennuksen jälkeen tarkistakaa
AINA että auton turvavyö on riittävän kireällä ja että pingotus on tasainen joka
paikassa, ja että vyössä ei ole kiertymisiä.
Älkää KOSKAAN aset tako turvavyötä muulla
tavalla kuin edellä on selostettu.
Kun haluatte ottaa Turvais tuimen pois autosta mutta jättää alustan autoon:
1. Ottakaa vinosti kulkeva turvavyö sel-
känojassa olevasta ohjainlovesta avaa-
matta solkea.
2. Viekää kantokahva pystyasentoon B
(Kuva 5).
3. Ottakaa Turvaistuin irti kuten edellä on
neuvottu.
2.3 ASENNUS ILM AN ALUSTAA
Kun haluatte asettaa Turvaistuimen ilman
alustaa, tehkää seuraavasti:
1. Vetäkää tukilevy ulos ja asettakaa Turvaistuin valitsemallenne auton istuimelle
(Fig. 18).
2. Vetäkää auton turv av yötä ja kiinnittäkää
se asiaankuuluvaan solkeen, viemällä
vyön vaak asuora osa (vatsan yli kulkeva)
kahden turvaistuimessa olevan sinisellä
nuolella merkityn ohjausloven (K) läpi
(Kuva 19).
3. Ott akaa auton turvavyön vin osti kulkeva
osa käteen ja viekää se asianomaisen
ohjainloven (O) läpi joka löyt yy Turvaistuimen selkänojast a (Kuva 20). HUOMIO! Vi nosti kulkevan tur vavyön on oltava AINA
tämän loven sisällä kun lasta kuljetet aan.
4. Kiristäkää vyö mahdollisimman tiukalle
jättämätt ä löysää ja huolehtikaa siitä ett ä
vyö ei ole kiertynyt.
5. Kääntäkää kantokahva asentoon A, tarki sta kaa ett ä se on a uton ist uint a va ste n
(Kuva 21).
Kun haluatte ottaa Turvaistuimen pois
autosta:
1. Löysätkää auton turvavyö painamalla
solkea.
2. Viekää kantokahva pystyasentoon B.
3. Ottakaa vyö pois vinosti kulkevasta ohjainlovesta ja vaakasu orista ohjainlovista.
2.4 ASENNUS ISOFI X-JALUSTAN KANS SA
(kuuluu toimitukseen tai ostettavissa erikseen).
Katso ISOFIX-jalustan kanssa asennusta
varten vastaavaa tuotteen kanssa toimitettua ohjekirjasta.
AUTOMALLIKOHTAISTA ISOFIX-järjestelmää
käytettäessä on ehdottoman tärkeää lukea auton käyttöopas huolellisesti ennen
turvaistuimen asentamista. Oppaassa
osoitetaan yhteensopivat istuimet auton
turvaistuimen painoluokan mukaan.
Chiccon Iso x-jalustalla on ”automallikohta ine n” t yyp pih yv äks ynt ä ja s ite n se e i ol e
yhteensopiva kaikk ien automallien kanssa
vaan ainoastaan niiden automallien kanss a,
jotka on mainittu tuotteen mukana toimitun ohjekirjasen kohdassa “Tyyppihyväk-
65
Page 66

syttyjen autojen luettelo”.
3. LISÄTO IMENPITE ITÄ
3.1 LAPSEN ASETTAMINEN ISTUIME EN
1. Kohottakaa kangasläppä, pitäkää säätönappia painettuna ja vetäkää turvaistuimen vöitä jott a ne löystyvät (Kuv a 22).
2. Avatkaa solk i painamalla punaista laattaa,
pitäkää vöitä levitettyinä (Kuva 23).
3. Pankaa lapsi istuimeen.
4. Lait takaa soljen kaksi kieleket tä päällek-
käin ja painakaa ne sitten soljen sisään
kunnes kuulette napsauksen “klik” (Kuva
24). HUOMIO! Älkää koskaan työntäkö
vain yhtä kielekettä kerrallaan tai vain
yhtä kielekettä solkeen.
5. Kiristäkää Tur vaistuimen turvavyöt vetämällä säätönauhasta (Kuva 25).
3.2 VÖIDEN ASENNON S ÄÄTÖ
HUOMIO! Vyöt on aina sovellutettava lapsen kasvun muka an. Ennen Turvaist uimen
asentamista autoon vyöt on asetettava
sopivalle korkeudelle.
Oikein säädettäessä vöiden on tultava ulos
selkänojasta lapsen olk apäiden korkeudella.
(Kuva 26).
Turvaistuimessa on kolm e säätökorkeutta.
Kun vöitä halutaan siirtää, toimikaa seuraavasti:
1. Ottakaa olkaimet pois vetämällä ne ulos
kangaspäällysteiden aukoista.
2. Avatkaa vöiden so lki painamalla punaista
laattaa.
3. Vetäkää vyöt ulos selkänojan takaa ja
asettakaa ne lapsen ko rkeudelle sopiviin
reikiin (Kuva 27A ja 27B).
HUOMIO! Varmistakaa aina että vyöt kulkevat ohjainelementin (R) ja kuoren välis tä.
HUOMIO! Säätöty yny takaa lapselle oikean
pidon ja parhaan asennon s ekä niskalle että
selälle syntymästä 6 kg painoon saakka.
3.3 IS TUIMEN LIIKKUVA TAI KEINUVA ASENTO
(SITTERI-ASENTO)
Kun Turvaistuinta ei käytetä au tossa, sitä vo i
käyttää myös keinuna tai sitterinä.
Sen saa keinuvaksi sulkemalla tukilevyn
(Kuva 14) ja asettamalla kantokahvan asentoon C (Kuva 5).
Jos haluatte käy ttää sitä liikkumattomassa
ase nnos sa, v etäk ää tu kile vy ul os ja aset takaa kantokahva asentoon D (Kuva 5).
Asettak aa istuin vain vaakasuorille, tukeville
alustoille.
HUOMIO! Ennen kuin lähdet te kantamaan
Turvaistui nta, viekää ka ntokahva aina asen toon B (pystysuora).
HUOMIO! Älkää jättäkö lasta yksin.
HUOMIO! Käyttäkää aina suojasysteemiä.
HUOMIO! On vaarallista asettaa
Turvaistuin korkeille paikoille kuten
pöydät, tuolit jne.
HUOMIO! Tätä Turvaistuinta ei ole
tarkoitettu pitkille nukkumisjaksoille.
HUOMIO! Älkää käyttäkö Turvaistuinta jos lapsi pystyy istumaan
yksin.
Turvaistuin ei vastaa vauvan vu odetta. Kun
lapsi haluaa nukkua, hänet on pantava so pivalle vuoteelle tai vauvan sänkyyn.
Älkää käyt täkö Turvais tuinta jos siitä puuttuu osa tai jos se on rikki.
3.4 KÄYTTÖ LASTENRATTAISSA
VAROITUS! Auto-Fix-istuinosa voidaan
kiinnittää Chicco-rattaisiin, jotka on varustettu tarvittavilla erikseen ostettavilla
tai sarjakiinnitysjärjestelmillä. HUOMIO!
Kun haluatte käyttää turvaistuinta lastenrattaissa, seuratkaa rattaiden käyttöopasta. KLIK- KLAK- systeemillä varustetuissa
CHICCO lastenrattaissa on käsinojat joissa
on erikoiset laitteet, joiden avulla Turvaistuimen voi asettaa su oraan rattaisiin ilman
muita apuvälineitä. Enn en auton istuinosan
kiinnittämistä poista käsinojan suojukset
kokonaan.
Turvaistuin asetetaan lastenrattaille seuraavasti:
66
Page 67

1. O ttakaa kiinni Turvaistuimen yläasenn os-
sa olevasta kantokahvasta (B) (Kuva 28).
2. Kiinnitä istuin osan (N) kaksi Clik Clak kiin-
nitystappia rattaiden käsinojiin tai erik-
seen ostettavaan kiinnit ysjärjestelmään
ollen erityisen varovainen sen suhteen,
että ne kiinnittyvät molemmin puolin.
Voit kuulla kiinnitystä osoittavan nap-
sahduksen (Kuva 29)
VAROITUS! Ennen käyttöä tarkistakaa että
Turvaistuimen kiinnitysvälineet on oikein
asennettu.
Turvaistuimen otto pois rattaista:
1. Viekää kantokahva pystyasentoon (B).
2. Vetäkää takana olevasta irrotuskäden-
sijasta.
3. Siirtäkää Turvaistuin ja asettakaa se ta-
saiselle pinnalle.
HUOMIO: Turvaistuimen rattaisiin asetus
ja rattaista poisto voidaan suorittaa vaikk a
lapsi on Turvaistuimessa; lapsen painon
takia siirtojen suo ritus voi kuitenkin olla hankalampaa. Siksi nämä suoritusoperaatiot
vaativat entistä suurempaa varovaisuutta.
3.5 PUHDISTUS JA SÄILYT YS
PÄÄLLISEN PUHDISTUS
Turvaistuimen päällisen voi poistaa kokonaan ja sen voi pestä pesukoneessa 30°C.
Pesua varten, vapauttakaa vyöt ja ottakaa
päällinen pois sen jälkeen kun olette vetäneet vöiden kaksi osaa ja soljen reikien
kautta ulos. (Kuva 30).
Seuratkaa pesuo hjeita jotka löyty vät päällyskankaan etiketistä:
Pesu koneessa 30°C
Ei saa valkaista
Ei saa kuivata rummussa
Ei silitystä
Ei kuivapesua
Älkää käyt täkö hankaavia tai liuottavia pe -
suaineita. Älkää lingotko päällistä, antakaa
sen kuivua vääntämättä.
MUOVI- JA METALLIOSIEN PUHDISTUS
Muovisten ja maalattujen metalliosien
puhdistukseen on käytettävä ainoastaan
kosteaa kangaspyyhettä. Älkää käyttäkö
hankaavia tai liuottavia pesuaineita.
Turvaistuimen liikkuvia osia ei tarvitse
voidella.
OSIEN EHEYDE N TARKISTUS
Suosittelemme että tarkistatte säännöllisesti seuraavien osien eheyden ja kulumis tilan:
• K a n g a s p ä ä l l i n e n : t a r k i s t a k a a e t t ä p e h m u s teita ei tule ulos päällysteestä. Tarkistakaa
että saumat ovat ehjät.
• V y ö t : t a r k i s t a k a a e t t ä n i i d e n k u d o k s e s s a
ei näy kuitujen tuhoutumista niin että
vyö on ohentunut s äätönauhan, jalkojen
väliläpän, olkainten ja vöiden säätölevyn
kohdalla.
• M u o v i o s a t : t a r k i s t a k a a o s i e n k u n t o ; n i i s s ä
ei saa olla vaurioiden merkkejä tai värin
haalistumista.
HUOMIO! Jos Turvaistuin näyttää epämuotoiselta tai kovasti käytetyltä, se on
va ihd ett ava : voi oll a et tä s e on men ett äny t
alkuperäiset turvallisuusominaisuutensa.
TUOTTEEN SÄILYTYS
Kun Turvaistuinta ei ole asennet tu autoon,
säilyttäkää se kuivassa, pölyttömässä paikassa, kaukana lämpölähteistä sekä suorasta auringon valosta.
TUOTTEEN POISTO
Kun Turvaistuimen ennakoitu käy ttöaika on
loppunut, pois takaa se käytöstä ja pankaa
se roskiin. Ympäristönsuojelusyistä istuin
on ennen poisheittoa purettava ja jaettava
erilaisiin jätteisiin, kussakin maassa voimassaolevien sääntöjen mukaisesti.
67
Page 68

CZ
CHICCO
AUTO-FIX FAST
TŘÍDA 0+ (0-13KG)
NÁVOD K POUŽITÍ
OBSAH:
1. ÚV OD
1.1 UP OZORN ĚNÍ
1.2 VLASTNOSTI VÝROBKU
1.3 POPIS SOUČÁSTÍ
1.4 POLOHY RUKOJETI
1.5 OMEZENÍ PŘI POUŽÍVÁNÍ VÝROBKU A
POŽADAVKY NA SEDADLO VOZIDLA
2. PŘIPEV NĚNÍ DO VOZIDLA
2.1 NAS TAVENÍ V ÝŠKY UCHYCENÍ PÁSŮ AUTOSEDAČKY
2.2 UPEVNĚNÍ AUTOSEDAČKY SE ZÁKLAD-
NOU
2.3 UPEVNĚNÍ AUTOSEDAČKY BEZ ZÁ-
KLADNY
3. DALŠÍ ÚKONY
3.1 USAZENÍ DÍTĚTE DO AUTOSEDAČKY
3.2 ÚPRAVA POLOHY BEZPEČNOSTNÍCH
PÁS Ů
3.3 PEVNÁ NEBO HOUPACÍ POLOHA AU-
TOSEDAČKY (POUŽITÍ JAKO LEHÁTKO)
3.4 POUŽITÍ NA KOČÁREK
3.5 ČIŠTĚNÍ A ULOŽENÍ
1. ÚV OD
1.1 UPOZORNĚNÍ
VELMI DŮLEŽITÉ: IHNED SI PŘEČTĚTE
• U S C H O V E J T E T E N T O N Á V O D P R O P Ř Í P A D N É
DALŠÍ POUŽI TÍ.
• P ř i m o n t á ž i a p ř i p e v ň o v á n í v ý r o b k u s e
přesně řiďte tímto návodem. Nedovolte,
aby kdokoliv používal výrobek, aniž by se
dříve neobeznámil stímto návodem.
• P O Z O R ! Z e s t a t i s t i k n e h o d v y p l ý v á , ž e z a d n í
sedadla jsou be zpečnější než přední: dopo ručujeme proto připevnit autosedačku na
za dní sed adl a. N ejb ez peč něj ší j e pro stř edn í
zadní sedadlo, pok ud je vybaveno tříbod ovým bezpečnostním pásem.
• P O Z O R ! V E L M I N E B E Z P E Č N É ! N i k d y n e u pevňujte tuto autosedačku na předním
sedadle, pokud je vybaveno čelním airbagem. Autosedačku je možné připevnit
na přední sedadlo, pouze pokud je airbag
vyřazen: ověřte si možnost vyřadit airbag
přímo u vý robce nebo vpříručce kvozidlu.
Pokud umístíte autosedačku na p řední sedadlo, doporučujeme posunout sedadlo co
nejvíce dozadu, samozřejmě dle m ožnosti
pokud jsou vzadu spolucestující.
• D o p o r u č u j e m e , a b y v š i c h n i s p o l u c e s t u j í c í
byli obeznámeni se způsobem odepnutí
dítěte vpřípadě nutnosti.
• P ř i u p e v n ě n í a u t o s e d a č k y d o v o z i d l a v ě n u j te zvláštní pozor nost tomu, aby nepřekážela
posuvnému sedadlu nebo dveřím auta.
• Ž á d n á a u t o s e d a č k a n e z a r u č í ú p l n o u b e z pečnost dítěte vpřípadě nehody, ale její
použití sníží ri ziko zranění nebo smrti dítěte.
• R i z i k o v á ž n é h o z r a n ě n í d í t ě t e s e z v y š u j e ,
a to nejen vpřípadě nehody, ale i vjiných
situacích (např. prudké zabrzdění, atd.)
pokud nejsou přesně dodržovány pokyny
uvedené vtomto návodu k použití: vždy
zkontrolujte, zda je autosedačka správně
upevněna ksedadlu.
• P o k u d j e a u t o s e d a č k a p o š k o z e n á , d e f o r m o vaná, velmi opotřebovaná nebo pokud jí
dokonce nějaká část chybí, musí být vyměněna, protože už nemusí splňovat pů vodní
požadavky na bezpečnost.
• N a v ý r o b k u n e s m í b ý t p r o v e d e n a ž á d n á
úprava nebo změna b ez předchozího souhlasu výrobce..
• N e p o u ž í v e j t e d o p l ň k y, n á h r a d n í d í l y n e b o
části, které nejsou dodávány výrobcem.
• N i k d y z ž á d n é h o d ů v o d u n e n e c h á v e j t e d í t ě
vautosedačce bez dozoru.
• N i k d y n e n e c h á v e j t e a u t o s e d a č k u n a s e dadle vozidla neupevněnou, mohla by při
nárazu zranit spolucestující.
• N e p o u ž í v e j t e ž á d n ý p ř e d m ě t , p o k u d n e n í
označen výrob cem jako doplněk, ať už mezi
sedadlem vozidla a autosedačkou nebo
mezi autosedačkou a dítětem: v případě
nehody by autosedačka nemusela být
plně funkční.
• P o k u d n e c h á t e a u t o d l o u h o s t á t n a p ř í m é m
slunci, doporučujeme au tosedačku přikrýt .
68
Page 69

• I při malé dopravní nehodě může dojít
kpoškození autosedačky, neznatelnému
pouhým okem: proto je nutné ji vyměnit.
• N e p o u ž í v e j t e a u t o s e d a č k y z a k o u p e n é j a k o
použité, mohlo dojít kvážnému p oškození
struktur y autosedačky, i když není znatelné
pouhým okem, ale které mo hlo snížit bezpečnost výrobku.
• P o t a h m ů ž e b ý t n a h r a z e n p o u z e p o t a h e m
schváleným výrobcem, neb oť je nedílnou
součástí autosedačky. Autosedačku nikdy
nepoužívejte bez potahu, abyste neohrozili
bezpečnost dítěte.
• Z k o n t r o l u j t e , z d a n e n í p o p r u h p á s ů p ř e kroucený a zabraňte tomu, aby se popruh
nebo části autosedačky mohly přivřít ve
dveřích auta nebo se třely o ostré hrany.
Je-li pás pořezaný nebo roztřepený, je třeba
jej nahradit.
• Z k o n t r o l u j t e , z d a n e v e z e t e v e v o z i d l e v o l n ě
le žíc í ne bo š pat ně p řip evn ěné pře dmě ty a
zavazadla, a to zvláště na zadní odkládací
desce. V případě nehody nebo prudkého
zabrzdění by mo hly zranit osoby ve vozidle.
• U j i s t ě t e s e , z d a m a j í v š i c h n i s p o l u j e z d c i
zapnut bezp ečnostní pás a to jak pro jejich
vlastní bezpečnost, tak i proto, že by vpřípadě nehody nebo prudkého zabrzdění
mohli zranit vaše dítě.
• B ě h e m d l o u h ý c h c e s t d ě l e j t e č a s t o z a s t á v ky. Dítě se velmi snadno unaví. Zžádného
důvodu nevyndavejte dítě za jízdy zautosedačky. Pokud dítě vyž aduje pozornost, je
nutné najít vhodné místo a zastavit.
• P r o d ě t i n a r o z e n é p ř e d č a s n ě p ř e d 3 7. t ý d nem těhotenství může být autosedačka
nebezpečná. Tito novorozenci usazení do
autosedačky mohou mít problémy sdýcháním. Doporučujeme Vám obr átit se na
vašeho lékaře nebo na lékařský personál,
aby zvážil stav vašeho dítě a doporučil vám
vhodnou autose dačku dříve, než odejdete
zporodnice.
• S p o l e č n o s t A r t s a n a n e n e s e ž á d n o u o d p o vědnost za nesprávné používání výrobku.
1.2 VLASTNOSTI V ÝROBKU
• Ta t o a u t o s e d a č k a j e h o m o l o g o v á n a p r o
“Třídu 0+”. To znamen á, že byla schválena
pro přepravu novorozenců a dětí sváhou
do 13 kg (od 0 do 10 měsíců/přibližně 1
roku), podle dispozi c evropské normy ECE
R44/04.
• Ta t o a u t o s e d a č k a b y l a k l a s i k o v á n a j a k o
„univerzální“, tudíž může být používána
vjakémkoli autě. POZOR! „Univerz ální“ znamená, že autosedačka je použitelná na
většině sedadel vozi dla, i když ne na všech.
DŮLEŽITÉ UPOZORNĚNÍ
1. Jedná se o „univerzální“ dětské zádržné
zařízení, které bylo s chváleno podle evropské normy ECE R44/04. Je použitelné na
většině sedadel vozi dla, i když ne na všech.
2. Autosedačka je plně kompatib ilní, pokud
výrobce vpříručce kvozidlu uvádí, že se
pro dané vozidlo předpokládá použití
dětských zádržných zařízení univerzálního
typu pro danou věkovou kategorii.
3. Tato autosedačka byla klasi kována jako
„univerzální“, protože vyhovuje přísnějším požadavkům pro homologaci oproti předcházejícím modelům, které takto
označeny nejsou.
4. Je vhodná pouze pro použití ve vozidl ech,
vybavených tříbodovými bezpečnostními
pásy, pevnými nebo sautomatický m navíjením, které byly schváleny dle dispozic
normy UN/ECE č. 16 nebo jiné odpovídající normy.
5. Vpřípadě jakýchkoliv pochybností se
obraťte na výrobce autosedačky nebo
na příslušnou prodejnu.
1.3 POPIS SOUČÁ STÍ
Obr. 1 (3/4)
A. Rukojeť
B. Sluneční stříška
C. Textilní potah
D. Přídavné polstrování (*)
E. Základna (**)
Obr. 2 (Před ní strana a utosedač ky)
F. Otvory na výškové nastavení pásů
G. Pásy autosedačky
H. Vycpávky (*)
I. T lač ítk o na ú pra vu d élk y p ásů ( pod tex til ní
výplní)
J. Pás na utažení pásů autosedačk y
69
Page 70

Obr. 3 (Z pro fi lu)
K. Vodící přezka břišního popruhu auto-
sedačky
L. Vodící přezka břišního popruhu základny
M. Tlačítka na úpravu polohy rukojeti
N. Čepy Clik Clak (na připevnění kočárku)
Obr. 4 (Zad ní strana)
O. Vodící přezka ramenního po pruhu vozidla
P. Rukojeť na uvolnění (od základny a od
kočárku)
Q. Otvory na výškové nastavení pásů
R. Upevňovací destička pásů autosedačky
S. Upevňovací páčka
(*) Forma a model s e mohou lišit podle typu
autosedačky.
(**) Volitelné vybavení
1.4 POLOHY RUKOJETI
Rukojeť autosedačky je možno nastavit do
4 poloh (Obr. 5).
A. Poloha pro převoz v autě (POZOR: toto
je jediná poloha, která je povolena při
převozu vautě).
B. Poloha pro přenášení v ruce.
C. Houpací poloha nebo poloha pro upev-
ně ní na koč áre k Chi cco vyb ave ný p řip ev-
ňovací soupravou.
D. Pevná poloha při použití jako lehátko.
Pokud chcete upravit polo hu rukojeti, stiskněte současně obě tlačítka (M) na rukojeti,
pak otočte rukojeť do p ožadované polohy,
dokud neuslyšíte cvaknutí.
1.5 OMEZENÍ PŘI POUŽ ÍVÁNÍ VÝROBKU A POŽA DAVKY NA SEDADL O VOZIDLA
POZOR! Pečlivě dodržujte následující ome zení při používání v ýrobku a požadavky na
sedadlo: vopačném případě n ení zaručena
plná bezpečnost.
• A u t o s e d a č k a m ů ž e b ý t p ř i p e v n ě n a n a
předním sedadle pro spolujezdce nebo
na jakémkoliv ze zadních sedadel. Se dadlo
vozidla musí být vždy otočeno ve směru
jízdy. Nikdy nepřipevňujte autoseda čku na
sedadla, která jsou otočena do b oku nebo
proti směru jízdy (Obr. 6).
• S e d a d l o v o z i d l a m u s í b ý t v y b a v e n o t ř í b o -
dovým bezpečnostním pásem, pevným
nebo sautomatickým navíjením, který by l
schválen podle dispoz ic normy UNI/ECE č.
16 nebo jiné jí odpovídající normy (Obr. 7).
• P O Z O R ! N i k d y n e p ř i p e v ň u j t e a u t o s e d a č k u
na sedadlo vybavené pouze dvoubodovým bezpečnostním pásem (Obr. 8).
• N i k d y n e p o u ž í v e j t e p ř í d a v n é p o l s t r o v á n í ,
pokud je hmotnost dítěte vyšší než 6 kg.
• Ujistěte se, zda přezka tříbodového pásu
vozi dla není pří liš vys oko (obr. 13-19). Po-
kud ano, zkuste autosedačku p řipevnit na
jiné sedadlo vozidla.
2. PŘIPEVNĚNÍ AUTOSEDAČK Y DO VOZIDLA
Autosedačka může být upevněna jak se
základnou (volitelné vybavení) tak bez
základny. Vobou provedeních musí být
připevněna pouze proti směru jízdy.
2.1 NASTAVENÍ VÝŠK Y UCHYCENÍ PÁSŮ AUTO-
SEDAČKY
Autosedačka je vybavena 2 různými typy
pásů (A a B) podle modelu autosedačky.
Dříve než budete autosedačku používat,
je nutné nastavit výšku uchycení pásů. Postupujte následujícím způsobem:
• P á s y t y p u A ( O b r . 9 A , 9 B a 9 C ) : P r o t á h n ě t e
vycpávky otvory vtextilním potahu ( ne
strukturou pod ním) tak, aby pásy zůstaly
nad nimi. Navlékněte mez inožní výplň přes
sponu pásů.
• P á s y t y p u B ( O b r . 1 0 A a 1 0 B ) : P r o v l é k n ě t e
pásy autosedačk y oběma vycpávkami. Na vlékněte me zinožní výplň přes spo nu pásů.
2.2 UPEVNĚNÍ AUTO SEDAČKY SE ZÁKLAD NOU
Při upevňování autosedačky se základnou
do vozidla postupujte následovně:
1. Ne jdř íve uvo lnět e au tos eda čku z e zá kla d-
ny. Zatáhněte za uvolňovací rukojeť na
zadní straně opěrky zad a autosedačku
zároveň zvedněte za rukojeť (Obr. 11).
2. Umístěte základnu na sedadlo, na které
chcete autosedačku připevnit a otočte ji
tak, jak je znázorněno na Obr. 12. Dbejte,
aby základna přiléhala k o pěradlu sedadla.
3. Natáhněte bezpečnostní pás vozidla a
zapněte jej do příslušné sp ony. Protáhněte
vodorovný (břišní) popruh oběma vodícími přezkami (L) označenými modrou
70
Page 71

šipkou a co nejvíce jej utáhněte (Obr. 13).
4. Dříve než připevníte autosedačku na
základnu, zkontrolujte, zda je sklopená
upevňovací páčka (Obr. 14).
5. Nasaďte autosedačku (otočenou proti
směru jízdy) na základnu a tlačte ji směrem dolů, dokud se nezahákne (uslyšíte
zacvaknutí pojistky) (Obr. 15).
6. Ověřte si, zda je autosedačka správně
uchycena na základně a pokuste se ji
zvednout jak vepředu tak i vzadu.
7. Uchopte ramenní popruh bezpečnost-
ního pásu vozidla a provlé kněte jej vodící
přezkou (O) na zadní straně opěrky zad
autosedačky (Obr. 16). POZOR! Ramenní
popruh musí při přepravě VŽDY zůstat
zasunutý uvnitř této vodící přezky.
8. Co možná nejvíce napněte be zpečnostní
pás, aniž by kdekoli volně v isel a ověřte si,
zda není nikde překroucený.
9. Nastavte rukojeť do polohy A a zkontrolujte, zda je opřená proti sedadlu vozidla
(Obr. 17).
POZOR! Po upevnění autosedačky VŽDY
zkontrolujte, zda je bezpečnostní pás řádně napnutý a stejnoměrně prochází všemi
body, aniž by byl někde překroucený. NIKDY
neprotahujte bezpečnostní pás vozidla jinými než znázorněnými místy.
Pokud chcete autosedačku uvolnit od základny upevněné ve vozidle:
1. V yvlékněte ramenní pás zvodící přezk y na
op ěrce zad , an iž b yst e jej ode pli zesp ony .
2. Přetočte rukojeť do svislé polohy B
(Obr. 5).
3. Autosedačku uvolněte p odle přechozího
návodu.
2.3 UPEVNĚNÍ AUTOS EDAČKY BEZ ZÁKLAD NY
Při upevňování autosedačky bez základny
postupujte následovně:
1. Vytáhněte upevňovací páčku a umístěte
autosedačku na sedadlo, na které ji hodláte připevnit (Obr. 18).
2. Natáhněte bezpečnostní pás vozidla a
zapněte jej do příslušné sp ony. Protáhněte
břišní popruh bezpečnostního pásu oběma vodícími přezkami (K) autosedačky,
označenými modrou šipkou (Obr. 19).
3. Uchopte ramenní pop ruh bezpečnostní-
ho pásu vozidla a provlékněte jej vodící
přezkou (O) na zadní straně opěrky zad
autosedačky (Obr. 20). POZOR! Ramenní
popruh musí při přepravě VŽDY zůstat
provléknutý touto vodící přezkou.
4. Co možná nejvíce napněte bez pečnostní
pás, aniž by kdekoli volně v isel a ověřte si,
zda není nikde překroucený.
5. Nastavte rukojeť do polohy A a zkontrolujte, zda je opřená proti sedadlu vozidla
(Obr. 21).
Pokud chcete autosedačku uvolnit:
1. Stiskněte sponu a rozepněte b ezpečnostní
pás vozidla.
2. Přetočte rukojeť do polohy B (svislé).
3. Vyvlékněte bezpečnostní pás zvodící
přezky diagonální a zvodorovných vodících přezek.
2.4 PŘIPEVNĚNÍ SE Z ÁKLADNOU ISOFIX
(sériový nebo prodávaný zvlášť)
Při upevňování autosedačky se základnou
ISOFIX se řiďte příslušným návodem přiloženým k výrobku.
Dříve než připev níte autosedačku ISOFIX POLOUNIVERZÁLNÍ, je nezbytně nutné, abyste
si přečetli příručku kvozidlu. Vpříručce jsou
uvedena sedadla, která jsou kompatibilní
se systémem a vhodná pro třídu této autosedačky.
Základna Iso x značky Chicco je homologována jako „Polouniverzální“ a tudíž není
kompatibilní se všemi modely vozidel, avšak
pouze smodely uvedeným i vpřiložené příručce „Seznam homologovaných vozidel“.
3. DALŠÍ ÚKONY
3.1 USAZENÍ DÍTĚTE DO AUTOSEDAČK Y
1. Zvedněte textilní výplň, stiskněte tlačítko na úpravu pásů a současně táhněte
za pásy autosedačky tak, aby se uvolnily
(Obr. 22).
2. Stiskněte červené tla čítko na sponě, otevřete
ji a držte pásy roztažené (Obr. 23).
3. N yní je m ožn é us adi t dí tě do aut ose dač ky.
4. Přeložte přes sebe oba jazýčky přezky a
zasuňte je do spony, dokud neuslyšíte zacv aknu tí p ojist ky ( Obr. 24) . POZOR ! Nikd y
71
Page 72

nezasunujte jazýčky do spony jeden po
druhém nebo pouze jeden znich.
5. Zatáhněte za příslušný pás na utažení
pásů a napněte bezpečnostní pásy autosedačky (Obr. 25).
3.2 ÚPRAVA POLOHY BEZ PEČNOSTNÍCH PÁSŮ
POZO R! P ásy mus í bý t vž dy u pra veny pod le
výšk y dítěte. Dříve než umístíte autosedačku
do vozidla, je nutné upravit polohu uchycení pásů.
Správná výška pásů je nastavena, pokud
pásy vys tupují zopěrk y zad na úrovni ramen
dítěte (Obr. 26).
Autosedačka je vybavena 3 polohami pro
výškové nastavení pásů.
Při úpravě výšk y uchycení pásů postupujte
následovně:
1. Vysuňte vycpávky zotvorů v textilním
potahu a vyjměte je.
2. Stiskněte červené tla čítko spony a rozepněte přezku bezpečnostních pásů.
3. Vytáhn ěte pásy opěrkou autosedačky na
zadní stranu a poté je vsuňte do otvorů,
které jsou pro výšku vašeho dítěte nejvhodnější (Obr. 27A a 27B).
POZOR! Ověřte si, zda oba pásy procházejí vždy mezi upevňovací destičkou (R)
a krytem.
POZOR! Přídavné polstrování umožní novorozence a děti s váhou do 6 kg správně
připnout a zajistí jim vhodnou polohu pro
krk a záda.
3.3 PEVNÁ NEBO HOUPACÍ P OLOHA AUTOSEDAČ-
KY (POUŽ ITÍ JAKO LEHÁTKO)
Pokud není autosedačka používána
vautě, může také sloužit jako kolébka
nebo lehátko.
Houpací polohu zvolíte, když zasunete
upevňovací páčku (Obr. 14) a posunete
rukojeť do polohy C (Obr. 5).
Pokud chcete autosedačku zablokovat
vpevné poloze, vy táhněte upevňovací páčku a přesuňte rukojeť do polohy D (Obr. 5).
Pokládejte autosedačku pouze na pevné a
vodorovné plochy.
POZOR! Dříve než začnete autosedačku
přenášet, přetočte vždy rukojeť do polohy
B (svislé).
UPOZORNĚNÍ! Nikdy nenechávejte
dítě bez dozoru.
UPOZORNĚNÍ! Vždy používejte zádržné zařízení.
UPOZORNĚNÍ! Je nebezpečné pokládat autosedačku na vyvýšené
plochy jako jsou stoly, židle atd.
UPOZORNĚNÍ! Tato autosedačka
není určena ktomu, aby vní dítě
déle spalo.
UPOZORNĚNÍ! Nepoužívejte autosedačku, když už dítě umí samo
sedět.
Autosedačka nenahrazuje postýlku nebo
kolébku. Pokud si dítě potřebuje odpočinout, doporučujeme jej uložit do vhodné
kolébky nebo postýlky.
Autosedačku nepoužívejte, pokud je rozbitá nebo nějaká část chybí.
3.4 POUŽITÍ NA KOČÁRE K
UPOZORNĚNÍ! Auto sedačka Auto -Fix může
být připevněna na ko čárky značky Chicco,
vybavené příslušnými sériovými nebo
zvlášť prodávanými upínacími systémy!
POZOR! Pokud chcete používat autosedačku připevněnou na ko čárek, řiďte se pok yny
uvedenými vnávodu ke kočárku. Kočárky
značky CHICCO vybavené systémem CLIK
CL AK m ají o pěr ky na ru ce v yb aven y sp eci álním úchytným zaří zením, které umožňuje
připevnit autosedačku přímo na kočárek
bez použití dalších doplňků. Dříve než
připevníte autosedačku, úplně stáhněte
potah z opěrek paží.
Pokud chcete připevnit autosedačk u na kočárek, postup ujte následujícím způsobem:
1. Uch opte autosedačku za rukojeť ve svislé
poloze (B) (Obr. 28).
2. Připněte oba čepy upínacího systému
Clik Clak autosedačky (N) k op ěrkám paží
kočárku nebo ke zvlášť zakoupenému
upínacímu zařízení. Buďte obz vláště pozo rní, aby se p řipn uly na o bou str anác h.
72
Page 73

Uslyšíte cvaknutí pojistky (Obr. 29).
UPOZORNĚNÍ Před použitím si ověřte, že
je upínací systém autosedačky správně
zajištěn. Pokud chcete odstranit autosedačku z kočárku:
1. Přetočte rukojeť do svislé polohy (B).
2. Táhněte za zadní uvolňovací rukojeť.
3. Uchopte autosedačku a položte ji na
rovnou plochu.
POZOR: Připevnění a odstranění může být
provedeno i sdítětem vautosedačce. Váha
dítěte může z tížit prove dení tohoto úkonu .
Při provádění těchto úkonů sdítětem vautosedačce buďte zvláště opatrní.
3.5 ČIŠTĚNÍ A ULOŽENÍ
ČIŠTĚNÍ POTAHU AUTOSEDAČKY
Textilní potah autosedačky je možno celý
sejmout a vyprat buď ručně nebo vpračce na 30°C. Pokud chcete potah vyprat,
protáhněte oba pásy a pře zku příslušnými
otvory (Obr. 30), rozepněte pásy a potah
stáhněte. Při praní se řiďte pokyny uvedenými na štítku potahu, který obsahuje
následující symboly pro praní:
30° C
Perte v pračce na 30°C
Nebělte
Nesušte v sušičce
Nežehlete
Nečistěte chemicky
Nikdy nepoužívejte tekutý písek ani ředidla. Potah neždímejte a nechejte jej volně
uschnout.
ČIŠTĚNÍ KOVOVÝCH A UMĚLOHMOTN ÝCH ČÁSTÍ
Části z umělé hmoty nebo lakovaného
kovu čistěte pouze navlhčeným hadříkem.
Nikdy nepoužívejte na čištění těchto částí
tekuté písky ani ředidla. Pohyblivé části
autosedačky nesmí být nijak olejovány.
KONTROLA CELISTVOSTI VŠECH ČÁSTÍ
Doporučujeme pravidelně kontrolovat stav
a stupeň opotřebení následujících částí:
• T e x t i l n í h o p o t a h u : K o n t r o l u j t e , j e s t l i v y cpávka někde nevyčnívá nebo jestli se
nedrolí. Kontrolujte stav švů. Musí být
pevné a nesmí se nikde párat.
• P á s ů : K o n t r o l u j t e , j e s t l i o s n o v a l á t k y n e řídne a jestli viditelně neslábne tloušťka
pásů vblízkosti regulačního pásu, pásu
mezi nohama dítěte, na úrovni ramen a
okolo destičky na uchycení pásů.
• U m ě l ý c h h m o t : K o n t r o l u j t e s t u p e ň o p o třebení všech částí zumělé hmoty, které
nesmí být ani viditelně poškozené ani
vybledlé.
POZOR! Pokud je autosedačka deformovaná nebo velmi opotřebovaná, musí být
vyměněna: nemusela by už splňovat původní požadavky na bezpečnost.
ULOŽENÍ VÝROBKU
Pokud není autosedačka používána ve
vozidle, doporučujeme ji uschovat mimo
dosah tepelných zdrojů a uložit ji tak, aby
byla chráněna před prachem, vlhkostí a
přímým slunečním světlem.
ZPŮSOB LIKV IDACE VÝROBKU
V případě, že autosedačka jeví známky
většího opotřebení v důsledku častého
používání, přes taňte ji používat a vyhoďte ji.
Za účelem ochrany životní ho prostředí, rozdělte části výrobku do tříděného odpadu
vsouladu splatnými národními předpisy.
73
Page 74

S
CHICCO
AUTO-FIX FAST
G
R. 0+ (0-13KG)
BRUKSANVISNING
INNEHÅLL
1. INTRODUKTION
1.1 VAR NING
1.2 PRODUKTENS EGENSKAPER
1.3 BESKRIVNING AV KOMPONENTER
1.4 HANDGREPPETS POSITIONER
1.5 BEGRÄNSNINGAR OCH KRAV FÖR
ANVÄNDNING AV PRODUKTEN OCH
BILSÄTET
2. MONTERING I BIL
2.1 STARTINSTÄLLNING AV AXELBANDEN
2.2 MONTERING MED UNDERREDE
2.3 MONTERING UTAN UNDERREDE
3. YTTERLIGARE ÅTGÄRDER
3.1 PLACERA BARNET I STOLEN
3.2 REGLERA SÄKERHETSBÄLTENA
3.3 FAST ELLER GUNGANDE POSITION AV
STOLEN (SOM BABYSIT TER)
3.4 ANVÄNDA MED SITTVAGNEN
3.5 RENGÖRING OCH FÖRVARING
1. INTRODUKTION
1.1 VARN ING
MYCKET VIKTIGT! LÄS GENAST
• F Ö R V A R A B R U K S A N V I S N I N G E N F Ö R
FRAMTIDA ANVÄNDNING.
• F ö l j i n s t r u k t i o n e r n a n o g g r a n t f ö r i h o p s ä t t -
ning och montering av produkten. Låt
inte någon använda produkten utan att
ha läst instruktionerna.
• V A R N I N G ! E n l i g t o l y c k s s t a t i s t i k e n ä r b i l -
barnstolar som sätts i fordonets baksäte
säkrare än de som sätts i framsäte: du
bör därför mo ntera stolen i ba ksätet. Den
säkraste plat sen är särskilt den mitt i baksätet, föruts att att den har 3-punk tsbälte.
• V A R N I N G ! A L L V A R L I G F A R A ! S ä t t a l d r i g
stolen på ett fr amsäte med frontal krockku dde . Sto len kan bar a sät ta s på f ra msät e
om krockkudden inte är aktiv : kontrollera
med biltillverka ren eller bilens bruksanvisning om det går att ta ur k rockkudden. Vi
rekommenderar i var je fall att skjuta sätet
bakåt så mycket som möjligt om andra
passagerare sitter i baksätet.
• A l l a p a s s a g e r a r e b ö r v a r a i n f o r m e r a d e
om hur barnstolens säkerhet sbälte hakas
loss vid nödfall.
• V a r u p p m ä r k s a m m e d h u r d u m o n t e r a r
barnstolen i bilen så att den inte störs av
ett fällbart säte eller en dörr.
• I n g e n b a r n s t o l k a n g a r a n t e r a t o t a l s ä k e r het för barnet i fall av ol ycka, men användningen av denna produkt minskar risken
för allvarliga eller dödliga skador.
• R i s k e n f ö r a l l v a r l i g a s k a d o r p å b a r n e t ,
inte bara vid olycka, men även i andra
situationer
(t.ex. plötsliga inb romsningar etc.) ökar, om
indikationerna i den här bruksanvisningen
inte följs noggrant: Kontrollera alltid att
barnstolen hakats fast korrekt vid bilsätet.
• O m s t o l e n ä r s k a d a d , d e f o r m e r a d e l l e r
mycket sliten, ska den bytas ut, eftersom
den kan ha förlorat sina ursprungliga säkerhetsegenskaper.
• G ö r i n g a m o d i e r i n g a r e l l e r t i l l ä g g p å
produkten utan att ha tillverkarens godkännande.
• A n v ä n d i n t e t i l l b e h ö r , r e s e r v d e l a r e l l e r
komponenter som inte kommer från
tillverkaren.
• L ä m n a a l d r i g b a r n e t u t a n t i l l s y n i s t o l e n .
• L ä m n a a l d r i g s t o l e n p å b i l s ä t e t u t a n a t t
haka fast den, den kan stöta i och skada
passagerare.
• S ä t t i n t e i n n å g o t , s o m i n t e ä r e t t t i l l b e h ö r
som godkänts för produkten, mellan bilsätet och stolen eller mellan stolen och
barnet: i fall av olycka kanske stolen inte
skulle fungera korrekt.
• O m b i l e n s k u l l e l ä m n a s u n d e r d i r e k t s o l
bör stolen täckas över.
• T i l l f ö l j d a v ä v e n d e n m i n s t a o l y c k a k a n
74
Page 75

stolen tillfogas skador som inte alltid är
synliga för blotta ögat: den måste där för
bytas ut.
• A n v ä n d i n t e b i l b a r n s t o l a r s o m e r h å l l i t s i
andra hand: Strukturen kan ha f ått skador
utan att det s yns för blotta ögat, men vilk a
komprometterar produktens säkerhet.
• F o d r e t k a n b a r a b y t a s u t m e d g o d k ä n nande från tillverkaren, eftersom det utgör en integrerande del av bilbarnstolen.
Bilbarnstolen får aldrig användas utan
fodret för att inte riskera barn ets säkerhet.
• K o n t r o l l e r a a t t b ä l t b a n d e t i n t e ä r s n o t t o c h
undvik att det ta eller delar av bilbarnstolen
kläms mellan dörrar e ller skavs mot vassa
pun kter. Om bält et fåt t sk åror e ller tråd ar
rivits upp, måste det bytas ut.
• K o n t r o l l e r a a t t i n g a f ö r e m å l e l l e r b a g a g e
som inte är fastspända elle r placerade på
säkert sätt transporteras, i synnerhet på
hatthyllan bakom baksätet inne i fordonet:
i fall av olycka eller plötslig inbromsning
kan passagerarna skadas.
• S e t i l l a t t a l l a b i l p a s s a g e r a r e a n v ä n d e r s i t t
eget säkerhetsbälte för den egna säkerheten och därför att de under resa kan
skada barnet, i fall av olycka eller plötslig
inbromsning.
• V i d l å n g a r e s o r b ö r m a n g ö r a m å n g a p a u ser. Barnet kan bli trött. Barnet får inte av
något skäl tas ur barnstolen innan bilen
stannat. Om barnet behöver uppmärksamhet måste man nna en säker p arkering och stanna först.
• D e t k a n v a r a f a r l i g t f ö r s p ä d b a r n s o m
fötts ef ter mindre än 37 veckors foster tid
att sitta i bilstol. Dessa spädbarn kan få
andningssvårigheter medan de sitter i
bilstolen. Vi rekommenderar därför att ni
vänder er till er läkare eller personalen p å
sjukhuset för att värd era risken för barnet
och få rekommendation av rätt sorts bilstol innan sjukhuset lämnas.
Företaget Art sana frånsäger sig allt ansvar
för oriktig användning av produkten.
1.2 PRODUKTENS EGENSKAPER
• D e n h ä r b i l b a r n s t o l e n ä r t y p g o d k ä n d
för “Grupp 0+”, för transport av barn från
födelsen till och med 13 kg vikt (från0 till
10 mån./cirka 1 år) i enlighet med den
europeiska lagbes tämmelsen ECE R44/04.
• T y p g o d k ä n n a n d e t ä r a v t y p e n “ U n i v e r s a l ” ,
därför kan stolen användas på vilken bilmodell som helst. VARNING! “Universal”
innebär att den är ko mpatibel med större
delen, men inte med alla bilsäten.
VIKTIG INFORMATION
1. Detta är en fastspänningsanordning för
barn av typ “Univer sal”, som ty pgodkänts
enligt lagbestämme lser ECE R44/04 och
är kompatibel med s törre delen men inte
alla bilsäten.
2. Fullständig kompatibilitet är lättare att
uppnå i de fall där tillverkaren av fordonet försäkrar i bilens bruksanvisning att
fordonet är avsett att användas med
fastspänningsanordningar för barn av
typen ”Universal” för ifrågavarande åldersgrupp.
3. Denna fastspänningsanordning har
klassi cerats som “Universal” enligt de
strängaste kriterie r för typgodkännande i
förhållande till föregående m odeller som
inte har denna information.
4. Bilens säte måste ha ett säkerhetsbälte
med 3 punkter, trepunktsbälte, statiskt
eller med upprullning, t ypgodkänt i enlighet med lagbes tämmelse UNI/ECE nr
16 eller andra motsvarande standarder.
5. Kontakta tillverkaren av fastspännings-
anordningen eller återförsäljaren, om
du har frågor.
1.3 BESKRIVNING AV KOMPONENTE R
Fig. 1 (3/4)
A. Handtag
B. Solskydd
C. Textilklädsel
D. Kuddinlägg (*)
E. Underrede (**)
75
Page 76

Fig. 2 (fra m)
F. Öppningar för passage av bältena
G. Stolens bälten
H. Axelbälten (*)
I. Knapp för bältesreglering (under tyget)
J. Band för bältesreglering
Fig. 3 (Pro fi l)
K. Skena för internbälte på bilbarnstolen
L. Skena för internbälte på underredet
M. Knappar för vridning av handtag
N. Sti ft C lik Clak (fö r fa sth akn ing på si tt va gn)
Fig. 4 (Bak)
O. Skena för diagonalt bilbälte
P. Handtag för losst agning (från underredet
och från sittvagnen)
Q. Hål för bältespassage
R. Element för skena till bilbarnstolens
bälten
S. Stopp
(*) Form och mode ll kan variera beroende
på bilbarnstolens version.
(**) Extra tillval
1.4 HANDGREPPETS LÄGEN
Bilbarnstolens handgrepp k an ställas in i 4
olika lägen (Fig. 5).
A. För transport i bil (OBS! det här är det
enda läget som är tillåtet för transport
i bil).
B. Bärläge.
C. Läge för användning som babysitter
med gungfunk tion eller för fasthakning
på särskild sittvagnsmodell från Chicco.
D. Läge för användning som stillastående
babysitter.
För reglering tr yck samtidigt på knapparna
(M) på handgreppet och vrid i ö nskat läge
tills ett klickljud hörs.
1.5 BEGRÄNSNINGAR OCH K RAV FÖR ANVÄNDNING AV PRODUKT OCH BIL SÄTE
OBS! Observera noga följande begränsningar och krav för användning s om gäller
produkten och bilsätet: i annat fall garan-
teras inte säkerheten.
• B i l b a r n s t o l e n k a n s ä t t a s i f r a m s ä t e t s
passerarsida eller på vilken som helst av
baksätena. I v arje fall ska bilsätet vara vänt
i färdriktningen. Använd aldrig bilbarnstolen på säten som är vända sidledes
eller bakåt i förhållande till f ärdriktningen.
(Fig. 6).
• B i l s ä t e t s k a h a e t t 3 - p u n k t s b ä l t e , s t a t i s k t
eller med upprullning, typgodkänt enligt lagbestämmelser UNI/ECE nr 16 eller
andra motsvarande standarder (Fig. 7).
• V A R N I N G : M o n t e r a a l d r i g b i l b a r n s t o l e n
med bilbälte som bara har två förankringspunkter (Fig. 8).
• A n v ä n d i n t e k u d d i n l ä g g e t o m b a r n e t
väger mer än 6 kg.
• S e t i l l a t t s p ä n n e t t i l l b i l e n s t r e p u n k t s b ä l t e
inte sitter för högt ( g.
13-19
). Försök i
annat fall att installera bilbarnstolen på
en annan sittplats i bilen.
2. MONTERING AV BILBARNSTOLEN I BIL
Bilbarnstolen kan monteras med underrede (extra tillval) eller utan. I båda fallen
får den endast monteras i mot satt riktning
i förhållande till färdriktningen.
2.1 STARTINSTÄLLNING AV AXELBANDEN
Bilstolen har 2 olika typer av axelband (A
och B) beroende p å versionen. För att montera axelbanden innan du börjar använda
stolen, gör på följande sätt:
• A x e l b a n d a v v e r s i o n A ( F i g . 9 A , 9 B o c h
9C): stick axelban den genom hålen i klädseln (inte under struk turen) så att bältena
sitter ovanför. Stoppa in grenskyddet i
bälteslåset.
• A x e l b a n d a v v e r s i o n B ( F i g . 1 0 A o c h 1 0 B ) :
stick in bilbarnstolens bälten mellan de
båda axelbanden. Stoppa in grenskyddet
i bälteslåset.
2.2 MONTERING MED UNDER REDE
Gör på följande sät t för att montera bilbarnstolen med underrede på bilsätet:
1. Lossa bilbar nstolen från underredet ge-
76
Page 77

nom att dra i loss tagningshandtaget på
ba ksi dan av r ygg stö det och ly ft s amt idi gt
mot stolens handgrepp (Fig. 11).
2. Placera underredet på det valda sätet
och rikta in som på Fig. 12, så att det har
kontakt med bilsätets ryggstöd.
3. Dra i bilbältet och fäst i motsvarande
lås genom att sticka den horisontella
delen (interndelen) i de två mot svarande
låsskenorna (L) som är markerade med
en blå pil och sträck så mycket det går
(Fig. 13).
4. Innan du sätter i stolen på underredet,
kontrollera att s toppet är spärrat (Fig. 14).
5. Sätt i stolen på und erredet (vänd tvärte-
mot färdriktningen) och skjut neråt tills
den fäster (ett klickljud hörs vid låsning)
(Fig. 15).
6. Kontrollera att stolen fästs korrekt vid
underredet genom att försöka lyfta
den uppåt både på framsidan och på
baksidan.
7. Ta tag i bilens diagonala bälte och för
det genom skenan (O) på baksidan av
bilbarnstolens ryggstöd (Fig. 16). OBS!
Det diagonala bältet ska ALLTID sitta i
denna skena under körning.
8. Spänn bältet så mycket som möjligt utan
att lämna för mycket band fritt, och se
till att det inte trasslar sig.
9. Vrid handgreppet i position A och kon-
trollera att det stöder mot bilsätet (Fig.
17 ).
OBS! kontrollera ALLTID efter montering
att bilbältet är korrek t spänt och att det är
jä mnt d ist rib uer at på all a pun kte r, ut an a tt
sno sig. Sätt ALDRIG b ältet i andra lägen än
de indikerade.
När du tar ur bilbarnstolen ska du låta underredet sitta kvar i bilen:
1. Lossa det diagonala bältet från skenan
på ryggstöd et, utan att ta ur det ur låset.
2. ställ tillbaka handgrep pet i vertikalt läge
B (Fig. 5).
3. Lossa bilbarnstolen på samma s ätt som
illustrerats tidigare.
2.3 MONTERING UTAN UNDERREDE
För att montera bilbar nstolen utan underrede gör du på följande sätt:
1. Dra ur s toppet och placera stolen på det
valda bilsätet (Fig. 18).
2. Dra i bilbältet och fäst i motsvarande
lås genom att sticka den horisontella
delen (interndelen) i de två mot svarande
låsskenorna (K) på stolen och som är
markerade med en blå pil (Fig. 19).
3. Ta tag i bilens diagonala bälte och för
det genom skenan (O) på baksidan av
bilbarnstolens ryggstöd (Fig. 20). OBS!
Det diagonala bältet ska ALLTID sitta i
denna skena under körning.
4. Sträck ut bältet så mycket som möjligt
ut an at t l ämna för myck et b and fri tt, och
se till att det inte trasslar sig.
5. Vrid handgreppet i position A och kontrollera att det stöder mot bilsätet (Fig.
21).
Ta ur bilbarnstolen så här:
1. Lossa b ilbältet genom att trycka p å låset.
2. För tillbaka handgreppet i läge B (vertikalt).
3. Lossa bältet från den diagonala skenan
och från de horisontella.
2.4 MONTERING MED ISOFIX- UNDERREDE
(medföljer eller köps separat)
För montering med ISOFIX-underrede,
se bruksanvisningen som följer med produkten.
För att använda sy stemet ISOFIX SEMIUNIVERSAL måste du först läsa bilens handbok
innan du mo nterar barnbils tolen. Handbo ken anger de platser i bil en som är lämpliga
för bílbarnstolens storleksklass.
Chicco Iso x-und errede har ett typgo dkännande av typen “ Semiuniversal” varför det
inte är kompatibelt med alla bilmodeller
utan bara med de m som speci ceras i den
bifogade broschyren “Lista över typgodkända bilar”.
77
Page 78

3. YTTERLIGARE ÅTGÄRDER
3.1 PLACERA BARNET I STOLEN
1. Lyft textilstycket, håll reglerknappen
intryckt och dra i stolens bälten för att
lossa dem (Fig. 22).
2. Öppna låset, tr yck in den röda knappen
och håll isär bältena (Fig. 23).
3. Sätt i barnet.
4. Lägg över de båda låsga arna och stick
in dem då du fåt t båda i nivå med låset,
tills du hör ett klick ljud (Fig. 24). OBS! Stick
aldrig in dem en i taget, eller b ara på ena
sidan av låset.
5. Spänn stolens säkerhetsb älten genom att
dra i rätt regleringsband (Fig. 25).
3.2 HUR DU REGLERAR BÄLTENA
OBS! Bältena måste alltid anpassas till barnets tillväxt. Innan du monterar stolen i
bilen måste höjden ställas in korrekt.
För korrekt reglering ska bältena komma
ut ur ryggstödet i höjd med barnets axlar
(Fig. 26).
Stolen har 3 höjdlägen.
För att ytta bältena gör du så här:
1. Ta av axelbanden genom at t dra ut dem
ur hålen i textilklädseln.
2. Öppna bälteslåset genom att trycka på
den röda knappen.
3. Lossa bältena bakifrån ryggstödet och
stick in dem i hålet på lämplig höjd för
barnet (Fig. 27A e 27B).
OBS! Se till att bältena alltid går mellan
skenan (R) och skalet. Se till att bältena
alltid passerar mellan skenelementet (R)
och skalet.
OBS! Kuddinlägget garanterar korrek t skydd
och idealiskt läge för nacke och rygg för
barn från födelsen till 6 kg vikt.
3.3 STOLENS FASTA LÄGE ELLER G UNGFUNKTION (BABYSITTER)
När stolen inte används i bilen kan den
också användas i gungfunktion eller som
babysitter.
För att ställa in gungfunktionen ska stoppet
stängas (Fig. 14) och handgreppet ställas
i läget C (Fig. 5).
För att använda stolen i stillastående läge,
ska stoppet dras ur o ch handgreppet ställs
i läget D (Fig. 5).
Ställ endast på stadiga och plana ytor.
OBS! Innan du bär stolen se alltid till att
handgreppet står i läget B (vertikalt).
VARNING! Lämna aldrig barnet
utan tillsyn.
VARNING! Använd alltid fastspänningsanordningen.
VARNING! Det är farligt att använda
stolen på upphöjda ytor, t.ex. bord,
stolar med mera.
VARNING! Den här stolen är inte
avsedd att användas för barnets
längre sovstunder.
VARNING! Använd inte stolen om
barnet redan kan sitta självt.
Stolen ersätter inte en säng eller vagga.
Om barnet behöver sova ska det läggas i
en säng eller vagga.
Använd inte stolen om någon del gått
sönder eller saknas.
3.4 ANVÄNDA MED SITTVAGN EN
OBS! Bilbarnstolen Auto-Fix kan fästas på
Chicco sittvagnar s om har särskilda fästsystem eller som kan köpas separat.
OBS! Se sittvagnens bruksanvisning, om
du vill använda stolen med sittvagnen.
CHICCO:s sittvagnar som är för sedda med
systemet CLIK CLAK har ar mstöd med särskilda anordningar där stolen kan f ästas direkt på sitt vagnen, utan att andra tillbehör
behövs. Ta av skydden till armstöden helt
och hållet, innan bilbarnstolen hakas fast.
För att fästa bilbarnstolen på sittvagnen
gör du på följande sätt:
1. Ta tag i stolen med handgreppet i ver tikalt läge (B) (Fig. 28).
2. Fäst de båda fäststiften Clik Clak på stolen
(N) vid sitt vagnens armstöd eller på fäst systemet som inköpts separ at, var noga med
78
Page 79

att fästa d em på båda sidorna. Ett klick ljud
hörs när de fästs ( g. 29).
VARNING Kontrollera före användning att
stolens fästanordningar satts i ordentligt.
Lossa stolen från sittvagnen så här:
1. För tillbaka handgreppet i det vertikala
läget (B).
2. Dra i det bakre handt aget för losstagning.
3. Fly tt a öve r oc h st äll stol en p å en pla n yt a.
OBS! Fastsättning och losst agning kan även
utföras me d barnet sittandes i stolen, även
om det kan bli lite svårare i och med barnets vikt. Vi råder i så fall att vara försik tiga
när detta utförs.
3.5 RENGÖRING OCH FÖRVARIN G
RENGÖRING AV FODRET
Tygklädseln på stolen är avtagbar o ch kan
tvättas för hand eller i maskin i 30° C.
Lossa bältena och dra av klädseln efter att
ha dragit ur de två grenbältena och låset
ur respektive hål. (Fig. 30).
Följ tvättinstruk tionerna på klädselns etikett
som innehåller följande tvättsymboler:
30° C
Tvättas i maskin i 30°C
Använd ej blekmedel
Får ej torktumlas
Stryk inte
Får ej kemtvättas
Använd aldrig repande rengöringsmedel
eller lösningsmedel. Centrifugera inte fodret och låt torka utan att krama ur.
RENGÖRING AV PLA ST- OCH METALLDELAR
Använd bara en fuktig duk för rengöring av
plastdelar eller lackerad metall, inte repande rengöringsmedel eller lösningsmedel.
Rörliga delar på stolen får inte smörjas.
KONTROLLERA ATT KOMPO NENTERNA ÄR HELA
Du bör regelb undet kontrollera att följande
komponenter är hela och inte är slitna:
• Textilklädseln: se till att ingen stoppning
sticker ut eller att delar av den ramlat ur
och undersök sömmar na, vilka alltid måste
vara hela.
• B ä l t e n : k o n t r o l l e r a a t t i n g a f e l p å t e x t i l brerna förekommer med för tunning som
följd vid regleringsband, grenbälte, axelband och kring p lattan för bältesreglering.
• P l a s t d e l a r : k o n t r o l l e r a a t t a l l a p l a s t d e l a r
är hela och att inget slitage förekommer,
eftersom dessa inte får uppvisa några
tecken på skador eller missfärgning.
OBS! Om stolen skulle vara deformerad
eller mycket sliten måste den bytas ut:
den kan då ha förlorat sina ursprungliga
säkerhetsegenskaper.
FÖRVARING AV PRODUKTEN
När stolen inte sitter i bilen bör d en förvaras
på torrt st älle, på avstånd från värmekällor
och i skydd från damm, fukt och direkt
solljus.
HUR DU KASSERAR PRODUKTEN
Då gränsen för stolens livslän gd uppnåtts,
får den inte användas mer och ska k asseras
bland annat avfall. Med hänsyn till miljön
ska olika typer av avfall skiljas åt, i enlighet med gällande lagstiftning i landet där
bilbarnstolen använts.
79
Page 80

PL
CHICCO
AUTO-FIX FAST
R. 0+ (0-13KG)
G
INSTRUKCJA UŻY TKOWANIA
SPIS TREŚCI:
1. WPR OWADZ ENIE
1.1 OSTRZEŻENIA
1.2 CECHY WYROBU
1.3 OPIS ELEMENTÓW SKŁADOW YCH
1.4 POZYCJE UCHWYTU
1.5 OGRANICZENIA I WYMAGANIA DOTYCZĄCE UŻYCIA PRODUKTU ORAZ SIEDZENIA
SAMOCHODOWEGO
2. INSTALOWANIE W SAMOCHODZIE
2.1 POC ZĄTKOWA KONFIGU RACJA POD KŁADEK NA PASY
2.2 INSTALOWANIE Z BAZĄ
2.3 INSTALOWANIE BEZ BAZY
3. DODATKOWE CZYN NOŚCI
3.1 UMIESZCZENIE DZIECKA W FOTELIKU
3.2 REGULOWANIE POZYCJI PASÓW
3.3 POZYCJA STAŁA LUB BUJANA FOTELIKA
(UŻYCIE JAKO LEŻACZEK)
3.4 UŻYCIE W POŁĄCZENIU ZE SPACERÓWKĄ
3.5 CZYSZCZENIE I KONSERWACJA
1. WPR OWADZ ENIE
1.1 OSTRZEŻENIA
BARDZO WAŻNE: PROSZĘ NATYCHMIAST
PRZECZ YTAĆ
• N A L E Ż Y Z A C H O W A Ć N I N I E J S Z Ą I N S T R U K C J Ę
NA PRZYSZŁOŚĆ.
• P o d c z a s m o n t a ż u i i n s t a l o w a n i a n a l e ż y s k r u pulatnie przestrzegać niniejszej instrucji.
Produkt nie powinien być używany przez
osoby, które nie zapoznały się z instrukcją
• O S T R Z E Ż E N I E ! Z b a d a ń s t a t y s t y c z n y c h d o tycząc ych wypadków samocho dowych wynika, że z reguł y tylne siedzenia samo chodu
są bezpieczniejsze niż przednie: dlatego
też zaleca się instalować fotelik właśnie z
tyłu. Najbezpieczniejszym miejscem jest
zwłaszcza tylne, środkowe siedzenie, jeśli
wyposażone jest w 3-punktowy pas zabezpieczający.
• O S T R Z E Ż E N I E ! P O W A Ż N E Z A G R O Ż E N I E ! N i e
należy nigdy instalować fotelika na przednim siedzeniu wyposażonym w poduszkę
powietrz ną. Fotelik może być instalowany na
przednim sied zeniu tylko wtedy gdy p oduszka powietr zna przed nim została w yłączona
lub jej nie ma: sprawdzić w inst rukcji obsługi
samochodu czy możliwe jest wyłączenie
poduszki powietrznej lub skontaktować się
z producentem samocho du. Dla większego
bezpieczeństwa zaleca się jak najbardziej
cofnąć siedzenie, o ile pozwoli na to obecność innych, siedzących z tyłu pasażerów.
• Z aleca się, aby wszysc y pasażerowie zostali
poinformowani o sp osobie odpięcia dziecka
w razie zagrożenia.
• Należ y zwrócić uwagę na sposób ins talowania fotelika w samochodzie, aby zapobiec
ruszającemu się sie dzeniu lub przeszkadz ającym drz wiom samochodowym.
• W r a z i e w y p a d k u ż a d e n f o t e l i k n i e m o ż e
zagwarantować dziecku całkowitego bezpieczeństwa, ale użycie tego produktu
zmniejsza ryzyko poważnych obrażeń lub
śmierci.
• R y z y k o o d n i e s i e n i a p o w a ż n y c h o b r a ż e ń
przez dziecko, nie tylko w razie wypadku
lecz również w innych okolic znościach (np.
pr zy gwa łto wny m ha mow ani u, i td.) , wz ras ta
jeśli nie przestrzega się dokładnie zaleceń
przy toczonych w niniejszej instrukcji: należy
zawsze sprawdzi ć czy fotelik jest popr awnie
przymocowany do siedzenia.
- Jeśli fotelik jest uszko dzony, zdeformowany
lub zbytnio zużyty musi być wymieniony,
ponieważ mógł utracić swoje pierwotne
właściwości, zapewniające bezpieczeństwo.
• P r o d u k t n i e m o ż e b y ć w ż a d e n s p o s ó b m o dy kowany, chyba że mody kacje te został y
zatwierdzone przez producenta.
• Nie montować na foteliku akcesoriów, części
zamiennych lub innych elementów, które
nie zostały dostarczone przez producenta.
• N i g d y n i e p o z o s t a w i a ć d z i e c k a b e z o p i e k i
w foteliku.
• N i g d y n i e p o z o s t a w i a ć f o t e l i k a s a m o c h o dowego na siedzeniu samochodu bez
jego uprzedniego przymocowania. Należy
zawsze przyczepić fotelik do siedzenia, w
przeciwnym razie może uderzyć i zranić
pasażerów.
• N i e n a l e ż y u ż y w a ć n i c z e g o , z a w y j ą t k i e m
80
Page 81

akcesoriów zatwierdzonych dla wyrobu,
tak pomiędz y fotelikiem i siedzeniem samo chodowym jak też fotelikiem i dzieckem: w
razie wypadku mogłoby to spowodować
nieprawidłowe działanie fotelika.
• Z a l e c a s i ę p r z y k r y ć f o t e l i k s a m o c h o d o w y, j e śli samochó d został pozostawio ny na słońcu.
• W w y n i k u n a w e t n i e g r o ź n e g o w y p a d k u
samochodowego, fotelik może ulec uszkodzeniom niewido cznym goły m okiem: stąd
należy go wymienić.
• N i e n a l e ż y s t o s o w a ć f o t e l i k ó w u ż y w a n y c h :
mogą posiadać niew idoczne goł ym okiem
uszkodzenia kons trukcyjne, wpły wające na
bezpieczeństwo produktu.
• P o n i e w a ż o b i c i e s t a n o w i i n t e g r a l n ą c z ę ś ć
fotelika, może ono być zas tąpione wyłąc znie
oryginalnym obiciem zatwierdzonym przez
producenta. Fotelik nie powini en być nigdy
używany bez obicia, może to stwarzać zagrożenie dla dziecka.
• S p r a w d z i ć c z y p a s n i e j e s t s k r ę c o n y i z w r ó c i ć
uwagę czy pas i części fotelika nie zostały
przyciśnięte dr zwiami pojazdu lub nie ociera ją się o ostre krawę dzie. Jeżeli pas jest usz kodzony lub zniszczony należy go wymienić.
• N i e p r z e w o z i ć p o z o s t a w i o n y c h l u ź n o l u b n i e zabezpie czonych przedmiotów lub bagaż y
zwłaszc za na tylnej pó łce wewnątrz pojazdu:
w razie kolizji lub gw ałtownego hamowania
mogą zranić pasażerów.
• U p e w n i ć s i ę , c z y w s z y s c y p a s a ż e r o w i e
pojazdu zapięli pasy bezpieczeństwa nie
tylko dla ich wł asnego bezpieczeńs twa, ale
też dlatego, że w trakcie podróży, w razie
wypadku lub gwałtownego hamowania,
mogliby zranić dziecko.
• W t r a k c i e d ł u g i c h p o d r ó ż y n a l e ż y c z ę s t o
zatrzymywać się. Dzieci bardzo łatwo się
męczą. W ż adnym wypadku podc zas jazdy
samochodem nie należ y wyjmować dziecka
z fotelika. Jeżeli dz iecko potrzebuje opiek i należy zat rzymać się w bez piecznym miejscu.
• W c z e ś n i a k i u r o d z o n e p r z e d 3 7 t y g o d n i e m c i ą ż y
mogą być zagrożone w fotelik u. Te niemowlęta
znajdując się w foteliku mogą mieć probl emy z
oddychaniem. Z tego powodu, przed opuszczeniem szpi tala, pediatra lub poł ożna powinni
ocenić stan zdrowia Waszego d ziecka i zalecić
najodpowiedniejsz y model fotelika.
• P r o d u c e n t , c z y l i r m a A r t s a n a z r z e k a s i ę
odpowiedzialności w przypadku niewłaś-
ciwego używania wyrobu.
\1.2 CECHY WYROBU
• F o t e l i k t e n p o s i a d a h o m o l o g a c j ę d l a “ G r u py 0+”, to znaczy przeznaczony jest on do
przewozu dzieci od urodzenia do 13kg (od
0 do około 10/12 miesiąca życia), zgodnie z
europejskim roz porządzeniem ECE R4 4/04.
• F o t e l i k z o s t a ł z a t w i e r d z o n y j a k o “ U n i w e r s a l ny ”, co o zna cz a, ż e moż e by ć on uży wa ny w e
wszys tkich typach pojazdów. OST RZEŻENIE!
Typ “Uniwersalny” oznac za, że jest on kompatybilny z więk szością lecz nie wszystkimi
siedzeniami samochodowymi.
WAŻNA INFOR MACJA
1. Niniejsze urządzenie zabezpieczająco-
-przytrzymujące zostało zakwali kowane
jako “Uniwersalne”, zgodnie z kryteriami
homologacyjnymi Rozporządzenia ECE
R44/04 i pasuje do większości, lecz nie do
wszystkich siedzeń samochodowych.
2. Prawidłowe dopasowanie jest najbardziej
prawdopodobne, kiedy producent samochodu oświadcza w podręczniku pojazdu, że w samochodzie przewidziane jest
instalowanie “Uniwersalnych” fotelików
samochodow ych dla danej grupy wiekowej.
3. Niniejszy fotelik samochodowy został za-
kwali kowany jako “Uniwersalny” zgodnie
z kryteriami homologacyjnymi znacznie
bardziej wymagającymi w stosunku do
kryteriów poprzednich modeli, które nie
przy taczają niniejszej informacji.
4. Może on być stosowany ty lko w pojazdach
wyposażonych w 3-punktowy pas zabezpieczający, statyczny lub bezwładnościowy, posiadający homologację zgodnie z
Rozporz ądzeniem UN/ECE Nr16 lub innymi
równorzędnymi standardami.
5. W razie wątpliwości należy skontaktować
się z producentem niniejszego urządzenia
zabezpieczająco-przytrzymującego lub z
jego sprzedawcą.
1.3 OPIS ELEMENTÓW SKŁADOWYCH
Rys. 1 (3/4)
A. Uchwyt
B. Daszek przeciwsłoneczny
C. Obicie
D. Poduszka redukcyjna (*)
E. Podstawa (**)
81
Page 82

Rys. 2 (Z Pr zodu)
F. Otwory na pasy
G. Pasy fotelika
H. Nakładki na pasy (*)
I. Przycisk do regulacji pasów (pod płatem
materiałowym)
J. Taśma do regulacji pasów
Fig. 3 (Z Bok u)
K. Prowadnica biodrowego pasa samocho-
dowego w foteliku
L. Prowadnica biodrowego pasa samocho-
dowego w podstawie
M. Przyciski do obrotu uchwytu
N. Sworznie Clik Clak (do zaczepienia na
spacerówce)
Fig. 4 (Z Tył u)
O. Prowadnica poprzecznego pasa samo-
chodowego
P. Uchwyt odczepiający (od podstawy i od
spacerówki)
Q. Otwory przesuwowe pasów
R. Element prowadzący pasy fotelika
S. Zacisk blokujący
(*) Ksz tałt i wzór mogą się różni ć w zależności
od modelu fotelika.
(**) Opcja
1.4 POZYC JE UCHWYTU
Uchwy t fotelika ustawiany jest w 4 pozycjach
(Rys. 5).
A. Pozycja do transportu w samochodzie
(OSTRZEŻENIE: jest to jedyna pozycja
dozwolona podczas transportu w samo-
chodzie).
B. Pozycja do ręcznego transportu.
C. Pozycja pozwalająca na użycie jako buja-
czek lub do przyczepienia na dostosowa-
nym do fotelika wózku Chicco.
D. Pozycja pozwalająca na użycie jako leża-
czek.
Aby przeprowadzić regulację należy jednocześnie nacisnąć przyciski (M) na uchwycie
obracając go do wybranej pozycji aż da się
usłyszeć odgłos zapadki.
1.5 O GRANICZENIA I W YMAGANIA DOT YCZĄCE
UŻYCIA PRODU KTU ORAZ SIEDZ ENIA SAMOCHODOWEGO
OSTRZEŻEN IE! Należy dokła dnie przestrzegać
poniższ ych ograniczeń i wymagań dot yczących użycia produktu oraz siedzenia samochodowego: w przeciwnym wypadku nie
gwarantuje się bezpieczeństwa.
• F o t e l i k m o ż e b y ć i n s t a l o w a n y n a p r z e d n i m
siedzeniu po stronie pasażera lub na jak imkolwiek tylnym siedzeniu. Siedzenie samochodowe musi być skierowane zgodnie z
kierunkiem jazdy. Nie należy nigdy używać
tego fotelika na siedzeniach ustawionych
w poprzek lub w kierunku przeciwnym do
kierunku jazdy (Rys. 6).
• S i e d z e n i e s a m o c h o d o w e p o w i n n o b y ć
wyposażone w 3-punktowy pas bezpieczeństwa , statyczny lub bez władnościowy,
posiadający homologację zgodnie z Rozporządzeniem UNI/ECE Nr 16 lub innymi
równorzędnymi standardami (Rys. 7).
• O S T R Z E Ż E N I E ! N i e n a l e ż y n i g d y m o c o w a ć
fotelika za pomocą dwupunktowego pasa
samochodowego (Rys. 8).
• N i e n a l e ż y u ż y w a ć m a t e r a c y k a r e d u k c y j n e g o
jeżeli waga dziecka przekracza 6 kg.
• U p e w n i ć s i ę , c z y k l a m r a t r z y p u n k t o w e g o
pasa bezpieczeństwa samochodu (rys. .13-
19
). Gdyby tak było, zamontować fotelik na
innym siedzeniu samochodu.
2. INSTALOWANIE FOTELIKA W SAMOCHODZIE
Fotelik może być instalowany tak z bazą
(opcja) jak i bez. W obydwu kon guracjach
musi być zawsze zainstalowany w kierunku
przeciwnym do kierunku jazdy.
2.1 POCZ ĄTKOWA KONFIGURACJA NAKŁADEK
NA PASY
Fotelik, w zależności od modelu, posiada 2
różne typy nak ładek na pasy (A i B). Przed prz ystąpieniem do użytkowania fotelika należy
nałożyć podkładki, w tym celu postępować
w następujący sposób:
• N a k ł a d k i w e r s j i A ( R y s . 9 A , 9 B i 9 C ) : p r z e ł o ż y ć
nakładki przez otwory materiałowego obicia (a nie znajdującej się poniżej obudow y)
tak, aby pasy były umieszczone nad nimi.
Przełoż yć element rozdzielający no gi przez
klamrę pasów.
• N a k ł a d k i w e r s j i B ( R y s . 1 0 A i 1 0 B ) : p r z e ł o ż y ć
pasy fotelika przez dwie nakładki. Przełożyć
element rozdzielający nogi przez klamrę
pasów.
82
Page 83

2.2 INSTALOWANIE Z BAZĄ
Aby zainstalować fotelik z podstawą na siedzeniu samochodowym należy postąpić w
następujący sposób:
1. Odczepić fotelik od bazy pociągając za
uchwyt odczepiający położony z tyłu
oparcia i jednocześnie unieść go do góry
poprzez uchwyt (Rys. 11).
2. Ustawić bazę na wybranym do instalacji siedzeniu, kierując ją tak jak na Rys. 12,
baza musi przylegać do oparcia siedzenia
samochodu.
3. Pociągnąć samo chodowy pas bezpie czeństwa i zapiąć go w odpowiedniej klamrze
tak, aby odcin ek poziomy (biodrowy) pr zeszedł prze z dwie stosowne prowadnice (L)
oznaczone niebieską strzałką i jak najbardziej go naprężyć (Rys. 13).
4. Przed umieszczeniem fotelika na bazie
należy sprawdzić czy zacisk blokujący jest
zamknięty (Rys. 14).
5. Nałożyć fotelik na bazę (skierowany tyłem
do kierunku jazdy) dociskając go do dołu,
aby go zaczepić (da się słyszeć odgłos zapadki “clack” ) (Rys. 15).
6. Sprawdzić poprawne zaczepienie fotelika
na bazie unosząc go do góry tak z przodu
jak i z tyłu.
7. Uchwycić p oprzeczny pas sam ochodowy i
przeprowadzić go przez stosowną prowadnicę (O) znajdującą się z tyłu op arcia fotelika
(Rys. 16). OSTRZEŻENIE! Pod czas transportu
poprzec zny pas musi być ZAWSZE umieszczony w tej prowadnicy.
8. Napiąć dobrze pas bezpieczeństwa,
upewniając się czy nie jest poluzowany
ani skręcony.
9. Obrócić uchwyt na pozycję A i sprawdzić
czy opiera się o siedzenie samochodu
(Rys. 17).
OSTRZEŻEN IE! po zainstalowaniu należ y ZAWSZE sprawdzić czy pas jest odpowiednio
naprężony we wszys tkich punktach i cz y nie
jest skręcony.
NIGDY nie należy przeprowadzać pasa
samochodowego przez pozycje inne od
wskazanych.
Aby odczepić fotelik pozostawiając bazę
zainstalowaną w samochodzie należy:
1. Wyciągnąć poprzeczny pas z prowadnicy
oparcia nie odpinając go od klamry.
2. Ustawić uchwyt w pionowej pozycji B
(Rys. 5).
3. Odczepić fotelik tak jak opisano powyżej.
2.3 INSTALOWANIE BEZ BAZ Y
Aby zainstalować fotelik b ez bazy należ y postępować w następujący sposób:
1. W yciągnąć zacisk blokujący i ust awić fotelik
na wybranym siedzeniu samochodow ym
(Rys. 18).
2. Pociągnąć samo chodowy pas bezpie czeństwa i zap iąć go w stosownej klamrze, prze prowadzić odcin ek poziomy pasa (biodrowy) przez s tosowne prowadnice (K) fotelika
oznakowane niebieską strzałką (Rys. 19).
3. Uchwycić poprzeczny odcinek pasa samochodowego i przeprowadzić go przez
stosowną prowadnicę (O) znajdującą się
z tyłu oparcia fotelika (Rys. 20). OSTRZEŻENIE! Podczas transportu poprzeczny
pas musi być ZAWSZE umieszczony w tej
prowadnicy.
4. Napiąć dobrze pas bezpieczeństwa,
upewniając się czy nie jest poluzowany
ani skręcony.
5. Obrócić uchwyt na pozycję A i sprawdzić
czy opiera się o siedzenie samochodu
(Rys. 21).
Aby odczepić fotelik należy:
1. Odpiąć samoch odowy pas bezpie czeństwa
naciskając na klamrę.
2. Ustawić uchwyt w pozycjil B (pionowo).
3. Wyciągnąć pas z prowa dnicy poprzec znej
i z prowadnic poziomych.
2.4 INSTALOWANIE Z BAZĄ ISO FIX
(dołączony do wyposażenia lub do nabycia
oddzielnie)
Aby zainstalowa ć Fotelik z bazą ISOFIX, należy
odnieść się do instrukcji obsługi dołączonej
do wyrobu.
Aby korz ystać z systemu ISOFIX PÓ Ł-UNIWERSALNEGO, przed zamontowaniem Fotelika,
należy obowią zkowo zapoznać się z podręcznikiem pojazdu. W podręczniku wskazane są
miejsca instalowania kompatybilne z klasą
wielkości Fotelika.
Baza Iso x Chicco zakwali kowana jest jako
“Pół-Uniwersalna” co oznacza, że nie może
być ona uży wana we wszystkich t ypach pojazdów, lecz tylko w tych, które zostały wy-
83
Page 84

mienione w instrukcji dołączonej do wyrobu
“Lista pojazdów z homologacją”.
3. DODATKOWE CZYN NOŚCI
3.1 UMIESZCZENIE DZIECKA W FO TELIKU
1. Unieść do góry materiałowy płat, trzymać
wciśnięty prz ycisk do regulacji pasów i pociągnąć do siebie pasy fotelika tak, aby je
poluzować (Rys. 22).
2. Odpiąć klamrę, wciskając cze rwony przycisk
i rozłożyć pasy do zewnątrz (Rys. 23).
3. Posadzić dziecko w foteliku.
4. Nałoż yć na siebie dwa kliny klamry i zdec ydowanym ruchem włożyć je do sprzączki,
aż da się usłyszeć odgłos zapadki “click”
(Rys. 24). OSTRZEŻENIE! Nie należy nigdy
wkładać tylko jednego klinu do sprzączki
lub wkładać je pojedyńczo.
5. Pociągając za stosowną taśmę do regulowania pasów, naprężyć pasy bezpieczeństwa
fotelika (Rys. 25).
3.2 REGULOWANIE POZ YCJI PASÓW BEZPIECZ EŃ-
STWA FOTELIKA
OSTRZEŻENIE! Pasy muszą być zawsze dostosowane do wzrostu dziecka. Przed zainstalowaniem fotelika w sam ochodzie należy
ustawić je na prawidłowej wysokości.
Po poprawnym uregulowaniu pasy muszą
wychodzić z oparcia na wysokości ramion
dziecka (Rys. 26).
Fotelik posiada pasy regulowane do 3 wysokości.
Aby wyregulować długość pasów należy
postępować w następujący sposób:
1. Zdjąć nakładki przeprowadzając je przez
materiałowe otwory w obiciu.
2. Odpiąć sprzączkę pasów naciskając czewony przycisk.
3. Wyciągnąć pasy z tyłu oparcia i włożyć je
do otworu dostosowanego do wzrostu
dziecka (Rys. 27A i 27B).
OSTRZEŻENIE! Należy zawsze upewnić się
czy pasy pr zechodzą pomiędzy elementem
prowadnicy (R) a skorupą fotelika.
OSTRZE ŻENIE! Materacyk redukcy jny zapewnia właściwe podtr zymanie oraz prawidłową
pozycję szyi i kręgosłupa dzieci w wieku od
urodzenia do 6 kg.
3.3 POZYC JA STAŁA LUB BUJANA FOTELIKA (UŻ Y-
CIE JAKO LEŻACZ EK LUB BUJACZEK)
Jeżeli fotelik nie jest uż ywany w samochod zie
może być wykorzystany jako bujaczek lub
leżaczek . Aby mógł się bujać należ y zamknąć
zacisk blokując y (Rys. 14) i ustawić uchwyt w
pozycji C (Rys. 5).
Aby mógł być uż ywany w pozycji stał ej należy
wyciągnąć zacisk b lokujący i ustawić uchw yt
w pozycji D (Rys. 5).
Fotelik należy zawsze ustaw iać na stabilnych
i poziomych powierzchniach.
OSTRZEŻENIE! Przed transportem fotelika
należy zawsze ustawić uchwyt w pozycji B
(pionowo).
OSTRZEŻENIE: Nigdy nie pozostawiaj dziecka bez opieki.
OSTRZEŻENIE: Zawsze używaj systemu zabezpieczeń.
OSTRZEŻENIE: Stawianie fotelika
na podwyższeniu, np. na stole, jest
niebezpieczne.
OSTRZEŻENIE: Ten fotelik nie jest
przeznaczony na miejsce dłuższego snu dziecka.
OSTRZEŻENIE: Nie używaj tego
leżaczka gdy twoje dziecko może
samodzielnie siedzieć.
Fotelik nie zastępuje łóżeczka lub kołyski.
Jeżeli dziecko potrzebuje odpoczynku lub
jest śpiące, należy położyć je w stosownym
łóżeczku lub kołysce.
Nie należy używać fotelika jeśli jakikolwiek
jego eleme nt został uszkodzony lub zgu biony.
3.4 UŻYCIE W PO ŁĄCZENIU ZE SPACERÓWK Ą
OSTRZE ŻENIE! Fotelik Auto-Fix może być mo cowany do sp acerówek Chicco p osiadających
specjalne sys temy mocowania wchodzące w
skład wy posażenia seryjne go lub nabywane
oddzielnie.
OSTRZEŻENIE! Aby zainstalować fotelik w
połączeniu ze spacerówką należ y przeczyt ać
instrukcję obsługi wózka. Spacerówki CHICCO
posiadające na podłokietnikach sytem CLIK
CLAK, pozwalają umocować fotelik bezpośrednio na ramie wózka bez zastosowania
dodatkowych el ementów mocujących. Przed
84
Page 85

zaczepieniem fotelika samocho dowego należy całkowicie zdjąć poszycie podłokietników.
Aby zamontować fotelik na spacerówce
należy postępować w następujący sposób:
1. Ustaw ić rączkę fotelika w pozycji pi onowej
(B) (Rys. 28).
2. Zaczep ić dwa trzpienie mocujące Clik Clak
fotelika samochodowego (N) do podłokietników spacerówki lub do zakupionego
oddzielnie systemu mocującego i upewnić
się, czy trzpienie są zamocowane po obu
stronach. Po zakońc zeniu operacji słychać
będzie kliknięcie sygnalizujące o poprawnym zaczepieniu (Rys. 29).
OSTRZE ŻENIE Przed przy stąpieniem do uży tkowania fotelika należy zawsze sprawdzić,
czy ws zystkie mechaniz my blokujące zostały
prawidłowo zamocowane.
Aby odczepić fotelik od wózka należy:
1. Ustawić rączkę fotelika w pozycji pionowej (B).
2. Pociągnąć tylny uchw yt odczepiający.
3. Wyjąć fotelik i postawić go na płaskiej powierzchni.
OSTRZE ŻENIE: Czynnośc i montażu i demontażu mogą być wykonywane również gdy
dziecko znajduje się w fotelik u, chociaż mogą
one okazać się trudniejsze do wykonania
ze względu na wagę dziecka. W tym przypadku, podczas wykonywania powyższych
czynności, należy zachować jak największą
ostrożność.
3.5 C ZYSZCZEN IE I KONSERWACJA
CZYSZCZENIE OBICIA
Materiałowe obicie fotelika jest całkowicie
zdejmowane i może być prane ręcznie lub
w pralce w temperaturze 30°C.
Aby wyprać obicie należy odpiąć pasy bezpieczeństwa fotelika i po przeprowadzeniu
dwóch odcinków pasów i k lamry przez otwo ry, zdjąć materiałowe obicie (Rys. 30).
W praniu należy dostosować się do instrukcji
przytoczonych na wszywce obicia zawierającej następujące symbole prania:
30° C
Prać w pralce w temp. 30°C
Nie wybielać
Nie suszyć w suszarce. Nie wirować.
Nie prasować prasprasować
Nie czyścić chemicznie
Nie używać nigdy żrących detergentów ani
rozpuszczalników. Aby wysuszyć obicie nie
należy go odwirowywać ani wyciskać.
CZYSZCZ ENIE PLASTIKOWYCH ORAZ METALOWYCH
ELEMENTÓW
Do czyszczenia elementów z plastiku lub
lakierowanego metalu, należy używać tylko
wilgotnej szmatk i. Nie używać nig dy żrących
detergentów ani rozpuszczalników.
Ruchome części fotelika nie powinny być
absolutnie naoliwiane.
KONTROLA STANU ELEMENTÓW SKŁADOWYCH
Zaleca się regularnie sprawdzać stan oraz
stopień zużycia następujących elementów:
• O b i c i e : s p r a w d z i ć c z y n i e j e s t p r z e t a r t e i
nie wychodz i z niego wyściółka. Sp rawdzić
stan szwów, któ re nie powinny być rozprute.
• P a s y : s p r a w d z i ć c z y n i e m a d z i w n e g o o d włóknienia wątka tkaniny oraz czy taśma
pasów nie przetarła się zbytnio w pobliżu
taśmy regulacyjnej, elementu rozdzielającego nogi, na odcinkach ramion i w stre e
płytki regulacyjnej pasów.
• E l e m e n t y p l a s t i k o w e : s p r a w d z i ć s t a n z u ż y c i a
wszystkich elementów plastikow ych, które
nie powinny być uszkodzo ne ani wypłowiałe.
OSTRZEŻEN IE! Jeśli fotelik jest zdeformowany
lub zniszczony, powinien być wymieniony:
możliwe, że utracił oryginaln e cechy zapew niające jego bezpieczne uż ytkowanie.
KONSERWACJA WYROBU
Kiedy fotelik nie jest zainstalowany w samochodzie, należy g o przechowywać w suchym
miejscu i z dala od źróde ł ciepła oraz chronić
przed kur zem, wilgocią i bezpośre dnim działaniem promieni słonecznych.
LIKWIDACJA W YROBU
Po zakończeniu okresu eksploatacji fotelika,
nie powinien być on używany i należy go
wyrz ucić. Ze względu na ochronę środowisk a,
należy wysegregować różnego rodzaju odpady zgodnie z przepisami obowiązującymi
w Kraju uży tkownika.
85
Page 86

H
CHICCO
AUTO-FIX FAST
G
R. 0+ (0-13 KG)
HASZNÁLATI UTASÍTÁS
TAR TAL OM JEG YZ ÉK :
1. BE VEZE TÉS
1.1. FI GYEL MEZ TET ÉSEK
1.2. A TERMÉK JELLEMZŐI
1.3. AZ ALKOTÓRÉSZEK LEÍRÁSA
1.4. A FOGANTYÚ ÁLLÁSAI
1.5. A TERMÉK ÉS AZ AUTÓÜLÉS HASZNÁLATÁRA VONATKOZÓ KORLÁTOZÁSOK ÉS
KÖVETELM ÉNYEK
2. BESZERELÉS AZ AUTÓBA
2.1. A VÁLLVÉDŐK ELŐZETES FELSZERELÉSE
2.2. BESZERELÉS TALPPAL EGYÜTT
2.3. BESZERELÉS TALP NÉLKÜL
3. TOVÁBBI MŰVELETEK
3.1. A GYERMEK ELHELYEZÉSE A GYEREKÜLÉSBEN
3.2. A BIZTONSÁGI ÖVEK BEÁLLÍTÁSA
3.3. A GYEREKÜLÉS ÜLŐ VAGY FEK TETET T
HELYZETE
3.4. HASZNÁLATA BABAKOCSIKÉNT
3.5. TISZTÍTÁS ÉS MEGÓVÁS
1. BE VEZE TÉS
1.1. FIG YELM EZTE TÉSEK
RENDKÍVÜL FONTOS: AZONNAL OLVASSUK EL!
• Ő R I Z Z E M E G E Z T A K É Z I K Ö N Y V E T A J Ö -
VŐBENI KONZULTÁCIÓKHOZ IS.
• A g y e r e k ü l é s ö s s z e á l l í t á s á n á l é s b e s z e r e -
lésénél szigorúan be kell tartani az előírásokat. Senki ne használja a terméket a
használati utasítás elolvasása nélkül.
• F I G Y E L E M ! A b a l e s e t e k r ő l s z ó l ó s t a t i s z t i k a i
adatok szerint általában a gépjárművek
hátsó ülései biztonságosabbak az első
üléseknél: éppen e zért javasoljuk, hogy a
Gyerekülést a jármű hátsó ül ésén helyezzük el. Különösen a hátsó ülés középső
ülése a legbiz tonságosabb, amennyiben
3 pontos biztonsá gi övvel van felszerelve.
• F I G Y E L E M ! S Ú LY O S V E S Z É L Y H E L Y Z E T ! S o h a
ne használjuk a Gyerekülést a jobb első
ülésen akkor, ha az autóban aktív elülső
légzsák található! Csak akkor szabad a
Gyerekülést az első ülésen elhelyezni,
amennyiben a légzs ákot kiiktatták: érdeklődjünk a gyártó cég képv iselőjénél vagy
a használati utasítás alapján győződjünk
meg arról, lehet séges-e a légzs ák kiiktatása. Mindenesetre javas oljuk, hogy az ülést
toljuk a lehető leghátrább, olyanannyira,
amennyire ez a hátsó ülésen utazóktól
lehetséges.
• A j á n l a t o s a z ö s s z e s u t a s t t á j é k o z t a t n i a r r ó l ,
hogyan kell a gyermeket kiszabadítani
a gyerekülésből, esetleges vészhelyzet
esetén.
• A m i k o r a G y e r e k ü l é s t b e s z e r e l j ü k a z a u tóba, gondosan ügyeljünk arra, hogy ne
ütközhessen például egy mozgó ülésbe
vagy az ajtónak.
• B a l e s e t e s e t é n s e m m i l y e n G y e r e k ü l é s n e m
biztosítja a gyerm ek teljes biztonságát, de
ennek a típusnak a használata csökkenti
a súlyos sérülések vagy az elhalálozás
kockázatát.
• A g y e r m e k s ú l y o s s é r ü l é s é n e k v e s z é l y e
nemcsak bales et esetén, hanem más körülmények között is (például hirtelen, erős
fékezéskor, stb.) növeksz ik akkor, ha a jelen
használati utasításban leír takat szigorúan
nem tartják be: minden esetben meg
kell győződni arról, hogy a Gyerekülés
megfelelően van-e rögzítve az üléshez.
• A m e n n y i b e n a G y e r e k ü l é s m e g s é r ü l t ,
eldeformálódott vagy erősen elhasználódott, azt ki kell cserélni, mert elveszíthette eredeti, a biztonságos használatot
garantáló tulajdonságait.
• A g y á r t ó h o z z á j á r u l á s a n é l k ü l s e m m i l y e n
átalakítást ne végezzünk.
• N e s z e r e l j ü n k f e l o l y a n t a r t o z é k o k a t , c s e r e alkatrészeket és alkotó elemeket, amelyek
nem a gyártótól származnak.
• S o h a , s e m m i l y e n o k b ó l n e h a g y j u k a g y e r meket felügyelet nélkül a Gyere külésben.
• S o h a n e h a g y j u k a G y e r e k ü l é s t a z a u t ó
ülésén rögzítés nélkül, mert neki ütközhet
az utasoknak, sérüléseket okozhat.
86
Page 87

• N e s z e r e l j ü n k f e l s e m m i t - k i v é v e a t e r mékhez tartozó, engedélyezett kellékeket
- sem az autó ülése és a Gyerekülés, sem
pedig a Gyerekülés és a gyermek közé:
ez ugyanis akadályozhatja a Gyerekülés
megfelelő működését baleset esetén.
• A m e n n y i b e n a z a u t ó t t ű z ő n a p o n h a g y j u k ,
javasoljuk a Gyerekülés letakarását.
• E g y , a k á r k i s e b b b a l e s e t e s e t é n i s a G y e r e külésben károk keletkezhetnek, amelyek
szabad szemmel talán nem is lathatók:
ilyen eseteben ki kell azt cserélni.
• N e h a s z n á l j u n k h a s z n á l t a n v á s á r o l t G y e rekülést, mert olyan, szabad szemmel
nem látható károk is keletkezh ettek benne, amelyek veszélyeztethetik a termék
biztonságos alkalmazását.
• A h u z a t o t c s a k i s a g y á r t ó e n g e d é l y é v e l l e het kicserélni, mive l az a termék tartozéka,
annak szerves részét kép ezi. A Gyerekülést
soha ne használjuk a huzat nélkül, mert
ez veszélyez tetné a gyermek biztonságát.
• E l l e n ő r i z z ü k , h o g y a z ö v n i n c s - e m e g c s a varodva és ügye ljünk arra, hogy az öv vagy
a Gyerekülés más része ne csukódhassék
oda az ajtó bezárásakor, illetve ne dörzsölődjön éles részekhez. Amennyiben az
övön vágások keletkeztek, vagy szálakra
bomlott, azt ki kell cserélni.
• G y ő z ő d j ü n k m e g a r r ó l , h o g y a g é p j á r műben, különösen annak hátsó ülésén
vannak-e olyan tárgyak vagy csomagok,
amelyek nincsen ek rögzítve, illetve biz tonságosan elhelyezve: baleset vagy hirtelen
fékezés esetén azok sérülést okozhatnak
az utasoknak.
• E l l e n ő r i z z ü k , h o g y a z a u t ó m i n d e n u t a s a
bekapcs olta-e a biztonsági övet, e gyrészt
saját biztonsága érdekében, másrészt
azért, mert az utazás közben, baleset vagy
hirtelen fékezés esetén sérülést okozhatnak a gyermeknek.
• H o s s z ú u t a z á s e s e t é n g y a k r a n k e l l p i h e nőt tartani.
A gyermek ugyanis nag yon hamar elfárad.
Semmilyen okból n e vegyük ki a gyermeket a Gyerekülésből addig, amíg az autó
mozgásban van. Amennyiben a gyerme knek g yelemre van szüksége, biz tonságos
helyet kell találni és meg kell állni.
• K o r a s z ü l ö t t , a t e r h e s s é g 3 7. h e t e e l ő t t v i l á g ra jött újszülöt tek számára a Gyermekülés
veszélyes lehet. Ezeknél az újszülötteknél
ugyanis légzési n ehézségek adódhatnak a
Gyermekülésben. Éppen e zért javasoljuk,
hogy a kórház elhagyása előtt a szülők
kérjenek tanácsot a gyermekor vostól vagy
a kórházi szakemberektől, milyen típusú
Gyerekülést ajánlanak a koraszülöttnek.
• A z A r t s a n a C é g m i n d e n f e l e l ő s s é g e t e l h á rít, amely a termék nem ren deltetésszerű
használatából ered.
1.2 A TERMÉK JELLEMZŐ I
• E z a „ G r u p p o 0 + ” c s o p o r t b a s o r o l t é s h i t e lesített biztonsági Gyerekülés gyermekek
szállítására szolgál, a születéstől 13 kg-os
sú lyi g (0 h óna pos tól kör ülb elü l 10 h óna pos /1
éves korig), s megfel el az ECE R44/04 európai
szabvány előírásainak.
• A h i t e l e s í t é s „ U n i v e r s a l ” t í p u s ú , t e h á t b á r milyen típusú gépkocsiban használható.
FIGYELEM! „Universal” azt jelenti, hogy a
legtöbb típusnál alkalmazható, de nem
minden autóülés esetén.
FONTOS FIGY ELMEZTETÉS!
1. Ez az „univerzális”, gyermekek szállítására
szolgáló biztonsági ülés megfelel az ECE
R44/04 szabvány előírásainak és a legtöbb,
de nem minden típusú autó esetében alkalmazható.
2. A tökéletes használat biz tosított, amennyi-
ben az autógyár tók a gépjármű használati
utasításában feltüntették, hogy a megfelelő életkorú gyermekek számára készült
„univerzális” gyerekülés a gépkocsiba beszerelhető.
3. Ez a gyerekülés „univerzális”-nak minősül,
s szigorúbb hitelesítési előírásoknak felel
meg, mint a korábbi tí pusok, amelyek nem
viselik ezt a jelzőt.
4. Olyan autók ba lehet beszerelni, amelyek ben
3 pontos, x vagy automata biz tonsági öv
van, amely megfelel az UN/ECE 16-os számú
szabványnak, vagy más, azzal megegyező
tartalmú előírásoknak.
5. Kétség esetén érdeklődjön a gyerekülés
gyártójától vagy forgalmazójától.
87
Page 88

1.3 AZ ALKOTÓRÉSZ EK LEÍRÁSA
1-es ábra (3/4)
A. Fogantyú
B. Napfény tető
C. Textil huzat
D. Fejszűkítő párna (*)
E. Talp (**)
2-es á bra (El ölnéz et)
F. Nyílás az övek átbújtatásához
G. A gyerekülés övei
H. Vállvédők (*)
I. Övszabályozó gomb (a textil nyelv alatt)
J. Övszabályozó szíj
3-as ábra (O ldalnézet)
K. Biztonságiöv-vezető a medence övrészhez
a Gyerekülésen
L. Biztonságiöv-vezető a medence övrészhez
a talpon
M. A fogantyút mozgató gombok
N. Clik Clak pecek (a babakocsira rögzítéshez)
4-es ábra (Hátulnézet)
O. Átlós biztonságiöv-vezető
P. Kioldó gomb (a talpról és a babakocsiról)
Q. Nyílás az övek átbújtatásához
R. A gyerekülés öv vezetőjének része
S. Kitámasztó rögzítő
(*) A forma és a típus változhat a Gyerekülés
típusától függően.
(**) Választható
1.4 A FOGANTY Ú ÁLLÁSAI
A Gyerekülés fogantyúja 4 különböző helyzetbe állítható (5-ös ábra).
A. Autóban történő szállítás (FI GYELEM: ez az
egyetlen megengedett pozíció az autóban
történő szállítás esetén).
C. Kézi szállítás.
D. Fekvő helyzet, ringatáshoz vagy pedig
az arra alkalmas Chicco babakocsi- vázra
rögzítéshez.
E. Stabil fekvő helyzet.
A kívánt pozíció beállításához egyszerre kell
megnyomni a foganty ún lévő gombokat (M),
s a fogantyút a k ívánt helyzetbe kell fordí tani,
olymódon, h ogy a kattanást hallani lehessen .
1.5 A TERMÉK ÉS AZ AUTÓ ÜLÉS HASZNÁLATÁRA
VONATKOZÓ KORLÁTOZÁSOK ÉS KÖVETELMÉNY EK
FIGYELEM! A termék és az autóülés használatára vonatkozó, alábbiakban felsorolt korlátozásokat és követelményeket szigorúan be
kell tartani: ellenkező esetben a biztonság
nem garantált.
• A G y e r e k ü l é s t b e l e h e t s z e r e l n i a j o b b o l d a l i
első ülésre vagy pe dig bármelyik hátsó ülésre. Mindenesetre az autóülésnek a haladási
iránynak megfelelő pozícióban kell lennie.
Soha ne helyezzük el ezt a Gyerekülést oldalra fordított vagy a menetiránynak háttal
lévő üléseken (6-os ábra).
• A z a u t ó ü l é s é n x v a g y a u t o m a t a , 3 p o n t o s
biztonsági övnek kell lennie, az UNI/ECE
16-os számú szabványnak, vagy más, azzal
megegyező tartalmú előírásoknak megfelelően (7-es ábra).
• F I G Y E L E M ! S o h a n e s z e r e l j ü k b e a G y e r e külést 2 pontos rögzítésű biztonsági övvel
rendelkező autóba (8-as ábra).
• S o h a n e h a s z n á l j u k a f e j s z ű k í t ő p á r n á t ,
amennyiben a gyermek súlya már meghaladta a 6 kilogrammot.
• E l l e n ő r i z z e , h o g y a z a u t ó h á r o m p o n t o s b i z tonsági övének csatja nincs túl magasan
(
13-19
ábra). Ellenkező esetben próbálja a
gyermekülést az autó egy másik ülésére
szerelni.
2 A GYEREKÜLÉS BE SZERELÉSE A GÉPKOCSIBA
A Gyerekülés beszerelhető mind talppal (opcionális), mind pedig talp nélkül. Mindkét
esetben csakis a menetiránnyal ellenkező
irányban lehet beszerelni.
2.1 A vállvéd ők előzetes f elszere lése
A Gyereküléshez két különböző típusú vállvédő tartozik (A és B), a modelltől függően.
A Gyerekülés használatba vétele előtt fel kell
szerelni a vállvédőket, a következők szerint:
• A t í p u s ú v á l l v é d ő k ( Á b r á k : 9 A , 9 B é s 9 C ) e s e tén: bújtassuk át a vállvédő ket a textilhuzaton
lévő nyílásokon (nem az alatta lévő szerkezet en) ol ymód on, h ogy a z öve k a vá llvéd ők
fölött maradjana k. Fűzzük be a lábak közotti
szíjat az öv csatjába.
• B t í p u s ú v á l l v é d ő k ( Á b r á k : 10 A é s 1 0 B ) : a
Gyerekülés öveit bújtassuk át a két v állvédőn.
A lábak közötti sz íjat fűzzük be az öv cs atjába.
88
Page 89

2.2 BESZERELÉ S TALPPAL EGYÜTT
A talppal is rendelke ző biztonsági Gyerekülés
felszerelésekor a köve tkezők szerint kell eljárni:
1. Csatoljuk le a Gyerekülést a talpról a háttámla mögött található kioldó kar meghúzásával, s ez zel egyidejűleg emeljük fe l a
fogantyú segítségével (11-es ábra).
2. A talpat helyezzük az autó kiválasztott
ülésére a 12-es számú ábra szerint. Úgy
kell a Gyerekülést elhelyezni, hogy az neki
támaszkodjék az autóülés támlájának.
3. H úz zuk k i a z au tó bi zto ns ági ö vét és c sat oljuk be a megfelelő helyre. Vízszintesen (a
medence részn él) húzzuk át a két megfel elő
övvezetőben (L ), amelyeket kék nyíl jelez, s a
lehető legjobban feszítsük meg (13-as ábra).
4. Miel őtt a biztonsági Gyerekülést ráhelyeznénk a talpra, gy őződjünk meg arról, hogy a
kitámasz tó rögzítő zárv a van-e (14-es ábra).
5. Helyez zük rá a talpra a biztons ági Gyerekülést (a menetiránnyal ellentétes irányban).
Addig nyomjuk lefelé, amíg be nem akadt
(hallani lehet a helyes rögzítésre utaló
„clack”-ot). (15-ös ábra).
6. Ellenőrizzük, hogy a biztonsági Gyerekülés megfele lően rákapcsoló dott-e a talpra:
próbáljuk meg kiemelni az első és a hátsó
részénél fogva.
7. Ve gy ük ké zb e az autó átl ó ir ány ú bi zto nsá gi
övét és helyezzük be a megfelelő övvezetőbe (O), amely a Gyerekülés háttámlájának
hátulján található (16-os ábra). FIGYELEM!
Az átló irányú övnek az utazás ideje alatt
MINDIG benne kell maradnia ebben az
övvezetőben.
8. A lehető legjobban feszítsük me g a biztonsági övet, s győződjünk m eg arról, hogy az
öv nincs-e megcsavarodva.
9. Fordítsuk a fogantyút A pozícióba, s győződjünk meg arról, hogy megfelően neki
támaszkodik-e az autó ülésének (17-es ábra).
FIGYELEM! A beszerelést követően MINDIG
ellenőrizni kell, hogy az autó biztonsági öve
korrekt módon megfeszül-e és egyenletes-e
minden pontnál, illet ve nincs-e megcs avarodva . SO HA n e ka pcs olj uk b e a b iz tons ági öve t a
fentiekben leírtaktól eltérő módon.
A biztonsági gyerekülés kiemelése a talp
kiszerelése nélkül.
1. Húzzuk ki a gyerekülés támláján elhelyezett övvezetőből az átlós biztonsági övet,
anélkül, hogy kicsatolnánk az övcsatból.
2. Állítsuk vissza a fogantyút függőleges (B)
állásba (5-ös ábra).
3. Oldjuk ki a Gyerekülést a korábbiakban
leírtak szerint.
2.3 BESZERELÉS TALP NÉLKÜL
Amennyiben a biztonsági Gyerekülést talp
nélkül szereljük be, az alábbiak szerint kell
eljárni:
1. Hajtsuk ki a kitámasztó rögzítőt és helyezzük a biztonsági Gyerekülést a kiválasztott
helyre (18-as ábra).
2. Húzzuk ki az autó biztonsági övét és csatoljuk be a megfelelő helyre, úgy, hogy az
öv vízszintes (medence) részét helyezzük a
Gyerekülés két övve zetőjébe (K), amelyeket
kék nyilak jeleznek (19-es ábra).
3. Vegyük kézbe az autó biztonsági övének
átló irányú szárát és helyez zük a Gyerekülés
háttámlájának hátulján található övvezető be (O) ( 20- as á bra ). FI GYE LEM ! Az átl ó ir ány ú
övnek az utazás ideje alatt MINDIG benne
kell maradnia ebben az övvezetőben.
4. Az övet a lehető legjobban meg kell feszíteni, tovbbá ellenőrizni kell, hogy nincs-e
valahol megcsavarodva.
5. A fogantyút A állásba kell fordítani, úgy,
ho gy a z ne ki tám asz kod jék az a utó ü lés én ek
(21-es ábra).
A biztonsági gyerekülés kiszerelése:
1. Kapcsoljuk ki az autó biztonsági övét az
övcsat megnyomásával.
2. A fogantyút állítsuk vissza függőleges (B)
helyzetbe.
3. Húzzuk ki az övet az átlós és a vizszíntes
övvezetőkből.
2.4 BESZERELÉS ISOFIX ÜLÉSALAPPAL
(gyári tartozék, vagy külön megvásárolható)
Az ISOFIX ülésalapp al történő beszereléshez a
termékkel egy ütt adott használati útmut atót
használja fel.
Az ISOFIX FÉLIG UNIVERZÁLIS rendszer használatához a gépjármû kéziköny vét feltétlenül
el kell olvasni a gyer mekülés beszerelése előt t.
A kézikönyvben megtalálható, hogy melyik
ülés összeegyeztethető a gyermekülés méretkategóriájával.
A Chicco Iso x ülésalapja „félig univerzális”
típusú honosítással rendelkezik, ezért nem
minden autóba illik, csak azokba, amelyek a
89
Page 90

mellékelt „Jóváhagyott személygépkocsik listája” c. könyve cskében felsorolva szerep elnek.
3. TOVÁBBI MŰVELETEK
3.1 A GYERMEK ELHELYEZÉS E A GYEREKÜLÉSBEN
1. Hajtsuk fel az ülőkén lévő textil nyelvet, s
tartsuk benyomva az alatta található övszabályozó gombot. Lehúzással lazítsuk meg
a Gyerekülés öveit (22-es ábra).
2. Csatoljuk ki az övcsatot a piros gomb benyomásával és az öveket rakjuk szét két
oldalra (23-as ábra).
3. Ültessük be a gyermeket.
4. Helyez zük egymásra a két csatot és e gyütt
csatoljuk be azokat úgy, hogy a „click” kattanás hallatszódjék (24-es ábra). FIGYELEM!
Soha ne próbáljuk meg egyenként beledugni és becsatolni a két övet.
5. A Gyerekülés biztonsági öveit húzzuk meg
és rögzítsük az arra szolgáló övszabályozó
szíj segítségével (25-ös ábra).
3.2 AZ ÖVEK HOSS ZÚSÁGÁNAK BEÁLLÍTÁSA
FIGYELEM! Az öveket mindig a gyermek
növekedéséhez kell igazítani. A Gyerekülés
beszerelése előtt az öveket a megfelelő magasságba kell állítani.
Akkor megfe lelő a beállítás, ha az övek a háttámlából a gyermek vállának magasságában
indulnak (26-os ábra).
Az öv vállmagassága 3 fokozatban állítható.
Az övek áthelyezésekor a következők szerint
kell eljárni:
1. El kell távolítani a vállvédőket, kihúzva azokat
a textil huzat nyílásain keresztül.
2. A piros gomb benyomásával csatoljuk ki
az öveket.
3. H átul ról húz zu k ki a z öv eke t a h átt áml ábó l,
majd fűzzük be a gyermek magasságának
leginkább megfelelő nyíláson (Ábrák: 27A
és 27B).
FIGYELEM! Győződjünk meg arról, hogy az
övek mindig az övvezetők (R) és a borítás
között haladjanak.
FIGYELEM! A fejszűk ítő párna biztosítja, ho gy
az újszülöt t a 6 kg-os súly elérésig a megfe lelő
körülmények között tartózkodjon a gyerekülésben, a feje és a nyaka mindig az ideális
pozícióban legyen.
3.3 A GYEREK ÜLÉS ÜLŐ VAGY RINGATÓ HELYZETE
(ALVÓ POZÍCIÓ)
Amikor a gyerekülés nincs az autóba beszerelve, ringatóként vagy alvó pozícióban is
használható.
Ringathatóvá úgy tehető, ha behajtjuk az ülőke alatti kitámasztó rögzítőt (14-es ábra) és a
fogantyút a C helyzetbe állítjuk (5-ös ábra).
Ha x , ül ő he ly zet ben kív ánj uk h asz nál ni, ki k ell
hajtani a kitámas ztó rögzítőt és a fogantyút D
pozícióba kell állítani (5-ös ábra).
A gyerekülést csak stabil és vízszintes felületen
szabad elhelyezni.
FIGYELEM! A Gyerekülés hordozása előtt
a fogantyút mindig állítsuk vissza a B (füg-
gőleges) helyzetbe.
FIGYELMEZTETÉS! A gyermeket ne
hagyjuk felügyelet nélkül.
FIGYELMEZTETÉS! Mindig biztonságos őrzésre szolgáló eszközöket
használjunk.
FIGYELMEZTETÉS! Veszélyes a Gyerekülést magasan, például asztalon,
széken, stb. Elhelyezni.
FIGYELMEZTETÉS! Ez a Gyerekülés
nem alkalmas hosszú ideig történő
alvásra.
FIGYELMEZTETÉS! Ne használjuk
a gyerekülést, ha a gyermek már
egyedül képes ülni.
A gyerekülés nem he lyettesíti a kiságyat v agy
a bölcsőt. Amiko r a gyermek aludni akar, megfelelő kiságyba vagy bölcsőbe kell fektetni.
Ne használjuk a Gyerekülést, ha bármelyik
része eltörött vagy megsérült.
3.4 HASZNÁLATA BABAKOCSIKÉNT
FIGYELEM! Az Auto-Fix ülés a gyári tartozék
vagy külön me gvásárolható beakasz tó csatlakozó rendszerrel ellátott Chicco babakocsikra
rögzíthető.
FIGYELEM! A babako csiként történő használat
esetén a babakocsi használati utasításában
foglaltak az irányadók. A CHICCO babakocsik
ún. CLICK CLACK szisz témával vannak ellátva, a
vázon különl eges szerkezet található, amely le hetővé teszi a Gyerekülés fe lszerelését közvet-
90
Page 91

lenül a babakocsira, minden egyéb tartozék
használata nélkül. Az autósülés beakasztása
előtt teljesen el kell távolítani a karf aborítókat.
A Gyerekülést az alábbiak szerint lehet a babakocsira szerelni:
1. Vegyük kézbe a Gyerekülést, úgy, hogy
annak fogantyúja B (fü ggőleges) helyzetben
legyen (28-as ábra).
2. Csatlakoztassa a gyermekülés két (N) Clik
Clak beakasztó kampóját a babakocsi karfáihoz, vagy a külön megvásárolt csatlakozó
rendszerhez, nagyon ügyelve arra, hogy a
kampók mindkét oldalon beakadjanak. A
beakadást egy kattanás jelzi (29. ábra).
FIGYELMEZTETÉS! A használat előtt ellenőrizzük, hogy a babakocsi és a Gyerekülés
rögzítő szerkezetei megfelelően egymásba
illeszkedtek-e.
A Gyerekülés leszerelése a babakocsiról:
1. A fogant yút helyezzü k vissza a függőleges
helyzetbe (B).
2. Húzzuk meg a hátsó kioldó kart.
3. Emeljük le a Gyerekül ést és helyezzük me gfelelő, vízszintes felületre.
FIGYELEM: A Gyerekülés beakasztása és kioldása úgy is elvégezhető, hogy a gyermek
benne ül, még akkor is, ha a baba súlya kissé
megnehezít i a művelet végrehajtását. Ebben
az esetben ajánlatos különös gondossággal
végrehajtani a fent leírtakat.
3.5 TISZTÍTÁS ÉS MEGÓVÁS
A HUZAT TISZTÍTÁSA
A Gyerekülés textilb ől készült huzata levehető
és mosható, kézzel vagy mosógépben, 30
fokos vízben. Először csatoljuk ki az öveket,
majd húzzuk ki a két övet és az övcsatot a
megfelelő nyíláson, s ezt követően vegyük
le a textil huzatot (30-as ábra). A mosásnál
kövessük a huzaton lévő címke utasításait,
amelyen az alábbi jelek találhatók:
30° C
Gépi mosás 30°C
Nem fehéríthető
Szárìtógépben nem száí ìtható
Nem vasalható
Szárazon nem
moshatò moshatòmoshatò
Soha ne használjunk durva mosószereket
vagy oldószert. A huzatot ne centrifugázzuk,
kicsavarás nélkül hagyjuk megszáradni.
A MŰANYAG ÉS FÉM RÉSZEK TIS ZTÍTÁSA
A műanyagból vagy befestet t, fémből készült
részek tisz tításához kizárólag e gy nedves törlőkendőt használjunk. Soha ne használjunk
durva mosószert vagy oldószert.
A Gyerekülés mozgatható, eltávolítható rés zeit
soha nem kell semmilyen m ódon beolajozni.
AZ EGYES ELEMEK ÉPSÉGÉNEK ELLENŐRZÉSE
Ajánlott az alábbi alkotó elemek épségének
és elhasználódottságának rendszeres ellenőrzése:
• A t e x t i l h u z a t : e l l e n ő r i z z ü k , h o g y a b é l é s
épségben van -e, nem látszik-e ki a huz atból.
Ellenőrizzük a varrásokat, ezeknek mindig
hibátlannak kell lenni.
• Ö v e k : e l l e n ő r i z z ü k , n i n c s e n e k - e r e n d e l l e n e sen kiszálasodva a textilb ől készült részek, s
emiatt nincs-e elvékonyodva a szabályozó
szíj, a lábak közötti szíj, a vállövek, továbbá
a szabályozó gomb mentén lévő övrész.
• M ű a n y a g o k : e l l e n ő r i z z ü k a z ö s s z e s , m ű anyagból készült rész elhasználódását.
Nem lehetnek rajtuk sérülések vagy elszíneződések.
FIGYELEM! Amennyiben a Gyerekülés eldeformálódott vagy erősen elhasználódott,
ki kell cserélni: elveszíthette a biztonságos
használatot garantáló jellemző tulajdonságait.
A TERMÉK MEGÓVÁSA
Amikor a Gyerekülés nincs b eszerelve a gépkocsiba, ajánlatos annak száraz h elyen történő
tárolása, hőtől, portól, nedvességtől, tűző
napfénytől távol.
A TERMÉK HULLAD ÉKKÉNT TÖRTÉNŐ FELDO LGOZÁSA
Amennyiben a Gyerekülés használati ideje
lejárt, s nem alkalmazzuk tovább, helyezzük
a hulladékgyűjtőbe. A környezet megkímélése érdekében különítsük el egymástól a
különböző alapanyagból készült részeket, a
szelektív hulladékgyűjtésre vonatkozó, adott
országban érvényes jogszabályok szerint.
91
Page 92

HR
CHICCO
AUTO-FIX FAST
R. 0+ (0-13KG)
G
UPUTE ZA UPORABU
SADRŽAJ:
1. UV OD
1.1 NA POMENE
1.2 OBILJEŽJA PROIZVODA
1.3 OPIS SASTAVNIH DIJELOVA
1.4 POLOŽAJ RUČKE
1.5 OGRANIČENJA I UVJETI UPORABE KOJI
SE ODNOSE NA PROIZVOD I NA SJEDIŠTE U AUTOMOBILU
2. INSTALACIJA U AUTOMOBILU
2.1 POČETNA KONFIGURACIJA NARAMENICA
2.2 INSTALACIJA S BAZOM
2.3 INSTALACIJA BEZ BAZE
3. DALJNJE RAD NJE
3.1 POS TAVL JANJE DJETE TA NA SJEDALICU
3.2 PODEŠAVANJE POLOŽAJA POJASEVA
3.3 FIKSNI ILI POKRE TNI POLOŽAJ SJEDALA
(UPORABA U LEŽEĆEM POLOŽAJU)
3.4 UPORABA S KOLICIMA
3.5 ČIŠĆENJE I ČUVANJE
1. UV OD
1.1 NAP OMEN E
VRLO VAŽNO: ODMAH PROČITATI
• Č U V A T I O V A J P R I R U Č N I K Z A B U D U Ć E
POTREBE.
• Z a m o n t i r a n j e i i n s t a l i r a n j e p r o i z v o d a
strogo se pridržavati uputa. Izbjegavati korištenje proizvoda od strane druge
osobe koja nije pročitala upute.
• PA Ž N J A ! N a o s n o v u s t a t i s t i k a o n e s r e ć a -
ma, općenito su stražnja sjedišta u vozilu
sigurnija od prednjih: preporuča se dakle
instalirati Sjedalicu na stražnjem sjedištu.
Najsigurnije sjedište je stražnje u sredini,
ako je opremljeno pojasom u tri točke.
• PA Ž N J A ! O Z B I L J N A O PA S N O S T ! N i k a d n e
koristiti ovu Sjedali cu na prednjem sjedištu
koje je opremljeno frontalnim zračnim
jastukom. Sjedalica se može instalirati na
prednjem sjedištu samo ako je frontalni zračni jastuk deaktiviran: provjeriti sa
proizvođačem automob ila ili u priručniku
s uputama za automobil mogućnost isključivanja zračnog jastuka. Preporuča se
u svakom slučaju povući što je moguće
više unatrag sjedište ovisno o tome ima
li drugih putnika na stražnjem sjedištu.
• U s v a k o m s l u č a j u p r e p o r u č l j i v o j e d a s v i
putnici u automobilu budu informirani o
na činu na k oji s e os lob ađa dij ete u slu čaju
opasnosti.
• P r i p a z i t i k a k o s e i n s t a l i r a S j e d a l i c a u a u t o mobilu kako pok retno sjedište ili vrata ne
bi utjecala na istu.
• N i j e d n a S j e d a l i c a n e m o ž e j a m č i t i p o t p u n u
sigurnost djeteta u slučaju nezgode, ali
uporaba ovog proizvoda smanjuje rizik
od teških ozljeda ili smrti.
• R i z i k o d t e š k i h o z l j e d a d j e t e t a , n e s a m o u
slučaju nezgoda, ve ć i u drugim situacijama
(npr. kod naglih kočenja itd.) povećava se
ukoliko se upute iz ovog priručnika ne slijede strogo: uvijek provjeriti da je Sjedalica
ispravno zakačena za sjedište.
• U s l u č a j u d a j e S j e d a l i c a o š t e ć e n a , d e f o r mi ran a ili jak o is troš ena , mo ra s e za mij eni ti
novom, obzirom da bi to moglo značiti
da je izgubila izvorna obilježja sigurnosti.
• N e v r š i t i n i k a k v e i z m j e n e i l i d o d a t k e n a
proizvodu bez odobrenja proizvođača.
• N e i n s t a l i r a t i d o d a t k e , r e z e r v n e d i j e l o v e i l i
komponente koje ne dostavlja proizvođač.
• N e p u s t i t i n i k a d d i j e t e s a m o u S j e d a l i c i b e z
nadzora, ni u kojem slučaju.
• N i k a d n e p u s t i t i n e z a k a č e n u S j e d a l i c u n a
sjedištu automobila, mogla bi udariti ili
ozlijediti putnike.
• N i k a d n e p o s t a v l j a t i b i l o š t o , o s i m d o z v o l j e nih dodataka za proizvod, između sjedišta
automobila i sjedalice, ili između Sje dalice
i djeteta: u slučaju nezgode Sjedalica bi
mogla neispravno raditi.
• U s l u č a j u d a s e a u t o m o b i l o s t a v i i z r a v n o
na suncu, preporuča se pokriti Sjedalicu.
• K a o p o s l j e d i c a , č a k i m a n j e n e z g o d e ,
92
Page 93

Sjedalica bi se mogla oštetiti bez da se
to vidi golim okom: stoga je potrebno
zamijeniti je.
• N e k o r i s t i t i r a b l j e n e S j e d a l i c e : s t r u k t u r a
bi mogla biti oštećena a da se to ne vidi
golim okom, dok bi sigurnost proizvoda
mogla biti ugrožena.
• P r e s v l a k a s e m o ž e z a m i j e n i t i i s k l j u č i v o d r u gom koju odobri proizvođač, Obzirom da
predstavlja sastavni dio Sjedalice. Sjedalica
se ne smije nikad koristiti bez presvlake,
kako se sigurnost djeteta ne bi ugrozila.
• P r o v j e r i t i d a t r a k a p o j a s a n i j e z a p e t l j a n a , t e
pripaziti da se p ojas ili dijelovi Sjedalice ne
zaglave u vratima ili da se ne trljaju o oš tre
predmete. Ukoliko se na pojasu pojave
rezovi ili se niti odvajaju neophodno je
zamijeniti ga.
• P r o v j e r i t i d a s e n e p r e v o z e p r e d m e t i i l i
prtljaga koji nisu sigurno pričvršćeni, i to
pogotovo na stražnjoj površini unutar vozila: u slučaju nezgode ili naglog kočenja
mogli bi ozlijediti putnike.
• P r o v j e r i t i d a s v i p u t n i c i u a u t o m o b i l u k o r i ste vlastiti sigurnosni pojas i to zbog vlastite
sigurnosti a i zato da u tijeku vožnje, u
slučaju nezgode ili naglog kočenja, ne bi
ozlijedili dijete.
• U s l u č a j u d u l j e v o ž n j e p o t r e b n o j e č e s t o
za ust avl jati se. Dij ete s e vr lo l ako umo ri. N i
u kojem slučaju ne smije se vaditi dijete
sa Sjedalice dok je automobil u pokretu.
Ukoliko je djetetu potrebna pažnja, valja
pronaći sigurno mjesto i zaustaviti se.
• N o v o r o đ e n č a d k o j a j e p r e r a n o r o đ e n a , s a
manje od 37 tjedana trudnoće mogla bi
biti u opasnosti u Sje dalici. Ta novorođenčad bi mogla imati teškoća u disanju dok
sjedi u Sjedalici. Preporučamo dakle da
se obratite vašem liječniku ili bolničkom
osoblju kako bi procijenili Vaše dijete i
preporučili odgovarajuću Sjedalicu prije
nego li odete iz bolnice.
• T v r t k a A r t s a n a o t k l a n j a s v a k u o d g o v o r n o s t
za neprimjerenu uporabu proizvoda.
1.2 OBILJEŽ JA PROIZVODA
• O v a S j e d a l i c a j e h o m o l o g i r a n a k a o “ G r u p a
0+”, za p rije voz dje ce od rođ enja do 13 k g
težine (od 0 do 10 mjeseci/godinu dana
otprilike), poštujući europski pr avilnik ECE
R44/04.
• H o m o l o g a c i j a j e t i p a “ U n i v e r s a l ”, t a k o d a
se Sjedalica može koristiti u bilo kojem
modelu automobila . PA ŽNJA! “Universal”
znači da je kompatibilna sa većinom, ali n e
i sa svim sjedištima automobila.
VAŽNA NAPOMENA
1. Ovo je proizvod za držanje djeteta
“Universal”, homologiran u skladu sa
Pravilnikom ECE R44/0 4 te kompatibilan
sa većinom, ali ne i sa svim sjedištima
automobila.
2. Do savršene kompatibilnosti lakše se
dolazi u slučajevima kada proizvođač
automobila izjavi u priručniku za uporab u da vo zilo p redv iđa ins tala ciju “ Univerzalnih” proizvoda za držanje djece
navedene dobi.
3. Ovaj proizvod za držanje klasi ciran je
kao “Univerzalan” u skladu sa strožim
kriterijima homologacije u odnosu na
prethodne modele koji ne sadrže ovu
napomenu.
4. Prikladan za uporabu u vozilima opre-
mljenim sigurnosnim pojasom u 3 točke,
statičkim ili sa elementom z a namotavanje,
homologiranim na osnovu Pravilnika UN/
ECE br. 16 ili drugih istovrijednih standarda.
5. U slučaju dvojbe, obratiti s e proizvođaču
proizvoda za držanje ili prodavaču.
1.3 OPIS SASTAVNIH DIJELOVA
Slika 1 (3/4)
A. Ručka
B. Krović za zaštitu od sunca
C. Tekstilna podloga
D. Jastuk za podešavanje (*)
E. Baza (**)
Slika 2 (Prednja strana)
F. Otvori za prolaz pojasa
G. Pojasevi Sjedalice
H. Naramenice (*)
I. Gumb za podešavanje pojaseva (ispod
tekstilne strukture)
J. Traka za podešavanje pojaseva
93
Page 94

Slika 3 (P rofi l)
K. Vodilica pojasa vozila na Sjedalici
L. Vodilica pojasa vozila na bazi
M. Gumbi za okretanje ručke
N. Klik Klak osovine (za pričvršćivanje na
kolica)
Slika 4 (Od ostraga)
O. Vodilica dijagonalnog pojasa autom obila
P. Ručka za otkačivanje (s baze i sa kolica)
Q. Otvori za prolaz pojasa
R. Element vodilica za pojaseve Sjedalice
S. Element za blokiranje i stabiliziranje
(*) Oblik i model mo gu se razlikovati u ovisnosti o inačicama Sjedalice.
(**) Opcionalno
1.4 POLOŽAJ RUČK E
Ručka Sjedalice podesiva je u 4 položaja
(Slika 5).
A. Položaj prijevoza u automo bilu (PAŽNJA:
to je jedini dozvoljeni položaj za vrijeme
vožnje u automobilu).
B. Položaj za ručni prijenos.
C. Ležeći položaj za ljuljanje ili za zakačiti
za predviđena kolica Chicco.
D. Fiksni ležeći položaj.
Za podešavanje pritisnuti istovremeno
gumbe (M) na ručki i okrenuti u odabrani
položaj sve dok ne čujete skok.
1.5 OGRANIČENJA I UVJE TI UPORABE KOJI
SE ODNOSE NA PROIZ VOD I NA SJEDIŠTE U
AUTOMOBILU
PAŽNJA! Strogo se pridržavati slijedećih
ograničenja i uvjeta upor abe koji se odnose
na proizvod i sje dište u automobilu u protivnom sigurnost nije zajamčena.
• S j e d a l i c a s e m o ž e i n s t a l i r a t i n a p r e d n j e m
sjedištu automobila do vozača ili na bilo
kojem stražnjem sje dištu. U svakom slučaju sjed išt e au tomo bil a mo ra b iti okr enut o
u smjeru kretanja. Nikad ne koristiti ovu
Sjedalicu na sjedištima koji su okrenuti bočno ili obrnuto od smjera kretanja
(Slika 6).
• S j e d i š t e a u t o m o b i l a m o r a b i t i o p r e m l j e n o
sigurnosnim pojasom u 3 točke, st atičkim
ili sa elementom za namotavanje, homologiranim na osnovu Pravilnika UN/ECE
Br. 16 ili drugih istovrijednih standarda
(Slika 7).
• P A Ž N JA ! N i k a d n e i n s t a l i r a t i S j e d a l i c u s a
pojasom automobila prič vršćenim u samo
dvije točke (Slika 8).
• N i k a d n e k o r i s t i t i j a s t u k z a r e g u l a c i j u a k o
je dijete teško više od 6 kg.
• P r o v j e r i t e d a k o p č a n a p o j a s u s t r i u p o rišne točke u automobilu nije previsoko
(sl. 13-19). U protivnom, probajte postaviti
sjedalicu na drugo sjedalo u automo bilu.
2. INSTALACIJA SJEDALI CE U AUTOMOBILU
Sjedalica se može inst alirati sa bazom (opcionalno) ili bez. U oba sluč aja kon guracije,
mora se instalirati samo obrnuto u odnosu
na smjer kretanja.
2.1 POČETNA KONFIGURACIJA NARAM ENICA
Sjedalica je opremljena s 2 različi ta tipa naramenica (A i B) ovisno o inačici . Prije nego
li se koristi Sjedalica, kako bi se montirale
naramenice, postupiti kako slijedi:
• N a r a m e n i c e i n a č i c a A ( S l i k a 9A , 9 B i 9 C ) :
pr ovu ći na ram eni ce k roz o tv ore t ek sti lno g
di jela (ne donj e st ruk tu re) k ako bi p ojas evi
ostali postavljeni iznad istih. Provući element između nogu kroz kopču pojaseva.
• N a r a m e n i c e i n a č i c a B ( S l i k a 1 0 A i 1 0 B ) :
provući pojaseve Sjedalice kroz dvije naramenice. Provući element između nogu
kroz kopču pojaseva.
2.2 INSTALACIJA S BAZ OM
Za instalaciju Sjedalice s a bazom na sjedištu
automobila, postupiti kako slijedi:
1. Otkačiti Sjedalicu sa baze na način da
povučete ručicu za otkačivanje postavljenu ispod leđno g naslona i istovremeno
podići pomoću ručke (Slika 11).
2. Postaviti bazu na odabrano sjedište za
instaliranje, te je okrenuti kao na Slici
12, tako da bude u dodiru sa naslonom
sjedišta automobila.
3. Povući sigurnosni pojas automobila i
zakačiti ga za odnosnu kopču, tako da
provučete vodoravni dio (trbušni) kroz
94
Page 95

dvije predviđene vodilice (L) označene
plavom strelicom te što je više moguće
nategnuti pojas (Slika 13).
4. Prije nego li umetnete Sjedalicu u ba zu,
provjeriti da je element za blokiranje
dobro zatvoren (Slika 14).
5. Umetnuti Sjedalicu u bazu (okrenutu u
obrnutom smjeru u odnosu na smjer
kretanja) i gurnuti je prema dolje sve d ok
se ne z aka či (č uti će s e zv uk k oji pot vrđ uje
da je zakačen) (Slika 15).
6. Provjeriti da je Sjedalica ispravno zakačena za bazu pokušajem podizanja kako
prednje tako i stražnje strane.
7. Uhvatiti dijagonalni pojas automobila i
provući kroz predviđenu vodilicu (O) na
stražnjoj strani naslona Sjedalice (Slika
16). PAŽNJA! Dijagonalni pojas za vrijeme vožnje mora UVIJEK biti uvršten u
navedenu vodilicu.
8. Što je više moguće nategnuti pojas, b ez
da ostane previše trake i dobro provjerivši
da nije zapetljan.
9. Okrenuti ručku u položaj A provjerivši
da se naslanja na sjedište automobila
(Slika 17).
PAŽNJA! nakon instalacije UVIJEK provj eriti
da je p ojas auto mob ila ispr avn o na tegn ut
i da je ravnomjerno raspoređen u svim
dijelovima, te isto tako da nije zapetljan.
NIKAD ne postavljati pojas automobila u
položaje različite od navedenih.
Za deinstaliranje sjedalice ostavivši bazu
instaliranu u automobilu:
1. Izvući iz vodilice naslona dijagonalni pojas
bez da se otkači od kopče.
2. vratiti ručku u oko miti položaj B (Slika 5).
3. Otkačiti Sjedalicu kao što je prikazano u
prethodnom tekstu.
2.3 INSTALACIJA BEZ BA ZE
Za instalaciju Sjedalice b ez baze, postupiti
kako slijedi:
1. Izvaditi element za blokiranje i stabili-
zaciju i postaviti Sjedalicu na odabrano
sjedište automobila (Slika 18).
2. Povući sigurnosni pojas automobila i
zakačiti ga za odnosnu kopču, tako da
provučete vodoravni dio (trbušni) kroz
dvije predviđene vodilice (K) sjedalice
označene plavom strelicom (Slika 19).
3. Uhvatiti dijagonalni dio pojasa automobila i provući kroz predviđenu vodilicu
(O) na stražnjoj strani naslona Sjedalice
(Slika 20). PAŽNJA! Dijagonalni pojas za
vrijeme vožnje mora UVIJEK biti uvršten
u navedenu vodilicu.
4. Što je više moguće nategnuti pojas, b ez
da ostane previše trake i dobro provjerivši
da nije zapetljan.
5. Okrenuti ručku u položaj A provjerivši
da se naslanja na sjedište automobila
(Slika 21).
Za deinstaliranje sjedalice:
1. Otkačiti pojas automobila pritiskom na
kopču.
2. Vratiti ručku u položaj B (okomiti).
3. Izvući pojas iz dijagonalne vodilice i iz
vodoravnih.
2.4 INSTALACIJA S POSTO LJEM ISOFIX
(isporučen u paketu ili se može kupiti odvojeno)
Za instalaciju sa p ostoljem ISOFIX, pogledati
od gov araj uću k nji žicu sa u puta ma, koja je
priložena uz proizvod.
Za uporabu sklopa ISOFIX POLU-UNIVERZALNO neophodno je pročitati priručnik
za uporabu vozila, p rije instalacije sjedalice.
U priručniku su naznačena mjes ta u vozilu
koja su usklađena sa klasom i veličinom
dječje sjedalice.
Postolje Iso x marke Chicco službeno je
uvršteno u skupinu “Polu-univerzalno”, te
stoga nije usklađeno sa svim modelima
vozila, već samo sa onim vozilima, koja su
navedena u priloženom priručniku “Spisak
službeno usklađenih vozila”.
3. DODATNE RADNJE
3.1 POSTAVLJANJE DJETETA NA SJEDALICU
1. Podignuti m eđunožni element od tkanine, držati pritisnutim gumb za regulaciju
te povući pojaseve Sjedalice na način da
ih olabavite (Slika 22).
2. Otvo riti kopču, pritisnuvši crveni gumb, i
95
Page 96

držati pojaseve odvojene (Slika 23).
3. Položiti dijete.
4. Preklopiti dva jezička kopče i umetnuti
ih zajednički u kopču sve dok ne čujete
klik (Slika 24). PAŽNJA! Nikad ne umetnuti jezičke u kopču jedan po jedan ili
samo jedan.
5. Napeti sigurnosne pojaseve Sjedalice na
način da povučete predviđenu traku za
podešavanje (Slika 25).
3.2 PODEŠAVANJE POLOŽAJA POJASEVA
PAŽNJA! Pojasevi uvijek moraju biti prilagođeni rastu djeteta. Prije nego li instalir ate
Sjedalicu u automobilu potrebn o ih je podesiti na ispravnu visinu.
Za ispravno podešavanje, pojasevi moraju
izaći iz naslona na visini ramena djeteta
(Slika 26).
Sjedalica sadrži 3 položaja u visini.
Za premještanje pojaseva postupiti kako
slijedi:
1. Ukloniti naramenice tako da ih izvučete
iz otvora tekstilnog dijela.
2. Otvoriti kopču pojaseva pritisnuvši crveni gumb.
3. Izvući pojaseve iza naslona i umetnuti
ih u otvor prikladniji visini djeteta (Slika
27A i 27B).
PAŽNJA! Provjeriti da pojasevi uvij ek prolaze
između elementa vodilice (R) i oklopa.
PAŽNJA! Jastuk za regulaciju jamči djetetu
od rođenja do 6 kg ispravan položaj za
vrat i leđa.
3.3 FIKSNI ILI LJUL JAJUĆI POLOŽA J SJEDALA
(UPORABA U LEŽEĆ EM POLOŽAJU)
Kada se ne korist i u automobilu, Sjedalica se
može isto tako koristi ti za ljuljanje ili ležanje.
Kako bi se mogla ljuljati, z atvoriti element za
blokiranje i stabiliziranje (Slika 14) podesiti
ručku u položaj C (Slika 5).
Kako biste koristili Sjedalicu u ksnom
položaju, izvući element za blokiranje i
stabilizaciju te postaviti ručku u položaj
D (slika 5).
Postaviti samo na stabilnim i vodoravnim
površinama.
PAŽNJA! Prije vožnje Sjedalice, uvijek vr atiti
ručku u položaj B (okomiti).
NAPOMENA! Ne ostavljati dijete
bez nadzora.
NAPOMENA! Uvijek koristiti sustav
za zadržavanje.
NAPOMENA! Opasno je koristiti Sjedalicu na podignutim površinama
kao što su stolovi, stolice, itd.
NAPOMENA! Ova Sjedalica nije
predviđena za dulja razdoblja
spavanja.
NAPOMENA! Ne koristiti Sjedalicu
ukoliko je dijete u stanju biti samostalno u sljedećem položaju.
Sjedalica ne zamjenjuje k revet ili kolijevku.
Ukoliko je djetetu potreban san, trebalo bi
ga položiti u prikladni krevetić ili kolijevku.
Ne koristiti Sjedalicu uko liko je bilo koji dio
razbijen ili nedostaje.
3.4 UPORABA S KOLICIM A
PAŽNJA! Sjedalica Auto-Fix se m ože ksirati
na Chicco kolica koja su već opremljena
prikladnim sustavima za kopčanje, ili se
mogu posebno kupiti.
PAŽNJA! Za uporabu sa kolicima pridr žavati
se priručnika za kolica. Kolica CHICCO opremljena sustavom “CLIK CLAK” imaju ručke
sa posebnim elementima koji omogućuju
pričvršćivanje Sjedalice izravno na kolica,
bez da je potrebno kor istiti dodatni pribor.
Prije nego što zakvačite auto-sjedalicu
skinite navlake za naslon za ruke.
Kako biste zakačili Sjedalicu za kolica postupiti kako slijedi:
1. Uhvatiti sjedalicu s ručkom u o komitom
položaju B (Slika 28).
2. Zakačite dvije Clik-Clak kopče od autosjedalice (N) za naslon za ruke na kolicima
ili na sustav za kopčanje koji ste kupili
posebno, pazeći da ih ispravno zakačite na obje strane. Čuti će se klik, što je
znak da su se pravilno zakačile (Sl.29).
96
Page 97

NAPOMENA Prije uporabe provjeriti da
su uređaji za pričvršćivanje Sjedalice
ispravno zakačeni.
Za otkačivanje Sjedalice od kolica:
1. Vratiti ručku u okomiti položaj (B).
2. Povući stražnju ručku za otkačivanje.
3. Pomaknuti i položiti Sjedalicu na ravnu
površinu.
PAŽNJA: Zakačivanje i otkači vanje mogu se
vršiti i dok je dijete u Sjedalici iako bi zbog
težine djeteta te radnje mogle biti manje
praktične. U tom slučaju prep oruča se vršiti
iste radnje s posebnom pažnjom.
3.5 ČIŠĆENJE I ČU VANJE
ČIŠĆENJE PRESVLAKE
Tekstilna presvlaka Sjedalice može se potpuno odvojiti i prati ručno ili u perilici na
30°C.
Kako biste je oprali, otkačiti tekstilni dio
nakon što ste izvukli dva kraja pojaseva i
kopču iz odnosnih otvora (Slika 30).
Za pranje slijediti upute navedene na etiketi
presvlake koja sadrži slijedeće simbole za
pranje:
Pranje u perilici na 30°C
30° C
Ne izbjelivati
Ne sušiti u sušilici
Ne glačati
Ne prati kemijski ecco
Nikad ne koristiti abrazivna sredstva za
čišćenje ili rastvarače. Ne centri gurati
presvlaku i pusti ti da se osuši bez ožimanja.
ČIŠĆENJE PLA STIČNIH I METALNIH DIJELOVA
Za čišćenje plastičnih dijelova ili dijelova
od lakiranog metala koristiti samo vlažnu
krpu. Nikad ne koristiti abrazivna sredstva
za čišćenje ili rastvarače.
Pokretni dijelovi Sjedalice ne smiju se nik ako
podmazivati.
KONTROLA CJELOVITO STI DIJELOVA
Preporuča se redovito provjeravati cjelovitost ili stanje istrošenosti slijedećih
komponenata:
• Te k s t i l n a p r e s v l a k a : P r o v j e r a v a t i d a n e
izlazi podstava ili da se ne gube dijelovi
iste. Provjeriti stanje šavova koji moraju
uvijek biti cjeloviti.
• P o j a s e v i : p r o v j e r i t i d a n i j e d o š l o d o v i d ljivog oslabljenja tekstilne strukture sa
smanjenjem debljine oko trake za podešavanje, elementa između nogu, oko
naramenica i u dijelu ploče za podešavanje pojaseva.
• P l a s t i k e : p r o v j e r i t i s t a n j e i s t r o š e n o s t i
plastičnih dijelova koji ne smiju pokazivati vidljive znakove oštećenja ili da su
izblijedjeli.
PAŽNJA! U slučaju da je Sjedalica oštećena,
deformirana ili jako istrošena, mora se zamijeniti: to bi moglo značiti da je izgubila
izvorna obilježja sigurnosti.
ČUVANJE PROIZVODA
Kada nije instalirana na autom obilu preporuča se čuvanje Sjedalice na suhom mjestu, dalje od izvora topline i zaštićena od
prašine, vlage i izvorne sunčeve svjetlosti.
ZBRINJAVANJE PROIZVODA
Kada se dostigne predviđeni limit uporabe
Sjedalice, potrebno je prekinuti uporabu
iste i zbrinuti je. U cilju poštivanja okoline,
odvojiti različite vrste otpada u skladu sa
zakonskim odredbama na snazi u vlastitoj
zemlji.
97
Page 98

RUS
CHICCO
AUTO-FIX FAST
Г
Р. 0+ (0-13КГ)
ИНСТРУКЦИЯ ПО ЭКСПЛ УАТАЦИИ
СОДЕРЖ АНИЕ:
1. ВС ТУП ЛЕНИЕ
1.1 МЕРЫ ПРЕДОСТОРОЖНОСТИ
1.2 ХАРАКТЕРИСТИКИ ИЗДЕЛИЯ
1.3 ОПИСАНИЕ КОМПОНЕНТОВ
1.4 ПОЛОЖЕНИЕ РУЧКИ
1.5 ОГРАНИЧЕНИЯ И ТРЕБОВАНИЯ ПРИ ИСПОЛЬЗОВАНИИ ИЗДЕЛИЯ И СИДЕНИЯ
АВТОМОБИЛЯ
2. УСТАНОВКА В АВТОМО БИЛЕ
2.1 ПЕРВО НАЧА ЛЬНАЯ КОНФИГ УРАЦИЯ
ЛЯМОК
2.2 УСТАНОВКА С ОСНОВАНИЕМ
2.3 УСТАНОВКА БЕЗ ОСНОВАНИЯ
3. ПОСЛЕДУЮЩ ИЕ ОПЕРАЦИИ
3.1 РАЗМЕЩЕНЕИ РЕБЕНКА В АВТОКРЕСЛЕ
3.2 РЕГУЛИРОВКА РЕМНЕЙ
3.3 НЕПОДВИЖНОЕ ИЛИ КАЧАЮЩЕЕСЯ
ПОЛОЖЕНИЕ КРЕСЛА (ШЕЗЛОНГ ИЛИ
КАЧАЛКА)
3.4 ИСПОЛЬЗОВАНИЕ С ПРОГУЛОЧНОЙ
КОЛЯСКОЙ
3.5 ЧИСТКА И ХРАНЕНИЕ
1. ВС ТУП ЛЕНИЕ
1.1 МЕРЫ ПРЕДОСТОРОЖНОСТИ
ОЧЕНЬ ВАЖНО: СРАЗУ ЖЕ ОЗНАКОМИТЬС Я
С СОДЕРЖАНИЕМ
• С О Х Р А Н И Т Е Д А Н Н О Е Р У К О В О Д С Т В О Д Л Я
ОБРАЩЕНИЯ В БУДУЩЕМ.
• Для монтажа и установки изделия точно
следуйте инструкции. Избегайте исполь-
зования изделия без предварительного
ознакомления с инструкцией.
• В Н И М А Н И Е ! С о гласно статист ическим дан-
ным о ДТП задние сиденья авто мобиля являются более безопасными по сравнению
с передними: поэтому рекомендуется уст а-
навливать автокрес ло на за дн ие си ден ья.
Особенно безопасно центральное заднее
сиденье, если оно снабжено ремнем без-
опасности с креплением в трех точках.
• В Н И М А Н И Е ! С Е Р Ь Е З Н А Я О П А С Н О С Т Ь ! Н е в
коем случае не используйте это автокре-
сло на переднем сидении, оснащенном
фронтальной воздушной подушкой. Уста-
новка детского автокресла на переднем
сидении возможна только при отключен-
ной фронтальной воздушной подушке
безопасности: уточните у автомобильного
дилера или в руководстве пользователя,
можно ли отключить воздушную подушку
безопасности. В любом случае, рекомендуется отодвинуть сиденье максимально
назад с учетом пассажиров на задних
сидениях.
• Н е о бходимо проинформировать всех пас-
сажиров автомобиля о способе отцепки
ребенка в случае аварии.
• Устанавливайте автокресло в автомобиле
так, чтобы не допустить его столкновений
с передвижным сиденьем или дверью.
• Н и о д н о а в т о к ресло не может гарантировать полную безопасность ребенка
в случае дорожно-транспортного про-
исшествия, но использование данного
изделия уменьшает риск серьезных травм
или смерти.
• Р и с к с е рьезных т равм ребенку, не только в
случае дорожно-транспортного происше-
ствия, но так же и в других обстоятельствах
(например, при резких торможениях и т.д.),
увеличивается при неточном следовании приведенным в данном руководстве
указаниям: всегда проверяйте, чтобы ав-
токресло было правильно пристегнуто
к сидению.
• П о в режденное, деформированное или
сильно изношенное автокресло подлежит
замене, так как оно более не отвечает исходным характеристикам безопасности.
• Н е пытайтесь вносить изменения в конструкцию автокресла.
• З а прещается устанавливать аксессуары,
сменные части и компоненты, не поставляемые производителем.
• Н и к о гда не оставляйте ребенка без присмотра в автокресле.
• Н и к о гда не оставляйте автокресло не
закрепленным к сидению автомобиля,
это может привести к травмированию
пассажиров.
• Н е в с т а в л я й т е н и ч е го, что не является
принадлежностью, утвержденной для
изделия, меж ду автомобильным сиденьем
98
Page 99

и автокреслом и между автокреслом и
ребенком: в случае дорожно-транспор-
тного происшествие автокресло может
исполнять свои функции неправильно.
• П ри планируемом долгом пребывании
автомобиля на солнце рекомендуется
прикрыть автокресло.
• Д о рожно-транспортное происшествие, в
том числе легкое, может вызвать повре-
ждения автокресла, не всегда заметные:
поэтому оно подлежит замене.
• Н е и с пользуйте бывшие в употреблении ав-
токресла: они м огут иметь конструктивные
повреждения, невидимые не вооруженным глазом, но отрицательно влияющие
на безопасность изделия.
• Ч е хол может быть заменен только по
согласованию с производителем, так как
сост авляет не отъемлемую часть автокре-
сла. Во избежание опасности дл я ребенка
запрещается использовать автокресло без
прилагающегося чехла.
• У бедитесь, что ремни безопасности не
защемило дверцей автомобиля, и что тесь-
ма ремней не трется об острые выступы
сиденья или салона авто мобиля. В случае
износа или разрыва ремней безопасности
следует заменить их новыми.
• П роверьте, чтобы не перевозились, осо-
бенно на задней полке внут ри автомобиля,
предметы или багаж, которые не прикре-
плены или не установлены безопасным
образом: в случае аварии или резкого
торможения они могут нанести травмы
пассажирам.
• У бедитесь в том, что все пассажиры автомобиля используют собственные ремни
безопасности. Это необходимо для их
собственной безопасности, а также во
избежание травмирования ребенка в
случае аварии или резкого торможения.
• В с л у ч а е д л и т е л ьных поездок делайте частые остановки. Ребенок легко у томляется
в пут и. Ни в ко ем с луч ае н е вынимайте ре-
бенка из автокресла, пока автомобиль на-
ходится в движении. Если ребенок требует
внимания, необходимо найти безопасное
место и остановиться.
• И с пользование автокресла может быть
опасным для недоношенных детей, родившихся до наступления 37 недели бе-
ременности. При нахождении их в автокресле возможны сложности с дыханием.
Поэтому, перед выпиской из больницы,
обратитесь к своему педиатру или больничному персоналу д ля оценки состояния
вашего ребенка и рекомендации по тому
или иному автокреслу.
• К о м пания Artsana снимает с себя какую-
либо ответственнос ть при использовании
изделия не по назначению.
1.2 ХАРАКТЕРИС ТИКИ ИЗДЕЛИЯ
Настоящее автокресло сертифицировано
как «Группа 0+», для перевозки детей от
рождения и до достижения веса в 13 кг
(возрастом от 0 до 10 месяцев/1 год приблизительно), в соответствии с европейским
стандартом ECE R44/04.
Сертификация соответствует типу «Универсал», поэтому автокресло может использоваться на любых моделях автомобилей.
ВНИМАНИЕ! «Универсал» означает, что автокресло совместимо с большинством, но
не со всеми автомобильными сидениями.
ОБРАТИТЕ ВНИМАНИЕ
1. Д анно е уд ерживающее устройство для
детей «Универсал» сертифицировано
согласно стандарту ECE R44/04 и совместимо с большей частью, но не всеми,
автомобильными сидениями.
2. Превосходная совместимость легче до-
стигается в случаях, когда производитель
автомобиля заявляет в руководстве по эк-
сплуатации автомобиля, что автомобиль
предусматривает установку средств для
сидения детей «Универсал» рассматрива-
емой возрастной категории.
3. Это средство для сидения классифици-
руется как «Универсальное», согласно
критериям сертификации, более строгим
по сравнению с предыдущими моделями,
в которых данное замечание отсу тствует.
4. Средство предназначено исключительно
для применения на транспортных средст-
вах, снабженных ремнями безопасности,
статическими или со втягивающим ме-
ханизмом и с креплением в трех точках,
сертифицированными на основании
Ста ндарта UN/ECE № 16 или других равнозначных стандартов.
5. В случае сомнения свяжитесь с произ-
водителем средства для сидения или
поставщиком.
99
Page 100

1.3 ОПИСАНИЕ КОМПОНЕНТОВ
Рис. 1 (Вид на 3/4)
A. Ручка
B. Капюшон от солнца
C. Текстильный чехол
D. Мягкая эргономическая подушка (*)
E. Основание (**)
Рис. 2 (Вид с переди)
F. П рорези для ремней
G. Ремни автокресла
H. Лямки (*)
I. Кнопка для регулировки ремней (под J.
тканевой накладкой)
Лента для регулировки ремней
Рис. 3 (Вид сб оку)
K. Направляющая поясного ремня на ав-
токресле
L. Направляющая поясного ремня на ос-
новании
M. Кнопки для поворота ручки
N. Штифты «Clik Clak» (для крепления к про-
гулочной коляске)
Рис. 4 (Вид с зади)
O. Н аправляющая диагонального ремня
автокресла
P. Ручка для отцепки (с основания и с про-
гулочной коляски)
Q. Отверстия д ля ремней
R. Направляющий элемент ремней авто-
кресла
S. Упор для устойчивости
(*) Форма и модель могут различаться в
зависимости от модификации автокресла.
(**) Поставляется отдельно
1.4 ПОЛОЖЕНИЕ РУЧКИ
Ручка автокресла может принимать 4 раз-
личных положений (Рис. 5).
A. Положение для перевозки в автомо-
биле (ВНИМАНИЕ: это – единственное
допустимое положение для перевозки
в автомобиле).
B. Положение для переноски вручную.
C. Положение для использов ания в качестве
креслица-качалки или для крепления к
прогулочной коляске Chicco.
D. Положение для использования в качестве
креслица-шезлонга.
Для того, чтобы изм енить положение ручки,
одновременно нажмите на кнопки (M) с
обеих сторон ручки, установите ручку в
нужное положение. Обязательно должен
раздаться щелчок.
1.5 ОГРАНИЧЕНИЯ И ТРЕБО ВАНИЯ ПРИ
ИСПОЛЬЗОВАНИИ ИЗДЕЛИЯ И СИДЕНИЯ
АВТОМОБИЛЯ
ВНИМАНИЕ! Строго придерживайтесь сле-
дующих ограничений и требований к ис-
пользованию изделия и автокресла: иначе
безопасность не гарантируется.
• Автокресло может быть установлено на
переднее пассажирское сиденье или на
одно из задних сидений по выбору. В лю-
бом случае сидение автомобиля должно
быть установлено по направлению движе-
ния. Запрещается использовать настоящее
автокресло на сидениях, повернутых боком или спиной к движению автомобиля
(Рис. 6).
• Сидение автомобиля должно быть снаб-
жено ремнем безопасности, статическими
или со втягивающим механизмом и с кре-
плением в трех точках, сертифицированным на основании Стандарта UN/ECE №
16 или других равнозначных стандартов
(Рис. 7).
• ВНИМАНИЕ! Запрещается устанавливать
автокресло с помощью автомобильного
ремня безопасности с креплением в двух
точках (Рис. 8).
• Запрещается использование мягкой эр-
гономической подушки, если вес ребенка
превышает 6 кг.
• Убедитесь в том, что пряжка трехточечного
ремня безопасности автомобиля не рас-
положена слишком высоко (рис. 13,19). В
противном с лучае попробуйте установить
детское автокресло на другое место для
сидения в автомобиле.
2. УСТАНОВКА АВТОКРЕС ЛА В АВТОМОБИЛЕ
Автокресло можно установить как с основанием (поставляется отдельно), так и без него.
В обоих случаях его следует ус танавливать
только спиной к движению автомобиля.
2.1 ПЕРВОНАЧАЛЬНАЯ КОНФИГУ РАЦИЯ ЛЯМОК
Автокресло оснащено 2 разными типами
лямок (A и B), в зависимости от его модификации. Перед началом использования
автокресла необходимо закрепить на нем
лямки, выполняя такие действия:
• Лямки модификации A (Рис. 9A, 9B и 9C):
проденьте лямки в отверстия тканевого
чехла (НЕ в нижней конс трукции) так, чтобы
ремни оказались поверх них. Вст авьте тка-
100
 Loading...