

Chicago Pneumatic RX 2, RX 3, RX 8, RX 4, RX 6 Safety And Operating Instructions Manual
Safety and operating instructions
Hydraulic breakers
RX 2, 3, 4, 6, 8
Prescriptions de sécurité et instructions pour
l’opérateur
Brise-roche hydraulique
Sicherheits- und Betriebsanleitung
Hydraulikhammer
Instrucciones de seguridad y de funcionamiento
Martillo hidráulico
Instruções de segurança e operação
Martelo demolidor hidráulico
Istruzioni per la sicurezza e per l'uso
Demolitore idraulico
Veiligheidsvoorschriften en bedieningshandleiding
Hydraulische sloophamer
Οδηγίες ασφάλειας και χειρισμού
Υδραυλικός θραυστήρας
Turvallisuusohjeet ja käyttöohje
Käsikäyttöiset hydrauliset iskuvasarat
Sikkerhedsinstruktioner og betjeningsvejledning
Hydraulikhammer
Sikkerhetsinstrukser og bruksanvisning
Hydraulisk hammer
Säkerhetsinstruktion och instruktionsbok
Hydraulhammare
Инструкции по безопасности и эксплуатации
Гидромолоты
www.cp.com

RX 2, 3, 4, 6, 8
9800 1050 90 | Original instructions2

RX 2, 3, 4, 6, 8
Contents
ENGLISH. . . . . . . . . . . . . . . . . . . . . . . . . . . . . . . . . . . . . . . . . . . . . . . . . . . . . . . . . . . . . . . . . . . . . . . . . . . 4
FRANÇAIS. . . . . . . . . . . . . . . . . . . . . . . . . . . . . . . . . . . . . . . . . . . . . . . . . . . . . . . . . . . . . . . . . . . . . . . . . 26
DEUTSCH. . . . . . . . . . . . . . . . . . . . . . . . . . . . . . . . . . . . . . . . . . . . . . . . . . . . . . . . . . . . . . . . . . . . . . . . . 48
ESPAÑOL. . . . . . . . . . . . . . . . . . . . . . . . . . . . . . . . . . . . . . . . . . . . . . . . . . . . . . . . . . . . . . . . . . . . . . . . . 70
PORTUGUÊS. . . . . . . . . . . . . . . . . . . . . . . . . . . . . . . . . . . . . . . . . . . . . . . . . . . . . . . . . . . . . . . . . . . . . . 92
ITALIANO. . . . . . . . . . . . . . . . . . . . . . . . . . . . . . . . . . . . . . . . . . . . . . . . . . . . . . . . . . . . . . . . . . . . . . . . 114
NEDERLANDS. . . . . . . . . . . . . . . . . . . . . . . . . . . . . . . . . . . . . . . . . . . . . . . . . . . . . . . . . . . . . . . . . . . . 136
ΕΛΛΗΝΙΚΑ. . . . . . . . . . . . . . . . . . . . . . . . . . . . . . . . . . . . . . . . . . . . . . . . . . . . . . . . . . . . . . . . . . . . . . . 158
SUOMI. . . . . . . . . . . . . . . . . . . . . . . . . . . . . . . . . . . . . . . . . . . . . . . . . . . . . . . . . . . . . . . . . . . . . . . . . . . 182
DANSK. . . . . . . . . . . . . . . . . . . . . . . . . . . . . . . . . . . . . . . . . . . . . . . . . . . . . . . . . . . . . . . . . . . . . . . . . . 204
NORSK. . . . . . . . . . . . . . . . . . . . . . . . . . . . . . . . . . . . . . . . . . . . . . . . . . . . . . . . . . . . . . . . . . . . . . . . . . . 226
SVENSKA. . . . . . . . . . . . . . . . . . . . . . . . . . . . . . . . . . . . . . . . . . . . . . . . . . . . . . . . . . . . . . . . . . . . . . . . 248
РУССКИЙ. . . . . . . . . . . . . . . . . . . . . . . . . . . . . . . . . . . . . . . . . . . . . . . . . . . . . . . . . . . . . . . . . . . . . . . . 270
39800 1050 90 | Original instructions

RX 2, 3, 4, 6, 8Contents
ENGLISH
Contents
Introduction. . . . . . . . . . . . . . . . . . . . . . . . . . . . . . . . . . . . . . . . . . . . . . . . . . . . . . . . . . . . . . . . . . . . . . . 5
About the Safety and operating instructions. . . . . . . . . . . . . . . . . . . . . . . . . . . . . . . . . . . . . . . 5
Safety instructions. . . . . . . . . . . . . . . . . . . . . . . . . . . . . . . . . . . . . . . . . . . . . . . . . . . . . . . . . . . . . . . . . 6
Safety signal words. . . . . . . . . . . . . . . . . . . . . . . . . . . . . . . . . . . . . . . . . . . . . . . . . . . . . . . . . . . . . . . . 6
Personal precautions and qualifications. . . . . . . . . . . . . . . . . . . . . . . . . . . . . . . . . . . . . . . . . . . . . . 6
Carrier, precautions. . . . . . . . . . . . . . . . . . . . . . . . . . . . . . . . . . . . . . . . . . . . . . . . . . . . . . . . . . . . . . . . 7
Installation, precautions. . . . . . . . . . . . . . . . . . . . . . . . . . . . . . . . . . . . . . . . . . . . . . . . . . . . . . . . . . . . 7
Operation, precautions. . . . . . . . . . . . . . . . . . . . . . . . . . . . . . . . . . . . . . . . . . . . . . . . . . . . . . . . . . . . 8
Maintenance, precautions. . . . . . . . . . . . . . . . . . . . . . . . . . . . . . . . . . . . . . . . . . . . . . . . . . . . . . . . . 10
Storage, precautions. . . . . . . . . . . . . . . . . . . . . . . . . . . . . . . . . . . . . . . . . . . . . . . . . . . . . . . . . . . . . . 10
Overview. . . . . . . . . . . . . . . . . . . . . . . . . . . . . . . . . . . . . . . . . . . . . . . . . . . . . . . . . . . . . . . . . . . . . . . . . 11
Design and function. . . . . . . . . . . . . . . . . . . . . . . . . . . . . . . . . . . . . . . . . . . . . . . . . . . . . . . . . . . . . . 11
Main parts. . . . . . . . . . . . . . . . . . . . . . . . . . . . . . . . . . . . . . . . . . . . . . . . . . . . . . . . . . . . . . . . . . . . . . 11
Labels. . . . . . . . . . . . . . . . . . . . . . . . . . . . . . . . . . . . . . . . . . . . . . . . . . . . . . . . . . . . . . . . . . . . . . . . . . 11
Transport. . . . . . . . . . . . . . . . . . . . . . . . . . . . . . . . . . . . . . . . . . . . . . . . . . . . . . . . . . . . . . . . . . . . . . . . . 12
Installation. . . . . . . . . . . . . . . . . . . . . . . . . . . . . . . . . . . . . . . . . . . . . . . . . . . . . . . . . . . . . . . . . . . . . . . 12
Hoses and connections. . . . . . . . . . . . . . . . . . . . . . . . . . . . . . . . . . . . . . . . . . . . . . . . . . . . . . . . . . . 13
Hydraulic oil. . . . . . . . . . . . . . . . . . . . . . . . . . . . . . . . . . . . . . . . . . . . . . . . . . . . . . . . . . . . . . . . . . . . . 13
Pressure adjustment. . . . . . . . . . . . . . . . . . . . . . . . . . . . . . . . . . . . . . . . . . . . . . . . . . . . . . . . . . . . . . 13
Assembly. . . . . . . . . . . . . . . . . . . . . . . . . . . . . . . . . . . . . . . . . . . . . . . . . . . . . . . . . . . . . . . . . . . . . . . . 14
Insertion tool. . . . . . . . . . . . . . . . . . . . . . . . . . . . . . . . . . . . . . . . . . . . . . . . . . . . . . . . . . . . . . . . . . . . 15
Operation. . . . . . . . . . . . . . . . . . . . . . . . . . . . . . . . . . . . . . . . . . . . . . . . . . . . . . . . . . . . . . . . . . . . . . . . 17
Preparation before breaking. . . . . . . . . . . . . . . . . . . . . . . . . . . . . . . . . . . . . . . . . . . . . . . . . . . . . . . 17
Operating. . . . . . . . . . . . . . . . . . . . . . . . . . . . . . . . . . . . . . . . . . . . . . . . . . . . . . . . . . . . . . . . . . . . . . . 17
Maintenance. . . . . . . . . . . . . . . . . . . . . . . . . . . . . . . . . . . . . . . . . . . . . . . . . . . . . . . . . . . . . . . . . . . . . 19
Lubrication. . . . . . . . . . . . . . . . . . . . . . . . . . . . . . . . . . . . . . . . . . . . . . . . . . . . . . . . . . . . . . . . . . . . . . 19
Every second hour. . . . . . . . . . . . . . . . . . . . . . . . . . . . . . . . . . . . . . . . . . . . . . . . . . . . . . . . . . . . . . . . 20
Every day. . . . . . . . . . . . . . . . . . . . . . . . . . . . . . . . . . . . . . . . . . . . . . . . . . . . . . . . . . . . . . . . . . . . . . . 21
Every week. . . . . . . . . . . . . . . . . . . . . . . . . . . . . . . . . . . . . . . . . . . . . . . . . . . . . . . . . . . . . . . . . . . . . . 21
Every year. . . . . . . . . . . . . . . . . . . . . . . . . . . . . . . . . . . . . . . . . . . . . . . . . . . . . . . . . . . . . . . . . . . . . . . 22
Storage. . . . . . . . . . . . . . . . . . . . . . . . . . . . . . . . . . . . . . . . . . . . . . . . . . . . . . . . . . . . . . . . . . . . . . . . . . . 22
Disposal. . . . . . . . . . . . . . . . . . . . . . . . . . . . . . . . . . . . . . . . . . . . . . . . . . . . . . . . . . . . . . . . . . . . . . . . . . 22
Technical data. . . . . . . . . . . . . . . . . . . . . . . . . . . . . . . . . . . . . . . . . . . . . . . . . . . . . . . . . . . . . . . . . . . . 23
Machine data. . . . . . . . . . . . . . . . . . . . . . . . . . . . . . . . . . . . . . . . . . . . . . . . . . . . . . . . . . . . . . . . . . . . 23
Capacities. . . . . . . . . . . . . . . . . . . . . . . . . . . . . . . . . . . . . . . . . . . . . . . . . . . . . . . . . . . . . . . . . . . . . . . 23
Noise declaration statement. . . . . . . . . . . . . . . . . . . . . . . . . . . . . . . . . . . . . . . . . . . . . . . . . . . . . . . 23
EC Declaration of Conformity. . . . . . . . . . . . . . . . . . . . . . . . . . . . . . . . . . . . . . . . . . . . . . . . . . . . . 24
EC Declaration of Conformity (EC Directive 2006/42/EC). . . . . . . . . . . . . . . . . . . . . . . . . . . . . . 24
9800 1050 90 | Original instructions4

Safety and operating instructionsRX 2, 3, 4, 6, 8
Introduction
Thank you for choosing Chicago Pneumatic brand products. For over a century, the
Chicago Pneumatic brand has represented performance and innovation in the
pneumatic tool industry.
Today the brand is found around the world on a range of pneumatic and hydraulic
tools that includes breakers, rock drills, chipping hammers, clay-diggers, picks and
busters, scabblers, pumps and a whole lot more.
The Chicago Pneumatic brand is associated with powerful and reliable products that
are easy to maintain and that give good value for the money.
For more information please visit www.cp.com
Atlas Copco Construction Tools AB
105 23 Stockholm
Sweden
About the Safety and operating
instructions
The aim of the instructions is to provide you with knowledge of how to use the
hydraulic breaker in an efficient, safe way. The instructions also give you advice and
tell you how to perform regular maintenance on the hydraulic breaker.
Before using the hydraulic breaker for the first time you must read these instructions
carefully and understand all of them.
59800 1050 90 | Original instructions

RX 2, 3, 4, 6, 8Safety and operating instructions
Safety instructions
To reduce the risk of serious injury or death to
yourself or others, read and understand the Safety
and operating instruction before installing,
operating, repairing, maintaining, or changing
accessories on the machine.
Post this Safety and operating instruction at work
locations, provide copies to employees, and make
sure that everyone reads the Safety and operating
instruction before operating or servicing the
machine.
In addition, the operator or the operator's employer
must assess the specific risks that may be present as
a result of each use of the machine.
Safety signal words
The safety signal words Danger, Warning and
Caution have the following meanings:
DANGER
WARNING
CAUTION
Personal precautions and
qualifications
Only qualified and trained persons may operate or
maintain the machine. They must be physically able
to handle the bulk, weight, and power of the tool.
Always use your common sense and good
judgement.
Transport
Transport of the hydraulic breaker may only be
undertaken by persons who:
> are authorised to operate a crane or fork-lift truck
in conformity with the applicable national
directives,
Indicates a hazardous situation
which, if not avoided, will result
in death or serious injury.
Indicates a hazardous situation
which, if not avoided, could
result in death or serious injury.
Indicates a hazardous situation
which, if not avoided, could
result in minor or moderate
injury.
Installation, storage, maintenance and
disposal
Installation, storage, maintenance and disposal of
the hydraulic breaker may only be undertaken by
persons who:
> are aware of all the relevant national safety
instructions and accident prevention instructions
> and have read and understood the Safety and
operating instructions.
Operation
Operation of the hydraulic breaker may only be
undertaken by qualified carrier operators. Carrier
operators are qualified if they:
> are trained to operate a carrier in conformity with
national directives,
> are aware of all the relevant national safety
instructions and accident prevention instructions
> and have read and understood the Safety and
operating instructions.
Testing
Testing of the hydraulic installation must only be
carried out by professional technicians. The
technicians must be authorised to approve a
hydraulic installation in accordance with national
directives.
Personal protective equipment
Always use approved protective equipment.
Operators and all other persons in the working area
must wear protective equipment, including at a
minimum:
> Protective helmet
> Hearing protection
> Impact resistant eye protection with side
protection
> Respiratory protection when appropriate
> Protective gloves
> Proper protective boots
> Appropriate work overall or similar clothing (not
loose-fitting) that covers your arms and legs.
> are aware of all the relevant national safety
instructions and accident prevention instructions
> and have read and understood the safety and
transport chapters of this manual.
9800 1050 90 | Original instructions6

Safety and operating instructionsRX 2, 3, 4, 6, 8
Drugs, alcohol or medication
WARNING Drugs, alcohol or medication
Drugs, alcohol or medication may impair your
judgment and powers of concentration. Poor
reactions and incorrect assessments can lead to
severe accidents or death.
► Never use the machine when you are tired or
under the influence of drugs, alcohol or
medication.
► No person who is under the influence of drugs,
alcohol or medication may operate the machine.
Carrier, precautions
Before using or transporting the carrier with the
hydraulic breaker attached, carefully read the carrier
manufacturer's safety regulations and operating
instructions.
Make sure that the carrier is equipped with adequate
protective features, including a protective screen in
front of the operator.
The hydraulic breaker should only be mounted on
a carrier with sufficient load capacity.
Carriers without sufficient load capacity will not
provide the required degree of stability and could
even fall over during hydraulic breaker use, causing
injury and damage.
WARNING Hydraulic oil at high
pressure
Thin jets of hydraulic oil under high pressure can
penetrate the skin and cause permanent damage.
► Immediately consult a doctor if hydraulic oil has
penetrated the skin.
► Never use your fingers to check for hydraulic fluid
leaks.
► Keep your face away from any possible leaks.
WARNING Hydraulic oil
Spilled hydraulic oil can cause burns, accidents due
to slippery conditions and will also harm the
environment.
► Take care of all spilled oil and handle it according
to your safety and environmental regulations.
► Never dismount the hydraulic machine when the
hydraulic oil is hot.
► Never run any hydraulic lines for attachment of
the hydraulic machine through the drivers cab.
CAUTION Skin eczema
Hydraulic oil can cause eczema if it comes in contact
with the skin.
► Avoid getting hydraulic oil on your hands.
► Always use protective gloves when working with
hydraulic oil.
Installation, precautions
Hydraulic system
DANGER Compressed gas, explosion
hazard
The integrated piston accumulator is pressurized
even when the hydraulic system is shut off. To
dismount the accumulator without first releasing
the nitrogen gas can cause serious personal injury
or death.
► Fill the integrated piston accumulator with
nitrogen (N 2) only.
► Wash hands after contact with hydraulic oil.
Assembly or disassembly
WARNING Moving parts
Risk for leaking oil and personal injury, such as
crushed hands and fingers.
► Never check bores or passages with hands or
fingers.
► Any boom movements shall only be done in
cooperation with the personnel mounting the
hydraulic breaker.
► If the hydraulic breaker is mounted on a quick
hitch coupling, make sure it is locked securely and
all risks of the hydraulic breaker coming loose are
eliminated.
79800 1050 90 | Original instructions

RX 2, 3, 4, 6, 8Safety and operating instructions
Operation, precautions
DANGER Explosion hazard
If an insertion tool comes into contact with
explosives or explosive gases, an explosion could
occur. When working on certain materials and when
using certain materials in machine parts, sparks and
ignition can occur. Explosions will lead to severe
injuries or death.
► Never operate the machine in any explosive
environment.
► Never use the machine near flammable materials,
fumes or dust.
► Make sure that there are no undetected sources
of gas or explosives.
WARNING Operating pressure
If the maximum operating pressure for the hydraulic
machine is exceeded, the accumulator can be over
charged which can result in material damage and
personal injury.
► Always run the hydraulic machine with the correct
operating pressure. See "Technical data".
WARNING Dust and fume hazard
Dusts and/or fumes generated or dispersed when
using the machine may cause serious and permanent
respiratory disease, illness, or other bodily injury (for
example, silicosis or other irreversible lung disease
that can be fatal, cancer, birth defects, and/or skin
inflammation).
Some dusts and fumes created by drilling, breaking,
hammering, sawing, grinding and other construction
activities contain substances known to the State of
California and other authorities to cause respiratory
disease, cancer, birth defects, or other reproductive
harm. Some examples of such substances are:
> Crystalline silica, cement, and other masonry
products.
> Arsenic and chromium from chemically-treated
rubber.
> Lead from lead-based paints.
Dust and fumes in the air can be invisible to the
naked eye, so do not rely on eye sight to determine
if there is dust or fumes in the air.
To reduce the risk of exposure to dust and fumes,
do all of the following:
► Perform site-specific risk assessment. The risk
assessment should include dust and fumes created
by the use of the machine and the potential for
disturbing existing dust.
► Use proper engineering controls to minimize the
amount of dust and fumes in the air and to
minimize build-up on equipment, surfaces,
clothing, and body parts. Examples of controls
include: exhaust ventilation and dust collection
systems, water sprays, and wet drilling. Control
dusts and fumes at the source where possible.
Make sure that controls are properly installed,
maintained and correctly used.
► Wear, maintain and correctly use respiratory
protection as instructed by your employer and as
required by occupational health and safety
regulations. The respiratory protection must be
effective for the type of substance at issue (and if
applicable, approved by relevant governmental
authority).
► Work in a well ventilated area.
► If the machine has an exhaust, direct the exhaust
so as to reduce disturbance of dust in a dust filled
environment.
► Operate and maintain the machine as
recommended in the operating and safety
instructions
9800 1050 90 | Original instructions8

Safety and operating instructionsRX 2, 3, 4, 6, 8
► Select, maintain and replace consumables/
inserted tools/ other accessory as recommended
in the operating and safety instructions. Incorrect
selection or lack of maintenance of consumables/
inserted tools/ other accessories may cause an
unnecessary increase in dust or fumes.
► Wear washable or disposable protective clothes
at the worksite, and shower and change into clean
clothes before leaving the worksite to reduce
exposure of dust and fumes to yourself, other
persons, cars, homes, and other areas.
► Avoid eating, drinking, and using tobacco
products in areas where there is dust or fumes.
► Wash your hands and face thoroughly as soon as
possible upon leaving the exposure area, and
always before eating, drinking, using tobacco
products, or making contact with other persons.
► Comply with all applicable laws and regulations,
including occupational health and safety
regulations.
► Participate in air monitoring, medical examination
programs, and health and safety training
programs provided by your employer or trade
organizations and in accordance with
occupational health and safety regulations and
recommendations. Consult with physicians
experienced with relevant occupational medicine.
► Work with your employer and trade organization
to reduce dust and fume exposure at the worksite
and to reduce the risks. Effective health and safety
programs, policies and procedures for protecting
workers and others against harmful exposure to
dust and fumes should be established and
implemented based on advice from health and
safety experts. Consult with experts.
WARNING Electric shock
The hydraulic breaker is not insulated against electric
current. Should the hydraulic breaker come in
contact with electric circuits or other electrical power
sources, there is a risk of severe injury or death.
► Never work in the proximity of electric circuits or
other electrical power sources.
WARNING Projectiles
Failure of the work piece, of accessories, or even of
the hydraulic breaker itself may generate high
velocity projectiles. During breaking, splinters, or
other particles may become projectiles and cause
bodily injury by striking the operator or other
persons. Also, breakage of the work piece,
accessories, or the insertion tool may generate high
velocity projectiles that can cause bodily injury. In
addition, objects falling from a height can cause
bodily injury. To reduce risks:
► Close off the working area.
► Before starting, make sure that no persons are in
the danger area, 20 meters both horisontally and
vertically from the hydraulic breaker.
► Immediately switch off the hydraulic breaker when
persons are present in the danger area.
► Press the insertion tool against the working
surface before you start.
► Never operate unless the inserted tool is retained
in the hydraulic breaker with a proper tool
retainer.
WARNING Noise hazard
High noise levels can cause permanent and disabling
hearing loss and other problems such as tinnitus
(ringing, buzzing, whistling or humming in the ears).
To reduce risk and prevent an unnecessary increase
in noise levels:
► Risk assessment of these hazards and
implementation of appropriate controls is
essential.
► Operate and maintain the machine as
recommended in these instructions.
► Select, maintain and replace the insertion tool as
recommended in these instructions.
► If the machine has a muffler, check that it is in
place and in good working condition.
► Always use hearing protection.
► Use damping material to prevent work pieces
from "ringing".
► Make sure there are no hidden electric circuits in
your working area.
99800 1050 90 | Original instructions

RX 2, 3, 4, 6, 8Safety and operating instructions
Maintenance, precautions
WARNING Involuntary start
An involuntary start of the hydraulic breaker can lead
to severe injuries.
► Follow the instructions in the carrier manual to
prevent involuntary start of the hydraulic breaker.
► Installation of a start circuit on the hydraulic
breaker must be made in a way that avoids any
unintentional starts.
► A foot pedal on the carrier must be equipped with
a protection cover.
WARNING Hydraulic system under high
pressure
Maintenance work on a hydraulic breaker under
pressure can lead to severe injuries. Connections
can loosen suddenly, parts can suddenly move and
hydraulic oil can be ejected.
► Depressurise the hydraulic system before
performing maintenance on the hydraulic breaker
or the carrier.
Storage, precautions
WARNING Hydraulic breaker and
insertion tool are heavy
► Store the hydraulic breaker and the insertion tool
so that falling or rolling down is prevented.
WARNING Machine modification
Any machine modification may result in bodily
injuries to yourself or others.
► Never modify the machine. Modified machines
are not covered by warranty or product liability.
► Always use original parts, insertion tools, and
accessories.
► Change damaged parts immediately.
► Replace worn components in good time.
CAUTION Hot insertion tool
The tip of the insertion tool can become hot and
sharp when used. Touching it can lead to burns and
cuts.
► Never touch a hot or sharp insertion tool.
► Wait until the insertion tool has cooled down
before carrying out maintenance work.
WARNING Insertion tool hazards
Accidental engagement of the start and stop device
during maintenance or installation can cause serious
injuries, when the power source is connected.
► Never inspect, clean, install, or remove the
insertion tool while the power source is
connected.
9800 1050 90 | Original instructions10
Overview
To reduce the risk of serious injury or death
to yourself or others, read the Safety
instructions section found on the previous
pages of this manual before operating the
machine.
Design and function
RX is a range of rigmounted hydraulic breakers
designed for all kinds of demolition works. No other
use is permitted.
The hydraulic breaker is operated from the driver's
cab of the carrier using the carrier's hydraulic system.
The breaker frequency is controlled by the oil flow
from the carrier.
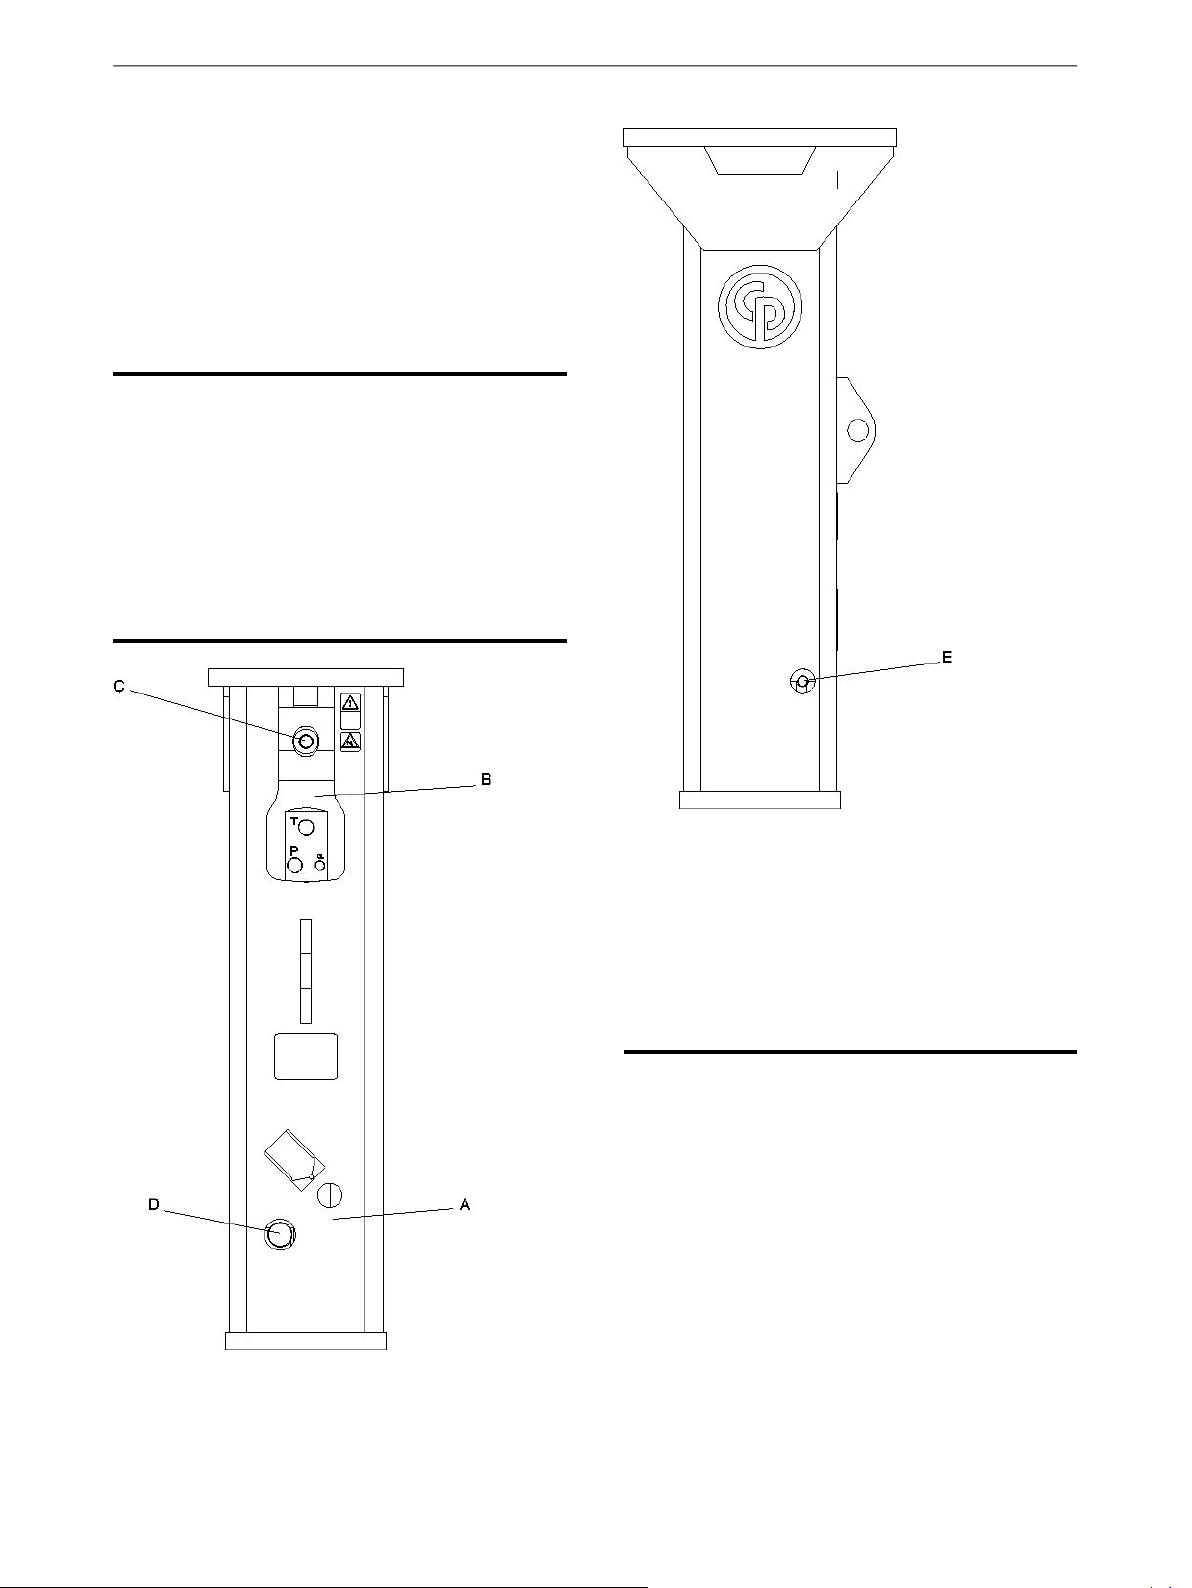
Main parts
Safety and operating instructionsRX 2, 3, 4, 6, 8
A. Hammer box
B. Percussion unit
C. Gasfilling valve
D. Tool retainer
E. Split pin
Labels
The machine is fitted with labels containing
important information about personal safety and
machine maintenance. The labels must be in such
condition that they are easy to read. New labels can
be ordered from the spare parts list.
119800 1050 90 | Original instructions
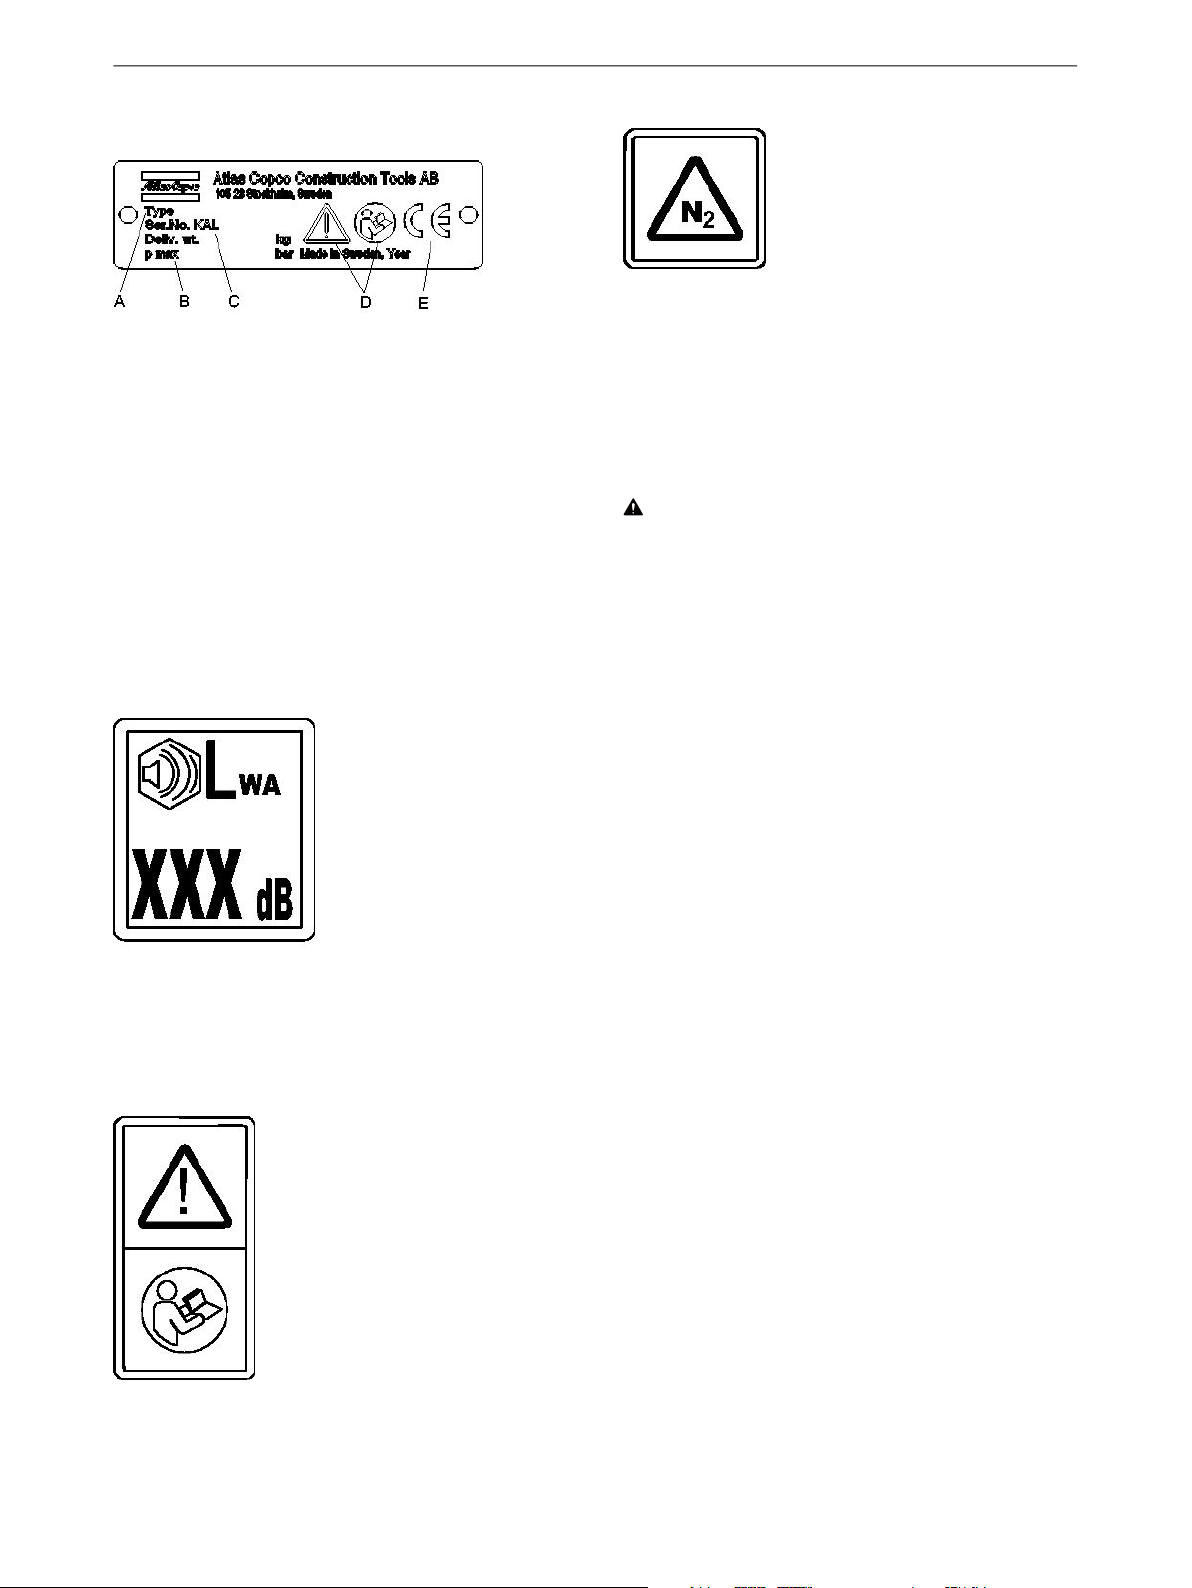
Data plate
A. Machine type
B. Maximum hydraulic pressure
C. Serial number
D. The warning symbol together with the book
symbol means that the user must read the
safety and operating instructions before the
machine is used for the first time.
E. The CE symbol means that the machine is
EC-approved. See the EC Declaration of
Conformity which is delivered with the
machine for more information.
Noise level label
RX 2, 3, 4, 6, 8Safety and operating instructions
The accumulator must only be charged with
Nitrogen.
NOTICE Only certified personnel are allowed to
work with the accumulator.
Transport
WARNING Falling breaker can cause
injuries
► Place the hydraulic breaker in a safe position
where it can not fall over and cause damage.
Carefully check that the carrier is stable enough
when transporting or performing maintenance or
other kind of work on the hydraulic breaker. The
hydraulic breaker is delivered in a box. To lift out the
hydraulic breaker in a safe way, use the lifting eye.
The label indicates the guaranteed noise level
corresponding to EC-directive 2000/14/EC. See
"Technical data" for accurate noise level.
Labels on the accumulator
Installation
Before installing the hydraulic breaker on the carrier
or operating it, read the operation manual and safety
instructions provided by the carrier manufacturer.
Follow all instructions.
The carrier must have the appropriate hydraulic
system for operation of the breaker.
If the carrier is too large for the hydraulic breaker it
may lead to broken insertion tools and increased
wear. See "Technical data" for choosing suitable
carrier.
The safety equipment in the hydraulic system must
be checked for quality (CE mark, etc.), suitability and
functionability by a professional or authorised
supervisor before use.
Read through the overhaul instructions carefully
before servicing or charging.
9800 1050 90 | Original instructions12

Safety and operating instructionsRX 2, 3, 4, 6, 8
Hoses and connections
WARNING Whipping hydraulic hose
Hydraulic hoses under pressure can whip
uncontrollably if screws loosen or are loosened. A
whipping hydraulic hose can cause severe injuries.
► Depressurize the hydraulic system before
loosening the connection of a hydraulic hose.
► Tighten the nuts on the connections of the
hydraulic hoses to the required torque.
Type of nipple: Chicago Pneumatic JIC standard
nipple. The nipple dimensions can be found in the
Spare parts list.
The quality of the hydraulic hoses should be 2SC
(according to EN 857) or better when connecting
the breaker to the carrier. If quick couplings are to
be used, we recommend using the "Flat Face" quick
coupling. This type is sturdy and easy to clean. The
quick couplings pressure class must agree with the
carrier's working pressure.
Always clean the quick couplings before mounting
or dismounting. Always plug hoses and hose nipples
with tight and clean plugs when dismounting.
Hose connections
Right side (As seen from operator’s seat)
Tank, return lineCentral lubrication
Symbol
Tightening torque for pressure and return hose
150 NmRX 2
150 NmRX 3
150 NmRX 4
150 NmRX 6
210 NmRX 8
Hydraulic oil
Normally the type of hydraulic oil the carrier is using
also works for the hydraulic breaker. When a
hydraulic breaker is connected to the carrier, the
hydraulic oil will get contaminated faster. Check and
follow the carrier's instructions for changing oil and
oil filter.
It is common to change the oil filter more frequently
when a hydraulic breaker is installed.
NOTICE When the machine is delivered it contains
some mineral based hydraulic oil. Before connecting
to the carrier's hydraulic system, check which type
of hydraulic oil the carrier is using. Mixing different
types of hydraulic oil may destroy the lubrication
quality which can lead to machine damage.
In order to protect the environment we recommend
the use of biologically degradable hydraulic oil.
Viscosity
15-100 cStViscosity (permitted)
M22 x 1.5G ¼”RX 2
M26 x 1.5G ¼”RX 3
M26 x 1.5G ¼”RX 4
M26 x 1.5G ¼”RX 6
M26 x 1.5G ¼”RX 8
Hose connections
Left side (As seen from operator's seat)
Pressure to
breaker
Symbol
Pressure for
ContiLube©II
M14 x 1.5M26RX 4
M14 x 1.5M26RX 6
M14 x 1.5M26RX 8
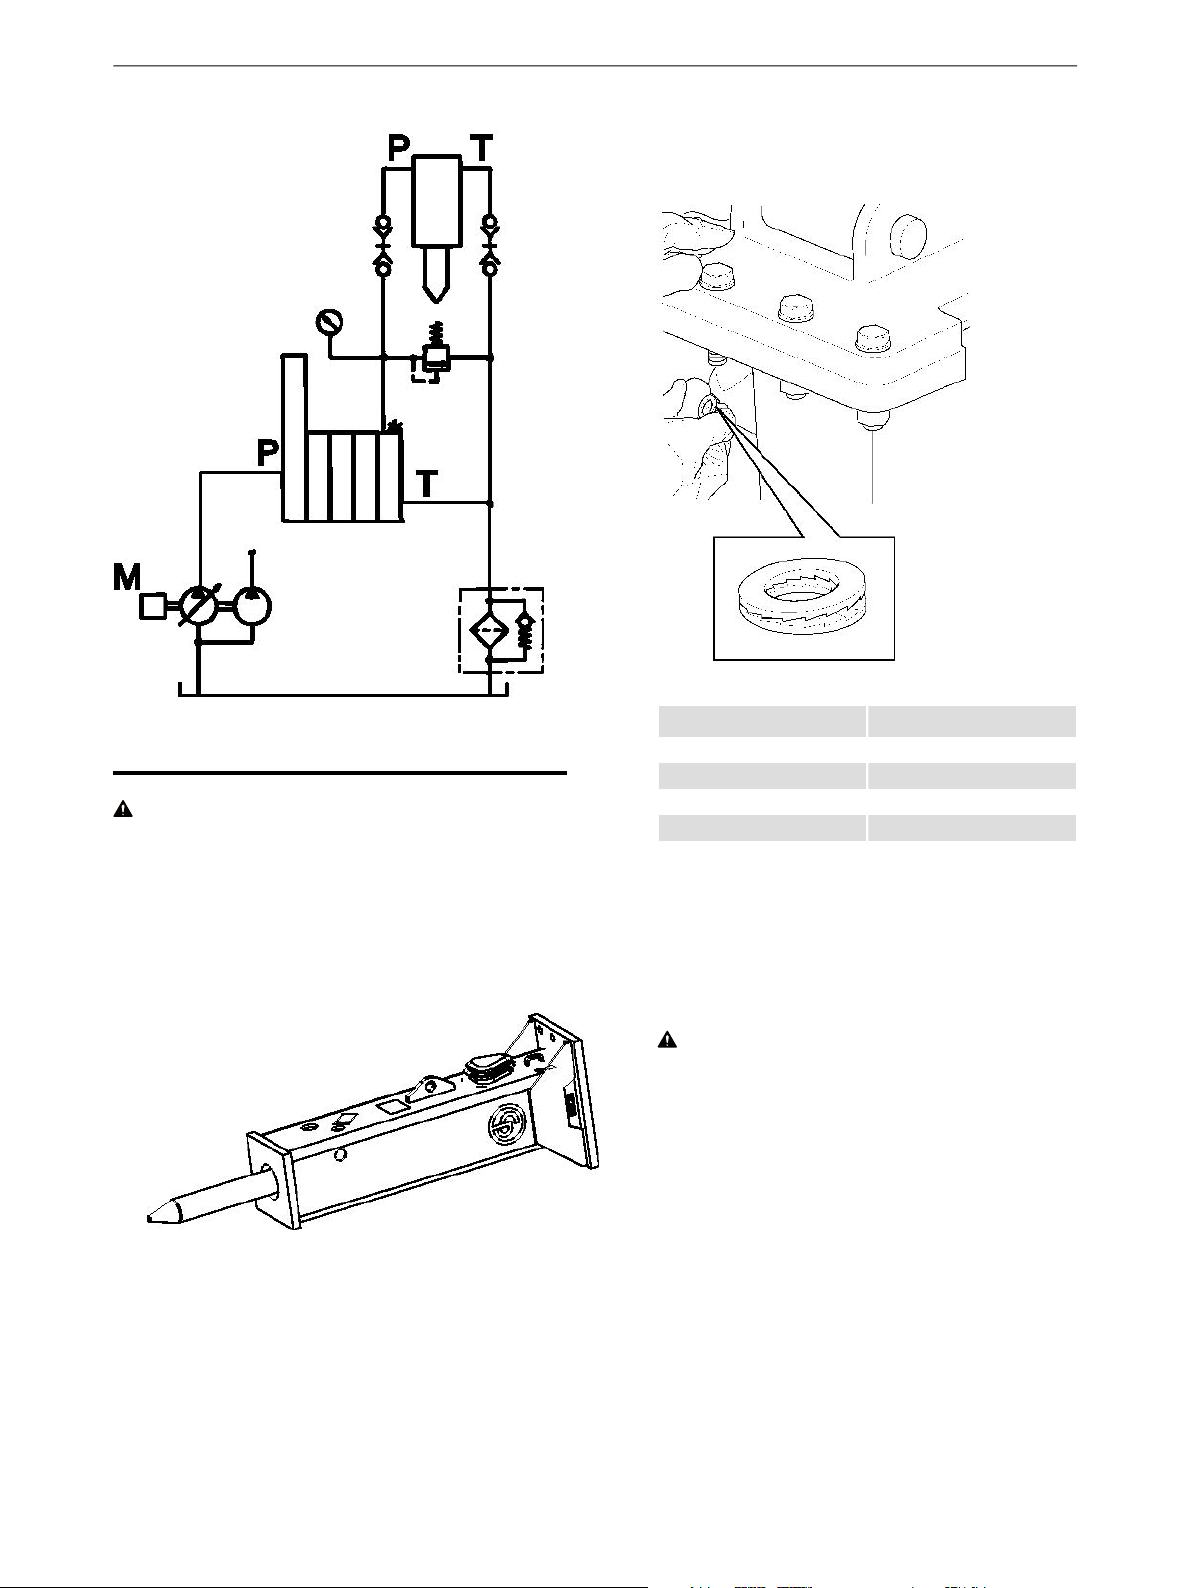
Pressure adjustment
To ensure that the accumulator and hammer are not
overloaded, a separate pressure relief valve should
be installed, see picture below. It is set at a value of
30 bar over the hammer’s maximum operating
pressure. If the carrier’s breaker circuit is already
equipped with a pressure limiting valve, no extra
valve is necessary.
-M22RX 2
-M26RX 3
139800 1050 90 | Original instructions
RX 2, 3, 4, 6, 8Safety and operating instructions
4. Always use NORDLOCK™ washers under bolt
and nut (NORDLOCK™ is a registered trademark
of Nord-Lock AB).
Assembly
WARNING Falling breaker can cause
injuries
► Place the breaker in a safe position where it can
not fall over and cause damage.
Preparation
1. Place the breaker in a position where it is easy
and safe to mount the adapter plate.
Mounting the adapter plate
2. Place a locking washer pair on each screw.
3. Tighten the screws with an spanner.
5.
Tightening torqueAdapter plate
200 NmRX 2
200 NmRX 3
390 NmRX 4
390 NmRX 6
390 NmRX 8
Connecting the breaker to the carrier
6. Place the breaker in a safe way at installation.
7. Carefully lower the stick of the boom into the
adapter.
WARNING Moving parts can crush
and cut
► Never check bores or passages with hands or
fingers.
An assistant should direct the movement of the
dipper arm until the bores in the dipper arm are
flush with those in the adapter.
Agree with the assistant on clear hand signals
for use during the mounting procedure.
8. Insert the pin and lock
9. Lift up the hydraulic breaker using the boom.
10. Extend the bucket cylinder until the bore in the
toggle is flush with those in the adapter. Insert
toggle pin and lock.
9800 1050 90 | Original instructions14
Safety and operating instructionsRX 2, 3, 4, 6, 8
11. After mounting the breaker, carefully extend and
retract the bucket cylinder to its full extent in
each direction. It is important that the cylinder
can be fully extended and retracted without any
difficulty.
Connecting the hydraulic hose
12. Circulate the hydraulic oil before connecting the
hydraulic breaker. This is to make sure that the
hydraulic oil is clean. Use the same routine when
changing the hydraulic oil hose. For further
information see "The hydraulic oil".
13. Connect the pressure and return hose.
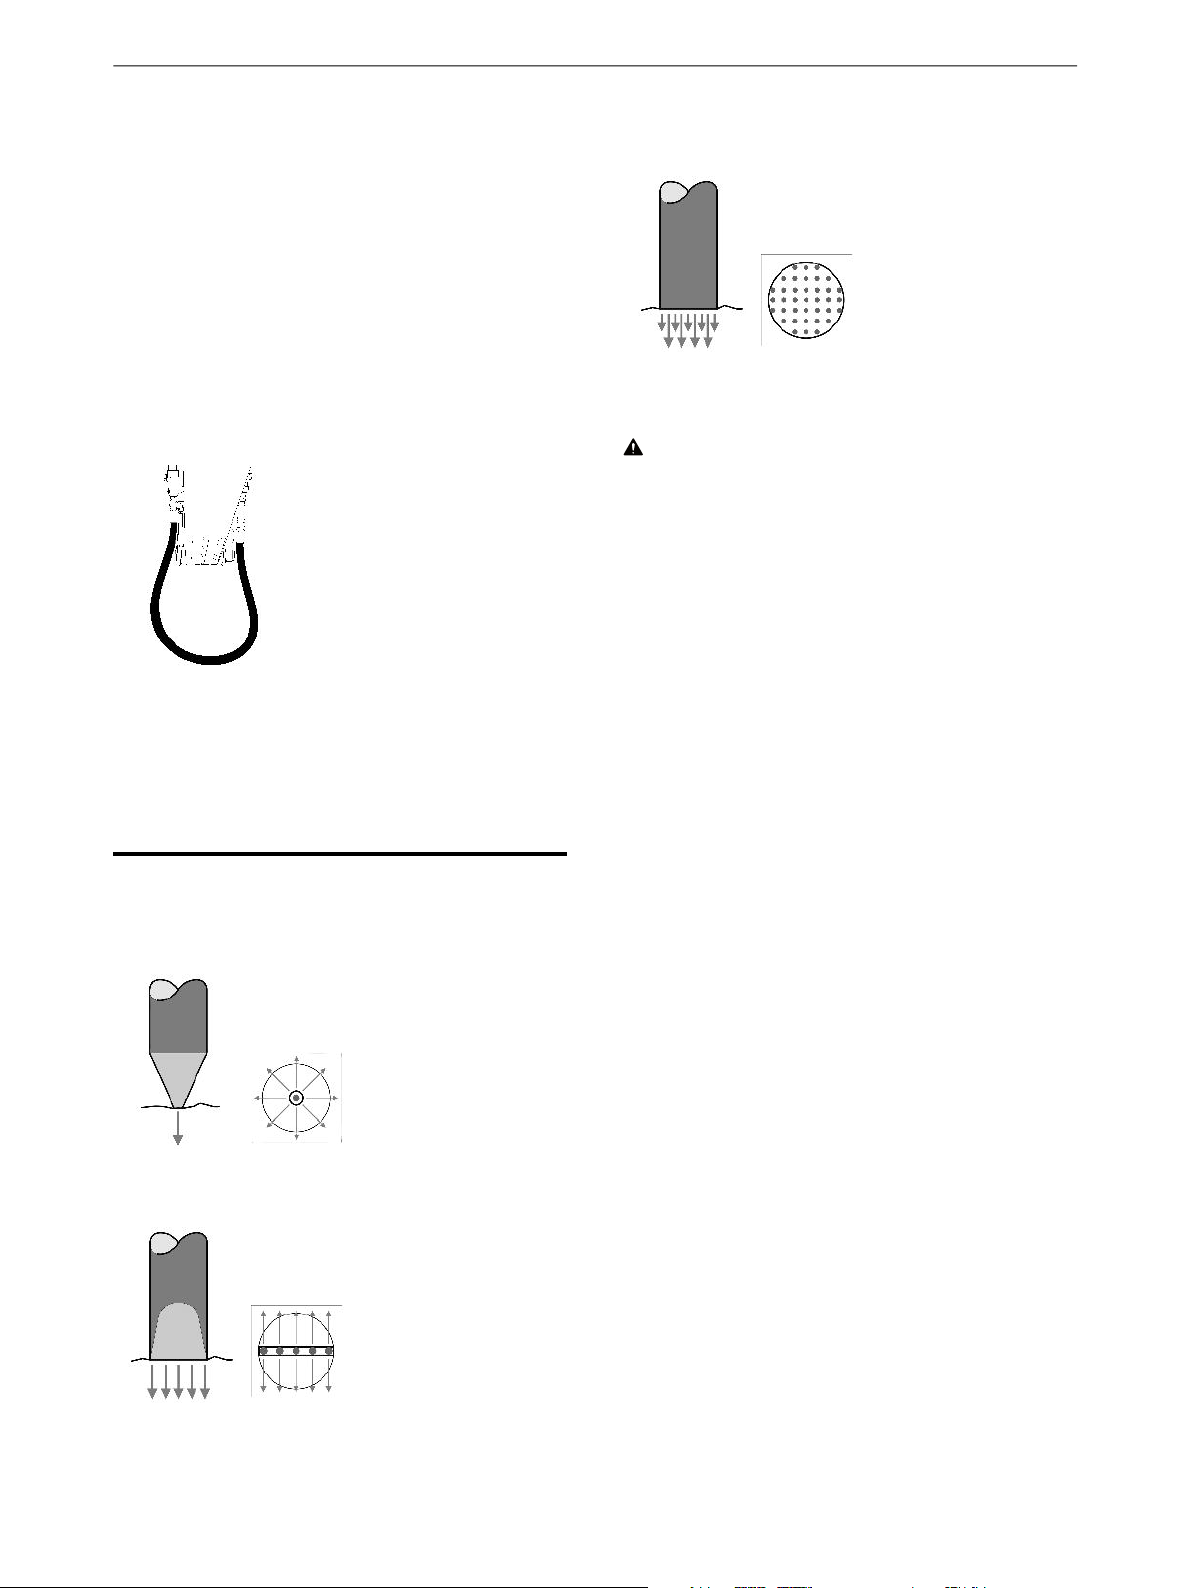
Blunt tool
> Very good energy
application
> Optimum breaking effect
> No torsion effect
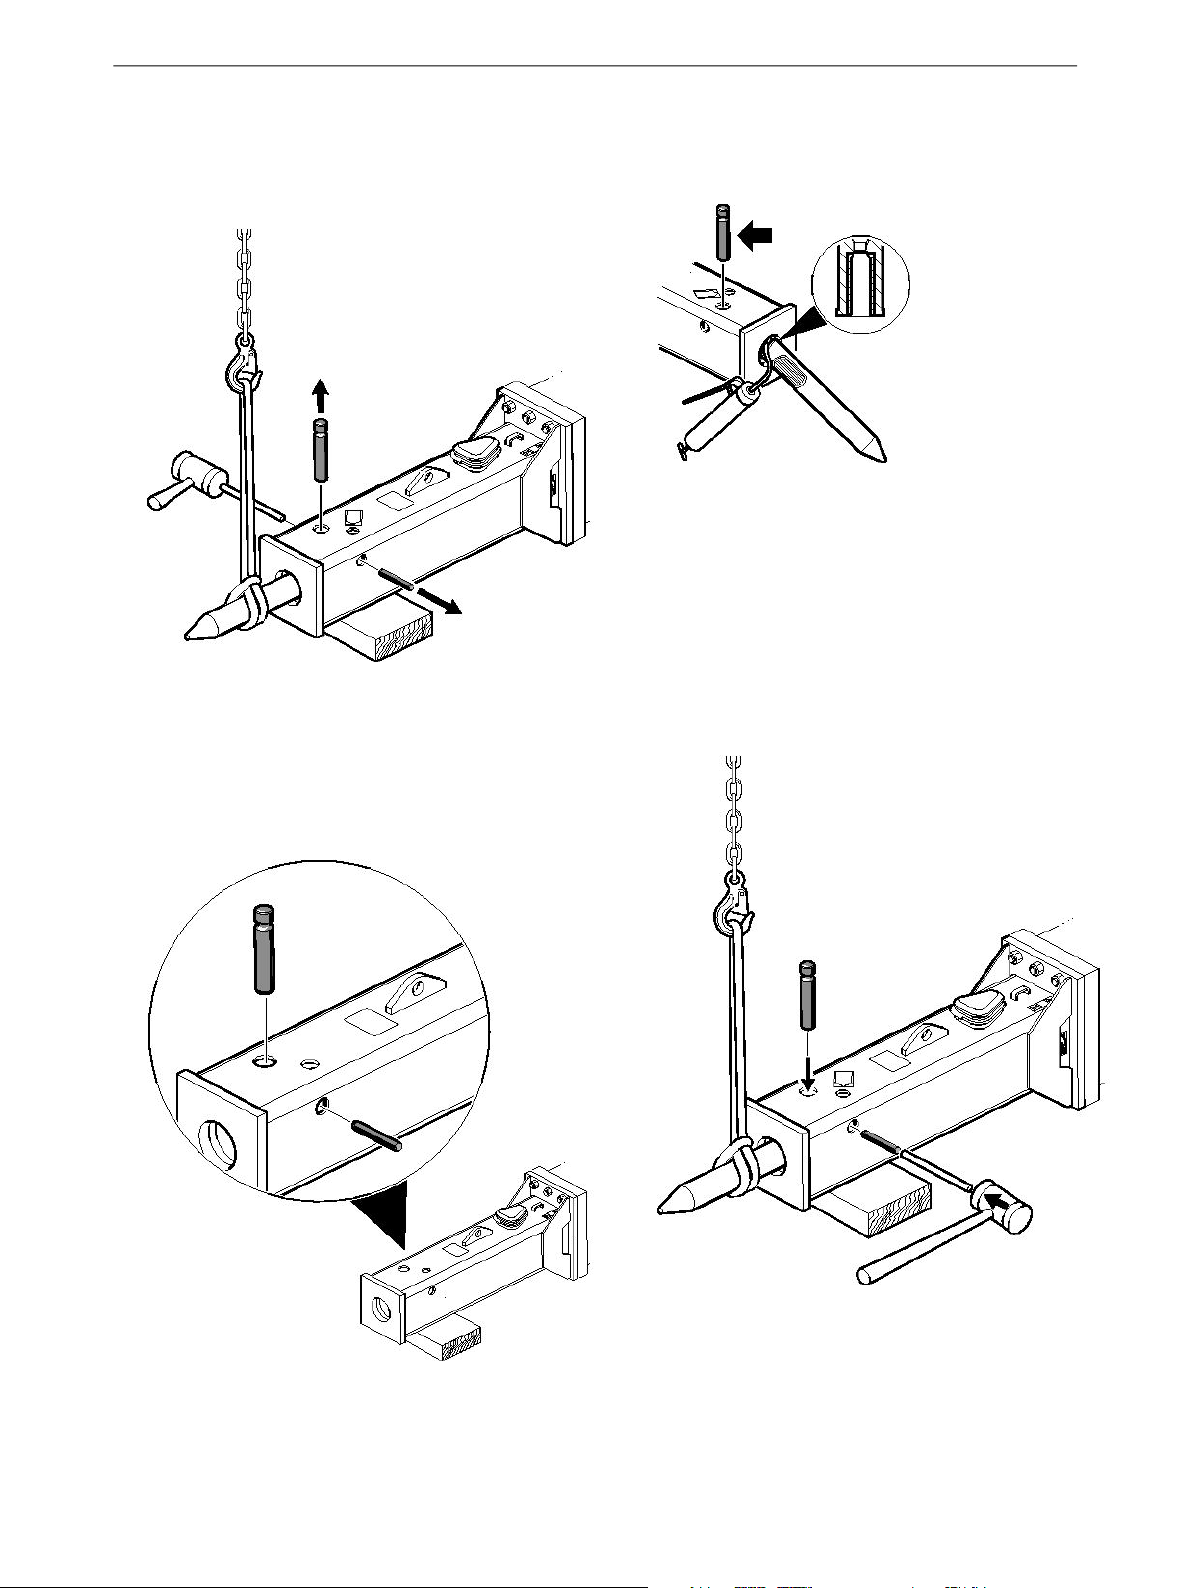
Mounting and dismounting the insertion
tool
WARNING Running engine
Changing the inserted tool or accessories while the
carrier's engine is running can cause serious injury.
► Secure the carrier against involuntary activation.
Before you start mounting or dismounting the
insertion tool, do the following:
1. Place the hydraulic breaker on timber support
blocks. The boring on the back side of the
hydraulic breaker has to remain free.
14. Run the hydraulic oil through the carrier's oil
filter for approximately 3 minutes to make sure
that the hoses are clean.
Insertion tool
Selecting the right insertion tool
Conical moil point
> Very good penetration
> Regular spread of wedge
action
> No torsion effect
Chisels and spades
> Very good spread of wedge
action
> Good penetration
> Torsion effect
2. Shut off the carrier's engine.
3. Remove two plugs from the hammer box, the
first at the split pin and the second at the retainer
pin.
Dismounting the insertion tool:
159800 1050 90 | Original instructions
RX 2, 3, 4, 6, 8Safety and operating instructions
1. Drive out the spring pin by using a break pin
punch and a hammer. Press the retainer pin out
from the hole at the back upwards until you can
remove it through the hole on the front side.
NOTICE Dismount the insertion tool with a
lifting strap to reduce the risk of crushed body
parts. Some insertion tools are heavy, therefore
lift out the insertion tool in a safe way.
1. Clean and lubricate the bushing plentifully. This
is especially important when mounting a new
insertion tool.
2. Mount the insertion tool.
3. Rotate the insertion tool to spread the grease.
4. Mount the retainer pin, and make sure it remains
in position so it not falls through the boring at
the back.
5. Drive in the spring pin by using a break pin
punch and a hammer, until it is flushed with the
percussion unit.
2. Check that the spring pin is not worn out or
damaged. Change if necessary.
Mounting the insertion tool
9800 1050 90 | Original instructions16

Safety and operating instructionsRX 2, 3, 4, 6, 8
Operation
NOTICE The hydraulic breaker or the inserted tool
is not to be used as a lifting device. When lifting
heavy components use the hook on the carrier arm.
Preparation before breaking
Operating temperatures
The operating temperatures of the hydraulic breaker
are between – 20 ºC and + 80 ºC.
CAUTION Temperature hazard
The hydraulic breaker and the hydraulic oil system
of the carrier can be damaged if the hydraulic breaker
is used at higher or lower temperatures.
► Only start the hydraulic breaker when the
hydraulic oil has reached the proper operating
temperature.
► If the ambient temperature is below – 20 ºC, you
should warm up the insertion tool and the
hydraulic breaker before use.
Breaking
CAUTION Machine and tool hazard
Continuous operation at full extension and/or
retraction can result in damage to the hydraulic
cylinders.
► Always avoid operating the breaker with the
cylinders fully extended or retracted.
► Reposition the carrier and/or boom to avoid fully
extended or retracted cylinders.
► Pay attention and look at what you are doing.
Never start the hydraulic breaker until both carrier
and the hydraulic breaker are in the correct position.
► If the oil temperature exceeds + 80 ºC, you must
not use the hydraulic breaker as the oil quality
becomes inadequate which severely shortens the
life time of seals and O-rings.
Engine rpm
Too high engine rpm only results in increased fuel
consumption and increased oil temperature. Adapt
the engine rpm to the recommended value to give
the correct operating oil flow.
Operating
Risk area
Before starting the hydraulic breaker, make sure that
no persons are in the risk area, 20 meters both
horizontally and vertically from the hydraulic
breaker.
179800 1050 90 | Original instructions
RX 2, 3, 4, 6, 8Safety and operating instructions
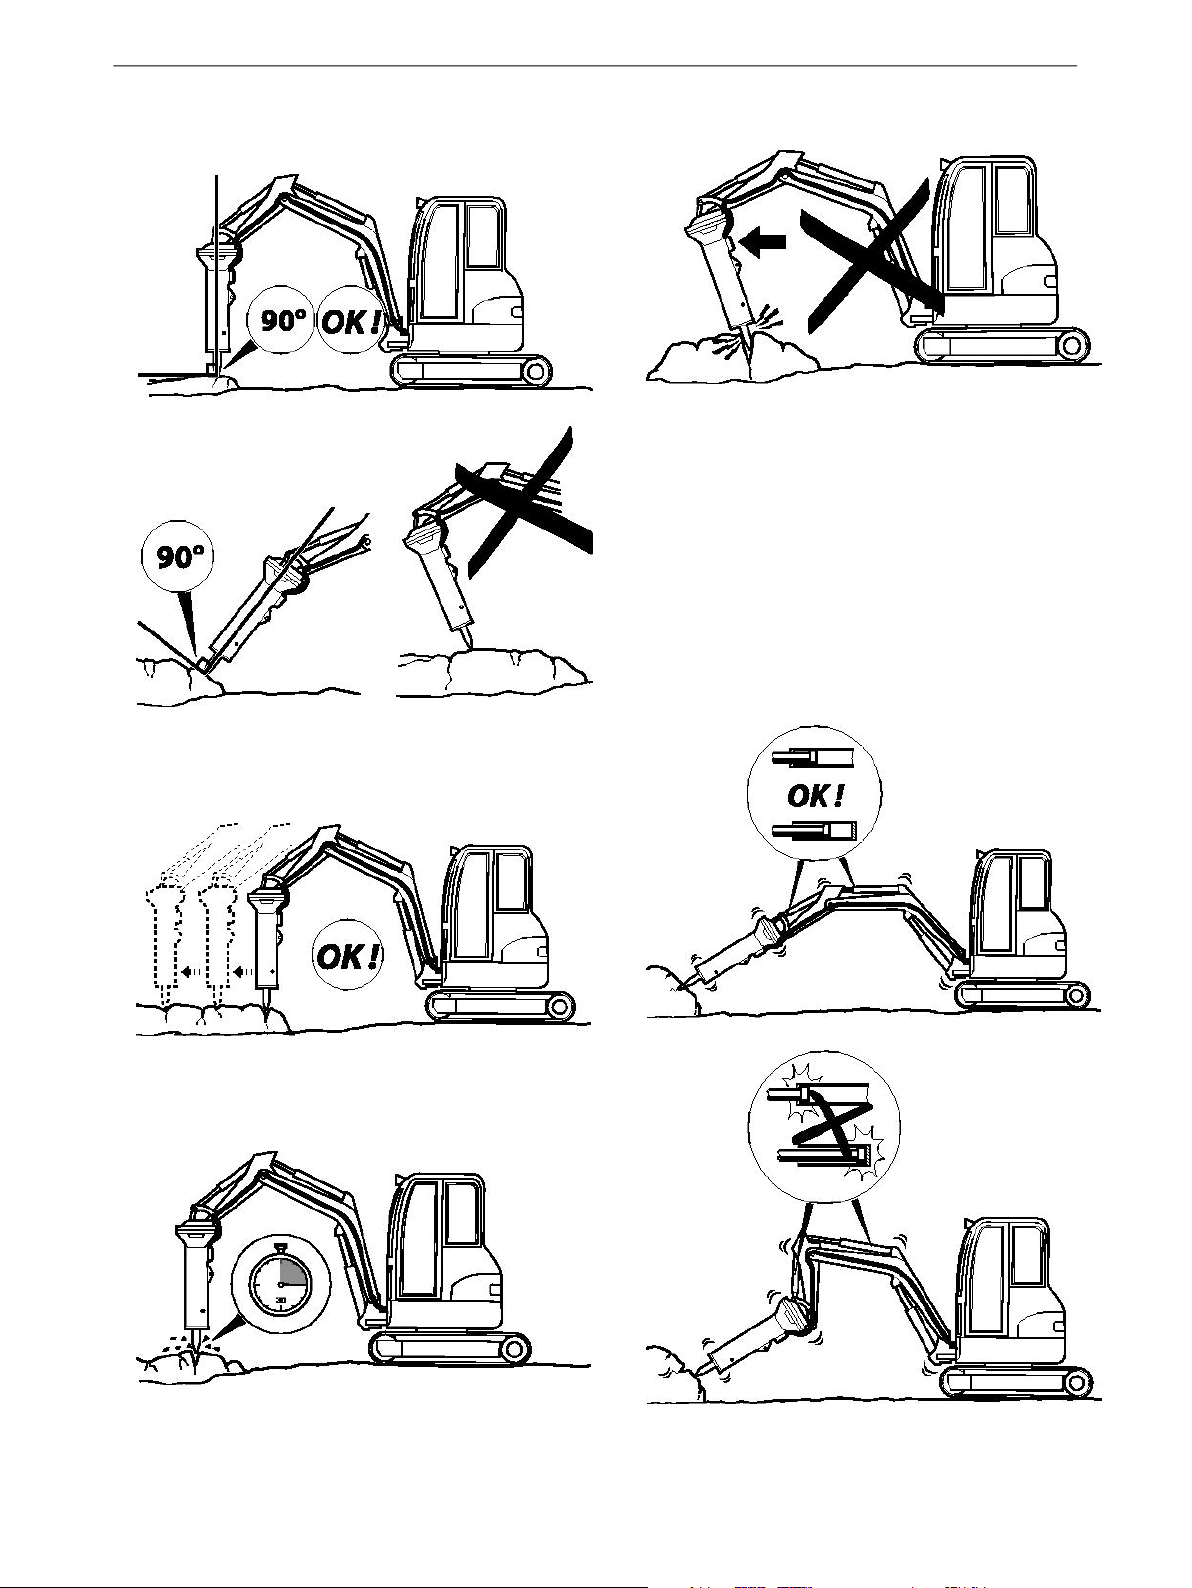
♦
Direct the hydraulic breaker in a position 90°
towards the object.
♦
Never bend with the insertion tool.
♦
Use the correct feed pressure. When the feed
pressure is correct the hydraulic breaker is working
at its best and the vibrations are at a minimum.
Also the wear on the bushing and inserted tool is
kept to a minimum.
♦
Listen to the sound from the hydraulic breaker.
The sound changes if there is any bending
between the inserted tool and bushing.
♦
Never run the breaker with the boom cylinders at
their end positions. It may cause damage to the
carrier.
♦
Start near the edge and work your way in towards
the middle. Never start in the middle of large
objects.
♦
Never run the hydraulic breaker longer then 15
seconds on the same spot. Move the inserted tool
to a new position if the object does not break.
9800 1050 90 | Original instructions18

♦
Avoid idling strokes; it causes wear on both
inserted tool and tool retainers.
Safety and operating instructionsRX 2, 3, 4, 6, 8
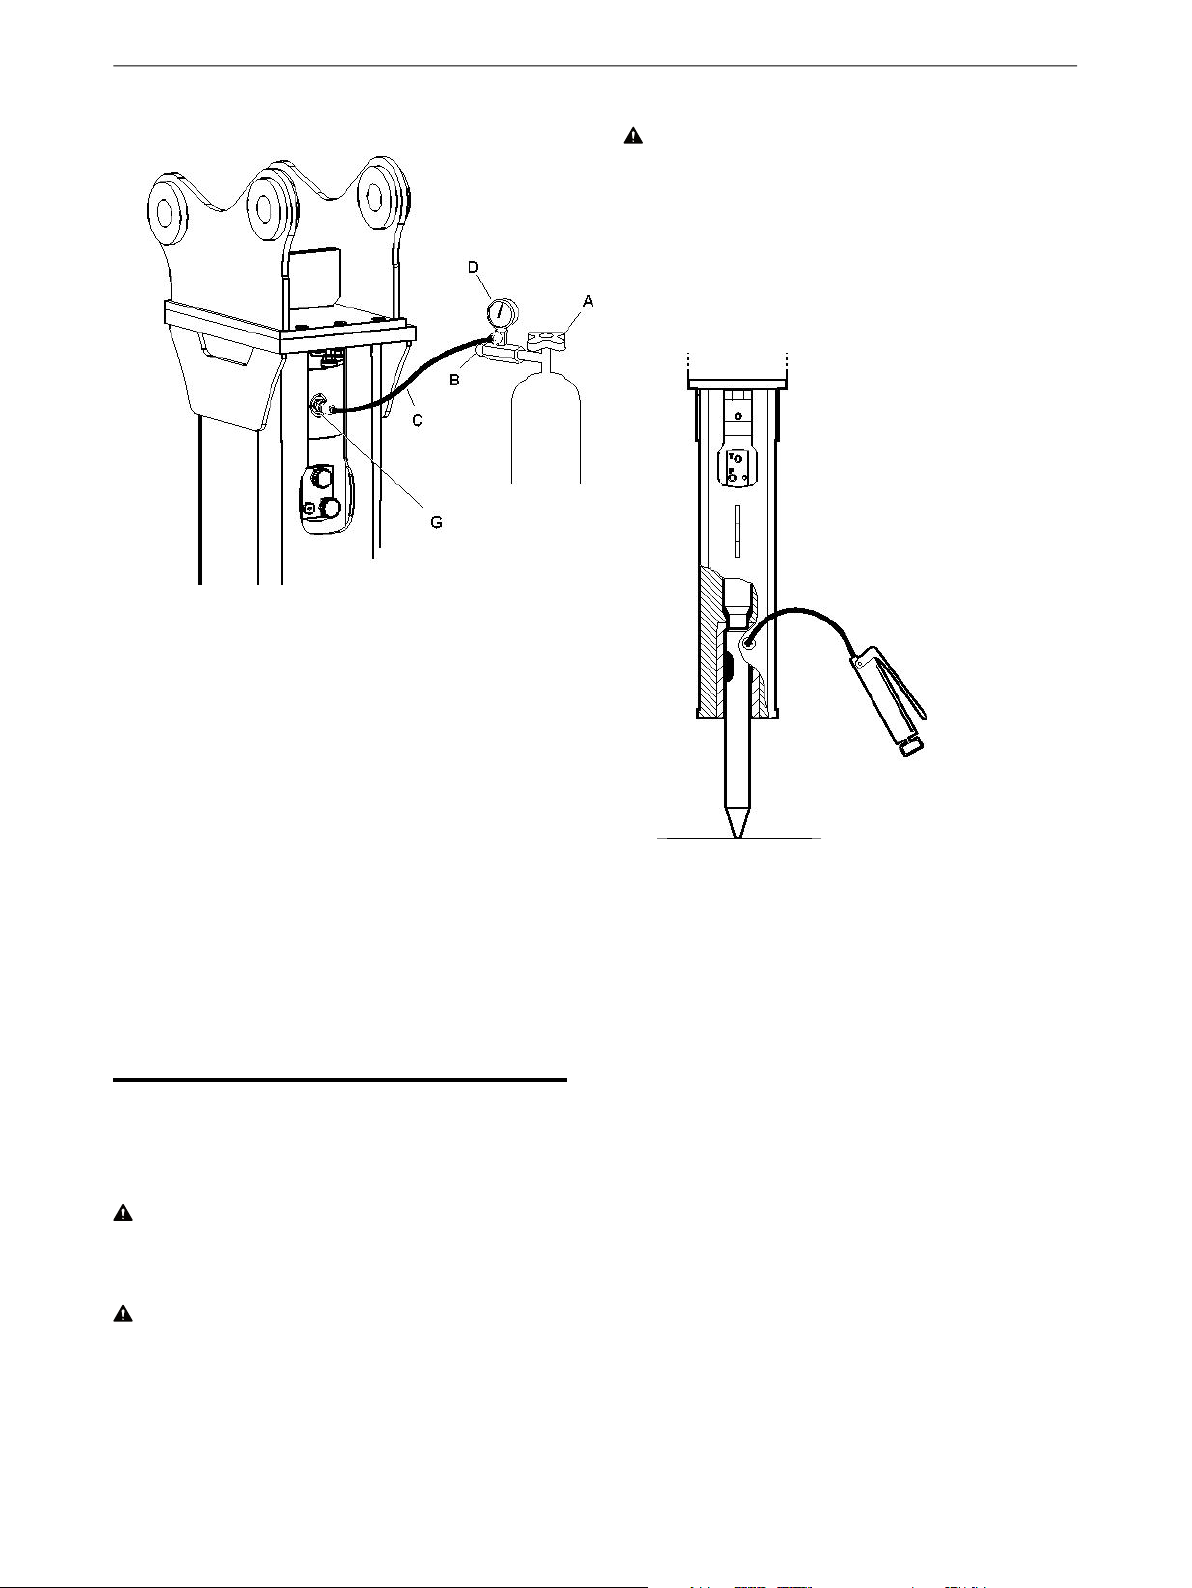
WARNING Explosion hazard
Use of other gases than Nitrogen (N2) can cause an
explosion.
► Charge the accumulator with Nitrogen (N2) only!
CP supplies a service box containing all necessary
tools and parts required to service the piston
accumulator. See the Spare parts list.
If the hammer's performance begins to deteriorate,
we recommend that you check the pressure in the
piston accumulator.
NOTICE The pressure must be checked with the
hammer at a working temperature of 60º-70ºC.
To measure the pressure, bring down the hammer
with no pressure on the chisel. Detach the plug from
the charge valve (G) and connect the test pressure
gauge.
The piston accumulator only needs to be filled if the
pressure falls below the minimum level.
Maintenance
It is essential that regular maintenance is performed
to maintain the breakers maximum efficiency.
Equipment that is insufficiently maintained can be
dangerous for both the operator and persons near
the breaker. Make sure that regular maintenance
routines with lubrication are followed to keep the
equipment safe and efficient.
Lubrication
Lubricate the chisel shank thoroughly every two
hours using high-temperature grease such as
genuine chisel grease from your supplier. This also
lubricates the bushing and the tool holder; 5-10
pumps of the grease gun is sufficient. Stop when
the grease starts to emerge at the chisel holder or
between the chisel and the bushing.
WARNING Running engine
If the carrier's engine is running when lubricating
the chisel by hand there is a risk of severe accidents.
► Always switch off the carrier's engine to avoid
accidents.
Filling
1. Connect pressure relief valve (B) to gas bottle
valve (A).
2. Connect gas hose (C) to pressure relief valve (B)
as shown in figure.
3. Close pressure relief valve (B).
4. Open gas bottle valve (A).
5. Remove the plug from the charge valve (G).
6. Guide the nozzle of the hose (C) into the charge
valve.
7. Carefully open the relief valve (B).
8. Fill the piston accumulator.
9. Read the pressure on the pressure gauge (D).
10. Close the pressure relief valve when the desired
pressure has been reached.
Pull the gas hose out of the charge valve (G) and
fit the plug.
During lubrication, the chisel must be pressed
against the hammer piston so that the space
between piston and the chisel does not fill with
grease.
199800 1050 90 | Original instructions
RX 2, 3, 4, 6, 8Safety and operating instructions
11. Close gas bottle valve (A).
Checking and reducing the gas pressure
1. Always use the gas hose (C) and the pressure
gauge (D) when checking the gas pressure.
CAUTION Skin eczema
Grease can cause eczema when it comes in contact
with the skin.
► Avoid getting grease on your hands. Wash
thoroughly after contact.
1. Press the insertion tool against the piston so that
the space between the piston and the insertion
tool does not fill with grease.
2. Connect the gas hose to the pressure gauge.
3. Remove the plug from the charge valve (G).
4. Press the nozzle of the gas hose into the charge
valve and read the pressure.
5. Reduce the pressure by repeatedly inserting and
removing the nozzle.
NOTICE Only the nozzle may be used to reduce
the pressure. Never use pins, screwdrivers etc. as
these can damage the charge valve.
Every second hour
Regularly lubricate the insertion tool, the tool
retainer and the bushings.
Lubricating with a grease gun
WARNING Hot insertion tool during
operation and a period of time after use.
► Avoid contact with the insertion tool.
WARNING Hot hydralic breaker during
operation and a period of time after use.
► Avoid contact with the hydralic breaker.
2. Lubricate the insertion tool's shank plentifully
while pressing the insertion tool against the
surface to avoid filling the cavity with grease. If
the cavity is filled with grease when the hydraulic
breaker is started, the lower seals may be
damaged.
When the insertion tool shank is exposed to high
pressure and high temperatures a standard type of
grease will melt and run. To avoid this always use a
genuine insertion tool grease from your supplier.
Central lubrication system
We recommend Chicago Pneumatic's central
lubrication system. When this system is fitted on the
carrier, grease is pumped continuosly from a
lubrication container on the carrier to the breaker
when the breaker is activated. This increases the life
of the tool bushings and insertion tools considerably.
9800 1050 90 | Original instructions20
Safety and operating instructionsRX 2, 3, 4, 6, 8
Every day
♦
Check the tool retainer and split pin.
♦
Check that hoses, couplings and accumulator are
in a good condition.
♦
Check that bolts and connections are free from
damage and properly tightened. See tightening
torques in the spare parts list.
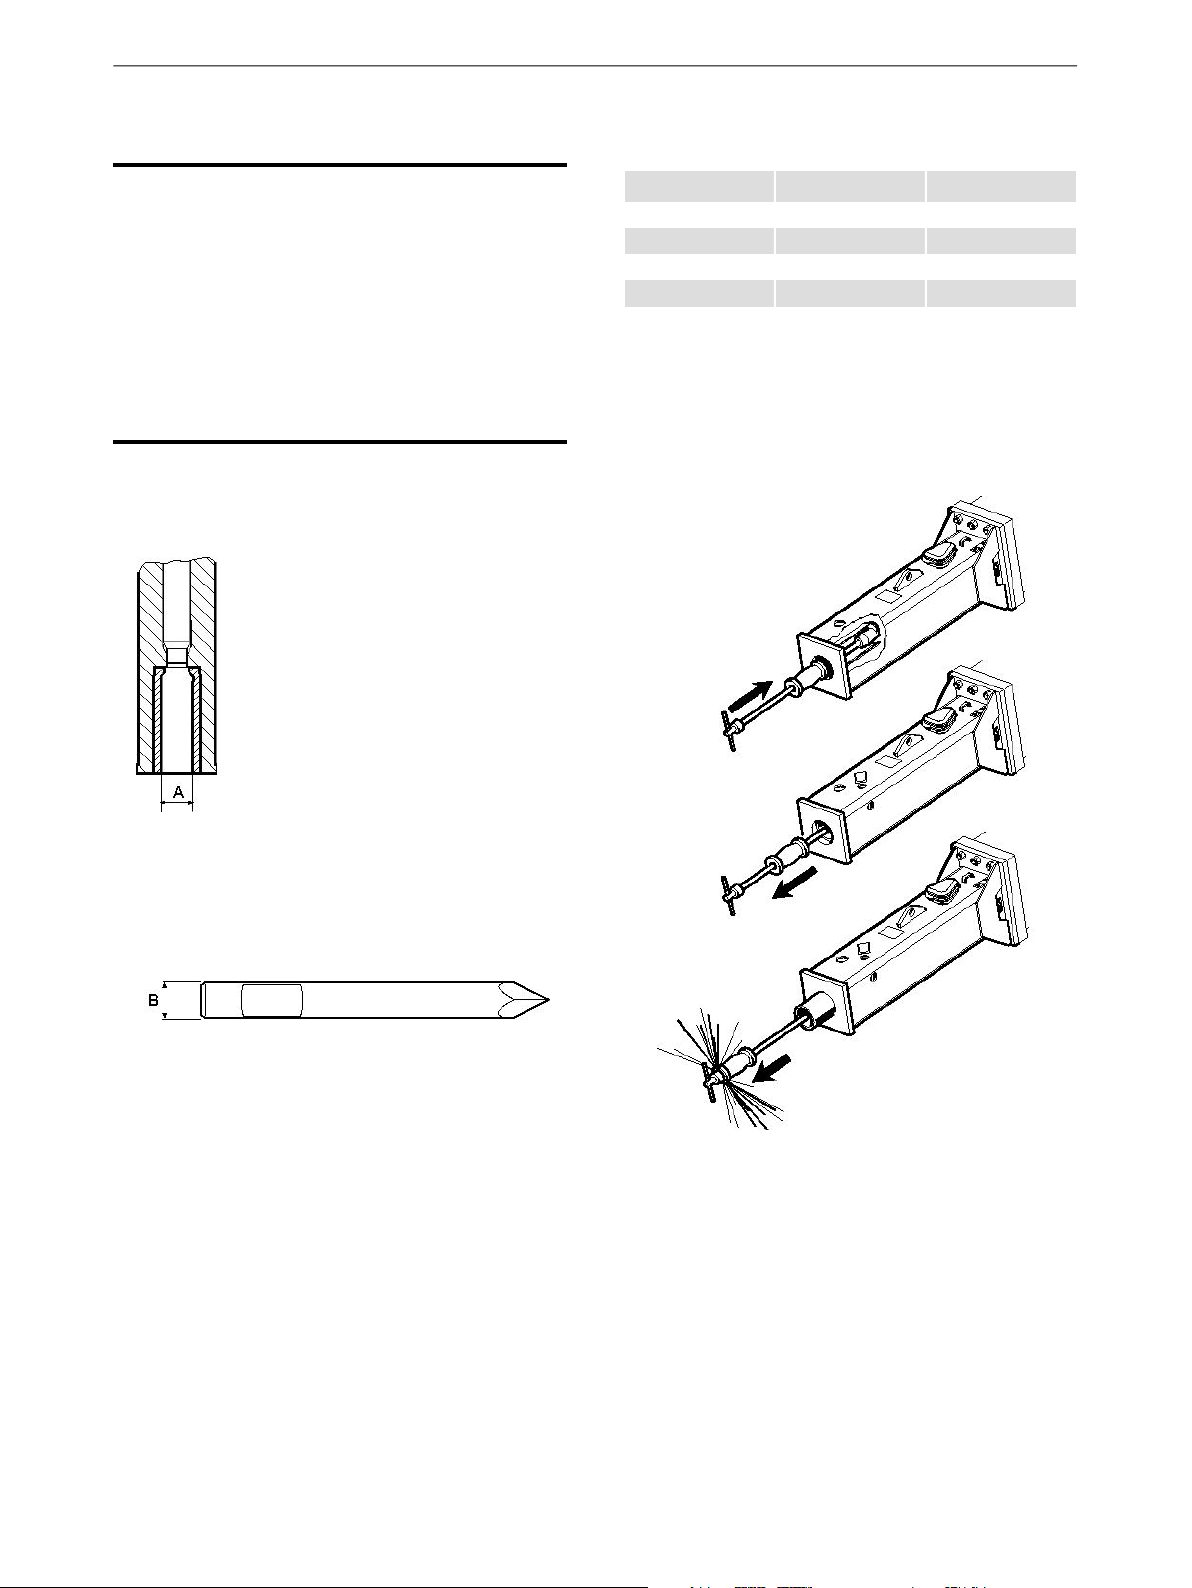
Every week
♦
Clean the hydraulic breaker carefully.
♦
Check the wear bushings wear and maximum
inner wear limits.
Wear limits
B (mm)A (mm)
3945RX 2
4955RX 3
5965RX 4
6773RX 6
7783RX 8
Replacing the insertion tool bushing
The insertion tool bushing is kept in place by the
tool retainer. A new bushing has a slip fit.
1. If a worn out bushing is stuck, use a sliding
hammer to remove it.
The wear bushing must be replaced when the
inner diameter (A) has reached its maximum wear
limit, see "Wear limits" and "Replacing the
insertion tool bushing".
♦
Check the insertion tool for wear.
The insertion tool must be replaced when the
outer diameter (B) has reached its minimum wear
limit. See "Wear limits".
Too large clearance can make the insertion tool
break and the piston can be damaged.
♦
Check the hammer and the adapter plate for
cracks and wear.
♦
Check that the accumulator screws are properly
tightened. The correct tightening torque is found
in the spare parts list.
The insertion tool may never be sharpened by
forging. Sharpening should only be performed by
milling, grinding, or turning.
2. Carefully clean the bore and the bushing seat
area.
3. Lubricate and mount the bushing.
4. Use a plastic sledgehammer to insert the
bushing.
5. Keep the bushing in position with help of the
tool retainer.
219800 1050 90 | Original instructions

Every year
Overhauling should be done after 1 year of
continuous operation. Overhauling should for safety
reasons be performed by authorised personnel at
an authorised workshop.
Storage
WARNING Falling breaker can cause
injuries
► Place the hydraulic breaker in a safe position
where it can not fall over and cause damage.
If the hydraulic breaker is not used for a long time,
the following points have to be considered to protect
the hydraulic breaker from corrosion:
1. Clean the hydraulic breaker carefully.
RX 2, 3, 4, 6, 8Safety and operating instructions
2. Dismount the insertion tool and lubricate the
front part of the piston, wear bushing, and the
retainer pin.
3. Store the hydraulic breaker in a dry place.
Always keep the breaker in an upright position, if
stored for a long time.
Disposal
A used machine must be treated and scrapped in
such a way that the greatest possible portion of the
material can be recycled and any negative influence
on the environment is kept as low as possible.
Before a used machine is scrapped it must be
emptied and cleaned from all hydraulic oil. The
remaining hydraulic oil must be deposited and any
negative influence on the environment is to be kept
as low as possible.
9800 1050 90 | Original instructions22

Technical data
Machine data
(kg)
(kg)
in. (mm)
Capacities
min-max tonnes
(blows/min)
(bar)
pressure (bar)
Safety and operating instructionsRX 2, 3, 4, 6, 8
RX 8RX 6RX 4RX 3RX 2
8460 0500 428460 0500 418460 0500 408460 0500 398460 0500 38Part number
838 (380)626 (284)514 (233)366 (166)258 (117)Operating weight lb
661 (300)472 (214)370 (168)265 (120)165 (75)Delivery weight lb
3.15 (80)2.76 (70)2.44 (62)2.05 (52)1.65 (42)Tool shank diameter
RX 8RX 6RX 4RX 3RX 2
7 - 125 - 9.02.5 - 62.0 - 4.51.2 - 3Suitable excavators
60–9045–7535–6030–5015–35Oil flow (l/min)
530–1050530–1150520–1150670–1450560–1700Impact rate
120–150100–140110–140110–140110–130Operating pressure
12 - 16.511 - 1514 - 1916 - 20.514 - 18.5Accumulator
Noise declaration statement
RX 8RX 6RX 4RX 3RX 2
1
dB(A)
1
Sound pressure level according to EN ISO 3744 in accordance with directive 2000/14/EC at 10 metres distance.
2
Guaranteed sound power according to EN ISO 3744 in accordance with directive 2000/14/EC inclusive spread
in production.
These declared values were obtained by laboratory type testing in accordance with the stated directive or
standards and are suitable for comparison with the declared values of other tools tested in accordance with
the same directive or standards. These declared values are not adequate for use in risk assessments and values
measured in individual work places may be higher. The actual exposure values and risk of harm experienced
by an individual user are unique and depend upon the way the user works, in what material the breaker is
used, as well as upon the exposure time and the physical condition of the user, and the condition of the
breaker.
We, Atlas Copco, cannot be held liable for the consequences of using the declared values, instead of values
reflecting the actual exposure, in an individual risk assessment in a work place situation over which we have
no control.
8786858381Sound pressure
115114113111109Sound power2dB(A)
239800 1050 90 | Original instructions

RX 2, 3, 4, 6, 8Safety and operating instructions
EC Declaration of Conformity
EC Declaration of Conformity (EC Directive 2006/42/EC)
We, Atlas Copco Construction Tools AB, hereby declare that the machines listed below conform to the provisions
of EC Directive 2006/42/EC (Machinery Directive) and 2000/14/EC (Noise Directive).
Guaranteed sound
power level [dB(A)]Hydraulic breaker
Technical Documentation authorised representative:
Erik Sigfridsson
Atlas Copco Constructions Tools AB
Dragonvägen 2
Kalmar
General Manager:
Erik Sigfridsson
Manufacturer:
Atlas Copco Constructions Tools AB
105 23 Stockholm
Sweden
Place and date:
Kalmar, 2010-03-16
Measured sound
power level [dB(A)]
Weight (kg)Pmax (bar)
75130108109RX 2
120140110111RX 3
168140112113RX 4
214140113114RX 6
300150114115RX 8
9800 1050 90 | Original instructions24

SommaireRX 2, 3, 4, 6, 8
259800 1050 90 | Instructions d’origine

RX 2, 3, 4, 6, 8Sommaire
FRANÇAIS
Sommaire
Introduction. . . . . . . . . . . . . . . . . . . . . . . . . . . . . . . . . . . . . . . . . . . . . . . . . . . . . . . . . . . . . . . . . . . . . . 27
À propos des prescriptions de sécurité et des instructions pour l'opérateur. . . . . . 27
Consignes de sécurité. . . . . . . . . . . . . . . . . . . . . . . . . . . . . . . . . . . . . . . . . . . . . . . . . . . . . . . . . . . . . 28
Indications de sécurité. . . . . . . . . . . . . . . . . . . . . . . . . . . . . . . . . . . . . . . . . . . . . . . . . . . . . . . . . . . . 28
Précautions et qualifications du personnel. . . . . . . . . . . . . . . . . . . . . . . . . . . . . . . . . . . . . . . . . . . 28
Engins porteurs, précautions. . . . . . . . . . . . . . . . . . . . . . . . . . . . . . . . . . . . . . . . . . . . . . . . . . . . . . 29
Installation, précautions. . . . . . . . . . . . . . . . . . . . . . . . . . . . . . . . . . . . . . . . . . . . . . . . . . . . . . . . . . . 29
Fonctionnement, précautions. . . . . . . . . . . . . . . . . . . . . . . . . . . . . . . . . . . . . . . . . . . . . . . . . . . . . . 30
Maintenance, précautions. . . . . . . . . . . . . . . . . . . . . . . . . . . . . . . . . . . . . . . . . . . . . . . . . . . . . . . . . 32
Stockage, précautions. . . . . . . . . . . . . . . . . . . . . . . . . . . . . . . . . . . . . . . . . . . . . . . . . . . . . . . . . . . . 32
Vue d'ensemble. . . . . . . . . . . . . . . . . . . . . . . . . . . . . . . . . . . . . . . . . . . . . . . . . . . . . . . . . . . . . . . . . . 33
Conception et fonctionnement. . . . . . . . . . . . . . . . . . . . . . . . . . . . . . . . . . . . . . . . . . . . . . . . . . . . 33
Pièces principales. . . . . . . . . . . . . . . . . . . . . . . . . . . . . . . . . . . . . . . . . . . . . . . . . . . . . . . . . . . . . . . . 33
Étiquettes. . . . . . . . . . . . . . . . . . . . . . . . . . . . . . . . . . . . . . . . . . . . . . . . . . . . . . . . . . . . . . . . . . . . . . . 33
Transport. . . . . . . . . . . . . . . . . . . . . . . . . . . . . . . . . . . . . . . . . . . . . . . . . . . . . . . . . . . . . . . . . . . . . . . . . 34
Installation. . . . . . . . . . . . . . . . . . . . . . . . . . . . . . . . . . . . . . . . . . . . . . . . . . . . . . . . . . . . . . . . . . . . . . . 34
Flexibles et connexions. . . . . . . . . . . . . . . . . . . . . . . . . . . . . . . . . . . . . . . . . . . . . . . . . . . . . . . . . . . . 35
L'huile hydraulique. . . . . . . . . . . . . . . . . . . . . . . . . . . . . . . . . . . . . . . . . . . . . . . . . . . . . . . . . . . . . . . 35
Réglage de pression. . . . . . . . . . . . . . . . . . . . . . . . . . . . . . . . . . . . . . . . . . . . . . . . . . . . . . . . . . . . . . 36
Assemblage. . . . . . . . . . . . . . . . . . . . . . . . . . . . . . . . . . . . . . . . . . . . . . . . . . . . . . . . . . . . . . . . . . . . . 36
Outil d'insertion. . . . . . . . . . . . . . . . . . . . . . . . . . . . . . . . . . . . . . . . . . . . . . . . . . . . . . . . . . . . . . . . . 37
Commande. . . . . . . . . . . . . . . . . . . . . . . . . . . . . . . . . . . . . . . . . . . . . . . . . . . . . . . . . . . . . . . . . . . . . . . 39
Préparatifs avant de commencer le travail de démolition. . . . . . . . . . . . . . . . . . . . . . . . . . . . . . 39
Utilisation. . . . . . . . . . . . . . . . . . . . . . . . . . . . . . . . . . . . . . . . . . . . . . . . . . . . . . . . . . . . . . . . . . . . . . . 39
Maintenance. . . . . . . . . . . . . . . . . . . . . . . . . . . . . . . . . . . . . . . . . . . . . . . . . . . . . . . . . . . . . . . . . . . . . 41
Lubrification. . . . . . . . . . . . . . . . . . . . . . . . . . . . . . . . . . . . . . . . . . . . . . . . . . . . . . . . . . . . . . . . . . . . . 41
Toutes les deux heures. . . . . . . . . . . . . . . . . . . . . . . . . . . . . . . . . . . . . . . . . . . . . . . . . . . . . . . . . . . . 42
Chaque jour. . . . . . . . . . . . . . . . . . . . . . . . . . . . . . . . . . . . . . . . . . . . . . . . . . . . . . . . . . . . . . . . . . . . . 43
Chaque semaine. . . . . . . . . . . . . . . . . . . . . . . . . . . . . . . . . . . . . . . . . . . . . . . . . . . . . . . . . . . . . . . . . 44
Chaque année. . . . . . . . . . . . . . . . . . . . . . . . . . . . . . . . . . . . . . . . . . . . . . . . . . . . . . . . . . . . . . . . . . . 44
Stockage. . . . . . . . . . . . . . . . . . . . . . . . . . . . . . . . . . . . . . . . . . . . . . . . . . . . . . . . . . . . . . . . . . . . . . . . . 45
Destruction d'une machine usagée. . . . . . . . . . . . . . . . . . . . . . . . . . . . . . . . . . . . . . . . . . . . . . . 45
Caractéristiques techniques. . . . . . . . . . . . . . . . . . . . . . . . . . . . . . . . . . . . . . . . . . . . . . . . . . . . . . 46
Caractéristiques de la machine. . . . . . . . . . . . . . . . . . . . . . . . . . . . . . . . . . . . . . . . . . . . . . . . . . . . . 46
Capacités. . . . . . . . . . . . . . . . . . . . . . . . . . . . . . . . . . . . . . . . . . . . . . . . . . . . . . . . . . . . . . . . . . . . . . . 46
Énoncé déclaratif sur le bruit. . . . . . . . . . . . . . . . . . . . . . . . . . . . . . . . . . . . . . . . . . . . . . . . . . . . . . . 46
Déclaration CE de conformité. . . . . . . . . . . . . . . . . . . . . . . . . . . . . . . . . . . . . . . . . . . . . . . . . . . . . 47
Déclaration CE de conformité (Directive 2006/42/CE). . . . . . . . . . . . . . . . . . . . . . . . . . . . . . . . . 47
9800 1050 90 | Instructions d’origine26

RX 2, 3, 4, 6, 8
Introduction
Nous vous remercions d'avoir choisi un produit Chicago Pneumatic. Depuis plus
d'un siècle, la marque Chicago Pneumatic est synonyme de performance et
d'innovation dans le secteur des outils pneumatiques.
Aujourd'hui, la société offre une vaste gamme d'outils pneumatiques et hydrauliques
comprenant brise-béton, trépans, marteaux burineurs, marteaux-bêches, pioches et
défricheuses, bouchardeuses, pompes et bien d'autres outils.
La marque Chicago Pneumatic est associée avec des produits puissants et fiables,
faciles à entretenir et ayant un bon rapport qualité-prix.
Pour plus d’informations, veuillez consulter le site Web www.cp.com
Atlas Copco Construction Tools AB
S-105 23 Stockholm
Suède
Prescriptions de sécurité et instructions pour
l’opérateur
À propos des prescriptions de sécurité et
des instructions pour l'opérateur
Le but des instructions est de vous apprendre à utiliser le brise-roche hydraulique
d’une manière efficace et en toute sécurité. Les instructions vous donnent également
des conseils et vous indiquent comment effectuer la maintenance de routine du
brise-roche hydraulique.
Vous devez lire ces instructions attentivement et les comprendre avant d'utiliser le
brise-roche hydraulique pour la première fois.
279800 1050 90 | Instructions d’origine

l’opérateur
RX 2, 3, 4, 6, 8Prescriptions de sécurité et instructions pour
Consignes de sécurité
Il convient de lire et d'assimiler les Prescriptions de
sécurité et des instructions pour l'opérateur avant
toute installation, utilisation, réparation, entretien
ou remplacement d'accessoire sur la machine, afin
de minimiser le risque de blessures graves ou de
dommages pouvant entraîner la mort.
Affichez les Prescriptions de sécurité et instructions
pour l'opérateur sur les différents sites de travail ;
faites en des copies pour les employés et
assurez-vous que chaque personne concernée a bien
lu les Prescriptions de sécurité et instructions pour
l'opérateur, avant d'utiliser ou d'intervenir sur la
machine.
En outre, l'opérateur ou l'employeur doit évaluer
les risques spécifiques pouvant survenir à la suite de
chaque utilisation de la machine.
Indications de sécurité
Les indications de sécurité Danger, Attention et
Prudence ont les sens suivants :
DANGER
AVERTISSEMENT
ATTENTION
Indique une situation
dangereuse qui, si elle n'est
pas évitée, terminera par
provoquer la mort ou des
blessures graves.
Indique une situation
dangereuse qui, si elle n'est
pas évitée, est de susceptible
de provoquer la mort ou des
blessures graves.
Indique une situation
dangereuse qui, si elle n'est
pas évitée, est de susceptible
de provoquer des blessures
mineures à modérées.
> sont qualifiées pour conduire une grue ou un
chariot élévateur conformément aux directives
nationales en vigueur,
> sont informées sur les prescriptions nationales de
sécurité pertinentes et les instructions de
prévention d’accidents
> et ont lu et compris les chapitres relatifs à la
sécurité et au transport contenus dans le présent
manuel.
Installation, stockage, maintenance et
mise au rebut
L'installation, le stockage, la maintenance et la mise
au rebut peuvent uniquement être entrepris par des
personnes qui :
> sont informés sur les prescriptions nationales de
sécurité pertinentes et les instructions de
prévention d’accidents
> et ont lu et compris les Prescriptions de sécurité
et instructions pour l'opérateur.
Fonctionnement
L'utilisation du brise-roche hydraulique est
uniquement réservée à des opérateurs d'engin
porteur qualifiés. Les opérateurs d'engin porteur
sont qualifiés s'ils :
> sont qualifiés pour conduire un engin porteur
conformément aux directives nationales en
vigueur,
> sont informées sur les prescriptions nationales de
sécurité pertinentes et les instructions de
prévention d’accidents
> et ont lu et compris les Prescriptions de sécurité
et instructions pour l'opérateur.
Précautions et qualifications
du personnel
Seules des personnes qualifiées ou formées peuvent
utiliser ou procéder à l'entretien de la machine. Elles
doivent être physiquement aptes à manipuler le
volume, le poids et la puissance de l'outil. Utilisez
toujours votre jugement et votre bon sens.
Transport
Le transport du brise-roche hydraulique peut
uniquement être entrepris par des personnes qui :
Procédure de test
La procédure de test de l'installation hydraulique
devra uniquement être entreprise par des techniciens
qualifiés. Les techniciens doivent être qualifiés pour
homologuer une installation hydraulique
conformément aux directives nationales.
9800 1050 90 | Instructions d’origine28

RX 2, 3, 4, 6, 8
Prescriptions de sécurité et instructions pour
l’opérateur
Équipement de protection du personnel
Utilisez toujours un équipement de protection
individuelle homologué. Les opérateurs et toutes
autres personnes séjournant sur la zone de travail
doivent porter un équipement de protection
individuelle, incluant au minimum :
> Casque de protection
> Protections auditives
> Protecteurs des yeux résistants aux chocs avec
protection latérale
> Appareil de protection respiratoire, le cas échéant
> Gants de protection
> Bottes de protection adaptées
> Salopette de travail appropriée ou vêtement
similaire (serré) qui recouvre les bras et les jambes.
Drogues, alcool ou médicaments
AVERTISSEMENT Drogues, alcool ou
médicaments
Les drogues, l'alcool ou les médicaments risquent
d'avoir un effet négatif sur votre jugement et votre
capacité de concentration. De mauvaises réactions
et des évaluations incorrectes peuvent entraîner des
accidents graves, voire la mort.
► N'utilisez jamais la machine lorsque vous êtes
fatigué(e) ou sous l'influence de drogues, de
l'alcool ou de médicaments.
► L'utilisation de la machine par une personne sous
l'influence de drogues, de l'alcool ou de
médicaments est strictement interdite.
Installation, précautions
Circuit hydraulique
DANGER Gaz comprimé, risque
d'explosion
L'accumulateur au-dessus du piston reste pressurisé
même lorsque le système hydraulique est coupé. Le
démontage de l'accumulateur sans libérer d'abord
l’azote peut provoquer des blessures graves ou la
mort.
► Remplir uniquement l'accumulateur au-dessus
du piston avec de l'azote (N2).
AVERTISSEMENT Huile hydraulique
sous haute pression
Les jets fins d'huile hydraulique sous haute pression
peuvent pénétrer la peau et provoquer des
dommages permanents.
► Consultez immédiatement un médecin en cas de
pénétration de l'huile hydraulique dans votre
peau.
► Ne jamais contrôler une fuite de liquide
hydraulique avec les doigts.
► Éloignez votre visage de toute fuite éventuelle.
AVERTISSEMENT Huile hydraulique
L'huile hydraulique renversée peut causer des
brûlures, des accidents par glissade et nuit
également à l'environnement.
► Soyez particulièrement prudent en cas d'huile
renversée et traitez celle-ci conformément aux
réglementations locales de sécurité et
d'environnement.
Engins porteurs, précautions
Avant d'utiliser ou de transporter l'engin porteur
avec le brise-roche hydraulique monté, lisez
soigneusement les prescriptions de sécurité et
instructions pour l'opérateur du fabricant de l'engin
porteur.
Assurez-vous que l'engin porteur est équipé de
dispositifs de protection adéquats, y compris un
écran de protection devant l'opérateur.
Le brise-roche hydraulique ne devrait être installé
que sur un engin porteur ayant une capacité de
charge suffisante.
Les engins porteurs sans capacité de charge
suffisante ne fournissent pas le niveau de stabilité
nécessaire et peuvent se renverser pendant
l’utilisation du brise-roche hydraulique en
provoquant des blessures et des dommages.
► Ne démontez jamais la machine hydraulique
lorsque l'huile hydraulique est chaude.
► Ne jamais faire passer des canalisations
hydrauliques pour l'attache de la machine
hydraulique à travers la cabine de conduite.
ATTENTION Eczéma de contact
L'huile hydraulique peut provoquer de l'eczéma en
cas de contact avec la peau.
► Évitez d’avoir de l'huile hydraulique sur vos mains.
► Portez toujours les gants de protection lorsque
vous manipulez de l'huile hydraulique.
► Lavez-vous les mains après tout contact avec de
l'huile hydraulique.
299800 1050 90 | Instructions d’origine

l’opérateur
RX 2, 3, 4, 6, 8Prescriptions de sécurité et instructions pour
Assemblage / Désassemblage
AVERTISSEMENT Pièces mobiles
Risque de fuites d'huile et de dommages corporels,
comme le pincement des mains et des doigts.
► Ne contrôlez jamais les orifices ou les canaux avec
les mains ou les doigts.
► Tous les mouvements de la flèche seront effectués
uniquement en coopération avec le personnel
d’installation du brise-roche hydraulique.
► Si le brise-roche hydraulique est installé avec une
attache rapide, assurez-vous qu'il est bien
verrouillé et que tous risques de desserrage soit
éliminés.
Fonctionnement,
précautions
DANGER Danger d'explosion
Si un outil d'insertion chaud entre en contact avec
un explosif ou avec des gaz explosifs, cela pourrait
provoquer une explosion. Lors de travaux sur
certains matériaux et lors d'utilisation de certains
matériaux dans les pièces de la machine, des
étincelles susceptibles d'enflammer des gaz peuvent
provoquer des explosions. Les explosions peuvent
provoquer des dommages corporels voire la mort.
► Ne jamais utiliser la machine dans un
environnement explosif quelconque.
► N'utilisez jamais cette machine près de poussières,
d'émanations ou de matériaux inflammables.
► Assurez-vous qu'il n'y a aucune source de gaz
non identifiée ni explosifs dans les environs.
AVERTISSEMENT Pression d'utilisation
Si la pression de fonctionnement maximale de la
machine hydraulique est dépassée, l'accumulateur
peut être surchargé, ce qui risque de provoquer des
dommages matériels et corporels.
► Faites toujours fonctionner la machine
hydraulique à la bonne pression de service. Voir
« Caractéristiques techniques ».
AVERTISSEMENT Dangers liés aux
poussières et aux fumées
Les poussières et/ou de fumées générées ou
dispersées lors de l’utilisation de la machine peuvent
causer des maladies respiratoires graves et
permanentes, ou autre lésion corporelle (par
exemple, la silicose ou autre maladie pulmonaire
irréversible qui peut être mortelle, cancer,
malformations congénitales et/ou inflammation de
la peau).
Certaines poussières et fumées créées lors de
foration, casse, martelage, sciage, meulage et autres
activités de construction, contiennent des substances
connues dans l'État de Californie et par d’autres
autorités pour provoquer des maladies respiratoires,
le cancer, des malformations congénitales ou autres
problèmes de reproduction. Quelques exemples de
ces substances sont :
> Silice cristalline, ciment et autres produits de
maçonnerie.
> Arsenic et chrome provenant de caoutchouc traité
chimiquement.
> Plomb provenant de peintures à base de plomb.
Les poussières et fumées dans l’air peuvent être
invisibles à l’œil nu. Par conséquent, ne comptez
pas sur la vue oculaire pour déterminer s'il y a des
poussières ou des fumées dans l’air.
Pour réduire les risques d’exposition aux poussières
et fumées, effectuez tout ce qui suit :
► Effectuez une évaluation des risques spécifiques
au site. L’évaluation des risques devra inclure les
poussières et les vapeurs créées par l’utilisation
de la machine et les poussières susceptibles
d'incommoder le voisinage.
► Utilisez la sécurité intégrée appropriée pour
minimiser la quantité de poussières et de fumées
dans l’air et leur accumulation sur les
équipements, les surfaces, les vêtements et les
parties du corps. Exemples de mesures applicables
: systèmes de ventilation aspirante et de captage
des poussières, pulvérisation d'eau et forage
humide. Contrôlez si possible les poussières et les
fumées à la source. Assurez-vous que les
commandes sont correctement installées,
entretenues et utilisées.
► Portez, entretenez et utilisez de manière correcte
la protection respiratoire comme indiqué par votre
employeur, en respectant les normes de sécurité
et de santé au travail. La protection respiratoire
doit être efficace pour le type de substance en
cause (et le cas échéant, approuvée par l’autorité
gouvernementale pertinente).
9800 1050 90 | Instructions d’origine30
 Loading...