

Chicago Faucets HYTRONIC User Manual

HYTRONIC WITH SSPS USER GUIDE
Recommended for Single Supply
HyTronic
®
Faucets Only
S
AFETY INFORMATION
R
ead this entire user guide to ensure proper installation. Compliance and conformity to local
codes and ordinances is the responsibility of the installer. The following safety notes must
always be complied with during handling of this product:
•
Make sure there is enough space and lighting available during installation and service
• Do not modify or convert this Chicago Faucets product yourself. All warranties will be voided.
I
MPORTANT
•
Installation may be performed at different times of construction by different individuals. For
this reason, these instructions should be left on-site with the facility or maintenance manager.
• Pressurized plumbing fixtures shall be installed in accordance with manufacturer’s
recommendations. The supply piping to these devices shall be securely anchored to
t
he building structure to prevent installed device from unnecessary movement when
operated by the user. Care shall be exercised when installing the device to prevent
marring the exposed significant surface.
•
Do not use pipe dope.
• Flush all the water supply lines before making connections.
Traditional Lavatory Contemporary Lavatory
Gooseneck Wallmount
957.078.00. 0 rev. 05/ 12
Cleaning or Replacing Inlet Filter
1 Close supply valves
2 Disconnect braided hoses
and clean or replace filter
(for a new filter, see "common
replacement parts")
3
Connect braided hoses with
filter to supply valves and
fully open.
Result — The filter is now cleaned or replaced.
Cleaning or Replacing Aerator
1
R
em
ove
sh
u
t-off
screw
2
Remove outlet with vandal
resistant wrench supplied with
the faucet. Clean or replace
outlet, then reinstall
3
Install shut-off screw
Result — The outlet is now cleaned or replaced.
SSPS Generator
INSTALLATION
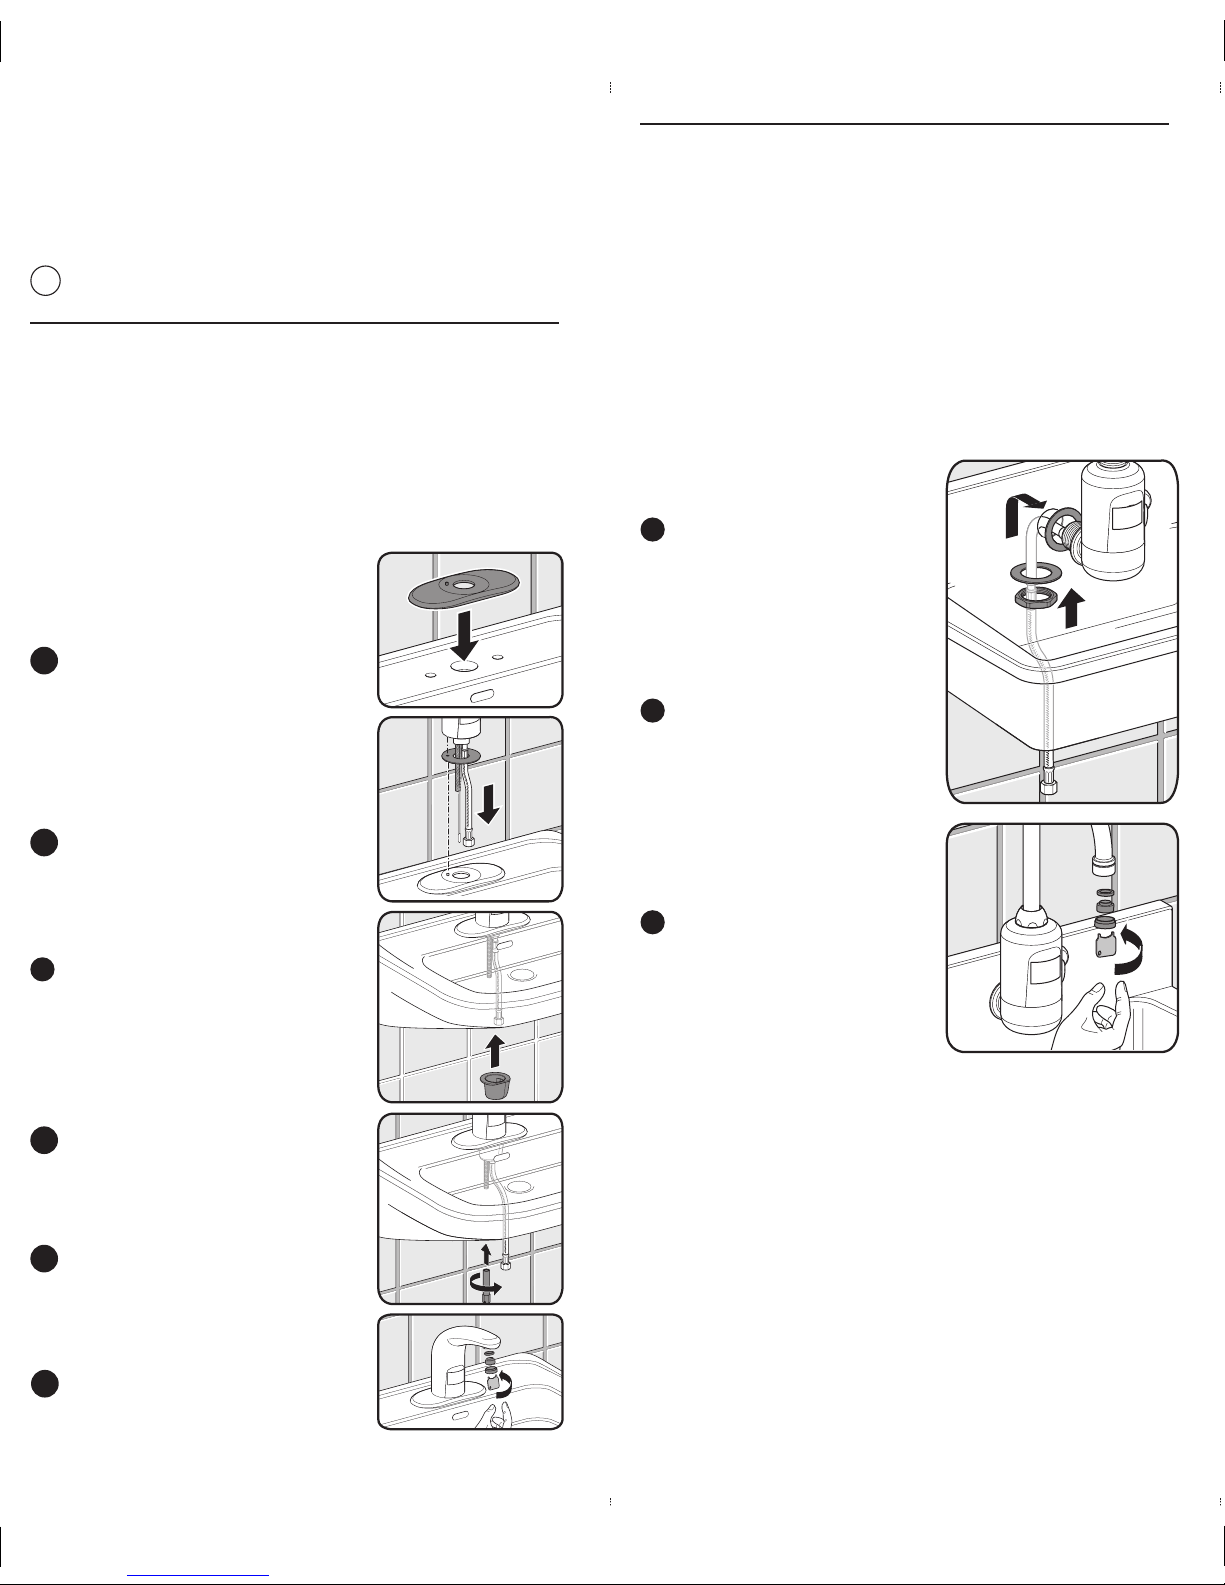
Mounting of Deck Mount Faucet
This faucet comes with all the components needed for
installation, however, some tools and supplies are not included.
• Basin Wrench • Plumber’s Putty
• Adjustable Wrench • Adjustable Locking Pliers
Prerequisites
• Supply valve is installed
• Water supply lines are flushed properly
Important
• It is not necessary to unscrew the connection between braided
hose and housing to install the product.
• Do not remove protective covering from
sensor until starting up faucet operation.
• Do not tighten locknut before
step 4 is completed.
i
D
o not use pipe dope on faucet and supply connections. Possible
s
olenoid contamination could occur and will void any warranty.
2 Mount gasket and put faucet
into sink.
3 Mount bracket from underneath.
Place hoses through large opening
and mounting rod through small
opening. Make sure flange
sits securely against surface.
4 Place nut onto mounting rod
and tighten with wrench.
6 Install aerator and tighten with
aerator key (supplied).
Aerator: 1.0 gpm (standard)
and optional 0.5 gpm insert
5 If faucet was installed with cover
plate, secure with basin washer,
flat washer and locknut.
1
Mount cover plate if required.
Plumber’s putty is recommended
to seal cover plate to the sink.
Security pin must be located on
the left side.
Mounting of Wall Mount Faucet
Prerequisites
• Supply valve is installed
• Water supply lines are flushed properly
Important
• It is not necessary to unscrew the connection between
braided hose and housing to install the product.
• Do not remove protective covering from sensor until
starting up faucet operation.
1 Mount gasket, put faucet into
opening and tighten
2 Install aerator and tighten
with aerator key (supplied)
3 For gooseneck faucets,
tighten spout with wrench.
Aerator: 1.0 gpm (standard)
and optional 0.5 gpm insert
Result — The Wall Mount faucet is now mounted.
Result — The Deck Mount faucet is now mounted.
a
c
b
Water pulses in seconds [s]
Modes 541 4 1 4 1 4 1 4 1
A - Cleaning Mode
B - Normal Mode
C - Metering Mode 10 s
D - Scrub Mode 60 s
E - Scrub Mode 180s
F - Sensor Range Adjustment
Legend:
Water is off
CF HyTronic_SSPS_Install_3_SSPS 5/1/12 9:24 AM Page 2
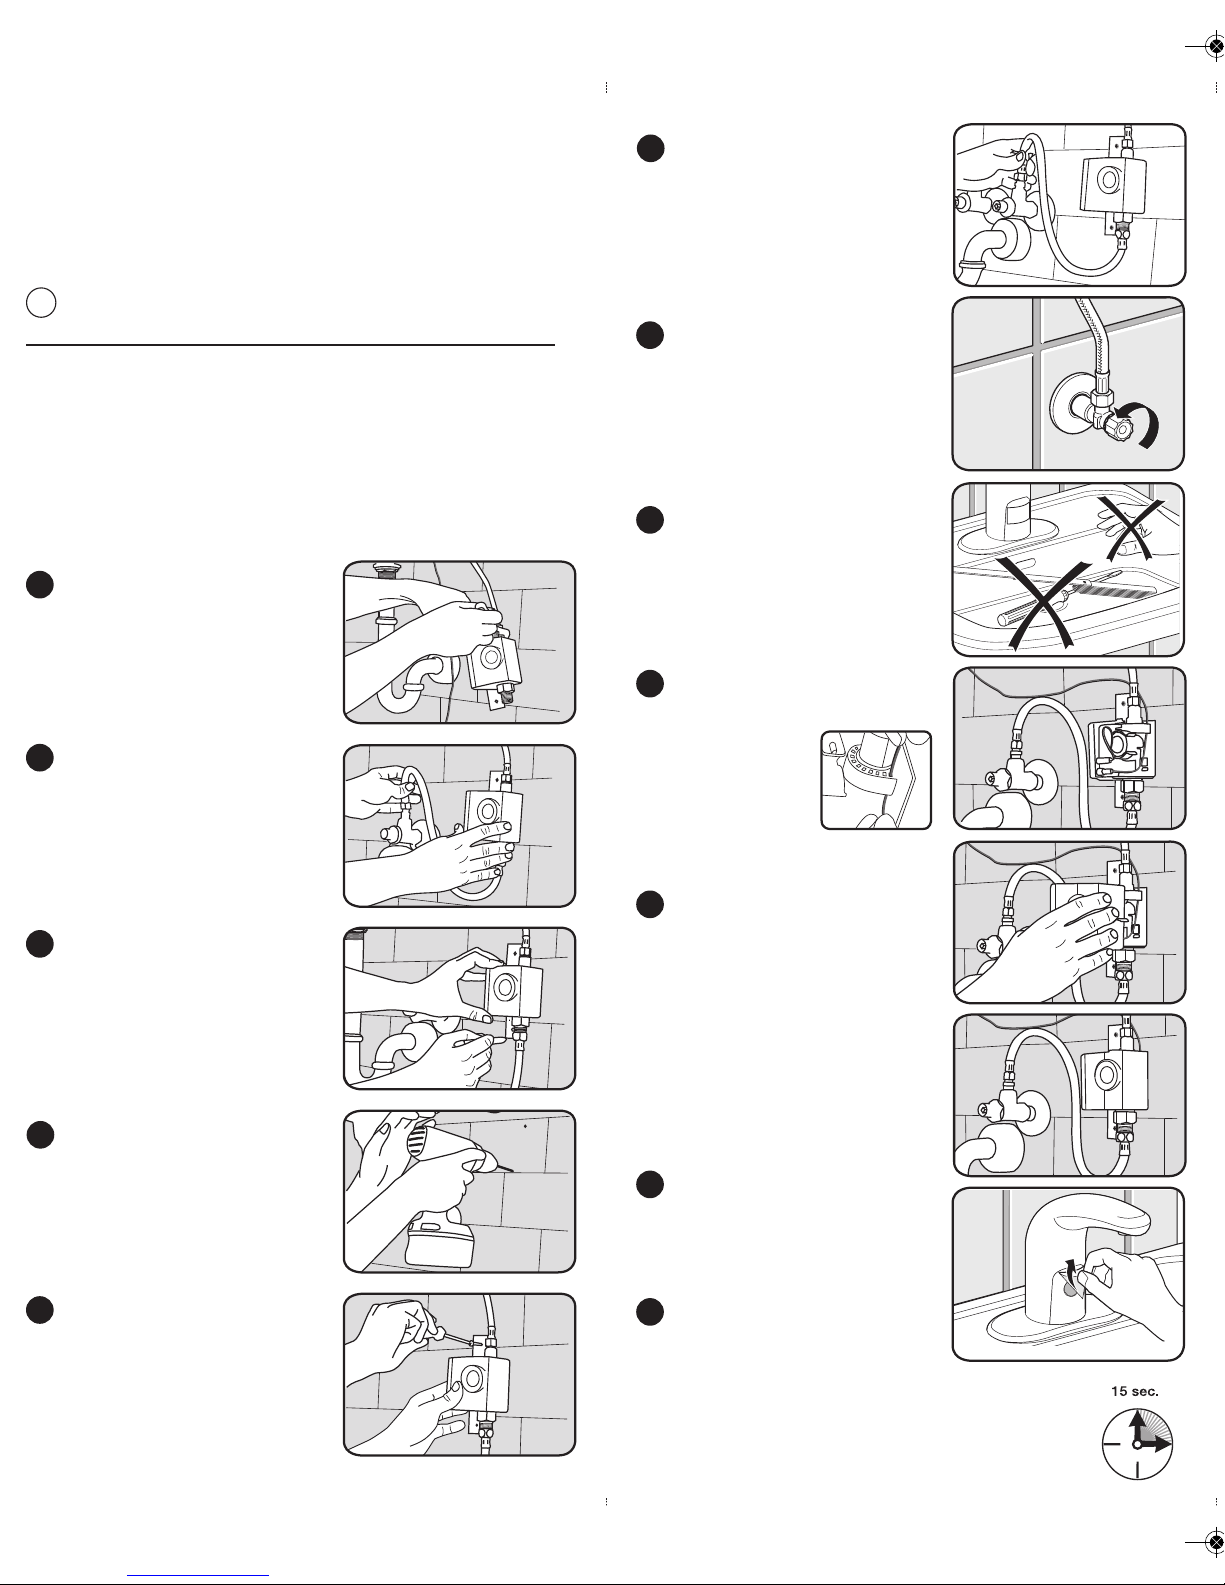
7 Fully open supply valve.
8 Remove all items from sink.
1 Connect faucet to SSPS unit.
Attached to faucet and
install water supply line.
Install filter at this point.
2 Position SSPS under sink.
Carefully position to allow
connection of water lines
and wiring.
3 Mark holes.
Position mounting bracket
and mark mounting holes.
4 Drill holes.
Drill holes for screw anchors.
5 Secure SSPS to wall.
Insert anchors into holes
and mount SSPS unit to
wall with supplied screws.
6 Attach to supply.
Attach inlet hose to supply
and turn on water.
With water on, check
system for leaks.
9 Connect wiring.
Remove cover
and connect
faucet wire to
SSPS and
secure into
wire harness.
10 Attach cover.
Faucet is ready to run
through programming
sequence.
INSTALLATION
Mounting of SSPS Generator
The SSPS Generator comes with all the components needed for
installation, however, some tools and supplies are not included.
• Basin Wrench • Hand Drill
• Adjustable Wrench • Adjustable Locking Pliers
Includes
• SSPS Generator Unit
• Electronics Module and Holder
• Green Power Adapter
• Hose
i
D
o not use pipe dope on faucet and supply connections. Possible
s
olenoid contamination could occur and will void any warranty.
Result — The faucet is now activated.
12 Wait for 15 seconds for
faucet to calibrate to its
environment.
11 Remove protective
covering from sensor.
a
c
b
Water pulses in seconds [s]
Modes 541 4 1 4 1 4 1 4 1
A - Cleaning Mode
B - Normal Mode
C - Metering Mode 10 s
D - Scrub Mode 60 s
E - Scrub Mode 180s
F - Sensor Range Adjustment
Legend:
Water is off
 Loading...