

Chicago Faucet 119.904.AB.1 Installation Manual
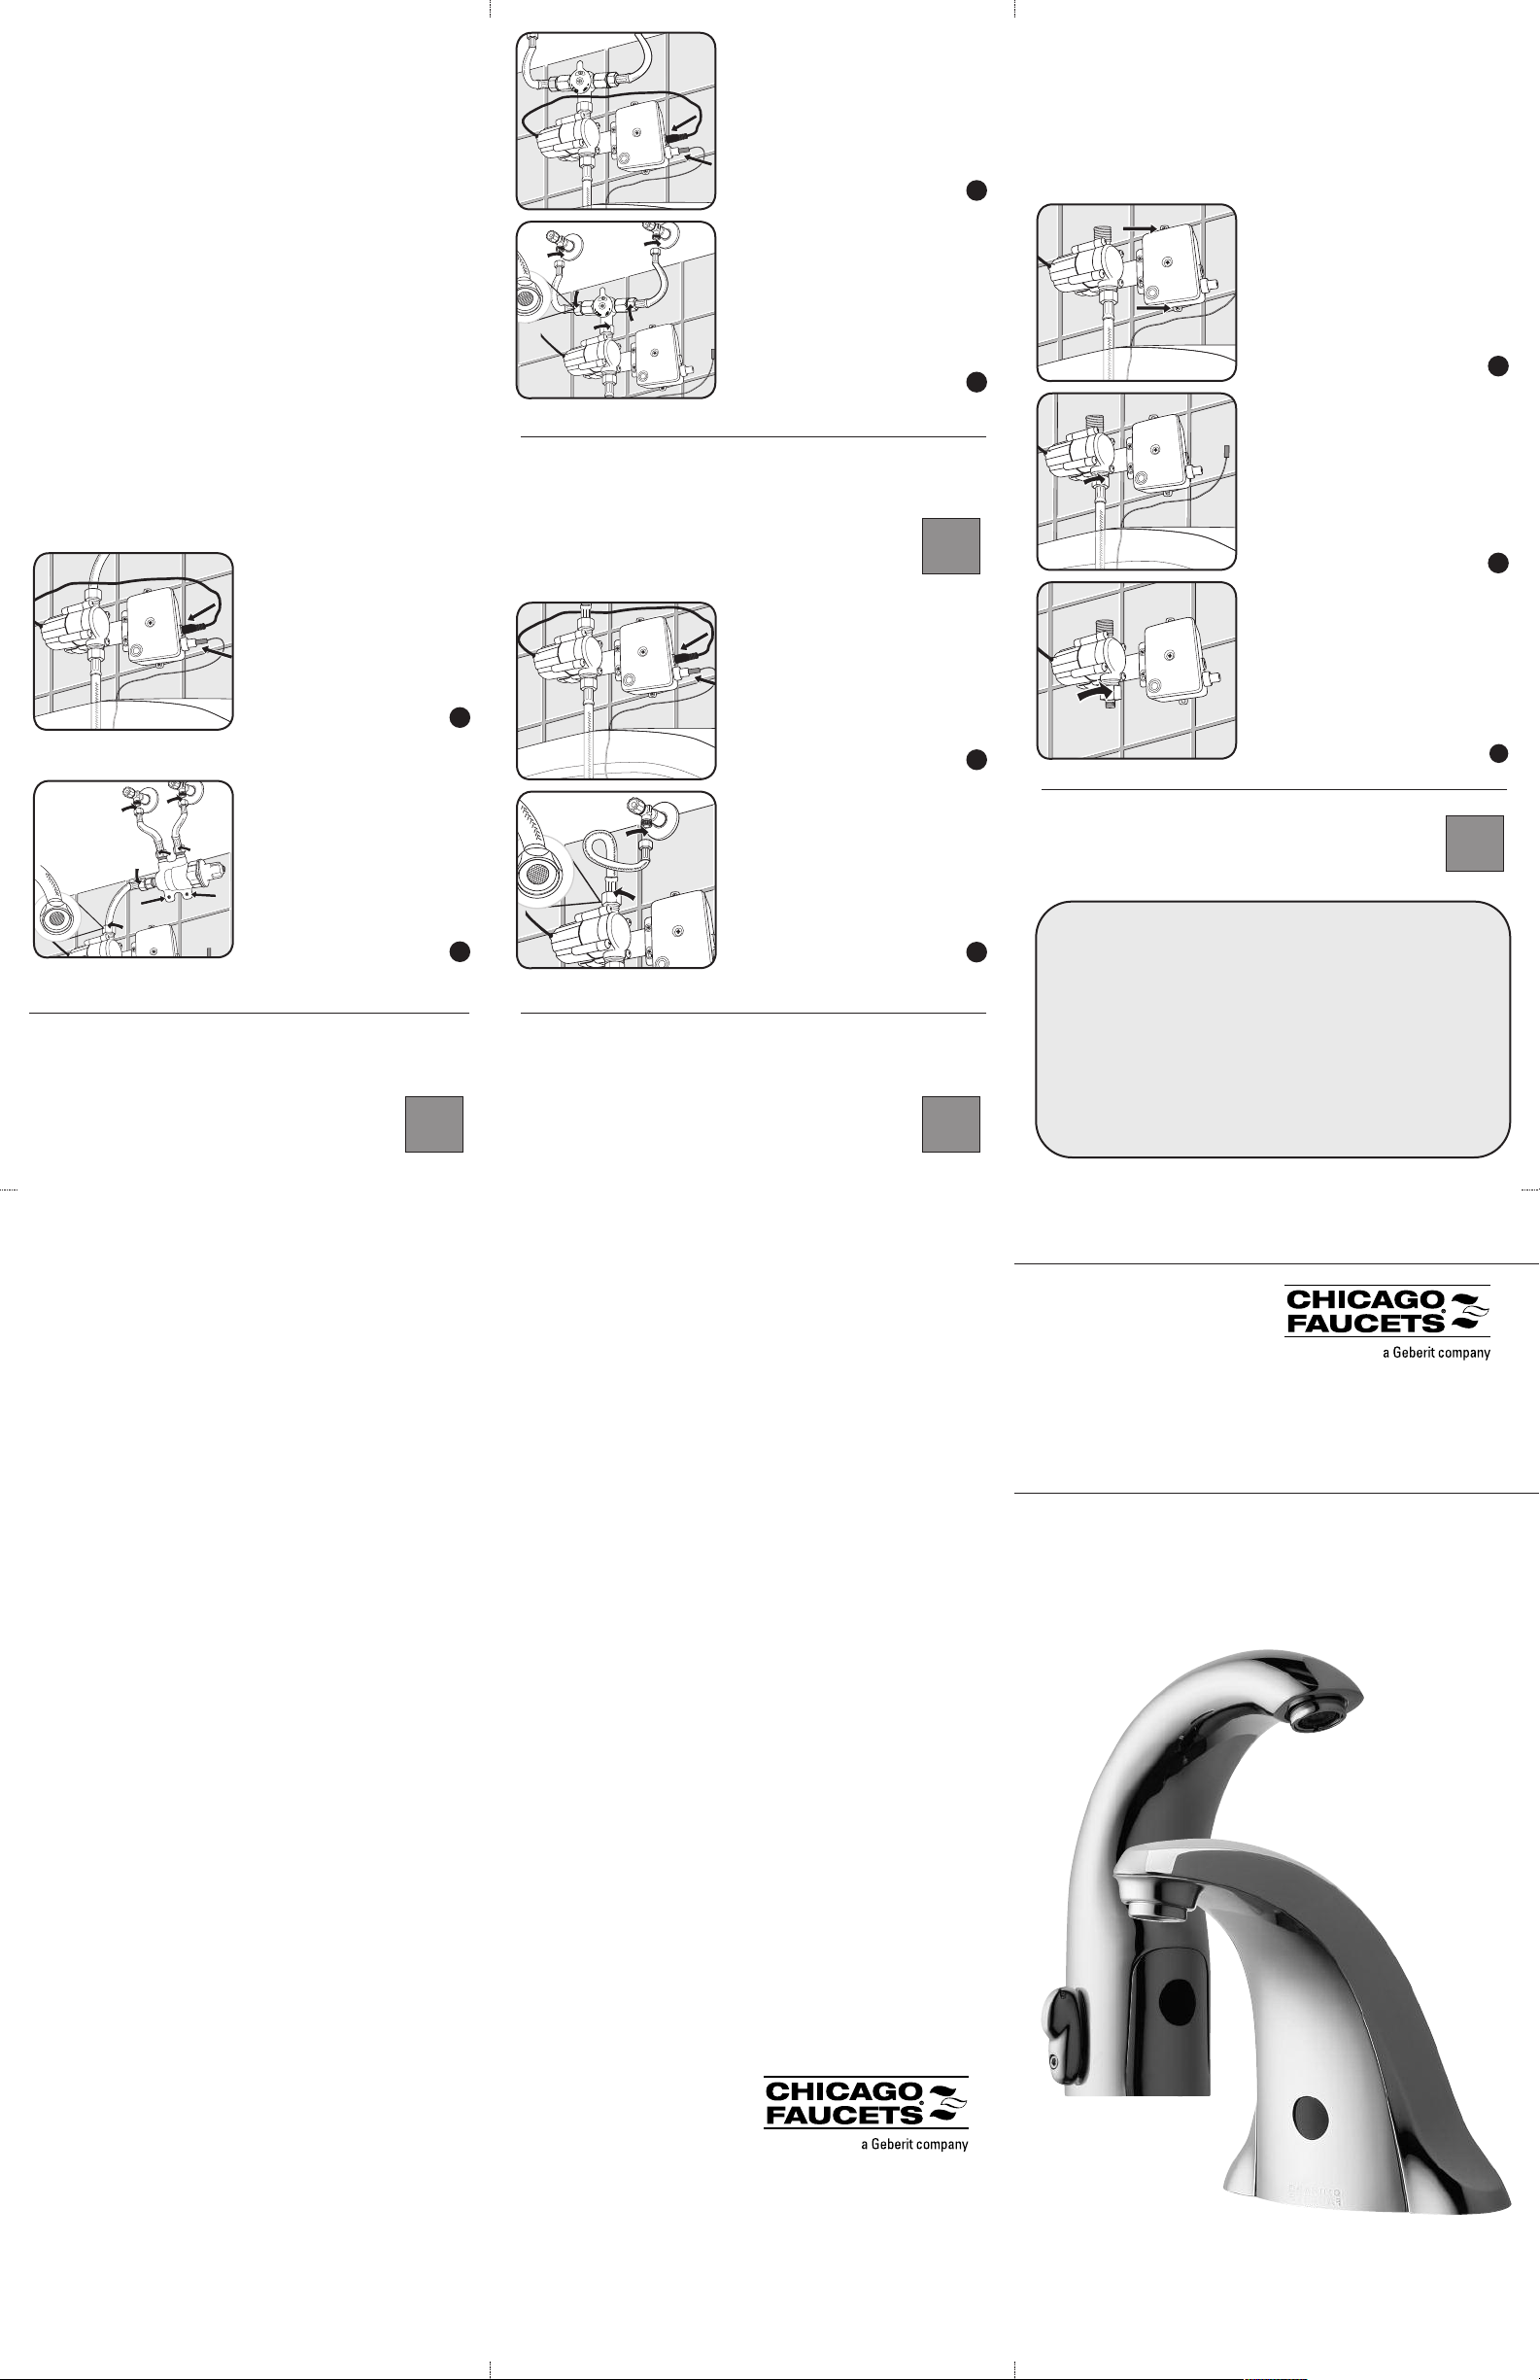
assembly.
to bottom plug on SSPS
power cable from generator
on SSPS assembly. Connect
HyTronic faucet to top plug
B Connect power cable from
of hoses.
filter is provided on 1/2˝ end
supply stops. Note: screen
mechanical mixer inlets to
provided hoses, connect
not overtighten). Using
outlet to SSPS assembly (do
A Connect mechanical mixer
After mounting the SSPS (see section 1.0), please proceed as follows:
or 119.914.AB.1 or 116.915.AB.1
116.911.AB.1 or 116.912.AB.1 or 116.913.AB.1
Product Model Numbers:
and Mechanical Mixer
aucets with SSPS
F
®
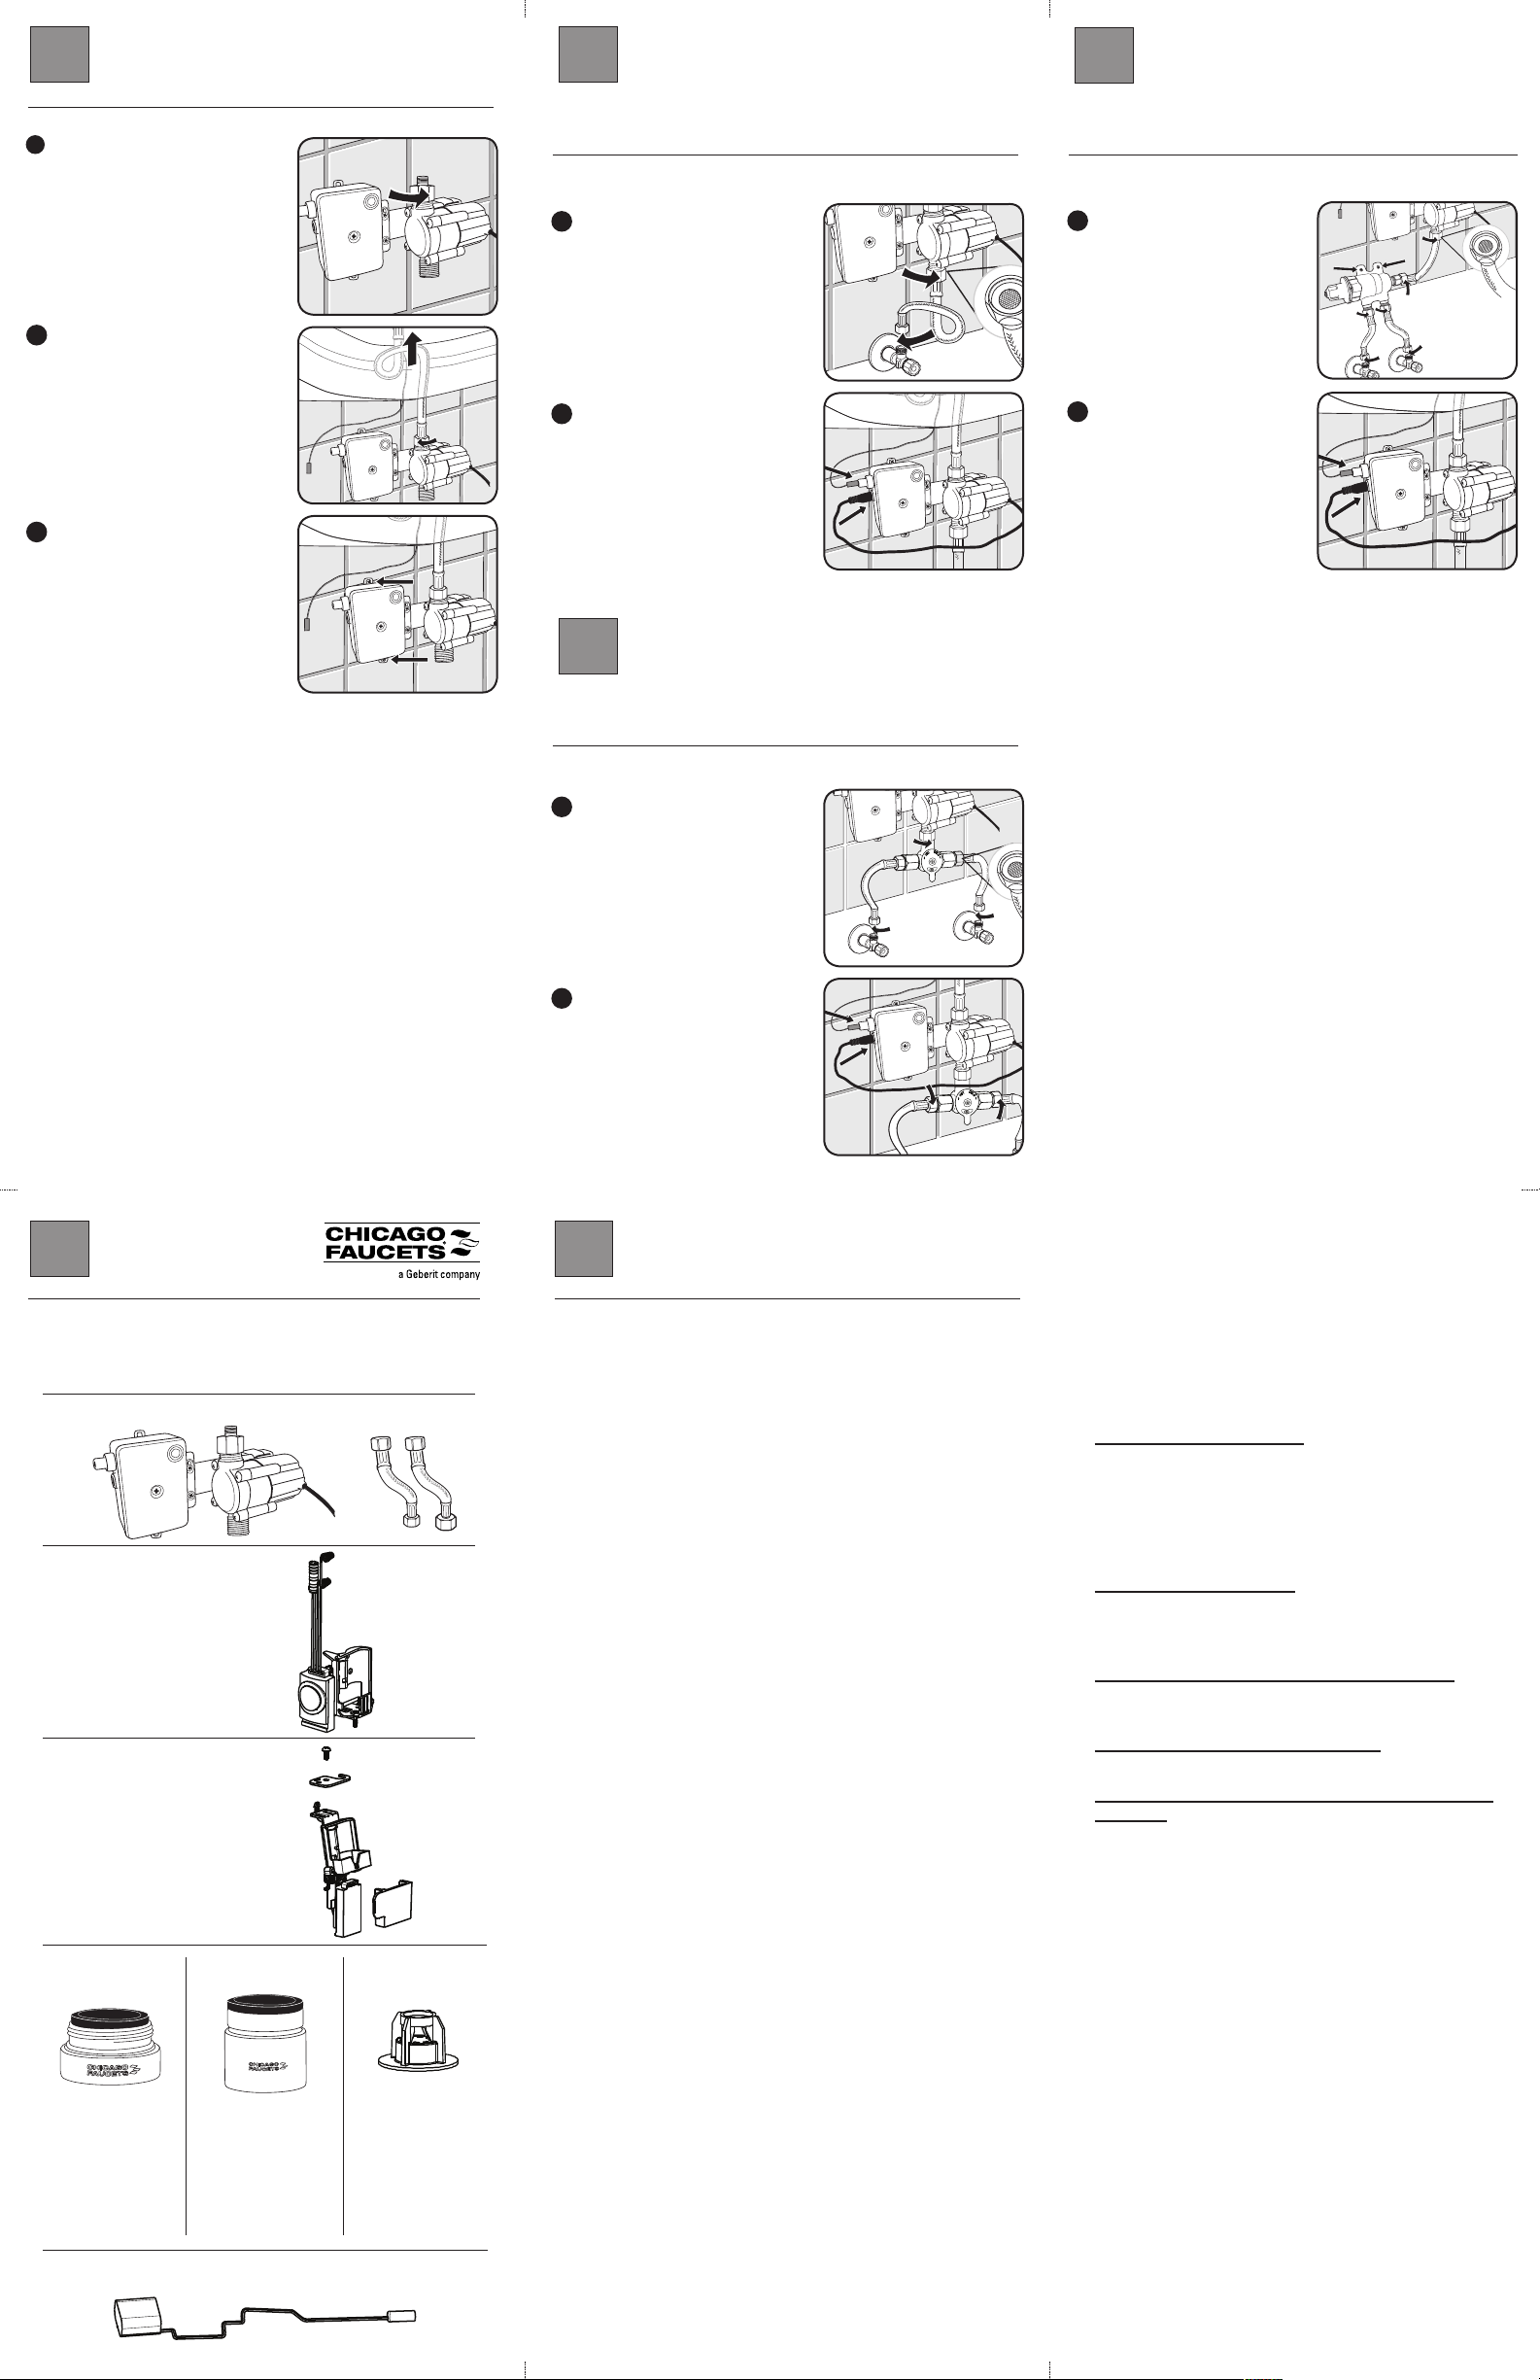
on SSPS assembly.
generator to bottom plug
power cable from
assembly. Connect
top plug on SSPS
from HyTronic faucet to
B Connect power cable
provided hoses.
to supply stops using
and connect mixer inlets
wall (screws not provided)
of hose. Mount mixer to
is provided on 1/2˝ end
hose. Note: screen filter
assembly using provided
mixer outlet to SSPS
A Connect thermostatic
After mounting the SSPS (see section 1.0), please proceed as follows:
or 119.924.AB.1 or 116.925.AB.1
116.921.AB.1 or 116.922.AB.1 or 116.923.AB.1
Product Model Numbers:
& 131 Series Thermostatic Mixer
Faucets with SSPS
®
HyTronic
1.3
Faucets with SSPS
®
yTronic
H
119.904.AB.1 or 116.905.AB.1
116.901.AB.1, 116.902.AB.1, 116.903.AB.1,
Product Model Numbers:
For Single Water Supply Use
HyTronic
1. 2
assembly.
to bottom plug on SSPS
power cable from generator
on SSPS assembly. Connect
HyTronic faucet to top plug
B Connect power cable from
Faucet
®
hose.
is provided on 1/2˝ end of
supply stop. Note: screen filter
connect SSPS assembly to
A Using flexible hose provided,
After mounting the SSPS (see section 1.0), please proceed as follows:
1.1
provided).
(Mounting screws not
bottom of housing.
wall using tabs on top and
3 Mount SSPS assembly to
adapter.
HyTronic faucet to outlet
Attach inlet hose from
2
wrench. Do not overtighten.
1 Tighten outlet adapter with
HyTronic
1. 0
Installing SSPS on a
maintain the faucet, please refer to the faucet user guide.
uide. For instructions on how to install, service, and
g
Note: This user guide is a supplement to the faucet user
ill provide years of dependable, reliable service.
w
industry. We are proud to offer you a product that
tested to insure the highest quality in the plumbing
Faucets products are carefully assembled and
Self-Sustaining Power Supply (SSPS). All Chicago
Thank you for purchasing the Chicago Faucets
Safety Information
Read this entire user guide to ensure proper
installation. Compliance and conformity to local codes
and ordinances is the responsibility of the installer. The
following safety notes must always be complied with
during handling of this product:
• Make sure there is enough space and lighting
available during installation and service.
• Do not modify or convert this Chicago Faucets
product yourself. All warranties will be voided.
IMPORTANT
• Installation may be performed at different times of
construction by different individuals. For this reason,
these instructions should be left on-site with the
facility or maintenance manager.
• Pressurized plumbing fittings shall be installed in
accordance with manufacturer’s recommendations.
The supply piping to these devices shall be securely
anchored to the building structure to prevent installed
device from unnecessary movement when operated
by the user. Care shall be exercised when installing
the device to prevent marring the exposed significant
surface.
• Do not use pipe dope.
• Flush all the water supply lines before making
connections.
Self-Sustaining
Power Supply
User Guide
The Chicago Faucet Company
2100 South Clearwater Drive
Des Plaines, IL 60018
Phone: 847/803-5000
Fax: 847/803-5454
Technical: 800/832-8783
www.chicagofaucets.com
© 2011 Chicago Faucet Company TAG -5 57 5 03 /1 1
Installing SSPS on an
-Tronic
E
1 Remove outlet adaptor.
®
0 Faucet
4
E-Tronic®40 Faucets with SSPS
2.12.0
After mounting the SSPS (see section 2.0), please proceed as follows:
or Single Water Supply Use
F
Product Model Numbers:
116.906.AB.1
-Tronic
E
2.3
After mounting the SSPS (see section 2.0), please proceed as follows:
& 131 Series Thermostatic Mixer
Product Model Numbers:
116.926.AB.1
®
0 Faucets with SSPS
4
2 Using provided hose, attach
faucet inlet shank to SSPS
assembly outlet. Do not
overtighten connection to
SSPS assembly.
3 Mount SSPS assembly to
all using tabs on top and
w
bottom of housing (mounting
screws not provided).
A Using flexible hose provided,
connect SSPS assembly to
supply stop. Note: screen filter
is provided on 1/2˝ end of
hose.
Connect power cable from
B
E-Tronic 40 faucet to top
plug on SSPS assembly.
onnect power cable from
C
generator to bottom plug on
SSPS assembly.
E-Tronic®40 Faucets with SSPS
2.2
After mounting the SSPS (see section 2.0), please proceed as follows:
nd Mechanical Mixer
a
Product Model Numbers:
116.916.AB.1
A Connect thermostatic mixer
outlet to SSPS assembly
using provided hose. Note:
screen filter is provided on
1/2˝ end of hose. Mount
mixer to wall (screws not
provided) and connect mixer
inlets to supply stops using
rovided hoses.
p
B Connect power cable from
E-Tronic 40 faucet to top
plug on SSPS assembly.
Connect power cable from
generator to bottom plug on
SSPS assembly.
A Connect mechanical mixer
outlet to SSPS assembly (do
not overtighten). Using
provided hoses, connect
mechanical mixer inlets to
supply stops. Note: screen
filter is provided on 1/2˝ end
of hoses.
B Connect power cable from
E-Tronic 40 faucet to top
plug on SSPS assembly.
Connect power cable from
generator to bottom plug on
SSPS assembly.
3.0 4.0
Spare Parts
For additional faucet spare parts refer to the Faucet User
Guide.
Description CFC Part Number
SSPS Assembly 242.566.AB.1
HyTronic
(includes Electronic Module and
Green Adapter Holder Assembly)
E-Tronic
(includes Electronic Module and
Green Adapter Holder Assembly)
Vandal-Proof Pressure
Compensating
Econo-Flo Spray
Outlet, 1.0 GPM
(3.8L/min) max. flow
at 60 PSI
Green Power Adapter 242.568.00.1
®
Electronic Module Kit 242.574.00.1
®
40 Electronic Module Kit 242.575.00.1
Lavatory
Fittings
E28JKCP
Gooseneck
Fittings
E28-5JKCP
Vandal-Proof Pressure
Compensating
Econo-Flo Spray
Outlet, 1.0 GPM
(3.8L/min) max. flow
at 60 PSI
Gooseneck
FC Fittings
1020-034KJKNF
1.0 GPM Pressure
Compensating Flow
Control (located in
spout base)
If you currently own a battery powered HyTronic or E-Tronic
faucet and you’ve purchased the SSPS to retrofit the
product please follow these instructions.
Note: In order to comply with current Codes and Standards
the following has to be addressed when retrofitting the SSPS
to existing products.
Conversion Overview
1.0 A minimum flow rate is required for power generation.
See Section 3.0 for recommended outlets.
2.0 The electronic module has to be set to a maximum run
time of 10 seconds by using the Geberit Commander
software and adjusting the faucet to water saver or
metering mode of 10 seconds. If you cannot make this
adjustment, you must purchase the appropriate electronic
module kit for your faucet (reference Section 3.0 for correct
part number).
3.0 A Green Power Adapter must to be purchased to allow
power distribution from the SSPS to the faucet.
(reference Section 3.0 for correct part number).
Conversion Steps:
1.0 Re-program the electronic module to water saver or
metering mode with maximum run time of 10 seconds.
* If re-programming is not desired, you must use the appropriate
2.0 Remove the spout screw and lift the spout.
3.0 Remove the battery from the battery holder.
4.0 Disconnect the power connection to the solenoid.
5.0 Remove the electronic module and battery holder assembly.
6.0 Loosen the faucet from the deck. Ensure that the faucet
can be lifted from the deck to allow for the next steps.
7.0 Insert the Green Power Adapter into the battery holder
and route the wire through the faucet valve body below
the deck.
8.0 Re-install the electronic module and battery holder with
Green Power Adapter back into the faucet.
9.0 Re-connect the solenoid assembly.
10.0 Replace the spout and holding screw.
11.0 Replace the faucet outlet with a recommended outlet
as listed in Section 3.0.
12.0 Install the SSPS by following the appropriate
Retrofitting the SSPS
electronic module kit.
instructions for your faucet model, as outlined in
this User Guide.
Limited Warranty
The CHICAGO FAUCET COMPANY (“Chicago
Faucets”) extends to the original consumer the
following warranties for Genuine Chicago Faucets
manufactured products and components, or
other components under the Chicago Faucets
Warranties, (collectively, the “Products”).
Lifetime Faucet Warranty
as any metal cast, forged, stamped of formed
portion of the Product, not including electronic or
moving parts or water restricting components, or
other components covered under the Chicago
Faucet warranties, is warranted against defects
for the life of the product.
™
One Year Finish Warranty
is warranted against manufacturing defects for a
period of one (1) year from the date of Product
purchase.
Electronic Faucets Mechanicals Warranty
warranted for five (5) years from the date of
installation.
Electronic Faucets Finishes Warranty Are warranted
for one-year from the date of installation.
Electronic Faucets Electronics and Solenoid
Warranty Are warranted for three (3) years from the
date of installation.
The “Faucet”, defined
The finish of the Product
Are
 Loading...