

Page 1
®
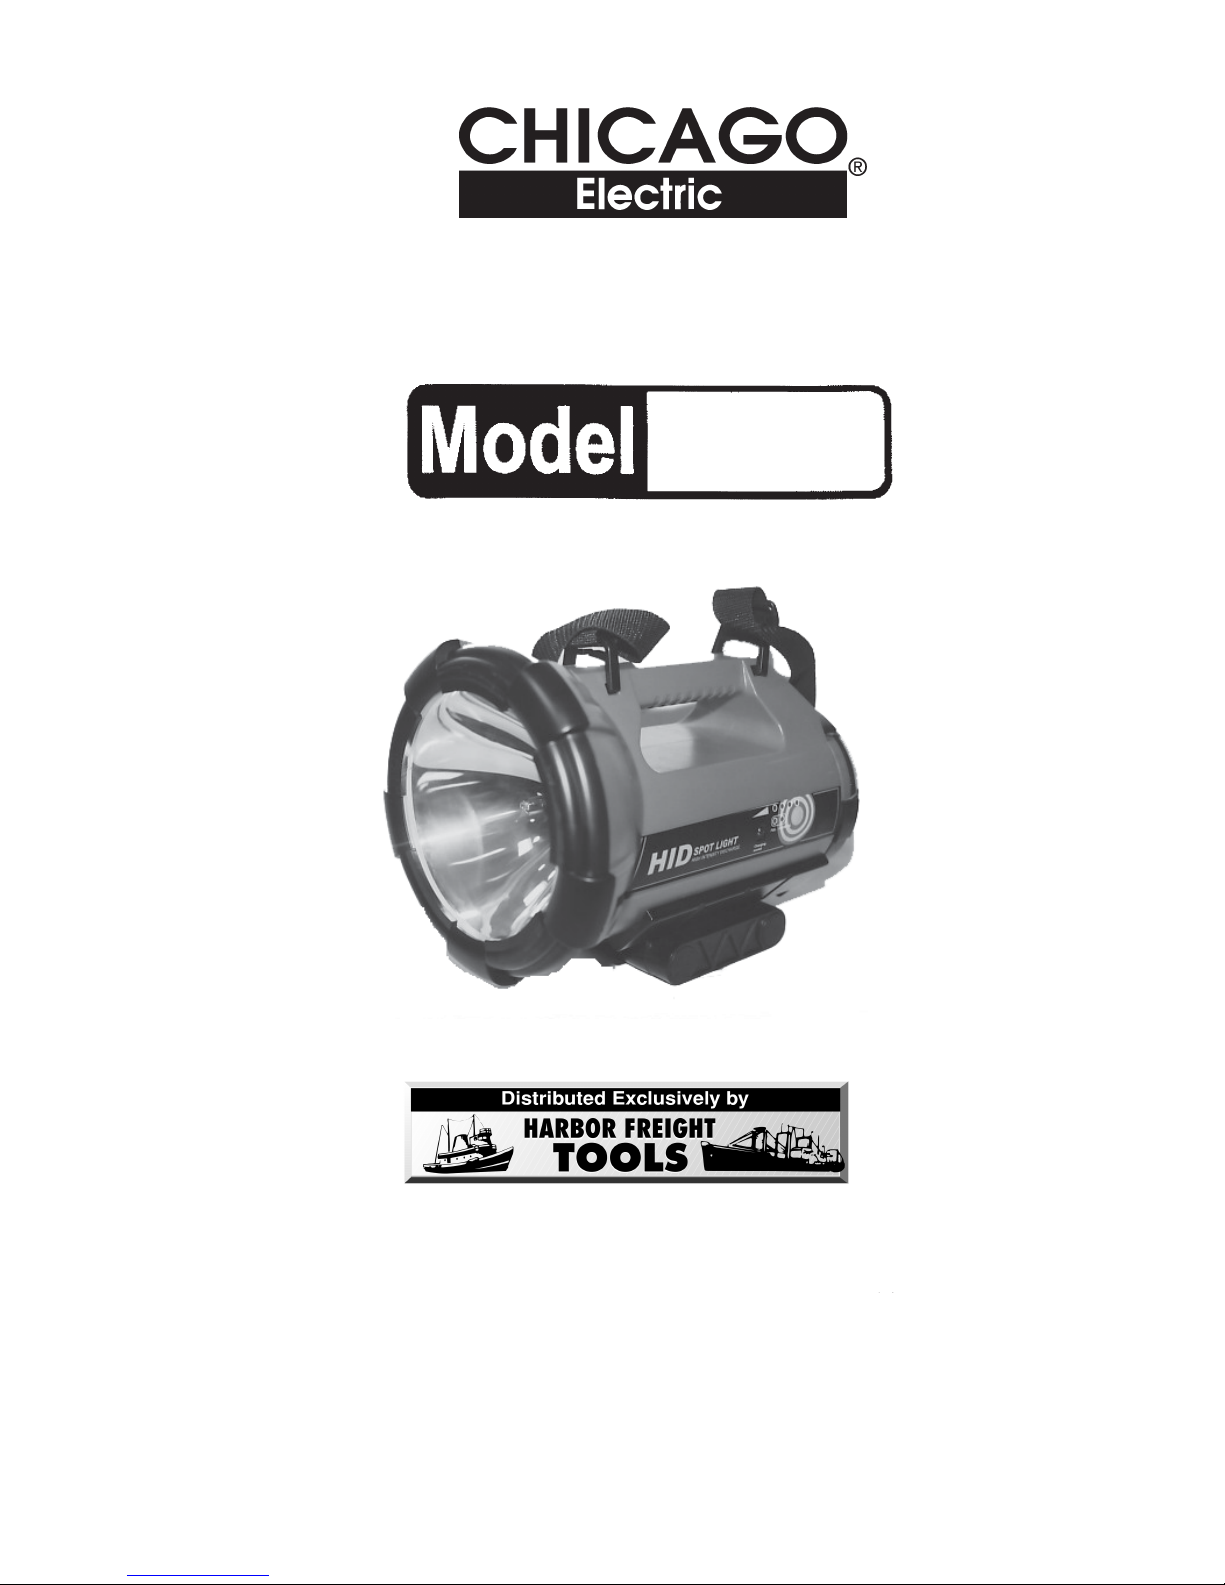
HIGH INTENSITY DISCHARGE
XENON SPOTLIGHT
94987
ASSEMBLY & OPERATING INSTRUCTIONS
Due to continuing improvement, actual product may differ slightly from the product described herein.
3491 Mission Oaks Blvd., Camarillo, CA 93011
Visit our Web Site at www.harborfreight.com
Copyright© 2006 by Harbor F reight Tools®. All rights reserved. No portion of this manual or
any artwork contained herein may be reproduced in any shape or form without the
express written consent of Harbor Freight Tools.
For technical questions and replacement parts please call 1-800-444-3353.
Page 2
THANK YOU for choosing a HARBOR FREIGHT TOOLS product. For future reference, please
complete the owner’s record below:
Model______________ Serial No.____________ Purchase Date_______________
SAVE THE RECEIPT, WARRANTY AND THESE INSTRUCTIONS. It is important that you read the
entire manual to become familiar with the unit BEFORE you begin assembly.
Technical Specifications
Super powerful HID (High Intensity Discharge) Spotlight provides light that can be seen f or miles.
Three times brighter than a halogen bulb at the same wattage.
Overall Dimensions: 11-7/8” L X 8.0” W X 9 “ H
Handle Dimensions: 7” L X 1” W X 1” H
Lamp Stand Dimensions: 1-3/16” L X 3/4” W X 4-11/16” H
Po wer Source: 12V rechargeable battery, 7Ah sealed lead acid
Cord Length: 6’
Shoulder Strap: Black Nylon, 49-1/2” L X 1-1/8” X 0.044” Thick
Weight: 9.65 Lbs.
Bulb: 35 W , H7 6000K (white) HID Xenon bulb
AC/DC Adapter: 120VAC, 60Hz (Input); 13.8 VDC, 750 mA (output)
Car Plug Adapter: 12V DC
Safety Warnings and Precautions
WARNING: When using product, basic safety precautions should always be followed to
reduce the risk of personal injury and damage to equipment.
Read all instructions before using this product!
GENERAL SAFETY RULES
WARNING!
READ AND UNDERSTAND ALL INSTRUCTIONS
Failure to follow all instructions listed below may result in
electric shock, fire, and/or serious injury.
SA VE THESE INSTRUCTIONS
WORK AREA
1. Keep your work area clean and well lit. Cluttered benches and dark areas invite
accidents.
2. Do not operate the Spotlight in explosive atmospheres, such as in the presence of
flammable liquids, gases, or dust. Electrical products create sparks which may ignite the
dust or fumes.
REV 03/07
SKU 94987 For technical questions please call 1-800-444-3353. Page 2
Page 3

ELECTRICAL SAFETY
3. Grounded products must be plugged into an outlet properly installed and grounded
in accordance with all codes and ordinances. Never remove the grounding prong or
modify the plug in any way. Do not use any adapter plugs. Check with a qualified
electrician if you are in doubt as to whether the outlet is properly grounded. If a
grounded prouct should electrically malfunction or break down, grounding provides a low
resistance path to carry electricity away from the user.
4. Double insulated products are equipped with a polarized plug (one blade is wider
than the other). This plug will fit in a polariz ed outlet only one way. If the plug does
not fit fully in the outlet, reverse the plug. If it still does not fit, contact a qualified
electrician to install a polarized outlet. Do not change the plug in any way.
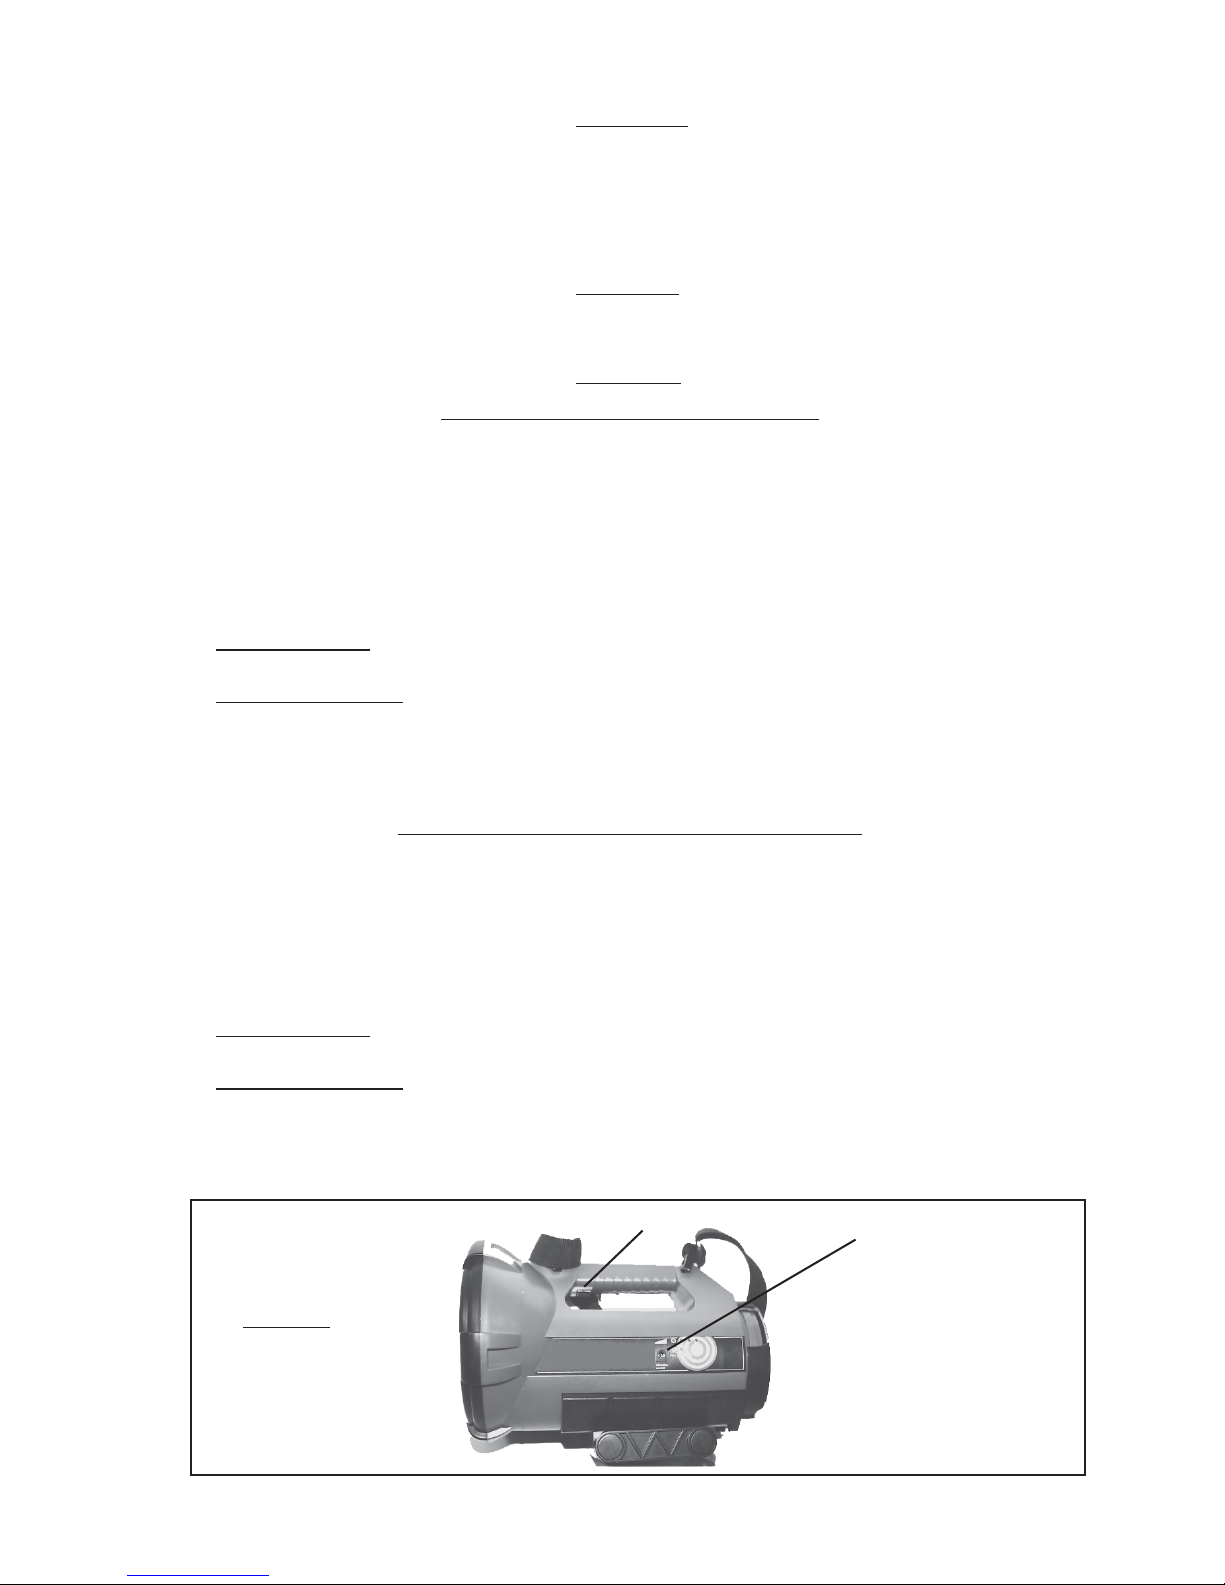
Double insulation
eliminates the need for the three wire grounded power cord and
grounded power supply system.
5. Avoid body contact with grounded surfaces such as pipes, radiators, ranges, and
refrigerators. There is an increased risk of electric shock if your body is grounded.
6. Do not expose the Spotlight to rain or wet conditions. Water entering a power tool
will increase the risk of electric shock.
7. Do not abuse the Power Cord. Never use the Power Cord to carry the Spotlight or to
pull the Plug from an outlet. Keep the Power Cord away from heat, oil, sharp
edges, or moving parts. Replace damaged Power Cords immediately. Damaged
Power Cords increase the risk of electric shock.
8. When operating the Spotlight outside, use an outdoor extension cord marked “W-A”
or “W”. These extension cords are rated for outdoor use, and reduce the risk of electric
shock.
PERSONAL SAFETY
9. Stay alert. Watch what you are doing, and use common sense when operating the
Spotlight. Do not operate the Spotlight while tired or under the influence of drugs,
alcohol, or medication.
10. Store the Spotlight out of reach of children and other untrained persons. Electrical
products are dangerous in the hands of untrained users.
TOOL USE AND CARE
11. Do not use the Spotlight if the Power Switch does not turn it on or off. Any appliance
that cannot be controlled with the Power Switch is dangerous and must be replaced.
12. Disconnect the Power Cord before making any adjustments, changing the battery,
or storing the Spotlight. Such preventive safety measures reduce the risk of turning on
the product accidentally.
SERVICE
13. Spotlight service must be performed only by qualified repair personnel. Service or
maintenance performed by unqualified personnel could result in a risk of injury .
SKU 94987 For technical questions please call 1-800-444-3353. Page 3
Page 4
14. When servicing the Spotlight, use only identical replacement parts. Follow
instructions in the
“Inspection, Maintenance, And Cleaning”
section of this manual.
Use of unauthorized parts or failure to follow maintenance instructions may create a risk of
electric shock or injury.
GROUNDING
WARNING!
Improperly connecting the grounding wire can result in the risk of electric shock. Check with
a qualified electrician if you are in doubt as to whether the outlet is properly grounded. Do not
modify the power cord plug provided with the Spotlight. Never remove the grounding prong
from the plug. Do not use the Spotlight if the power cord or plug is damaged. If damaged, have
it repaired by a service facility before use. If the plug will not fit the outlet, have a proper outlet
installed by a qualified electrician.
GROUNDED TOOLS: TOOLS WITH THREE PRONG PLUGS
1. Tools marked with “Grounding Required” have a three wire cord and three prong grounding
plug. The plug must be connected to a properly grounded outlet. If the Spotlight should
electrically malfunction or break down, grounding provides a low resistance path to
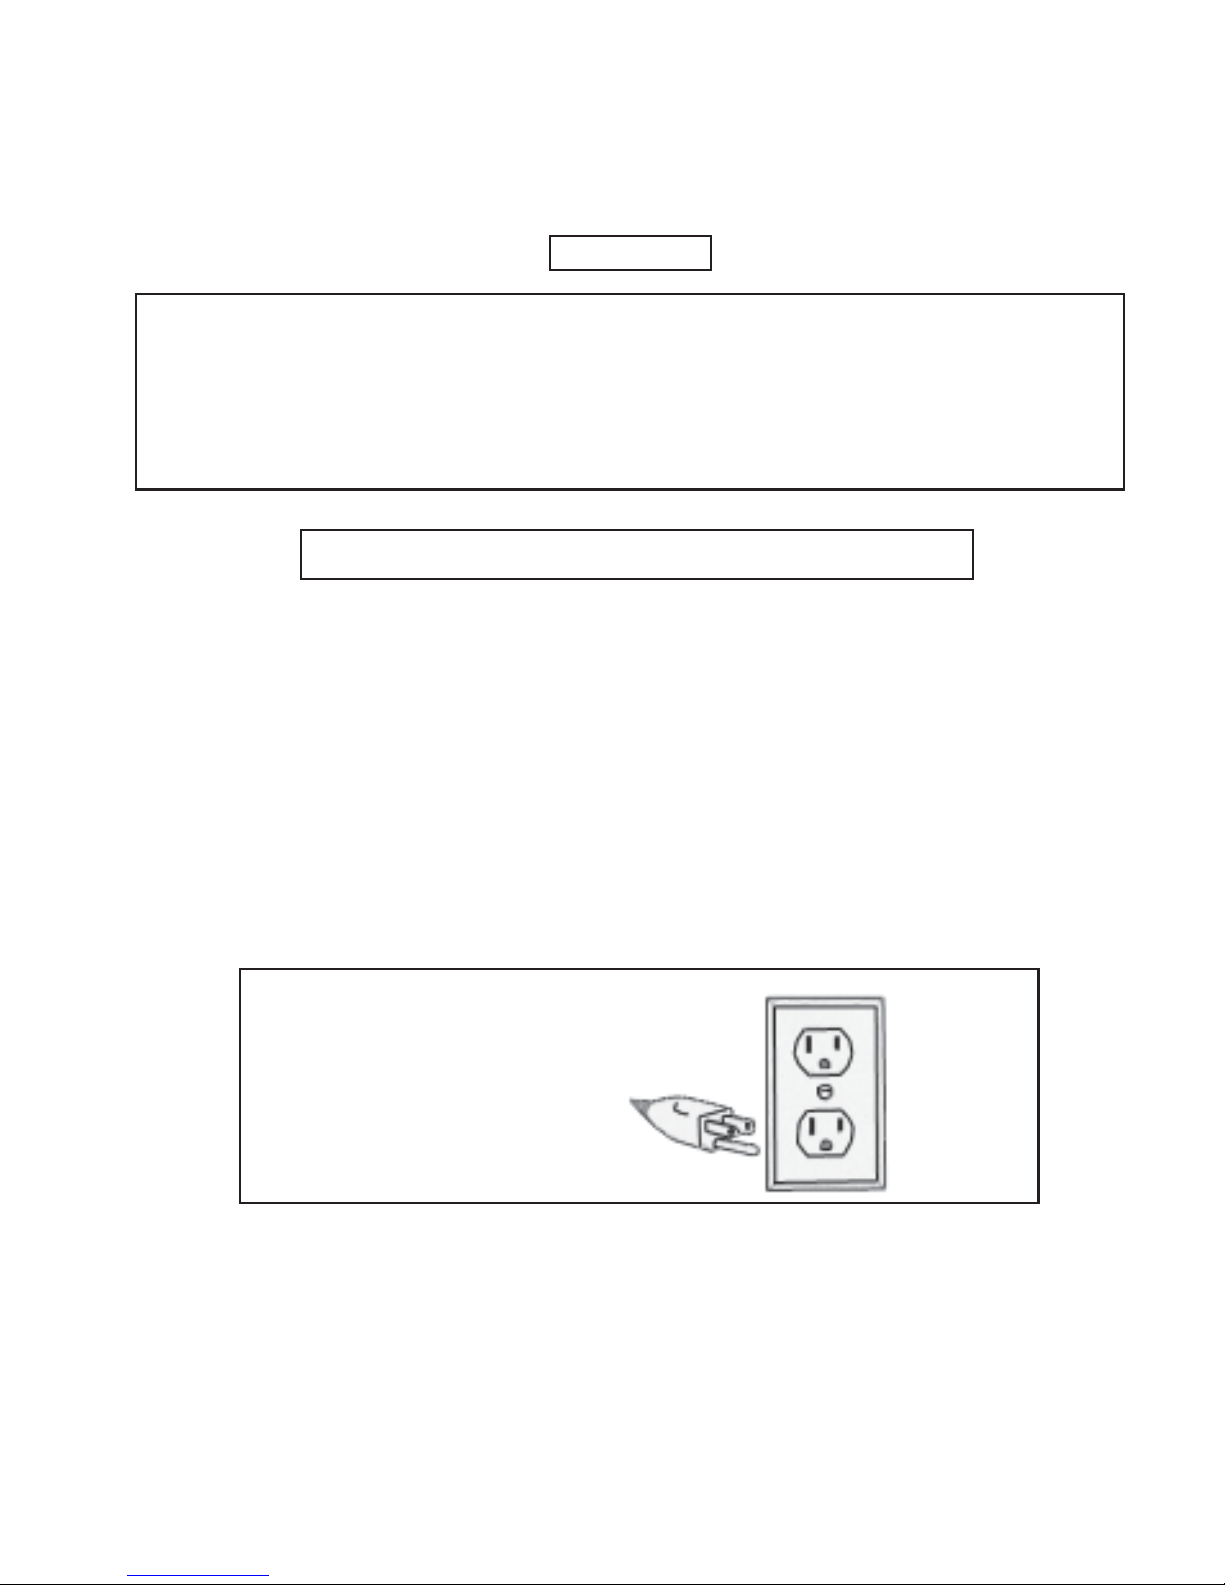
carry electricity away from the user, reducing the risk of electric shock. (See Figure A.)
2. The grounding prong in the plug is connected through the green wire inside the cord to the
grounding system in the tool. The green wire in the cord must be the only wire connected to
the Spotlight’s grounding system and must never be attached to an electrically “live” terminal.
(See Figure A.)
3. A grounded appliance must be plugged into an appropriate outlet, properly installed and
grounded in accordance with all codes and ordinances. The plug and outlet should look like
those in the following illustration. (See Figure A.)
Figure A
DOUBLE INSULATED APPLIANCES: APPLIANCES WITH TWO PRONG PLUGS
1. Appliances marked “Double Insulated” do not require grounding. They have a special double
insulation system which satisfies OSHA requirements and complies with the applicable
standards of Underwriters Laboratories, Inc., the Canadian Standard Association, and the
National Electrical Code. (See Figure B.)
SKU 94987 For technical questions please call 1-800-444-3353. Page 4
Page 5
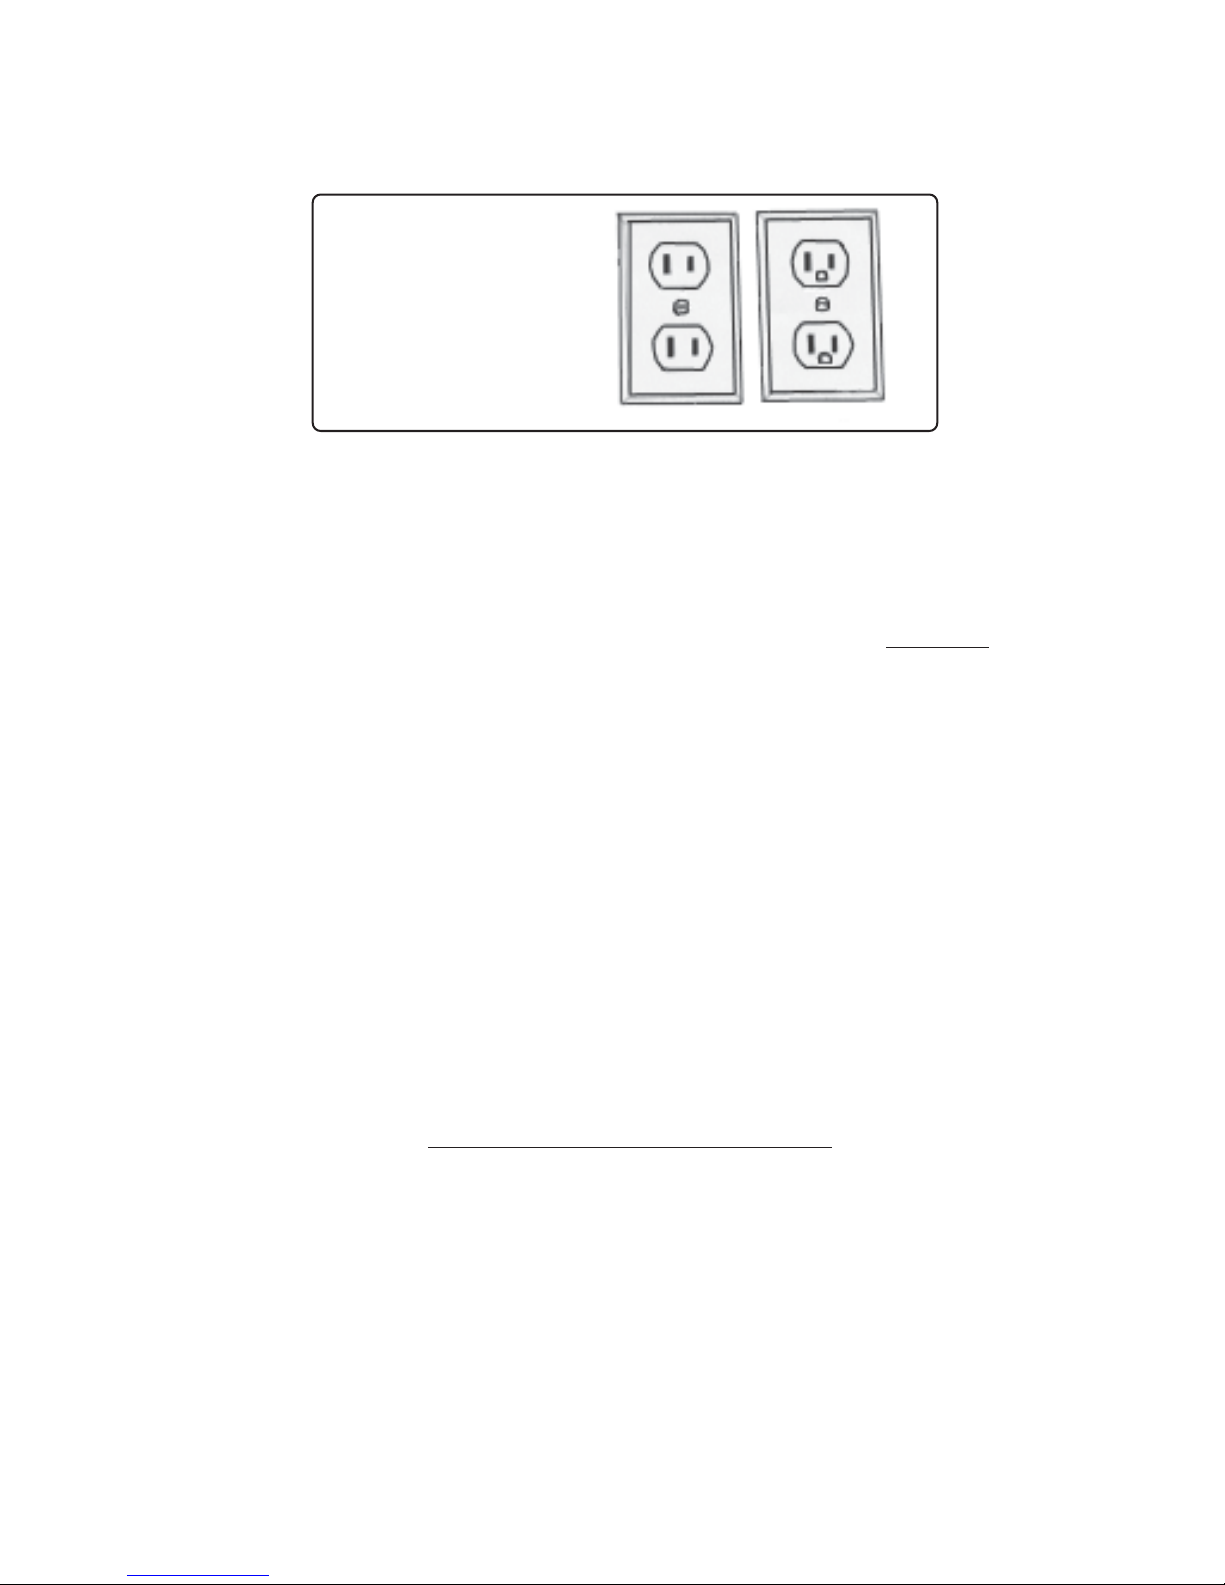
2. Double insulated tools may be used in either of the 120 volt outlets shown in the following
illustration. (See Figure B.)
Figure B
EXTENSION CORDS
1.
Grounded
appliances require a three wire extension cord.
Double Insulated
products can
use either a two or three wire extension cord.
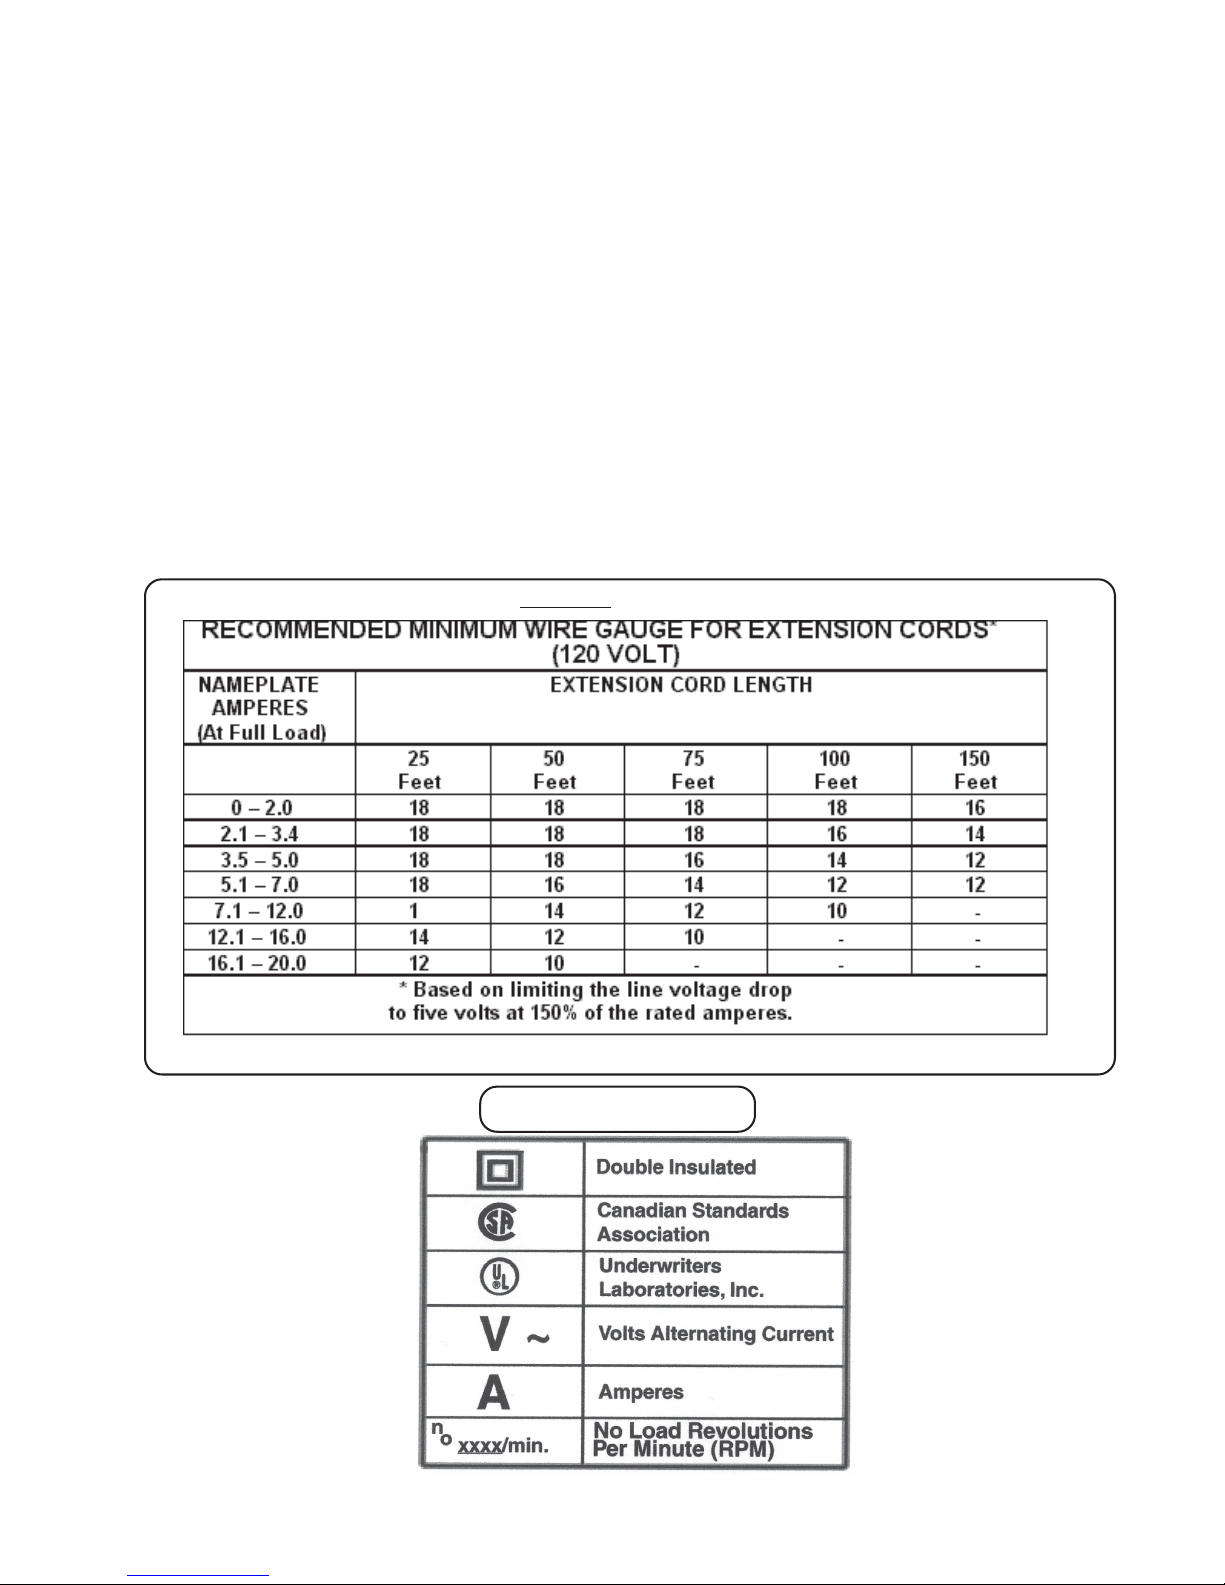
2. As the distance from the supply outlet increases, you must use a heavier gauge extension
cord. Using extension cords with inadequately sized wire causes a serious drop in voltage,
resulting in loss of power and possible tool damage. (See Figure C,
next page.)
3. The smaller the gauge number of the wire, the greater the capacity of the cord. For
example, a 14 gauge cord can carry a higher current than a 16 gauge cord. (See Figure C.)
4. When using more than one extension cord to make up the total length, make sure each cord
contains at least the minimum wire size required. (See Figure C.)
5. If you are using one extension cord for more than one tool, add the nameplate amperes and
use the sum to determine the required minimum cord size. (See Figure C.)
6. If you are using an extension cord outdoors, make sure it is marked with the suffix “W-A”
(“W” in Canada) to indicate it is acceptable for outdoor use.
7. Make sure y our e xtension cord is properly wired and in good electrical condition. Alw a ys
replace a damaged extension cord or have it repaired by a qualified electrician before using
it.
8. Protect your extension cords from sharp objects, excessive heat, and damp or wet areas.
1. Supervise children while using the Spotlight.
2. Do not mix old and new batteries. Do not use different types of batteries; do not use
rechargeable and alkaline batteries.
3. Remove the battery if the Spotlight is not used for a long period of time.
4. Dispose of old batteries properly. Make cer tain to follow all local laws and
restrictions for proper disposal.
SKU 94987 For technical questions please call 1-800-444-3353. Page 5
Specific Safety Rules for the Spotlight
Page 6
5. Av oid serious e y e injury. Do not look directly into the Lens when oper ating this
product. Always wear ANSI-approved safety goggles when working with tools and
equipment.
6. Do not touch the bulb at any time. Oil from skin will drastically shorten the bulb’s life-span
if not cleaned (with rubbing alcohol) before use. Handle with a soft, clean cloth instead.
7. Turn off the Spotlight and allow it to completely cool down prior to performing any
inspection, maintenance, or cleaning on the unit.
Note: Performance of this tool (if powered by line voltage) may vary depending on variations in
local line voltage. Extension cord usage may also affect tool performance.
Warning: The warnings, cautions, and instructions discussed in this instruction manual
cannot cover all possible conditions and situations that may occur. It must be understood by
the operator that common sense and caution are factors which cannot be built into this
product, but must be supplied by the operator.
Figure C
SKU 94987 For technical questions please call 1-800-444-3353. Page 6
SYMBOLOGY
Page 7
Unpacking
When unpacking your Spotlight, check to make sure that all parts listed in the parts list on page 9
are included. If any par ts are missing or broken, please call HARBOR FREIGHT TOOLS at 1-800-
444-3353. It is important that you read the entire manual to become familiar with the product
BEFORE you operate and use the Spotlight.
Assembly
Your Spotlight comes completely assembled. Only maintenance such as bulb replacement and
battery replacement may be required.
Operation
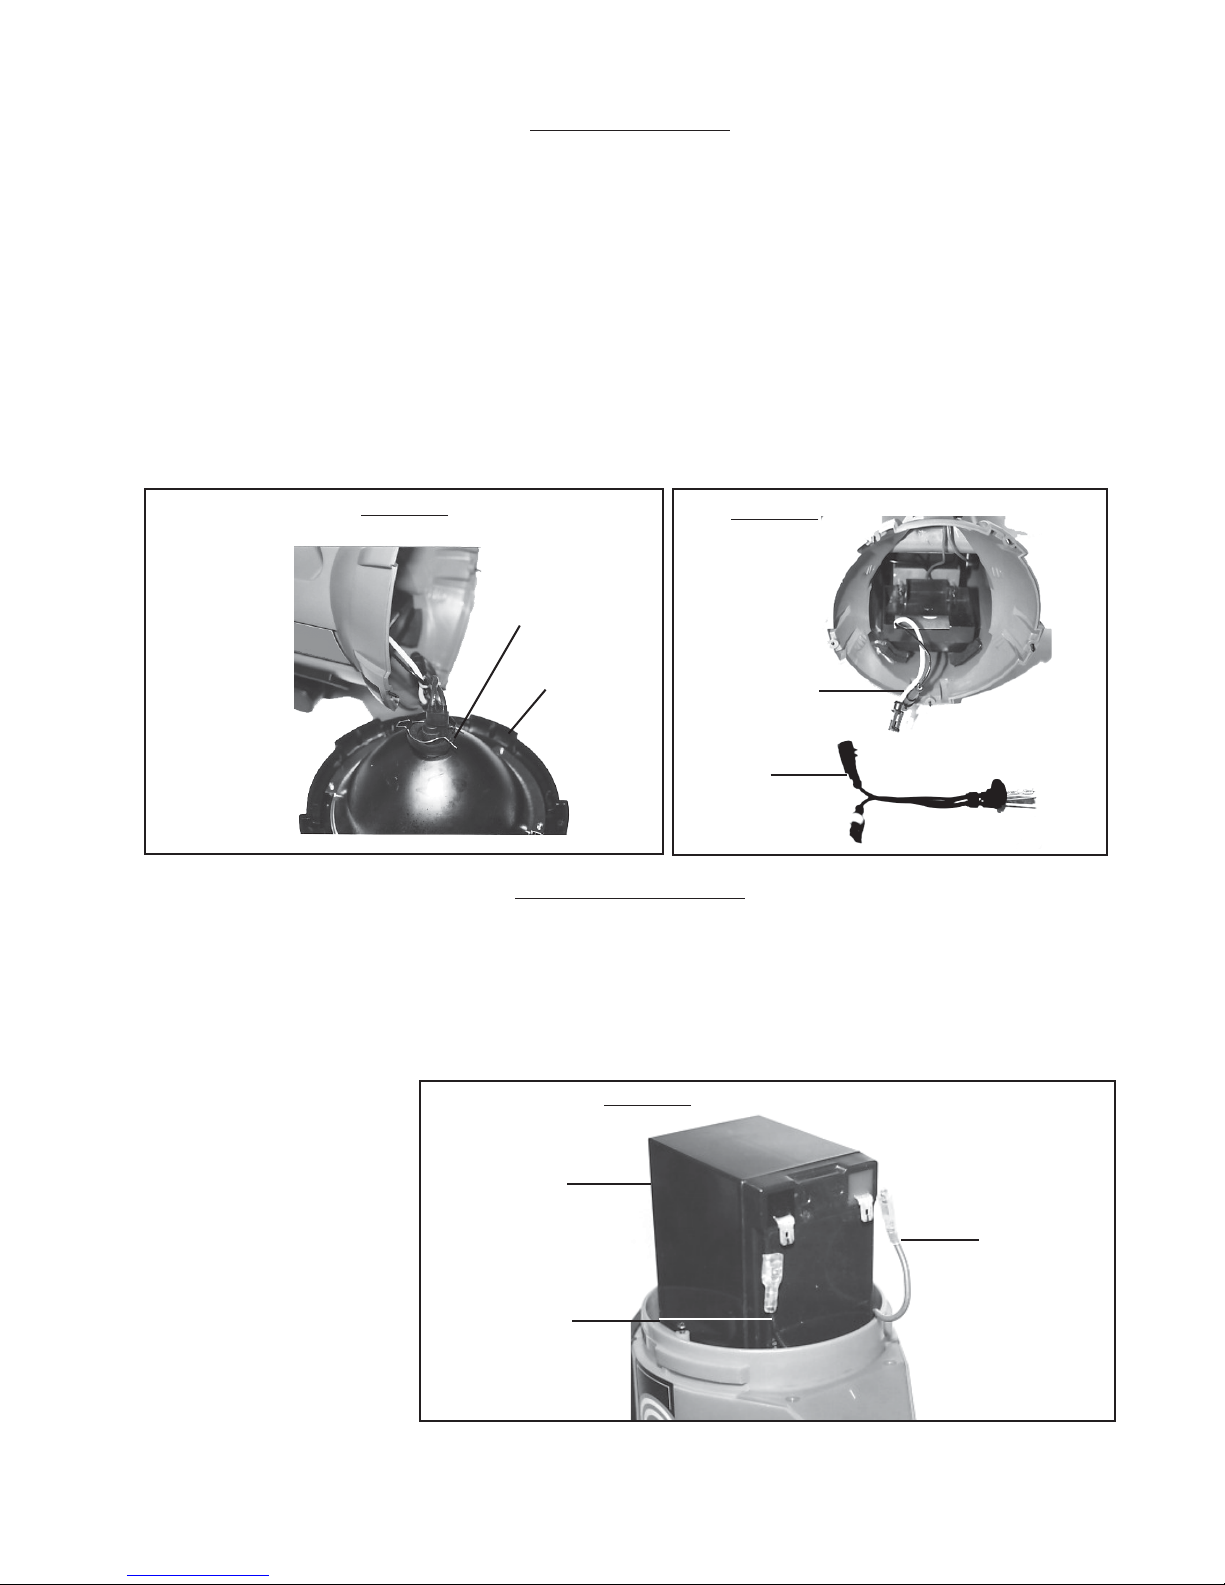
Charging the Battery using the Adapter
The Spotlight will require fully charging before the first use.
1. Move the ON/OFF Switch to the OFF position. Remove the AC Charger Plug (8) from the
storage compartment in the rear of the Spotlight. Plug the AC Charger Plug (8) into the J a ck
located on the side of the Spotlight-see Figure 1. Plug into an electrical socket.
2. Allow the Spotlight to charge for up to ten to twelve hours during initial charge.
3.
During charging the red LED will light up.
4. When fully charged, the green LED light will light up.
5. Unplug the AC Charger Plug (8) from the Spotlight. Unplug AC Charger Plug (8) from the
electrical outlet. Never operate the Spotlight with the AC Charger Plug plugged in.
Charging the Battery using the Car Plug Adapter
1. Remov e the Car Plug Adapter (7) from the storage compartment in the rear of the Spotlight.
Move the ON/OFF Switch to the OFF position.
2. Plug the Car Plug Adapter (7) into your v ehicle’ s cigarette lighter. Plug the Car Plug Adapter
into the Jack on the Spotlight-see Figure 1.
3.
During charging the red LED will light up.
4. When fully charged, the green LED light will light up.
5. Remove the Car Plug Adapter from the cigarette lighter and the jacket on the Spotlight.
Never operate the Spotlight with the car Plug Adapter plugged in.
On/Off Switch
Charging Jack
Figure 1
SKU 94987 For technical questions please call 1-800-444-3353. Page 7
Page 8
Replacing the Bulb
Note: Do not touch the bulb at any time. See Specific Safety Rule #6 on page 6.
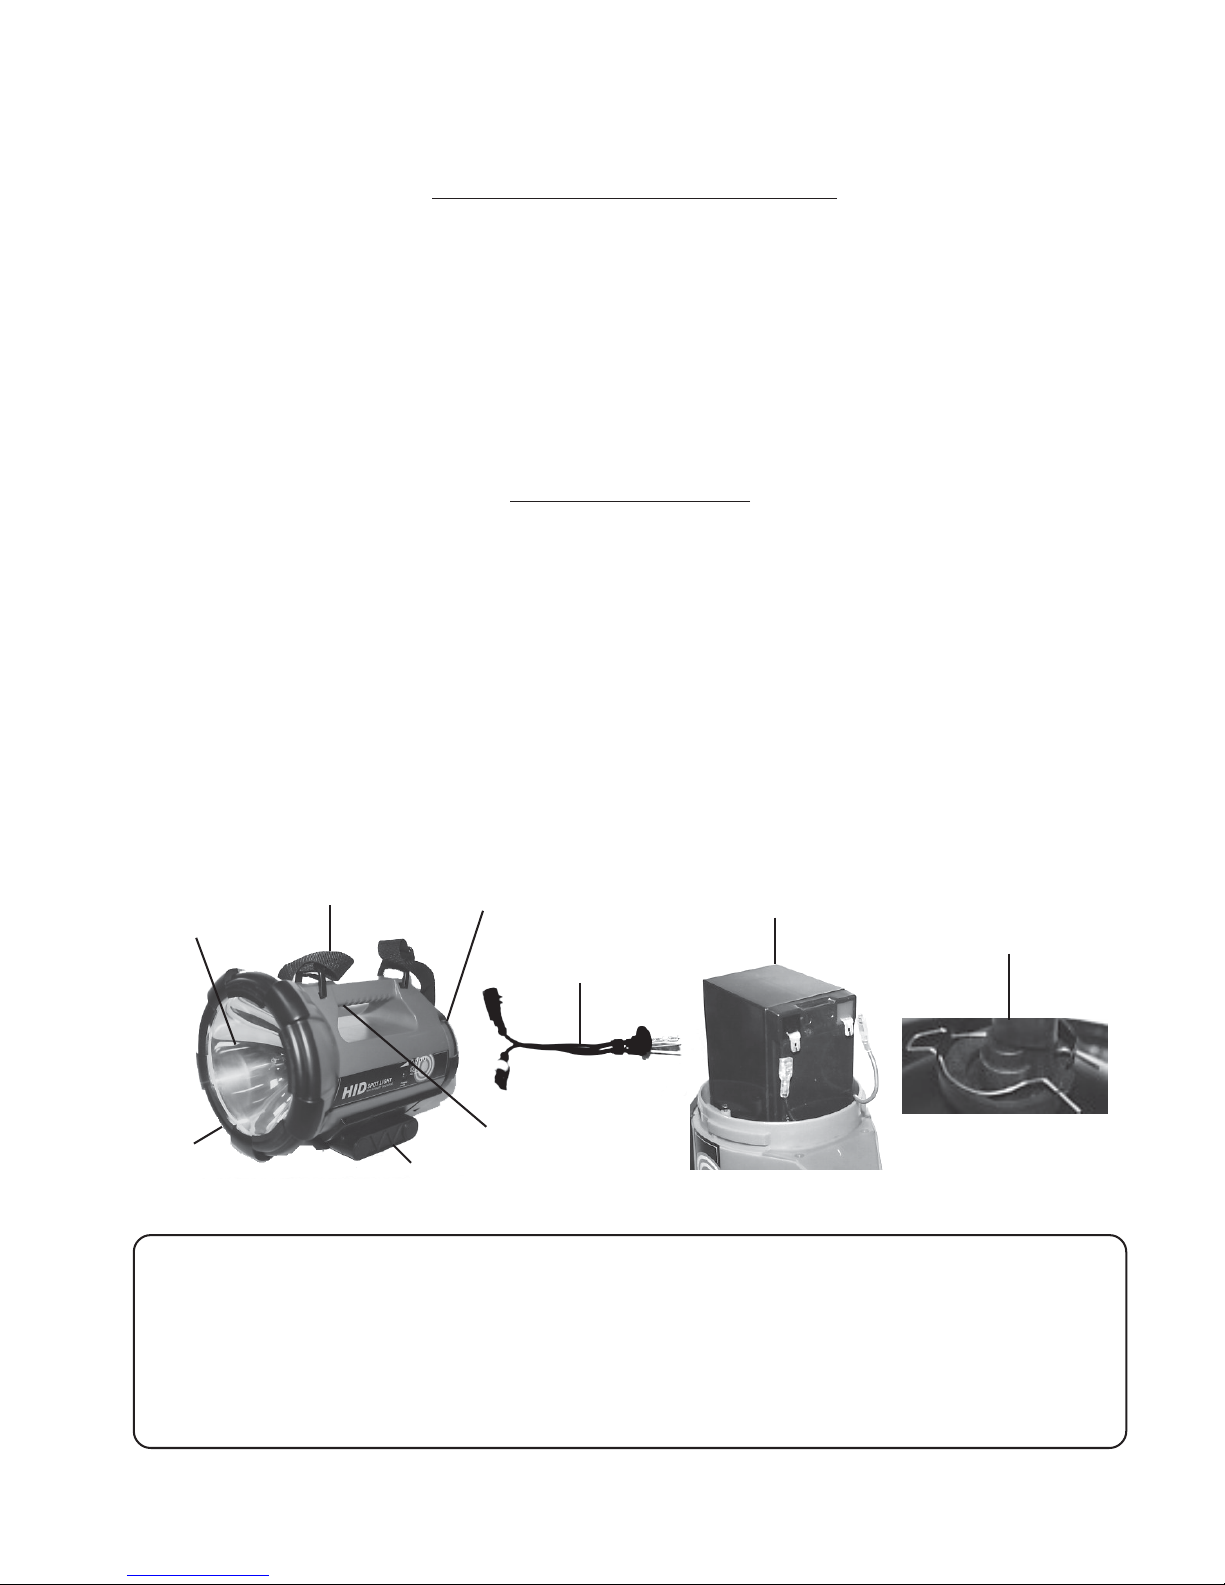
1. Remove the five Torx #10 screws located in the Lens Cover (11).
2. Pinch and remove the Light Bulb Clip (10) holding the Light Bulb (1) in place-see Figure 2.
3. Remove both ends of the Light Bulb (1) by lifting the bar connecting the Light Bulb (1) to the
main wire-see Figure 3.
4. Replace the Light Bulb (1) by connecting it to the main wire as indicated in Step 3.
5. Set the Light Bulb in place. Pinch and insert the Light Bulb Clip (10) into place.
6. Replace the Lens Cov er (11) and tighten all five screws.
Figure 2
Figure 3
Light Bulb Clip (10)
Lens Cover (11)
main wire
Light
Bulb (1)
Replacing the Battery
1. Unscrew and remove the Battery Cover (9). Pull out the Battery (2) as in Figure 4.
2. Grasp and gently disconnect the wires attaching the Battery to the Spotlight. Replace the
Battery (2) with a 12 VDC, Lead-acid, 7 Ah battery.
3. Line up the Battery Cover (9) with the marks on the Spotlight body and screw back on.
Figure 4
Note:
Always dispose of or
recycle used batteries
properly. Contact your
local Hazardous Waste
Authority for proper battery
disposal guidelines.
4. Make certain to reconnect the positive red and negative black wires to the Battery as
indicated.
SKU 94987 For technical questions please call 1-800-444-3353. Page 8
Battery (2)
positive wire
Negative wire
REV 03/07
Page 9
The Spotlight also has an adjustable Bracket (3) which can be set to provide various positions for
shinging the Spotlight.
Inspection, Maintenance and Cleaning
1. Always unplug the Spotlight from its electrical outlet and allow the unit to completely cool
down before performing any inspection, maintenance, or cleaning.
2. Do not submerge the Spotlight in water or any other liquid. Clean with a soft cloth as
necessary .
3. Do not touch the bulb at any time. Oil from skin will drastically shorten the bulb’s life-span
if hands are not cleaned (with rubbing alcohol) before use. Handle with a soft, clean cloth
instead.
Parts List and Diagram
Part Description Quantity
1 H7 6000K HID Xenon Bulb 1
2 Battery 1
3 Bracket 1
4 Shoulder Strap 1
5 Lens and Reflector 1
6 ON/OFF Switch 1
7 Car Adapter Plug 1
8 AC Charger Plug 1
9 Battery Cover 1
10 Light Bulb Clip 1
11 Lens Cover 1
4
9
5
2
10
1
11
6
3
Parts 7 and 8 not shown
PLEASE READ THE FOLLOWING CAREFULLY
THE MANUFACTURER AND/OR DISTRIBUTOR HAS PROVIDED THE PARTS DIAGRAM IN THIS MANUAL AS A REFERENCE
TOOL ONLY. NEITHER THE MANUFACTURER NOR DISTRIBUTOR MAKES ANY REPRESENTATION OR WARRANTY OF ANY
KIND TO THE BUYER THAT HE OR SHE IS QUALIFIED TO MAKE ANY REPAIRS TO THE PRODUCT OR THAT HE OR SHE IS
QUALIFIED TO REPLACE ANY PARTS OF THE PRODUCT. IN FACT, THE MANUFACTURER AND/OR DISTRIBUTOR EXPRESSLY
STATES THAT ALL REPAIRS AND PARTS REPLACEMENTS SHOULD BE UNDERTAKEN BY CERTIFIED AND LICENSED
TECHNICIANS AND NOT BY THE BUYER. THE BUYER ASSUMES ALL RISK AND LIABILITY ARISING OUT OF HIS OR HER
REPAIRS TO THE ORIGINAL PRODUCT OR REPLACEMENT PARTS THERETO, OR
ARISING OUT OF HIS OR HER INSTALLATION OF REPLACEMENT PARTS THERETO.
SKU 94987 For technical questions please call 1-800-444-3353. Page 9
Page 10
Warranty
LIMITED 90 DAY
WARRANTY
Harbor Freight T ools Co . makes e very effort to assure that its products meet high quality and durability standards,
and warrants to the original purchaser that this product is free from defects in materials and workmanship for
the period of ninety days from the date of purchase. This warranty does not apply to damage due directly or
indirectly, to misuse, abuse, negligence or accidents, repairs or alterations outside our facilities, or to lack of
maintenance. W e shall in no event be liable for death, injuries to persons or property, or for incidental, contingent,
special or consequential damages arising from the use of our product. Some states do not allow the exclusion
or limitation of incidental or consequential damages, so the above limitation of exclusion may not apply to you.
THIS WARRANTY IS EXPRESSLY IN LIEU OF ALL OTHER WARRANTIES, EXPRESS OR IMPLIED,
INCLUDING THE WARRANTIES OF MERCHANTABILITY AND FITNESS.
To take advantage of this warranty, the product or part must be returned to us with transpor tation charges
prepaid. Proof of purchase date and an explanation of the complaint must accompan y the merchandise. If our
inspection verifies the defect, we will either repair or replace the product at our election or we may elect to
refund the purchase price if we cannot readily and quickly provide you with a replacement. We will return
repaired products at our expense, but if we determine there is no defect, or that the defect resulted from
causes not within the scope of our warranty, then you must bear the cost of returning the product.
This warranty gives y ou specific legal rights and you ma y also have other rights which vary from state to state.
3491 Mission Oaks Blvd. • PO Box 6009 • Camarillo, CA 93011 • (800) 444-33533491 Mission Oaks Blvd. • PO Box 6009 • Camarillo, CA 93011 • (800) 444-3353
3491 Mission Oaks Blvd. • PO Box 6009 • Camarillo, CA 93011 • (800) 444-3353
3491 Mission Oaks Blvd. • PO Box 6009 • Camarillo, CA 93011 • (800) 444-33533491 Mission Oaks Blvd. • PO Box 6009 • Camarillo, CA 93011 • (800) 444-3353
SKU 94987 For technical questions please call 1-800-444-3353. Page 10
 Loading...