

Page 1
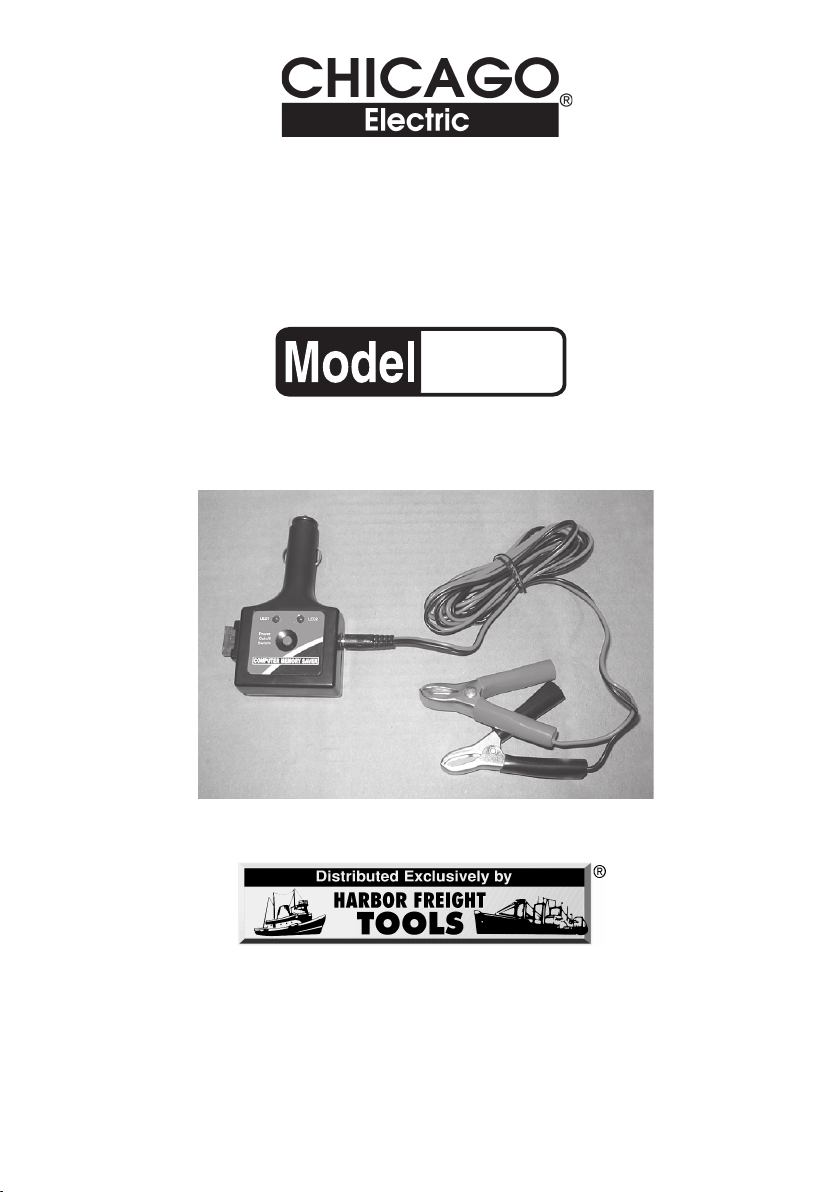
12V Computer Memory Saver
(Temporary Battery Backup)
93550
ASSEMBLY AND OPERATING INSTRUCTIONS
Due to continuing improvements, actual product may differ slightly from the product described herein.
3491 Mission Oaks Blvd., Camarillo, CA 93011
Visit our Web site at http://www.harborfreight.com
Copyright© 2005 by Harbor Freight Tools®. All rights reserved. No portion of this
manual or any artwork contained herein may be reproduced in any shape or form
without the express written consent of Harbor Freight Tools.
For technical questions and replacement parts, please call 1-800-444-3353.
Page 2

Specifications
:noitcurtsnoC
:stuOdaeRsthgilrotacidniDELneerG2:egu
:esuFepytelibomotuadradnatspmA3:thgieWteN.bL½
scinortceleetatSdiloS
dnagulpyrettabV9htiw
srotcennocCDV21
:rewoP
:tnemhcattA.nigulprethgiletteragiC
aGeriWeriWreppoC.aG02
.smetsys
edivorpotyrettabV21/V9sesU
yromemCDV21rofpukcabrewop
Save This Manual
You will need the manual for the safety warnings and precautions, assembly
instructions, operating and maintenance procedures, parts list and diagram. Keep
your invoice with this manual. Write the invoice number on the inside of the front
cover. Keep the manual and invoice in a safe and dry place for future reference.
Safety Warnings and Precautions
WARNING: When using tool, basic safety precautions should always be
followed to reduce the risk of personal injury and damage to equipment.
Read all instructions before using this tool!
1. Keep work area clean. Cluttered areas invite injuries.
2. Observe work area conditions. Do not use electrical tools in damp or wet
locations. Don’t expose to rain. Keep work area well lit. Do not use electrically
powered tools in the presence of flammable gases or liquids.
3. Keep children away. Children must never be allowed in the work area. Do
not let them handle machines, tools, or extension cords.
4. Store idle equipment. When not in use, tools must be stored in a dry location
to prevent corrosion.
5. Use the right tool for the job. Do not attempt to force a small tool or attachment
to do the work of a larger industrial tool. There are certain applications for
which this tool was designed. It will do the job better and more safely at the
rate for which it was intended. Do not modify this tool and do not use this tool
for a purpose for which it was not intended.
6. Dress properly. Do not wear loose clothing or jewelry as they can be caught
in moving parts. Protective, electrically nonconductive clothes and nonskid
footwear are recommended when working. Wear restrictive hair covering to
contain long hair.
7. Use eye and ear protection. Always wear ANSI-approved impact safety
goggles when working near vehicle motors or batteries.
SKU 93550
For technical questions please call 1-800-444-3353
. Page 2
Page 3

8. Do not overreach. Keep proper footing and balance at all times.
9. Maintain tools with care. Keep tools maintained and clean for better and
safer performance. Inspect tool cords periodically and, if damaged, have
them repaired by an authorized technician. The tool must be kept clean, dry,
and free from oil and grease at all times.
10. Disconnect power. Unplug tool when not in use.
11. Stay alert. Watch what you are doing, use common sense. Do not operate
any tool when you are tired.
12. Check for damaged parts. Before using any tool, any part that appears
damaged should be carefully checked to determine that it will operate
properly and perform its intended function. Any part that is damaged should
be properly repaired or replaced by a qualified technician. Do not use the
tool if any switch does not operate properly.
13. Guard against electric shock. Prevent body contact with grounded
surfaces such as pipes, radiators, ranges, and refrigerator enclosures.
14. Replacement parts and accessories. When servicing, use only identical
replacement parts. Use of any other parts will void the warranty. Only use
accessories intended for use with this tool. Approved accessories are
available from Harbor Freight Tools.
15. Do not operate tool if under the influence of alcohol or drugs. Read
warning labels on prescriptions to determine if your judgment or reflexes are
impaired while taking drugs. If there is any doubt, do not operate the tool.
16. Maintenance. For your safety, service and maintenance should be
performed regularly by a qualified technician.
Warning: The warnings, cautions, and instructions discussed in this instruction
manual cannot cover all possible conditions and situations that may occur. It
must be understood by the operator that common sense and caution are
factors which cannot be built into this product, but must be supplied by the
operator.
Unpacking
When unpacking, check to make sure that the product is intact and undamaged.
If any parts are missing or broken, please call Harbor Freight Tools at the number
on the cover of this manual.
SKU 93550
For technical questions please call 1-800-444-3353
. Page 3
Page 4

Operation
This device must be powered to preserve the vehicle’s saved settings. You may use
a 12V battery or a 9V “radio” battery to supply this power (neither one included).
1. If using a 12V battery: connect the Red alligator clip to the positive (+) pole
of the battery and the Black alligator clip to the negative (-) pole of the
battery. Plug connector into the Jack on side to the tool. WARNING: 12V
lead/acid batteries can be very dangerous. Always wear safety gloves and
ANSI-approved safety goggles when working with 12V lead/acid batteries.
Do not allow battery to overheat.
If using a 9V battery: open the battery cover of the device, and install a new 9V
battery, attaching the battery plug to the battery. Close the battery compartment
cover.
2. Using either a spare 12V battery or an installed 9V battery, two green LED
lights will illuminate indicating the device has power. Do not short out the
12V Lighter adapter on a metal surface, it is now powered.
3. Be sure that vehicle ignition and all accessories, including lights, radio,
interior light, etc. are OFF Before using this device. If any powered item is
ON, the memory device may fail.
4. Press and hold the Red Button on the device while inserting the plug into the
vehicle cigarette lighter outlet.
5. One Green LED will now glow, indicating a good connection through the
vehicle cigarette lighter outlet.
NOTE: On some vehicles, the key must be left in the “Accessories” setting
for the cigarette lighter outlet to be active.
6. Release the Red Button. Both green LED lights will now glow indicating a
good connection.
7. You may now disconnect the vehicle 12V battery. Keep in mind that the
temporary power supply will only last as long as the battery used.
8. When the work is finished, reconnect the vehicle 12V battery.
9. Press and hold the Red Button on the Memory Saver while you remove the
Memory Saver device from the cigarette lighter outlet. Do not leave the unit
connected after use.
10. If a 12V Battery is used, carefully disconnect the Alligator clips from the 12V
battery, and unplug from Jack on side of tool.
REV 04/06
SKU 93550
For technical questions please call 1-800-444-3353
. Page 4
Page 5

Maintenance
1. This item must be kept clean and dry. Protect it from water and moisture to
prevent damage to the electrical components.
2. If it is to be stored for a long time, remove the 9V battery before storage to
prevent damage from possible battery leakage.
Troubleshooting
Green LED’s do not light when connected to 12V battery or 9V battery
installed. Possible causes: Battery has no charge, or faulty connection.
Solution: Check the charge of the battery and recheck the battery
connection and polarity.
Green LED’s do not light even though battery is charged and properly
connected. Possible Causes: Fuse is blown or device is damaged. Solution:
Test and/or replace 3 Amp fuse. Only replace fuse with same kind and
amperage fuse
Single Green LED does not glow after device is connected to cigarette
lighter outlet in step 4, page 4. Possible cause: Cigarette lighter outlet is
not active or not in good condition. Solution: Try moving ignition key to
“accessory” position and repeat steps 3-5 on page 4. If this still doesn’t
work, inspect the condition of the cigarette lighter outlet. Try the cigarette
lighter. With the vehicle battery disconnected, clean the outlet. (NOTE:
Disconnecting the battery may erase the vehicle memory.) If damaged
or dirty, the cigarette lighter outlet may need to be replaced by a qualified
technician.
Cigarette Lighter Plug
3 Amp Fuse
Battery Compartment
9V Battery Plug
Battery Compartment Cover
NOTE: Some parts are listed and shown for illustration purposes only and are not
available individually as replacement parts.
SKU 93550
For technical questions please call 1-800-444-3353
. Page 5
Page 6

PLEASE READ THE FOLLOWING CAREFULLY
THE MANUFACTURER AND/OR DISTRIBUTOR HAS PROVIDED THE PARTS DIAGRAM IN THIS
MANUAL AS A REFERENCE TOOL ONLY. NEITHER THE MANUFACTURER NOR DISTRIBUTOR
MAKES ANY REPRESENTATION OR WARRANTY OF ANY KIND TO THE BUYER THAT HE OR
SHE IS QUALIFIED TO MAKE ANY REPAIRS TO THE PRODUCT OR THAT HE OR SHE IS
QUALIFIED TO REPLACE ANY PARTS OF THE PRODUCT. IN FACT, THE MANUFACTURER AND/
OR DISTRIBUTOR EXPRESSLY STATES THAT ALL REPAIRS AND PARTS REPLACEMENTS
SHOULD BE UNDERTAKEN BY CERTIFIED AND LICENSED TECHNICIANS AND NOT BY THE
BUYER. THE BUYER ASSUMES ALL RISK AND LIABILITY ARISING OUT OF HIS OR HER REPAIRS
TO THE ORIGINAL PRODUCT OR REPLACEMENT PARTS THERETO, OR ARISING OUT OF HIS
OR HER INSTALLATION OF REPLACEMENT PARTS THERETO.
3 Amp Fuse
Parts List
Green LED
Cigarette
Lighter Plug
12V Spare
Battery Jack
12V Spare
Battery Cable
Alligator Clips
NOTE: Only the Fuse and the Battery Cable/Clamps are replaceable.
SKU 93550
For technical questions please call 1-800-444-3353
. Page 6
 Loading...