

Page 1
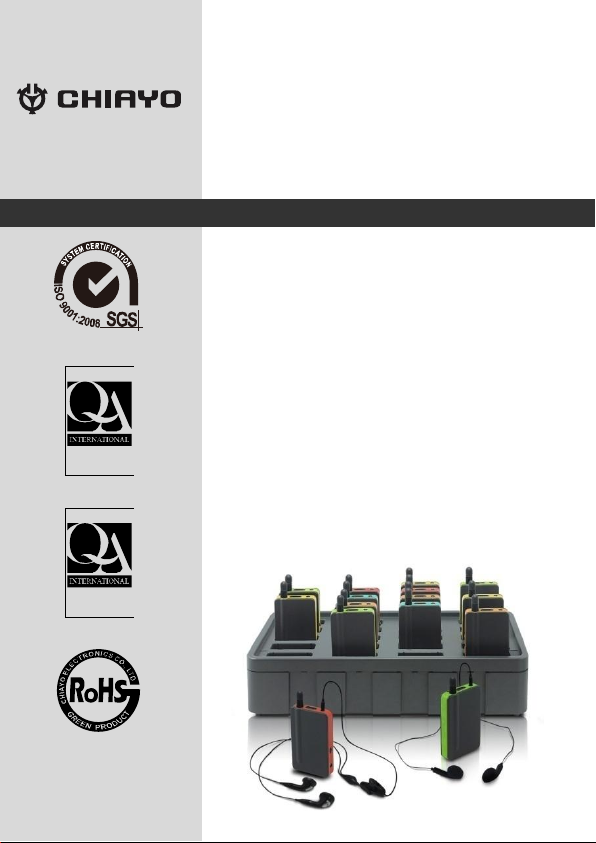
DCT-511
DCR-511
2.4G DIGITAL TWO-WAY TOUR GUIDE SYSTEM
ISO 9001:2008
ISO 14001
OHSAS 18001
Green Product
OPERATION MANUAL
IS O
14 0 01
RE GI ST ER ED
OH S A S
18 0 01
RE GI ST ER ED
Page 2
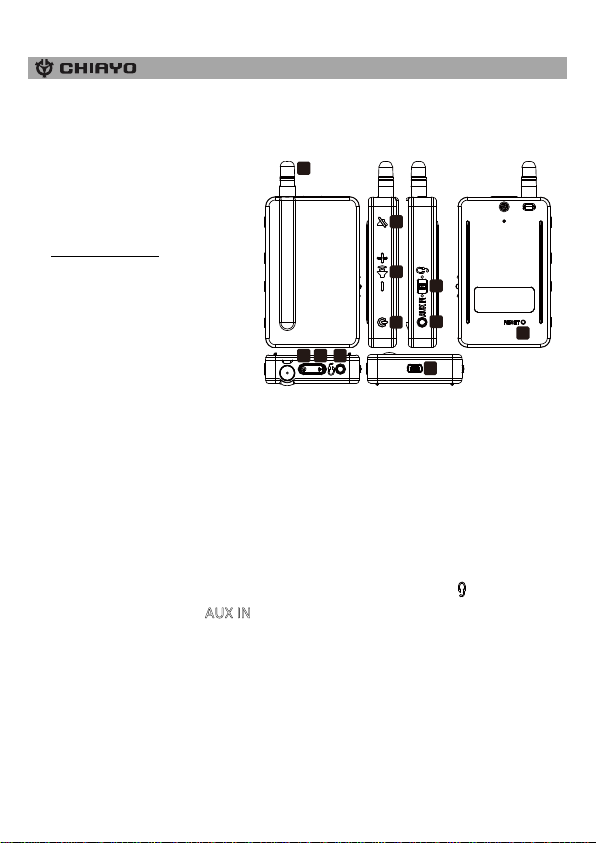
1. Antenna
2. Mute
3. Volume control
4. Power/frequency synchronizing
5. MIC-MIX-AUX IN mode switch
6. Aux input(Ø 3.5mm)
7. Power indicator
8. Mute indicator
9. Earphone jack (Ø 3.5mm)
10. Mini USB charging port
11. Reset
1
2
3
4
5
6
11
7 8 9
10
DCT-511 Mini transmitter
Parts and functions
Instructions
1. Power ON/OFF: To turn on the transmitter, press the power button for one
second and the power indicator will turn green. It turns red when battery is
low or during charging. To turn off the transmitter, press and hold the power
button for about 3 seconds and the indicator light will go off.
2. To activate or cancel muting, press Mute button
3. To add music as background music, just input your audio signal to AUX IN In
a museum tour, you may also input the respective prerecorded introductions
for various galleries.
4. Audio mode switch: If using only earphone, please switch to . For only
music, please switch to . To use earphone and play music
simultaneously, please switch to the middle.
5. Charging: During charging, the red light will go off once the battery is full. The
charging process takes approximately four hours. Charging can be done by
either mini USB or the dedicated charging box.
-1-
Page 3
ISO 9001|ISO 14001|OHSAS 18001
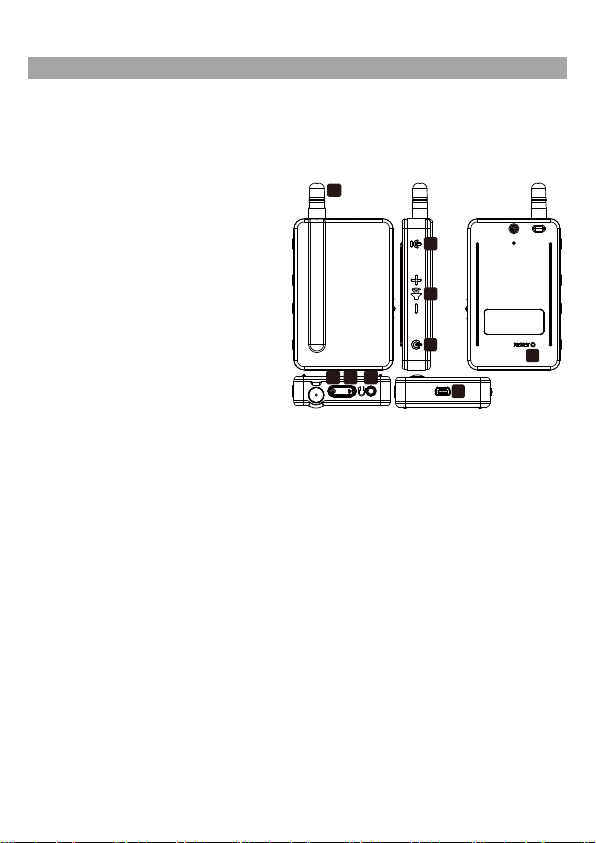
1. Antenna
2. Press to talk
3. Volume control
4. Power/frequency synchronizing
5. Power indicator
6. Reception indicator
7. Earphone jack (Ø 3.5mm)
8. Mini USB charging port
9. Reset
1
2
3
4
9
5 6 7
8
DCR-511 Mini receiver
Parts and functions
Instructions
1. Power ON/OFF: To turn on the receiver, press the power button for one
second and the power indicator will turn green. It turns red when battery is
low or during charging. To turn off the receiver, press and hold the power
button for about 3 seconds and the indicator light will go off.
2. Press to talk button: Press the talk button to talk with your guide and the
conversation could be heard by other members. And release to stop.
3. Reception indicator: The LED stays green within the reception range from
the tour guide. Once beyond the reception range, it will flash red and beep as
a warning of dropout. In this case, please catch up and go nearer to the tour
guide.
4. Charging: During charging, the red light will go off once the battery is full. The
charging process takes approximately four hours. Charging can be done by
either mini USB or the dedicated charging box.
-2-
Page 4

Frequency synchronizing between DCT-511 and DCR-511
1. Even though the transmitter and receiver (in the same package) were ready
paired at the factory, it is highly recommended that before the tour begins,
the receiver should do a fresh synchronization with the specific tour leader’s
transmitter.
2. Before synchronization, please make sure that the battery has enough power
and then turn off the devices. Frequency synchronizing isn’t workable if the
power is weak with indicator glowing RED.
3. To begin the synchronization, press DCT-511’s power button for five
seconds till the mute indicator flashes green, which implies readiness to
synchronize.
4. Press DCR-511’s power button for five seconds till the reception indicator
flashes green, which implies readiness to synchronize. Both mute and
reception indicators will glow green after the setting is completed.
5. DCT-511’s mute indicator will stop flashing after a setting period of about
twelve seconds.
6. DCR-511’s reception indicator will stop flashing after a setting period of about
twelve seconds.
7. To synchronize mass receivers with the transmitter, just follow STEP 2 on all
receivers simultaneously.
8. Once the transmitter and receiver are synchronized, they will stay
synchronized and no synchronization is needed for next subsequent usages.
-3-
Page 5
ISO 9001|ISO 14001|OHSAS 18001
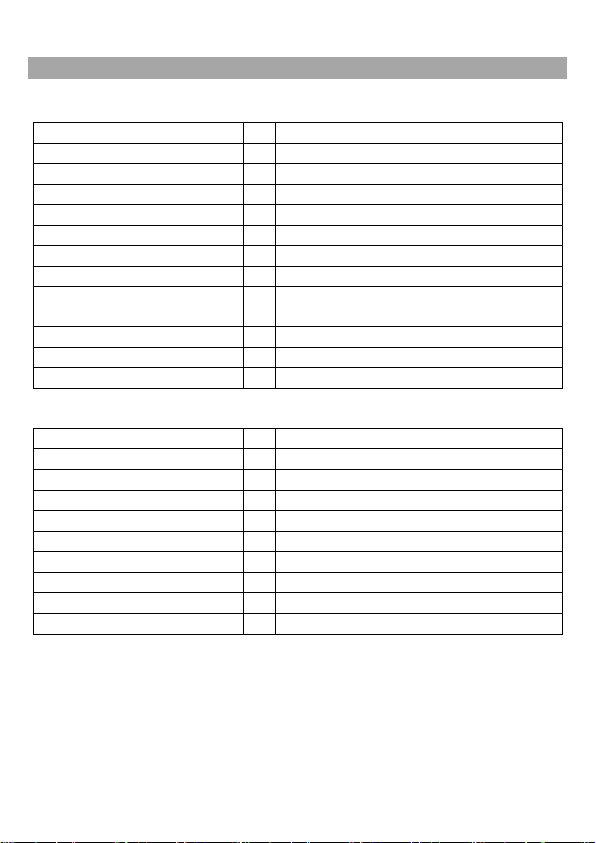
Part
LED
Function
Antenna
1
Signal transmission
MUTE button
2
Muting ON / OFF
Volume Control
3
+- Loudness
Power / Synchronization
4
Power ON / Off or Synchronization
MODE switch
5
MIC – MIX – AUX IN position switch
AUX IN
6
AUX IN (3.5mm)
Power LED
7
Power ON / OFF indicator
MUTE Indicator LED
8
MUTE ON / OFF or Synchronization
indicator
Earphone IN
9
Earphone IN socket (3.5mm)
Mini USB socket
10
Charging port
Reset
11
Reset
Parts
LED
Function
Antenna
1
Signal Receiving antenna
Press to Talk button
2
Press to Talk
Volume Control button
3
+- Loudness
Power / Synchronization
4
Power ON / Off or Synchronization
Power Indicator
5
Power Indicator LED
Reception Indicator
6
Reception Indicator
Earphone Jack
7
Earphone input jack (3.5mm)
Mini USB socket
8
Charging port
Reset 9 Reset
LED status of DCT-511
LED status of DCR-511
-4-
Page 6
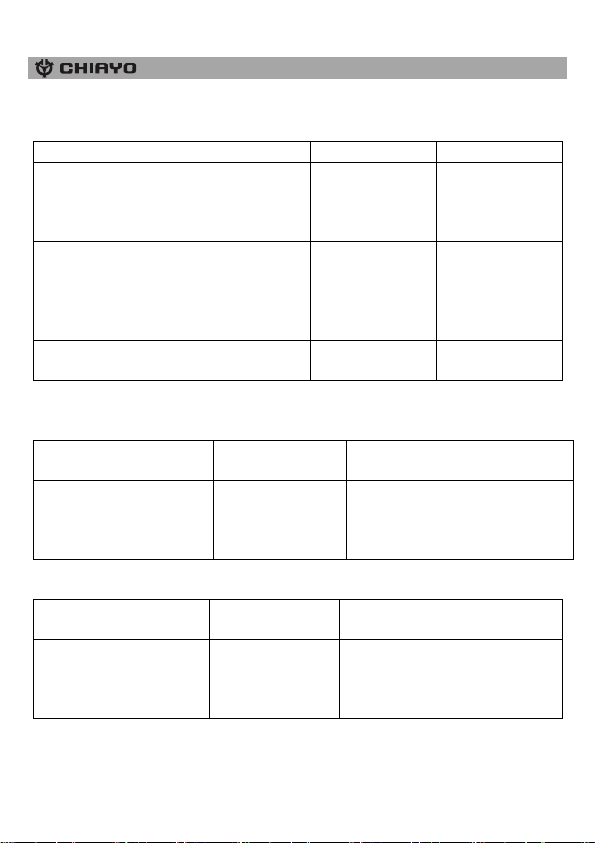
Action
Power LED
Indication
1. Press Power button of transmitter for
1 second.
2. Press power buttonof receiver for 1
second
GREEN
RED
Power ON
Battery is low or
charging is in
progress
1. When power is ON, Press Power
button of transmitter for about 3
second.
2. When power is ON, Press power
button of receiver for about 3 second
GREEN light goes
off
Power is OFF
During charging
RED goes off
Battery is fully
charged
Action
Power LED
(next to antenna)
Indication
Press transmitter POWER
button for 1 second
1. RED
2. GREEN
1. Battery weak, not ok for
synchronization
2. Battery good, ok for
synchronization
Action
Power LED
(next to antenna)
Indication
Press transmitter POWER
button for 1 second
1. RED
2. GREEN
1. Battery weak, not ok for
synchronization
2. Battery good, ok for
synchronization
POWER Indicator (Transmitter, Receiver)
Both indicators are next to the individual antenna.
Before synchronization
Transmitter DCT-511
Receiver DCR-511
-5-
Page 7
ISO 9001|ISO 14001|OHSAS 18001
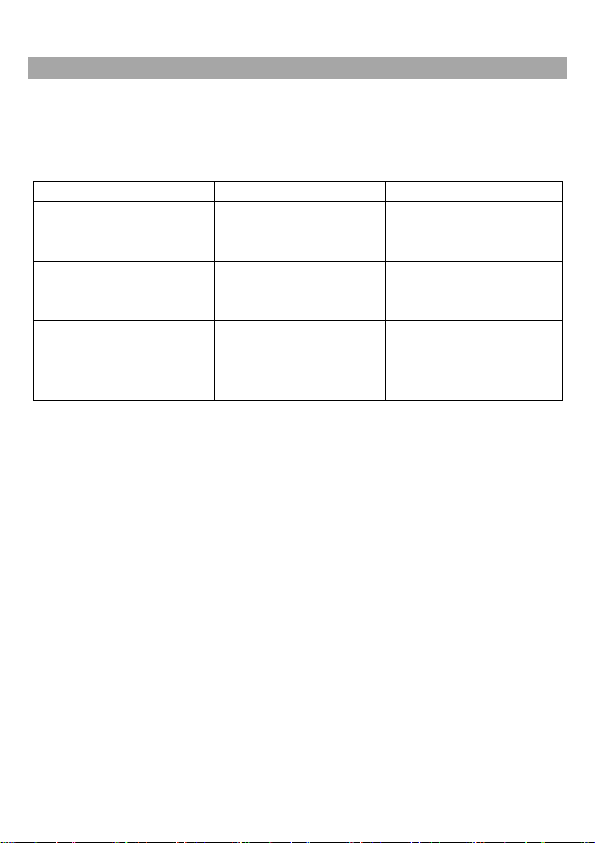
Action
LED
Indication
Press transmitter DCT-511
power button for 5
seconds
MUTE indicator flashes
GREEN
Transmitter is ready for
synchronization
Press receiver DCR-511
power button for 5
seconds
RECEPTION LED flashes
GREEN
Receiver is ready for
synchronization
After performing the
above actions
Both MUTE LED and
RECEPTION LED
glowing permanent
GREEN
Synchronization setting is
DONE and system is ready
for use.
During Synchronization
Synchronization indicator LEDs to watch:
Transmitter MUTE indicator LED (next to Earphone IN)
Receiver Reception indicator LED (next to Earphone IN)
-6-
Page 8

CHIAYO ELECTRONICS CO.,LTD.
Http://www.chiayo.com.tw Email: [email protected]
Office: 30, Lane 27, Section 4, Jen-Ai Road, Taipei 10685, Taiwan|Tel:886-2-27415741|Fax: 886-2-27525242
Factory: 88, Chung-Hsiao Street 2, Chiayi 60080, Taiwan|Tel:886-5-2711000|Fax:886-5-5767611
Federal Communication Commission Interference Statement
This equipment has been tested and found to comply with the limits for a Class B digital
device, pursuant to Part 15 of the FCC Rules. These limits are designed to provide
reasonable protection against harmful interference in a residential installation. This
equipment generates, uses and can radiate radio frequency energy and, if not installed and
used in accordance with the instructions, may cause harmful interference to radio
communications. However, there is no guarantee that interference will not occur in a
particular installation. If this equipment does cause harmful interference to radio or
television reception, which can be determined by turning the equipment off and on, the
user is encouraged to try to correct the interference by one of the following measures:
Reorient or relocate the receiving antenna.
Increase the separation between the equipment and receiver.
Connect the equipment into an outlet on a circuit different from that to which the receiver
is connected.
Consult the dealer or an experienced radio/TV technician for help.
FCC Caution: To assure continued compliance, any changes or modifications not expressly
approved by the party responsible for compliance could void the user's authority to operate
this equipment. (Example - use only shielded interface cables when connecting to computer
or peripheral devices).
FCC Radiation Exposure Statement
This equipment complies with FCC RF radiation exposure limits set forth for an uncontrolled
environment. This equipment should be installed and operated with a minimum distanc e of
20 centimeters between the radiator and your body.
This transmitter must not be co-located or operating in conjunction with any other antenna
or transmitter.
This device complies with Part 15 of the FCC Rules. Operation is subject to the following two
conditions:
(1) This device may not cause harmful interference, and
(2) This device must accept any interference received, including interference that may cause
undesired operation.
-7-
12I1313
 Loading...