


Chevrolet Low Cab Forward 6.0L Gasoline Engine 3500/4500 Series (GMNA-
Localizing-U.S.-12533400) - 2019 - CRC - 11/19/18
Contents
Introduction . . . . . . . . . . . . . . . . . . . . . . 2
In Brief . . . . . . . . . . . . . . . . . . . . . . . . . . . 7
Keys, Doors, and Windows . . . . . 23
Seats and Restraints . . . . . . . . . . . 36
Storage . . . . . . . . . . . . . . . . . . . .. . . . . 52
Instruments and Controls . . . . . . . 62
Lighting . . . . . . . . . . . . . . . . . . . . . . .. . 80
Infotainment System . . . . . . . . . . . . 85
Climate Controls . . . . . . . . . . . . . . 121
Driving and Operating . . . . . . . . . 128
Vehicle Care . . . . . . . . . . . . . . . . . . 186
Service and Maintenance . . . . . 269
Technical Data . . . . . . . . . . . . . . . . 292
Customer Information . . . . . . . . . 304
Reporting Safety Defects . . . . . . 311
Index . . . . . . . . . . . . . . . . . . . . 313

Chevrolet Low Cab Forward 6.0L Gasoline Engine 3500/4500 Series (GMNA-
Localizing-U.S.-12533400) - 2019 - CRC - 11/19/18
2 Introduction
Introduction
The names, logos, emblems,
slogans, vehicle model names, and
vehicle body designs appearing in
this manual including, but not limited
to, GM, the GM logo, CHEVROLET,
and the CHEVROLET Emblem are
trademarks and/or service marks of
General Motors LLC, its
subsidiaries, affiliates, or licensors.
This manual has been prepared to
acquaint you with the operation and
maintenance of your vehicle, and to
provide important safety information.
It includes a Maintenance Schedule
and is supplemented with a
Warranty and Owner Assistance
Information booklet. We urge you to
read these publications carefully.
The following recommendations will
help ensure the most enjoyable,
safe, and trouble-free operation of
your vehicle. When it comes to
service, keep in mind that your
commercial truck dealer knows your
vehicle best and is interested in
your complete satisfaction. Your
dealer invites you to return for all of
your service needs both during and
after the warranty period.
Remember, if you have a concern
that has not been handled to your
satisfaction, follow the steps in the
separate Warranty and Owner
Assistance Information booklet. We
thank you for choosing our product,
and want to assure you of our
continuing interest in your motoring
pleasure and satisfaction.
Model Reference
The models covered in this
manual are:
Single Cab:
.
3500
.
4500
Crew Cab:
.
3500
.
4500
Litho in U.S.A.
Part No. 84445127 A First Printing
©
2018 General Motors LLC. All Rights Reserved.
Chevrolet Low Cab Forward 6.0L Gasoline Engine 3500/4500 Series (GMNA-
Localizing-U.S.-12533400) - 2019 - CRC - 11/19/18
Using this Manual
To quickly locate information about
the vehicle, use the Index in the
back of the manual. It is an
alphabetical list of what is in the
manual and the page number where
it can be found.
Danger, Warning, and Caution
Warning messages found on vehicle
labels and in this manual describe
hazards and what to do to avoid or
reduce them.
Danger
{
Danger indicates a hazard with a
high level of risk which will result
in serious injury or death.
Warning
{
Warning indicates a hazard that
could result in injury or death.
Caution
Caution indicates a hazard that
could result in property or vehicle
damage.
A circle with a slash through it is a
safety symbol which means “Do
Not,” “Do not do this,” or “Do not let
this happen.”
Warning/Caution Labels in
Your Vehicle
The warning/caution labels in your
vehicle indicate very important
instructions and information that you
should respect to ensure safe and
proper use of the vehicle. Be sure to
read them before using the vehicle.
Introduction 3
If any of these labels are peeling or
illegible due to wear or scratches,
please contact your dealer for a
replacement.
Some examples of warning/caution
labels are indicated on the following
pages, but there are many others
not shown. Also, the contents of
these labels may vary from model to
model.
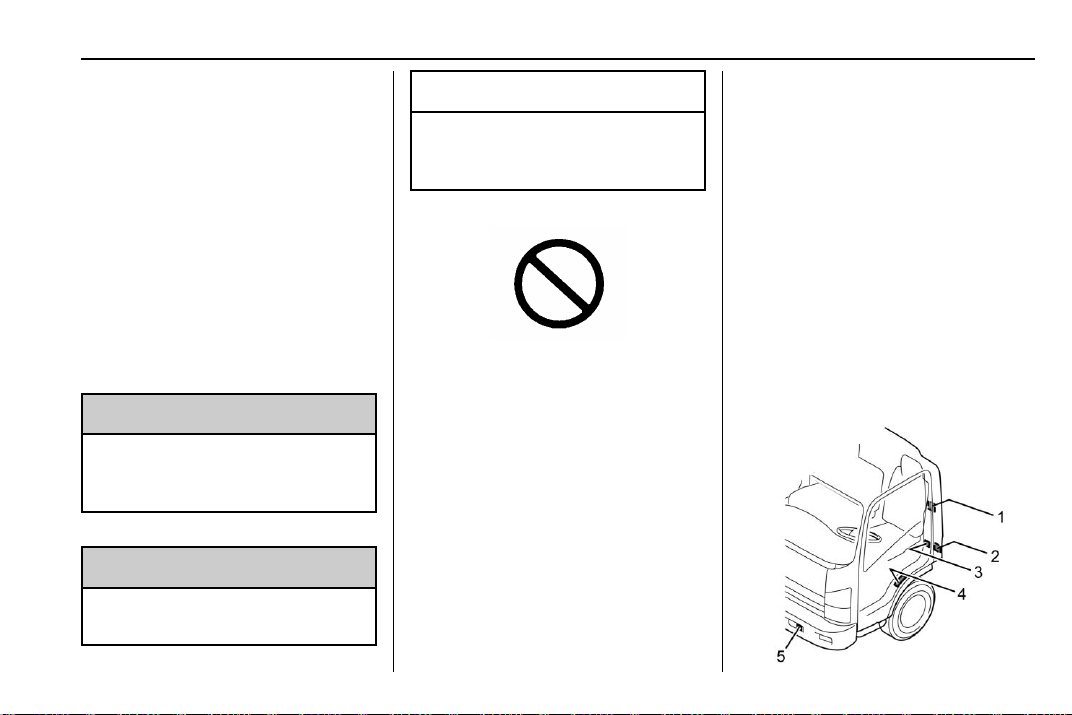
The warning/caution labels shown
may be located differently in your
vehicle.
Warning/Caution Labels
Single cab model

Chevrolet Low Cab Forward 6.0L Gasoline Engine 3500/4500 Series (GMNA-
Localizing-U.S.-12533400) - 2019 - CRC - 11/19/18
4 Introduction
No. Description
1 Cab tilt instruction
Automatic transmission fluid
2
level
Vehicle certification and
3
Greenhouse Gas (GHG)
emissions
4 NO STEP instruction
5 Towing
Vehicle noise emission
6
control information
7 Engine cooling
8 Fan blade
Vehicle emission control
9
information
Crew cab model
Chevrolet Low Cab Forward 6.0L Gasoline Engine 3500/4500 Series (GMNA-
Localizing-U.S.-12533400) - 2019 - CRC - 11/19/18
No. Description
Vehicle emission control
1
information
Vehicle certification and
2
Greenhouse Gas (GHG)
emissions
3 Engine coolant check
4 Engine coolant level
5 NO STEP instruction
6 Power steering fluid
Vehicle noise emission
7
control information
8 Engine cooling
9 Fan blade
10 Towing
Automatic transmission fluid
11
level
Introduction 5

Chevrolet Low Cab Forward 6.0L Gasoline Engine 3500/4500 Series (GMNA-
Localizing-U.S.-12533400) - 2019 - CRC - 11/19/18
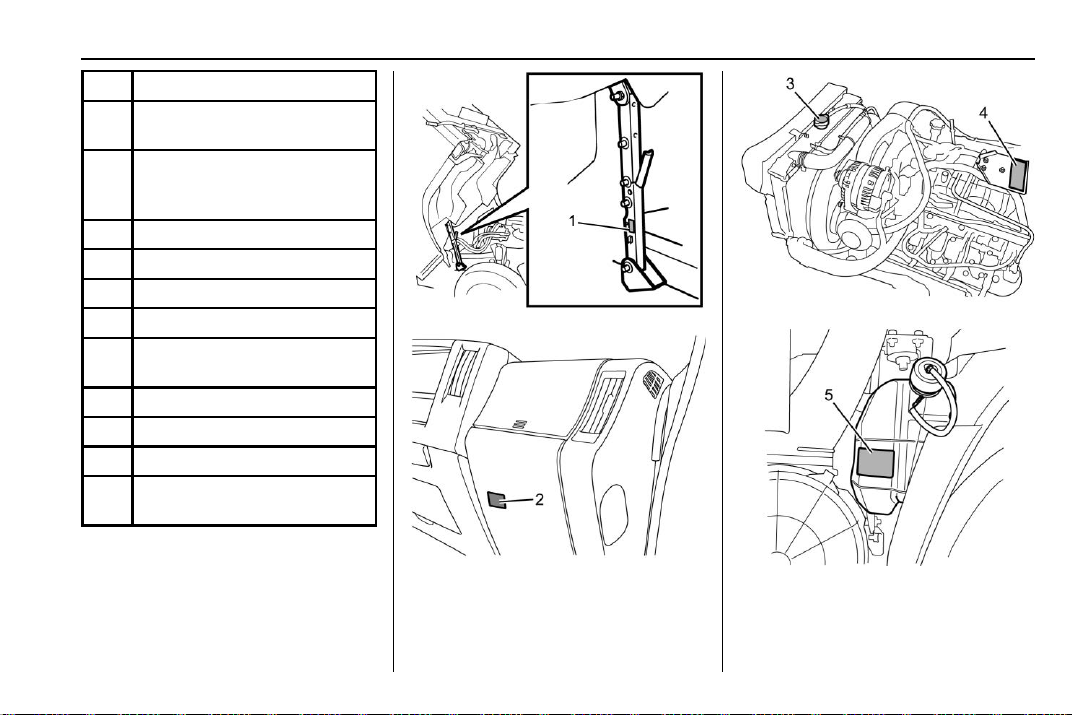
6 Introduction
No. Description
1 Safety lock pin (Single cab)
Engine cover notice
2
(Crew cab)
3 Radiator cap
Engine emission control
4
information
5 Engine coolant (Single cab)

Chevrolet Low Cab Forward 6.0L Gasoline Engine 3500/4500 Series (GMNA-
Localizing-U.S.-12533400) - 2019 - CRC - 11/19/18
In Brief
Instrument Panel
Instrument Panel . . . . . . . . . . . . . . . . 8
Instrument Panel
(Driver Side) . . . . . . . . . . . . . . . . . . 10
Instrument Panel (Vehicle
Interior) . . . . . . . . . . . . . . . . . . . . . . . 11
Initial Drive Information
Remote Keyless Entry (RKE)
System . . . . . . . . . . . . . . . . . . . . . . . 12
Getting In and Out of the
Vehicle . . . . . . . . . . . . . . . . . . . . . . . 12
Door Locks . . . . . . . . . . . . . . . . . . . . 12
Windows . . . . . . . . . . . . . . . . . . . . . . . 13
Seat Adjustment . .. . . . . . . . . . . . . 14
Seat Belts . . . . . . . . . . . . . . . . . . . . . 16
Mirror Adjustment . . . . . . . . . . . . . . 16
Steering Wheel Adjustment . . . . 16
Interior Lighting . .. . . . . . . . . . . . . . 17
Exterior Lighting . . . . . . . . . . . . . . . 18
Windshield Wiper/Washer . . . . . . 18
Climate Controls . . . . . . . . . . . . . . . 19
Vehicle Features
Radio(s) . . . . . . . . . . . . . . . . . . . . . . . 19
Portable Audio Devices . . . . . . . . 20
In Brief 7
Cruise Control . . . . . . . . . . . . . . . . . 20
Power Outlets . . . . . . . . . . . . . . . . . 21
Performance and Maintenance
Driving for Better Fuel
Economy . . . . . . . . . . . . . . . . . . . . . 21

Chevrolet Low Cab Forward 6.0L Gasoline Engine 3500/4500 Series (GMNA-
Localizing-U.S.-12533400) - 2019 - CRC - 11/19/18
8 In Brief
Instrument Panel

Chevrolet Low Cab Forward 6.0L Gasoline Engine 3500/4500 Series (GMNA-
Localizing-U.S.-12533400) - 2019 - CRC - 11/19/18
1. Air Flow Direction Control
Lever. See Air Vents 0 124.
2. Exterior Lamp Controls 0 80.
Cruise Control Set Switch. See
Cruise Control 0 179.
3. Windshield Wiper and
Windshield Washer Switch.
See Windshield Wiper/Washer
0 63.
4. Heater and Manual Air
Conditioner. See Climate
Control Systems 0 121.
5. Radio with CD/USB/Bluetooth.
See AM-FM Radio 0 85 and
Bluetooth Audio 0 108.
6. Small Article Storage Pockets.
See Instrument Panel Storage
0 52.
7. Windshield Washer Fluid Tank.
See Washer Fluid 0 207.
8. Glove Box 0 53.
9. Relay Box. See Electrical
System Overload 0 229.
In Brief 9
10. Cupholders 0 54.
11. Hook. See Shopping Bag
Hooks 0 55.
12. Card Holder. See Instrument
Panel Storage 0 52.
13. Accessory Power Outlet. See
Power Outlets 0 65.
14. Accessory Power Outlet. See
Power Outlets 0 65.

Chevrolet Low Cab Forward 6.0L Gasoline Engine 3500/4500 Series (GMNA-
Localizing-U.S.-12533400) - 2019 - CRC - 11/19/18
10 In Brief
Instrument Panel (Driver Side)
7. Cruise Control Main Switch.
See Cruise Control 0 179.
8. Hazard Warning Flasher
Switch. See Hazard Warning
Flashers 0 82.
9. Rear Power Window Switch.
See Power Windows 0 33.
10. Odometer Check Switch. See
Odometer 0 69.
11. Door Lock Switch. See Power
Door Locks 0 31.
1. Instrument Panel Light Level
Control. See Instrument Panel
Illumination Control 0 83.
2. Rear Body Interior Light
Switch. See Cargo Lamp 0 84.
3. Instruments, Warning Lights
and Indicator Lights. See
Instrument Cluster 0 68.
4. Horn Button. See Horn 0 63.
5. Rear Power Window Lock
Switch. See Power Windows
0 33.
6. Outside Rearview Mirror
Heater Switch. See Heated
Mirrors 0 32.

Chevrolet Low Cab Forward 6.0L Gasoline Engine 3500/4500 Series (GMNA-
Localizing-U.S.-12533400) - 2019 - CRC - 11/19/18
Instrument Panel (Vehicle Interior)
In Brief 11
7. Cupholders 0 54.
8. Parking Brake Lever. See
Parking Brake 0 176.
9. Selector Lever 0 172.
10. Fully Adjustable Steering. See
Steering Wheel Adjustment
0 62.
1. Overhead Tray. See Storage
Compartments 0 52.
2. Sun Visor. See Sun Visors
0 35.
3. Dome Lamps 0 84.
4. Seat Belt. See Three-Point
Seat Belt 0 43.
5. Seat Back Pocket (Driver’s
Side). See Storage
Compartments 0 52.
6. Seat. See Seat Position 0 36.

Chevrolet Low Cab Forward 6.0L Gasoline Engine 3500/4500 Series (GMNA-
Localizing-U.S.-12533400) - 2019 - CRC - 11/19/18
12 In Brief
Initial Drive Information
Remote Keyless Entry (RKE) System
Unlocking and Locking the
Doors
Unlocking
Press the unlock button (2) of the
remote control unit for 1 second or
longer. The vehicle's keyless entry
system causes the right and left turn
signal lights to simultaneously flash
twice upon receiving the signals
from the remote control unit.
Locking
Press the lock button (1) of the
remote control unit for 1 second or
longer. The vehicle's keyless entry
system causes the right and left turn
signal lights to simultaneously flash
once upon receiving the signals
from the remote control unit.
See Remote Keyless Entry (RKE)
System Operation 0 24.
Getting In and Out of the Vehicle
Carefully check that the area around
the vehicle is safe, hold the grip,
and place your foot on the step
when getting in or out of the vehicle.
See Getting In and Out of the
Vehicle 0 27.
Door Locks
Locking and Unlocking the Door
from Outside Using the Key
Turn the key toward the front of the
vehicle to lock the door and turn it
toward the rear of the vehicle to
unlock it. The doors can be opened
by pulling the outside door handle.

Chevrolet Low Cab Forward 6.0L Gasoline Engine 3500/4500 Series (GMNA-
Localizing-U.S.-12533400) - 2019 - CRC - 11/19/18
Locking the Door from Outside
without Using the Key
Locking and Unlocking the Door
from Inside
In Brief 13
Windows
Window Switches on
Driver’s Door
First, push the lock button (1) on the
inside door handle forward and then
close the door while keeping the
outside door handle (2) raised.
Before closing the door, be sure to
check that you have the key
with you.
Push the lock button (1) forward to
lock the door; pull the lock button
backward to unlock it. After
unlocking the door, open it by
pulling the inside door handle (2).
If the door is locked, the lock
mechanism overrides operation of
the door handle.
The power window switch on the
driver’s door can operate both
driver’s (2) and passenger’s (1)
power windows.
Chevrolet Low Cab Forward 6.0L Gasoline Engine 3500/4500 Series (GMNA-
Localizing-U.S.-12533400) - 2019 - CRC - 11/19/18
14 In Brief
To Open the Driver’s Window
Lightly pressing the driver-side
window switch will lower the driver’s
window until the switch is released
(manual mode operation). When the
switch is firmly pressed, the window
will lower completely without the
need to press the switch
continuously (automatic mode
operation). If you want to stop the
automatic movement of the window
before it lowers completely, raise the
switch lightly.
To Close the Driver’s Window
Lightly raising the driver-side
window switch will cause the
driver's window to move up until the
switch is released.
To Open the Passenger’s Window
The passenger's window continues
to lower while the passenger-side
switch on the driver's door is being
pressed.
To Close the Passenger’s Window
The passenger's window continues
to move up while the
passenger-side switch on the
driver's door is being raised.
Window Switches on
Passenger’s Door
The power window switch on the
passenger's door can raise and
lower the passenger's side window
only and rear doors, if equipped.
The window continues to lower
while the window switch is being
pressed and continues to rise while
the switch is being raised. It will
stop moving at any position when
the switch is released.
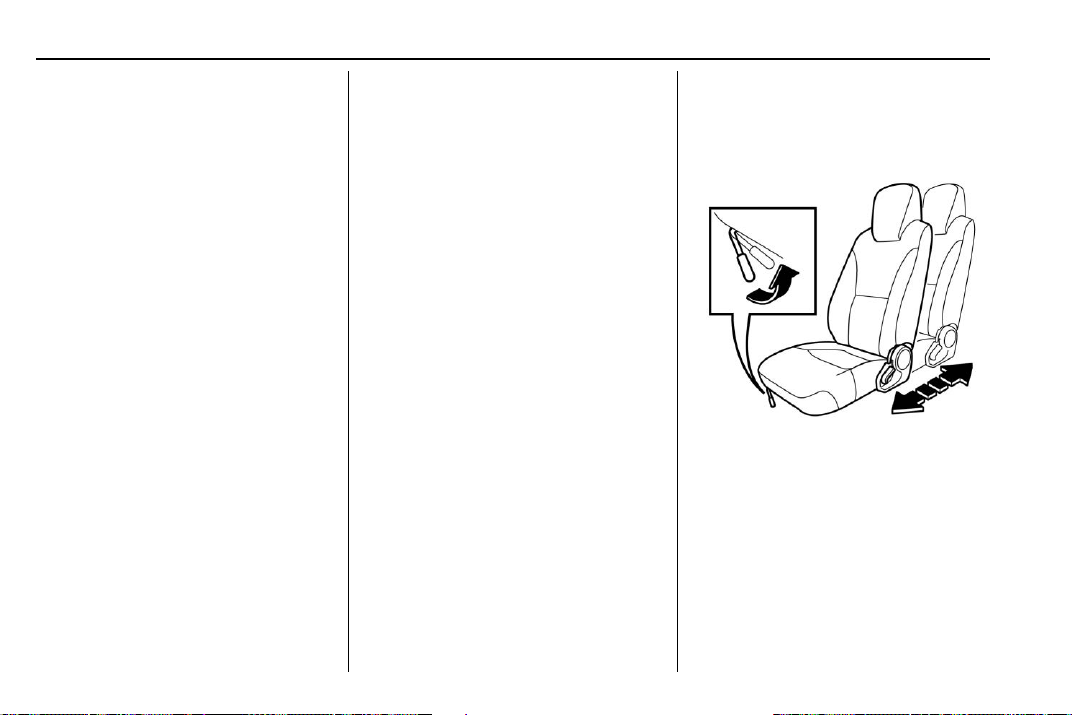
Seat Adjustment
Driver’s Seat
Forward/backward Adjustment
While raising the unlock lever, move
the seat forward or backward.
Release the lever when the seat is
in the desired position. After making
adjustments, try to move the seat
back and forth to check that it is
fully locked.

Chevrolet Low Cab Forward 6.0L Gasoline Engine 3500/4500 Series (GMNA-
Localizing-U.S.-12533400) - 2019 - CRC - 11/19/18
Reclining Adjustment
To recline the seatback, raise the
seatback tilt lever and gently lean
back to the desired position.
To move the seatback forward, lean
forward with your back slightly clear
of the seatback and raise the lever.
After making adjustments, check
that the seatback is fully locked.
See Seat Position 0 36.
Passenger’s Seat/Center Seat
Passenger’s Seat
In Brief 15
Center Seat
You can tip the seatback forward if
you pull forward the lever at the side
of the seatback. Normally, you
should keep the seatback in the
raised position.
See Seat Position 0 36.

Chevrolet Low Cab Forward 6.0L Gasoline Engine 3500/4500 Series (GMNA-
Localizing-U.S.-12533400) - 2019 - CRC - 11/19/18
16 In Brief
Seat Belts
Refer to the following sections for
important information on how to use
seat belts properly:
.
Seat Belts 0 41
.
Three-Point Seat Belt 0 43
.
Child Restraint Systems 0 49
Mirror Adjustment
Sit in the correct driving position
with the seat adjusted properly.
Then, check each mirror to ensure
that a proper view of the rear and
sides of the vehicle are provided.
Make adjustments and clean mirrors
if necessary.
Outside Rearview Mirrors
After properly adjusting your seat for
proper driving position, adjust the
mirrors so that they provide
adequate views for checking the
rear and the sides of the vehicle.
Adjust the outside rearview mirrors
by hand before vehicle operation.
This helps you determine the
location of objects seen in the
mirror. If the outside mirror fogs up,
warm up the outside rearview
mirror's face to defog.
See Mirrors 0 31.
Steering Wheel Adjustment
Warning
{
.
Adjust the position of the
steering wheel before you
start driving.
.
To reduce the risk of
personal injury, apply force
to the steering wheel to
make certain the steering
column is firmly locked
before driving. Also, do not
try to tilt or adjust the
steering wheel while the
vehicle is moving. If these
steps are not followed, the
steering column could move
suddenly while the vehicle
is in motion which could
cause a temporary loss of
steering control which may
result in personal injury or
death.

Chevrolet Low Cab Forward 6.0L Gasoline Engine 3500/4500 Series (GMNA-
Localizing-U.S.-12533400) - 2019 - CRC - 11/19/18
3. Firmly lock the steering wheel
at the selected position by
moving the lock lever to the
lock position.
Interior Lighting
Front Light
The steering wheel is adjustable up
and down as well as forward and
backward.
Before adjusting, position the seat
as desired.
1. Lift the lock lever toward you to
unlock the steering column.
2. Sit in the correct driving
position, and then move the
steering wheel up and down
and forward and backward to
select the optimum steering
wheel position.
The dome light operates regardless
of the engine control switch position.
The switch has three positions.
ON : The light stays on regardless
of the doors being open or closed.
OFF : The light stays off regardless
of the doors being open or closed.
In Brief 17
Between ON and OFF, the light
comes on when the driver's door is
opened.
Rear Light (Crew Cab Model Only)
The dome light operates regardless
of the engine control switch position.
The switch has three positions.
ON : The light stays on regardless
of the doors being open or closed.
OFF : The light stays off regardless
of the doors being open or closed.
Between ON and OFF, the light
comes on when the driver's door is
opened.

Chevrolet Low Cab Forward 6.0L Gasoline Engine 3500/4500 Series (GMNA-
Localizing-U.S.-12533400) - 2019 - CRC - 11/19/18
18 In Brief
Exterior Lighting
time period with the engine off.
Otherwise, the battery may go dead,
making it impossible to restart the
engine.
9 : Turns off all exterior lights.
; : Turns on the parking lights
including all exterior lights, except
the headlights.
2 : Turns on the headlights
together with the parking lights,
sidemarker lights, roofmarker lights,
taillights, license plate light, and
instrument panel lights.
.
Turning the light control switch to
the following positions will cause the
relevant lights to illuminate.
The light control switch can be used
when the engine control switch is
placed in the LOCK or ACC
position. Do not operate the
combination lights for an extended
Exterior Lamp Controls 0 80.
Windshield Wiper/Washer
To use the windshield wiper and
washer switches, the engine control
switch must be in the ON position.
The windshield wiper switch has the
following positions, which
correspond to the states of the
wiper.
9 : Stopped.
3 : Intermittent, light rain.
Low Speed : Low speed,
moderate rain.
High Speed : High speed,
heavy rain.

Chevrolet Low Cab Forward 6.0L Gasoline Engine 3500/4500 Series (GMNA-
Localizing-U.S.-12533400) - 2019 - CRC - 11/19/18
Windshield Washer
Windshield washer fluid is sprayed
over the windshield when this switch
is pressed. At the same time, the
windshield wiper operates.
To spray washer fluid on the
windshield, push the button on the
end of the combination switch lever.
The spray will continue as long as
you hold in the button.
See Windshield Wiper/Washer 0 63.
Climate Controls
The heating, cooling, and ventilation
for the vehicle can be controlled
with this system.
Climate Control System w/Air
Conditioning shown, Heater Only
similar
1. Outlet Selector Knob
2. Air Selector Lever
3. Temperature Control Knob
4. Air Conditioning (A/C) Switch,
if equipped
5. Fan Speed Control Knob
See Climate Control Systems 0 121.
In Brief 19
Vehicle Features
Radio(s)
Turning the Power On or Off
Press MODE/
power on. Press and hold it for
one second or more to turn the
power off.
If MODE/
while listening to music in audio
mode, the power is turned off. When
MODE/
the audio system resumes the last
mode just before it was turned off.
Adjusting the Volume
Turn the MODE/
clockwise or counterclockwise to
increase or decrease the volume.
Tuning
Manual tuning:
1. Press Tune/Track
less than one second.
O /ENTER to turn the
O /ENTER is pressed
O /ENTER is pressed again,
O /ENTER knob
y or z for

Chevrolet Low Cab Forward 6.0L Gasoline Engine 3500/4500 Series (GMNA-
Localizing-U.S.-12533400) - 2019 - CRC - 11/19/18
20 In Brief
2. Press Tune/Track y or z for
less than one second again to
select the station of your
choice.
Settings
Adjustment of bass, treble, fader,
and balance, and setting of clock
display and time can be performed.
See “Function Setting Mode” in
AM-FM Radio 0 85.
CD Player
To play a CD, see CD Player 0 90.
Portable Audio Devices
This vehicle is equipped with a
3.5 mm (1/8 in) auxiliary input jack
and a USB port in the radio
faceplate. External devices such as
iPods, laptop computers, MP3
players, and USB storage devices
may be connected.
See USB Port 0 98 and Auxiliary
Devices 0 107.
Cruise Control
1. Press the cruise control main
switch to turn it on.
At this time, the cruise main
indicator light comes on
simultaneously.
2. Use the accelerator pedal to
adjust the vehicle to the
desired speed. Upon reaching
the desired speed, turn the
cruise control set switch. The
vehicle speed at the moment
you operate the switch is set in
the system, enabling you to
drive with the set speed
automatically maintained
without using the accelerator
pedal.

Chevrolet Low Cab Forward 6.0L Gasoline Engine 3500/4500 Series (GMNA-
Localizing-U.S.-12533400) - 2019 - CRC - 11/19/18
instructions that are included with
any electrical equipment you install.
These circuits are protected by a
fuse and have maximum current
loads.
At the same time the cruise set
indicator light comes on.
See Cruise Control 0 179.
See Power Outlets 0 65.
Power Outlets
You can plug in auxiliary electrical
equipment. Just flip the outlet cover
open from the left edge of the cover
and follow the proper installation
In Brief 21
Performance and Maintenance
Driving for Better Fuel Economy
Economical Driving
How you drive, where you drive and
when you drive all affect fuel
economy.
Drive at a constant speed as much
as possible. When accelerating,
increase your speed gently and
slowly, and up-shift early.
Maintain a constant cruising speed,
as traffic allows, and avoid sudden
stops.
Frequent short trips, excessive
idling and use of the air conditioner
in cool weather when "Vent" would
provide adequate comfort, can all
lead to decreased fuel economy.
Warming up the engine for longer
than necessary, driving with the
vehicle overloaded and revving the
engine are a waste of fuel.

Chevrolet Low Cab Forward 6.0L Gasoline Engine 3500/4500 Series (GMNA-
Localizing-U.S.-12533400) - 2019 - CRC - 11/19/18
22 In Brief
The careful attention you give your
vehicle, as far as maintenance is
concerned, will also help fuel
economy.
Protection of Engine against
Overcooling
Overcooling of the engine not only
accelerates wear of the vital engine
parts but also hurts fuel economy.

Chevrolet Low Cab Forward 6.0L Gasoline Engine 3500/4500 Series (GMNA-
Localizing-U.S.-12533400) - 2019 - CRC - 11/19/18
Keys, Doors, and Windows
Keys and Locks
Keys
Keys and Locks
Keys . . . . . . . . . . . . . . . . . . . . . . . . . . . 23
Remote Keyless Entry (RKE)
System . . . . . . . . . . . . . . . . . . . . . . . 24
Remote Keyless Entry (RKE)
System Operation . . . . . . . . . . . . 24
Getting In and Out of the
Vehicle . . . . . . . . . . . . . . . . . . . . . . . 27
Door Locks . . . . . . . . . . . . . . . . . . . . 28
Power Door Locks . . . . . . . . . . . . . 31
Vehicle Security
Vehicle Security . . . . . . . . . . . . . . . . 31
Exterior Mirrors
Mirrors . . . . . . . . . . . . . . . . . . . . . . . . . 31
Heated Mirrors . . . . . . . . . . . . . . . . . 32
Windows
Power Windows . . . . . . . . . . . . . . . 33
Sun Visors . . . . . . . . . . . . . . . . . . . . . 35
1. Main Key
2. Spare Key
3. Metal plate with key code
One key (1) can operate all the
locks on the vehicle. Keep one of
the two keys provided as a
spare (2). Record the key code
numbers.
Keys, Doors, and Windows 23
Both sides of the key are identical,
so you can insert the key in the
engine control switch without
worrying about which way you
insert it.
The key code is indicated on a
separate metal plate (3) in order to
prevent it from being acquired by an
unauthorized person.
Where is the Key Used?
Where For What
Engine Control
Switch
Front doors Locking and
Wipe off the key to remove any dirt
or dust, etc. before using it.
To prevent theft, store the metal
plate with key code in a safe place
other than the vehicle.
Should you lose the key, please
give the key number to the nearest
dealer. The dealer will be able to
duplicate your key.
Starting and
shutting down
the engine
unlocking the
doors.

Chevrolet Low Cab Forward 6.0L Gasoline Engine 3500/4500 Series (GMNA-
Localizing-U.S.-12533400) - 2019 - CRC - 11/19/18
24 Keys, Doors, and Windows
If you resell the vehicle, be sure to
hand over the plate with key code to
the new owner together with the
vehicle.
Remote Keyless Entry (RKE) System
See Radio Frequency Statement
0 311.
If there is a decrease in the Remote
Keyless Entry (RKE) operating
range:
.
Check the distance. The
transmitter may be too far from
the vehicle.
.
Check the location. Other
vehicles or objects may be
blocking the signal.
.
Check the transmitter's battery.
See “Replacing the Battery in
the Remote Control Unit” later in
this section.
.
If the transmitter is still not
working correctly, see your
dealer or a qualified technician
for service.
Remote Keyless Entry (RKE) System Operation
The keyless entry system allows
you to lock/unlock the doors by
simply pressing the remote control
button rather than inserting the key
into the lock.
The remote control unit works within
a 10 m (33 ft) radius of the cab
center as indicated in the figure.
The actual distance over which the
unit operates may vary depending
on conditions.
Unlocking and Locking the
Doors
Remote Control Unit
Unlocking
Press the unlock button (2) of the
remote control unit for 1 second or
longer. The vehicle's keyless entry
system causes the right and left turn
signal lights to simultaneously flash
twice upon receiving the signals
from the remote control unit.
Locking
Press the lock button (1) of the
remote control unit for 1 second or
longer. The vehicle's keyless entry

Chevrolet Low Cab Forward 6.0L Gasoline Engine 3500/4500 Series (GMNA-
Localizing-U.S.-12533400) - 2019 - CRC - 11/19/18
system causes the right and left turn
signal lights to simultaneously flash
once upon receiving the signals
from the remote control unit.
Should you lose the remote control
unit, please contact your dealer.
After locking the doors using the
remote control unit, be sure to
check that they are locked by
pulling the door handles.
Avoid getting water on the remote
control unit, dropping it, hitting it
against another object, or stepping
on it; otherwise, the remote control
unit could malfunction.
Do not leave the remote control unit
on the dashboard or any other
surface where the unit might be
exposed to high temperatures
(exceeding 60°C/140°F). Doing so
may result in shorter battery life or
malfunction of the remote
control unit.
If the keyless entry system fails to
operate normally, lock and unlock
the doors using the key and have
the system inspected by your
dealer.
The lock or unlock buttons on the
remote control unit must be fully
pressed for more than 1 second
to work.
If you do not open any doors within
about 30 seconds after pressing the
unlock button to unlock the doors,
the automatic locking function of
the system will lock the doors again
to prevent theft.
In areas near a TV tower, electric
power plant, radio station, etc. or
under any conditions involving
strong electrical disturbances, the
remote control unit operating range
might change or the keyless entry
system might not work.
The keyless entry system does not
operate in the following cases:
.
The engine control switch is in
the "ON" position.
.
The key is inserted in the engine
control switch.
.
One of the doors is open.
Keys, Doors, and Windows 25
Replacing the Battery in the
Remote Control Unit
When the battery runs down,
replace it. Battery life is
approximately two years.
Battery Used
Lithium battery 1
Model number:
CR 2032
Voltage: DC3V
1. Battery Cover
Number of
Battery

Chevrolet Low Cab Forward 6.0L Gasoline Engine 3500/4500 Series (GMNA-
Localizing-U.S.-12533400) - 2019 - CRC - 11/19/18
26 Keys, Doors, and Windows
2. Remote Control Cover
Notch
3. Remote Control Unit Cover
4. Remote Control Unit
5. Battery
2. Remove the battery cover (1).
1. Pry open the remote control
unit cover (3) by inserting a flat
head screwdriver or similar tool
into the notch of the remote
control unit cover (2). Wrap a
piece of cloth or tape around
the tip of the screwdriver so as
not to damage the remote
control unit cover (3).
3. Insert a flat head screwdriver
or similar tool into the recess of
the remote control unit (4) to
remove the old battery.
4. Insert the new battery into the
remote control unit (4) with its
positive side visible, and press
the battery downward until fully
seated.
5. Install the remote control
unit (4), battery (5), and battery
cover (1) in their original
positions inside the remote
control unit cover (3).
6. Close the remote control unit
cover (3).
When closing the remote control
unit cover (3), check that there is no
dust, hair, or anything else caught
underneath it. A poorly sealed
remote control unit could become
deteriorated.
Please comply with the collection
system available in your country for
the disposal of old batteries. In
addition, take special care to
prevent any danger to children.

Chevrolet Low Cab Forward 6.0L Gasoline Engine 3500/4500 Series (GMNA-
Localizing-U.S.-12533400) - 2019 - CRC - 11/19/18
Keys, Doors, and Windows 27
Warning
{
When changing the battery, use
only a battery of the same type as
the original battery, or an
equivalent. Otherwise, there is a
risk of explosion.
Do not place the battery in direct
sunlight, or near a fire or other
sources of heat.
Be sure to install the battery with
the "+" and "-" sides correctly
oriented. Incorrect installation will
result in leakage of chemicals
from inside the battery or other
operational problems.
You and others could be seriously
injured.
The battery life varies depending on
how the remote control unit is used.
The battery has reached its end of
life when the remote control unit
works intermittently or does not
work at all. Replace the battery as
soon as this happens.
Getting In and Out of the Vehicle
Carefully check that the area around
the vehicle is safe, hold the grip (1),
and place your foot on the step (2)
when getting in or out of the vehicle.
{
When getting in or out of the
vehicle, make sure you use the
step and grips to support yourself
Warning
(Continued)
Warning (Continued)
at 3 points. It is very dangerous to
stand on the tire or wheel when
getting in or out of the vehicle.
Furthermore, do not try to jump in
or out of the vehicle, as doing so
could cause unexpected
accidents or injuries.
Getting in or out of the vehicle
with oily or greasy hands or
shoes could cause you to slip.
Always thoroughly clean grease,
etc. from your hands and shoes
before getting in or out of the
vehicle.
Rain and snow can cause the
step to become very slippery.
Therefore, always remove snow
and ice from your shoes and the
step, and be careful not to slip
when getting in and out of the
vehicle.
(Continued)

Chevrolet Low Cab Forward 6.0L Gasoline Engine 3500/4500 Series (GMNA-
Localizing-U.S.-12533400) - 2019 - CRC - 11/19/18
28 Keys, Doors, and Windows
Warning (Continued)
Exercise caution when opening or
closing doors, as strong winds or
steep slopes may cause doors to
open or close suddenly.
Do not hold parts other than the
grip when getting in or out of the
vehicle. Doing so may cause
damage to the vehicle or injuries
to yourself or others.
You and others could be seriously
injured.
Door Locks
Warning
{
Be sure to do the following
whenever you leave the vehicle:
1. Fully engage the parking
brake.
2. Stop the engine.
3. Lock the doors.
(Continued)
Warning (Continued)
When you close the door after
sitting behind the wheel, check
that the door is fully closed.
Driving with any door ajar is very
dangerous.
Before opening the door when
climbing into or out of the cab,
carefully check all areas around
the vehicle for safety, especially
the area at the rear of the vehicle.
If you suddenly open a door
without checking the surrounding
area, the door could be hit by a
vehicle behind you or a
pedestrian.
Never leave the key in the
vehicle.
Tilt the cab only after fully closing
the doors.
To help reduce the risk of
personal injury in an accident,
always lock the doors when
driving. Along with using the seat
(Continued)
Warning (Continued)
belts properly, locking the doors
helps prevent people from being
thrown from the vehicle. It also
helps prevent unintended opening
of the doors and helps keep out
intruders.
You and others could be seriously
injured.
Warning
{
To protect the child from the
danger of getting his/her hands
and head trapped, an adult must
open, close and lock the door for
the child.
Be careful that the child does not
interfere with the power window
switches and get his/her hands or
head trapped in the window.
While a child is in the cab, be
(Continued)

Chevrolet Low Cab Forward 6.0L Gasoline Engine 3500/4500 Series (GMNA-
Localizing-U.S.-12533400) - 2019 - CRC - 11/19/18
Warning (Continued)
sure to control the power windows
using the power window switches
beside the driver's seat.
You and others could be seriously
injured.
Overriding door locks are a
standard safety feature. When the
doors are locked, the inside handles
will not open them. This is to
prevent accidental opening of the
doors.
Front Doors
Locking and Unlocking the Door
from Outside Using the Key
Turn the key toward the front of the
vehicle to lock the door and turn it
toward the rear of the vehicle to
unlock it. The doors can be opened
by pulling the outside door handle.
Keys, Doors, and Windows 29
Locking the Door from Outside
without Using the Key
First, push the lock button (1) on the
inside door handle forward and then
close the door while keeping the
outside door handle (2) raised.
Before closing the door, be sure to
check that you have the key
with you.

Chevrolet Low Cab Forward 6.0L Gasoline Engine 3500/4500 Series (GMNA-
Localizing-U.S.-12533400) - 2019 - CRC - 11/19/18
30 Keys, Doors, and Windows
Locking and Unlocking the Door
from Inside
Push the lock button (1) forward to
lock the door; pull the lock button
backward to unlock it. After
unlocking the door, open it by
pulling the inside door handle (2).
If the door is locked, the lock
mechanism overrides operation of
the door handle.
Rear Doors
Outside Door Handles
A handle for opening each cab door
from outside the cab is located at
the rear edge of the door's outer
panel. To open the door from
outside the vehicle, pull up on the
handle.
Locking the Door from the Outside
Push the door lock button forward
and then close the door; the door
will be locked.
Inside Door Handles
An inside handle for opening each
cab door is located in the recessed
area at the front of the door. To
open the door, pull on the handle.
If the door is locked, the lock
mechanism overrides operation of
the door handle. The door must first
be unlocked before the handle can
be used to open the door.
Locking and Unlocking Doors
from the Inside
Push the door lock button (1)
forward to lock the door and pull the
lock button backward to unlock it.

Chevrolet Low Cab Forward 6.0L Gasoline Engine 3500/4500 Series (GMNA-
Localizing-U.S.-12533400) - 2019 - CRC - 11/19/18
Keys, Doors, and Windows 31
Power Door Locks
Power Door Lock (Central
Door Lock)
How the Power Door Lock System
Operates
When you lock the driver's door
using the key or by operating the
lock button, the power door lock
system will automatically lock all
doors simultaneously.
Door Lock Switch
Both doors can be locked and
unlocked by pressing the power
door lock switch.
Vehicle Security
Guard Against Theft
Your new vehicle has many features
to help prevent theft of the vehicle,
its equipment and contents. But
these anti-theft features depend
upon you to work.
The time to be most on guard is
when leaving the vehicle:
.
Park in a lighted spot when
you can.
.
Turn the engine control switch to
"LOCK" and remove the key.
This locks the switch and the
steering controls. The selector
lever is not locked.
.
Keep items that may appear to
be of value out of sight and
locked up when possible.
.
Fully close all windows and lock
all doors.
Exterior Mirrors
Mirrors
Sit in the correct driving position
with the seat adjusted properly.
Then, check each mirror to ensure
that a proper view of the rear and
sides of the vehicle are provided.
Make adjustments and clean mirrors
if necessary.
Outside Rearview Mirrors
After properly adjusting your seat for
proper driving position, adjust the
mirrors so that they provide
adequate views for checking the
rear and the sides of the vehicle.
Adjust the outside rearview mirrors
by hand before vehicle operation.
This helps you determine the
location of objects seen in the
mirror. If the outside mirror fogs up,
warm up the outside rearview
mirror's face to defog.
See Heated Mirrors 0 32.

Chevrolet Low Cab Forward 6.0L Gasoline Engine 3500/4500 Series (GMNA-
Localizing-U.S.-12533400) - 2019 - CRC - 11/19/18
32 Keys, Doors, and Windows
Warning
{
Before driving, be sure to adjust
the seat and mirrors to positions
that give you a correct driving
posture.
Do not adjust the outside mirrors
while operating the vehicle.
Adjust the mirrors when the
vehicle is stationary, not while the
vehicle is in motion.
When checking the rear of the
vehicle with mirrors, be careful
that this does not distract your
attention from the traffic ahead.
Outside mirrors may make the
vehicle behind you appear farther
away than it really is. Use these
mirrors very carefully until you are
able to correctly determine
distances from the images.
(Continued)
Heated Mirrors
Warning (Continued)
Keep the mirrors in mind when
passing another vehicle on a
narrow road, moving the vehicle
into a garage, or driving near
pedestrians.
Do not drive with the mirrors
folded.
You and others could be seriously
injured.
If the outside mirrors fog up, press
the outside rearview mirror heater
switch to defog them. When the
switch is pressed the indicating light
will illuminate. If the switch is
pressed once again, it will switch to
“OFF”, and the operation indicating
light will go out.
Do not use this switch while the
engine is off. Due to high power
consumption, the battery can be
discharged.
Turn off the switch as soon as
defogging is complete.

Chevrolet Low Cab Forward 6.0L Gasoline Engine 3500/4500 Series (GMNA-
Localizing-U.S.-12533400) - 2019 - CRC - 11/19/18
Windows
Power Windows
Warning
{
If you are traveling with a child,
do not leave the child alone in the
vehicle. If the child touches the
controls or equipment, an
accident could occur. (For
example, the vehicle could move
or a fire could start.) Also, the cab
inside could become dangerously
hot in hot weather.
Warning
{
Before closing the windows, make
sure that there is no risk of a
hand, head, or anything else
being trapped in the moving
window.
You and others could be seriously
injured.
Regardless of whether the vehicle
is moving or stationary, you must
never allow a child to put his/her
head, hands, or other body part
out of the window. Allowing such
behavior would be dangerous
because the child could hit an
obstacle.
You and others could be seriously
injured.
The power windows operate only
when the engine control switch is in
the ON position. Open each door
window by pressing the power
window switch; close each one by
raising the switch.
{
Warning
Keys, Doors, and Windows 33
Window Switches on
Driver’s Door
The power window switch on the
driver’s door can operate both
driver’s (2) and passenger’s (1)
power windows.
To Open the Driver’s Window
Lightly pressing the driver-side
window switch will lower the driver’s
window until the switch is released
(manual mode operation). When the
switch is firmly pressed, the window
will lower completely without the
need to press the switch
continuously (automatic mode

Chevrolet Low Cab Forward 6.0L Gasoline Engine 3500/4500 Series (GMNA-
Localizing-U.S.-12533400) - 2019 - CRC - 11/19/18
34 Keys, Doors, and Windows
operation). If you want to stop the
automatic movement of the window
before it lowers completely, raise the
switch lightly.
To Close the Driver’s Window
Lightly raising the driver-side
window switch will cause the
driver's window to move up until the
switch is released.
To Open the Passenger’s Window
The passenger's window continues
to lower while the passenger-side
switch on the driver's door is being
pressed.
To Close the Passenger’s Window
The passenger's window continues
to move up while the
passenger-side switch on the
driver's door is being raised.
Window Switches on
Passenger’s Door and Rear
Doors (If equipped)
The power window switch on the
passenger's door can raise and
lower the passenger's side window
only, while, if equipped, the rear
power window switches can raise
and lower the rear door windows.
Warning
{
Be sure to warn passengers not
to let any part of the body
become trapped or caught in a
moving window.
You and others could be seriously
injured.
The window continues to lower
while the window switch is being
pressed and continues to rise while
the switch is being raised. It will
stop moving at any position when
the switch is released.
When the rear power window lock
switch is in the “LOCK” position, it is
not possible to open and close the
rear windows.
Window Switches on Center of
Dashboard (Crew Cab Model)
The power window switch on the
instrument panel and rear door can
raise and lower the rear door
window.
To Open a Rear Window
Rear Power Window Switch
The window glass will move
downward while you are pushing
the bottom part of the switch.
To Close a Rear Window
The window glass will move upward
while you are pushing the top part of
the switch.

Chevrolet Low Cab Forward 6.0L Gasoline Engine 3500/4500 Series (GMNA-
Localizing-U.S.-12533400) - 2019 - CRC - 11/19/18
To Lock Rear Power Windows
Rear Power Window Lock Switch
If you push the rear power window
lock switch, only the driver's window
and front passenger's window will
open. To cancel the rear power
window lock, push the switch again.
Use the rear power window lock
switch to "LOCK" the rear power
windows. By doing so, you can
prevent passengers from operating
the rear power windows.
Sun Visors
Driver’s Side
Keys, Doors, and Windows 35
Passenger’s Side
The sun visor (1) protects your eyes
in strong sunlight. Use it when
sunlight is too bright. To reduce side
glare, unhook (2) the sun visor (1)
and swing it around to the side.
Make sure to fold up the sun visor
after use.

Chevrolet Low Cab Forward 6.0L Gasoline Engine 3500/4500 Series (GMNA-
Localizing-U.S.-12533400) - 2019 - CRC - 11/19/18
36 Seats and Restraints
Seats and Restraints
Front Seats
Seat Position . . . . . . . . . . . . . . . . . . 36
Rear Seats
Rear Seats (Crew
Cab Only) . . . . . . . . . . . . . . . . . . . . 40
Front Seats
Seat Position
Warning
{
Use caution when adjusting the
seat, as failure to do so could
cause injury. You and others
could be seriously injured.
Seat Belts
Seat Belts . . . . . . . . . . . . . . . . . . . . . 41
Three-Point Seat Belt . . . . . . . . . . 43
Seat Belt Use During
Pregnancy . . . . . . . . . . . . . . . . . . . . 45
Lap Belt . . . . . . . . . . . . . . . . . . . . . . . 46
Seat Belt Extender . . . . . . . . . . . . . 47
Safety System Check . . . . . . . . . . 47
Seat Belt Care . . . . . . . . . . . . . . . . . 47
Child Restraints
Child Restraint Systems . . . . . . . 49
Never allow children to adjust
their seats themselves; an adult
should adjust the seat for
occupants who are children. You
and others could be seriously
injured.
{
Warning
Warning
{
Adjust the seat only before you
start driving. Adjusting the seat
while the vehicle is in motion
must be avoided not only
because the unlocked seat will
move back and forth unstably,
preventing you from taking the
correct position, but might also
cause you to lose control of the
vehicle, possibly resulting in an
accident. You and others could be
seriously injured.
Warning
{
Try to move the seat without
unlatching it after making
adjustments to check that it is
completely locked. A loosely
locked seat may move
unexpectedly and your position
might then become unstable; this
could lead to an accident. Take
(Continued)

Chevrolet Low Cab Forward 6.0L Gasoline Engine 3500/4500 Series (GMNA-
Localizing-U.S.-12533400) - 2019 - CRC - 11/19/18
Seats and Restraints 37
Warning (Continued)
the vehicle to your dealer for
service if you find that your seat
adjusters do not latch. In addition,
the seat belt will not operate
properly if the seatback is not
completely locked. You and
others could be seriously injured.
Warning
{
Driving with the seat excessively
reclined could be very dangerous
in the event of a collision or
sudden stop. Raise the seatback,
and apply the seat belt correctly
while sitting straight in the seat.
You and others could be seriously
injured.
Do not place a cushion or similar
object between your back and the
seatback. Doing so not only
affects the stability of your driving
position but also prevents the
seat belt from working effectively
in the event of a collision. You
and others could be seriously
injured.
Do not place any objects under
the seat. If there are any objects
under the seat, the seat could be
locked in an improper position.
You and others could be seriously
injured.
{
{
Warning
Warning
Warning
{
Before making adjustments,
check that the seat rails are free
of anything that could obstruct the
locking of the seat. Be careful that
your hand or foot does not
become trapped in the seat or
rails when adjusting the seat. You
and others could be seriously
injured.
Warning
{
When adjusting the seat, be
careful that the seat does not hit
passengers or objects. Doing so
could cause injury to passengers,
or damage objects. You and
others could be seriously injured.

Chevrolet Low Cab Forward 6.0L Gasoline Engine 3500/4500 Series (GMNA-
Localizing-U.S.-12533400) - 2019 - CRC - 11/19/18
38 Seats and Restraints
Warning
{
Make sure not to hit passengers
or luggage when adjusting your
seat. You and others could be
seriously injured.
Warning
{
When adjusting the seat, or when
getting up from the seat, do not
put your hand or other objects
under the seat or near moving
parts. Doing so could cause injury
or damage to objects.
Driver’s Seat
The driver's seat must be adjusted
so that when you sit well back in the
seat, you can fully press the pedals
without moving your back from the
seatback, and you can operate the
steering wheel easily and freely.
After making adjustments, check
that the seat is completely locked.
Adjusting the seat for a correct
driving posture is a fundamental
part of safe driving.
Forward/backward Adjustment
While raising the unlock lever, move
the seat forward or backward.
Release the lever when the seat is
in the desired position. After making
adjustments, try to move the seat
back and forth to check that it is
fully locked.
Reclining Adjustment
Warning
{
To reduce the risk of sliding under
the lap belt during a collision, an
occupied reclining seat should not
be reclined any more than
needed for comfort. The seatback
and seat belts provide best
restraint only when the rider is
sitting well back and straight up in
the seat. (The lap belt is designed
to spread the force of a collision
over the hipbone. If you are
reclined, the lap belt may slide
past your hips and apply restraint
forces directly to the abdomen.
Therefore, in the event of a
collision, the risk of personal
injury will increase with increasing
recline of the seatback). You and
others could be seriously injured.

Chevrolet Low Cab Forward 6.0L Gasoline Engine 3500/4500 Series (GMNA-
Localizing-U.S.-12533400) - 2019 - CRC - 11/19/18
Warning
{
Do not adjust the reclining
seatback on the driver's seat
while the vehicle is moving. The
seatback could jerk and cause a
loss of control. You and others
could be seriously injured.
To recline the seatback, raise the
seatback tilt lever and gently lean
back to the desired position.
To move the seatback forward, lean
forward with your back slightly clear
of the seatback and raise the lever.
After making adjustments, check
that the seatback is fully locked.
Suspension Adjustment
Avoid making any kind of contact
with the pointer on the scale. Doing
so may result in damage to the
pointer, preventing appropriate
weight adjustments from being
possible.
Before sitting on the seat, use the
knob to adjust the suspension to
suit your weight. Turn the knob
clockwise to move the pointer down
Seats and Restraints 39
the scale and counterclockwise to
move it up the scale. The pointer
should be alongside your weight on
the scale.
The range of adjustment is
50-130 kg (110-290 lbs). If your
weight is outside this range, the
suspension may not be fully
effective. However, you will be able
to sit in the correct position for
driving.
Avoid inserting fingers or objects
between (1) the inner (3) and
outer (2) seatback, as doing so may
prevent the seat suspension from
operating properly.

Chevrolet Low Cab Forward 6.0L Gasoline Engine 3500/4500 Series (GMNA-
Localizing-U.S.-12533400) - 2019 - CRC - 11/19/18
40 Seats and Restraints
Passenger’s Seat/Center Seat
Warning
{
Baggage must not be placed on
the center seat. If the baggage
falls on the floor when braking, it
may prevent the driver from
operating the pedals. You and
others could be seriously injured.
Rear Seats
Rear Seats (Crew Cab Only)
Do not remove the seat cushion
except when taking out or stowing
onboard tools.
Warning
{
Center Seat
You can tip the seatback forward if
you pull forward the lever at the side
of the seatback. Normally, you
should keep the seatback in the
raised position.
Passenger’s Seat
Do not drive with the seat cushion
removed. The seat would not be
stable, which could lead to an
accident. You and others could be
seriously injured.

Chevrolet Low Cab Forward 6.0L Gasoline Engine 3500/4500 Series (GMNA-
Localizing-U.S.-12533400) - 2019 - CRC - 11/19/18
Seat Belts
The rear seat headrests are not
adjustable.
Do not use the rear seats with the
headrests removed during driving.
The protection provided by seat
belts might be significantly reduced
if they are not fastened properly; in
certain cases, improperly fastened
seat belts can even play a role in
causing injury to the wearer. Seat
belts must be worn not only by the
driver but also by the passenger(s)
before the vehicle starts moving.
You should be fully acquainted with
the proper use of seat belts and
important points to be respected as
described in the following pages.
Seats and Restraints 41
Familiarizing yourself with the
correct use of seat belts is essential
for your safety.
Warning
{
To help reduce the risk of
personal injury in collisions or
sudden maneuvers, use the seat
belts following these instructions
on their proper use, maintenance,
and use with child restraint
systems.
Seat belts must always be
fastened BEFORE starting to
drive.
Seat belts provide full protection
only when the driver and
passenger(s) fasten them while
sitting upright and fully back on
the seat.
Wearing a seat belt with the
seatback excessively reclined
could be very dangerous in a
collision or sudden stop since the
occupant may slide under the belt
(Continued)

Chevrolet Low Cab Forward 6.0L Gasoline Engine 3500/4500 Series (GMNA-
Localizing-U.S.-12533400) - 2019 - CRC - 11/19/18
42 Seats and Restraints
Warning (Continued)
and be seriously injured. Seat
belts work best only when the
occupant is sitting well back and
straight up in the seat.
Be sure to insert the latch plate
into the buckle until a click is
heard. An incompletely inserted
latch plate is dangerous in the
event of a collision or
sudden stop.
Do not run the seat belt over your
face, chin or neck.
Wear the seat belt as low as
possible around the hips, not
around the waist. A seat belt
running over the waist would
press the abdomen with a strong
force and could increase the
likelihood of injuries in a collision
or sudden stop.
Do not use a seat belt for a small
child if the belt is on or very close
to the child's neck or chin. Also,
(Continued)
Warning (Continued)
do not use a seat belt if it does
not fit snugly over the child's hips
because restraining the child
under those conditions could be
dangerous in the event of a
collision or sudden stop. Instead,
use an appropriate child restraint
system available on the market.
For further details, please contact
your dealer.
Use a child restraint system that
fits the size of the infant or child.
Install the system according to
the manufacturer's instructions.
Children who have outgrown child
restraint systems should use the
vehicle's seat belts.
Remove any twists in the seat
belt before fastening it. A seat
belt with twists will not provide full
protection because it cannot
Warning (Continued)
disperse shocks efficiently in the
event of a collision or
sudden stop.
Too much slack could increase
the amount of injury because the
belt would not be able to properly
restrain you in an accident.
Do not put the lap portion of a
seat belt over any armrest.
Do not wear a shoulder belt under
your arm nearest the door.
Do not let a buckle release button
face downward or inward.
Expectant mothers or people
suffering from chest or abdominal
conditions should check with their
doctor for specific
recommendations about wearing
seat belts.
(Continued)
(Continued)

Chevrolet Low Cab Forward 6.0L Gasoline Engine 3500/4500 Series (GMNA-
Localizing-U.S.-12533400) - 2019 - CRC - 11/19/18
Seats and Restraints 43
Warning (Continued)
Do not use one seat belt for more
than one person. If worn by more
than one person, the seat belt
would not work effectively in a
collision or sudden stop.
Have seat belts inspected and,
if necessary, replaced by the
nearest dealer when the webbing
becomes frayed or worn and/or
when the buckle or other
mechanical parts fail to work
properly.
If your vehicle has been involved
in a collision, the seat belts worn
at the time may have lost their
original strength due to impact
even if they appear intact. These
seat belts must be inspected and,
if necessary, replaced by the
nearest dealer.
(Continued)
Warning (Continued)
Be careful to keep the buckles
and retractors free of dust and
foreign matter. (This may jam the
retractor or damage the belt.)
Do not let the belt system
become damaged by the door
or seat.
Do not let the belt twist while it is
rewinding: it may cause the
retractor to jam so it will not
rewind further. If it is not fully
rewound, the belt cannot be
pulled out. Should the belt jam,
you may be able to release it by
working the belt in and out until
the belt rewinds far enough to
unlock. However, if the belt
remains jammed or other parts of
the restraint system do not work
properly, have your dealer
service it.
(Continued)
Warning (Continued)
Wearing seat belts is a legal
requirement. All other passengers
must wear seat belts. The driver
is responsible not only for
wearing a seat belt himself/herself
but also for prompting all
passengers to wear their seat
belts. It is necessary, however, to
check with a doctor about the
appropriateness of a seat belt for
an expectant mother or a
passenger with a chest/abdominal
condition.
Three-Point Seat Belt
Warning
{
The shoulder belt should be
adequately positioned on your
shoulder but should not touch
your neck and/or face. The
shoulder belt could harm you in a
(Continued)

Chevrolet Low Cab Forward 6.0L Gasoline Engine 3500/4500 Series (GMNA-
Localizing-U.S.-12533400) - 2019 - CRC - 11/19/18
44 Seats and Restraints
Warning (Continued)
collision or sudden stop if it is in
contact with your neck and/
or face.
Every seat except the center seat
on your vehicle is equipped with a
three-point seat belt. The seat belt
extends or retracts freely if the
wearer moves slowly, but it locks
and restrains the occupant during
forward force caused by the
occupant's body following a strong
shock.
To Fasten:
1. Sit on the seat in the correct
driving position.
2. Pull out the seat belt holding
the latch plate. After checking
that there are no twists in the
belt, insert the latch plate into
the buckle until it clicks. If the
retractor locks before the latch
plate reaches the buckle, let
the belt retract slightly, then
withdraw it slower than before.
3. To reduce the risk of sliding
under the belt during a
collision, position the belt
across your lap as low on your
hips as possible and adjust it to
a snug fit by pulling the
"shoulder" portion upward
through the latch plate.
The lap-shoulder belt is
designed to lock during a
sudden stop or impact. At other
times it should move freely.

Chevrolet Low Cab Forward 6.0L Gasoline Engine 3500/4500 Series (GMNA-
Localizing-U.S.-12533400) - 2019 - CRC - 11/19/18
To Unfasten:
Push the button on the buckle. As
the belt automatically retracts, let it
be taken up slowly by holding on to
the latch plate until the belt is fully
retracted.
While being automatically retracted,
the seat belt could damage a
nearby window or interior trim
unless the latch plate is properly
held. Hold the latch plate to ensure
that the belt is taken up slowly.
Before closing the door, check that
the retracted seat belt is taut.
A slack belt could become trapped
in the door or seat rail.
When the passenger's seat belt is
fully taken up (or not pulled out),
check that the stopper is holding the
belt in a fully taut state.
Emergency Locking Retractor
(ELR) Function
The three-point seat belts are
provided with an Emergency
Locking Retractor (ELR) function.
The ELR normally allows the seat
belt to move in and out freely as the
occupant moves. However, it locks
the seat belt to restrain the
occupant when a forward force
resulting from a collision or sudden
stop acts on the occupant.
The ELR also locks the seat belt
when the belt is pulled out quickly.
If this happens, allow it to retract
once and then pull it out slowly.
Seats and Restraints 45
Seat Belt Use During Pregnancy
Warning
{
Unless the seat belt is correctly
worn, it may dig into the abdomen
in the event of hard braking or a
collision, harming not only the
expectant mother but also the
unborn child, putting them both in
danger of serious injuries or
death.

Chevrolet Low Cab Forward 6.0L Gasoline Engine 3500/4500 Series (GMNA-
Localizing-U.S.-12533400) - 2019 - CRC - 11/19/18
46 Seats and Restraints
An expectant mother or a person
who is ill riding in the vehicle must
also wear a seat belt. In light of the
risk that the seat belt will apply
pressure to the abdomen, chest and
shoulders in the event of a collision,
however, an expectant mother or
person who is ill should get advice
from a physician beforehand.
.
An expectant mother should use
a three-point seat belt.
.
An expectant mother should
position the lap belt snugly as
low as possible on the hips (not
across the abdomen). Also, she
should fasten the shoulder belt
so it rests on her chest, not on
her abdomen.
Lap Belt
The center seat lap belt has no
retractor, but should be positioned,
worn, and released as described
below.
To Fasten:
1. Sit on the seat in the correct
position.
3. After checking that there are no
twists in the belt, insert the
latch plate into the buckle until
it clicks.
2. Pull out the latch plate side of
the belt a little longer than
necessary. Placing the latch
plate at right angles with the
belt makes this easier.

Chevrolet Low Cab Forward 6.0L Gasoline Engine 3500/4500 Series (GMNA-
Localizing-U.S.-12533400) - 2019 - CRC - 11/19/18
4. Position the seat belt across
the lap as low as possible on
the hips. Pull the fold-back end
of the belt (upper side) until the
belt is adjusted to a snug fit.
To Unfasten:
Seat Belt Extender
If the vehicle's seat belt will fasten
around you, you should use it. But if
a seat belt isn't long enough to
fasten, your dealer can order you an
extender. When you go in to order it,
take the heaviest coat you will wear,
so the extender will be long enough
for you. The extender will be just for
you, and just for the seat in your
vehicle that you choose. Do not let
someone else use it, and use it only
for the seat it is made to fit. To wear
it, just attach it to the regular
seat belt.
Safety System Check
Now and then check that the belts,
Push the button on the buckle to
unfasten the belt.
The center seat belt
(length-adjustable two-point belt) is
designed so that it cannot be
connected with any of the
windowside seat belts (three-point
seat belts with ELR).
buckles, latch plates, retractors,
anchorages and guide loops work
properly; look for loose parts or
damage (without disassembly) that
could keep the restraint system from
doing its job. Have a belt assembly
replaced if the webbing has been
cut or otherwise damaged. Replace
belts, retractors, and hardware used
in all but a minor collision. Also,
restraint systems should be
Seats and Restraints 47
replaced and anchorages properly
repaired if they were in areas
damaged by a collision, whether the
belt was in use or not. If there is any
question, replace the belt system.
Damage, whether visible or not,
could result in a serious personal
injury in the event of an accident.
Seat Belt Care
Warning
{
Keep belts clean and dry.
Clean seat belts only with mild
soaps and lukewarm water.
Do not bleach or dye belts since
this may severely weaken them.
Seat belt webbing can lose its
strength when bleached or
redyed, or when cleaned using
gasoline, paint thinners or other
volatile substances.
Do not disassemble the seat belt
mechanism in order to remove
any foreign material or objects
(Continued)

Chevrolet Low Cab Forward 6.0L Gasoline Engine 3500/4500 Series (GMNA-
Localizing-U.S.-12533400) - 2019 - CRC - 11/19/18
48 Seats and Restraints
Warning (Continued)
that may have entered the buckle.
Instead, arrange for inspection
and maintenance to be carried
out by your dealer.
A dirty seat belt can develop
retracting problems, and for this
reason, regular inspection and
upkeep are required.
Cleaning a Seat Belt Fold-Back
Fitting Portion
1. Seat belt fold-back fitting
portion
2. Seat belt
3. Cloth
Cleaning a Seat Belt Fold-Back
Fitting Portion:
1. Fold a piece of cotton cloth,
absorbent gauze, or the like of
approximately 50 mm (2 in) in
width into a rectangle.
2. Mix one part neutral detergent
into approximately twenty parts
warm water.
3. Wet the cloth in the detergent
mixture, pass it through the
fold-back fitting portion of the
belt, and slide it back and forth
and laterally until dirt can no
longer be seen.
4. Remove the cloth, remove
moisture from the fitting portion
of the belt using a dry cloth,
and then allow it to dry
naturally out of direct sunlight.
5. Check to be sure the seat belt
retracts and pulls out correctly.
Avoid using anything like a tool to
pass the cloth through the fold-back
fitting portion or try to remove
stubborn dirt. Using such an object
can result in damage to plastic parts
or seat belt webbing.
Cleaning a Seat Belt Webbing
1. Brush
2. Seat belt
Cleaning a Belt Webbing:
1. Fully extract the belt and
examine for any difference in
color between the front and
back surfaces.

Chevrolet Low Cab Forward 6.0L Gasoline Engine 3500/4500 Series (GMNA-
Localizing-U.S.-12533400) - 2019 - CRC - 11/19/18
2. Mix one part neutral detergent
into approximately twenty parts
warm water.
3. Wet a nail brush or another
similar brush having soft
bristles (of nylon or the like) in
warm water, and use this to
clean away dirt.
4. Wipe the seat belt dry using a
dry cloth, and then allow it to
dry naturally out of direct
sunlight.
5. Check to be sure the seat belt
retracts and pulls out correctly.
If the above-described upkeep
operations do not improve the
operation of the seat belt through
the retractor, there is a possibility
that the belt is making contact with
the door pillar trim. In this case,
arrange for inspection and
maintenance to be carried out by
your dealer.
If the belt is not winding and
unwinding correctly, or if inspection
reveals problems such as loose
mountings, metal parts deformation,
webbing damage, fraying or
discoloration, arrange for
replacement to be carried out by
your dealer.
Seats and Restraints 49
Child Restraints
Child Restraint Systems
Warning
{
Children small enough for child
restraints (as indicated on the
label of such restraints), including
booster seats, should always be
transported in them. Children who
have outgrown child restraint
systems should wear seat belts.
The lap belt should be snug and
positioned low on the abdomen
so that it is below the top of the
hipbone. Otherwise, the belt could
intrude into the child's abdomen
during an accident and cause
personal injury. When a child has
grown enough so that the
shoulder belt can be worn, a
seating position with a shoulder
belt should be chosen whenever
possible.
(Continued)

Chevrolet Low Cab Forward 6.0L Gasoline Engine 3500/4500 Series (GMNA-
Localizing-U.S.-12533400) - 2019 - CRC - 11/19/18
50 Seats and Restraints
Warning (Continued)
Any unrestrained child could be
injured by striking the vehicle's
interior or by ejection from the
vehicle during an accident or
driving maneuver. Never allow a
child to be held by another
occupant instead of being
properly restrained. If not properly
restrained, the child could strike
the vehicle interior or be crushed
by the person holding the child,
or by other occupants.
Be sure to follow all installation and
use instructions that come with any
child restraint system.
Child restraint systems are designed
to be secured in vehicle seats either
by the lap belt, or the lap portion of
the lap-shoulder belt at that seating
position. The child must also be
secured within the restraint by the
means provided by the child
restraint manufacturer. If the child or
the child restraint is not properly
secured, the child risks personal
injury in the event of a collision.
Using a Lap Belt That Has No
Retractor
When securing a child restraint with
the center seat lap belt, pull the
excess webbing through the belt's
adjustment feature, then take these
steps:
.
Once installed, push and pull the
child restraint in all directions to
be sure it is secure. If it comes
loose, flip the end of the belt
with the adjustment feature over
before rebuckling.
.
If the child restraint is still not
secure, use the outboard seating
position in the vehicle and
contact your dealer and the child
restraint manufacturer for help.
.
Secure the child in the restraint
in accordance with the child
restraint manufacturer's
instructions.
Installation on Outboard Seat
A seat belt locking clip is required
for installation of a child restraint
system on the outboard seat of this
vehicle. A locking clip may usually
be obtained where child restraints
are sold, or by contacting your
dealer for assistance. Make sure the
locking clip is identical to the one
shown on this page. Until you have
the clip, use the child restraint
system only in the center seat.

Chevrolet Low Cab Forward 6.0L Gasoline Engine 3500/4500 Series (GMNA-
Localizing-U.S.-12533400) - 2019 - CRC - 11/19/18
Warning
{
To help avoid personal injury or
death during a collision or sudden
maneuver, always thread both the
lap and shoulder belt through the
locking clip when securing a child
restraint on the outboard seat.
If the clip is not used or installed
properly, the child restraint may
move or tip over when your
vehicle turns or stops abruptly.
Secure the child restraint with the
lap belt portion (1) of the seat belt in
accordance with the restraint
manufacturer's instructions. Then
thread both the lap (1) and shoulder
belt (2) portions through the locking
clip. Push and pull the child restraint
in all directions to be sure it is
secure.
Locking Clip Attached to Seat Belt
– Side View
1. Lap Belt
2. Shoulder Belt
3. Locking Clip
Seats and Restraints 51
When your child restraint is not
installed, remove the locking clip to
permit normal use of the
lap-shoulder belt. Keep the locking
clip in the glove box to help prevent
its loss.
Child Restraint with Top Tether
Warning
{
We do not recommend using a
child restraint that requires the
use of a top tether. There is no
appropriate place to attach a top
tether anchor behind the seat in
this vehicle.
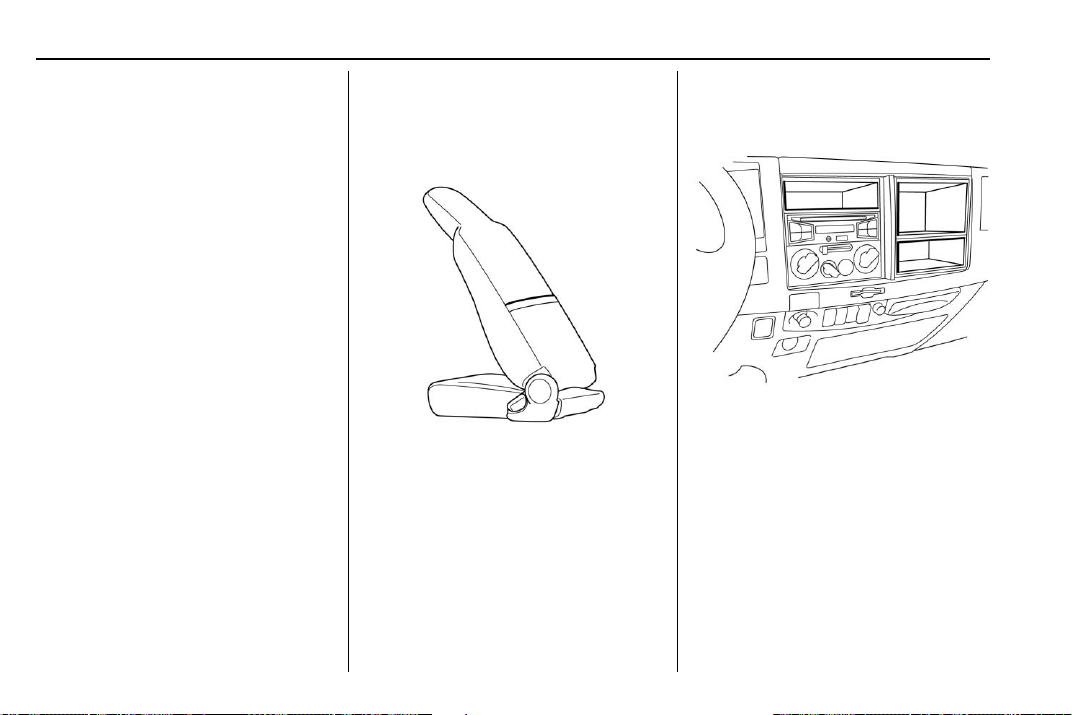
Chevrolet Low Cab Forward 6.0L Gasoline Engine 3500/4500 Series (GMNA-
Localizing-U.S.-12533400) - 2019 - CRC - 11/19/18
52 Storage
Storage
Storage Compartments
Storage Compartments . . . . . . . . 52
Instrument Panel Storage . . . . . . 52
Glove Box . . . . . . . . . . . . . . . . . . . . . 53
Cupholders . . . . . . . . . . . . . . . . . . . . 54
Rear Storage . . . . . . . . . . . . . . . . . . 55
Additional Storage Features
Shopping Bag Hooks . . . . . . . . . . 55
Information on Loading the
Vehicle
Information on Loading the
Vehicle . . . . . . . . . . . . . . . . . . . . . . . 56
Storage
Compartments
Seat Back Pocket
Use the seat back pocket for storing
items such as vehicle registration
documents or owner manuals.
Instrument Panel Storage
Small Article Storage Pockets
Use the storage pockets for storing
small articles.

Chevrolet Low Cab Forward 6.0L Gasoline Engine 3500/4500 Series (GMNA-
Localizing-U.S.-12533400) - 2019 - CRC - 11/19/18
Card Holder
Use this to hold your cards.
Glove Box
Press on the central mark to lock
and unlock the lid.
Storage 53
Warning
{
For safety, close the glove box
during driving. There is a risk of
injury from the open lid or items
stored in the glove box.
You and others could be seriously
injured.
The glove box lid will automatically
spring open when it is unlocked. Do
not put your face or head near
the lid.
Warning
{
Do not leave eyeglasses or a
lighter in the vehicle. Lighters
may explode and plastic lenses or
frames may deform or crack if the
interior temperature becomes
very hot.
You and others could be seriously
injured.

Chevrolet Low Cab Forward 6.0L Gasoline Engine 3500/4500 Series (GMNA-
Localizing-U.S.-12533400) - 2019 - CRC - 11/19/18
54 Storage
Caution
When closing the glove box lid,
do not allow stored items to pass
the line shown in the illustration.
The glove box lid may break if it
is closed when items inside have
passed the line and are sticking
out from the box.
Do not place items such as vehicle
registration documents or owner
manuals in the glove box, but store
them in the seat back pocket
located on the back side of the
driver seat.
Refer to Storage Compartments
0 52.
Cupholders
Pull the cupholder towards you to
open it.
Do not place a cup that is too full in
the cupholder. Spillages could
cause damage to the radio and
other electrical circuits. If there is a
spill, wipe it up immediately with a
dry cloth.
Do not tilt the cab with a filled cup in
the cupholder. There may be a
danger of the cupholder breaking if
the weight on each holder exceeds
0.75 kg (1.65 lbs). Doing so may
also result in damage to the radio or
other electronic components.
Use the cupholders for storing small
articles or cups.

Chevrolet Low Cab Forward 6.0L Gasoline Engine 3500/4500 Series (GMNA-
Localizing-U.S.-12533400) - 2019 - CRC - 11/19/18
Rear Storage
Single Cab Model Only
Warning
{
Storage 55
Additional Storage Features
Do not use the back panel tray to
hold any object that may fly or fall
out during vehicle operation.
Doing so would be dangerous.
Items may fly or fall out when the
cab is tilted.
You and others could be seriously
injured.
The center area of the back panel
tray can be used as a storage
receptacle. The warning triangle and
fire extinguisher can be carried in
both sides.
Shopping Bag Hooks
This can be used to hold plastic
shopping bags. Do not hang
anything weighing over 3 kg
(6.6 lbs) or the hook will break.

Chevrolet Low Cab Forward 6.0L Gasoline Engine 3500/4500 Series (GMNA-
Localizing-U.S.-12533400) - 2019 - CRC - 11/19/18
56 Storage
Information on Loading the Vehicle
Overloading
Warning
{
Overloading can result in loss of
vehicle control and personal
injury or death, either by causing
component failures or by affecting
vehicle handling. It can also
shorten the service life of your
vehicle.
The components of your truck are
designed to provide satisfactory
service if the vehicle is not loaded in
excess of either the gross vehicle
weight rating (GVWR) or the
maximum front and rear gross axle
weight ratings (GAWRs). These
ratings are listed on the “Vehicle
Certification and Greenhouse Gas
(GHG) Emissions Plate”, which is
located on the left side rear pillar
panel below the striker (single cab)
or on the left center pillar panel
beside the shoulder seat belt anchor
(crew cab).
Gross vehicle weight (GVW) is the
weight of the originally equipped
vehicle and all items added to it
after it has left the factory. This
would include bodies, lift gates,
refrigeration systems, winches,
booms, etc., the driver and all
occupants, and the load the vehicle
is carrying. The GVW must not
exceed the GVWR. Also, gross
weight on each of the front and rear
axles must not exceed the front and
rear GAWRs respectively.
Your dealer can advise you of the
proper loading conditions for your
vehicle. Using selected heavier
suspension components for added
durability may not increase any of
the weight ratings shown on the
“Vehicle Certification and
Greenhouse Gas (GHG) Emissions
Plate.”

Chevrolet Low Cab Forward 6.0L Gasoline Engine 3500/4500 Series (GMNA-
Localizing-U.S.-12533400) - 2019 - CRC - 11/19/18
Model Maximum
GVWR
kg (lb.)
3500 5 443 (12,000) 2 204 (4,860) 4 010 (8,840)
4500 6 577 (14,500) 3 007 (6,630) 4 482 (9,880)
Maximum Front and Rear Axle
Weights
The weight of the cargo load must
be properly distributed over both the
front and rear axles. The “Vehicle
Certification and Greenhouse Gas
Front GAWR
Capacity
kg (lb.)
(GHG) Emissions Plate” shows the
maximum weight that the front axle
can carry (front GAWR). It also
shows the maximum weight that the
rear axle can carry (rear GAWR).
The GVWR is the maximum
permissible loaded weight of the
vehicle and takes into account the
capabilities of the engine,
transmission, frame, springs,
brakes, axles and tires. Actual loads
at the front and the rear axles can
only be determined by weighing the
vehicle. This can be done at
highway weigh stations or other
such places. See your dealer for
help. The cargo load should be
distributed on both sides of the
center line as equally as possible.
Rear GAWR
Capacity
kg (lb.)
Storage 57
Tires
The tires on your truck must be of
the proper size and properly inflated
for the load that you are carrying.
The “Vehicle Certification and
Greenhouse Gas (GHG) Emissions
Plate” shows the originally equipped
tire size and recommended inflation
pressures. The tire inflation tables
show the load limits for various size
tires at various inflation pressures.
For the vehicle plate location, see
Vehicle Identification Number (VIN)
0 292.
See “Tire Load and Inflation Table”
under Tire Pressure 0 249.

Chevrolet Low Cab Forward 6.0L Gasoline Engine 3500/4500 Series (GMNA-
Localizing-U.S.-12533400) - 2019 - CRC - 11/19/18
58 Storage
Load Cargo Correctly
Warning (Continued)
Warning (Continued)
The weight of the payload must
be limited within the gross vehicle
weight (GVW) rating and
distributed over the front and rear
axles so as not to exceed the
axle capacities.
It is extremely dangerous to
overload the vehicle or to load the
vehicle with the cargo positioned
on one side. Load the vehicle
correctly, observing the maximum
Warning
{
Overloading can result in a crash
because it places too much strain
on the wheel studs with the result
that they break and the wheels
come off.
(Continued)
loading capacity.
Incorrect loading can make the
cargo unstable. It can also cause
an overload condition confined to
a small area, resulting in damage
to the cargo bed and frame.
Overloading places undue strain
on vehicle parts. It can shorten
the vehicle's service life and
cause a crash. You and others
could be seriously injured.
(Continued)

Chevrolet Low Cab Forward 6.0L Gasoline Engine 3500/4500 Series (GMNA-
Localizing-U.S.-12533400) - 2019 - CRC - 11/19/18
Cargo loading caution Incorrect Correct
Do not place cargo only at the front or only at the rear. Distribute it
evenly.
When using supports under cargo, position them uniformly along the
cargo.
To the greatest extent possible, do not allow long cargo to protrude
beyond the rear edge of the cargo bed. Rather, use supports to raise it
at an angle. Avoid supporting it using just the front guard frame and the
rear edge of the cargo bed.
Storage 59

Chevrolet Low Cab Forward 6.0L Gasoline Engine 3500/4500 Series (GMNA-
Localizing-U.S.-12533400) - 2019 - CRC - 11/19/18
60 Storage
Cargo loading caution Incorrect Correct
Use ropes and tarpaulins to secure the cargo so it does not fall off the
cargo bed. Use rubber bands or bungee cords to prevent the tarpaulins
from flapping in the wind.
Avoid loading cargo too high. It can cause the vehicle to tip sideways
when it catches side winds and when turning the vehicle.

Chevrolet Low Cab Forward 6.0L Gasoline Engine 3500/4500 Series (GMNA-
Localizing-U.S.-12533400) - 2019 - CRC - 11/19/18
Loading Equipment
Do not load equipment from the rear
of the cargo bed. The frame may
become deformed when equipment
is loaded from the rear of the cargo
bed. In addition, the frame may
become deformed even when
loading equipment that has a weight
under the maximum loading
capacity.
When loading equipment, a device
for securing the cargo bed is
required. Use a car carrier or attach
a rear support stand. If you have
any questions, contact your dealer.
Make Sure There is No Flammable
Material between the Cab and
Cargo Bed
Caution
Be careful not to allow a sheet,
canvas top, or the ends of ropes
or rubber straps to touch or come
close to the engine or exhaust
pipe. During vehicle operation,
the engine's heat could set them
on fire. Carefully secure the
sheet, canvas top, or the ends of
ropes or rubber straps.
Storage 61
Do not Carry Fuel and Spray Cans
in the Cab
Danger
{
It is extremely dangerous to carry
fuel and spray cans in the cab.
If such a container were to ignite
or rupture, it could cause a fire or
explosion. You and others could
be seriously injured.

Chevrolet Low Cab Forward 6.0L Gasoline Engine 3500/4500 Series (GMNA-
Localizing-U.S.-12533400) - 2019 - CRC - 11/19/18
62 Instruments and Controls
Instruments and Controls
Controls
Steering Wheel Adjustment . . . . 62
Horn . . . . . . . . . . . . . . . . . . . . . . . . . . . 63
Windshield Wiper/Washer . . . . . . 63
Power Outlets . . . . . . . . . . . . . . . . . 65
Warning Lights, Gauges, and
Indicators
Warning Lights, Gauges, and
Indicators . . . . . . . . . . . . . . . . . . . . 67
Instrument Cluster . . . . . . . . . . . . . 68
Speedometer . . . . . . . . . . . . . . . . . . 69
Odometer . . . . . . . . . . . . . . . . . . . . . . 69
Trip Odometer . . . . . . . . . . . . . . . . . 69
Tachometer . . . . . . . . . . . . . . . . . . . . 70
Fuel Gauge . .. . . . . . . . . . . . . . . . . . 70
Engine Coolant Temperature
Gauge . . . . . . . . .. . . . . . . . . . . . . . . 71
Seat Belt Reminders . . . . . . . . . . . 71
Battery Warning Light . .. . . . . . . . 72
Malfunction Indicator Lamp
(Check Engine Light) . . . . . . . . . 72
Service Vehicle Soon Light . . . . 73
Brake System Warning Light . . . 73
Antilock Brake System (ABS)
Warning Light . . . . . . . . . . . . . . . . 75
Engine Coolant Temperature
Warning Light . . . . . . . . . . . . . . . . 76
Engine Oil Pressure Light . . . . . . 76
Reduced Engine Power
Light . . . . . . . . . . . . . . . . . . . . . . . . . 77
High-Beam On Light . . . . . . . . . . . 77
Daytime Running Lamps (DRL)
Indicator Light . .. . . . . . . . . . . . . . 78
Cruise Control Light . . . . . . . . . . . 78
Vehicle Messages
Warning Buzzers . . . . . . . . . . . . . . 79
Controls
Steering Wheel Adjustment
Warning
{
.
Adjust the position of the
steering wheel before you
start driving.
.
To reduce the risk of
personal injury, apply force
to the steering wheel to
make certain the steering
column is firmly locked
before driving. Also, do not
try to tilt or adjust the
steering wheel while the
vehicle is moving. If these
steps are not followed, the
steering column could move
suddenly while the vehicle
is in motion which could
cause a temporary loss of
steering control which may
result in personal injury or
death.

Chevrolet Low Cab Forward 6.0L Gasoline Engine 3500/4500 Series (GMNA-
Localizing-U.S.-12533400) - 2019 - CRC - 11/19/18
3. Firmly lock the steering wheel
at the selected position by
moving the lock lever to the
lock position.
Horn
The steering wheel is adjustable up
and down as well as forward and
backward.
Before adjusting, position the seat
as desired.
1. Lift the lock lever toward you to
unlock the steering column.
2. Sit in the correct driving
position, and then move the
steering wheel up and down
and forward and backward to
select the optimum steering
wheel position.
To sound the horn, press the pad
with a horn symbol on the steering
wheel.
Instruments and Controls 63
Windshield Wiper/Washer
To use the windshield wiper and
washer switches, the engine control
switch must be in the ON position.
The windshield wiper switch has the
following positions, which
correspond to the states of the
wiper.
9 : Stopped.
3 : Intermittent, light rain.
Low Speed : Low speed,
moderate rain.
High Speed : High speed,
heavy rain.

Chevrolet Low Cab Forward 6.0L Gasoline Engine 3500/4500 Series (GMNA-
Localizing-U.S.-12533400) - 2019 - CRC - 11/19/18
64 Instruments and Controls
If the wiper frequently stops during
operation, contact your nearest
Dealer.
Before operating the wiper, ensure
that the wiper rubber is not stuck on
to the windshield. If the wiper rubber
is stuck to the windshield and you
still operate the wiper, the wiper
may break or the wiper motor
may fail.
Clear ice or packed snow from the
wiper blades before using the
wipers. Carefully loosen or thaw
wipers that are frozen to the
windshield.
Do not operate the wiper on a dry
windshield surface. Otherwise, the
windshield surface may sustain
damage.
Windshield Washer
Warning
{
At extremely low temperatures,
washer fluid may freeze on the
windshield after being sprayed,
(Continued)
Warning (Continued)
obstructing your forward view. In
such a case, warm up the
windshield before using the
windshield washer.
Windshield washer fluid is sprayed
over the windshield when this switch
is pressed. At the same time, the
windshield wiper operates.
To spray washer fluid on the
windshield, push the button on the
end of the combination switch lever.
The spray will continue as long as
you hold in the button.
If windshield washer fluid does not
come out in sufficient quantity,
immediately release the switch.
Otherwise, the windshield surface
may sustain damage.
If windshield washer fluid does not
come out, release the windshield
washer switch immediately.
Otherwise the motor may seize up.
Do not hold the switch pressed for
more than 30 seconds. Otherwise,
the washer pump may sustain
damage.
Check the washer fluid level
regularly. Do it often when the
weather is bad.
Use a good quality windshield
antifreeze to help prevent freezing
damage, and for better cleaning.

Chevrolet Low Cab Forward 6.0L Gasoline Engine 3500/4500 Series (GMNA-
Localizing-U.S.-12533400) - 2019 - CRC - 11/19/18
When the vehicle is used in a
cold-climate region or during the
winter:
.
Use washer fluid with
appropriate concentration for the
season to prevent frozen fluid.
.
Fill the washer fluid reservoir
only 3/4 full to allow for
expansion if the temperature
should fall low enough to freeze
the solution.
See Washer Fluid 0 207 for
information on filling the windshield
washer fluid reservoir.
Power Outlets
Warning
{
.
The maximum allowable
load of the accessory power
outlet is 120W (10A). If you
subject the accessory power
outlet to more than the
allowable load, the wiring
may overheat and cause a
(Continued)
Warning (Continued)
fire. Use the accessory
power outlet within the
allowable load.
.
The power source for the
accessory power outlet is
12V. If electrical equipment
other than 12V are
connected, a malfunction
due to overheating or fire
may occur.
.
Be sure to insert the plug of
the electrical appliance all
the way into the accessory
power outlet. Using an
appliance when the plug is
not completely inserted
could cause abnormal heat
generation and may result in
the vehicle's fuses blowing.
Instruments and Controls 65
Warning
{
.
If foreign matter enters the
accessory power outlet, or if
water or drinks contact it, it
could be damaged. Also, do
not insert fingers or any
metallic objects into the
accessory power outlet.
.
As the internal part of the
accessory power outlet may
become deformed
depending on the size of the
plug used, do not attempt to
force the plug into the
accessory power outlet. In
this case, replace the
accessory power outlet.
Using the accessory power outlet
for a long period of time while the
engine is stopped will drain the
battery.
When not in use, be sure to attach
the cap.

Chevrolet Low Cab Forward 6.0L Gasoline Engine 3500/4500 Series (GMNA-
Localizing-U.S.-12533400) - 2019 - CRC - 11/19/18
66 Instruments and Controls
When inserting or removing the plug
of an electrical appliance, turn the
electrical appliance off or place the
engine control switch in the "LOCK"
position.
When using accessory power
outlets, total maximum electrical
load must not exceed 120W (10A).
Always turn off any electrical
equipment when not in use.
Type 1
The accessory power outlet can be
used when the engine control switch
is on or in ACC/ACCESSORY. Use
the accessory power outlet to
supply power to commercially
available vehicle accessories, etc.
Remove the cap to use.
Type 2
You can plug in auxiliary electrical
equipment. Just flip the outlet cover
open from the left edge of the cover
and follow the proper installation
instructions that are included with
any electrical equipment you install.
These circuits are protected by a
fuse and have maximum current
loads.
When using accessory power
outlets, total maximum electrical
load must not exceed 120W. Always
turn off any electrical equipment
when not in use.
Leaving electrical equipment on for
extended periods will drain your
battery.

Chevrolet Low Cab Forward 6.0L Gasoline Engine 3500/4500 Series (GMNA-
Localizing-U.S.-12533400) - 2019 - CRC - 11/19/18
Warning Lights, Gauges, and Indicators
Warning lights and gauges can
signal that something is wrong
before it becomes serious enough
to cause an expensive repair or
replacement. Paying attention to the
warning lights and gauges could
prevent injury.
Some warning lights come on briefly
when the engine is started to
indicate they are working. When
one of the warning lights comes on
and stays on while driving, or when
one of the gauges shows there may
be a problem, check the section that
explains what to do. Waiting to do
repairs can be costly and even
dangerous.
Instruments and Controls 67
For safety reasons, do not place
packages, tools, or other items in
the driver’s area that may restrict
access to the controls or sight of the
gauges.

Chevrolet Low Cab Forward 6.0L Gasoline Engine 3500/4500 Series (GMNA-
Localizing-U.S.-12533400) - 2019 - CRC - 11/19/18
68 Instruments and Controls
Instrument Cluster

Chevrolet Low Cab Forward 6.0L Gasoline Engine 3500/4500 Series (GMNA-
Localizing-U.S.-12533400) - 2019 - CRC - 11/19/18
Speedometer
The speedometer shows the
vehicle's speed in either kilometers
per hour (km/h) or miles per
hour (mph).
Odometer
The odometer shows how far the
vehicle has been driven, in either
kilometers or miles.
Each time the reset knob is pressed
with the engine control switch in the
ON position, the odometer/trip meter
shows ODO, TRIP A, and TRIP B in
this sequence. With the key
removed, the odometer and trip
meter continue to indicate for about
five minutes.
Odometer Check Switch
Press the Odometer Check switch
to display the odometer and trip
meter mileage after the key is
turned off. The fuel gauge will also
operate when this switch is pressed.
Trip Odometer
The trip odometer shows how far
the vehicle has been driven since
the trip odometer was last reset.
Press the trip odometer reset stem
next to the odometer to switch
between the odometer and trip
odometer.
To reset the trip odometer to zero,
press and hold the trip odometer
reset stem while TRIP A or TRIP B
is displayed. The engine control
switch should be in the ON position.
Instruments and Controls 69
When the battery is disconnected,
TRIP A and TRIP B will be reset to
zero. The per trip fuel economy is
also reset by the TRIP B reset.
When you turn the engine control
switch to the ON position, the
odometer/trip odometer shows what
was displayed the last time the
engine control switch was turned to
LOCK or ACC.
To set the odometer to display each
time you turn the engine control
switch to the ON position, turn the
engine control switch to LOCK or
ACC while the odometer is
displayed. With the reset stem
pressed, turn the engine control
switch to the ON position and then
within three seconds, turn the
engine control switch back to the
LOCK or ACC position. Follow the
same procedure to cancel the
setting.

Chevrolet Low Cab Forward 6.0L Gasoline Engine 3500/4500 Series (GMNA-
Localizing-U.S.-12533400) - 2019 - CRC - 11/19/18
70 Instruments and Controls
Tachometer
The tachometer displays the engine
speed in revolutions per
minute (rpm). The red zone
indicates a range of dangerous
engine speeds beyond permissable
levels. Do not drive your vehicle
with the needle in the red zone.
Caution
Exercise extreme care when
shifting down on a steep
downslope. The engine speed
may exceed the critical speed,
which can damage the vehicle.
Fuel Gauge
With the engine control switch in the
ON position, the fuel gauge
indicates about how much fuel is left
in the tank.
To check the fuel level with the
engine control switch in the LOCK
position, press the Odometer Check
switch.
Fill the tank well before it
approaches empty. After filling up
the fuel tank, it takes awhile for the
fuel gauge needle to stabilize after
the engine control switch is turned
to the ON position. If the fuel tank is
filled while the engine is off, but the
engine control switch is in the ON
position, the fuel gauge needle
takes awhile to show the correct
reading.

Chevrolet Low Cab Forward 6.0L Gasoline Engine 3500/4500 Series (GMNA-
Localizing-U.S.-12533400) - 2019 - CRC - 11/19/18
Instruments and Controls 71
Engine Coolant Temperature Gauge
If the engine coolant temperature
gauge shows an overheat
condition or you have any other
reason to suspect the engine may
be overheating, continued
operation of the engine, even for
a short time, may result in a fire
and the risk of personal injury and
severe vehicle damage. Take
immediate action as outlined in
Engine Overheating. See Engine
Overheating 0 203.
With the engine control switch in the
ON position, this gauge indicates
the temperature of the engine
coolant. “C” means cold while “H”
means hot. If the engine overheats,
the engine coolant temperature
warning light comes on and a
warning buzzer sounds. During
operation, the needle should stay in
the safety zone.
See Engine Overheating 0 203 and
Engine Coolant Temperature
Warning Light 0 76.
If the needle goes up above the
upper limit and enters the H zone,
the engine is likely to overheat.
Immediately pull safely off the
road out of the way of traffic and
take the necessary actions to
deal with engine overheating.
If the needle nears the H zone but
{
Warning
Caution
(Continued)
Caution (Continued)
does not cross into it, this is not a
problem, but check the engine
coolant level in the reservoir. Add
engine coolant as necessary.
Seat Belt Reminders
Seat Belt Warning Light
There is a driver seat belt reminder
light on the instrument cluster.
This warning light comes on and a
warning buzzer sounds when the
driver is not wearing the seat belt
while the engine control switch is in
the ON position.
When the vehicle speed exceeds
20 km/h (12 mph) with the seat belt
unbuckled, the warning light will
flash and the buzzer will continue to

Chevrolet Low Cab Forward 6.0L Gasoline Engine 3500/4500 Series (GMNA-
Localizing-U.S.-12533400) - 2019 - CRC - 11/19/18
72 Instruments and Controls
sound. The warning light will go out
and the warning buzzer will stop
when the driver buckles the
seat belt.
Battery Warning Light
This light comes on briefly when the
ignition is turned on, but the engine
is not running, as a check to show
the light is working. It should go out
when the engine is started.
If the light stays on, or comes on
while driving, there may be a
problem with the electrical charging
system (such as a loose or broken
fan belt). Pull off to a safe place well
clear of traffic and contact your
dealer. Driving while this light is on
could drain the battery.
Check and Corrective Action
1. Check to see if the fan belt is
broken or loose.
2. If the fan belt is loose, adjust
the tension.
3. If the fan belt is broken or there
is no abnormality in the fan
belt, see your dealer for
service.
See Battery - North America 0 212,
Jump Starting - North America
0 253, and Engine Drive Belt
Routing 0 303.
Malfunction Indicator Lamp (Check Engine Light)
This light should come on to show
that it is working when the engine
control switch is turned to the ON
position, and then should go out
after the engine is started.
If this light stays on or comes on
while the engine is running, it
indicates a malfunction with the
engine electronic emission control
system. Avoid driving at high
speeds and have the vehicle
inspected by your dealer.
If this light comes on when the fuel
tank is empty, you do not need to
have your vehicle serviced.
If this light comes on intermittently
or continuously while driving,
service is required. Even if the
vehicle is drivable and does not
require towing, see your dealer as
soon as possible. Continued driving
without having the system serviced
could cause damage to the
emission control system. It could
also affect fuel economy and
drivability.

Chevrolet Low Cab Forward 6.0L Gasoline Engine 3500/4500 Series (GMNA-
Localizing-U.S.-12533400) - 2019 - CRC - 11/19/18
Service Vehicle Soon
Brake System Warning Light
Light
If the light remains on after engine
This light comes on briefly when the
engine control switch is in the ON
position, but the engine is not
running, as a check to show the
light is working. It should go out
when the engine is started.
If the light stays on, or comes on
while driving, the vehicle control
system may be malfunctioning. Take
the vehicle to your dealer for service
as soon as possible.
Brake System Warning
Light
This light should come on briefly
when the engine control switch is
turned to the ON position, and then
should go out after the engine is
started.
start up or comes on during
operation of the vehicle, it means
that there is something wrong with
part of the brake system.
The brake system warning light
comes on while the engine is
running (after startup) in the
following situations:
.
Drop in the level of brake fluid
(due to brake lining wear or fluid
leakage).
.
Abnormality in the charging
system (such as an alternator
malfunction or loose or split
fan belt).
.
Abnormality in the anti-lock
brake system (ABS) and EBD
functions. (The ABS warning
light and brake system warning
Instruments and Controls 73
light will illuminate at the same
time.) See Antilock Brake
System (ABS) Warning Light
0 75.
To serve as a reminder, the light
should stay on when the parking
brake is not fully released, and the
engine control switch is on. Have
the system repaired if the light does
not come on when it should. If this
warning light does not go away,
brake inspection and maintenance
should be performed.
Check and Corrective Action
1. Check to see that the parking
brake has been fully released.
If it has, check the following:
2. Pull off the road and stop
carefully. Remember that
stopping distances may be
longer, the pedal may be
harder to push and go down
farther than normal.
3. Check the brake fluid reservoir
on the left side of the
instrument panel. If low, add
fluid as needed.

Chevrolet Low Cab Forward 6.0L Gasoline Engine 3500/4500 Series (GMNA-
Localizing-U.S.-12533400) - 2019 - CRC - 11/19/18
74 Instruments and Controls
4. If the brake fluid is not low: Try
out the brakes by starting and
stopping on the shoulder of the
road, then either drive
cautiously at a safe speed to
the nearest dealer for repair,
if you judge driving to be safe;
or have the vehicle towed to
the nearest dealer for repair.
Continued driving without the
necessary repairs could be
dangerous.
If this warning light stays on, see
your dealer.
The regular braking system is a split
system designed so that one part
will provide some braking if there is
a loss of hydraulic pressure in the
other part of the system.
Warning
{
If this warning light comes on
while the engine is running,
immediately stop the vehicle at a
safe place well clear of traffic and
contact your dealer for inspection.
(Continued)
Warning (Continued)
When the brake system warning
light is illuminated, brake
effectiveness may be decreased.
When this happens, strongly
press the brake pedal.
See Brakes 0 208.
Parking Brake Light
This indicator light comes on when
the parking brake lever is pulled
with the engine control switch on.
This light also stays on when the
parking brake is not fully released
and the engine control switch is on.
If this warning light stays on, see
your dealer.
The illumination of the parking brake
light does not necessarily ensure
firm application of the parking brake.
The parking brake lever must be
sufficiently pulled up and locked.
Be careful not to drive the vehicle
with the parking brake lever still
pulled up.
Brake Low Vacuum Warning
Light
This light should come on briefly
when the engine control switch is
turned to the ON position, and then
should go out after the engine is
started. If the light does not come
on when the engine control switch is
turned to ON, it could indicate a
burned out bulb or a blown fuse.
Have the system repaired if the light
does not come on during this check.

Chevrolet Low Cab Forward 6.0L Gasoline Engine 3500/4500 Series (GMNA-
Localizing-U.S.-12533400) - 2019 - CRC - 11/19/18
The warning light and buzzer will
come on simultaneously when the
brake booster’s vacuum or pressure
becomes insufficient either during
driving or when the engine control
switch is in the ON position, or when
there is an abnormality in the
charging system, such as an
alternator malfunction or loosening
or splitting of the fan belt or
whenever the hydraulic brake
booster (HBB) becomes faulty. The
warning buzzer will stop sounding
when the parking brake is engaged.
On 4500, the brake low vacuum
warning light and warning buzzer
should come on to indicate low
vacuum reserve for brake power
assist. At the same time, the Back
up Electric Vacuum Pump operates.
4500 models are equipped with a
Back up Electric Vacuum Pump that
will turn on if brake booster vacuum
becomes insufficient.
If this happens while driving:
.
Do not pump the brakes. The
system is designed to stop the
truck with reserve power assist if
the pedal is held down. This
reserve is greatly reduced each
time you apply and release the
brakes.
.
Stopping distance may be
longer.
.
You may have to push much
harder on the brake pedal.
.
Have the vehicle repaired before
you continue driving.
The buzzer stops when the selector
lever is shifted to the P position.
{
Do not drive while the buzzer
sounds as the brakes are not
operating to their full capacity.
You and others could be seriously
injured.
Warning
Instruments and Controls 75
Antilock Brake System (ABS) Warning Light
This light comes on briefly when the
engine control switch is turned to
the ON position, and then should go
out after approximately
three seconds. If the light does not
come on, have it fixed so it will be
ready to warn if there is a problem.
This warning light comes on
together with the brake system
warning light whenever there is a
problem in the Anti-lock Brake
System (ABS). In this case, the ABS
stops working but the brakes still
function as ordinary service brakes.

Chevrolet Low Cab Forward 6.0L Gasoline Engine 3500/4500 Series (GMNA-
Localizing-U.S.-12533400) - 2019 - CRC - 11/19/18
76 Instruments and Controls
Warning
{
If this warning light comes on
while driving, immediately stop
your vehicle at a safe place well
clear of traffic and take the
following actions.
1. Stop the engine.
2. Restart the engine. Check if
the ABS warning light
comes on and then goes
out. If it does, there is no
problem. The ABS operates
normally.
3. Move the vehicle slowly
forward. Gradually increase
the speed to 15 km/h
(9 mph). If the light goes off,
the ABS is normal.
If the light does not come on or
go out, or comes on frequently,
contact your dealer immediately
and have the system repaired.
(Continued)
Warning (Continued)
Even if a problem has occurred in
the ABS, the brakes will still work
as normal brakes. In this case,
the ABS has no influence on the
operation of the brake system.
See Brake System Warning Light
0 73 and Antilock Brake System
(ABS) 0 173.
Engine Coolant Temperature Warning Light
This light comes on briefly while
starting the vehicle.
If it does not, have the vehicle
serviced by your dealer. If the
system is working normally the
indicator light goes off.
Caution
The engine coolant temperature
warning light indicates that the
vehicle has overheated. Driving
with this light on can damage the
engine and it may not be covered
by the vehicle warranty. See
Engine Overheating 0 203.
The engine coolant temperature
warning light comes on when the
engine has overheated. If this
happens, pull over and turn off the
engine as soon as possible.
Engine Oil Pressure Light

Chevrolet Low Cab Forward 6.0L Gasoline Engine 3500/4500 Series (GMNA-
Localizing-U.S.-12533400) - 2019 - CRC - 11/19/18
This light should come on briefly
when the engine control switch is
turned to the ON position, and then
should go out after the engine is
started.
This light comes on when the
engine oil pressure has fallen below
the normal level while the engine is
running or the oil pressure across
the oil filter rises above the normal
level while the engine is running.
If the warning light comes on while
driving, immediately pull off to a
safe place and stop the engine.
Check the oil level in the engine
crankcase. If the oil level is normal,
restrictions are in the oil filter or
within the lubricating system. Have
the vehicle inspected at your dealer.
Do not run the engine with this light
on. It could damage the engine.
When this light comes on while
driving, a warning tone also sounds.
The oil level varies while the engine
is running right after it has stopped
or if the vehicle is on uneven
ground. As a result, the red engine
oil pressure warning light may
light up.
When this warning light comes on,
and the oil level is correct, the
lubrication system may be faulty.
See your dealer for service.
See Engine Oil 0 192.
Reduced Engine Power Light
This light comes on briefly when the
engine control switch is turned to
the ON position, and then should go
out after the engine is started.
If this light comes on while the
engine is running, this means the
engine is overheating and in
overheat protection mode. The
overheat protection mode alternates
firing groups of cylinders in order to
Instruments and Controls 77
prevent engine damage. In this
mode, the engine loses power and
performance. This operating mode
allows your vehicle to be driven to a
safe place in an emergency. Driving
extended miles (km) and/or towing a
trailer in the overheat protection
mode should be avoided.
After driving in the overheated
engine protection mode, allow the
engine to cool before attempting
any repair to avoid engine damage.
The engine oil will be severely
degraded. Repair the cause of
coolant loss and change the oil. See
Engine Overheating 0 203.
High-Beam On Light

Chevrolet Low Cab Forward 6.0L Gasoline Engine 3500/4500 Series (GMNA-
Localizing-U.S.-12533400) - 2019 - CRC - 11/19/18
78 Instruments and Controls
This light comes on when the
high-beam headlamps are in use or
the headlamps are cycled between
high and low beams (passing
signal).
See Headlamp High/Low-Beam
Changer 0 81.
Daytime Running Lamps (DRL) Indicator Light
This light comes on when the DRL
are on. If the vehicle is started
during the daytime with the lighting
switch off and the parking brake
released, the low beam headlamps
will come on at a reduced
brightness. The light will go out
when the lighting switch is
turned on.
See Exterior Lamp Controls 0 80.
Cruise Control Light
This light should come on briefly
when the engine control switch is
turned to the ON position, and then
should go out after the engine is
started.
For vehicles with cruise control, this
light comes on when cruise control
is turned on.
This light should come on briefly
when the engine control switch is
turned to the ON position, and then
should go out after the engine is
started.
This light comes on when the
vehicle enters the cruise control
mode after the cruise control set
switch is operated to set the vehicle
speed.
For gasoline vehicles, the light will
flash slowly when the high idle
mode is active.
See Cruise Control 0 179.

Chevrolet Low Cab Forward 6.0L Gasoline Engine 3500/4500 Series (GMNA-
Localizing-U.S.-12533400) - 2019 - CRC - 11/19/18
Vehicle Messages
Warning Buzzers
A warning buzzer may not sound if
there is a problem with the buzzer
system. If this occurs, the system
needs to be inspected. See your
dealer.
A warning buzzer sounds under the
following conditions:
.
Seat Belt— continuous beep.
See Seat Belt Reminders 0 71.
.
Brake booster — continuous
beep. See Brake System
Warning Light 0 73.
Instruments and Controls 79

Chevrolet Low Cab Forward 6.0L Gasoline Engine 3500/4500 Series (GMNA-
Localizing-U.S.-12533400) - 2019 - CRC - 11/19/18
80 Lighting
Lighting
Exterior Lighting
Exterior Lamp Controls
Exterior Lighting
Exterior Lamp Controls . . . . . . . . 80
Headlamp High/Low-Beam
Changer . . . . . . . . . . . . . . . . . . . . . . 81
Flash-to-Pass . . . . . . . . . . . . . . . . . . 81
Hazard Warning Flashers . .. . . . 82
Turn and Lane-Change
Signals . . . . . . . . . . . . . . . . . . . . . . . 82
Cornering Lamps . . . . . . . . . . . . . . 83
Interior Lighting
Instrument Panel Illumination
Control . . . . . . . . . . . . . . . . . . . . . . . 83
Cargo Lamp . . . . . . . . . . . . . . . . . . . 84
Dome Lamps . . . . . . . . . . . . . . . . . . 84
Turning the light control switch to
the following positions will cause the
relevant lights to illuminate.
The light control switch can be used
when the engine control switch is
placed in the LOCK or ACC
position. Do not operate the
combination lights for an extended
time period with the engine off.
Otherwise, the battery may go dead,
making it impossible to restart the
engine.
9 : Turns off all exterior lights.
; : Turns on the parking lights
including all exterior lights, except
the headlights.
2 : Turns on the headlights
together with the parking lights,
sidemarker lights, roofmarker lights,
taillights, license plate light, and
instrument panel lights.
When you start the engine in
daytime, with the lighting switch off,
and release the parking brake, the
daytime running lights will come on.
See Daytime Running Lamps (DRL)
Indicator Light 0 78 and Turn and
Lane-Change Signals 0 82.

Chevrolet Low Cab Forward 6.0L Gasoline Engine 3500/4500 Series (GMNA-
Localizing-U.S.-12533400) - 2019 - CRC - 11/19/18
Lighting 81
Headlamp High/ Low-Beam Changer
With the headlights on, move the
lever forward and backward to
switch between the high beam and
low beam.
Moving the lever forward selects
high beam; moving the lever
backward selects low beam.
While the headlights are on high
beam, the headlights high beam
indicator light on the instrument
panel remains on.
This indicator light comes on when
high beam is selected or the
headlights are cycled between high
and low beams.
Use low beam whenever there are
vehicles ahead in the same lane or
oncoming vehicles in the
opposite lane.
See Bulb Replacement 0 219.
Flash-to-Pass
By lightly pulling the light control
switch lever and releasing it, the
high beam comes on and off. At the
same time, the headlights high
beam indicator light on the
instrument panel comes on and off.
Use this function as a signal for
flash-to-pass a vehicle or other
purposes.

Chevrolet Low Cab Forward 6.0L Gasoline Engine 3500/4500 Series (GMNA-
Localizing-U.S.-12533400) - 2019 - CRC - 11/19/18
82 Lighting
Hazard Warning Flashers
Use the hazard warning light flasher
to warn other drivers any time your
vehicle becomes a traffic hazard,
day or night. With the engine control
switch in any position or the key
removed, when this switch is
pressed, all of the turn signal lights
and the turn signal indicator lights
flash to signal an emergency. To
turn off the hazard lights, press the
switch again.
Do not leave the hazard warning
light flasher operating for an
extended time period with the
engine off. Otherwise, the battery
may go dead, making it impossible
to restart the engine.
Both indicator lights flash when the
hazard warning flasher switch is
operated irrespective of the position
of the engine control switch.
The individual turn signals do not
work when the hazard flasher is
turned on.
Turn and Lane-Change Signals
When turning left or right, move the
lever up or down to flash the turn
signal light.
When the turn is completed, the
signal will cancel and the lever will
return to horizontal.
If the steering wheel is only turned a
small amount, turn off the signal
manually. Lightly press and hold the
lever up or down when overtaking or
changing lanes. The turn signal light
continues flashing as long as the

Chevrolet Low Cab Forward 6.0L Gasoline Engine 3500/4500 Series (GMNA-
Localizing-U.S.-12533400) - 2019 - CRC - 11/19/18
lever is held up or down. The lever
moves back to neutral as soon as it
is released.
A green light on the instrument
panel is designed to flash to tell you
that the front and rear turn signal
lights are working. If the light stays
on, but does not flash, check for a
burned-out turn signal bulb. If the
green light does not come on when
you move the lever, check the fuse
and indicator bulb.
Either of these indicator lights
flashes when the turn signal switch
is operated with the engine control
switch in the ON position.
Cornering Lamps
The cornering light illuminates the
area to which the vehicle is turning.
With the headlights or marker lights
on, the cornering lights come on in
coordination with the turn signal
lights.
See Exterior Lamp Controls 0 80
and Bulb Replacement 0 219.
Lighting 83
Interior Lighting
Instrument Panel Illumination Control
The control will change the light
level of the instrument panel.

Chevrolet Low Cab Forward 6.0L Gasoline Engine 3500/4500 Series (GMNA-
Localizing-U.S.-12533400) - 2019 - CRC - 11/19/18
84 Lighting
Cargo Lamp
Dome Lamps
Front Light
Rear Light (Crew Cab Model Only)
When this switch is pressed, the
rear body interior light comes on
and the indicator light on the switch
comes on.
The dome light operates regardless
of the engine control switch position.
The switch has three positions.
ON : The light stays on regardless
of the doors being open or closed.
OFF : The light stays off regardless
of the doors being open or closed.
Between ON and OFF, the light
comes on when the driver's door is
opened.

Chevrolet Low Cab Forward 6.0L Gasoline Engine 3500/4500 Series (GMNA-
Localizing-U.S.-12533400) - 2019 - CRC - 11/19/18
Infotainment System 85
Infotainment System
Radio
AM-FM Radio . . . . . . . . . . . . . . . . . . 85
Radio Reception . . . . . . . . . . . . . . . 89
Fixed Mast Antenna . . . . . . . . . . . 90
Audio Players
CD Player . . . . . . . . . . . . . . . . . . . . . 90
USB Port . . . . . . . . . . . . . . . . . . . . . . 98
Auxiliary Devices . . . . . . . . . . . . . 107
Bluetooth Audio . . . . . . . . . . . . . . 108
Phone
Bluetooth . . . . . . . . . . . . . . . . . . . . . 111
Trademarks and License
Agreements
Trademarks and License
Agreements . . . . . . . . . . . . . . . . . 119
Radio
AM-FM Radio
Control Panel
Warning
{
Adjust the radio or CD player only
while the vehicle is stationary.
Adjusting them while the vehicle
is moving could cause a crash.
You and others could be seriously
injured.
Adjust the volume so that sound
outside of the vehicle can be heard.
If outside sound cannot be heard,
crashes may be harder to avoid.
Do not install a radio equipment
antenna near the vehicle's radio
antenna. This could cause
unwanted noise on the radio or
while playing a CD.
The radio or CD/USB player can be
used when the ignition is on or in
ACC/ACCESSORY. Continued use
while engine is stopped may cause
the battery to discharge.
Take care not to spill liquids, etc. on
the radio or CD player. It may cause
damage to the player.
Do not disassemble or apply oil to
radio or CD player.

Chevrolet Low Cab Forward 6.0L Gasoline Engine 3500/4500 Series (GMNA-
Localizing-U.S.-12533400) - 2019 - CRC - 11/19/18
86 Infotainment System
the audio system returns to the
mode it was in just before it was
turned off.
Switching the Audio Modes
1. Press MODE/
O /ENTER.
(1) Eject
(2) CD slot
(3) MODE/
(4) FUNC
(5) LIST
(6) Tune/Track or Back
(7) Presets
(8) Auxiliary Jack
(9) USB
O /ENTER
Turning the Power On or Off
Press MODE/
power on. Press and hold it for
one second or more to turn the
power off.
If MODE/
while listening to music in audio
mode, the power is turned off. When
MODE/
O /ENTER to turn the
O /ENTER is pressed
O /ENTER is pressed again,
2. Turn MODE/
select the audio mode and
press ENTER. The audio mode
changes in the following order:
FM1 ↔ FM2 ↔ FM3 ↔ DISC*1
*2 ↔ USB/IPOD(iPod)*3 ↔
BT- AUDIO ↔ AUX*4 ↔ AM1
↔ AM2 ↔ FM1.
*1 This mode is skipped when
a disc is not inserted.
*2 The content to be displayed
varies depending on the
data stored in the disc.
(CD/MP3/WMA)
*3 These modes are skipped
when the USB/iPod is not
connected. "USB" is not
displayed while an iPod is
connected. "IPOD" is not
displayed when "USB" is
connected.
O /ENTER to

Chevrolet Low Cab Forward 6.0L Gasoline Engine 3500/4500 Series (GMNA-
Localizing-U.S.-12533400) - 2019 - CRC - 11/19/18
*4 This mode is skipped when
an auxiliary player is not
connected.
Adjusting the Volume
Turn the MODE/
clockwise or counterclockwise to
increase or decrease the volume.
Turning the power on or off with the
volume set to maximum will damage
the equipment and your hearing. Set
the volume to a moderate level.
The MODE/
on turning until you stop. However,
the volume itself is limited, and even
if you keep on turning the MODE/
/ENTER knob clockwise or
counterclockwise, the volume is
kept to a certain degree.
When the gear lever is moved to the
reverse (R) position, the system will
automatically mute the sound.
O /ENTER knob
O /ENTER knob keeps
Function Setting Mode
Adjustment of bass, treble, fader,
and balance, and setting of clock
display and time can be performed.
Adjusting Bass
Adjusting Treble
O
1. Press FUNC.
2. Turn MODE/
select SOUND, and then press
ENTER.
3. Turn MODE/
select BASS, and then press
ENTER.
4. Turn MODE/
clockwise or counterclockwise
to adjust the level, and then
press ENTER.
1. Press FUNC.
2. Turn MODE/
select SOUND, and then press
ENTER.
3. Turn MODE/
select TREBLE, and then press
ENTER.
4. Turn MODE/
clockwise or counterclockwise
to adjust the level, and then
press ENTER.
O /ENTER to
O /ENTER to
O /ENTER
O /ENTER to
O /ENTER to
O /ENTER
Infotainment System 87
Adjusting Fader
1. Press FUNC.
2. Turn MODE/
select SOUND, and then press
ENTER.
3. Turn MODE/
select FADER, and then press
ENTER.
4. Turn MODE/
clockwise or counterclockwise
to adjust the front or rear
speakers, and then press
ENTER.
Adjustment of rear speaker volume
is not possible if there are no rear
speakers installed.
Adjusting Balance
1. Press FUNC.
2. Turn MODE/
select SOUND, and then press
ENTER.
3. Turn MODE/
select BALANCE, and then
press ENTER.
O /ENTER to
O /ENTER to
O /ENTER
O /ENTER to
O /ENTER to

Chevrolet Low Cab Forward 6.0L Gasoline Engine 3500/4500 Series (GMNA-
Localizing-U.S.-12533400) - 2019 - CRC - 11/19/18
88 Infotainment System
4. Turn MODE/O /ENTER
clockwise or counterclockwise
to adjust the right or left
speakers, and then press
ENTER.
Clock Display
1. Press FUNC.
2. Turn MODE/
select CLOCK, and then press
ENTER.
3. Turn MODE/
clockwise or counterclockwise
to select OFF or ON, and then
press ENTER.
Time is not reset when clock mode
is turned off.
Setting the Time
1. Press FUNC.
2. Turn MODE/
select CLOCK, and then press
ENTER.
O /ENTER to
O /ENTER
O /ENTER to
3. Turn MODE/
clockwise or counterclockwise
to select SET, and then press
ENTER.
4. Turn MODE/
the clock time (hour), and then
press ENTER. Turn clockwise
or counterclockwise to move
one hour forward or one hour
backward.
5. Turn MODE/
the clock time (minute), and
then press ENTER. Turn
clockwise or counterclockwise
to move one minute forward or
one minute backward.
To return to the clock time (hour)
setting mode, press
setting the clock time (minute).
Tuner Mode Operation
Turning on the Radio
1. Press MODE/
O /ENTER
O /ENTER to set
O /ENTER to set
O /ENTER.
0 while
2. Turn MODE/
select "FM1", "FM2", "FM3",
"AM1" or "AM2", and then
press the "ENTER" button.
Follow one of the procedures below
to tune.
Tuning
Manual tuning:
1. Press Tune/Track
less than one second.
2. Press Tune/Track
less than one second again to
select the station of your
choice.
Automatic tuning:
1. Press Tune/Track
less than two seconds but
more than one second. The
radio starts searching for
stations, and stops when it
finds a station.
2. Press and hold Tune/Track
or z for more than
two seconds. The radio keeps
O /ENTER to
y or z for
y or z for
y or z for
y

Chevrolet Low Cab Forward 6.0L Gasoline Engine 3500/4500 Series (GMNA-
Localizing-U.S.-12533400) - 2019 - CRC - 11/19/18
searching for stations within its
available frequency band. To
cancel, press the button again.
When Tune/Track
radio is tuned to the higher
frequency range (step up), and to
the lower frequency range (step
down) when pressing Tune/
z.
Track
In both cases, if the radio cannot
find stations, it continues searching.
Storing the Stations (PRESET)
Favorite stations can be tuned by
one touch operation if they are
stored in the Preset buttons.
A maximum of 30 stations can be
memorized and stored. 12 in AM
(six each for AM1 and AM2.), and
18 in FM (six each for FM1,
FM2 and FM3.)
1. Select the radio mode to be
stored from FM1, FM2, FM3,
AM1 or AM2.
2. Tune in the station of your
choice.
y is pressed, the
3. Press and hold down the
Preset buttons you want to
store in, for more than
two seconds. When the station
is stored, the Preset button
number and station frequency
appear on the display window.
Radio Reception
Usually, a problem with radio
reception does not mean there is a
problem with your radio. It is just the
normal result of conditions outside
the vehicle. For example, nearby
buildings and terrain can interfere
with FM reception. Power lines or
telephone wires can interfere with
AM signals.
And of course, radio signals have a
limited range. The farther you are
from a station, the weaker its signal
will be. In addition, reception
conditions change constantly as
your vehicle moves.
Here are some common reception
problems that probably do not
indicate a problem with your radio.
Infotainment System 89
FM Transmissions
Fading and drifting stations Generally, the effective range of FM
is about 40 km (25 miles). Once
outside this range, you may notice
fading and drifting, which increase
with the distance from the radio
transmitter. They are often
accompanied by distortion.
Multi-path - FM signals are
reflective, making it possible for two
signals to reach your antenna at the
same time. If this happens, the
signals will cancel each other out,
causing a momentary flutter or loss
of reception.
Static and fluttering - These occur
when signals are blocked by
buildings, trees, or other large
objects. Increasing the bass level
may reduce static and fluttering.
Station swapping - If the FM signal
you are listening to is interrupted or
weakened, and there is another
strong station nearby on the FM
band, your radio may tune in the
second station until the original
signal can be picked up again.

Chevrolet Low Cab Forward 6.0L Gasoline Engine 3500/4500 Series (GMNA-
Localizing-U.S.-12533400) - 2019 - CRC - 11/19/18
90 Infotainment System
AM Transmissions
Fading - AM broadcasts are
reflected by the upper atmosphere,
especially at night. These reflected
signals can interfere with those
received directly from the radio
station, causing the radio station to
sound alternately strong and weak.
Station interference - When a
reflected signal and a signal
received directly from a radio station
are very nearly the same frequency,
they can interfere with each other,
making it difficult to hear the
broadcast.
Static - AM is easily affected by
external sources of electrical noise,
such as high tension power lines,
lightning, or electrical motors. This
results in static.
Certification
For Federal Communications
Commission (FCC) compliance
information for this device, see
Radio Frequency Statement 0 311.
Fixed Mast Antenna
Pull the antenna out to its full length
when using it.
To prevent breaking the antenna,
shorten it when passing through
areas with low clearance or through
a car wash.
Audio Players
CD Player
CD Operations
Playing a Disc (When There is No
CD Inserted)
Insert a disc into the disc slot with
the label side (printed side) facing
up. The power will switch on and
playback will start automatically.
Playing a Disc (When There is a
CD Inserted)
1. Press MODE/
2. Turn MODE/
select DISC, and then press
ENTER.
Turning off the Player
Press POWER for one second or
more. To resume playback, press
POWER again.
Ejecting the Disc
Press EJECT to stop playback and
eject the disc.
O /ENTER.
O /ENTER to

Chevrolet Low Cab Forward 6.0L Gasoline Engine 3500/4500 Series (GMNA-
Localizing-U.S.-12533400) - 2019 - CRC - 11/19/18
If a disc could not be ejected,
contact nearest dealer for service.
Track (File) Selection
y or z to select the
Press
track (file) of your choice.
.
.
Selecting the Folder
For CD (MP3/WMA):
Press 5 or 6 to select the MP3/WMA
folder.
.
.
Fast Forwarding/Fast Reversing
Press and hold
forward or fast reverse the
track (file).
y to advance to the next
Press
track (file).
Press
z to return to the
beginning of the track (file) being
played. To return to the previous
track (file), press again.
Press
n to advance to the next
folder.
Press
q to return to the
previous folder.
y or z to fast
.
.
Repeat Playback
For CD:
Press 1.
To cancel, press 1 again.
For CD (MP3/WMA):
.
.
y for fast forward.
Press
Press
z for fast reverse. To
stop fast forward or fast reverse,
release.
w is displayed.
Press 1 to repeat the same file
being played.
To cancel, press 1 twice.
disappears.
Press 1 twice to repeat the same
folder being played. After the
player has played the last file, it
starts playing the first file of the
same folder. FLD
displayed.
To cancel, press 1 again. FLD
w disappears.
w is displayed.
w
w is
Infotainment System 91
Random Playback
For CD:
Press 2.
To cancel, press 2 again.
For CD (MP3/WMA):
.
v is displayed.
Press 2 to play all files in the
MP3/WMA disc in random order.
v is displayed.
To cancel, press 2 twice.
disappears.
.
Press 2 twice to play the files
from the folder being played in
the MP3/WMA disc in random
order. After the player has
played the last file, it starts
playing the first file of the same
folder. FLD
To cancel, press 2 twice. FLD
v is displayed.
v
v disappears.
Selecting a Music File from the
Category List
For CD (MP3/WMA):
1. Press LIST for less than
one second. LIST is displayed.

Chevrolet Low Cab Forward 6.0L Gasoline Engine 3500/4500 Series (GMNA-
Localizing-U.S.-12533400) - 2019 - CRC - 11/19/18
92 Infotainment System
To cancel the category
selection mode, press LIST
again or press BACK.
2. Turn MODE/
select the category of your
choice, and then press
ENTER. The category changes
in the following order:
PLAYING ↔ FOLDER ↔ FILE
↔ PLAYING...
3. Turn MODE/
select the folder or file of your
choice from the list, and then
press ENTER.
When a file is selected, the
player starts playing the file.
When FOLDER is selected,
select the file in the folder to
start playback.
To return to the list selection or
category selection mode, press
BACK for less than one second.
To cancel the category selection
mode, press and hold down BACK
for more than one second.
O /ENTER to
O /ENTER to
Go Back to the First Position
(Home Jump)
You can go back to the first file of
the first folder on the MP3/WMA
disc being played from any position
of it. This function is called
Home Jump.
For example: If Home Jump is used
when playing File 5 in Folder 4, it
goes back to File 1 in Folder 1 and
starts playing.
Press and hold down 5 for more
than one second.
Display Text Information
1. Press and hold down LIST for
more than one second.
2. Turn the MODE/
switch to select the display
item of your choice, and then
press ENTER. The display item
changes in the following order.
.
For CD:
TR NO/TIME (Track
number/Playback time) ↔
ALBUM (Album title) ↔
O /ENTER
TRACK (Track title) ↔
ARTIST (Artist name) ↔ TR
NO/TIME...
.
For CD (MP3/WMA):
FL/TR NO (Folder number/
File number) ↔ TIME
(Playback time) ↔
FOLDER (Folder name) ↔
FILE (File name) ↔ ALBUM
(Album title)* ↔ TRACK
(Track title) ↔ ARTIST
(Artist name) ↔ FL/
TR NO...
* It is not displayed during
the WMA file playback.
If the text information is too long to
fit into the display window, press
and hold down the FUNC for more
than one second to switch to the
next page.
Texts recorded with characters other
than alphanumeric characters and
symbols will appear as “*”
(asterisks).
If there is no text information stored
in a music file, NO TITLE is
displayed.

Chevrolet Low Cab Forward 6.0L Gasoline Engine 3500/4500 Series (GMNA-
Localizing-U.S.-12533400) - 2019 - CRC - 11/19/18
.
If Error Appears in the Display
The following messages are
displayed (blink) according to the
status.
.
LOAD: This message is
displayed right after inserting a
disc into the main unit or while
reading TOC
.
READING: This message is
displayed when reading the file
format of the disc in the MP3/
WMA mode.
.
CD CHECK: This message is
displayed when the disc is
stained or upside-down. This
message is displayed when a
disc reading error or a
media-dependent error occurs,
including when a blank disc is
inserted. Check the disc in the
player.
.
DECK ERROR: This message is
displayed when the player
cannot operate for some reason.
Eject the disc from the audio
system.
NO SUPPORT: This message is
displayed when the disc is in
one of the following conditions:
‐ Not in
ISO9660 Level 1, 2 format
‐ Not containing MP3/WMA data
(including MP3/WMA
extension files)
‐ Containing only SKIP FILEs
If a disc cannot be ejected, please
contact nearest dealer for service.
Using the Compact Disc
System
Disc
When it is cold or when it is raining,
the car windows will fog up and
cause condensation (water drops) to
form in the vehicle compartment.
When this happens, the audio may
skip, and playback will stop.
Ventilate the vehicle compartment
and dehumidify before
resuming use.
The audio may skip due to violent
vibrations when the car is traveling
across harsh roads.
Infotainment System 93
Never insert foreign objects into the
disc insertion slot.
Do not insert a wet disc into the
player.
This player uses an invisible laser
beam which could cause hazardous
radiation exposure if directed
outside the player. Be sure to
operate the player correctly.
Playback may not be possible due
to recording conditions or disc
characteristics, scratches, dirt,
or deterioration.
Usable Discs
Music CDs with the following marks
can be used. CD-R and CD-RW
discs recorded according to the
CD-DA format can also be played.
.
CD-R (CD-Recordable), CD-RW
(CD-ReWritable) may not be
able to play back due to the
recording condition,
characteristics of the disc,
damage, dirt or deterioration due
to long exposure to the
environment of the vehicle
compartment. CD-R, CD-RW

Chevrolet Low Cab Forward 6.0L Gasoline Engine 3500/4500 Series (GMNA-
Localizing-U.S.-12533400) - 2019 - CRC - 11/19/18
94 Infotainment System
that are not finalized and CD-R
and CD-RW that are saved in
the UDF format cannot be
played (excluding MP3/WMA).
.
CD-TEXT function is only
compatible with commercial CD
compatible with CD-TEXT.
Characters may not display
accurately in CD-R and CD-RW.
.
CD, C-thru Disc with transparent
or translucent recorded parts
may not be inserted and ejected
accurately. Please do not
use them.
.
SACD (Super Audio CD) can
only be played in the CD level of
a hybrid disc.
.
CCCD (Copy Control CD) may
not play as it does not meet the
standard CD requirements.
.
CD-EXTRA can be played as a
music CD. The sound of a data
track of a Mixed Mode CD
cannot be played. Only music
tracks can be played. A Mixed
Mode CD mixed with DTS also
cannot be played accurately.
This device accepts 8 cm (3 in)
CDs. Plug in the device directly
without using an adapter, etc. to
avoid damage.
When Removing a Disc
Do not leave discs inside the player
or partially inserted for a long time.
This may scratch the discs and
make them unusable.
Remove the disc horizontally from
the main device. Do not pull it
violently towards the top.
Also do not pull it down hard while
removing. The disc may become
damaged and the audio may skip.
Do not insert objects other than
discs into the disc slot or insert
more than one disc at a time.
Handling a Disc
Avoid exposing the disc to direct
sunlight and always keep it in a
case. Otherwise, the disc will bend
and become unusable.
Do not stick any paper tape to the
recording side or the label side as it
may lead the disc to malfunction.
Do not use a disc with cracks or if it
is severely bent as it may lead to
damage.
Hold the disc without touching the
recording side as this may make the
disc dirty and lead to the audio
skipping.
Using benzene, record disc cleaner,
or anti-static fluids may damage the
disc. Using a dirty disc will damage
the disc and lead to audio skipping.
When the disc is dirty, use a
commercial disc cleaner to gently
clean it from the inside to the
outside. Do not use lens cleaner.
Do not use the types of disc
described below because such
discs may cause a breakdown.
.
Adapters or discs with special
properties, such as Dual Discs
and printable discs.
.
Discs with transparent or
semitransparent sections on the
recording side.
.
Discs with copy protection.

Chevrolet Low Cab Forward 6.0L Gasoline Engine 3500/4500 Series (GMNA-
Localizing-U.S.-12533400) - 2019 - CRC - 11/19/18
New Disc
Some new discs may have burrs
found in the center hole or at the
edges. Remove these burrs with a
ballpoint pen, etc. before using
the disc.
If burrs are not removed, the disc
may not be read accurately and
cause improper operation.
Rental Discs
Do not use any disc that has
cellophane tape or any rental disc
that has glue from the label exposed
or if some of the removed label still
attached to it. Using the disc like
this may cause the disc to not eject
properly and damage the disc.
Discs with Special Shapes
Heart-shaped or octagon-shaped
discs cannot be played. Do not use
them as they may cause damage.
Disc Accessories
Do not use CD labels or
commercially available accessories
(such as stabilizers, protective
seals, etc.) that are said to improve
sound quality or protect the discs.
They may change the thickness of
the disc and external specifications
and lead to damage.
Do not use commercially available
accessories (such as CD rings,
protectors) that are said to improve
sound quality or are effective
against vibrations. They may come
off inside the device, causing the
disc to become unplayable or
unretrievable and lead to
malfunction.
MP3/WMA Files
MP3 (MPEG Audio LAYER 3) is a
standard format for sound
compression technology.
By using MP3, a file can be
compressed to one-tenth the size of
the original.
WMA (Windows Media Audio) is a
Microsoft sound compression
format. It can compress sounds to a
smaller size than the MP3.
Infotainment System 95
This player has limitations on MP3/
WMA file standards and recorded
media and formats that can
be used.
Playable MP3 File Standards
Supported standards:
.
MPEG-1 Audio Layer III
.
MPEG-2 Audio Layer III
Supported sampling frequencies:
.
MPEG-1: 32, 44.1, 48 (kHz)
.
MPEG-2: 16, 22.05, 24 (kHz)
Supported bit rate:
.
MPEG-1: 32, 40, 48, 56, 64, 80,
96, 112, 128, 160, 192, 224,
256, 320 (kbps)
.
MPEG-2: 8, 16, 24, 32, 40, 48,
56, 64, 80, 96, 112, 128,
160 (kbps)
‐ Variable bit rate (VBR) is
supported.
‐ Does not support free format.
‐ Digital Rights Management
(DRM) is not supported.

Chevrolet Low Cab Forward 6.0L Gasoline Engine 3500/4500 Series (GMNA-
Localizing-U.S.-12533400) - 2019 - CRC - 11/19/18
96 Infotainment System
Supported channel modes:
.
Stereo
.
Joint Stereo
.
Dual Channel
.
Monaural
Playable WMA File Standards
Supported standards:
.
WMA Ver. 7
.
WMA Ver. 8
.
WMA Ver. 9
Supported sampling frequencies:
.
32
.
44.1
.
48 (kHz)
Supported bit rates:
.
Ver. 7, 8: CBR 48, 64, 80, 96,
128, 160, 192 (kbps)
.
Ver. 9 (9.1/9.2): CBR 48, 64, 80,
96, 128, 160, 192, 256,
320 (kbps)
‐ Only compatible with
2-channel playback
.
Variable bit rate (VBR) is
supported.
.
Lossless compression is not
supported.
ID3 Tag/WMA Tag
MP3/WMA files have an ID3 Tag/
WMA Tag that allows the input of
information so that data such as
song title and artist can be saved.
This player supports ID3 Ver. 1.0,
1.1, 2.2, 2.3 and WMA tags.
Media
Media such as CD-R and CD-RW
discs are capable of playing MP3/
WMA files. Compared to the
CD-ROM media commonly used for
music discs, CD-R and CD-RW
discs are easily damaged in high
temperature/high humidity
environments and part of the CD-R
and CD-RW may become incapable
of playback. Fingerprints or
scratches on the disc may prevent
playback or cause skipping during
playback. Sections of a CD-R or
CD-RW may deteriorate if it is left
inside a vehicle for long periods of
time. It is also recommended that
CD-R and CD-RW discs be kept in
a light-resistant case because the
discs are vulnerable to ultra-violet
light.
Format of Discs
The format of discs to be used must
be ISO 9660 Level 1 or Level 2.
Control items for this standard are
as follows:
.
Maximum directory layers:
8 layers
.
Maximum characters for folder
names/file names: 48 (including
“_” and 3 letter file extension)
.
Maximum number of folders:
192 (including the root folder)
.
Maximum number of files per
disc: 255
A root directory is counted as one
folder.
File Names
Only files with the MP3/WMA file
extension mp3, .wma can be
recognized as MP3/WMA and
played. Be sure to save MP3 files

Chevrolet Low Cab Forward 6.0L Gasoline Engine 3500/4500 Series (GMNA-
Localizing-U.S.-12533400) - 2019 - CRC - 11/19/18
with the mp3 file extension. Be sure
to use the .wma file extension when
saving WMA files. The MP letters of
the file extension will be recognized
whether entered as uppercase
letters or lowercase letters.
If the .mp3 or .wma file extension is
attached to a file other than an MP3/
WMA file, that file will be mistakenly
recognized by the deck as an MP3/
WMA file and played, resulting in
loud noise output that can damage
the speakers. Be sure to avoid
attaching the mp3 or .wma file
extension to files that are not MP3/
WMA files.
Multi-Sessions
Does not support multi-session.
When the disc used is a
multi-session disc, only the first
session will be played.
Playing MP3/WMA
When a disc with recorded MP3/
WMA files is inserted, the player
first checks all the files on the disc.
No sound is emitted while the player
is checking the files on the disc. It is
recommended that the disc should
be recorded without files other than
MP3/WMA files and without
unnecessary folders in order to
speed up the checking of disc files
by the player.
MP3/WMA Playing Time Display
It is possible that playing time will
not be correct, depending on the
writing condition of the MP3/WMA
file or when VBR Fast Up/Down is
operated.
Infotainment System 97
Display Order of MP3/WMA File/
Folder Names
Names of MP3/WMA folders and
files within the same level are
displayed in the following order.
1. MP3/WMA folders displayed
first, by ascending order of
numbers, letters. The files
stored just below the root of the
disc will be stored in the ROOT
FOLDER.
2. Files displayed next, by
ascending order of numbers,
letters. It is assumed here that
a disc has already been loaded
into the unit.
This unit reconfigures the folders
created by a user as shown below.

Chevrolet Low Cab Forward 6.0L Gasoline Engine 3500/4500 Series (GMNA-
Localizing-U.S.-12533400) - 2019 - CRC - 11/19/18
98 Infotainment System
USB Port
USB Operation
Playing Music Files in the USB
Memory (When the USB Memory
is not Connected)
When the USB Memory is
connected to the USB terminal
users can listen to music in the USB
Memory.
1. Connect the USB Memory to
the USB terminal.
2. Press MODE/
O /ENTER.
The following operations are based
on the sample MP3/WMA file
structure given above.
When a disc is inserted, the CD
player screen will be displayed for
about a few seconds while the unit
checks whether the CD is an audio
CD or whether it contains MP3/
WMA data.
Normally, tracks in ROOT FOLDER
will be played in order from the
first file.
3. Turn MODE/
select USB, and then press
ENTER.
The music file starts playing.
Playing Music Files in the USB
Memory (When the USB Memory
is Connected)
1. Press MODE/
2. Turn MODE/
select USB, and then press
ENTER.
O /ENTER to
O /ENTER.
O /ENTER to

Chevrolet Low Cab Forward 6.0L Gasoline Engine 3500/4500 Series (GMNA-
Localizing-U.S.-12533400) - 2019 - CRC - 11/19/18
The music file starts playing.
Do not connect, adjust or remove
the USB Memory while driving.
Do not remove the USB Memory or
turn the ignition off or to ACC/
ACCESSORY when the USB
Memory is being accessed
(playback). This may damage the
data. We recommend making a
backup of your data in case you
accidentally delete it.
Depending on the USB Memory
used (non-brand products, USB
Memories which have been
damaged due to external factors),
there may be cases where
connection is not possible, or where
the operation is unstable.
When the USB mode is switched to
other modes and then switched
back again, the main unit returns to
the music file played last.
File Selection
Press
y or z to select the music
file of your choice.
.
.
Selecting the Folder
Press 5 or 6 to select the MP3/WMA
folder.
.
.
Fast Forwarding/Fast Reversing
Press and hold
forward or fast reverse the
music file.
.
.
Release to stop.
y to advance to the
Press
next file.
z to return to the
Press
beginning of the file being
played. Press again to return to
the previous file.
n to advance to the next
Press
folder.
Press
q to return to the
previous folder.
y or z to fast
Press
y to fast forward.
z to fast reverse.
Press
Infotainment System 99
Repeat Playback
Press 1 to repeat the same file
being played.
To cancel, press 1 twice.
disappears.
Press 1 twice to repeat the same
folder being played. After the player
has played the last file, it starts
playing the first file of the same
folder.
w is displayed. To cancel,
FLD
press the button again. FLD
disappears.
Random Playback
.
Press 2 to play all files in the
USB Memory in random order.
w is displayed.
w
w
v is displayed. To cancel,
press the button twice.
disappears.
.
Press 2 twice to play the files
from the folder being played in
the USB Memory in random
order.
v
 Loading...