

Chevrolet Impala 1969 Owner's Manual
www.carburetor-manual.com
Would you like some Free Manuals?
http://carburetor-manual.com/free-shop-manual-club-t-13.html
Also visit http://freeshopmanual.com for more Free Manuals
Also Visit my website for 7 FREE Download Manuals starting
with this one.
"The ABC's of Carburetion"
Click Here Now
file:///C|/Documents%20and%20Settings/Tim/Desktop/carburetor-manual-welcome/index.htm[4/25/2009 11:42:20 AM]
GM
'JiM''''e',..",,'
This
is
the
General
Motors
mark
of
excellence
that
appears
on
all
Chevrolet
motor
vehicles.
We
use
it
in
the
same
spirit
with
which
craftsmen.
through
the
centuries.
have
used a personal
mark
to
identify
the
products
of
their
skills:
We
are
proud
of
the
things
we
make.
and
we
want
our
customers
to
be
able
to
identify
them
easily
and
to
know
that
we
stand
behind
them.
Whenever
you
see
this
mark
of
excellence.
you
can
be
certain
that
it
represents
our
very
finest
in
design
and
engineering
...
that
it
has
been
built
with
care
and
dedication
...
and
that
it
offers
all
the
quality.
reliability.
safety
and
value
that
you
have
come
to
expect
from
Chevrolet.
Your
new
1969
Chevrolet
meets
or
exceeds
all
applicable
U.
S.
Federal
Motor
Vehicle
Safety
Standards.
Effectiveness
of
these
safety
features
can
best
be
continued
through
regular
vehicle
inspection
and
maintenance.
IMPORTANT:
For
maximum
performance
and
economy
keep
your
GM
car
or
truck
all
GM.
Specify
General
Motors
parts
identified
by
one
of
these
trademarks.
I
liM
IQ.I
e I
Chevrolet
Motor
Division
General
Motors
Corporation
Detroit.
Michigan
48202
/I~,e;(~~V
2.1
-t,t-/J1 D
£j
1969
CHEVROLET
OWNER'S
MANUAL
OPERATION &
MAINTENANCE
INSTRUCTIONS
TABLE
OF
CONTENTS
Page
Operating
Instructions
.............................
6
Instruments
.......................................
12
Controls
...........................................
15
Other
Features
....................................
32
Station
Wagon
....................................
39
Convertible
.......................................
44
Cleaning
Your
Chevrolet
...........................
45
Guardian
Maintenance
for
Owner
Protection
.........
47
Owner's
Responsibilities
..............
:
.........
.47
Maintenance
and
Lubrication
....................
52
Minor
Trouble
Shooting
............................
66
Specifications
......................................
70
Index
.............................................
73
All information contained
in
this booklet is the latest prod.
uct information available
at
the time
of
printing. The right
is reserved to make changes
at
any time without notice.
CHEVROLET
MOTOR
DIVISION
•
GENERAL MOTORS CORPORATION
DETROIT, MICHIGAN
48202
©General
Motors
Corporation
1968
SECON
DEDITION
DECEMBER,
196B
IMPORTANT
SAFETY
AND
ANTI-THEFT
INFORMATION
TO HELP
YOU
ENJOY THE
MAXIMUM
IN
VEHICLE
SATISFACTION
Part No.
3955541
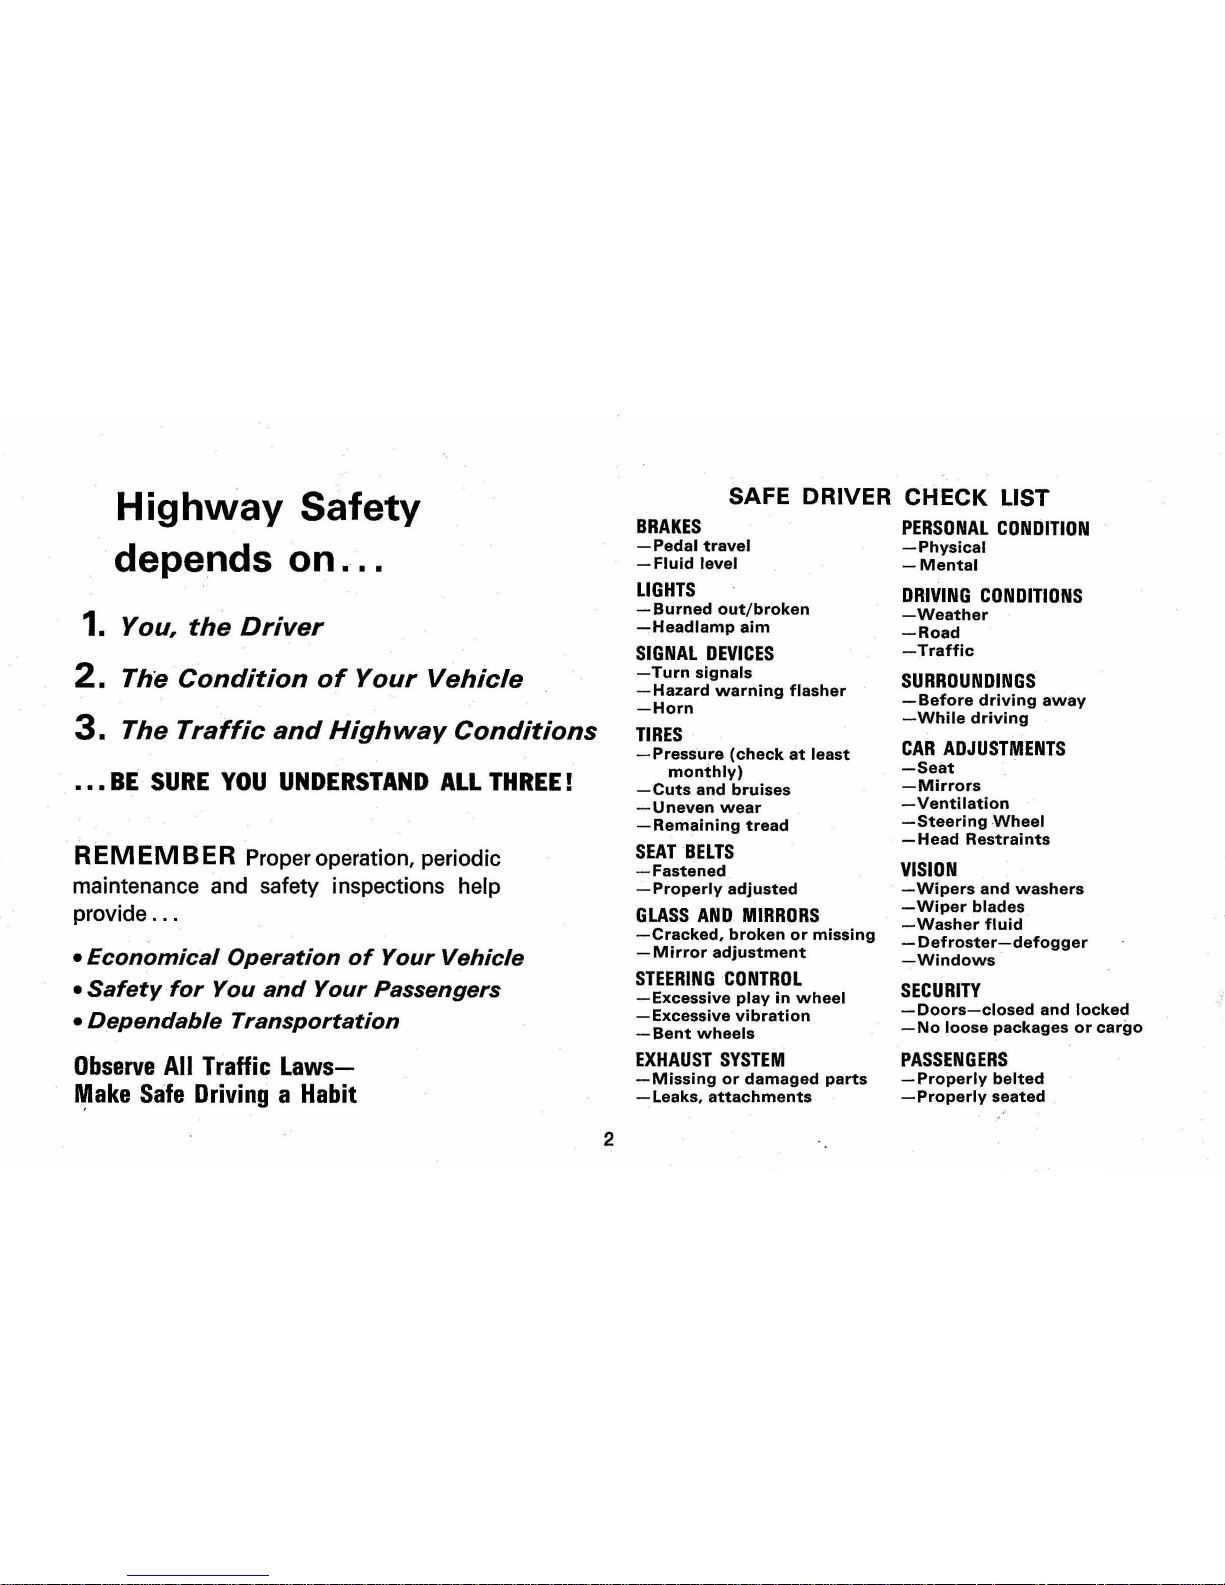
Highway
Safety
depends
on
...
1.
You,
the
Driver
2. The
Condition
of
Your
Vehicle
3.
The
Traffic
and
Highway
Conditions
• ••
BE
SURE
YOU
UNDERSTAND
ALL
THREE!
REMEMBER Proper operation, periodic
maintenance and safety inspections help
provide
...
•
Economical
Operation
of
Your
Vehicle
•
Safety
for
You
and
Your
Passengers
•
Dependable
Transportation
Observe
All Traffic
Laws-
\\!lake
Safe
Driving a Habit
2
SAFE DRIVER CHECK LIST
BRAKES
-Pedal
travel
-Fluid
level
LIGHTS
-Burned
out/broken
-Head/amp
aim
SIGNAL
DEVICES
-Turn
signals
-Hazard
warning
flasher
-Horn
TIRES
-Pressure
(check
at
least
monthly)
-Cuts
and
bruises
-Uneven
wear
-Remaining
tread
SEAT
BELTS
-Fastened
-Properly
adjusted
GLASS
AND
MIRRORS
-Cracked,
broken
or
missing
-
Mirror
adjustment
STEERING 'CONTROL
-Excessive
play
in
wheel
-Excessive
vibration
-
Bent
wheels
EXHAUST
SYSTEM
-Missing
or
damaged
parts
- Leaks,
attachments
PERSONAL
CONDITION
-Physical
-Mental
DRIVING
CONDITIONS
-Weather
-Road
-
Traffic
SURROUNDINGS
-Before
driving
away
-While
driving
CAR
ADJUSTMENTS
-Seat
-Mirrors
-Ventilation
-Steering
Wheel
-Head
Restraints
VISION
-
Wipers
and
washers
-Wiper
blades
-Washer
fluid
-
Defroster-defogger
-Windows
SECURITY
-Doors-closed
and
locked
-No
loose
packages
or
cargo
PASSENGERS
-
Properly
belted
-Properly
seated
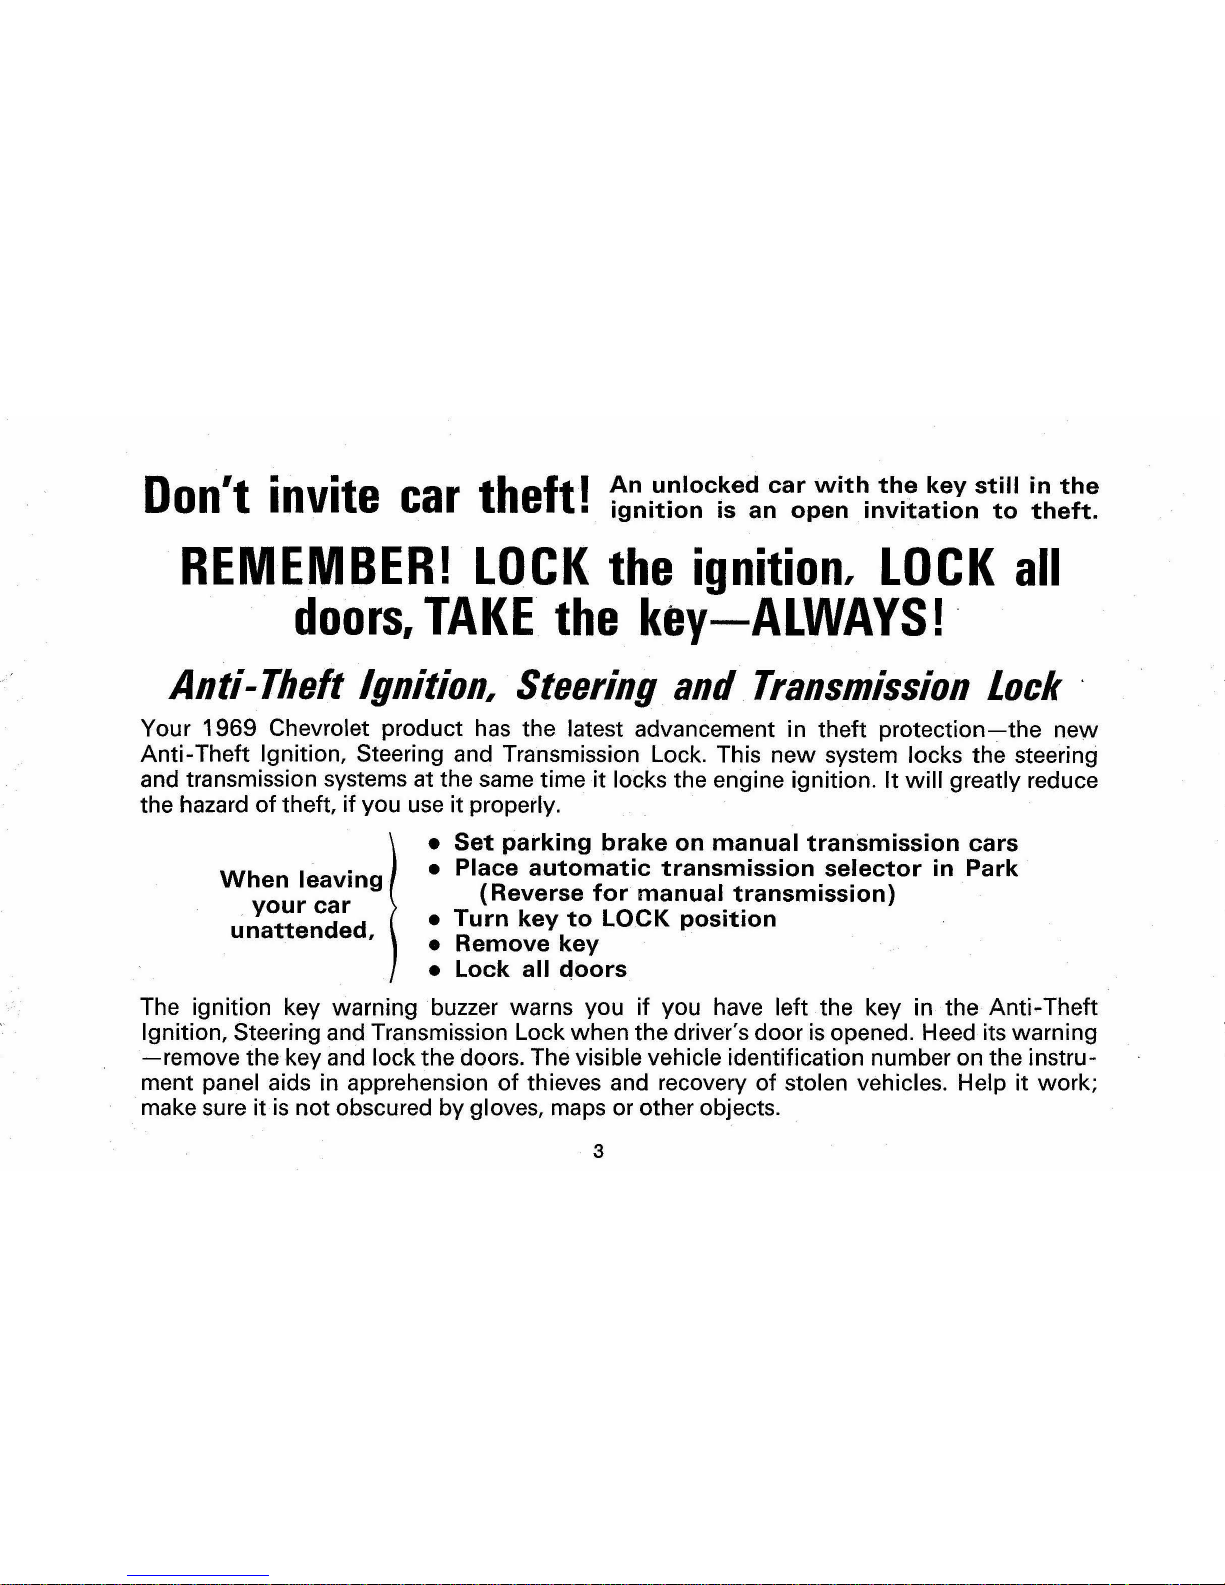
O
't -
-t
th
ft I
An
unlocked
car
with
the
key
still
in
the
on
Invi
e
car
e.
ignition
is
an
open
invitation
to
theft.
REMEMBER!
LOCK
the
ignition,
LOCK
all
doors,
TAKE
the
key-ALWAYS!
Anti-Theft
Ignition,
Steering
and
Transmission
lock
Your
1969
Chevrolet product has the latest advancement in theft
protection-the
new
Anti-
Theft Ignition, Steering and Transmission Lock. This
new
system locks the steering
and transmission systems at the same time
it
locks the engine ignition.
It
will
greatly reduce
the hazard
of
theft,
if
you use
it
properly.
When
leaving
your
car
unattended,
•
Set
parking
brake
on
manual
transmission
cars
•
Place
automatic
transmission
selector
in
Park
(Reverse
for
manual
transmission)
•
Turn
key
to
LOCK
position
•
Remove
key
•
Lock
all
doors
The ignition key warning buzzer warns you
if
you have left the key in the
Anti-Theft
Ignition, Steering and Transmission Lock when the driver's door is opened. Heed its warning
-remove
the key and lock the doors. The visible vehicle identification number on the instru-
ment
panel aids in apprehension
of
thieves and recovery
of
stolen vehicles. Help
it
work;
make sure
it
is
not
obscured
by
gloves, maps or other objects.
3
A
WORD
FROM
CHEVROLET
...
This Owner's Manual contains important information regarding
the
operation
and maintenance of your Chevrolet.
In
order to obtain maximum enjoyment and usage from your
car,
we
suggest
that you familiarize yourself with the contents of this booklet and follow the
recommendations outlined.
Your Chevrolet dealer
has
the trained personnel and specialized equipment
to properly service your Chevrolet. Have him inspect your
car
and perform
any maintenance
or
adjustments required.
We
would like to take this opportunity to thank you
for
choosing a Chevrolet
product-and assure you of our continuing interest in your motoring pleasure
and satisfaction.
4
"
,
YOUR CHEVROLET'S FIRST
FEW
HUNDRED
MILES OF
DRIVING
Sound
design
and
precision
manu-
facturing
methods
will
permit
you
to
operate
your
new
Chevrolet
from
its
very
first mile
without
adhering
to
a
formal
"break-in"
schedule. However,
during
the
first
few
hundred
miles of
driving
you
can, by
observing
a few
simple
precautions,
add
to
the
future
performance
and
economy
of
your
car.
It
is
recommended
that
your
speed
Driving For
Economy
Proper
maintenance
and
wise
oper-
ation
will
combine
to
help
you
achieve
maximum
fuel
economy
with
your
Chevrolet.
Your
Authorized
Chevrolet
during
the
first 500
miles
be
confined
to a maximum
of
60
M.P.H.,
but
do
not
drive
for
extended
periods
at
anyone
constant
speed,
either
fast
or
slow.
During
this
period,
avoid
full
throttle
starts
and
, if possible,
abrupt
stops.
Gentle
braking
during
the
first few
hundred
miles
of
operation
will
result
in
longer
brake
life
and
better
future
performance. A
void
hard
stops
especi-
Dealer
can
properly
tune
and
maintain
your
car
but
wise
operation
is
your
responsibility
. Give
the
car
sufficient
warm-up
time, do
not
make
full
throt-
tle
starts
or
unnecessary
severe
stops,
and
drive
at
reasonable
speeds
and
as
steadily
as
traffic
permits
to
gain
the
benefits of
all
the
economy
built
into
your
Chevrolet
.
5
ally
during
the
first
200
miles of
opera-
tion
since
brake
misuse
during
this
period
will
destroy
much
future
brake
efficiency.
Always
drive
at
moderate
speed
un-
til
the
engine
has
completely
warmed
up.
If
you
plan
to
use
your
new
Chev-
rolet
for
trailer
hauling
see
additional
information
on
page
65.
CAUTION: Avoid inhaling exhaust gases
especially in
an enclosed area such
as
a
garage. Exhaust gases contain a percent-
age
of
carbon monoxide which is a poten-
tlal/y
lethal gas that, by itself, Is tasteless,
colorless,
and
odorless.
The
exhaust sys-
tem should be inspected
for
proper mount-
ing, leaks, and missing or damaged parts
each time the
vehiCle is raised
for
lubri-
cation or
oil
change service.

OPERATING
INSTRUCTIONS
Anti-Theft Ignition, Steering
and Transmission Lock
The
five position
anti-theft
lock
is
located on
the
right
side of
the
steer-
ing
column.
In
"LOCK
" position,
the
steering
and
shift mechanisms
are
automatically
locked
along
with
the
ignition
system
to
provide
added
theft
protection for
your
car.
The
transmis-
sion selector
lever
must
be
in
"PARK
"
on
automatic
transmission models,
or
reverse
on
standard
transmission
models, before
the
key
can
be
turned
to
the
"LOCK
" position.
"ACCES-
SORY
" position
permits
operation
of
electrical accessories
when
the
engine
is
not
running
. "
OFF
" position
is
pro
-
vided
so
that
the
ignition
can
be
turned
off
without
locking
the
steer-
ing
column
or
transmission linkage.
The
key
can
be
inserted
or
withdrawn
only
when
the
switch
is
in
the
"LOCK"
position.
CAUTION: In a parking situation, always
let
go
of
the steering wheel BEFORE turn-
ing
the ignition key to LOCK position.
Turning the wheels
to
left
or
right
with the
car
stationary
"winds
up"
the steering sys-
tem, which can result In a sharp
"spring-
back"
of
the steering wheel when the
lock
is released. As a further precaution, never
reach through the steering wheel
to
oper-
ate controls,
or
for
any other reason.
Starting
the
Engine
Place
the
selector
lever
of
AUTO-
MATIC transmissions
in P or
N, P
pre-
ferred. A
starter
safety
switch
is
designed
to
prevent
starter
operation
in
any
other
position.
On
manual
transmission
cars, depress
the
clutch
pedal
to
the
floor. A
new
starter
safety
switch
incorporated
into
these
cars
is
designed to
prevent
starter
operation
unless
the
pedal
is fully depressed.
6
Select
the
proper
gear
range
before
releasing
the
clutch
pedal.
•
Engine
Cold -Depress
accelerator
pedal
to floor
and
release.
This
sets
automatic
choke.
•
Engine
Hot-Hold
accelerator
pedal
part
way
down
while
starting.
• During Extremely Cold
Weather
(O°F.
and
below) -
Depress
accel-
erator
pedal
to floor
three
times
(3)
and
RELEASE.
Turn
ignition
switch
to
START
and
release
as
soon
as
engine
starts. When
engine is
running
smoothly,
tap
ac-
celerator
pedal
to
reduce
engine idle
speed
.
•
Engine
Flooded -Depress
acceler-
ator
pedal
and
hold to floor while
starting
until
engine is
cleared
of
excess fuel
and
is
running
smoothly.
Never
"pump"
the
accelerator
pedal.
Warm-up
Always
let
the
engine idle
for
20
to
30
seconds
after
starting
and
drive
at
moderate
speeds for
several
miles,
es-
pecially
during
cold
weather
.
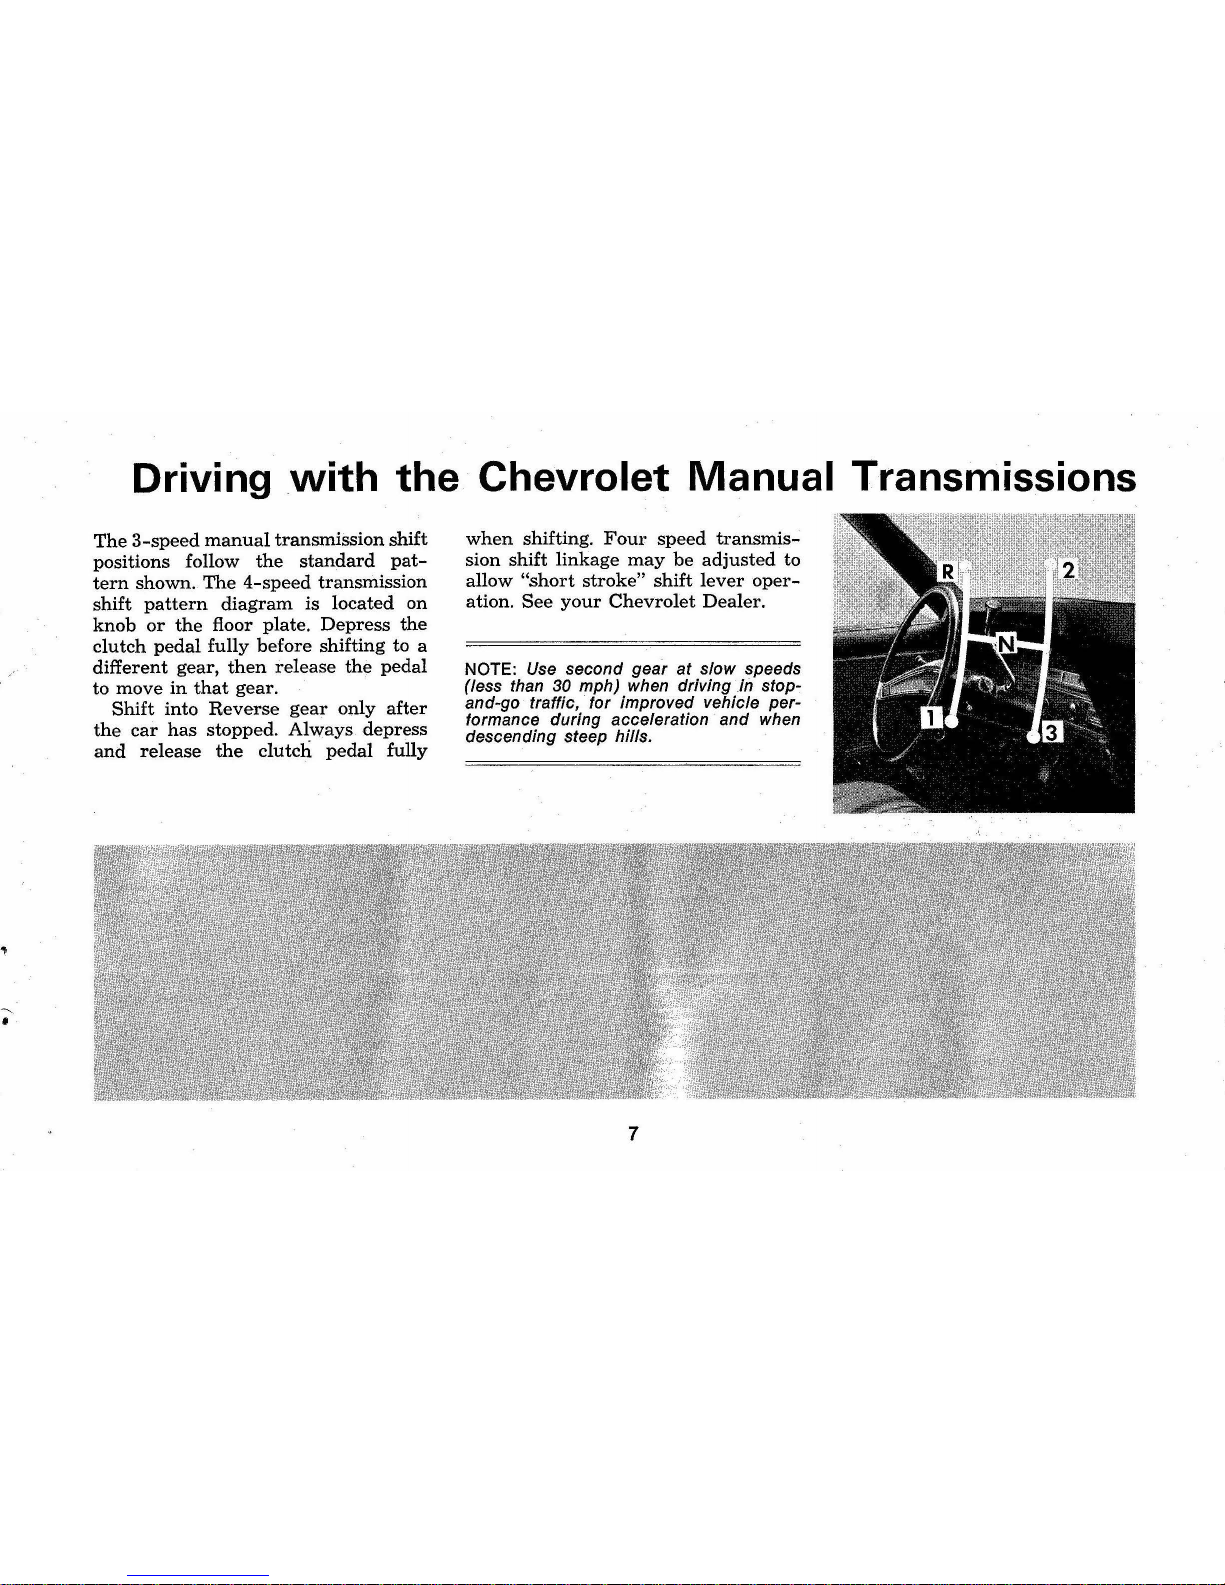
Driving
with
the
Chevrolet
Manual
Transmissions
The
3-speed
manual
transmission
shift
positions follow
the
standard
pat-
tern
shown.
The
4-speed
transmission
shift
pattern
diagram
is
located
on
knob
or
the
floor plate.
Depress
the
clutch
pedal
fully
before
shifting
to
a
different
gear,
then
release
the
pedal
to
move
in
that
gear.
Shift
into
Reverse
gear
only
after
the
car
has
stopped.
Always
depress
and
release
the
clutch
pedal
fully
when
shifting.
Four
speed
transmis-
sion shift
linkage
may
be
adjusted
to
allow
"short
stroke"
shift
lever
oper-
ation.
See
your
Chevrolet
Dealer.
NOTE: Use second gear at slow speeds
(less than
30 mph) when driving
in
stopand-go traffic, for improved vehicle performance during acceleration and when
descending steep hills.
7
Drivi'ng
with
the
Chevrolet Automatic Transmissions
The
Powerglide,
Turbo
Hydra-Matic-
350
and
400
are
completely
automatic
transmissions
which
replace
the
standard
clutch
and
transmission.
After
starting
the
engine
with
the
selector
lever
in N (Neutral)
or
P
(Park)
position,
select
the
range
de-
sired
(see
tables
below)
and
depress
the
accelerator. A
gradual
start
with
a
steady
increase
in
accelerator
pres-
sure
will
result
in
best
possible
fuel
economy.
Rapid
acceleration
for
fast
starts
will
result
in
greater
fuel
con-
sU",lption.
Automatic
transmission
shift
quad-
rants
of all
GM
cars
continue
the
uni-
form
sequence
of
selector
positions.
This
particularly
benefits
multicar
families
and
those
who
occasionally
drive
other
cars.
Shift
indicators
are
arranged
with
"Park"
position
at
one
end, followed
in
sequence
by
"Re-
verse",
Neutral"
and
the
forward
driv-
ing
ranges.
All
automatic
transmissions
are
equipped
with a starter
safety
switch
designed
to
permit
starting
the
engine
only
when
the
transmission
se-
lector
is
in
the
"Park"
or
"Neutral"
position.
For
additional
engine
braking
effect,
as
sometimes
needed
in
moun-
tainous
driving, place
the
transmission
in
an
intermediate
or
low
range.
CAUTION: When
parking
or
leaving the
car
unattended, even
for
a few minutes,
place the selector lever in
"Park"
position
and remove the ignition key.
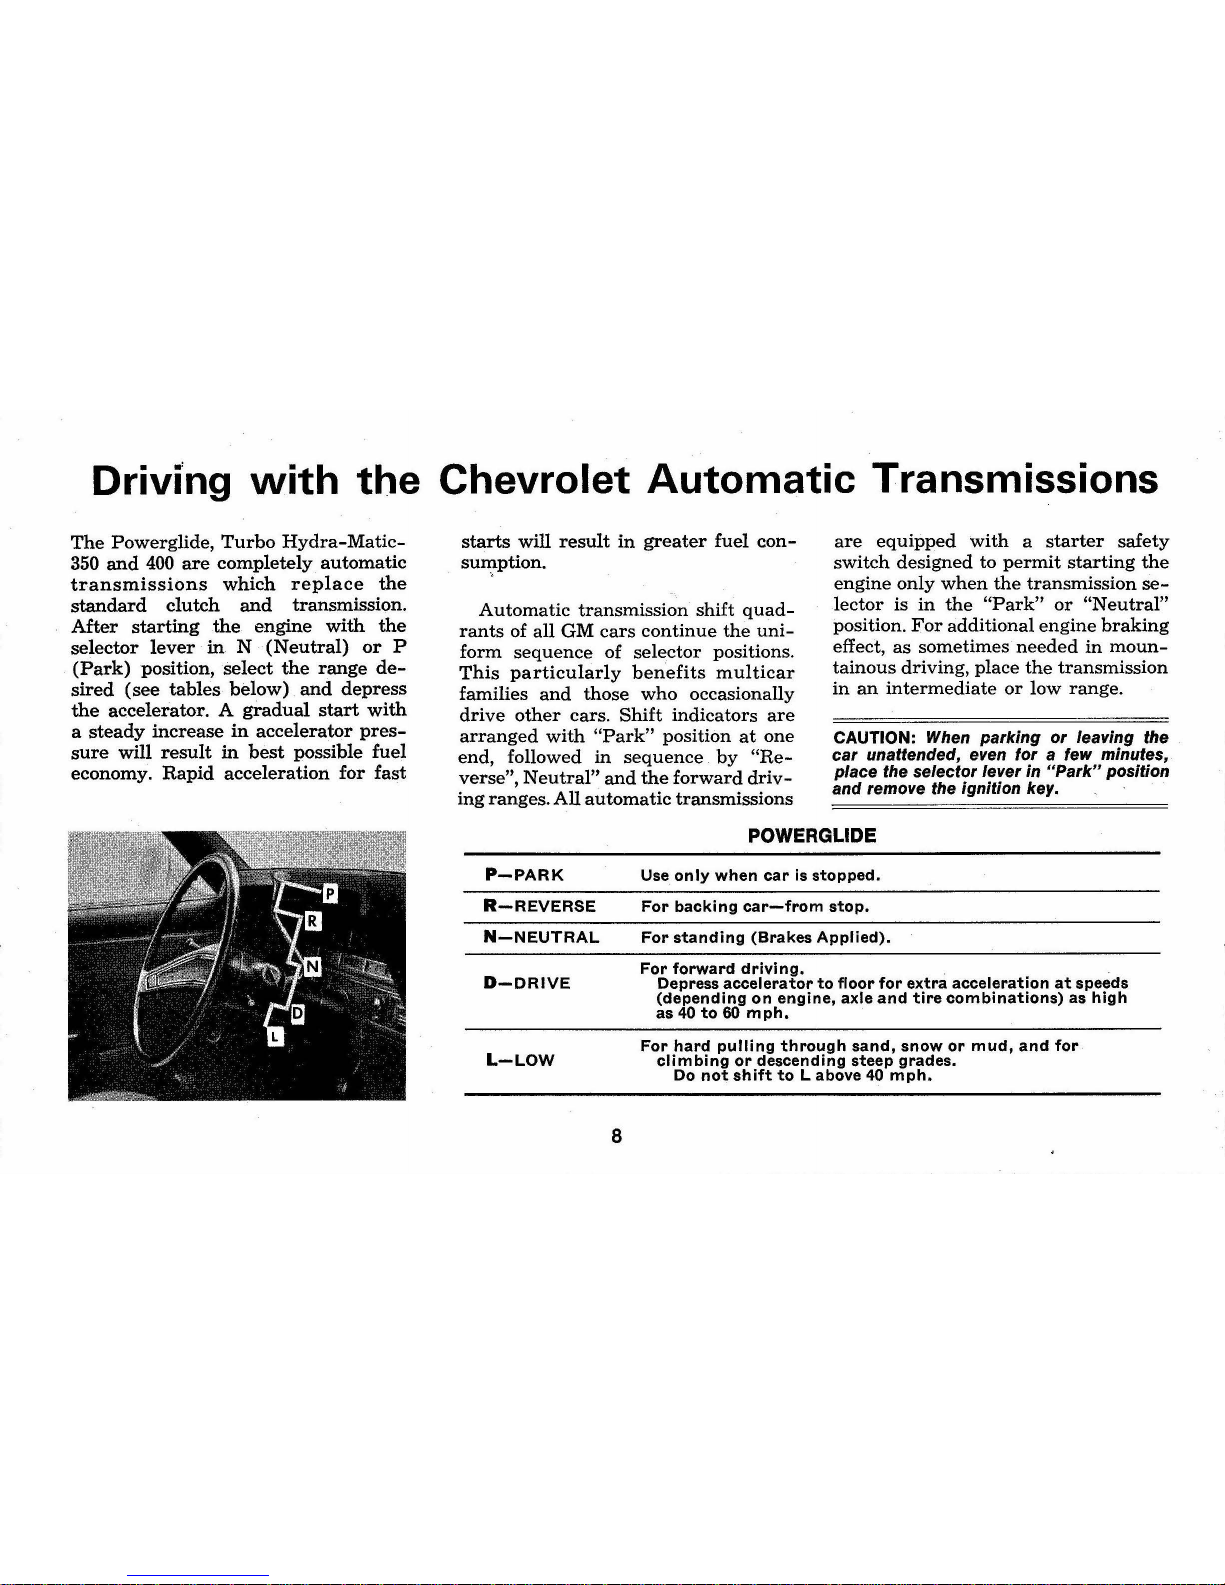
POWERGLIDE
P-PARK
R-REVERSE
N-NEUTRAL
D-DRIVE
L-LOW
8
Use
only
when
car
is
stopped.
For
backing
car-from
stop.
For
standing
(Brakes
Applied).
For
forward
driving.
Depress
accelerator
to
floor
for
extra
acceleration
at
speeds
(depending
on
engine,
axle
and
tire
combinations)
as
high
as 40
to
60
mph.
For
hard
pulling
through
sand,
snow
or
mUd,
and
for
climbing
or
descending
steep
grades.
Do
not
shift
to
Labove
40
mph.
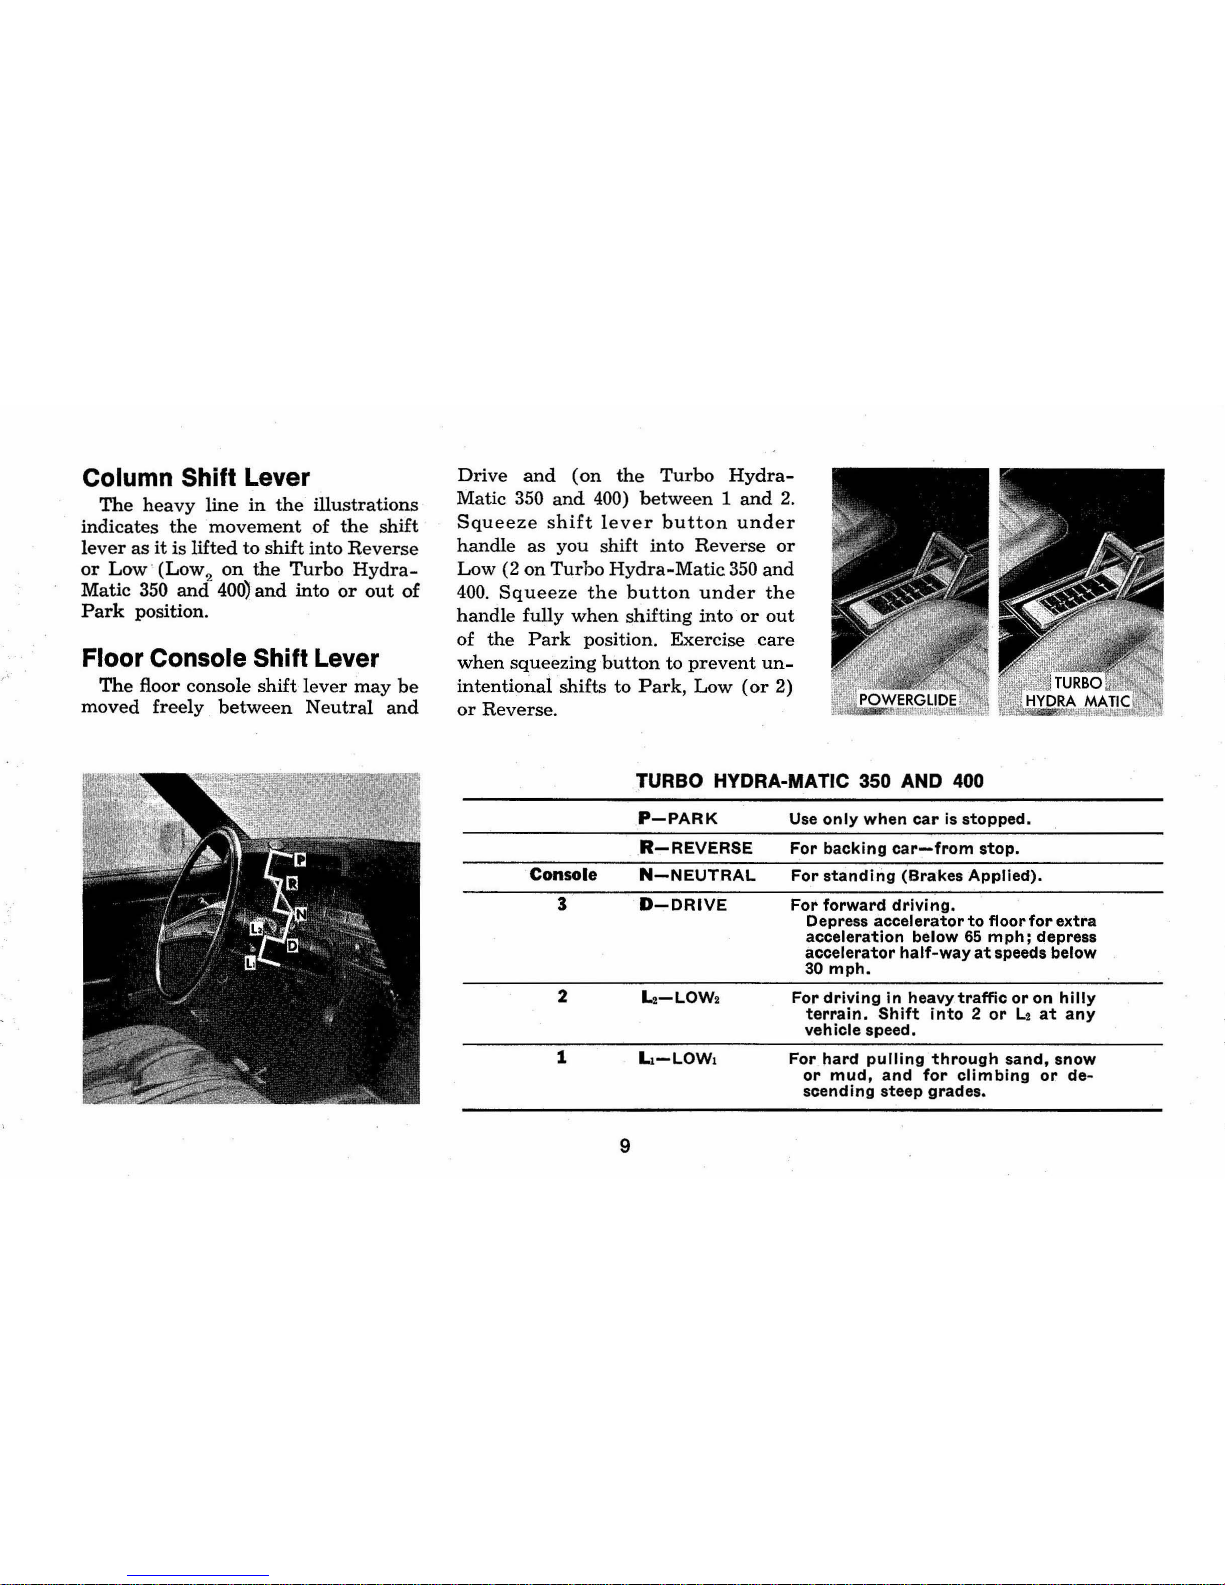
Column Shift Lever
The
heavy
line
in
the
illustrations
indicates
the
movement
of
the
shift
lever
as
it
is
lifted
to
shift
into
Reverse
or
Low· (Low 2 on
the
Turbo
Hydra-
Matic 350
and
400)
and
into
or
out
of
Park
position.
Floor Console Shift Lever
The
floor console
shift
lever
may
be
moved
freely
between
Neutral
and
Drive
and
(on
the
Turbo
Hydra-
Matic
350
and
400)
between 1 and
2.
Squeeze
shift
lever
button
under
handle
as
you
shift
into
Reverse
or
Low
(2
on
Turbo
Hydra-Matic
350
and
400.
Squeeze
the
button
under
the
handle
fully
when
shifting
into
or
out
of
the
Park
position. Exercise
care
when
squeezing
button
to
prevent
un-
intentional
shifts
to
Park, Low
(or
2)
or
Reverse.
Console
3
2
1
9
TURBO HYDRA-MATIC 350 AND 400
P-PARK
.
R-REVERSE
N-NEUTRAL
L.-LOW.
Use
only
when
car
is
stopped
.
For
backing
car-from
stop.
For
standing
(Brakes
Applied).
For
forward
driving.
Depress
accelerator
to
floor
for
extra
acceleration
below
65
mph;
depress
accelerator
half-way
at
speeds
below
30
mph.
For
driving
in
heavy
traffic
or
on
hilly
terrain.
Shift
into 2 or
L2
at
any
vehicle
speed.
For
hard
pulling
through
sand,
snow
or
mud,
and
for
climbing
or
de-
scend
ing
steep
grades.
Transmission Operating Tips
Good Driving Practice
Before
descending a
steep
or
long
grade,
down a mountain
or
hillside,
reduce
speed
and
shift
into a
lower
gear.
Use
the
brakes
sparingly
to
pre-
vent
them
from
overheating
and
thus
reducing
brake
effectiveness.
Holding Car
on
an
Upgrade
When
stopped
on
an
upgrade,
main-
tain
your
position
by
applying
the
brakes.
Never
hold
the
car
in
place
by
accelerating
engine
with
transmission
in
gear.
This
could
cause
damage
by
overheating
the
transmission
(auto-
matic)
or
clutch
(manual)
.
"Rocking" Car
If
it
becomes
necessary
to
rock
the
car
to
free
it
from
sand,
mud
or
snow,
move
the
selector
lever
from
"D"
to
"R"
(automatic
transmission)
or
the
shift
lever
from
forward
to
reverse
(manual
transmission)
in a repeat
pat-
tern
while
simultaneously
applying
moderate
pressure
to
the
accelerator.
Do
not
race
engine. A void
spinning
wheels
when
trying
to
free
the
car.
Parking Your Car
Always
engage
the
parking
brake
on
manual
transmissions, and
place
the
automatic
transmission
selector
lever
in
"Park"
position
when
leaving
your
car
unattended.
Also,
with
auto-
matic
transmissions,
never
park
for
prolonged
periods
with
engine
idling
and
transmission
in
gear, especially
if
your
car
is
equipped
with
air
condi-
tioning.
This
practice
is
detrimental
to
the
transmission,
due
to
overheating.
Towing-(With Ignition
Key Available)
Normally
your
Chevrolet
may
be
towed
with
all
four
wheels
on
the
ground
for
distances
up
to
50
miles
at
speeds
of less
than
35 mph.
How-
ever,
t):le
drive
wheels
(rear
wheels),
must
be
raised
off
the
ground
or
the
driveshaft
disconnected
when
the
transmission
is
not
operating
properly
or
when a speed
of
35
mph
or
distance
of
50
miles
will
be
exceeded.
CAUTION: For towing, the transmission should be In neutral and the engine Ignition should be
"olf",
but
the Anti-Theft Ignition Steering
and Transmission
Lock
should not be in the
"lock"
position.
10
CAUTION:
If
car
Is towed
on
its front wheels only, the steerIng wheel must be secured with the wheels In a straight ahead position.
Towing-(Without Ignition
Key)
Since
the
Anti-
Theft
Ign~tion
Steer-
ing
and
Transmission
Lock
locks
the
steering
and
shift
mechanism
as
well
as
the
ignition system, special
pro-
visions
ate
necessary
for towing a
vehicle
when
the
switch
is
in
"lock"
position.
Normally
it
will
be
neces-
sary
to
place a dolly
under
the
rear
wheels
and
tow
the
vehicle
with
the
front
end
raised. Detailed
towing
in-
formation
is available
at
your
dealer
and
has
been
provided
to
tow
truck
operators
responsible
for
movement
of disabled
or
locked vehicles .
Proper
lifting
and
towing
equipment
is
neces-
sary
to
prevent
damage
to
the
vehicle
during
the
towing operation.
Emergency Starting
If
your
Chevrolet
is
equipped
with
a
manual
3-speed
or
4-speed
trans-
mission,
it
can
be
started
in
an
emer-
gency
by
pushing.
When
being
pushed
to
start
the
engine,
turn
oj] all
un-
necessary electrical loads,
turn
igni-
tion
to "ON",
depress
the
clutch
pedal
and
place
the
shift
lever
in
high
gear. Release
the
clutch
pedal
when
the
car
speed
reaches
10
to
15
miles
per
hour.
Bumpers· and
other
11
parts
contacted
by
the
pushing
ve-
hicle
should
be
protected
from
dam-
age
during
pushing.
Never
tow
the
car
to
start.
Engines
in
vehicles
with
automatic
transmissions
cannot
be
started
by
pushing
the
car. To
start
the
car
when
the
Energizer
is discharged,
use
an
auxiliary
battery
or
Energizer
with
jumper
cables.
Be
sure
to
observe
correct
polarity
(positive
terminal
to
positive
terminal
and
negative
ter-
minal
to negative
terminal)
when
con-
necting
the
auxiliary
battery
to
pre-
vent
possible damage to
the
electrical
system
.
INSTRUMENTS
The
instruments,
gauges
and
indi-
cator
lights
conveniently
grouped
in
the
instrument
cluster
are
designed
to
tell
you
at
a glance
many
important
things
about
the
performance
of
your
car. The
information
on
this
and
the
following
two
pages
will
enable
you
to
more
quickly
understand
and
prop-
erly
interpret
these
instruments.
GOOD
DRIVING
PRACTICE:
A
good
driver
familiarizes himself
with
the
controls of
any
automobile
BE-
FORE
operating
it.
Fuel Gauge
This
electrically
operated
gauge
registers
correctly
when
the
ignition
switch
is
in
the
"on"
position.
When
the
ignition
switch
is
turned
"off,"
the
needle
will
not
necessarily
return
to
the
empty
mark
but
may
stop
at
any
point
on
the
dial.
12
EngiAe,1emperature
Indicator Light
This
indicator
light
is
provided
in
the
instrument
cluster
to
quickly
warn
of
an
overheated
engine.
With
the
ig-
nition
switch
in
the
START
position,
the
red
(HOT)
indicator
will
light
to
let
you
know
that
it
is
operating
properly.
When
the
engine
is
started,
the
red
light
will
go
out
immediately.
It
will
light
up
at
no
other
time
unless
for
some
reason
the
engine
reaches
a
dangerously
high
operating
tempera-
ture.
If
the
red
light
should
come
on,
the
engine
must
be
stopped
until
the
cause
of
the
overheating
is
corrected.
Check
this
light
frequently
as
you
drive.
Generator Indicator Light
This
light
provides a quick
check
on
the
generating
system
of
your
Chevro-
let.
The
red
light
will
be
on
when
the
ignition
key
is
in
the
"on"
position,
but
before
the
engine
is
started.
After
the
engine
starts,
the
light
should
go
out
and
remain
out.
If
the
light
remains
on
when
engine
is
running,
have
your
Authorized
Chevrolet
Dealer
locate
and
correct
the
trouble
as soon as
possible.
Oil Pressure Indicator Light
This
light
will
be
on
when
the
ig-
nition
switch
is
turned
on
and
should
go
out
after
the
engine
is
started.
Oc-
casionally
the
light
may
be
seen
to
flicker
momentarily,
but
this
will
do
13
no
harm.
However,
if
the
light
remains
on
during
normal
driving
speeds,
the
engine
should
be
stopped
until
the
cause
of
the
trouble
can
be
located
and
corrected.
Driving
the
car
with
low
oil
pressure
can
cause
serious
en-
gine
damage.
Brake System Warning Light
This
dual
purpose
indicater
light
operates
as
follows:
With
parking
brake
applied
the
red
light
will
light
when
the
ignition
switch
is
turned
on.
As a dqal
service
brake
system
warn-
ing,
the
red
light
will
come
on
when
the
brake
pedal
is
depressed
if
low
pressure
has
developed
in
either
the
front
or
rear
brake
system.
Have
your
Authorized
Chevrolet
Dealer
locate
and
correct
the
trouble
immediately.
Headlight Beam
Indicator Light
The
headlights
of
your
Chevrolet
have
high
and
low
beams
to
provide
you
with
proper
night-time
visibility
during
all
driving
conditions.
The
"low"
beams
are
used
during
most
city
driving.
The
"high"
beams
are
especi-
ally
useful
when
driving
on
dark
roads
since
they
provide
excellent
long
range
illumination.
The
headlight
beam
indicator
will
be
on
whenever
the
high
beams
or
"brights"
are
in
use.
The
Headlight
Beam
Switch
controls
the
headlight
beams
(see
Page
16).
Optional Warning Lights
Low Fuel
The
low
fuel
indicator
light
will
light
and
illuminate
the
word
"Fuel"
when
the
fuel
gauge
registers
just
above
the
empty
mark
(approximately
three
gallons
in
tank).
Occasional flicking
of
the
light
when
stopping
and
starting
the
car
is normal. A
steady
glow
in-
dicates
low
fuel.
14
Check Doors
This
indicator
light
will glow
when
the
ignition
switch
is
on
and
any
door
of
your
car
is
not
properly
closed.
Be
sure
all
doors
are
closed
before
driv-
ing
your
car.
Seat Belts
With
the
ignition
switch
on,
this
light
will glow
as a reminder
to
fasten
your
seat
belt.
The
light
will
go
out
after a few
seconds of
operation.
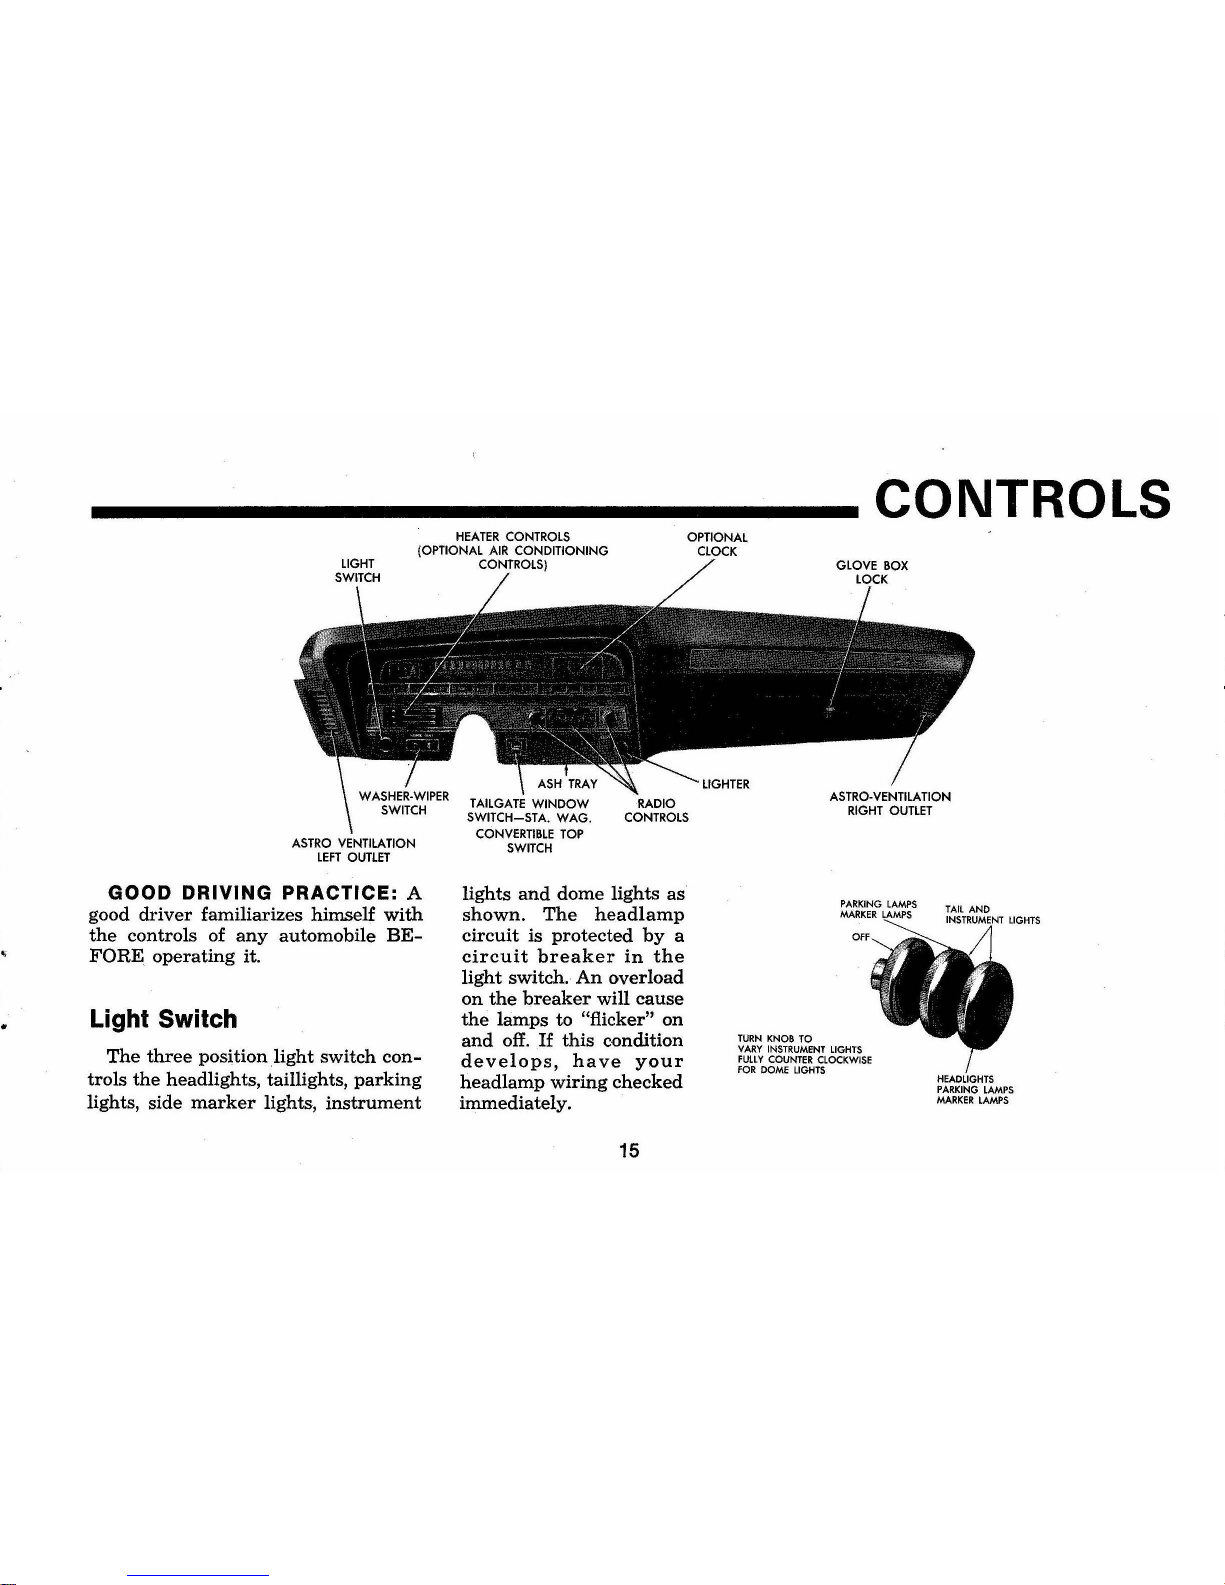
HEATER
CONTROLS
(OPTIONAL AIR
CONDITIONING
CONTROLS)
ASTRO VENTILATION
LEFT
OUTLET
GOOD
DRIVING
PRACTICE: A
good
driver
familiarizes himself
with
the
controls of
any
automobile
BE-
FORE
operating
it.
Light Switch
The
three
position
light
switch
con-
trols
the
headlights, taillights,
parking
lights, side
marker
lights,
instrument
lights
and
dome lights as
shown.
The
headlamp
circuit
is
protected
by
a
circuit
breaker
in
the
light
switch.
An
overload
on
the
breaker
will
cause
the
lamps
to "flicker"
on
and
off.
If
this
condition
develops,
have
your
headlamp
wiring
checked
immediately.
15
CONTROLS
OPTIONAL
CLOCK
TURN
KNOB
TO
PARKING
LAMPS
MARKER
VARY INSTRUMENT LIGHTS
FULLY
COUNTER
CLOCKWISE
FOR
DOME
LIGHTS
LIGHTS

Good Driving Practice: A good
driver
turns
on
his
headlamps
at
early
dusk,
and
during
bad
weather
to
help
other
drivers
see
his.
car
from
a distance,
even
though
he
himself
may
still
be
·'able
to
see
the
roadway
adequately.
Headlight Beam Switch
"High"
and
"low"
headlight
beams
are
controlled
by
the
floor
button
at
your
left
foot.
The
indicator, located
in
the
instrument
cluster
will
light
up
when
the
high
beams
are
in
use.
Good Driving Practice:
Always
use
the
"low
beam"
when
approaching
or
following
other
cars.
Turn Signals and Lane
Change Feature
The
turn
signal
lever
is located
on
the
left
side of
the
steering
column
immediately
under
the
steering
wheel.
The
lever
is
moved
upward
to
signal
a
right
turn
and
downward
to
signal
a
left
turn.
Lamps
on
the
front
and
rear
of
the
car
transmit
this signal
to
other
motorists
and
pedestrians.
The
ignition
switch
must
be
in
the
"ON"
position
in
order
for
the
turn
signals
to
be
operational.
This
feature
pre-
vents
battery
drain
if
the
lever
is
left
in
an
"ON"
position
when
your
car
is
not
in
use.
In a
normal
turning
situation
such
as
turning a corner,
the
turn
signal
is canceled
automatically
after
the
turn
is completed.
However,
in
some
driving
maneuvers
such
as
changing
lanes
on
an
expressway,
the
steering
wheel
is
not
turned
back
sufficently
after
completing
the
turn
to
automa-
tically cancel
the
turn
signal.
For
16
convenience
in
such
maneuvers
the
driver
can
flash
the
turn
signals
by
moving
the
turn
signal
lever
part
way
(to
the
first
stop)
and
holding
it
there.
The
lever
returns
to
the
neu-
tral
or
canceled
position
when
the
driver
releases
his
hold
on
the
lever.
A
green
light
on
the
instrument
cluster
flashes
to
indicate
proper
op-
eration
of
the
front
and
rear
turn
signal lamps.
If
the
indicator
lamp
re-
mains
on
and
does
not
flash,
check
for
a defective signal
lamp
bulb.
If
the
indicator
fails
to
light
when
the
lever
is moved,
check
the
fuse
and
indicator
bulb.

Four-Way Hazard Warning
Flasher
In
the
event
your
car
is disabled
or
you
stop
for
any
reason
on
the
high-
way,
the
four-way
hazard
warning
flasher
system
on
your
vehicle,
front
and
rear
signal lamps,
should
be
used
to
warn
other
drivers
that
your
ve-
CAUTION: Use
of
the hazard warning
flasher
while the vehicle is moving is
prohibited
In some states.
hicle is a traffic
hazard.
However,
you
should
do
everything
possible
to
avoid stopping
on
the
actual
highway.
The
hazard
warning
system
is
acti-
vated
by
pushing
in
on
the
button
located
just
below
the
steering
wheel
on
the
right
side of
the
stE:ering
col-
umn.
When
the
system
is
operating,
the
NOTE: The hazard warning flasher
will
operate with the ignition in the
"Lock"
po-
sition and the key removed, allowing the
car
to
be
locked while help is sought.
17
turn
signal
indicators
on
the
instru-
.
ment
cluster
will
flash simultaneously.
Use
this
system
only
when
your
vehicle is stopped
on
or
near
the
road-
way,
or
otherwise
constitutes
a traffic
hazard.
The
hazard
warning
flasher
may
be
canceled
by
pulling
the
button
outward.
CAUTION:
If
the brake pedal
is
de-
pressed when the hazard warning flasher
Is in operation, the lights
will
not
flash
but
will
glow continuously Instead.
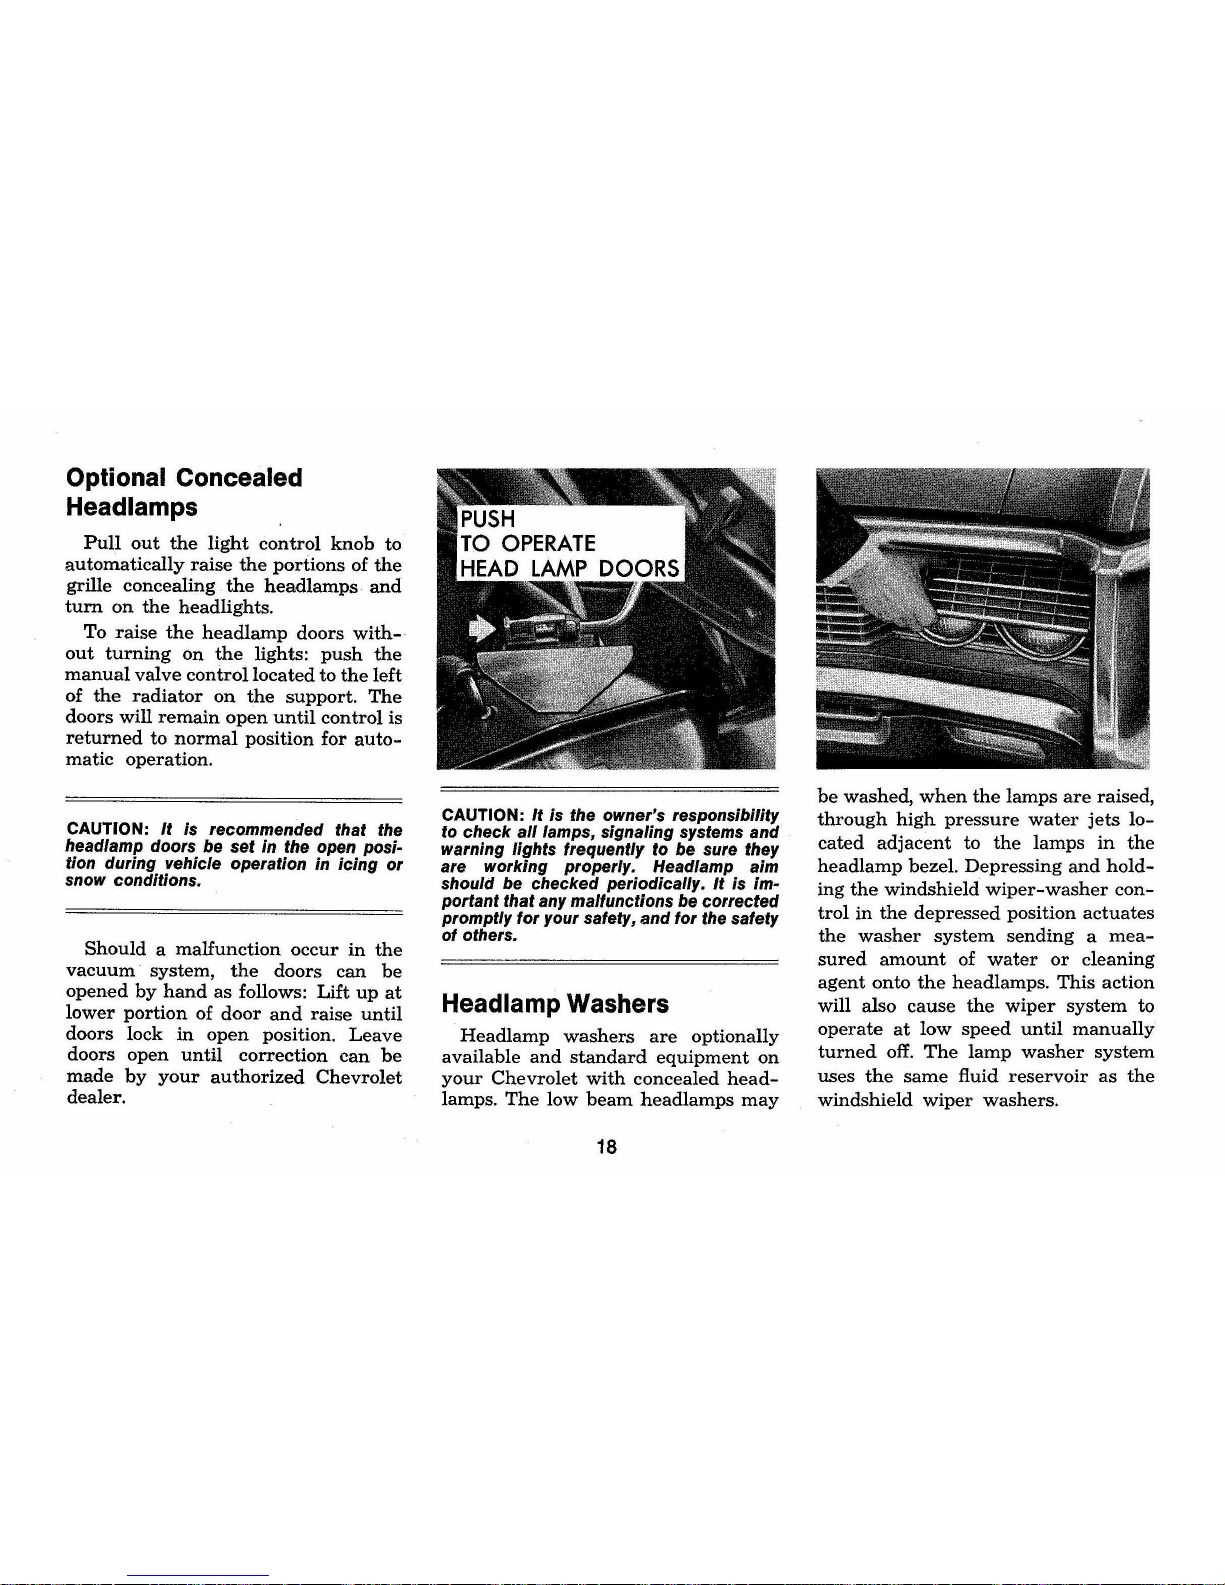
Optional Concealed
Headlamps
Pull
out
the
light
control
knob
to
automatically
raise
the
portions
of
the
grille concealing
the
headlamps·
and
turn
on
the
headlights.
To
raise
the
headlamp
doors
with-
out
turning
on
the
lights:
push
the
manual
valve
control
located
to
the
left
of
the
radiator
on
the
support.
The
doors
will
remain
open
until
control
is
returned
to
normal
position
for
auto-
matic
operation.
CAUTION:
It
is recommended that the
headlamp doors be set in the open
posi-
tion during vehicle operation in
icing
or
snow conditions.
Should a malfunction
occur
in
the
vacuum
system,
the
doors
can
be
opened
by
hand
as
follows:
Lift
up
at
lower
portion
of
door
and
raise
until
doors
lock
in
open
position.
Leave
doors
open
until
correction
can
be
made
by
your
authorized
Chevrolet
dealer.
CAUTION:
It
is
the owner's responsibility
to check
all
lamps, signaling systems and
warning lights frequently
to
be sure they
are working properly. Headlamp aim
should be checked periodically.
It
is important that any malfunctions be corrected
promptly
for
your safety,
and
for
the safety
of
others.
Headlamp Washers
Headlamp
washers
are
optionally
available
and
standard
equipment
on
your
Chevrolet
with
concealed
head-
lamps.
The
low
beam
headlamps
may
18
be
washed,
when
the
lamps
are
raised,
through
high
pressure
water
jets
lo-
cated
adjacent
to
the
lamps
in
the
headlamp
bezel.
Depressing
and
hold-
ing
the
windshield
wiper-washer
con-
trol
in
the
depressed
position
actuates
the
washer
system
sending a mea-
sured
amount
of
water
or
cleaning
agent
onto
the
headlamps.
This
action
will also
cause
the
wiper
system
to
operate
at
low
speed
until
manually
turned
off.
The
lamp
washer
system
uses
the
same
fluid
reservoir
as
the
windshield
wiper
washers.
Braking Systems
The
service
brake
system
is designed
for
braking
performance
under a wide
range
of
driving
conditions
even
when
the
vehicle is
loaded
to
its
full
rated
vehicle load.
CAUTION: Driving through deep water
may
affect brake performance. Applying
the brakes lightly
will
indicate whether
they have been
affected. To dry them
quickly, lightly apply the brakes while
maintaining
a slow forward speed with
an
assured clear distance ahead until brake
performance returns
to
normal.
Brake System Warning Light
The
service
brake
system
is
de-
signed so
that
in
the
event
of a hy-
draulic
fluid leak,
in
one-half
of
the
system,
the
other
half
still
provides
some
braking
action.
A
dual
purpose
brake
system
warn-
ing
light
is
located
at
lower
right
of
instrument
cluster.
The
warning
light
glows
red
to
indicate
to
the
operator
that
the
parking
brake
has
not
been
fully released.
It
also glows
red
while
braking
in
the
event
of
broken
brake
lines,
major
brake
fluid loss,
air
in
the
brake
lines
or a pressure
deviation
between
the
front
and
the
rear
wheel
brake
lines.
If
this
happens,
it
may
mean
that
braking
effectiveness is
im-
paired.
In
any
case,
the
cause
should
be
determined
and
any
problem
cor-
rected
as soon
as
possible. To
make
sure
the
brake
warning
light is
not
burned
out,
set
the
parking
brake
and
start
the
engine.
If
the
light
does
not
come on,
have
your
Chevrolet
dealer
correct
the
trouble
as
soon
as
possible.
NOTE: This warning
light
is
not
a substi·
tute for visual checking
of
the fluid level
in the master cylinder, which is
a normal
maintenance item
at
intervals specified on
page 63.
Power Brakes
Cars
equipped
with
power
brakes
use
engine
vacuum
to
reduce
the
brak-
ing
effort.
The
system
has a vacuum
reserve
which
will
supply
two
or
more
power
assisted
brake
applications
after
the
engine
has
stopped.
After
the
vacuum
reserve
has
been
exhausted,
the
vehicle
can
still
be
stopped
by
using
greater
pedal
force.
19
Automatic Brake Adjusters
All
Chevrolets
are
equipped
with
self-adjusting
brakes
designed
to
eliminate
periodic
brake
adjustments.
The
self-adjusting
mechanism
is
ac-
tuated,
as
needed,
whenever
the
car
is
moved
in
reverse
and
the
brakes
are
applied.
It
is possible,
however,
for excessive
brake
pedal
travel
to
develop if
the
required
reverse
move-
ment
with a brake
application does
not
take
place
during a prolonged
period
of
stop
and
go
forward
driving.
Should
this
occur,
the
car
should
be
driven
backward
and
forward
with
the
brakes
applied
at
the
end
of
each
directional
movement,
until
the
brake
pedal
travel
is
back
to
normal.
If
this
procedure
fails
to
restore
normal
pedal
travel,
or
if
any
abnormally
rapid
increase
in
pedal
travel
is experienced,
immedi-
ate
inspection
should
be
made
by
your
Authorized
Chevrolet
Dealer.
CAUTION: Care should be exercised
to
assure that
full
brake pedal travel is
not
obstructed
by
improper floor mats or
other interfering material under the pedal.
CAUTION: Brake linings should be periodically inspected for wear by a qualified technician. The frequency of this inspection depends
upon driving conditions such
as traffic or terrain, and also the driving techniques of individual owners. Your Chevrolet Dealer is best
qualified to advise you
as to how often this inspect:on
slJould
be performed. When brakes require relining, use Genuine General
Motor Parts.
Parking Brake
The
parking
brake
operates
inde-
pendently
. of
the
regular
foot
brake
hydraulic
system.
It
is
applied
by
fully
depressing
the
foot
pedal
which
is
lo-
cated
to
the
lower
left
side
of
the
front
compartment
under
the
instrument
panel.
The
parking
brake
is
released
by
pulling
the
"BRAKE
RELEASE"
lever
located
directly
over
the
park
-
ing
brake
foot pedal.
Never
drive
the
car
with
the
parking
brake
engaged.
Clutch Adjustment
Clutch
adjustment
should
be
checked
and
adjusted
periodically
as
necessary
to
compensate
for
clutch
wear.
To check,
depress
pedal
by
hand
until
resistance
is felt.
Free
travel
of
pedal
should
be
approximately
one
inch;
if
very
little
or
no
free
travel
is
evidence,
clutch
adjustment
is
re-
quired.
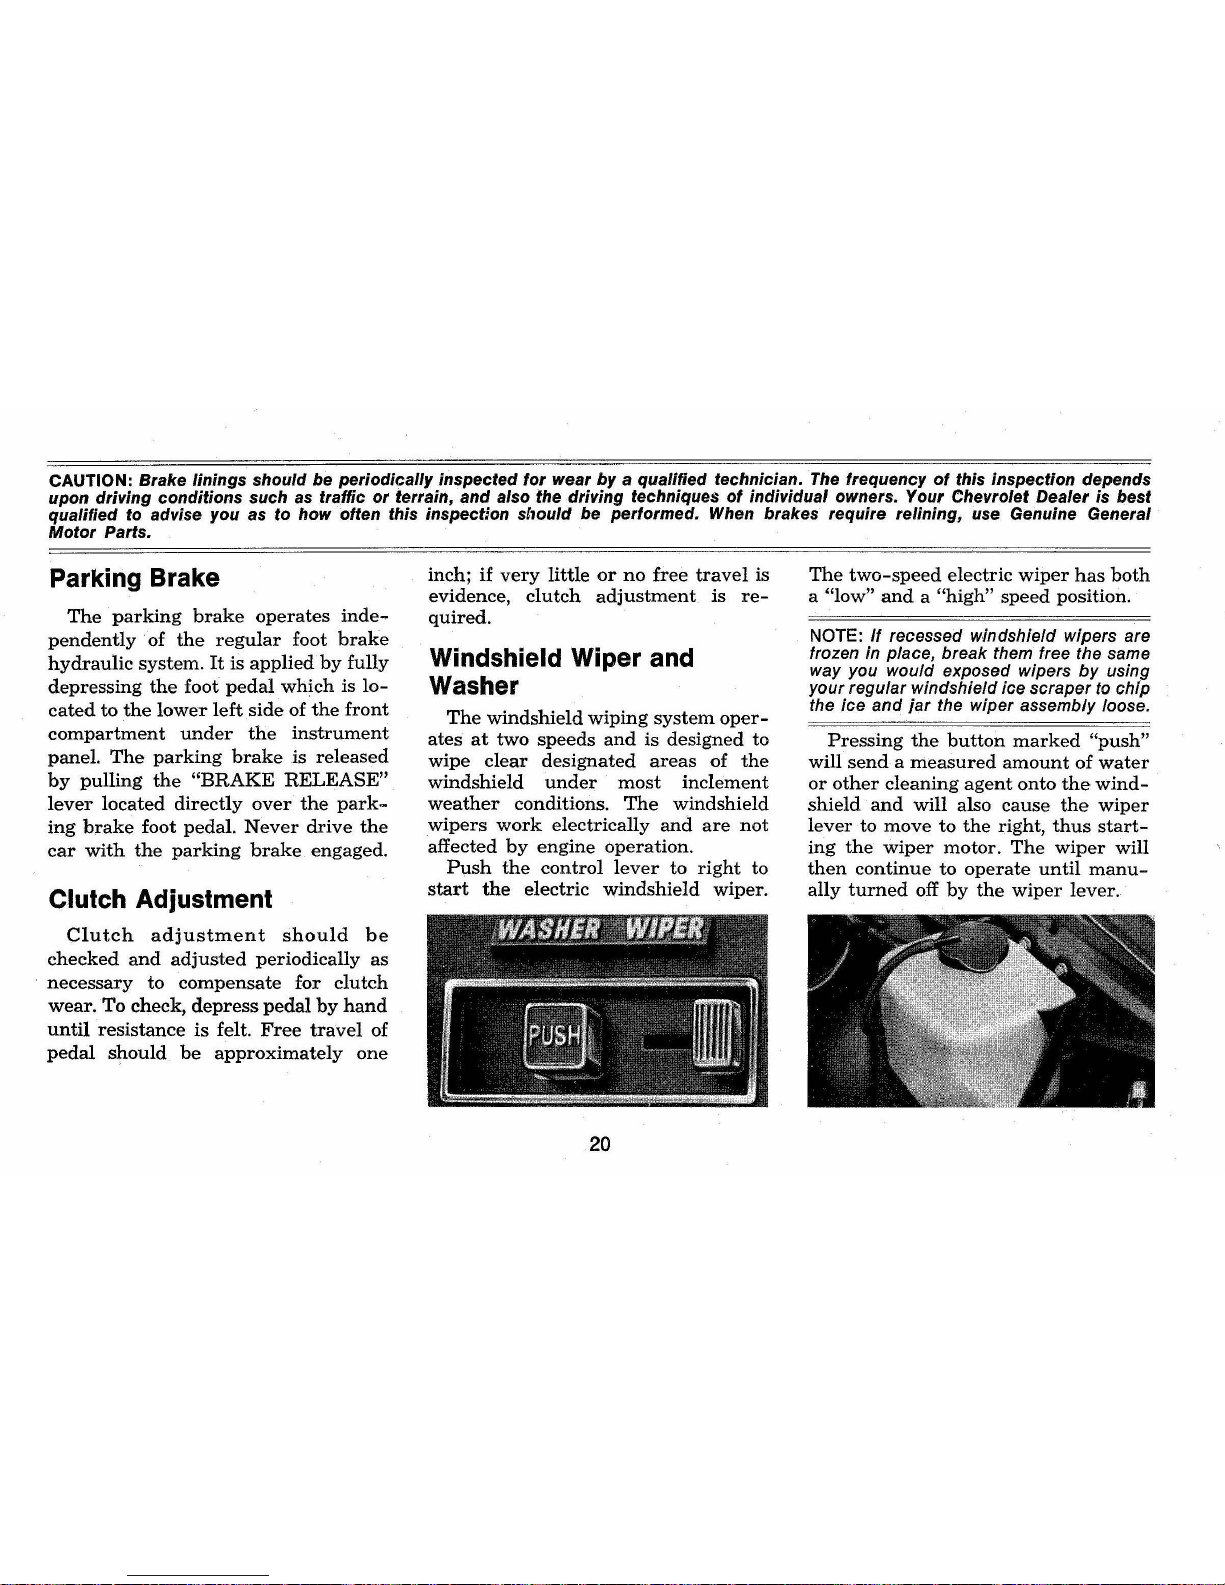
Windshield Wiper and
Washer
The
windshield
wiping
system
oper-
ates
at
two
speeds
and
is designed
to
wipe
clear
designated
areas
of
the
windshield
under
most
inclement
weather
conditions.
The
windshield
wipers
work
electrically
and
are
not
affected
by
engine
operation.
Push
the
control
lever
to
right
to
start
the
electric
windshield
wiper.
20
The
two-speed
electric
wiper
has
both
a "low"
and a "high"
speed
position.
NOTE:
If
recessed windshield wipers are
frozen in place, break them free the
same
way you would exposed wipers
by
using
your regular windshield ice scraper to chip
the ice
and
jar
the wiper assembly loose.
Pressing
the
button
marked
"push"
will
send a measured
amount
of
water
or
other
cleaning
agent
onto
the
wind-
shield
and
will
also
cause
the
wiper
lever
to
move
to
the
right,
thus
start-
ing
the
wiper
motor.
The
wiper
will
then
continue
to
operate
until
manu-
ally
turned
off
by
the
wiper
lever.
Fill
the
washer
jar
only
% full
dur-
ing
the
winter
to
allow
for
expansion
if
the
temperature
should
fall low
enough
to
freeze
the
solution.
CAUTION: Have the fluid level in the
washer reservoir checked regularly, with
special attention
to keeping the reservoir
filled during periods
of
heavy use. GM
Optlkleen should be used
as
directed to
prevent freezing damage and
for
better
cleaning
of
the windshield under
all
con-
ditions.
Do
not
use radiator anti-freeze
because this
will
cause
paint
damage.
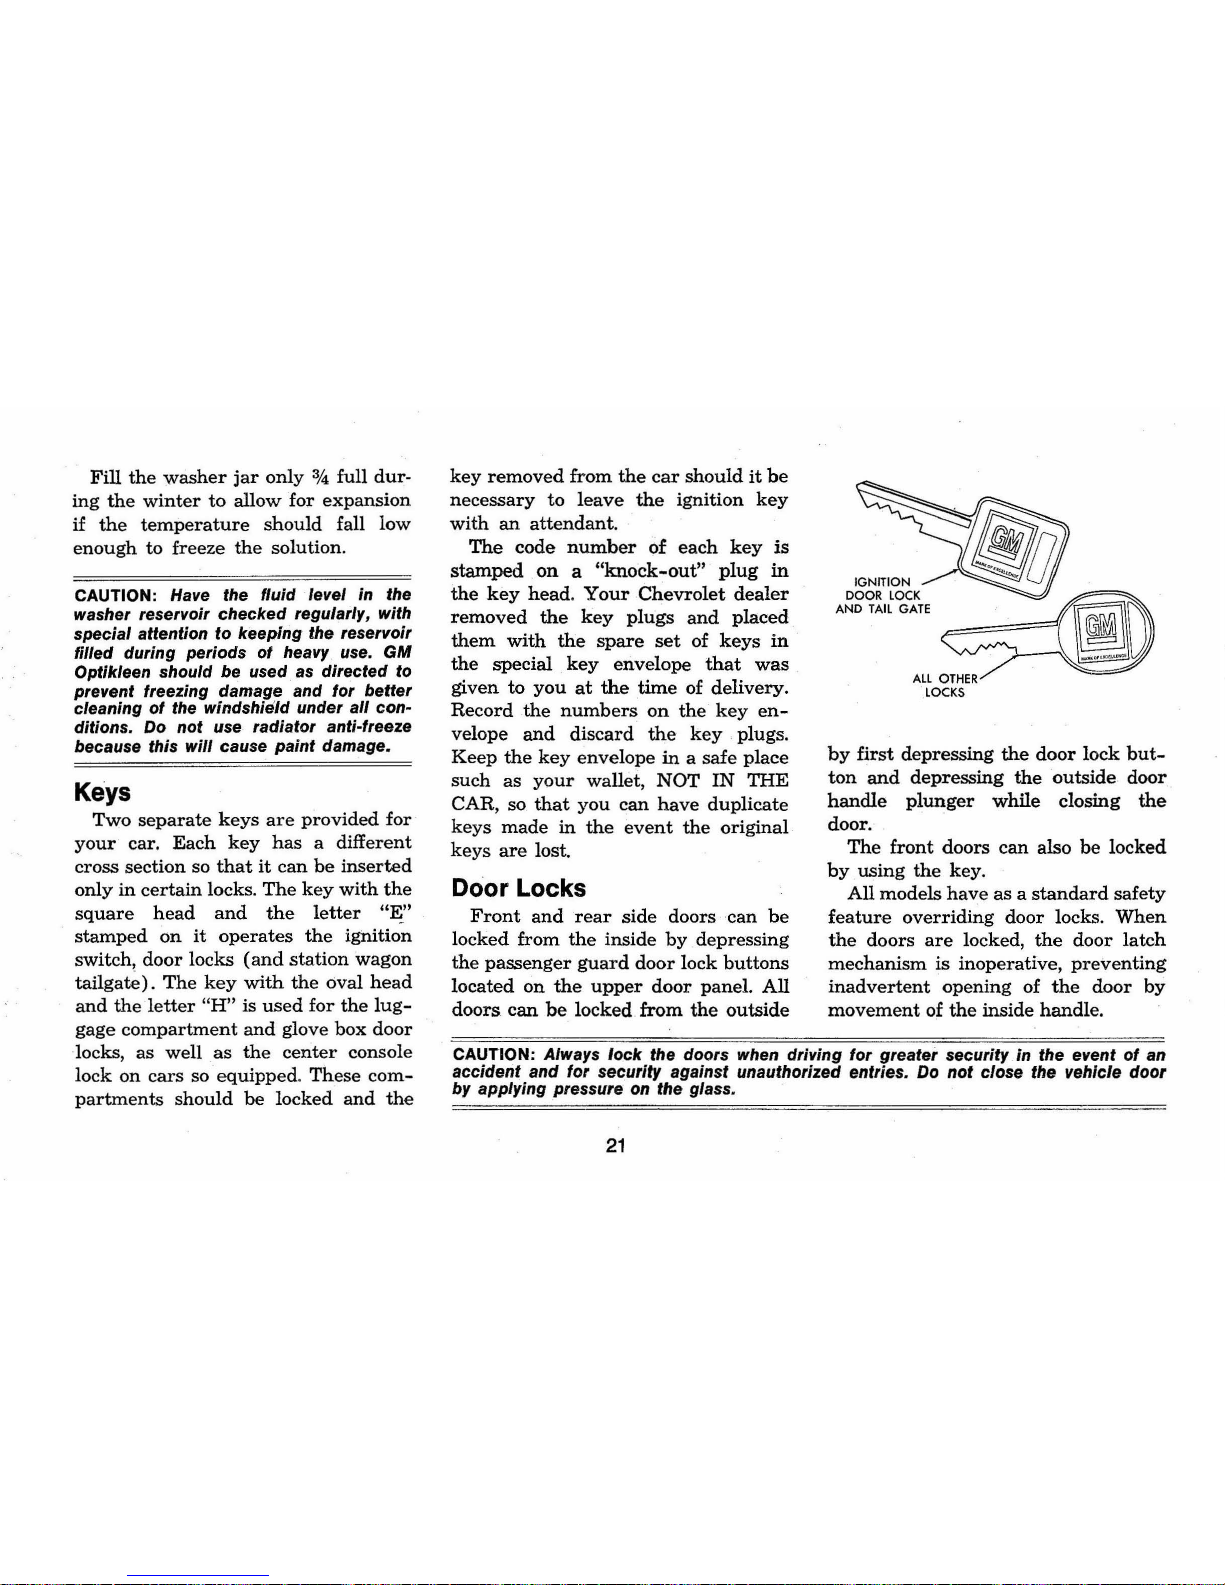
Keys
Two
separate
keys
are
provided
for
your
car.
Each
key
has
a different
cross section so
that
it
can
be
inserted
only
in
certain
locks.
The
key
with
the
square
head
and
the
letter
"E:'
stamped
On
it
operates
the
ignition
switch,
door
locks
(and
station
wagon
tailga~).
The
key
with
the
oval
head
and
the
letter
"H"
is
used
for
the
lug-
gage
compartment
and
glove
box
door
locks, as
well
as
the
center
console
lock
on
cars
so
equipped. These
com-
partments
should
be
locked
and
the
key
removed
from
the
car
should
it
be
necessary
to
leave
the
ignition
key
with
an
attendant.
The
code
number
of
each
key
is
stamped
on a "knock-out"
plug
in
the
key
head. Your
Chevrolet
dealer
removed
the
key
plugs
and
placed
them
with
the
spare
set
of
keys
in
the
special
key
envelope
that
was
given
to
you
at
the
time
of delivery.
Record
the
numbers
on
the
key
en-
velope
and
discard
the
key
plugs.
Keep
the
key
envelope
in
a safe place
such
as
your
wallet, NOT
IN
THE
CAR,
so
that
you
can
have
duplicate
keys
made
in
the
event
the
original
keys
are
lost.
Door Locks
Front
and
rear
side
doors
can
be
locked
from
the
inside by.
depressing
the
passenger
guard
door
lock
buttons
located
on
the
upper
door
panel.
All
doors
can
be
locked
from
the
outside
,:\'6':'~~,
1!iJ!JJ
AND
TAIL
GATE
~li1~
~
~~jJ
ALL
OTHER
LOCKS
by
first
depressing
the
door
lock
but-
ton
and
depressing
the
outside
door
handle
plunger
while
closing
the
door.
The
front
doors
can
also
be
locked
by. using
the
key.
All
models
have
as a standard
safety
feature
overriding
door
locks.
When
the
doors
are
locked,
the
door
latch
mechanism
is inoperative,
preventing
inadvertent
opening of
the
door
by
movement
of
the
inside handle.
CAUTION: Always
lock
the doors when driving
for
greater security
in
the event
of
an
accident and
for
security against unauthorized entries. Do
not
close the vehicle door
by applying pressure
on
the glass.
21
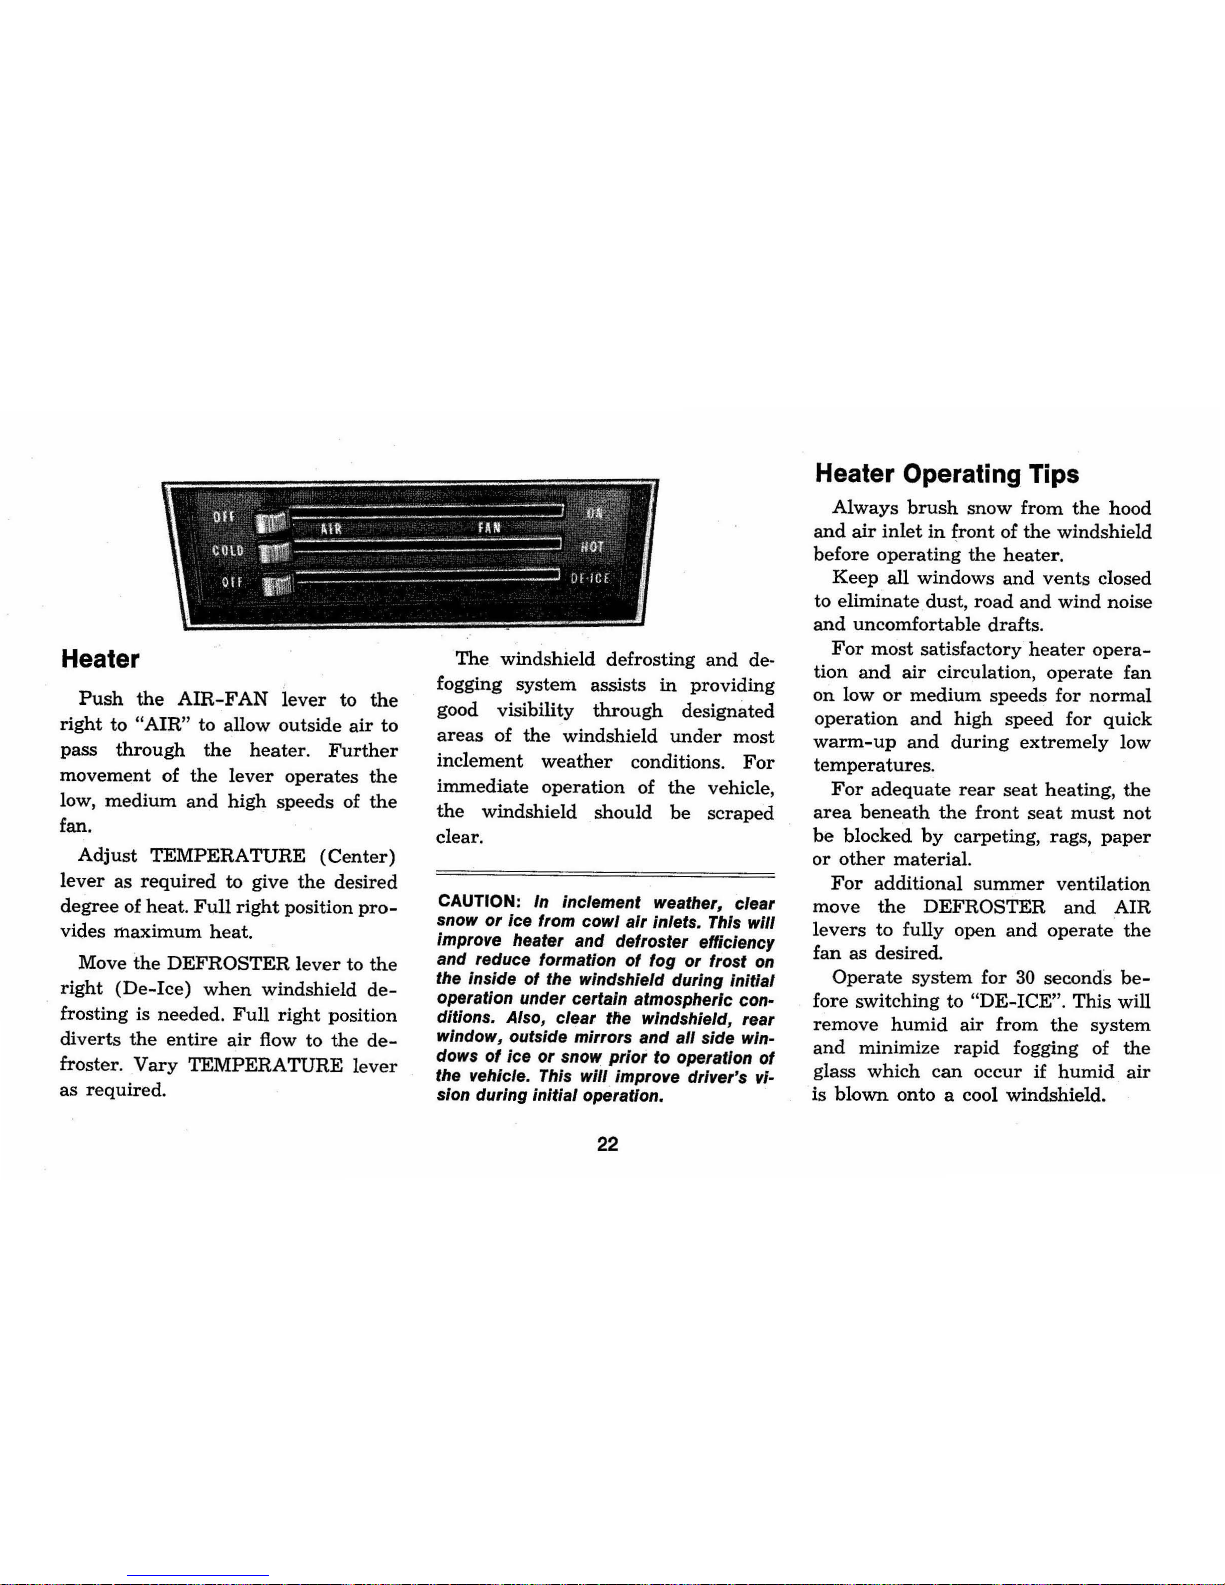
Heater
Push
the
AIR-FAN
lever
to
the
right
to
"AIR"
to allow outside
air
to
pass
through
the
heater.
Further
movement
of
the
lever
operates
the
low,
medium
and
high
speeds of
the
fan.
Adjust
TEMPERATURE
(Center)
lever
as
required
to
give
the
desired
degree
of heat.
Full
right
position
pro-
vides
maximum
heat.
Move
the
DEFROSTER
lever
to
the
right
(De-Ice)
when
windshield
de-
frosting is needed.
Full
right
position
diverts
the
entire
air
flow to
the
de-
froster. Vary
TEMPERATURE
lever
as
required.
The
windshield defrosting
and
de-
fogging
system
assists
in
providing
good visibility
through
designated
areas
of
the
windshield
under
most
inclement
weather
conditions.
For
immediate
operation
of
the
vehicle,
the
windshield should
be
scraped
clear.
CAUTION:
In inclement weather, clear
snow
or
ice from
cowl
air
inlets. This
will
improve heater
and
defroster efficiency
and reduce formation
of
fog
or
frost
on
the inside
of
the windshield during
initial
operation under certain atmospheric conditions. Also, clear tlie windshield, rear
window, outside mirrors and
all
side win-
dows
of
ice
or
snow
prio;
to
operation of
the vehicle. This
will
improve driver's vi-
sion during
initial
operation.
22
Heater Operating Tips
Always
brush
snow
from
the
hood
and
air
inlet
in
front
of
the
windshield
before
operating
the
heater.
Keep
all windows
and
vents
closed
to
eliminate
dust,
road
and
wind
noise
and
uncomfortable
drafts.
For
most
satisfactory
heater
opera-
tion
and
air
circulation,
operate
fan
on
low
or
medium
speeds for
normal
operation
and
high
speed
for
quick
warm-up
and
during
extremely
low
temperatures.
For
adequate
rear
seat
heating,
the
area
beneath
the
front
seat
must
not
be
blocked
by
carpeting, rags,
paper
or
other
material.
For
additional
summer
ventilation
move
the
DEFROSTER
and
AIR
levers
to fully open
and
operate
the
fan
as desired.
Operate
system
for
30
seconds
be-
fore switching to
"DE-ICE".
This
will
remove
humid
air
from
the
system
and
minimize
rapid
fogging of
the
glass
which
can
occur
if
humid
air
is
blown
onto
a cool windshield.
 Loading...