

Chevrolet Beat DIESEL Owner's Manual
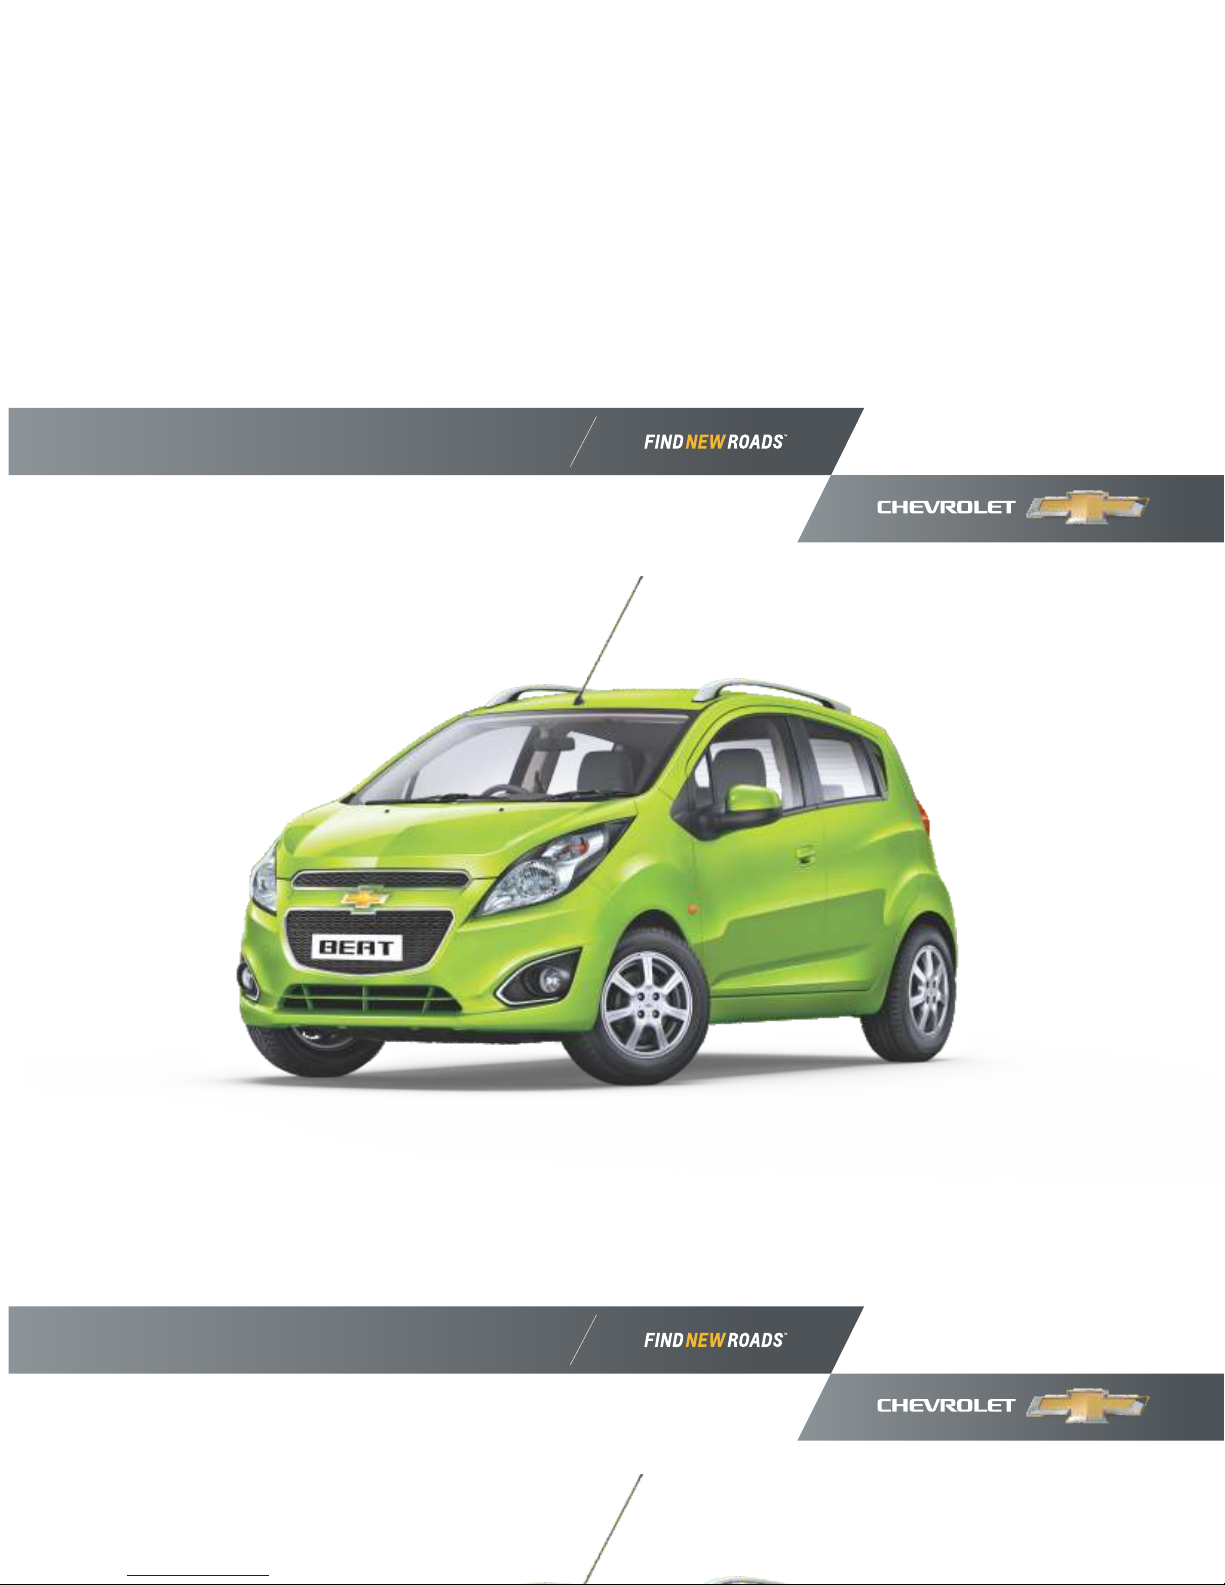
CHEVROLET BEAT DIESEL
CHEVROLET BEAT DIESEL

Dear Customer,
Welcome to the Chevrolet family. We wish to thank you for choosing Chevrolet Beat.
It is our constant endeavor to provide you with products that offer excellent performance through out their ownership period. Which is
why, in addition to offering great cars, we have also set up an extensive, and very well equipped network of retailers and authorized
service centers across the country.
Naturally, these Chevrolet retailer know everything about your car and provides you with the best service possible. In fact, every retailer
is equipped with the most advanced technology, technicians specially trained by us and genuine spares. Needless to say, they are also
committed to ensure your complete satisfaction.
So, please contact a Chevrolet retailer for any servicing need and make sure that only genuine spares are used for your car.
This Manual will familiarize you with the operation and maintenance of your new vehicle. It will also provide you with important safety
information. Please do read it carefully and follow the recommendations. In fact, the Manual is like a permanent part of your car. And it
would go a long way in ensuring a safe and trouble-free operation for your car.
Should you have any query please feel free to call our 24 hr. Helpline at 1800 3000 8080 or email us at : gmi.cac@gm.com.
Happy Motoring


CONTENTS
Introduction ...................................... 3
Initial drive information ................... 5
Keys, doors and windows .............. 15
Seats and restraints ......................... 29
Storage ........................................... 51
Instruments and controls ................ 57
Lighting .......................................... 69
Infotainment system*...................... 75
Climate control ............................... 85
Driving and operating .................... 91
Vehicle care .................................. 103
Service and maintenance .............. 139
Technical data .............................. 145
Service and warranty .................... 149
24x7 Roadside assistance ............. 179
Service network ........................... 187


Yourvehicleisadesigned combination
ofadvancedtechnology, safety, enviro-
nmentalfriendliness andeconomy.
ThisOwner's Manualprovidesyou
withallthenecessaryinformationto
enableyoutodriveyourvehicle safely
andefficiently.
Makesureyourpassengersare awareof
thepossible riskofaccident andinjury
whichmayresultfrom improperuseof
thevehicle.
Youmustalwayscomplywiththe
specificlawsandregulationsofthe
countrythatyouare in. Theselaws may
differfromtheinformationinthis
Owner'sManual.
WhenthisOwner'sManualrefersto a
CHEVROLET retailervisit, we
recommendyour ChevroletService
Partner.
AllChevroletServicePartners provide
first-classserviceat reasonableprices.
Experienced mechanicstrainedby
Chevrolet accordingtospecific
Chevrolet instructions.
Thecustomerliteraturepackshould
alwaysbekeptreadytohandinthe vehicle.
USINGTHISMANUAL
n This Manual describes all options and
features available for this model.
Certain descriptions, including
those for display and menu
functions, may not apply to your
vehicle due to model variant,
country specifications, special
equipment or accessories.
n This section will give you an initial
overview.
n Thetableofcontentsatthe beginning
ofthisManualandwithin eachchapter
showswherethe informationis
located.
n TheOwner's Manualusesthe
factoryenginedesignations.The
correspondingsalesdesignations
canbefoundinthechapter
"Technicaldata".
n Directionaldata e.g. leftorright, or
frontorback, alwaysrelatetothe
directionoftravel.
INTRODUCTION
Introduction ...................................... 3
Using this Manual............................. 3
Danger, warnings and cautions ........ 4
3Introduction
INTRODUCTION
This Manual describes the options and
trims available at the time of publication. Some of the items covered may not
apply to your vehicle. Contact your
CHEVROLET retailer for information
on option and trim availability.
Non Chevrolet Genuine Parts &
Accessories have not been examined or
approved by General Motors India Pvt.
Ltd. We can certify neither the
suitability nor the safety of Non
Chevrolet Genuine Parts & Accessories
and are not liable for damage caused by
their use.
Warning : Tampering of wiring
harness or fitment of non genuine
accessories in your vehicle may lead to
short circuit resulting in fire.
We wish you many hours of pleasurable
driving Chevrolet.
* or (Option) : The asterisk and
(Option) in this Manual signify an item
of equipment that is not included on all
vehicles. Such items include engine
options, model variations specific to
one country, and optional equipment.
All information, illustrations, and
specifications in this Manual are based
on the latest product information
available at the time of publication.
General Motors India Pvt. Ltd. reserves
the right to change specifications or
designs at any time without notice and
without incurring obligation.
This vehicle may not comply with the
standards or regulations of other
countries. Before attempting to register
this vehicle in any other country, check
all applicable regulations and make any
necessary modifications.
n
not support your specific language.
n Display messages and interior
labelling are written in bold letters.
DANGER, WARNINGSAND
CAUTIONS
The vehicle display screens may
Danger
Text marked Danger provides
information on risk of fatal injury.
Disregarding this information may
endanger life.
Warning
Text marked Warning provides
information on risk of accident or
injury. Disregarding this information
may lead to injury.
Caution
TextmarkedCautionprovides
information onpossibledamageto
thevehicle. Disregardingthis
informationmayleadtovehicle
damage.
Note
Text marked Note indicates a point
to take into account when operating
the vehicle. Failure to observe this
may lead to incorrect operation.
4 Introduction
INITIAL DRIVE
INFORMATION
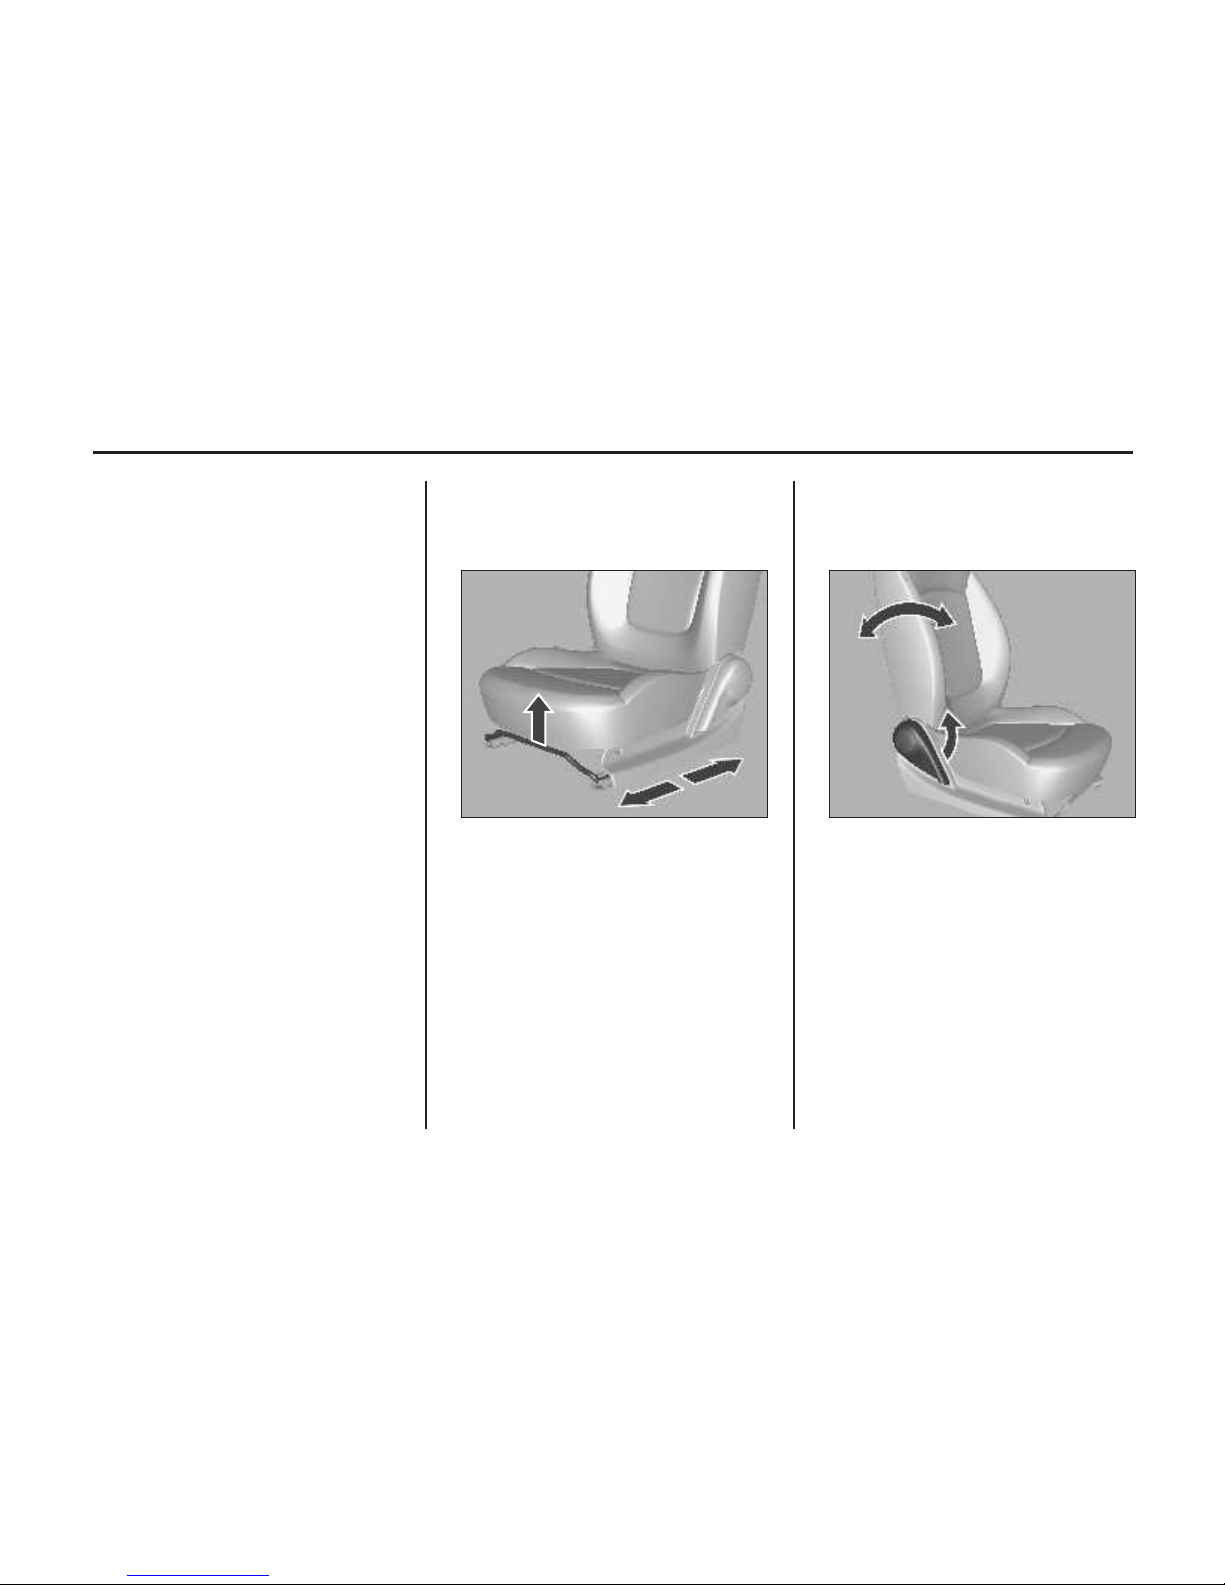
SEAT ADJUSTMENT
Seat Positioning
Pull handle, slide seat, release handle.
See Seat adjustment on page 39.
See Seat positioning on page 39.
Seat Backrest
Pull lever, adjust inclination and release
lever. Allow the seat to engage audibly.
Do not lean on seat backrest when
adjusting.
Seat adjustment ................................ 5
Safety belts ....................................... 6
Mirror adjustment ............................ 7
Steering wheel adjustment* .............. 7
Instrument panel overview ............... 8
Exterior lighting ............................... 9
Horn ............................................... 10
Washer and wiper systems .............. 11
Climate control ............................... 11
Transmission .................................. 12
Getting started................................. 12
Parking ........................................... 13
5Initial Drive Information

Pull the head restraint upwards.
To move down press the release button
and push the head restraint downwards.
To pull out a head restraint completely,
press the release button and take out the
head restraint.
See Head restraints on page 37.
Head Restraint Adjustment
SAFETY BELTS
Withdraw belt from reel, guide it
untwisted across the body and engage
the latch plate in the buckle.
To release the belt, press the red button
on the belt buckle.
See Safety belts on page 41.
See Airbag system on page 41.
See Seat positioning on page 39.
To adjust the height of the entire seat
cushion, rotate the knob.
Rotate the knob clock-wise to move up
and anti-clock wise to move down.
Seat Height Adjustment *
(Driver’s Seat)
6 Initial Drive Information
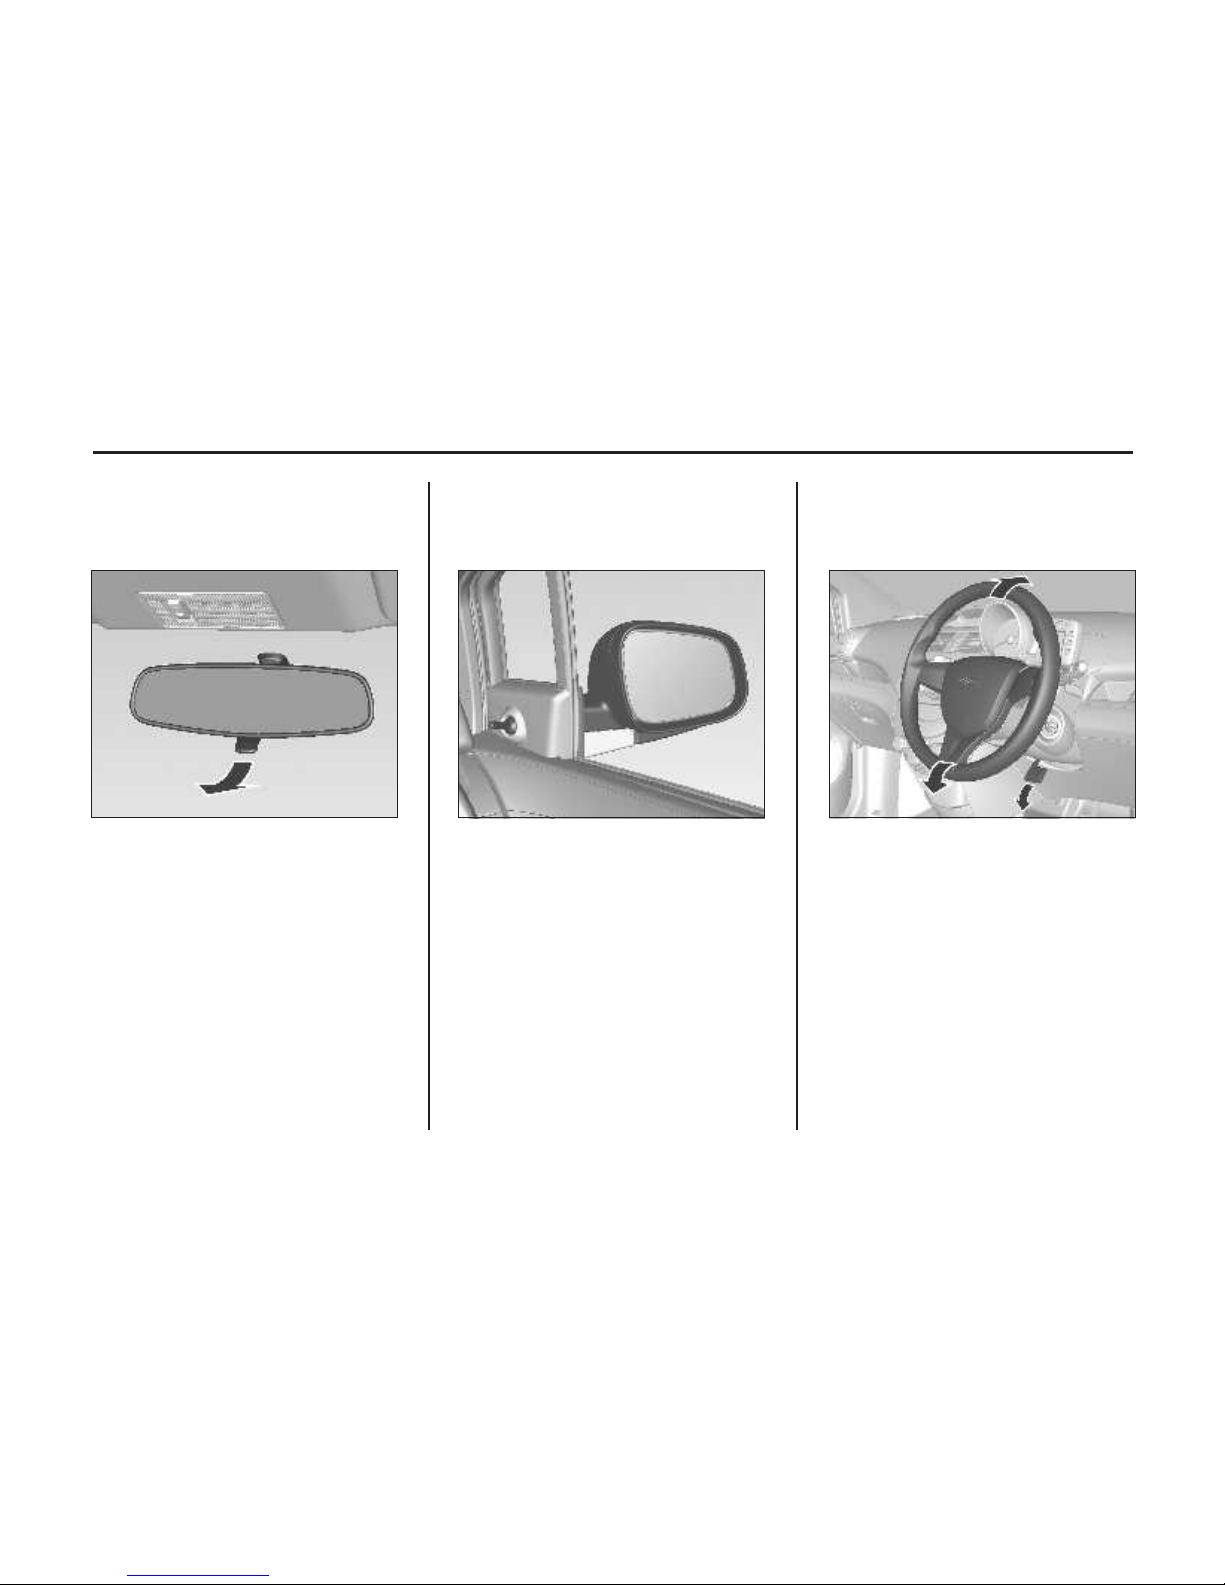
Exterior Mirrors
Simply move the adjusting lever in the
desired direction to adjust the mirror
angles.
See Convex mirrors on page 23.
See Folding mirrors on page 23.
Unlock lever, adjust steering wheel,
then engage lever and ensure it is fully
locked. Do not adjust steering wheel
unless vehicle is stationary.
See Airbag system on page 41.
See Ignition switch positions on page
94.
STEERING WHEEL
ADJUSTMENT*
MIRROR ADJUSTMENT
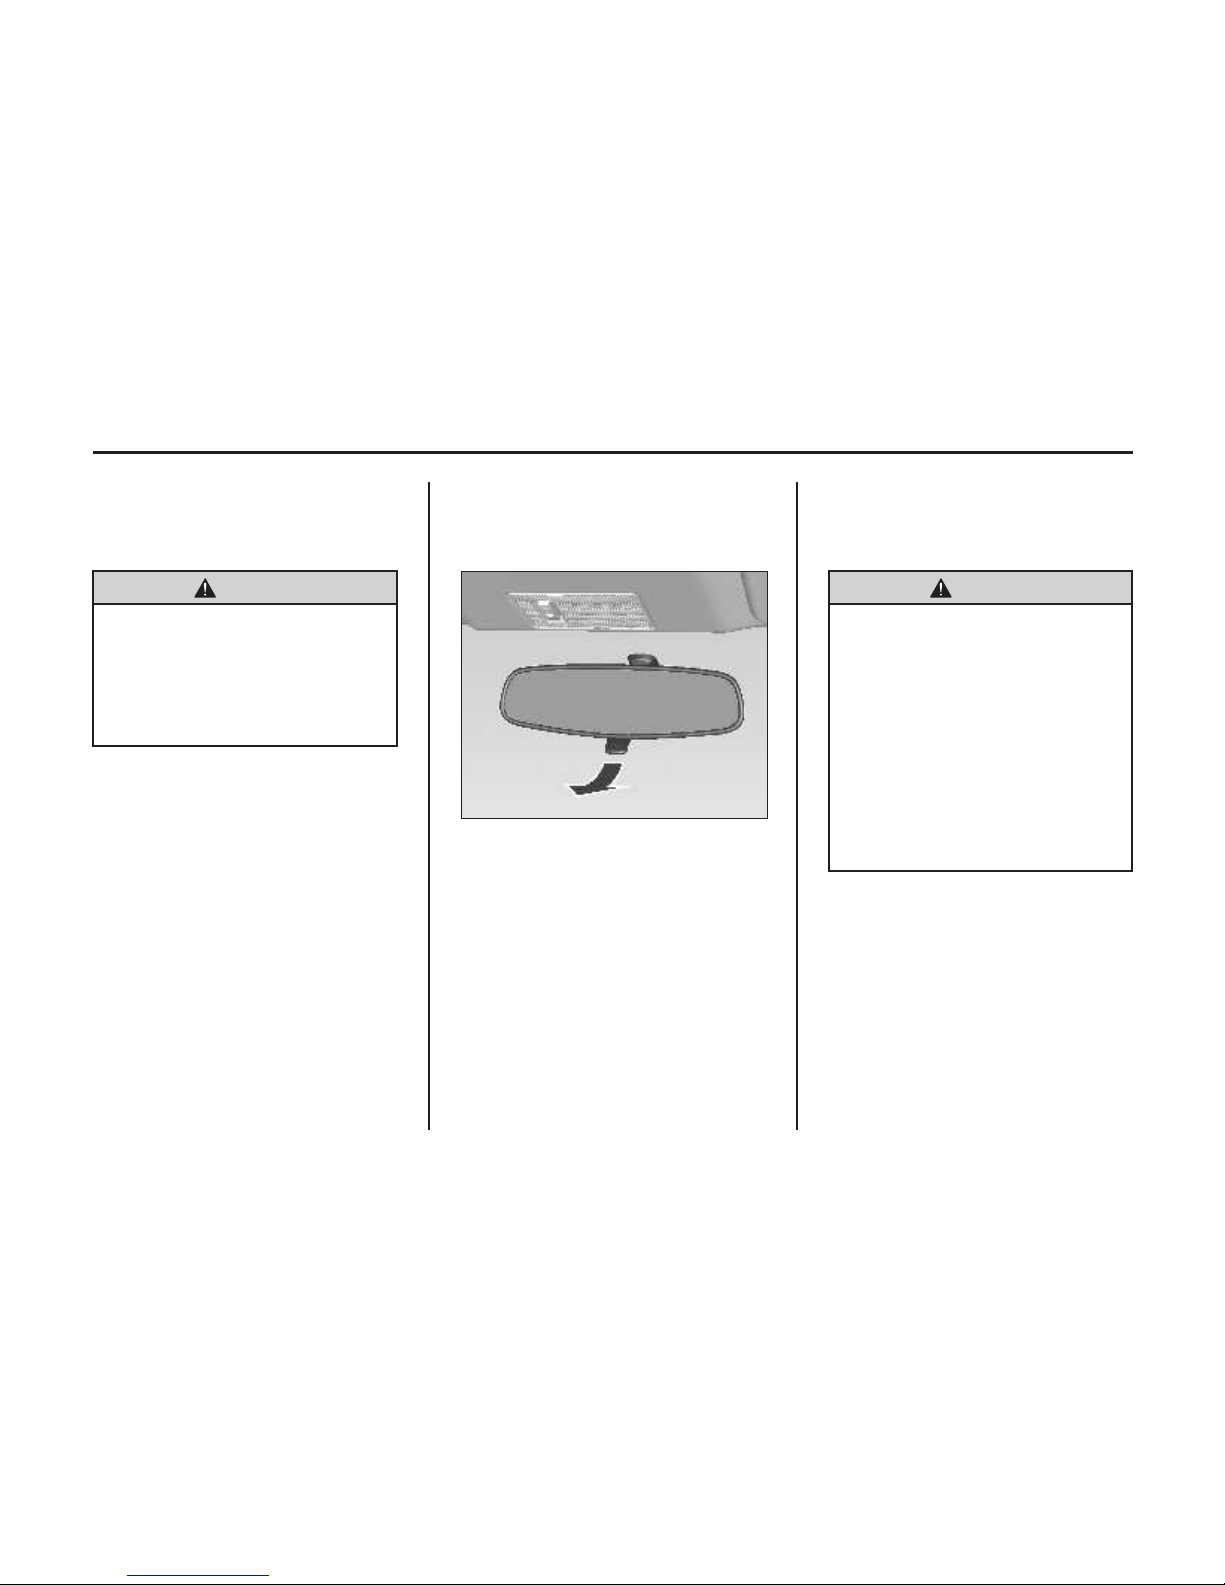
Interior Mirror
To adjust the inside rearview mirror,
hold the rearview mirror in the center
and move it to view the area behind the
vehicle.
To reduce dazzle, adjust the lever on the
underside of the mirror housing.
See Manual rear view mirror on page
24.
7Initial Drive Information
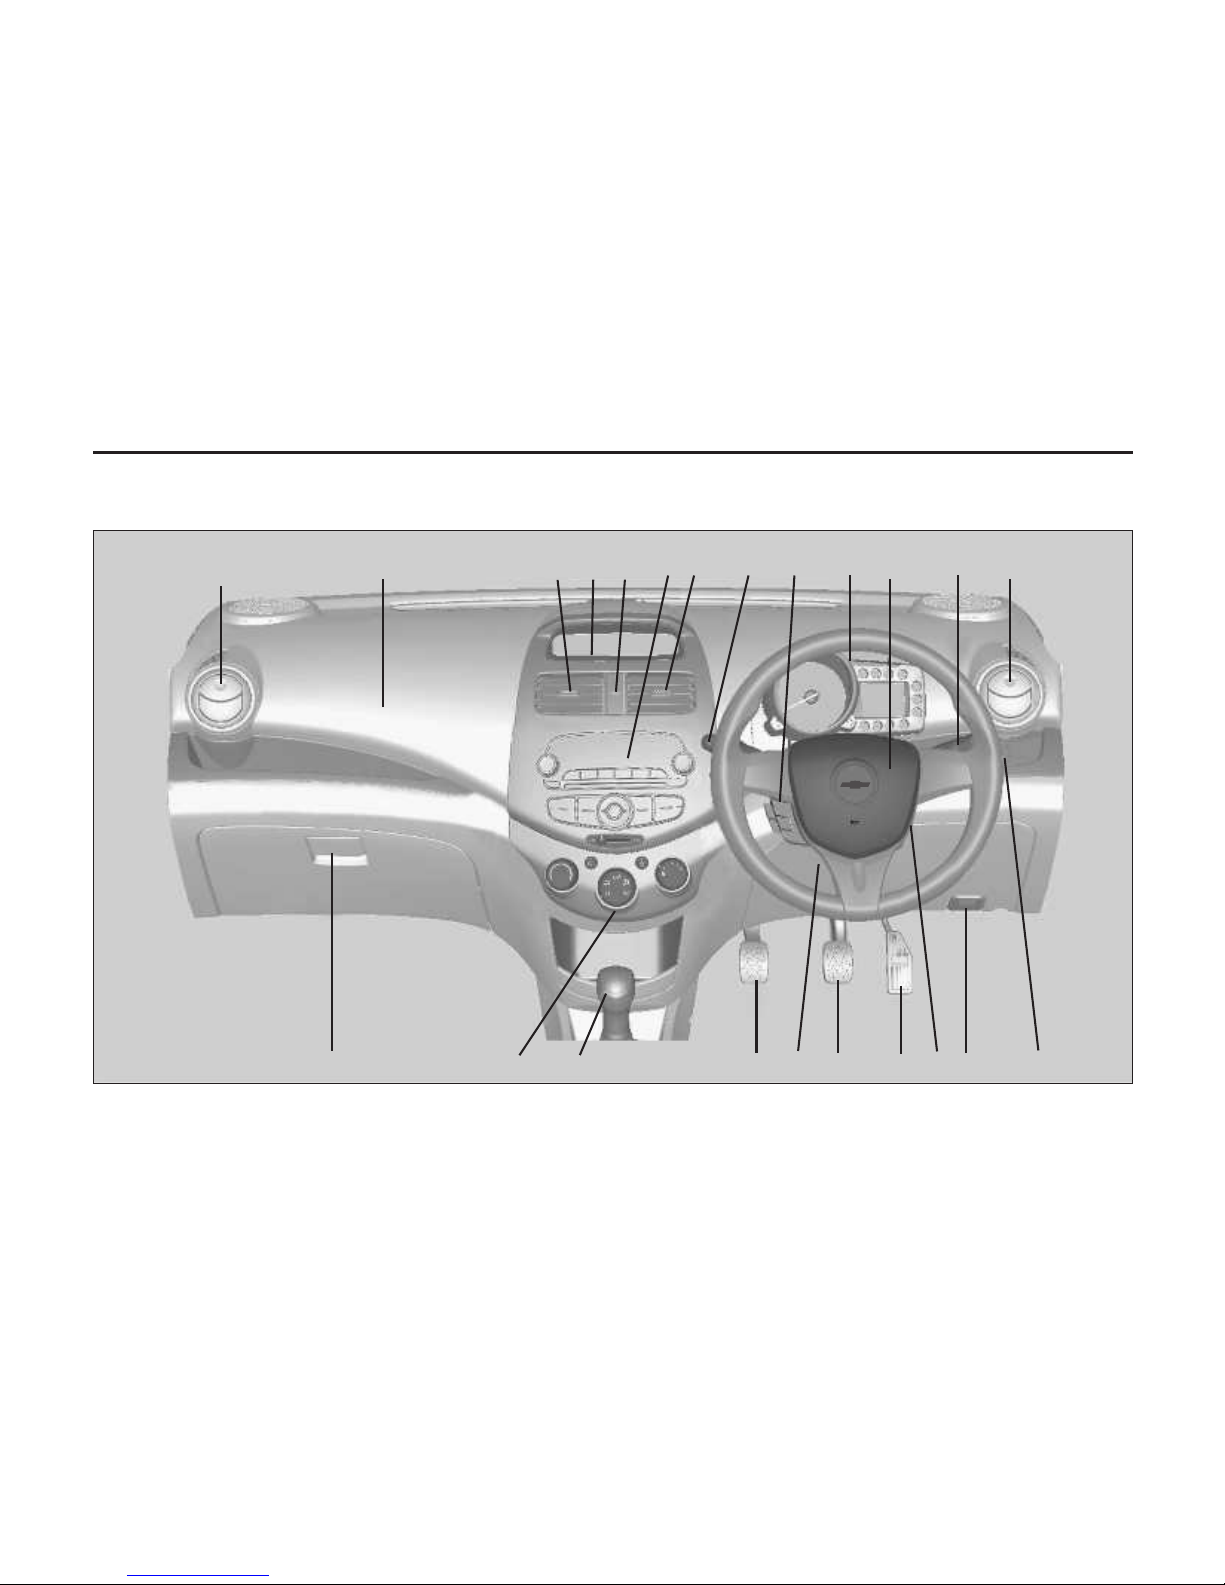
INSTRUMENT PANEL OVERVIEW
11
5
34266
7
89
10 11 12 16 17 14 13 15 18 19
20 21
8 Initial Drive Information
+
-
MODE
PWR
SEEK
OFF
ON
OFF
OFF
ON
OFF
1. Side air vents
2. Wiper and washer lever
3. Horn, Driver airbag
4. Cluster
5. Exterior lamp lever
6. Center air vents
7. Infotainment system
8. Hazard warning switch
9. Passenger airbag
10. Glove box
11. Climate control system
12. Shift lever
13. Accelerator pedal
14. Brake pedal
15. Ignition switch
16. Clutch pedal
17. Steering wheel adjustment
18. Hood release lever
19. Headlamp range adjustment
20. Telltale IP display unit
21. Steering wheel audio control
switch
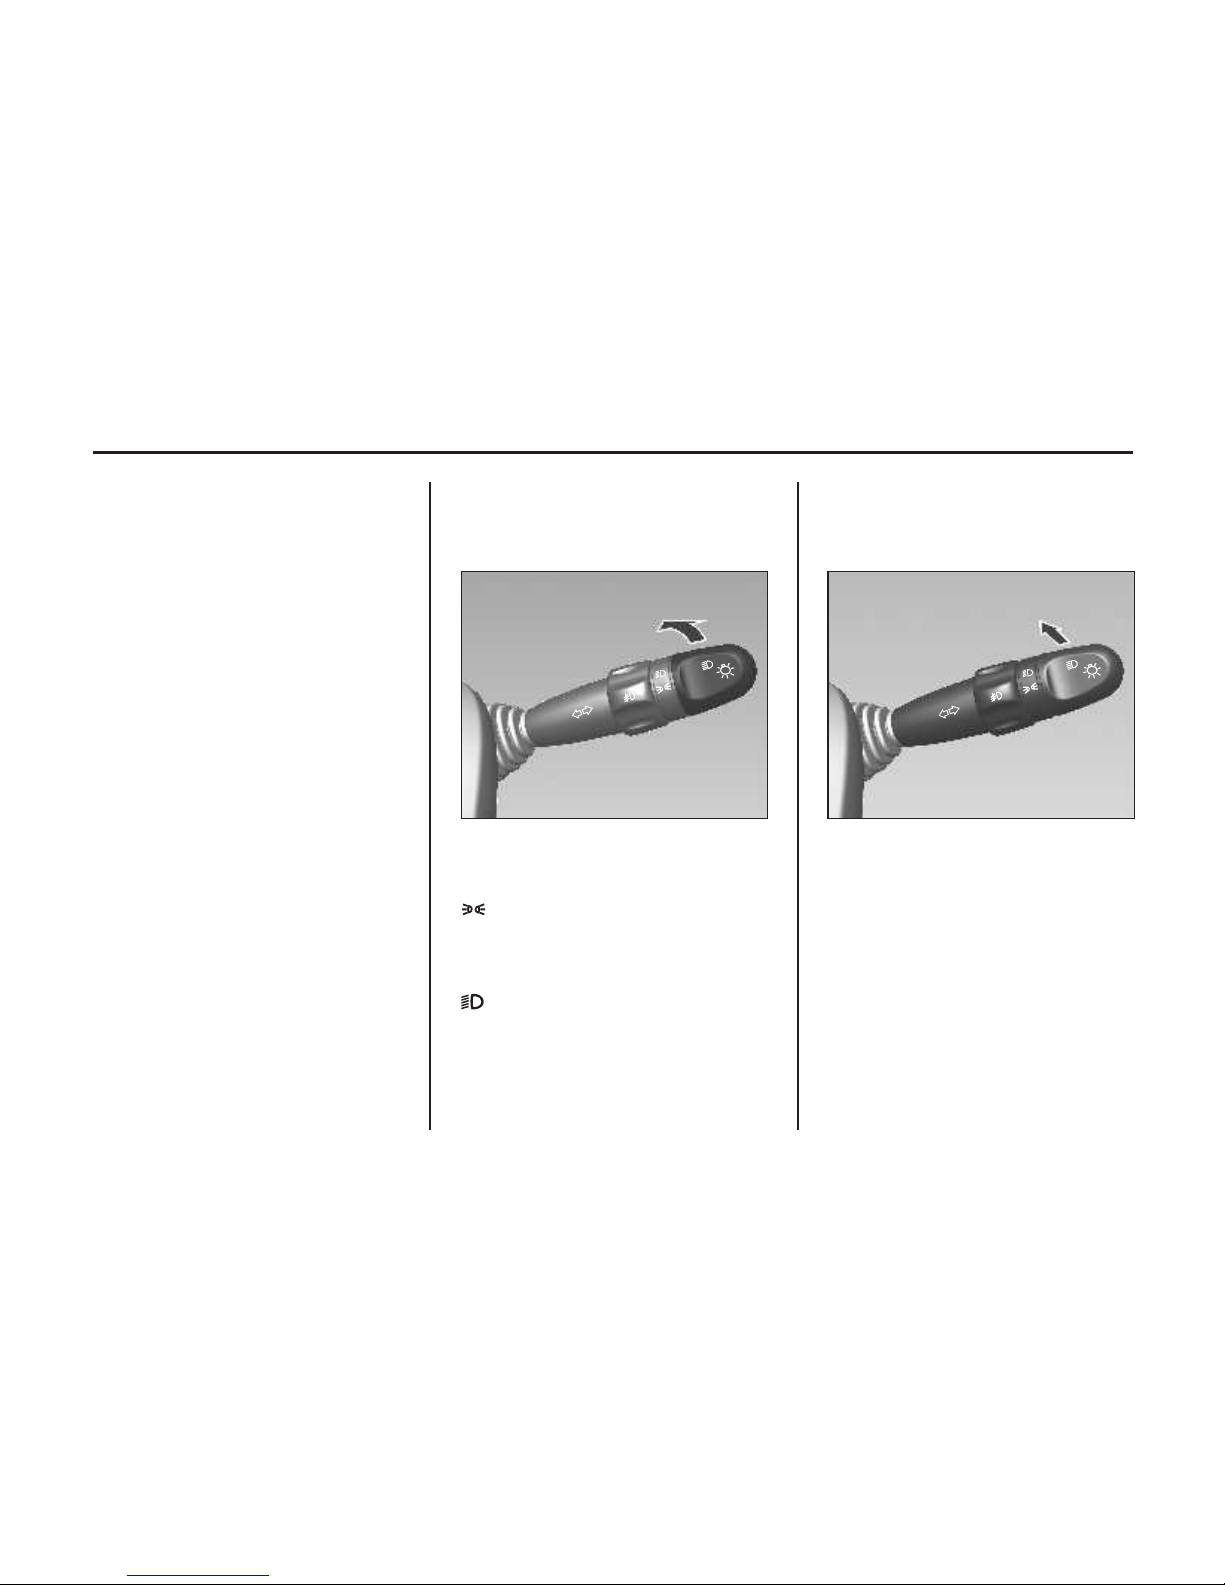
EXTERIOR LIGHTING
Turn light switch.
OFF : All the lamps are off.
: The parking lamps, tail lamps,
number plate lamps and
instrument panel lamps are
illuminated.
: The low-beam headlamps and
all of the above lamps are
illuminated.
See Exterior lamp controls on page 69.
Headlamp High/Low-Beam
Change
To switch from low to high beam, push
lever.
To switch to low beam, pull lever.
See Headlamp high/low-beam changer
on page 70.
See Flash-to-pass on page 70.
Exterior Lamp Controls
9Initial Drive Information

OFF
ON
OFF
HORN
Hazard Warning Flashers
Operated with the button.
See Hazard warning flashers on page
71.
Press the switch on the steering
wheel pad to sound the horn.
Lever up = Left indicator
Lever down = Right indicator
See Turn and lane-change signals on
page 72.
Turn And Lane-Change Signals
10 Initial Drive Information
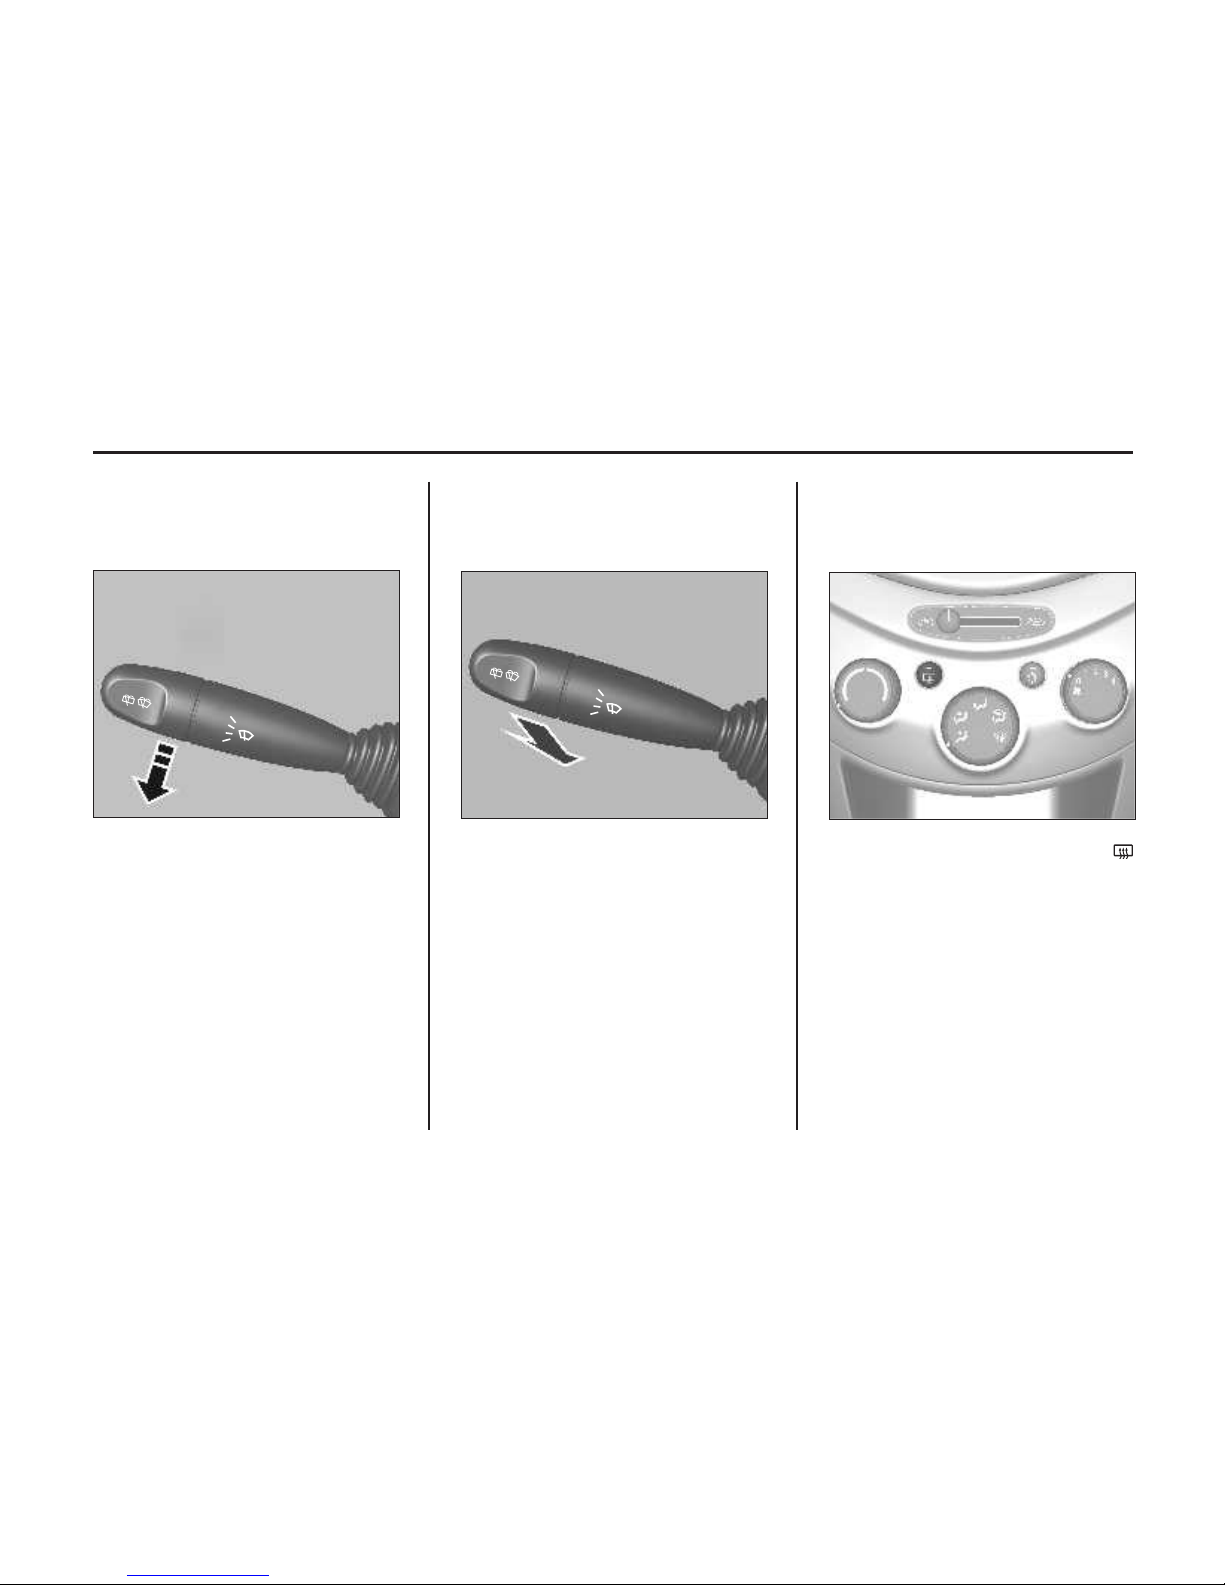
HI
LO
INT
OFF
HI
LO
INT
OFF
Heating is operated by pressing the
button.
See Heated rear window / Windshield
wiper de-icer on page 26.
Ü
Windshield Wipers
CLIMATE CONTROL
OFF : System off.
INT : Intermittent operation.
LO : Continuous wipe, slow speed.
HI : Continuous wipe, fast speed.
For a single wipe when the windshield
wipers are off, lightly move the lever
towards the INT position and release it.
See Windshield wiper/washer on page
58.
Pull lever.
See "Windshield was her" under
Windshield wiper/washer on page 59.
See Washer fluid on page 112.
WASHER AND WIPER
SYSTEMS
Windshield Washer
Heated Rear Window*
11Initial Drive Information

TRANSMISSION
Manual Transmission
See "Demisting windshield" under Air
conditioning system on page 86.
Reverse: With the vehicle stationary,
depress the clutch pedal and engage the
gear.
If the gear does not engage, set the lever
to neutral, release the clutch pedal and
depress again; then repeat gear
selection.
See Manual transmission on page 96.
Demisting And Defrosting The
Windows
GETTING STARTED
Check Before Starting Off
n
n Engine oil level and fluid levels.
n All windows, mirrors, exterior
lighting and number plates are free
from dirt, snow and ice and are
operational.
n Proper position of seats, seat belts
and mirrors.
n Check brake function at low speed,
particularly if the brakes are wet.
Tire pressure and condition.
12 Initial Drive Information
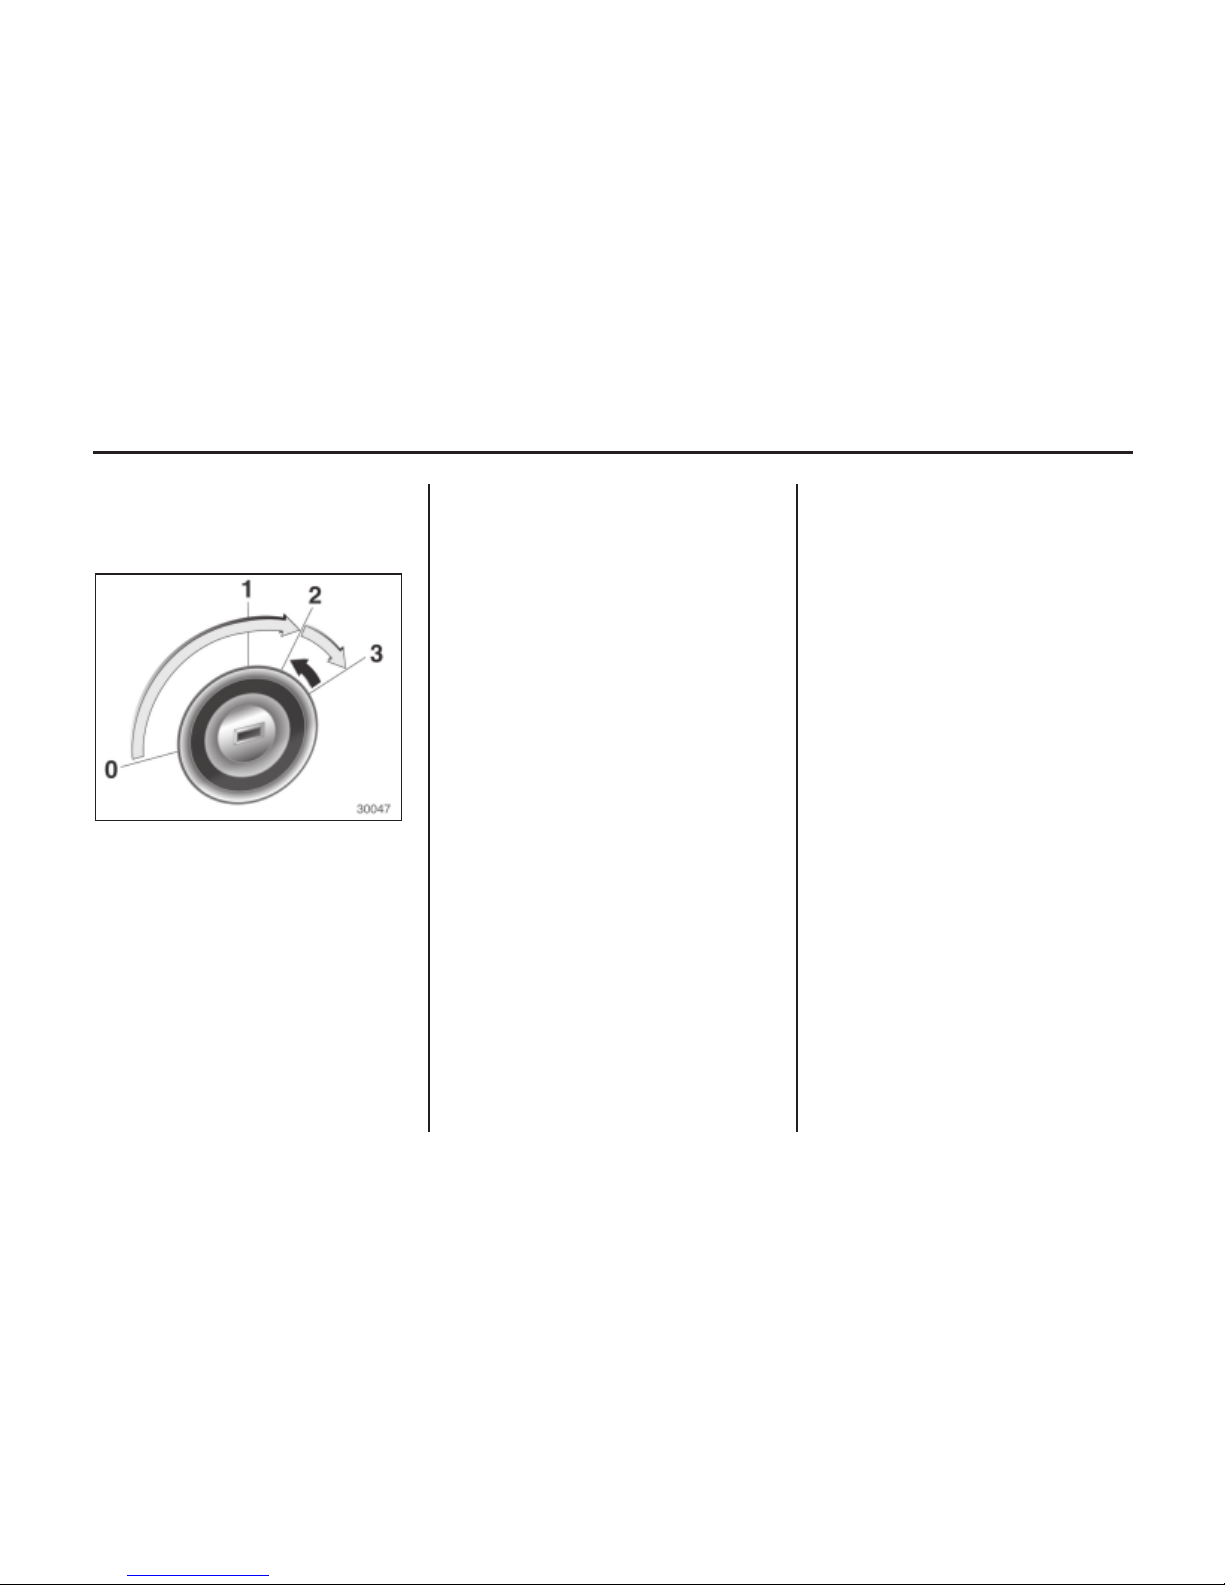
Starting Engine With The Ignition
Switch
n
steeringwheelslightlyto releasethe
steeringwheellock.
n Manualtransmission: Operate
clutch.
n Donotpress accelerator pedal.
n Turn key to position 3 depressing
the clutch pedal and foot brake then
release when engine is running.
Before restarting or to switch off the
engine, turn key back to 1 or 0.
Turnkeytoposition 1, movethe
PARKING
n Do not park the vehicle on an easily
flammable surface. The high
temperature of the exhaust system
could ignite the surface.
n Always apply parking brake with-
out pressing release button. Apply
as firmly as possible on downhill or
uphill slopes. Depress the footbrake
at the same time to reduce operating
force.
n Switch off the engine and ignition.
Turn the steering wheel until the
steering wheel lock engages.
n If the vehicle is on a level surface or
uphill slope, engage first gear
before switching off the ignition.
On an uphill slope, turn the front
wheels away from the kerb. If the
vehicle is on a downhill slope,
engage reverse gear before switching off the ignition. Turn the front
wheels towards the kerb.
n Close windows.
n After running at high engine speeds
or with high engine loads, operate
the diesel engine briefly at a low
load or run in neutral for about one
to two minutes at idle speed before
switching off in order to protect the
turbocharger.
n Lock the vehicle.
See Keys on page 15.
Note
The engine cooling fan may
continue to run after the engine is
shut down.
13Initial Drive Information
14 Initial Drive Information
15Keys, Doors and Windows
KEYS, DOORS AND
WINDOWS
KEYS, LOCKS
Keys
Keys, locks ..................................... 15
Doors .............................................. 20
Vehicle security ............................... 21
Exterior mirrors .............................. 23
Interior mirror ................................ 24
Windows ........................................ 25
Sun visors ....................................... 27
Assist handles ................................. 27
Warning
Do not leave the key in the vehicle.
• Lock the vehicle.
• Take the key with you.
Note
In case of loss, replacement keys are
available with your CHEVROLET
retailer.
Replacement keys
The key number is specified on a
detachable tag.
The key number must be quoted when
ordering replacement keys.
Two keys are provided with your new
vehicle.
Keep one of the two keys as a spare.
See "Locks" under Exterior care on
page 136.
Warning
Leaving children in a vehicle with
the ignition key is dangerous for
many reasons. Children or others
could be badly injured or even killed.
They could operate the power
windows or other controls or even
make the vehicle move.
The windows will function with the
key in the ignition and children could
be seriously injured or killed if
caught in the path of a closing
window. Do not leave the keys in a
vehicle with children.
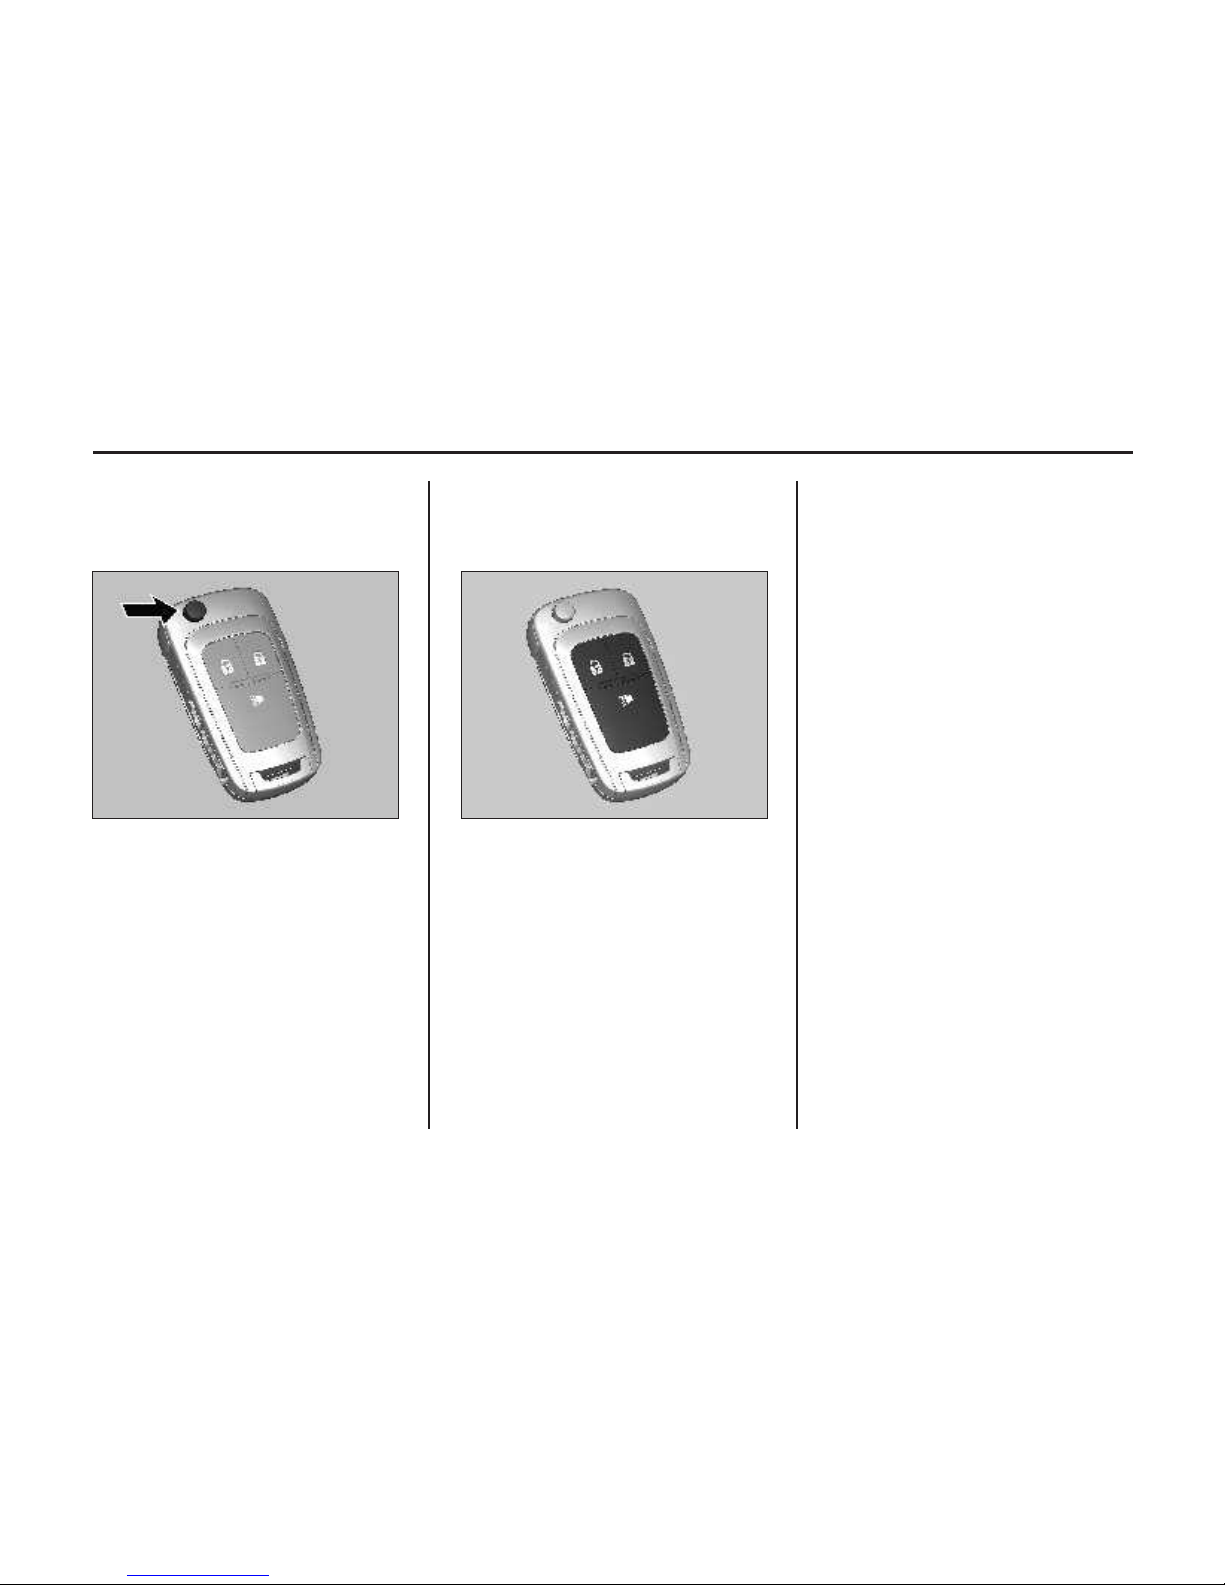
Key With Foldaway Key Section*
Press button to extend.
To fold the key, press the button and
fold the key manually.
Radio Remote Control*
Used to operate:
n Central locking system
n Anti-theft alarm system
n Vehicle alarm system
The radio remote control has an
approximate range of up to 20 metres
(66ft). It can be restricted by outside
influences.
The hazard warning flashers confirm
operation.
Handle with care, protect from
moisture and high temperatures and
avoid unnecessary operation.
Fault
If the central locking system cannot be
operated with the radio remote control,
it may be due to the following:
n Range exceeded,
n Battery voltage too low,
n Frequent, repeated operation of the
remote control while not in range,
which will require resynchronisation,
n Overload of the central locking
system by operating at frequent
intervals, the power supply is
interrupted for a short time,
n Interference from higher-power
radio waves from other sources.
Ra d io remote cont rol b atter y
replacement
Replace the battery as soon as the range
is noticeably diminished.
16 Keys, Doors and Windows
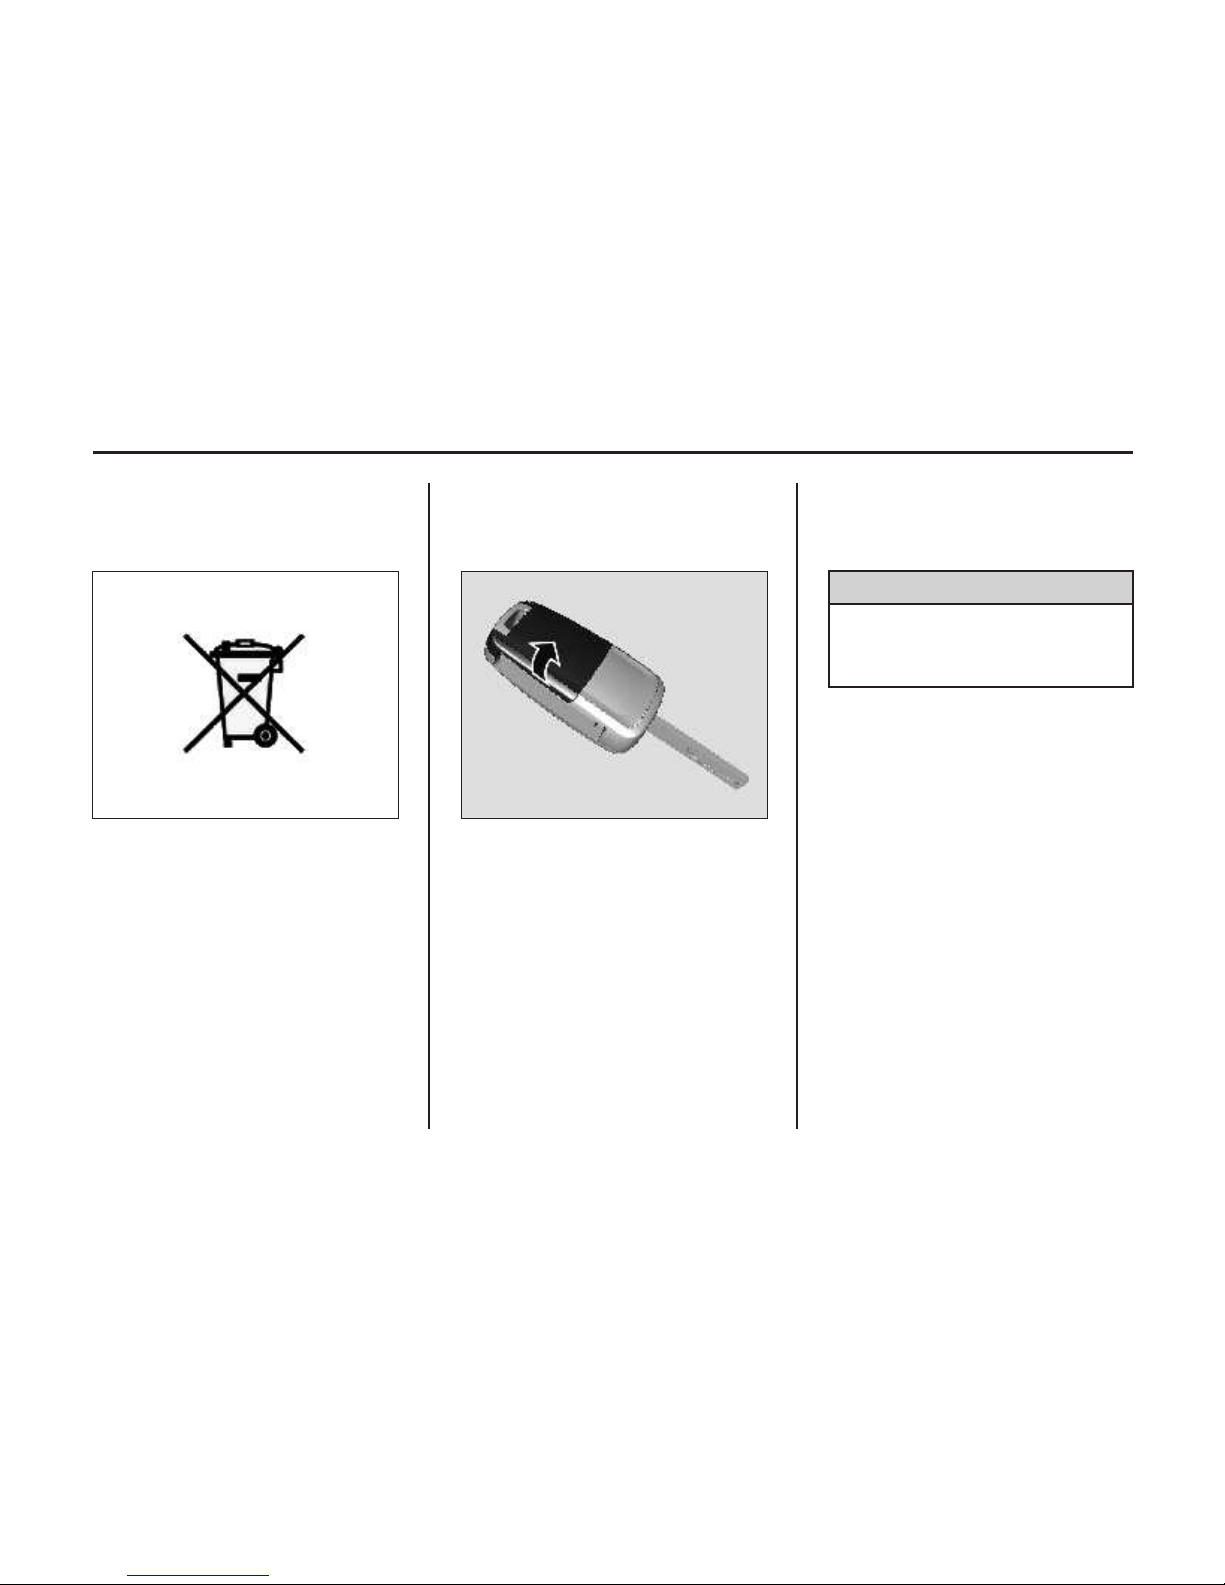
Caution
Avoid touching the flat surfaces of
the battery with your bare fingers.
Handling will shorten battery life.
Batteries do not belong in household
waste. They must be disposed of at an
appropriate recycling collection point.
Note:
Use CR2032 (or equivalent)
replacement battery.
1. Open the transmitter cover.
2. Remove the used battery. Avoid
touching the circuit board to other
components.
3. Install the new battery. Be sure the
negative side (-) faces down toward
the base.
4. Close the transmitter cover.
5. Check the operation of the transmitter with your vehicle.
Note:
Used lithium batteries can harm the
environment.
Follow local recycling laws for
disposal.
Do not discard with household
waste.
Note:
In order to keep the transmitter
working properly, follow these
guidelines:
Avoid dropping the transmitter.
Do not place heavy objects on the
transmitter.
Keep the transmitter away from
water and direct sunlight. If the
transmitter gets wet, wipe it with a
soft cloth.
Key With Foldaway Key Section*
17Keys, Doors and Windows
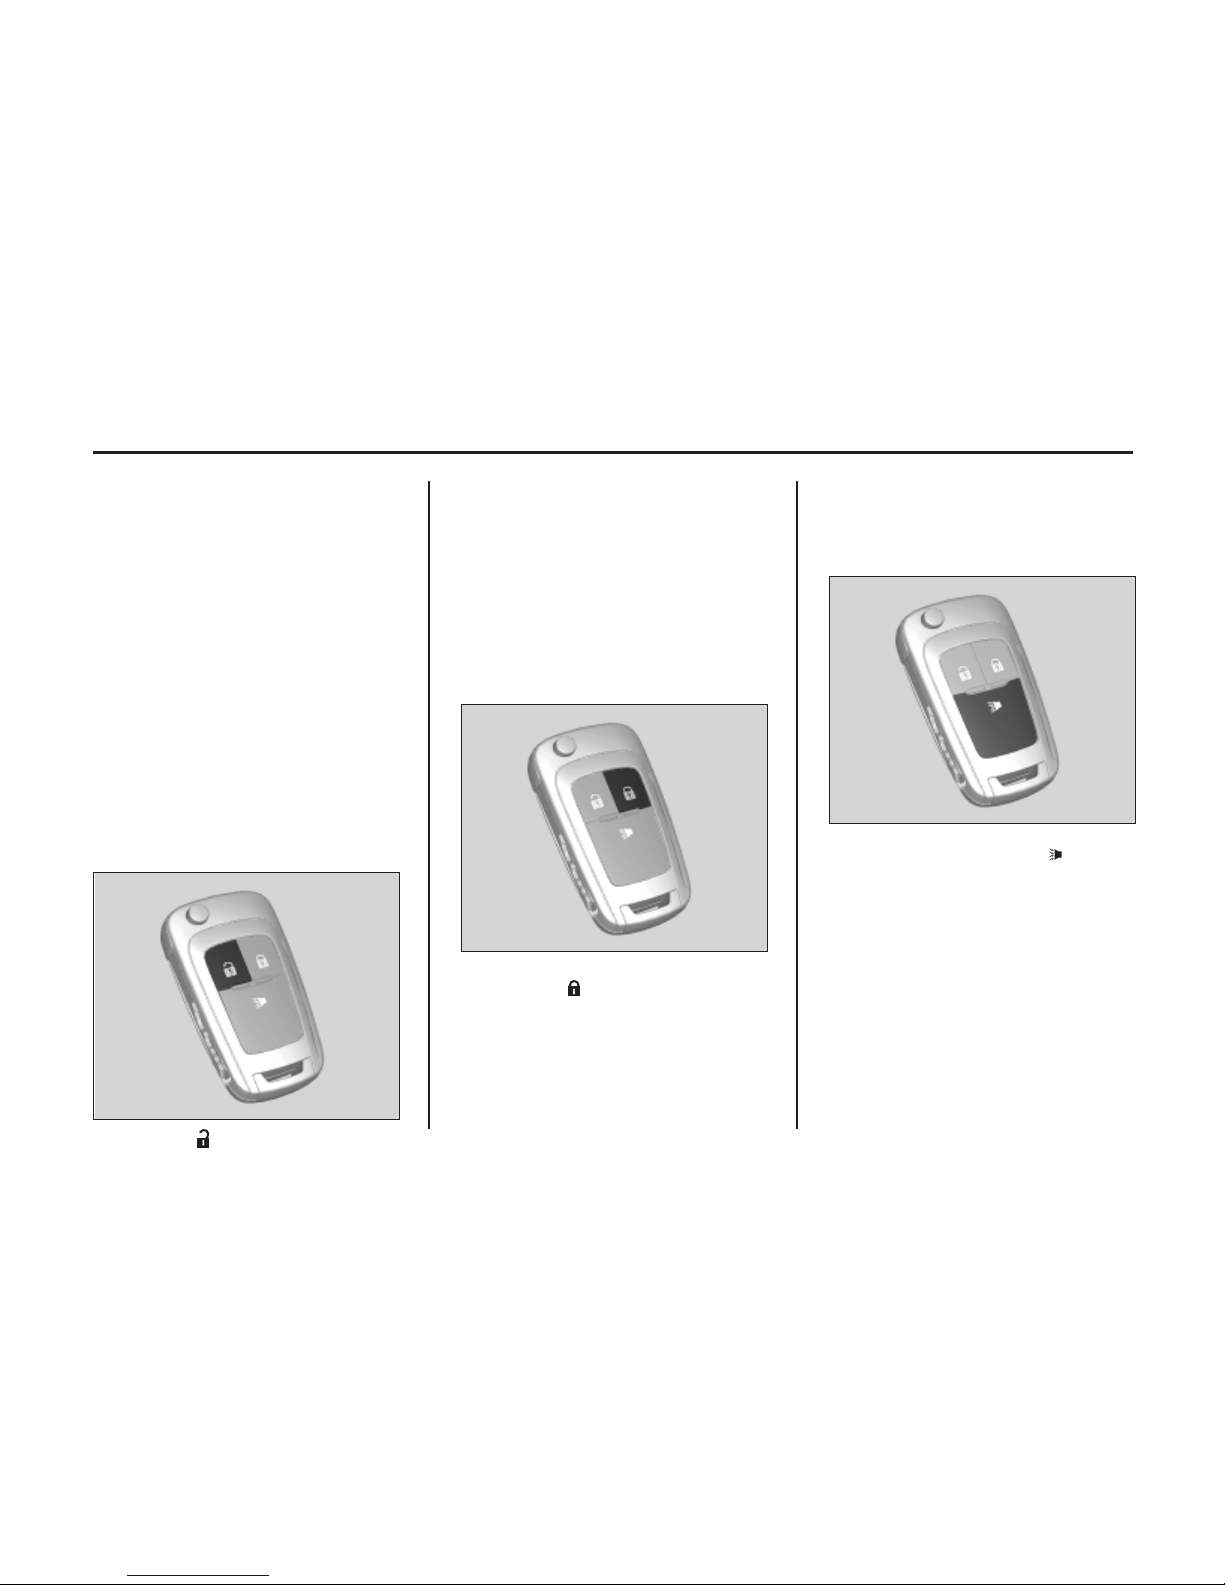
Central Locking System*
You can activate the central door locking
system from the driver's door.
This system allows you to lock and
unlock all the doors from the driver's
door, using either the key or keyless
remote (from outside) or the door lock
knob (from inside).
If the driver's door is not closed properly,
the central locking system will not work.
If the driver's door is opened, driver's
door cannot be locked.
Unlocking*
Press button .
Unlocks all doors. The hazard warning
flashers will flash twice and the antitheft system will be deactivated.
Locking*
Press button .
Locks all doors. Hazard warning
flashers will flash once.
The anti-theft system will be activated.
Vehicle alarm*
Press and release button once to
operate Panic alarm. The horn sounds
and the turn signal lamps flash until any
button of the key is pressed.
18 Keys, Doors and Windows
Note:
Lock, Unlock and Vehicle Alarm
buttons are disabled while the key is
in the ignition switch.
Safety Locks
Caution
Do not pull the inside door handle
while the child security door lock is
set to LOCK position. Doing so can
damage the inside door handle.
Warning
Use the child security door locks
whenever children are occupying the
rear seats.
Fault in radio remote control system
Unlocking
Manually unlock the driver's door by
turning the key in the lock.
The alarm will sound if door is opened
with a key when anti-theft mode is
active. So, please open the door with
unlock button on the remote.
Locking
Close the driver's door and lock it from
the outside with the key.
Fault in central locking system
Unlocking
Manually unlock the driver's door by
turning the key in the lock. The other
doors can be opened by using the
interior handle.
To deactivate the anti-theft locking
system, switch on the ignition.
Locking
Push inside locking knob of all doors
except driver's door. Then close the
driver's door and lock it from the
outside with the key.
Warning
Do not lock the vehicle if anyone is
to be left inside the vehicle.
Never leave children or pets
unattended in your vehicle. The
temperature inside the vehicle can
increase more rapidly and reach
much higher levels than the
temperature outside.
This can result in serious injury or
death.
19Keys, Doors and Windows

You can also open the tailgate by
pulling up the tailgate release lever
located near the driver's seat.
To operate the child security door lock,
move the lever up to the lock position.
To open a rear door when the child
security door lock is activated, unlock
the door from inside and open the door
from outside.
To cancel the child security door lock,
move the lever down to the unlock
position.
Note
Each rear door has its individual
lock. The child safety locks for the
rear doors must be individually,
manually activated.
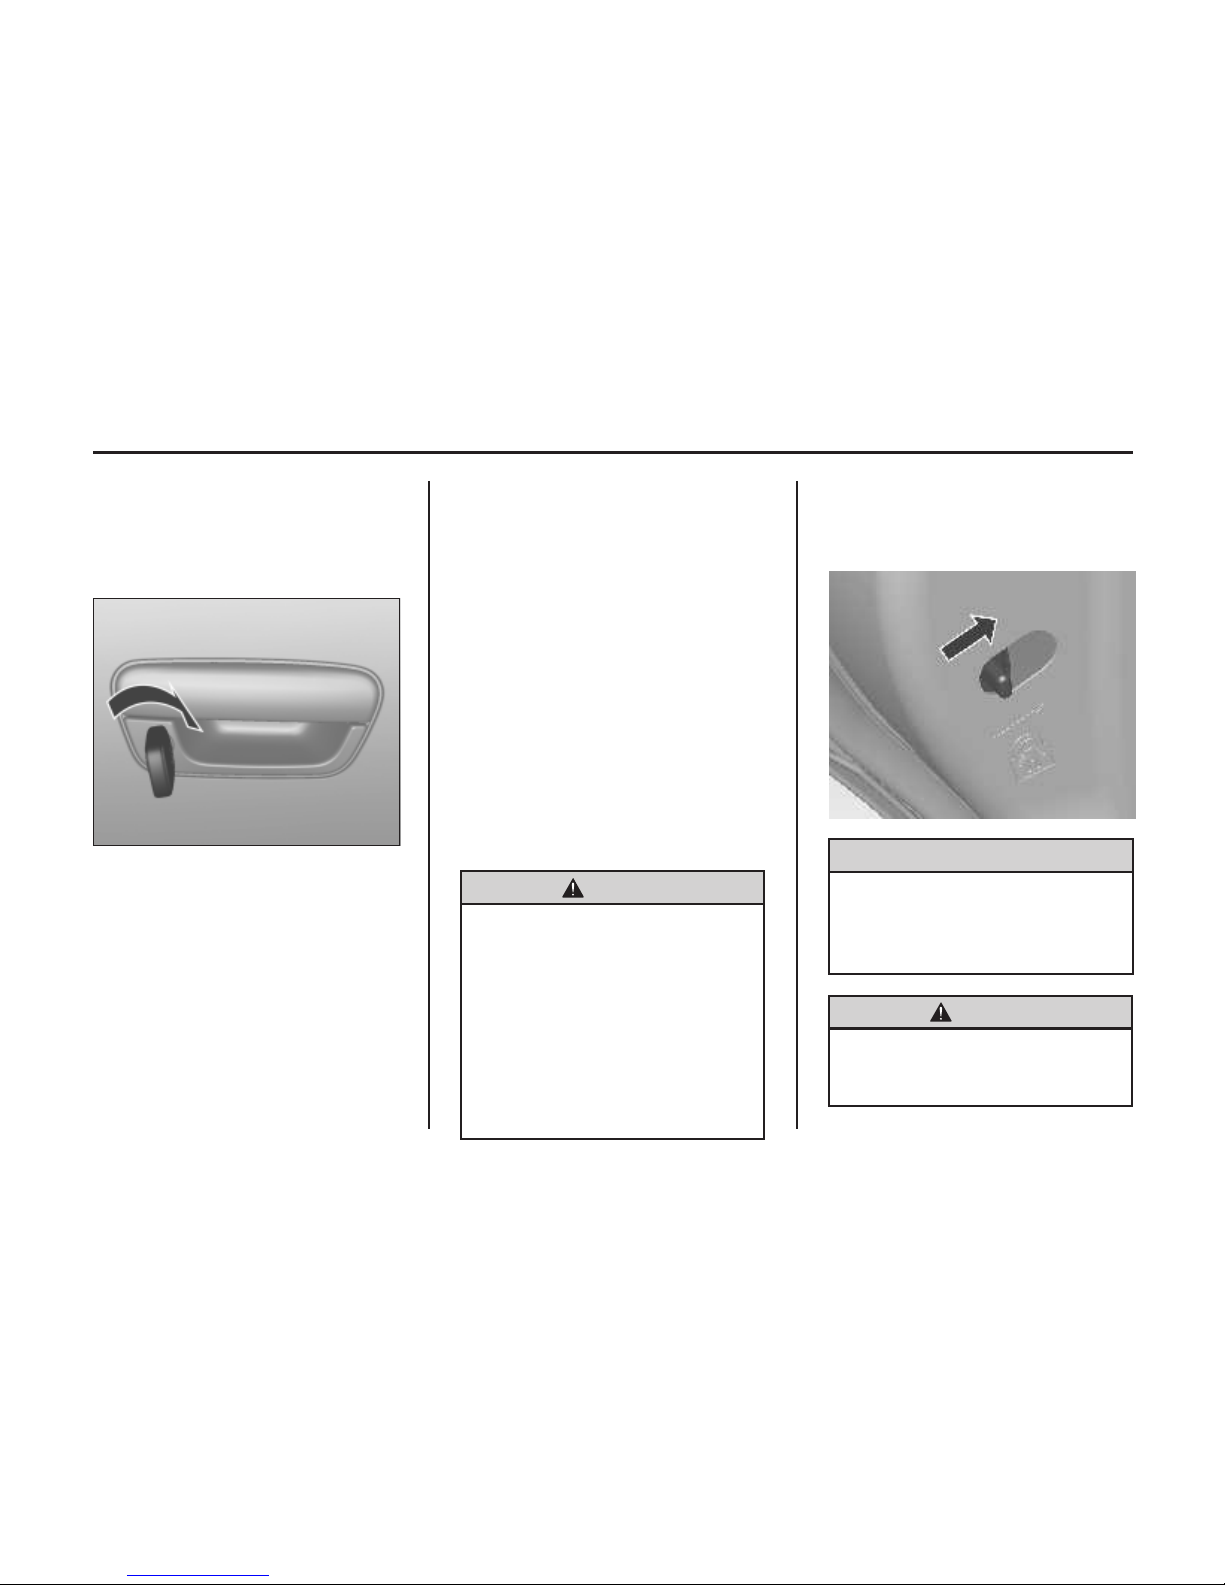
DOORS
Tailgate Opening*
To open the tailgate, insert the key into
the key slot and turn it clockwise.
Lift the tailgate.
<Type 1>
20 Keys, Doors and Windows

21Keys, Doors and Windows
Caution
Before opening the tailgate check
overhead obstructions, such as a
garage door, to avoid damage of the
tailgate. Always check the moving
area above and behind the tailgate.
Note
The installation of certain heavy
accessories onto the tailgate may
affect its ability to remain open.
Closing*
Type 1
To close tailgate, push it down so it
latches securely. It locks automatically.
Type 2
To close tailgate, push it down so it
latches securely. It locks automatically
when all doors are locked.
Make sure your hands and any other
body parts, as well as those of other
persons are completely away from the
tailgate closure area.
The tailgate is locked or unlocked when all
doors are locked or unlocked with the key
or with the remote. When the tailgate is
unlocked, pull the long handle to open it.
Warning
Do not drive with the tailgate open or
ajar, e.g. when transporting bulky
objects, since toxic exhaust gases
could enter the vehicle.
VEHICLE SECURITY*
Anti-theft Alarm System*
Anti-theft alarm system monitors:
n Doors, tailgate, hood
n Ignition
Activate the anti-theft system directly
by pressing button.
<Type 2>
Note: To unlock the tailgate while
engine is running, pull up the knob
on the driver door. When the
tailgate is unlocked, pull the long
handle to open it.

The security indicator will flash to
indicate the anti-theft system is
working.
It goes out when doors are unlocked
using the keyless entry transmitter.
It comes on when you lock the doors
using the keyless entry transmitter.
Status indicator* Deactivation*
Unlocking the vehicle by pressing
button deactivates anti-theft alarm
system.
Alarm sound
The system provides an alarm when any
of the doors, tailgate or hood are opened
without pressing the unlock button on
the transmitter.
To stop the alarm sound, press either the
lock or unlock button on the transmitter.
Otherwise, after 28 seconds, the alarm
will automatically stop, being reset to
the activated anti-theft mode.
If the system does not operate as
described above, have it checked by
your CHEVROLET retailer.
Auto door lock
If the door is not opened or the position
of the ignition key is not located in ACC
or ON within 30 seconds after
unlocking the do ors usi ng the
transmitter, all doors are automatically
locked.
22 Keys, Doors and Windows
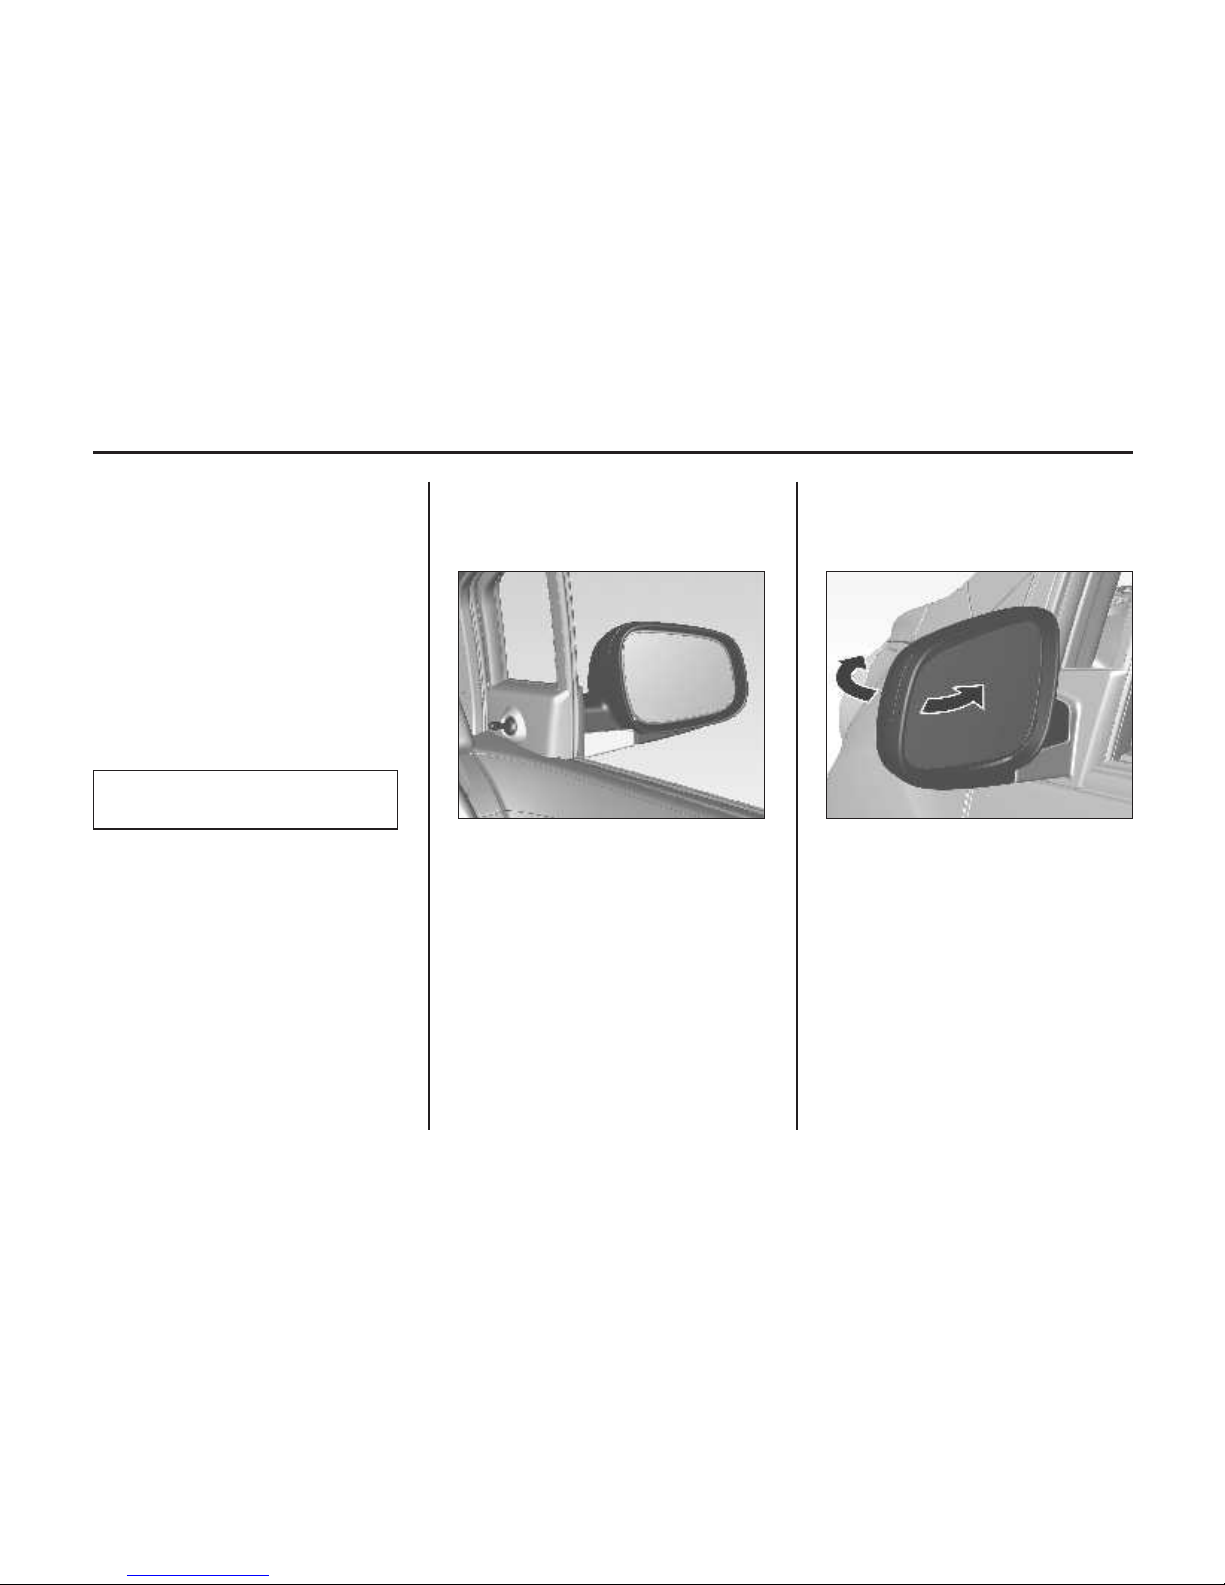
EXTERIOR MIRRORS
Convex Mirrors
The convex exterior mirror reduces
blind spots. The shape of the mirror
makes objects appear smaller, which
will affect the ability to estimate
distances.
Both outside mirrors are convex and is
labelled with a notice that reads as
follows:
Manual Mirrors
Adjust the outside rearview mirrors so
you can see each side of your vehicle, as
well as each side of the road behind you.
Simply move the adjusting lever in the
desired direction to adjust the mirror
angles.
Folding Mirrors
For pedestrian safety, the exterior
mirrors will swing out of their normal
mounting position if they are struck
with sufficient force. Reposition the
mirror by applying slight pressure to the
mirror housing.
OBJECTS IN MIRROR ARE
CLOSER THAN THEY APPEAR
23Keys, Doors and Windows
Warning
Always keep your mirrors properly
adjusted, and use them while driving
to increase your visibility of objects
and other vehicles around you. Do
not drive while either outside
rearview mirror is folded back.
INTERIOR MIRROR
Manual Rearview Mirror
To adjust the inside rearview mirror,
hold the rearview mirror in the center
and move it to view the area behind the
vehicle.
To reduce dazzle, adjust the lever on the
underside of the mirror housing.
Warning
Your view through the mirror may
lose some clarity when it is adjusted
for night vision.
Take special care while using your
inside rearview mirror when it is
adjusted for night vision.
Failure to ensure a clear rear view
while driving may result in a
collision causing damage to your
vehicle or other property, and/or
personal injury.
24 Keys, Doors and Windows
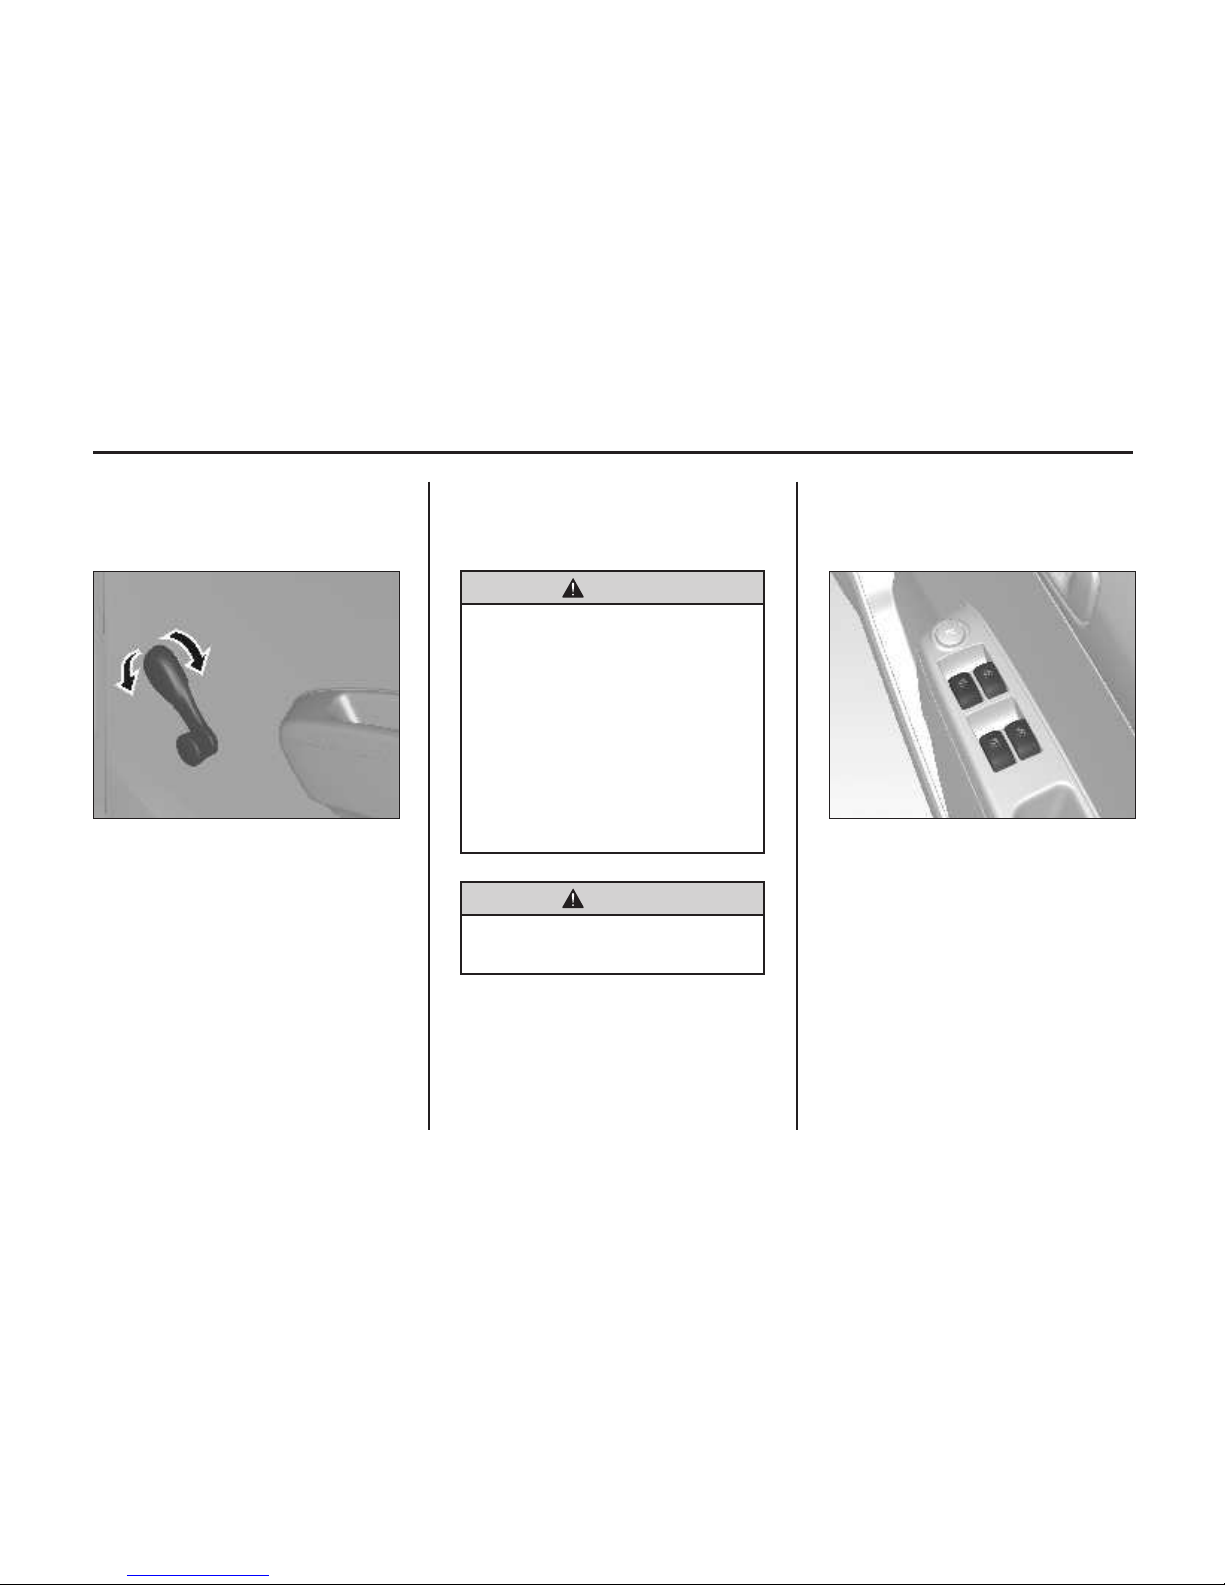
WINDOWS
Manual Windows
To raise or lower the windows, turn the
window regulator handle on the door
panel.
Be sure there is no object in the opening
before closing the windows.
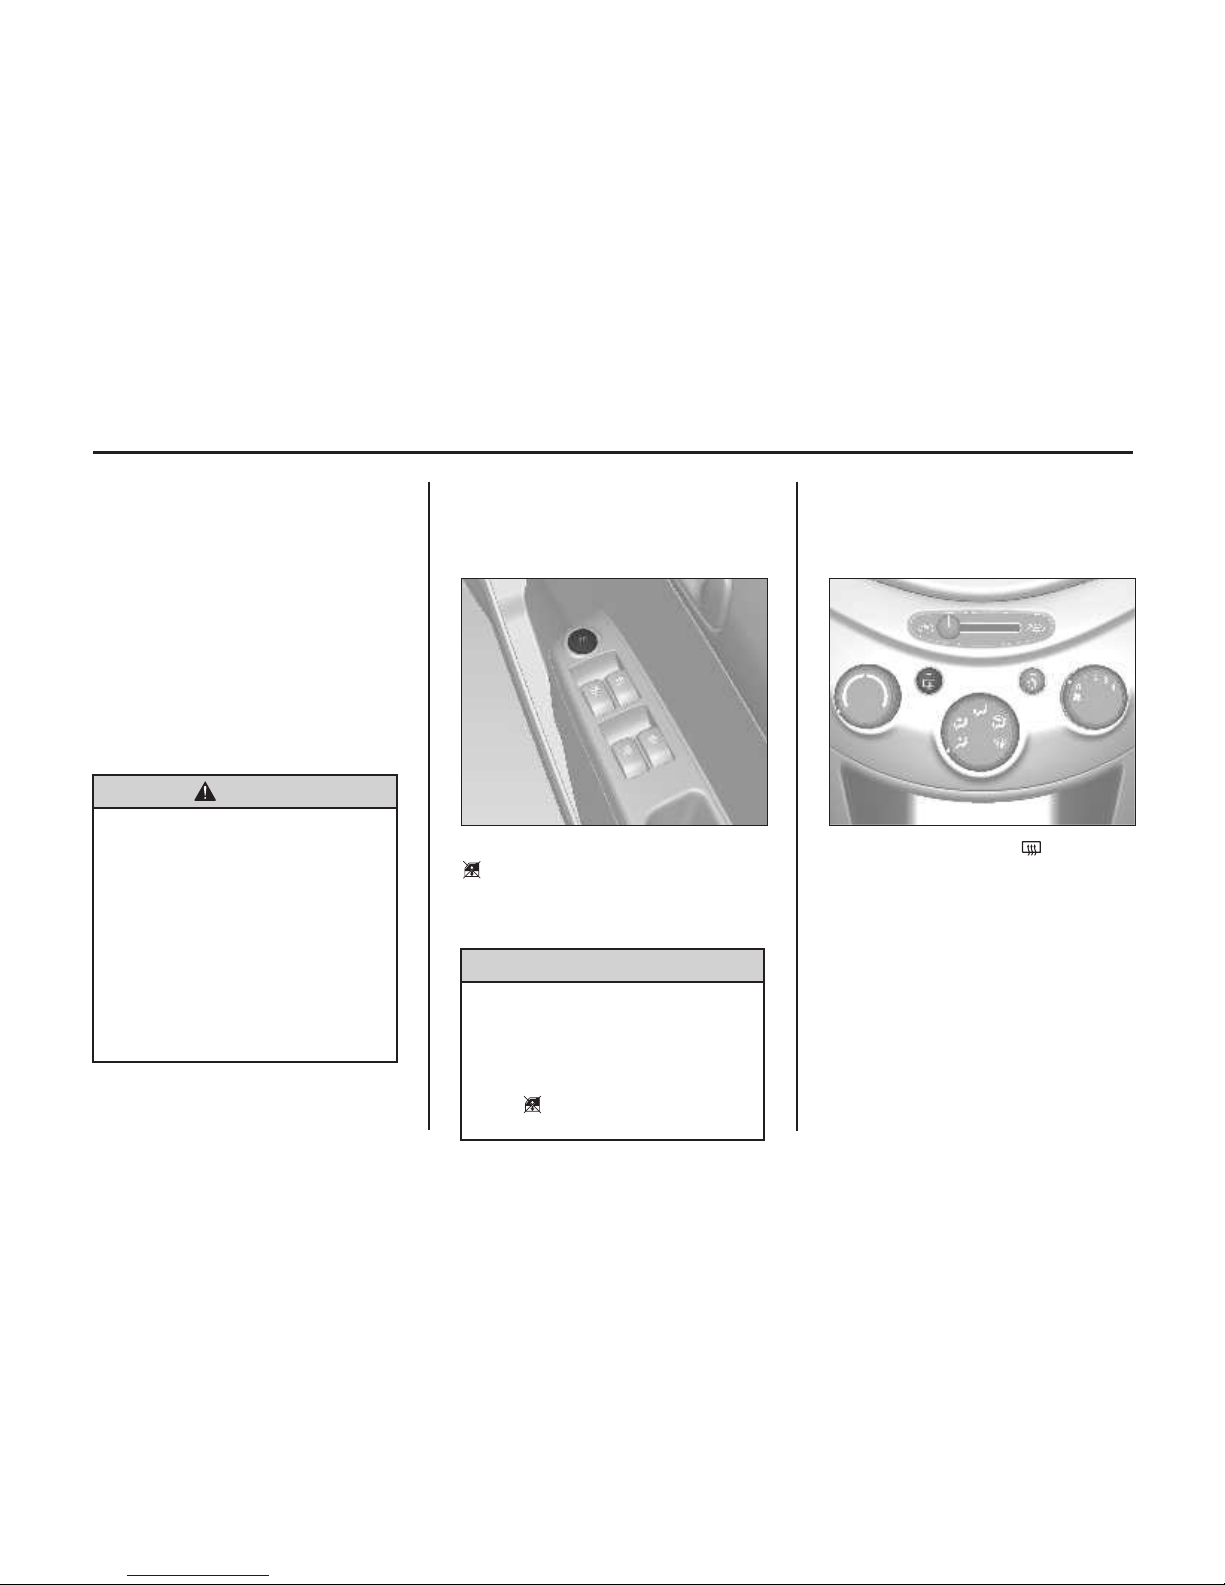
Power Windows*
Warning
Take care when operating the power
windows. There is risk of injury,
particularly to children.
If there are children on the rear seat,
switch on the child safety system for
the power windows.
Keep a close watch on the windows
when closing them.
Ensure that nothing becomes trapped
in them as they move.
Power windows can be operated with
ignition on.
Operate the switch for the respective
window by pushing to open or pulling
to close.
Operation
You may operate the power windows
when the ignition switch is ON by using
the power window switches on each
door panel.
To raise the window, lift up the switch.
Note
The rear windows cannot be fully
opened.
Warning
Do not operate the power window
switch with no purpose.
25Keys, Doors and Windows
To lower the window, press down the
switch.
Release the switch when the window
reaches the desired position.
Warning
Body parts outside vehicle can be
struck by passing objects. Please
keep all parts of the body inside
vehicle.
Children can operate and become
entrapped in power windows.
Do not leave your keys or unattended
children in your car.
Serious injury or death can occur
from misuse of power windows.
Child Safety System For Rear
Windows*
The power window lockout button
can lock out the rear window
switches. The rear windows can only be
operated by the front switches after this
button is locked.
Heated Rear Window* /
Windshield Wiper De-icer*
Operated by pressing the button.
Heating works with the ignition ON/
engine running and is switched off
automatically after a few minutes or by
pressing the button again.
Caution
Children could operate the power
windows and become trapped by the
windows, resulting in serious
injuries.
Use the power window lockout
button when children are traveling
in the rear seats.
Note
The rear windows cannot be fully
opened.
26 Keys, Doors and Windows
 Loading...