

Chevrolet Beat Owner's Manual
Operation, Safety and Maintenance
Owner’s Manual
Owner’s Manual

VEHICLE RECORD SHEET
Model Name
V.I.N.
Engine No.
Transmission No.
Battery Make
Address
Tyre Make
Tyre Location
Fr RH
Fr LH
Rr RH
Rr LH
Spare
Batch Code
Delivery Date
Battery Batch Code / Sl.No.
Registration No.
Regn. Date
Color, Code No.
Key No.
City
Selling Dealer's Name
Address
Pin Code
Pin Code
Selling Dealer’s Stamp
Owner's Name

Dear Customer,
Welcome to the Chevrolet family. We wish to thank you for choosing Chevrolet car.
It is our constant endeavor to provide you with products that offer excellent performance through out their ownership period. Which is
why, in addition to offering great cars, we have also set up an extensive, and very well equipped network of retailers and authorized
service centers across the country.
Naturally, these Chevrolet retailer know everything about your car and provides you with the best service possible. In fact, every retailer
is equipped with the most advanced technology, technicians specially trained by us and genuine spares. Needless to say, they are also
committed to ensure your complete satisfaction.
So, please contact a Chevrolet retailer for any servicing need and make sure that only genuine spares are used for your car.
This manual will familiarize you with the operation and maintenance of your new vehicle. It will also provide you with important safety
information. Please do read it carefully and follow the recommendations. In fact, the manual is like a permanent part of your car. And it
would go a long way in ensuring a safe and trouble-free operation for your car.
Should you have any query please feel free to call our 24 hr. Helpline at 30308080 (Prefix local STD code when dialling from mobile
phone) or email us at : gmi.cac@gm.com.
Happy Motoring


2 Introduction
INTRODUCTION
Your vehicle is a designed combination
of advanced technology, safety,
environmental friendliness and
economy.
This Owner's Manual provides you
with all the necessary information to
enable you to drive your vehicle safely
and efficiently.
Make sure your passengers are aware of
the possible risk of accident and injury
which may result from improper use of
the vehicle.
Yo u must always comply with the
specific laws and regulations of the
country that you are in. These laws may
differ from the information in this
Owner's Manual.
When this Owner's Manual refers to a
workshop visit, we recommend your
Chevrolet Service Partner.
All Chevrolet Service Partners provide
first-class service at reasonable prices.
Experienced mechanics trained by
Chevrolet according to specific
Chevrolet instructions.
The customer literature pack should
always be
kept ready to hand in the
vehicle.
USING THIS MANUAL
n This manual describes all options
and features available for this
model. Certain descriptions,
including those for display and
menu functions, may not apply to
your vehicle due to model
variant, country specifications,
special equipment or accessories.
n In this section will give you an
initial
overview.
n The table of contents at the
beginning of this manual and within
each chapter shows where the
information is located.
n The index will enable you to search
for specific information.
n The Owner's Manual uses the
factory engine designations. The
corresponding sales designations
can be found in the chapter
"Technical data".
INTRODUCTION
Introduction ...................................... 2
Using this manual ............................. 2
Danger, warning and cautions........... 3
Seat adjustment ................................ 4
Safety belt ........................................ 5
Mirror adjustment ............................ 5
Steering wheel adjustment ............... 6
Instrument panel overview ............... 7
Exterior lighting ............................... 8
Horn ................................................. 9
Washer and wiper systems .............. 10
Climate control ............................... 10
Transmission .................................. 11
Getting started................................. 11
Parking ........................................... 12

3Introduction
this vehicle in any other country, check
all applicable regulations and make any
necessary modifications.
This manual describes the options and
trims available at the time of publication. Some of the items covered may not
apply to your vehicle. Contact your
CHEVROLET retailer for information
on option and trim availability.
Non-General Motors India Pvt. Ltd.
genuine parts and accessories have not
been examined or approved by General
Motors India Pvt. Ltd. We can certify
neither the suitability nor the safety of
Non-General Motors India Pvt. Ltd.
genuine parts and accessories and are
not liable for damage caused by their
use.
Warning : Tampering of wiring
harness or fitment of non genuine
accessories in your vehicle may lead to
short circuit resulting in fire.
We wish you many hours of pleasur-
able
driving Chevrolet.
* or (Option) : The asterisk and
(Option) in this manual signify an item
of equipment that is not included on all
vehicles. Such items include engine
options, model variations specific to
one country, and optional equipment.
All information, illustrations, and
specifications in this manual are based
on the latest product information
available at the time of publication.
General Motors India Pvt. Ltd. reserves
the right to change specifications or
designs at any time without notice and
without incurring obligation.
This vehicle may not comply with the
standards or regulations of other
countries. Before attempting to register
Caution
Text marked Caution provides
information on possible damage to
the vehicle. Disregarding this
information may lead to vehicle
damage.
n
front or back, always relate to the
direction of travel.
n The vehicle display screens may
not support your specific language.
n Display messages and interior
labelling are written in bold letters.
DANGER, WARNINGS AND
CAUTIONS
Directional data e.g. left or right, or
Danger
Text marked Danger provides
information on risk of fatal injury.
Disregarding this information may
endanger life.
Warning
Text marked Warning provides
information on risk of accident or
injury. Disregarding this information
may lead to injury.
4 Introduction
INITIAL DRIVE
INFORMATION
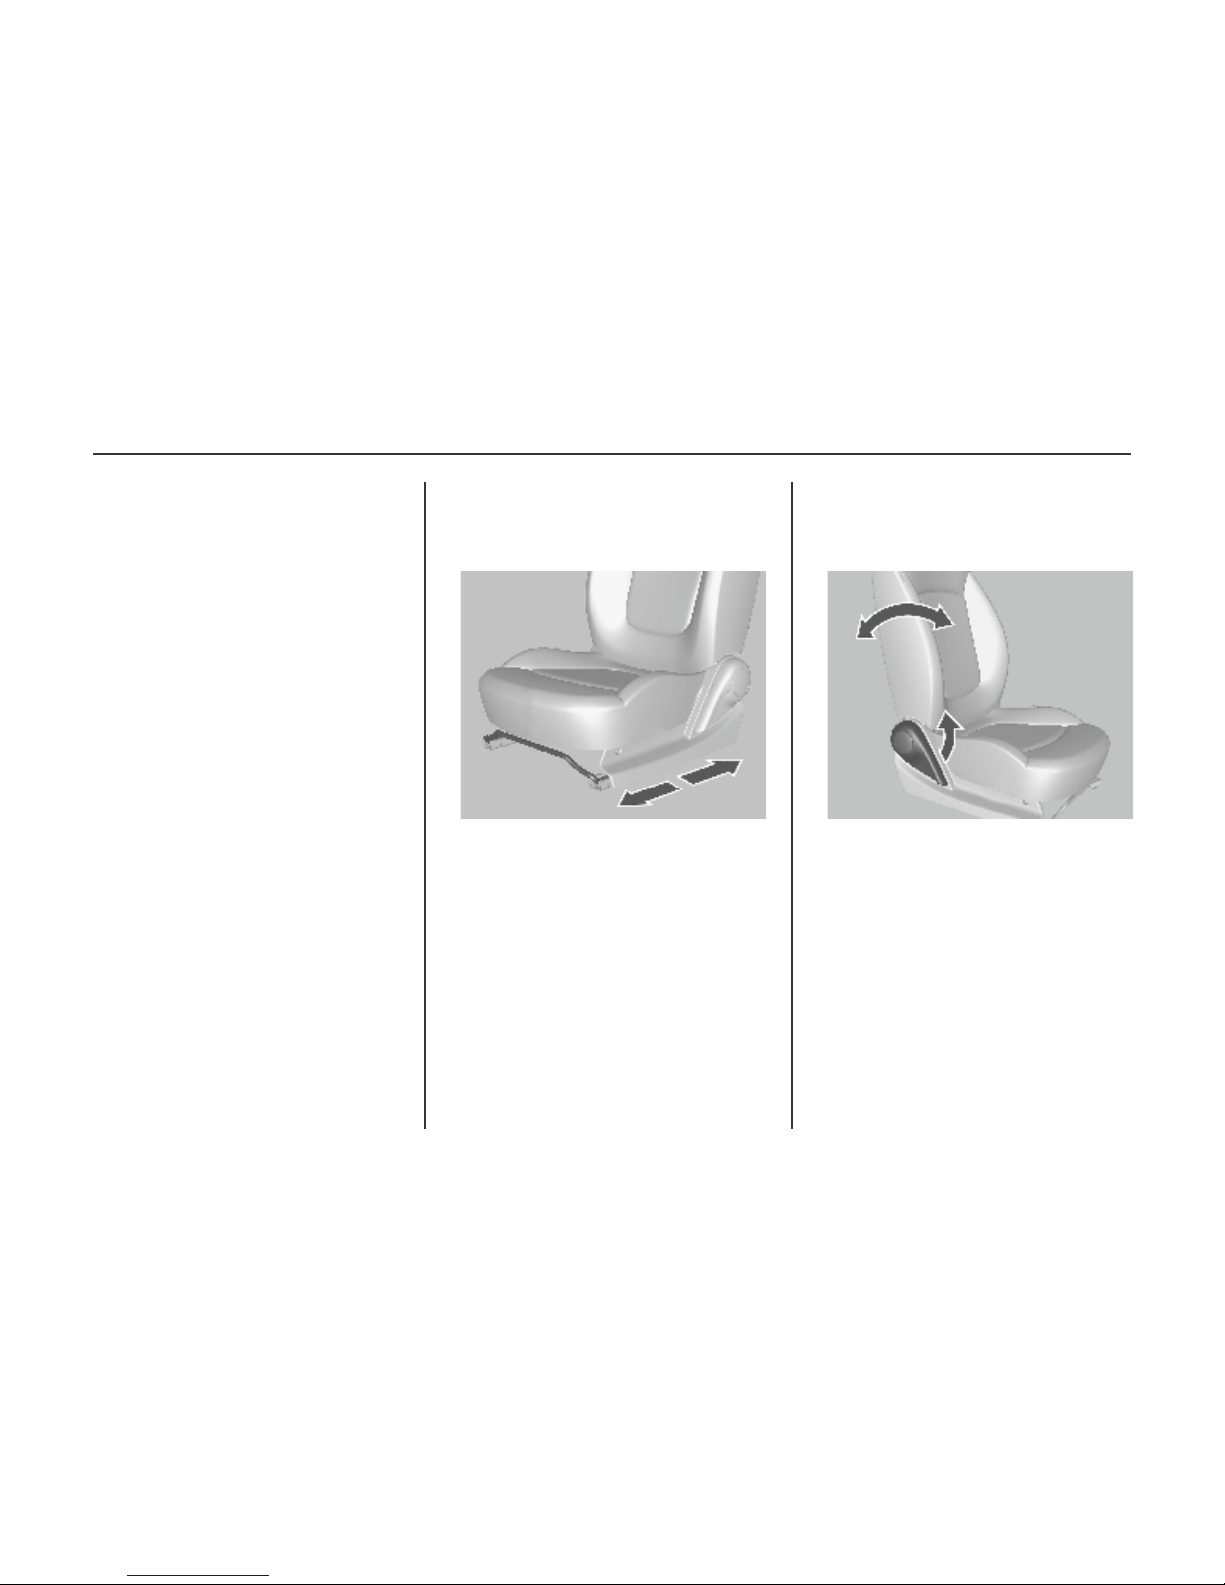
SEAT ADJUSTMENT
Seat Positioning
Pull handle, slide seat, release handle.
See Seat adjustment on page 31.
See Seat position on Page 31.
Seat Backrests
Pull lever, adjust inclination and release
lever. Allow the seat to engage audibly.
Do not lean on backrest when adjusting.
5Introduction
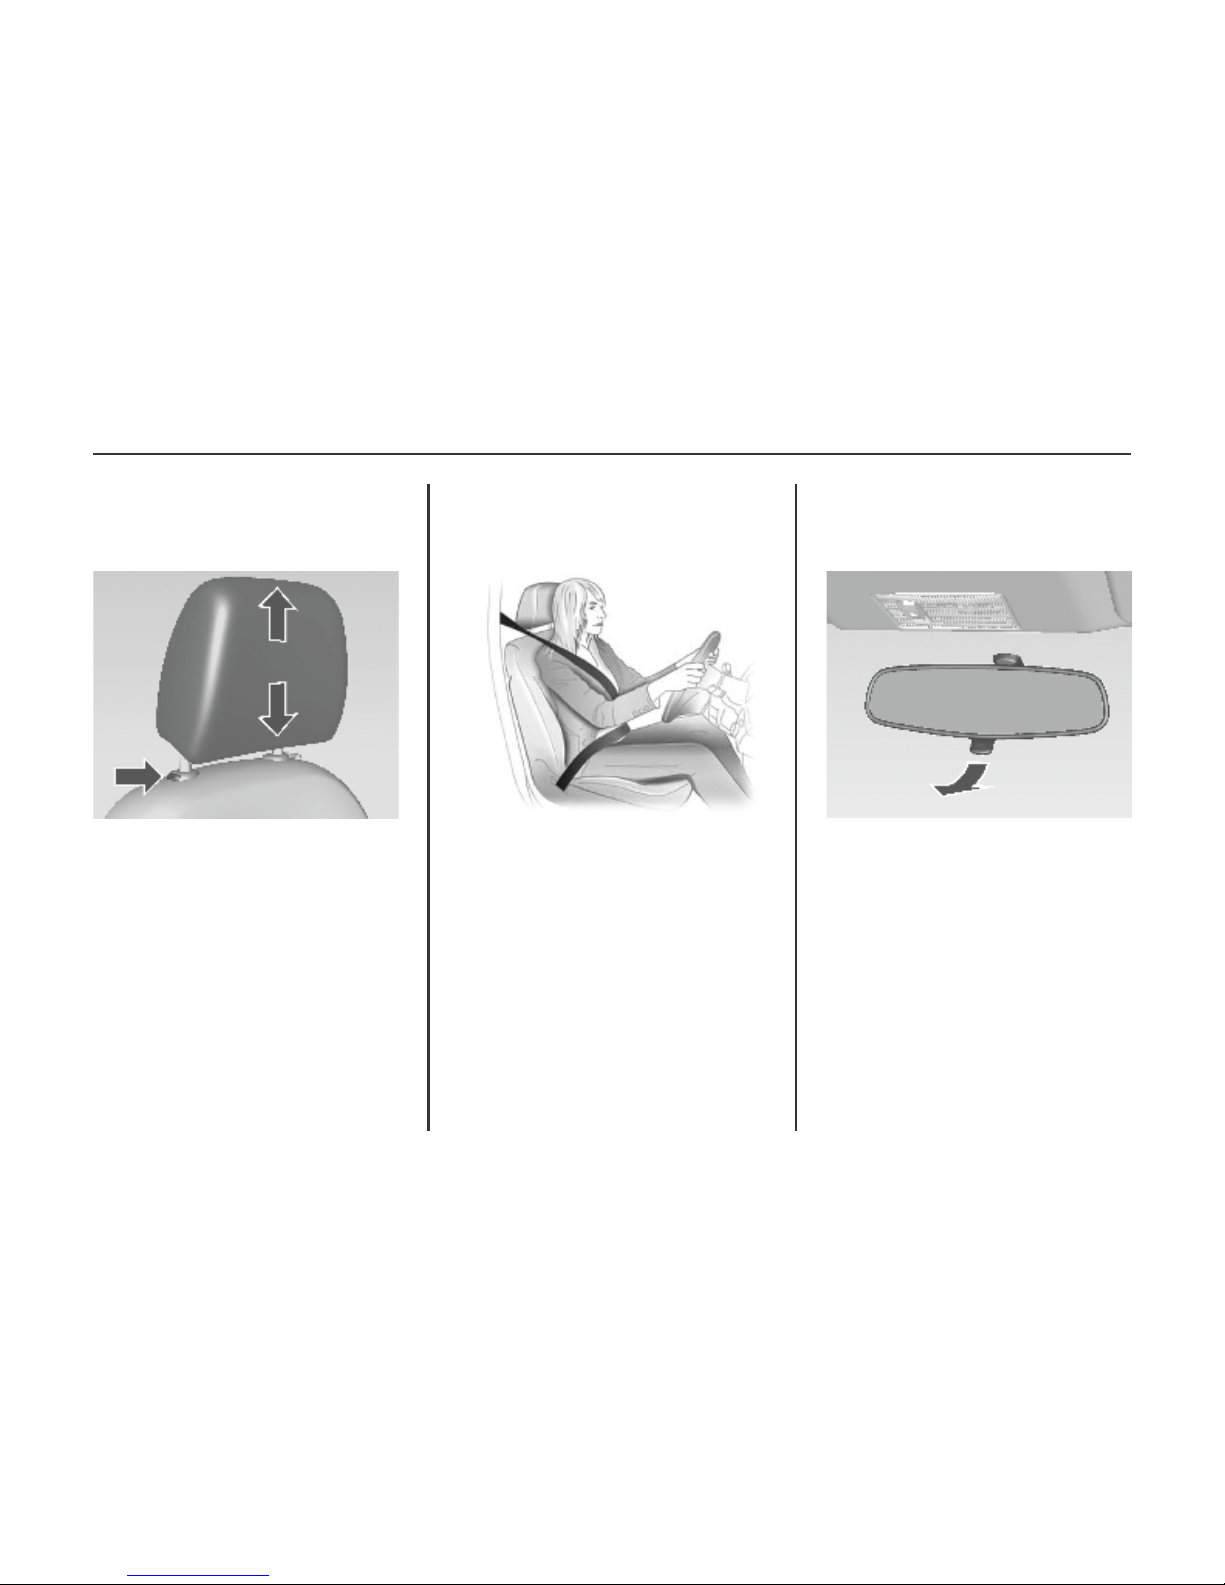
Pull the head restraint upwards.
To move down press the catch and push
the head restraint downwards.
See Head restraints on page 29.
Head Restraint Adjustment
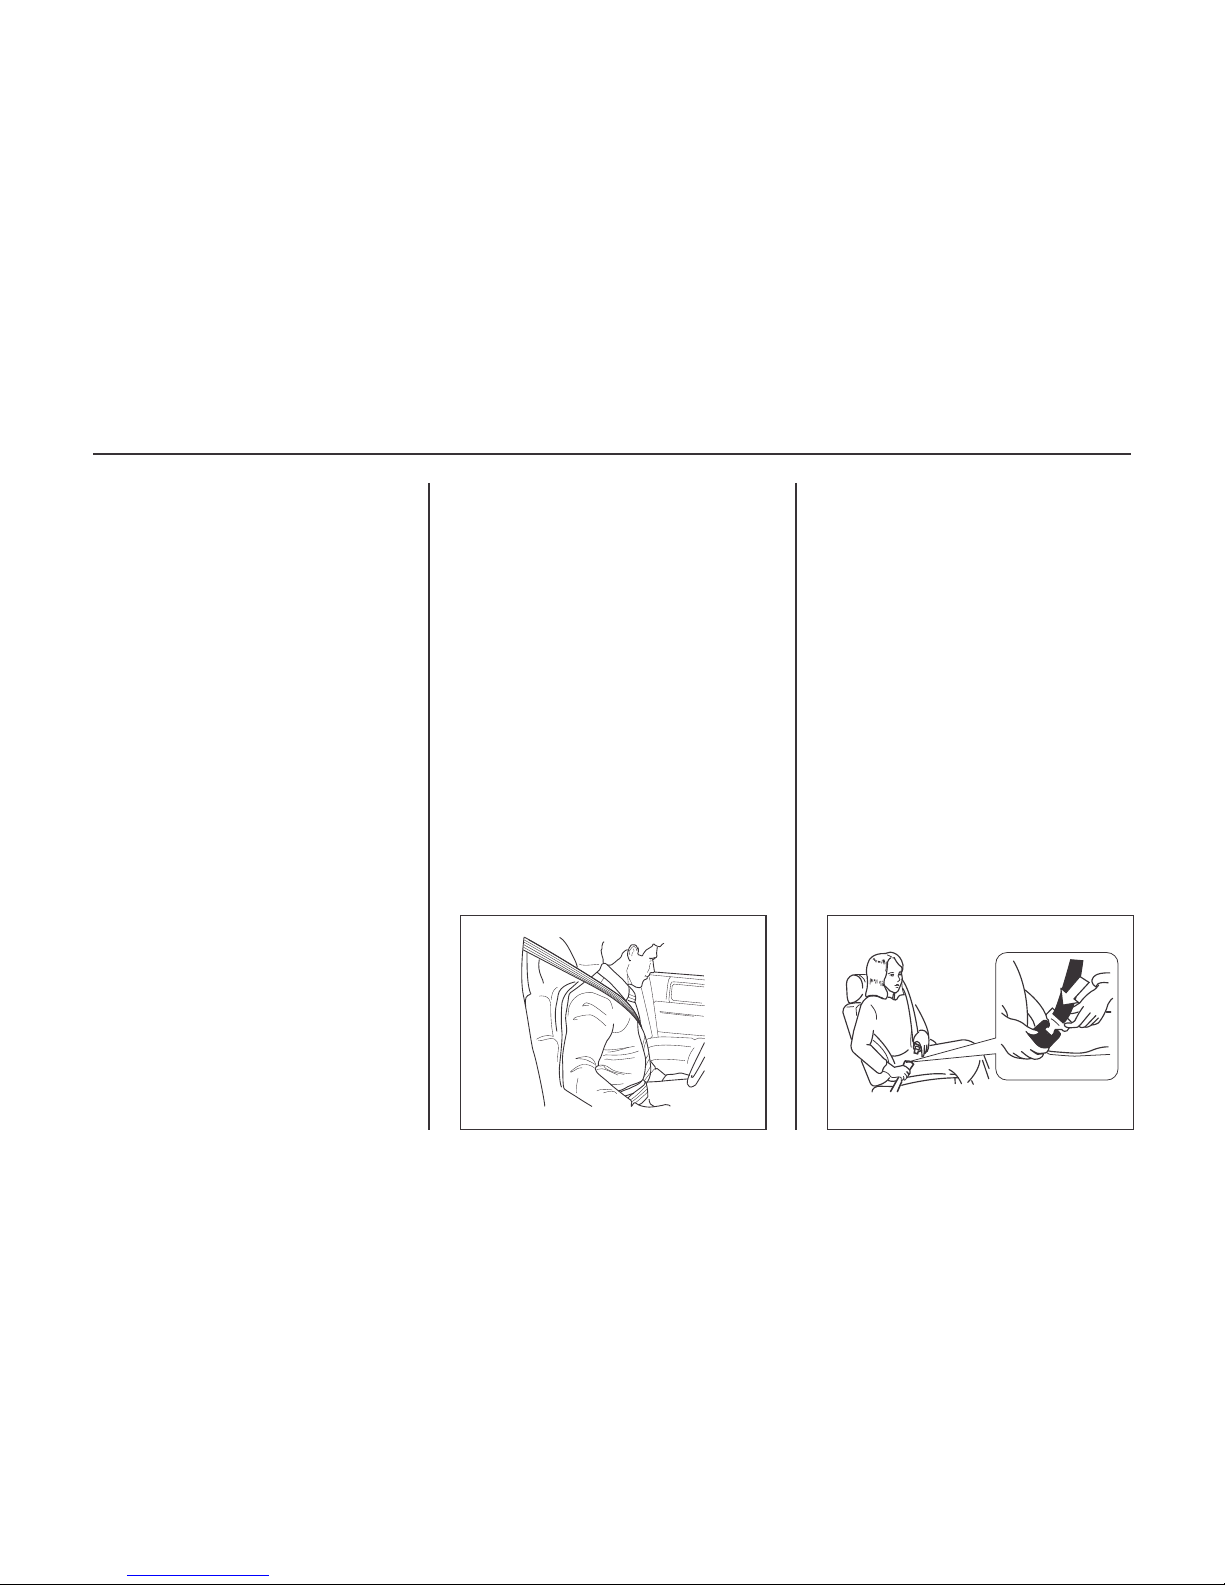
SAFETY BELT
Withdraw belt from reel, guide it
untwisted across the body and engage
the latch plate in the buckle.
To release the belt, press the red button
on the belt buckle.
See Safety belts on page 32,
See Airbag system on page 33,
See Seat position on page 31.
MIRROR ADJUSTMENT
Interior Mirror
To reduce dazzle, pull the lever on the
underside of the mirror housing.
See Manual rearview mirror on page
16.

6 Introduction
Exterior Mirrors
Simply move the adjusting lever in the
desired direction to adjust the mirror
angles.
See Convex mirrors on page 16,
See Folding mirrors on page 16.
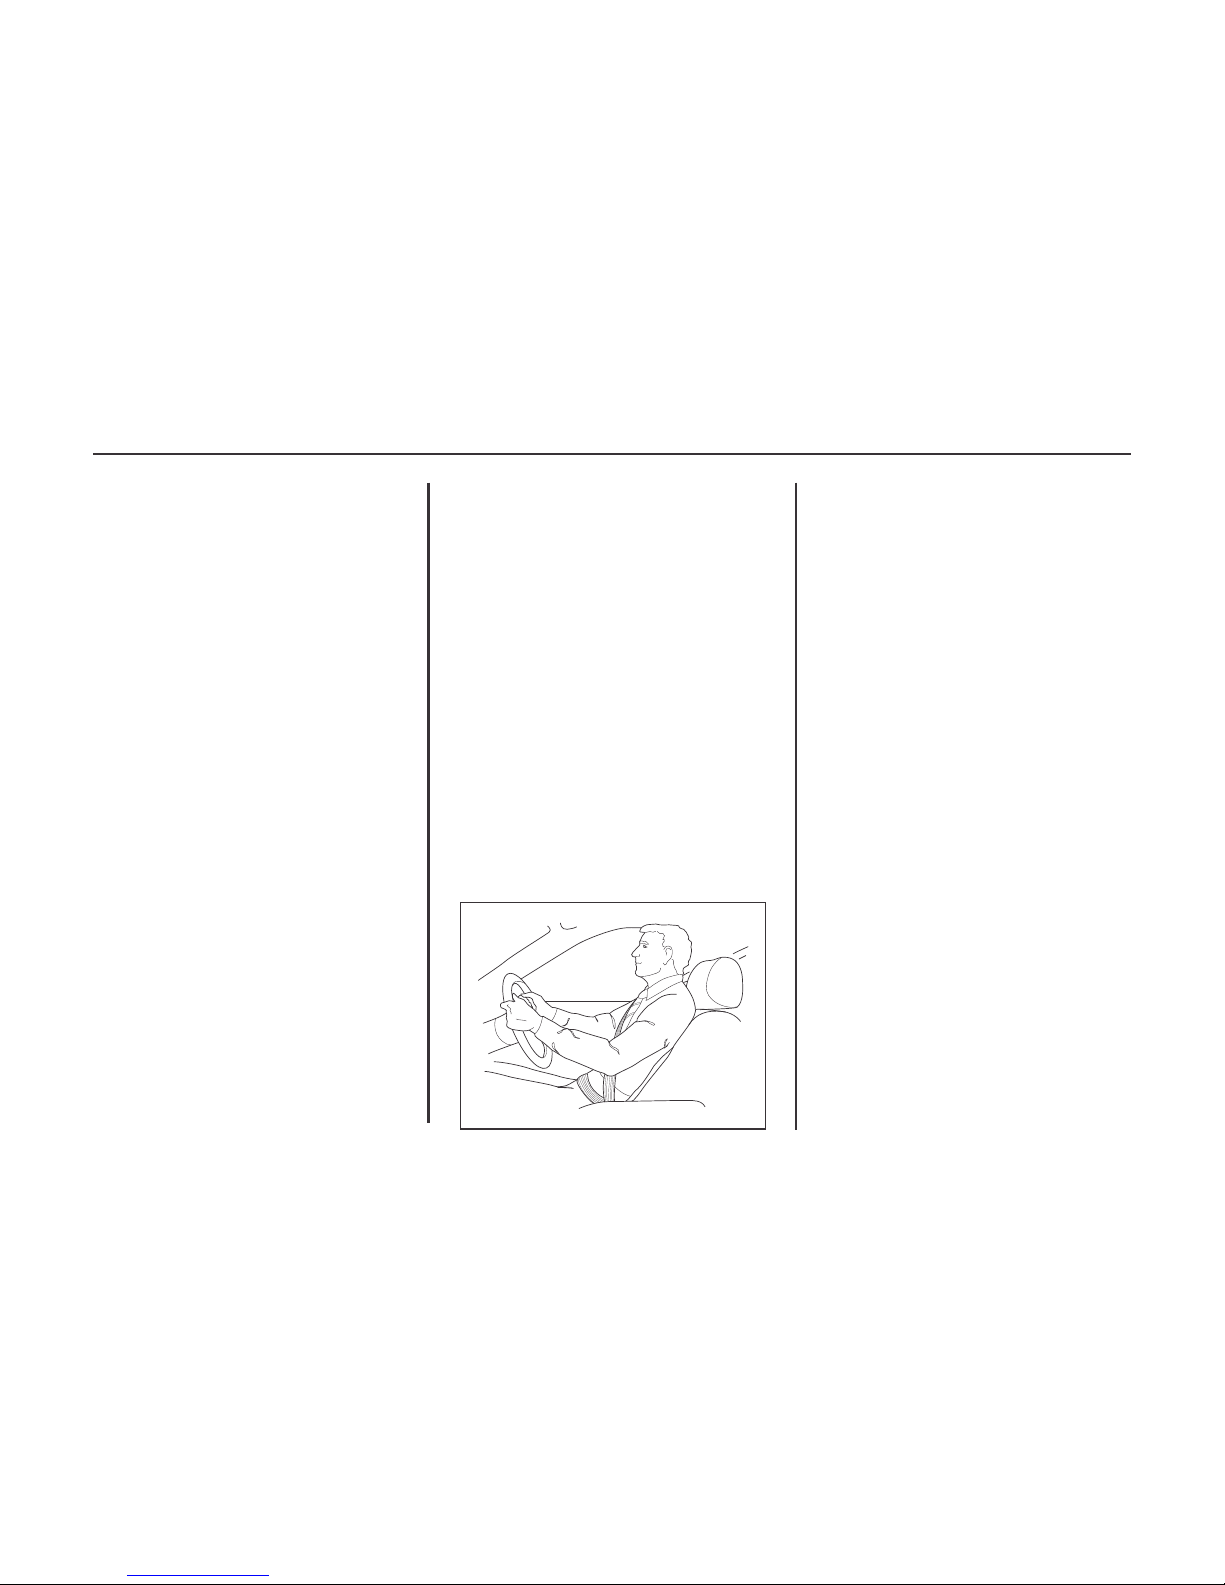
Unlock lever, adjust steering wheel,
then engage lever and ensure it is fully
locked. Do not adjust steering wheel
unless vehicle is stationary.
See Airbag system on page 33.
See Ignition positions on page 90.
STEERING WHEEL
ADJUSTMENT (OPTION)
7Introduction
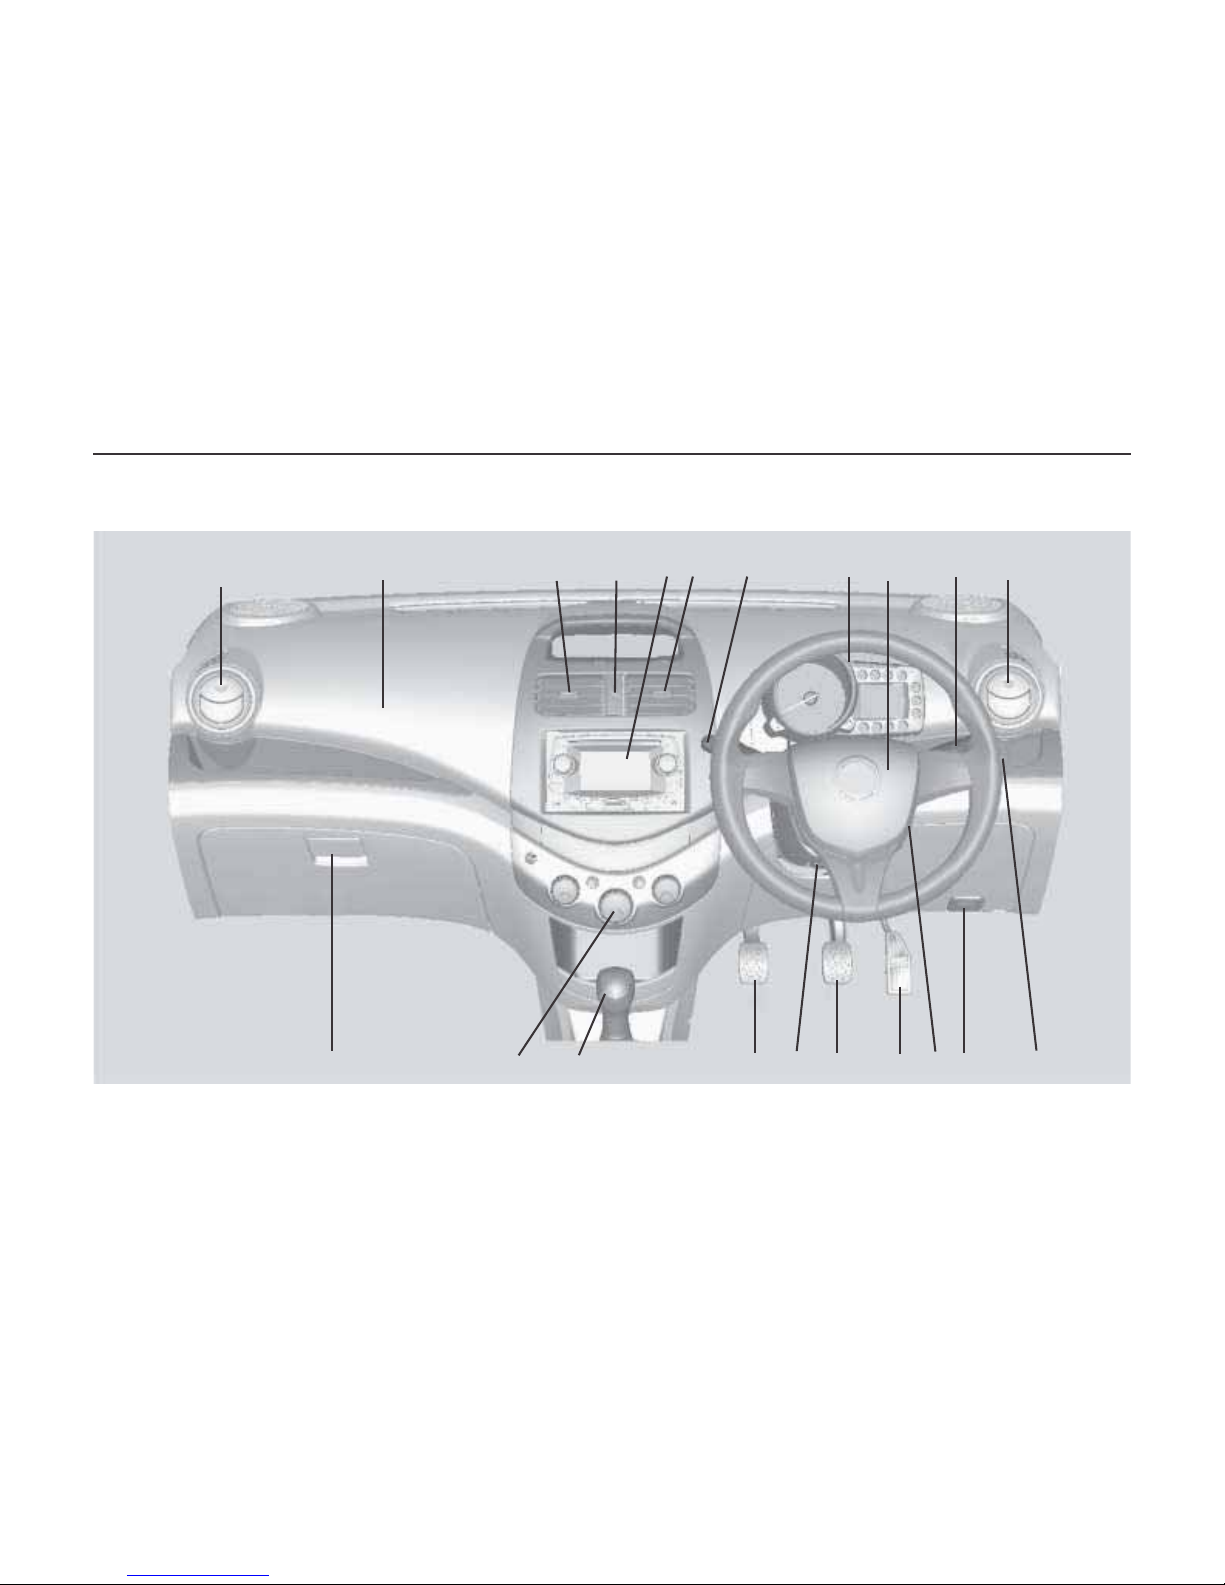
INSTRUMENT PANEL OVERVIEW
11
5
34266
7
89
10 11 12 16 17 14 13 15 18 19
OFF
ON
OFF
OFF
ON
OFF
8 Introduction
1. Side air vents
2. Wiper and washer lever
3. Horn, Driver's airbag
4. Cluster
5. Exterior lamp lever
6. Center air vents
7. Infotainment system
8. Hazard warning flasher
9. Passenger airbag
10. Glove box
11. Climate control system
12. Shift lever
13. Accelerator pedal
14. Brake pedal
15. Ignition switch
16. Clutch pedal
17. Steering wheel adjustment
18. Hood release lever
19. Headlamp range adjustment
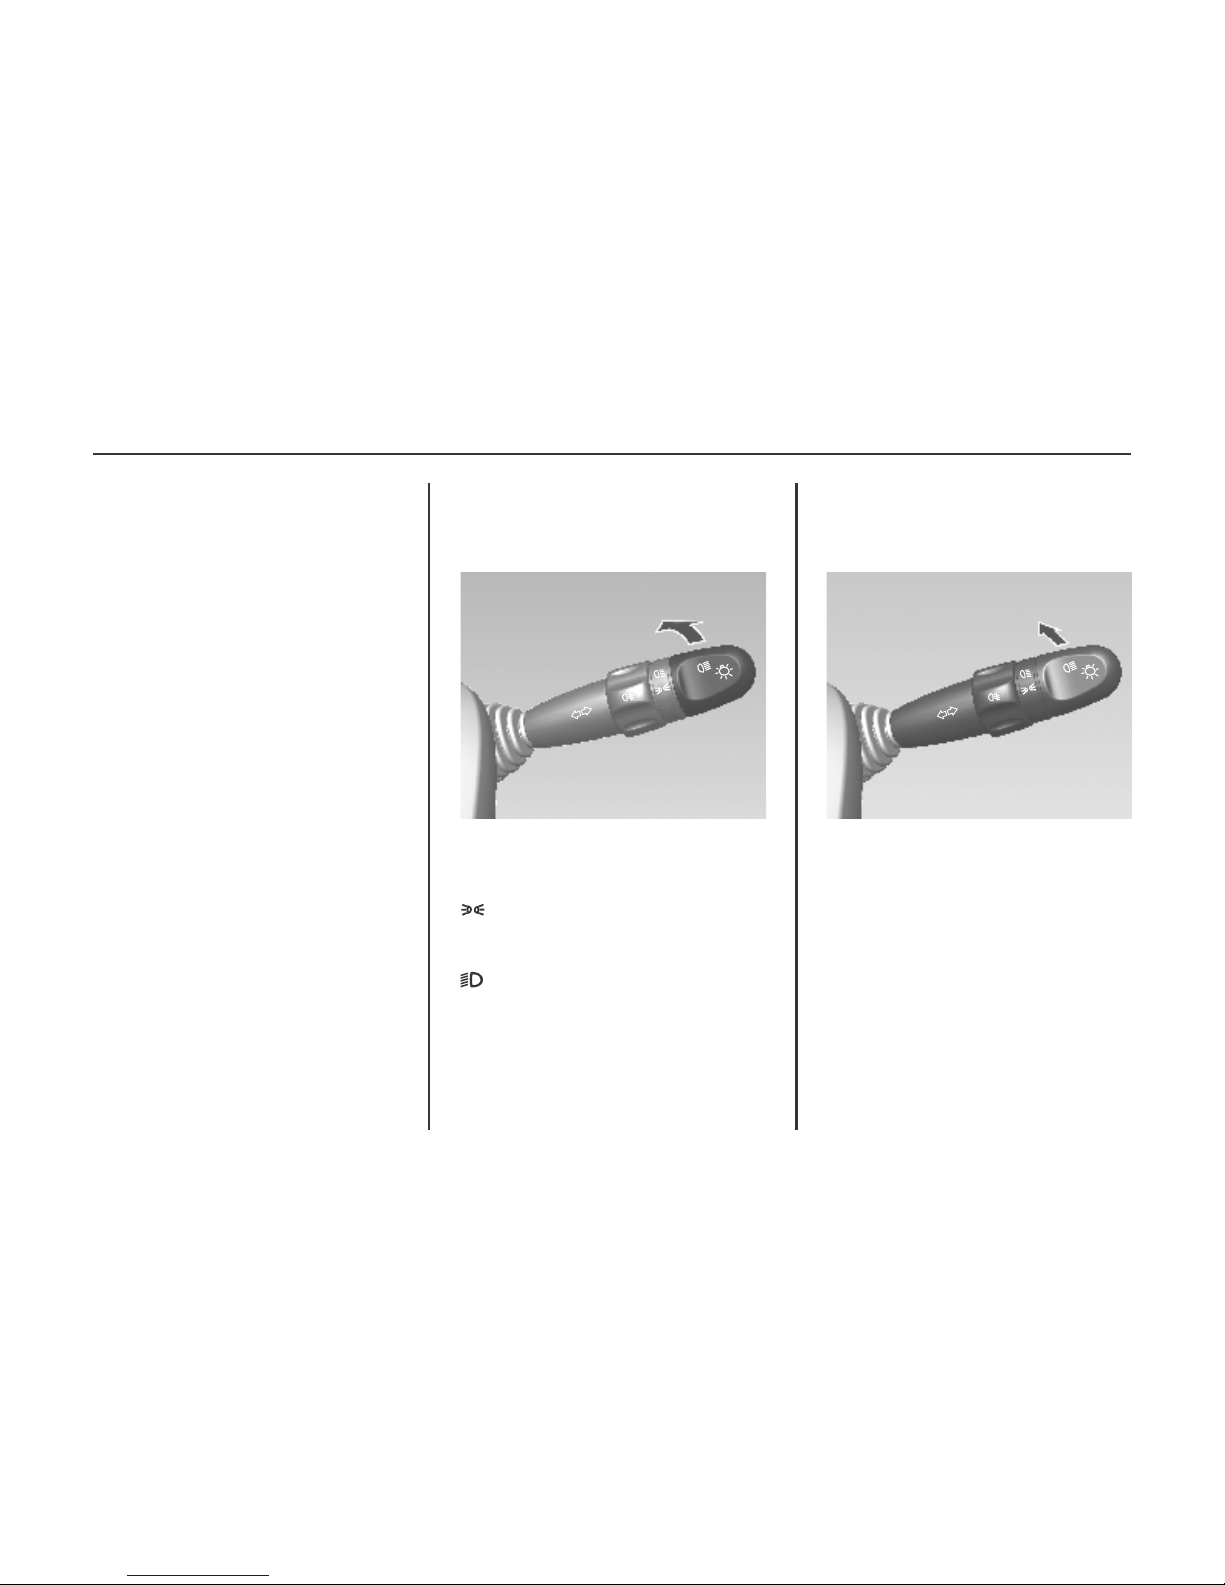
EXTERIOR LIGHTING
Turn light switch
OFF : All the lamps are off.
: The tail lamps, number plate
lamps, and instrument panel
lamps are illuminated.
: The low-beam headlamps and
all of the above lamps are
illuminated.
See Exterior lamp controls on page 61.
Headlight High/Low-Beam
Change
To switch from low to high beam, push
lever.
To switch to low beam, push lever again
or pull.
See Headlamp high/low-beam changer
on page 62,
See Flash-to-pass on page 62.
OFF
ON
OFF
9Introduction
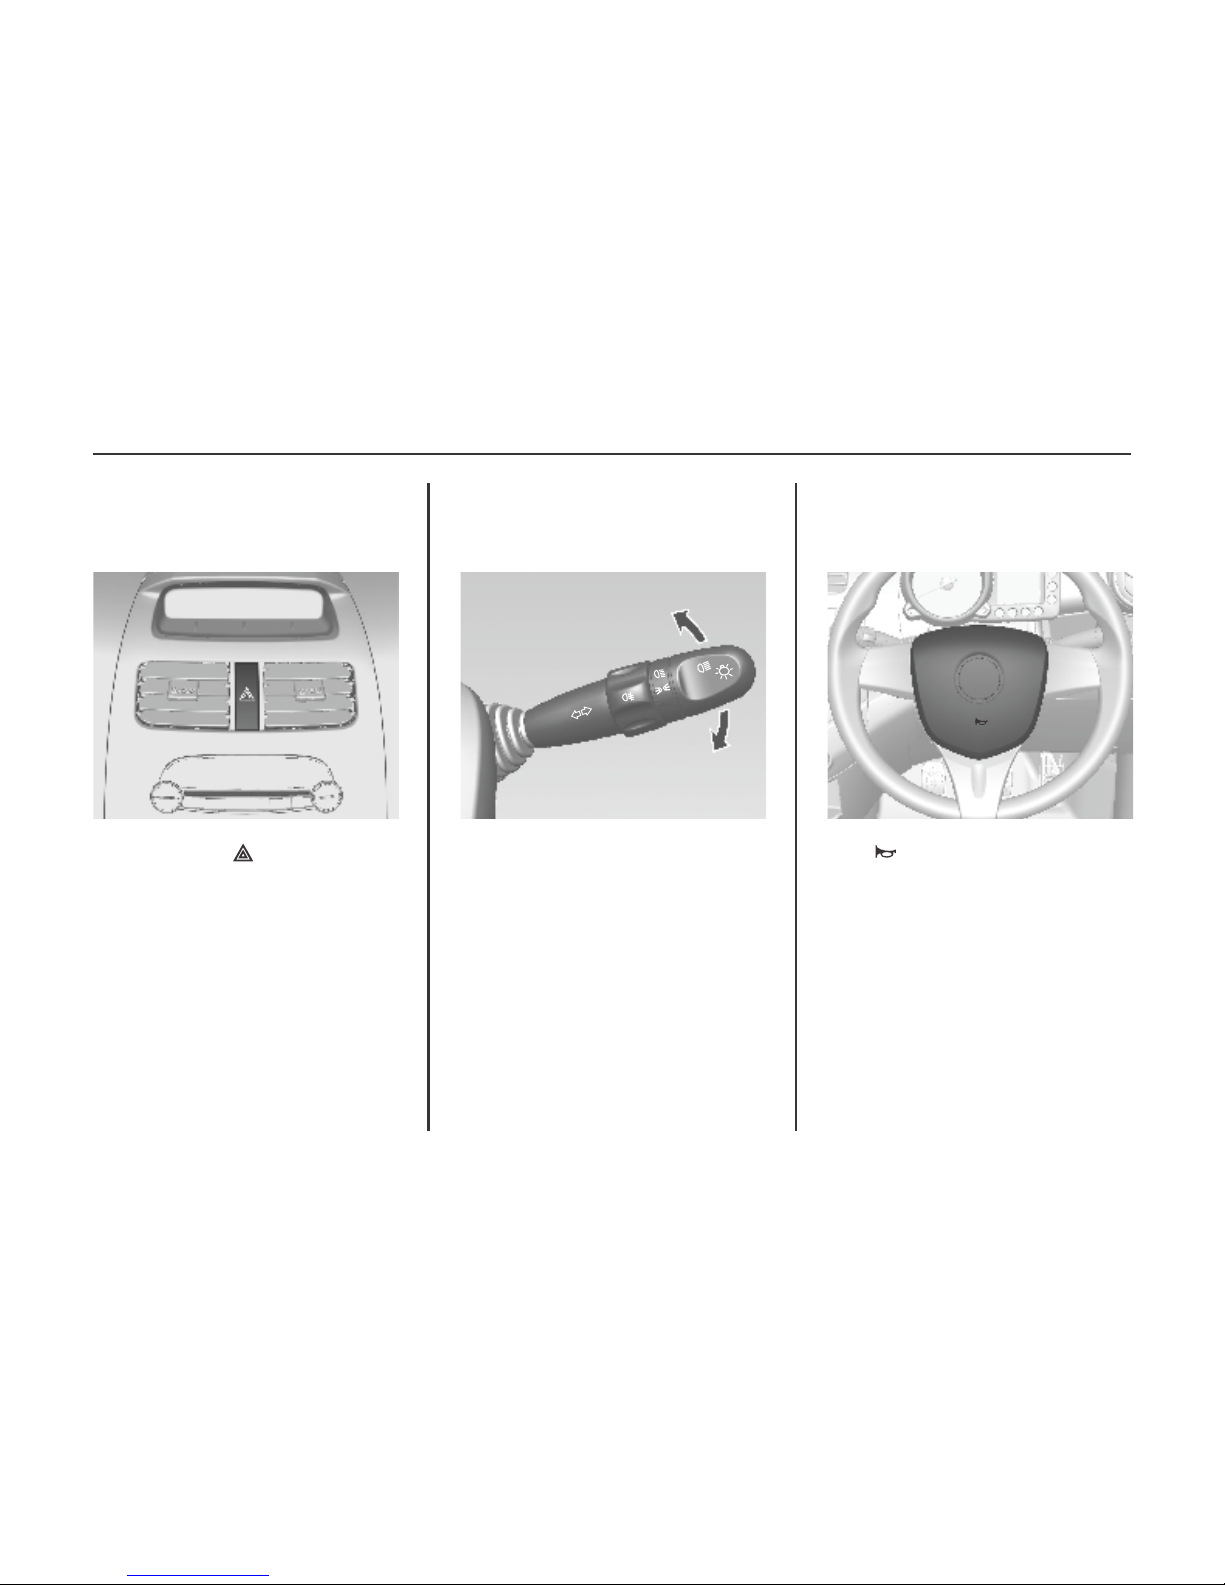
HORN
Hazard Warning Flashers
Operated with the button.
See Hazard warning flashers on page
63.
Press .lever up = left indicator
lever down = right indicator
See Turn and lane-change signals on
page 64,
See Parking lamps on page 64.
Turn And Lane-change Signals
HI
LO
I
NT
O
F
F
HI
L
O
I
NT
O
F
F
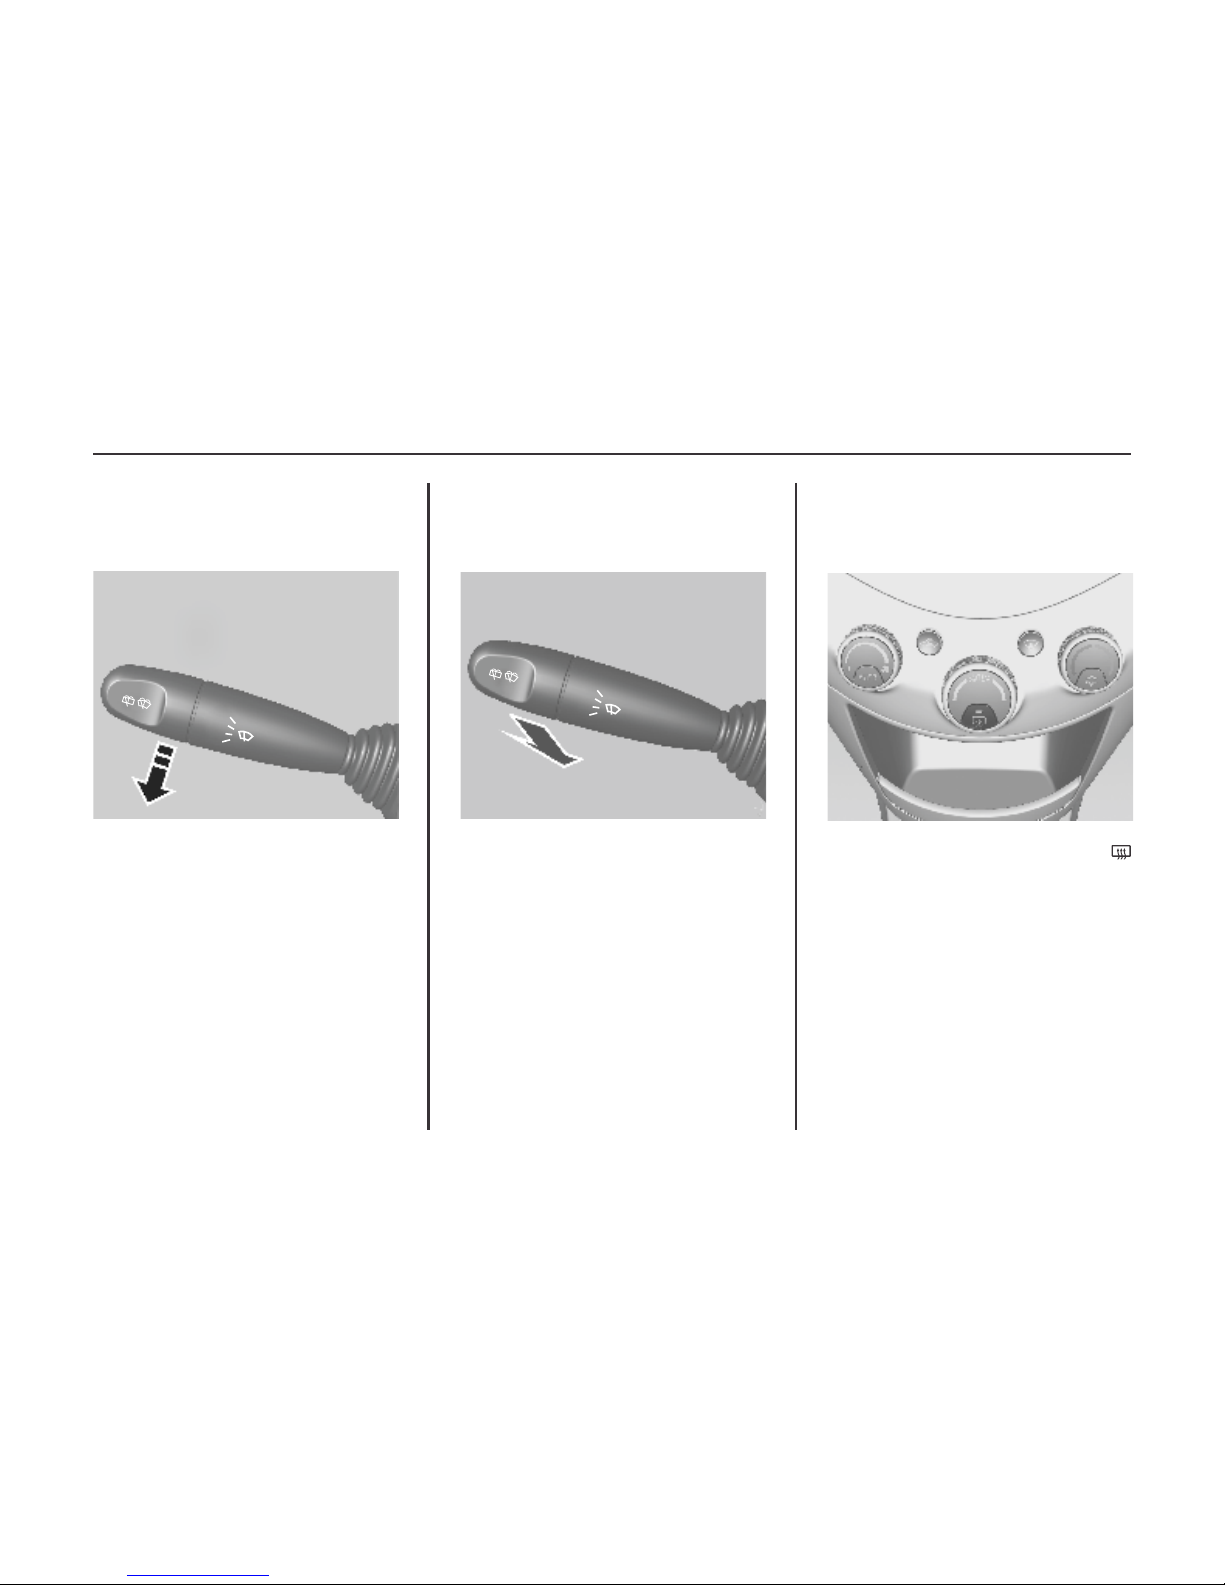
10 Introduction
Heating is operated by pressing the
button.
See Heated rear window, Windshield
wiper de-icer on page 19.
Ü
Windshield Wipers
CLIMATE CONTROL
OFF : System off.
INT : Intermittent operation.
LO : Continuous wipe, slow speed.
HI : Continuous wipe, fast speed
For a single swipe when the windscreen
wipers are off, lightly move the lever
toward the INT position and release it.
See Windshield wiper/washer on page
50.
Pull lever.
See "Windshield washer" under
Windshield wiper/washer on page 50,
See Washer fluid on page 106.
WASHER AND WIPER
SYSTEMS
Windshield Wiper
Heated Rear Window
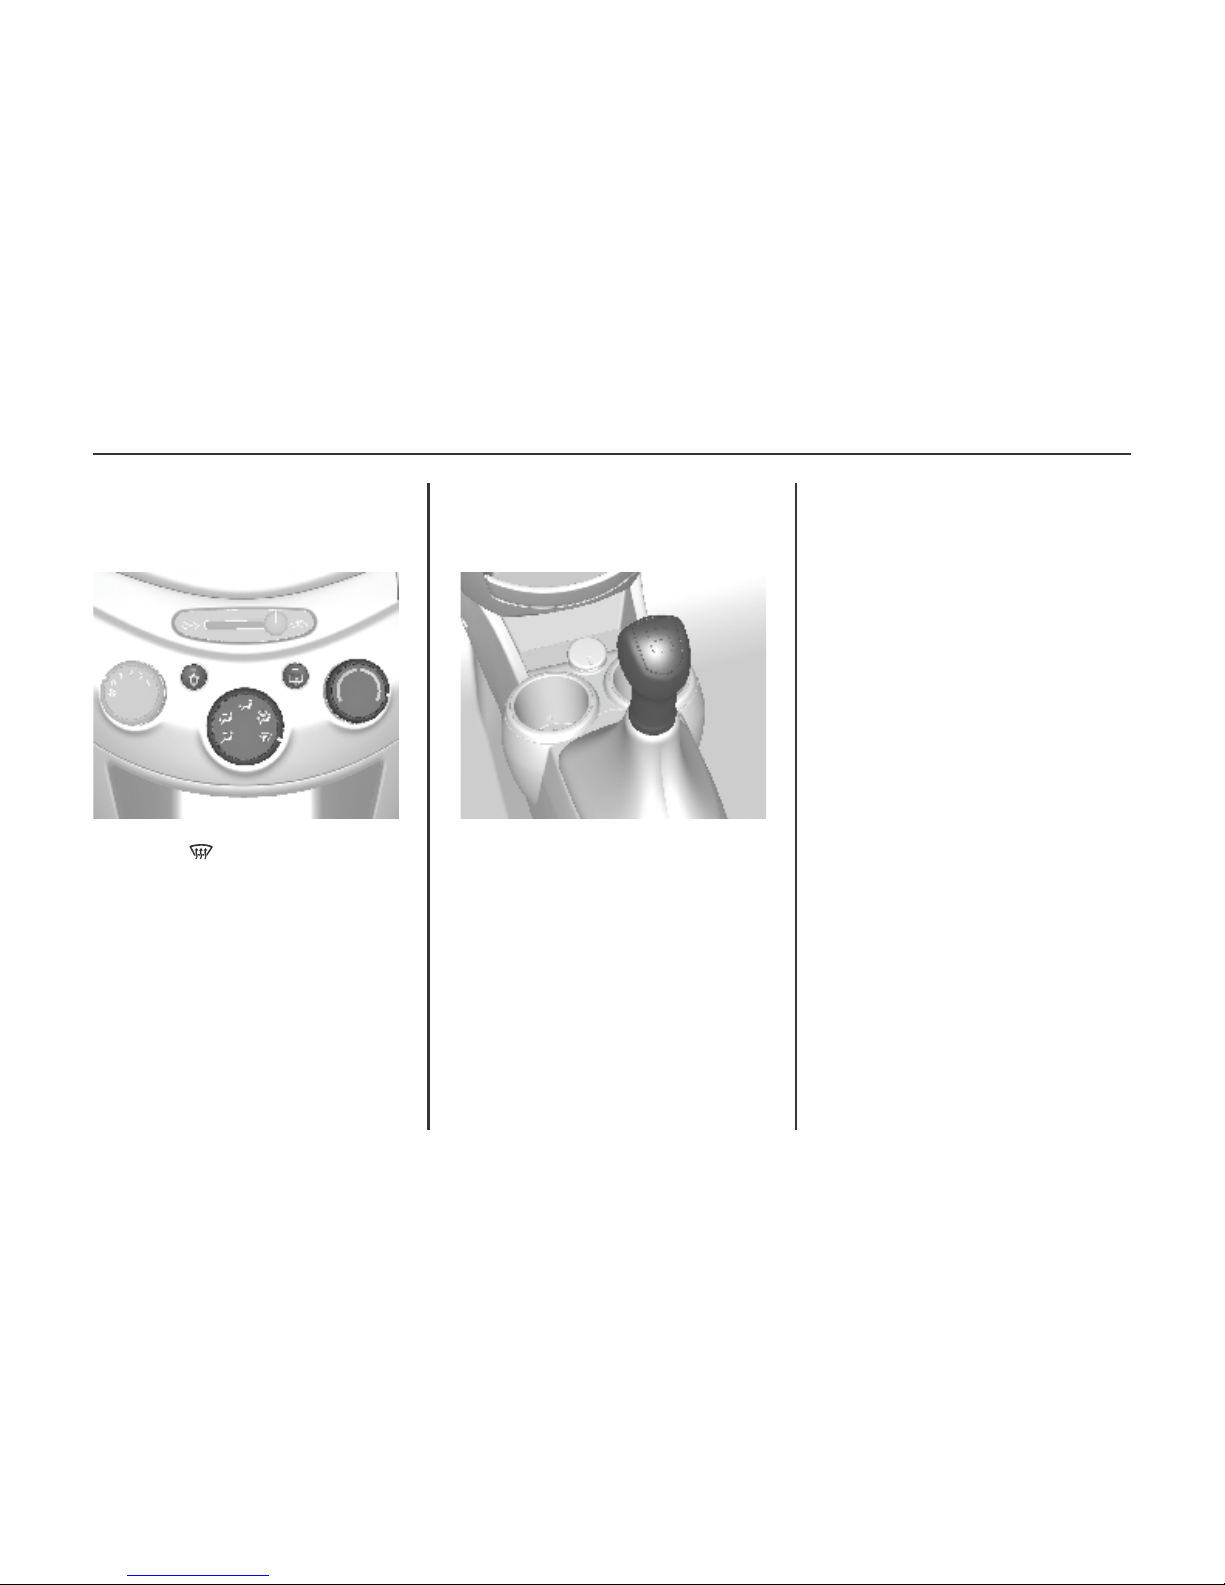
11Introduction
TRANSMISSION
Manual Transmission
Press button .
See "Demisting windshield" under Air
conditioning system on page 78,
See "Demisting and defrosting
window" under Electronic climate
control system on page 83.
Reverse: with the vehicle stationary,
depress the clutch pedal and engage the
gear.
If the gear does not engage, set the lever
to neutral, release the clutch pedal and
depress again; then repeat gear
selection.
See Manual transmission on page 92.
Demisting And Defrosting The
Windows
GETTING STARTED
Check Before Starting Off
n
n
Engine oil level and fluid levels.
n All windows, mirrors, exterior
lighting and number plates are free
from dirt, snow and ice and
operational.
n Proper position of seats, seat belts
and mirrors.
n Check brake function at low speed,
particularly if the brakes are wet.
Tyre pressure and condition.
12 Introduction
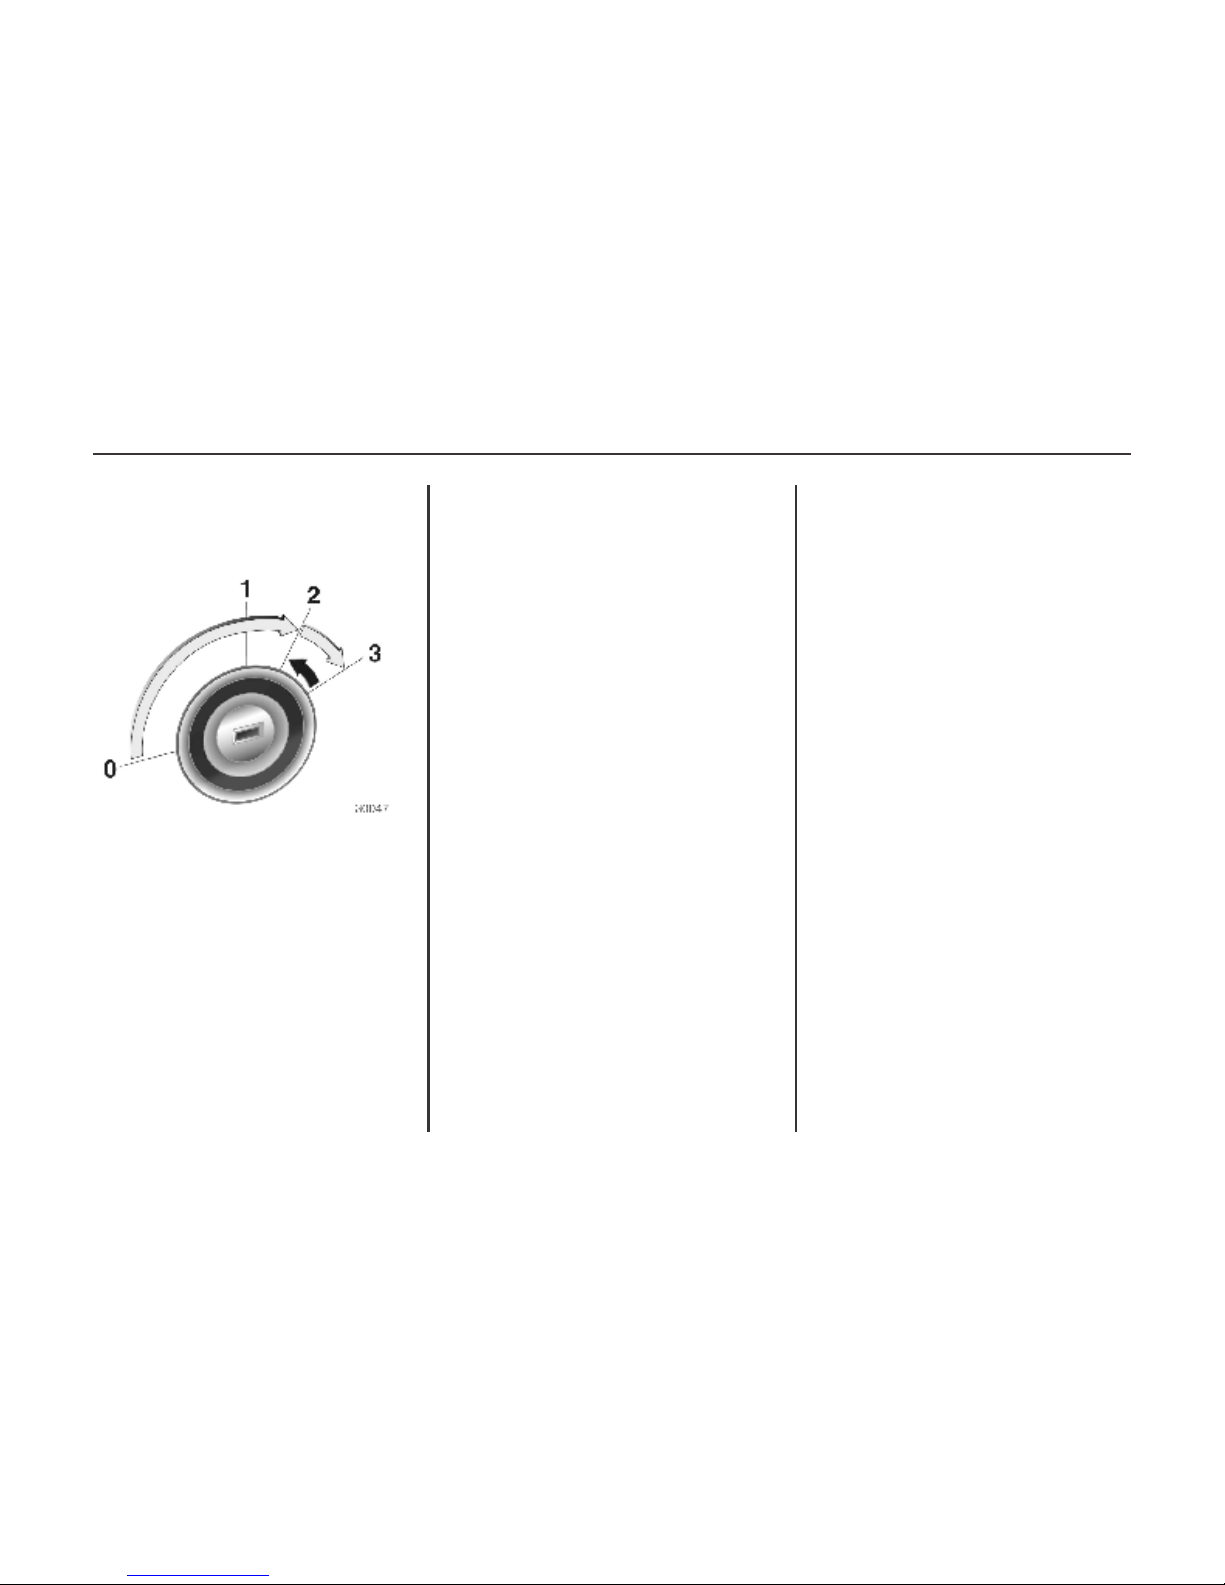
Starting Engine With The Ignition
Switch
n
steering wheel slightly to release the
steering wheel lock.
n Manual transmission: operate
clutch;
n Do not press accelerator pedal.
n Turn key to position 3 depressing
the clutch pedal and foot brake then
release when engine is running
Before restarting or to switch off the
engine, turn key back to 0.
Turn
key to position1, move the
PARKING
n Do not park the vehicle on an easily
flammable surface. The high
temperature of the exhaust system
could ignite the surface.
n Always apply parking brake
without pressing release button.
Apply as firmly as possible on
downhill or uphill slopes. Depress
the footbrake at the same time to
reduce operating force.
n Switch off the engine and ignition.
Turn the steering wheel until the
steering wheel lock engages.
n If the vehicle is on a level surface or
uphill slope, engage first gear
before switching off the ignition.
On an uphill slope, turn the front
wheels away from the kerb. If the
vehicle is on a downhill slope,
engage reverse gear before
switching off the ignition. Turn the
front wheels towards the kerb.
n Close windows.
n Lock the vehicle.
See Keys on page 13.
13Keys, doors & windows
KEYS, DOORS AND
WINDOWS
KEYS, LOCKS
Keys
Keys, locks ..................................... 13
Doors .............................................. 15
Exterior mirrors .............................. 16
Interior mirror ................................ 17
Windows ........................................ 18
Sun visors ....................................... 20
Central Locking System*
You can activate the central door
locking system from the driver's door.
This system allows you to lock and
unlock all the doors from the driver's
door, using either the key or the door
lock button (from inside).
If the driver's door is not closed
properly, the central locking system
will not work.
Warning
Do not leave the key in the vehicle.
• Lock the vehicle.
• Take the key with you.
Note
In case of loss, replacement keys are
available from Chevrolet retailers.
Replacement keys
The key number is specified on a
detachable tag.
The key number must be quoted when
ordering replacement keys.
Two keys are provided with your new
vehicle.
Keep one of the two keys as a spare.
See "Lock" under Exterior care on page
130.
14 Keys, doors & windows
Fault in central locking system
Unlocking
Manually unlock the driver's door by
turning the key in the lock. The other
doors can be opened by using the
interior handle.
Locking
Push inside locking knob of all doors
except driver's door. Then close the
driver's door and lock it from the
outside with the key.
Safety locks
Caution
Do not pull the inside door handle
while the child security door lock is
set to LOCK position. Doing so can
damage the inside door handle.
Warning
Use the child security door locks
whenever children are occupying the
rear seats.
To close the child security door lock,
move the lever up to the lock position.
To open a rear door when the child
security door lock is activated, unlock
the door from the inside and open the
door from the outside.
To cancel the child security door lock,
move the lever down to the unlock
position.
15Keys, doors & windows
DOORS
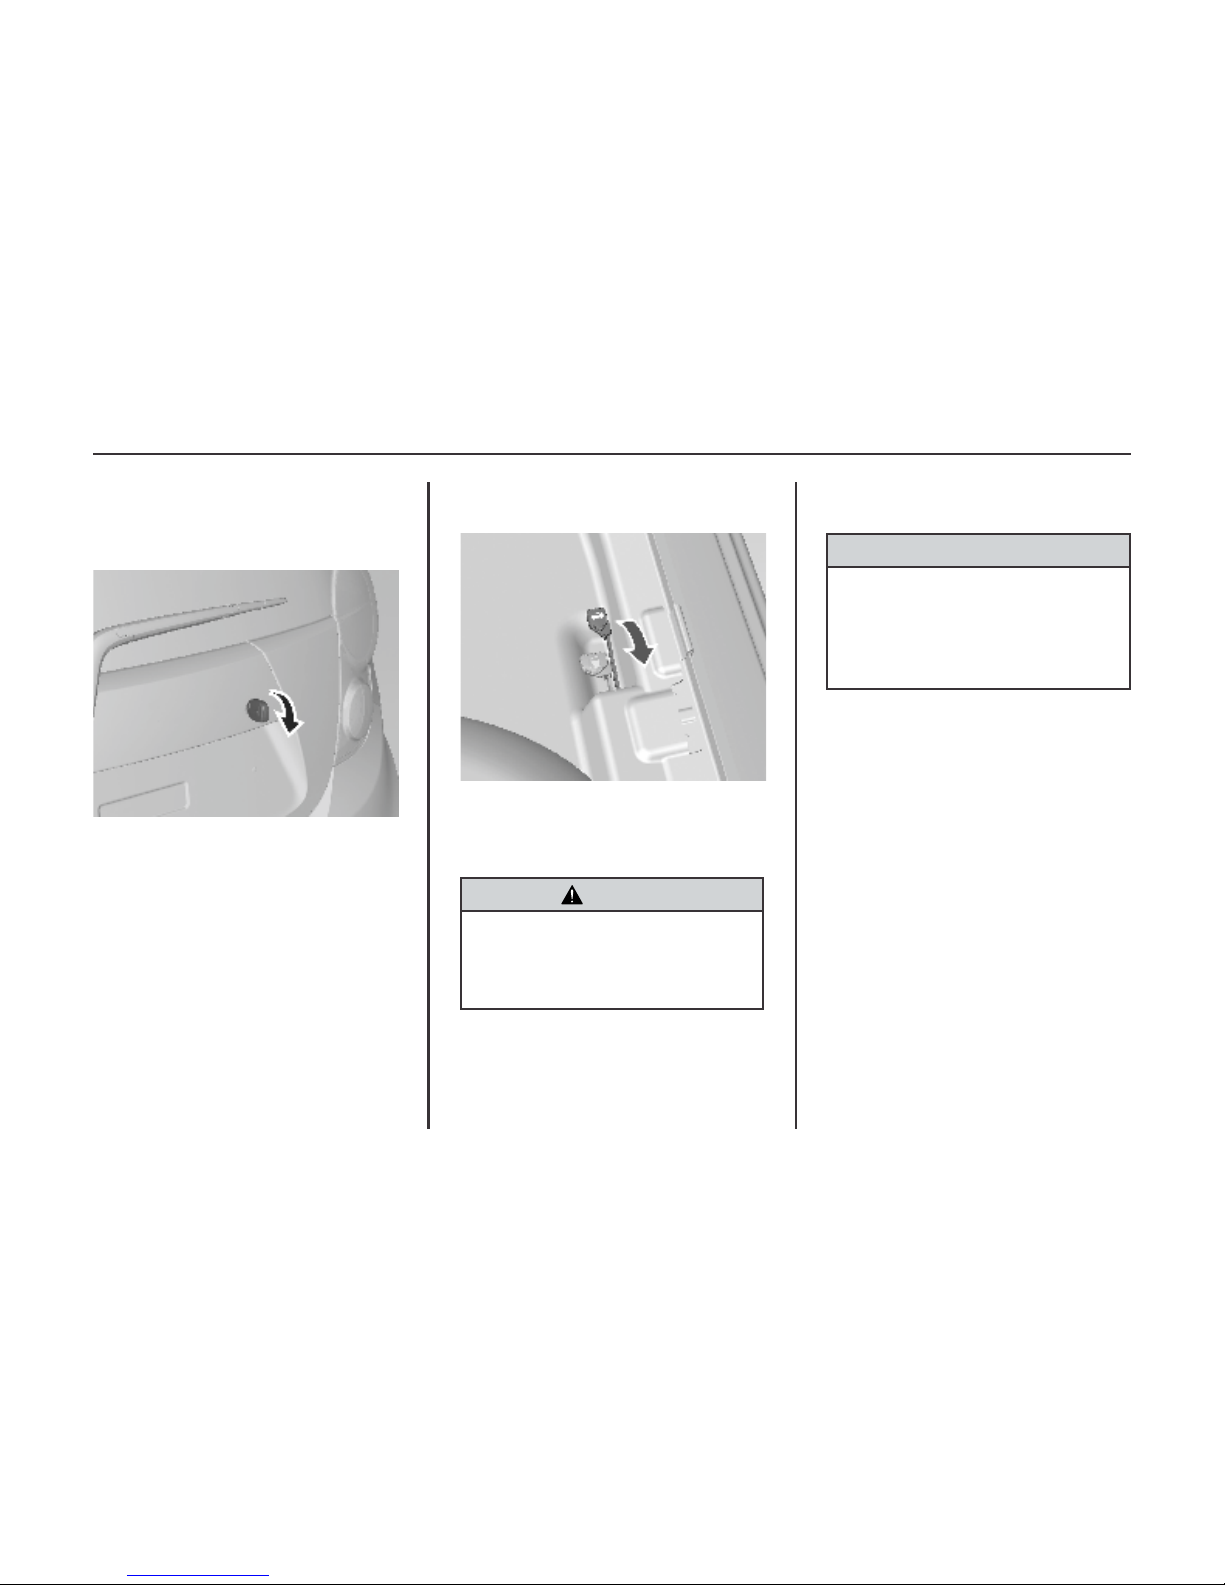
Tailgate Opening
To open the tailgate, insert the key into
the key slot and turn it clockwise.
Lift the tailgate.
You can also open the tailgate by
pulling up the tailgate release lever
located near the driver's seat.
Warning
Do not drive with the tailgate open or
ajar, e.g. when transporting bulky
objects, since toxic exhaust gases
could enter the vehicle.
Caution
Before opening the tailgate check
overhead obstructions, such as a
garage door, to avoid damage of the
tailgate. Always check the moving
area above and behind the tailgate.
Note
The installation of certain heavy
accessories onto the tailgate may
affect its ability to remain open.
Closing
To close tailgate, push it down so it
latches securely. It locks automatically.
Make sure your hands and any other
body parts, as well as those of other
persons are completely away from the
tailgate closure area.
16 Keys, doors & windows
EXTERIOR MIRRORS
Convex Mirrors
The convex exterior mirror reduces
blind spots. The shape of the mirror
makes objects appear smaller, which
will affect the ability to estimate
distances.
Both outside mirrors are convex and is
labelled with a notice that reads as
follows:
Manual Mirrors
Adjust the outside rearview mirrors so
you can see each side of your vehicle, as
well as each side of the road behind you.
Simply move the adjusting lever in the
desired direction to adjust the mirror
angles.
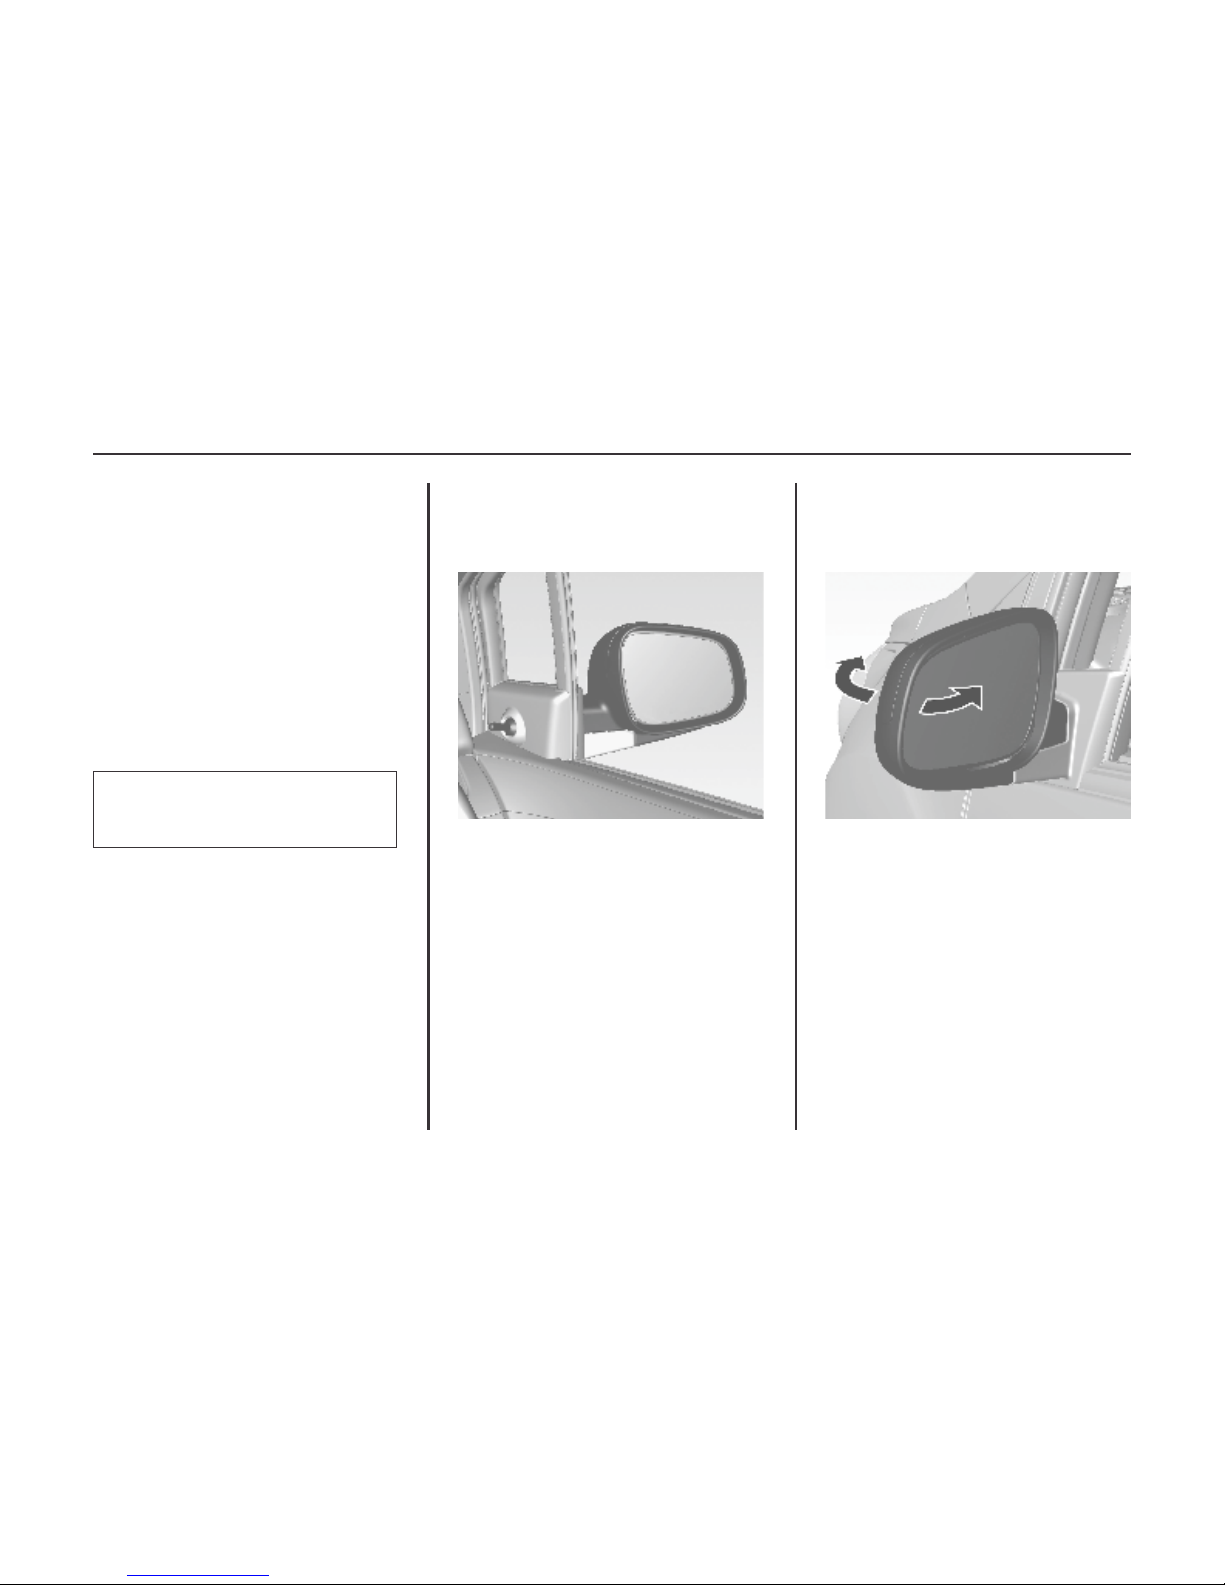
Folding Mirrors
For pedestrian safety, the exterior
mirrors will swing out of their normal
mounting position if they are struck
with sufficient force. Reposition the
mirror by applying slight pressure to the
mirror housing.
OBJECTS IN THE MIRROR
ARE CLOSER THAN THEY
APPEAR.
17Keys, doors & windows
Warning
Always keep your mirrors properly
adjusted, and use them while driving
to increase your visibility of objects
and other vehicles around you. Do
not drive while either outside
rearview mirror is folded back.
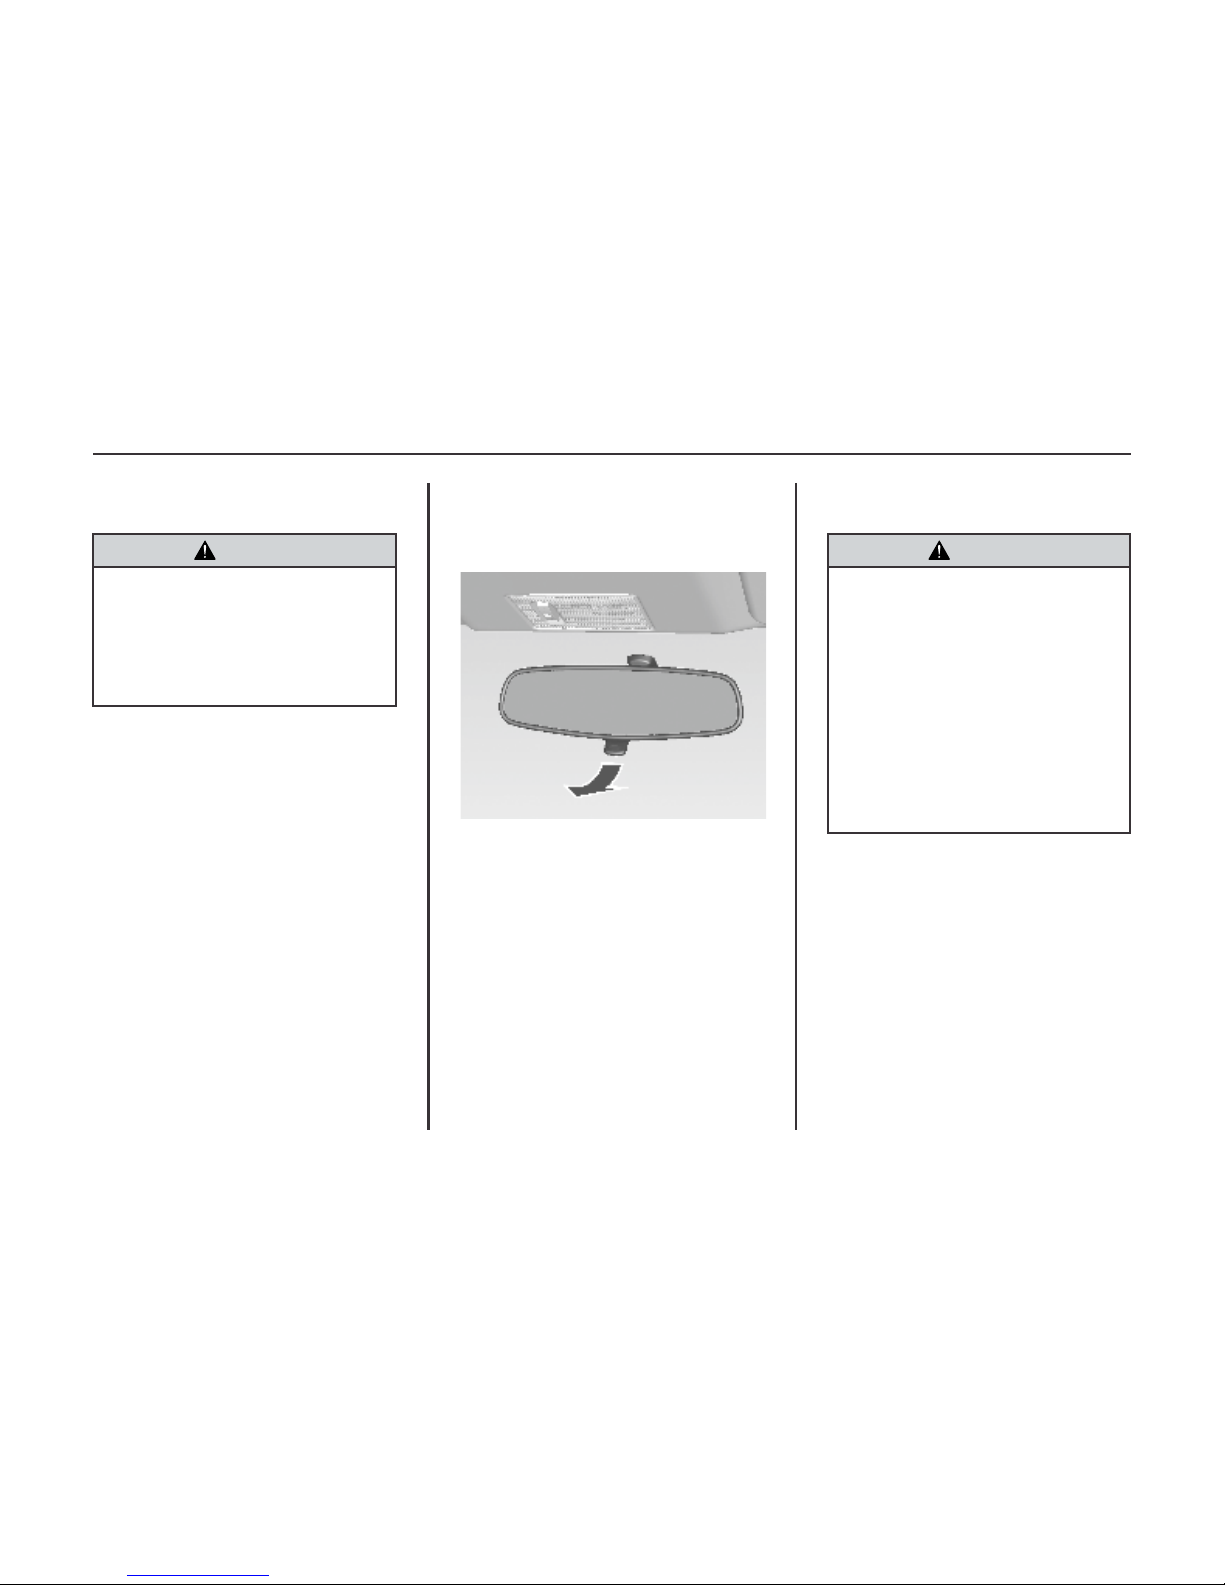
INTERIOR MIRROR
Manual Rearview Mirror
To reduce dazzle, pull the lever on the
underside of the mirror housing.
Warning
Your view through the mirror may
lose some clarity when it is adjusted
for night vision.
Take special care while using your
inside rearview mirror when it is
adjusted for night vision.
Failure to ensure a clear rear view
while driving may result in a
collision causing damage to your
vehicle or other property, and/or
personal injury.
WINDOWS
Manual Windows (Option)
The door windows can be opened or
closed with the window winders.
18 Keys, doors & windows
Power Windows (Option)
Warning
Take care when operating the power
windows. There is risk of injury,
particularly to children.
If there are children on the rear seat,
switch on the child safety system for
the power windows.
Keep a close watch on the windows
when closing them.
Ensure that nothing becomes trapped
in them as they move.
Power windows can be operated with
ignition on.
Operate the switch for the respective
window by pushing to open or pulling
to close.
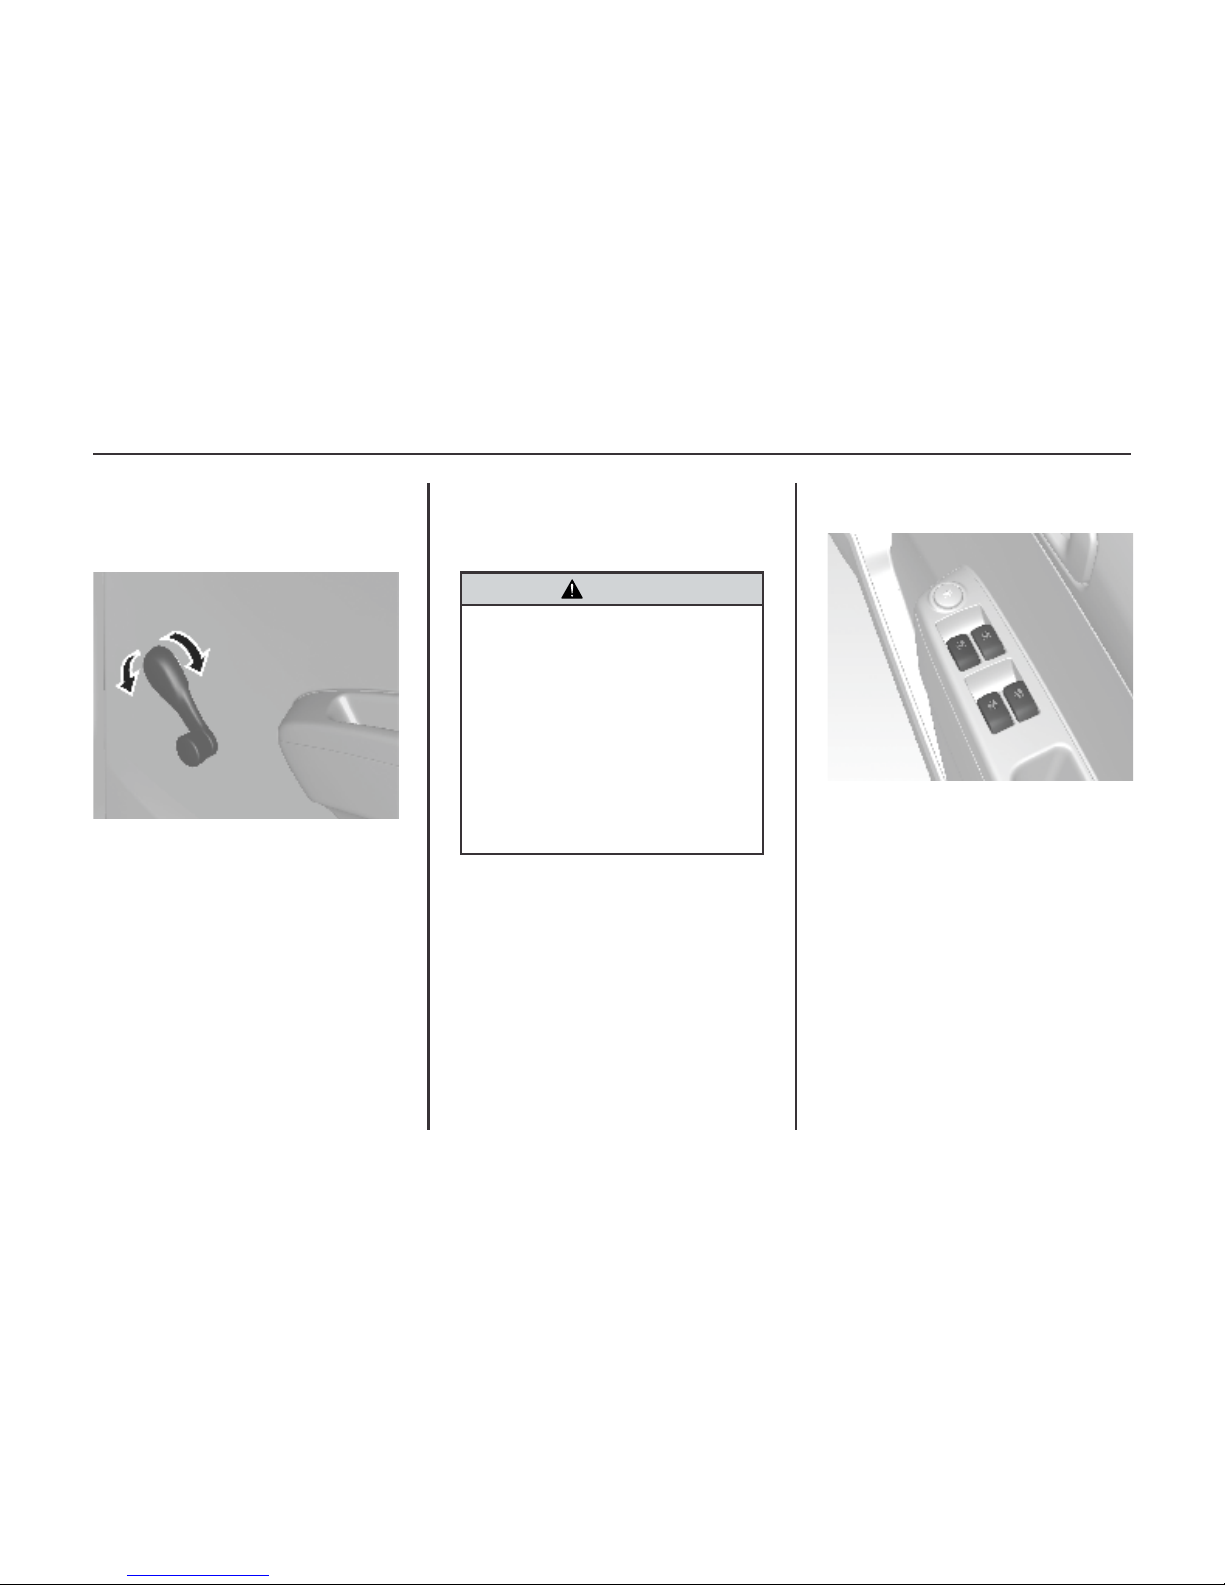
Operation
You may operate the power windows
when the ignition switch is ON by using
the power window switches on each
door panel.
To raise the window, lift up the switch.

19Keys, doors & windows
To lower the window, press down the
switch.
Release the switch when the window
reaches the desired position.
Warning
Body parts outside vehicle can be
struck by passing objects. Please
keep all parts of the body inside
vehicle.
Children can operate and become
entrapped in power windows.
Do not leave your keys or unattended
children in your car.
Serious injury or death can occur
from misuse of power windows.
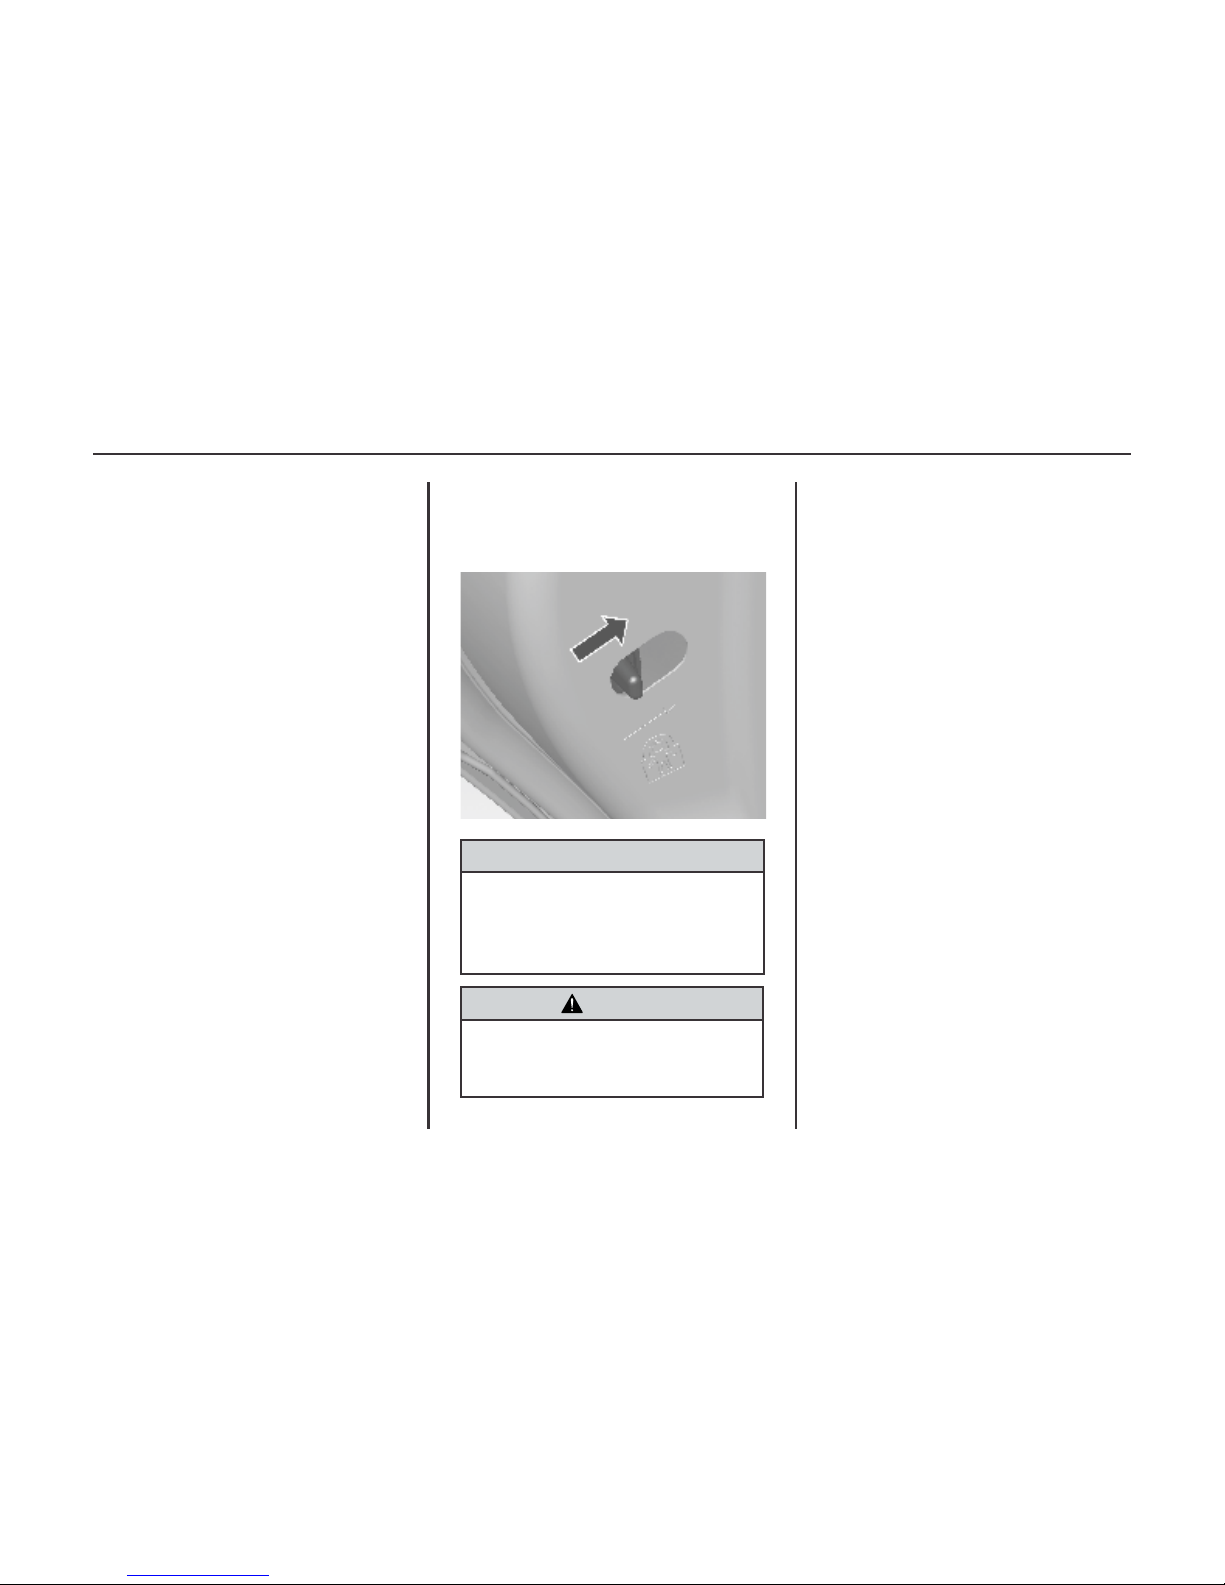
Child Safety System For Rear
Windows
Press switch to deactivate rear door
power windows. To activate press
again.
v
v
Heated Rear Window /
Windshield Wiper de-icer
Operated by pressing the button.
Heating works with the engine running
and is switched off automatically after
approximately 16 minutes or by
pressing the button again.
20 Keys, doors & windows
SUN VISORS
The sun visors can be folded down or
swivelled to the side to prevent
dazzling.
If the sun visors have integral mirrors,
the mirror covers should be closed when
driving.
Caution
Do not use sharp instruments or
abrasive window cleaners on your
vehicle's windshield or rear window.
Do not scratch or damage the
defroster wires when you clean or
work around the windshield or rear
window.
Warning
Do not place the sun visor in such a
manner that it obscures visibility of
the roadway, traffic or other objects.
Your vehicle has assist handles above
the front seat passenger door & the rear
doors. The handle above the rear doors
include a coat hook.
Assist Handles
Caution
Hanging items on the assist handles
can obstruct the driver's view. Do not
hang anything on the assist handle
unless the handle is equipped with a
coat hook.
21Seats & Restraints
SEATS &
RESTRAINTS
Always wear your safety belts ....... 21
Front seat occupants ....................... 26
Rear seat occupants ........................ 26
Three-poing sefety belts ................. 26
Center rear lap belt ......................... 28
Pregnant women & safety belts ..... 29
Head restraints ............................... 29
Front seats ...................................... 31
Safety belts ..................................... 32
Air bag system ............................... 33
Occupant protection has been the focus
of much private and public research and
development for many years. The seat
belts are incorporated into the vehicle
solely for the protection of the
occupants. The safety belts can protect
you and your passengers only if they are
used.
The safety belt information included
here is intended for vehicle occupants
of adult size and for older children who
have outgrown booster seats.
Be sure that if children are too small to
be well restrained by the safety belt
system, that they are secured in an
appropriate child restraint.
ALWAYS WEAR YOUR
SAFETY BELTS*
Safety belts are helpful for several
distinct reasons:
1) Safety belts attach the occupants to
the vehicle so that they will not be
ejected during an accident.
2) Safety belts attach the occupant to
the vehicle so that they can use the
space between their pre-crash
seating position and the front of the
vehicle to slow down to a stop more
gradually, as their safety belts
stretch and the front end of the
vehicle absorbs the energy of the
crash by crumpling.
3) Safety belts keep the driver in his
seat, so that the driver might have a
chance to regain control in certain
accident situations.
4) Safety belts keep occupants from
being catapulted into and injuring
the driver and other occupants.
Why Wear Safety Belts?
22 Seats & Restraints
Warning
• Safety belts have been shown to
be the single most effective
protection against injury or death
in a vehicular accident!
• As the owner and driver of your
vehicle, you must make certain
that each occupant is properly
wearing the safety belt provided at
the seating position.
• Pregnant women, injured, and
physically impaired persons
should also wear safety belts. Like
all other occupants, they are more
likely to suffer serious injury or
death, if they do not do so.
• The best way to protect the foetus
is to protect the mother.
Warning
• Why safety belts work, how to
wear them, and how to adjust your
seat position properly, is
explained in this section. Read all
of the information provided and
always observe these instructions
and warnings in order to gain the
full benefit of these safety
systems.
Safety belts cannot work unless they are
worn and worn properly.
Vehicle occupants are injured if the
forces applied to the body’s structures
are greater than the body can tolerate
without being injured. If a person’s
body is stopped abruptly, the forces
applied to the body will be high,
whereas if the body is slowed down
gradually over some distance, the
forces will be much lower. Thus, in
order to protect an occupant from injury
in a crash, the idea is to give the person
as much time and distance as possible in
coming to a stop.
Imagine a person running at 15 miles
per hour (25 km/h) head first into a
concrete wall. Imagine a second person
running at 15 miles per hour into a wall
covered by a 3-foot (90 cm) thick
deformable cushion. In the first
instance the person could be seriously
injured or even killed. In the second, the
runner could expect to walk away
How Safety Belts Work*

23Seats & Restraints
uninjured. Why? In the first instance,
the body hit the non-yielding concrete
surface and stopped immediately. All of
the energy the sprinter built up was
absorbed by the structures of the body,
not by the non-yielding concrete
surface. In the second example, the
body had exactly the same amount of
energy that had to be absorbed as in the
first example, but it continued to move
into the padding, giving the body
additional time and distance to slow
down to a complete stop as the padding
absorbed the sprinter’s energy by
deforming.
If a car crashes into a concrete wall at 30
miles per hour (50 km/h), the front
bumper of the car stops immediately,
but the passenger compartment stops
more gradually as the front structure of
the vehicle crumples. The belted
occupant is held to the seat and gains
the advantage of the cushion provided
by the crumpling of the front of the
vehicle and the stretching of the safety
belt webbing. That belted occupant’s
body slows down from 50 km/h (30
mph) to zero over a distance of 90-120
cm (3-4 feet). That belted occupant also
remains properly positioned so that, if
the air bag (if provided) deploys in a
frontal collision, the occupant might
never strike any rigid structures in the
vehicle. The unbelted occupant
receives no such benefit. The unbelted
person is not attached to the vehicle and
so that person continues to travel at the
vehicle’s pre-crash speed of 30 miles
per hour (50 km/h) until striking a hard
object at approximately 30 miles per
hour (50 km/h) and stopping abruptly.
Even in a frontal collision in which the
air bag (if provided) deploys, the
unbelted front seat occupant remains at
greater risk of serious injury or death
than the properly restrained front seat
occupant.
Warning
SAFETY BELTS PROTECT
Accident statistics show that drivers
and passengers properly wearing
safety belts have a lower risk of
being injured and a higher chance of
surviving an accident. For this
reason, wearing a safety belt is
legally required in most countries.
WEARING THE SAFETY BELT
Each front seat and each outboard
rear seat of your CHEVROLET
vehicle is equipped with a threepoint safety belt system that is
anchored at three locations. All front
and rear seat belts are stored and
locked by a retractor mechanism.
When set in its normal emergency
locking mode, the three-point safety
belt requires no length adjustment
and allows freedom of movement
when the vehicle moves at constant
speeds.
(Continued)
Warning
However in a sudden or strong stop,
or during heavy acceleration or
deceleration, the safety belt will lock
automatically to restrain the body.
In order to gain the full benefit of a
safety belt, you must wear it
correctly and position yourself
correctly within your seat, as
follows:
• Seatback upright (not reclined, to
prevent you from “submarining”
or slipping out from under the
safety belt, and injuring vulnerable body parts in a crash.)
• Occupant sitting upright (not
slouched, to properly position the
lap and shoulder portions of the
safety belt for maximum restraint
and minimum injury to soft and
vulnerable parts of your body in a
crash)
(Continued)
Warning
• Safety belt latch plate and buckle
securely fastened with a “click” (if
the safety belt is not securely
latched, it cannot provide any
protection; pull on the belt to
make sure it is secure)
• Lap portion of safety belt snug
and low on hips and bony pelvis
(not abdomen where the restraining belt could cause serious injury
in a crash – THIS IS
PARTICULARLY IMPORTANT
FOR PREGNANT WOMEN)
• Shoulder portion of the safety
belts over your outside shoulder
and snug against the chest (not
under an arm, around your neck,
over an inside shoulder or behind
your back, and not loose with
slack allowing excessive forward
movement and injury in a crash)
(Continued)
Warning
• Only one occupant per one safety
belt (do not allow more than one
person in a safety belt; multiple
people in a single safety belt can
exceed the capacity of the safety
belts and people sharing a safety
belt can cause crushing and other
injuries to each other in a crash)
• Children in secure child seats (in a
crash the forces are too great for an
adult to hold onto a child and the
adult will crush the child if they
share the same safety belt)
• No unbelted occupants (occupants not wearing a safety belt are
an injury threat to themselves and
to other occupants in the vehicle
because in a crash they become a
free-flying body that will strike
other persons in their path)
(Continued)
24 Seats & Restraints
25Seats & Restraints
Warning
• No twisted safety belts (twisted
safety belts will not move freely
and restrain properly and can cut
into the occupants rather than
spread the force, thus increasing
the risk of injury and death)
• Lock doors (unlocked doors
increase the risk of injury and
death from external impacts and
ejection in a crash)
Warning
• Make periodic checks (while
riding in the vehicle, check from
time to time to be sure that the lap
portion of the belt is snugly across
the hips and has not ridden up
around the waist and that the
shoulder portion is midway over
the shoulder and across the chest;
properly positioned belts allow
the stronger structures of the hips
and shoulders to absorb the forces
of the belt against the body, while
improperly positioned belts may
cause neck injury or injury to the
vulnerable organs in the abdominal area).
• No hard or breakable objects,
between safety belts and body
parts (objects such as pens,
glasses, etc. in the occupant’s
pocket or on the cloth can cause
injury in the event of a collision)
(Continued)
Warning
• Improper use of a safety belt can
cause serious injury. Do not
modify the safety belt. Do not add
any device which would affect the
operation of the safety belt.
• Before you close the door, make
sure the safety belt is out of the
way. Otherwise, the belt and/or the
vehicle body could be damaged.
Warning
If the safety belt goes over an armrest
(if so equipped), lap portion of the
safety belt could force the occupant’s
abdomen, not the bony pelvis, in a
collision.
• Be sure that the safety belt goes
under the armrests.
Failure to follow this can result in
injuries or even death in case of a
collision.
26 Seats & Restraints
Each front seat is equipped with
adjustable seat and seatback with
height-adjustable head restraint and
three point lap-and-shoulder safety
belts.
REAR SEAT OCCUPANTS
The rear seat is equipped with two
outboard seating positions featuring
three-point lap-and-shoulder safety
belts and a center seat equipped with a
lap safety belt.
THREE-POINT SAFETY
BELTS
To help reduce the risk of personal
injury in collisions or sudden
manoeuvres, your CHEVROLET
vehicle is equipped with three-point
safety belts. The two front seats and the
two outboard rear seating positions are
each equipped with three-point safety
belts. These safety belts are each
anchored in three locations to restrain
passengers who are properly positioned
and wearing the safety belt.
FRONT SEAT OCCUPANTS
A three-point safety belt set in the ELR /
WLR (Emergency Locking Retractor /
Webbing Locking Retractor) mode
requires no length adjustment and
allows the freedom of body movement
when the vehicle moves at a constant
speed.
However, in the event of a sudden or
strong stop, or during heavy
acceleration or deceleration, the safety
belt will lock automatically to restrain
the body.
Always fasten your safety belts
correctly:
1. Close and lock the doors.
2. Make sure seatback is upright.
3. Pick up the safety belt latch plate
and use it to pull the belt across your
body. Make sure the belt is not
twisted. If the safety belt locks as
you are pulling it out, allow it to
rewind into the retractor. Pull the
safety belt out again to a
comfortable and secure length.
 Loading...