

Page 1
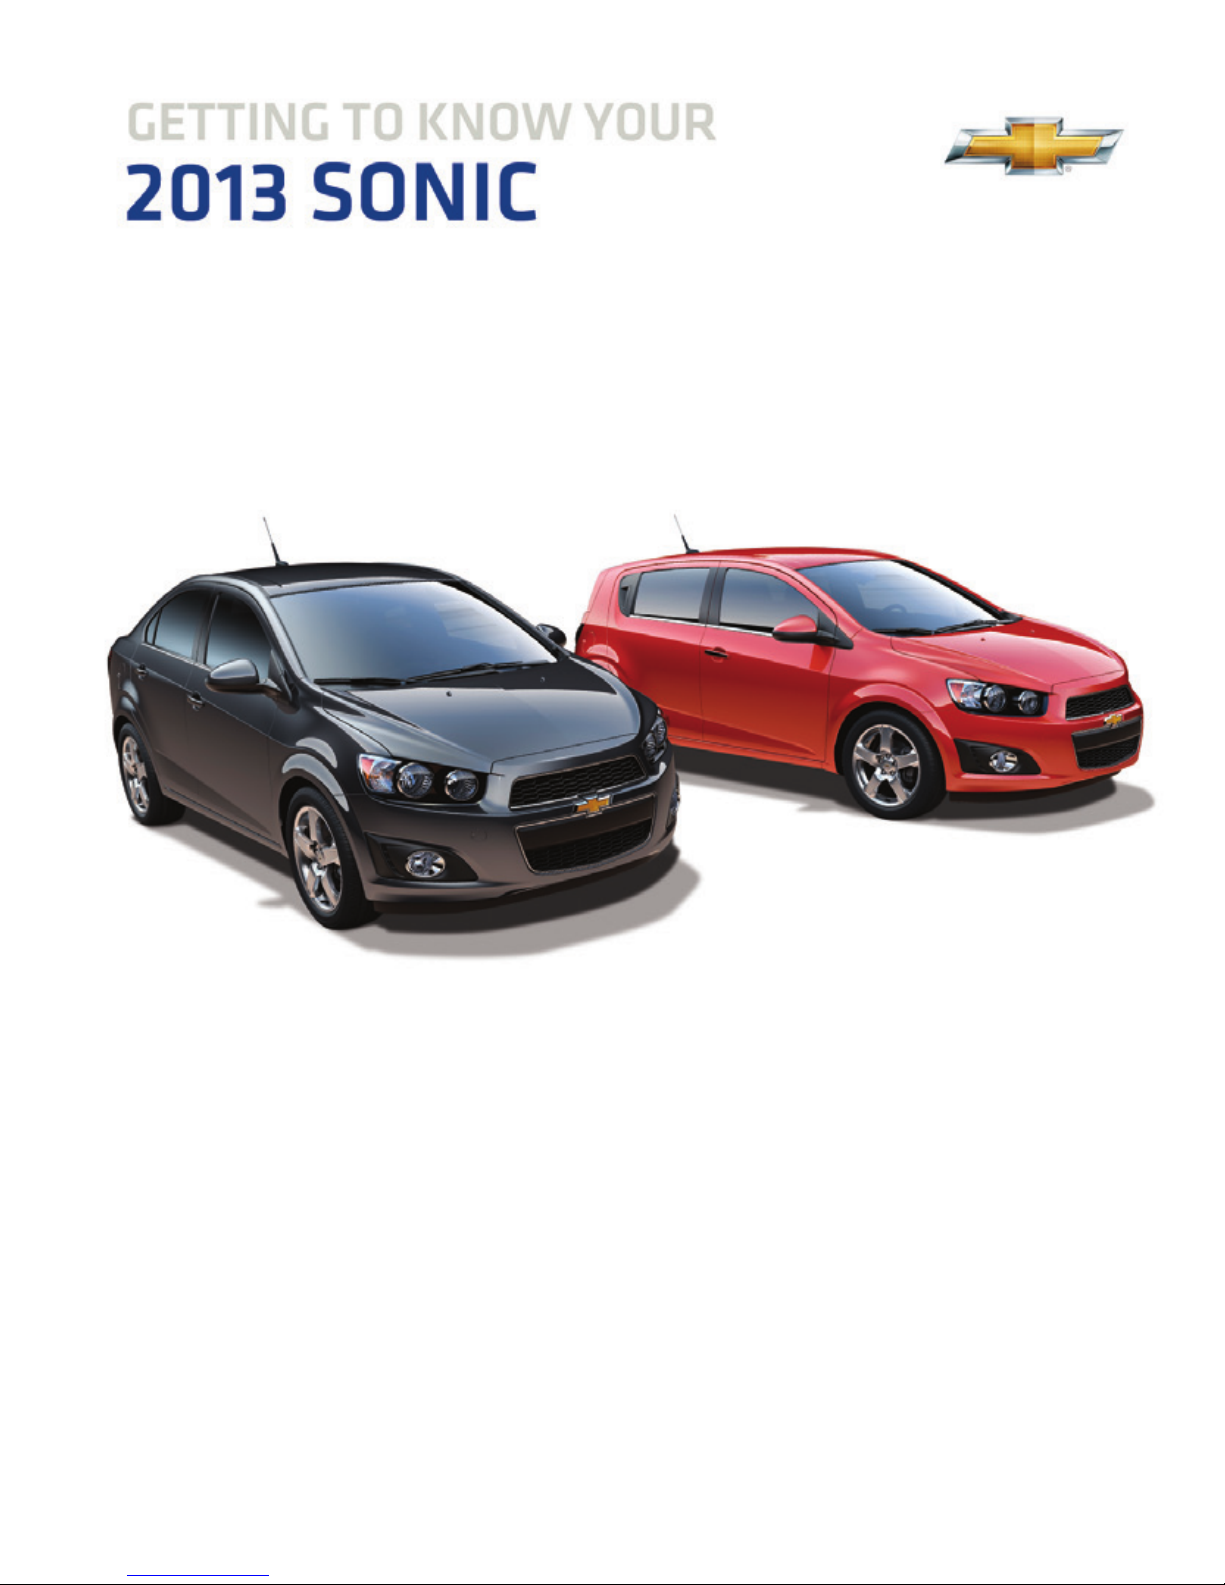
Review this Quick Reference Guide for an overview of some important features in your Chevrolet Sonic.
More detailed information can be found in your Owner Manual. Some optional equipment described in
this guide may not be included in your vehicle. For easy reference, keep this guide with your Owner
Manual in your glove box.
www.chevrolet.com
Page 2
2
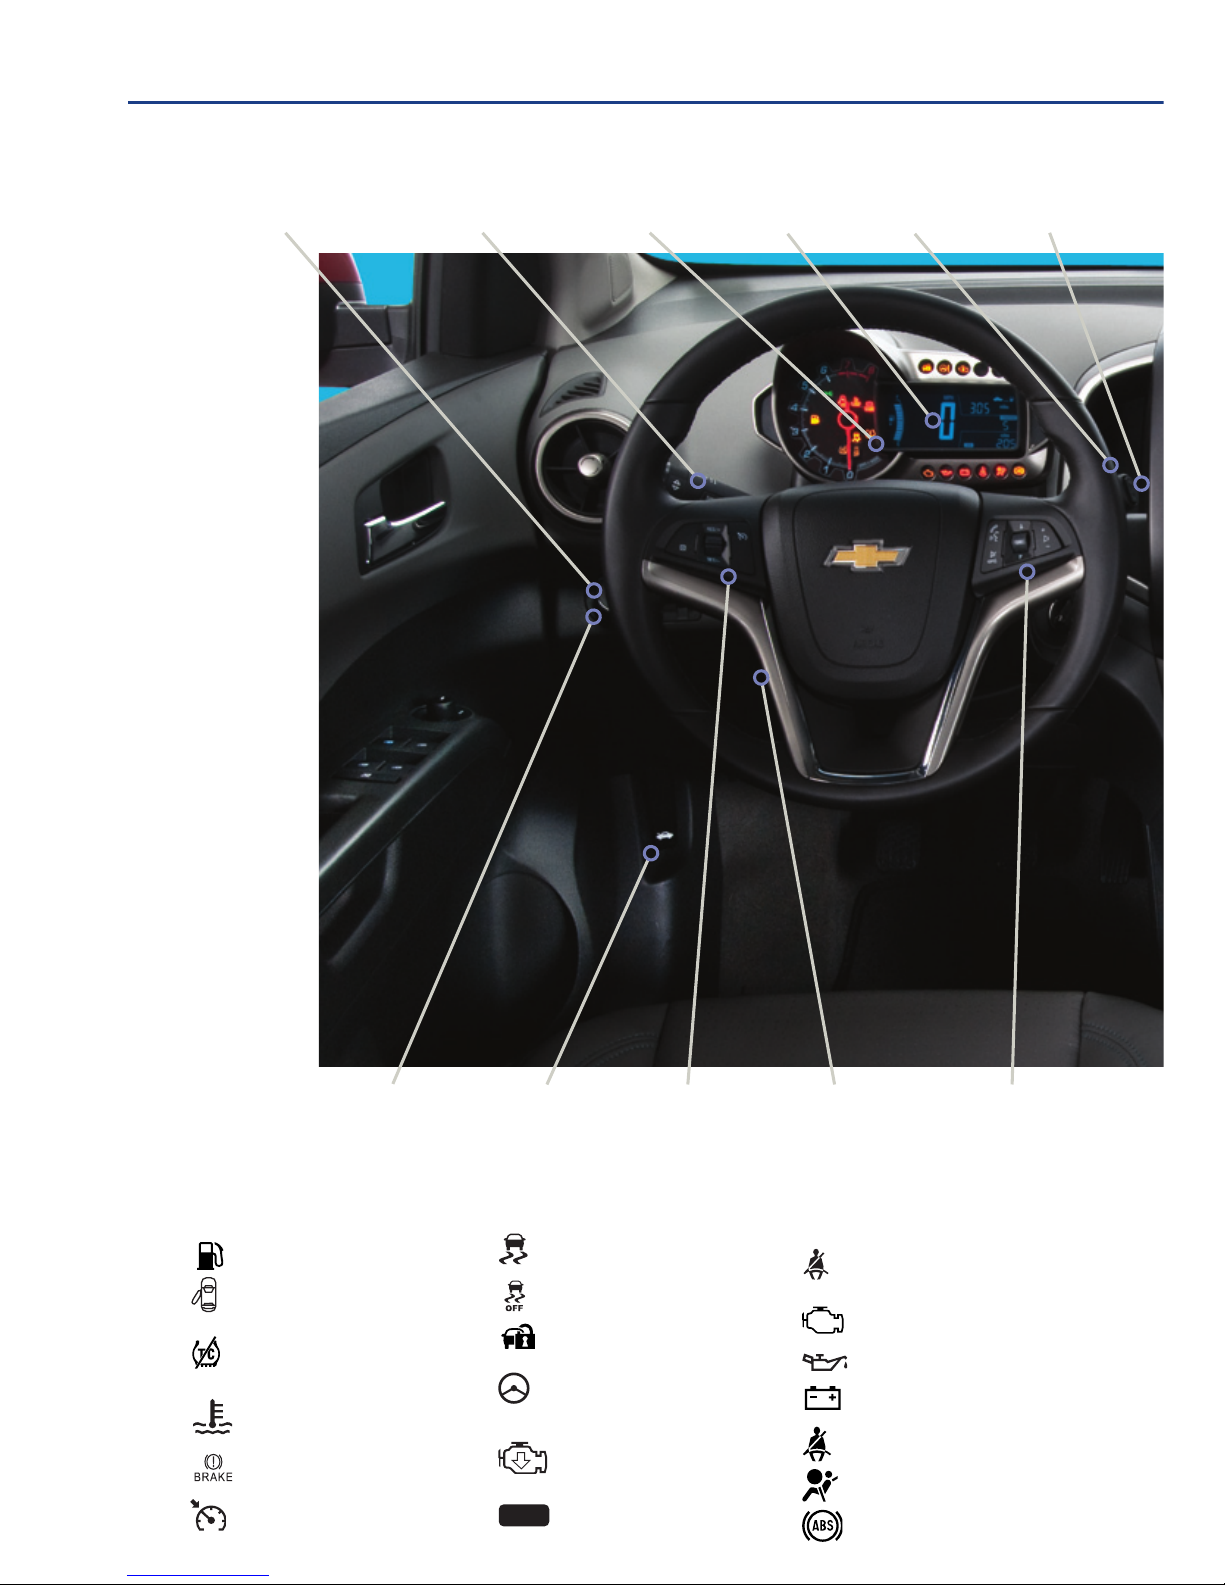
Turn Signal Lever/
Driver Information
Center ControlsF
Windshield
Wipers
Lever
Rear Wiper
ControlF
Exterior Lamp
Control
Low Fuel
Door Ajar
Traction
Control Off
Engine Coolant
Temperature
Brake System
Cruise Control Set
StabiliTrak Active
StabiliTrak Off
Security
!
Speed Sensitive
Power Steering
Reduced Engine
Power
CODE
Code Set
2
Passenger Safety
Belt Reminder
Check Engine
Oil Pressure
Charging System
Safety Belt Reminder
Airbag Readiness
Antilock Brake System
Tilt/Telescopic
Steering
Wheel Lever
Symbols
Instrument
Panel Illumination
Control
Trip
Odometer
Reset Stem*
Cruise
Control
Buttons
Hood
Release Lever
Audio Steering
Wheel ControlsF
Driver
Information
Center
INSTRUMENT PANEL CONTROLS
Page 3
3
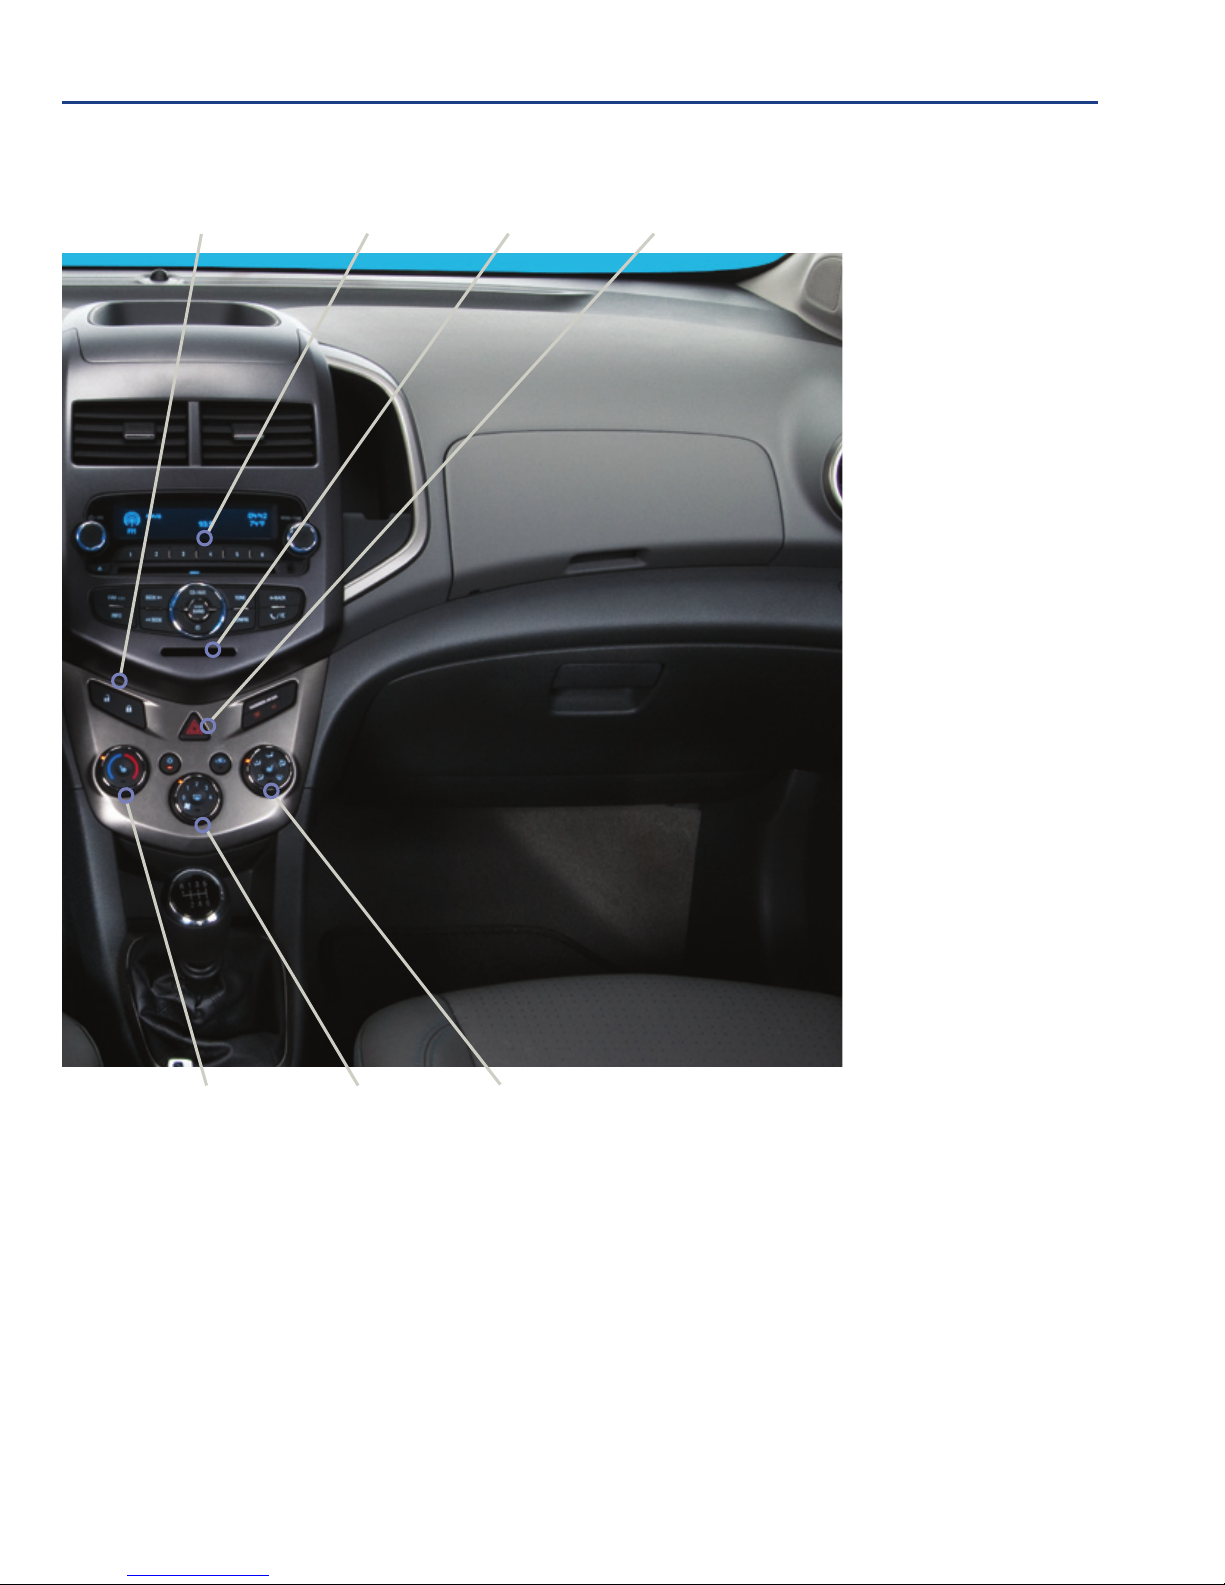
Power Door
Locks Button
Audio System
Hazard Warning
Flashers Button
Card
Holder
Climate
Controls
Driver’s Heated
Seat ButtonF
Note: Refer to your Owner Manual to learn about the information being relayed by the lights,
gauges and indicators on the instrument cluster, as well as what to do to ensure safety and prevent
damage to your vehicle.
See In Brief in your Owner Manual.
Passenger’s
Heated Seat
ButtonF
*To reset the trip odometer that is currently displayed, press and hold the reset stem
on the tachometer.
F Optional equipment
Page 4
4
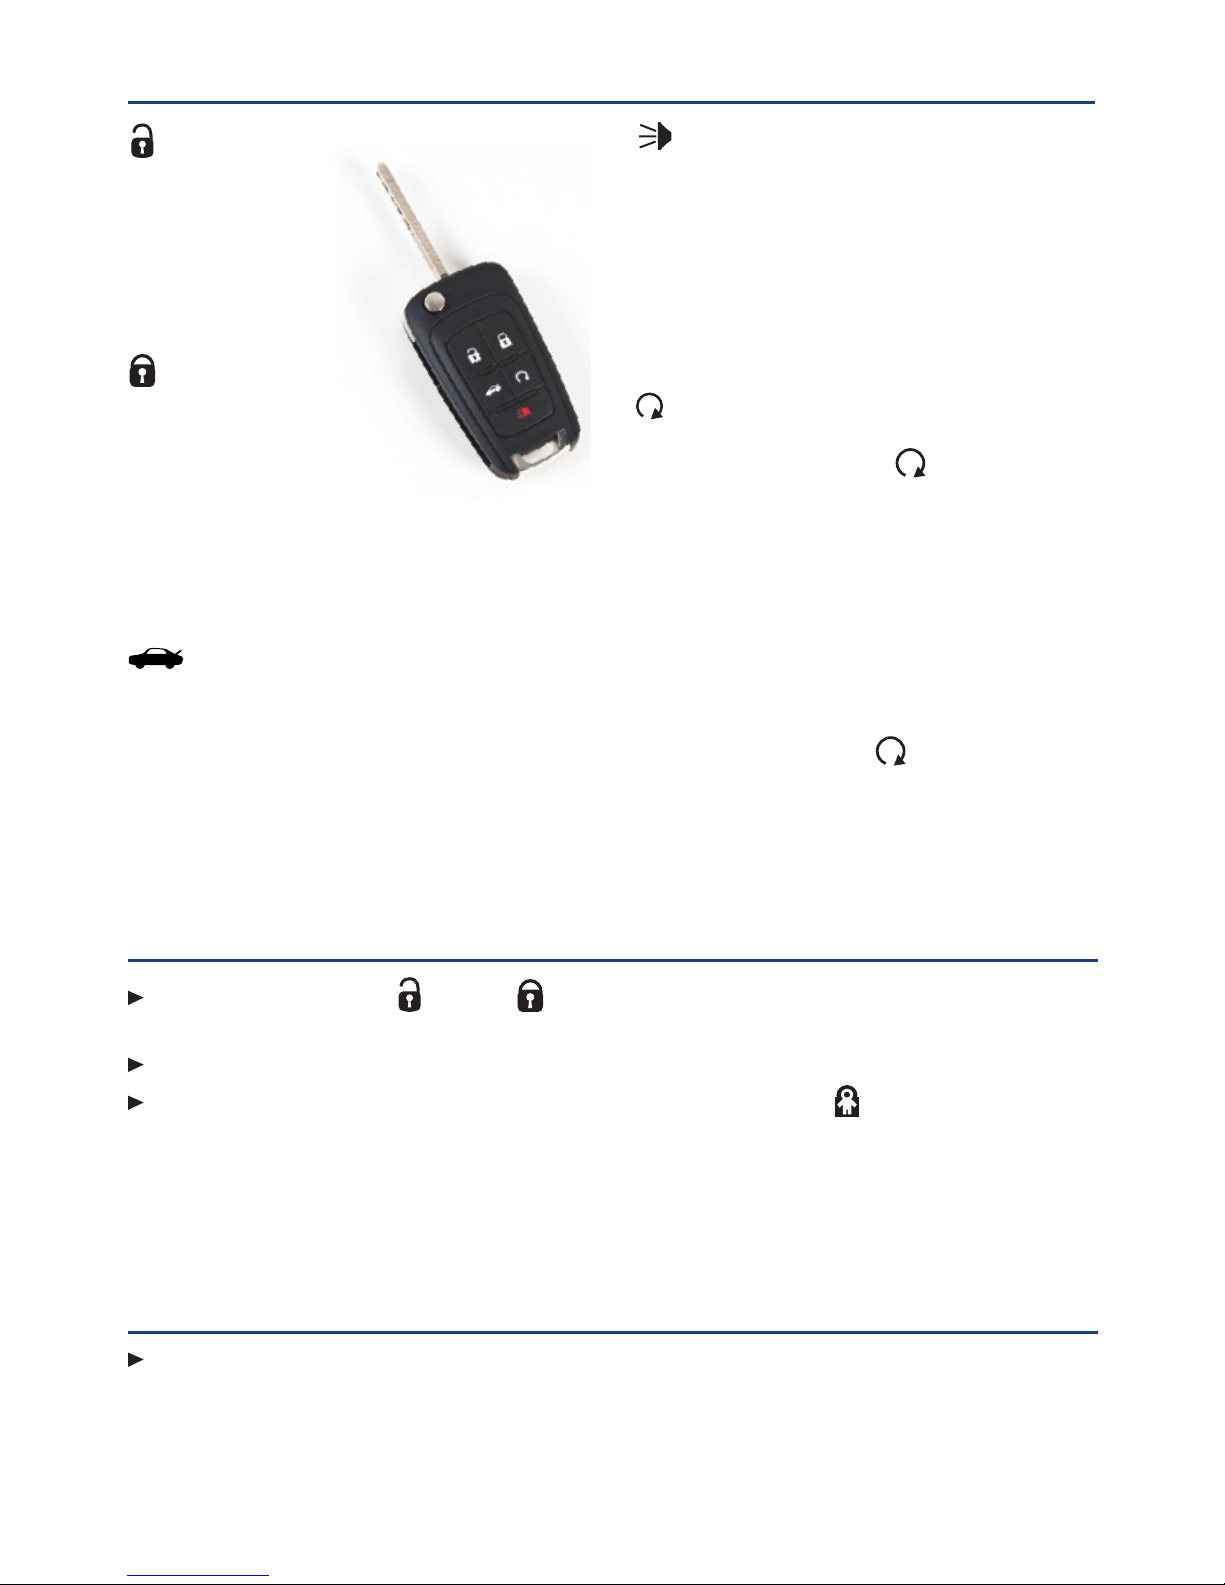
Unlock
Press to unlock
the driver’s door.
Press again to
unlock all doors
and liftgate
(if equipped).
Lock
Press to lock all
doors and liftgate
(if equipped).
The driver’s door
will not lock if open.
Note: The remote lock and unlock settings can
be changed in the Vehicle Settings menu by
using the audio system controls.
Trunk
(Sedan model only)
Press and hold to unlock the trunk.
Press the power door Unlock/ Lock buttons located on the center of the
instrument panel to lock or unlock all doors and liftgate (if equipped).
Press the driver’s door lock knob to lock all doors and liftgate (if equipped).
To prevent a rear door from opening from the inside, press the Rear Door Safety
Lock button located on the center console in front of the cupholders. The button
indicator will illuminate when activated.
See Keys, Doors and Windows in your Owner Manual.
Vehicle Locator/Panic Alarm
Press and release to locate your vehicle.
The turn signal lamps will ash and the
horn will sound.
Press and hold to activate the alarm. The
turn signal lamps will ash and the horn will
sound until the button is pressed again or
the ignition is turned on.
Remote Vehicle StartF
Press and release the Lock button and
then press and hold the button to start
the engine from outside the vehicle. After
entering the vehicle, turn the ignition to the
On position before driving.
– The engine will run for 10 minutes.
Repeat these steps for a 10-minute time
extension.
– Only two remote starts are allowed
between ignition cycles.
– Press and hold the button to cancel
a remote start.
REMOTE KEYLESS ENTRY TRANSMITTER
DOOR LOCKS AND REAR DOOR CHILD SAFETY LOCKS
TILT/TELESCOPIC STEERING WHEEL
With the vehicle parked, push down the lever on the left side of the steering column to
adjust the steering wheel. The steering wheel can then be moved up or down and in or
out. Pull up the lever to lock the steering wheel in place.
See Instruments and Controls in your Owner Manual.
See Keys, Doors and Windows in your Owner Manual.
F Optional equipment
Page 5
5
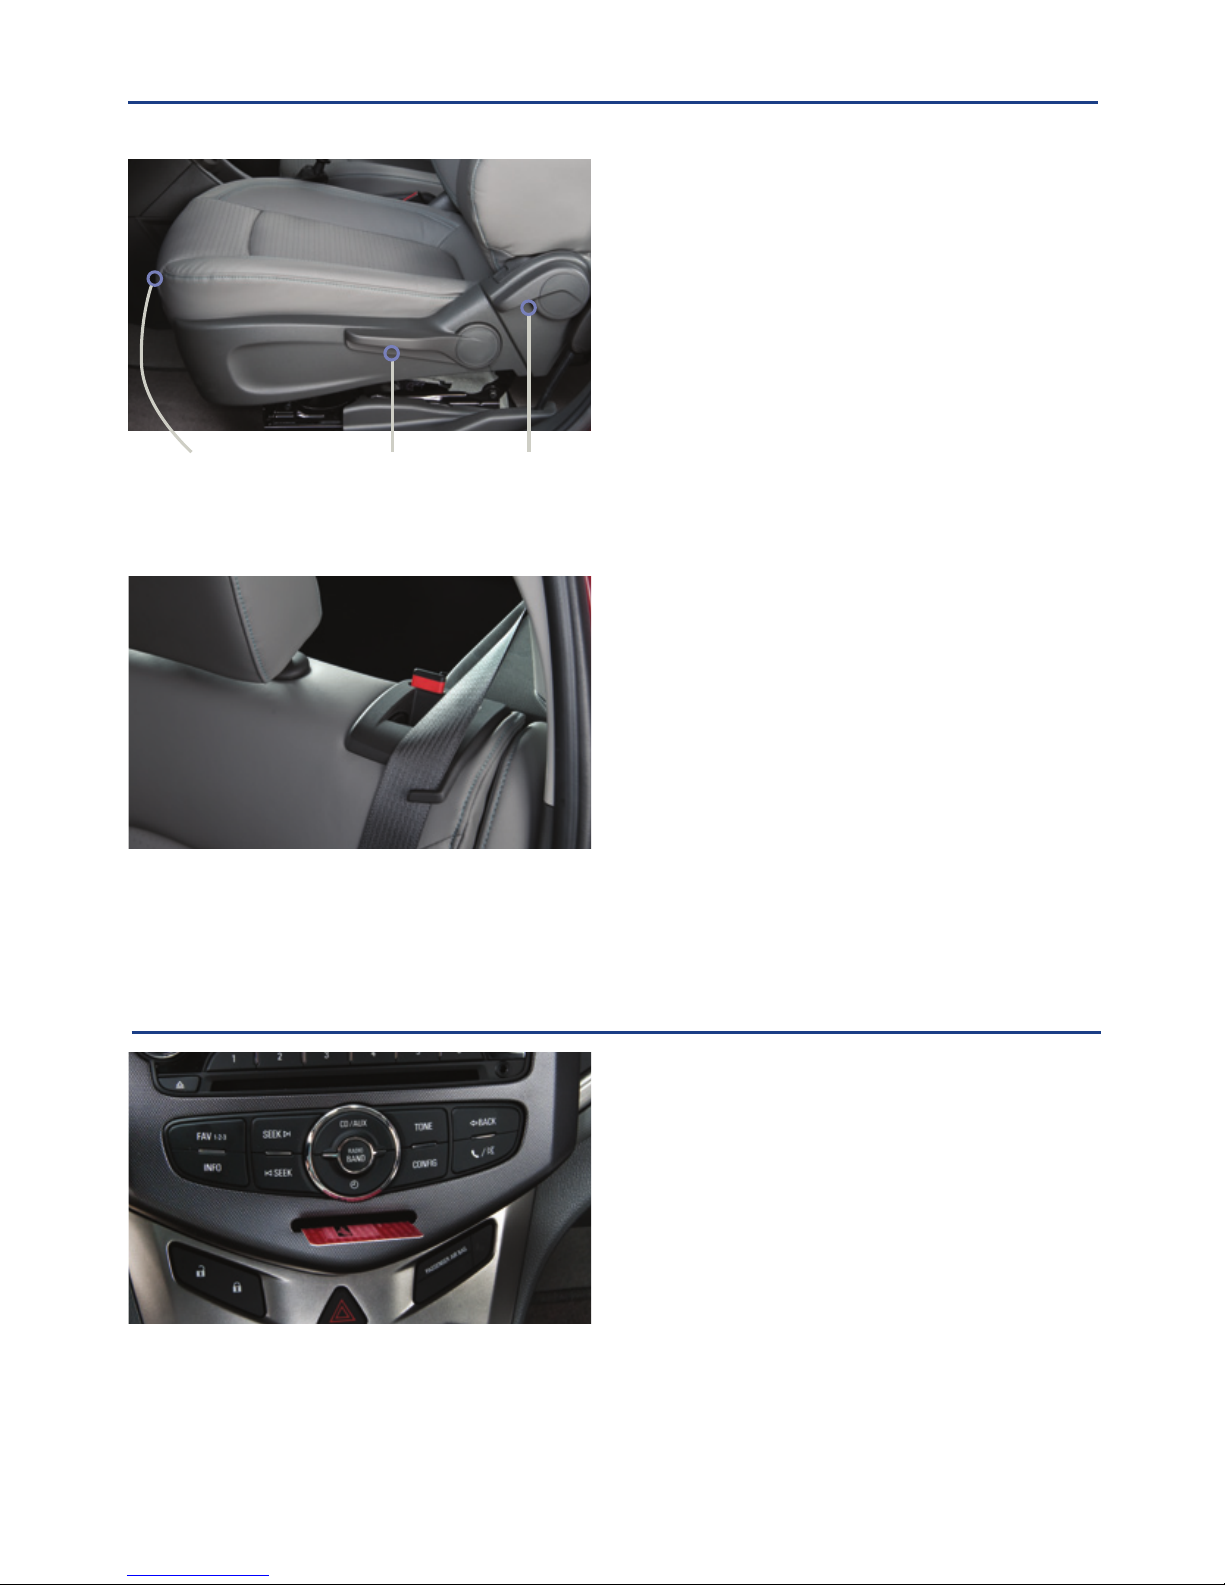
SEATS
A. Seat Fore/Aft Adjustment
Lift the handle under the front of the
seat near the center console to slide
the seat forward or rearward.
B. Seat Height Adjustment
Ratchet the middle lever up or down
repeatedly to raise or lower the seat.
C. Seatback Recline Adjustment
Lift the rear lever to recline or raise
the seatback.
Manual Driver’s Seat
1. Make sure the safety belt is in the
retainer hook.
2. Pull the lever on top of the seatback.
When the red marking is visible, the
seatback is unlatched.
3. Fold down the seatback.
Folding Rear Seats
See Seats and Restraints in your Owner Manual.
B
C
A
CARD HOLDER
A convenient card holder is located in the
center of the instrument panel and on each
sun visor.
See Storage in your Owner Manual.
Page 6
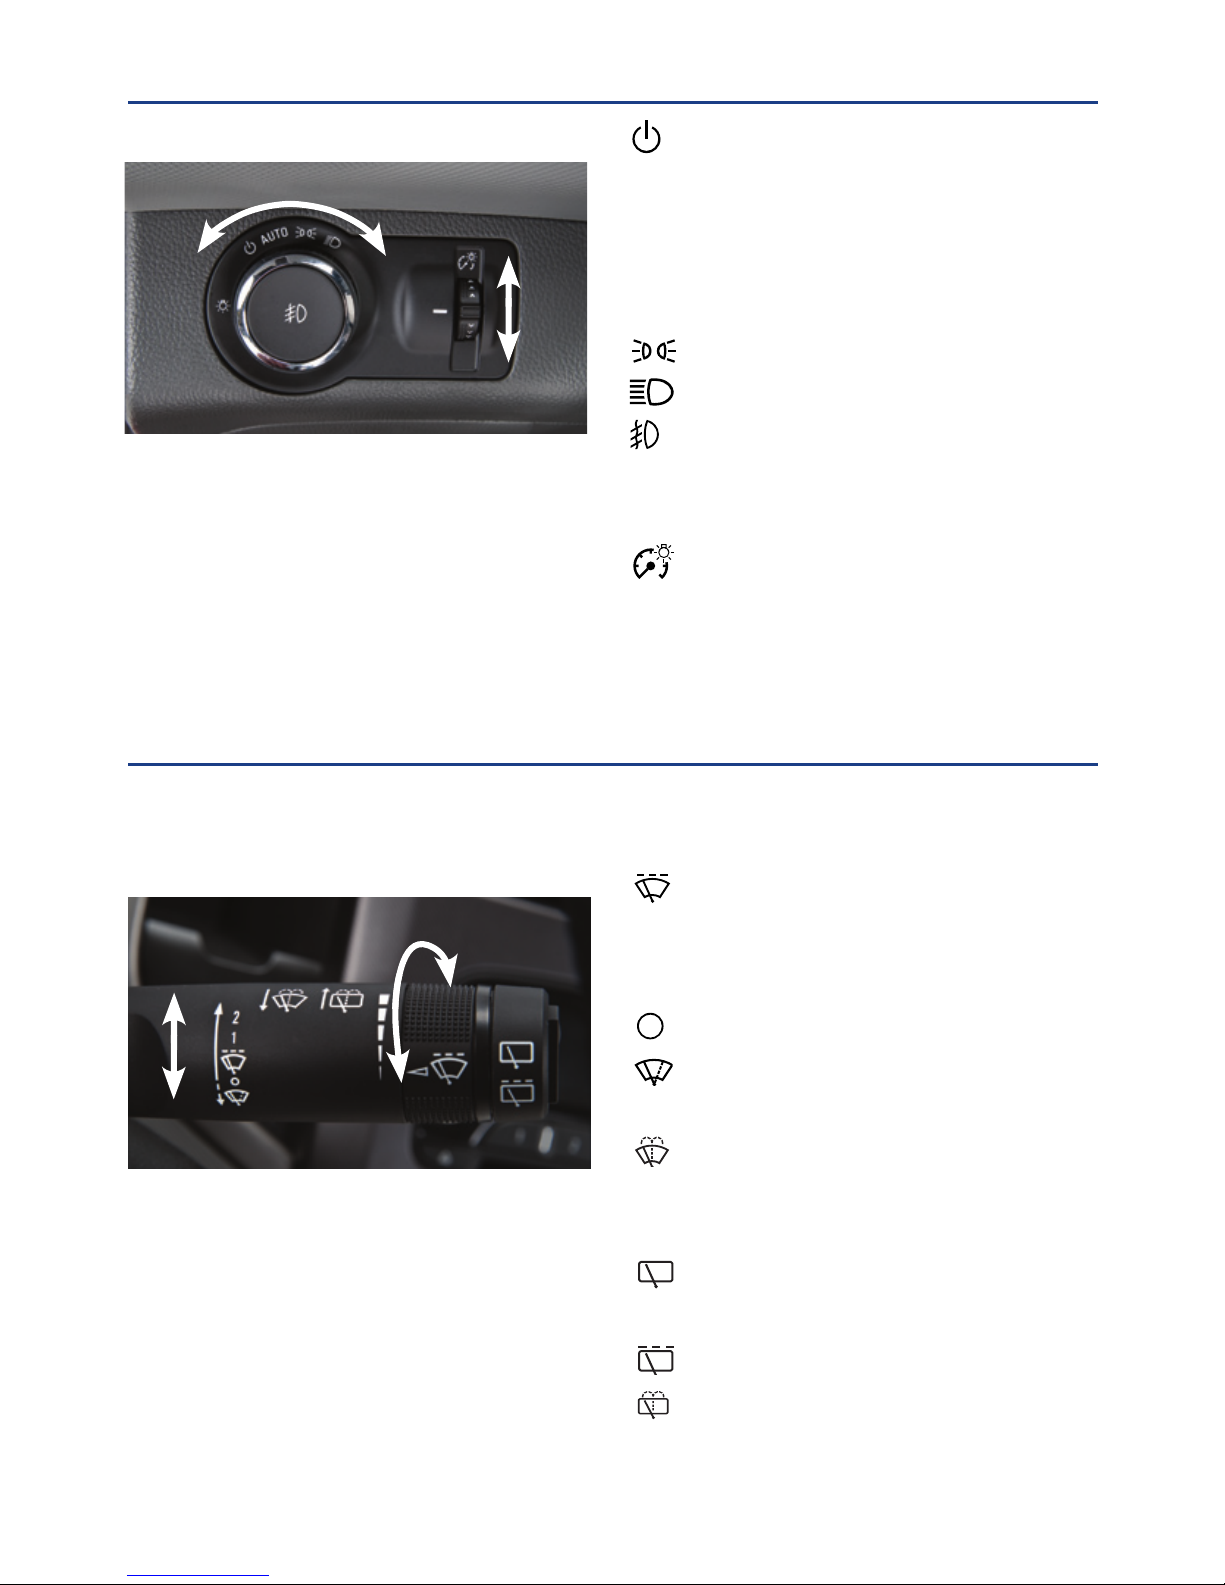
Windshield Wipers and Washer
Move the lever up or down to operate the
windshield wipers.
6
LIGHTING
WIPERS AND WASHERS
Off/On
AUTO Automatic Headlamp System
Activates the Daytime Running Lamps
(DRLs) in the daytime and the headlamps
and other exterior lamps at night or when
necessary.
Parking Lamps
Headlamps
Fog LampsF
Press to turn the fog lamps and parking
lamps on or off.
Automatic Headlamp System
Instrument Panel Brightness
Rotate and hold the switch to adjust the
instrument panel lighting.
See Lighting in your Owner Manual.
Instrument Panel Lighting
2 High Speed
1 Low Speed
Intermittent
Rotate the band to adjust the delay
between wipes. The wipers activate more
often as the band is rotated upward.
OFF
Mist
Single wipe
Washer Fluid
Pull the lever toward you to spray washer
uid on the windshield.
Low Speed
OFF
Intermittent
Washer Fluid
Push the lever away from you to spray
washer uid on the rear window.
See Instruments and Controls in your Owner Manual.
Rear Wiper and Washer
(5-door model only)
Press the switch on the end of the lever
to operate the rear wiper.
F Optional equipment
Page 7
7
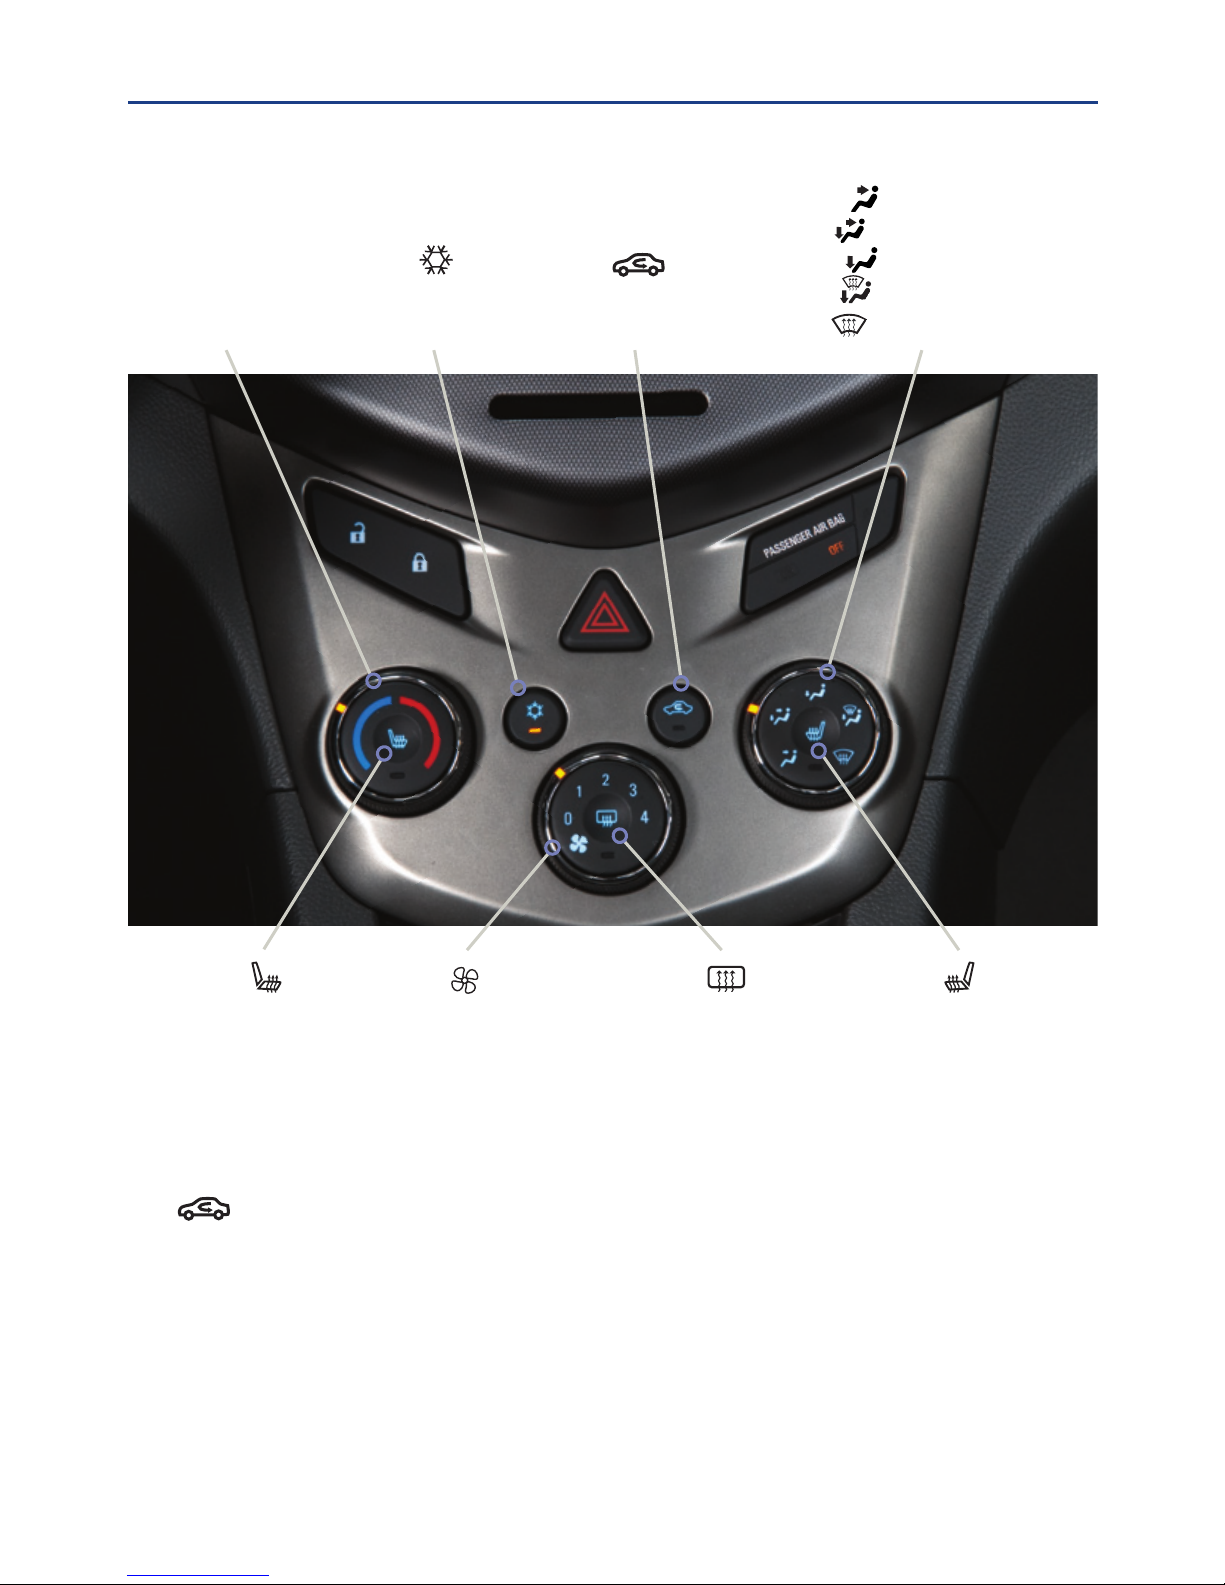
Air Conditioning
Mode
F
Recirculation
Mode
Temperature
Control
Fan Speed
Control/Off
Rear Window/Outside
Mirror Defogger
Driver’s Heated
Seat Control
Air delivery modes:
Vent Mode
Bi-level Mode
Floor Mode
Defog Mode
Defrost Mode
Passenger’s Heated
Seat Control
Recirculation Mode
The Recirculation Mode can help to quickly cool the air inside the vehicle or prevent
outside odors from entering the vehicle. It is not available while the Defog or Defrost Mode
is selected. When the Recirculation Mode is used without air conditioning, the air humidity
increases and the windows may fog.
Defog and Defrost Mode
When the Defog or Defrost Mode is selected, the air conditioning also will run when above
certain ambient temperatures to help reduce air humidity.
See Climate Controls in your Owner Manual.
CLIMATE CONTROLS
Climate control system with heated seats shown
F Optional equipment
Page 8
8
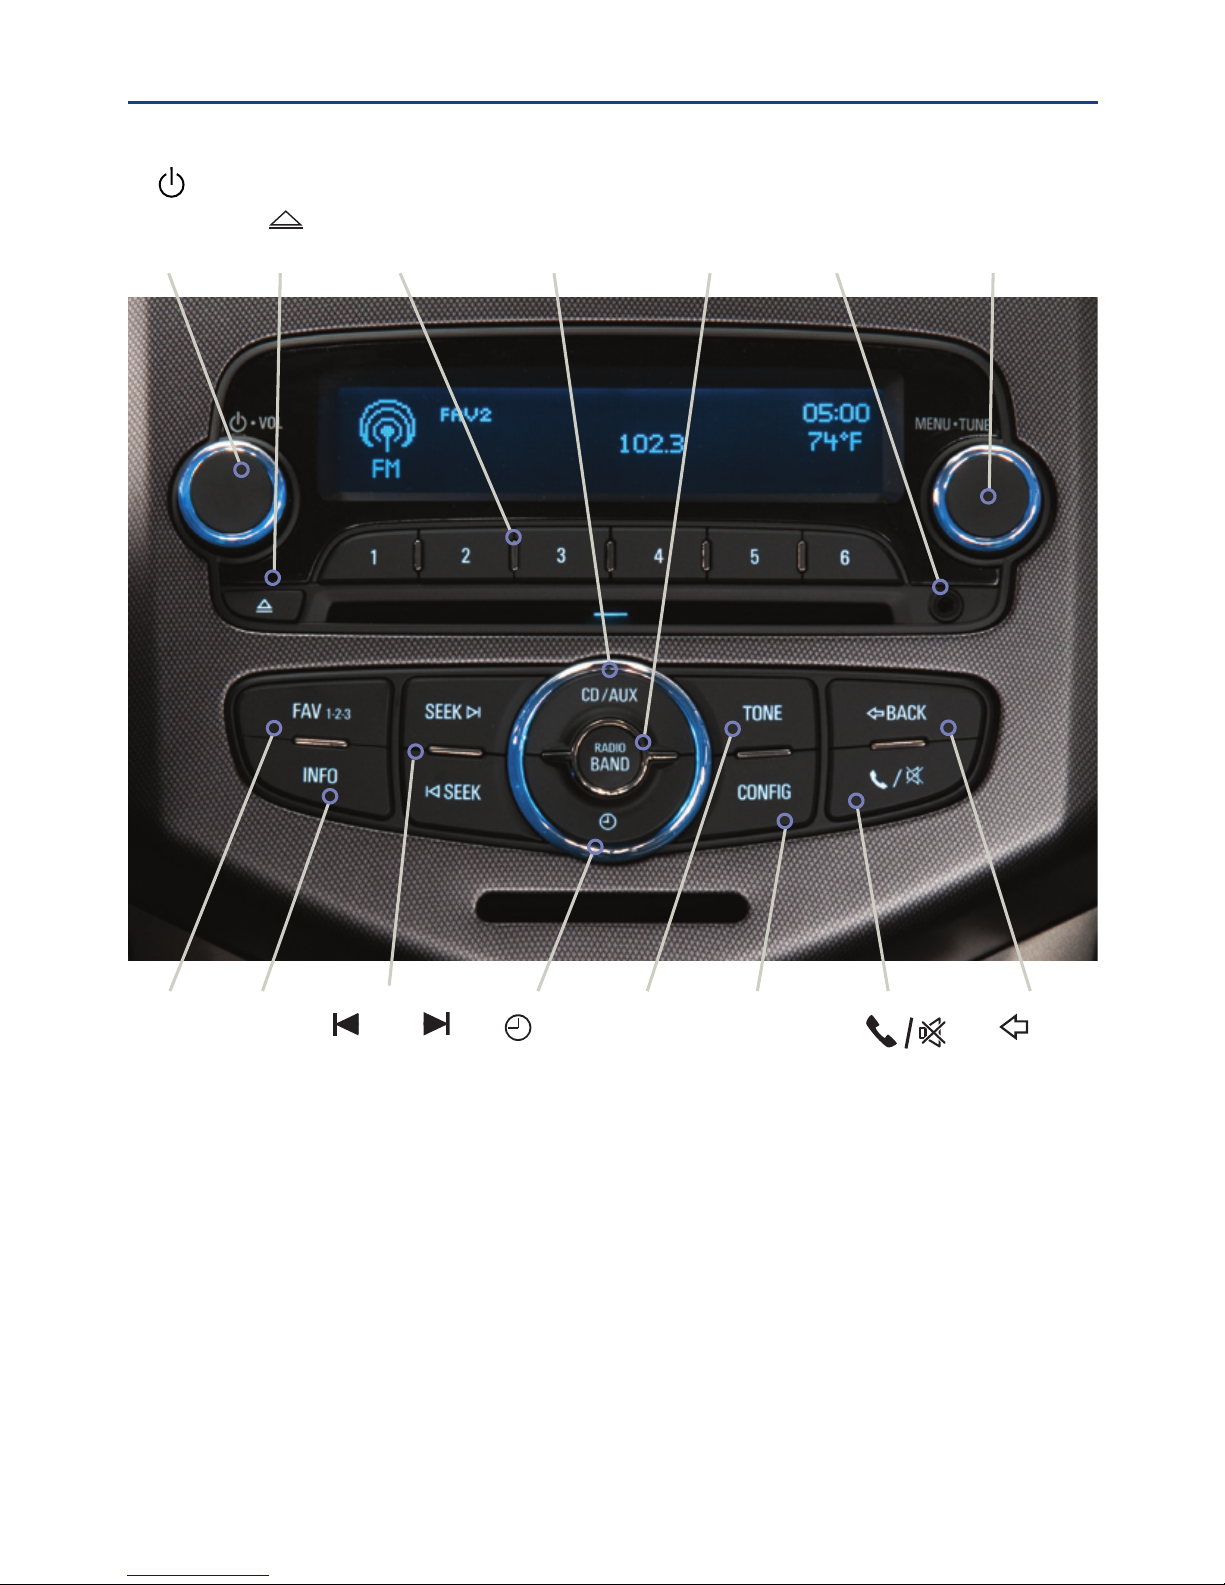
Power/
Volume
Auxiliary
input jack
CD/AUX:
Play a CD or
portable audio
device
Eject disc
1–6:
Favorite
preset
stations
Open the
Clock menu
INFO:
Display
available
song
information
CONFIG:
Open the
Conguration
menu
Open the Phone
menu/Mute the
vehicle speakers
SEEK
Previous/
Next radio
station or
track
RADIO
BAND:
AM, FM,
XM
F
MENU/TUNE:
Open and
select menus/
Tune radio stations
BACK:
Move back
one level in
the menus
FAV:
Display
pages of
favorite
radio
stations
TONE:
Open
the Tone
menu
See Infotainment System in your Owner Manual.
AUDIO SYSTEM
Storing Favorite Stations
Radio stations from all bands (AM, FM or XM) can be stored, in any order, on up to six
pages of favorites.
1. Tune in the desired radio station.
2. Press the FAV button to display the page where the station is to be stored.
3. Press and hold one of the six numeric pushbuttons until a beep is heard.
4. Repeat the steps for each pushbutton on each page.
F Optional equipment
Page 9
9
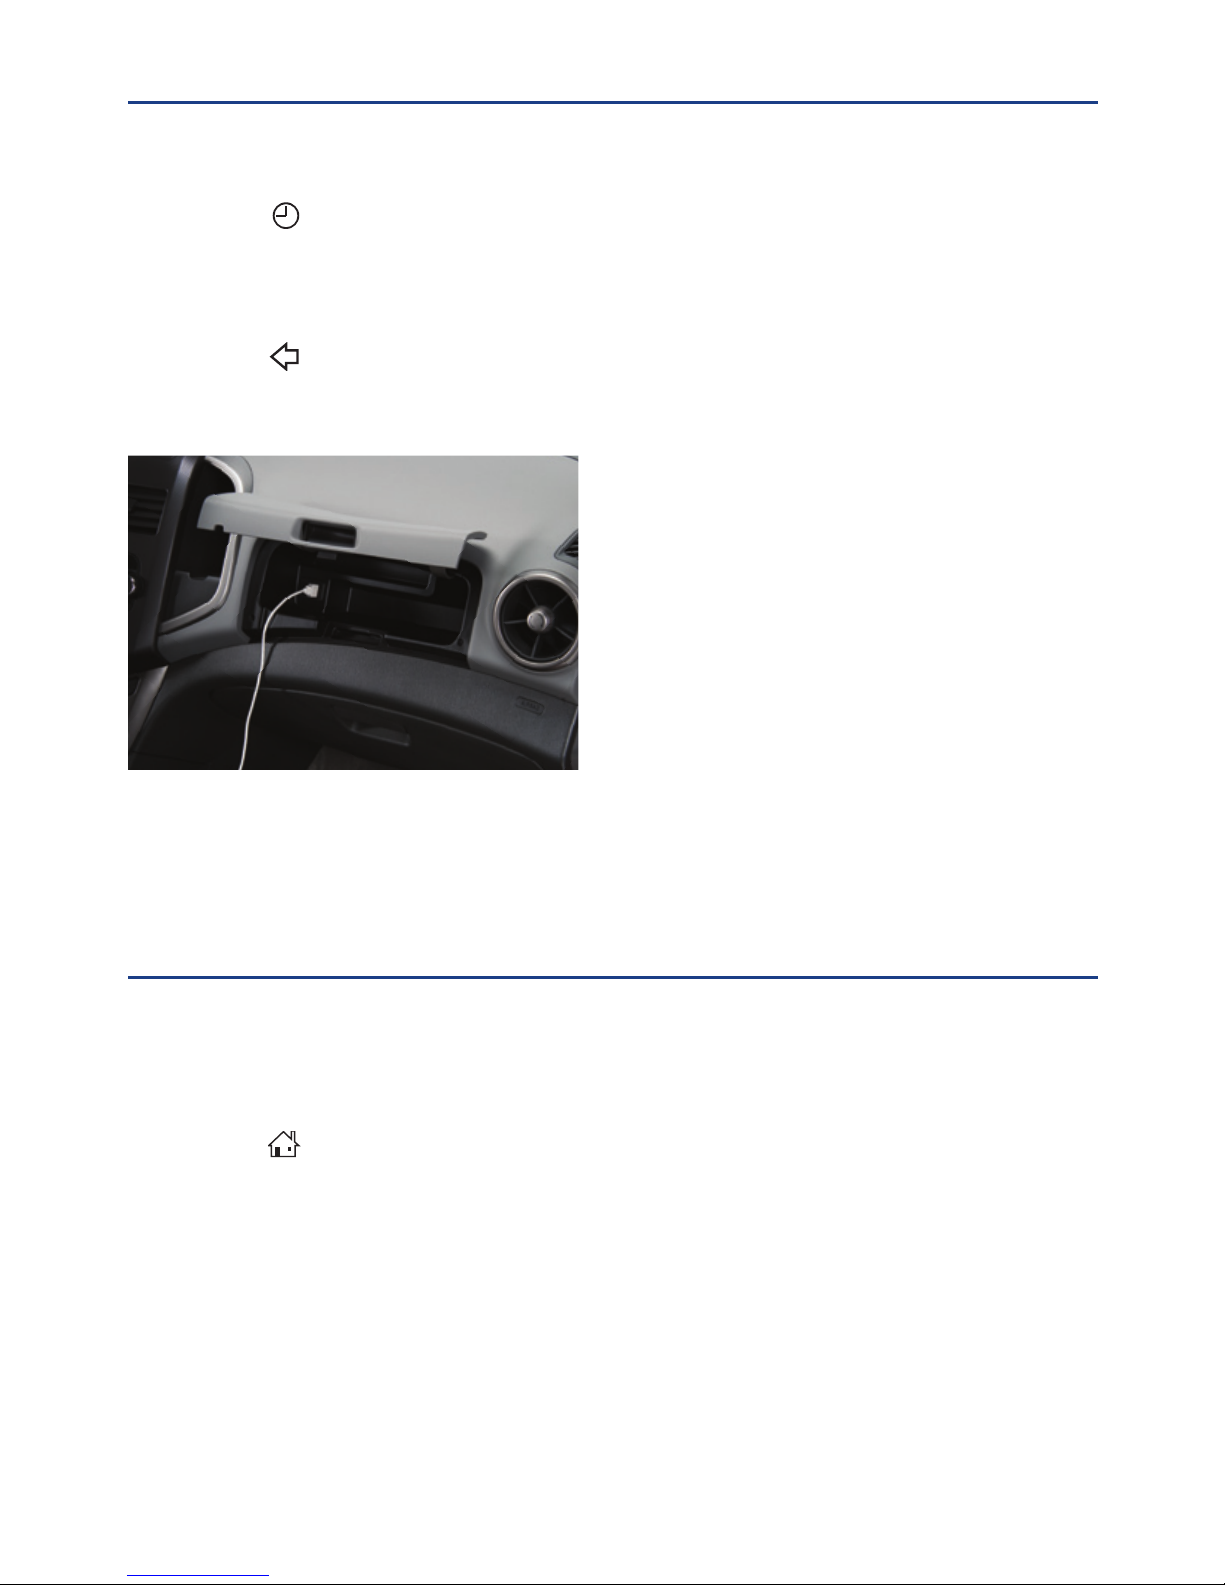
An auxiliary input jackF and a USB portF
are located in the instrument panel upper
storage compartment. Route the device
wires through the wire exits of the storage
compartment door.
• A portable audio device connected to the
auxiliary input jack can be controlled only
by using the portable device controls. To
optimize speaker volume, fully increase
the volume level of the portable device.
• An iPod™, iPhone™, MP3 Player, a
USB ash drive or a USB mass storage
device can be connected to the USB
port. Search for music on-screen. Not all
devices may be supported.
See Infotainment System in your Owner Manual.
Note: Avoid extended searching for specic items or conguring system settings while driving.
Setting the Time
1. Press the
Clock button.
2. Turn the MENU knob to highlight the desired time or date item; press the knob to
select it.
3. Turn the MENU knob to change the value; press the knob to conrm the set value.
4. Press the BACK button to exit each menu.
Portable Audio Devices
AUDIO SYSTEM
Note: Some supported devices can be
recharged when connected to the USB portF.
F Optional equipment
BLUETOOTH® SYSTEMF
Before using a Bluetooth-enabled device in the vehicle, it must be paired with the in-vehicle
Bluetooth system. Not all devices will support all functions. Streaming audio by Bluetooth is
available only with the Chevrolet MyLink systemF.
Pair a Device
1. Press the Home button.
2. Touch settings.
3. Touch connection settings.
4. Touch Bluetooth settings.
5. Touch pair device.
6. Touch search Bluetooth device.
7. Start the pairing process on the device.
8. Once your device appears on the screen, conrm the six-digit code on the device.
9. When complete, a prompt will request transfer of phone data.
Visit www.gm.com/bluetooth and see Infotainment System in your Owner Manual.
Page 10
10
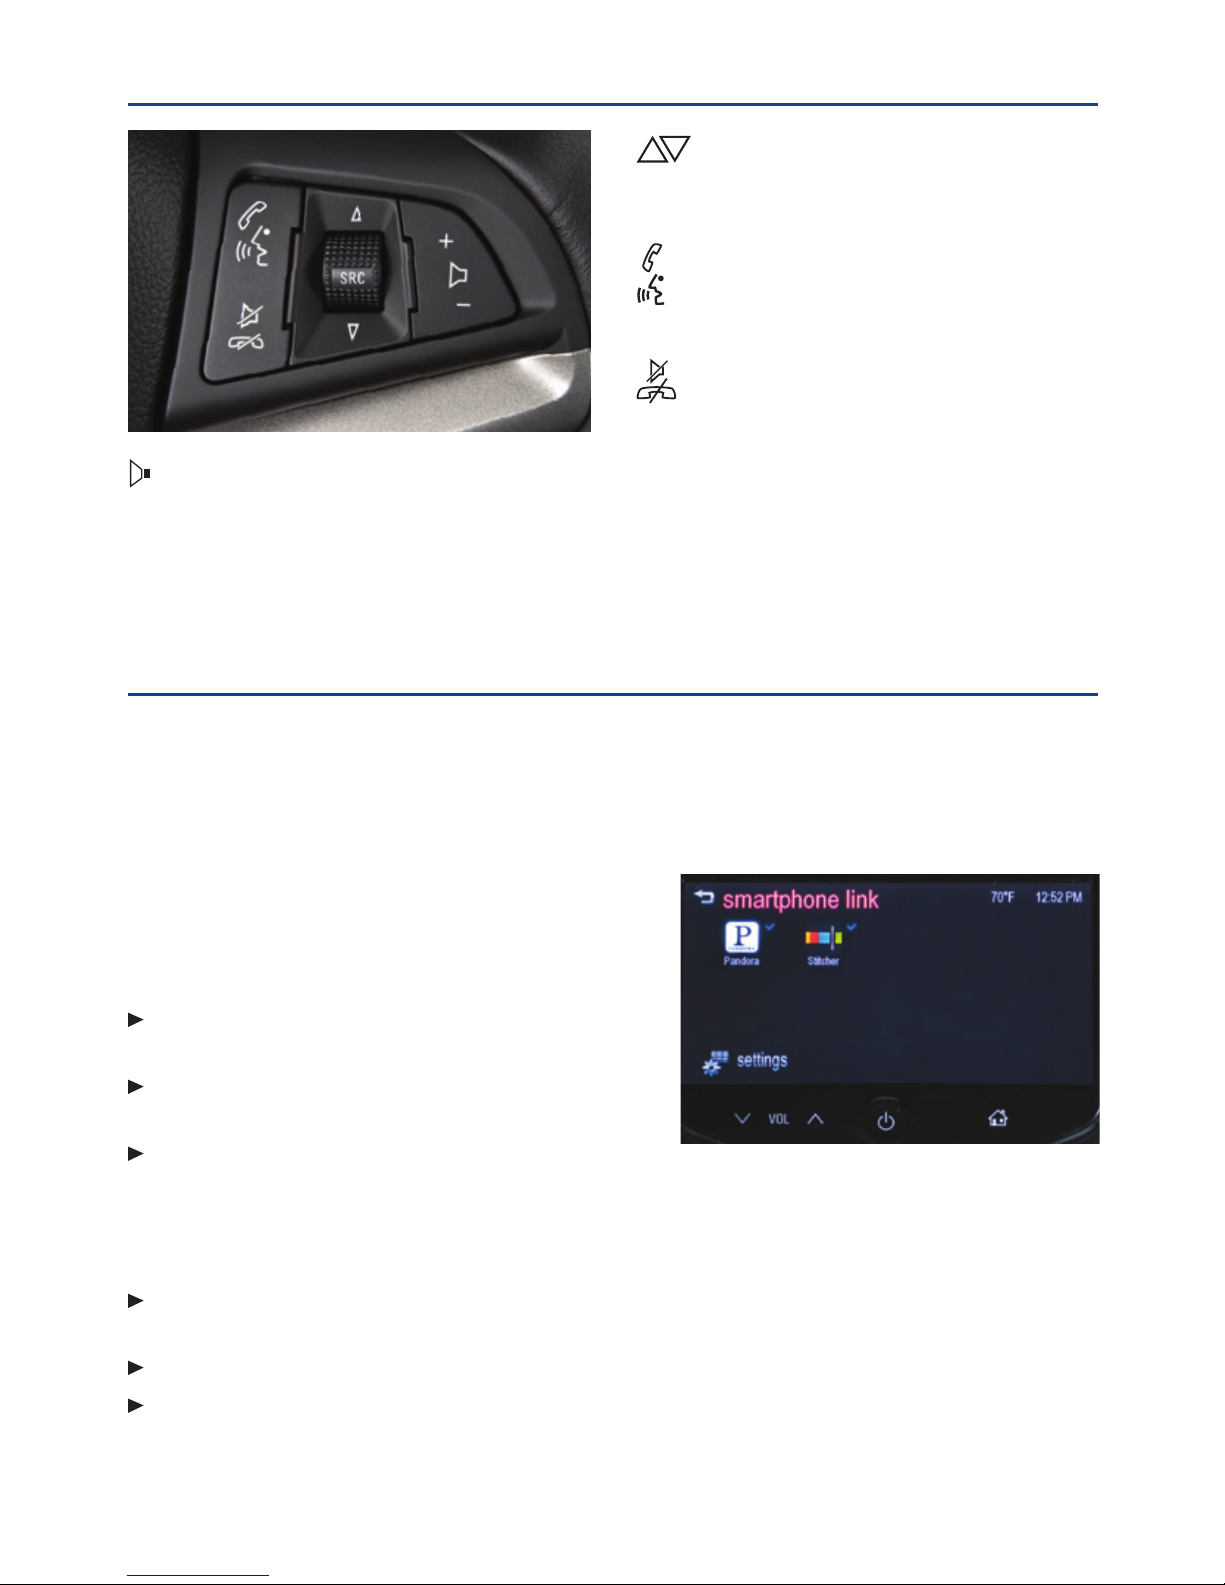
Next/Previous
Rotate up or down to go to the next or
previous favorite radio station, track or le.
Push to Talk
Press to interact with the OnStar® or
Bluetooth system.
End Call/Mute
Press to end or reject an OnStar or a
Bluetooth call.
Press to mute the vehicle speakers.
See Instruments and Controls in your Owner Manual.
AUDIO STEERING WHEEL CONTROLSF
Volume
Press + or – to adjust the volume.
SRC Source
Press to select an audio source.
MyLink uses a Bluetooth or USB connection to link a smartphone, cell phone, USB
ash drive or portable audio player/iPod™ to the touch screen infotainment display.
It offers a variety of entertainment options, including streaming audio from the Internet
through a smartphone. For more information, including device compatibility, visit
www.chevrolet.com/mylink or call 1-855-4-SUPPORT (1-855-478-7767).
PANDORA® Internet Radio
Listen to personalized radio stations based on
favorite artists or genres (a slight delay may occur
when loading a song or changing a station).
Download the Pandora app to your smartphone.
Restart the smartphone and sign in to Pandora.
Create a station on your smartphone to listen to
a customized song list in the vehicle.
If you like or dislike a song, you can touch the
Thumbs Up or Thumbs Down screen button.
Stitcher SmartRadio™
Stream favorite podcasts, radio shows and news to your vehicle.
Download the Stitcher app to your smartphone. Restart the smartphone and sign in
to Stitcher.
Select a category to listen to.
If you like the station, touch the Star screen button to add it to your Favorites list.
See Infotainment System in your Owner Manual.
CHEVROLET MYLINKF
F Optional equipment
Page 11
11
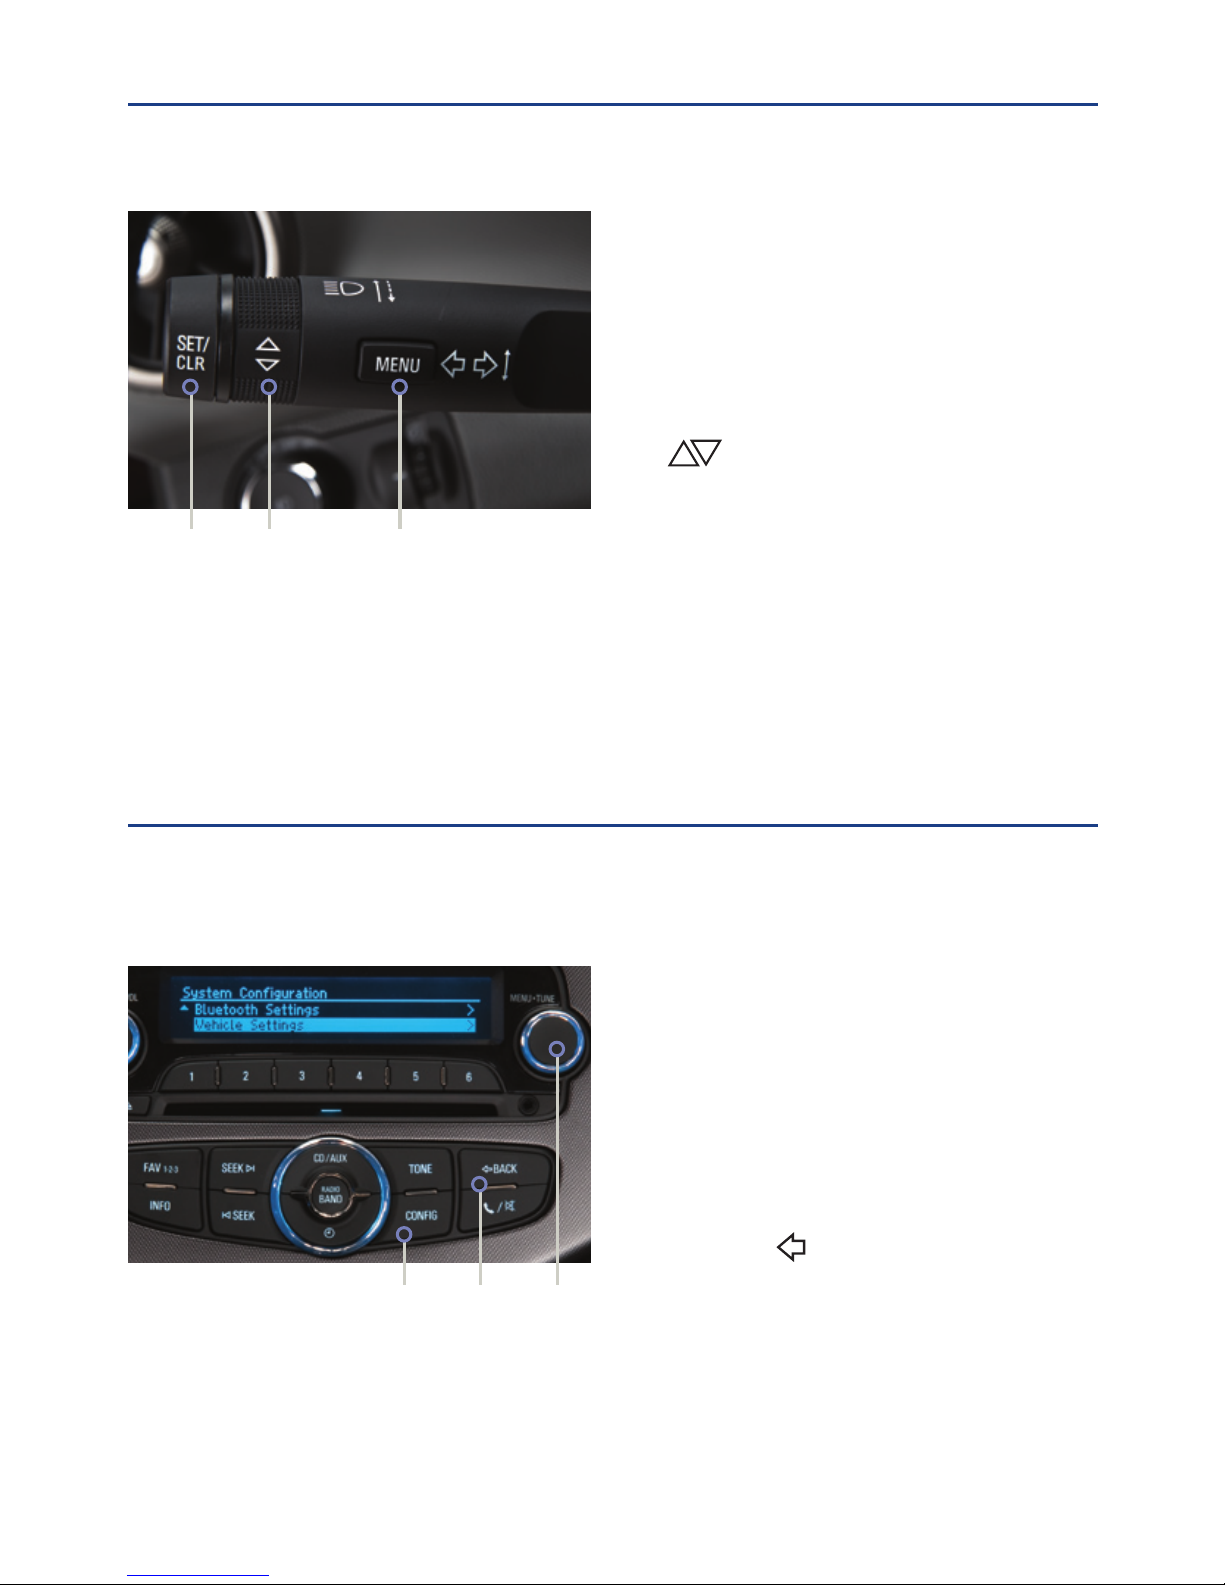
The Driver Information Center (DIC) on the instrument cluster displays a variety of vehicle
system information and warning messages.
DRIVER INFORMATION CENTERF
A. MENU
Press to display the Fuel menu (may
include average speed, fuel range,
average fuel economy and timer) or the
Vehicle Information menu (may include
remaining oil life, units, language and tire
learn).
B.
Rotate the switch to scroll through the
items of each menu.
C. SET/CLR
Press the button on the end of the lever
to set or clear a menu item or warning
message.
See Instruments and Controls in your Owner Manual.
B
B
AC
C
Some vehicle features can be customized using the audio controls and menus.
Personalization menus may include Comfort and Convenience, Lighting, Power Door
Locks, Remote Lock/Unlock and Factory Settings.
VEHICLE PERSONALIZATION
1. Press the CONFIG button (A) to enter
the Conguration Settings menu.
2. Turn the MENU knob (B) to highlight
Vehicle Settings; press the knob to
select it.
3. Turn the MENU knob to highlight the
desired menus and settings; press the
knob to select the highlighted item.
4. Press the BACK button (C) to move
back within a menu.
See Instruments and Controls in your Owner Manual.
A
F Optional equipment
Page 12
12
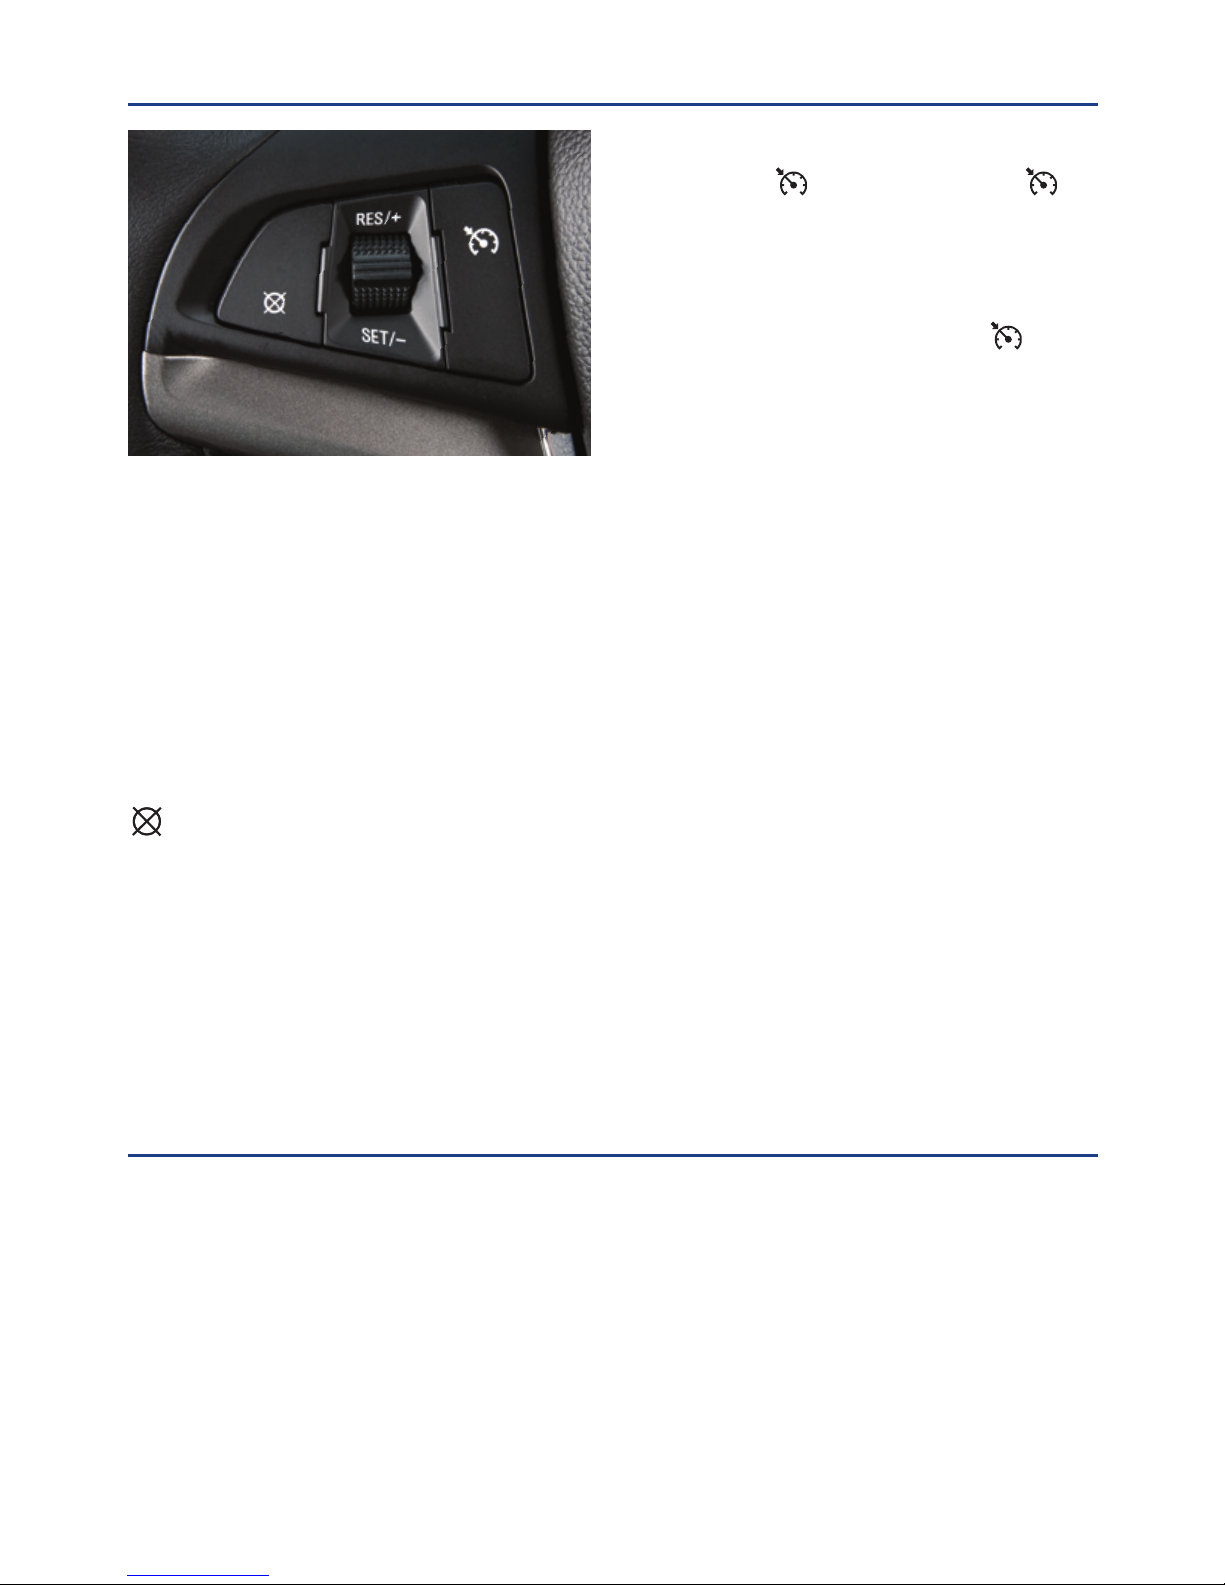
Setting Cruise Control
1. Press the On/Off button. The
Cruise Control symbol will illuminate in
white on the instrument cluster.
2. When traveling at the desired speed,
rotate the switch down to the SET/–
position to set the speed. The
symbol will illuminate in green on the
instrument cluster.
Note: Cruise control does not operate at speeds
below 25 mph. The automatic transmissionF
may downshift to maintain the set speed when
traveling down a steep grade.
When stopped on a steep hill, the Hill Start Assist feature prevents the vehicle from rolling
before driving off, whether facing uphill or downhill. During the transition between when the
driver releases the brake pedal and starts to accelerate, Hill Start Assist holds the brake
pressure (for up to two seconds) to ensure the vehicle doesn’t roll.
Note: Hill Start Assist will not operate if StabiliTrak is disabled.
See Driving and Operating in your Owner Manual.
CRUISE CONTROLF
HILL START ASSIST
Adjusting Cruise Control
RES/+ Resume/Accelerate
Rotate the switch up to resume a set speed.
When the system is active, rotate the switch up to increase speed.
SET/– Set/Coast
When the system is active, rotate the switch down to decrease speed.
Cancel
Press to cancel the cruise control but retain the set speed in memory.
Pressing the brake pedal or clutch pedal (manual transmission only) also will cancel the
cruise control.
The cruise control set speed is erased when cruise control or the vehicle ignition is
turned off.
See Driving and Operating in your Owner Manual.
F Optional equipment
Page 13
13
AUTOMATIC TRANSMISSIONF
Manual Mode
Manual Mode allows the driver to shift gears manually. This feature can be used to drive
the vehicle in a sportier manner or to downshift when driving on a downhill grade to provide
engine braking.
1. Move the shift lever to the Manual (M) position.
2. Press the + plus or – minus button on the side of the shift lever to upshift or downshift.
The current gear will be displayed on the Driver Information Center.
If vehicle speed is too high or too low for the requested gear, the shift will not occur. When
coming to a stop, the transmission will downshift automatically.
Note: The transmission has a fuel-saving Neutral shift feature. It shifts into Neutral when the vehicle
comes to a stop and the brake pedal is applied. It shifts back to Drive when the brake pedal is
released.
See Driving and Operating in your Owner Manual.
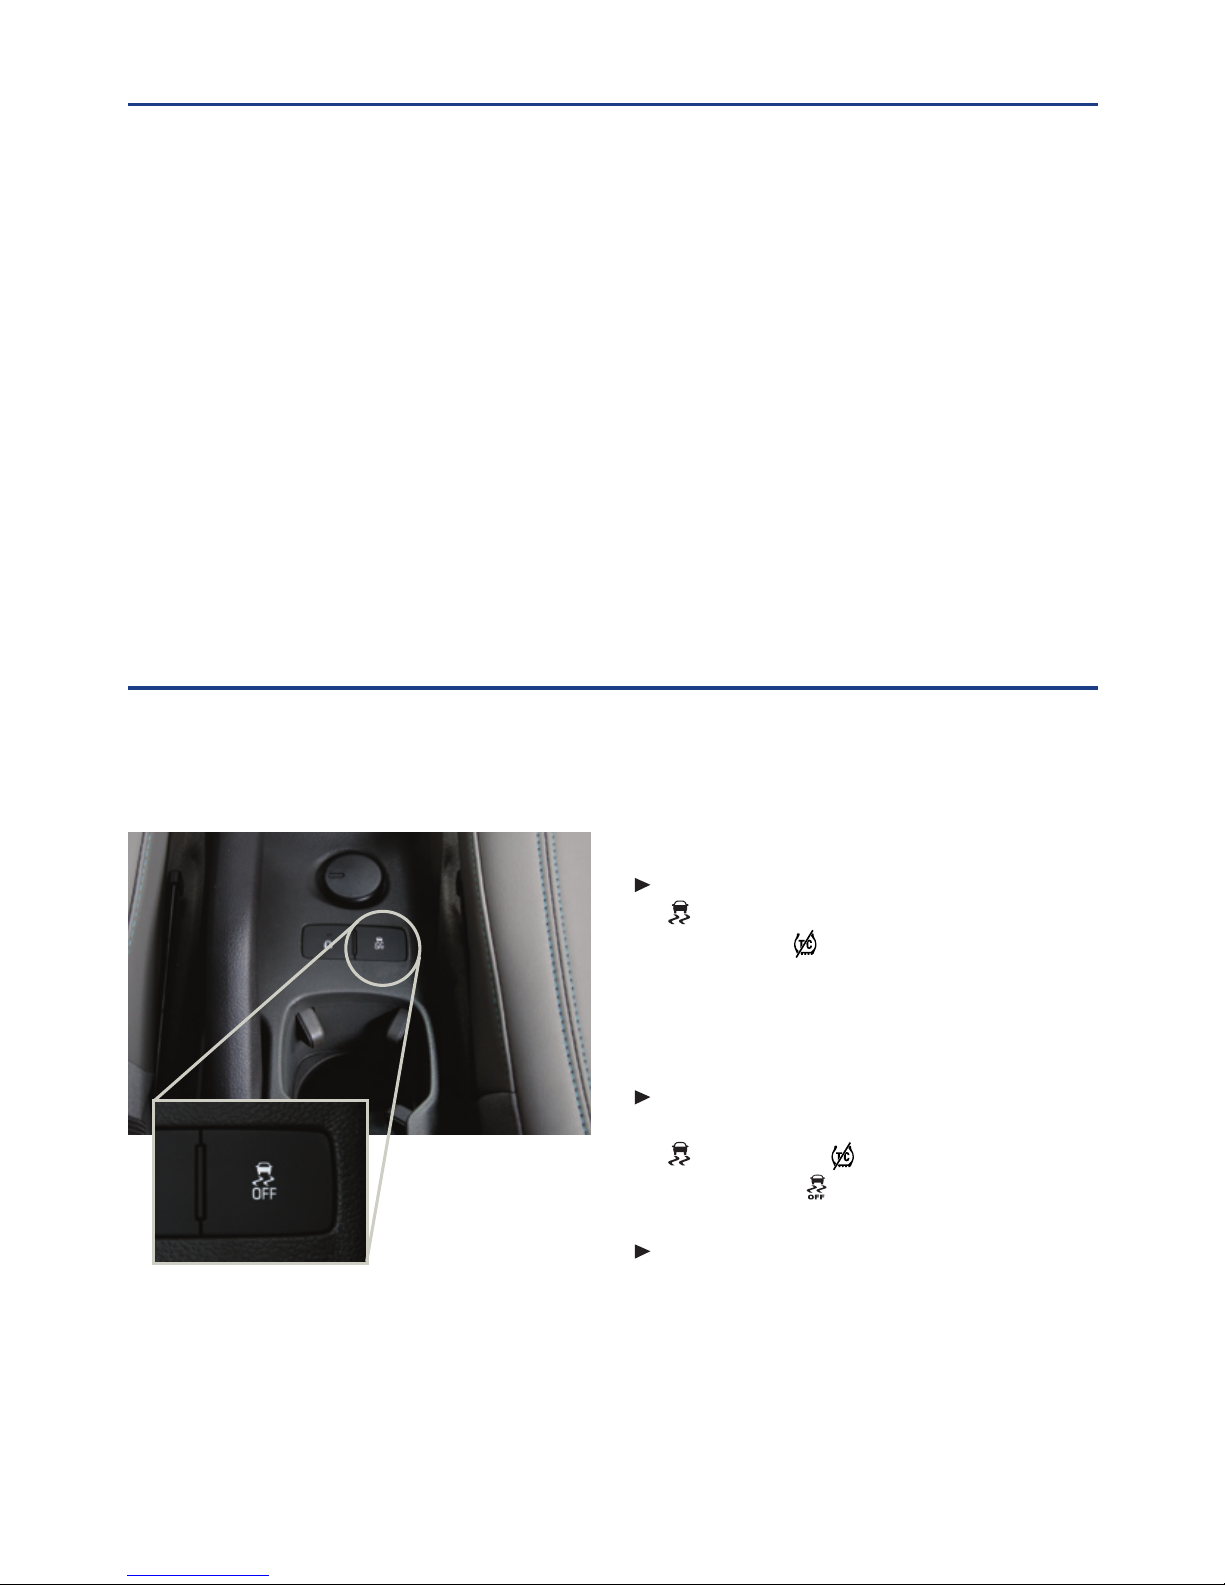
The traction control system limits wheelspin and the StabiliTrak stability control system
assists with directional control of the vehicle in difcult driving conditions. Both systems
turn on automatically every time the vehicle is started.
TRACTION CONTROL AND STABILITRAK® SYSTEMS
Turning the Systems Off/On
To turn off traction control, press the
Traction Control/StabiliTrak Off
button. The Traction Control Off
light will illuminate on the instrument
cluster. Turn off traction control if the
vehicle is stuck and rocking the vehicle
is required.
To turn off both traction control
and StabiliTrak, press and hold the
button. The Traction Control
Off light and StabiliTrak Off light will
illuminate on the instrument cluster.
Press the button again to turn on both
systems.
See Driving and Operating in your Owner Manual.
F Optional equipment
Page 14
14
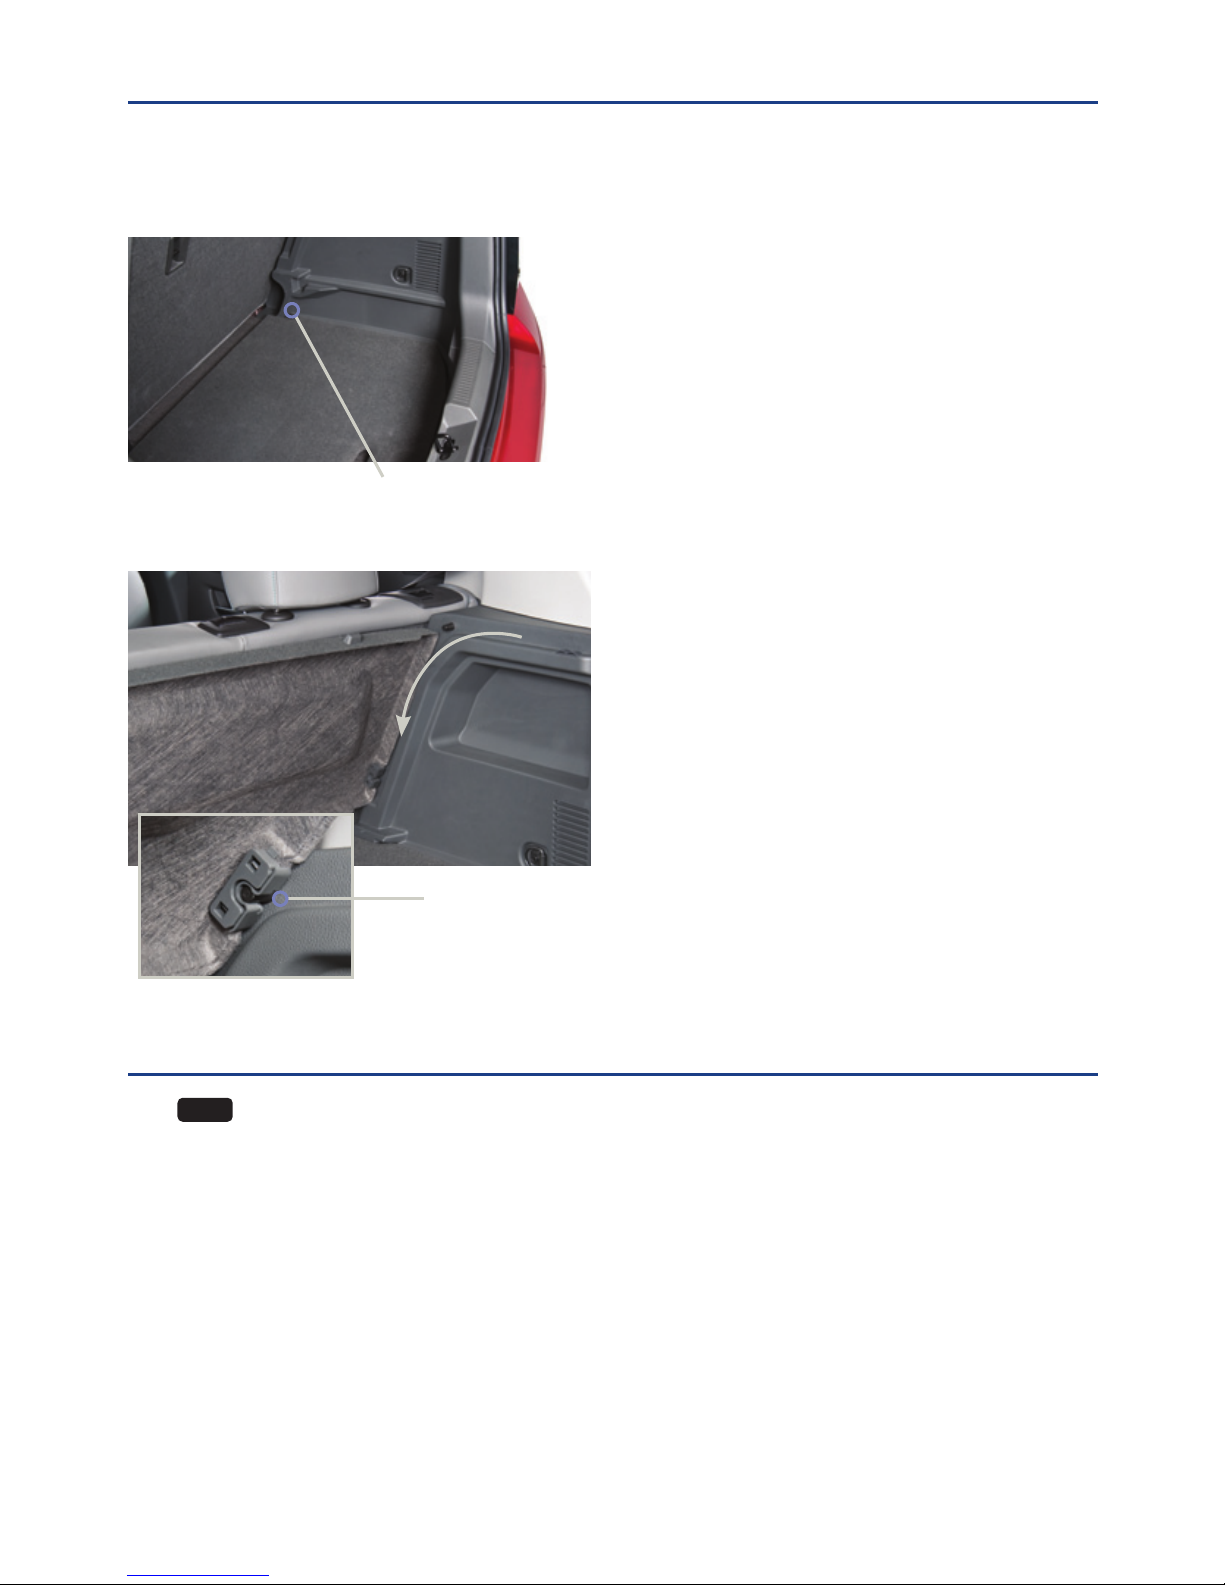
STORAGE FEATURES (5-DOOR MODEL ONLY)
Remove the Cover
1. Lift up the cover and pull it out.
2. Store the cover on the bottom of the
load compartment.
Install the Cover
1. Align the rear corners of the cover with
the rear slots (A) on both sides of the
load compartment.
2. Lower the cover onto the lip around the
load compartment.
Cargo Floor Storage Compartment
Additional storage space is available under
the rear cargo oor cover.
Remove the Shade
1. Unhook the cords from the liftgate
and pull the shade out of the rear
hinges (B).
2. Slide the shade along the channels
to store it behind the rear seats.
Install the Shade
1. Insert the shade into the rear hinges (B).
2. Hook the cords to the liftgate.
Cargo Shade
A
B
See Storage in your Owner Manual.
CODE SET INDICATOR
The
CODE
Code Set indicator displays with a number when the status of the vehicle has
changed and action may be needed to correct the condition. Following are the vehicle
messages indicated by each code number:
15 Center High Mounted Brake
Lamp Failure
16 Service Brake Lamps
21 Left Front Position Lamp Failure
22 Right Front Position Lamp Failure
23 Reversing Lamp Failure
24 License Plate Lamp Failure
25 Left Front Turn Indicator Failure
26 Left Rear Turn Indicator Failure
27 Right Front Turn Indicator Failure
28 Right Rear Turn Indicator Failure
82 Change Engine Oil Soon
84 Engine Power is Reduced
89 Service Vehicle Soon
128 Hood Open
See Instruments and Controls in your Owner Manual.
Page 15

15
TIRE PRESSURE MONITOR
The Low Tire Pressure warning light on the instrument cluster illuminates when a sig-
nicant reduction in pressure occurs in one or more of the vehicle’s tires. The warning light
will remain on until the tire pressure is corrected. The proper tire pressures for the vehicle
are listed on the Tire and Loading Information label, located below the driver’s door latch.
Tire pressure is affected by cold weather and distance driven. If the low tire pressure
warning light illuminates when the vehicle is rst started and then turns off as the vehicle is
driven in cooler temperatures, check for the proper tire pressures.
Note: The Tire Pressure Monitor can alert you about low tire pressure, but it doesn’t replace normal
monthly tire maintenance. It is the driver’s responsibility to maintain correct tire pressures.
See Vehicle Care in your Owner Manual.
To open the fuel door, press the center of the rear edge of the door. It will pop out
slightly. Pull the door open.
Turn the ignition key to the Off position before refueling the vehicle; otherwise, the fuel
gauge may not immediately show the updated fuel level.
See Driving and Operating in your Owner Manual.
REFUELING THE VEHICLE
ENGINE OIL LIFE SYSTEM
The Oil Life System calculates oil life based on vehicle use and displays Code 82 –
Change Engine Oil Soon on the Driver Information Center when it’s necessary to change
the engine oil and lter. The system should be reset to 100% only following an oil change.
Resetting the Oil Life System
1. Turn the ignition to the On position, but do not start the engine.
2. Press the MENU button to display the Vehicle Information menu.
3. Rotate the switch to view Remaining Oil Life.
4. Press the SET/CLR button until 100% is displayed.
5. Turn off the ignition.
See Vehicle Care in your Owner Manual.
RECREATIONAL VEHICLE TOWING
Recreational vehicle towing means towing the vehicle behind another vehicle, such as a
motor home. All Sonic models can be towed from the front using a dolly. All Sonic models
except the RS model with an automatic transmission also can be towed from the front with
all four wheels on the ground (dinghy towing). See your Owner Manual for the proper towing procedure.
See Vehicle Care in your Owner Manual.
Page 16

16
Certain restrictions, precautions and safety procedures apply to your vehicle. Please read your Owner Manual for
complete instructions. All information contained herein is based on the latest information available at the time of
printing and is subject to change without notice. Copyright 2012 General Motors. All rights reserved.
Always demand genuine GM Parts
22816421 A
!22816421!
If you require roadside service and have a current OnStar subscription, press the OnStar
button and the vehicle will send your current GPS location to an OnStar Advisor who will
speak to you, assess your problem, contact Roadside Assistance and relay your exact
location so you will get the help you need.
For more information about OnStar services, press the OnStar button, refer to your Owner
Manual, call 1-888-466-7827 or visit OnStar.com.
ROADSIDE ASSISTANCE
1-800-CHEV-USA TTY Users: 1-888-889-2438
(1-800-243-8872)
As the owner of a new Chevrolet, you are automatically enrolled in the Chevrolet
Roadside Assistance program for 5 years/100,000 miles at no expense to you. This
value-added service is intended to provide you with peace of mind as you drive across
town or travel the open road.
Chevrolet’s Roadside Assistance toll-free number is staffed by a team of trained advisors
who are available 24 hours a day, 365 days a year, to contact a service provider for light
services (fuel delivery, jump-starts, at tire and lock-outs) or make arrangements to tow
your vehicle to the nearest Chevrolet dealer.
ONSTAR®
CHEVROLET OWNER CENTER
The Chevrolet Owner Center, a complimentary service for Chevrolet owners, is a one-stop
resource designed to enhance your Chevrolet ownership experience. Exclusive member
benets include online service reminders, vehicle maintenance tips, online owner manual,
special privileges and more.
Sign up today at my.chevrolet.com.
 Loading...