

Page 1
1
"
_
5
4
1
"
_
2
2
7
"
_
3
8
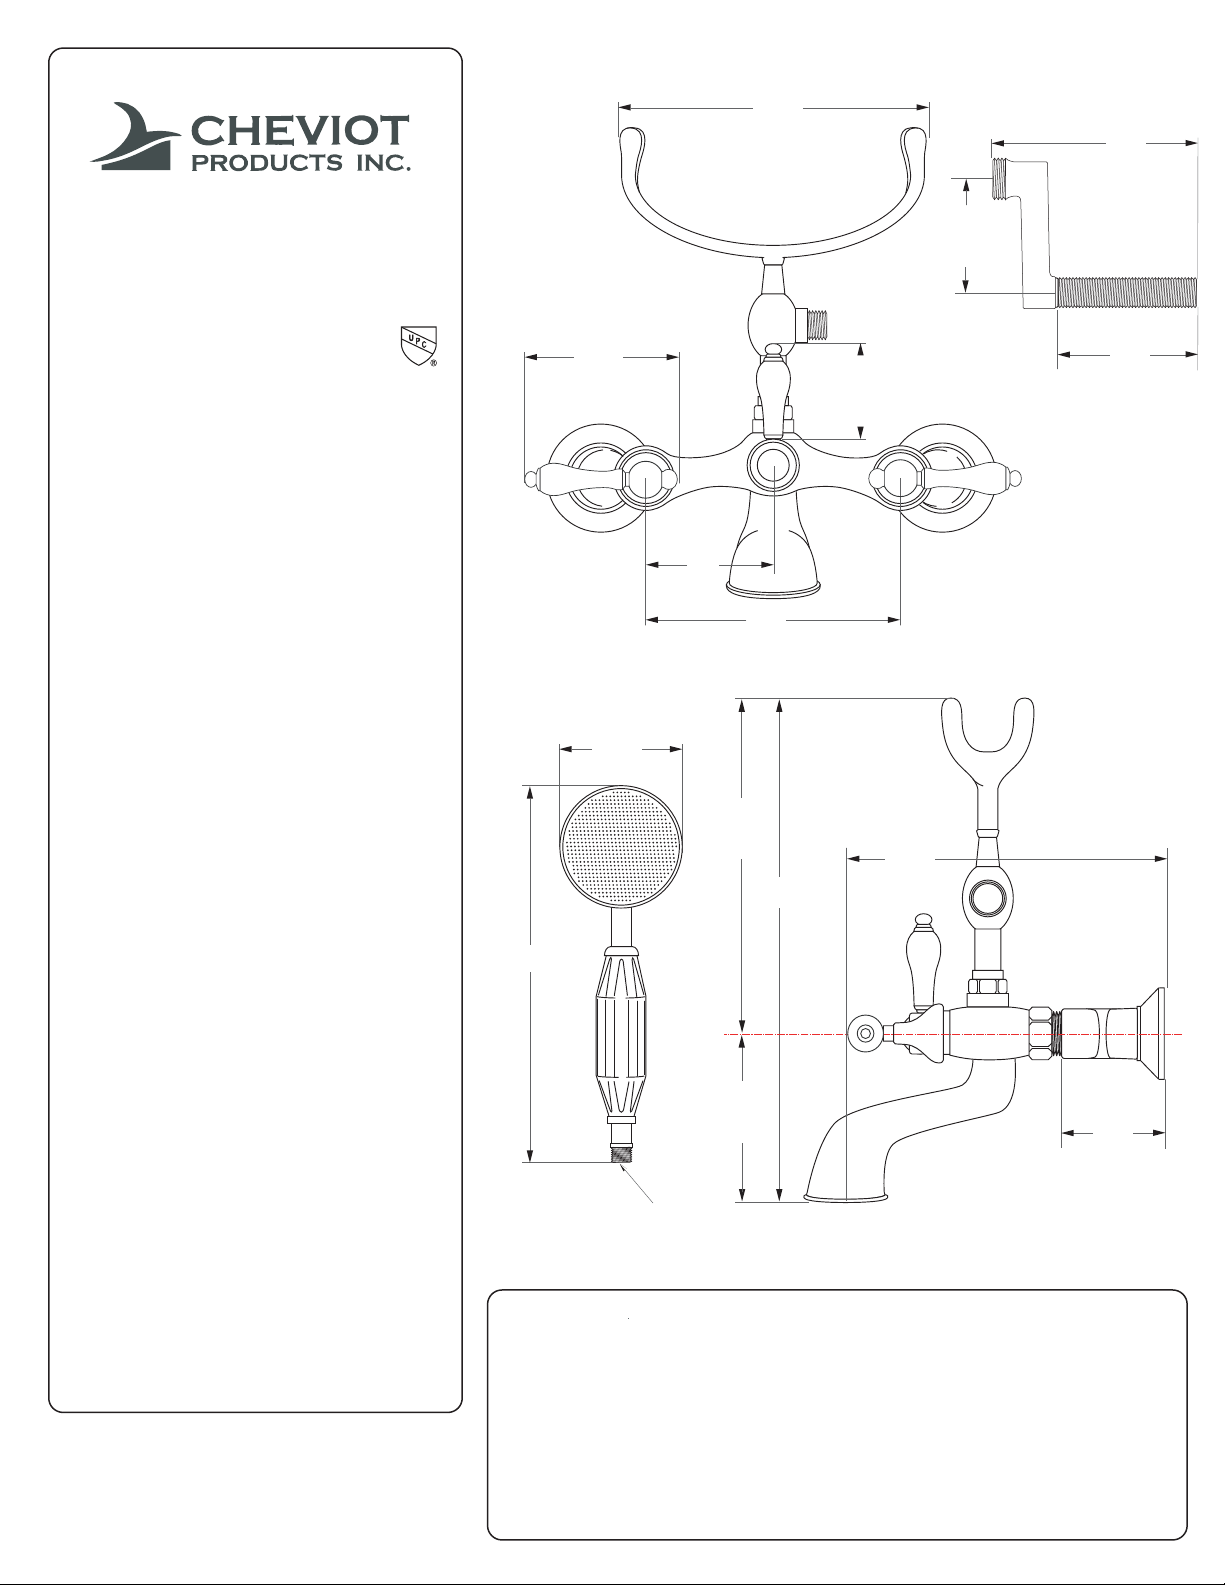
Model # 5115-LEV
INSTRUCTIONS
1. Attach the S-Union to the tub with flat
metal washer and 1/2” lock nut. Make
sure that escutcheon is tight against
S-Union arm (hand tighten only).
2. Attach faucet to S-Unions (3/4“
washers must be installed) and adjust
faucet so that it sits level. Now tighten
hex nuts on back of faucet to secure the
S-Unions. Then tighten the 1/2” lock
nuts on the back of the S-Unions to
secure faucet on vertical surface.
3. Next connect the water supply lines.
Must have hot going to hot side & cold
to the cold side. If using 1/2“ OD
decorative supply line connect the hex
nuts at the top of the supply lines
back of the S-Unions. If installing inside
the wall use copper fittings.
4. Install the hand shower cradle on to
the top of the faucet body. Place the
rubber washer in the hex nut at the base
of the cradle and tighten until sealed and
secure.
C
rubber
to the
8"
1
"
1
"
_
4
8
3
"
_
2
4
Note: S Unions allow 3” to 8” Centers
_
2
4
3"
6"
3
"
_
2
4
3
"
_
8
8
1
"
_
6
2
13"
5. To install the shower hose place the
1/2” rubber washers in the cone nuts at
both ends of the shower hose. Install
one end to the side port on the cradle
stand and one end to the bottom of the
hand shower. Hand tighten.
6. Once installed, remove aerator and
hand shower to flush faucet and water
lines. This will remove any debris that
may be trapped. Then attach shower
head and aerator.
Tel : (800)-444-5969
www.cheviotproducts.com
5
"
_
4
8
Backflow prevention device
CARE AND MAINTENANCE
Minimum Maintenance is required to maintain product finish. With proper
maintenance your CHEVIOT Faucet will continually look like new. Special care
should be taken when cleaning your faucet and the following suggestions should help
extend your faucet life.
a) Cleaning should be done regularly using a soft cotton cloth and warm water, then
towel dry.
b) Do not use cleaners that contain abrasives or harsh chemicals; Care should be
taken in selecting cleaning supplies. Many cleaners contain detergents, ammonia, or
other corrosive solvents that could damage your faucet finish.
c) occasionally clean with a non-abrasive wax polish.
5
"
_
1
8
Page 2
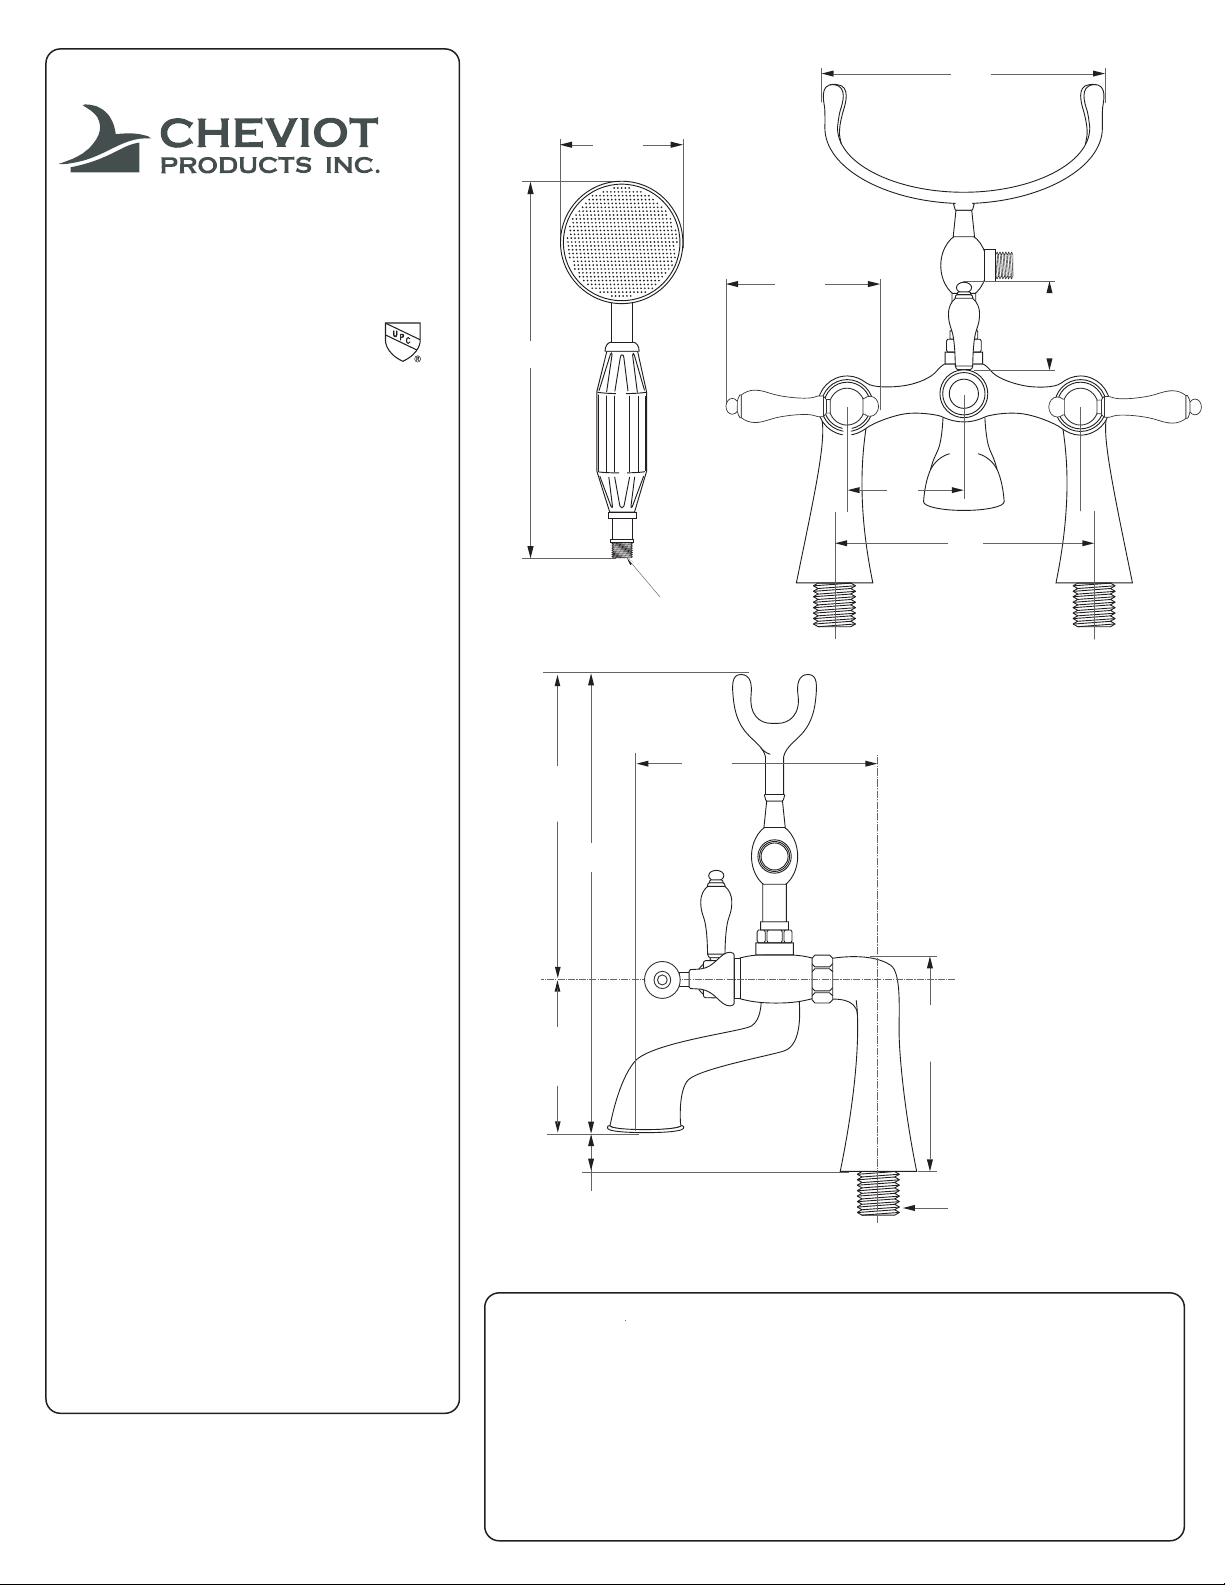
Model # 5121-LEV
INSTRUCTIONS
1. Place mounting legs on the tub, then
tighten the lock nuts from underneath.
Water supply lines are to be connected
to bottom of mounting legs using teflon
tape.
2. Install the faucet body by connecting
the 3/4” end nuts on the back of the
faucet body to the top end of the
mounting legs. Be sure that the rubber
washers are installed, and tighten the
nuts down with a wrench. (Careful not to
damage the finish of the faucet. Use a
piece of cloth between the finished
surface and the wrench)
3. Install the hand shower cradle on to
the top of the faucet body. Place the
rubber washer in the hex nut at the
of the cradle and tighten until sealed and
secure.
C
base
3
"
_
2
4
8"
Backflow prevention device
3
"
_
8
8
13"
1
"
_
5
4
1
"
_
4
8
3
"
_
2
4
3"
7"
* Pay close attention to
the offset mounting
legs. Although the
faucet is a 6” spread,
the mounting legs
install into a 7” spread.
"
6
4. To install the shower hose place the
1/2” rubber washers in the cone nuts at
both ends of the shower hose. Install
one end to the side port on the cradle
stand and one end to the bottom of the
hand shower. Hand tighten.
5. Once installed, remove aerator and
hand shower to flush faucet and water
lines. This will remove any debris that
may be trapped. Then attach shower
head and aerator.
Tel : (800)-444-5969
www.cheviotproducts.com
3
"
_
5
"
_
4
8
"
3
_
5
8
3/4 -14 NPSM
8
CARE AND MAINTENANCE
Minimum Maintenance is required to maintain product finish. With proper
maintenance your CHEVIOT Faucet will continually look like new. Special care
should be taken when cleaning your faucet and the following suggestions should help
extend your faucet life.
a) Cleaning should be done regularly using a soft cotton cloth and warm water, then
towel dry.
b) Do not use cleaners that contain abrasives or harsh chemicals; Care should be
taken in selecting cleaning supplies. Many cleaners contain detergents, ammonia, or
other corrosive solvents that could damage your faucet finish.
c) occasionally clean with a non-abrasive wax polish.
Page 3
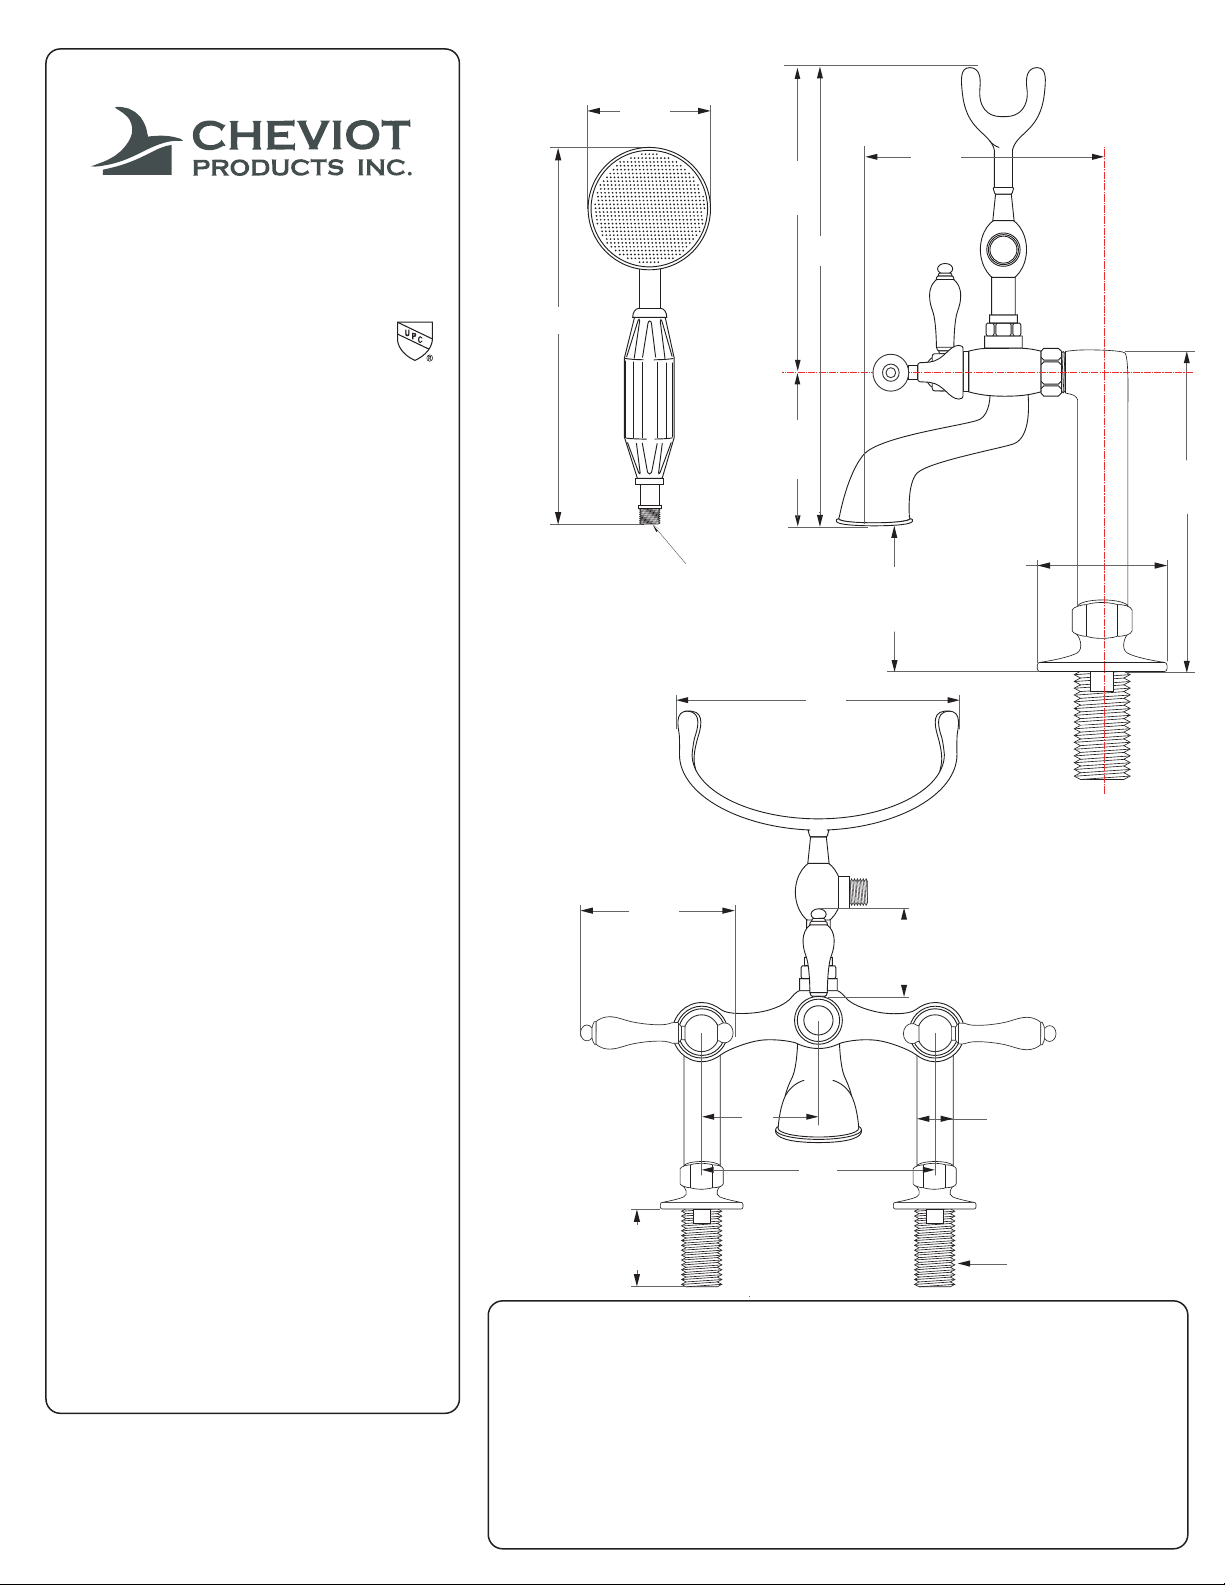
Model # 5127-LEV
INSTRUCTIONS
1. First check to see that the brass
shanks are installed in the mounting
legs. Next place mounting legs on the
tub, then tighten the lock nuts from
underneath.
Water supply lines are to be connected
to bottom of mounting legs using teflon
tape.
2. Install the faucet body by connecting
the 3/4” end nuts on the back of the
faucet body to the top end of the
mounting legs. Be sure that the rubber
washers are installed, and tighten the
nuts down with a wrench. (Careful not to
damage the finish of the faucet. Use a
piece of cloth between the finished
surface and the wrench)
C
3
"
_
2
4
8"
Backflow prevention device
"
3
"
_
8
8
6
13"
5
"
_
4
8
"
1
_
6
2
2"
"
3
_
1
8
1
"
_
5
4
3. Install the hand shower cradle on to
the top of the faucet body. Place the
rubber washer in the hex nut at the base
of the cradle and tighten until sealed and
secure.
4. To install the shower hose place the
1/2” rubber washers in the cone nuts at
both ends of the shower hose. Install
one end to the side port on the cradle
stand and one end to the
hand shower. Hand tighten.
5. Once installed, remove aerator and
hand shower to flush faucet and water
lines. This will remove any debris that
may be trapped. Then attach shower
head and aerator.
Tel : (800)-444-5969
www.cheviotproducts.com
bottom of the
1
"
_
4
8
3
"
_
2
4
3"
1"
6"
"
4
3/4-14 NPSM
CARE AND MAINTENANCE
Minimum Maintenance is required to maintain product finish. With proper
maintenance your CHEVIOT Faucet will continually look like new. Special care
should be taken when cleaning your faucet and the following suggestions should help
extend your faucet life.
a) Cleaning should be done regularly using a soft cotton cloth and warm water, then
towel dry.
b) Do not use cleaners that contain abrasives or harsh chemicals; Care should be
taken in selecting cleaning supplies. Many cleaners contain detergents, ammonia, or
other corrosive solvents that could damage your faucet finish.
c) occasionally clean with a non-abrasive wax polish.
 Loading...