

Page 1

chesneys
architectural fireside outdoor living
installation of fireplaces
Page 2

Page 3

INSTALLATION OF MARBLE AND LIMESTONE FIREPLACES
introduction
For many years we have restored antique fireplaces at our workshops in
London. Conserving and reviving an 18th century marble chimneypiece
is a painstaking exercise which requires an extraordinary level of skill,
expertise and patience.
There can be no compromises in the process, and it is this rigorous
approach which has guided the development of our entire range of designs
over the years, and which has come to set a Chesneys fireplace apart from
all others.
A fireplace should be the primary focus of any room, and therefore we
ensure that every one of our fireplaces embodies the finest craftsmanship
and integrity of design.
We have added new designs to our established Historical and Contemporary
Collections, the latter showcasing the talents of contemporary designers, most
recently in collaboration with the renowned New York designer, Eric Cohler.
I hope that you will find plenty to enjoy.
PAUL CHESNEY
1
Page 4

installation of fireplaces, HeartHs, Gas fires,
flues and tHeir related appliances are governed
within the UK by bUilding regUlations approved
docUment J 2010 edition.
Document J outlines various British
Standards that cover all aspects of
fireplace installation. A number of
those listed include BS 5871 part 3,
BS 54 40 part 1, BS 1251, BS 8303
part 3, BS 6461, BS 5258 and BS
8000. Regulations detailed within
these documents have to be
adhered to. Also the fixing of
stonework is covered by BS 8298
‘Code of Practice for Design and
Installation of Natural Stone
Cladding and Lining’.
While many stages of the surround
and decorative hearth installation
are suitable for someone
experienced in general building
practices, others like the installation
of appliances for solid fuel, flue
lining, gas work and the sweeping/
testing of flues must be carried out
by a suitably qualified professional.
If the fireplace cannot be fixed to a
solid brick/blockwork masonry wall
then we recommend that you
consult an architect or a structural
engineer to identify that you can
achieve suitable anchoring and
bonding points to ensure that the
fireplace cannot come away from
the surface you are attaching it to.
WARNING: We do not recommend
this as a DIY installation.
In your own interest and safety, it is
law that all gas appliances are
installed by a competent person,
in accordance with the current
Gas Safety (installation and use)
Regulations; 1998 (registered
GAS SAFE installer).
In your own interest and safety it
is law that all solid fuel appliances
are installed by a competent person
who is HETAS registered.
In addition, they must be carried
out in accordance with relevant and
current local and National Building
Regulations.
These instructions are intended
for use by competent personnel
and any installations carried out
by your own contractors are done
so entirely at your own risk.
Chesneys have their own teams
of in-house installers to cover the
installation process, please call
020 7498 5555 for more details
on our installation service.
2
Page 5

Chesneys’ website
contains detailed installation
and user manuals for
all products with document
downloads available
INSTALLATION OF MARBLE AND LIMESTONE FIREPLACES
installation
marble & limestone
fireplaces
chesneys.co.uk/information
3
Page 6

INSTALLATION OF MARBLE AND LIMESTONE FIREPLACES
the devonshire
Handsome proportions
and crisp detailing, with an
elegant downward taper
to the pilasters. Carved in
limestone, it is shown here
with the Alpine 6 Series
multi-fuel stove.
4
Page 7

INSTALLATION OF MARBLE AND LIMESTONE FIREPLACES
Ge t tinG started
installer tip
it is always
advisable to
install a
throated lintel
MiniMUM TooLinG
reQUireMenT
Clean rust free gauging trowels,
clean rubber buckets, at least one
for mixing adhesive and one for
clean water, clean white (noncoloured) sponge, 3ft level, small
boat level, stainless steel/
galvanised ties, adjustable square,
tape measure, lump hammer,
bolster, coal chisel, drill with
assorted masonry drill bits, filling
knives, fixing adhesive (cement
based tiling adhesive ie Ardex
S16/W), white plaster (casting
plaster), marble glue (i.e. Steinkitt
vertical clear or white).
Do not attempt to install the
fireplace unless you have the
correct adhesives as mentioned
and all mechanical fixings.
PPe
Ensure in all steps of the
installation suitable protective
equipment is worn and you have
read and understood the relevant
COSHH sheets for all materials
used during the installation
process. COSHH sheets must be
obtained from relevant material
manufacturers’ suppliers.
fLUes
Ensure the flue has been swept,
tested and certificated by a suitably
qualified NACS registered chimney
sweep, to the standard required for
fuel you wish to burn. These are
Class 1 for both solid fuel and open
flue gas appliances, tested to BS
5871 for decorative fuel effect gas
fires and BS6 461 for solid fuel
appliances supplied by Chesneys.
Subject to the diameter (surface
area), height/ length of the flue, and
whether the opening will be fan
assisted, prepare the structural
opening size bearing in mind the
maximum working opening of the
associated flue. Ensure a throated
lintel is installed and the gather area
to the flue is smooth and tapered,
see Document J.
Gas sUPPLy
If a decorative fuel effect gas fire is
to be installed, run in an 8mm gas
pipe to a central rear position in the
structural opening. There should be
a 15mm supply adjacent to the
sub-hearth area. This pipe is then
reduced to 8mm and the 8mm feed
5
Page 8

INSTALLATION OF MARBLE AND LIMESTONE FIREPLACES
ISOMETRIC VIEW
installer tip
applying the first coat
of render early will
speed Up completing
the installation
older plaster can
normally be removed
with a hammer and
chisel, newer plaster
may reqUire an
electric grinder
run into the chamber. Maximum
length of 8mm pipe should be no
more than 1000mm. The isolation
valve can be in the chamber under
the basket/insert and is there for
servicing purposes only. If there
was ever a problem with the gas
fire, the gas supply would need to
be isolated at the gas meter.
soLid fUeL
If a solid fuel fire is to be
installed, ensure the structural
sub-hearth conforms to Building
Regulations, see approved
Document J 2010 edition.
PreParaTion of Goods
For limestone and white marble,
seal the underside of the hearths
with PVA or stone sealant. Allow
the sealant to fully dry prior to
commencing installation. Carry out
works in a protected and ventilated
area and wear appropriate PPE.
PreParaTion of The
insTaLLaTion area
Ensure the work area is clear and
all furnishings have been removed
from the room where the surround
is due to be installed. All flooring
and finishes should be protected.
Cut back and remove all plaster
from the chimney breast in the
immediate area of the fireplace,
up to about 10mm outside the
profile of the fireplace to be
installed to enable a good bond
between the surround and the
masonry. Do not fit mechanical
fixings to mortar, only to solid
brick/blockwork and please note
lightweight block work is not
suitable to take plugged
mechanical fixings as they can
pull out, chemical resin anchors
100
31
55
63
Ø6
55
63
Ø6
6
Page 9

INSTALLATION OF MARBLE AND LIMESTONE FIREPLACES
installer tip
place the frieze in
position ‘dry’ while
fixing the Jambs
add a few spots of
rapid set plaster when
laying the hearth.
this will allow yoU to
continUe installation
immediately
must be used in this instance.
Ensure suitable PPE is worn such
as gloves, goggles, dust mask etc.
Bag rubble and remove to skip and
clean work area.
fixinGs
The fixings used should be
stainless steel or galvanized steel/
iron to prevent deterioration from
rust as there is water present
during fireplace manufacture.
The fixings must be secured into
the stone with two part adhesives
and a down turn penetration into
the top of each piece of stone
excluding the shelf which must
have substantial dowels in the rear
chemically fixed to the wall and
stone work. The fixings should be
secured to the solid wall with
stainless steel or galvanized screws
with plugs that can withstand being
pulled out by a person.
WarninG: The fixings included
with the product are only suitable
for installing on to a solid brick/
blockwork masonry wall. If you
are not installing onto a surface like
this then you will need to consult
an architect or a structural engineer
as mentioned on the first page of
this document.
LayinG The hearTh
Lay the hearth ensuring it is level
both along its length and width
running parallel to the face of the
chimney breast. Limestone hearths
should be set on quick setting
cement based tiling adhesive.
For gas fires ‘only’, where the
hearth is to be bedded onto wood,
fix EML first then apply the
adhesive bed. Ensure any wooden
7
Page 10

INSTALLATION OF MARBLE AND LIMESTONE FIREPLACES
installer tip
whilst the adhesive
is still drying, Keep
checKing the Jambs
are level
sub-hearth area is suitably sound
and secure. For all solid fuel fires
the hearth should be set in three
equal pieces to reduce the risk of
fracture from thermal shock.
fiTTinG ProcedUre
All stone components should have
mechanical fixing recessed to allow
full stone contact and downturned
into their top to restrain them
excluding the shelf. Each bond of
adhesive should have continuous
contact along its full joint and is
bonded to the masonry along all
of the back edge with the solid
wall, it is important that all joints
and bonded surfaces are clean and
suitably wetted/soaked to allow
the adhesive to set correctly and
in accordance with the
manufacturer’s instructions.
The shelf and other overhanging
components should be adequately
restrained in all instances as they
are liable to tip forward so it is
imperative this is securely fixed
back into the wall so there is no
possibility of any piece tipping
and falling.
will later be back filled and
flaunched off.
Fix strawboard/corrugated
cardboard to the rear of the insert,
this covers and fits tight to the
complete back of the register grate
and finishes 25mm (1") above the
top of the burning area/firebrick.
Fit the register grate ensuring that
it is correctly positioned and
properly sealed all round using
fire cement. The front of the
register grate should sit on top of
the back edge of the hearth, in
such a position that will be
recessed behind and butting up to
the back of each jamb and the
frieze. Always allow a 3mm
expansion gap between the
register grate and the jambs.
Back fill the space between the
back of the register grate and the
wall of the fire chamber with
vermiculite/pearlite concrete
(6:1 vermiculite/cement or 10:1
pearlite/cement) to eliminate any
voids/ large spaces behind the
register grate fill level to top of the
back of the register grate.
for reGisTer GraTes
Installations not involving register
grates please proceed to the
next step.
Suitably reduce the fire chamber
prior to installing the register grate
to reduce the void between the
back/sides of the register grate
and the structural chamber. This
Flaunch-off the top of the backfill
with 1:1:8 mix of cement/lime/sand
to form smooth slope to flue at an
angle of about 45 degrees.
8
Page 11

PaneLLed firePLaces
installation of the sUrroUnd
Fix the jambs upright and back to
the brickwork of the chimney
breast using galvanised or
stainless steel wall ties and quick
setting cement based tiling
adhesive bonded to the masonry.
Ensure quick setting cement
adhesive is applied to the
underside of the jambs where
they meet the hearth. The jambs
should be positioned on top of
the hearth, equidistant to the
ends of the hearth and parallel
to the front edge.
INSTALLATION OF MARBLE AND LIMESTONE FIREPLACES
Please Note: If using Modern
Steel slips, place these in position
now, as with register grates allow
a 3mm expansion gap between
the jambs and the steel slips.
Put the fireplace frieze in place,
and fix level using quick setting
cement based tiling adhesive
or marble glue. For a register
grate allow a 3mm expansion
gap between the frieze and the
register grate.
When fixing a solid surround the
frieze should also be fixed back
with galvanized or stainless steel
wall ties/brackets.
See the diagram supplied with the
fireplace for individual fixing points.
the aLhaMbra A traditional design with a contemporary twist.
Larger than many fireplaces and with a strong architectural form. Shown in
limestone with the Morris fire basket for dogs, Burton andirons black slate hearth.
9
Page 12
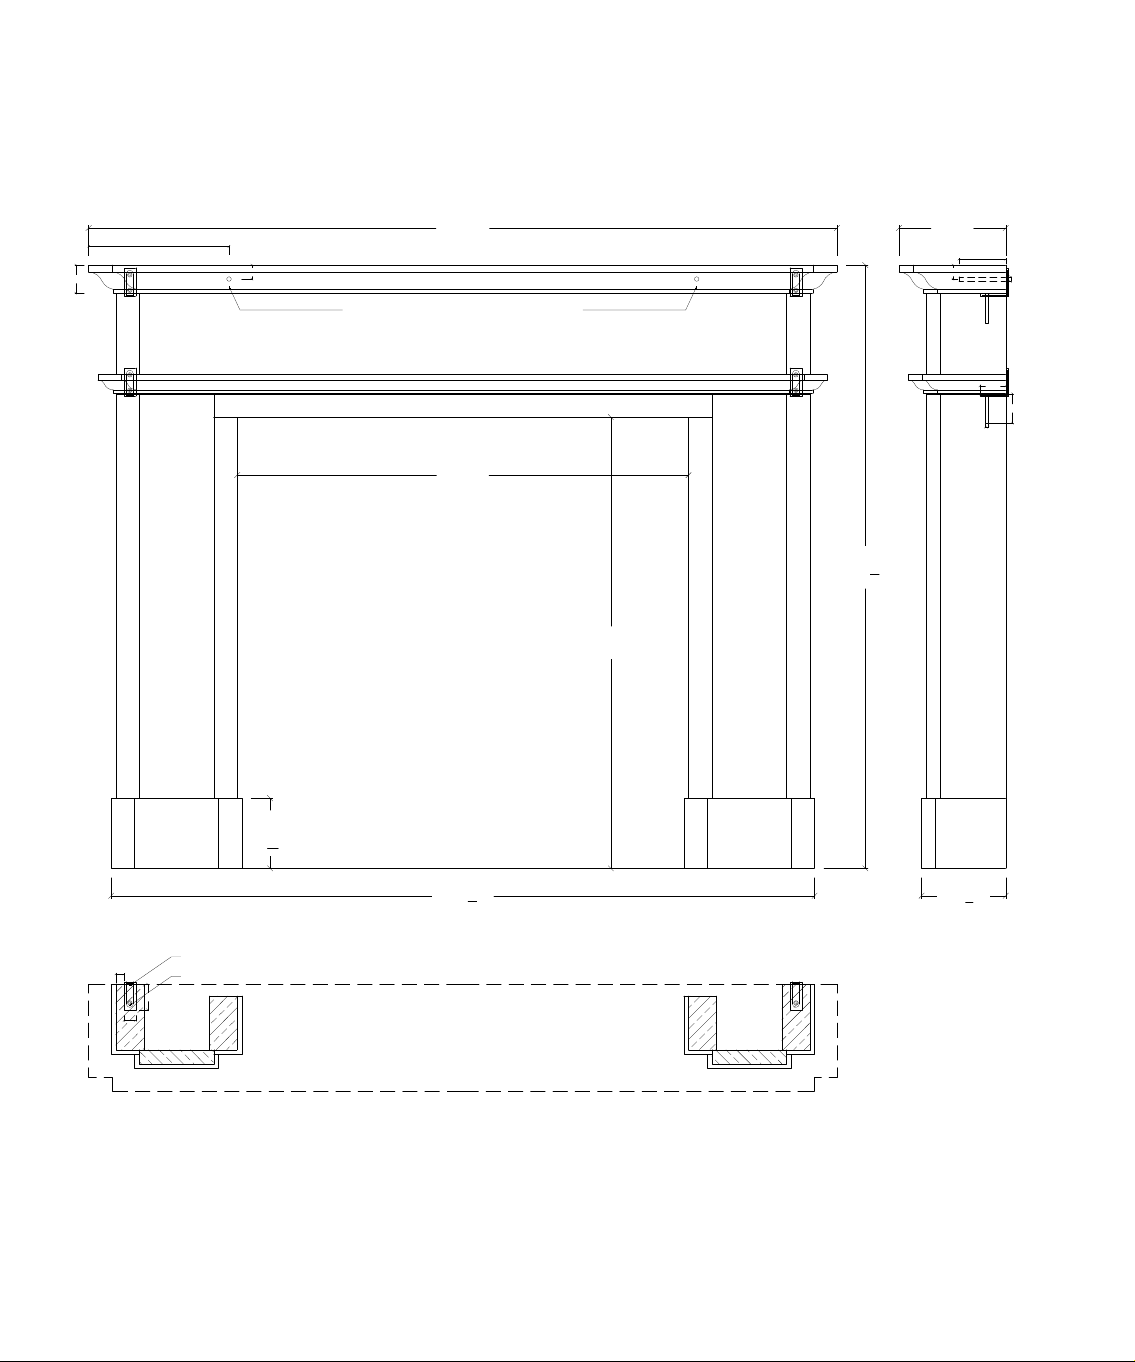
INSTALLATION OF MARBLE AND LIMESTONE FIREPLACES
ISOMETRIC VIEW
30
Ø10
100
1600
300
60
30
10mm holes drilled 100mm into the back of shelf
[ 63" ]
228
[ 9" ]
30
100
Ø10
55
63
Ø6
965
[ 38" ]
1290
3
" ]
[ 50
4
965
[ 38" ]
FRONT ELEVATION
150
7
[ 5
" ]
8
17.5
55
25
5 mm recess to take bracket
6 mm hole 60mm deep
[ 59
1504
PLAN
1
" ]
4
180
1
" ]
[ 7
8
SIDE ELEVATION
10
Page 13
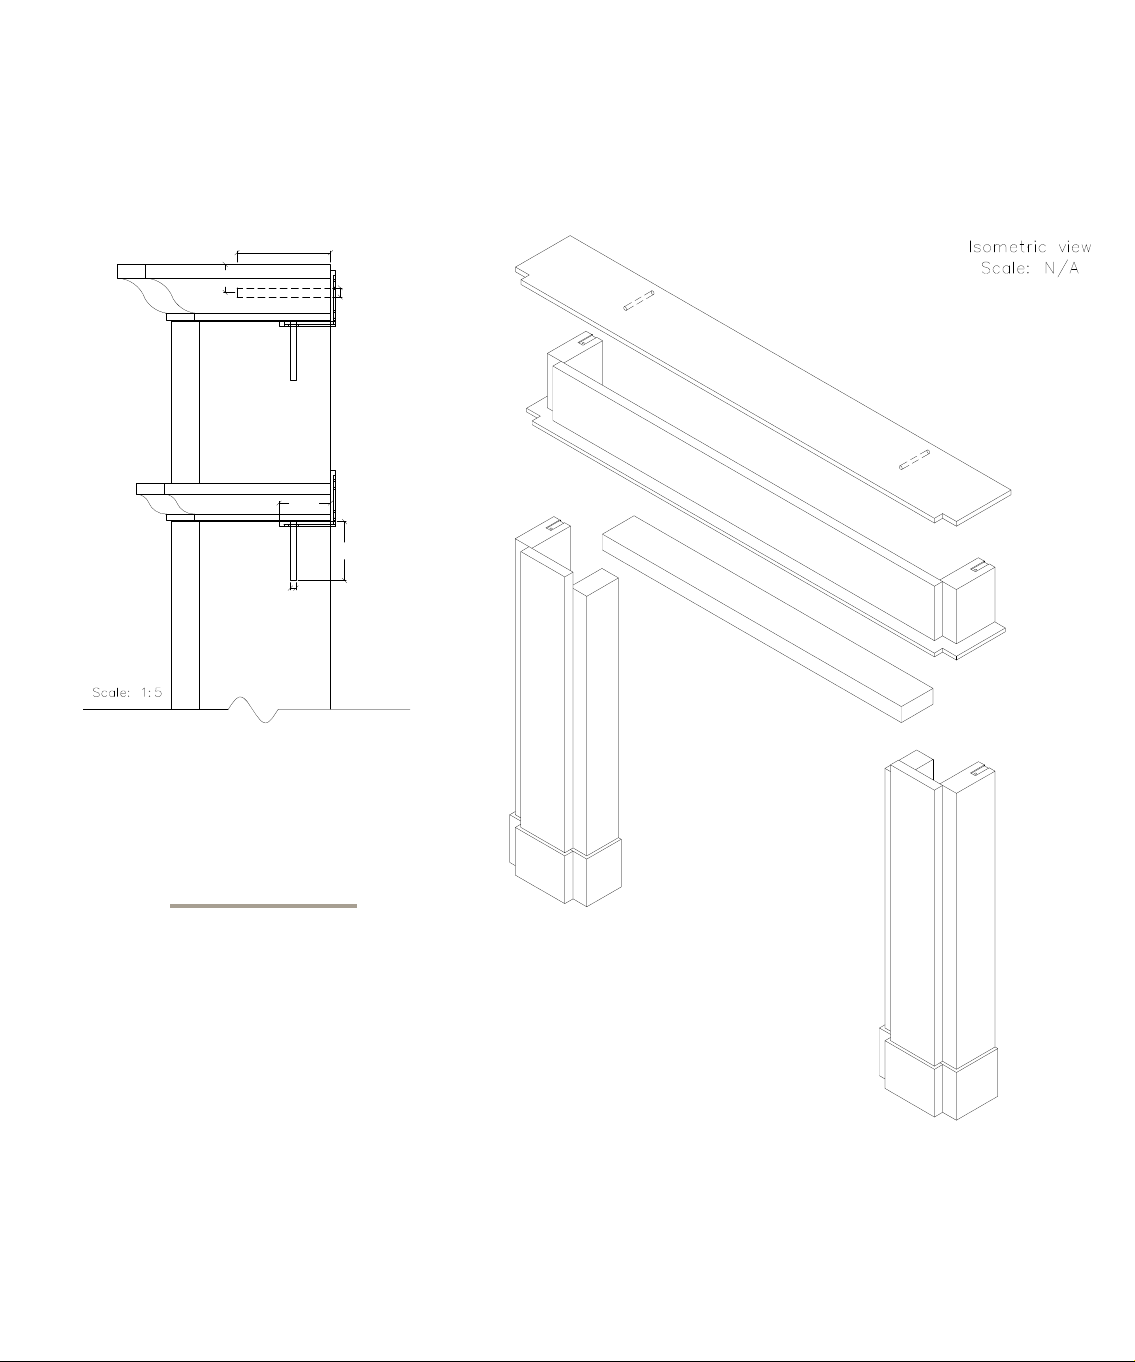
INSTALLATION OF MARBLE AND LIMESTONE FIREPLACES
ISOMETRIC VIEW
30
Ø10
100
ISOMETRIC VIEW
100
30
55
Ø6
SIDE ELEVATION DETAIL
Ø10
63
PaneLLed firePLace
the line drawing
shown here is
an indicative
illUstration of
a typical panelled
fireplace.
model shown:
the alhambra
11
Page 14

INSTALLATION OF MARBLE AND LIMESTONE FIREPLACES
soLid firePLaces installation of the sUrroUnd
Fix the jambs upright and back to
the brickwork of the chimney
breast using galvanised or stainless
steel wall ties and quick setting
cement based tiling adhesive
bonded to the masonry.
Ensure the quick setting cement
based adhesive is applied to the
whole length of the back of the
jambs and to the underside of the
jambs where they meet the hearth.
The jambs should be positioned on
top of the hearth, equidistant to the
ends of the hearth and parallel to
the front edge.
Please Note: If using Modern Steel
slips, place these in position now,
as with register grates allow a 3mm
expansion gap between the jambs
and the steel slips.
Put the fireplace frieze in place, and
fix level using quick setting cement
based tiling adhesive or marble glue
using the stainless bracket provided
and raw plugs provided. Ensure
quick setting cement based
adhesive is applied to the whole
length of the back of the frieze.
the cLandon The Clandon bolection is based on a Queen Anne design from
the beginning of the 18th century. Its simple lines and generous curves make it a
versatile choice suitable for both contemporary and period interiors. Shown with
Burton forged steel andirons and the Swansnest fire basket.
12
For a register grate allow a 3mm
expansion gap between the frieze
and the register grate. When fixing
a solid surround the frieze should
also be fixed back with galvanized
or stainless steel wall ties/brackets.
See the diagram supplied with the
fireplace for individual fixing points.
Page 15

INSTALLATION OF MARBLE AND LIMESTONE FIREPLACES
the bUrLinGTon
A timeless design carved from limestone. With its simple
geometric lines and classical proportions, it will give
architectural interest and a sense of scale to both modern and
traditional interiors. Shown with Modern steel slips, Soho
fire basket, Spherical steel fire dogs and slate hearth.
13
Page 16
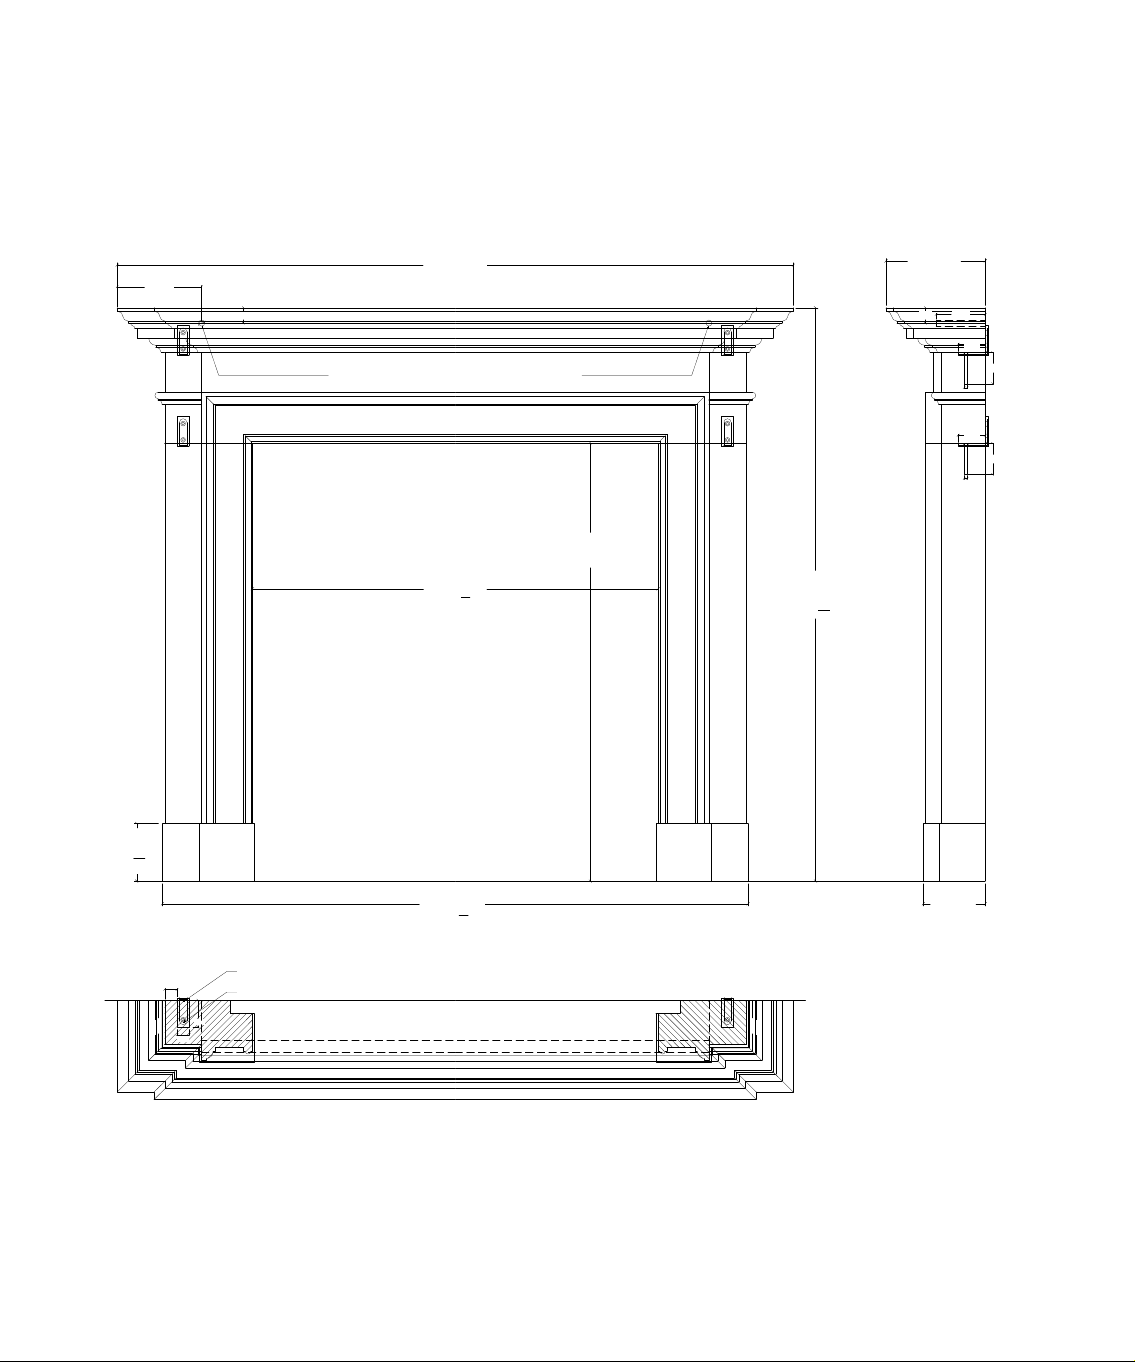
INSTALLATION OF MARBLE AND LIMESTONE FIREPLACES
ISOMETRIC VIEW
63
Ø6
55
63
Ø6
55
31
100
ISOMETRIC VIEW
55
31
100
171.5
1371.5
[ 54" ]
31 31
Ø12
12mm holes drilled 100mm into the back of shelf
889
[ 35" ]
823
3
" ]
[ 32
8
FRONT ELEVATION
1163.5
[ 45
7
" ]
8
201.5
[ 8" ]
100
55
63
Ø6
55
63
Ø6
117
5
" ]
[ 4
8
25
25
5 mm recess to take bracket
6 mm hole 60mm deep
55
1188
[ 46
PLAN
3
" ]
4
SIDE ELEVATION
126
[ 5" ]
14
Page 17
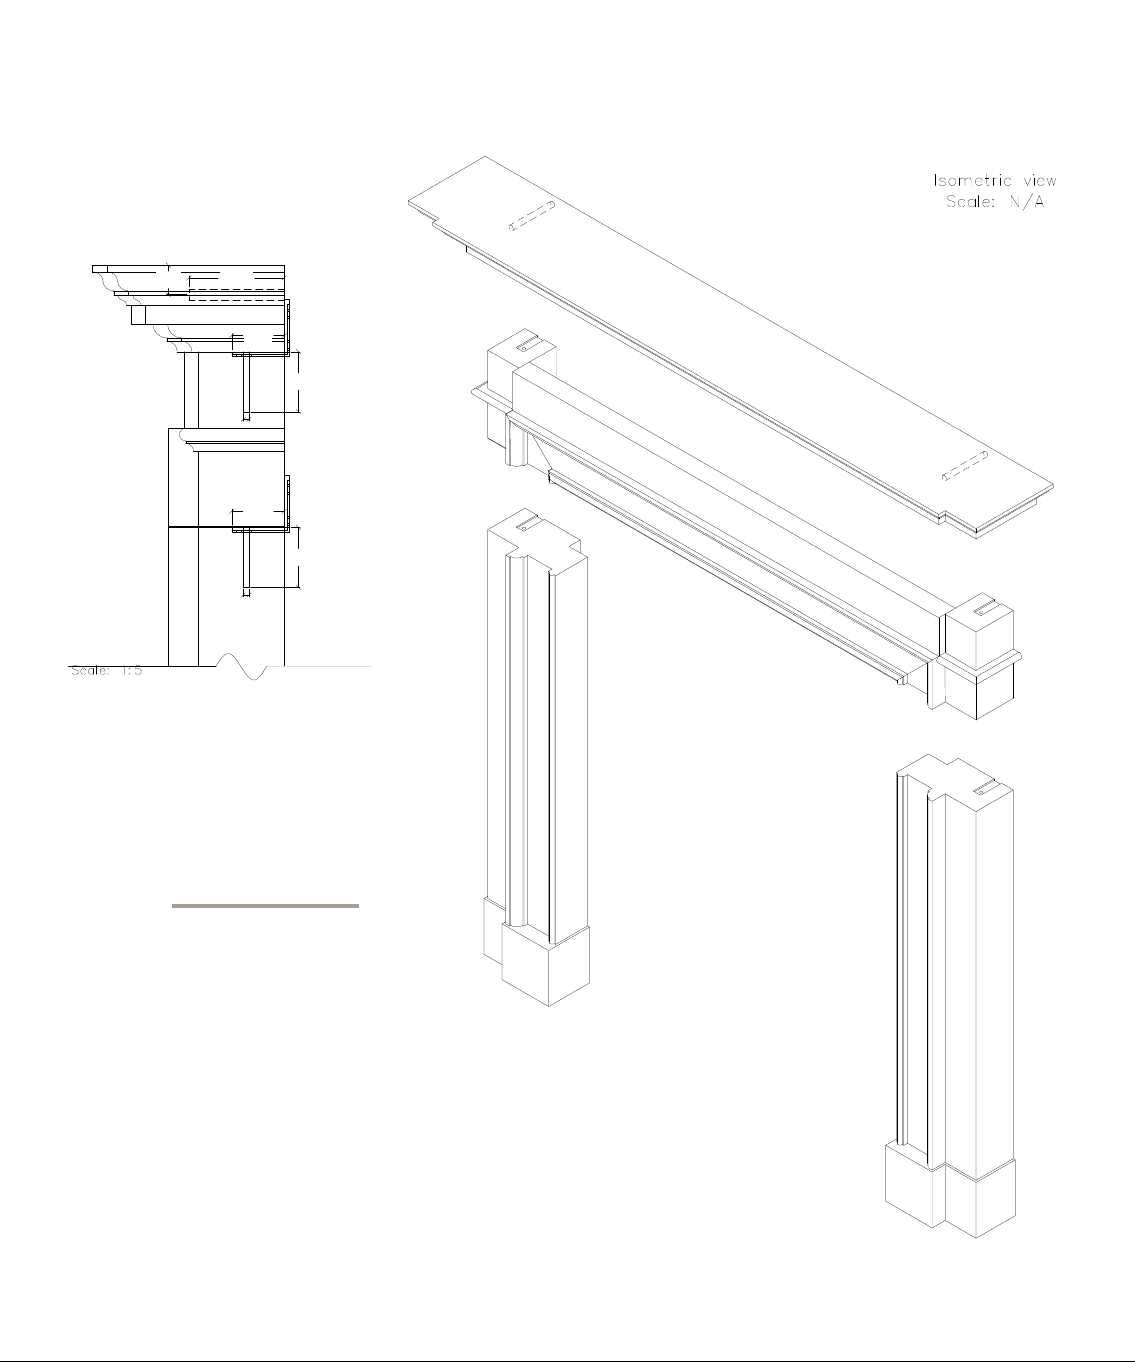
INSTALLATION OF MARBLE AND LIMESTONE FIREPLACES
ISOMETRIC VIEW
ISOMETRIC VIEW
31
100
55
63
Ø6
55
63
Ø6
SIDE ELEVATION DETAIL
soLid firePLace
the line drawing
shown here is
an indicative
illUstration of
a typical solid
fireplace.
model shown:
the bUrlington
15
Page 18

INSTALLATION OF MARBLE AND LIMESTONE FIREPLACES
installer tip
whilst the adhesive is
drying, Keep checKing
the Jambs are sqUare
to the hearth
sLiPs and header
Fix the slips and header into the
rebates behind and butting up to
the back of the jambs and frieze,
using quick setting cement based
tiling adhesive. Ensure any gap
between the back of the header
and structural opening lintel is
filled with fire cement. If slips/
header have been installed – render
the sides and back of the structural
opening using sand, cement and
lime (1:1:6 mix of cement/lime/
sand) recessing it at least 10mm 15mm behind the leading edge of
the slips.
The sheLf
When fixing the fireplace shelf this
should be dowelled into the wall
with galvanized or stainless steel
studs and thixotropic two part resin
chemical anchor fixings (see
diagram supplied with fireplace for
individual fixing points). Fix the
mantle shelf and cushion (where
applicable) onto the fireplace using
quick setting cement based tiling
adhesive and steel brackets
supplied with the fireplace,
ensuring it is level both along its
length and width and running
parallel to the face of the chimney
breast and the jambs and is bonded
to the masonry along all the back
edge. Make good around surround
to a pre decorators finish and grout
where necessar y using fixing
adhesive and white plaster.
finishinG
If a back hearth is not be used,
screed the area behind the hearth
using sand, cement and lime
(1:1:6 mix of cement/lime/sand).
When dry, paint black if desired.
luxury fired by design
16
Page 19

INSTALLATION OF MARBLE AND LIMESTONE FIREPLACES
noTes reGardinG hearThs
Gas Decorative Hearth
Hearth to be bedded so there is a
change in height between
combustible finished flooring and
hearth, a height of 20mm would
satisfy or use of fixed fender.
Minimum depth 300mm (12") in
front and extend at least 150mm
(6") each side of the opening.
Gas Constructional Sub Hearth
At least 12mm thick and to extend
from the back of the structural
opening to project at least 300mm
(12") in front of the naked flame and
extend at least 150mm (6") each
side of the opening. The sub hearth
should be of a material that will
prevent the transmission of heat in
excess of 80 degrees centigrade to
its underside.
Solid Fuel Decorative Hearth
Minimum 300mm (12") in front
and extend at least 150mm (6")
each side of the opening. Set in
three equal pieces.
Solid Fuel Constructional
Sub Hearth
Usually of concrete at least
125mm (5") thick and to extend
from the back of the structural
opening to project at least
500mm (20") in front of the naked
flame and extend at least 150mm
(6") each side of the opening.
An air gap of at least 50mm is
required between base of
sub-hearth and combustible
material, and if combustible
material within the construction
of wall or support area this has
to be a minimum of 250mm from
top of constructional hearth.
Solid Fuel Back Hearth
This is the area immediately under
the fire and should be of firebrick
or heatproof screed. Never use
natural stone, marble or tiles as
they can shatter or explode.
If you require any further
technical assistance in relation
to installation, please do not
hesitate to contact us:
t: +44 (0) 20 7498 5555
WarninG
In order to prevent any part of the structure detaching from the wall:
It is essential that all parts of modular stone and marble fireplaces are
securely fixed to a solid wall by means of mechanical fixings.
The fireplace should never be glued to paintwork or plasterwork.
Note: We do not recommend this as a DIY installation and strongly
advise using the services of a qualified installer.
17
Page 20

cleaninG &
maintenance
18
Page 21

cleaning & maintenance
tHe cHesneys
stonecare kit
has been specifically
developed to assist with
the protection and
maintenance of varioUs
types of natUral stone.
the easy to apply Kit
provides three Key prodUcts
for sealing, cle aning
and
maintenance.
MarbLe sUrroUnds
Clean with general household
cleaning polish i.e. Mr. Sheen,
using a soft cloth.
For more stubborn stains caused
through the spillage of wine etc.
use a cleaning detergent such as
Flash, then repeat as above with
household polish. There is no
guarantee against staining.
LiMesTone sUrroUnd,
hearTh and sLiPs
Clean with Chesneys’ Stonecare.
Apply a small amount of cleaner
on to the surface, wipe over
surfaces with a clean dry cloth
and leave surfaces to dry. It is
important that strong household
detergents and abrasive cleaners
are not used as this will damage
the finish on the stone.
For more stubborn stains caused
through the spillage of wine etc.,
use Chesneys’ Stonefoam.
Spray an even layer of foam onto
the surface of the stone, once the
foam has dissolved, agitate with a
mild abrasive pad and rinse well
with plenty of clean water and
leave to dry.
Chesneys Stoneseal is a rapid
drying spray on sealer for both
polished and unpolished stone.
Easy to apply this product should
ensure that your surfaces will
remain well protected. Apply
periodically throughout the year
and always use to top up
protection after intensively
cleaning surfaces with Chesneys
Stonefoam.
Use a Smooth White Emulsifying
Pad, available from Chesneys, to
work the maintenance products
into the stone. There is no
guarantee against staining.
sLaTe and GraniTe
hearTh and sLiPs
Clean with general household
cleaning polish i.e. Mr. Sheen,
using a soft cloth. Alternatively
use spray oil such as WD-40 for
minor scratches.
casT iron reGisTer GraTe,
sTeeL reGisTer GraTe
and sTeeL sLiPs
Clean with spray oil such as
WD-40, this will help to protect
19
Page 22

INSTALLATION OF MARBLE AND LIMESTONE FIREPLACES
the Loire
Inspired by a design from
the Louis VXI period
featuring console jambs and
a running fielded frieze.
The Loire employs the
device of simplified detail
throughout and oversized
decorative corner blocks
as a means of establishing
it in a modern form.
20
Page 23

the metal against rust. Moisture is
produced by the burning of the gas
fire and rust is still likely to form.
This is normal and not a problem,
the level of moisture is increased
when burning solid fuel.
Polishing with WD-40 and fine wire
wool is highly recommended on a
periodic basis. The areas of the
basket or register grate near the
burning area are subject to
‘tempering’ which is discolouration
of the metal, this is normal and not
a problem. The level of
discolouration is increased when
burning solid fuel. Burn small fires
initially to temper the metal slowly.
fire baskeTs
Black baskets are relatively low
maintenance and wiping clean with
WD-40 will be sufficient. Some
discolouration of the basket should
be expected. Gas fires produce
moisture and rust is still likely to
form. This is normal, the level of
moisture is increased when burning
solid fuel.
For highly polished steel baskets
cleaning with WD-40 on fine wire
wool is highly recommended on a
periodic basis.
The basket will be subject to
‘tempering’, which is the
discolouration of the metal, this is
normal and not a problem and again
is increased when burning solid
fuel. Burn small fires initially to
temper the metal slowly.
Gas effecT fires and
chiMney sweePinG
Please refer to the manufacturer’s
operating instructions.
The gas fire must be serviced on a
12 monthly basis by a Gas Safe
Registered approved engineer, this
is a legal requirement for the Gas
Safety Regulations 1994 (Reg.35).
All chimneys must be swept at least
once a year preferably by a member
of the National Association of
Chimney Sweeps (NACS).
However, if your appliance is used
continuously throughout the year
more frequent sweeping is
recommended. The best time to
have your chimney swept is at the
start of the heating season.
cleaning & maintenance
tHe cHesneys stone care kit
Chesneys’ Stoneseal is a rapid
drying spray-on sealer for both
polished and unpolished stone.
Easy to apply, this product should
ensure that your surfaces will
remain well protected. Apply
periodically throughout the year and
always use to top up protection
after intensively cleaning surfaces
with Chesneys’ Stonefoam.
Chesneys’ Stonecare is a daily or
weekly maintenance cleaner for all
types of natural stone. Easy to
apply and does not require rinsing.
Chesneys’ Stonefoam is an
intensive cleaner ideal for
refurbishing surfaces that have
minor staining or a build up of after
care product. It also helps to
remove various types of dirt and
grime including soot. Use once or
twice a year.
Chesneys’ Stone Care Kit is
available to order online at
chesneys.co.uk/shop
21
Page 24

22
Page 25

chesneys
arcHitectural
service
chesneys offer a
comprehensive service
for the design and
manUfactUre of
architectUral stone
and marble worK
inclUding cantilevered
staircases to finely
carved ecclesiastical
obJects
The technical skills that the company
has acquired over the past 25 years
in developing its unique range of
hand carved fireplaces have also
enabled it to undertake a wide
variety of architectural projects that
require execution of even the most
challenging stone work.
of design, material selection and
procurement, services which are
all delivered through a single point
of responsibility.
In addition to offering all the
elements of stone work required
for external residential projects,
Chesneys can boast a diverse
international portfolio of interior
commissions ranging from the
supply of finely carved ecclesiastical
objects to the design and
manufacture of cantilevered stone
and marble staircases.
The unique skill set and experience
that Chesneys offers is nowhere
better seen than in its acknowledged
expertise in the architectural art form
of the cantilevered staircase.
Our company’s ability to manage the
stonework element of a project is
not limited to technical expertise in
the fields of masonry and carving
but also includes the key elements
Projects and further information can be viewed online at:
www.chesneysarchitectural.co.uk
Chesneys London showroom has a solid limestone cantilevered staircase
on display and other fine examples of our work, from baths and sinks to
columns and pilasters, as well as a stunning Loggia in our purpose built
limestone courtyard.
23
Page 26

chesneys
outdoor livinG
cooK the perfect
meal then enJoy the
warmest night of
the year with
chesneys’ heaT
collection of
barbecUe heaters
Chesneys has now expanded into
the field of Outdoor Living.
Utilising the unique technology
employed in its award winning
range of clean burning wood
stoves and working with
renowned chef, James Martin,
Chesneys has developed a ground
breaking collection of barbecue
heaters that will re-invent the way
we use the outdoors.
The HEAT range combines a
versatile and easy to use cooking
and barbecuing experience, using
wood or charcoal, with an effective
and atmospheric outdoor heating
system that is entirely unique in
the way that it enhances the
experience of outdoor living.
This innovative product has been
five years in development and as
with all Chesneys products, no
effort has been spared in ensuring
it combines the most intelligent
engineering and robust
manufacture with a visual
aesthetic that is unmatched by
other products.
24
Page 27

INSTALLATION OF MARBLE AND LIMESTONE FIREPLACES
25
Page 28

cHesneys’ brocHures avail able to order or download from oUr website
fireplaces
Fireplaces, Fires, Baskets and Grates,
Fire Dogs
Kelly hoppen collection
Fireplace designs for modern
living
gas stoves
Gas Stoves that combine the latest
technology with a design aesthetic
bio ethanol fires
Automatic, Remote and Manual
Bio Ethanol Fires
wood & mUlti-fUel stoves
Wood Stoves & Multi-Fuel Stoves
gas fires
The Alchemy Collection of High
Efficiency Fires, DFE Basket/Grate Fires
26
Page 29

chesneys brochUres
the lUtyens collection
Designs for Five Chimneypieces
from drawings by Sir Edwin Lutyens
architectUral service
Cantilevered Staircases, Floors and
Bespoke Architectural Products
the adam collection
Designs for Six Chimneypieces
from drawings from the office of
Robert Adam
directory of chimneypieces
Bespoke Period Fireplace designs
fireside accessories
Fire Screens, Fire Baskets and
Fire Tools
oUtdoor living
Ground breaking collection of barbecue
heaters that will re-invent the way we
use the outdoors
27
Page 30

ins tallation de tails
chesneys
Goods Supplied/Order Number
The following goods were supplied
on order
Please quote the above order number in all correspondence with Chesneys
The information contained within this document is given in good faith for general guidance only and may
not be applicable to, and should not be relied upon, in any particular circumstances. The manufacturer/
supplier will not be liable for any direct or indirect or consequential loss or damage.
useful telepHone numbers and WHo to contact
Gas Safe Register 0800 408 5500
HETAS 0845 634 5626
The National Association of Chimney Sweeps (NACS) 01785 811 732
Chesneys Installation Department 020 7498 5555
Battersea Park Road Showroom 020 7627 1410
28
Page 31

to be completed by installer upon completion
Property address
Room location
Which surround was installed
Installer name
Installer address
Installer contact number
Registration number HETAS/CSCS/GAS SAFE
where applicable
ins tallation de tails
Has the fireplace been fitted in accordance with
Chesneys’ drawings and installation instructions
If no then reason for deviation and what
alternative method was used
Name of professional person who approved
this installation method ie architect/structural
engineer/surveyor
Which adhesive was used
Were all mechanical fixings used
Surface fixed to ie concrete block/brickwork
The Data Plate for this installation has
been located
I confirm all of the above Installer’s signature
The products of this fireplace were supplied by Chesneys
29
Page 32

ins tallation de tails
notes
30
Page 33

fireplace glossary
Chesneys pursues a policy of
continuing improvement in design
and performance of its products.
The right is therefore reserved to
vary specifications without notice.
For illustration purposes some
chimneypieces and baskets may
be shown in optional materials
or finishes other than standard
production specifications.
© Chesneys 2018
capital moulding
The decorative detail drawn
from the classical orders
which sits at the head of
the pilaster or column.
chimneypiece
The fire surround or
mantelpiece.
corner blocking
The decorative panel found
at the head of the jamb.
corniced mantel shelf
A mantel shelf which
incorporates a series
of architectural mouldings.
depth of rebate
The difference between
inner jamb and outer jamb.
detached column
A column that stands
free of the jambs of the
chimneypiece.
engaged column
A column that is attached
to the jambs of the
chimneypiece.
enblature
The term to describe the
frieze, corner blockings
and mantel shelf as one unit.
fire basket
The grate which houses
a fire and sits within
the fire chamber.
fire dogs or andirons
Decorative supports for
a fire basket.
frieze
The cross member between
the jambs of a chimneypiece.
frieze tablet
The decorative panel found
at the centre of the frieze.
header and slips
Non-combustible panels set
between the chimneypiece
and fire chamber to protect
the former from the heat
of the fire and ensure a fire
that draws safely.
hearthstone
The non-combustible
base upon which the
chimneypiece sits, usually
slate, stone or marble.
ingrounds
Facing slips that form part
of the chimneypiece and
which frame the opening,
sometimes incorporating a
contrasting coloured marble.
inlay
Decorative device in the
form of coloured marble
in a variety of patterns set
into the base marble of
the chimneypiece.
jamb or pilaster
The vertical sections or
‘legs’ of a chimneypiece.
plinth block
The supporting base
to the jamb.
register grate
Decorative steel or cast
iron unit housing the fire
which conceals the brick fire
chamber, developed during
the 18th and 19th centuries.
Page 34

chesneys
Showrooms
London
194-204 Battersea Park Road,
London SW11 4ND
Telephone 020 7627 1410
Fax 020 7622 1078
Email sales@chesneys.co.uk
147-151 Haverstock Hill,
London NW3 4QU
Telephone 020 7561 8280
Fax 020 7622 1078
Email sales@chesneys.co.uk
Architectural & Outdoor Living Showroom:
521-525 Battersea Park Road,
London SW11 3BN
Telephone 020 7978 7224
Email architectural@chesneys.co.uk
www.chesneys.co.uk
New York
Suite 1119, 11th Floor,
D&D Building, 979 Third Avenue,
New York NY 10022
Telephone 001 646 840 0609
Fax 001 646 840 0602
Email sales@chesneys.com
www.chesneys.com
 Loading...