

Page 1
36
BLANK
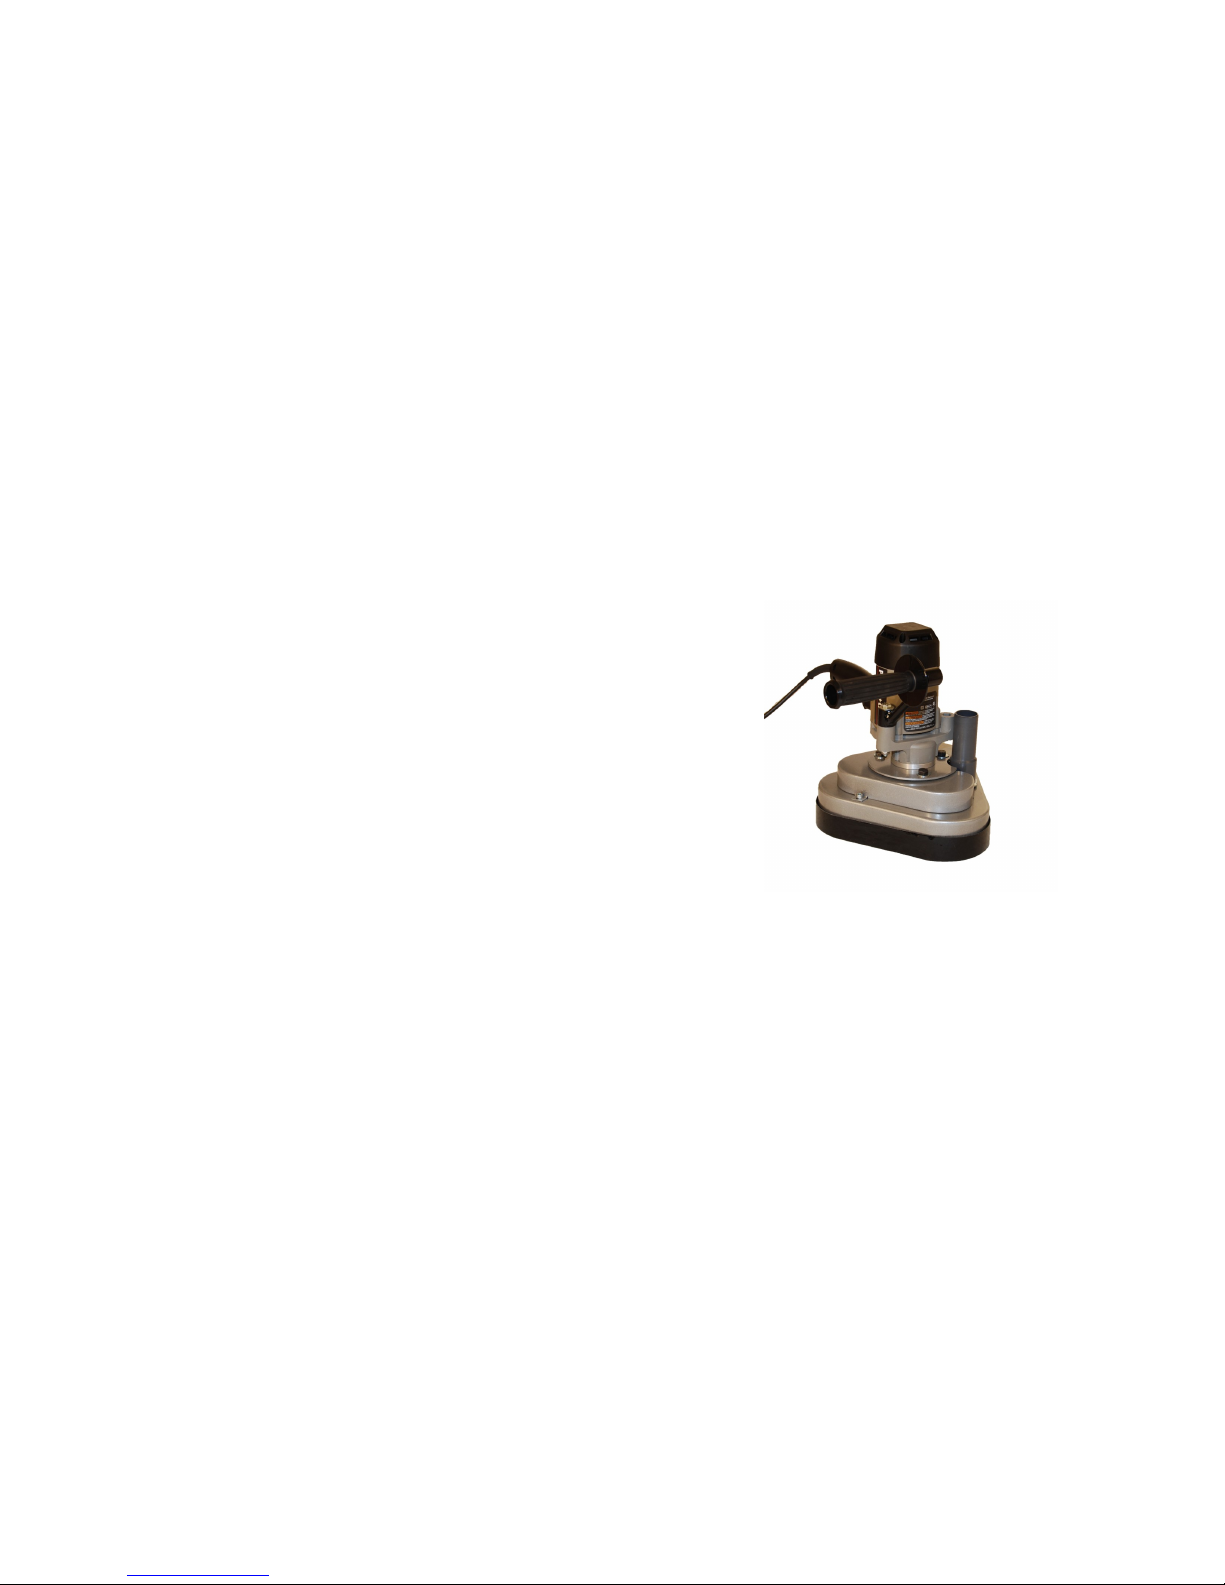
U-SAND MINI®
Hand held random orbit sander
Patent Pending
MODEL US-MINI
IMPORTANT
Please make certain that the person who is to use this equipment carefully
reads and understands these instructions before starting operations.
The Serial No plate is located on the main base of the tool. Record this number in the space below and retain for future reference.
Serial Number _______________________________
Serial Number _______________________________
Page 2

2
TABLE OF CONTENTS
IMPORTANT SAFETY INSTRUCTIONS ……………….……...…. 3
SAFETY GUIDELINES ……………...……………………..…….…. 3
GENERAL SAFETY RULES….………………………………...…… 3
CARTON CONTENTS …………………………….………….……... 5
BACKER PAD INSTALLATION ………….………………….…..… 5
BACKER PAD SAVER INSTALLATION …..………………..…….. 5
SANDPAPER INSTALLATION...……………………….………….. 5
DUST SKIRT INSTALLATION…………………………….……….. 5
VACUUM ATTACHMENT ……………………………….…….….. 5
OPERATION …………………………………………………...……. 6
SANDPAPER …………………………………………….…….…..… 6
MAINTENANCE ……………………………….………..………...… 7
ACCESSORIES …………………………………………...……..…… 7
PARTS LIST……………………………………………….…….…… 9
WARRANTY –MOTOR….……………………………...……..…… 10
WARRANTY …………………………………………..…………….10
ESPANOL ………….…………………………………..…...………. 12
.
FRANCAISE ……………………………………………….…….…. 24
35
Ni le personnel de ventes du vendeur ni n'importe quelle autre personne n'est
autorisé à ne faire aucune garantie autres que ceux décrits ci-dessus, ou
à prolonger la durée d'aucune garantie au delà de la période de temps décrite
ci-dessus au nom de Cherryhill Manufacturing Corporation. Les garanties décrites
ci-dessus seront les garanties uniques et exclusives accordées par Cherryhill
Manufacturing Corporation et seront le remède unique et exclusif disponible à
l'acheteur. La correction des défauts, de la façon et pour la période décrite
ci-dessus, constituera la réalisation complète de toutes les responsabilités et les
responsabilités de Cherryhill Manufacturing Corporation à l'acheteur en c
qui concerne le produit, et constituera l'entière satisfaction de toutes les
réclamations, si basé sur le contrat, négligence, responsabilité sans faute
intentionnelle ou autrement. Dans aucun cas Cherryhill Manufacturing
Corporation sera exposé, ou de quelque façon responsable, de tous les dommages
ou défauts dans le produit qui ont été provoqués par des réparations ou ont essayé
des réparations exécutées par n'importe qui autre qu'un servicer autorisé.
CETTE GARANTIE TE DONNE DES DROITS LÉGAUX
SPÉCIFIQUES. VOUS POUVEZ EN OUTRE AVOIR D'AUTRES
DROITS, QUI CHANGENT DE L'ÉTAT À L'ÉTAT.
Votre numéro de type de produit : ______ de ponceuse d'US-MINI®
Période de garantie pour ce produit : Un (1) an sur toutes les parties,
à l'exclusion de ces articles expressément exclus comme
déterminés ci-dessous.
Articles additionnels exclus de l'assurance de garantie : Articles
d'aspect du produit, boutons, corde électrique, prises, poignées
de poignée, jupe de la poussière, ceinture d'entraînement,
garnitures de ponçage, attachements de la poussière, ou aux
accessoires, montant le kit, les joints, ou tous matériaux
imprimés. Le moteur/information électrique de garantie voient le
Porter-Cable®.
Où obtenir le service : Cchacun des 1-800-392-8894.
Ce qui à faire pour obtenir le service :
Cchacun des 1-800-392-8894.
Soyez sûr avoir la preuve de l'achat disponible.
Pour l'information de produit additionnelle entrez en contact svp
Cherryhill Manufacturing Corporation
640 Kolter, Indiana, PA 15701
Téléphone : 800-392-8894 www.u-sand.com Fax : 724-465-4015
Page 3

34
WARRANTY-MOTOR
Toutes les questions au sujet du moteur/de l'opération/de garantie électriques
contactent Porter-Cable® par manuel d'instruction inclus.
Porter-Cable®
4825 Highwy 45 North
Jackson, TN 38305
888-848-5175
Www.porter-cable.com
GARANTIE
Les garanties de Cherryhill Manufacturing Corporation au premier acheteur qui ce
produit de marque d'U-Sand® (le « produit, ») quand transporté dans son récipient
original, seront exemptes de l'exécution et des matériaux défectueux, et conviennent
qu'elle, à son option, l'une ou l'autre réparation le défaut ou remplacera le produit
défectueux ou partie en à aucune charge à l'acheteur pour des pièces ou au travail
pour les périodes réglées en avant ci-dessous. Cette garantie limitée ne couvre pas
l'échec à la fonction provoquée par des dommages au produit alors qu'en votre
possession, installation inexacte, utilisation ou abus peu raisonnable du produit,
manque de fournir ou employer l'entretien approprié, manque de suivre les
instructions écrites d'installation et d'utilisation, ou aucune utilisation autre que des
buts personnels ou de ménage. De plus, la garantie limitée ne s'applique à aucun
article d'aspect du produit ni aux articles exclus additionnels non determines
au-dessous ni derrière aucun produit dont l'extérieur a été endommagé ou défiguré,
duquel a été soumis à l'abus, au service anormal ou à la manipulation, ou qui a été
changé ou modifié dans la conception ou la construction.
Dans l'ordre pour imposer les droites sous cette garantie limitée, l'acheteur devrait
suivre les étapes déterminées ci-dessous et DOIT maintenir la preuve de l'achat du
produit.
La garantie limitée décrite ci-dessus est en plus de celui qui ait impliqué des garanties
puisse être accordé aux acheteurs par loi. TOUTES LES GARANTIES IMPLICITES
COMPRENANT LES GARANTIES DE LA VALEUR MARCHANDE ET DE LA
FORME PHYSIQUE POUR L'USAGE SONT LIMITÉES AUX PÉRIODES DE LA
DATE DE L'ACHAT DÉTERMINÉE CI-DESSOUS. LES REMÈDES ONT
FOURNI DANS LA GARANTIE LIMITÉE EXPRÈS CI-DESSUS SONT LES
REMÈDES UNIQUES ET EXCLUSIFS DISPONIBLES À TOI. AUCUNE AUTRE
GARANTIE EXPRÈS N'EST FAITE. TOUTES LES GARANTIES IMPLICITES,
INCLUANT MAIS NON LIMITÉES À N'IMPORTE QUELLE GARANTIE
IMPLICITE DE VALEUR MARCHANDE OU DE FORME PHYSIQUE POUR UN
BUT OU UN USAGE PARTICULIER, SONT LIMITÉES DANS LA DURÉE
COMME DÉTERMINÉ CI-DESSOUS. DANS AUCUN CAS LE FABRICANT
SERA RESPONSABLE DE TOUS LES DOMMAGES FORTUITS OU
CONSÉCUTIFS. Quelques états ne permettent pas des limitations sur combien de
temps une garantie implicite dure, ainsi ci-dessus la limitation peut ne pas s'appliquer
à toi.
3
IMPORTANT SAFETY INSTRUCTIONS
*WARNING* Read and understand all warnings and operating instruc-
tions before using any tools or equipment. When using tools or equipment,
basic safety precautions should always be followed to reduce the risk of
personal injury. Improper operation, maintenance, or modification of tools
or equipment could result in serious injury and property damage. This
product is NOT to be modified and/or used for any application other than
for which it was designed.
SAFETY GUIDELINES – DEFINITIONS
It is important for you to read and understand this manual. The information
it contains relates to protecting YOUR SAFETY and PREVENTING
PROBLEMS. The symbols below are used to help you recognize this
information.
Δ DANGER Indicates an imminently dangerous situation which, if not
avoided, will result in death or serious injury.
Δ WARNING Indicates a dangerous situation which, if not avoided
could result in death or serious injury.
Δ CAUTION Indicates a potentially dangerous situation which, if not
avoided, may result in personal injury.
GENERAL SAFETY RULES
Δ WARNING Read and understand all instructions. Failure to follow all
instructions listed below, may result in serious personal injury.
SAVE THESE INSTRUCTIONS
Work area safety
A. Keep work area clean and well lit. Cluttered or dark
areas invite accidents.
B. Do not operate power tools in explosive atmospheres,
such as in the presence of flammable liquids, gases or
dust.
C. Keep children and bystanders away while operating a
power tool. Distractions may cause you to lose control.
Page 4

4
Electrical safety
A. Power tools must match the outlet. Never modify the
plug in any way. Do not use any adapter plugs with
earthed (grounded) power tools.
B. Avoid body contact with earthed or grounded surfaces
such as pipes, radiators, ranges, and refrigerators.
C. Do not expose power tools to rain or wet conditions.
D. Do not abuse the cord. Never use the cord for carrying,
pulling or unplugging the power tool. Keep cord away
from heat, oil, sharp edges or moving parts.
Personal safety
A. Stay alert, watch what you are doing and use common
sense when operating a power tool. Do not use a power
tool while you are tired or under the influence of drugs,
alcohol or medication.
B. Use safety equipment. Always wear eye protection.
Safety equipment such as a dusk mask, non-skid safety
shoes, hard hat, or hearing protection, used for
appropriate conditions will reduce personal injuries.
C. Avoid accidental Starting. Ensure the switch is in the
off-position before plugging in.
D. Do not overreach. Keep proper footing and balance at
all times.
E. Dress properly. Do not wear loose clothing or jewelry.
Keep your hair, clothing, and gloves away from moving
parts.
Power Tool use and care
A. Do not use the power tool if the switch does not turn it
on and off.
B. Disconnect the plug from the power source before
making any adjustments, changing accessories, or
storing power tools.
C. Store idle power tools out of reach of children and do
not allow persons unfamiliar with the power tool or
these instructions to operate the power tool.
D. Maintain the power tools. Check for damages and any
condition that may affect the power tools operation.
33
ARTICLE
IDENTIFICATION
D'ARTICLE DESCRIPTION Quantité
1 M-3002 POULIE DE MOTEUR 1
2 MOTOR MINI 7 " MOTEUR DE 8 AMPÈRES 1
3 HW-010 WASHER-3/8 3
4 M-3003 LOGEMENT 3
5 BB-002 DECKPLATE-MDS 1
6 M-3007 POIGNÉE 1
7 M-3008 VAC PORT 1
8 M-3001 POULIE 3
9 HW-007 HEX-SHCS 3
10 HW-006 HEX-SHCS 3
11 HW-009 RONDELLE 11/16 3
12 M-3005 ROULEMENT, LOGEMENT 3
13 M-3009 ENTRETOISE 3
14 HW-011 CEINTURE 1
15 M-3006 SOUTENANT, AXE INFÉRIEUR 3
16 HW-003 BOULON DE SORTILÈGE 3
17 HW-005 HEX-SHCS 3
18 HW-004 HEX-HMS 1
19 HW-008 WASHER-5/16 1
20 BB-001 COUVERTURE DE CEINTURE 1
21 M-3000 ARBRE PRINCIPAL 3
22 BB-003 BÂTI DE MOTEUR 1
23 HW-001 BOLT-HSCS 12
24 HW-002 ÉCROU - H 1
25 M-3004 ABAISSEZ L'AXE - MDS 3
26 HW-012 CONTRE-ÉCROU 2
27 M-3021 BASE DE JUPE DE LA POUSSIÈRE 1
28 M-3020 JUPE DE LA POUSSIÈRE 1
29 MANUEL MANUEL (NON MONTRÉ) 1
faire la liste de
Page 5
32
5
CARTON CONTENTS
This tool comes with an instruction manual that includes a parts list.
BP4.5 – 5” Backer Pads (3) M-3020 – Adjustable dust skirt (1)
BACKER PAD INSTALLATION
Install the three, BP4.5 – Backer Pads on the lower shafts of the
Spindle Assemblies. Line up the screw on the back of the BP4.5 – Backer
Pads with the threaded holes in the lower shafts and turn counterclockwise
until finger tight.
BACKER PAD SAVER INSTALLATION
Attach the three, BPS4.5 – Backer Pad Savers on the, BP4.5 – Backer
Pads by aligning the pads together and pressing.
SANDPAPER INSTALLATION
Attach the necessary sandpaper needed for the application by aligning the
paper onto the disc.
DUST SKIRT INSTALLATION
Once the above items are assembled, remove the Dust Skirt, M-3020 from
the box and attach to the bottom of the deck plate ensuring the Dust Skirt
you are attaching is level with the work surface for maximum vacuum suction.
VACUUM ATTACHMENT
Slide end of the vacuum hose you plan to use onto the vac port. Should be
1.25” in diameter for the vacuum hose. This should fit snuggly.
Insure the vacuum remains on and connected during operation of the
machine.
Δ WARNING - AIRBORNE DUST CAN BE A SERIOUS FIRE
HAZARD. ALWAYS FOLLOW THE MANUFACTU RER’S
INSTRUCTIONS FOR EMPTYING THE VACUUM CONTENTS.
NEVER LEAVE MACHINE ATTACHED TO THE VACUUM
UNATTENDED.
Page 6

6
OPERATION
Δ CAUTION Make certain the switch is in the “OFF” position before
connecting the tool to the power source to avoid unintentional starting.
Δ WARNING Make sure to wear eye and ear protection when operating
this equipment.
USE A STANDARD 100v OUTLET.
Plug in the vacuum and then turn on the vacuum. Plug in the machine,
hold machine with two hands and turn the power switch to the “ON” posi-
tion. The switch on the sander may be locked in the on position for extended use. To keep the sander running continuously, depress the trigger
and push in the switch locking button on the left side of the handle. While
holding the button in release the trigger. To release the locking button,
depress the trigger and release.
Variable Speed - You can adjust the speed of the sander by turning the
thumbwheel. Thumbwheel position #1 provides the slowest operating
speed (3300RPM) and position #6 the fastest (4500 RPM). You can
change the speed while the motor is “ON” or “OFF”.
Always turn machine off and unplug when not in use.
Move machine slowly over area to be sanded, replace sandpaper as needed.
When switching from one grit to another vacuum area thoroughly to avoid
scratches from previous grit.
SANDPAPER
This machine uses 5” hook and loop sanding discs. Various grits are avail-
able from the manufacturer in 24, 36, 40, 60, 80, 100, 120, and 180 grits.
31
BLANK
Page 7

30
ENTRETIEN DE MACHINE
Tournez la machine outre de quand employer fini et la débranchez.
Démontez le vide de la machine et nettoyez à l'aspirateur toute la poussière,
du fond de la machine.
Arrêtez le vide et le débranchez. Videz le vide selon fabrique des
instructions juste après l'utilisation.
Δ AVERTISSEMENT Le risque d'incendie ne laissent jamais tenir la
poussière pour rester dans l'appareillage de dépoussiérage quand pas en
service. Videz le vide et l'enlevez de la ponceuse chaque fois que
l'opérateur laisse la zone de travail de la ponceuse. Les particules de
poussière mettent en boîte spontanément le combust causant un feu !
ACCESSOIRES
BP4.5- garnitures d'appui
BPS4.5-Backer Épargnants de garniture de
M-3020 Dust Jupe de
Manuel
Papier- de la fabrication vendue dans 20 paquets de
PC dans diverses granulations. Appel pour des détails.
7
MACHINE MAINTENANCE
Turn machine off when finished using and unplug. Disconnect vacuum
from machine and vacuum all dust from bottom of machine.
Turn off vacuum and unplug. Empty the vacuum according to the
manufacturer’s instructions immediately after use.
Δ WARNING Fire Hazard- Never allow standing dust to remain in the
dust collection apparatus when not in use. Empty the vacuum and
remove from sander each time operator is leaving the work area of
the sander. Dust particles can spontaneously combust causing a fire!
ACCESSORIES
BP4.5 - Backer Pads BPS4.5 - Backer Pad Savers
M-3020 - Dust Skirt US-M-MINI - Manual
Sandpaper from the manufacturer- sold in 20 disc packs in various grits.
Call for details.
Page 8
8
29
OPÉRATION
Δ ATTENTION Assurez-vous le commutateur est en position de
"OFF" avant de relier l'outil à la source d'énergie pour éviter commencer
involontaire.
Δ AVERTISSEMENT Veillent à porter la protection auditive d'oeil et
quand l'opération cet équipement.
EMPLOYEZ Une SORTIE 100v STANDARD.
Branchez le vide et allumez alors le vide. Branchez la machine, et
tournez alors la machine sur se tenir avec deux mains. Le passage sur la
ponceuse peut être fermé à clef dans la position de fonctionnement pour
l'usage prolongé. Pour continuer la ponceuse courir sans interruption,
diminuer le déclenchement et enfoncer le commutateur fermant le bouton
à clef du côté gauche de la poignée. Tout en tenant le bouton libérez
dedans le déclenchement. Pour libérer le bouton de fermeture, diminuez
le déclenchement et libérez.
Vitesse variable - vous pouvez ajuster la vitesse de la ponceuse en
tournant la roue codeuse. La position #1 de roue codeuse fournit la
vitesse de fonctionnement la plus lente (3300RPM) et la position #6 le
plus rapide (4500 t/mn). Vous pouvez changer la vitesse tandis que le
moteur fonctionne ou ne fonctionne pas.
Arrêtez la machine et la débranchez si non utilisable.
Déplacez le secteur d'excédent de machine lentement à poncer, remplacez
le papier sablé comme nécessaire. En commutant d'une granulation à un
autre secteur de vide complètement pour éviter des éraflures de
granulation précédente.
PAPIER SABLÉ
Cette machine emploie 5” les disques de ponçage de crochet et de boucle
dans diverses granulations fournies par le fabricant, Dans 24, 36, 40, 60,
80, 100, 120, et 180 granulations.
Page 9

28
TABLE DES MATIÈRES DE CARTON
Cet outil vient avec un manuel d'instruction qui inclut une liste des pièces.
Garnitures de l'appui BP4.5-5 (3) M-3020 - Jupe réglable de la poussière (1)
INSTALLATION DE GARNITURE D'APPUI
Installez les trois garnitures de l'appui BP4.5 sur les axes inférieurs des
Assemblées d'axe. Alignez la vis sur le dos du BP4.5 avec les trous filetés
dans les axes inférieurs et tournez dans le sens contraire des aiguilles d'une
montre jusqu'au doigt serré.
INSTALLATION D'ÉPARGNANT DE GARNITURE D'APPUI
Attachez les trois BPS4.5 - épargnants de garniture d'appui sur le BP4.5 en
alignant les garnitures ensemble et la pression.
INSTALLATION DE PAPIER SABLÉ
Attachez le papier sablé nécessaire requis pour l'application en alignant le
papier sur le disque.
INSTALLATION DE JUPE DE LA POUSSIÈRE
Une fois les articles ci-dessus sont assemblés, enlèvent la jupe M-3020 de
crépuscule de la boîte et l'attache au fond du tablier assurant la jupe que
vous attachez est de niveau avec la surface de travail pour l'aspiration
maximum de vide.
ATTACHEMENT DE VIDE
L'extrémité de glissière de la conduite à dépression que vous projetez
utiliser sur le port de VCA devrait être 1.25” de diamètre pour la conduite
à dépression. Ceci devrait s'adapter snuggly.
Assurez le vide reste allumé et s'est relié lors du fonctionnement de la
machine.
Δ AVERTISSEMENT LES POUSSIÈRES DANS L'AIR PEUVENT
ÊTRE UN RISQUE D'INCENDIE SÉRIEUX. SUIVEZ TOUJOURS
FABRIQUE L'INSTRUCTION POUR VIDER LA TABLE DES
MATIÈRES DE VIDE.
NE LAISSEZ JAMAIS LA MACHINE ATTACHÉE AU VIDE SANS
SURVEILLANCE.
9
ITEM
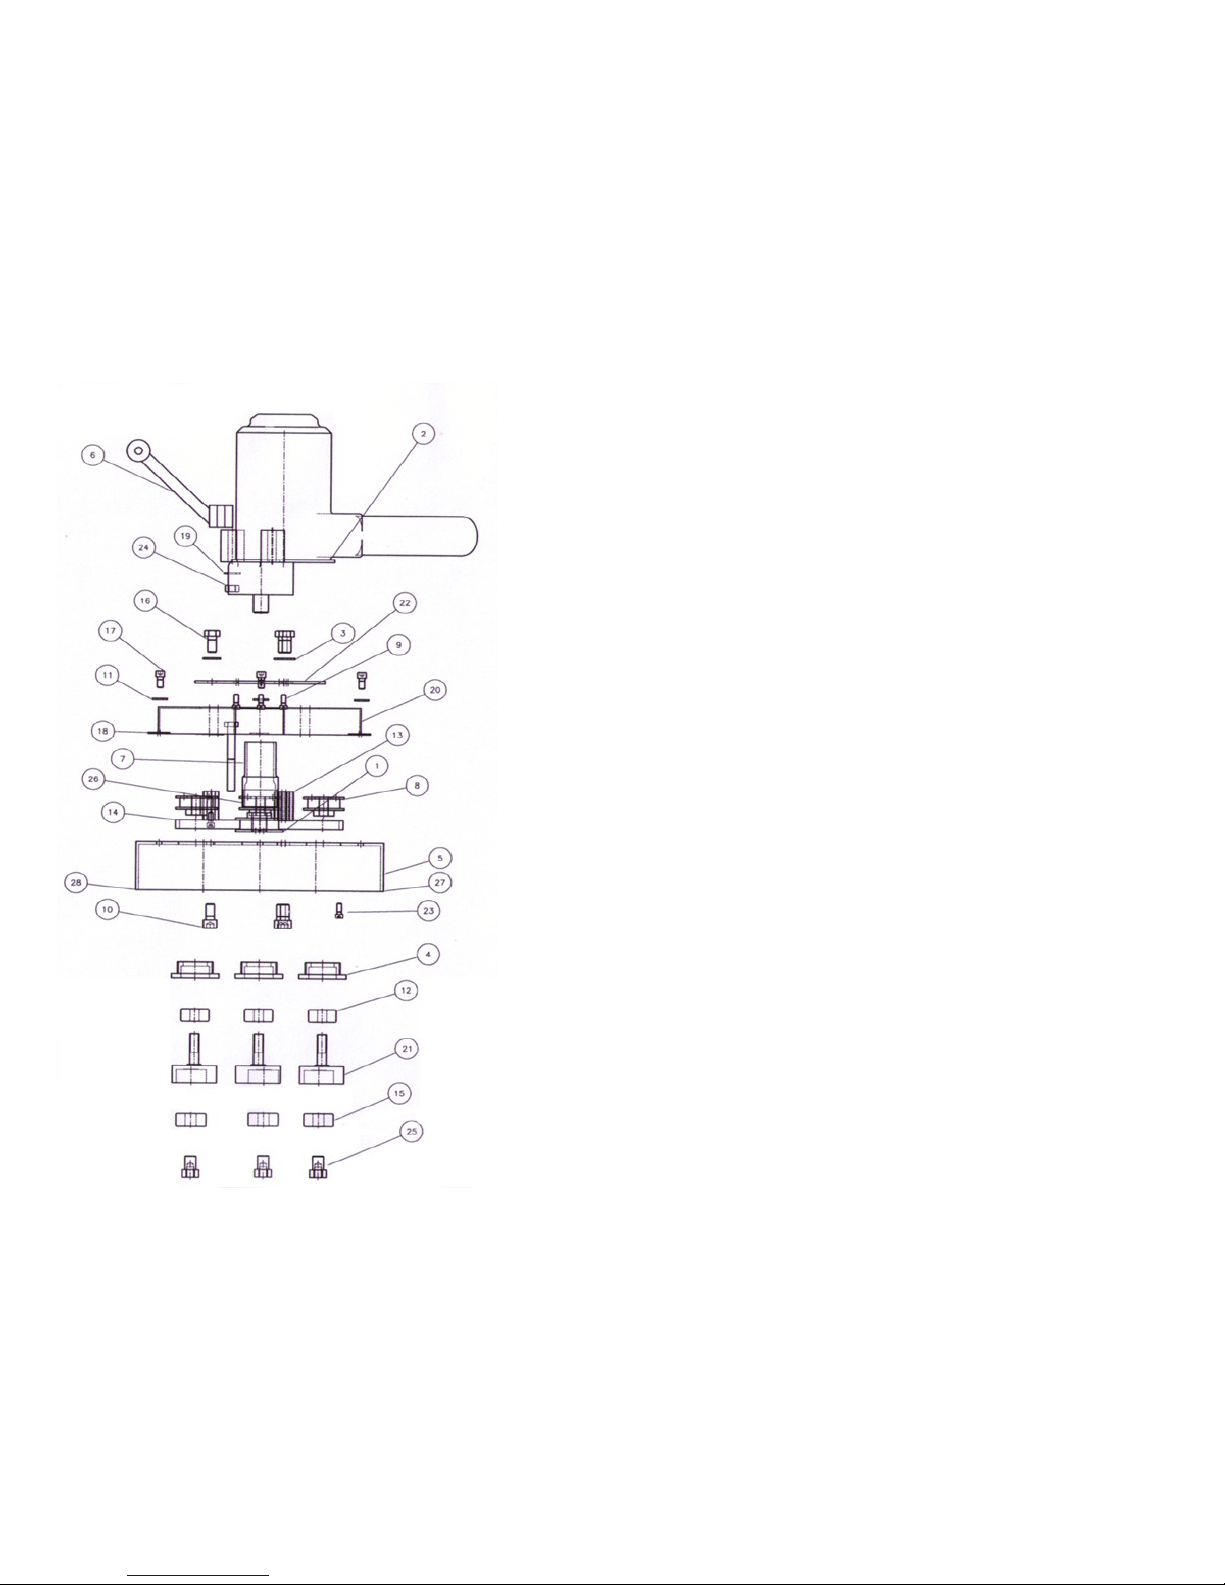
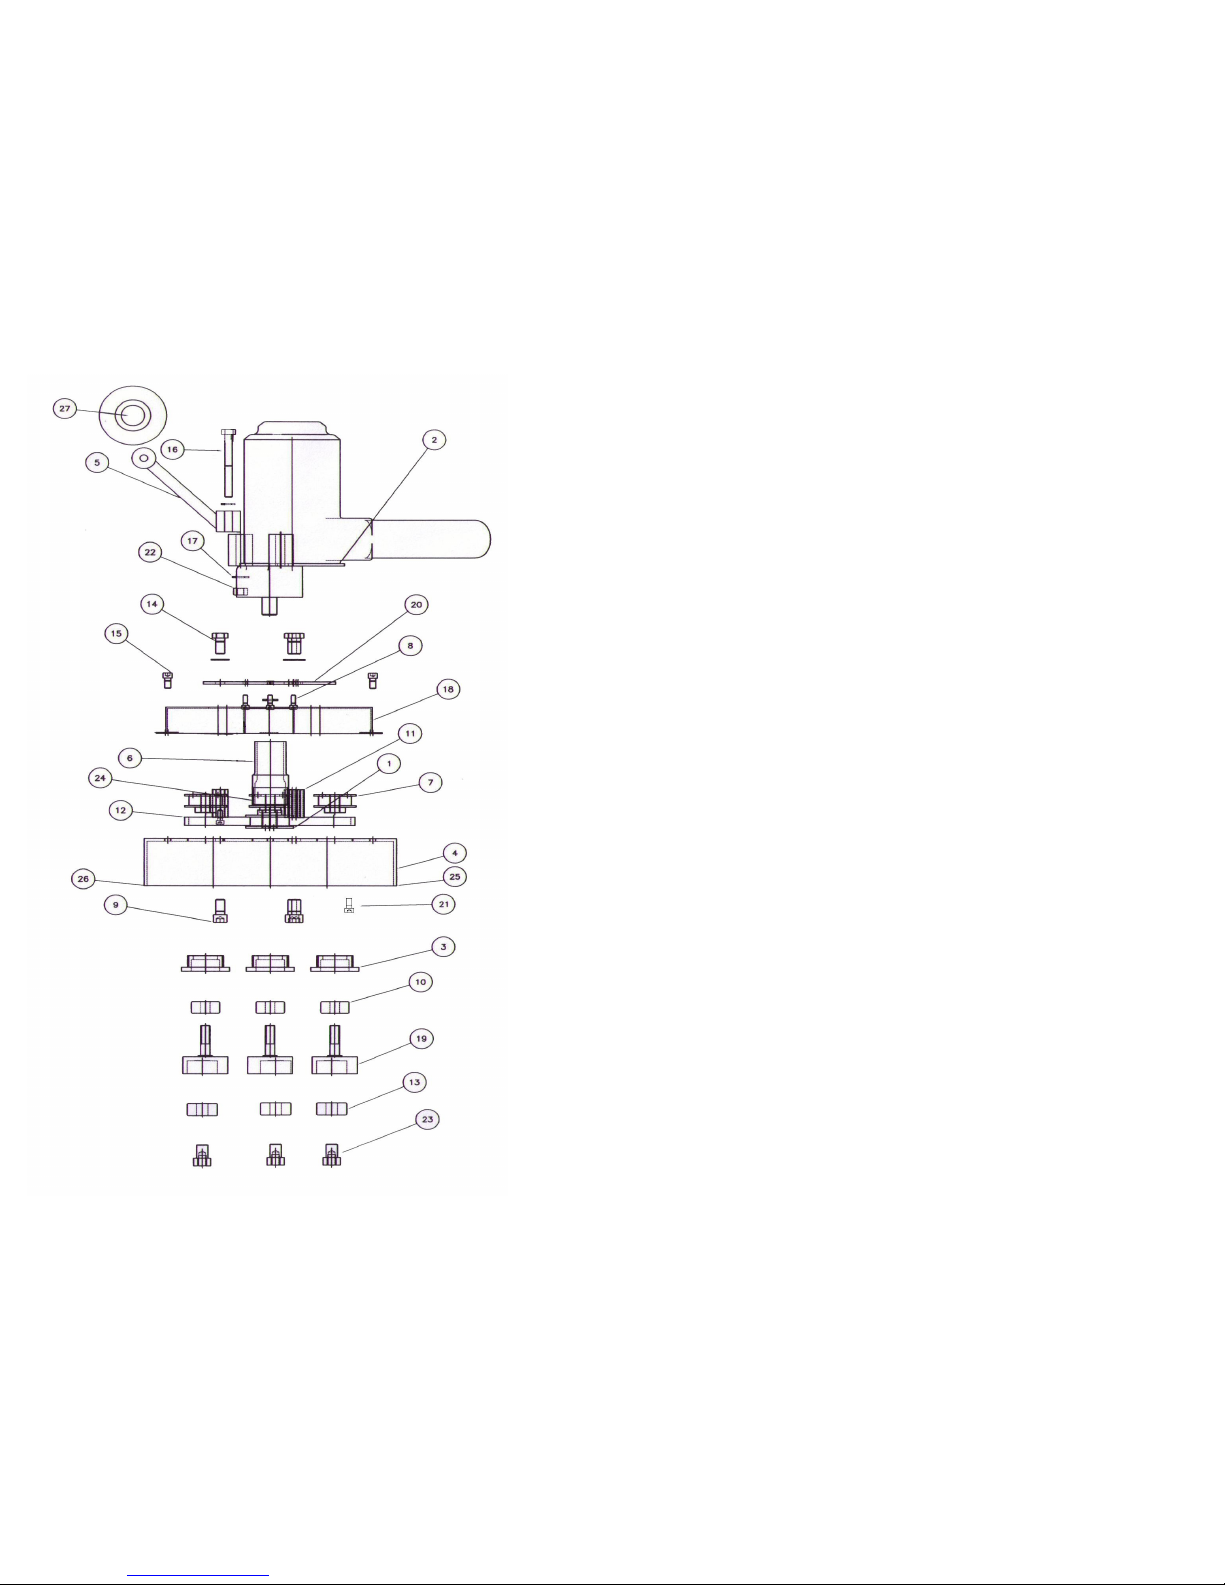
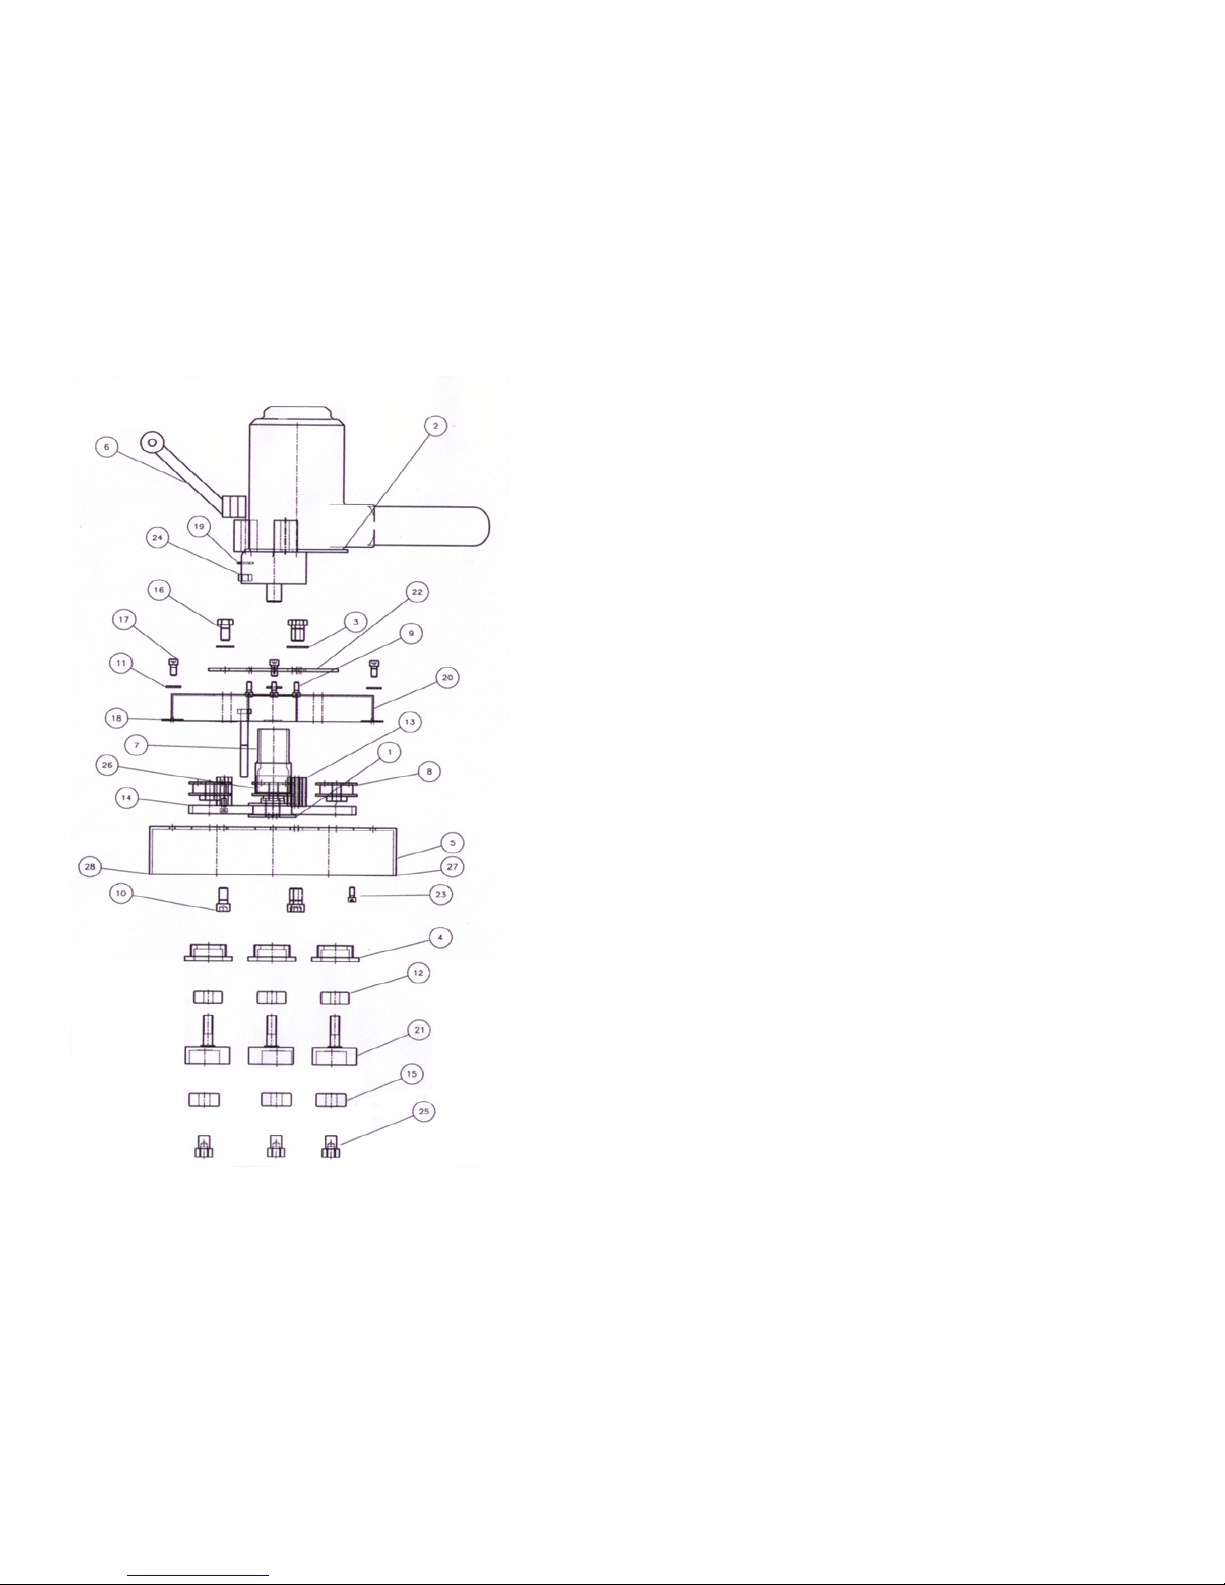
ITEM ID DESCRIPTION QTY
1 M-3002 MOTOR PULLY 1
2 MOTOR MINI 7" VS 8 AMP MOTOR 1
3 M-3003 HOUSING 3
4 BB-002 DECKPLATE-MDS 1
5 M-3007 HANDLE 1
6 M-3008 VAC PORT 1
7 M-3001 SPINDLE PULLY 3
8 HW-007 HEX-SHCS 8-32 X 3/4 3
9 HW-006 HEX-SHCS 3/8-16 X 3/4 3
10 M-3005 BEARING HOUSING 5200ZZ 3
11 M-3009 STANDOFF 3
12 HW-011 BELT 1
13 M-3006 BEARING LOWER SHAFT 5201LS 3
14 HW-003 HEX BOLT 3
15 HW-005 HEX-SHCS 1/4-20 X 1/2 2
16 HW-004 HEX-HMS 5/6-18-3 1
17 HW-008 WASHER-5/16 5
18 BB-001 BELT COVER 1
19 M-3000 MAINSHAFT 3
20 BB-003 MOTOR MOUNT 1
21 HW-001 BOLT-HSCS 10-24 12
22 HW-002 NUT - H 1
23 M-3004 LOWER SHAFT - MDS 3
24 HW-012 LOCKNUT 2
25 M-3021 DUST SKIRT BASE 1
26 M-3020 DUST SKIRT 1
27 M-3022 PC HANDLE 1
28 MANUAL MANUAL (NOT SHOWN) 1
Parts List
Page 10

10
WARRANTY-MOTOR
All issues concerning the motor/electrical operation/warranty please
contact Porter Cable® per the enclosed Instruction Manual.
Porter-Cable®
4825 Highway 45 North
Jackson, TN 38305
888-848-5175
Www.porter-cable.com
WARRANTY
Cherryhill Manufacturing Corporation warrants to the first purchaser that this
U-Sand® brand product (the “product,”) when shipped in its original container, will
be free from defective workmanship and materials, and agrees that it will, at its
option, either repair the defect or replace the defective Product or part thereof at no
charge to the purchaser for parts or labor for the period(s) set forth below. This
limited warranty does not cover failure to function caused by damage to the product
while in your possession, improper installation, unreasonable use or abuse of the
product, failure to provide or use proper maintenance, failure to follow the written
installation and use instructions, or any use other than personal or household
purposes. Further, the limited warranty does not apply to any appearance items of
the Product nor to the additional excluded item (s) set forth below nor to any
product the exterior of which has been damaged or defaced, which has been
subjected to misuse, abnormal service or handling, or which has been altered or
modified in design or construction.
In order to enforce the rights under this limited warranty, the purchaser should
follow the steps set forth below and MUST maintain proof of purchase of the
product.
The limited warranty described herein is in addition to whatever implied warranties
may be granted to purchasers by law. ALL IMPLIED WARRANTIES
INCLUDING THE WARRANTIES OF MERCHANTABILITY AND FITNESS
FOR USE ARE LIMITED TO THE PERIOD(S) FROM THE DATE OF
PURCHASE SET FORTH BELOW. THE REMEDIES PROVIDED IN THE
EXPRESS LIMITED WARRANTY HEREIN ARE THE SOLE AND EXCLUSIVE REMEDIES AVAILABLE TO YOU. NO OTHER EXPRESS
WARRANTIES ARE MADE. ALL IMPLIED WARRANTIES, INCLUDING
BUT NOT LIMITED TO ANY IMPLIED WARRANTY OF
MERCHANTABILITY OR FITNESS FOR A PARTICULAR PURPOSE OR
USE, ARE LIMITED IN DURATION AS SET FORTH BELOW. IN NO EVENT
SHALL MANUFACTURER BE LIABLE FOR ANY INCIDENTAL OR
CONSEQUENTIAL INJURIES. Some states do not allow limitations on how long
an implied warranty lasts, so the herein limitation may not apply to you.
27
Sûreté électrique
A. Les péages de puissance doivent match la sortie. Ne
modifiez de quelque façon jamais la prise.
pas utilisez toutes les prises d'adapteur avec les
machines-outils (fondées) mises à la terre.
B. Évitez le contact de corps avec les surfaces mises à la terre
ou au sol telles que des pipes,
radiateurs, cuisinières, et réfrigérateurs.
C. N'exposez pas les machines-outils à la pluie ou aux
conditions humides.
D. Ne maltraitez pas la corde. N'employez jamais la corde
pour porter, tirer ou débrancher la machine-outil.
Maintenez la corde partie de la chaleur, du pétrole, des bords
pointus ou des pièces mobiles.
Sûreté personnelle
A. Alerte de séjour, montre ce qui vous faites et employez le
bon sens en actionnant une machine-outil . N'utilisez pas
une machine-outil tandis que vous êtes fatigué ou sous
influence des drogues, de l'alcool ou du médicament.
B. Utilisez l'équipement de sûreté. Portez toujours la
protection d'oeil. L'équipement de sûreté tel qu'un masque
de crépuscule, des chaussures antidérapantes de sûreté,
masque, ou une protection d'audition, utilisée pour des
conditions appropriées réduira des blessures.
C. Évitez commencer accidentel. Assurez le commutateur est
en au loin-position avant de brancher le po.
D. Ne surmontez pas. Gardez la pose et l'équilibre appropriés à
tout moment.
E. Robe correctement. Ne portez pas l'habillement ou les bi-
joux lâches. Gardez vos cheveux, habillement, et gants
partis des pièces mobiles.
Utilisation et soin de machine-outil
A. N'utilisez pas la machine-outil si le commutateur ne la
tourne pas marche-arrêt.
B. Démontez la prise de la source d'énergie avant de faire
tous les accessoires d'ajustements, de changer, ou stocker
des machines-outils.
C. Stockez les machines-outils à vide hors de portée des
enfants et ne permettez pas les personnes peu familières
avec la machine-outil ou ces instructions d'actionner la
machine-outil.
D. Maintenez les machines-outils. Vérifiez les dommages et
n'importe quelle condition qui peuvent affecter l'opération
de machines-outils
Page 11

26
INSTRUCTIONS DE SÛRETÉ IMPORTANTES
Δ AVERTISSEMENT Lisez et comprenez tous les avertissements et
consignes d'utilisation avant d'utiliser n'importe quel outil ou équipement. À
l'aide des outils ou de l'équipement, des mesures de sécurité de base devraient
toujours être suivies pour réduire le risque de blessures. Le fonctionnement,
l'entretien , ou la modification inexact des outils ou de l'équipement ont pu
avoir comme conséquence des dommages et des dégats matériels sérieux.
Ce produit est PAS être modifié et/ou employé pour toute demande autre
que de ce qu'il a été conçu.
DIRECTIVES DE SÛRETÉ - DÉFINITIONS
Il est important que vous de lire et comprendre ce manuel. L'information
qu'il contient se relie à la protection VOTRE SÛRETÉ et
EMPÊCHEMENT DES PROBLÈMES. Les symboles ci-dessous sont
employés pour vous aider à identifier cette information.
Δ DANGER indique une situation d'une manière imminente dan
gereuse qui, sinon évité, aura comme conséquence
la mort ou des dommages sérieux.
Δ AVERTISSEMENT indique une situation dangereuse qui, sinon évité
a pu avoir comme conséquence la mort ou des
dommages sérieux.
Δ ATTENTION indique une situation potentiellement dangereuse qui,
Sinon évité peut avoir comme conséquence des bles
sures.
RÈGLES GÉNÉRALES DE SÛRETÉ
Lisez et comprenez toutes les instructions. Le manque de suivre toutes les
instructions énumérées ci-dessous, peut avoir comme conséquence des
blessures sérieuses.
ÉCONOMISER CES INSTRUCTIONS.
Sûreté de zone de travail
A. Maintenez la zone de travail propre et bien allumée. Les
secteurs encombrés ou foncés invitent des accidents.
B. N'actionnez pas les machines-outils en atmosphères
explosives, comme en présence des liquides inflammables,
gaz ou poussière.
C. Enfants et spectateurs de subsistance loin tout en actionnant
une machine-outil. Les distractions peuvent vous faire
desserrer la commande.
11
Neither the sales personnel of the seller nor any other person is authorized to
make any warranties other than those described above, or to extend the duration
of any warranties beyond the time period described herein on behalf of Cherryhill
Manufacturing Corporation.
The warranties described herein shall be the sole and exclusive warranties
granted by Cherryhill Manufacturing Corporation and shall be the sole and
exclusive remedy available to the purchaser. Correction of defects, in the manner
and for the period of time described herein, shall constitute complete fulfillment
of all liabilities and responsibilities of Cherryhill Manufacturing Corporation to
the purchaser with respect to the Product, and shall constitute full satisfaction of
all claims, whether based on contract, negligence, strict liability or otherwise. In
no event shall Cherryhill Manufacturing Corporation be liable, or in any way
responsible, for any damages or defects in the product which were caused by
repairs or attempted repairs performed by anyone other than an authorized
servicer.
THIS WARRANTY GIVES YOU SPECIFIC LEGAL RIGHTS. YOU
MAY ALSO HAVE OTHER RIGHTS, WHICH VARY FROM STATE
TO STATE.
Your Product Model Number: US-MINI® Sander ______
Warranty Period for this Product: One (1) year on all parts, excluding
those items expressly excluded as set forth below.
Additional Items Excluded From Warranty Coverage: Appearance
items of the product, knobs, electrical cord, plugs, handle grips,
dust skirt, drive belt, sanding pads, dust attachments, or to
accessories, mounting kit, seals, or any printed materials.
Motor/electrical warranty info see enclosed Porter–Cable® info.
Where to Obtain Service: Call 1-800-392-8894.
What to Do to Obtain Service: Call 1-800-392-8894.
Be sure to have Proof of Purchase available.
For additional product information please contact
Cherryhill Manufacturing Corporation
640 Kolter Drive, Indiana, PA 15701
Phone: 800-392-8894 www.u-sand.com Fax: 724-465-4015
Page 12
12
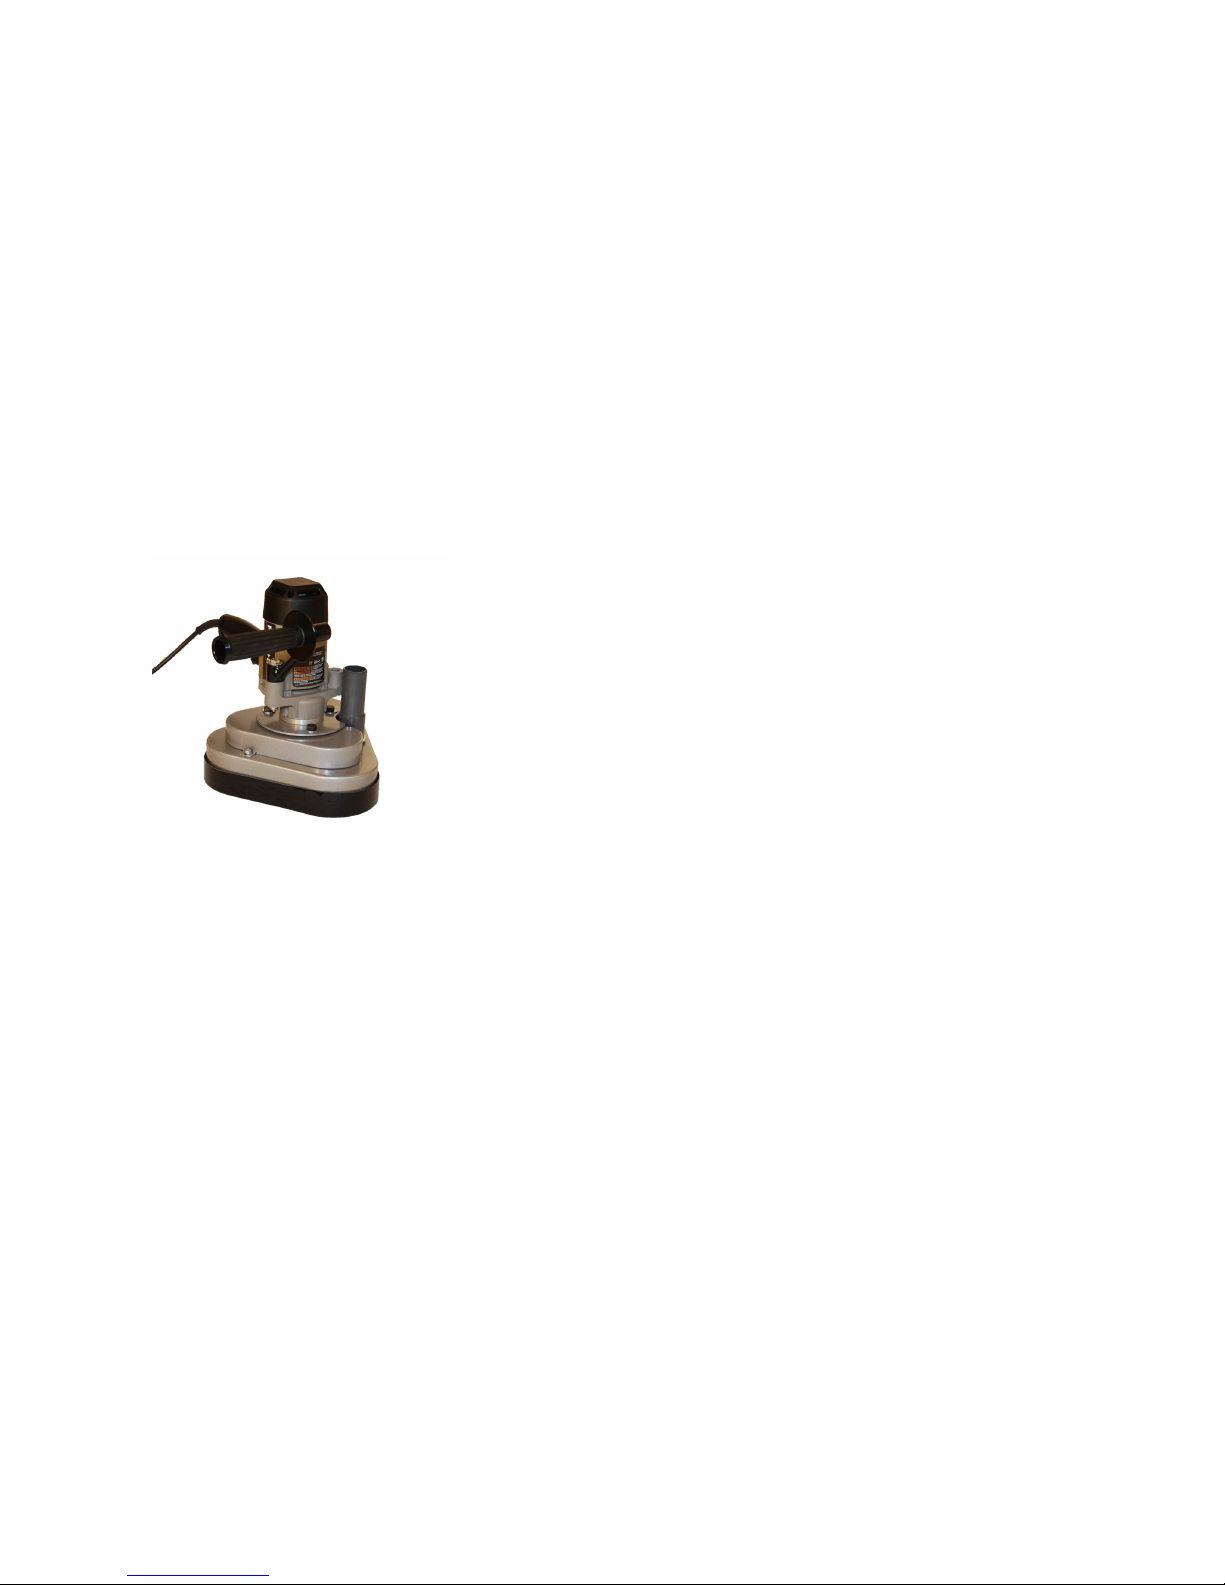
U-SAND MINI®
Mano - lijadora al azar sostenida de la órbita
Nosotros-Mini MODELO
IMPORTANTE
Por favor asegúrese que la persona que debe utilizar este equipo
cuidadosamente lea y entienda estas instrucciones antes de comenzar
operaciones.
El cuento por entregas ninguna placa está situado en la base principal
de la herramienta. Registre este número en el espacio abajo y
consérvelo para la referencia futura.
del número de serie______________________________
25
TABLE DES MATIÈRES
INSTRUCTIONS DE SÛRETÉ IMPORTANTES ................... 26
DIRECTIVES DE SÛRETÉ ..................................................... 26
LA SÛRETÉ GÉNÉRALE RÈGNE ......................................... 26
CONTENU DE CARTON ........................................................ 28
INSTALLATION ...................................................................... 28
ATTACHEMENT DE PAPIER SABLÉ .................................. 28
ATTACHEMENT DE JUPE DE LA POUSSIÈRE .................. 28
ATTACHEMENT DE VIDE .................................................... 28
OPÉRATION ............................................................................. 29
PAPIER SABLÉ ........................................................................ 29
ENTRETIEN ..............................................................................30
ACCESSOIRES ........................................................................ 30
LISTE DES PIÈCES ................................................................. 33
GARANTIE - MOTEUR ........................................................... 34
GARANTIE ............................................................................... 34
ESPANOL ................................................................................. 12
.
FRANCAISE ............................................................................ 24
Page 13
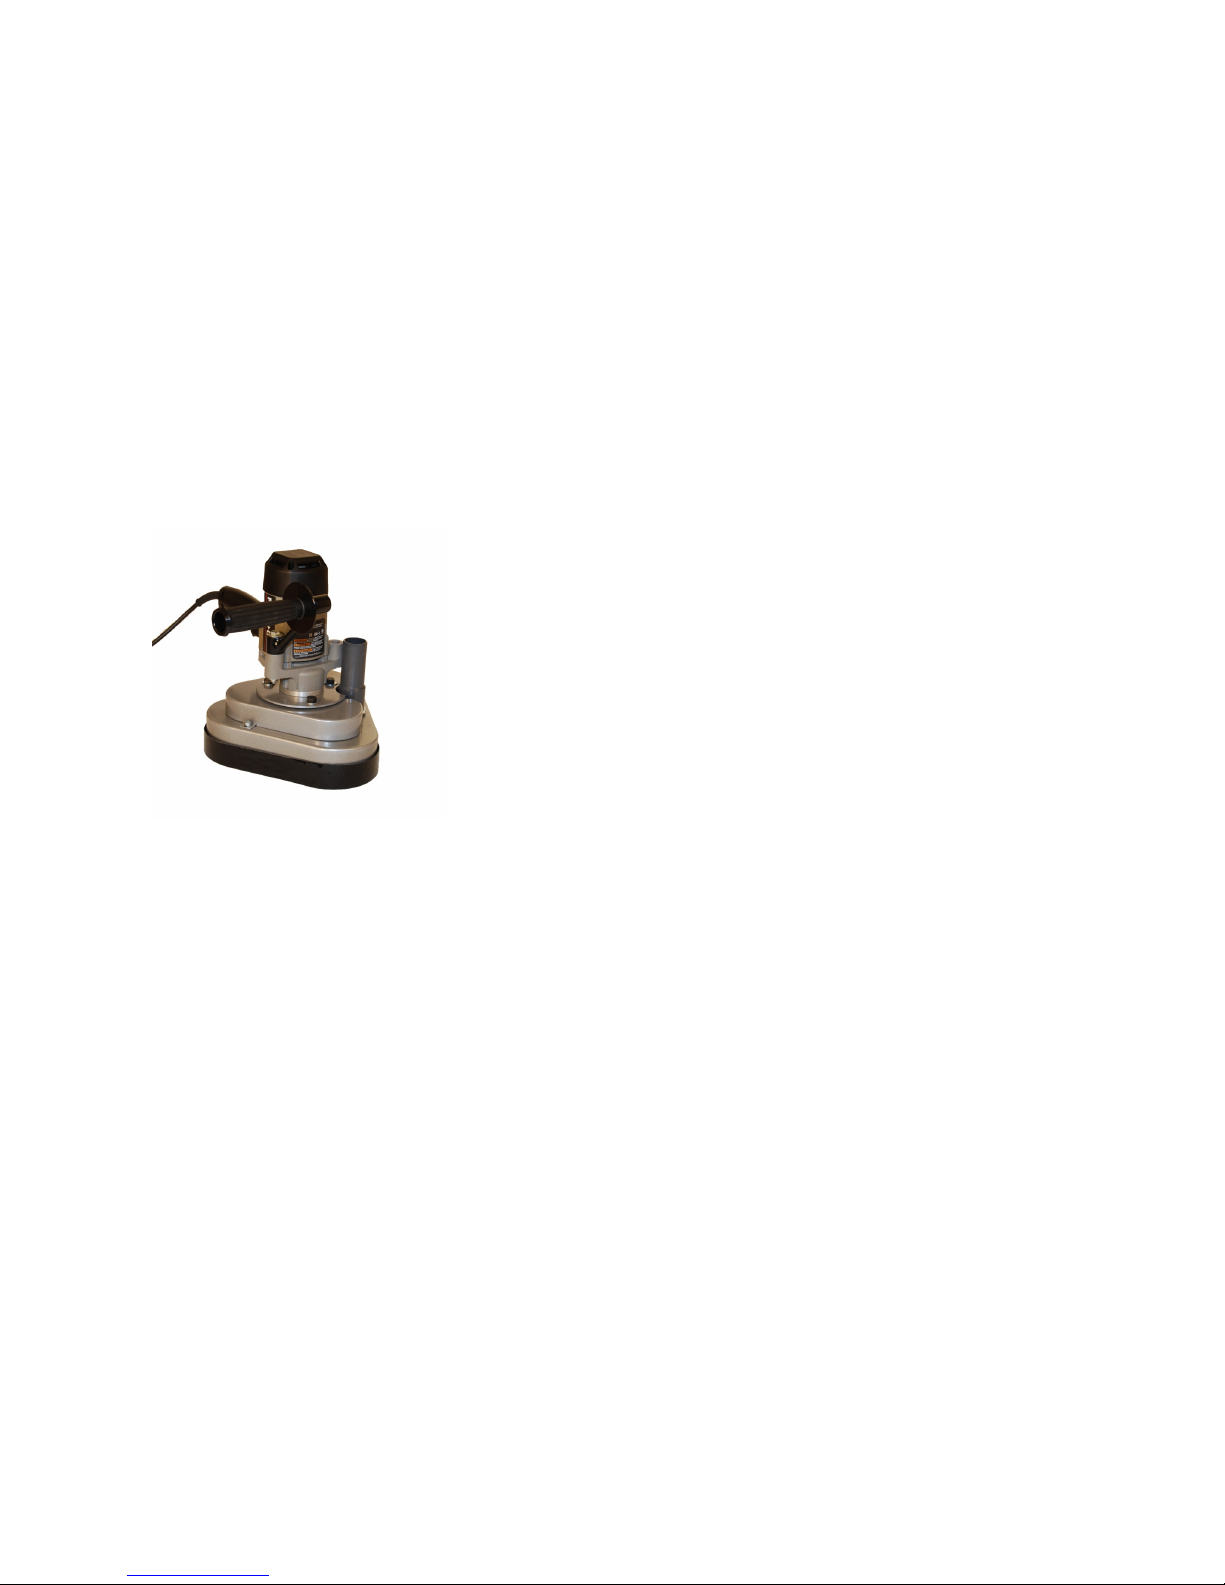
24
U-SAND MINI®
Ponceuse aléatoire tenue dans la main d'orbite
Nous-Mini MODÈLE
IMPORTANT
Assurez-vous svp que la personne qui doit utiliser cet équipement
soigneusement lit et comprend ces instructions avant de commencer des
opérations.
La publication périodique aucun plat est située sur la base principale de
l'outil. Enregistrez ce nombre dans l'espace ci-dessous et le maintenez
pour la future référence.
de numéro de série_____________________________
13
CONTENIDO
INSTRUCCIONES DE SEGURIDAD IMPORTANTES .................. 14
PAUTAS DE SEGURIDAD ............................................................... 14
LA SEGURIDAD GENERAL GOBIERNA ...................................... 14
CONTENIDO DEL CARTÓN ........................................................... 16
INSTALACIÓN .................................................................................. 16
COJÍN DEL SOPORTE ………………………………….……….... 16
ACCESORIO DEL PAPEL DE LIJA ................................................ 16
ACCESORIO DEL VACÍO ............................................................... 16
OPERACIÓN ..................................................................................... 17
PAPEL DE LIJA ................................................................................ 17
MANTENIMIENTO ...........................................................................18
ACCESORIOS ....................................................................................18
LISTA DE PIEZAS ............................................................................ 21
GARANTÍA - MOTOR ...................................................................... 22
GARANTÍA ........................................................................................ 22
ESPANOL ............................................................................................12
.
FRANCAISE ...................................................................................... 24
Page 14

14
INSTRUCCIONES DE SEGURIDAD IMPORTANTES
Δ ADVERTENCIA Lea y entienda todas las advertencias e instrucciones
de funcionamiento antes de usar cualquier herramienta o equipo. Al usar las
herramientas o el equipo, las medidas de seguridad básicas se deben seguir
siempre para reducir el riesgo de los daños corporales. La operación, el
mantenimiento , o la modificación incorrecto de herramientas o del equipo
podían dar lugar a lesión y a daños materiales serios. Este producto es NO
ser modificado y/o ser utilizado para cualquier uso con excepción de para
cuál fue diseñada.
PAUTAS DE SEGURIDAD - DEFINICIONES
Es importante que usted leer y entienda este manual. La información que
contiene se relaciona con la protección SU SEGURIDAD y
PREVENCIÓN DE PROBLEMAS. Los símbolos abajo se utilizan para
ayudarle a reconocer esta información.
Δ PELIGRO Indica una situación inminente peligrosa que,
si no evitado, dará lugar a muerte o a lesion seria.
Δ ADVERTENCIA Indica una situación peligrosa que, si no
Evitado podía dar lugar a muerte o a lesión seria.
Δ PRECAUCIÓN Indica una situación potencialmente pe
ligrosa que, si no evitado puede dar lugar a
daños corporales.
REGLAS GENERALES DE SEGURIDAD
Lea y entienda todas las instrucciones. La falta de seguir todas las
instrucciones enumeradas abajo, puede dar lugar a daños corporales serios.
EXCEPTO ESTAS INSTRUCCIONES
Seguridad del área de trabajo
A. Mantenga el área de trabajo limpia y bien iluminada. Las
áreas estorbadas u oscuras invitan accidentes.
B. No funcione las herramientas eléctricas en atmósferas
explosivas, por ejemplo en presencia de líquidos
inflamables, gases o polvo.
C. Niños y personas presentes de la subsistencia lejos mien
tras que funciona una herramienta eléctrica. Las
distrac ciones pueden hacerle soltar control.
23
Ni autorizan al personal de ventas del vendedor ni a cualquier otra persona a
hacer cualesquiera garantías con excepción de ésos descritos arriba, o a prolongar
la duración de cualquier garantía más allá del período descrito adjunto a nombre
de Cherryhill Manufacturing Corporation.
Las garantías descritas adjunto serán las garantías únicas y exclusivas concedidas
por Cherryhill Manufacturing Corporation y serán el remedio único y exclusivo
disponible para el comprador. La corrección de defectos, de la manera y para el
período del tiempo descrito adjunto, constituirá el cumplimiento completo de
todas las responsabilidades y responsabilidades de Cherryhill Manufacturing
Corporation al comprador con respecto al producto, y constituirá la satisfacción
completa de todas las demandas, está basada en el contrato, negligencia, responsabilidad terminante o de otra manera. Nunca Cherryhill Manufacturing
Corporation será obligado, o de cualquier manera responsable, de cualesquiera
daños o defectos en el producto que fueran causados por reparaciones o
procuraron las reparaciones realizadas por cualquier persona otro que un servicer
autorizado.
ESTA GARANTÍA LE DA LAS DERECHAS LEGALES
ESPECÍFICAS. USTED PUEDE TAMBIÉN TENER OTRAS
DERECHAS, QUE VARÍAN DE ESTADO AL ESTADO.
Su número de modelo del producto: ______
Período de la garantía para este producto: Un (1) año en todas las
partes, excepto esos artículos expreso excluidos según lo
dispuesto abajo.
Artículos adicionales excluidos de cobertura de la garantía: Artículos
del producto, perillas , cuerda eléctrica, enchufes, apretones de
la manija, falda del polvo, correa de impulsión, cojines que
enarenan , accesorios del aspecto del polvo, o a los accesorios,
montando el kit, los sellos, o cualquieres materiales
impresos. El motor/la garantía eléctrica Info ve
Porter-Cable® Info.
Donde obtener servicio: Cel 1-800-392-8894.
Qué a hacer para obtener servicio: Cel 1-800-392-8894.
Sea seguro tener prueba de la compra disponible.
Para la información de producto adicional entre en contacto con por
favor
Cherryhill Manufacturing Corporation
640 Kolter, Indiana, PA 15701
Teléfono: 800-392-8894 www.u-sand.com Fax: 724-465-4015
Page 15

22
WARRANTY-MOTOR
Todas las ediciones referentes el motor/la operación/a la garantía eléctricas
entran en contacto con por favor a Porter-Cable® por el manual de
instrucción incluido.
Portero-Cable®
4825 Highway 45 North
Jackson, TN 38305
888-848-5175
Www.porter-cable.com
GARANTÍA
Las autorizaciones de Cherryhill Manufacturing Corporation al primer comprador
que este producto de la marca de fábrica de U-Sand® (el “producto,”) cuando están
enviadas en su envase original, estarán libres de la ejecución y de materiales
defectuosos, y convienen que, en su opción, cualquier reparación el defecto o
substituirá el producto defectuoso o parte de eso en ninguna carga al comprador
para las piezas o al trabajo para los períodos fijados adelante abajo. Esta garantía
limitada no cubre falta a la función causada por el daño al producto mientras que en
su posesión,
instalación incorrecta, uso o abuso desrazonable del producto, falta de proporcionar
o de utilizar mantenimiento apropiado, falta de seguir las instrucciones escritas de la
instalación y del uso, o ningún uso con excepción de propósitos personales o de la
casa. Además, la garantía limitada no se aplica a ninguna artículos del aspecto del
producto ni a los artículos excluidos adicionales dispuestos debajo ni a ningún
producto el exterior de el cual se ha dañado o se ha desfigurado, de el cual se haya
sujetado al uso erróneo, al servicio anormal o a la dirección, o que se ha alterado o
se ha modificado en diseño o la construcción. En la orden para hacer cumplir las
derechas bajo esta garantía limitada, el comprador debe seguir los pasos dispuestos
abajo y DEBE mantener la prueba de la compra del producto.
La garantía limitada descrita adjunto está además de lo que implicó garantías se
puede conceder a los compradores por la ley. TODAS LAS GARANTÍAS
IMPLICADAS INCLUYENDO LAS GARANTÍAS DEL MERCHANTABILITY
Y DE LA APTITUD PARA EL USO SE LIMITAN A LOS PERÍODOS A
PARTIR DE LA FECHA DE LA COMPRA DISPUESTA ABAJO. LOS
REMEDIOS PROPORCIONADOS EN LA GARANTÍA LIMITADA EXPRESA
ADJUNTO SON LOS REMEDIOS ÚNICOS Y EXCLUSIVOS DISPONIBLES
PARA USTED. NO SE HACE NINGUNAS OTRAS GARANTÍAS
EXPRESAS. TODAS LAS GARANTÍAS IMPLICADAS, INCLUYENDO PERO
NO LIMITADAS A CUALQUIER GARANTÍA IMPLICADA DEL
MERCHANTABILITY O DE LA APTITUD PARA UN PROPÓSITO O UN USO
PARTICULAR, SE LIMITAN EN LA DURACIÓN SEGÚN LO DISPUESTO
ABAJO. NUNCA EL FABRICANTE SERÁ OBLIGADO PARA CUALQUIER
LESIÓN FORTUITA O CONSECUENTE. Algunos estados no permiten
limitaciones en cuánto tiempo una garantía implicada dura, así que adjunto la
limitación puede no aplicarse a usted.
15
Seguridad eléctrica
A. las herramientas eléctricas deben emparejar el enchufe.
Nunca modifique el enchufe de cualquier anera.
no utilice cualquier enchufe de adaptador con las
herramientas eléctricas (puestas a tierra) conectadas a
ierra.
B. Evite el contacto del cuerpo con las superficies
conectadas a tierra o puestas a tierra tales como pipas,
radiadores, gamas, y refrigeradores.
C. No exponga las herramientas eléctricas a la lluvia o a
las condiciones mojadas.
D. No abuse de la cuerda. Nunca utilice la cuerda para
llevar, tirar o desenchufar de la herramienta
éctrica. Guarde la cuerda lejos del calor, del aceite,
de bordes agudos o de piezas móviles.
Seguridad personal
A. Alarma de la estancia, reloj qué usted está haciendo
y utiliza sentido común al funcionar una herramienta
eléctrica . No utilice una herramienta eléctrica mientras
que usted es cansado o debajo de
influencia de drogas, del alcohol o de la medicación.
B. Utilice el equipo de seguridad. Use siempre la
protección de ojo. El equipo de seguridad tal como una
máscara de la oscuridad, zapatos antideslizantes de
seguridad, sombrero duro, o una protección de oído,
usada para las condiciones apropiadas reducirá daños
corporales.
C. Evite comenzar accidental. Asegure el interruptor
está en la apagado-posición antes de tapar el pulg.
D. No overreach. Mantenga el pie y el equilibrio
apropiados siempre.
E. Vestido correctamente. No use la ropa o la joyería
floja. Guarde su pelo, ropa, y guantes lejos de piezas
móviles.
Uso y cuidado de la herramienta eléctrica
A. No utilice la herramienta eléctrica si el interruptor no le
da vuelta por intervalos.
B. Desconecte el enchufe de la fuente de energía antes de
hacer cualesquiera accesorios de los ajustes, el cambiar,
o almacenar las herramientas eléctricas.
C. Almacene las herramientas eléctricas ociosas fuera del
alcance de niños y no permita las personas
desconocedoras con la herramienta eléctrica o estas
instrucciones de funcionar la herramienta eléctrica.
D. Mantenga las herramientas eléctricas. Compruebe para
saber si hay daños y cualquier condición que puedan
Page 16

16
CONTENIDO DEL CARTÓN
Esta herramienta viene con un manual de instrucción que incluya una lista
de piezas.
” Cojines del soporte BP4.5-5 (3) M-3020 - Falda ajustable del polvo (1)
INSTALACIÓN DEL COJÍN DEL SOPORTE
Instale los tres cojines del soporte BP4.5 en los ejes más bajos de las
asambleas del huso. Alinee el tornillo en la parte posteriora del BP4.5 con
los agujeros roscados en los ejes más bajos y dé vuelta a la izquierda hasta
el dedo apretado.
INSTALACIÓN DEL AHORRADOR DEL COJÍN DEL SOPORTE
Una los tres BPS4.5 - ahorradores del cojín del soporte en el BP4.5
alineando los cojines juntos y presionando.
INSTALACIÓN DEL PAPEL DE LIJA
Una el papel de lija necesario necesitado para el uso alineando el papel
sobre el disco.
INSTALACIÓN DE LA FALDA DEL POLVO
Los artículos antedichos están montados, quitan una vez la falda M-3020 de
la oscuridad de la caja y la fijación al fondo de la placa de la cubierta
asegurando la falda que usted está uniendo es llana con la superficie de
trabajo para la succión máxima del vacío.
ACCESORIO DEL VACÍO
El extremo de la diapositiva de la manguera de vacío que usted planea
utilizar sobre el puerto del VAC debe ser 1.25” en el diámetro para la
manguera de vacío. Esto debe caber snuggly.
Asegure el vacío queda orientado y conectó durante la operación de la
máquina.
Δ ADVERTENCIA EL POLVO AEROTRANSPORTADO PUEDE
SER UN RIESGO DE INCENDIOS SERIO. SIGA SIEMPRE
FABRICA LA INSTRUCCIÓN PARA VACIAR EL CONTENIDO
DEL VACÍO.
21
ART
ÍCU
LO
IDENTIFICACIÓN DESCRIPCIÓN
Q
T
Y
1 M-3002 POLEA DEL MOTOR 1
2 MOTOR MINI
7 " CONTRA EL MOTOR DE 8 AMPERIOS
1
3 HW-010 WASHER-3/8 3
4 M-3003 CUBIERTA 3
5 BB-002 DECKPLATE-MDS 1
6 M-3007 MANIJA 1
7 M-3008 VAC DE PUERTO 1
8 M-3001 POLEA DE HUSO 3
9 HW-007 HEX-SHCS 3
10 HW-006 HEX-SHCS 3
11 HW-009 ARANDELA 11/16 3
12 M-3005 COJINETE, CUBIERTA, 3
13 M-3009 PILAR 3
14 HW-011 CORREA 1
15 M-3006 LLEVANDO, un EJE MÁS BAJO, 3
16 HW-003 PERNO DE LA TUERCA HEXAGONAL 3
17 HW-005 HEX-SHCS 3
18 HW-004 HEX-HMS 1
19 HW-008 WASHER-5/16 1
20 BB-001 CUBIERTA DE LA CORREA 1
21 M-3000 ÁRBOL PRINCIPAL 3
22 BB-003 MONTAJE DEL MOTOR 1
23 HW-001 BOLT-HSCS
1
2
24 HW-002 TUERCA - H 1
25 M-3004 BAJE EL EJE - MDS 3
26 HW-012 TUERCA DE FIJACIÓN 2
27 M-3021 BASE DE LA FALDA DEL POLVO 1
28 M-3020 FALDA DEL POLVO 1
29 MANUAL MANUAL (NO DEMOSTRADO) 1
sustantivo lista femenino
Page 17
20
17
OPERACIÓN
Δ PRECAUCIÓN Asegúrese el interruptor está en la posición de "OFF"
antes de conectar la herramienta con la fuente de energía para evitar
comenzar inintencional.
Δ ADVERTENCIA Se cerciora de usar la protección auditiva del ojo y
cuando la operación este equipo.
UTILICE Un ENCHUFE ESTÁNDAR 100v.
Enchufe el vacío y después gire el vacío. Enchufe la máquina, y después
dé vuelta a la máquina en sostener con dos manos. El interruptor en la
lijadora se puede trabar en la posición de trabajo para el uso extendido. Para guardar la lijadora el funcionar continuamente, presionar el
disparador y empujar hacia adentro el interruptor que traba el botón en el
lado izquierdo de la manija. Mientras que sostiene el botón adentro lance
el disparador. Para lanzar el botón de fijación, presione el disparador y
lance.
Velocidad variable - usted puede ajustar la velocidad de la lijadora dando
vuelta al thumbwheel. La posición #1 del Thumbwheel proporciona la
velocidad de funcionamiento más lenta (3300RPM) y la posición #6 el más
rápido (4500 RPM). Usted puede cambiar la velocidad mientras que el
motor está funcionando o no está funcionando.
Dé vuelta a la máquina apagado y desenchúfela cuando es parado.
Mueva el área del excedente de la máquina lentamente que se enarenará,
substituya el papel de lija según lo necesitado. Al cambiar a partir de una
arena a otra área del vacío a fondo para evitar rasguños de la arena anterior.
PAPEL DE LIJA
Esta máquina utiliza 5” los discos que enarenan del gancho y del lazo en las
varias arenas disponibles del fabricante, en 24, 36, 40, 60, 80, 100, 120, y
180 arenas.
Page 18

18
MANTENIMIENTO DE LA MÁQUINA
Dé vuelta a la máquina de cuando el usar acabado y
desenchúfela. Desconecte el vacío de la máquina y limpie todo el
polvo con la aspiradora, del fondo de la máquina.
Dé vuelta apagado al vacío y desenchúfelo. Vacie el vacío según
fabrica instrucciones inmediatamente después del uso.
Δ ADVERTENCIA El riesgo de incendios nunca permite el estar
parado del polvo para permanecer en el aparato de la eliminación del
polvo cuando es no funcionando. Vacie el vacío y quítelo de la
lijadora cada vez que el operador está dejando el área de trabajo
de la lijadora. ¡Las partículas de polvo pueden
espontáneamente el combust que causa un fuego!
ACCESORIOS
BP4.5- cojines del soporte
BPS4.5-Backer Ahorradores del cojín de
M-3020 Falda de Dust
Manual
Papel de lija- de la fabricación vendió en 20 paquetes de la
PC en varias arenas. Llamada para los detalles.
19
BLANK
 Loading...