

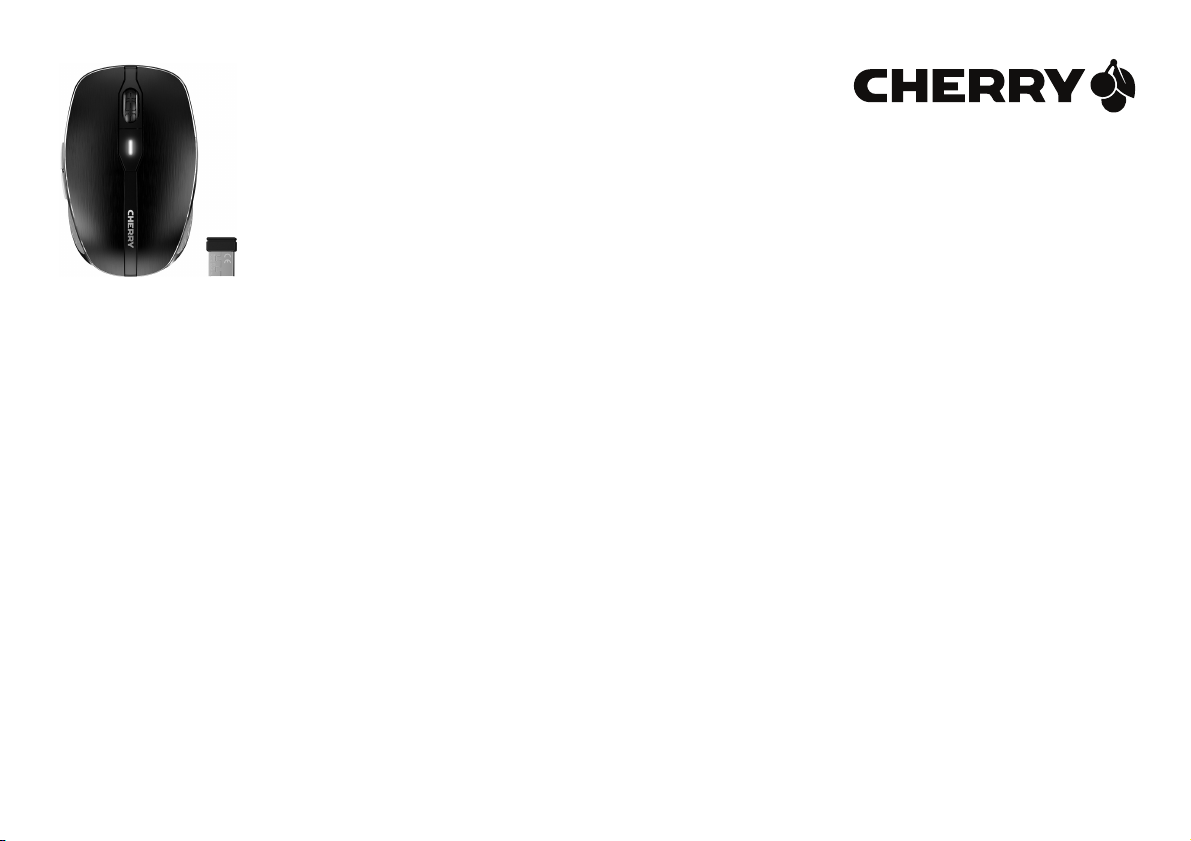
CHERRY MW 8 ADVANCED
Wireless Mouse with Bluetooth®
and RF Transmission
64410040-01, DE, EN, FR, ES, IT, NL, Sep 2018 (JW-8000 = Mod. JF-80, JR-90)
Bedienungsanleitung ........................................... 4
Operating Manual ................................................. 8
Mode d’emploi .................................................... 12
Manual de instrucciones.................................... 16
Istruzione d'uso .................................................. 20
Gebruikshandleiding .......................................... 24
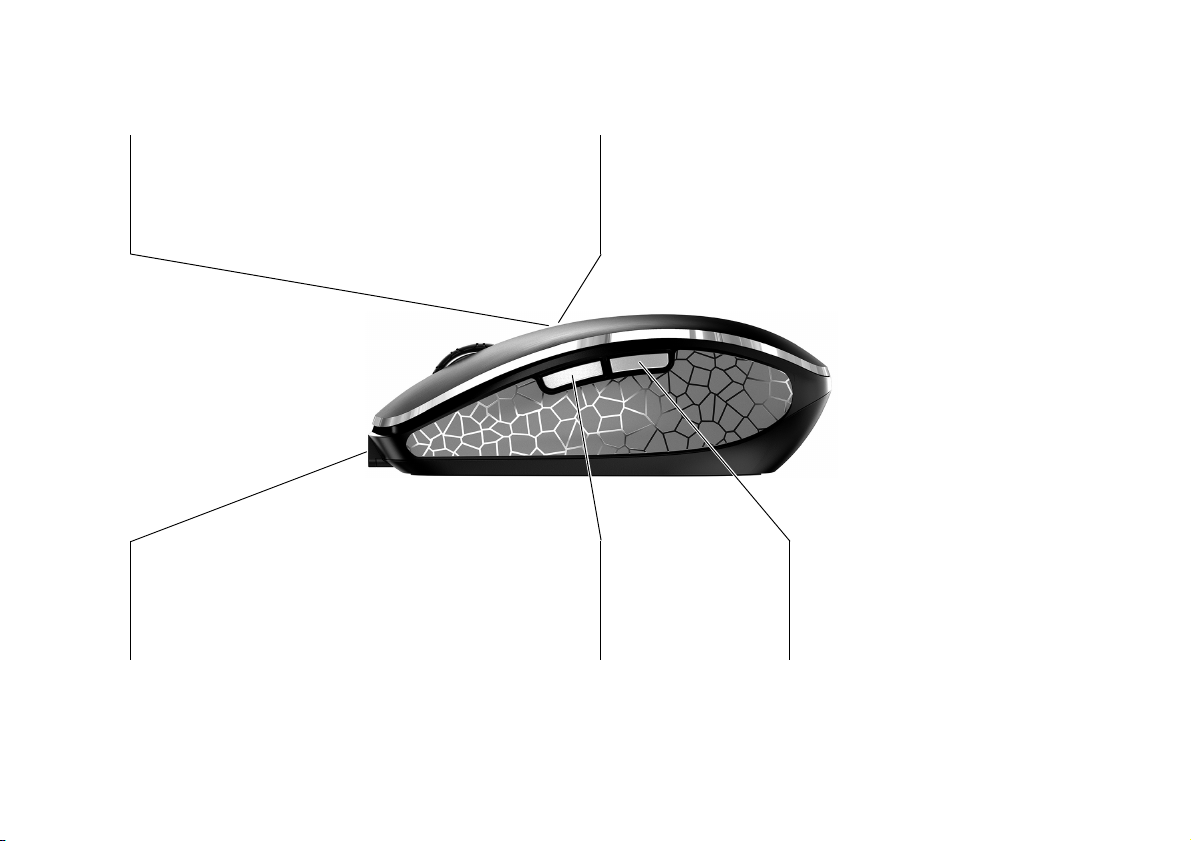
Status-LED für Batterie und Auflösung
Status LED for battery and resolution
Affichage d'état de batterie et réglage en dpi (points par pouce)
Indicación del estado de carga de la pila y ajuste DPI
Visualizzazione dello stato della batteria e impostazione DPI
Status-LED voor accu en resolutie
Browser zurück
Browser back
Navigation arrière
Navegador atrás
Browser indietro
Browser achteruit
DPI-Umschaltung
DPI switch
Commutateur de DPI
Conmutación DPI
Cambiamento DPI
DPI-schakelaar
Browser vor
Browser forward
Navigation avant
Navegador adelante
Browser avanti
Browser vooruit
Buchse für Ladekabel
Socket for charging cable
Prise pour le câble de recharge
Hembrilla para cable de carga
Presa per cavo di ricarica
Bus voor laadkabel
Funktionen / Functions / Fonctions / Funciones / Funzioni / Functies
2
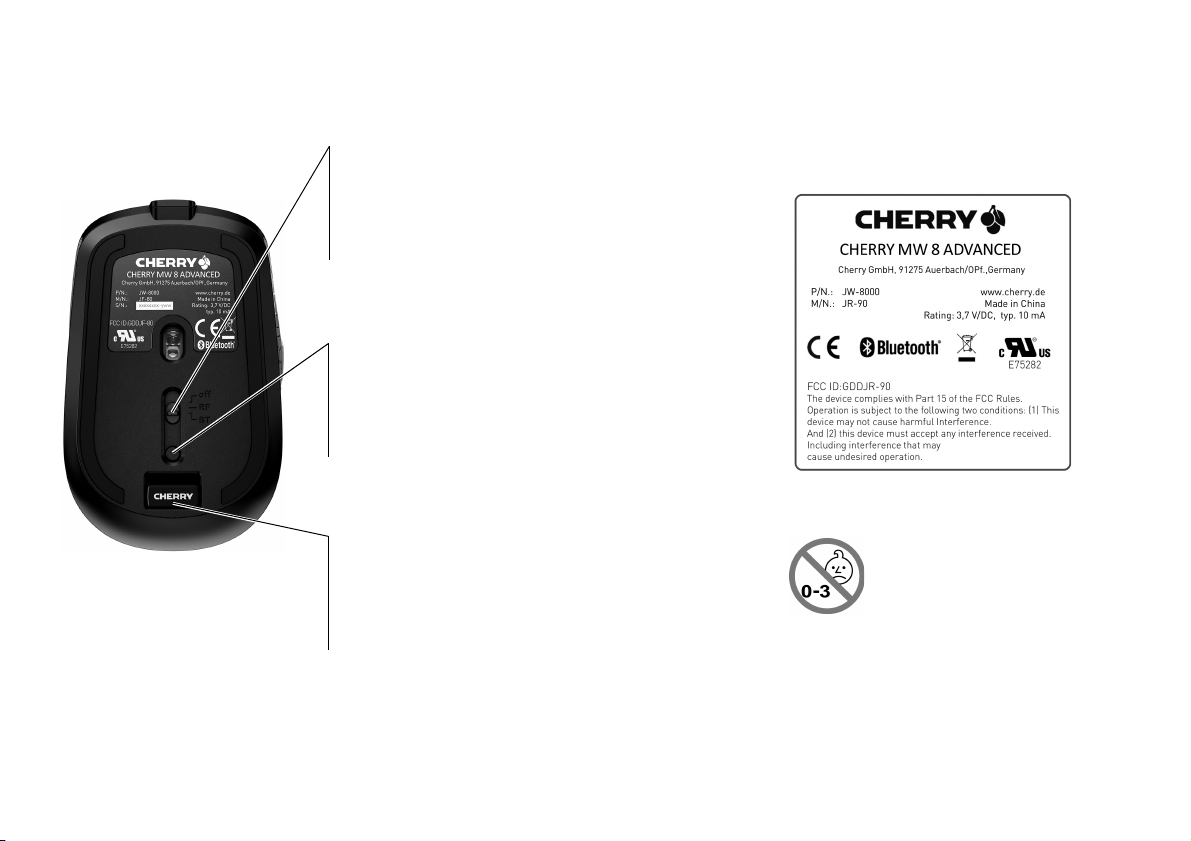
Schalter Aus (off)/Funk (RF)/Bluetooth (BT)
Off switch/wireless (RF)/Bluetooth (BT)
Commutateur arrêt (off) / radio (RF) / Bluetooth (BT)
Interruptor apagado (off)/Radio (RF)/Bluetooth (BT)
Interruttore di spegnimento (off)/radio (RF)/Bluetooth (BT)
Schakelaar uit (off)/snoerloos (RF)/Bluetooth (BT)
Taste für Bluetooth-Verbindung
Button for Bluetooth connection
Touche pour la connexion Bluetooth
Tecla para conexión Bluetooth
Tasto per collegamento Bluetooth
Toets voor Bluetooth-verbinding
Receiver für Funkverbindung
Receiver for wireless connection
Récepteur pour la connexion radio
Receptor de conexión inalámbrica por radiofrecuencia
Ricevitore per collegamento wireless
Ontvanger voor snoerloze verbinding
Receiver label
3
BEDIENUNGSANLEITUNG
CHERRY MW 8 ADVANCED – Wireless Mouse with Bluetooth® and RF Transmission
1 Bevor Sie beginnen ...
DE
Jedes Gerät ist anders!
In der Bedienungsanleitung erhalten
zuverlässigen Verwendung.
• Lesen Sie die Bedienungsanleitung
• Bewahren Sie die Bedienungsanleitung auf
Die CHERRY MW 8 ADVANCED ist eine kabellose
Maus zur Bedienung von PCs/Laptops.
Sie zeichnet sich besonders durch folgende Eigenschaften aus:
• Umschaltbare Übertragung über Bluetooth (4.0)
• Optischer Lasersensor, der sogar auf
• Umschaltbare Auflösung zum präzisen Arbeiten
• Eingebaute Lithium-Ionen-Batterie zum Laden
Für Informationen zu weiteren Produkten,
Downloads und vielem mehr, besuchen Sie bitte
www.cherry.de.
Sie Hinweise zur effektiven und
aufmerksam durch.
und geben Sie sie an andere Benutzer weiter.
oder Funk (2,4 GHz)
Glasflächen funktioniert
durch den DPI-Schalter auf der Mausoberseite
(600/1000/1600/3200 dpi)
über USB-Kabel während des Betriebs
2 Allgemeine
Warnhinweise
WARNUNG: Erstickungsgefahr durch
Verschlucken von Kleinteilen
• Bewahren Sie das Gerät außerhalb der
Reichweite von Kindern unter 3 Jahren auf.
HINWEIS: Löschen von
Speichermedien und Beschädigung
von mechanischen Uhren durch
Magnet in der Maus.
An der Unterseite der Maus befindet sich zum
Halten des Empfängers der Maus ein Magnet.
• Bringen Sie keine Speichermedien, wie
Magnetkarten oder externe Festplatten, und
keine mechanischen Uhren in den Bereich der
Maus.
3 Maus mit dem PC/Laptop
verbinden
Ladezustand der Batterie
Die Batterie der Maus ist vorgeladen.
Sie können die Maus sofort verwenden.
• Vor dem ersten Gebrauch empfehlen wir Ihnen
jedoch, sie mit dem beiliegenden Kabel zu
laden (siehe 5 "Maus laden").
Sie können die Maus über Bluetooth mit dem PC/
Laptop verbinden oder mit dem Empfänger über
eine 2,4 GHz-Funkverbindung.
Die Verbindung über Bluetooth ist bequem, wenn
Sie die Maus an mehreren Geräten verwenden
möchten: Sie müssen die Verbindung nur einmal
herstellen und benötigen den Empfänger nicht.
Parallele Anmeldung an mehreren
PCs/Laptops
Bluetooth erkennt automatisch, wenn
bereits ein PC/Laptop eingeschaltet ist, der
schon einmal mit dem Gerät verbunden wurde. In
diesem Fall lässt Bluetooth keine neue
Verbindung mit einem weiteren PC/Laptop zu,
damit es nicht zu Fehleingaben kommt.
• Schalten Sie den ersten PC/Laptop aus oder
deaktivieren Sie die Verbindungen.
Falls Ihr PC/Laptop nicht über Bluetooth verfügt,
oder falls Sie keine Einstellungen vornehmen
möchten, können Sie die Maus über den Empfänger mit dem PC/Laptop verbinden.
4

3.1 Maus über Bluetooth verbinden
Falls die Maus bereits mit einem anderen Gerät
verbunden ist, können Sie keine parallele
Verbindung herstellen. Schalten Sie das erste
Gerät aus oder lösen Sie die Verbindung.
1 Öffnen Sie an Ihrem PC/Laptop die Suche nach
Bluetooth-Geräten (zum Beispiel über Start >
Einstellungen > Geräte > Bluetooth).
2 Folgen Sie den Anweisungen der Software.
3 Stellen Sie auf der Unterseite der Maus den
Schalter auf BT.
4 Aktivieren Sie die Bluetooth-Verbindung der
Maus, indem Sie den Knopf an der Unterseite
der Maus drücken.
Die blaue LED der Maus blinkt schnell.
Falls die blaue LED nicht blinkt:
• Es besteht bereits eine Verbindung der Maus
mit einem anderen PC/Laptop. Schalten Sie
diesen PC/Laptop aus oder deaktivieren Sie
die Verbindung an diesem PC/Laptop.
5 Folgen Sie den Anweisungen der Software.
Die LED erlischt und die Maus ist mit Ihrem PC/
Laptop verbunden.
Falls die rote LED der Maus schnell blinkt, ist die
Verbindung fehlgeschlagen.
• Versuchen Sie es erneut.
3.2 Maus über Empfänger verbinden
Der Empfänger befindet sich in einem Fach an der
Unterseite der Maus und wird durch einen
Magneten gehalten.
1 Ziehen Sie den Empfänger aus dem Gehäuse.
2 Schließen Sie den Empfänger am USB-
Anschluss des PCs/Laptops an.
3 Stellen Sie auf der Unterseite der Maus den
Schalter auf RF.
Die Maus ist mit Ihrem PC/Laptop verbunden.
4 Wechseln der
Empfindlichkeit der Maus
(DPI-Zahl)
Die Auflösung des Sensors können Sie
entsprechend anpassen. Dadurch verändert sich
die Geschwindigkeit des Mauszeigers.
• Drücken Sie die DPI-Taste auf der
Mausoberseite.
Die LED blinkt je nach Einstellung:
1x = 600 dpi
2x = 1000 dpi
3x = 1600 dpi
4x = 3200 dpi
Die Einstellung wird in der Maus gespeichert und
bleibt auch beim Ausschalten erhalten.
5 Maus laden
Wenn die rote LED langsam blinkt, sollten Sie die
Maus in Kürze laden. Je schneller die rote LED
blinkt, um so geringer ist der Ladestand der
Batterie.
• Verbinden Sie das Ladekabel mit der Maus und
einer USB-Buchse am PC/Laptop.
Solange die Maus geladen wird, leuchtet die LED.
Wenn die Maus voll geladen ist, erlischt die LED.
Solange der PC/Laptop eingeschaltet ist, wird die
Batterie der Maus geladen. Sie können während
des Ladevorgangs weiterarbeiten.
6 Maus ein-/ausschalten
Aufwachfunktion bei Bluetooth
Wenn sich Ihr PC/Laptop im StandbyModus befindet, ist ein Aufwecken über
Bluetooth-Geräte nicht möglich.
Die CHERRY MW 8 ADVANCED schaltet bei Nichtbenutzung in einen Schlaf-Modus, in dem sie fast
keine Energie benötigt. Beim ersten Tastendruck
schaltet sie sich automatisch wieder ein.
Weil sie im Energiesparmodus trotzdem Energie
verbraucht, sollten Sie sie bei längerer
Nichtbenutzung und zum Transport manuell
ausschalten.
DE
5
BEDIENUNGSANLEITUNG
CHERRY MW 8 ADVANCED – Wireless Mouse with Bluetooth® and RF Transmission
• Schieben Sie den Schalter auf der
DE
Mausunterseite in die entsprechende Position:
Aus = off
Ein (Funk) = RF
Ein (Bluetooth) = BT
7 Tipps
7.1 Empfänger in der Maus verstauen
Der Empfänger ist so klein, dass er auch beim
Transport eines Laptops in der USB-Buchse
bleiben kann. Um Beschädigungen auszuschließen,
können Sie den Empfänger auch abziehen und zum
Schutz vor Verschmutzung und Verlust in der Maus
deponieren (siehe Übersichtsseite).
7.2 Reinigen der Maus
HINWEIS: Beschädigung durch
aggressive Reinigungsmittel oder
Flüssigkeit in der Maus
• Verwenden Sie zur Reinigung keine Lösungsmittel wie Benzin oder Alkohol und keine
Scheuermittel oder Scheuerschwämme.
• Verhindern Sie, dass Flüssigkeit in die Maus
gelangt.
1 Schalten Sie die Maus aus.
2 Reinigen Sie die Maus mit einem leicht feuchten
Tuch und etwas mildem Reinigungsmittel
(z. B. Geschirrspülmittel).
3 Trocknen Sie die Maus mit einem fusselfreien,
weichen Tuch.
7.3 RSI-Syndrom
"Repetitive Strain Injury" = "Verletzung
durch wiederholte Beanspruchung".
RSI entsteht durch kleine, sich ständig
wiederholende Bewegungen.
Typische Symptome sind Beschwerden in den
Fingern oder im Nacken.
• Richten Sie Ihren Arbeitsplatz ergonomisch ein.
• Positionieren Sie Tastatur und Maus so, dass
sich Ihre Oberarme und Handgelenke seitlich
vom Körper befinden und ausgestreckt sind.
• Machen Sie mehrere kleine Pausen,
ggf. mit Dehnübungen.
• Ändern Sie oft Ihre Körperhaltung.
7.4 Hilfe im Problemfall
• Schalten Sie die Maus aus und wieder ein.
• Bei Verbindung über den Empfänger: Schließen
Sie den Empfänger an einem anderen USBAnschluss am PC/Laptop an.
• Bei Verbindung über Bluetooth: Entfernen Sie
die Maus in der Bluetooth-Software und fügen
Sie sie als neues Gerät wieder hinzu.
8 Entsorgung
Das Gerät enthält eine Lithium-IonenBatterie. Diese lässt sich nicht wechseln.
Entsorgen Sie das Gerät nicht im
Hausmüll. Batterien enthalten
möglicherweise Schadstoffe, die Umwelt und
Gesundheit schaden können. Bitte geben Sie die
Batterie gemeinsam mit dem Gerät im Handel oder
bei den Recyclinghöfen der Kommunen ab. Die
Rückgabe ist gesetzlich vorgeschrieben und
unentgeltlich.
Alle Batterien und Akkus werden wiederverwertet.
So lassen sich wertvolle Rohstoffe, wie Eisen, Zink
oder Nickel, zurückgewinnen. Batterierecycling ist
der leichteste Beitrag zum Umweltschutz.
Vielen Dank für’s Mitmachen.
6
9 Technische Daten
Bezeichnung Wert
Versorgungsspannung
Ladespannung Typ. 5,0 V/DC
Stromaufnahme Maus: typ. 10 mA
Batterie Aufladbare Lithium-Ionen-
Sendefrequenz 2400,0 ... 2483,5 MHz
Sendeleistung Max. 10 mW (EIRP)
Bluetooth 4.0
Lagertemperatur
Betriebstemperatur
Empfänger:
5,0 V/DC ±5 %
Standby: max. 0,3 mA
Empfänger: typ. 10 mA
Batterie, 550 mAh
–15 °C ... +60 °C
0 °C ... +40 °C
10 Kontakt
Bitte halten Sie bei Anfragen an den Technischen
Support folgende Informationen bereit:
• Artikel- und Serien-Nr. des Produkts
• Bezeichnung und Hersteller Ihres Systems
• Betriebssystem und ggf. installierte Version
eines Service Packs
Cherry GmbH
Cherrystraße
91275 Auerbach/OPf.
Internet: www.cherry.de
Telefon: +49 (0) 9643 2061-100*
*zum Ortstarif aus dem deutschen Festnetz,
abweichende Preise für Anrufe aus
Mobilfunknetzen möglich
11 Allgemeiner
Anwenderhinweis
Technische Änderungen, die dem Fortschritt
dienen, behalten wir uns vor. Unsachgemäße
Behandlung und Lagerung können zu Störungen
und Schäden am Produkt führen.
Die vorliegende Anleitung ist nur gültig für das
mitgelieferte Produkt.
12 Gewährleistung
Es gilt die gesetzliche Gewährleistung. Bitte
wenden Sie sich an Ihren Händler oder
Vertragspartner.
Die Gewährleistung erlischt komplett, sofern
unautorisierte Änderungen am Produkt
durchgeführt worden sind. Führen Sie
eigenmächtig keine Reparaturen durch und öffnen
Sie das Produkt nicht.
13 EU-Konformitäts-
erklärung
Hiermit erklärt die
Auerbach/OPf., Deutschland, dass dieser
Funkanlagentyp der Richtlinie
2014/53/EU entspricht. Den vollständigen Text der
EU-Konformitätserklärung finden Sie unter
folgender Internet-Adresse:
www.cherry.de/compliance.
Klicken Sie dort auf den Produktnamen, um die
EU-Konformitätserklärung zu öffnen.
Cherry GmbH,
DE
7
OPERATING MANUAL
CHERRY MW 8 ADVANCED – Wireless Mouse with Bluetooth® and RF Transmission
1 Before you begin ...
Every device is different!
EN
• Read the operating instructions carefully.
• Keep the operating instructions and pass them
The CHERRY MW 8 ADVANCED is a wireless mouse
for operating PCs and laptops.
It is characterized by the following features:
• Switchable transmission via Bluetooth (4.0) or
• Optical laser sensor that even works on glass
• Adjustable resolution for precise work via the
• In-built lithium ion battery for charging via USB
For information on other products, downloads and
much more, visit us at www.cherry.de.
The operating instructions contain
information on effective and reliable
use.
on to other users.
wireless (2.4 GHz)
surfaces
DPI switch on the top of the mouse (600/1000/
1600/3200 dpi)
cable during operation
2 General safety
instructions
WARNING: Risk of choking from
swallowing small parts
• Keep the device out of the reach of children
under 3 years.
NOTICE: The magnet in the mouse can
wipe storage media and damage
mechanical watches
On the bottom of the mouse there is a magnet for
holding its receiver.
• Do not put any storage media such as SD cards
or external hard drives, or mechanical watches
near the mouse.
3 Connecting the mouse
with a PC/laptop
Battery charge status
The battery in the mouse is already
charged. You can use the mouse
immediately.
• Before first use, however, we recommend that
you charge the mouse fully with the cable
supplied (see 5 "Charging the mouse").
You can connect the mouse to the PC/laptop via
Bluetooth or with the receiver using a 2.4 GHz
wireless connection.
The Bluetooth connection is convenient if you wish
to use the mouse with several devices: You only
need to make the connection once and do not
require the receiver.
Parallel login to multiple PCs / laptops
Bluetooth automatically detects if a PC
or laptop that has already been
connected to the device is switched on. In this
case, Bluetooth does not allow a new connection
with any other PC or laptop, thus preventing
inadvertent entries.
• Turn off the first PC/laptop or disable the
connections.
If your PC/laptop does not have Bluetooth or if you
don’t want to make any settings, you can connect
the mouse with the PC/laptop via the receiver.
3.1 Connecting the mouse via Bluetooth
If the mouse is already connected to another
device, you cannot make a parallel connection.
Switch off the first device or deactivate the
connection.
1 Start the search for Bluetooth devices on your
PC/laptop (for example by calling up Start >
Settings > Devices > Bluetooth).
8

2 Follow the instructions in the software.
3 Set the switch on the bottom of the mouse to BT.
4 Activate the Bluetooth connection of the mouse
by pressing the button on the bottom of the
mouse.
The blue LED on the mouse flashes quickly.
If the blue LED does not flash:
• There is already a connection between the
mouse and another PC/laptop. Switch off this
PC/laptop or deactivate the connection on this
PC/laptop.
5 Follow the instructions in the software.
The LED stops glowing and the mouse is connected
with your PC/laptop.
If the red LED of the mouse flashes quickly, the
connection has failed.
• Try to establish the connection again.
3.2 Connecting the mouse via the receiver
The receiver is in a compartment on the bottom of
the mouse and is held in place by magnets.
1 Pull the receiver out of the housing.
2 Connect the receiver to the USB socket on the
PC/laptop.
3 Set the switch on the bottom of the mouse to RF.
The mouse is connected with your PC/laptop.
4 Adjusting the sensitivity
of the mouse
(DPI number)
You can adjust the resolution of the sensor
according to your needs.This changes the speed of
the mouse pointer.
• Press the DPI button on the top of the mouse.
The LED flashes depending on the setting:
1x = 600 dpi
2x = 1000 dpi
3x = 1600 dpi
4x = 3200 dpi
The setting is saved in the mouse and is retained
even when the mouse is switched off.
5 Charging the mouse
When the red LED flashes slowly, you should
charge the mouse soon. The faster the red LED
flashes, the lower the charging status of the
battery.
• Connect the charging cable to the mouse and a
USB socket on the PC/laptop.
The LED glows as long as the mouse is being
charged. When the mouse is fully charged, the LED
stops glowing.
The battery will be charged as long as the PC/
laptop is switched on. You can continue working
while the mouse is charging.
6 Switching the mouse
on/off
Wake-up function with Bluetooth
If your PC/laptop is in standby mode, it
is not possible to wake them up using
Bluetooth devices.
The CHERRY MW 8 ADVANCED switches to a sleep
mode, which requires nearly no energy, when it is
not in use. It switches on again automatically the
first time a button is pressed.
However, it still consumes power in the energysaving mode, therefore you should switch it off
manually for longer periods of disuse or for
transporting.
• Push the switch on the bottom of the mouse to
the corresponding position:
Off
Wireless on = RF
Bluetooth on = BT
7Tips
7.1 Storing the receiver in the mouse
The receiver is so small that it can stay in the USB
socket of a laptop while being transported. To avoid
any damage, you can also pull out the receiver and
deposit it in the mouse to protect it from dirt and
loss (see overview page).
EN
9

OPERATING MANUAL
CHERRY MW 8 ADVANCED – Wireless Mouse with Bluetooth® and RF Transmission
7.2 Cleaning the mouse
NOTICE: Damage due to aggressive
cleaning agents or liquid in the mouse
EN
• Do not use solvents such as benzene, alcohol,
scouring agents or abrasive scourers for
cleaning the mouse.
• Prevent any liquid from getting inside the
mouse.
1 Switch the mouse off.
2 Clean the mouse with a slightly damp cloth and
some mild detergent (such as washing-up
liquid).
3 Dry the mouse with a soft, lint-free cloth.
7.3 RSI syndrome
RSI stands for "Repetitive Strain
Injury". RSI arises due to small
movements continuously repeated
over a long period of time.
Typical symptoms are discomfort in the fingers or
neck.
• Set up your workspace ergonomically.
• Position the keyboard and mouse in such a
manner that your upper arms and wrists are
outstretched and to the sides of your body.
• Take several short breaks, with stretching
exercises if necessary.
• Change your posture often.
7.4 Troubleshooting
• Switch the mouse off and on again.
• When connected via the receiver: Connect the
receiver to another USB port on the PC/laptop.
• When connected via Bluetooth: Remove the
connection to the mouse in the Bluetooth
software and try to establish the connection
again.
8 Disposal
This device contains a lithium ion battery.
This cannot be replaced.
Do not dispose of the device in the
household waste. Batteries may contain
pollutants which can harm the environment and
health. Dispose of the battery with the device in a
retail outlet or at your local recycling depot.
Returning the device is compulsory and free of
charge.
All batteries are recycled. This enables valuable
resources to be restored such as iron, zinc or
nickel. Recycling batteries is the easiest
contribution you can make towards environmental
protection.
Thank you for your cooperation.
9 Technical data
Designation Value
Supply voltage Receiver:
5.0 V/DC ±5%
Charging voltage Typ. 5.0 V/DC
Current consumption Mouse: typ. 10 mA
Standby: max. 0.3 mA
Receiver: typ. 10 mA
Battery Rechargeable lithium
ion battery, 550 mAh
Operating frequency 2400.0 ... 2483.5 MHz
Effective radiated power Max. 10 mW (EIRP)
Bluetooth 4.0
Storage temperature –15 °C ... +60 °C
Operating temperature 0 °C ... +40 °C
10 Contact
Please have the following information on hand
when contacting technical support:
• Item and serial no. of the product
• Name and manufacturer of your system
• Operating system and, if applicable, installed
service pack version
10

For Europe:
Cherry GmbH
Cherrystraße
91275 Auerbach/OPf.
Germany
Internet: www.cherry.de
For USA:
Cherry Americas, LLC
5732 95th Avenue
Suite 850
Kenosha, WI 53144
USA
Tel.: +1 262 942 6508
Email: sales@cherryamericas.com
Internet: www.cherryamericas.com
11 General advice
We reserve the right to make technical
modifications which serve the development of our
products. Improper use and storage can lead to
faults and damage to the product.
These instructions are only valid for the supplied
product.
12 Warranty
The statutory warranty applies. Please contact your
specialist dealer or contractual partner.
The warranty expires completely once unauthorized
modifications to the product have been carried out.
Do not carry out any unauthorized repairs and do
not open up the product.
13 Certifications
13.1 EU Declaration of conformity
The company Cherry GmbH, Auerbach/
OPf., Germany hereby declares that this
radio system model conforms to the
European guideline 2014/53/EU. The full text of the
EU declaration of conformity can be found under
the following Internet address:
www.cherry.de/compliance.
There you must click on the product names to open
the EU declaration of conformity.
13.2 Federal Communications
Commission (FCC) Radio
Frequency Interference
Statement
This device complies with part 15 of the FCC Rules.
Operation is subject to the following two conditions:
(1) This device may not cause harmful interference,
and (2) this device must accept any interference
received, including interference that may cause
undesired operation.
Note: This equipment has been tested and found to
comply with the limits for a Class B digital device,
pursuant to part 15 of the FCC Rules. These limits
are designed to provide reasonable protection
against harmful interference in a residential
installation. This equipment generates, uses and
can radiate radio frequency energy and, if not
installed and used in accordance with the
instructions, may cause harmful interference to
radio communications. However, there is no
guarantee that interference will not occur in a
particular installation. If this equipment does cause
harmful interference to radio or television
reception, which can be determined by turning the
equipment off and on, the user is encouraged to try
to correct the interference by one or more of the
following measures:
• Reorient or relocate the receiving antenna.
• Increase the separation between the equipment
and receiver.
• Connect the equipment into an outlet on a circuit
different from that to which the receiver is
connected.
• Consult the dealer or an experienced radio/TV
technician for help.
Caution: Any changes or modifications not
expressly approved by the party responsible for
compliance could void the user's authority to
operate the equipment.
13.3 For UL
For use with Listed Personal Computers only!
EN
11

MODE D’EMPLOI
CHERRY MW 8 ADVANCED – Wireless Mouse with Bluetooth® and RF Transmission
1 Avant de commencer...
Chaque appareil est différent !
Le mode d’emploi contient des
consignes pour une utilisation efficace
et fiable.
• Lisez attentivement le mode d’emploi.
FR
• Conservez le mode d’emploi et transmettez-le
aux autres utilisateurs.
CHERRY MW 8 ADVANCED est une souris sans fil
pour l’utilisation des PC / ordinateurs portables.
Il se distingue par les caractéristiques suivantes :
• Changement de transmission par Bluetooth (4.0)
ou radio (2,4 GHz)
• Capteur laser optique, fonctionnant également
sur les surfaces en verre
• Changement de résolution par le commutateur
DPI sur la souris pour un travail de précision
(600/1000/1600/3200 dpi)
• Batterie aux ions Lithium installée pour le
chargement via le câble USB en cours de
fonctionnement
Pour obtenir des informations sur d'autres
produits, sur les téléchargements et bien d'autres
choses, consultez le site www.cherry.de.
12
2 Consignes de sécurité
générales
AVERTISSEMENT : Risque
d’étouffement en cas d’ingestion de
petites pièces
• Conserver l’appareil hors de portée des
enfants de moins de 3 ans.
AVIS : Effacement des supports de
données et endommagement des
montres mécaniques en raison des
aimants dans la souris.
Un aimant se trouve sous la souris pour le
maintien du récepteur de la souris.
• Ne placez ni supports de données tels que des
cartes magnétiques ou des disques durs
extérieurs ni montres mécaniques au niveau
de la souris.
3 Relier la souris au PC / à
l’ordinateur portable
Niveau de charge de la batterie
La batterie dans la souris est
préchargée. La souris peut être utilisée
immédiatement.
• Toutefois, avant la première utilisation, nous
vous recommandons de charger la souris avec
le câble fourni (voir 5 "Chargement de la
souris").
Vous pouvez relier la souris au PC / à l’ordinateur
portable par Bluetooth ou à l’aide du récepteur via
une connexion radio 2,4 GHz.
La connexion par Bluetooth est confortable si vous
souhaitez utiliser la souris sur plusieurs appareils :
Vous ne devez établir la connexion qu’une seule
fois et n’avez pas besoin du récepteur.
Connexion parallèle sur plusieurs PC /
ordinateurs portables
Le Bluetooth détecte automatiquement lorsqu’un
PC / ordinateur portable, ayant déjà été connecté
une fois à l’appareil, est activé. Dans ce cas, le
Bluetooth n’autorise aucune nouvelle connexion à
un autre PC / ordinateur portable, afin d’éviter les
erreurs de saisie.
• Coupez le premier PC / ordinateur portable ou
désactivez les connexions.
Si votre PC / ordinateur portable ne dispose pas du
Bluetooth, ou si vous ne souhaitez effectuer aucun
réglage, vous pouvez relier la souris au PC / à
l’ordinateur portable par l’intermédiaire du
récepteur.

3.1 Connexion de la souris par Bluetooth
Si la souris est déjà reliée à un autre appareil, vous
ne pouvez pas effectuer de connexion parallèle.
Désactivez le premier appareil ou coupez la
connexion.
1 Depuis votre PC / ordinateur portable, ouvrez la
recherche des périphériques Bluetooth (par
exemple via Démarrage > Paramètres >
Périphériques > Bluetooth).
2 Suivez les instructions du logiciel.
3 Sous la souris, positionnez le commutateur
sur BT.
4 Activez la connexion Bluetooth de la souris en
appuyant sur le bouton sous la souris.
La LED bleue de la souris clignote rapidement.
Si la LED bleue ne clignote pas :
• La souris est déjà connectée à un autre PC /
ordinateur portable. Éteignez ce PC / cet
ordinateur portable ou désactivez la
connexion sur ce PC / cet ordinateur.
5 Suivez les instructions du logiciel.
La LED s’éteint et la souris est connectée à votre
PC / ordinateur portable.
Si la LED rouge clignote rapidement, la connexion a
échoué.
• Essayez à nouveau.
3.2 Connexion de la souris par l’intermédiaire du récepteur
Le récepteur se trouve dans un compartiment sous
la souris et est maintenu par un aimant.
1 Tirez le récepteur en-dehors du boîtier.
2 Branchez le récepteur à la prise USB du PC ou
de l’ordinateur portable.
3 Sous la souris, positionnez le commutateur
sur RF.
La souris est connectée à votre PC / ordinateur
portable.
4 Modification de
sensibilité de la souris
(nombre de dpi)
La résolution du capteur peut être ajustée en
fonction des besoins. Cela modifie la vitesse du
pointeur de la souris.
• Appuyez sur la touche DPI située sur la souris.
La LED clignote en fonction du réglage :
1x = 600 dpi
2x = 1000 dpi
3x = 1600 dpi
4x = 3200 dpi
Le réglage est enregistré dans la souris et est
conservé lorsqu’elle est mise à l’arrêt.
5 Chargement de la souris
Lorsque la LED rouge clignote lentement, la souris
doit être rechargée prochainement. Plus la LED
rouge clignote rapidement, plus le niveau de
charge de la batterie est bas.
• Branchez le câble de recharge sur la souris et
sur un port USB du PC / de l’ordinateur portable.
Tant que la souris est en charge, la LED clignote.
Lorsque la souris est entièrement chargée, la LED
s’éteint.
Tant que le PC / l’ordinateur portable est allumé, la
batterie de la souris est chargée. Vous pouvez
continuer de travailler pendant le chargement.
6 Marche / arrêt de la
souris
Fonction de sortie du mode veille avec
le Bluetooth
Lorsque votre PC / ordinateur portable
se trouve en mode veille, la sortie du
mode veille via les appareils Bluetooth
n’est pas possible.
Lorsqu’elle n’est pas utilisée, la souris
CHERRY MW 8 ADVANCED se met en mode veille
et consomme très peu d’énergie. Lors de la
première pression sur la touche, elle s’allume à
nouveau automatiquement.
FR
13

MODE D’EMPLOI
CHERRY MW 8 ADVANCED – Wireless Mouse with Bluetooth® and RF Transmission
Veillez à éteindre la souris manuellement si vous
ne l’utilisez plus sur une longue durée ou pour la
transporter car elle continue de consommer de
l’énergie, même en mode d’économie.
• Amenez le commutateur dans la position
correspondante sous la souris :
FR
Arrêt = off
Marche (radio) = RF
Marche (Bluetooth) = BT
7Conseils
7.1 Logement du récepteur dans la
souris
Le récepteur est si petit qu’il peut rester dans le
port USB pendant le transport d’un ordinateur
portable. Vous pouvez retirer le récepteur et le
placer dans la souris afin de le protéger de
l’endommagement et de l’encrassement (cf. page
de vue synoptique).
7.2 Nettoyage de la souris
AVIS : Des nettoyants ou des liquides
corrosifs peuvent endommager la
souris
• Les solvants (essence, alcool etc.), les éponges
ou les produits abrasifs sont à proscrire.
• Prévenez toute pénétration de liquide dans la
souris.
1 Désactivez la souris.
2 Nettoyez la souris avec un chiffon légèrement
humidifié de nettoyant doux (du produit pour la
vaisselle, par exemple).
3 Séchez la souris avec un chiffon doux non
pelucheux.
7.3 Syndrome LMR
LMR signifie "Lésion due aux
mouvements répétitivs". Le syndrome
LMR apparaît suite à de petits
mouvements se répétant en
permanence.
Des symptômes typiques sont des douleurs dans
les doigts ou la nuque.
• Organisez votre poste de travail de manière
ergonomique.
• Positionnez le clavier et la souris de telle façon
que vos bras et vos poignets se trouvent
latéralement par rapport au corps et soient
étendus.
• Faites plusieurs petites pauses, le cas échéant
accompagnées d’exercices d’étirement.
• Modifiez souvent votre attitude corporelle.
7.4 Aide en cas de problème
• Éteignez et rallumez la souris.
• Lors d’une connexion via le récepteur :
Connectez le récepteur à un autre port USB du
PC / de l’ordinateur portable.
• Lors d’une connexion Bluetooth : Supprimez la
souris dans le logiciel Bluetooth et ajoutez-la à
nouveau comme nouveau périphérique.
8Elimination
L’appareil exploite une batterie aux ions
Lithium. Elle ne peut pas être remplacée.
Ne jetez en aucun cas l’appareil avec les
ordures ménagères. Les batteries
contiennent des substances nocives pour la santé
de l'homme et pour l'environnement. Veuillez
remettre les batteries usagées avec l'appareil à un
commerce ou à un centre de recyclage de la
commune. La restitution est imposée par la
législation et se fait à titre gratuit.
Toutes les batteries et tous les accumulateurs sont
recyclés. Cela permet de récupérer des précieuses
matières premières comme le fer, le zinc ou le
nickel. Le recyclage des batteries est la
contribution la plus simple à la protection de
l'environnement.
Merci beaucoup de votre participation.
14

9 Caractéristiques
techniques
Désignation Valeur
Alimentation Récepteur :
Tension de charge Typ. 5,0 V/CC
Consommation de
courant
Batterie Batterie aux ions Lithium
Fréquence
d’émission
Puissance
d’émission
Bluetooth 4.0
Température de
stockage
Température de
fonctionnement
5,0 V/CC ±5 %
Souris : typ. 10 mA
Veille : max. 0,3 mA
Récepteur : typ. 10 mA
rechargeable, 550 mAh
2 400,0 ... 2 483,5 MHz
Max. 10 mW (PIRE)
–15 °C ... +60 °C
0 °C ... +40 °C
10 Contact
En cas de questions, veuillez indiquer les
informations suivantes concernant l'appareil :
• N° d'article et n° de série du produit
• Désignation et fabricant de votre système
• Système d'exploitation et le cas échéant version
installée d'un Service Pack
Cherry GmbH
Cherrystraße
91275 Auerbach/OPf.
Allemagne
Internet : www.cherry.de
11 Généralités
Sous réserve de modifications techniques.
Un traitement et un stockage non conformes
peuvent entraîner des dysfonctionnements et des
dommages du produit.
La présente notice est valable uniquement pour le
produit avec lequel elle est fournie.
12 Garantie
La garantie légale s'applique. Veuillez contacter
votre revendeur ou votre partenaire contractuel.
La garantie devient complètement caduque si des
modifications non-autorisées sont effectuées sur le
produit. N'effectuez aucune réparation de votre
propre chef et n'ouvrez pas le produit.
13 Déclaration de
conformité UE
La société Cherry GmbH, Auerbach/OPf.,
Allemagne, déclare par la présente que
ce type d’équipement radioélectrique est
conforme à la directive européenne 2014/53/UE.
Vous trouverez l’intégralité de la déclaration de
conformité UE sur Internet, à l'adresse suivante :
www.cherry.de/compliance.
Cliquez sur le nom du produit pour ouvrir la
déclaration de conformité UE.
FR
15

MANUAL DE INSTRUCCIONES
CHERRY MW 8 ADVANCED – Wireless Mouse with Bluetooth® and RF Transmission
1 Antes de empezar...
¡Cada aparato es distinto!
En las instrucciones de uso encontrará
explicaciones sobre la utilización
efectiva y segura del aparato.
• Lea las instrucciones detenidamente.
• Guarde las instrucciones de uso y transmítalas
a otros usuarios.
ES
CHERRY MW 8 ADVANCED es un ratón inalámbrico
para PC y ordenador portátil.
Se distingue principalmente por las siguientes
características:
• Comunicación por Bluetooth (4.0) o
radiofrecuencia (2,4 GHz)
• Sensor óptico por láser que funciona incluso en
superficies de cristal
• Resolución conmutable (600/1000/1600/3200 dpi)
por medio del interruptor DPI situado en la parte
superior del ratón para trabajar con precisión
• Pila recargable integrada de iones de litio que
puede cargarse mediante el cable USB mientras
se usa
En la dirección www.cherry.de podrá, entre otros,
encontrar y descargar información sobre los
productos.
2 Indicaciones generales
de seguridad
ADVERTENCIA: peligro de asfixia
debido al atragantamiento con piezas
pequeñas
• Mantenga el aparato fuera del alcance de los
niños menores de 3 años.
AVISO: el imán del ratón puede borrar
el contenido de soportes de memoria y
dañar relojes mecánicos
En la parte inferior del ratón hay un imán
destinado a sujetar el receptor del ratón.
• No sitúe soportes de memoria (tarjetas
magnéticas, discos duros externos) ni relojes
mecánicos cerca del ratón.
3 Conexión del ratón con el
PC u ordenador portátil
Nivel de carga de la pila
La pila del ratón está cargada. Puede
utilizar el ratón inmediatamente.
• Sin embargo, antes del primer uso le
recomendamos cargar el ratón con el cable
suministrado (véase 5 "Carga del ratón").
Puede conectar el ratón con el ordenador, ya sea
de sobremesa o portátil, a través de Bluetooth o
mediante el receptor a través de una conexión de
radiofrecuencia de 2,4 GHz.
La conexión a través de Bluetooth resulta muy
cómoda si desea utilizar el ratón para varios
dispositivos: solo tendrá que establecer la conexión
una vez y no necesitará el receptor.
Registro paralelo en varios PC u
ordenadores portátiles.
El dispositivo Bluetooth reconoce
automáticamente si está encendido un PC u
ordenador portátil que ya ha sido conectado con
el aparato. En ese caso, el Bluetooth no permite
la conexión con otro PC u ordenador portátil para
evitar entradas erróneas.
• Apague el primer PC u ordenador portátil o
desactive las conexiones.
Si su PC o ordenador portátil no dispone de
Bluetooth o si no desea realizar ninguna
configuración, puede conectar el ratón al
ordenador a través del receptor.
16

3.1 Conexión del ratón a través de Bluetooth
Si el ratón ya está conectado a otro dispositivo, no
podrá establecer una conexión paralela. En ese
caso, desconecte el primer dispositivo o borre esa
primera conexión.
1 En su PC o ordenador portátil, abra la búsqueda
de dispositivos Bluetooth (p. ej., con los
comandos Inicio > Configuración >
Dispositivos > Bluetooth).
2 Siga las indicaciones del software.
3 En la parte inferior del ratón, coloque el
interruptor en la posición BT.
4 Active ahora la conexión Bluetooth del ratón
pulsando el botón situado en la parte inferior del
mismo.
El LED azul del ratón parpadea rápidamente.
Si el LED azul no parpadea:
• El ratón ya está conectado con otro
ordenador. Desconecte ese otro ordenador o
desactive la conexión de este con el ratón.
5 Siga las indicaciones del software.
El LED se apaga; el ratón se ha conectado a su
ordenador.
Si el LED rojo del ratón parpadea rápidamente, la
conexión ha fallado.
• Inténtelo de nuevo.
3.2 Conexión del ratón a través del receptor
El receptor se encuentra en un compartimento en
la parte inferior del ratón y se sujeta mediante un
imán.
1 Extraiga el receptor de la carcasa.
2 Conecte el receptor en el puerto USB de su PC o
ordenador portátil.
3 En la parte inferior del ratón, coloque el
interruptor en la posición RF.
El ratón se ha conectado a su PC o ordenador
portátil.
4 Ajuste de la sensibilidad
del ratón (número DPI)
La resolución del sensor se puede ajustar a los
gustos personales. Con ello se modifica la
velocidad del puntero.
• Pulse el botón DPI de la parte superior del ratón.
Según sea el ajuste, el LED parpadea:
1 vez = 600 dpi
2 veces = 1000 dpi
3 veces = 1600 dpi
4 veces = 3200 dpi
El ajuste se guarda en el ratón y se mantiene aún
después de desconectarlo.
5 Carga del ratón
Cuando el LED rojo parpadee lentamente, deberá
cargar el ratón en breve. Cuando más rápido
parpadee el LED rojo, más bajo es el estado de
carga de la pila recargable.
• Conecte el cable de carga con el ratón y con un
puerto USB del PC o ordenador portátil.
El LED permanecerá iluminado mientras se carga
el ratón. Cuando el ratón esté completamente
cargado se apagará el LED.
La pila del ratón se carga mientras el ordenador
está encendido. Usted puede seguir trabajando
mientras se carga el ratón.
6 Encendido y apagado del
ratón
Función de activación con Bluetooth
Cuando su PC o ordenador portátil, se
encuentra en modo stand-by, no
funciona la activación a través de
dispositivos Bluetooth.
Cuando no se utiliza, el CHERRY MW 8 ADVANCED
cambia al modo stand-by, donde prácticamente no
consume energía. Se volverá a encender
automáticamente al pulsar una tecla.
Dado que en el modo de ahorro de energía también
consume algo de energía, conviene apagarlo
ES
17

MANUAL DE INSTRUCCIONES
CHERRY MW 8 ADVANCED – Wireless Mouse with Bluetooth® and RF Transmission
manualmente cuando no se vaya a utilizar durante
un tiempo prolongado o cuando se vaya a
transportar.
• Desplace el interruptor situado en la parte
inferior del ratón a la posición correspondiente:
Apagado = off
Conectado (con radiofrecuencia) = RF
Conectado (con Bluetooth) = BT
ES
7Consejos
7.1 Guardar el receptor en el ratón
El receptor es tan pequeño que puede permanecer
enchufado en el puerto USB incluso al transportar
un ordenador portátil. No obstante, si se desea
excluir la posibilidad de que sufra cualquier tipo de
desperfecto, puede extraer el receptor y guardarlo
en el ratón para evitar que se pierda o que acumule
polvo (véase la página de la vista general).
7.2 Limpieza del ratón
AVISO: se pueden producir daños si se
utiliza un producto de limpieza
agresivo o si penetra líquido en el
ratón
• Para la limpieza no utilice ningún disolvente,
como gasolina o alcohol, ni ningún producto de
limpieza abrasivo ni esponja abrasiva.
• Evite que penetre líquido en el ratón.
1 Apague el ratón.
2 Limpie el ratón con un paño ligeramente
humedecido y un agente de limpieza suave (por
ejemplo: detergente para vajillas).
3 Seque el ratón con un paño suave que no deje
pelusa.
7.3 Síndrome RSI
"Repetitive Strain Injury" = "Síndrome
del túnel carpiano". El RSI se origina
por movimientos pequeños, repetidos
continuamente.
Los síntomas típicos son molestias en los dedos
o en la nuca.
• Organice su puesto de trabajo de forma
ergonómica.
• Coloque el teclado y el ratón de modo que los
brazos y las muñecas se encuentren a los
lados del cuerpo y estirados.
• Haga varias pausas cortas, cuando sea
necesario con ejercicios de estiramiento.
• Cambie con frecuencia la postura corporal.
7.4 Resolución de problemas
• Apague el ratón y vuelva a encenderlo.
• En conexiones a través del receptor: conecte el
receptor en otro puerto USB del PC o ordenador
portátil.
• En conexiones a través de Bluetooth: elimine el
ratón en el software de Bluetooth y vuelva a
añadirlo como nuevo dispositivo.
8Gestión
El dispositivo contiene una pila recargable
de iones de litio. La pila no puede
cambiarse.
No deseche el dispositivo en la basura
doméstica. Las baterías pueden contener
sustancias nocivas para el medio ambiente y la
salud, por ello deposítelas junto con el dispositivo
al que pertenezcan en su establecimiento
comercial o en los centros de reciclaje previstos en
el municipio. La entrega está prescrita por ley y es
gratuita.
Todas las pilas y baterías se reciclan para así
recuperar materias primas valiosas como hierro,
cinc o níquel. El reciclaje de pilas es la contribución
más sencilla al medio ambiente.
¡Muchas gracias por su contribución!
18

9 Datos técnicos
10 Contacto
12 Garantía
Denominación Valor
Suministro de
tensión
Tensión de carga Tipo. 5,0 V/CC
Consumo de
corriente
Pila Pila recargable de iones de
Frecuencia de
emisión
Potencia de
emisión
Bluetooth 4.0
Temperatura de
almacenamiento
Temperatura de
funcionamiento
Receptor:
5,0 V/CC ±5 %
Ratón: tipo. 10 mA
En stand-by: máx. 0,3 mA
Receptor: tipo. 10 mA
litio, 550 mAh
2400,0 ... 2483,5 MHz
Máx. 10 mW (EIRP)
–15 °C ... +60 °C
0 °C ... +40 °C
Si realiza alguna consulta, indique la siguiente
información sobre el dispositivo:
• Nº de artículo y de serie del producto
• Denominación y fabricante del PC, ordenador
portátil o placa base
• Sistema operativo y, en su caso, versión
instalada de un paquete de servicios
Cherry GmbH
Cherrystraße
91275 Auerbach/OPf.
Alemania
Internet: www.cherry.de
11 Instrucciones generales
para el usuario
Nos reservamos el derecho de realizar
modificaciones técnicas destinadas a la mejora del
producto. Un manejo o almacenamiento
inadecuados pueden provocar averías o
desperfectos en el producto.
Las presentes instrucciones solo rigen para el
producto suministrado.
Rige la garantía legal. Póngase en contacto con su
distribuidor o parte contratante.
La garantía pierde su validez tan pronto como se
introduzcan modificaciones no autorizadas. No
lleve a cabo ninguna reparación por su cuenta ni
abra el producto.
13 Declaración de
conformidad de la UE
Por la presente, Cherry GmbH,
Auerbach/OPf., Alemania, declara que
este tipo de equipo inalámbrico cumple
la directiva 2014/53/UE. El texto completo de la
declaración de conformidad de la UE se puede
consultar en la siguiente dirección de Internet:
www.cherry.de/compliance.
Haga clic allí en el nombre del producto para abrir
la declaración de conformidad de la UE.
ES
19

ISTRUZIONE D’USO
CHERRY MW 8 ADVANCED – Wireless Mouse with Bluetooth® and RF Transmission
1 Prima di cominciare...
Ogni apparecchio è diverso!
Il presente manuale d’uso contiene
istruzioni per un uso efficiente e
affidabile.
• Leggere il manuale d’uso con attenzione.
• Conservare il manuale d’uso e consegnarlo ad
altri utenti.
CHERRY MW 8 ADVANCED è un mouse wireless
per il comando di PC/laptop.
IT
Si contraddistingue soprattutto per le seguenti
caratteristiche:
• Trasmissione commutabile mediante
Bluetooth (4.0) o radio (2,4 GHz)
• Sensore laser ottico, funzionante persino su
superfici di vetro
• Risoluzione commutabile per la lavorazione
precisa mediante l’interruttore DPI sul lato
superiore del mouse (600/1000/1600/3200 dpi)
• Batteria incorporata agli ioni di litio per il
caricamento del cavo USB durante il
funzionamento
Per informazioni su ulteriori prodotti, download e
molto altro ancora, visitate la pagina web
www.cherry.de.
2 Avvertenze di sicurezza
generali
AVVERTENZA: pericolo di asfissia
dovuto all’ingerimento di piccoli pezzi
• Conservare l’apparecchio fuori dalla portata
dei bambini al di sotto dei 3 anni.
AVVISO: cancellazione di supporti di
memoria e danneggiamento di orologi
meccanici a causa del magnete
presente nel mouse.
Sulla parte inferiore del mouse si trova un
magnete per tenere il ricevitore del mouse.
• Non portare supporti di memoria, come
schede magnetiche o dischi rigidi esterni, e
orologi meccanici in prossimità del mouse.
3 Collegamento del mouse
con il PC/laptop
Livello di carica della batteria
La batteria del mouse è precaricata. È
possibile utilizzare il mouse
immediatamente.
• Prima dell’uso iniziale, tuttavia, si consiglia di
caricare il mouse con il cavo in dotazione (vedi
5 "Caricamento del mouse").
Il mouse può essere collegato con il PC/laptop via
Bluetooth o con un ricevitore mediante un
collegamento wireless da 2,4 GHz.
Il collegamento via Bluetooth è comodo quando si
desidera utilizzare il mouse su più dispositivi: il
collegamento deve essere stabilito solo una volta e
non occorre utilizzare il ricevitore.
Registrazione parallela su più PC/
laptop
Il Bluetooth riconosce automaticamente se è già
acceso un PC/laptop che è stato collegato già una
volta con il dispositivo. In questo caso il Bluetooth
non consente nessun nuovo collegamento con un
altro PC/laptop in modo da non creare immissioni
errate.
• Spegnere il primo PC/laptop o disattivare i
collegamenti.
Nell’eventualità che il PC/laptop non disponga di
Bluetooth o che non si desideri effettuare alcuna
impostazione, è possibile collegare il mouse al PC/
laptop tramite il ricevitore.
3.1 Collegamento del mouse tramite Bluetooth
Se il mouse è già collegato con un altro dispositivo,
non sarà possibile stabilire un collegamento
parallelo. Disinserire il dispositivo o staccare il
collegamento.
20

1 Aprire sul PC/laptop la ricerca di dispositivi
Bluetooth (ad esempio con
Avvio > Impostazioni > Dispositivi > Bluetooth).
2 Seguire le istruzioni del software.
3 Regolare l’interruttore sul lato inferiore del
mouse su BT.
4 Attivare il collegamento Bluetooth del mouse
premendo il pulsante sul lato inferiore del
mouse.
Il LED blu del mouse lampeggia velocemente.
Se il LED blu non lampeggia:
• Sussiste già un collegamento del mouse con
un altro PC/laptop. Spegnere questo PC/
laptop oppure disattivare il collegamento sul
suddetto PC/laptop.
5 Seguire le istruzioni del software.
Il LED si spegne e il mouse è collegato con il PC/
laptop.
Se lampeggia il LED rosso del mouse, vuol dire che
il collegamento non è riuscito.
• Ritentare.
3.2 Collegamento del mouse tramite ricevitore
Il ricevitore si trova in uno scomparto sul lato
inferiore del mouse e viene trattenuto da magneti.
1 Estrarre il ricevitore dall’alloggiamento.
2 Collegare il ricevitore alla presa USB del PC/
laptop.
3 Regolare l’interruttore sul lato inferiore del
mouse su RF.
Il mouse è collegato con il PC/laptop.
4 Modifica della sensibilità
del mouse (numero DPI)
È possibile regolare in modo adeguato la
risoluzione del sensore. In questo modo la velocità
del cursore del mouse cambia.
• Premere il tasto DPI sul lato superiore del
mouse.
A seconda dell’impostazione il LED lampeggia:
1x = 600 dpi
2x = 1000 dpi
3x = 1600 dpi
4x = 3200 dpi
L’impostazione viene salvata nel mouse e resta
invariata anche dopo lo spegnimento.
5 Caricamento del mouse
Se il LED lampeggia lentamente, vuol dire che
occorre caricare tra breve il mouse. Maggiore è la
frequenza alla quale lampeggia il LED, minore sarà
lo stato di carica della batteria.
• Collegare il cavo di ricarica con il mouse e con
una presa USB sul PC/laptop.
Il LED è acceso per tutto il tempo in cui viene
caricato il mouse. Quando il mouse è
completamente caricato, il LED si spegne.
Finché è acceso il PC/Laptop, la batteria del mouse
viene caricata. È possibile lavorare durante il
caricamento.
6 Spegnimento/accensione
del mouse
Funzione di riattivazione con Bluetooth
Se il PC/laptop si trova in modalità
stand-by, la funzione di riattivazione
non è possibile attraverso gli
apparecchi Bluetooth.
Il CHERRY MW 8 ADVANCED, se non utilizzato,
commuta in una modalità di riposo con consumo di
energia pressoché nullo. Non appena si preme un
tasto, si riattiva automaticamente.
Dal momento che consuma energia anche nella
modalità di risparmio energetico, si consiglia di
spegnerlo manualmente in caso di inutilizzo
prolungato o durante trasporto.
• Spingere nella posizione corrispondente
l’interruttore sul lato inferiore del mouse:
Spento = off
Acceso (radio) = RF
Acceso (Bluetooth) = BT
IT
21

ISTRUZIONE D’USO
CHERRY MW 8 ADVANCED – Wireless Mouse with Bluetooth® and RF Transmission
7 Suggerimenti
7.1 Sistemazione del ricevitore nel mouse
Il ricevitore è talmente piccolo che può restare
nella presa USB anche durante il trasporto di un
laptop. Per escludere danneggiamenti, è possibile
comunque estrarre il ricevitore e metterlo nel
mouse, per proteggerlo dallo sporco e prevenirne
lo smarrimento (vedi pagina di riepilogo).
7.2 Pulizia del mouse
IT
AVVISO: danneggiamento dovuto a
detergenti aggressivi o liquidi nel
mouse
• Per la pulizia non ricorrere a solventi quali
benzina o alcool o a prodotti abrasivi o spugnette abrasive.
• Evitare che i liquidi penetrino nel mouse.
1 Spegnere il mouse.
2 Pulire il mouse con un panno appena inumidito e
una piccola dose di detergente delicato (ad es.
detersivo per i piatti:
3 Asciugare il mouse utilizzando un panno
morbido che non rilascia pelucchi.
7.3 Sindrome RSI
RSI è l'acronimo di "Repetitive Strain
Injury", ovvero sindrome da tensione
ripetuta. La sindrome RSI è causata da
piccoli e continui movimenti ripetuti.
Sintomi tipici sono dolori alle dita e alla nuca.
• Allestire la postazione di lavoro in modo
ergonomico.
• Posizionare la tastiera e il mouse in modo tale
che l'avambraccio e l'articolazione del polso si
trovino ai lati del corpo e siano distesi.
• Fare piccole pause, eventualmente praticando
esercizi di allungamento.
• Cambiare spesso posizione.
7.4 Consigli in caso di problemi
• Spegnere e riaccendere il mouse.
• Con collegamento tramite il ricevitore: collegare
il ricevitore a un’altra porta USB del PC/laptop.
• Con collegamento via Bluetooth: rimuovere il
mouse nel software del Bluetooth e aggiungerlo
nuovamente come nuovo dispositivo.
8 Smaltimento
Il dispositivo è provvisto di batteria agli ioni
di litio. Essa non può essere sostituita.
Non smaltire il dispositivo nei rifiuti
domestici. Le batterie possono contenere
sostanze nocive per l'ambiente e la salute.
Consegnarle insieme al dispositivo in un negozio o
nei centri di riciclaggio predisposti dai comuni. La
restituzione è prevista per legge ed è gratuita.
Tutte le batterie e gli accumulatori vengono
riciclati, permettendo così di recuperare materie
prime come ferro, zinco o nichel. Il riciclaggio delle
batterie è il più semplice contributo alla tutela
dell'ambiente.
Vi ringraziamo per il vostro aiuto.
22

9 Dati tecnici
Denominazione Valore
Tensione di alimentazione
Tensione di
carica
Corrente assorbita
Batteria Batteria caricabile agli ioni
Frequenza di
trasmissione
Potenza di
trasmissione
Bluetooth 4.0
Temperatura di
magazzinaggio
Temperatura
d'esercizio
Ricevitore:
5,0 V/DC ±5%
Tip. 5,0 V/DC
Mouse: tip. 10 mA
Standby: max 0,3 mA
Ricevitore: tip. 10 mA
di litio, 550 mAh
2400,0 ... 2483,5 MHz
Max. 10 mW (EIRP)
–15 °C ... +60 °C
0 °C ... +40 °C
10 Contatti
In caso di richieste, indicare le seguenti
informazioni sull'apparecchio:
• N° di articolo e di serie del prodotto
• Denominazione e produttore del PC, laptop o
scheda madre
• Sistema operativo ed eventualmente versione
installata di un service pack
Cherry GmbH
Cherrystraße
91275 Auerbach/OPf.
Germania
Internet: www.cherry.de
11 Avvertenza generale per
l'utente
Ci riserviamo il diritto di effettuare modifiche
tecniche che consentano un miglioramento del
prodotto. Un uso e uno stoccaggio del prodotto non
appropriati possono causare guasti e danni al
prodotto.
Il presente manuale vale solo per il prodotto in
dotazione.
12 Garanzia
L'apparecchio è coperto dalla garanzia legale. Per
qualsiasi informazione, contattare il proprio
rivenditore o parte contraente.
La garanzia decade completamente qualora sul
prodotto siano state apportate modifiche non
autorizzate. Non effettuare riparazioni in modo
arbitrario e non aprire il prodotto.
13 Dichiarazione di
conformità UE
Cherry GmbH, Auerbach/OPf., Germania,
con la presente dichiara che questo
modello di impianto radio corrisponde
alla Direttiva 2014/53/UE. Il testo completo della
Dichiarazione di conformità UE è disponibile su
Internet al seguente indirizzo:
www.cherry.de/compliance.
Cliccare qui sul nome del prodotto per aprire la
Dichiarazione di conformità UE.
IT
23

GEBRUIKSHANDLEIDING
CHERRY MW 8 ADVANCED – Wireless Mouse with Bluetooth® and RF Transmission
1 Voordat u begint...
Elk apparaat is anders!
De handleiding bevat aanwijzingen over
effectief en betrouwbaar gebruik.
• Lees de handleiding nauwkeurig door.
• Bewaar de handleiding en stel deze ter
beschikking voor andere gebruikers.
De CHERRY MW 8 ADVANCED is een muis voor de
bediening van de pc/laptops.
Het onderscheidt zich vooral door de volgende
eigenschappen:
• Omschakelbare overdracht via Bluetooth (4.0) of
NL
radio (2,4 GHz)
• Optische lasersensor, werkt zelfs op glazen
oppervlakken
• Omschakelbare resolutie voor exact werken
door de DPI-schakelaar aan de muisbovenzijde
(600/1000/1600/3200 dpi)
• Ingebouwde lithium-ion-accu voor het laden via
USB-kabel tijdens gebruik
Informatie over verdere producten, downloads, etc,
vindt u op www.cherry.de.
2 Algemene
veiligheidsinstructies
WAARSCHUWING: Verstikkingsgevaar
door inslikken van kleine onderdelen
• Bewaar het apparaat buiten bereik van
kinderen jonger dan 3 jaar.
LET OP: Wissen van geheugenmedia
en beschadiging van mechanische
klokken door magneet in de muis.
Aan de onderzijde van de muis bevindt zich voor
het bevestigen van de ontvanger van de muis een
magneet.
• Breng geen geheugenmedia zoals
magneetkaarten of externe harde schijven in
het bereik van de muis.
3 Muis met de pc/laptop
verbinden
Laadtoestand van de accu’s
De accu van de muis is geladen. U kunt
de muis onmiddellijk gebruiken.
• Voor het eerste gebruik adviseren wij om de
muis met de bijgeleverde kabel te laden (zie 5
"Muis laden").
U kunt de muis via Bluetooth met de pc/laptop
verbinden of met de ontvanger via een 2,4 GHz
snoerloze verbinding.
De verbinding via Bluetooth is comfortabel, als u de
muis met meerdere apparaten wilt gebruiken: U
brengt de verbinding slechts een keer tot stand, en
heeft de ontvanger niet nodig.
Parallelle aanmelding bij meerdere
pc’s/laptops
Bluetooth herkent automatisch, als al een pc/
laptop is ingeschakeld die al eens met het
apparaat verbonden is geweest. In dit geval laat
Bluetooth geen nieuwe verbinding met een
andere pc/laptop toe, om onjuiste invoer te
voorkomen.
• Schakel de eerste pc/laptop uit of deactiveer
de verbindingen.
Als uw pc/laptop niet over Bluetooth beschikt of als
u geen instellingen wilt uitvoeren, kunt u de muis
via de ontvanger met de pc/laptop verbinden.
24

3.1 Muis via Bluetooth verbinden
Als de muis al met een ander apparaat is
verbonden, kunt u geen parallelle verbinding
maken. Schakel het eerste apparaat uit of
ontkoppel de verbinding.
1 Open op uw pc/laptop de zoekfunctie voor
Bluetooth-apparaten (bijvoorbeeld via Start >
Instellingen > Apparaten > Bluetooth).
2 Volg de aanwijzingen van de software.
3 Zet de schakelaar aan de onderzijde van de muis
op BT.
4 Activeer de Bluetooth-verbinding van de muis
door op de knop aan de onderzijde van de muis
te drukken.
De blauwe LED van de muis knippert snel.
Als de blauwe LED niet knippert:
• er bestaat al een verbinding van de muis met
een andere pc/laptop. Schakel de pc/laptop uit
of deactiveer de verbinding op deze pc/laptop.
5 Volg de aanwijzingen van de software.
De LED gaat uit en de muis is met uw pc/laptop
verbonden.
Als de rode LED van de muis snel knippert, is de
verbinding mislukt.
• Probeer het opnieuw.
3.2 Muis via ontvanger verbinden
De ontvanger bevindt zich in een vak aan de
onderzijde van de muis en wordt door een magneet
gefixeerd.
1 Neem de ontvanger uit de behuizing.
2 Sluit de ontvanger aan op de USB-aansluiting
van de pc/laptop.
3 Zet de schakelaar aan de onderzijde van de muis
op RF.
De muis is met uw pc/laptop verbonden.
4 Wijzigen van de
gevoeligheid van de muis
(DPI-waarde)
De resolutie van de sensor kunt u overeenkomstig
aanpassen. Hierdoor verandert de snelheid van de
muisaanwijzer.
• Druk op de DPI-schakelaar aan de
muisbovenzijde.
De LED knippert afhankelijk van de instelling:
1x = 600 dpi
2x = 1000 dpi
3x = 1600 dpi
4x = 3200 dpi
De instelling wordt in de muis opgeslagen en blijft
ook na het uitschakelen behouden.
5Muis laden
Als de rode LED langzaam knippert, moet u de
muis binnenkort laden. Hoe sneller de rode LED
knippert, hoe geringer de laadtoestand van de accu
is.
• Verbind de laadkabel met de muis en een USBbus van de pc/laptop.
Zolang de muis geladen wordt, brandt de LED. Als
de muis vol geladen is, gaat de LED uit.
Zolang de pc/laptop is ingeschakeld, wordt de accu
van de muis geladen. Tijdens het laden kunt u
gewoon verder werken.
6 Muis in-/uitschakelen
Wekfunctie via Bluetooth
Als uw pc/laptop in de standby-modus
staat, is het niet mogelijk om via
Bluetooth-apparaten te worden gewekt.
Als de CHERRY MW 8 ADVANCED niet wordt
gebruikt, schakelt deze in een slaapmodus, waarin
bijna geen energie nodig is. Nadat u de eerste keer
op de knop drukt, worden ze automatisch weer
ingeschakeld.
Omdat er in de energiebesparingsmodus toch
energie wordt gebuikt, dient u de muis voor
langdurig niet-gebruik en bij transport handmatig
uit te schakelen.
NL
25

GEBRUIKSHANDLEIDING
CHERRY MW 8 ADVANCED – Wireless Mouse with Bluetooth® and RF Transmission
• Schuif de schakelaar aan de onderzijde van de
muis in de desbetreffende positie:
Uit = off
Aan (snoerloos) = RF
Aan (Bluetooth) = BT
7Tips
7.1 Ontvanger in de muis opbergen
De ontvanger is zo klein dat hij ook bij transport van
een laptop in de USB-bus kan blijven. Om
beschadigingen uit te sluiten, kunt u de ontvanger
er ook uittrekken en ter bescherming tegen vuil en
verlies in de muis opbergen (zie overzicht).
NL
7.2 Reinigen van de muis
LET OP: Beschadiging door agressieve
reinigingsmiddelen of vloeistof in de
muis
• Gebruik voor de reiniging geen oplosmiddelen
zoals benzine of alcohol en geen schuurmiddelen of schuursponzen.
• Voorkom dat vloeistof de muis binnendringt.
1 Schakel de muis uit.
2 Reinig de muis met een licht vochtige doek en
weinig reinigingsmiddel (bijvoorbeeld
afwasmiddel).
3 Droog de muis af met een pluisvrije, zachte
doek.
7.3 RSI-syndroom
RSI staat voor "Repetitive Strain
Injury" = "Pijnklachten door
herhaaldelijke overbelasting". RSI
ontstaat door kleine, zich voortdurend
herhalende bewegingen.
Typische symptomen zijn klachten in de vingers
of in de nek.
• Richt uw werkplek ergonomisch in.
• Plaats het toetsenbord en de muis op zo'n
manier dat uw bovenarmen en polsen zich aan
de zijkant van het lichaam bevinden en zijn
gestrekt.
• Las meerdere kleine pauzes in en doe
eventueel een aantal rekoefeningen.
• Wijzig uw lichaamshouding zeer regelmatig.
7.4 Hulp bij problemen
• Schakel de muis uit en weer in.
• Bij verbinding via de ontvanger: Sluit de
ontvanger aan op een andere USB-aansluiting
van de pc/laptop.
• Bij verbinding via Bluetooth: Verwijder de muis in
de Bluetooth-software en voeg deze weer toe als
nieuw apparaat.
8Afvoer
Het apparaat bevat een lithium-ion-accu.
Deze kan niet worden vervangen.
Voer het apparaat niet af bij het
huidshoudelijke afval. Batterijen kunnen
stoffen bevatten die schadelijk zijn voor het milieu
en de gezondheid. Geef de batterijen samen met
het apparaat af bij uw handelaar of breng ze naar
de plaatselijke milieustraat. De teruggave is
wettelijk verplicht en gratis.
Alle accu's en batterijen worden hergebruikt. Zo
kunnen waardevolle grondstoffen, zoals ijzer, zink
of nikkel, worden teruggewonnen. Accurecycling is
de eenvoudigste bijdrage aan de bescherming van
het milieu.
Bedankt voor uw medewerking.
26

9 Technische gegevens
10 Contact
12 Garantie
Aanduiding Waarde
Voedingsspanning Ontvanger:
5,0 V/DC ±5 %
Laadspanning Type. 5,0 V/DC
Stroomverbruik Muis: type. 10 mA
Standby: max. 0,3 mA
Ontvanger: type. 10 mA
Accu Oplaadbare lithium-
ion-accu, 550 mAh
Zendfrequentie 2400,0 ... 2483,5 MHz
Zendvermogen Max. 10 mW (EIRP)
Bluetooth 4.0
Opslagtemperatuur –15°C ... +60 °C
Bedrijfstemperatuur 0 °C ... +40 °C
Vermeld bij aanvragen de volgende informatie over
het apparaat:
• Artikel- en serienummer van het product
• Naam en fabrikant van uw pc, laptop of
moederbord
• Besturingssysteem en eventueel geinstalleerde
versie van een Service Pack
Cherry GmbH
Cherrystraße
91275 Auerbach/OPf.
Duitsland
Internet: www.cherry.de
11 Algemene gebruikerstip
Technische wijzigingen, die voor de verbetering
dienen, behouden wij ons voor. Verkeerde
behandeling en opslag kunnen tot storingen en
schade aan het product leiden.
Deze gebruiksaanwijzing is alleen geldig voor het
meegeleverde product.
De wettelijke garantie is van toepassing. Neem
contact op met uw handelaar of verdragspartner.
De garantie vervalt volledig, als er
ongeautoriseerde wijzigingen aan het product zijn
uitgevoerd. Voer geen eigenmachtige reparaties uit
en open het product niet.
13 EU-conformiteits-
verklaring
Hierbij verklaart Cherry GmbH,
Auerbach/OPf., Duitsland, dat dit type
radio-installatie aan Richtlijn 2014/53/EU
voldoet. De volledige tekst van de EUconformiteitsverklaring is te vinden op het volgende
internetadres: www.cherry.de/compliance.
Klik daar op de productnaam om de
EU-conformiteitsverklaring te openen.
NL
27

Leave us a comment
#cherrykeyboards
social.cherry.de/fbmx social.cherry.de/youtube
social.cherry.de/twitter social.cherry.de/insta
blog.cherry.de
Cherry GmbH, Cherrystraße, 91275 Auerbach/OPf., Germany – www.cherry.de
 Loading...