

Page 1

Wireless-G Broadband Router
User Manual (GWA502)
®
®
Page 2

Page 3

Welcome
Thank you for choosing IOGEAR® to serve your wireless needs. Soon, you will be sharing files
or surfing the Internet wirelessly. We hope you will have as much fun using your IOGEAR
®
Wireless-G Broadband Router, as we had designing it.
Rest assured, your IOGEAR® Wireless-G Broadband Router is built rock-solid to ensure
maximum up-time for you to stay up-and-running. If for any reason you have a problem, we
stand behind our products with an industry-leading 3 year factory warranty, so you can have
peace-of-mind with your current and future IOGEAR® purchases.
We want you to be happy with your purchase, so we have made every effort to ensure product
quality, reliability, and ease-of-use.
©2004 IOGEAR. All Rights Reserved. PKG-M0108
IOGEAR®, the IOGEAR® logo, are trademarks or registered trademarks of IOGEAR®, Inc. Microsoft and Windows are
registered trademarks of Microsoft® Corporation. IBM is a registered trademark of International Business Machines, Inc.
Macintosh, G3/G4 and iMac are registered trademarks of Apple Computer, Inc. IOGEAR® makes no warranty of any kind with
regards to the information presented in this document. All information furnished here is for informational purposes only and is
subject to change without notice. IOGEAR®, Inc. assumes no responsibility for any inaccuracies or errors that may appear in
this document.
Page 4

Table of Contents
Package Contents
Introduction
Features
Requirements
○○○○○○○○○○○○○○○○○○○○○○○○○○○○○○○○
○○○○○○○○○○○○○○○○○○○○○○○○○○○○○○○○○
○○○○○○○○○○○○○○○○○○○○○○○○○○○○○○○
Pictorial Introduction
Installation
○○○○○○○○○○○○○○○○○○○○○○○○○○○○○○○○
Quick Installation
Configuration Utility
- System Page
- LAN Page
- Wireless Page
- Internet Page
- Firewall Page
○○○○○○○○○○○○○○○○○○○○○○○○○○○○○○
○○○○○○○○○○○○○○○○○○○○○○○○○○○○○○○○
○○○○○○○○○○○○○○○○○○○○○○○○○○○○○○
○○○○○○○○○○○○○○○○○○○○○○○○○○○○○○○
○○○○○○○○○○○○○○○○○○○○○○○○○○○○○○
○○○○○○○○○○○○○○○○○○○○○○○○○○○○○
○○○○○○○○○○○○○○○○○○○○○○○○○○○○
○○○○○○○○○○○○○○○○○○○○○○○○○○○○○
○○○○○○○○○○○○○○○○○○○○○○○○○○○○
03
04
05
06
07
10
14
22
23
28
33
46
52
Page 5

Table of Contents
- NAT Page
- Summary Page
Specification
Technical Support
○○○○○○○○○○○○○○○○○○○○○○○○○○○○○○○○○
○○○○○○○○○○○○○○○○○○○○○○○○○○○○○○
○○○○○○○○○○○○○○○○○○○○○○○○○○○○○○○○
○○○○○○○○○○○○○○○○○○○○○○○○○○○○○
Radio and TV Interference Statement
Limited Warranty
○○○○○○○○○○○○○○○○○○○○○○○○○○○○○
Regulatory Compliance FCC Warning
○○○○○○○○○○○○○○○○○○○○○
○○○○○○○○○○○○○○○○○○○○
2
57
59
62
64
65
66
67
Page 6

Package Contents
This package contains:
• IOGEAR Wireless-G Broadband Router
• Category-5 Ethernet Patch Cable
• AC Po wer Adapter
• Quick Start Guide
• User Manual CD
• Warranty & Registration Card
3
Page 7

Introduction
IOGEAR’s Ultra-F ast Wireless-G Broadband Router is an all-in-one wireless access point, router , and 4-port
Ethernet switch for both small and home office users. With IOGEAR, you can surf the Internet, share files, and
chat with your friends....Wirelessly!
Our simple, easy-to-use, web-based setup wizard will have you up-and-running in minutes.
Moreover, our turn-ke y Firew all and Wireless Security packages keep y ou saf e on the Internet.
Remember, IOGEAR’ s Wireless Broadband Router giv es y ou the same connectivity and security that big
companies use...all in a small, cost-effective, reliable setup . Go with IOGEAR, and go Wireless!
4
Page 8

Features
Features
• Built-in…
- 4-port 10/100 Base T Ethernet Switch
- Internet Router
- Wireless Access Point
• 802.11g and 802.11b Compliant
• Advanced Wireless Security P ac kage
- Wireless Protected Access (W AP)
- Wired Equivalent Privacy (WEP)
- MAC and IP Address Filtering
• Built-in High-Gain Directional Antenna —— Super signal transceiving
• NAT and SPI FireWall
• Solid Three Y ear Limited Warranty
5
Page 9

System Requirements
• PC system
- 200MHz or faster CPU
- Internet browser
- Microsoft Windows 98/ME/2000/XP
- Ethernet interface card or WLAN client card installed
• Mac system
- G3 Power Mac or higher
- Mac OS 9.2 and above
- Open Ethernet Prot or Airport card installed
Requirements
6
Page 10
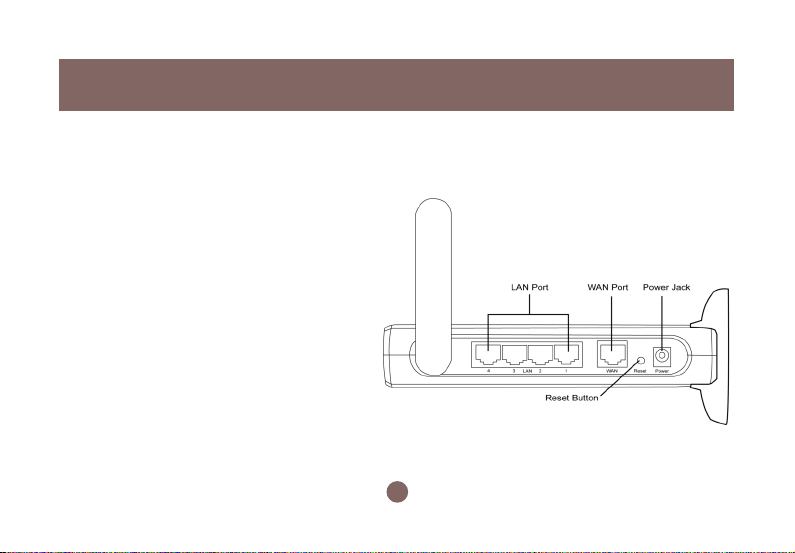
Pictorial Introduction
Back View
1. LAN ports: Ethernet P orts. Allows
connections of up to four computers or daisychain out to more hubs and switches.
2. W AN port: The WAN port is where you
connect your Cable or DSL modem through
an ethernet cable. It’s the only port that
connects to the Internet.
3. Reset button: The reset b utton can reboot the
router or set back to factory default setting.
Pess about 2 seconds to reboot the router;
press over 5 seconds to go back to factory
setting.
4. Po wer Jack: Po wer cable connection for 12V
adapter.
1
3
7
24
Page 11
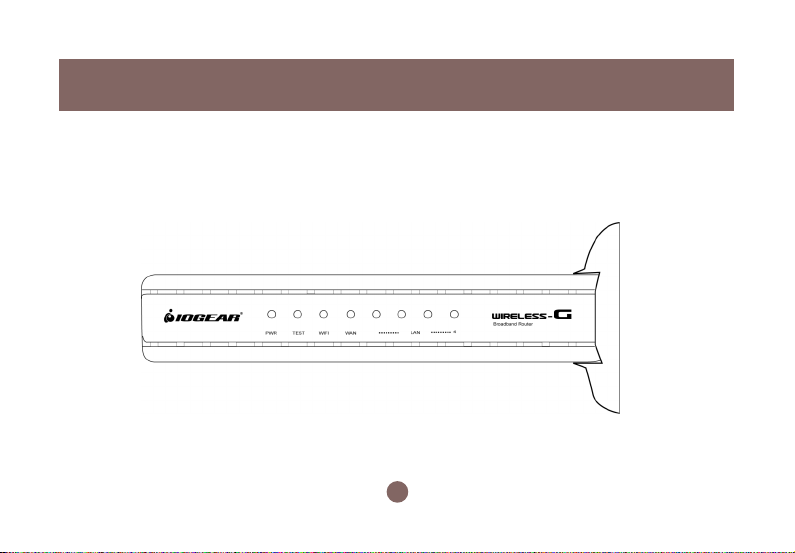
Front View
Pictorial Introduction
8
Page 12

Pictorial Introduction
Front View
9
Page 13

Configuring your PC
The instructions in this section will help you configure
each of your computers to be able to communicate
with the Wireless-G Broadband Router.
Note: The follo wing screenshots are taken in
Windows 2000. F or other OS, the configuration
procedure will be exactly the same but the
screenshots will vary.
1. Right-click mouse b utton on the My Netw ork Place
icon on your Windows desktop and select
Properties from the short-cut menu.
Installation
10
Page 14

Installation
2. Right-click the Local Area Connection for the
Ethernet Adapter equipped on your computer and
select Properties from the shortcut menu.
3. Click the General tab of the Location Area
Connection dialog box, select Internet Protocol
(TCP/IP) and click Properties.
11
Page 15

4. In the General tab, you can choose either obtain
an IP address automatically or Use the following IP
address.
• Enable DHCP: Click the b utton of Obtain an IP
address automatically.
• Use static IP address: Clic k the b utton of Use the
following IP address. F or e xample, in the IP
address field, enter in the following IP address:
192.168.62.11.
Note: The def ault IP address of the router is
192.168.62.10 so the IP address for the Ethernet
Adapter must follow the 192.168.62.x IP address
format and the IP should not be the same IP address
assigned to any other devices in the network.
12
Enable
DHCP
Function
Obtain
a Static
ID
Installation
Page 16

Installation
5. Under Subnet mask, input the follo wing IP address: 255.255.255.0.
6. Click OK to save your settings and close the dialog box.
13
Page 17

Quick Installation
1. Tak e your IOGEAR® Wireless-G Broadband Router
out of box. Simply plug-in the included AC Adapter
to the wall outlet, then to the Broadband Router.
Make sure the power LED illuminates; otherwise ,
try another AC Wall Outlet.
2. F or initial setup , plug your desktop or notebook
computer directly into the LAN Port #1 with the
included CA T5 patch cab le. Please mak e sure
that your computer LAN setting is DHCP or
192.168.62.x. Submask: 255.255.255.0.
14
Page 18

Quick Installation
3. Open your Internet Browser (Internet Explorer,
Netscape, or Safari), and type in the following URL
in your browser’s address bar: 192.168.62.10. You
will be brought to Enter Network Password
prompt window. The default User Name is admin;
Password is admin .
4. To proceed to the basic setup options, clic k
on the Typical button.
15
Page 19

Quick Installation
5. You will now be ask ed f or the Time Zone you
are in. Select your Time Zone, and select
whether you wish to enable Daylight Savings
Time. Clic k Next to continue.
6. You will now be asked f or which Internet
Connection Type you are using. When you
select the connection type, you will be asked for
your ISP’s configuration settings (if applicable).
16
Page 20

Quick Installation
a. Cable Modem and DHCP Client - If y our broadband
access is through a cable modem, or if your IP
address is automatically assigned by your service
provider or a DHCP server, you should choose this
type.
• If your ISP gave you a Host Name or a MAC
address, you can enter them on the following
page.
b. Static IP - xDSL - If your broadband access is
through an xDSL modem and your ISP assigned
you a static IP Address, you should choose this type.
• Please enter the necessary information such as
the IP Address, Subnet Mask, Default Gatewa y
and DNS server that your ISP provided in the
following page.
c. Dynamic IP - If your broadband access is through
an xDSL modem and your ISP did not assign you a
static IP Address, you should choose this type.
• Please enter the necessary information such as
username and password your ISP provided in the
following page. If your ISP gave you a service
name, you should enter it in the following page.
d . Dynamic IP (Eur opean countries) - If your
broadband access is through an xDSL modem and
your ISP did not assign you a static IP Address,
you should choose this type.
• If your Internet Service Provider requires the use
of PPTP, enter the information. (PPTP is generally
more popular in Europe.)
After you have entered your ISP’s configuration
settings, click Next.
17
Page 21

Quick Installation
7. You will now see the Wireless Configuration
Settings. You can set the SSID, channel, and
wireless security for your wireless gatewa y here .
Click Next when you are done.
(For more information on SSID , channel, and
wireless security, y ou can mo ve the mouse cursor
over the highlighted feature and an explanation will
appear.)
8. You will now see the Firew all settings. IOGEAR®
offers you an easy set-up package to configure a
Firewall. Please note high Firew all protection will
make your network securer, but ma y cause
wireless gateway’ s performance to be lower . Click
Next when you are done.
18
Page 22

Quick Installation
This is the summary page showing all
9.
configurations you’ve set. Clic k Next
when you are done.
10. You can click the test button to see whether
your Internet connection is functioning. Please
make sure your WAN port has been connected
(to a xDSL, Cable modem, or Ethernet). Click
Finish when you are done. When you have
finished the configuration, you will be brought to
the main window.
19
Page 23

Advanced Setup
After going through all the steps in Typical Configuration, your wireless router is ready to connect to your
ISP and allow internal clients to access to the Internet.
If you want to customize your wireless router for
specific purposes, you may perform the configuration
in this section.
1. Log-in to your Wireless Broadband Router
(Default as http://192.168.62.10)
2. You will now be asked for User Name and
Password. Unless you hav e changed them, they
should be default as admin (user name); admin
(Password).
Quick Installation
20
Page 24

Quick Installation
3. After you have logged in, click on the Custom
button.
4. The Customized Configuration menu is separated
into seven categories.
21
Page 25

Configuration Utility
System
LAN
Wireless
Internet
Firewall
NA T
Summary
It includes all the basic configuration tools, such as options to control management access,
upgrading system firmware and restart system.
The router must have an IP address for the local network. You can also enable DHCP service for
dynamic IP address allocation to your clients, or configure filtering functions based on specific
clients or protocols.
In this section, you can configure all wireless related settings for your wireless access point.
In Internet settings, you can configure the way your router connects to you ISP.
Y our Wireless-G Broadband Router f eatures po werful and flexib le Firew all protection to keep your
network secure. You can configure the strength of Firew all protection to a high or lo w lev el. If you
are an advanced user, y ou can configure Firewall policies to meet on y our needs .
Network Address Translation allows multiple users at your local site to access the internet over a
single user account. It can also prevent hac k er attac ks by mapping local addresses to pub lic
addresses for key services such as W eb or FTP.
In this section, you can check all system status, network statistics and Event Log.
22
Page 26

Configuration Utility
System Page
23
Page 27

Configuration Utility
Time Zone
For system management purposes, a correctly
configured time zone setting will let you have accurate
time stamps on the system log. If you’ re in an area that
is within the daylight savings time period, please also
check the option.
Restart
In some special cases, you may restart your
Wireless-G Broadband Router manually without
unplugging the power cable. Please note that
restarting the Wireless-G Broadband Router you
will not lose your current configuration. Click
Restart button to restart the router.
24
Page 28

Configuration Utility
Click the Restore button to set your configuration
back to factory settings.
Password SettingFactory Default
This is where you can change your administration
password for the Wireless-G Broadband Router . For
better security, y ou should giv e a new pass word
because password setting is disabled by def ault.
Don’t forget to Click Apply button to make y our
configuration take effect.
25
Page 29

Remote Management
This setting allows you to manage your Wireless-G
Broadband Router through a WAN connection
(Internet). Click the button to enable or disab le this
function. If you enable this function y ou can use the
specified port on your PC to remotely control the
router. The def ault port is 8080.
Configuration Utility
26
Page 30

Configuration Utility
Firmware Update
From time to time, a new and updated firmware will
be released, which has either feature improvements
or bug fixes. Once y ou download the new firmware
patch, you can update the firmware of your WirelessG Broadband Router from here.
• Upgrade Steps:
T o update the firmware by web page, clic k the
Browse button first to select the file that had been
saved in your laptop or PC . Then click the Upgrade
button to update the firmware. Please do not power
off the router while upgrading and there will be a
sequence of screen descriptions to inform you the
status of the upgrade process. If the upg rade
process is successful, the utility will go back to
homepage.
27
Page 31

LAN Page
Configuration Utility
28
Page 32

Configuration Utility
IP Setting
You can setup IP address information for the LAN
ports of your wireless router.
DHCP Server
Your wireless router can act as a DHCP server , and
assign IP addresses to your clients automatically . This
function is enabled by default. The assigned IP
addressed will be within the range of IP pool that you
specify . It is a good security practice to set just enough
range of IP pool for the devices y ou want to connect to
this wireless network. This can bloc k other unintended
devices to enter your network.
• IP Pool Starting Address: Enter a v alue for the
DHCP server to start with when issuing IP
addresses. The default v alue is 192.168.62.12.
• IP P ool Ending Address: The maximum number of
PCs that you want the DHCP server to assign IP
addresses to. This number cannot be greater than
253.
29
Page 33

• Lease Time: Setting Lease Time f or shorter period,
such as one day or several hours , can free up IP
addresses frequently . How ev er , you ma y
experience brief network performance drag down or
stall when DHCP reassigning IP addresses to
clients. It also causes a computer’ s IP address
changed over time. If y ou will use some adv anced
router features, such as DMZ or client IP filters, you
may select longer time to avoid frequent re-set, or
you can use Static Host setting described below.
Configuration Utility
30
Page 34

Configuration Utility
DHCP IP MAC Mapping
This setting will permanently associate the MAC
address of a LAN client to an IP address. The client
is assigned the same IP address every time.
Changes to a currently assigned LAN client IP will
take effect only after expiration of current lease. T o
create a new association, enter the information on
the field and click Add button. To delete an
association, press Delete button on the list.
DHCP Client
The DHCP client list shows clients assigned by the
DHCP server. Click Refresh button to refresh the list.
31
Page 35

Configuration Utility
MAC Filter
You can control which PCs can connect to the
Internet. If you enable this f eature, only computers
with a MAC address located in MAC List can connect
to the Internet.
T o add a MA C address , enter the MA C address in the
MAC address field, specify Allow or Deny and click
Add button. Clic k Delete button will delete a MA C
Address.
IP Filter
You can control which PCs can connect to the
Internet. If you enable this f eature, only computers
with an IP address located in IP List can connect to
the Internet. To add an IP address, click the radio
button of Allow, type the IP address and click Add.
The allowed IP address will be added. To delete an IP
address, click Delete button on the list.
32
Page 36

Configuration Utility
Wireless Page
33
 Loading...