

Page 1
IMPORTANT: Read Before Using.
ZHEJIANG CHENGKANG MACHINERY &
ELECTRICAL PRODUCT
MANUFACTURING CO.,LTD
INSTRUCTION MANUAL
CDL1801 CDL2101
1
Page 2

SPECIFICATIONS
Work area safety
CDL1801 CDL2101 1. Keep work area clean and well lit. Cluttered or
Machine
Screw
dark areas invite accidents.
Standard
Bolt
2. Do not operate power tools in explosive
atmospheres, such as in the presence of
flammable liquids, gases or dust. Power tools
create sparks which may ignite the dust or fumes.
3. Keep children and bystanders away while
operating a power tool. Distractions can cause
you to lose control.
Electrical Safety
1.76 1.9
4. Power tool plugs must match the outlet. Never
D.C 18V D.C 21.6V
modify the plug in any way. Do not use any
adapter plugs with earthed (grounded) power
• Due to our continuing programme of research and tools. Unmodified plugs and matching outlets will
development, the specifications herein are subject to reduce risk of electric shock.
change without notice 5. Avoid body contact with earthed or grounded
without notice. surfaces such as pipes, radiators, ranges and
• Note: Specifications may differ from country to refrigerators. There is an increased risk of
country. electric shock if your body is earthed or grounded.
General Power Tool Safety 6. Do not expose power tools to rain or wet
Warnings conditions. Water entering a power tool will
WARNING Read all safety warnings and all increase the risk of electric shock.
instructions. Failure to follow the warnings and 7. Do not abuse the cord. Never use the cord for
instructions may result in electric shock, fire and/or carrying, pulling or unplugging the power tool.
serious injury. Keep cord away from heat, oil, sharp edges or
moving parts. Damaged or entangled cords
Save all warnings and increase the risk of electric shock.
instructions for future reference. 8. When operating a power tool outdoors, use an
The term "power tool" in the warnings refers to your extension cord suitable for outdoor use. Use of
mains-operated (corded) power tool or battery-operated a cord suitable for outdoor use reduces the risk of
(cordless) power tool. electric shock.
9. If operating a power tool in a damp location is
unavoidable, use a ground fault circuit
MODEL
Rated Voltage
Max.Torque (NM)
Baterry Capacity
Length(MM)
Charge time
Weight including
battery(KGS)
173
M4-M10
No load Speed(rpm)
Impacts per minute
M4-M16
0-2200
0-3200
180
1H
Toolholder 1/4"
Capacities
3.0AH
2
Page 3

interrupter (GFCI) protected supply. Use of an Power tool use and care
GFCI reduces the risk of electric shock. 17. Do not force the power tool. Use the correct
Personal Safety power tool for your application. The correct
10. Stay alert, watch what you are doing and use power tool will do the job better and safer at the
common sense when operating a power tool. rate for which it was designed.
Do not use a power tool while you are tired or 18. Do not use the power tool if the switch does
under the influence of drugs, alcohol or not turn it on and off. Any power tool that cannot
medication. A moment of inattention while be controlled with the switch is dangerous and
operating power tools may result in serious must be repaired.
personal injury. 19. Disconnect the plug from the power source
11. Use personal protective equipment. Always and/or the battery pack from the power tool
wear eye protection. Protective equipment such before making any adjustments, changing
as dust mask, non-skid safety shoes, hard hat, or accessories, or storing power tools. Such
hearing protection used for appropriate conditions preventive safety measures reduce the risk of
will reduce personal injuries. starting the power tool accidentally.
12. Prevent unintentional starting. Ensure the 20. Store idle power tools out of the reach of
switch is in the off-position before connecting children and do not allow persons unfamiliar
to power source and/or battery pack, picking with the power tool or these instructions to
up or carrying the tool. Carrying power tools with operate the power tool. Power tools are
your finger on the switch or energising power tools dangerous in the hands of untrained users.
that have the switch on invites accidents. 21. Maintain power tools. Check for misalignment
13. Remove any adjusting key or wrench before or binding of moving parts, breakage of parts
turning the power tool on. A wrench or a key left and any other condition that may affect the
attached to a rotating part of the power tool may power tool’s operation. If damaged, have the
result in personal injury. power tool repaired before use. Many accidents
14. Do not overreach. Keep proper footing and are caused by poorly maintained power tools.
balance at all times. This enables better control 22. Keep cutting tools sharp and clean. Properly
of the power tool in unexpected situations. maintained cutting tools with sharp cutting edges
15. Dress properly. Do not wear loose clothing or are less likely to bind and are easier to control.
jewellery. Keep your hair, clothing, and gloves 23. Use the power tool, accessories and tool bits
away from moving parts. Loose clothes, etc. in accordance with these instructions,
jewellery or long hair can be caught in moving taking into account the working conditions
parts. and the work to be performed. Use of the power
16. If devices are provided for the connection of tool for operations different from those intended
dust extraction and collection facilities, could result in a hazardous situation.
ensure these are connected and properly used. Battery tool use and care
Use of dust collection can reduce dust-related 24. Recharge only with the charger specified by
hazards. the manufacturer. A charger that is suitable for
3
Page 4

one type of battery pack may create a risk of fire 3. Hold power tool by insulated gripping
when used with another battery pack. surfaces, when performing an operation
25. Use power tools only with specifically where the fastener may contact hidden wiring
designated battery packs. Use of any other or its own cord. Fasteners contacting a "live" wire
battery packs may create a risk of injury and fire. may make exposed metal parts of the power tool
26. When battery pack is not in use, keep it away live and could give the operator an electric
from other metal objects, like paper clips, shock.
coins, keys, nails, screws or other small metal 4. Always be sure you have a firm footing.
objects, that can make a connection from one Be sure no one is below when using the tool in
terminal to another. Shorting the battery high locations.
terminals together may cause burns or a fire. 5. Hold the tool firmly.
27. Under abusive conditions, liquid may be 6. Keep hands away from rotating parts.
ejected from the battery; avoid contact. If 7. Do not leave the tool running. Operate the tool
contact accidentally occurs, flush with water. only when hand-held.
If liquid contacts eyes, additionally seek 8. Do not touch the drill bit or the workpiece
medical help. Liquid ejected from the battery may immediately after operation; they may be
cause irritation or burns. extremely hot and could burn your skin.
Service 9. Some material contains chemicals which may
28. Have your power tool serviced by a qualified be toxic. Take caution to prevent dust
repair person using only identical replacement inhalation and skin contact. Follow material
parts. This will ensure that the safety of the power supplier safety data.
tool is maintained.
29. Follow instruction for lubricating and SAVE THESE INSTRUCTIONS.
changing accessories. WARNING:
30. Keep handles dry, clean and free from oil and DO NOT let comfort or familiarity with product
grease. (gained from repeated use) replace strict adherence
CORDLESS DRILL SAFETY to safety rules for the subject product. MISUSE or
WARNINGS failure to follow the safety rules stated in this
1. Use auxiliary handles supplied with the tool. instruction manual may cause serious personal
Loss of control can cause personal injury. (if injury.
supplied)
2. Hold power tools by insulated gripping IMPORTANT SAFETY
surfaces when performing an operation where INSTRUCTIONS
the cutting tool may contact hidden wiring or FOR BATTERY CARTRIDGE
its own cord. Contact with a "live" wire will make 1. Before using battery cartridge, read all
exposed metal parts of the tool "live" and shock instructions and cautionary markings on (1)
the operator. battery charger, (2) battery, and (3) product
using battery.
4
Page 5
2. Do not disassemble battery cartridge.
3. If operating time has become excessively FUNCTIONAL DESCRIPTION
shorter, stop operating immediately. It may CAUTION:
result in a risk of overheating, possible burns • Always be sure that the tool is switched off and the
and even an explosion. battery cartridge is removed before adjusting or
4. If electrolyte gets into your eyes, rinse them checking function on the tool.
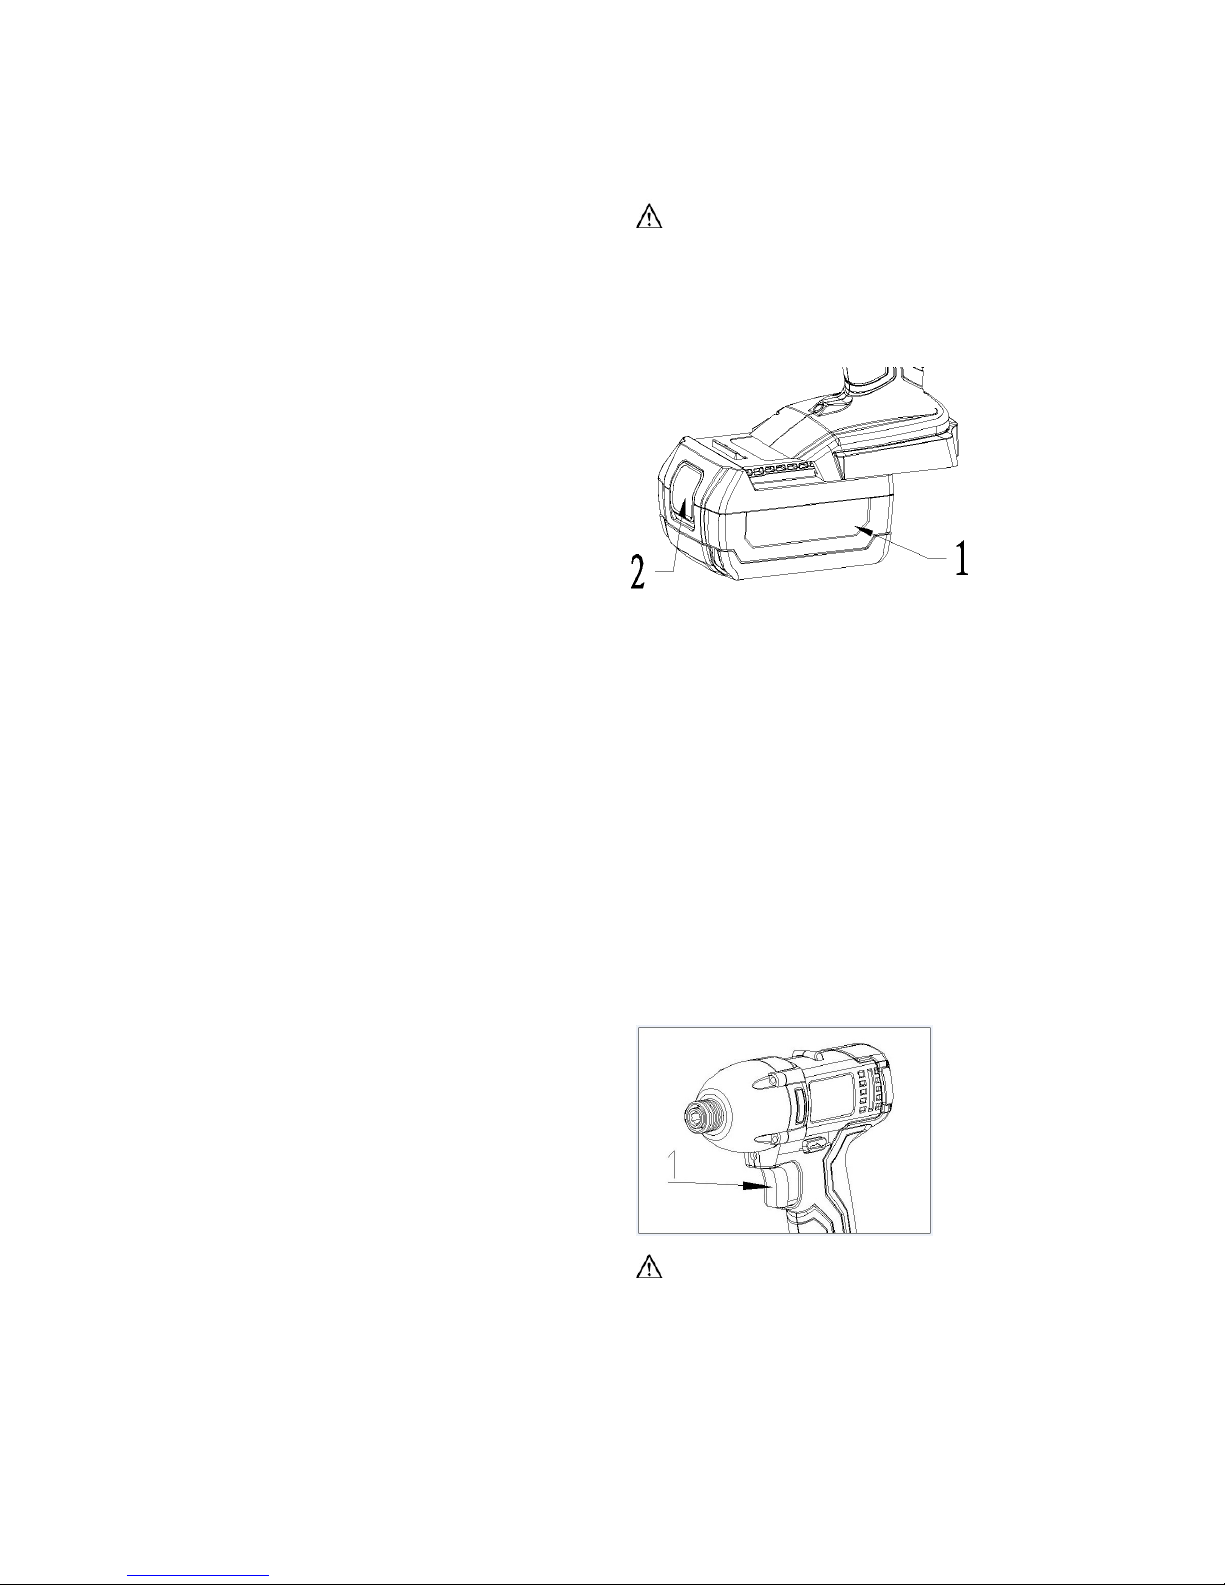
out with clear water and seek medical Installing or removing battery cartridge
attention right away. It may result in loss of
your eyesight.
5. Do not short the battery cartridge:
(1) Do not touch the terminals with any
conductive material.
(2) Avoid storing battery cartridge in a
container with other metal objects such as
nails, coins, etc.
(3) Do not expose battery cartridge to water or rain. • Always switch off the tool before installation or
A battery short can cause a large current removal of the battery cartridge.
flow, overheating, possible burns and • To remove the battery cartridge, withdraw it from
even a breakdown. the tool while sliding the button on the front of the
6. Do not store the tool and battery cartridge in cartridge.
locations where the temperature may reach or • To insert the battery cartridge, align the tongue on
exceed 50 ゚C (122 ゚F). the battery cartridge with the groove in the housing
7. Do not incinerate the battery cartridge even if and slip it into place. Always insert it all the way
it is severely damaged or is completely worn until it locks in place with a little click.
out. The battery cartridge can explode in a fire. • Do not use force when inserting the battery
8. Be careful not to drop or strike battery. cartridge. If the cartridge does not slide in easily, it
9. Do not use a damaged battery. is not being inserted correctly.
Switch action
SAVE THESE INSTRUCTIONS.
Tips for maintaining maximum battery life
1. Charge the battery cartridge before
completely discharged.
Always stop tool operation and charge the
battery cartridge when you notice less tool power
2. Never recharge a fully charged battery cartridge.
Overcharging shortens the battery service life. CAUTION:
3. Charge the battery cartridge with room • Before inserting the battery cartridge into the tool,
temperature at 10 ゚C - 40 ゚C (50 ゚F - 104 ゚F). always check to see that the switch trigger
Let a hot battery cartridge cool down before actuates properly and returns to the "OFF" position
charging it. when released.
1. Button
2. Battery cartridge
1. Switch trigger
5
Page 6
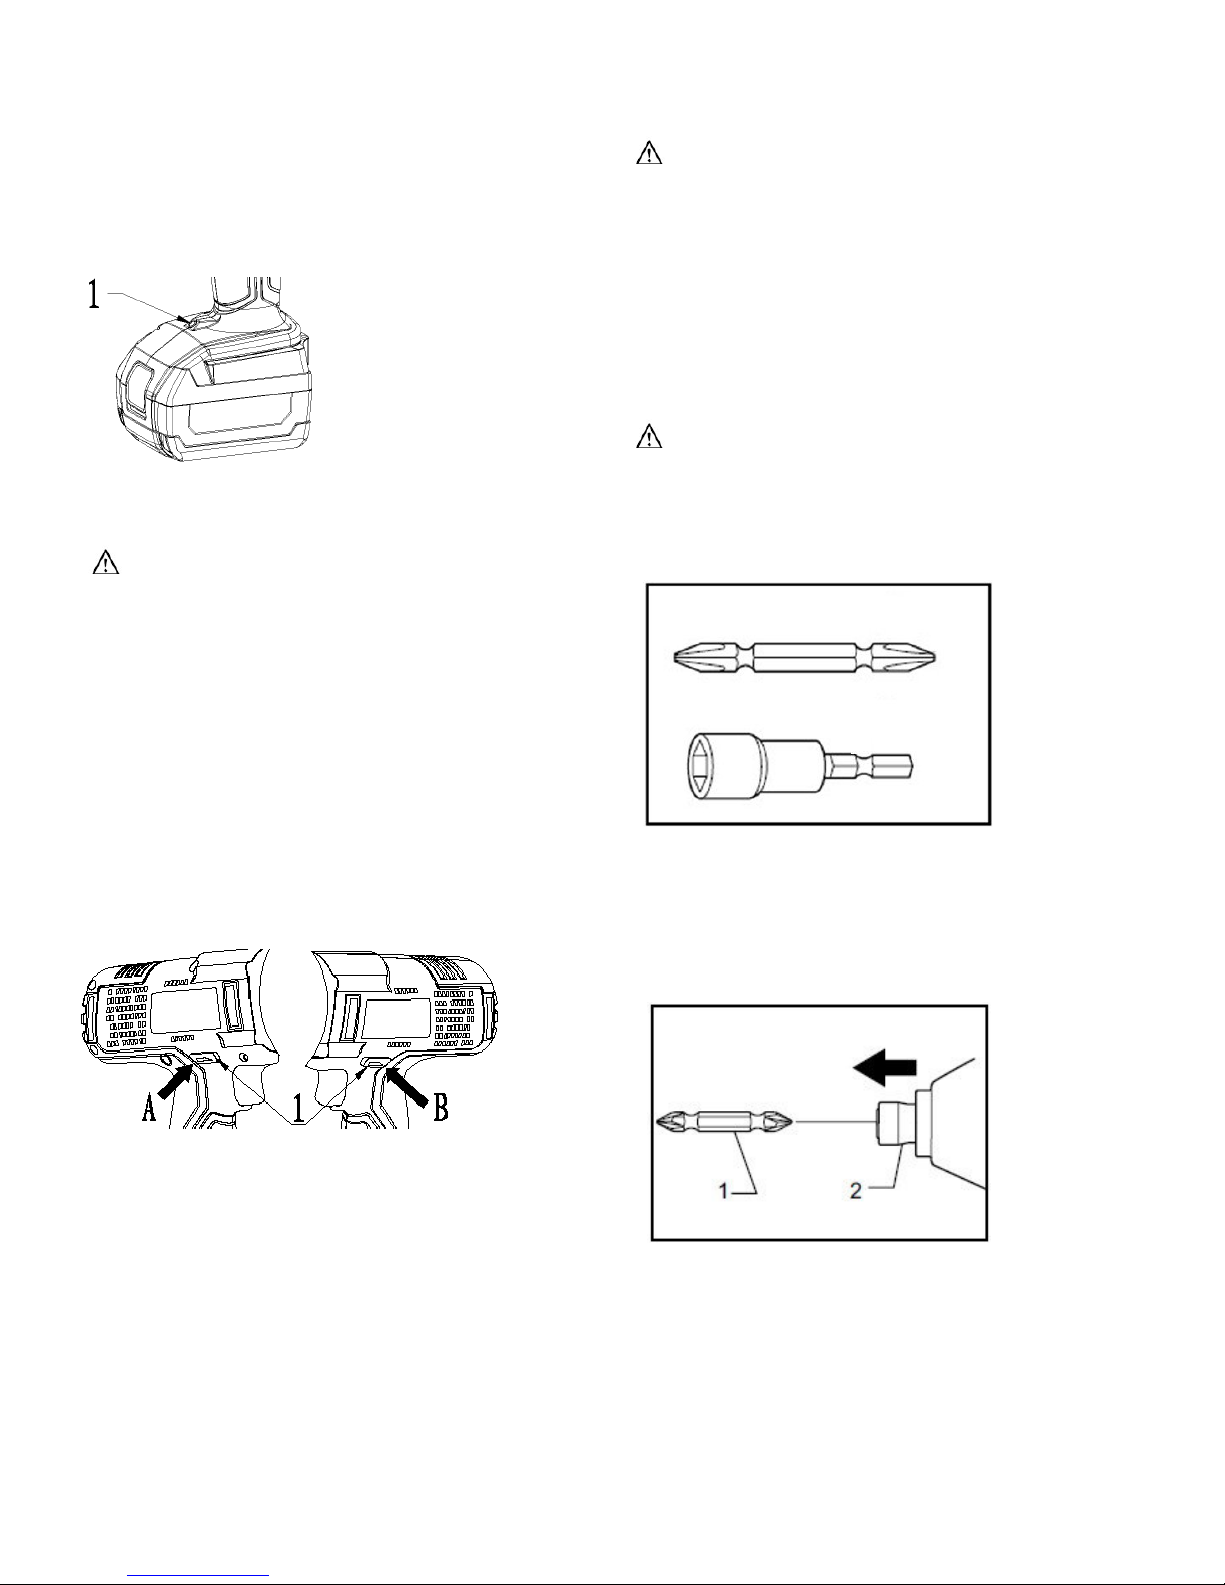
To start the tool, simply pull the switch trigger. Tool CAUTION:
speed is increased by increasing pressure on the • Always check the direction of rotation before
switch trigger. Release the switch trigger to stop. operation.
Lighting up the front lamp
• Use the reversing switch only after the tool comes
to a complete stop. Changing the direction of
1. Lamp rotation before the tool stops may damage the tool.
• When not operating the tool, always set the
reversing switch lever to the neutral position.
ASSEMBLY
CAUTION:
• Always be sure that the tool is switched off and the
battery cartridge is removed before carrying out
any work on the tool.
CAUTION: Installing or removing driver bit or socket bit
• Do not look in the light or see the source of light
directly.
Pull the switch trigger to light up the lamp. The lamp
keeps on lighting while the switch trigger is being pulled.
NOTE:
• Use a dry cloth to wipe the dirt off the lens of lamp.
Be careful not to scratch the lens of lamp, or it may Use only the driver bit or socket bit shown in the figure.
lower the illumination. Do not use any other driver bit or socket bit.
Reversing switch action
To install the bit, pull the sleeve in the direction of the
arrow and insert the bit into the sleeve as far as it will go.
Then release the sleeve to secure the bit.
This tool has a reversing switch to change the direction
of rotation. Depress the reversing switch lever from 1. Bit
the A side for clockwise rotation or from the B side for 2. Sleeve
counterclockwise rotation. To remove the bit, pull the sleeve in the direction of the
When the reversing switch lever is in the neutral arrow and pull the bit out firmly.
position,the switch trigger cannot be pulled.
6
Page 7
NOTE:
• If the bit is not inserted deep enough into the
sleeve, the sleeve will not return to its original
position and the bit will not be secured. In this case,
try re-inserting the bit according to the instructions
above.
OPERATION
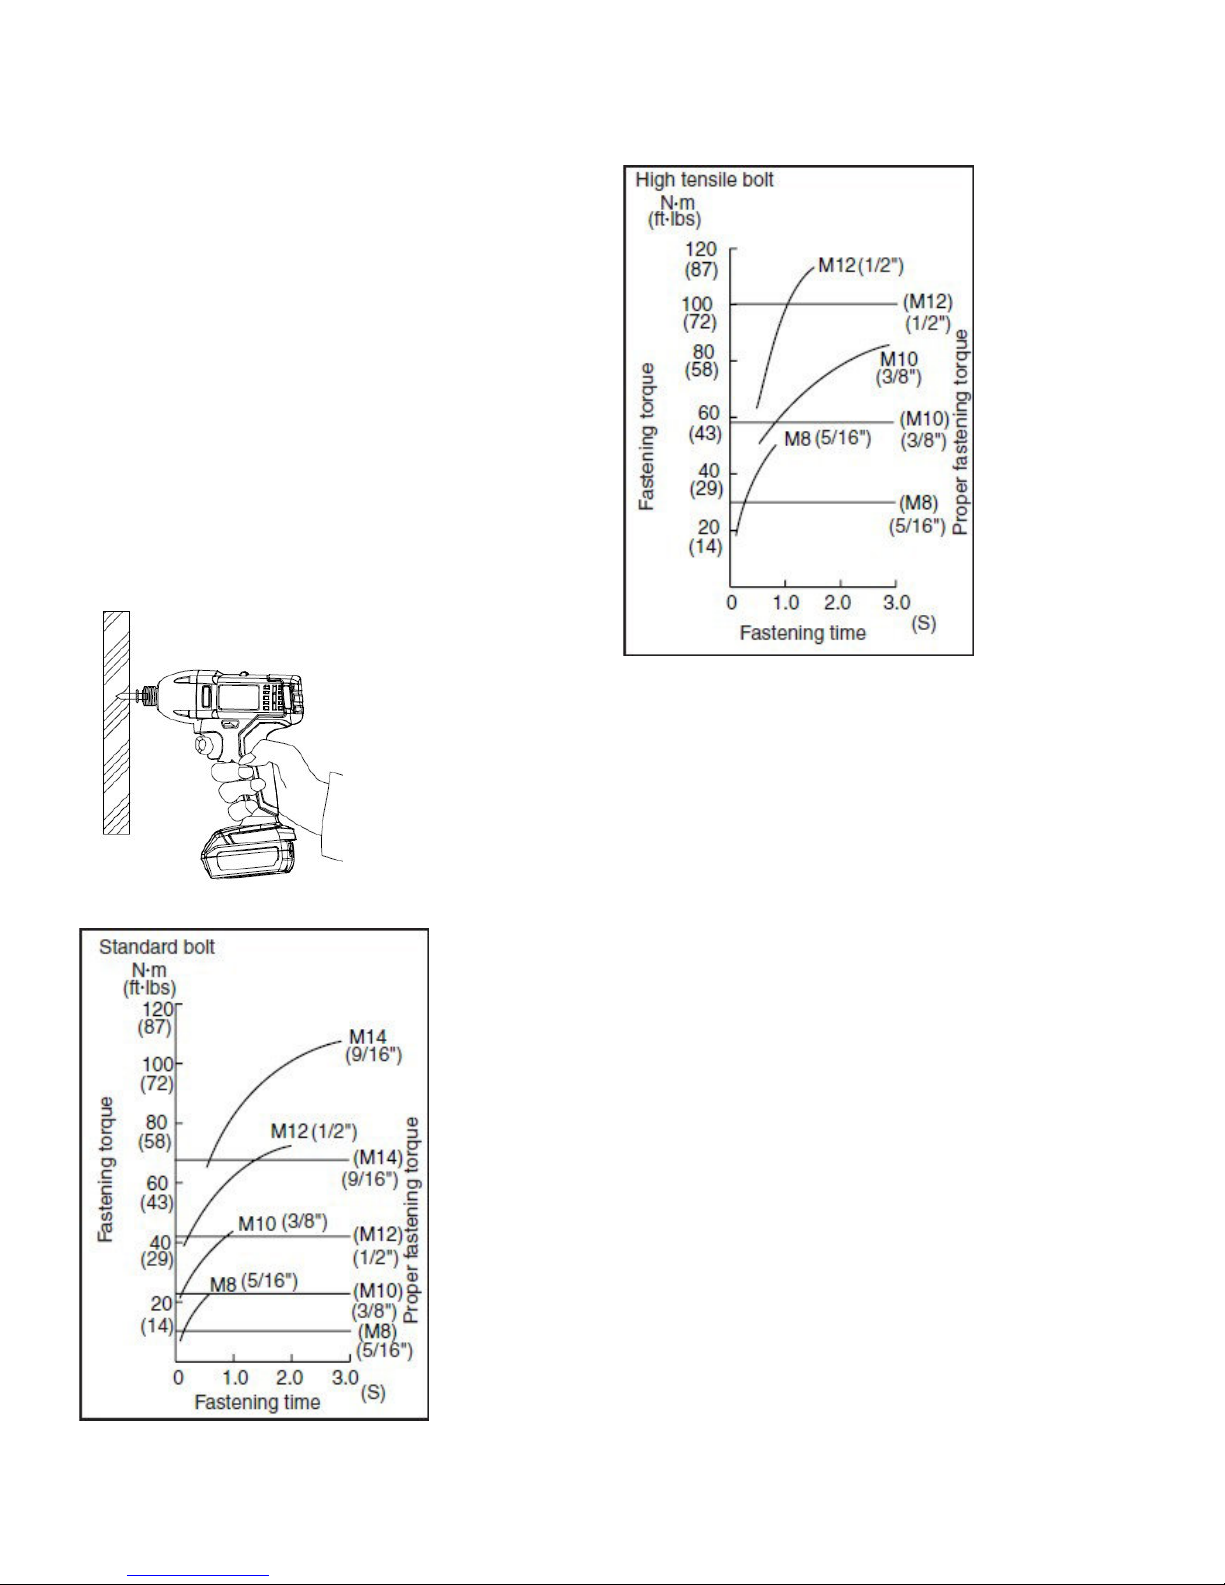
The proper fastening torque may differ depending upon
the kind or size of the screw/bolt, the material of the
workpiece to be fastened, etc. The relation between
fastening torque and fastening time is shown in the
figures
Hold the tool firmly and place the point of the driver bit in
the screw head. Apply forward pressure to the tool to the
extent that the bit will not slip off the screw and turn the
tool on to start operation.
NOTE:
• Use the proper bit for the head of the screw/bolt
that you wish to use.
• When fastening screw M8 or smaller, carefully
adjust pressure on the switch trigger so that the
screw is not damaged.
• Hold the tool pointed straight at the screw.
• If you tighten the screw for a time longer than
shown in the figures, the screw or the point of the
driver bit may be overstressed, stripped, damaged,
etc. Before starting your job, always perform a test
operation to determine the proper fastening time for
your screw.
The fastening torque is affected by a wide variety of
factors including the following. After fastening, always
check the torque with a torque wrench.
1. When the battery cartridge is discharged almost
completely, voltage will drop and the fastening
torque will be reduced.
7
Page 8

2. Driver bit or socket bit
Failure to use the correct size driver bit or socket bit
will cause a reduction in the fastening torque.
3. Bolt
• Even though the torque coefficient and the
class of bolt are the same, the proper fastening
torque will differ according to the diameter of
bolt.
• Even though the diameters of bolts are the
same, the proper fastening torque will differ
according to the torque coefficient, the class of
bolt and the bolt length.
4. The manner of holding the tool or the material of
driving position to be fastened will affect the torque.
5. Operating the tool at low speed will cause a reduction
in the fastening torque.
ACCESSORIES
CAUTION:
• These accessories or attachments are
recommended for use with your CHENGKANG tool
specified in this manual. The use of any other
accessories or attachments might present a risk of
injury to persons. Only use accessory or
attachment for its stated purpose.
If you need any assistance for more details regarding
these accessories, ask your local service center.
• Screw bits
• Plastic carrying case
• Various type of CHENGKANG batteries and
chargers
8
Page 9

9
 Loading...