

Page 1
OPERATOR’S MANUAL
V-3000 PHOTOMETER
CHEMetrics, Inc.
4295 Catlett Road
Midland, Virginia 22728
Toll Free 1-800-356-3072
Phone: 540-788-9026
Fax: 540-788-4856
Web: www.chemetrics.com
Jan. 18, Rev. 8
Page 2

Table of Contents
1 Overview
1.1 Features and Specifications
1.2 Keypad .......................................................... 1
1.3 Key Functions ...................................................... 2
1.4 Display ........................................................... 3
1.5 Socket Field ....................................................... 3
1.6 List of Direct Read Programs (factory calibrations) ......................... 4
1.7 Power LabStation (sold separately) ..................................... 6
2 Getting Started
2.1 Scope of Delivery ................................................... 7
2.2 Power Supply ...................................................... 7
2.3 Battery Installation .................................................. 7
2.4 Automatic Switch-off ................................................ 7
2.5 Display Illumination.................................................. 7
3 Setup
3.1 Turning the Photometer On ........................................... 8
3.2 Inserting a Cell ..................................................... 8
3.3 Operating Modes ................................................... 9
3.4 Navigation......................................................... 9
3.5 Menu Overview ..................................................... 10
....................................... 1
4 Photometry
4.1 Measuring the Concentration .......................................... 11
4.2 Analysis Timer ..................................................... 12
4.3 Timer ............................................................ 12
4.4 Measuring Diluted Samples ........................................... 12
5 Storing Data
5.1 Assigning Measurement ID Number..................................... 13
5.2 Managing Stored Measurement Values .................................. 13
5.3 Filtering Stored Measurement Values ................................... 13
6 Use with Printers and Computers
6.1 Saved Data Output Format ........................................... 14
6.2 Printing Data Directly to a Printer....................................... 14
6.3 Downloading Data to a Computer ...................................... 15
6.4 Uploading Program Revisions ......................................... 15
7 Troubleshooting .................................................... 17
Page 3

1 Overview
1.1 Features and Specifications
Wavelengths (nm): 436, 517, 557, 594, 610, 690
Cell Sizes: 13 mm, 16 mm, 28 mm - Flat bottom vials only
Wavelength Accuracy: K2 nm
Light Source: Light Emitting Diode with interference filters
Detector: Photodiode
Photometric Range: -0.200 to 2.000 absorbance units
Operating Temperature: 0EC to 50EC
Humidity: 75% Yearly Mean (up to 30 days at a maximum of 95%)
Waterproof: IP67
Power Supply: 4 X 1.5 V AA - approximately 5000 measurements
Data Logging: 100 data sets
Download Capability: Data to spreadsheet and printer, RS232 output
Upload Capability: Web Based Methods Update
Custom User Programs: Requires V-3000 Data Management Software (sold separately,
Catalog Number A-0301)
1.2 Keypad
1
Page 4
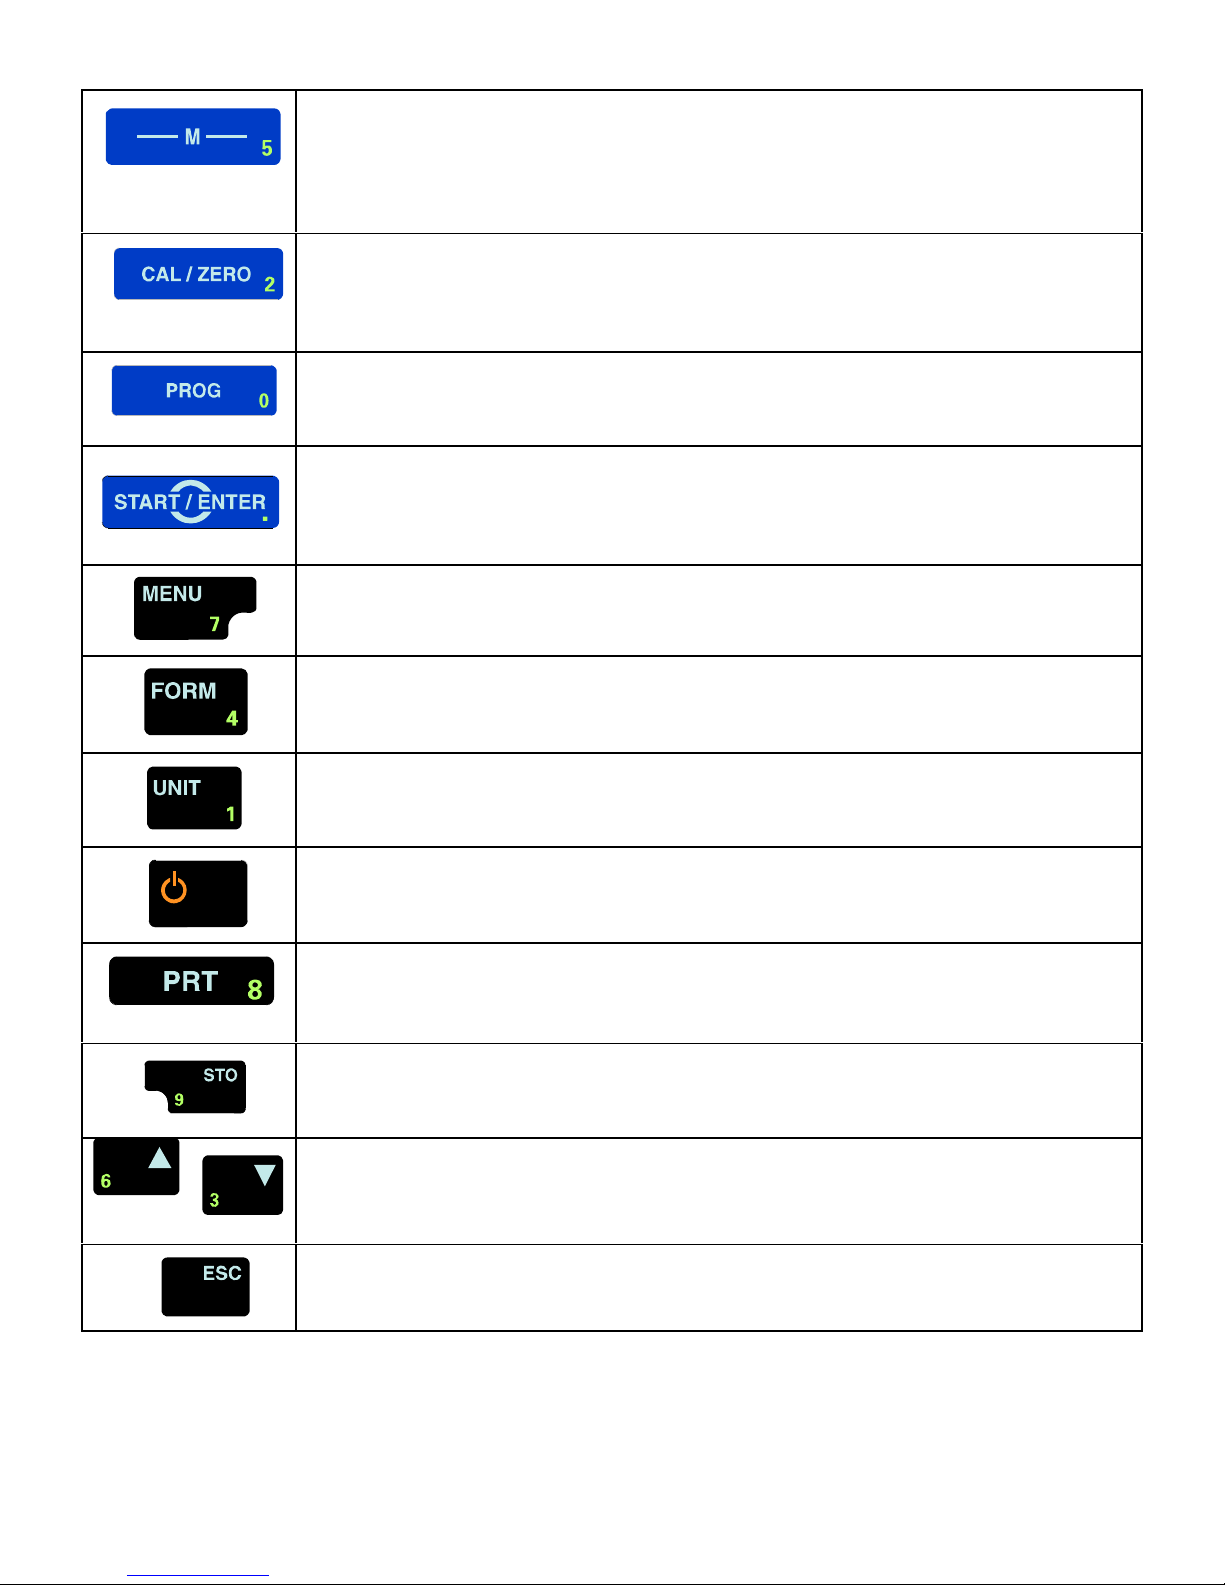
1.3 Key Functions
Measuring MODE key
Toggle through concentration, absorbance, and % transmittance.
CAL/ZERO key
Reset Zero Adjustment
Reset Blank Value Measurement
PROGRAM key
Select a program for concentration (direct read) measurement.
START/ENTER key
Open Menus
Confirm Selections
Start Measurements
MENU key
Open the Configuration Menu. All settings are made in the configuration mode.
FORM key
In Photometry / Concentration (direct read) mode, toggle through available chemical
forms for a particular analyte (example: NH3, NH3-N, NH4).
UNIT key
In Photometry / Concentration (direct read) mode, toggle through available reporting
units (example: ppm, mg/Liter, mmol/Liter)
ON/OFF key
Turn the instrument ON and OFF
PRINT key
Print the display contents via an RS232 interface
STORE key
Press once: open the Store Menu
Press twice: quick store a measurement
• UP key
– DOWN key
Move up and down in menu selections
ESCAPE key
Go back to the previous menu level
NOTE: Keys with numbers printed on them can also be used to enter numbers in special menus.
2
Page 5
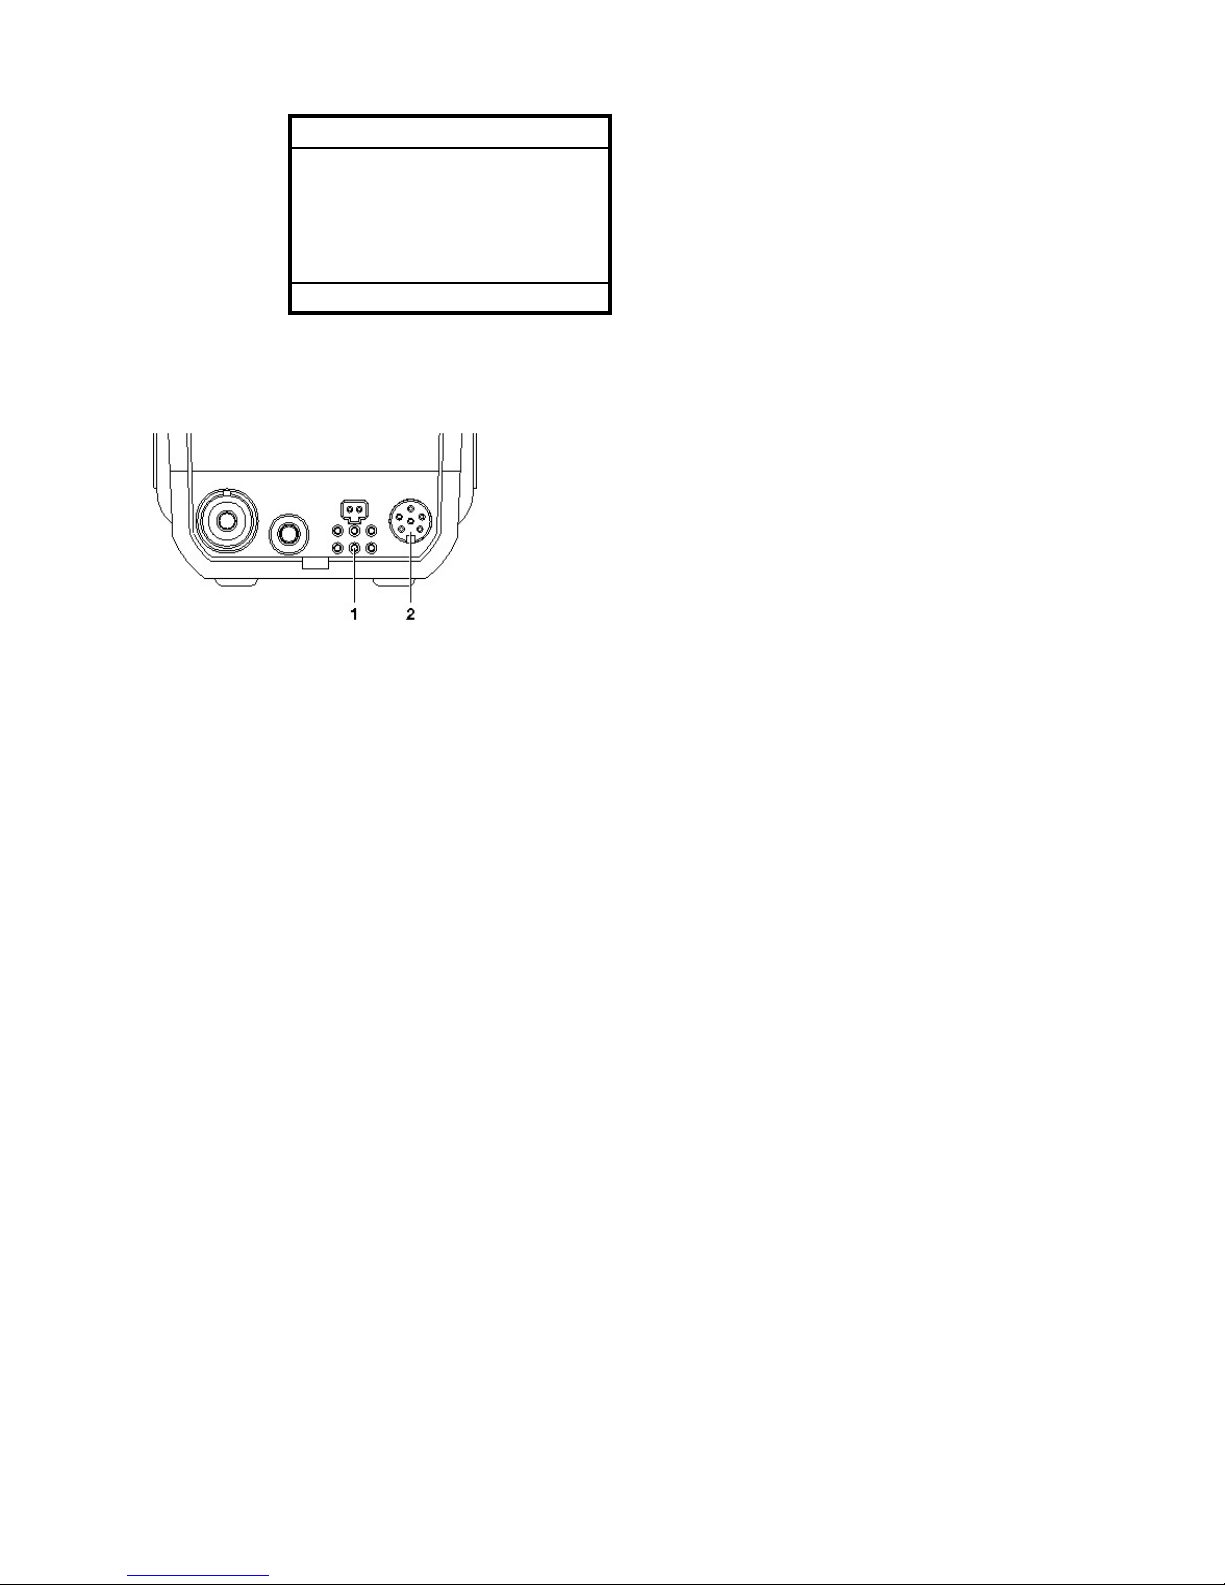
1.4 Display
1.5 Socket Field
Photometry\Concentration
1.29 mg/l
15: K1503 NH3-N
13 mm 0.00 - 7.00 mg/l
11.30.13 15:12
Measuring mode
Measured value (with unit)
Program no.: Catalog no. and Chemical form
Diameter of the cell and measuring range
Status line with date and time
Contacts for Lab Station
1.
RS232 serial interface
2.
3
Page 6
1.6 List of Direct Read Programs (factory calibrations)
.
Analyte Prog. # Kit Cat. #
Cell Size,mmBlank
Y/N
Wavelength,nmRange,
ppm
Method
Aluminum 9 K-0603 13 Y 517 0 - 0.25 Eriochrome Cyanine R
Ammonia 12 K-1413 13 N 610
Ammonia 13 K-1413 13 N 610
Ammonia 15 K-1503 13 N 436
Ammonia 16 K-1523 13 N 436
0 - 3.00
(as N)
0 - 60.0
(as N)
0 - 7.00
(as N)
0 - 14.0
(as N)
Hydroxybenzyl Alcohol
Hydroxybenzyl Alcohol
Direct Nesslerization
Direct Nesslerization
Chloride 26 K-2103 13 Y 436 0 - 40.0 Ferric Thiocyanate
Chlorine 32 K-2513 13 N 517 0 - 5.00 DPD
Chlorine 33 K-2523 13 N 517 0 - 5.00 DPD
Chlorine Dioxide 37 K-2703 13 N 517 0 - 11.00 DPD
Chromate 42 K-2803 13 N 557
0 - 3.50
(as CrO
Diphenylcarbazide
)
4
Copper 55 K-3503 13 N 436 0 - 12.00 Bathocuproine
Cyanide 60 K-3803 13 Y 594 0 - 0.400 Isonicotinic/Barbituric Acid
DEHA 64 K-3903 13 N 557 0 - 2.00 PDTS
Fluoride 73 K-4009 28 Y 594 0 - 3.00 SPADNS (Arsenic-free)
Hydrazine 89 K-5003 13 N 436 0 - 1.20 PDMAB
Peroxide 93 K-5513 13 N 517 0 - 3.00 DPD
Peroxide 95 K-5543 13 N 436 0 - 6.00 Ferric Thiocyanate
Iron 100 K-6003 13 N 517 0 - 6.00 Phenanthroline
Iron 101 K-6013 13 N 436 0 - 25.0 Phenanthroline
4
Page 7
Analyte Prog. # Kit Cat. #
Cell Size,mmBlank
Y/N
Wavelength,nmRange,
ppm
Method
Iron 102 K-6023 13 N 557 0 - 2.50 PDTS
Iron 103 K-6203 13 N 517 0 - 6.00 Phenanthroline
Manganese 110 K-6503 13 N 517 0 - 30.0 Periodate
Molybdate 115 K-6703 13 N 436
Nitrate 119 K-6903 13 N 517
Nitrate 122 K-6913 13 N 517
Nitrate 120 K-6923 13 N 517
Nitrate 121 K-6933 13 N 517
Nitrite 125 K-7003 13 N 517
0 - 25.0
(as Mo)
0 - 1.50
(as N)
0 - 1.50
(as N)
0 - 7.50
(as N)
0 - 50.0
(as NO
0 - 1.00
(as N)
Catechol
Cadmium Reduction
Zinc Reduction
Cadmium Reduction
Cadmium Reduction
)
3
Azo Dye Formation
Ozone 133 K-7423 13 N 517 0 - 5.00 DPD
Oxygen 140 K-7503 13 N 610 0 - 2.00 Indigo Carmine
Oxygen 141 K-7513 13 N 517 0 - 15.0 Indigo Carmine
Oxygen 142 K-7553 13 N 517 0 - 1.000 Rhodazine D™
Peracetic Acid 148 K-7913 13 N 517 0 - 5.00 DPD
Phenols 152 K-8003 13 N 517 0 - 8.00 4-Aminoantipyrine
Phenols 153 K-8023 13 N 517 0 - 20.0 4-Aminoantipyrine
Phosphate 158 K-8503 13 N 436
Phosphate 160 K-8513 13 N 690
Silica 168 K-9003 13 N 690
0 - 80.0
(as PO
0 - 5.00
(as PO
0 - 10.00
(as SiO
Vanadomolybdo-
)
phosphoric Acid
4
Stannous Chloride
)
4
Heteropoly Blue
)
2
Sulfate 174 K-9203 13 N 436 0 - 100.0 Turbidimetric
5
Page 8
Analyte Prog. # Kit Cat. #
Cell Size,mmBlank
Y/N
Wavelength,nmRange,
ppm
Method
Sulfide 179 K-9503 13 N 690 0 - 3.00 Methylene Blue
Sulfide 180 K-9523 13 N 610 0 - 6.00 Methylene Blue
Zinc 187 K-9903 13 Y 610 0 - 3.00 Zincon
Zinc 188 K-9923 13 Y 610 0 - 15.0 Zincon
1.7 Power LabStation (sold separately, Catalog Number A-0302)
The Power LabStation includes: LabStation, Universal Power Cable with four plugs (US, Euro, UK, AUS),
Rechargeable Battery Pack, PC Interface Cable (9 pin to 9 pin).
The Power LabStation provides the following features:
• When the photometer is placed in the Power LabStation (which is plugged into an electrical outlet), the
photometer will always be fully charged and ready for use.
• For photometric measurements, when the photometer is in the Power LabStation, the zero measurement is
retained even after turning the instrument off.
• Batteries are not needed when using the Power LabStation.
• The Power LabStation (when plugged into an electrical outlet) charges the re-chargeable battery pack, even
when the instrument is turned off.
6
Page 9

2 Getting Started
2.1 Scope of Delivery
• Handheld photometer
• four alkaline AA batteries, 1.5 V
• 13 mm cell adapter and light shield
• two empty 28 mm cells for MDL+ testing
• PC interface cable (6 pin to 9 pin)
• Operator’s Manual
2.2 Power Supply
The V-3000 photometer can be operated with regular AA batteries, a rechargeable battery pack or a power
cable. The rechargeable battery pack and the power cable are part of the Power LabStation package, which is
sold separately. There is a LoBat display indicator that appears when the batteries are nearly discharged.
2.3 Battery Installation
The V-3000 photometer requires four AA alkaline or lithium batteries. Remove the batteries when the
photometer is not in use.
To install batteries, carefully loosen the two screws on the battery compartment on the back of the instrument.
Remove the battery compartment cover and insert the four batteries with correct orientation as illustrated in the
battery compartment. Replace the battery compartment cover and secure it in place with the two screws.
2.4 Automatic Switch-off
The meter has a user chosen, automatic switch-off function (10 minutes to 24 hours) that is designed to save
battery life. The automatic switch-off time is chosen in the Configuration/System/Continue menu.
2.5 Display Illumination
During operation with batteries, the display illumination automatically turns off if no key is pressed for 30
seconds. Display illumination is switched on with the next keystroke. Display illumination features can be
adjusted Configuration/System/Display menu.
7
Page 10
3 Setup
3.1 Turning the Photometer On
Press the ON/OFF key. For 30 seconds, the Start menu appears listing the measuring modes. The measuring
mode last selected is highlighted. The status line indicates the meter name and the version number of the
software. After about 30 seconds, the meter automatically switches to the measuring
mode and measured parameter used last.
3.2 Inserting a Cell
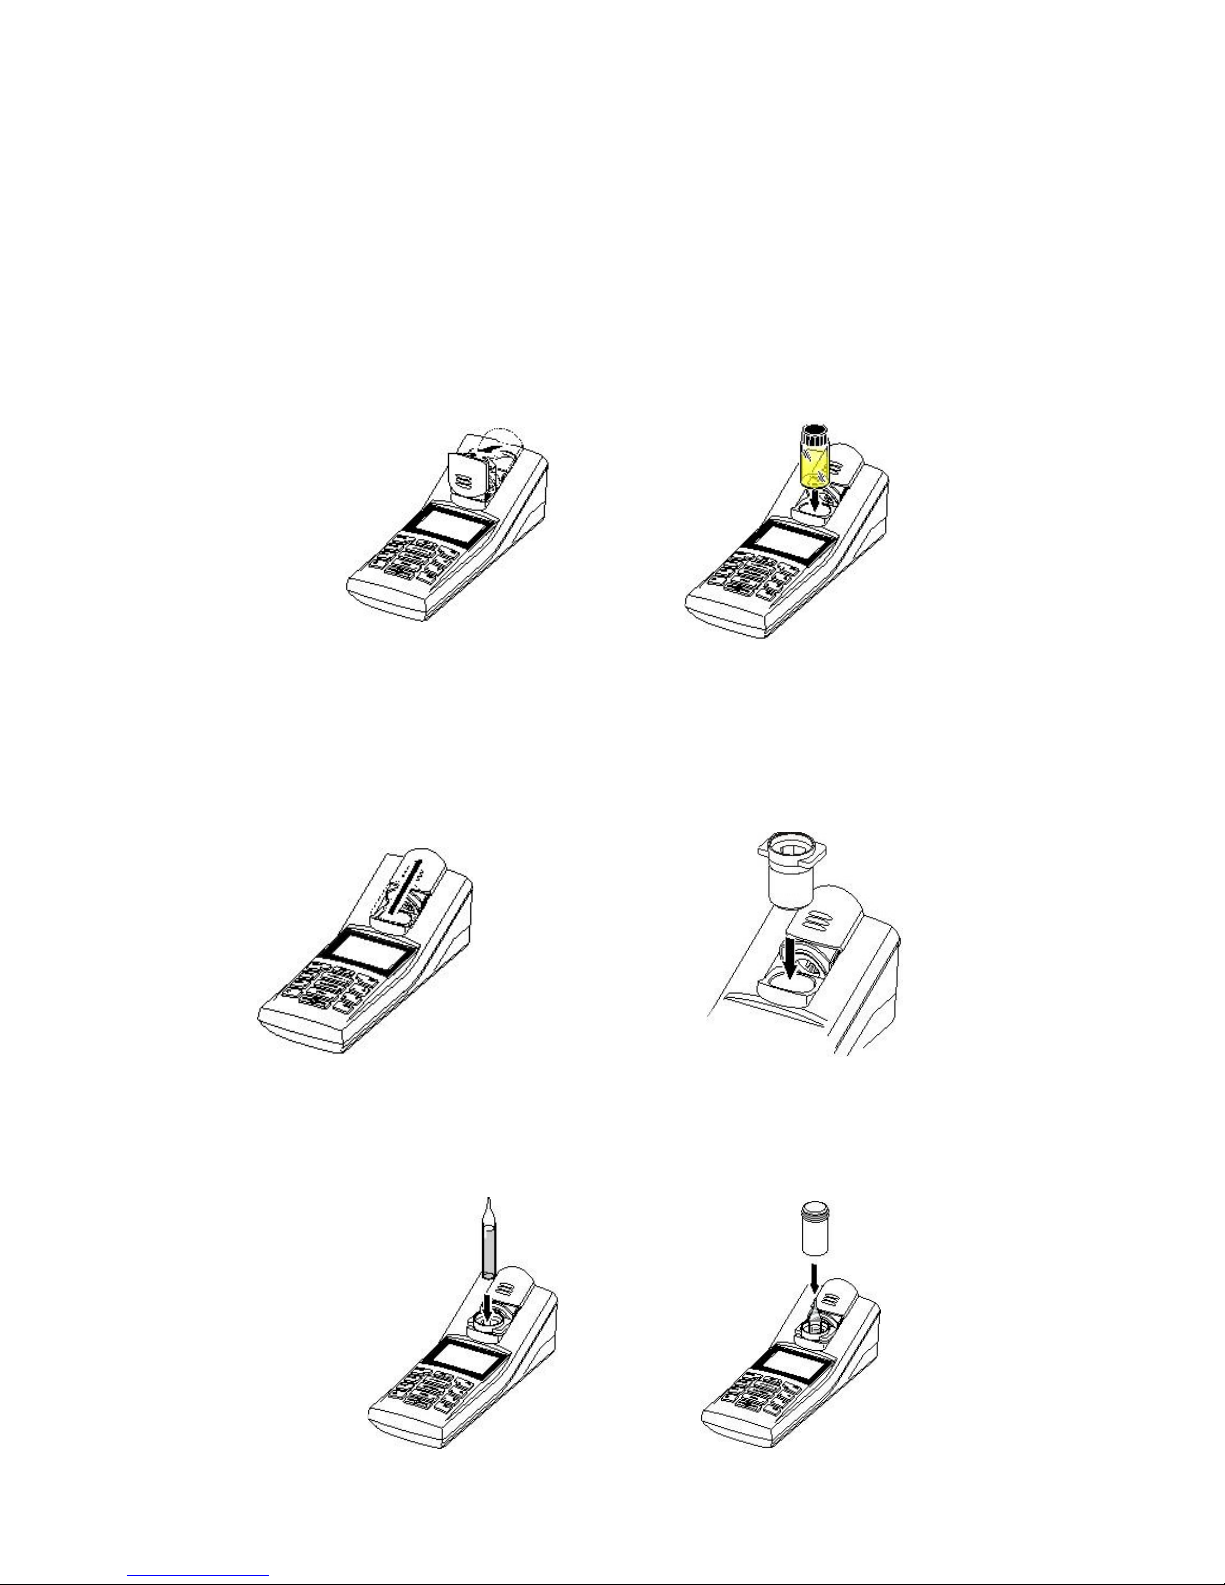
Inserting a 28 mm cell
Remove the black 13 mm adapter if it is in the sample compartment. Make sure that the dust cover is pushed
upward. Insert a 28 mm cell into the sample compartment using downward pressure to ensure that it is fully
seated.
Inserting a Vacu-vials® Ampoule (13 mm) - Requires installation of an adapter
# Installing the 13 mm Adapter
Make sure that the dust cover is pushed upward. Insert the black 13 mm adapter into the sample
compartment with the proper orientation (silver ball plunger in the cell shaft goes to the right). Use downward
pressure to ensure that the adapter is fully seated.
# Inserting the 13 mm Vacu-vials® Ampoule
Insert the Vacu-vials ampoule into the sample compartment using downward pressure to ensure that it is fully
seated. Place the light shield over the ampoule.
8
Page 11

3.3 Operating Modes
The instrument has the following operating modes:
• Measurement - The display indicates measurement data in the measured value display.
• Calibration - The display indicates a calibration process with calibration information, or a process to carry out
a zero adjustment.
• Data transmission - The meter transmits data or calibration records to the serial interface.
• Configuration - The display indicates a menu with further menus, settings and functions.
3.4 Navigation - Menus, Settings and Messages
• Menus
Menus are opened by pressing the START/ENTER key. The name of the menu is displayed in the upper left
corner of the screen.
• Settings
Settings represent choices that the user may make and are displayed as follows: Language: English.
• Messages
Information or instructions are marked by the symbol. Messages can not be selected or altered. They do not
i
initiate a process.
Navigation Example: Setting the date and time
The V-3000 photometer has a clock with a date function. The date and time are indicated in the status line of the
display. There are choices for date format presentation: day, month, year (dd.mm.yy) or month, day, year
(mm.dd.yy). When storing measured values and calibrating, the current date and time are automatically stored
as well. The correct setting of the date and time and date format is important for the following functions and
displays: current date and time, calibration date, and identification of stored measured values. Therefore, check
the time at regular intervals. If power is interrupted (example: batteries die), the date and time will need to be
reset.
Press the MENU key. The Configuration menu is opened.
Use the • or – key to highlight System. Press the START/ENTER key. System menu is opened.
Use the • or – key to highlight Continue. Press the START/ENTER key.
Use the • or – key to highlight Date/Time. Press the START/ENTER key. Date/Time menu is opened.
Use the • or – key to highlight Time or Date. Press the START/ENTER key.
Use the START/ENTER key to move curser to the right. The digit to be changed is underlined on the display.
Use the number keys to enter the correct Time or Date.
Press the START/ENTER key when the correct information is displayed.
Press the ESC key to go back to the previous menu.
9
Page 12
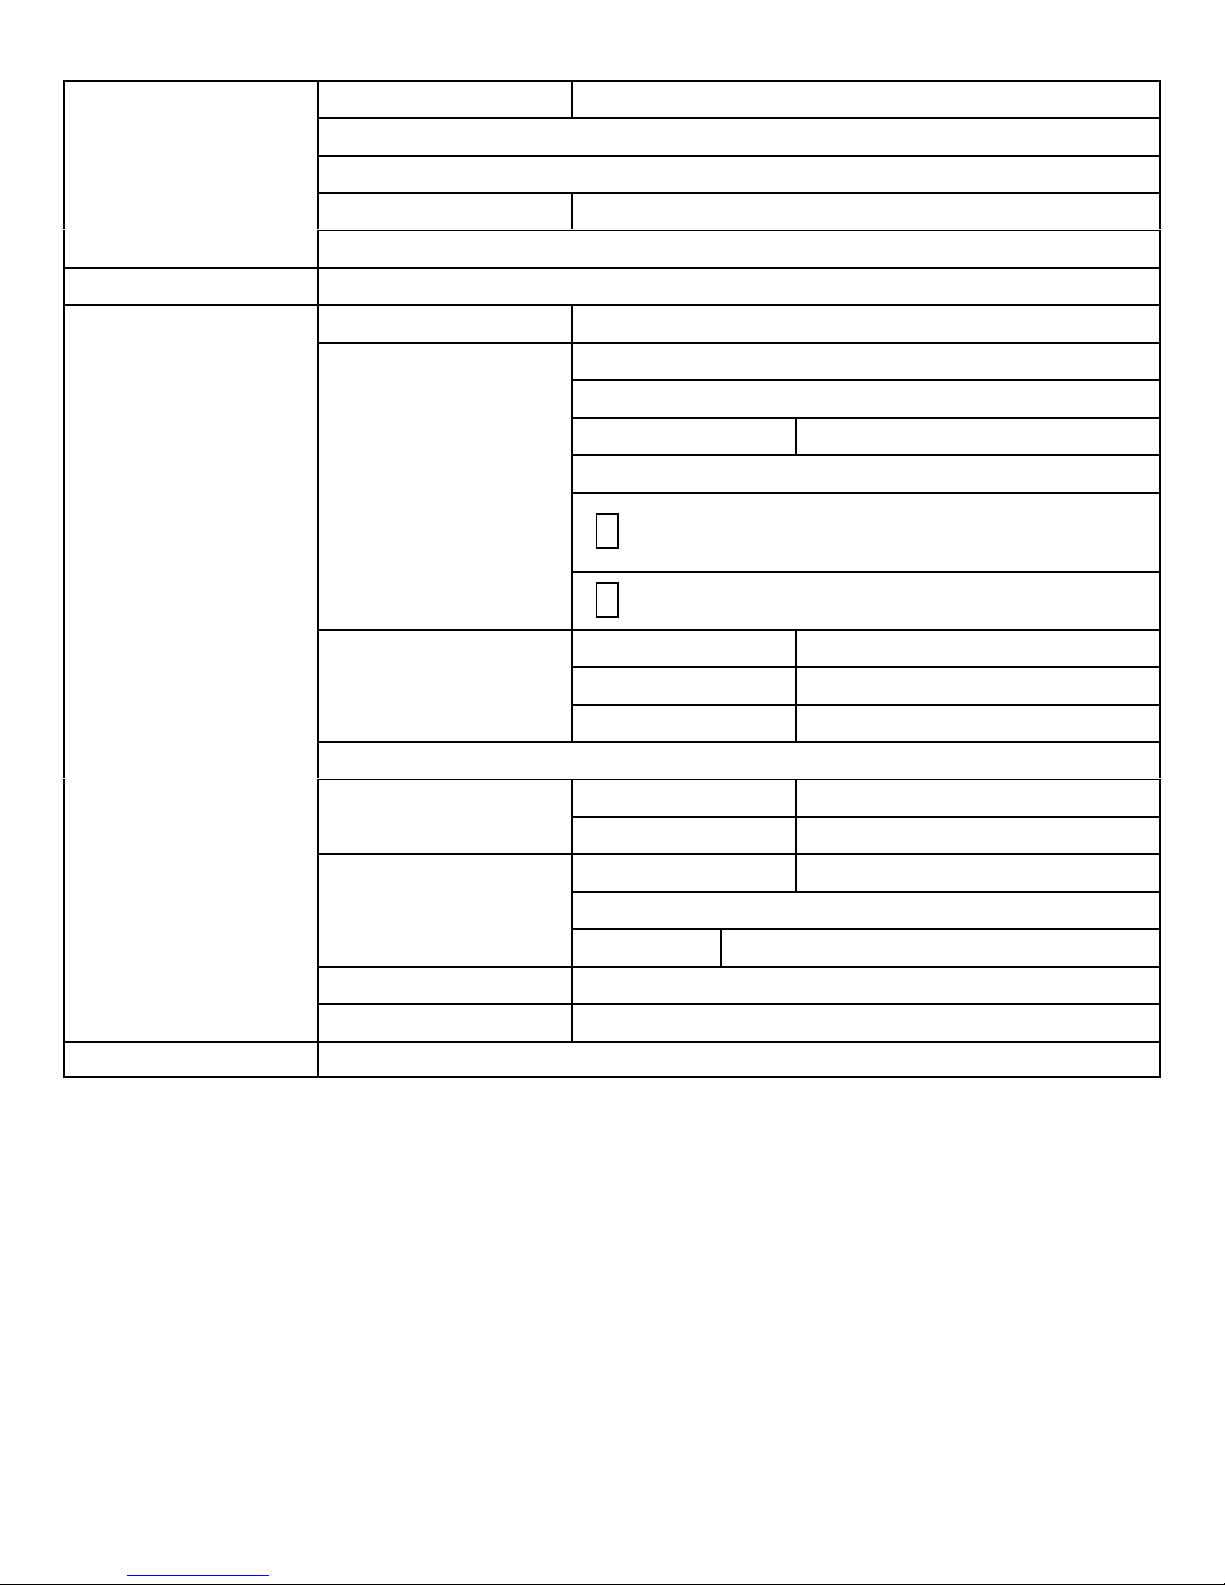
3.5 Menu Overview
Measured Parameter Concentration, % Transmittance, Absorbance
Programs
Photometry
Timer
System
Dilution
Analysis Timer On, Off
Reset
Language German, English, French, Spanish
Display
RS232 Download
Measured Value
Memory (Store)
Data Filter Filter, ID, Program, Date
Delete
# of 100 occupied
i
Filter, No filter i
Illumination Auto off, On, Off
Display
Contrast 0...100%
Brightness 0...100%
Info
Reset (Restore basic settings)
Baud Rate 1200, 2400, 4800, 9600, 19200
Interface
Output Format ASCII, CSV
Time hh:mm:ss
Continue.../ Date/Time
Date
Date Format
dd.mm.yy (default setting), mm.dd.yy, mm/dd/yy
Continue.../ Switchoff 10, 20, 30, 40, 50 min
Continue.../ Beep On, Off
10
Page 13
4 Photometry
4.1 Measuring the Concentration
1. Prepare the meter to receive the cell size of choice (See Section 3.2)
2. Turn the meter on by pressing the ON/OFF key.
3. Press the -M- key until Photometry\Concentration is displayed on the top line of the display. After the first
concentration measurement, the last program used is automatically displayed.
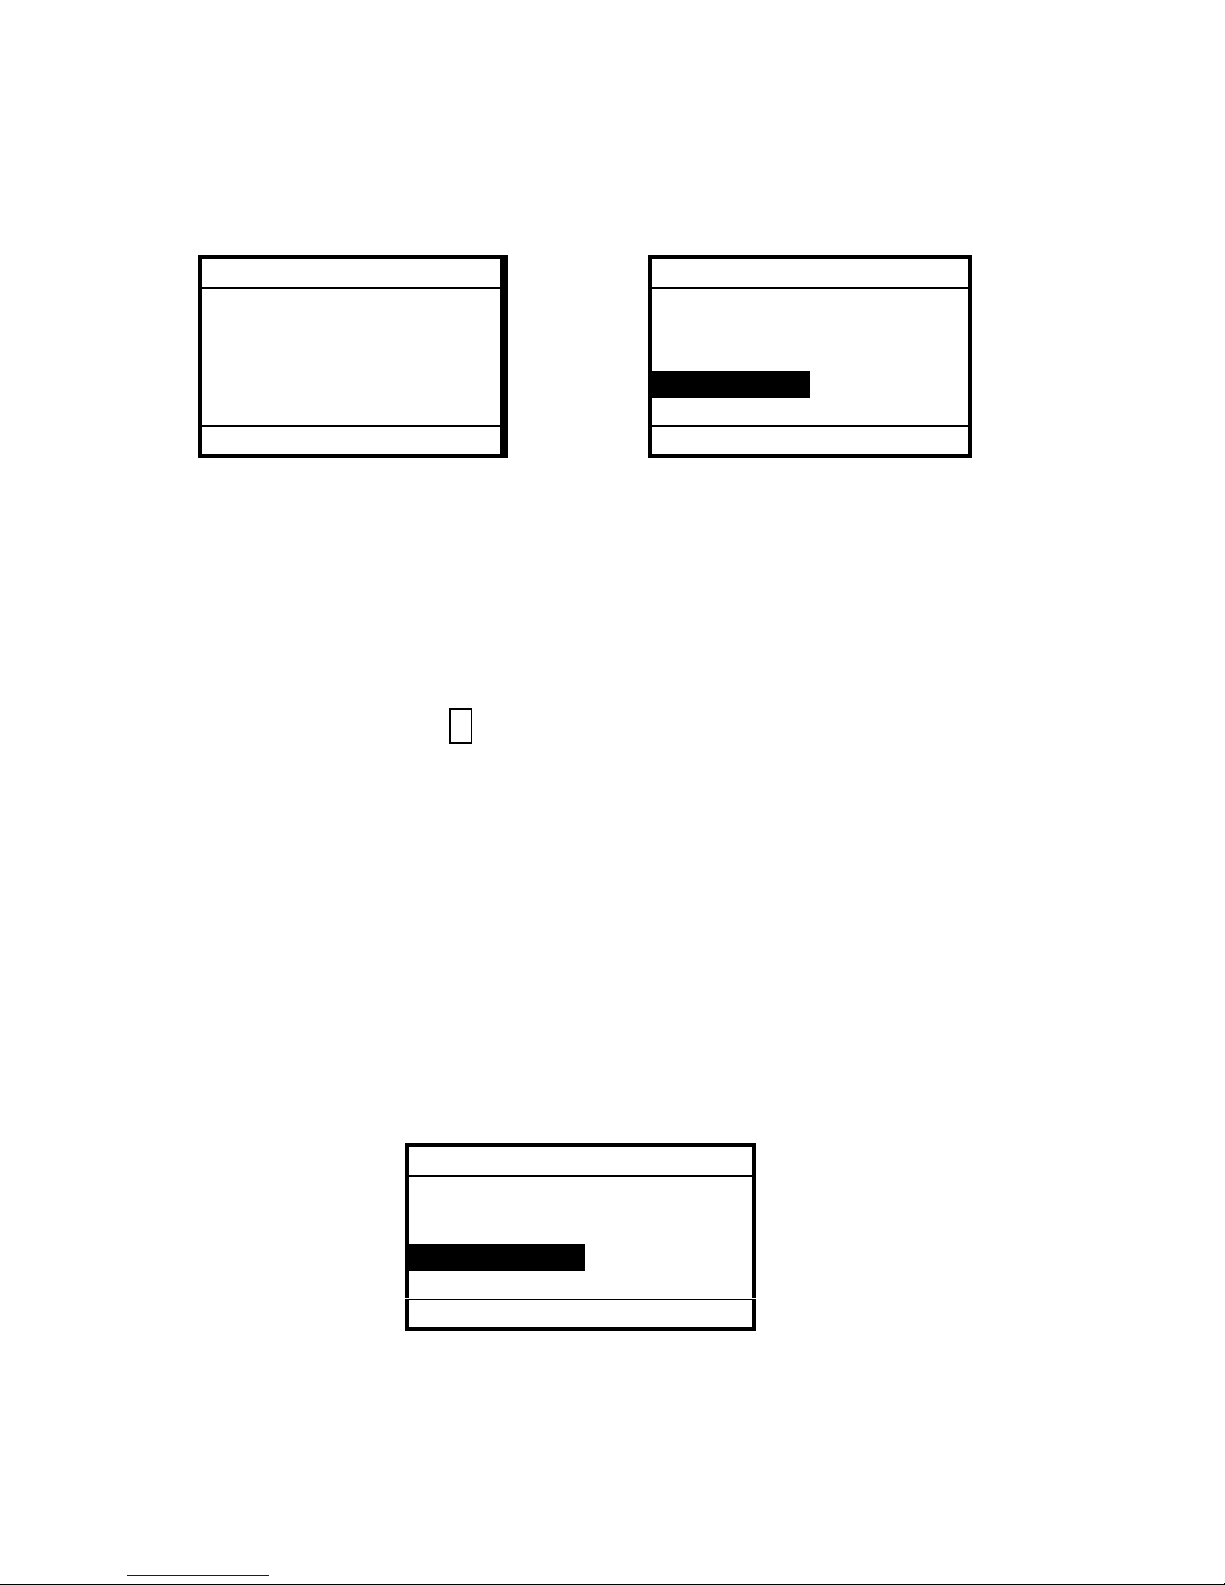
Photometry\Concentration Photometry\Concentration
# Select program
with <PROG>
11.30.13 15:12 11.30.13 15:12
# Select program
with <PROG>
or with • –
15: K1503 NH3-N
13 mm 0.00 - 7.00 mg/l
First concentration measurement (#1) All subsequent concentration Measurements (#2)
NOTE: From display #2 above, use the FORM key to change the chemical form being reported for the program
displayed and use the UNITS key to change the reporting unit. (See Section 1.3).
4. Use the • or – keys to toggle through the last ten programs used or press the PROGRAM key and enter the
desired program number, then press START/ENTER.
5.
Zero adjustment (zeroing the photometer at all wavelengths) is required each time the meter is turned on,
unless the photometer is docked in a Power LabStation (See Section 1.7). Zero adjustment must employ the
cell size for the test that is being run (See Section 1.6). If zeroing is necessary, the required cell size and the
following message are displayed: “ No valid zero adjustment is available”. The user is prompted to i
perform the zero adjustment. The prompts are highlighted across the bottom of the display. To proceed to
each next prompt, press START/ENTER.
NOTE: To perform the zero adjustment for Vacu-vials® Test Kits, use the factory sealed ZERO ampoule supplied with
each kit. For MDL+ Test Kits, fill a sample cell with distilled water to perform the zero adjustment.
6. In addition to zero adjustment, some programs also require a reagent blank (indicated in the individual kit
instructions):
# If a blank measurement has NOT previously been made (stored) for a program, the menu prompts the
user to measure a blank value. The prompts are highlighted across the bottom of the display. To
proceed to each next prompt, press START/ENTER.
# If a blank measurement has previously been made (stored) for a program, the previously stored blank
value will automatically be applied to the new sample measurement unless the user deletes or changes
the blank value. To delete the old blank value or generate a new blank value, press the CAL/ZERO key
and follow the choices/prompts.
NOTE: When a blank value has been applied to a test result, [BV] is displayed on the screen with the test result.
Photometry\Concentration
[BV]
0.74
187: K9903 Zn
13 mm 0.00 - 3.00 mg/l
mg/l
11.30.13 15:12
7. Insert the clean, dry sample vial or ampoule as prompted and press START/ENTER. The test result is
displayed.
NOTE: If the measured test result is above the upper limit of the test range, the display will show > XX ppm. However,
immediately above that in a smaller font, the actual test result will be displayed
.
11
Page 14

4.2 Analysis Timer
The analysis timer is programmed with program specific color development times for all factory calibrated
programs. When the analysis timer is turned on (Configuration/Photometry/Analysis timer menu), it is active for
all factory calibrated programs and can not be bypassed. When the analysis timer is turned on and a program is
selected to run, the meter will show a prompt for starting the analysis timer. When START/ENTER is pushed, the
analysis timer displays and counts down the required color development time and then beeps. When the meter
beeps, START/ENTER must be pressed twice to obtain a the concentration measurement.
4.3 Timer
There may be waiting periods in between the individual steps of a test method. The Timer function can be used
to manually set these time intervals. The timer is set and started in the Configuration/Timer menu by entering a
time interval. The timer is displayed in the lower left corner (status line) of the display. When the selected time
expires, the meter beeps. Press START/ENTER to stop the beeping.
4.4 Measuring Diluted Samples
If the concentration of a sample exceeds the measuring range of a test method, it may be reasonable to dilute
the sample with distilled water prior to analysis. The corresponding dilution factor (1....99) can be manually set
on the photometer so that test results are automatically adjusted for the dilution factor. After selecting the
program for which a sample dilution is to be employed, go to the Configuration/ Photometry/Dilution menu to
specify the appropriate dilution factor. Once the dilution factor is set, the meter applies the dilution factor and
displays the concentration of the undiluted sample. The entered dilution factor is only valid for the selected
program. If a dilution factor is active, it is indicated on the display during measurement as follows:
[x + 1].............with x = parts water and 1 = parts sample.
The dilution factor is erased if:
! the photometer is turned off
! a different program number is selected
! the factor 0 is entered in the Dilution menu.
NOTE: Sample dilution is not appropriate for all analytes.
12
Page 15

5 Storing Data
The V-3000 photometer can store up to 100 measurements. A measurement is stored by pressing the STO key.
This opens the Store menu. Each stored measurement includes the date, time and measurement ID number as
well as the following:
Measuring Mode Measurement Data
Program Number
Measured Value
Photometry
Chemical Form Chosen for the Analyte Tested
Use of a Blank Value (BV), if applicable
Dilution (x +1), if applicable
5.1 Assigning Measurement ID Number
Use the • or – keys, the START/ENTER key and the number keys to assign an ID number from 0 to 99. The
same ID number can be used multiple times to indicate a particular sampling location or a particular operator.
5.2 Managing Stored Measurement Values
The number of storage locations that are still free is displayed in parenthesis at the top of the Store menu
display. The number of storage locations that are occupied is displayed in the Configuration/System/Measured
value memory menu.
If the measured value memory capacity is full, the meter will offer the option to overwrite the oldest stored
measurement with the new storing command. Another option is that all stored values can be deleted using the
Configuration/System/Measured Value Memory menu. A security prompt appears before a dataset is overwritten
or all of the measured values are deleted. It is not possible to selectively delete a single stored measurement.
5.3 Filtering Stored Measurement Values
The functions to display and download stored measurements refer to all stored measurements that correspond
to the adjusted filter criteria. The filter criteria choices (listed below) are found in the
Configuration/System/Measured value memory/Data filter menu.
Filter Criteria Description
No filter There is no filter set
ID Select according to ID Number
PROG Select according to Program Number
Date Select according to a period of days
ID + PROG
ID + Date
PROG + Date
ID + PROG + Date
Select according to ID Number and Program Number
Select according to ID Number and period of days
Select according to Program Number and period of days
Select according to ID Number and Program Number and period of days
13
Page 16

6 Use with Printers and Computers
The V-3000 photometer allows communication directly to a printer or bidirectional communication with a
computer. Connecting to a printer or a computer requires the use of the supplied PC interface cable with RS-232
connector. This cable has a special 6-pin connector on one end for the V-3000. The 6-pin RS-232 port is on the
back of the photometer. If your printer or computer does not have a 9 pin RS232 port, you will need to purchase
the following USB adapter that will allow you to connect the V-3000 PC Interface cable to the USB port on your
printer or computer: Catalog Number: A-0307, Description: RS232 (9 pin) to USB Cable Adapter.
6.1 Saved Data Output Format
When data is being downloaded from the V-3000 to a computer or printer, output format can be selected. ASCII
output format downloads data sets with formatting. CSV output format downloads the data set information
separated by semi-colons(;). CSV format is used for importing data into spreadsheets. The output format setting
is set or changed in the Configuration/System/Interface/Output format menu.
Example of ASCII format:
V-3000 Ser. No. 12390625
3: 12/31/15 11:55:09
ID 0 / PROG 15
4.50 mg/l NH3-N
Example of CSV format:
2;12/31/15;11:55:06;0;15:NH3-N; ;4.50;mg/l;VALID; ; ;
Description of data separated by semi-colons in CSV format
Data storage number
Date of storing
Time of storing
User assigned ID
Program number, only for the concentration measurements
Citation form, only for the measured parameter
Blank value (BV) for concentration readings
Dilution factor, only for concentration measurements
Measured value
Unit of measured value (e.g. ppm, mg/L, Abs, etc,)
Measured value status-VALID, INVALID, UFL (below measuring range), OFL (above measuring range)
Secondary value for Absorbance/%Transmittance measurements:
Wavelength
Unit of secondary value (nm)
Value status
6.2 Printing Data Directly to a Printer
1. With the V-3000 power off, connect the V-3000 to a printer using the supplied PC interface cable.
2. Turn the meter on by pressing the ON/OFF key.
3. Press the MENU key. The Configuration menu is opened.
4. Use the • or – keys to highlight System. Press START/ENTER. The System menu is opened.
5. Use the • or – keys to highlight Measured value memory. Press START/ENTER.
6. To print individual readings: Use the • or – keys to highlight Display. Press START/ENTER. Readings
will display one at a time. Use • or – keys to scroll. Press PRT key to print individual readings in selected
output format. (See Section 6.1)
To print entire dataset: Use the • or – keys to highlight RS232 download. Press START/ENTER. This will
print entire dataset according to the filters criteria that has been set (See Section 5.3).
14
Page 17

6.3 Downloading Data to a Computer
V-3000 Data Management Software for Data Exchange (Catalog Number A-0301) is available for easy data
downloading and manipulation. However, without the additional software, data can also be sent to a terminal
emulator program and then exported to a spreadsheet or database software application.
To download data without the V-3000 PC Software:
NOTE: These instructions are specific to the terminal emulator program HyperTerminal.
1. Create and save a text file (*.txt) to receive the V-3000 logged data. Close this file.
2. With the V-3000 power off, connect the V-3000 to a computer using the supplied PC interface cable.
3. Turn the meter on by pressing the ON/OFF key.
4. Press the MENU key. The Configuration menu is opened.
5. Use the • or – keys to highlight System. Press START/ENTER. The System menu is opened.
6. Use the • or – keys to highlight Measured value memory. Press START/ENTER.
7. Open HyperTerminal by going to the Start button on your computer, then clicking on Programs/
Accessories/Communications/HyperTerminal.
8. A “New Connection” window will open. Enter a name for the terminal program, for example “V3000".
Select an icon to represent the terminal program.
9. A “Connect To” window will open. Select the Com (serial) port to which V-3000 is connected.
10. Enter the port transmission settings:
Baud Rate: 1200, 2400, 4800, or 9600
Data Bits: 8
Parity: None
Stop Bit: 1
Start Bit: 1
Flow Control: Hardware
NOTE: The baud rate selected in Hyper Terminal must match the V-3000 baud rate. V-3000 baud rate is set in
the Configuration/System/Interface/Baud rate menu.
11. From the HyperTerminal menu, select Transfer. Click on Capture Text. Enter the path and name of the
file created in Step 1. Click on Start.
12. Make sure that the desired V-3000 output format has been chosen (See Section 6.1).
13. To download individual readings: Use the • or – keys to highlight Display. Press START/ENTER.
Readings will display one at a time. Use • or – keys to scroll. Press PRT key to download individual
readings in selected output format.
To download entire datasets: Use the • or – keys to highlight RS232 download. Press
START/ENTER. This will download entire data sets in the selected output format according to the filter
criteria that has been set (See Section 5.3).
14. Downloaded readings should appear in the Hyper Terminal window. Once transmission is complete,
click on Transfer/Capture Text and select Stop. Exit the HyperTerminal program and disconnect the V3000 from the computer.
15. The text file, which captured the V-3000 data, can now be opened in the appropriate software
application. Data may be reformatted as needed for spreadsheet or database manipulation.
6.4 Uploading Program Revisions
The V-3000 program version can be updated by visiting the CHEMetrics website, www.chemetrics.com
and
clicking on V-3000 Method Update under the Support tab. The CHEMetrics website will inform customers
when new programs are available or existing programs have been updated. Also, product specific test kit
labels will alert the user about program updates as they occur. To ensure that the most current calibrations
are being used, it is recommended that every V-3000 user check the CHEMetrics website frequently.
To determine what firmware version is currently on your V-3000, turn the photometer on. Press the Menu
key and select “Info”. The info screen displays Software version and Program version (as well as Serial
number and main PC board identification).
15
Page 18

Equipment Needed to Upgrade your V-3000:
! PC with Windows XP, Windows Vista, Windows 7, or Windows 10.
NOTE: Administrator rights will be required.
PC Serial interface cable (6 pin to 9 pin, supplied with instrument) and if necessary, USB Cable
!
Adapter (sold separately, Cat. No. A-0307).
OR
Power LabStation (sold separately, Cat. No. A-0302) with its serial interface cable and if necessary,
USB Cable Adapter (Cat No. A-0307).
Procedure for Firmware Revision Update:
Important Message! Before beginning the update:
! Ensure that the V-3000 has a stable uninterrupted power supply (i.e. fresh batteries or Power
LabStation with power cord).
! Close all other applications on your PC.
NOTE: Updates do not delete user generated custom methods.
Click on the link provided on the CHEMetrics website to open the update program.
1.
2. Files have been compressed into a zip archive (*.zip). Admin rights will be required to unzip the
archive and install the program on your PC. Unzip the files and save them to your PC. Open the
folder on your PC called “V3000_update”, then double click on the executable (*.exe) file. When the
installation has occurred successfully, the executable icon (shortcut to the V-3000 upload program)
will be saved to your desktop.
NOTE: The step-by-step procedure for installing the program and unzipping the files varies among different
operating systems and individual PCs. Consult with an IT Specialist for detailed instructions.
3. With the V-3000 power off, connect the V-3000 to the computer using the supplied PC interface
serial cable. If only USB ports are available, connect the V-3000 using the supplied serial cable and
USB Cable Adapter (sold separately, Cat. No. A-0307).
4. Turn the V-3000 on by pressing the ON/OFF key.
NOTE: It does not matter which screen the instrument displays at the start of this update.
5. Double click on the V-3000 executable icon on your desktop. Click “OK” to initiate the V-3000
Firmware Update. The entire process will take approximately 10 minutes. The V-3000 screen will
go through a series of programming tasks.
NOTE: Do NOT click Cancel, remove PC cable, interrupt power supply, or attempt to stop the update.
This can result in meter malfunction requiring repair by the manufacturer.
6. When the update is complete, the PC screen will display “Firmware update successfully completed!”
as well as meter and revision information including the new Software and Program Version numbers.
If the update fails, follow the prompts on the PC screen to re-initiate the upload. When prompted,
carefully enter the V-3000 serial number.
NOTE: If the update repeatedly fails, disconnect the V-3000 from the COM port and contact
7. When the update is completed successfully, disconnect the V-3000 from the COM port.
8. Click File\Exit to close the program. Do NOT click “OK”.
16
Page 19
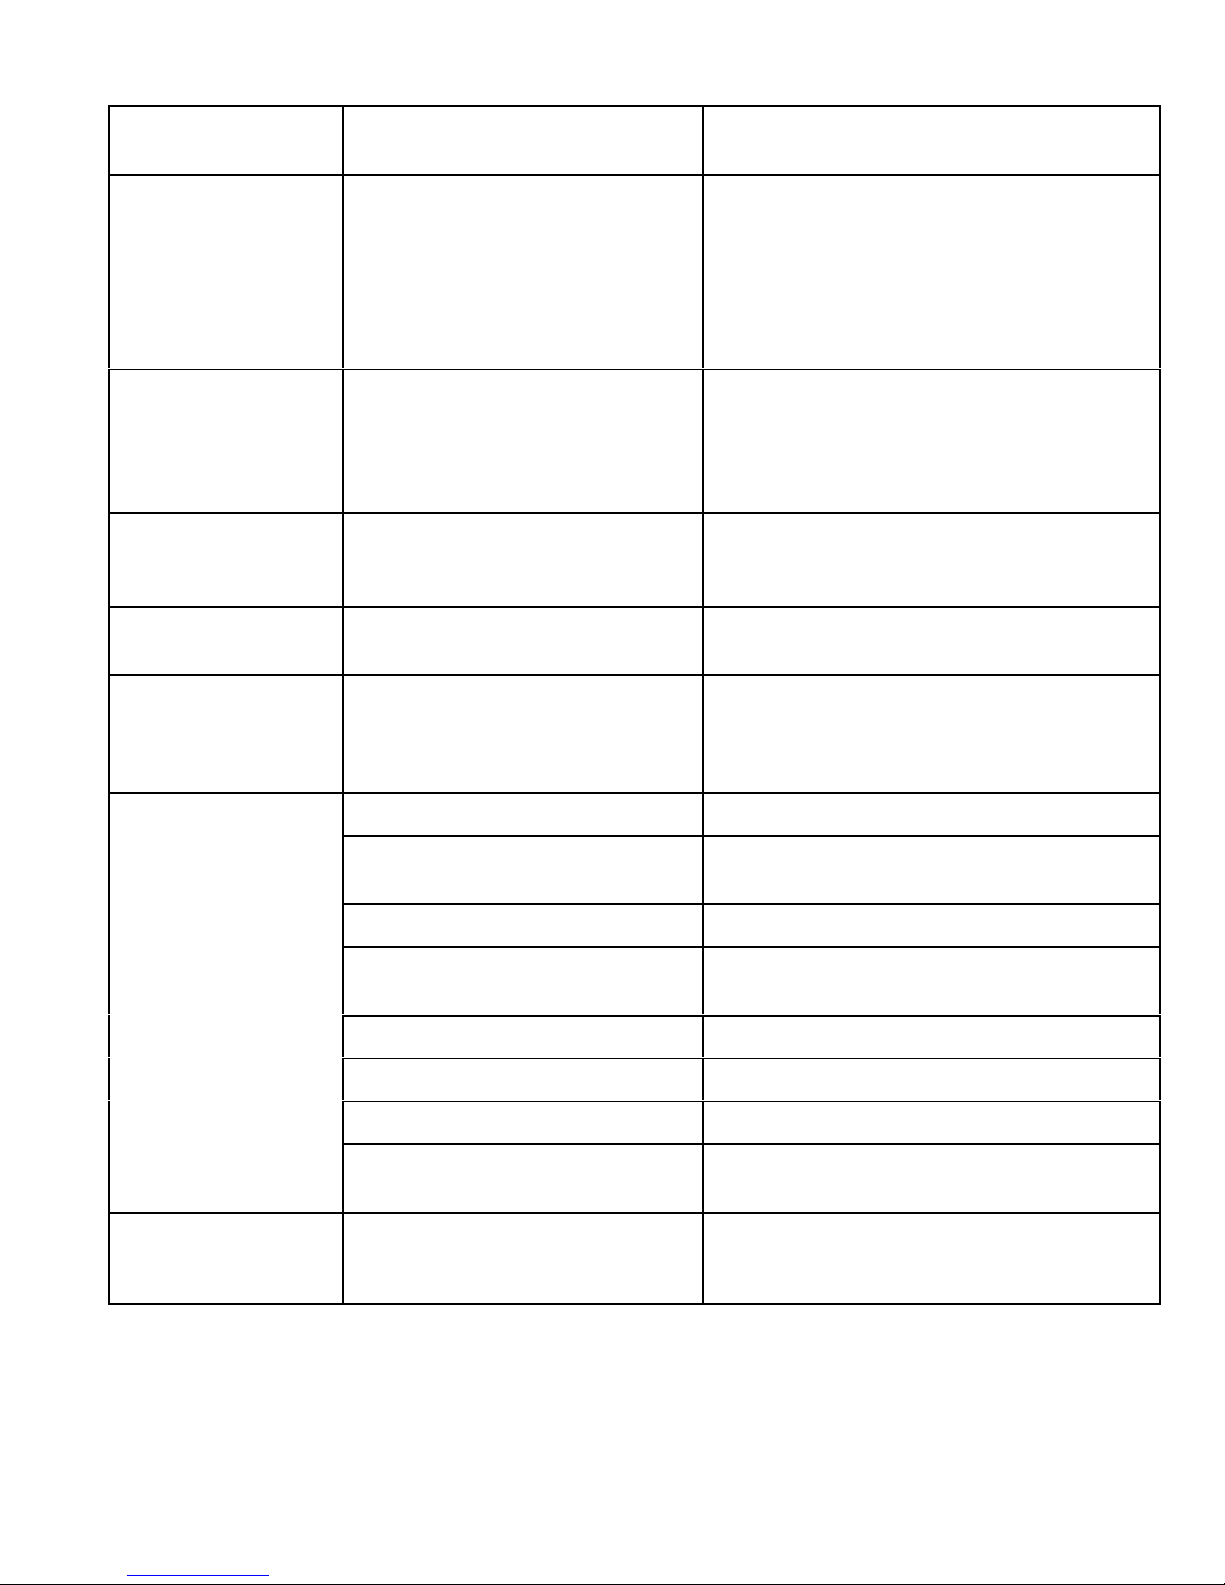
7 Troubleshooting
Issue/Error
Cause Remedy
Message
Failure to perform zero at all six
wavelengths.
Zero Adjustment
Error
Debris in sample well
Debris on zeroing ampoule
Invalid zeroing ampoule
LoBat Battery power is insufficient.
Instrument does not
react to keystroke or
RS232 interface.
Meter software needs to system
reboot.
Bootloader waiting Error uploading method update.
Program number
invalid!
Program number not recognized.
Only zero with valid 13 or 28 mm water
blank.
Clean zeroing ampoule.
Clean sample well. Make sure it is free of
debris and liquid.
Replace AA batteries immediately.
Recharge “accumulator pack”.
Plug into 9V power supply cable.
Perform processor reset by pressing
<START/ENTER> and <PRT> key
simultaneously.
Never press cancel during a method update.
Contact CHEMetrics for assistance.
Only use program appropriate program
numbers.
Make sure method software is up to date.
Obviously incorrect
measured values
Error message, Error
0, 8, 16, 16384
Measurement disturbed by light. Use light shield.
Cell not correctly inserted.
Insert cell positioned in the bottom of the
sample compartment.
Cell contaminated. Clean the cell.
Sample compartment
contaminated.
Clean the sample compartment.
Dilution set incorrectly. Set the correct dilution factor.
Selected program unsuitable. Select appropriate program number.
Zero measurement incorrect. Perform zero adjustment.
Blank value incorrect.
Re-measure the blank value for program in
use.
Repeat measurement.
Instrument error.
Restart instrument.
17
 Loading...