

Page 1
Page 2

Chelsio Communications (Headquarters)
370 San Aleso Ave.
Suite 100
Sunnyvale, CA 94085
U.S.A
www.chelsio.com
Tel: 408.962.3600
Fax: 408.962.3661
Chelsio (India) Private Limited
Subramanya Arcade, Floor 3, Tower B
No. 12, Bannerghatta Road,
Bangalore-560029
Karnataka,
India
Tel: +91-80-4039-6800
Fax: +91-80-4039-6807
Chelsio KK (Japan)
SHIMA Akasaka Bldg.
Minato-ku, Tokyo
Japan 107-0052
Tel: 03-6234-4353
This document and related products are distributed under licenses restricting their use, copying,
distribution, and reverse-engineering.
No part of this document may be reproduced in any form or by any means without prior written permission
by Chelsio Communications.
All third party trademarks are copyright of their respective owners.
THIS DOCUMENTATION IS PROVIDED “AS IS” AND WITHOUT ANY EXPRESS OR IMPLIED
WARRANTIES, INCLUDING, WITHOUT LIMITATION, THE IMPLIED WARRANTIES OF
MERCHANTABILITY AND FITNESS FOR A PARTICULAR PURPOSE.
THE USE OF THE SOFTWARE AND ANY ASSOCIATED MATERIALS (COLLECTIVELY THE
“SOFTWARE”) IS SUBJECT TO THE SOFTWARE LICENSE TERMS OF CHELSIO
COMMUNICATIONS, INC.
Sales
For all sales inquiries please send email to sales@chelsio.com
Support
For all support related questions please send email to support@chelsio.com
Copyright © 2014.Chelsio Communications. All Rights Reserved.
Chelsio ® is a registered trademark of Chelsio Communications.
All other marks and names mentioned herein may be trademarks of their respective companies.
Chelsio T5/T4 Unified Wire For Linux ii
Page 3

Version
Revision Date
1.0.0
12/08/2011
1.0.1
01/09/2013
1.0.2
01/27/2013
1.0.3
03/26/2013
1.0.4
04/12/2013
1.0.5
06/20/2013
1.0.6
08/17/2013
1.0.7
10/22/2013
1.0.8
03/08/2013
1.0.9
05/15/2013
1.1.0
07/26/2013
1.1.1
08/14/2013
1.1.2
12/06/2013
1.1.3
12/19/2013
1.1.4
03/13/2014
1.1.5
05/02/2014
1.1.6
06/30/2014
Document History
Chelsio T5/T4 Unified Wire For Linux iii
Page 4

TABLE OF CONTENTS
I. CHELSIO UNIFIED WIRE 12
1. Introduction 13
1.1. Features 13
1.2. Hardware Requirements 14
1.3. Software Requirements 14
1.4. Package Contents 14
2. Hardware Installation 17
3. Software/Driver Installation 20
3.1. Pre-requisites 21
3.2. Installing Chelsio Unified Wire from source 21
3.3. Installing Chelsio Unified Wire from RPM 32
3.4. Firmware update 35
4. Software/Driver Uninstallation 36
4.1. Uninstalling Chelsio Unified Wire from source 36
4.2. Uninstalling Chelsio Unified Wire from RPM 40
5. Configuring Chelsio Network Interfaces 42
5.1. Configuring 40G adapters 42
5.2. Configuring network-scripts 43
5.3. Creating network-scripts 44
5.4. Checking Link 45
6. Software/Driver Update 46
II. NETWORK (NIC/TOE) 47
1. Introduction 48
1.1. Hardware Requirements 48
1.2. Software Requirements 49
2. Software/Driver Loading 50
2.1. Loading in NIC mode (without full offload support) 50
2.2. Loading in TOE mode (with full offload support) 50
3. Software/Driver Unloading 51
3.1. Unloading the NIC driver 51
3.2. Unloading the TOE driver 51
4. Software/Driver Configuration and Fine-tuning 52
4.1. Instantiate Virtual Functions (SR-IOV) 52
4.2. Performance tuning 52
III. VIRTUAL FUNCTION NETWORK (VNIC) 58
1. Introduction 59
1.1. Hardware Requirements 59
Chelsio T5/T4 Unified Wire For Linux iv
Page 5

1.2. Software Requirements 60
2. Software/Driver Loading 61
2.1. Loading the driver 61
3. Software/Driver Unloading 62
3.1. Unloading the driver 62
4. Software/Driver Configuration and Fine-tuning 63
4.1. Instantiate Virtual Functions 63
IV. IWARP (RDMA) 64
1. Introduction 65
1.1. Hardware Requirements 65
1.2. Software Requirements 65
2. Software/Driver Loading 67
2.1. Compiling and Loading iWARP driver 67
3. Software/Driver Unloading 68
4. Software/Driver Configuration and Fine-tuning 69
4.1. Testing connectivity with ping and rping 69
4.2. Enabling various MPIs 70
4.3. Setting up NFS-RDMA 78
V. WD-UDP 80
1. Introduction 81
1.1. Hardware Requirements 81
1.2. Software Requirements 81
2. Software/Driver Loading 83
3. Software/Driver Unloading 84
4. Software/Driver Configuration and Fine-tuning 85
4.1. Accelerating UDP Socket communications 85
VI. WD-TOE 91
1. Introduction 92
1.1. Hardware Requirements 92
1.2. Software Requirements 92
2. Software/Driver Loading 94
3. Software/Driver Unloading 95
4. Software/Driver Configuration and Fine-tuning 96
4.1. Running the application 96
VII. ISCSI PDU OFFLOAD TARGET 97
1. Introduction 98
Chelsio T5/T4 Unified Wire For Linux v
Page 6

1.1. Features 98
1.2. Hardware Requirements 99
1.3. Software Requirements 101
2. Software/Driver Loading 103
2.1. Latest iSCSI Software Stack Driver Software 103
2.2. Generating single RPM for T3 and T4 adapters 105
2.3. Obtaining the iSCSI Software License 106
3. Software/Driver Unloading 108
4. Software/Driver Configuration and Fine-tuning 109
4.1. Command Line Tools 109
4.2. iSCSI Configuration File 109
4.3. A Quick Start Guide for Target 110
4.4. The iSCSI Configuration File 113
4.5. Challenge-Handshake Authenticate Protocol (CHAP) 122
4.6. Target Access Control List (ACL) Configuration 124
4.7. Target Storage Device Configuration 125
4.8. Target Redirection Support 128
4.9. The command line interface tools “iscsictl” & “chisns” 129
4.10. Rules of Target Reload (i.e. “on the fly” changes) 134
4.11. System Wide Parameters 135
VIII. ISCSI PDU OFFLOAD INITIATOR 137
1. Introduction 138
1.1. Hardware Requirements 138
1.2. Software Requirements 139
2. Software/Driver Loading 140
3. Software/Driver Unloading 142
4. Software/Driver Configuration and Fine-tuning 143
4.1. Accelerating open-iSCSI Initiator 143
4.2. Auto login from cxgb4i initiator at OS bootup 146
IX. DATA CENTER BRIDGING (DCB) 147
1. Introduction 148
1.1. Hardware Requirements 148
1.2. Software Requirements 148
2. Software/Driver Loading 149
3. Software/Driver Unloading 150
4. Software/Driver Configuration and Fine-tuning 151
4.1. Configuring Cisco Nexus 5010 switch 151
4.2. Configuring the Brocade 8000 switch 154
Chelsio T5/T4 Unified Wire For Linux vi
Page 7

X. FCOE PDU OFFLOAD TARGET 157
1. Introduction 158
1.1. Hardware Requirements 158
1.2. Software Requirements 158
2. Software/Driver Loading 161
3. Software/Driver Configuration and Fine-tuning 162
3.1. Configuring Cisco Nexus 5010 switch 162
3.2. Collecting port information 165
3.3. Configuring LUNs on Target 169
3.4. Configuring Persistent Target 171
3.5. Verifying initiators connected to the target 172
3.6. Removing LUNs 173
3.7. Performance tuning 173
4. Software/Driver Unloading 176
XI. FCOE FULL OFFLOAD INITIATOR 177
1. Introduction 178
1.1. Hardware Requirements 178
1.2. Software Requirements 178
2. Software/Driver Loading 179
3. Software/Driver Unloading 180
4. Software/Driver Configuration and Fine-tuning 181
4.1. Configuring Cisco Nexus 5010 and Brocade switch 181
4.2. FCoE fabric discovery verification 181
4.3. Formatting the LUNs and Mounting the Filesystem 185
4.4. Creating Filesystem 187
4.5. Mounting the formatted LUN 188
XII. OFFLOAD BONDING DRIVER 189
1. Introduction 190
1.1. Hardware Requirements 190
1.2. Software Requirements 190
2. Software/Driver Loading 192
3. Software/Driver Unloading 193
4. Software/Driver Configuration and Fine-tuning 194
4.1. Offloading TCP traffic over a bonded interface 194
XIII. OFFLOAD MULTI-ADAPTER FAILOVER (MAFO) 195
1. Introduction 196
1.1. Hardware Requirements 196
1.2. Software Requirements 197
Chelsio T5/T4 Unified Wire For Linux vii
Page 8

2. Software/Driver Loading 198
3. Software/Driver Unloading 199
4. Software/Driver Configuration and Fine-tuning 200
4.1. Offloading TCP traffic over a bonded interface 200
4.2. Network Device Configuration 201
XIV. UDP SEGMENTATION OFFLOAD AND PACING 202
1. Introduction 203
1.1. Hardware Requirements 204
1.2. Software Requirements 204
2. Software/Driver Loading 206
3. Software/Driver Unloading 207
4. Software/Driver Configuration and Fine-tuning 208
4.1. Modifying the application 208
4.2. Configuring UDP Pacing 210
XV. OFFLOAD IPV6 DRIVER 211
1. Introduction 212
1.1. Hardware Requirements 212
1.2. Software Requirements 212
2. Software/Driver Loading 214
3. Software/Driver Unloading 215
3.1. Unloading the NIC driver 215
3.2. Unloading the TOE driver 215
XVI. BYPASS DRIVER 216
1. Introduction 217
1.1. Features 217
1.2. Hardware Requirements 218
1.3. Software Requirements 219
2. Software/Driver Loading 220
3. Software/Driver Unloading 221
4. Software/Driver Configuration and Fine-tuning 222
4.1. Starting ba server 222
4.2. Bypass API (CLI) 222
XVII. WD SNIFFING AND TRACING 228
1. Theory of Operation 229
1.1. Hardware Requirements 230
1.2. Software Requirements 231
2. Installation and Usage 232
Chelsio T5/T4 Unified Wire For Linux viii
Page 9

2.1. Installing basic support 232
2.2. Using Sniffer (wd_sniffer) 232
2.3. Using Tracer (wd_tcpdump_trace) 232
XVIII.CLASSIFICATION AND FILTERING 234
1. Introduction 235
1.1. Hardware Requirements 235
1.2. Software Requirements 236
2. Usage 237
2.1. Configuration 237
2.2. Creating Filter Rules 237
2.3. Listing Filter Rules 239
2.4. Removing Filter Rules 239
2.5. Layer 3 example 240
2.6. Layer 2 example 243
3. Hash/DDR Filters 247
3.1. Creating Filter Rules 247
3.2. Listing Filter Rules 248
3.3. Removing Filter Rules 249
3.4. Swap MAC feature 249
3.5. Hit Counters 250
XIX. TRAFFIC MANAGEMENT 252
1. Introduction 253
1.1. Hardware Requirements 253
1.2. Software Requirements 254
2. Software/Driver Loading 255
3. Software/Driver Unloading 256
4. Software/Driver Configuration and Fine-tuning 257
4.1. Traffic Management Rules 257
4.2. Configuring Traffic Management 259
5. Usage 262
5.1. Non-Offloaded Connections 262
5.2. Offloaded Connections 262
5.3. Offloaded Connections with Modified Application 263
XX. UNIFIED WIRE MANAGER (UM) 264
1. Introduction 265
1.1. Features 265
1.2. Reference Architecture 266
1.3. Unified Wire Manager Components 266
Chelsio T5/T4 Unified Wire For Linux ix
Page 10

1.4. Authentication and encryption 267
2. Hardware and Software 268
2.1. Supported Adapters 268
2.2. Platform/Component Matrix 269
2.3. Platform/Driver Matrix 269
3. Installing Unified Wire Manager 270
4. Verifying UM components status 271
4.1. Verifying Management Agent 271
4.2. Verifying Management Client 272
4.3. Verifying Management Station 272
5. Management Agent 273
5.1. Communication 273
5.2. Configuration 273
5.3. Service configuration 273
5.4. Firewall 274
6. CLI client 275
6.1. CLI Help system 275
6.2. Client conflict resolution 275
7. Web GUI client 276
7.1. Management Station 276
7.2. Accessing Web Management Interface 277
7.3. Layout and Navigation 280
7.4. Home page 281
7.5. System page 294
7.6. Network page 306
7.7. Storage Page 335
7.8. Hardware Features 369
8. Uninstalling Unified Wire Manager 385
8.1. Uninstalling Management Agent 385
8.2. Uninstalling Management Client 385
8.3. Uninstalling Management Station 386
XXI. UNIFIED BOOT 387
1. Introduction 388
1.1. Hardware Requirements 388
1.2. Software Requirements 389
2. Flashing firmware and option ROM 390
2.1. Using Flash Utility 390
2.2. Using cxgbtool 394
3. Configuring PXE Server 395
4. PXE boot process 396
Chelsio T5/T4 Unified Wire For Linux x
Page 11

4.1. Legacy PXE boot 396
5. FCoE boot process 401
5.1. Legacy FCoE boot 401
6. iSCSI boot process 410
6.1. Legacy iSCSI boot 410
7. Creating Driver Update Disk (DUD) 423
7.1. Creating DUD for RedHat Enterprise Linux 423
7.2. Creating DUD for Suse Enterprise Linux 423
8. OS Installation 425
8.1. Installation using Chelsio NIC DUD (PXE only) 425
8.2. Installation on FCoE LUN 435
8.3. Installation on iSCSI LUN 440
XXII. LUSTRE FILE SYSTEM 450
1. Introduction 451
1.1. Hardware Requirements 451
1.2. Software Requirements 452
2. Creating/Configuring Lustre File System 453
XXIII. APPENDIX A 455
1. Troubleshooting 456
2. Chelsio End-User License Agreement (EULA) 458
Chelsio T5/T4 Unified Wire For Linux xi
Page 12

Chapter I. Chelsio Unified Wire
I. Chelsio Unified Wire
Chelsio T5/T4 Unified Wire For Linux Page 12
Page 13

Chapter I. Chelsio Unified Wire
1. Introduction
Thank you for choosing Chelsio T5/T4 Unified Wire adapters. These high speed, single chip,
single firmware cards provide enterprises and data centers with high performance solutions for
various Network and Storage related requirements.
The Terminator 5 (T5) is Chelsio’s next generation of highly integrated, hyper-virtualized
40/10GbE controllers. The T5 is built around a programmable protocol-processing engine, with
full offload of a complete Unified Wire solution comprising NIC, TOE, iWARP RDMA, ISCSI,
FCoE and NAT support. It scales true 40Gb line rate operation from a single TCP connection to
thousands of connections, and allows simultaneous low latency and high bandwidth operation
thanks to multiple physical channels through the ASIC.
The T4 adapters can fully offload TCP, UDP, iSCSI, iWARP and FCoE over a single Unified
Wire. The adapters also fully support SR-IOV, EVB/VNTag, DCB, Traffic Management and
Filtering.
Ideal for all data, storage and high performance clustering applications, the T5/T4 Adapters
enable a unified fabric over a single wire by simultaneously running all unmodified IP sockets,
Fibre Channel and InfiniBand applications over Ethernet at line rate.
Designed for deployment in virtualized data centers, cloud service installations and high
performance computing environments, Chelsio T5/T4 adapters bring a new level of performance
metrics and functional capabilities to the computer networking industry.
Chelsio Unified Wire software comes in two formats: Source code and RPM package forms.
Installing from source requires compiling the package to generate the necessary binaries. You
can choose this method when you are using a custom-built kernel. You can also install the
package using the interactive GUI installer. In other cases, download the RPM package specific
to your operating system and follow the steps mentioned to install the package. Please note that
the OFED software required to install Chelsio iWARP driver comes bundled in both source as
well as RPM packages.
This document describes the installation, use and maintenance of the software and its
various components.
1.1. Features
The Chelsio Unified Wire Package uses a single command to install various drivers and utilities.
It consists of the following software:
Network (NIC/TOE)
Virtual Function Network (vNIC)
iWARP (RDMA)
Chelsio T5/T4 Unified Wire For Linux Page 13
Page 14

Chapter I. Chelsio Unified Wire
WD-UDP
WD-TOE
iSCSI PDU Offload Target
iSCSI PDU Offload Initiator
Data Center Bridiging (DCB)
FCoE PDU Offload Target
FCoE full offload Initiator
Offload Bonding driver
Offload Multi-Adapter Failover(MAFO)
UDP Segmentation Offload and Pacing
Offload IPv6 driver
Bypass driver
Classification and Filtering feature
Traffic Management feature (TM)
Unified Wire Manager (UM)
Unified Boot Software
Lustre File System
Utility Tools(cop,cxgbtool,t4_perftune,benchmark tools, sniffer & tracer)
libs (iWARP and WD-UDP libraries)
For detailed instructions on loading, unloading and configuring the drivers/tools please refer to
their respective sections.
1.2. Hardware Requirements
The Chelsio Unified Wire software supports Chelsio T5 and T4 Series of Unified Wire Adapters.
To know more about the list of adapters supported by each driver, please refer to their
respective sections.
1.3. Software Requirements
The Chelsio Unified Wire software has been developed to run on 64-bit Linux based platforms
and therefore it is a base requirement for running the driver. To know more about the complete
list of operating systems supported by each driver, please refer to their respective sections.
1.4. Package Contents
1.4.1. Source Package
The Chelsio Unified Wire source package consists of the following files/directories:
Chelsio T5/T4 Unified Wire For Linux Page 14
Page 15

Chapter I. Chelsio Unified Wire
To use cxbtool for FCoE Initiator driver, use [root@host]# cxgbtool stor –h
Note
install.py,dialog.py: Python scripts needed for the GUI installer.
EULA: Chelsio’s End User License Agreement
install.log: File containing installation summary.
docs: The docs directory contains support documents - README, Release Notes and
User’s Guide (this document) for the software.
libs: This directory is for libraries required to install the WD-TOE, WD-UDP and iWARP
drivers. The libibverbs library has implementation of RDMA verbs which will be used by
iWARP applications for data transfers. The librdmacm library works as an RDMA connection
manager. The libcxgb4 library works as an interface between the above mentioned generic
libraries and Chelsio iWARP driver. The libcxgb4_sock library is a LD_PRELOAD-able
library that accelerates UDP Socket communications transparently and without
recompilation of the user application.
Makefile: The Makefile for building and installing from the source.
sample_machinefile: Sample file used during iWARP installation on cluster nodes.
scripts: Support scripts used by the Unified Wire Installer.
specs: The packaging specification files required for building RPM packages.
src: Source code for different drivers.
support: This directory contains source files for the dialog utility.
tools:
ba_tools: Management and configuration tools for bypass adapters.
benchmarks: This directory contains various benchmarking tools to measure
throughput and latency of various networks.
cop: The cop tool compiles offload policies into a simple program form that can be
loaded into the kernel and interpreted. These offload policies are used to determine
the settings to be used for various connections. The connections to which the
settings are applied are based on matching filter specifications. Please find more
details on this tool in its manual page (run man cop command).
cxgbtool: The cxgbtool queries or sets various aspects of Chelsio network
interface cards. It complements standard tools used to configure network settings
and provides functionality not available through such tools. Please find more details
on this tool in its manual page (run man cxgbtool command).
rdma_tools: This directory contains iWARP benchmarking tools.
sniffer: This directory contains sniffer tracing and filtering libraries. See WD Sniffing
and Tracing chapter for more information.
um: This directory contains Unified Wire Manager RPMs for different distributions
and Management Station configuration files.
chsetup: The chsetup tool loads NIC,TOE and iWARP drivers, and creates WD-
UDP configuration file.
chstatus: This utility provides status information on any Chelsio NIC in the system.
Chelsio T5/T4 Unified Wire For Linux Page 15
Page 16

Chapter I. Chelsio Unified Wire
t4_perftune.sh: This shell script is to tune the system for higher performance. It
achieves it through modifying the IRQ-CPU binding. This script can also be used to
change Tx coalescing settings.
t4-forward.sh: RFC2544 Forward test tuning script.
uname_r: This file is used by chstatus script to verify if the Linux platform is
supported or not.
wdload: UDP acceleration tool.
wdunload: Used to unload all the loaded Chelsio drivers.
bootcfg: This utility generates a default boot configuration file in binary format.
chiscsi_set_affinity.sh: This shell script is used for mapping iSCSI Worker threads
to different CPUs.
chelsio_adapter_config: This directory contains scripts and binaries needed to
configure Chelsio 40G Adapters.
Uboot: There are two sub-directories in the Uboot directory: OptionROM and LinuxDUD.
The OptionROM directory contains Unified Boot Option ROM image (cuwlbt4.bin) and a
Legacy Flash Utility (cfut4.exe), which can be used to flash Unified Boot Option ROM onto
Chelsio's T5 and T4 Converged Network Adapters (CNAs).
The LinuxDUD directory contains image (.img) files required to update drivers for Linux
(RHEL and SLES) distributions.
1.4.2. RPM package
The Chelsio Unified Wire RPM package consists of the following:
docs: The docs directory contains support documents i.e. README, Release Notes and
User’s Guide (this document) for the software.
scripts: Support scripts used by the Unified Wire Installer.
DRIVER-RPMS: RPM packages of Chelsio drivers.
OFED-RPMS: OFED RPM packages required to install iWARP driver.
install.py: Python script that installs the RPM package. See Software/Driver Installation
section for more information.
uninstall.py: Python script that uninstalls the RPM package. See Software/Driver
Uninstallation section for more information.
EULA: Chelsio’s End User License Agreement.
Uboot: There are two sub-directories in the Uboot directory: OptionROM and LinuxDUD.
The OptionROM directory contains Unified Boot Option ROM image (cuwlbt4.bin) and a
Legacy Flash Utility (cfut4.exe), which can be used to flash Unified Boot Option ROM onto
Chelsio's T5 and T4 Converged Network Adapters (CNAs).
The LinuxDUD directory contains image (.img) files required to update drivers for Linux
(RHEL and SLES) distributions.
Chelsio T5/T4 Unified Wire For Linux Page 16
Page 17

Chapter I. Chelsio Unified Wire
2. Hardware Installation
Follow these steps to install Chelsio Adapter in your system:
1. Shutdown/power off your system.
2. Power off all remaining peripherals attached to your system.
3. Unpack the Chelsio adapter and place it on an anti-static surface.
4. Remove the system case cover according to the system manufacturer’s instructions.
5. Remove the PCI filler plate from the slot where you will install the Ethernet adapter.
6. For maximum performance, it is highly recommended to install the adapter into a PCIE x8
slot.
7. Holding the Chelsio adapter by the edges, align the edge connector with the PCI connector
on the motherboard. Apply even pressure on both edges until the card is firmly seated. It
may be necessary to remove the SFP (transceiver) modules prior to inserting the adapter.
8. Secure the Chelsio adapter with a screw, or other securing mechanism, as described by the
system manufacturer’s instructions. Replace the case cover.
9. After securing the card, ensure that the card is still fully seated in the PCIE x8 slot as
sometimes the process of securing the card causes the card to become unseated.
10. Connect a fiber cable, multi-mode for short range (SR) optics or single-mode for long range
(LR) optics, to the 40/10Gb Ethernet adapter or regular Ethernet cable for the 1Gb Ethernet
adapter.
11. Power on your system.
12. Verify if the adapter was installed successfully by using the lspci command
a. For T5 adapters :
[root@host]# lspci |grep -i Chelsio
07:00.0 Ethernet controller: Chelsio Communications Inc T520-LL-CR Unified
Wire Ethernet Controller
07:00.1 Ethernet controller: Chelsio Communications Inc T520-LL-CR Unified
Wire Ethernet Controller
07:00.2 Ethernet controller: Chelsio Communications Inc T520-LL-CR Unified
Wire Ethernet Controller
07:00.3 Ethernet controller: Chelsio Communications Inc T520-LL-CR Unified
Wire Ethernet Controller
07:00.4 Ethernet controller: Chelsio Communications Inc T520-LL-CR Unified
Wire Ethernet Controller
07:00.5 SCSI storage controller: Chelsio Communications Inc T520-LL-CR
Unified Wire Storage Controller
07:00.6 Fibre Channel: Chelsio Communications Inc T520-LL-CR Unified Wire
Storage Controller
Chelsio T5/T4 Unified Wire For Linux Page 17
Page 18

Chapter I. Chelsio Unified Wire
b. And for T4 adapters :
[root@host]# lspci | grep –i Chelsio
03:00.0 Ethernet controller: Chelsio Communications Inc T420-CR Unified Wire
Ethernet Controller
03:00.1 Ethernet controller: Chelsio Communications Inc T420-CR Unified Wire
Ethernet Controller
03:00.2 Ethernet controller: Chelsio Communications Inc T420-CR Unified Wire
Ethernet Controller
03:00.3 Ethernet controller: Chelsio Communications Inc T420-CR Unified Wire
Ethernet Controller
03:00.4 Ethernet controller: Chelsio Communications Inc T420-CR Unified Wire
Ethernet Controller
03:00.5 SCSI storage controller: Chelsio Communications Inc T420-CR Unified
Wire Storage Controller
03:00.6 Fibre Channel: Chelsio Communications Inc T420-CR Unified Wire
Storage Controller
03:00.7 Ethernet controller: Chelsio Communications Inc Device 0000
For Chelsio T5/T4 adapters, the physical functions are currently assigned as:
Physical functions 0 - 3: for the SR-IOV functions of the adapter
Physical function 4: for all NIC functions of the adapter
Physical function 5: for iSCSI
Physical function 6: for FCoE
Physical function 7: Currently not assigned
Once Unified Wire package is installed and loaded, examine the output of dmesg to see if the
card is discovered.
For T5 adapters:
eth2: Chelsio T520-LL rev 0 10GBASE-SFP RNIC PCIe 8 GT/s x8 MSI-X, Offload
capable
0000:07:00.4: S/N: RE12130097, P/N: 11011675004
And, for T4 adapters:
eth0: Chelsio T420-CR rev 2 10GBASE-SFP RNIC PCIe x8 MSI-X
0000:04:00.4: S/N: PT18111226, P/N: 110112140D0
Chelsio T5/T4 Unified Wire For Linux Page 18
Page 19

Chapter I. Chelsio Unified Wire
Network device names for Chelsio’s physical ports are assigned using the
following convention: the port farthest from the motherboard will appear as the
first network interface. However, for T5 40G and T420-BT adapters, the
association of physical Ethernet ports and their corresponding network device
names is opposite. For these adapters, the port nearest to the motherboard will
appear as the first network interface.
Note
The above outputs indicate the hardware configuration of the adapters as well as the Serial
numbers. As observed by the x8, the card is properly installed in an x8 slot on the machine and
using MSI-X interrupts.
Chelsio T5/T4 Unified Wire For Linux Page 19
Page 20

Chapter I. Chelsio Unified Wire
T5/T4
Configuration
Tuning Option
Description
Driver/Software installed
Unified Wire
Configures adapters to run multiple protocols
like NIC/TOE, iWARP, iSCSI and FCoE
Initiator simultaneously.
NIC/TOE, vNIC, iWARP, WD-UDP,
iSCSITarget, iSCSI Initiator, Bonding,
MAFO,IPv6, Sniffer & Tracer, DCB, FCoE
Initiator, UM(Agent,Client,WebGUI),
Filtering, TM, Lustre
Low latency
Networking
Configures adapters to run NIC/TOE and
iWARP traffic with low latency specially
needed for financial applications.
NIC/TOE, vNIC, iWARP, WD-UDP, WD-
TOE, IPv6, Sniffer & Tracer,
UM(Agent,Client,WebGUI), Filtering, TM
High capacity
RDMA
Configures adapters to establish a large
number of RDMA connections.
NIC/TOE, vNIC, iWARP, WD-UDP, Bonding,
MAFO,IPv6, Sniffer & Tracer,
UM(Agent,Client,WebGUI), Filtering, TM
RDMA
Performance
Improves RDMA performance on T5/T4
adapters.
NIC/TOE,iWARP,
UM(Agent,Client,WebGUI)
High capacity
TOE
Configures adapters to establish a large
number of TOE connections.
NIC/TOE, vNIC, Bonding, MAFO,IPv6,
UM(Agent,Client,WebGUI), Filtering,
TM
iSCSI
Performance*
Improves iSCSI performance on T5
adapters.
NIC/TOE,iSCSI Target, iSCSI Initiator,
UM(Agent,Client,WebGUI)
UDP Seg.Offload
& Pacing
Configures adapters to establish a large
number of UDP Segmentation Offload
connections.
NIC/TOE, IPv6, USO,
UM(Agent,Client,WebGUI), Filtering, TM
T5 Wire Direct
Latency*
Configures T5 adapters to provide low Wire
Direct latency.
NIC/TOE,iWARP,WD-UDP,WD-TOE,
UM(Agent,Client,WebGUI)
T5 High Capacity
WD*
Configures T5 adapters to establish a large
number of WD-UDP connections.
NIC/TOE,WD-UDP,WD-TOE,
UM(Agent,Client,WebGUI)
T5 Hash Filter*
Configures T5 adapters to create more
filters.
NIC,Filtering, UM(Agent,Client,WebGUI)
3. Software/Driver Installation
There are two main methods to install the Chelsio Unified Wire package: from source and RPM.
If you decide to use source, you can install the package using CLI or GUI mode.
If you decide to use RPM, you can install the package using Menu or CLI mode.
Irrespective of the method chosen for installation, the machine needs to be rebooted for
changes to take effect.
The following table describes the various configuration tuning options available during
installation and drivers/software installed with each option by default:
* Supported only on T5 adapters.
Chelsio T5/T4 Unified Wire For Linux Page 20
Page 21

Chapter I. Chelsio Unified Wire
3.1. Pre-requisites
Depending on the component you choose to install, please ensure that the following
requirements are met, before proceeding with the installation.
If you want to install OFED with NFS-RDMA support, please refer “Setting up NFS-RDMA”
in iWARP (RDMA) (Click here).
If you’re planning to install iSCSI PDU Offload Initiator, please install openssl-devel
package.
IPv6 should be enabled in the machine to use the RPM Packages.
3.2. Installing Chelsio Unified Wire from source
3.2.1. GUI mode (with Dialog utility)
i. Download the tarball ChelsioUwire-x.xx.x.x.tar.gz from Chelsio Download Center,
http://service.chelsio.com/
ii. Untar the tarball using the following command:
[root@host]# tar -zxvfm ChelsioUwire-x.xx.x.x.tar.gz
iii. Change your current working directory to Chelsio Unified Wire package directory and run the
following script to start the GUI installer:
[root@host]# ./install.py
iv. If Dialog utility is present, you can skip to step (v). If not, press ‘y’ to install it when the
installer prompts for input.
Chelsio T5/T4 Unified Wire For Linux Page 21
Page 22
Chapter I. Chelsio Unified Wire
The tuning options may vary depending on the Linux distribution.
Note
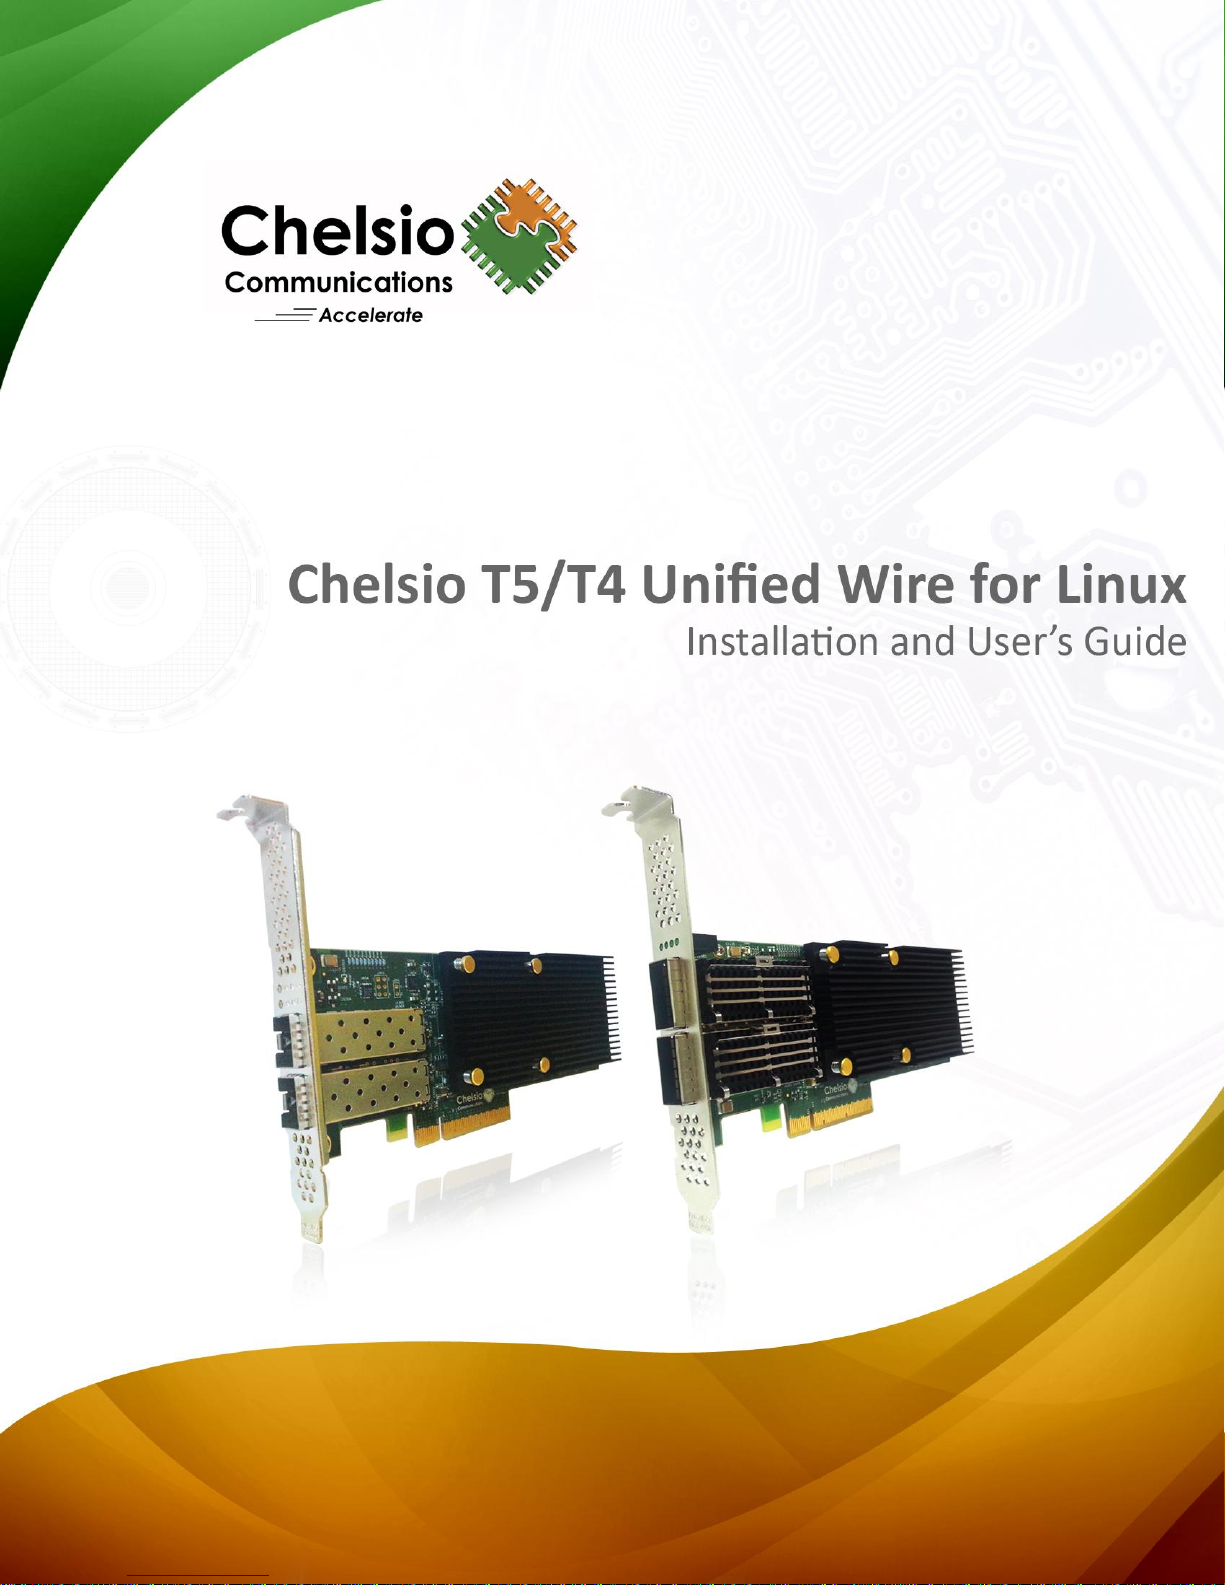
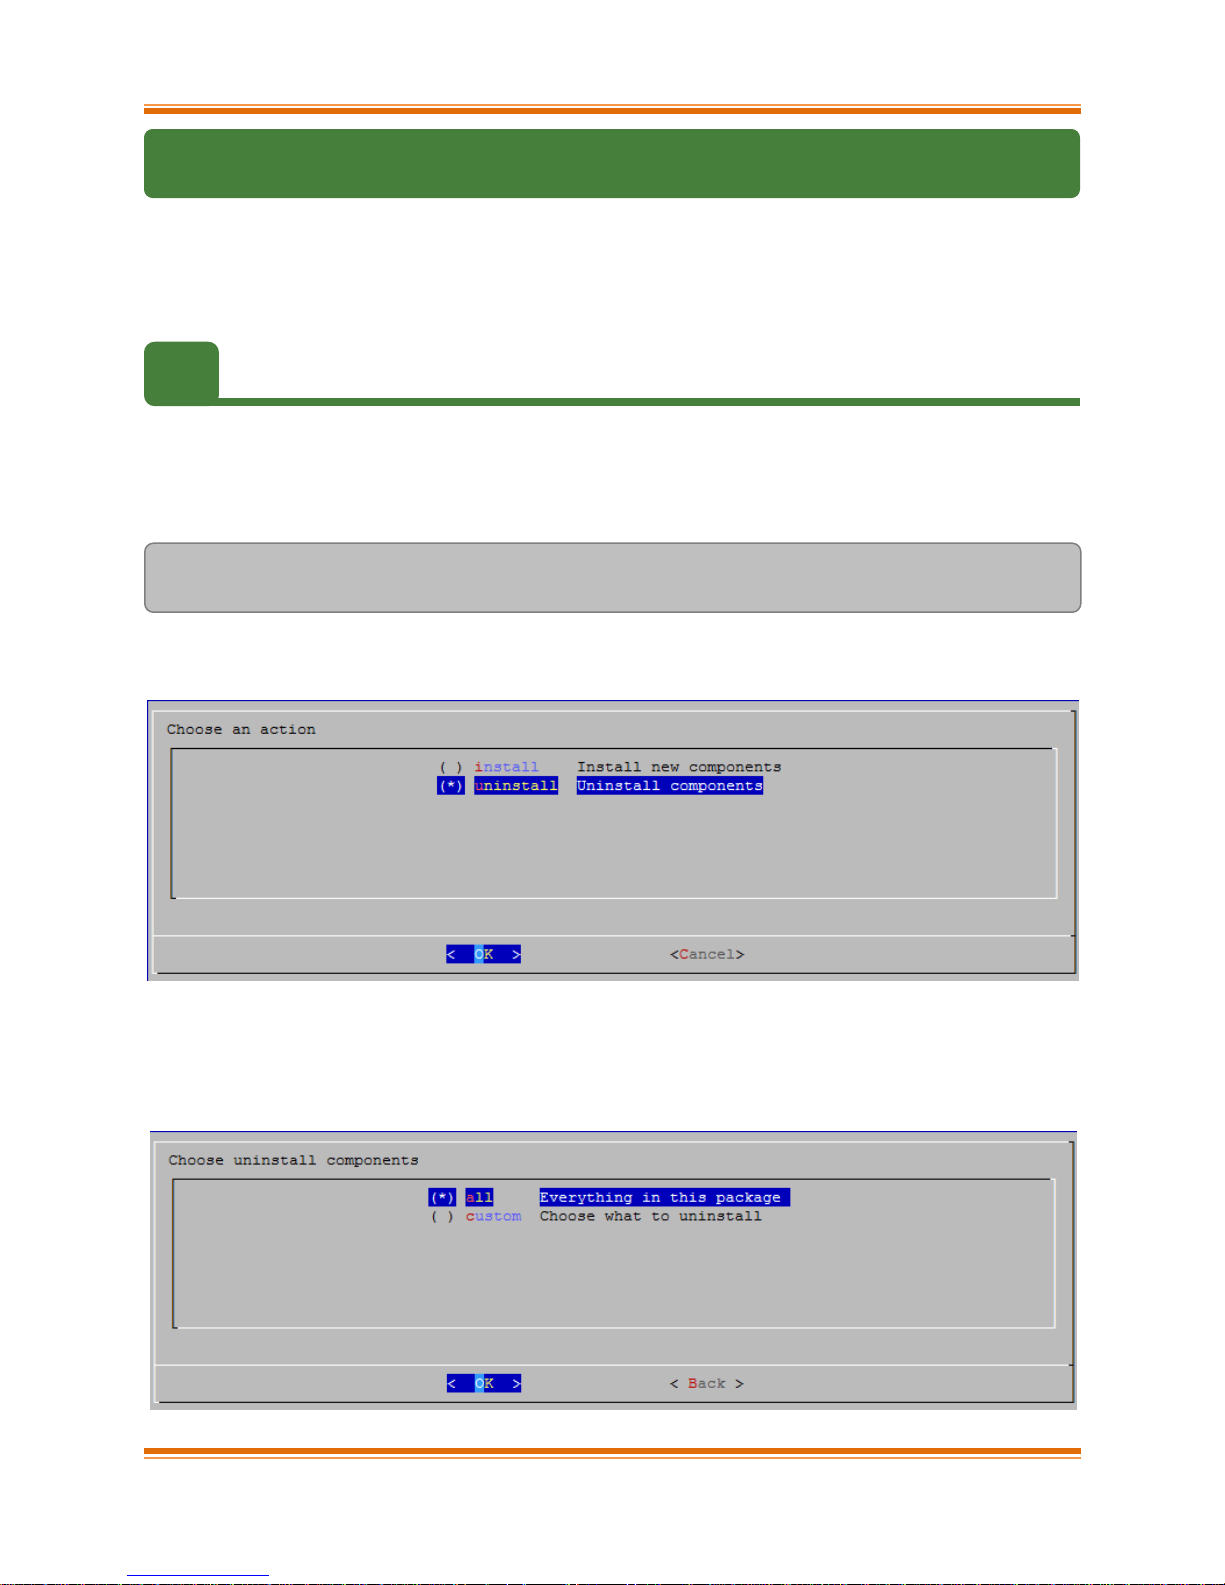
v. Select “install” under “Choose an action”
vi. Select Enable IPv6-Offload to install drivers with IPv6 Offload support or Disable IPv6-
offload to continue installation without IPv6 offload support.
vii. Select the required T5/T4 configuration tuning option:
Chelsio T5/T4 Unified Wire For Linux Page 22
Page 23
Chapter I. Chelsio Unified Wire
For more information on the Performance tuning options, please refer to
Software/Driver Configuration and Fine-tuning section of the Network
(NIC/TOE) chapter.
Note
To install Bypass or FCoE PDU Offload Target drivers, please select Unified
Wire in step (ix). Then select “custom” option.
Important
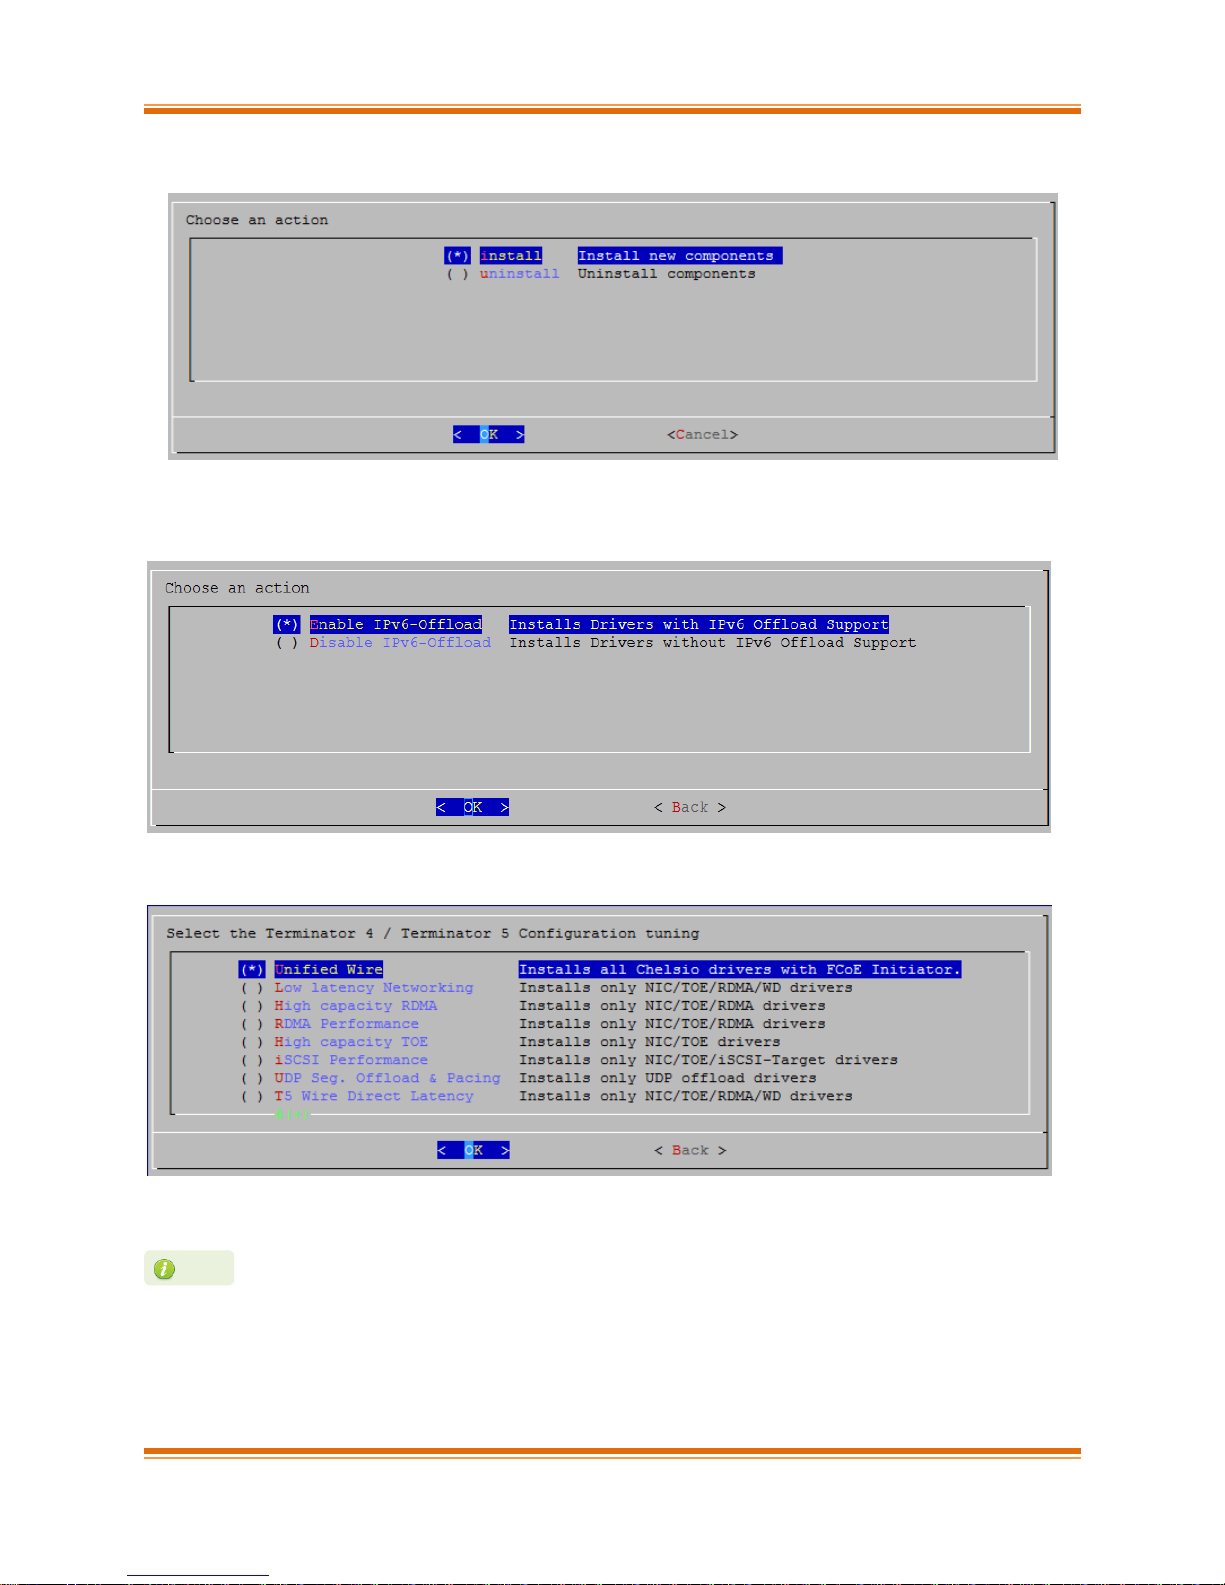
viii. Under “Choose install components”, select “all” to install all the related components for the
option chosen in step (ix) or select “custom” to install specific components.
ix. Select the required performance tuning option.
a. Enable Binding IRQs to CPUs: Bind MSI-X interrupts to different CPUs and disable
IRQ balance daemon.
b. Retain IRQ balance daemon: Do not disable IRQ balance daemon.
c. TX-Coalasce: Write tx_coal=2 to modprobe.d/conf.
Chelsio T5/T4 Unified Wire For Linux Page 23
Page 24
Chapter I. Chelsio Unified Wire
OFED is currently not supported on RHEL 6.5
Note
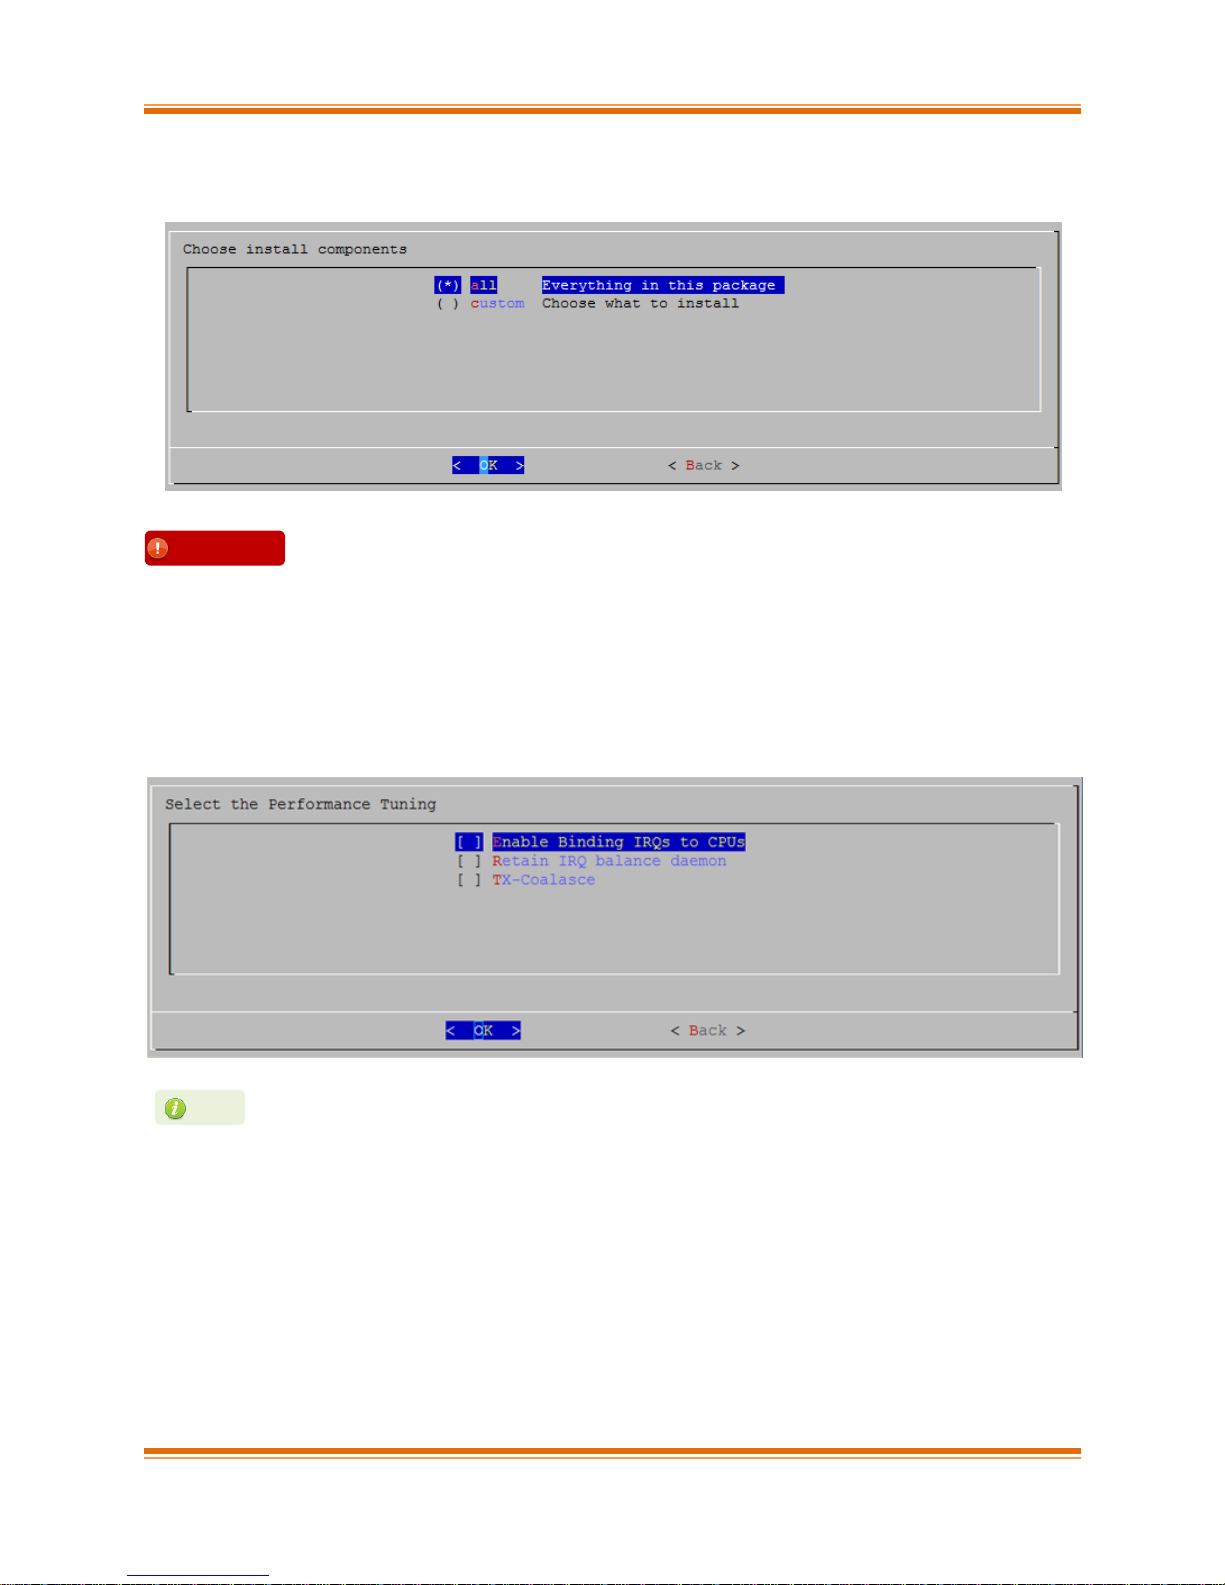
x. If you already have the required version of OFED software installed, you can skip this step.
To install OFED-3.5-2 choose the Install-OFED option. To install a different version, select
Choose-OFED-Version and then select the appropriate version. To skip this step, select
Skip-OFED.
xi. The selected components will now be installed:
Chelsio T5/T4 Unified Wire For Linux Page 24
Page 25

Chapter I. Chelsio Unified Wire
Press Esc or Ctrl+C to exit the installer at any point of time.
Note
xii. After successful installation, summary of installed components will be displayed.
xiii. Select “View log” to view the installation log or “Exit” to continue.
xiv. Select “Yes” to exit the installer or “No” to go back.
xv. Reboot your machine for changes to take effect.
Chelsio T5/T4 Unified Wire For Linux Page 25
Page 26

Chapter I. Chelsio Unified Wire
3.2.1.1. Installation on updated kernels
If the kernel version on your Linux distribution is updated, follow the steps mentioned below to
install the Unified Wire package:
i. Change your current working directory to Chelsio Unified Wire package directory and run the
following script to start the GUI installer:
[root@host]# ./install.py
ii. Select “Yes” to continue with the installation on the updated kernel or “No” to exit.
iii. Select the nearest supported kernel version from the list and select “OK”.
iv. Follow steps (xv) to (xvii) mentioned in the previous section.
3.2.2. CLI mode (without Dialog utility)
If your system does not have Dialog or you choose not to install it, follow the steps mentioned
below to install the Unified Wire package:
Chelsio T5/T4 Unified Wire For Linux Page 26
Page 27

Chapter I. Chelsio Unified Wire
To install Bypass or WD-TOE driver, run
[root@host]# ./install.py -c <target> and follow steps (iv) - (vi)
mentioned above.
To customize the installation, view the help by typing
[root@host]#./install.py –h
Important
OFED is currently not supported on RHEL 6.5.
Note
Please make sure that you have enabled password less authentication with ssh
on the peer nodes for this feature to work.
Important
i. Download the tarball ChelsioUwire-x.xx.x.x.tar.gz from Chelsio Download Center,
http://service.chelsio.com/
ii. Untar the tarball using the following command:
[root@host]# tar -zxvfm ChelsioUwire-x.xx.x.x.tar.gz
iii. Change your current working directory to Chelsio Unified Wire package directory and run the
following script to start the installer:
[root@host]# ./install.py
iv. When the installer prompts you for your input, press ‘n’ to continue installation without the
Dialog utility.
v. Enter the number corresponding to the Configuration tuning option in the Input field and
press Enter.
vi. If you already have the required version of OFED software installed, you can skip this step.
To install OFED-3.5-2 choose the Install-OFED option. To install a different version, select
Choose-OFED-Version and then select the appropriate version. To skip this step, select
Skip-OFED.
vii. The selected components will now be installed.
After successful installation you can press 1 to view the installation log. Press any other key
to exit from the installer.
viii. Reboot your machine for changes to take effect.
3.2.2.1. iWARP driver installation on Cluster nodes
Chelsio’s Unified Wire package allows installing iWARP drivers on multiple Cluster nodes with a
single command. Follow the procedure mentioned below:
Chelsio T5/T4 Unified Wire For Linux Page 27
Page 28

Chapter I. Chelsio Unified Wire
OFED is currently not supported on RHEL 6.5.
Note
i. Create a file (machinefilename) containing the IP addresses or hostnames of the nodes in
the cluster. You can view the sample file, sample_machinefile, provided in the package to
view the format in which the nodes have to be listed.
ii. Now, execute the following command:
[root@host] # ./install.py -C -m <machinefilename>
iii. Select the required T5/T4 configuration tuning option. The tuning options may vary
depending on the Linux distribution.
iv. Select the required Cluster Configuration.
v. If you already have the required version of OFED software installed, you can skip this step.
To install OFED-3.5-2 choose the Install-OFED option. To install a different version, select
Choose-OFED-Version and then select the appropriate version. To skip this step, select
Skip-OFED.
vi. The selected components will now be installed.
3.2.3. CLI mode
i. Download the tarball ChelsioUwire-x.xx.x.x.tar.gz from Chelsio Download Center,
http://service.chelsio.com/
ii. Untar the tarball using the following command:
[root@host]# tar -zxvfm ChelsioUwire-x.xx.x.x.tar.gz
iii. Change your current working directory to Chelsio Unified Wire package directory and build
the source using :
[root@host]# make
iv. Install the drivers, tools and libraries using the following command:
[root@host]# make install
Chelsio T5/T4 Unified Wire For Linux Page 28
Page 29

Chapter I. Chelsio Unified Wire
To view the different configuration tuning options, view help by typing
[root@host]#make help
Note
Steps (iv)and (v) mentioned above will NOT install Bypass, FCoE PDU offload
target drivers and benchmark tools.They will have to be installed manually.
Please refer to section CLI mode (individual drivers) for instructions on
installing them.
Important
v. The default configuration tuning option is Unified Wire. The configuration tuning can be
selected using the following commands:
[root@host]# make CONF=<T5/T4 configuration>
[root@host]# make CONF=<T5/T4 configuration> install
vi. Reboot your machine for changes to take effect.
3.2.3.1. Installation on updated kernels
If the kernel version on your Linux distribution is updated, please execute the following
command to install the Unified Wire package:
[root@host]# make UNAME_R=<kernel_version>
Where kernel_version is the nearest supported kernel version.
For example, if you want to install the package on a RHEL 6 distribution updated to 2.6.32-
279.2.1.el6 kernel, run the following commands:
[root@host]# make UNAME_R=2.6.32-279.el6
[root@host]# make UNAME_R=2.6.32-279.el6 install
To view the list of the supported kernel versions, run the following command:
[root@host]# make list_kernels
Reboot your machine for changes to take effect.
Chelsio T5/T4 Unified Wire For Linux Page 29
Page 30

Chapter I. Chelsio Unified Wire
3.2.4. CLI mode (individual drivers)
You can also choose to install drivers individually. Provided here are steps to build and install
NIC, TOE, iWARP, Bypass, WD-UDP, WD-TOE, UDP Segmentation Offload, FCoE PDU
Offload target drivers and benchmarking tools. To know about other drivers, view help by
running make help.
To build and install NIC driver without offload support :
[root@host]# make nic
[root@host]# make nic_install
To build and install NIC driver with offload support and Offload drivers:
[root@host]# make toe
[root@host]# make toe_install
To build and install Offload drivers without IPv6 support:
[root@host]# make toe_ipv4
[root@host]# make toe_ipv4_install
To build and install iWARP driver against outbox OFED:
[root@host]# make iwarp
[root@host]# make iwarp_install
To build and install all drivers without IPv6 support:
[root@host]# make ipv6_disable=1
[root@host]# make ipv6_disable=1 install
The above step will not install Bypass and WD-TOE drivers.
To build and install Bypass driver:
[root@host]# make bypass
[root@host]# make bypass_install
Chelsio T5/T4 Unified Wire For Linux Page 30
Page 31

Chapter I. Chelsio Unified Wire
To build and install WD-TOE driver:
[root@host]# make wdtoe
[root@host]# make wdtoe_install
To build and install WD-TOE and WD-UDP drivers together:
[root@host]# make wdtoe_wdudp
[root@host]# make wdtoe_wdudp_install
To build and install all drivers with DCB support:
[root@host]# make dcbx=1
[root@host]# make dcbx=1 install
The offload drivers support UDP Segmentation Offload with limited number of connections
(1024 connections).To build and install UDP Offload drivers which support large number of
offload connections (approx 10K):
[root@host]# make udp_offload
[root@host]# make udp_offload_install
To build and install FCoE Target drivers:
[root@host]# make fcoe_pdu_offload_target
[root@host]# make fcoe_pdu_offload_target_install
The default T5/T4 configuration tuning option is Unified Wire. The configuration tuning can
be selected using the following commands:
[root@host]# make CONF=<T5/T4 configuration> <Build Target>
[root@host]# make CONF=<T5/T4 configuration> <Install Target>
Chelsio T5/T4 Unified Wire For Linux Page 31
Page 32

Chapter I. Chelsio Unified Wire
To view the different configuration tuning options, view the help by typing
[root@host]#make help
Note
If IPv6 is administratively disabled in the machine, by default the drivers will be
built and installed without IPv6 Offload support.
Note
To build and install drivers along with benchmarks,
[root@host]# make BENCHMARKS=1
[root@host]# make BENCHMARKS=1 install
3.3. Installing Chelsio Unified Wire from RPM
3.3.1. Menu Mode
i. Download the tarball specific to your operating system and architecture from Chelsio
Download Center, http://service.chelsio.com/
ii. Untar the tarball:
E.g. For RHEL 6.4, untar using the following command:
[root@host]# tar -zxvfm ChelsioUwire-x.xx.x.x-RHEL6.4_x86_64.tar.gz
iii. Change your current working directory to Chelsio Unified Wire package directory and run
the following command:
[root@host]# ./install.py
iv. Select the required T5/T4 configuration tuning option as described below. Enter the
corresponding number in the Input field and press Enter.
v. Next press 1 if you want to install OFED along with the configuration tuning option selected
in step (vi) or 2 to skip OFED installation. Press Enter to continue with your choice.
vi. Select the Installation type as described below. Enter the corresponding number in the Input
field and press Enter.
1. Install all Chelsio drivers: Install all the drivers provided in the Unified Wire
package.
2. Install NIC and TOE drivers: Install only the Network and TOE drivers.
3. Install bypass drivers and tools: Install only the bypass drivers and tools.
4. Install WD drivers and library: Install only Wire Direct drivers and libraries.
5. EXIT: Exit the installer.
Chelsio T5/T4 Unified Wire For Linux Page 32
Page 33

Chapter I. Chelsio Unified Wire
If the installation aborts with the message "Resolve the errors/dependencies
manually and restart the installation", please go through the install.log to resolve
errors/dependencies and then start the installation again.
Note
The Installation options may vary depending on the Configuration tuning
option selected.
Note
The Installation options may vary depending on the Linux distribution.
Note
vii. The selected components will now be installed.
viii. Reboot your machine for changes to take effect.
3.3.2. CLI mode
i. Download the tarball specific to your operating system and architecture from Chelsio
Download Center, http://service.chelsio.com/
ii. Untar the tarball:
E.g. For RHEL 6.4, untar using the following command:
[root@host]# tar -zxvfm ChelsioUwire-x.xx.x.x-RHEL6.4_x86_64.tar.gz
iii. Change your current working directory to Chelsio Unified Wire package directory and install
Unified Wire using:
[root@host]# ./install.py –i <nic_toe/all/bypass/udpso/wd>
nic_toe : NIC and TOE drivers only
all : all Chelsio drivers built against inbox OFED
bypass : bypass drivers and tools
udpso : UDP segmentation offload capable NIC and TOE drivers only
wd : Wire Direct drivers and libraries only
Chelsio T5/T4 Unified Wire For Linux Page 33
Page 34

Chapter I. Chelsio Unified Wire
Note
To view the different configuration tuning options, view the help by typing
[root@host]# ./install.py –h
Please make sure that you have enabled password less authentication with ssh
on the peer nodes for this feature to work.
Important
iv. The default configuration tuning option is Unified Wire. The configuration tuning can be
selected using the following command:
[root@host]# ./install.py –i <Installation mode> -c <Configuration>
v. To install OFED and Chelsio drivers built against OFED, run the above command with -o
option.
[root@host]# ./install.py –i <Installation mode> -c <Configuration> -o
vi. Reboot your machine for changes to take effect.
3.3.2.1. Driver installation on cluster nodes
i. Create a file (machinefilename) containing the IP addresses or hostnames of the nodes in
the cluster. You can view the sample file, sample_machinefile, provided in the package to
view the format in which the nodes have to be listed.
ii. Navigate to ChelsioUwire directory and execute the following command:
[root@host]# ./install.py -C -m <machinefilename> -i
<nic_toe/all/bypass/udpso/wd> -c <T5/T4 configuration> -o
Here, -o parameter will install OFED and Chelsio drivers built against OFED.
iii. Reboot your machine for changes to take effect.
Chelsio T5/T4 Unified Wire For Linux Page 34
Page 35

Chapter I. Chelsio Unified Wire
3.4. Firmware update
The T5 and T4 firmwares are installed on the system, typically in /lib/firmware/cxgb4, and
the driver will auto-load the firmwares if an update is required. The kernel must be configured to
enable userspace firmware loading support:
Device Drivers -> Generic Driver Options -> Userspace firmware loading support
The firmware version can be verified using ethtool:
[root@host]# ethtool -i <iface>
Chelsio T5/T4 Unified Wire For Linux Page 35
Page 36
Chapter I. Chelsio Unified Wire
4. Software/Driver Uninstallation
Similar to installation, the Chelsio Unified Wire package can be uninstalled using two main
methods: from the source and RPM, based on the method used for installation. If you decide to
use source, you can uninstall the package using CLI or GUI mode.
4.1. Uninstalling Chelsio Unified Wire from source
4.1.1. GUI mode (with Dialog utility)
i. Change your current working directory to Chelsio Unified Wire package directory and run the
following script to start the GUI installer:
[root@host]# ./install.py
ii. Select “uninstall” , Under “Choose an action”
iii. Select “all” to uninstall all the installed drivers, libraries and tools or select “custom” to
remove specific components.
Chelsio T5/T4 Unified Wire For Linux Page 36
Page 37
Chapter I. Chelsio Unified Wire
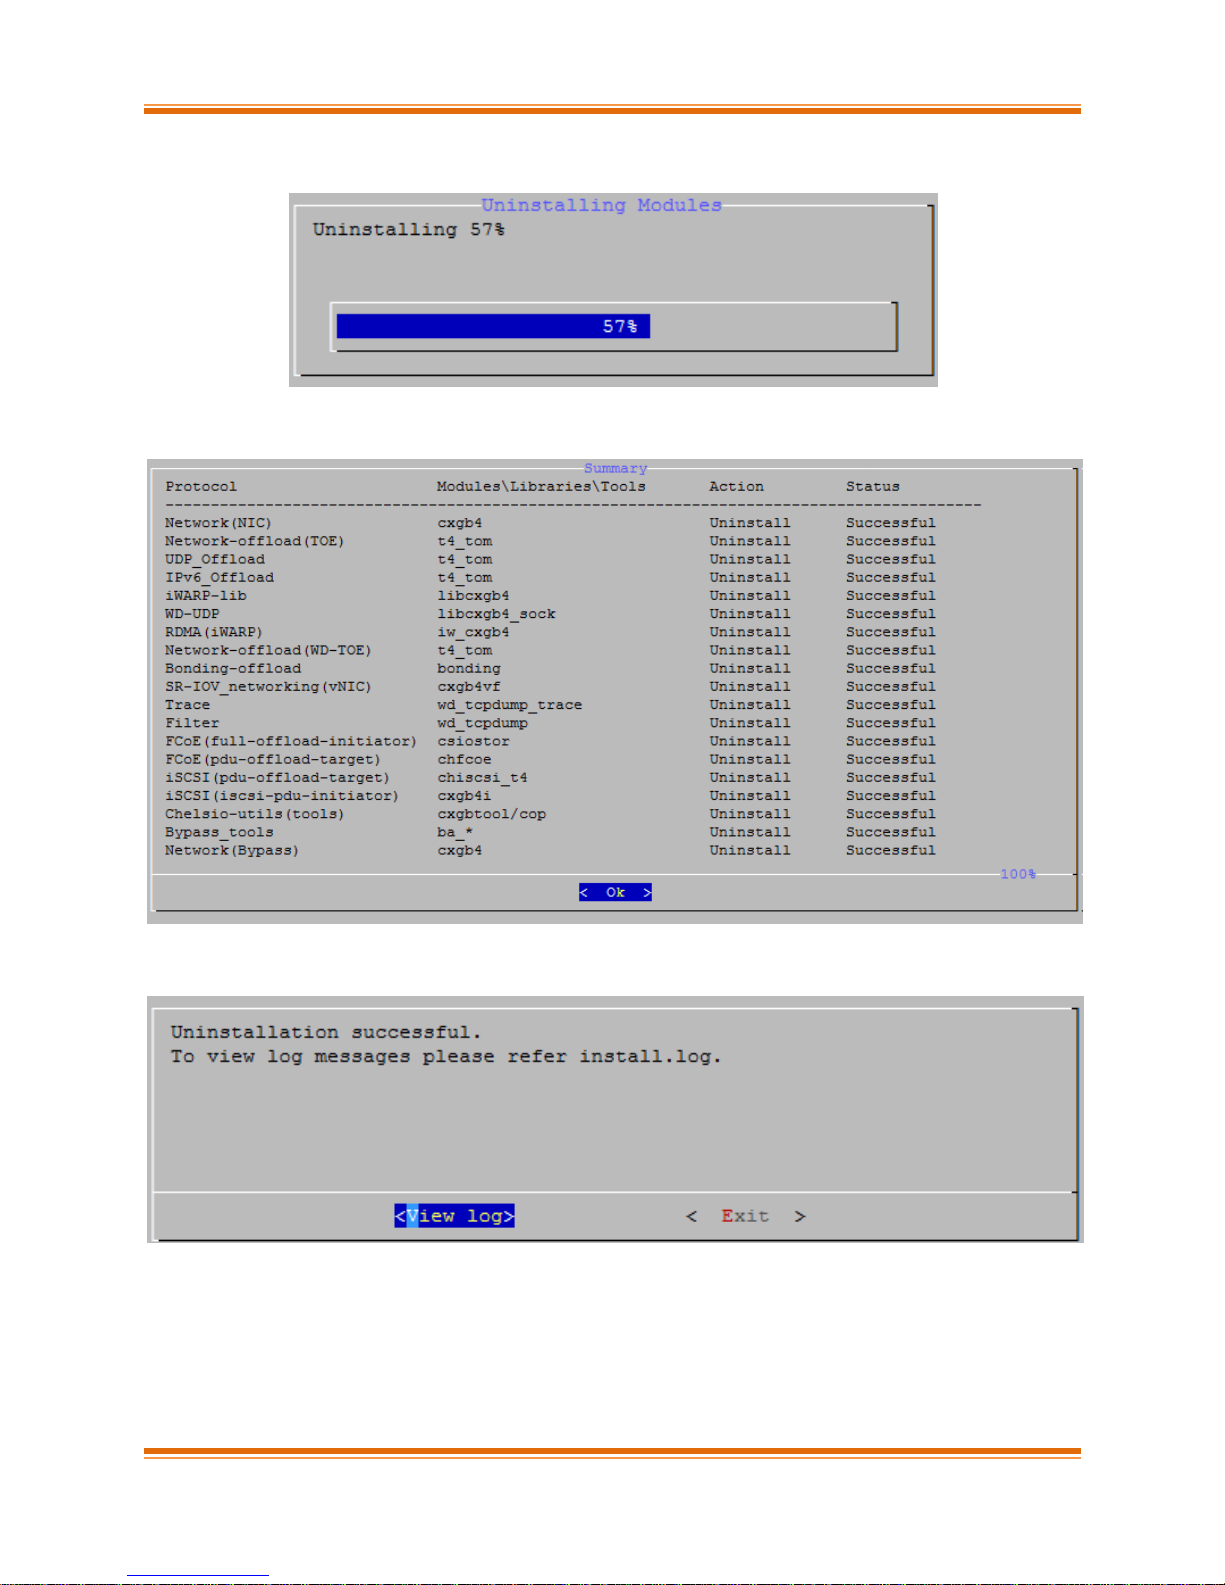
iv. The selected components will now be uninstalled.
v. After successful uninstalltion, summary of the uninstalled components will be displayed.
vi. Select “View log” to view uninstallation log or “Exit” to continue.
Chelsio T5/T4 Unified Wire For Linux Page 37
Page 38
Chapter I. Chelsio Unified Wire
Press Esc or Ctrl+C to exit the installer at any point of time.
Note
View help by typing [root@host]# ./install.py –h for more information
Note
Uninstalling Unified Wire package will not uninstall Unified Wire Manager. Refer
to the next section, CLI mode (individual drivers) to remove the software
manually.
Note
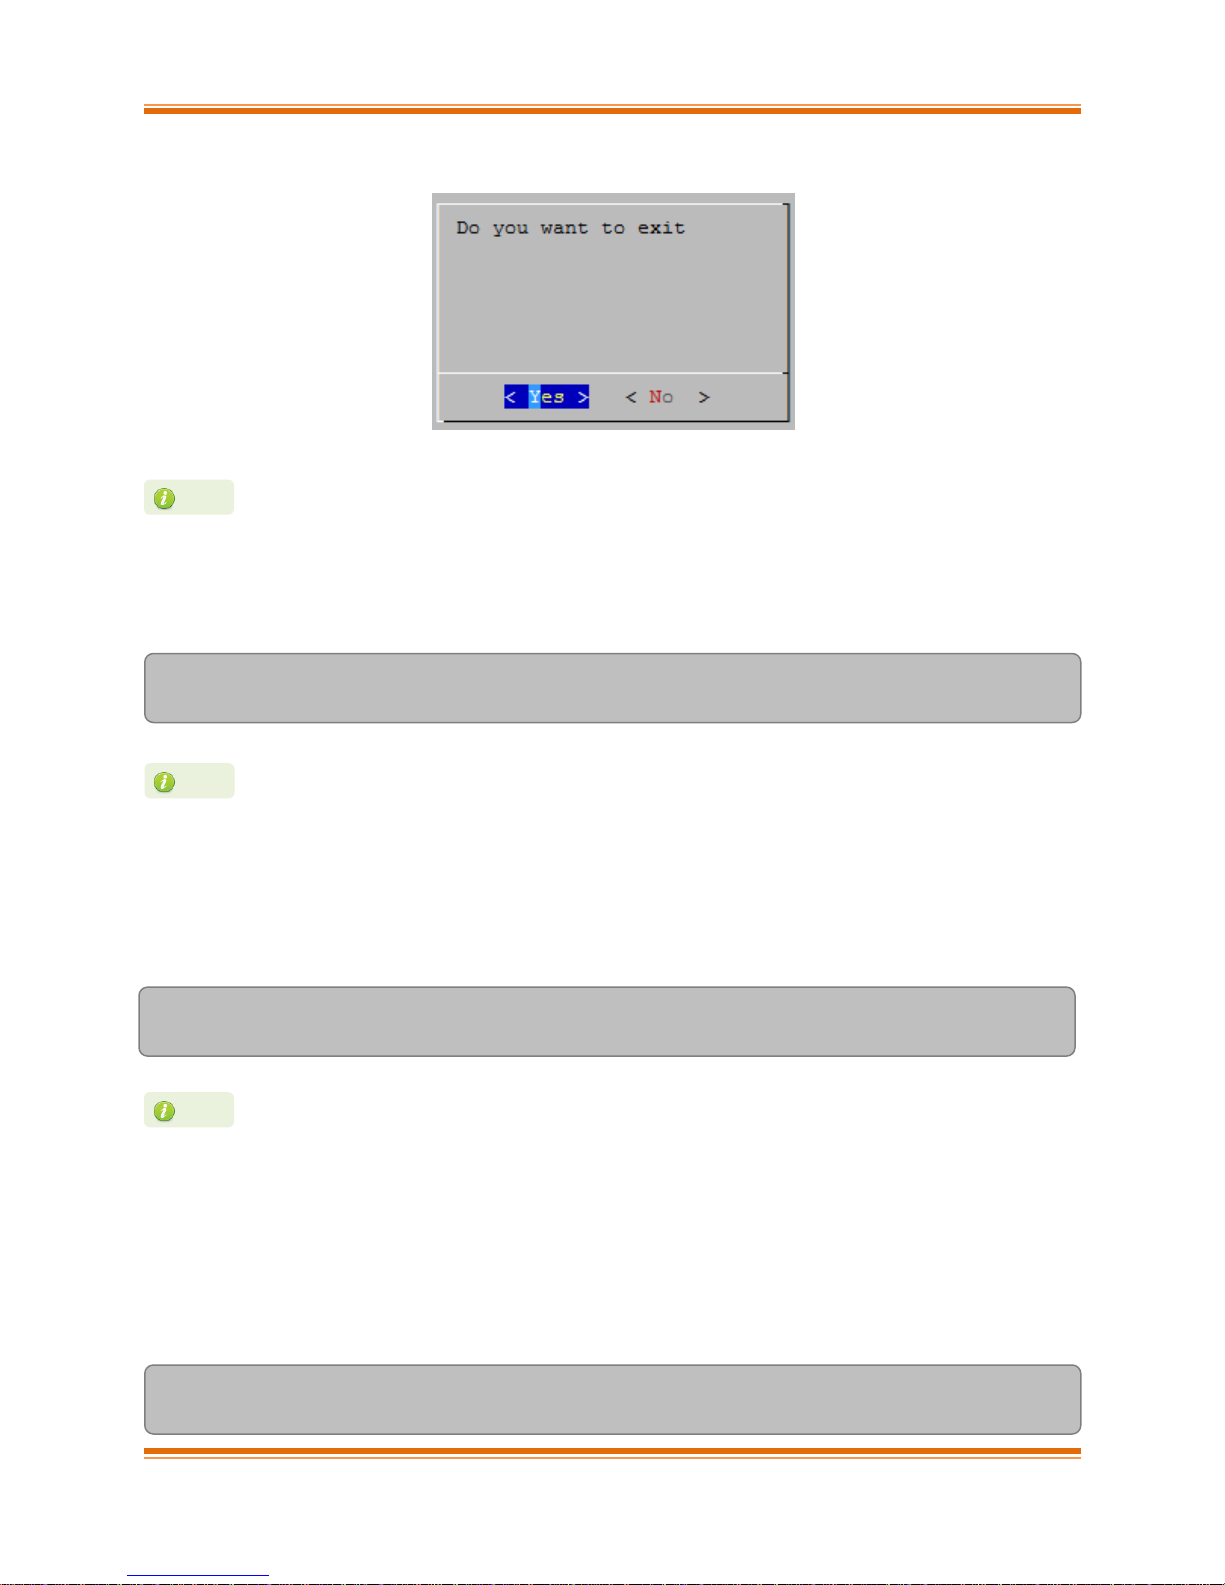
vii. Select “Yes” to exit the installer or “No” to go back.
4.1.2. CLI mode (without Dialog utility)
Run the following script with –u option to uninstall the Unified Wire Package:
[root@host]# ./install.py –u <target>
4.1.3. CLI mode
Change your current working directory to Chelsio Unified Wire package directory and uninstall
using the following command:
[root@host]# make uninstall
4.1.3.1. iWARP driver uninstallation on Cluster nodes
To uninstal iWARP drivers on multiple Cluster nodes with a single command, run the following
command:
[root@host]# ./install.py -C -m <machinefilename> -u all
Chelsio T5/T4 Unified Wire For Linux Page 38
Page 39

Chapter I. Chelsio Unified Wire
The above command will remove Chelsio iWARP (iw_cxgb4) and TOE (t4_tom) drivers from all
the nodes listed in the machinefilename file.
4.1.4. CLI mode (individual drivers/software)
You can also choose to uninstall drivers/software individually. Provided here are steps to
uninstall NIC, TOE, iWARP, Bypass, WD-TOE, UDP Segmentation Offload, FCoE PDU Offload
target drivers and Unified Wire Manager (UM). To know about other drivers, access help by
running make help
To uninstall NIC driver :
[root@host]# make nic_uninstall
To uninstall offload driver:
[root@host]# make toe_uninstall
To uninstall iWARP driver:
[root@host]# make iwarp_uninstall
To uninstall Bypass driver:
[root@host]# make bypass_uninstall
To uninstall UDP Segmentation Offload driver:
[root@host]# make udp_offload_uninstall
To uninstall WD-TOE driver:
[root@host]# make wdtoe_uninstall
Chelsio T5/T4 Unified Wire For Linux Page 39
Page 40

Chapter I. Chelsio Unified Wire
Uninstalling Unified Wire package will not uninstall Unified Wire Manager. Refer
to the Unified Wire Manager (UM) chapter to remove the software manually
(Click here).
Note
The uninstallation options may vary depending on Linux distribution. View help
by typing [root@host]# ./uninstall.py –h for more information.
Note
To uninstall WD-TOE and WD-UPD drivers together:
[root@host]# make wdtoe_wdudp_uninstall
To uninstall FCoE Target driver:
[root@host]# make fcoe_pdu_offload_target_uninstall
To uninstall Unified Wire Manager (UM):
[root@host]# make uninstall UM_UNINST=1
OR
[root@host]# make tools_uninstall UM_UNINST=1
4.2. Uninstalling Chelsio Unified Wire from RPM
Change your current working directory to Chelsio Unified Wire package directory and and run
the following command:
[root@host]# ./uninstall.py <inbox/ofed>
inbox : for removing all Chelsio drivers.
ofed : for removing OFED and Chelsio drivers.
Chelsio T5/T4 Unified Wire For Linux Page 40
Page 41

Chapter I. Chelsio Unified Wire
4.2.1.1. iWARP driver uninstallation on Cluster nodes
To uninstal iWARP drivers on multiple Cluster nodes with a single command, run the following:
[root@host] # ./install.py -C -m <machinefilename> -u
The above command will remove Chelsio iWARP (iw_cxgb4) and TOE (t4_tom) drivers from all
the nodes listed in the machinefilename file.
Chelsio T5/T4 Unified Wire For Linux Page 41
Page 42

Chapter I. Chelsio Unified Wire
Some operating systems may attempt to auto-configure the detected hardware
and some may not detect all ports on a multi-port adapter. If this happens,
please refer to the operating system documentation for manually configuring the
network device.
Note
5. Configuring Chelsio Network Interfaces
In order to test Chelsio adapters’ features it is required to use two machines both with Chelsio’s
(T5, T4 or both) network adapters installed. These two machines can be connected directly
without a switch (back-to-back), or both connected to a switch. The interfaces have to be
declared and configured. The configuration files for network interfaces on Red Hat Enterprise
Linux (RHEL) distributions are kept under /etc/sysconfig/network-scripts.
5.1. Configuring 40G adapters
Chelsio T5 40G adapters can be configured in the following two modes:
i. 2X40Gbps: This is the default mode of operation where each port functions as 40Gbps link.
ii. 4X10Gbps: In this mode, port 0 functions as 4 10Gbps links and port 1 is disabled.
To configure/change the mode of operation, use the following procedure:
i. Unload all Chelsio drivers using the rmmod command:
[root@host]# rmmod <chelsio_driver>
ii. Run the chelsio_adapter_config command to detect all T5 40G adapter(s) present in the
system.
[root@host]# chelsio_adapter_config
Chelsio T580 card detected
Chelsio T580 PCI devices :
|------------------------------|
| 1 T580-LP-CR 01:00.0 |
| 2 T580-CR 03:00.0 |
| 3 T580-LP-SO-CR 04:00.0 |
|------------------------------|
iii. Select the adapter to configure by specifying the adapter index.
Chelsio T5/T4 Unified Wire For Linux Page 42
Page 43

Chapter I. Chelsio Unified Wire
On earlier versions of RHEL the NETMASK attribute is named IPMASK. Make sure
you are using the right attribute name.
Note
In case of T580-SO-CR adapters, reboot the machine for changes to take effect.
Note
iv. Select the required mode:
Possible T580 adapter modes:
|------------------------------|
| 1: 2x40G |
| 2: 4x10G |
|------------------------------|
Select mode for adapter (1,2):
v. Reload the network driver for changes to take effect.
[root@host]# rmmod cxgb4
[root@host]# modprobe cxgb4
5.2. Configuring network-scripts
A typical interface network-script (e.g. eth0) on RHEL 6.3 looks like the following:
# file: /etc/sysconfig/network-scripts/ifcfg-eth0
DEVICE="eth0"
HWADDR=00:30:48:32:6A:AA
ONBOOT="yes"
NM_CONTROLLED="no"
BOOTPROTO="static"
IPADDR=10.192.167.111
NETMASK=255.255.240.0
In the case of DHCP addressing the last two lines should be removed and
BOOTPROTO="static" should be changed to BOOTPROTO="dhcp"
Chelsio T5/T4 Unified Wire For Linux Page 43
Page 44

Chapter I. Chelsio Unified Wire
The ifcfg-ethX files have to be created manually. They are required for bringing the
interfaces up and down and attribute the desired IP addresses.
5.3. Creating network-scripts
To spot the new interfaces, make sure the driver is unloaded first. To that point ifconfig -a |
grep HWaddr should display all non-chelsio interfaces whose drivers are loaded, whether the
interfaces are up or not.
[root@host]# ifconfig -a | grep HWaddr
eth0 Link encap:Ethernet HWaddr 00:30:48:32:6A:AA
Then load the driver using the modprobe cxgb4 command (for the moment it does not make
any difference whether we are using NIC-only or the TOE-enabling driver). The output of
ifconfig should display the T5/T4 interfaces as:
[root@host]# ifconfig -a | grep HWaddr
eth0 Link encap:Ethernet HWaddr 00:30:48:32:6A:AA
eth1 Link encap:Ethernet HWaddr 00:07:43:04:6B:E9
eth2 Link encap:Ethernet HWaddr 00:07:43:04:6B:F1
eth3 Link encap:Ethernet HWaddr 00:07:43:04:6B:F9
eth4 Link encap:Ethernet HWaddr 00:07:43:04:6C:01
For each interface you can write a configuration file in /etc/sysconfig/network-scripts.
The ifcfg-eth1 could look like:
# file: /etc/sysconfig/network-scripts/ifcfg-eth1
DEVICE="eth1"
HWADDR=00:07:43:04:6B:E9
ONBOOT="no"
NM_CONTROLLED="no"
BOOTPROTO="static"
IPADDR=10.192.167.112
NETMASK=255.255.240.0
From now on, the eth1 interface of the adapter can be brought up and down through the ifup
eth1 and ifdown eth1 commands respectively. Note that it is of course not compulsory to
create a configuration file for every interface if you are not planning to use them all.
Chelsio T5/T4 Unified Wire For Linux Page 44
Page 45

Chapter I. Chelsio Unified Wire
5.4. Checking Link
Once the network-scripts are created for the interfaces you should check the link i.e. make sure
it is actually connected to the network. First, bring up the interface you want to test using
ifup eth1.
You should now be able to ping any other machine from your network provided it has ping
response enabled.
Chelsio T5/T4 Unified Wire For Linux Page 45
Page 46

Chapter I. Chelsio Unified Wire
6. Software/Driver Update
For any distribution specific problems, please check README and Release Notes included in
the release for possible workaround.
Please visit Chelsio support web site http://service.chelsio.com/ for regular updates on various
software/drivers. You can also subscribe to our newsletter for the latest software updates.
Chelsio T5/T4 Unified Wire For Linux Page 46
Page 47

Chapter II. Network (NIC/TOE)
II. Network (NIC/TOE)
Chelsio T5/T4 Unified Wire For Linux Page 47
Page 48

Chapter II. Network (NIC/TOE)
1. Introduction
Chelsio’s T5 and T4 series of Unified Wire Adapters provide extensive support for NIC
operation, including all stateless offload mechanisms for both IPv4 and IPv6 (IP, TCP and UDP
checksum offload, LSO - Large Send Offload aka TSO - TCP Segmentation Offload, and assist
mechanisms for accelerating LRO - Large Receive Offload).
A high performance fully offloaded and fully featured TCP/IP stack meets or exceeds software
implementations in RFC compliance. Chelsio’s T5/T4 engine provides unparalleled performance
through a specialized data flow processor implementation and a host of features designed for
high throughput and low latency in demanding conditions and networking environments, using
standard size Ethernet frames.
TCP offload is fully implemented in the hardware, thus freeing the CPU from TCP/IP overhead.
The freed CPU can be used for any computing needs. The TCP offload in turn removes network
bottlenecks and enables applications to take full advantage of the networking capabilities.
1.1. Hardware Requirements
1.1.1. Supported Adapters
The following are the currently shipping Chelsio Adapters that are compatible with Chelsio
Network driver:
T502-BT
T580-CR
T580-SO-CR*
T580-LP-CR
T520-LL-CR
T520-SO-CR*
T520-CR
T522-CR
T540-CR
T420-CR
T440-CR
T422-CR
T420-SO-CR
T404-BT
T420-BCH
T440-LP-CR
T420-BT
T420-LL-CR
T420-CX
*Only NIC driver supported
Chelsio T5/T4 Unified Wire For Linux Page 48
Page 49

Chapter II. Network (NIC/TOE)
1.2. Software Requirements
1.2.1. Linux Requirements
Currently the Network driver is available for the following versions:
Redhat Enterprise Linux 5 update 9 kernel (RHEL5.9), 2.6.18-348.el5*
Redhat Enterprise Linux 5 update 10 kernel (RHEL5.10), 2.6.18-371.el5*
Redhat Enterprise Linux 6 update 4 kernel (RHEL6.4), 2.6.32-358.el6
Redhat Enterprise Linux 6 update 5 kernel (RHEL6.5), 2.6.32-431.el6*
Suse Linux Enterprise Server 11 SP1 kernel (SLES11SP1), 2.6.32.12-0.7
Suse Linux Enterprise Server 11 SP2 kernel (SLES11SP2), 3.0.13-0.27
Suse Linux Enterprise Server 11 SP3 kernel (SLES11SP3), 3.0.76-0.11
Ubuntu 12.04, 3.2.0-23
Ubuntu 12.04.2, 3.5.0-23*
Kernel.org linux-3.4
Kernel.org linux-3.6*
Kernel.org linux-3.7
Kernel.org linux-3.8*
Kernel.org linux-3.9*
Kernel.org linux-3.10*
Kernel.org linux-3.11*
Kernel.org linux-3.12*
Kernel.org linux-3.13*
Other kernel versions have not been tested and are not guaranteed to work.
* Limited QA performed.
Chelsio T5/T4 Unified Wire For Linux Page 49
Page 50

Chapter II. Network (NIC/TOE)
Offload support needs to be enabled upon each reboot of the system. This can
be done manually as shown above.
Note
2. Software/Driver Loading
The driver must be loaded by the root user. Any attempt to load the driver as a regular user will
fail.
2.1. Loading in NIC mode (without full offload support)
To load the Network driver without full offload support, run the following command:
[root@host]# modprobe cxgb4
2.2. Loading in TOE mode (with full offload support)
To enable full offload support, run the following command:
[root@host]# modprobe t4_tom
Chelsio T5/T4 Unified Wire For Linux Page 50
Page 51

Chapter II. Network (NIC/TOE)
3. Software/Driver Unloading
3.1. Unloading the NIC driver
To unload the NIC driver, run the following command:
[root@host]# rmmod cxgb4
3.2. Unloading the TOE driver
Please reboot the system to unload the TOE driver.
Chelsio T5/T4 Unified Wire For Linux Page 51
Page 52

Chapter II. Network (NIC/TOE)
To get familiar with physical and virtual function terminologies, please refer the
PCI Express specification.
Note
4. Software/Driver Configuration and Fine-tuning
4.1. Instantiate Virtual Functions (SR-IOV)
To instantiate the Virtual functions, load the cxgb4 driver with num_vf parameter with a non-zero
value. For example:
[root@host]# modprobe cxgb4 num_vf=1,0,0,0
The number(s) provided for num_vf parameter specifies the number of Virtual Functions to be
instantiated per Physical Function. The Virtual Functions can be assigned to Virtual Machines
(Guests). A maximum of 64 Virtual Functions can be instantiated with 16 Virtual Functions per
Physical Function. Loading the cxgb4 driver with num_vf parameter loads the cxgb4vf module
(the driver for Virtual Functions) in the host by default. Hence unload the cxgb4vf module (on
the host) before assigning Virtual Functions to the Virtual Machines (Guests), using the
following command:
[root@host]# rmmod cxgb4vf
4.2. Performance tuning
In order to auto tune the system and TOE devices for best performance, Chelsio recommends
installing the tools which will copy t4_perftune.sh script to /sbin directory. Run the script by
using the following command:
[root@host]# t4_perftune.sh
This script will configure RSS and enable Interrupt Coalescing.
Chelsio T5/T4 Unified Wire For Linux Page 52
Page 53

Chapter II. Network (NIC/TOE)
Receiver Side Scaling (RSS)
Receiver Side Scaling enables the receiving network traffic to scale with the available number of
processors on a modern networked computer. RSS enables parallel receive processing and
dynamically balances the load among multiple processors. Chelsio’s T5/T4 network controller
fully supports Receiver Side Scaling for IPv4 and IPv6.
This script first determines the number of CPUs on the system and then each receiving queue is
bound to an entry in the system interrupt table and assigned to a specific CPU. Thus, each
receiving queue interrupts a specific CPU through a specific interrupt now. For example, on a 4core system, t4_perftune.sh gives the following output:
[root@host]# t4_perftune.sh
Discovering Chelsio T4/T5 devices ...
Configuring Chelsio T4/T5 devices ...
Tuning eth7
IRQ table length 4
Writing 1 in /proc/irq/62/smp_affinity
Writing 2 in /proc/irq/63/smp_affinity
Writing 4 in /proc/irq/64/smp_affinity
Writing 8 in /proc/irq/65/smp_affinity
eth7 now up and tuned
...
Because there are 4 CPUs on the system, 4 entries of interrupts are assigned. For other T5/T4
network interfaces, you should see similar output message.
Now the receiving traffic is dynamically assigned to one of the system’s CPUs through a T5/T4
queue. This achieves a balanced usage among all the processors. This can be verified, for
example, by using the iperf tool. First set up a server on the receiver host:
[root@receiver_host]# iperf –s
Then on the sender host, send data to the server using the iperf client mode. To emulate a
moderate traffic workload, use -P option to request 20 TCP streams from the server:
[root@sender_host]# iperf -c receiver_host_name_or_IP -P 20
Chelsio T5/T4 Unified Wire For Linux Page 53
Page 54

Chapter II. Network (NIC/TOE)
Linux’s irqbalance may take charge of distributing interrupts among CPUs on a
multiprocessor platform. However, irqbalance distributes interrupt requests
from all hardware devices across processors. For a server with T5/T4 network
card constantly receiving large volume of data at 40/10Gbps, the network
interrupt demands are significantly high. Under such circumstances, it is
necessary to enable RSS to balance the network load across multiple
processors and achieve the best performance.
Note
Then on the receiver host, look at interrupt rate at /proc/interrupts:
[root@receiver_host]# cat /proc/interrupts | grep eth6
Id CPU0 CPU1 CPU2 CPU3 type interface
36: 115229 0 0 1 PCI-MSI-edge eth6 (queue 0)
37: 0 121083 1 0 PCI-MSI-edge eth6 (queue 1)
38: 0 0 105423 1 PCI-MSI-edge eth6 (queue 2)
39: 0 0 0 115724 PCI-MSI-edge eth6 (queue 3)
Now interrupts from eth6 are evenly distributed among the 4 CPUs.
Without T5/T4’s RSS support, the interrupts caused by network traffic may be distributed
unevenly over CPUs. For your information, the traffic produced by the same iperf commands
gives the following output in /proc/interrupts.
[root@receiver_host]# cat /proc/interrupts | grep eth6
Id CPU0 CPU1 CPU2 CPU3 type interface
36: 0 9 0 17418 PCI-MSI-edge eth6 (queue 0)
37: 0 0 21718 2063 PCI-MSI-edge eth6 (queue 1)
38: 0 7 391519 222 PCI-MSI-edge eth6 (queue 2)
39: 1 0 33 17798 PCI-MSI-edge eth6 (queue 3)
Here there are 4 receiving queues from the eth6 interface, but they are not bound to a specific
CPU or interrupt entry. Queue 2 has caused a very large number of interrupts on CPU2 while
CPU0 and CPU1 are barely used by any of the four queues. Enabling RSS is thus essential for
best performance.
Chelsio T5/T4 Unified Wire For Linux Page 54
Page 55

Chapter II. Network (NIC/TOE)
For more information, run the following command:
[root@host]# ethtool -h
Note
Interrupt Coalescing
The idea behind Interrupt Coalescing (IC) is to avoid flooding the host CPUs with too many
interrupts. Instead of throwing one interrupt per incoming packet, IC waits for ‘n’ packets to be
available in the Rx queues and placed into the host memory through DMA operations before an
interrupt is thrown, reducing the CPU load and thus improving latency. It can be changed using
the following command:
[root@host]# ethtool –C ethX rx-frames n
Large Receive Offload / Generic Receive Offload
Large Receive Offload or Generic Receive Offload is a performance improvement feature at the
receiving side. LRO/GRO aggregates the received packets that belong to same stream, and
combines them to form a larger packet before pushing them to the receive host network stack.
By doing this, rather than processing every small packet, the receiver CPU works on fewer
packet headers but with same amount of data. This helps reduce the receive host CPU load and
improve throughput in a 10Gb network environment where CPU can be the bottleneck.
LRO and GRO are different names to refer to the same receiver packets aggregating feature.
LRO and GRO actually differ in their implementation of the feature in the Linux kernel. The
feature was first added into the Linux kernel in version 2.6.24 and named Large Receive Offload
(LRO). However LRO only works for TCP and IPv4. As from kernel 2.6.29, a new protocolindependent implementation removing the limitation is added to Linux, and it is named Generic
Receive Offload (GRO). The old LRO code is still available in the kernel sources but whenever
both GRO and LRO are presented GRO is always the preferred one to use.
Please note that if your Linux system has IP forwarding enabled, i.e. acting as a bridge or
router, the LRO needs to be disabled. This is due to a known kernel issue.
Chelsio’s T5/T4 card supports both hardware assisted GRO/LRO and Linux-based GRO/LRO.
t4_tom is the kernel module that enables the hardware assisted GRO/LRO. If it is not already in
the kernel module list, use the following command to insert it:
Chelsio T5/T4 Unified Wire For Linux Page 55
Page 56

Chapter II. Network (NIC/TOE)
[root@host]# lsmod | grep t4_tom
[root@host]# modprobe t4_tom
[root@host]# lsmod | grep t4_tom
t4_tom 88378 0 [permanent]
toecore 21618 1 t4_tom
cxgb4 225342 1 t4_tom
Then T5/T4’s hardware GRO/LRO implementation is enabled.
If you would like to use the Linux GRO/LRO for any reason, first the t4_tom kernel module
needs to be removed from kernel module list. Please note you might need to reboot your
system.
After removing the t4_tom module, you can use ethtool to check the status of current
GRO/LRO settings, for example:
[root@host]# ethtool -k eth6
Offload parameters for eth6:
rx-checksumming: on
tx-checksumming: on
scatter-gather: on
tcp-segmentation-offload: on
udp-fragmentation-offload: off
generic-segmentation-offload: on
generic-receive-offload: on
large-receive-offload: off
Now the generic-receive-offload option is on. This means GRO is enabled. Please note
that there are two offload options here: generic-receive-offload and large-receive-
offload. This is because on this Linux system (RHEL6.0), the kernel supports both GRO and
LRO. As mentioned earlier, GRO is always the preferred option when both of them are present.
On other systems LRO might be the only available option. Then ethtool could be used to
switch LRO on and off as well.
When Linux’s GRO is enabled, Chelsio’s T5/T4 driver provides two GRO-related statistics. They
are displayed using the following command:
[root@host]# ethtool -S eth6
...
GROPackets : 0
GROMerged : 897723
...
Chelsio T5/T4 Unified Wire For Linux Page 56
Page 57

Chapter II. Network (NIC/TOE)
GROPackets is the number of held packets. Those are candidate packets held by the kernel to
be processed individually or to be merged to larger packets. This number is usually zero.
GROMerged is the number of packets that merged to larger packets. Usually this number
increases if there is any continuous traffic stream present.
ethtool can also be used to switch off the GRO/LRO options when necessary:
[root@host]# ethtool -K eth6 gro off
[root@host]# ethtool -k eth6
Offload parameters for eth6:
rx-checksumming: on
tx-checksumming: on
scatter-gather: on
tcp-segmentation-offload: on
udp-fragmentation-offload: off
generic-segmentation-offload: on
generic-receive-offload: off
large-receive-offload: off
The output above shows a disabled GRO.
Chelsio T5/T4 Unified Wire For Linux Page 57
Page 58

Chapter III. Virtual Function Network (vNIC)
III. Virtual Function Network (vNIC)
Chelsio T5/T4 Unified Wire For Linux Page 58
Page 59

Chapter III. Virtual Function Network (vNIC)
1. Introduction
The ever increasing network infrastructure of IT enterprises has lead to a phenomenal increase
in maintenance and operational costs. IT managers are forced to acquire more physical servers
and other data center resources to satisfy storage and network demands. To solve the Network
and I/O overhead, users are opting for server virtualization which consolidates I/O workloads
onto lesser physical servers thus resulting in efficient, dynamic and economical data center
environments. Other benefits of Virtualization include improved disaster recovery, server
portability, cloud computing, Virtual Desktop Infrastructure (VDI), etc.
Chelsio’s T5 and T4 Unified Wire family of Adapters deliver increased bandwidth, lower latency
and lower power with virtualization features to maximize cloud scaling and utilization. The
adapters support SFP+ and 10BASE-T media. The adapters also provide full support for PCISIG SR-IOV to improve I/O performance on a virtualized system. User can configure up to 64
Virtual and 8 Physical functions (with 4 PFs as SR-IOV capable) along with 336 virtual MAC
addresses.
1.1. Hardware Requirements
1.1.1. Supported Adapters
The following are the currently shipping Chelsio Adapters that are compatible with the Chelsio
vNIC driver:
T502-BT
T580-CR
T520-LL-CR
T520-CR
T522-CR
T580-LP-CR
T540-CR
T420-CR
T440-CR
T422-CR
T420-SO-CR
T404-BT
T440-LP-CR
T420-BT
T420-LL-CR
T420-CX
Chelsio T5/T4 Unified Wire For Linux Page 59
Page 60

Chapter III. Virtual Function Network (vNIC)
1.2. Software Requirements
1.2.1. Linux Requirements
Currently the vNIC driver is available for the following versions:
Redhat Enterprise Linux 5 update 9 kernel (RHEL5.9), 2.6.18-348.el5*
Redhat Enterprise Linux 5 update 10 kernel (RHEL5.10), 2.6.18-371.el5*
Redhat Enterprise Linux 6 update 4 kernel (RHEL6.4), 2.6.32-358.el6
Redhat Enterprise Linux 6 update 5 kernel (RHEL6.5), 2.6.32-431.el6*
Suse Linux Enterprise Server 11 SP1 kernel (SLES11SP1), 2.6.32.12-0.7
Suse Linux Enterprise Server 11 SP2 kernel (SLES11SP2), 3.0.13-0.27
Suse Linux Enterprise Server 11 SP3 kernel (SLES11SP3), 3.0.76-0.11
Ubuntu 12.04, 3.2.0-23
Ubuntu 12.04.2, 3.5.0-23*
Kernel.org linux-3.4
Kernel.org linux-3.6*
Kernel.org linux-3.7
Kernel.org linux-3.8*
Other kernel versions have not been tested and are not guaranteed to work.
* Limited QA performed.
Chelsio T5/T4 Unified Wire For Linux Page 60
Page 61

Chapter III. Virtual Function Network (vNIC)
2. Software/Driver Loading
The vNIC driver must be loaded or unloaded on the Guest OS by the root user. Any attempt to
load the driver as a regular user will fail.
2.1. Loading the driver
To load the driver, run the following command:
[root@host]# modprobe cxgb4vf
Chelsio T5/T4 Unified Wire For Linux Page 61
Page 62

Chapter III. Virtual Function Network (vNIC)
3. Software/Driver Unloading
3.1. Unloading the driver
To unload the driver, execute the following command:
[root@host]# rmmod cxgb4vf
Chelsio T5/T4 Unified Wire For Linux Page 62
Page 63

Chapter III. Virtual Function Network (vNIC)
4. Software/Driver Configuration and Fine-tuning
4.1. Instantiate Virtual Functions
To instantiate Chelsio Virtual Functions, please refer to the Network (NIC/TOE) section (click
here)
Chelsio T5/T4 Unified Wire For Linux Page 63
Page 64

Chapter IV. iWARP (RDMA)
IV. iWARP (RDMA)
Chelsio T5/T4 Unified Wire For Linux Page 64
Page 65

Chapter IV. iWARP (RDMA)
1. Introduction
Chelsio’s T5/T4 engine implements a feature rich RDMA implementation which adheres to the
IETF standards with optional markers and MPA CRC-32C.
The iWARP RDMA operation benefits from the virtualization, traffic management and QoS
mechanisms provided by T5/T4 engine. It is possible to ACL process iWARP RDMA packets. It
is also possible to rate control the iWARP traffic on a per-connection or per-class basis, and to
give higher priority to QPs that implement distributed locking mechanisms. The iWARP
operation also benefits from the high performance and low latency TCP implementation in the
offload engine.
1.1. Hardware Requirements
1.1.1. Supported Adapters
The following are the currently shipping Chelsio Adapters that are compatible with Chelsio
iWARP driver:
T502-BT
T580-CR
T520-LL-CR
T520-CR
T522-CR
T580-LP-CR
T540-CR
T420-CR
T440-CR
T422-CR
T404-BT
T440-LP-CR
T420-LL-CR
T420-CX
1.2. Software Requirements
1.2.1. Linux Requirements
Currently the iWARP driver is available for the following versions:
Redhat Enterprise Linux 5 update 9 kernel (RHEL5.9), 2.6.18-348.el5*
Redhat Enterprise Linux 5 update 10 kernel (RHEL5.10), 2.6.18-371.el5*
Redhat Enterprise Linux 6 update 4 kernel (RHEL6.4), 2.6.32-358.el6
Chelsio T5/T4 Unified Wire For Linux Page 65
Page 66

Chapter IV. iWARP (RDMA)
Redhat Enterprise Linux 6 update 5 kernel (RHEL6.5), 2.6.32-431.el6*
Suse Linux Enterprise Server 11 SP1 kernel (SLES11SP1), 2.6.32.12-0.7
Suse Linux Enterprise Server 11 SP2 kernel (SLES11SP2), 3.0.13-0.27 *
Suse Linux Enterprise Server 11 SP3 kernel (SLES11SP3), 3.0.76-0.11
Ubuntu 12.04, 3.2.0-23
Kernel.org linux-3.4
Kernel.org linux-3.6*
Kernel.org linux-3.7
Kernel.org linux-3.8*
Kernel.org linux-3.9*
Kernel.org linux-3.10*
Kernel.org linux-3.11*
Kernel.org linux-3.12*
Kernel.org linux-3.13*
Other kernel versions have not been tested and are not guaranteed to work
*Limited QA performed
Chelsio T5/T4 Unified Wire For Linux Page 66
Page 67

Chapter IV. iWARP (RDMA)
2. Software/Driver Loading
2.1. Compiling and Loading iWARP driver
The driver must be loaded by the root user. Any attempt to load the driver as a regular user will
fail.
Change your current working directory to driver package directory and run the following
command :
[root@host]# make
[root@host]# make install
To load the iWARP driver we need to load the NIC driver and core RDMA drivers first. Run
the following commands:
[root@host]# modprobe cxgb4
[root@host]# modprobe iw_cxgb4
[root@host]# modprobe rdma_ucm
Chelsio T5/T4 Unified Wire For Linux Page 67
Page 68

Chapter IV. iWARP (RDMA)
3. Software/Driver Unloading
To unload the iWARP driver, run the following command:
[root@host]# rmmod iw_cxgb4
Chelsio T5/T4 Unified Wire For Linux Page 68
Page 69

Chapter IV. iWARP (RDMA)
4. Software/Driver Configuration and Fine-tuning
4.1. Testing connectivity with ping and rping
Load the NIC, iWARP & core RDMA modules as mentioned in Software/Driver Loading
section. After which, you will see two or four ethernet interfaces for the T5/T4 device. Configure
them with an appropriate ip address, netmask, etc. You can use the Linux ping command to test
basic connectivity via the T5/T4 interface. To test RDMA, use the rping command that is
included in the librdmacm-utils RPM:
Run the following command on the server machine:
[root@host]# rping -s -a server_ip_addr -p 9999
Run the following command on the client machine:
[root@host]# rping -c –Vv -C10 -a server_ip_addr -p 9999
You should see ping data like this on the client:
ping data: rdma-ping-0: ABCDEFGHIJKLMNOPQRSTUVWXYZ[\]^_`abcdefghijklmnopqr
ping data: rdma-ping-1: BCDEFGHIJKLMNOPQRSTUVWXYZ[\]^_`abcdefghijklmnopqrs
ping data: rdma-ping-2: CDEFGHIJKLMNOPQRSTUVWXYZ[\]^_`abcdefghijklmnopqrst
ping data: rdma-ping-3: DEFGHIJKLMNOPQRSTUVWXYZ[\]^_`abcdefghijklmnopqrstu
ping data: rdma-ping-4: EFGHIJKLMNOPQRSTUVWXYZ[\]^_`abcdefghijklmnopqrstuv
ping data: rdma-ping-5: FGHIJKLMNOPQRSTUVWXYZ[\]^_`abcdefghijklmnopqrstuvw
ping data: rdma-ping-6: GHIJKLMNOPQRSTUVWXYZ[\]^_`abcdefghijklmnopqrstuvwx
ping data: rdma-ping-7: HIJKLMNOPQRSTUVWXYZ[\]^_`abcdefghijklmnopqrstuvwxy
ping data: rdma-ping-8: IJKLMNOPQRSTUVWXYZ[\]^_`abcdefghijklmnopqrstuvwxyz
ping data: rdma-ping-9: JKLMNOPQRSTUVWXYZ[\]^_`abcdefghijklmnopqrstuvwxyzA
client DISCONNECT EVENT...
#
Chelsio T5/T4 Unified Wire For Linux Page 69
Page 70

Chapter IV. iWARP (RDMA)
4.2. Enabling various MPIs
4.2.1. DAPL Library configuration for Intel MPI and Platform MPI
To run Intel MPI over RDMA interface, DAPL 2.0 should be set up as follows:
Enable the Chelsio device by adding an entry at the beginning of the /etc/dat.conf file for the
Chelsio interface. For instance, if your Chelsio interface name is eth2, then the following line
adds a DAT version 2.0 device named “chelsio2" for that interface:
chelsio2 u2.0 nonthreadsafe default libdaplofa.so.2 dapl.2.0 "eth2 0" ""
4.2.2. Setting shell for Remote Login
User needs to set up authentication on the user account on all systems in the cluster to allow
user to remotely logon or executing commands without password.
Quick steps to set up user authentication:
i. Change to user home directory
[root@host]# cd
ii. Generate authentication key
[root@host]# ssh-keygen -t rsa
iii. Hit [Enter] upon prompting to accept default setup and empty password phrase
iv. Create authorization file
[root@host]# cd .ssh
[root@host]# cat *.pub > authorized_keys
[root@host]# chmod 600 authorized_keys
v. Copy directory .ssh to all systems in the cluster
[root@host]# cd
[root@host]# scp -r /root/.ssh remotehostname-or-ipaddress:
Chelsio T5/T4 Unified Wire For Linux Page 70
Page 71

Chapter IV. iWARP (RDMA)
The hosts in this file should be Chelsio interface IP addresses.
I_MPI_DEVICE=rdssm:chelsio assumes you have an entry in
/etc/dat.conf named chelsio.
MPIEXEC_TIMEOUT value might be required to increase if heavy traffic is
going across the systems.
Note
4.2.3. Configuration of various MPIs (Installation and Setup)
Intel-MPI
i. Download latest Intel MPI from the Intel website
ii. Copy the license file (.lic file) into l_mpi_p_x.y.z directory
iii. Create machines.LINUX (list of node names) in l_mpi_p_x.y.z
iv. Select advanced options during installation and register the MPI.
v. Install software on every node.
[root@host]# ./install.py
vi. Set IntelMPI with mpi-selector (do this on all nodes).
[root@host]# mpi-selector --register intelmpi --source-dir
/opt/intel/impi/3.1/bin/
[root@host]# mpi-selector --set intelmpi
vii. Edit .bashrc and add these lines:
export RSH=ssh
export DAPL_MAX_INLINE=64
export I_MPI_DEVICE=rdssm:chelsio
export MPIEXEC_TIMEOUT=180
export MPI_BIT_MODE=64
viii. Logout & log back in.
ix. Populate mpd.hosts with node names.
x. Contact Intel for obtaining their MPI with DAPL support.
xi. To run Intel MPI applications:
mpdboot -n <no_of_nodes_in_cluster> -r ssh
mpdtrace
mpiexec -ppn -n 2 /opt/intel/impi/3.1/tests/IMB-3.1/IMB-MPI1
Chelsio T5/T4 Unified Wire For Linux Page 71
Page 72

Chapter IV. iWARP (RDMA)
To enable multithreading, add “--enable-mpi-thread-multiple” and
“--with-threads=posix” parameters to the above configure command.
Note
The performance is best with NIC MTU set to 9000 bytes.
Open MPI (Installation and Setup)
Open MPI iWARP support is only available in Open MPI version 1.3 or greater.
Open MPI will work without any specific configuration via the openib btl. Users wishing to
performance tune the configurable options may wish to inspect the receive queue values. Those
can be found in the "Chelsio T4" section of mca-btl-openib-device-params.ini. Follow the
steps mentioned below to install and configure Open MPI.
i. If not alreay done, install mpi-selector tool.
ii. Download the latest stable/feature version of openMPI from OpenMPI website
,http://www.open-mpi.org
iii. Untar and change your current working directory to openMPI package directory.
iv. Configure and install as:
[root@host]# ./configure --with-openib=/usr CC=gcc CXX=g++ F77=gfortran
FC=gfortran --enable-mpirun-prefix-by-default --prefix=/usr/mpi/gcc/openmpix.y.z/ --with-openib-libdir=/usr/lib64/ --libdir=/usr/mpi/gcc/openmpix.y.z/lib64/ --with-contrib-vt-flags=--disable-iotrace
[root@host]# make
[root@host]# make install
The above step will install openMPI in /usr/mpi/gcc/openmpi-x.y.z/
Chelsio T5/T4 Unified Wire For Linux Page 72
Page 73

Chapter IV. iWARP (RDMA)
v. Next, create a shell script , mpivars.csh, with the following entry:
# path
if ("" == "`echo $path | grep /usr/mpi/gcc/openmpi-x.y.z/bin`") then
set path=(/usr/mpi/gcc/openmpi-x.y.z/bin $path)
endif
# LD_LIBRARY_PATH
if ("1" == "$?LD_LIBRARY_PATH") then
if ("$LD_LIBRARY_PATH" !~ */usr/mpi/gcc/openmpi-x.y.z/lib64*) then
setenv LD_LIBRARY_PATH /usr/mpi/gcc/openmpix.y.z/lib64:${LD_LIBRARY_PATH}
endif
else
setenv LD_LIBRARY_PATH /usr/mpi/gcc/openmpi-x.y.z/lib64
endif
# MPI_ROOT
setenv MPI_ROOT /usr/mpi/gcc/openmpi-x.y.z
vi. Simlarly, create another shell script, mpivars.sh, with the following entry:
# PATH
if test -z "`echo $PATH | grep /usr/mpi/gcc/openmpi-x.y.z/bin`"; then
PATH=/usr/mpi/gcc/openmpi-x.y.z/bin:${PATH}
export PATH
fi
# LD_LIBRARY_PATH
if test -z "`echo $LD_LIBRARY_PATH | grep /usr/mpi/gcc/openmpi-
x.y.z/lib64`"; then
LD_LIBRARY_PATH=/usr/mpi/gcc/openmpi x.y.z/lib64${LD_LIBRARY_PATH:+:}${LD_LIBRARY_PATH}
export LD_LIBRARY_PATH
fi
# MPI_ROOT
MPI_ROOT=/usr/mpi/gcc/openmpi-x.y.z
export MPI_ROOT
vii. Next, copy the two files created in steps (v) and (vi) to /usr/mpi/gcc/openmpi-x.y.z/bin and
/usr/mpi/gcc/openmpi-x.y.z/etc
Chelsio T5/T4 Unified Wire For Linux Page 73
Page 74

Chapter IV. iWARP (RDMA)
viii. Register OpenMPi with MPI-selector:
[root@host]# mpi-selector --register openmpi --source-dir
/usr/mpi/gcc/openmpi-x.y.z/bin
ix. Verify if it is listed in mpi-selector:
[root@host]# mpi-selector --l
x. Set OpenMPI:
[root@host]# mpi-selector --set openmpi –yes
xi. Logut and log back in.
MVAPICH2 (Installation and Setup)
i. Download the latest MVAPICH2 software package from http://mvapich.cse.ohio-state.edu/
ii. Untar and change your current working directory to MVAPICH2 package directory.
iii. Configure and install as:
[root@host]# ./configure --prefix=/usr/mpi/gcc/mvapich2-x.y/ --withdevice=ch3:mrail --with-rdma=gen2 --enable-shared --with-iblibpath=/usr/lib64/ -enable-rdma-cm --libdir=/usr/mpi/gcc/mvapich2-x.y/lib64
[root@host]# make
[root@host]# make install
The above step will install MVAPICH2 in /usr/mpi/gcc/mvapich2-x.y/
Chelsio T5/T4 Unified Wire For Linux Page 74
Page 75

Chapter IV. iWARP (RDMA)
iv. Next, create a shell script , mpivars.csh, with the following entry:
# path
if ("" == "`echo $path | grep /usr/mpi/gcc/mvapich2-x.y/bin`") then
set path=(/usr/mpi/gcc/mvapich2-x.y/bin $path)
endif
# LD_LIBRARY_PATH
if ("1" == "$?LD_LIBRARY_PATH") then
if ("$LD_LIBRARY_PATH" !~ */usr/mpi/gcc/mvapich2-x.y/lib64*) then
setenv LD_LIBRARY_PATH /usr/mpi/gcc/mvapich2-
x.y/lib64:${LD_LIBRARY_PATH}
endif
else
setenv LD_LIBRARY_PATH /usr/mpi/gcc/mvapich2-x.y/lib64
endif
# MPI_ROOT
setenv MPI_ROOT /usr/mpi/gcc/mvapich2-x.y
v. Simlarly, create another shell script, mpivars.sh, with the following entry:
# PATH
if test -z "`echo $PATH | grep /usr/mpi/gcc/ mvapich2-x.y/bin`"; then
PATH=/usr/mpi/gcc/mvapich2-x.y/bin:${PATH}
export PATH
fi
# LD_LIBRARY_PATH
if test -z "`echo $LD_LIBRARY_PATH | grep /usr/mpi/gcc/mvapich2-
x.y/lib64`"; then
LD_LIBRARY_PATH=/usr/mpi/gcc/mvapich2-
x.y/lib64${LD_LIBRARY_PATH:+:}${LD_LIBRARY_PATH}
export LD_LIBRARY_PATH
fi
# MPI_ROOT
MPI_ROOT=/usr/mpi/gcc/mvapich2-x.y
export MPI_ROOT
Chelsio T5/T4 Unified Wire For Linux Page 75
Page 76

Chapter IV. iWARP (RDMA)
vi. Next, copy the two files created in steps (iv) and (v) to /usr/mpi/gcc/mvapich2-x.y/bin and
/usr/mpi/gcc/mvapich2-x.y/etc
vii. Add the following entries in .bashrc file:
export MVAPICH2_HOME=/usr/mpi/gcc/mvapich2-x.y/
export MV2_USE_IWARP_MODE=1
export MV2_USE_RDMA_CM=1
viii. Register MPI:
[root@host]# mpi-selector --register mvapich2 --source-dir
/usr/mpi/gcc/mvapich2-x.y/bin/
xii. Verify if it is listed in mpi-selector:
[root@host]# mpi-selector --l
ix. Set MVAPICH2:
[root@host]# mpi-selector --set mvapich2 –yes
x. Logut and log back in.
xi. Populate mpd.hosts with node names.
xii. On each node, create /etc/mv2.conf with a single line containing the IP address of the local
T4/T5 interface. This is how MVAPICH2 picks which interface to use for RDMA traffic.
4.2.4. Building MPI tests
i. Download Intel’s MPI Benchmarks from http://software.intel.com/en-us/articles/intel-mpi-
benchmarks
ii. Untar and change your current working directory to src directory.
iii. Edit make_mpich file and set MPI_HOME variable to the MPI which you want to build the
benchmarks tool against. For example, in case of openMPI-1.6.4 set the variable as:
MPI_HOME=/usr/mpi/gcc/openmpi-1.6.4/
Chelsio T5/T4 Unified Wire For Linux Page 76
Page 77

Chapter IV. iWARP (RDMA)
For OpenMPI/RDMA clusters with node counts greater than or equal to 8 nodes,
and process counts greater than or equal to 64, you may experience the
following RDMA address resolution error when running MPI jobs with the default
OpenMPI settings:
Note
iv. Next, build and install the benchmarks using:
[root@host]# gmake -f make_mpich
The above step will install IMB-MPI1, IMB-IO and IMB-EXT benchmarks in the current working
directory (i.e. src).
v. Change your working directory to the MPI installation directory. In case of OpenMPI, it will
be /usr/mpi/gcc/openmpi-x.y.z/
vi. Create a directory called tests and then another directory called imb under tests.
vii. Copy the benchmarks built and installed in step (iv) to the imb directory.
viii. Follow steps (v), (vi) and (vii) for all the nodes.
4.2.5. Running MPI applications
Run Open MPI application as:
mpirun --host node1,node2 -mca btl openib,sm,self /usr/mpi/gcc/openmpix.y.z/tests/imb/IMB-MPI1
The RDMA CM returned an event error while attempting to make a connection.
This type of error usually indicates a network configuration error.
Local host: core96n3.asicdesigners.com
Local device: Unknown
Error name: RDMA_CM_EVENT_ADDR_ERROR
Peer: core96n8
Workaround: Increase the OpenMPI rdma route resolution timeout. The default is 1000, or
1000ms. Increase it to 30000 with this parameter:
--mca btl_openib_connect_rdmacm_resolve_timeout 30000
Chelsio T5/T4 Unified Wire For Linux Page 77
Page 78

Chapter IV. iWARP (RDMA)
Run MVAPICH2 application as :
mpirun_rsh -ssh -np 8 -hostfile mpd.hosts $MVAPICH2_HOME/tests/imb/IMB-MPI1
4.3. Setting up NFS-RDMA
4.3.1. Starting NFS-RDMA
Server-side settings
Follow the steps mentioned below to set up an NFS-RDMA server.
i. Make entry in /etc/exports file for the directories you need to export using NFS-RDMA on
server as:
/share/rdma *(fsid=0,async,insecure,no_root_squash)
/share/rdma1 *(fsid=1,async,insecure,no_root_squash)
Note that for each directory you export, you should have DIFFERENT fsid’s.
ii. Load the iwarp modules and make sure peer2peer is set to 1.
iii. Load xprtrdma and svcrdma modules as:
[root@host]# modprobe xprtrdma
[root@host]# modprobe svcrdma
iv. Start the nfs service as:
[root@host]# service nfs start
All services in NFS should start without errors.
v. Now we need to edit the file portlist in the path /proc/fs/nfsd/
vi. Include the rdma port 2050 into this file as:
[root@host]# echo rdma 2050 > /proc/fs/nfsd/portlist
Chelsio T5/T4 Unified Wire For Linux Page 78
Page 79

Chapter IV. iWARP (RDMA)
vii. Run exportfs to make local directories available for Network File System (NFS) clients to
mount.
[root@host]# exportfs
Now the NFS-RDMA server is ready.
Client-side settings
Follow the steps mentioned below at the client side.
i. Load the iwarp modules and make sure peer2peer is set to 1. Make sure you are able to ping
and ssh to the server Chelsio interface through which directories will be exported.
ii. Load the xprtrdma module.
[root@host]# modprobe xprtrdma
iii. Run the showmount command to show all directories from server as:
[root@host]# showmount –e <server-chelsio-ip>
iv. Once the exported directories are listed, mount them as:
[root@host]# mount.nfs <serverip>:<directory> <mountpoint-on-client> -o
vers=3,rdma,port=2050,wsize=65536,rsize=65536
Chelsio T5/T4 Unified Wire For Linux Page 79
Page 80

Chapter V. WD-UDP
V. WD-UDP
Chelsio T5/T4 Unified Wire For Linux Page 80
Page 81

Chapter V. WD-UDP
1. Introduction
Chelsio WD-UDP (Wire Direct-User Datagram Protocol) with Multicast is a user-space UDP
stack with Multicast address reception and socket acceleration that enables users to run their
existing UDP socket applications unmodified.
It features software modules that enable direct wire access from user space to the Chelsio
T5/T4 network adapter with complete bypass of the kernel, which results in an ultra-low latency
40/10Gb Ethernet solution for high frequency trading and other delay-sensitive applications.
1.1. Hardware Requirements
1.1.1. Supported Adapters
The following are the currently shipping Chelsio Adapters that are compatible with Chelsio WDUDP driver:
T502-BT
T580-CR
T520-LL-CR
T520-CR
T522-CR
T580-LP-CR
T540-CR
T420-CR
T440-CR
T422-CR
T404-BT
T440-LP-CR
T420-LL-CR
T420-CX
1.2. Software Requirements
1.2.1. Linux Requirements
Currently the WD-UDP driver is available for the following versions:
Redhat Enterprise Linux 5 update 9 kernel (RHEL5.9), 2.6.18-348.el5*
Redhat Enterprise Linux 5 update 10 kernel (RHEL5.10), 2.6.18-371.el5*
Redhat Enterprise Linux 6 update 4 kernel (RHEL6.4), 2.6.32-358.el6
Redhat Enterprise Linux 6 update 5 kernel (RHEL6.5), 2.6.32-431.el6*
Suse Linux Enterprise Server 11 SP1 kernel (SLES11SP1),2.6.32.12-0.7
Chelsio T5/T4 Unified Wire For Linux Page 81
Page 82

Chapter V. WD-UDP
Suse Linux Enterprise Server 11 SP2 kernel (SLES11SP2), 3.0.13-0.27
Suse Linux Enterprise Server 11 SP3 kernel (SLES11SP3), 3.0.76-0.11
Ubuntu 12.04, 3.2.0-23
Ubuntu 12.04.2, 3.5.0-23*
Kernel.org linux-3.4
Kernel.org linux-3.6*
Kernel.org linux-3.7
Kernel.org linux-3.8*
Kernel.org linux-3.9*
Kernel.org linux-3.10*
Kernel.org linux-3.11*
Kernel.org linux-3.12*
Kernel.org linux-3.13*
Other kernel versions have not been tested and are not guaranteed to work.
*Limited QA performed
Chelsio T5/T4 Unified Wire For Linux Page 82
Page 83

Chapter V. WD-UDP
2. Software/Driver Loading
The driver must be loaded by the root user. Any attempt to load the driver as a regular user will
fail.
i. Change your current working directory to driver package directory & run the following
command :
[root@host]# make
[root@host]# make install
ii. RDMA core modules from the OFED package should be loaded before proceeding. To load
the WD-UDP driver, use the following commands which will automatically load RDMA core
modules:
[root@host]# modprobe cxgb4
[root@host]# modprobe iw_cxgb4
[root@host]# modprobe rdma_ucm
Chelsio T5/T4 Unified Wire For Linux Page 83
Page 84

Chapter V. WD-UDP
3. Software/Driver Unloading
To unload the WD-UDP driver, run the following command:
[root@host]# rmmod iw_cxgb4
Chelsio T5/T4 Unified Wire For Linux Page 84
Page 85

Chapter V. WD-UDP
4. Software/Driver Configuration and Fine-tuning
4.1. Accelerating UDP Socket communications
The libcxgb4_sock library is a LD_PRELOAD-able library that accelerates UDP Socket
communications transparently and without recompilation of the user application. This section
describes how to use libcxgb4_sock.
By preloading libcxgb4_sock, all sockets created by the application are intercepted and possibly
accelerated based on the user’s configuration. Once accelerated, data for the UDP endpoint are
transmitted or received via HW queues allocated specifically for the accelerated endpoint,
bypassing the kernel, the host networking stack and sockets framework, and enabling ultra-low
latency and high bandwidth utilization.
Due to HW resource limitations, only a small number of queues can be allocated for UDP
acceleration. Therefore only performance critical UDP applications should use libcxgb4_sock.
Only 64 IPv4 UDP sockets / 28 IPv6 UDP Sockets can be accelerated per Chelsio T5/T4
device used.
4.1.1. Application Requirements
Certain application behavior is not supported by libcxb4_sock in this release. If your application
does any of the following, it will not work with libcxgb4_sock:
Calling fork() after creating UDP sockets and using the UDP socket in the child process.
Using multiple threads on a single UDP socket without serialization. For instance, having
one thread sending concurrently with another thread receiving. If your application does this,
you need to serialize these paths with a spin or mutex lock.
Only 1 UDP endpoint is allowed to bind to a given port per host. So if you have multiple
processes on the same host binding to the same UDP port number, you cannot use
libcxgb4_sock.
Applications must have root privileges to use libcxgb4_sock.
Applications requiring bonded T5/T4 interfaces are not currently supported.
The performance benefit observed with libcxgb4_sock will vary based on your application’s
behavior. While all UDP IO is handled properly, only certain datagrams are accelerated. Non
accelerated IO is handled by libcxgb4_sock via the host networking stack seamlessly. Both
Unicast and Multicast datagrams can be accelerated, but the datagrams must meet the
following criteria:
Non fragmented. In other words, they fit in a single IP datagram that is <= the T5/T4 device
MTU.
Routed through the T5/T4 acceleration device. If the ingress datagram arrives via a device
other than the T5/T4 acceleration device, then it will not utilize the acceleration path. On
Chelsio T5/T4 Unified Wire For Linux Page 85
Page 86

Chapter V. WD-UDP
If you encounter error while using wdload on kernels built on RHEL 5.x
distribution, then run the above command as :
[root@host]# NUMA=0 PROT=UDP wdload <pathto>/your_application
Note
egress, if the destination IP address will not route out via the T5/T4 device, then it too will
not be accelerated.
4.1.2. Using libcxgb4_sock
The libcxgb4_sock library utilizes the Linux RDMA Verbs subsystem, and thus requires the
RDMA modules be loaded. Ensure that your systems load the iw_cxgb4 and rdma_ucm
modules:
[root@host]# modprobe iw_cxgb4
[root@host]# modprobe rdma_ucm
Now, preload libcxgb4_sock, using one of the methods mentioned below when starting your
application:
Preloading using wdload script:
[root@host]# PROT=UDP wdload <pathto>/your_application
The above command will generate an end point file, libcxgb4_sock.conf at /etc/. Parameters
like interface name and port number can be changed in this file.
Preloading manually
Create a configuration file that defines which UDP endpoints should be accelerated, their vlan
and priority if any, as well as which T5/T4 interface/port should be used. The file
/etc/libcxgb4_sock.conf contains these endpoint entries. Create this file on all systems
using libcxgb4_sock. Here is the syntax:
#
# Syntax:
#
# endpoint {attributes} ...
# where attributes include:
# interface = interface-name
# port = udp-port-number
# vlan = vlan-id
# priority = vlan-priority
#
Chelsio T5/T4 Unified Wire For Linux Page 86
Page 87

Chapter V. WD-UDP
In order to offload IPv6 UDP sockets, please select “low latency networking” as
T5/T4 configuration tuning option during installation.
Note
# e.g.
# endpoint {
# interface=eth2.5
# port = 8000 vlan = 5 priority=1
# }
# endpoint { interface=eth2 port=9999}
#
# endpoints that bind to port 0 (requesting the host allocate a port)
# can be accelerated with port=0:
#
# endpoint {interface=eth1 port=0}
#
Assume your T5/T4 interface is eth2. To accelerate all applications that preload libcxgb4_sock
using eth2, you only need one entry in /etc/libcxgb4_sock.conf:
endpoint {interface=eth2 port=0}
If you have eth2 and eth3 configured for example, you can define certain endpoints to eth2 and
others to eth3:
endpoint {interface=eth2 port=9999}
endpoint {interface=eth3 port=8888}
For VLAN support, create your VLANs using the normal OS service (like vconfig, for example),
then add entries to define the VLAN and priority for each endpoint to be accelerated:
endpoint {interface = eth2.5 port=10000}
endpoint {interface = eth2.7 priority=3 port=9000}
Now, preload libcxgb4_sock:
[root@host]# CXGB4_SOCK_CFG=<path to config file>
LD_PRELOAD=libcxgb4_sock.so <pathto>/your_application
Chelsio T5/T4 Unified Wire For Linux Page 87
Page 88

Chapter V. WD-UDP
4.1.3. Running WD-UDP in debug mode
To use libcxgb4_sock’s debug capabilities, use the libcxgb4_sock_debug library provided in the
package. Follow the steps mentioned below:
i. Make the following entry in the /etc/syslog.conf file:
*.debug /var/log/cxgb4.log
ii. Restart the service:
[root@host]# /etc/init.d/syslog restart
iii. Finally, preload libcxgb4_sock_debug using the command mentioned below when starting
your application:
root@host]# LD_PRELOAD=libcxgb4_sock_debug.so CXGB4_SOCK_DEBUG=-1
<pathto>/your_application
4.1.4. Running WD-UDP with larger I/O size
If the I/O size is > 3988, execute the commands mentioned below:
[root@host]# echo 1024 > /proc/sys/vm/nr_hugepages
[root@host]# CXGB4_SOCK_HUGE_PAGES=1 PROT=UDP wdload
<pathto>/your_application
4.1.5. Example with hpcbench/udp
The udp benchmark from the hpcbench suite can be used to show the benefits of
libcxgb4_sock. The hpcbench suite can be found at:
Source: http://hpcbench.sourceforge.net/index.html
Sample: http://hpcbench.sourceforge.net/udp.html
The nodes in this example, r9 and r10, have T5/T4 eth1 configured and the ports are connected
point-to-point.
Chelsio T5/T4 Unified Wire For Linux Page 88
Page 89

Chapter V. WD-UDP
[root@r9 ~]# ifconfig eth1|grep inet
inet addr:192.168.2.111 Bcast:192.168.2.255 Mask:255.255.255.0
inet6 addr: fe80::7:4300:104:465a/64 Scope:Link
[root@r9 ~]#
[root@r10 ~]# ifconfig eth1|grep inet
inet addr:192.168.2.112 Bcast:192.168.2.255 Mask:255.255.255.0
inet6 addr: fe80::7:4300:104:456a/64 Scope:Link
[root@r10 ~]#
For this benchmark, we need a simple “accelerate all” configuration on both nodes:
[root@r9 ~]# cat /etc/libcxgb4_sock.conf
endpoint {interface=eth1 port=0}
[root@r9 ~]#
[root@r10 ~]# cat /etc/libcxgb4_sock.conf
endpoint {interface=eth1 port=0}
[root@r10 ~]#
On R10, we run udpserver on port 9000 without libcxgb4_sock preloaded, and on port 90001
with preload:
[root@r10 ~]# /usr/local/src/hpcbench/udp/udpserver -p 9000 &
[1] 11453
[root@r10 ~]# TCP socket listening on port [9000]
[root@r10 ~]# LD_PRELOAD=libcxgb4_sock.so
/usr/local/src/hpcbench/udp/udpserver -p 9001 &
[2] 11454
[root@r10 ~]# TCP socket listening on port [9001]
[root@r10 ~]#
Then on r9, we run udptest to port 9000 to see the host stack UDP latency:
[root@r9 ~]# /usr/local/src/hpcbench/udp/udptest -r 5 -a -h 192.168.1.112 -p
9000
Running the same test with libcxgb4_sock:
[root@r9 ~]# LD_PRELOAD=libcxgb4_sock.so /usr/local/src/hpcbench/udp/udptest
-r 5 -a -h 192.168.1.112 -p 9001
Chelsio T5/T4 Unified Wire For Linux Page 89
Page 90

Chapter V. WD-UDP
4.1.6. Performance tuning on 2.6.18 kernel
To get better performance with WD-UDP using the 2.6.18 kernel, load the iw_cxgb4 modules
with the ocqp_support=0 parameter. For example,
modprobe iw_cxgb4 ocqp_support=0
4.1.7. Determining if the application is being offloaded
To see if the application is being offloaded, open a window on one of the machines, and run
tcpdump against the Chelsio interface. If you see minimal UDP output on the interface, then the
UDP traffic is being properly offloaded.
Chelsio T5/T4 Unified Wire For Linux Page 90
Page 91

Chapter VI. WD-TOE
VI. WD-TOE
Chelsio T5/T4 Unified Wire For Linux Page 91
Page 92

Chapter VI. WD-TOE
1. Introduction
Chelsio WD-TOE (Wire Direct-Transmission Control Protocol) with a user-space TCP stack
enables users to run their existing TCP socket applications unmodified.
It features software modules that enable direct wire access from user space to the Chelsio
T5/T4 network adapter with complete bypass of the kernel, which results in a low latency 10Gb
Ethernet solution for high frequency trading and other delay-sensitive applications.
1.1. Hardware Requirements
1.1.1. Supported Adapters
The following are the currently shipping Chelsio Adapters that are compatible with the WD-TOE
driver.
T580-CR
T520-LL-CR
T520-CR
T522-CR
T580-LP-CR
T420-CR
T440-CR
T422-CR
T420-SO-CR
T404-BT
T420-BCH
T440-LP-CR
T420-BT
T420-LL-CR
T420-CX
1.2. Software Requirements
1.2.1. Linux Requirements
Currently the WD-TOE driver is available for the following version(s):
Redhat Enterprise Linux 5 update 9 kernel (RHEL5.9), 2.6.18-348.el5*
Redhat Enterprise Linux 5 update 10 kernel (RHEL5.10), 2.6.18-371.el5*
Redhat Enterprise Linux 6 update 4 kernel (RHEL6.4), 2.6.32-358.el6
Redhat Enterprise Linux 6 update 5 kernel (RHEL6.5), 2.6.32-431.el6*
Suse Linux Enterprise Server 11 SP1 kernel (SLES11SP1), 2.6.32.12-0.7*
Chelsio T5/T4 Unified Wire For Linux Page 92
Page 93

Chapter VI. WD-TOE
Suse Linux Enterprise Server 11 SP2 kernel (SLES11SP2), 3.0.13-0.27
Suse Linux Enterprise Server 11 SP3 kernel (SLES11SP3), 3.0.76-0.11
Ubuntu 12.04.2, 3.5.0-23*
Kernel.org linux-3.4
Kernel.org linux-3.6
Kernel.org linux-3.7
Other kernel versions have not been tested and are not guaranteed to work.
*Limited QA performed
Chelsio T5/T4 Unified Wire For Linux Page 93
Page 94

Chapter VI. WD-TOE
2. Software/Driver Loading
Before proceeding, please ensure that the offload drivers are installed with WD-TOE support.
They are installed by default with Low Latency Networking, T5 Wire Direct Latency or T5 High
Capacity WD configuration tuning Options. With any other configuration tuning option, the
installation needs to be customized.
The driver must be loaded by the root user. Any attempt to load the driver as a regular user will
fail.
Run the following commands to load the driver:
[root@host]# modprobe cxgb4
[root@host]# modprobe t4_tom
Chelsio T5/T4 Unified Wire For Linux Page 94
Page 95

Chapter VI. WD-TOE
3. Software/Driver Unloading
Reboot the system to unload the driver.
Chelsio T5/T4 Unified Wire For Linux Page 95
Page 96

Chapter VI. WD-TOE
4. Software/Driver Configuration and Fine-tuning
4.1. Running the application
To run an application with WD-TOE, use the following command:
[root@host]# PROT=TCP wdload <path to application>
Example: To run Netperf application with WD-TOE.
i. Start netserver at the PEER, using the following command:
[root@host]# PROT=TCP wdload netserver –D -4
ii. On the Test Machine, run the following command to run netperf application.
[root@host]# PROT=TCP wdload netperf -H <PEER_IP> -t TCP_RR -l 10
Chelsio T5/T4 Unified Wire For Linux Page 96
Page 97

Chapter VII. iSCSI PDU Offload Target
VII. iSCSI PDU Offload Target
Chelsio T5/T4 Unified Wire For Linux Page 97
Page 98

Chapter VII. iSCSI PDU Offload Target
1. Introduction
This section describes how to install and configure iSCSI PDU Offload Target software for use
as a key element in your iSCSI SAN. The software runs on Linux-based systems that use
Chelsio or non-Chelsio based Ethernet adapters. However to guarantee highest performance,
Chelsio recommends using Chelsio adapters. Chelsio’s adapters include offerings that range
from stateless offload adapters (regular NIC) to the full line of TCP/IP Offload Engine (TOE)
adapters.
The software implements RFC 3720, the iSCSI standard of the IETF. The software has been
fully tested for compliance to that RFC and others and it has been exhaustively tested for
interoperability with the major iSCSI vendors.
The software implements most of the iSCSI protocol in software running in kernel mode on the
host with the remaining portion, which consists of the entire fast data path, in hardware when
used with Chelsio’s TOE adapters. When standard NIC Adapters are used the entire iSCSI
protocol is executed in software.
The performance of this iSCSI stack is outstanding and when used with Chelsio’s hardware it is
enhanced further. Because of the tight integration with Chelsio’s TOE adapters, this software
has a distinct performance advantage over the regular NIC. The entire solution, which includes
this software, Chelsio TOE hardware, an appropriate base computer system – including a high
end disk subsystem, has industry leading performance. This can be seen when the entire
solution is compared to others based on other technologies currently available on the market in
terms of throughput and IOPS.
1.1. Features
Chelsio’s iSCSI driver stack supports the iSCSI protocol in the Target mode. From henceforth
“iSCSI Software Entity” term refers to the iSCSI target.
The Chelsio iSCSI PDU Offload Target software provides the following high level features:
Expanded NIC Support
Chelsio TCP Offload Engine (TOE) Support
T5/T4 Based HBAs (T5/T4xx Series cards)
Chelsio Terminator ASIC Support
Offloads iSCSI Fast Data Path with Direct Data Placement (DDP)
Offloads iSCSI Header and Data Digest Calculations
Offload Speeds at 1 Gb and 10 Gb
Offloads TCP/IP for NAS simultaneously with iSCSI
Target Specific features
Chelsio T5/T4 Unified Wire For Linux Page 98
Page 99

Chapter VII. iSCSI PDU Offload Target
Full compliance with RFC 3720
Error Recovery Level 0 (ERL 0)
CHAP Support, including Mutual Authentication
Internet Storage Name Service (iSNS) Client
Target Access Control List (ACL)
Multiple Connections per Session
Multiple Targets
Multiple LUNs per Target
Multi Path I/O (MPIO)
Greater than 2 TB Disk Support
Reserve / Release for Microsoft Cluster© Support
Persistent Reservation
Dynamic LUN Resizing
iSCSI Target Redirection
Multiple Target device types
Block
Virtual Block (LVM, Software RAID, EVMS, etc.)
Built in RAM Disk
Built in zero copy RAM Disk
Supports iSCSI Boot Initiators
An Intuitive and Feature Rich Management CLI
This chapter will cover these features in detail.
1.2. Hardware Requirements
1.2.1. Supported Adapters
The following are the currently shipping Chelsio Adapters that are compatible with iSCSI PDU
Offload Target software:
T502-BT
T580-CR
T520-LL-CR
T520-CR
T522-CR
T580-LP-CR
T540-CR
T420-CR
T440-CR
T422-CR
T404-BT
T420-BCH
Chelsio T5/T4 Unified Wire For Linux Page 99
Page 100

Chapter VII. iSCSI PDU Offload Target
T440-LP-CR
T420-BT
T420-LL-CR
T420-CX
1.2.2. Adapter Requirements
The Chelsio iSCSI PDU Offload Target software can be used with or without hardware protocol
offload technology. There are four modes of operation using the iSCSI PDU Offload Target
software on Ethernet-based adapters:
Regular NIC – The software can be used in non-offloaded (regular NIC) mode. Please note
however that this is the least optimal mode of operating the software in terms of
performance.
TOE HW Acceleration – In TOE mode the software takes advantage of the TCP/IP Offload
capability of Chelsio’s TOE adapter (without the additional benefit of iSCSI HW
acceleration).
iSCSI HW Acceleration– In addition to offloading the TCP/IP protocols in hardware (TOE),
this mode also takes advantage of Chelsio’s ASIC capability of hardware assisted iSCSI
data and header digest calculations as well as using the direct data placement (DDP)
feature.
Mix of iSCSI HW Acceleration and TOE HW Acceleration – Using a special software mode
the stack can be configured to change between iSCSI acceleration or just TOE acceleration,
depending if digests are used or not.
1.2.3. Storage Requirements
When using the Chelsio iSCSI target, a minimum of one hardware storage device is required.
This device can be any of the device types that are supported (block, virtual block, RAM disk).
Multiple storage devices are allowed by configuring the devices to one target or the devices to
multiple targets. The software allows multiple targets to share the same device but use caution
when doing this.
Chelsio’s implementation of the target iSCSI stack has flexibility to accommodate a large range
of configurations. For quick testing, using a RAM Disk as the block storage device works nicely.
For deployment in a production environment a more sophisticated system would be needed.
That typically consists of a system with one or more storage controllers with multiple disk drives
attached running software or hardware based RAID.
Chelsio T5/T4 Unified Wire For Linux Page 100
 Loading...