

Page 1

Chell Instruments Ltd
Folgate House
Folgate Road
North Walsham
Norfolk NR28 0AJ
ENGLAND
Tel: 01692 500555
Fax: 01692 500088
microDAQ-Mk2
Pressure Scanner
Acquisition System
INSTALLATION
AND
OPERATING MANUAL
900193-1.3
Page 2

Page 1
Please read this manual carefully before using the instrument.
Use of this equipment in a manner not specified in this
manual may impair the user’s protection.
Chell Document No. : 900193 Issue 1.3
ECO : 2230 Date: 9th May 2016
Chell’s policy of continuously updating and improving products means that this manual may contain
minor differences in specification, components and software design from the actual instrument
supplied.
Page 3

Page 2
CONTENTS
1 Description ................................................................................................................................. 3
1.1 General ....................................................................................................................................................................... 3
2 Specification ........................................................................................................................... 4
2.1 Power Supply: ............................................................................................................................................................ 4
2.2 CAN specifications: ................................................................................................................................................... 4
2.3 Serial specifications: .................................................................................................................................................. 4
2.4 Ethernet Specifications: ............................................................................................................................................. 4
2.5 Operating conditions: ................................................................................................................................................. 4
2.6 Measurement specifications: ...................................................................................................................................... 4
3 Installation and Interconnections ......................................................................................... 5
3.1 Connector – Mating connector: DEUTSCH ASDD606-09SN-HE ............................................................................ 5
3.3 Scanner Connector – Internal micro miniature ‘D’ type, female. ............................................................................... 5
4 Operation of the instrument .................................................................................................. 6
4.1 Connecting up the microDAQ.................................................................................................................................... 6
4.3 Re-zeroing the microDAQ. ........................................................................................................................................ 6
4.4 Hardware Trigger ........................................................................................................................................................ 7
4.4.1 Hardware Trigger Input. ...................................................................................................................................... 7
4.4.2 Timing Information .............................................................................................................................................. 7
4.4.3 Software Control .................................................................................................................................................. 7
5 microDAQ Configuration Webserver ....................................................................................... 8
5.1 Introduction. ................................................................................................................................................................ 8
5.2 Common Controls Sidebar .......................................................................................................................................... 9
5.3. The 'Setup' Page ........................................................................................................................................................ 9
5.3.1 Introduction .......................................................................................................................................................... 9
5.3.2 Data Streaming..................................................................................................................................................... 9
5.3.3 TCP Parameters ................................................................................................................................................ 10
5.3.4 UDP Parameters ................................................................................................................................................. 10
5.3.5 CAN Parameters ............................................................................................................................................... 11
5.4. 'Live Data' Page ...................................................................................................................................................... 12
5.5. 'Calibration' Page .................................................................................................................................................... 13
5.6. 'DTC Information’ Page .......................................................................................................................................... 15
5.7 ‘Advanced’ Page ....................................................................................................................................................... 16
5.7.1 Filtering ............................................................................................................................................................. 16
5.7.2 Advanced communication settings .................................................................................................................... 16
5.7.3 Miscellaneous ................................................................................................................................................... 17
5.7.4 Span and Zero Coefficients ............................................................................................................................... 19
5.9 ‘Timestamp’ page .................................................................................................................................................... 19
6. Service and Calibration .......................................................................................................... 21
6.1 Service ..................................................................................................................................................................... 21
6.2 Calibration ............................................................................................................................................................... 21
6.3 Adjustment ............................................................................................................................................................... 21
6.4 Cleaning ................................................................................................................................................................... 21
7. MicroDAQ-INT Connector interface adaptor ......................................................................... 22
7.1 Case Assembly .......................................................................................................................................................... 22
7.2 Power Connector - Mating connector 2.1mm DC power jack ................................................................................. 22
7.3 Can Connector – Mating connector 9 way dtype male.............................................................................................. 22
7.4 Trigger Connector - Mating connector 50 Ohm BNC.............................................................................................. 22
7.5 uDAQ – Mating connector: DEUTSCH ASDD606-09SN-HE ................................................................................. 22
Page 4

Page 3
1 Description
1.1 General
The microDAQ-Mk2 is a self contained acquisition system and combined pressure scanner that
acquires and transmits data to a host via Ethernet or a CAN bus. It is the newest version of the
popular Chell microDAQ acquisition system, now known as microDAQ-Mk1.
The microDAQ comes in several variants to accommodate both conventional HD series scanners
and Digital Thermal Compensation (DTC) scanners with 16, 32 and 64 channels.
The microDAQ is supplied with all the software required to configure it and read the data from it.
The microDAQ addresses the scanner at a defined rate, acquires the output and applies a
pressure and thermal calibration to derive the engineering units.
The microDAQ also has a hardware trigger like the Mk3 CANdaq system, to give some time
determination to the data acquired.
This manual revision covers firmware version 2.0.2.
Page 5

Page 4
2 Specification
2.1 Power Supply:
Line voltage:
8-24 VDC
Absolute Max. Line voltage 25VDC
Consumption:
With a 64 channel scanner:
Max 4VA
2.2 CAN specifications:
CAN type 2.0B
CAN baudrate Configurable (by internal switch) from 1M, 500K, 125K
and 100K.
Programmable variables:
Address 0x?nn Most significant programmable device ID
Address 0xn?n Next most significant programmable device ID
BRP CAN bus timing – see Infineon data sheet
TSEG1 CAN bus timing – see Infineon data sheet
TSEG2 CAN bus timing – see Infineon data sheet
SJW CAN bus timing – see Infineon data sheet
2.3 Serial specifications:
USB2.0 (micro) 57600 baud, no parity, 8 data bits and 1 stop bit.
2.4 Ethernet Specifications:
TCP/IP 10Mb/s & 100Mb/s via Auto Negotiation
TCP & UDP protocols supported
2.5 Operating conditions:
Operating temperature range:
+5C to +90C
Storage temperature range:
-20C to +90C
Maximum Relative humidity:
95% at 50C (non condensing)
2.6 Measurement specifications:
System accuracy:
0.25% FS for conventional scanners
0.06% FS for DTC scanners
0.06% FS for I-Daq scanners
Resolution: 16 Bit
Theoretical Maximum
Measurement Speed:
(actual data output is limited by chosen comms
available bandwidth)
See table below:
Number of Scanner channels Acquired
16 32 48 64
@ 50KHz Scanner Acq
Frequency
3000 1500 1000 750
@ 20 KHz Scanner Acq
Frequency
1250 625 400 312
All measurements are in measurements / channel / second.
Page 6
Page 5
3 Installation and Interconnections
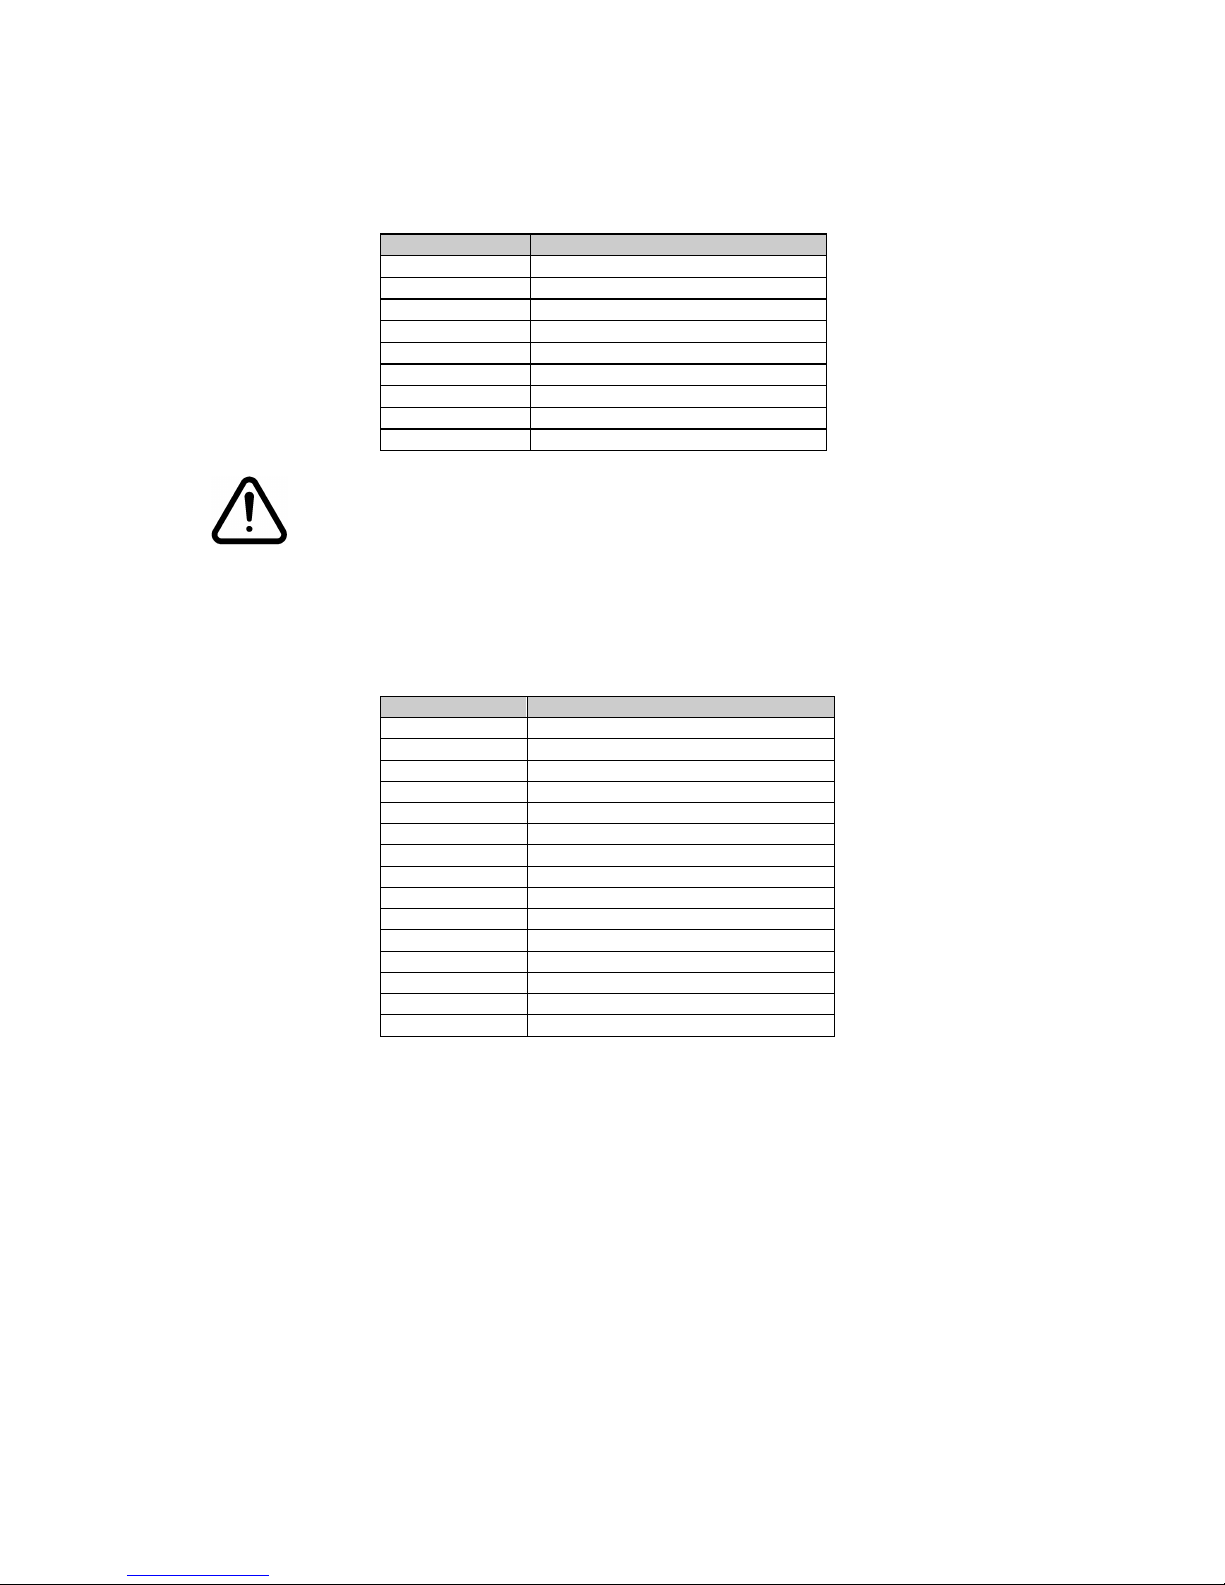
3.1 Connector – Mating connector: DEUTSCH ASDD606-09SN-HE
Pin Number Designation
1 TX+
2 RX+
3 TRIGGER IN (TTL)
4 +8~25V SUPPLY
5 0V
6 CAN_H
7 CAN_L
8 TX9 RX-
Hot plugging the power to the microDAQ at the
connector can cause permanent damage to the unit.
Always switch the power at the power supply source.
3.3 Scanner Connector – Internal micro miniature ‘D’ type, female.
Pin number Signal
1 Address line A0
2 Address line A1
3 Address line A2
4 Address line A3
5 Address line A4
6 +12VDC
7 -12VDC
8 +5VDC (Vs)
9 +5VDC RTN
10 Ground
11 Output
12 Address line A5
13 Ov sense
14 Not used
15 Temperature signal
Note: The connection pinouts for the microDAQ-INT interface adapter
can be found at the end of this document (Section 7).
Page 7

Page 6
4 Operation of the instrument
4.1 Connecting up the microDAQ.
The microDAQ has one connector and cable which supplies the unit with power and also provides
CAN and Ethernet comms. Ensure all the connections are made before powering up the
microDAQ. The microDAQ should not be hot plugged with the power connector. Doing so can
cause permanent damage to the unit. Always switch the power at the power supply source.
Upon power up, the blue LED will light constantly while the microDAQ boots up. This boot-up
period will vary depending on the type of scanner and the number of channels. The boot up time is
also influenced by the Ethernet initialisation process. This process requires a valid network
connection to perform auto negotiation and link check status. If there isn’t a valid connection the
process waits until either a network is found or the timeout occurs. This timeout is configurable via
setup and ranges from 0 to 30 secs per check (2 checks).
When the microDAQ has finished booting, the blue LED will flash at a constant rate to show that
the system is running (unless auto hardware trigger enable has been set – see later).
4.3 Re-zeroing the microDAQ.
Before any measurements are made, the microDAQ should be re-zeroed. The microDAQ may
need further re-zeroing if the unit or scanner should be subject to significant thermal variations.
The microDAQ is re-zeroed by sending the appropriate command over the CAN or Ethernet link via
the Chell software. The system will then average a number of zero readings and perform a re-zero.
Naturally, there should be no pressure applied to the ports of the scanner when a re-zero is being
performed.
When a re-zero is being performed, the red LED will light momentarily.
Page 8

Page 7
4.4 Hardware Trigger
The microDAQ features a hardware trigger to enable the user to synchronise multiple microDAQ’s
and to calculate the timing of the measurements made. The hardware trigger takes the form of a
pulse train. Each time the microDAQ receives a positive edge, it will generate a set of
measurements for all the channels configured in the system.
4.4.1 Hardware Trigger Input.
The hardware trigger input is a 5V TTL square wave pulse train. Minimum frequency 2Hz and
maximum frequency 1.2KHz (32 channel scanner, real world application – theoretical maximum is
determined by the number of channels on the scanner. 64 channel units streaming data via TCP
comms will struggle to stream faster than around 600Hz)
4.4.2 Timing Information
The hardware trigger allows the user to calculate the time of each measurement. For example if the
hardware trigger were running at 100Hz then the user would receive 100 measurements per
channel per second. The first pulse would generate the first set of measurements and 10ms later
the second pulse would generate the second set and so on. When the hardware trigger is
activated, the microDAQ will wait for the first pulse. The time that this first pulse is generated can be
measured by the user and therefore the time of the first set of data and all subsequent sets can be
determined. For more details on hardware trigger timing a technical paper is available – Chell
document no. 900118 (this paper was developed for the CANdaq but applies to the microDAQ as
well).
4.4.3 Software Control
The hardware trigger mode is activated by the T command over the CAN or Ethernet interfaces.
The T command can be used to enable the hardware trigger that will cause the microDAQ to stop
free-running and wait for the first pulse. The disable command will return the microDAQ to freerunning. The command structure is as follows:
Command Interface On / Off
T01 CAN Off
T11 CAN On
T02 Ethernet Off
T12 Ethernet On
The hardware trigger can also be set to auto enable on power up which means that the microDAQ
will not go into free-running mode after initialisation and will instead wait for the first hardware
trigger pulse. In this instance the blue LED will not flash at a constant rate after initialisation and will
actually turn off. This feature can be enabled/disabled from the embedded webserver
configuration.
Page 9
Page 8
5 microDAQ Configuration Webserver
5.1 Introduction.
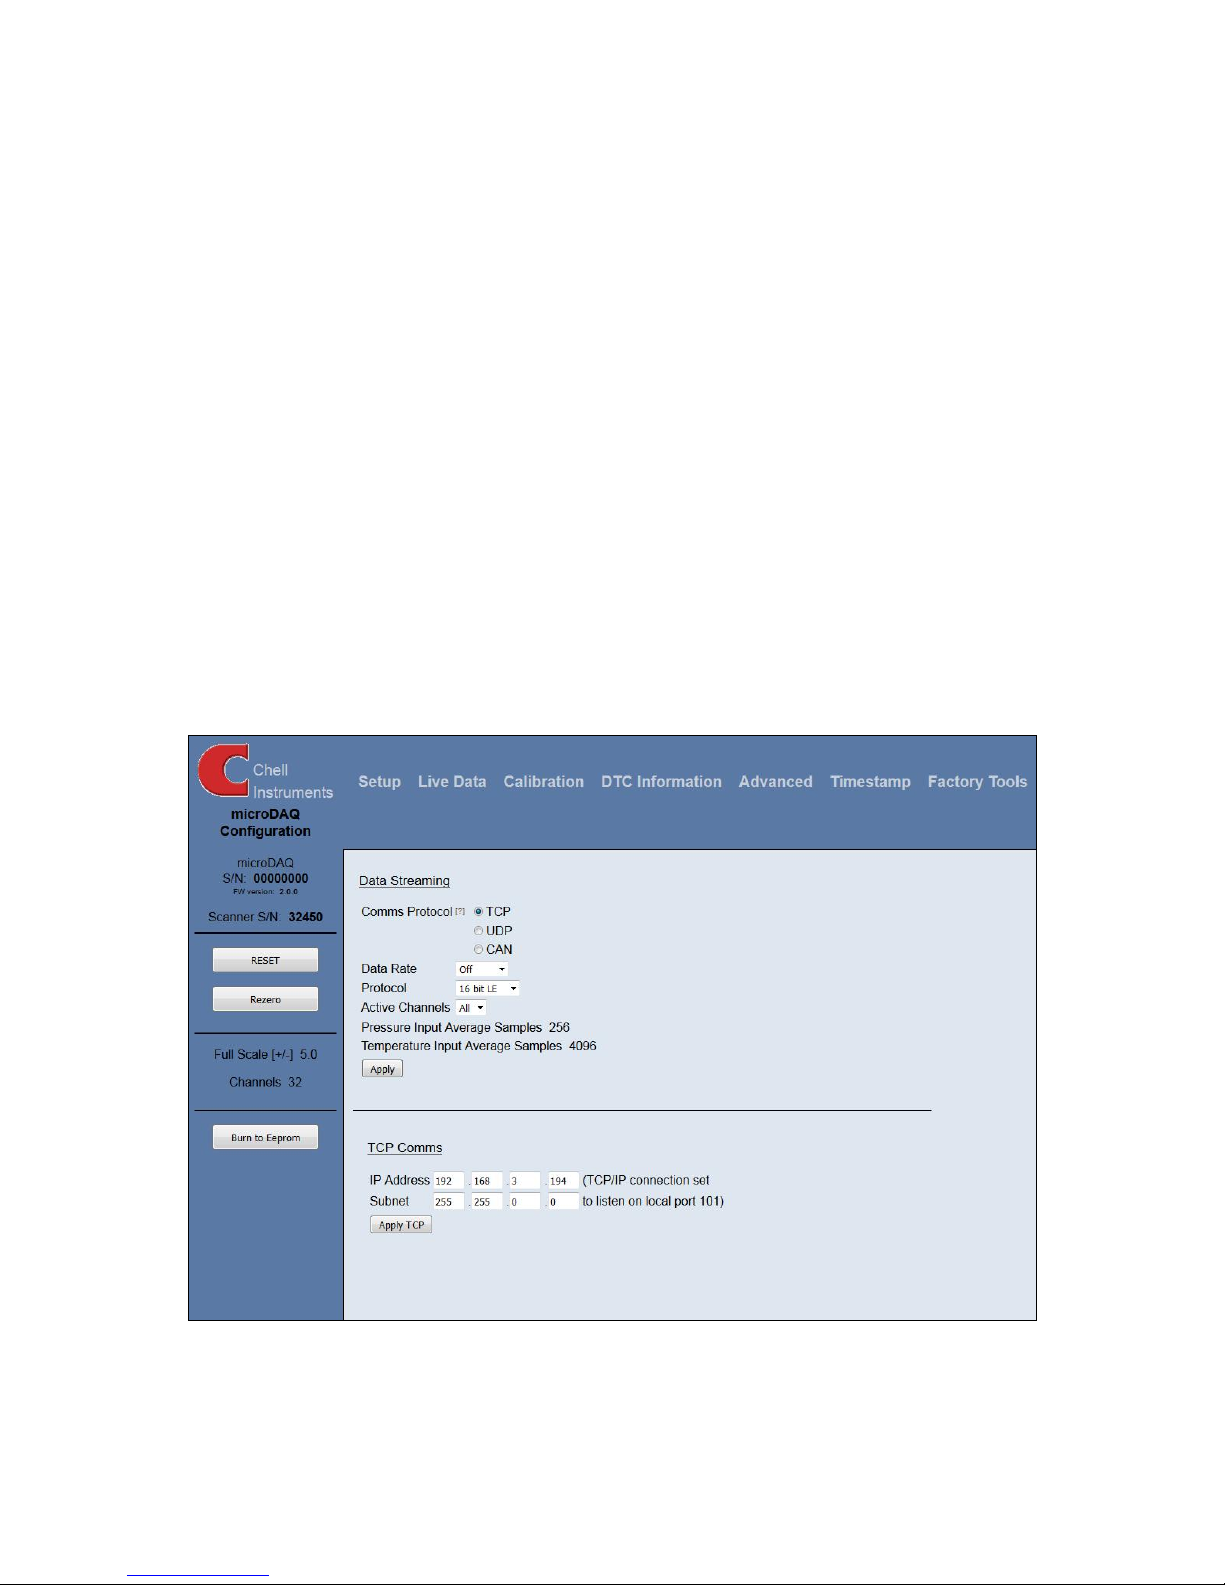
The microDAQ web Configuration provides the means of setting up, calibrating and demonstrating
the microDAQ unit from a standard PC with an ethernet port and browser. It replaces the old
microDAQSetup program provided with the microDAQ-Mk1.
The software is divided by tabs into seven areas of functionality, namely 'Setup’, 'Live data',
'Calibration', 'DTC Information’, ‘Advanced’, ‘Timestamp’ and ‘Factory Tools’
'Setup’ provides the means to set microDAQ’s operating parameters and its identification
information. The unit's function may be checked and demonstrated using 'Live Data' to show
attached pressure scanner raw readings and microDAQ’s calibrated output. 'Calibration' gives
access to microDAQ's existing on board, non DTC calibration coefficients, the tools for performing
a new calibration, namely calculating and downloading new coefficients, and the means to
managing calibration data. Data from the calibration procedure and resulting coefficients may be
loaded, stored and exported for filing, reuse and examination in other packages. 'DTC Information'
provides a means for interrogating a DTC variant of the microDAQ, the user having access to
identification information, the current status of the calibration shuttle valve and both excitation and
temperature voltages. ‘Advanced’ has extra functions that some users might not need but might be
necessary for other users. ‘TimeStamp’ provides a means for the user to control the timestamping
settings of the microDAQ . ‘Factory Tools’ provides some functionality to read DTC coefficients and
current scanner values and change the MAC address of the Ethernet hardware. This tab is not
readily available to everyone and further detail is beyond the scope of this document.
Figure 5.1, Main Setup page
Page 10
Page 9
5.2 Common Controls Sidebar
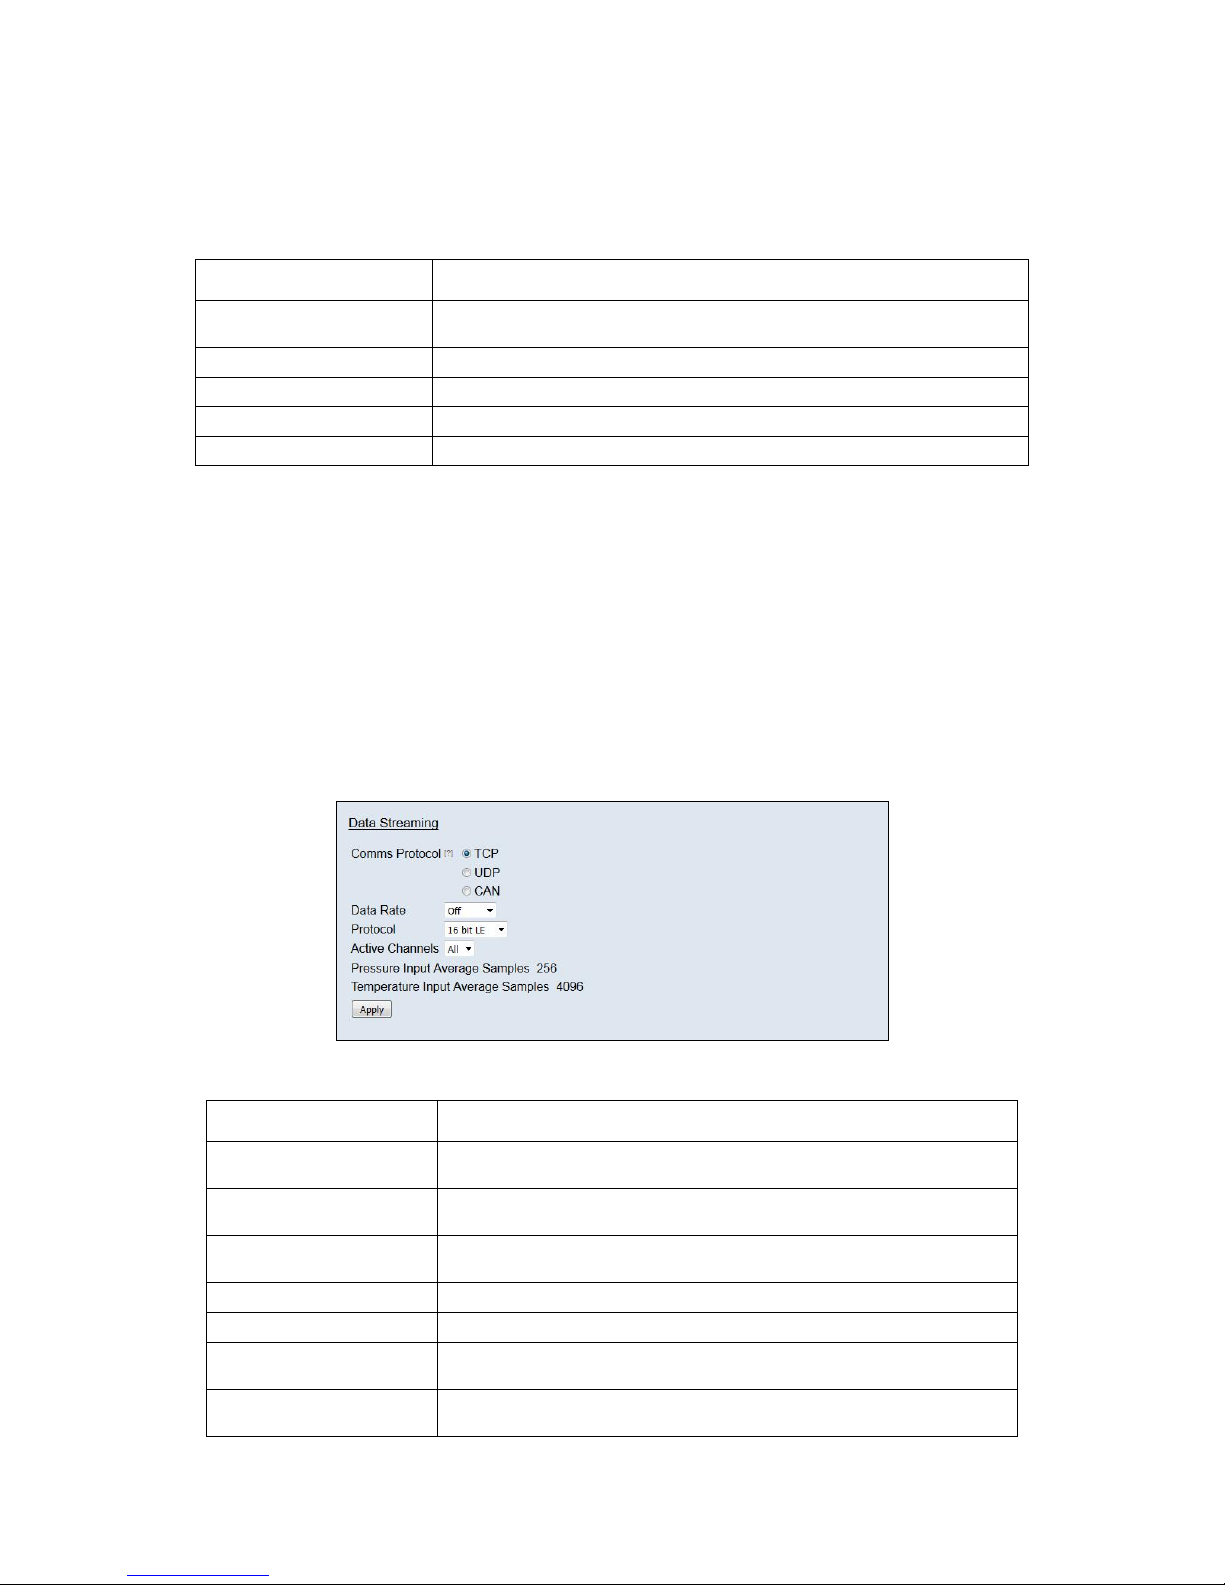
Figure 5.1 above shows the first page viewed when navigating to the webserver. The menu at the
top allows the user to choose what is visible in the central window, and the sidebar shows
information and has a select few commands that are useful regardless of the central page the user
is on.The function of the controls on the sidebar is detailed in the subsequent table (Table 5.1)
Control Function
'RESET' button Resets the microDAQ, similar to power cycling the device. Use to activate new
settings and/or rebuild calibration tables.
'Rezero' button Starts a microDAQ rezero operation.
'Full Scale' Displays the value of the fullscale that the microDAQ is set up to use .
'Channels' Displays the number of channels that the microDAQ is set up to use.
‘Burn to eeprom” button Burns all changes made to the local settings into the eeprom
Table 5.1, Common sidebar control functions.
5.3. The 'Setup' Page
5.3.1 Introduction
The 'Setup’ page shows all of the microDAQ's main operating parameters. Setup is divided into
different categories by function, and each category is detailed separately in the following.
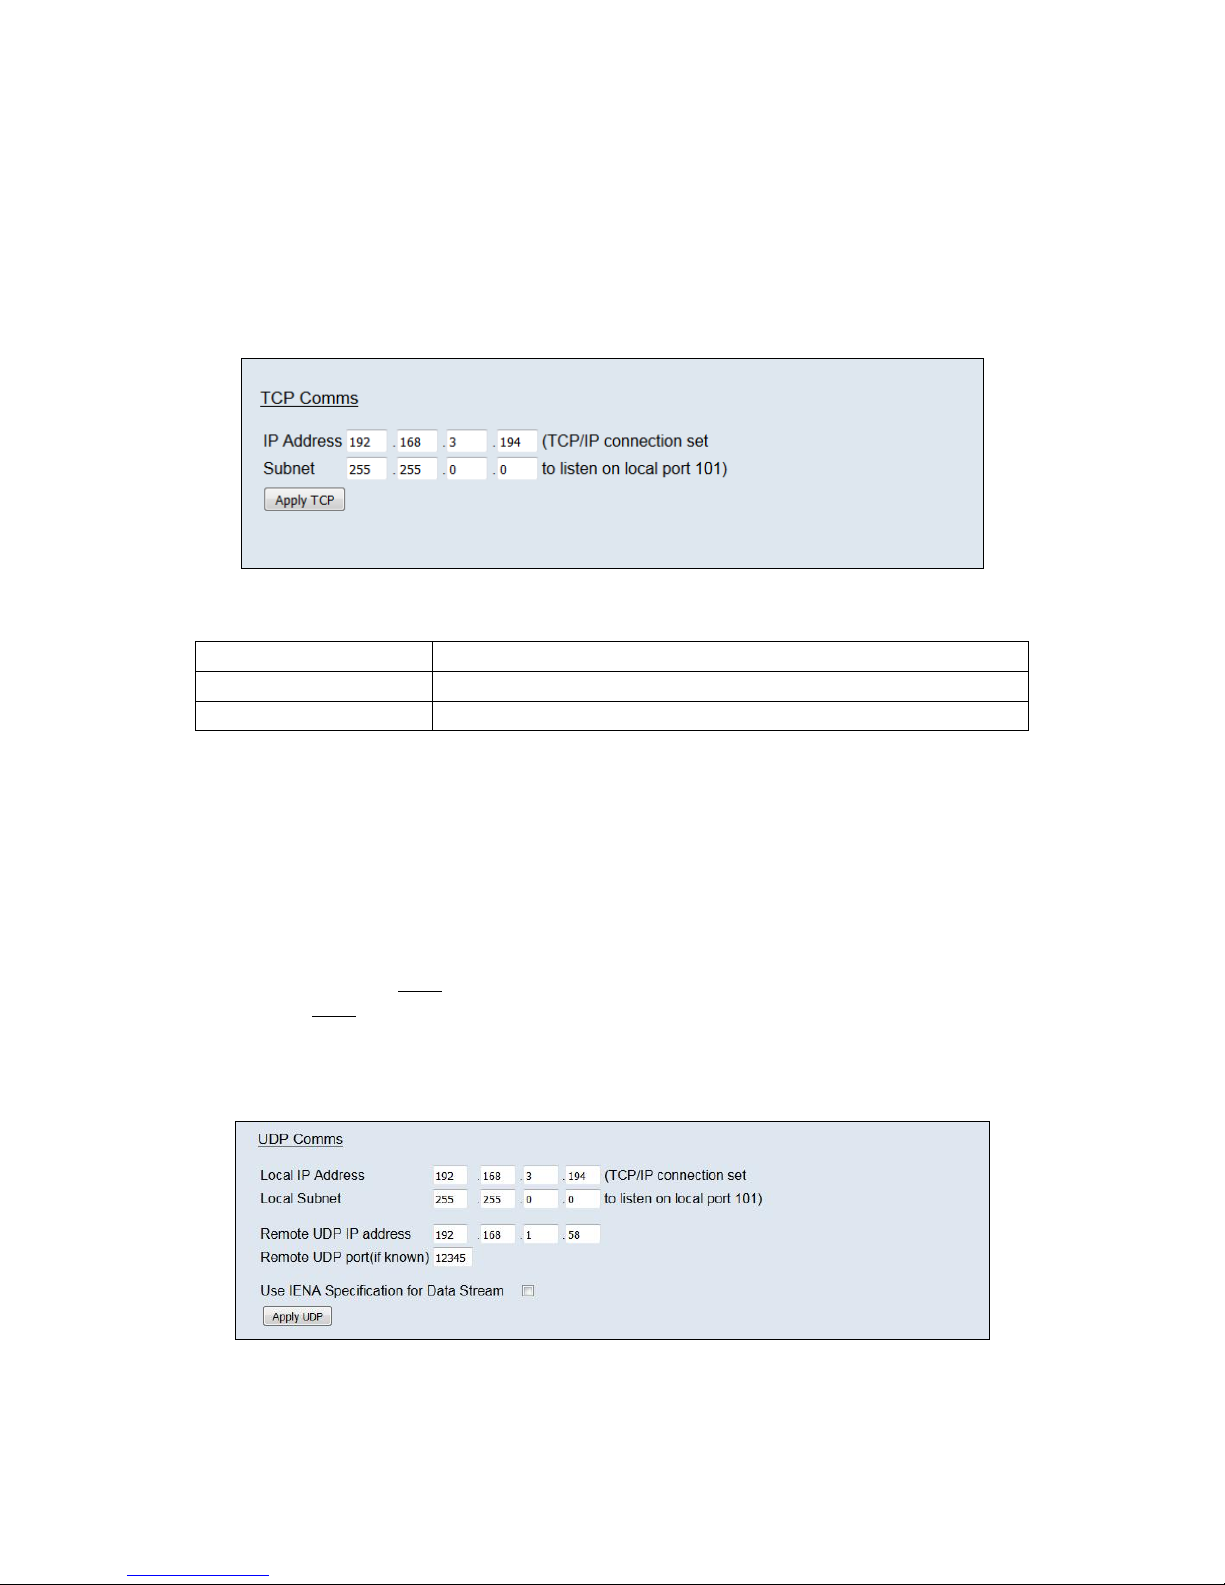
5.3.2 Data Streaming
The ‘Data Streaming’ section allows the user to change settings that affect all three communication
protocols, and allows the user to choose the protocol that is to be used, along with the data
transfer rate and the amount of channels.
Figure 5.2, Data Streaming group
Control Function
‘Comms Protocol’ radio button Chooses the communication protocol that is to be used. W hen selected this button
will change the communications page underneath to the appropriate comms menu.
‘DATA Rate’ option list Selects the rate at which the microDAQ will transmit data, whether this value is for
TCP, UDP or CAN will depend on the comms protocol selection.
‘Protocol’ option list Selects the format that the data will be transmitted as, options are 16 bit LE, 16 bit
BE for all protocols and eng. units as an extra option for TCP and UDP Comms.
‘Active channels’ Selects the numbher of active channels, either 16,32,48 or All
‘Apply’ button Applies the changes made to the local settings
Pressure input Average
Samples
Standard moving averaging filter for the acquired pressure readings.
Temperature input average
samples
Standard moving averaging filter for the acquired temperature readings.
Table 5.2, Data Streaming settings.
Page 11
Page 10
Note that selecting Engineering Units for a protocol will cause the scanner addressing rate to be
reduced; it is better to scale calibrated 16 bit data to engineering units within the client software.
5.3.3 TCP Parameters
The TCP communication protocol parameters are shown in Figure 5.4. Options control the
microDAQs IP address and subnet mask, in addition to any gateway IP address required. Note
microDAQ's active TCP listening port is fixed at 101.
Figure 5.3, TCP Comms group
'IP Address' IP address allocated to microDAQ on the user's network.
'Subnet' Subnet mask as set on the user's network.
‘Apply’ Applies the settings to the local settings memory
Table 5.3, TCP Comms group settings
5.3.4 UDP Parameters
The UDP section (figure 5.5) holds all the settings specific to UDP. In UDP mode each acquisition
cycle (of ‘x’ number of channels) is packed as a separate UDP packet with a four byte
representation of the microDAQ serial number at the start of the packet. These are attempted to be
sent out at the required rate but with no checking for reception or validity of data.
Note that the microDAQ’s local IP address is the same setting as from the TCP Comms group and
the microDAQ’s local UDP port is also fixed at 101. Settings available from this section include
setting the UDP address and port for a remote connection (for auto streaming via UDP at boot up)
and a setting for auto broadcasting a UDP message at bootup to inform the network of the
availability of the microDAQ.
Figure 5.4, UDP Comms group
Page 12
Page 11
Local IP Address This is the IP address of the device. This address is the same as the TCP comms
section.
Local Subnet This is the subnet of the device. This subnet is the same as the TCP comms section.
Remote UDP IP address. Address of remote connection to microDAQ. If set then the microDAQ can be set to
auto stream data to that remote host on boot up (after initialisation)
Remote UDP port. Port of remote connection to microDAQ. If set then the microDAQ can be set to auto
stream data to that remote host on boot up (after initialisation)
‘Use IENA Specification for
Data Stream’
Turns the Data stream format to IENA specification format. More information on this
format can be found in the user programming guide.
‘Apply’ Applies the settings to the local settings memory
Table 5.4, UDP Comms group settings
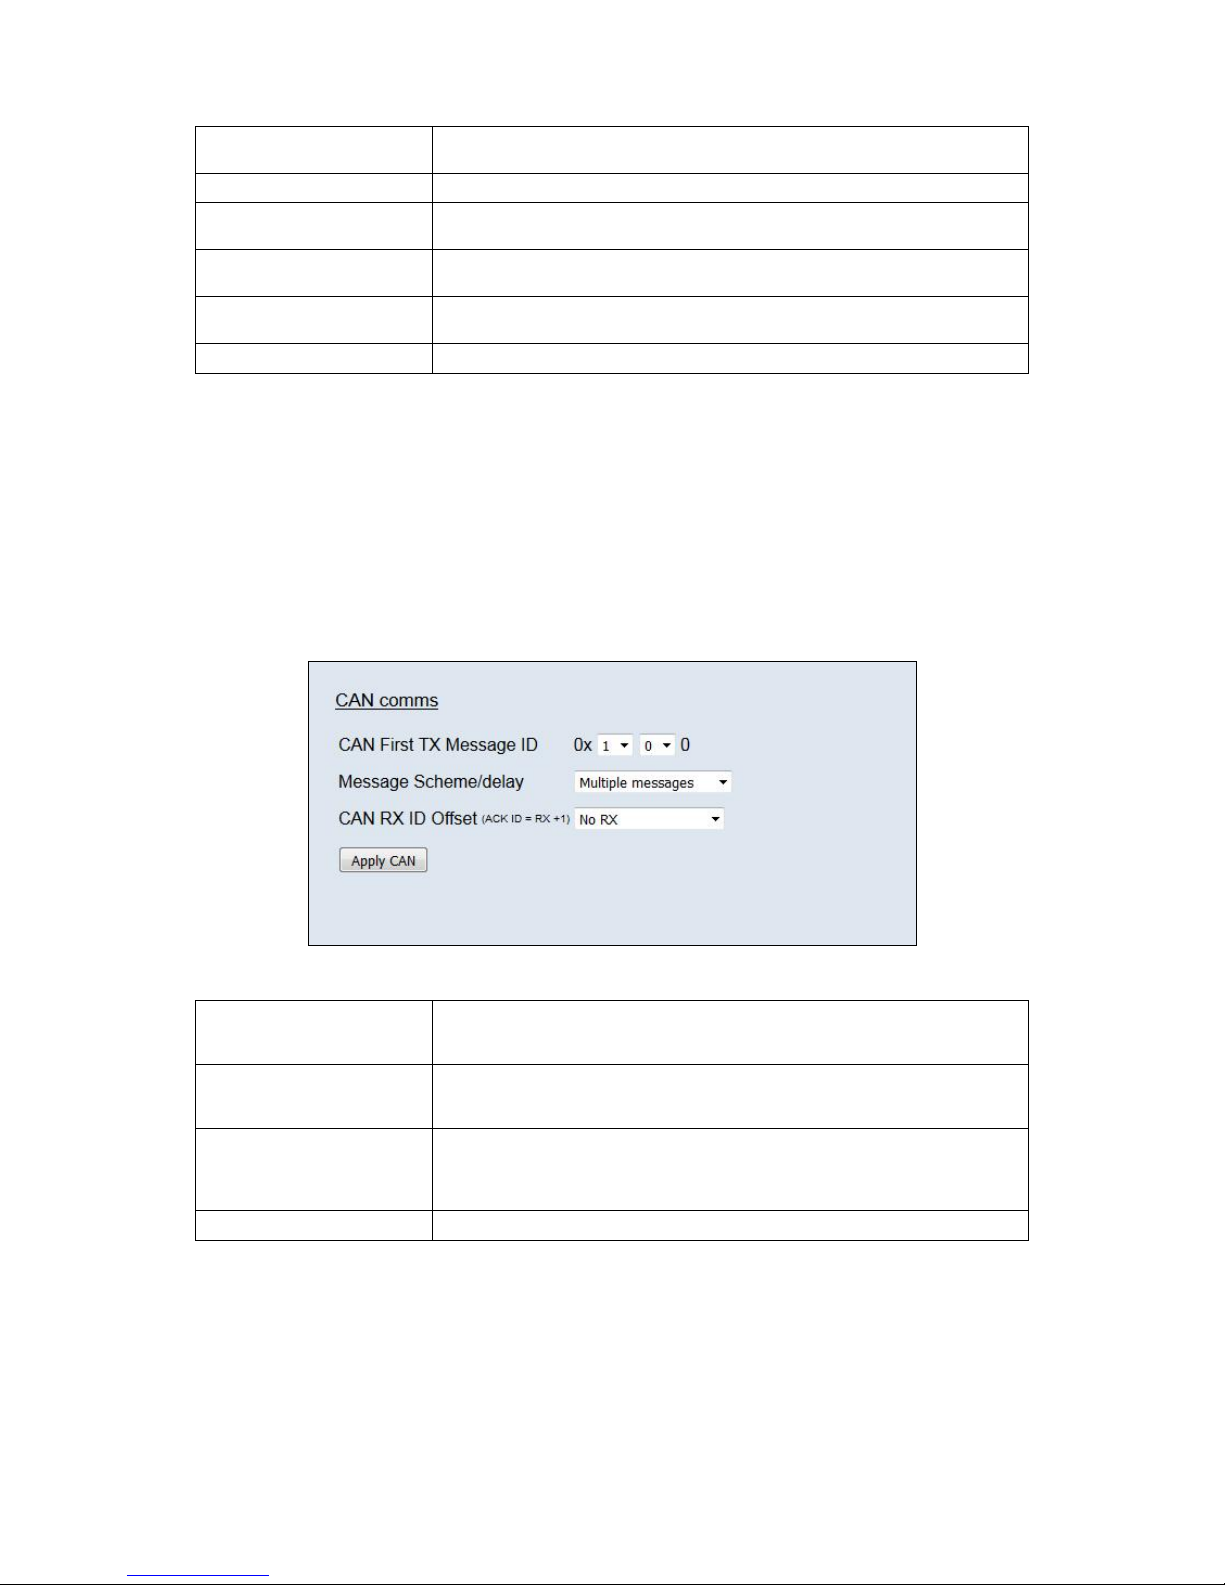
5.3.5 CAN Parameters
The CAN communication settings are shown in Figure 5.6. Options are available to set the base
message ID number may be selected, and the offset from this base number for the reception of
user commands over CAN, and whether an acknowledgement of these user commands is sent on
the next higher message number. Data may be transmitted on either multiple messages, or
alternatively on a single message ID, with a selectable delay between messages. Additionally the
CAN bus baudrate and sample point can be modified via the setting of the BRP, TSEG1, TSEG2 &
SJW registers.
Figure 5.5, CAN Comms group
‘CAN First TX Message ID’ microDAQ uses standard CAN message arbitration id’s, and the unit is assigned the
most significant 2 digits of the Hex base address. For the digits 0x1A for example,
data for the first 4 channels will be sent on 0x1A0, the next 4 on 0x1A1, etc.
Message scheme/delay Select ‘Multiple Messages’ for the 4 channels per message, multiple message
scheme. Alternatively data may be packed 3 channels per message + identifier byte,
with a selectable delay between messages.
‘CAN RX ID Offset’ Selects the hex offset from the base message ID where microDAQ will receive
incoming user commands (see user command document). If ‘Ack. Enabled’ is
selected, the unit will acknowledge the reception of a correctly formatted command on
the message ID calculated as Base ID + RX Offset + 1
‘Apply’ Applies the settings to the local settings memory
Table 5.5, CAN Comms group settings.
Page 13
Page 12
5.4. 'Live Data' Page
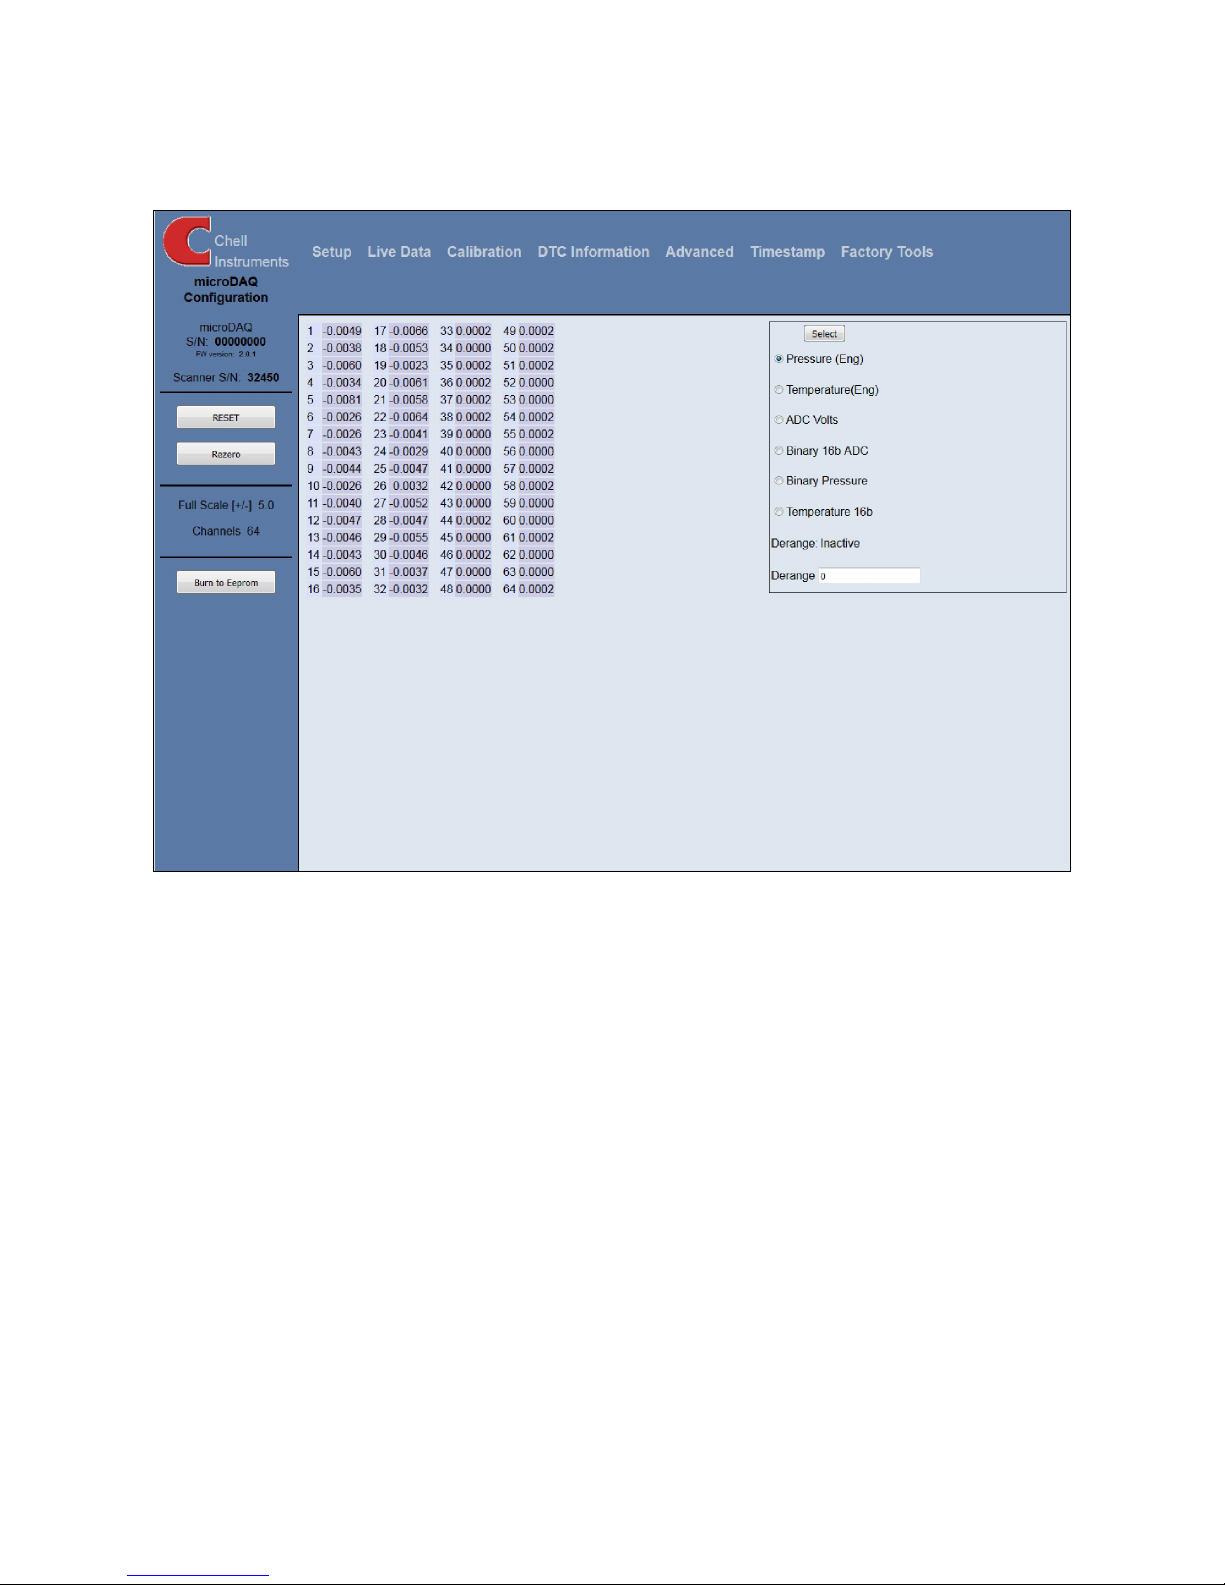
Figure 5.8 shows the 'Live Data' page of the webserver, selected for a 64 channel pressure
scanner.
Figure 5.6, Live Data Page
The live data page is a means to demonstrating the correct operation of microDAQ and testing the
unit's calibration. By selecting the correct number of channels for the attached scanner, the
software shows a data label dedicated to each. The type of value shown in the label may be
selected by means of the option buttons to the right of the frame, the user selecting between raw
(decimal 16 bit unsigned), calibrated (decimal 16 bit unsigned) and engineering units or voltage
scaled to the known full scales. Also for DTC scanners, the temperature values as raw unsigned
16 bit and calibrated engineering units may be displayed. Values are updated automatically, once
a second, with the default view being Pressure (Eng). Use the Select button to start showing values
from one of the other selectable options.
The 'Derange' shows whether the derage is active or inactive, this is changed by changing the DTC
Gain value in the advanced page, a DTC Gain of 1 means derange will be inactive and a DTC Gain
of 3 means derange will be active. The derange value will be displayed on if derange is active, if
not then the displayed value will be 0.
Page 14
Page 13
5.5. 'Calibration' Page
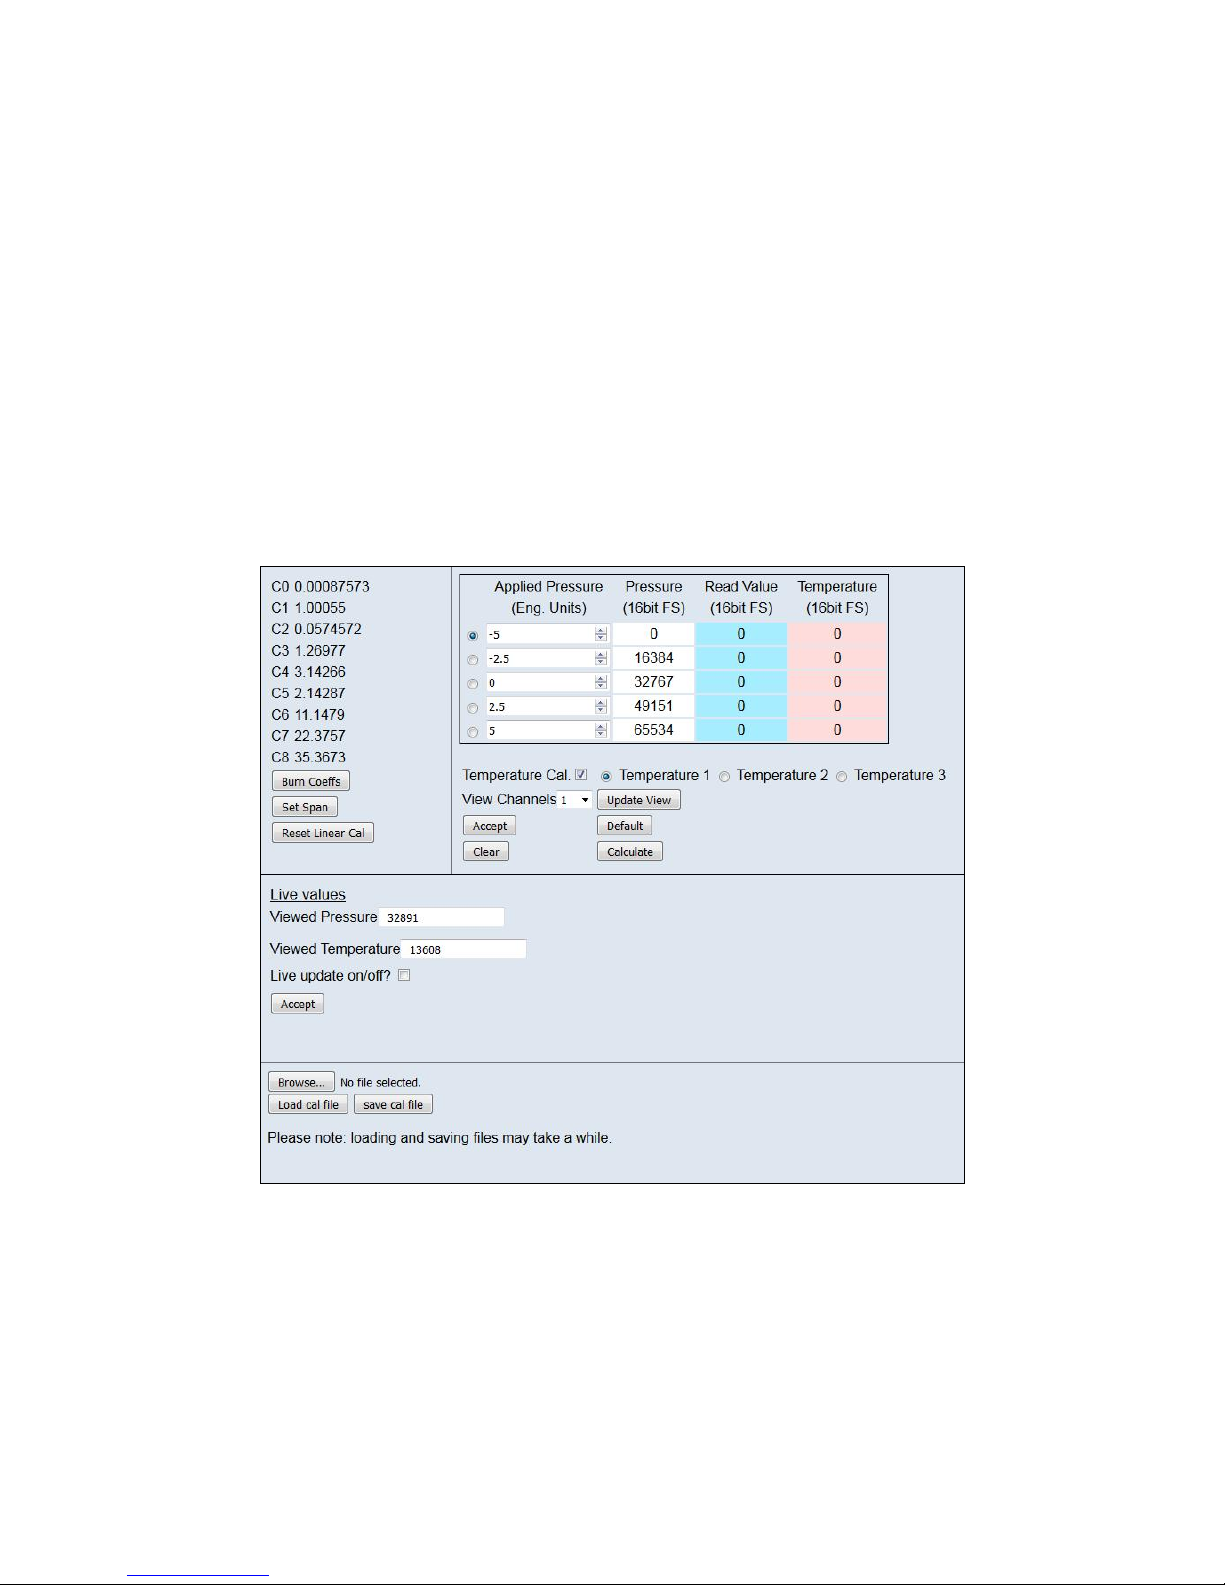
The 'Calibration' page allows access to microDAQ’s existing non DTC calibration coefficients and
provides a means to acquiring live calibration data and calculating new coefficients. The loading
and saving of tests is also possible from this tab.
Calibrations may either be 3 temperature based for a temperature calibration, or by unchecking the
'Temperature Cal.' checkbox, a non temperature calibration may be performed at a single
temperature. Figure 5.9 shows the 'Calibration' tab controls which are further explained in table
5.8.
The Live values section is an indicator of the currently read pressure and temperature of the
selected View channel. This is just to show if valid values are being read by the unit. They can be
toggled off and on using the check box and Accept button.
Other controls include the ‘Burn Coeffs’ button which writes the current local coefficients to
microDAQ EEPROM. The 'Clear' button sets all local coefficients to zero.
Figure 5.7, Calibration Page
Page 15

Page 14
Control Function
Temperature tickbox and radio
buttons
Select at which temperature point the unit is currently been calibrated
Applied Pressure The engineering units pressure setpoints - user entered, or set to standard values (+/-
FS, +/-0.5FS, 0) by clicking 'Defaults'
Pressure (16 bit FS) The 16 bit unsigned representation of the pressure setpoints, calculated by the
software
Read value (16 bit FS) The raw value read by microDAQ from the pressure scanner for the pressure setpoint
Temperature (16 bit FS) The temperature value read by microDAQ from the pressure scanner at that pressure
setpoint
‘Accept’ button Clicking 'Accept' stores the current read value as the calibration point, and moves on
to the following setpoint
‘Defaults’ button Sets the default calibration points as +/- full scale, +/- 0.5 full scale and zero
Calculate Takes the acquired data and calculates the derived calibration coefficients - will not
proceed unless there is no more than one zero in the applied pressure text boxes
Clear Clear the current calibration test data to zeroes, also clears the calibration controls
Temperature Cal. When checked enables temperature options 2 and 3 for a 3 temperature calibration.
Unchecked only temperature point 1 is available to the user and the system will
calculate coefficients for a non temperature calibration
Live Values The live values of the current channel are displayed here
Live update on/off Selects whether the live values will update at a 1 second interval or not.
View channel Select the channel that supplies the values displayed in the calibration controls
C0 – C8 Calibration coefficients read/calculated for the selected channel
Burn Coeffs Tell the microDAQ to store the current coefficients to non-volatile storage (EEPROM)
Linear Cal Functions
‘Set Span’ Set the span of a linear calibration – confirms the value of pressure that has been set
up as the span value is being applied to the sensor.
‘Reset Linear Cal.’ Resets the linear calibration to (+ 0) x1 i.e. no offset, unity gain. Applies ONLY to the
current linear calibration, ie the DTC calibration if using a DTC scanner.
Calibration Load/Save
Browse Allows the user to search through the file directory system and select a calibration file
Save File Save the current local calibration coefficients to a file - defaults to the calibration file
directory
Read File Reads the calibration file selected by the browse function into the microDAQ (note:
Reading a non calibration file will cause the system to crash)
Table 5.6, Calibration Page controls
Page 16
Page 15
5.6. 'DTC Information’ Page
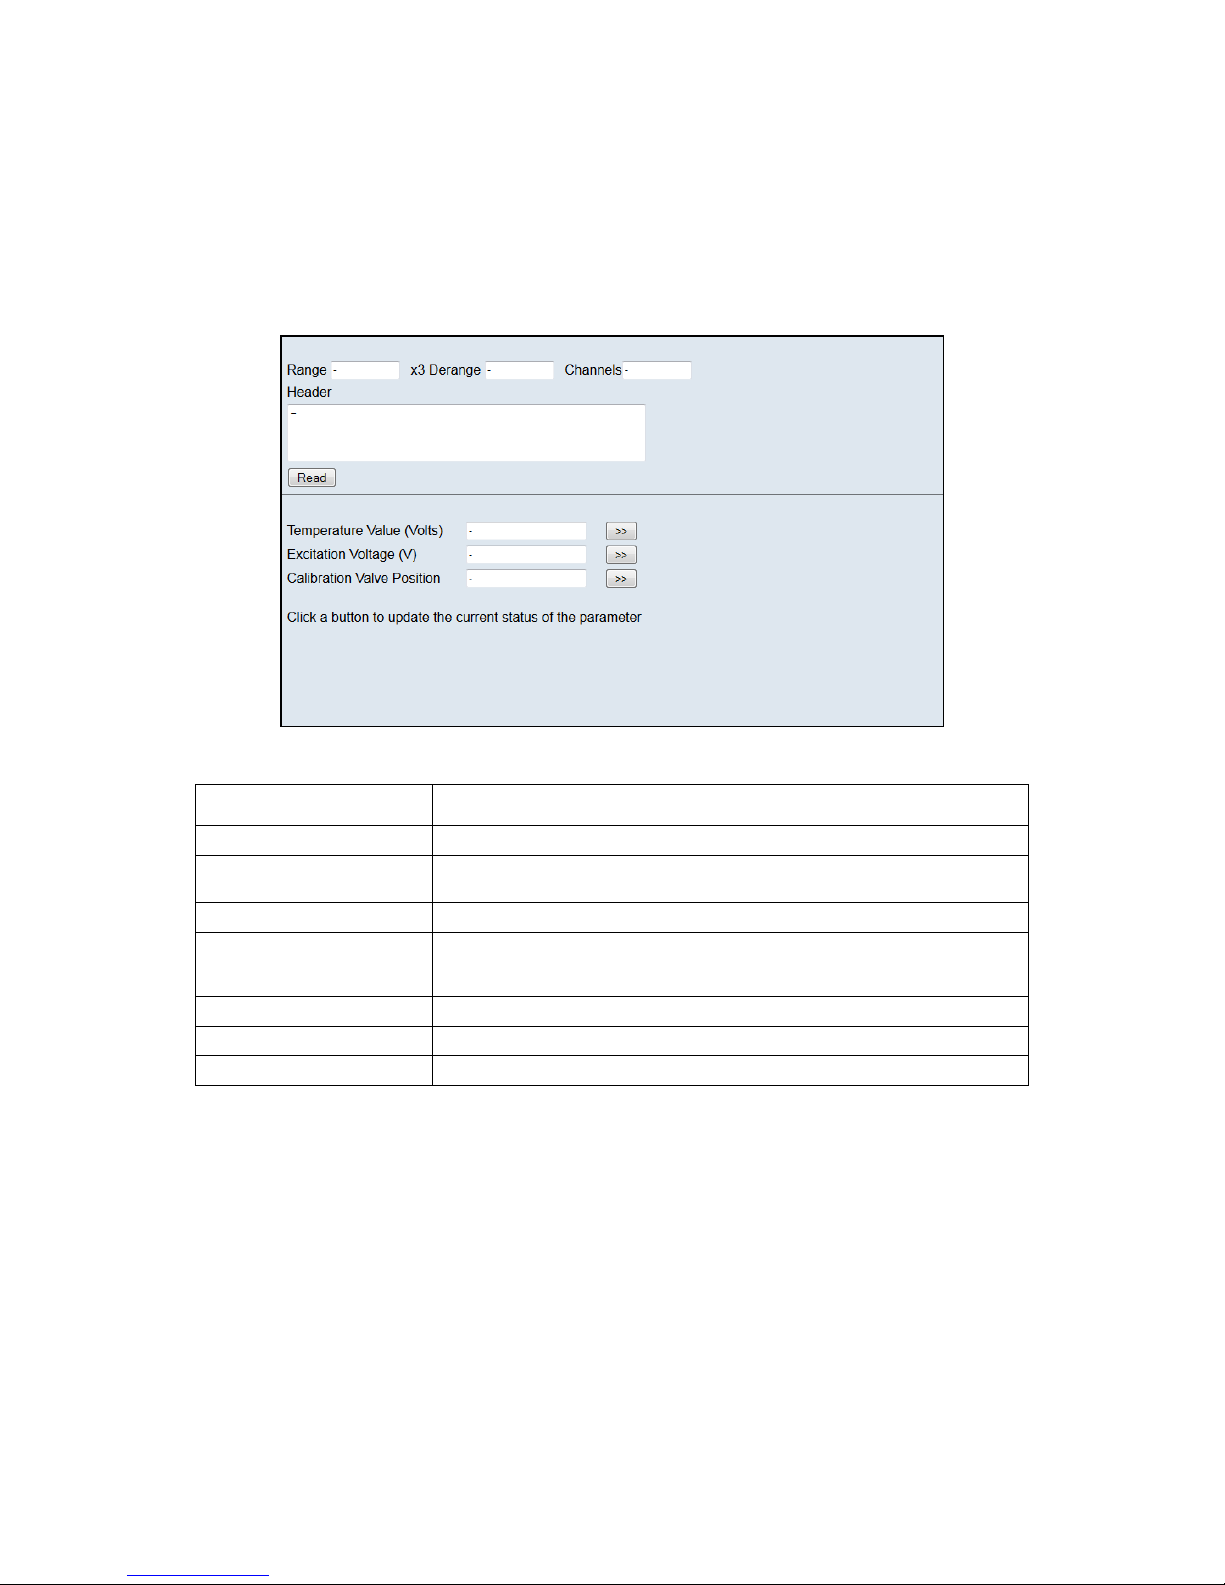
The 'DTC Functions' page gives the user access to some information regarding the attached DTC
scanner. The scanner voltages for temperature and excitation may be read and the position of the
calibration shuttle valve determined as either being in 'RUN' or 'CAL.' mode. Also, the information
contained in the scanner header may be displayed. Note that the value of the parameter read from
the scanner (ie temperature, excitation voltage and particularly valve position) is valid only for the
time that it is read.
Figure 5.8, 'DTC Information' Page
Control Function
'Range' Shows the floating point value for the range contained within the scanner.
'x3 derange' Shows the floating point value for the sensitivity derange constant contained within
the scanner.
'Channels' Shows the floating point value for number of scanner channels.
'Read' Displays the data header from the DTC scanner, splits out the information and
displays scanner full scale, the number of channels and the deranging factor. Also
shown are the scanner model, serial number and date of manufacture.
'Temperature (V)' Click '>>' to read the current temperature voltage from the scanner.
'Excitation (V)' Click '>>' to read the current excitation voltage from the scanner.
Calibration Valve Position Click '>>' to read the valve position as 'RUN' or 'CAL'.
Table 5.7, 'DTC Information’ Page controls
Page 17
Page 16
5.7 ‘Advanced’ Page
The advanced page contains functions that will change the how the microDAQ acts and how it
applies various calculations to its data, this page should only be used by users who fully
understand what they are changing.
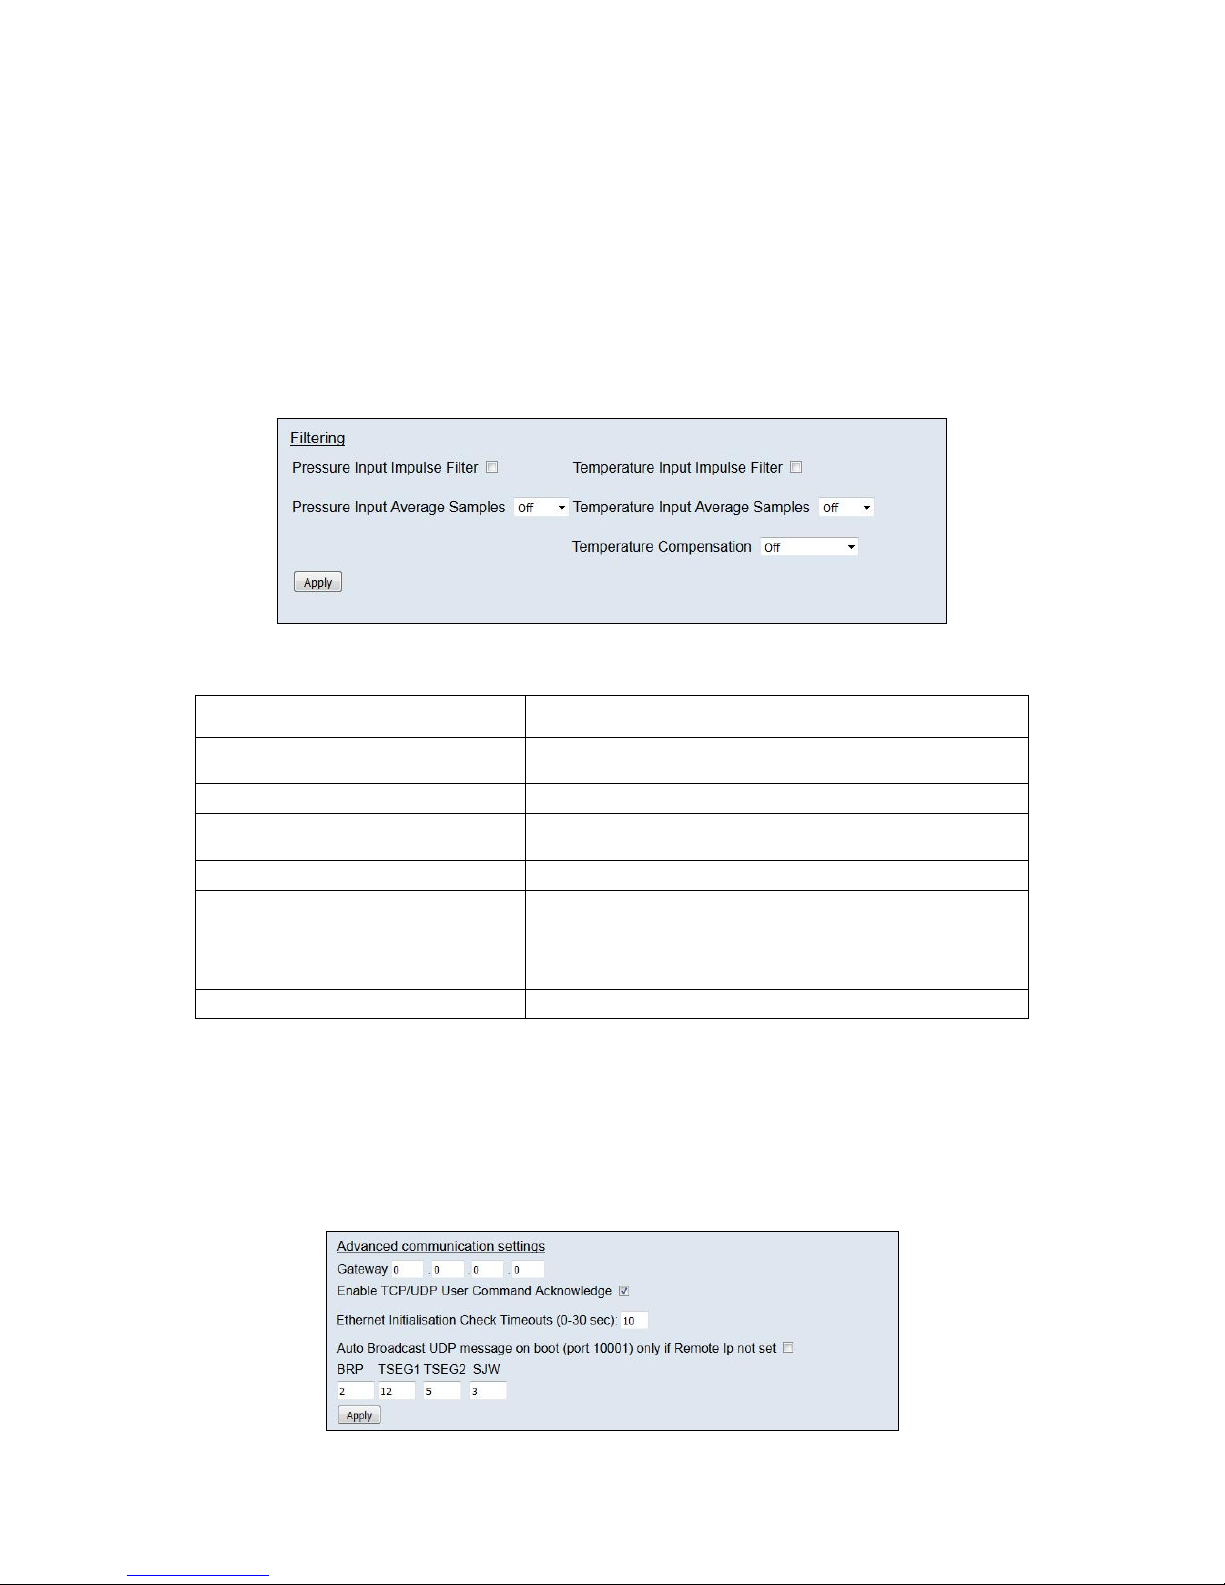
5.7.1 Filtering
The microDAQ has settings to allow the user flexible control over the data throughput of the device.
Averaging options allow the preference of noise reduction over time domain response, the
frequency of calibration temperature compensation renewal may be chosen as may be the size of
the average (and hence time taken) for the rezero routine. Table 5.2 details the function of the
signal parameter option controls.
Figure 5.9, Filtering group
Control Function
'Pressure Input Impulse Filter' Check box to apply impulse filter to pre calibration data - will remove
single impulse noise events in the pressure data.
'Temperature Input Impulse Filter' As above but with temperature data.
'Pressure input average samples' Selects the number of samples for a moving average of pre calibration
pressure data.
'Temperature input average samples' As above but with temperature data.
'Temperature Compensation' Selects the temperature compensation scheme for the calibration.
'Continuous' repeatedly rebuilds the calibration data on a channel by
channel basis without interrupting the flow of data. 'With zero only'
rebuilds the table when a user rezero is issued, after the rezero has
been actioned.
‘Apply’ Applies the settings to the local settings memory
Table 5.8, Filtering group settings
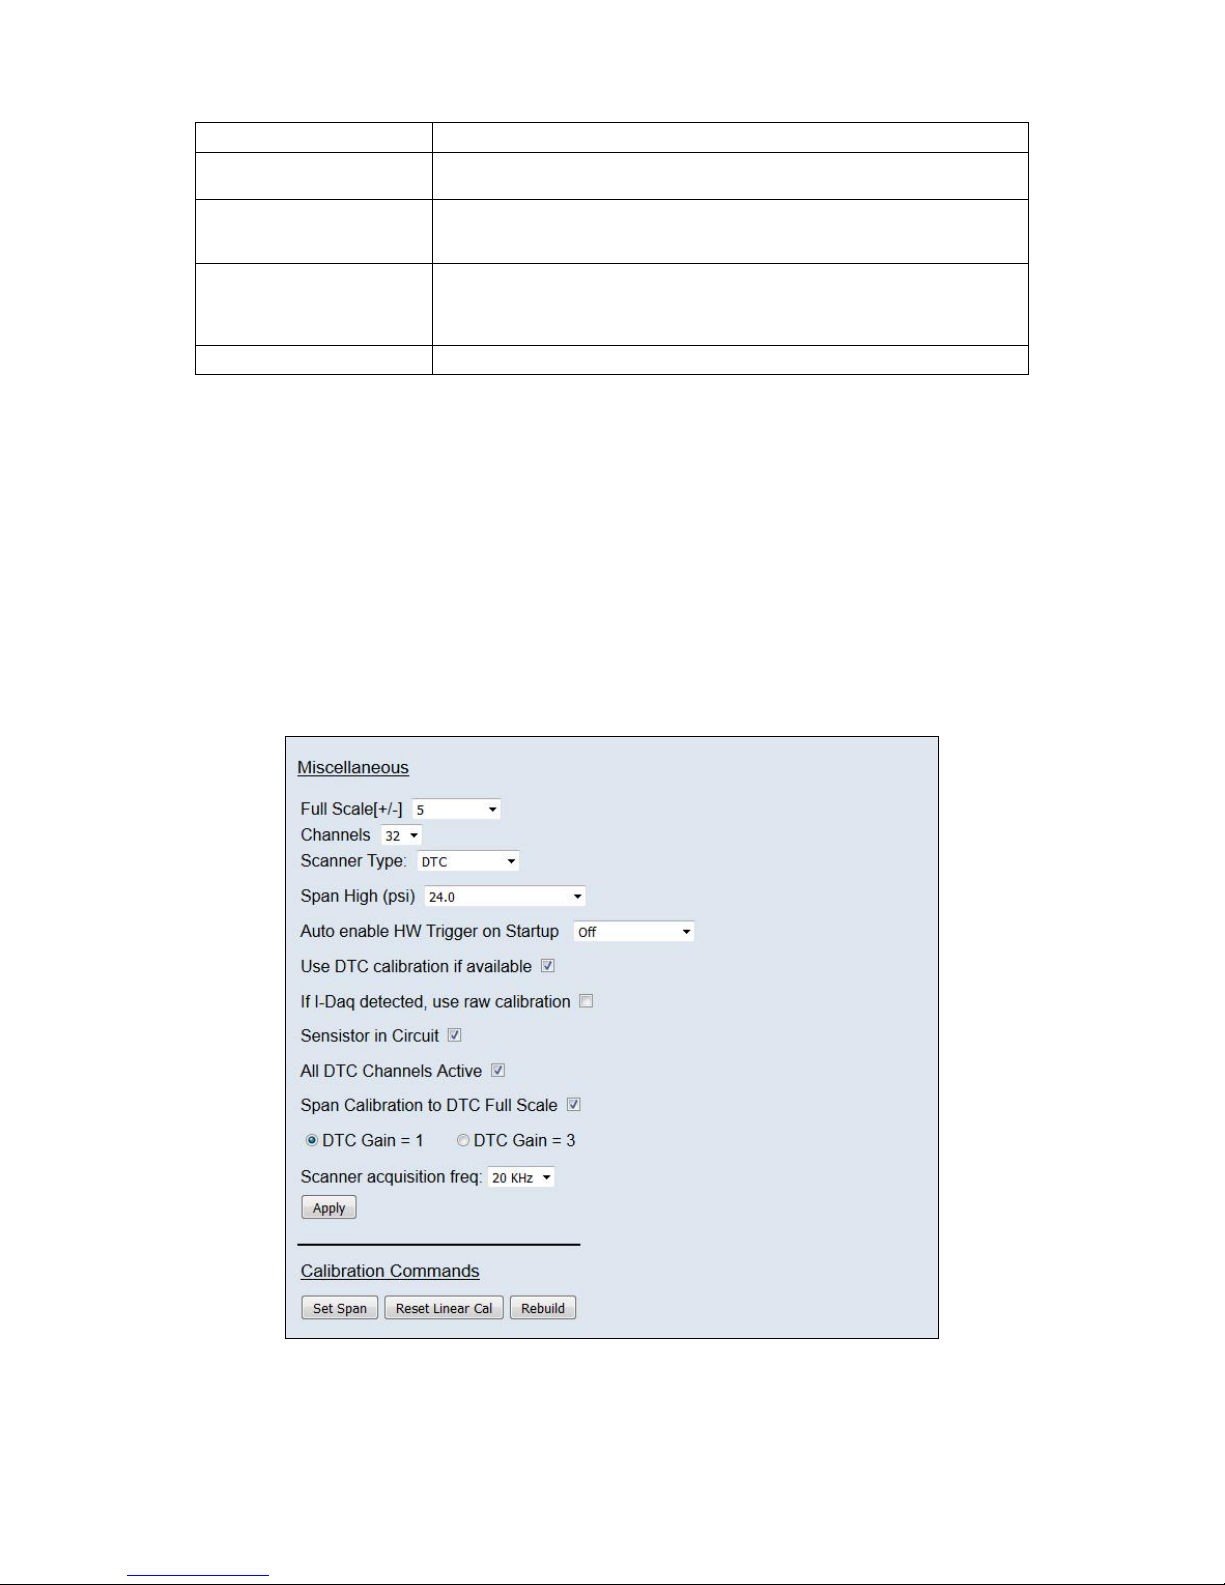
5.7.2 Advanced communication settings
The microDAQ has several more advanced communication options available, but these features
are unlikely to be used by an everyday user and as such should generally be left as default
settings.
Figure 5.10, Advanced communication settings
Page 18
Page 17
'Gateway’ Allows the user to change the Gateway address interface for the local connection.
‘Enable TCP/UDP User
Command Acknowledge’
If enabled, replies with a two byte acknowledge if a user command is sent to the
microDAQ over TCP or UDP.
Ethernet Initialisation Check
Timeouts(0-30 sec)
At bootup the Ethernet module performs two checks for auto negotiation and link
check status. This timeout can be controlled via this text box. If Ethernet comms are
not going to be used then this value can be set at 0 to speed up startup time.
Auto Broadcast UDP message
on boot (port 10001)
If checked, auto broadcasts a UDP message on port 10001 on startup which details
the microDAQs serial number, IP address, etc. in an ASCII, comma separated list.
(should not be used if remote UDP address/port has been configured and auto
streaming has been set – via TCP rate on Standard tab)
BRP, TSEG1, TSEG2, SJW Register values for the CAN module within microDAQs microcontroller.
Table 5.9, Advanced communication settings
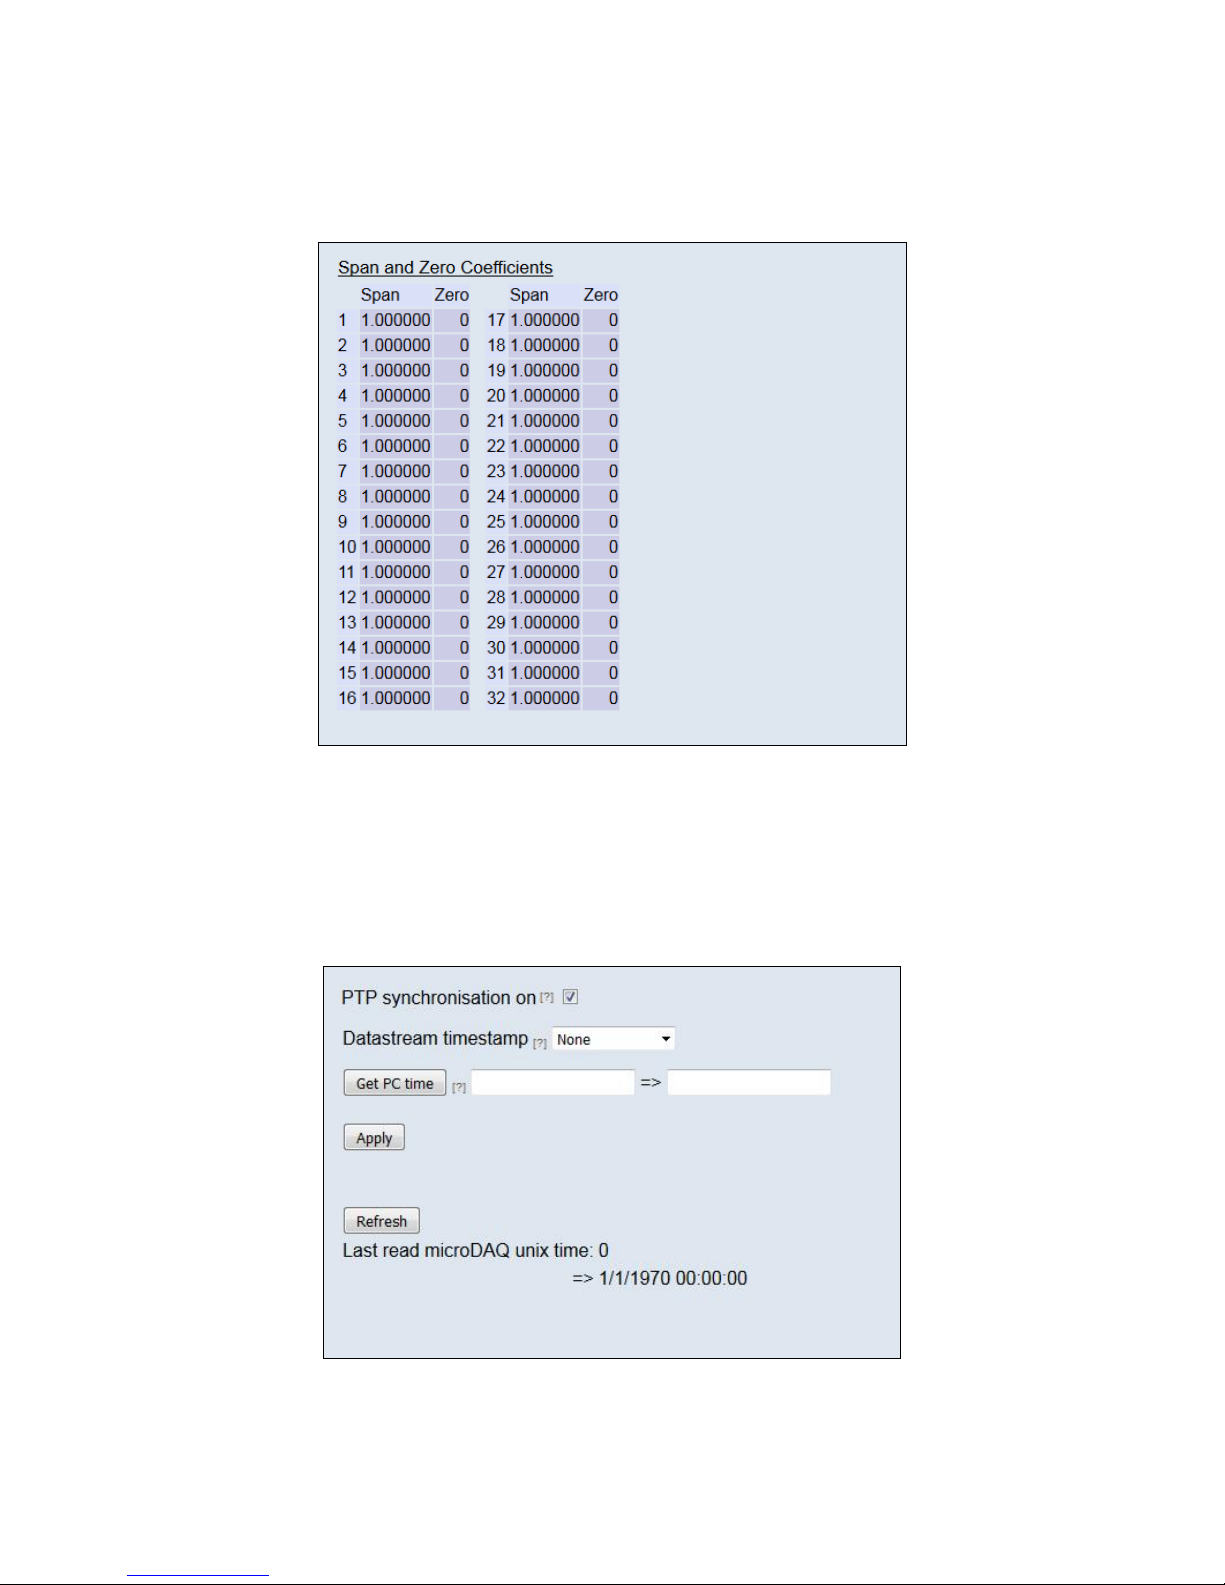
5.7.3 Miscellaneous
The remaining parameters are edited via the Miscellaneous group shown in Figure 5.7. The
scanner type should always be set to the type of scanner installed in the microDAQ to ensure
proper operation of the system. If the microDAQ is a DTC variant and DTC mode is to be used, the
'Use DTC' checkbox should be checked. If the microDAQ is an I-daq variant then the ‘use raw
calibration’ checkbox can be ticked to apply a linear calibration function on boot up. The DTC
scanner's options of sensistor and gain configuration may also be selected from this tab. 'All DTC
Channels Active', defaults the number of active channels to all on a DTC scanner, overriding the
number in the setup. The scanner acquisition frequency can be toggled between 20KHz & 50KHz.
The latter should be used in most cases to allow for faster data streaming, however 20KHz is
provided for older scanners that only have Gen1 headers.
Figure 5.11, Miscellaneous group.
Page 19

Page 18
'Channels' dropdown The number of channels on the attached scanner should be chosen from the
'Channels' drop down. It is important that this number is correct when performing any
calibration or reading data from microDAQ.
'Full Scale' dropdown This dropdown is the only means of selection of the scanner's full scale operating
pressure. The value affects the display of live engineering values and the generation
of calibration coefficients.
Scanner Type Sets the type of scanner installed into the microDAQ (Conv, DTC, I-Daq, T-DAQ)
'Span High' Sets the value of pressure for the 'high' point in the linear span and zero calibration.
Valid values range from 0.144PSI (3”WC) to 90PSI. Typically this value should be set
to 90% of the scanners full scale value, if possible.
‘Auto enable HW trigger on
startup’ dropdown
If set to anything other than Off, the microDAQ will immediately switch to hardware
trigger mode, waiting for the first trigger pulse, after initialisation. The dropdown
indicates the comms protocol used to send acquired data during triggering.
'Use DTC calibration if
available'
On powerup, uses the DTC scanners internal calibration coefficients to build the
microDAQ’s internal calibration data table.
If I-daq detected, use raw
calibration
If checked, this replaces the normal polynomial calibration function with a ‘raw’ linear
function whenever an I-daq is present in the microDAQ.
'Sensistor in circuit' If checked, keeps the sensistor in circuit for a DTC scanner. In normal operation this
control should be left unchecked.
'All DTC Channels Active' If checked, defaults microDAQ to setting the number of active channels to the number
read from the DTC scanner header
'Span Calibration to DTC Full
Scale'
If checked, defaults the span of the calibrated output to the full scale read from the
DTC scanner header.
'DTC gain = 1/3' Selects the deranging function of the DTC scanner if the '3' option is selected,
otherwise defaults to the standard range of the scanner.
‘Scanner acquisition freq’ Selects the acquisition frequency of the scanner, either 20KHz or 50 KHz
‘Apply’ Applies the settings to the local settings memory
Calibration commands
Set span Set the span of the linear calibration – confirms the value of pressure that has been
set up as the span value is being applied to the sensor.
Reset Linear cal Resets the linear calibration to (+ 0) x1 ie no offset, unity gain. Applies ONLY to the
current linear calibration, ie the DTC calibration if using a DTC scanner.
Rebuld Force a calibration table rebuild.
Table 5.10, Miscellaneous group settings
Page 20
Page 19
5.7.4 Span and Zero Coefficients
This section displays the Span and Zero coefficients currently stored within the microDAQ as a
result of a linear calibration.
Figure 5.12, Span and zero coefficients
5.9 ‘Timestamp’ page
This page allows the user to edit the timestamp settings of the microDAQ. This timestamp will alow
the user to get millisecond level accuracy timestamps on the data packets. If the timestamp is
enabled it will have an affect on the maximum transmission rate.
Figure 5.13, Timestamp
Page 21

Page 20
‘PTP synchronisation on’
checkbox
This allows the user to select whether any timestamps that may be
added to the datastream are PTP synchronised or not. Please note this
will only work if there is a PTP grandmaster on the same network as
the microDAQ
‘Datastream timestamp’
dropbox
The user can use this to select where the timestamp is positioned in
the datastream, either none which will turn the timestamp off, start of
cycle which will place a timestamp at the beginning of all the channels
and every channel which will read the timestamp for every channel. It
should be noted that the latter 2 options will reduce the maximum
transmission speed datastream.
‘get PC time’ This button allows the user to get the timestamp from the PC time of
the PC they are using. This can be used as a base time for the
timestamps if the user is not using PTP. In the first box it will show the
timestamp and in the second box it displays the timestamp converted
date/time to make it easier to understand.
‘Apply’ This button will apply the settings chosen on this page.
‘Refresh’ This allows the user to refresh the displayed value of the last read
timestamp from the microDAQ.
‘last read microDAQ unix time’ The top line shows the current time in the microDAQ in
Table 5.11, Timestamp
Page 22

Page 21
6. Service and Calibration
6.1 Service
There are no user serviceable parts inside the instruments. Should any difficulties be encountered
in the use of the microDAQ, it is recommended that you contact Chell Instruments Ltd for advice
and instructions.
6.2 Calibration
Calibration is recommended on an annual basis and Chell Instruments Ltd. Provides a fully
traceable facility for this purpose.
6.3 Adjustment
There are no user adjustments in the instrument. The user is strictly forbidden from removing the
covers without invalidating Chell’s obligations under both Warranty and COSSH.
6.4 Cleaning
A dirty instrument may be wiped clean with a soft cloth that has been sprayed with a proprietary
‘foaming cleaner’, then wiped dry immediately.
Under no circumstances should the instrument be wetted
directly or left damp.
Page 23
Page 22
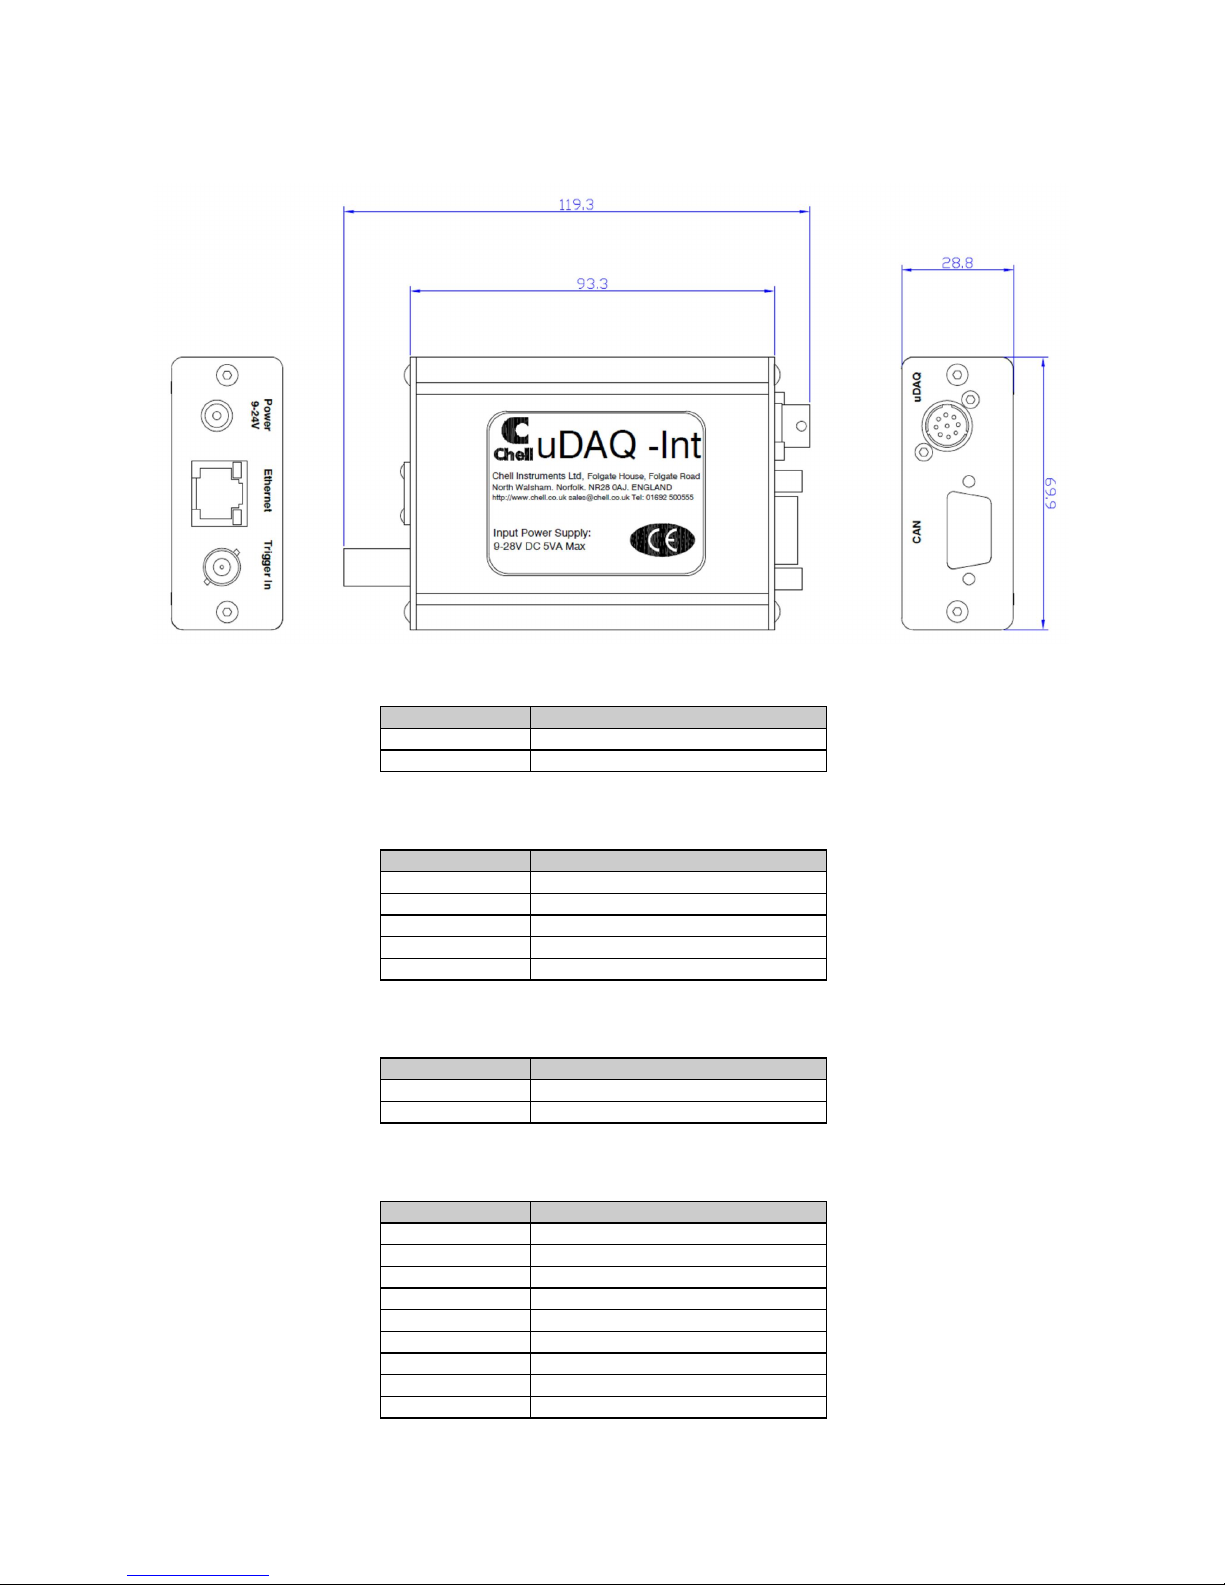
7. MicroDAQ-INT Connector interface adaptor
7.1 Case Assembly
7.2 Power Connector - Mating connector 2.1mm DC power jack
Pin Number Designation
Center +8 to 25Vdc
Outer Gnd
7.3 Can Connector – Mating connector 9 way dtype male
Pin Number Designation
2 CAN_L
5 Gnd
7 CAN_H
4 N/C
5 0V
7.4 Trigger Connector - Mating connector 50 Ohm BNC
Pin Number Designation
Center TTL level input
Outer Gnd
7.5 uDAQ – Mating connector: DEUTSCH ASDD606-09SN-HE
Pin Number Designation
1 TX+
2 RX+
3 TRIGGER IN (TTL)
4 +8~25V SUPPLY
5 0V
6 CAN_H
7 CAN_L
8 TX9 RX-
 Loading...