

Page 1
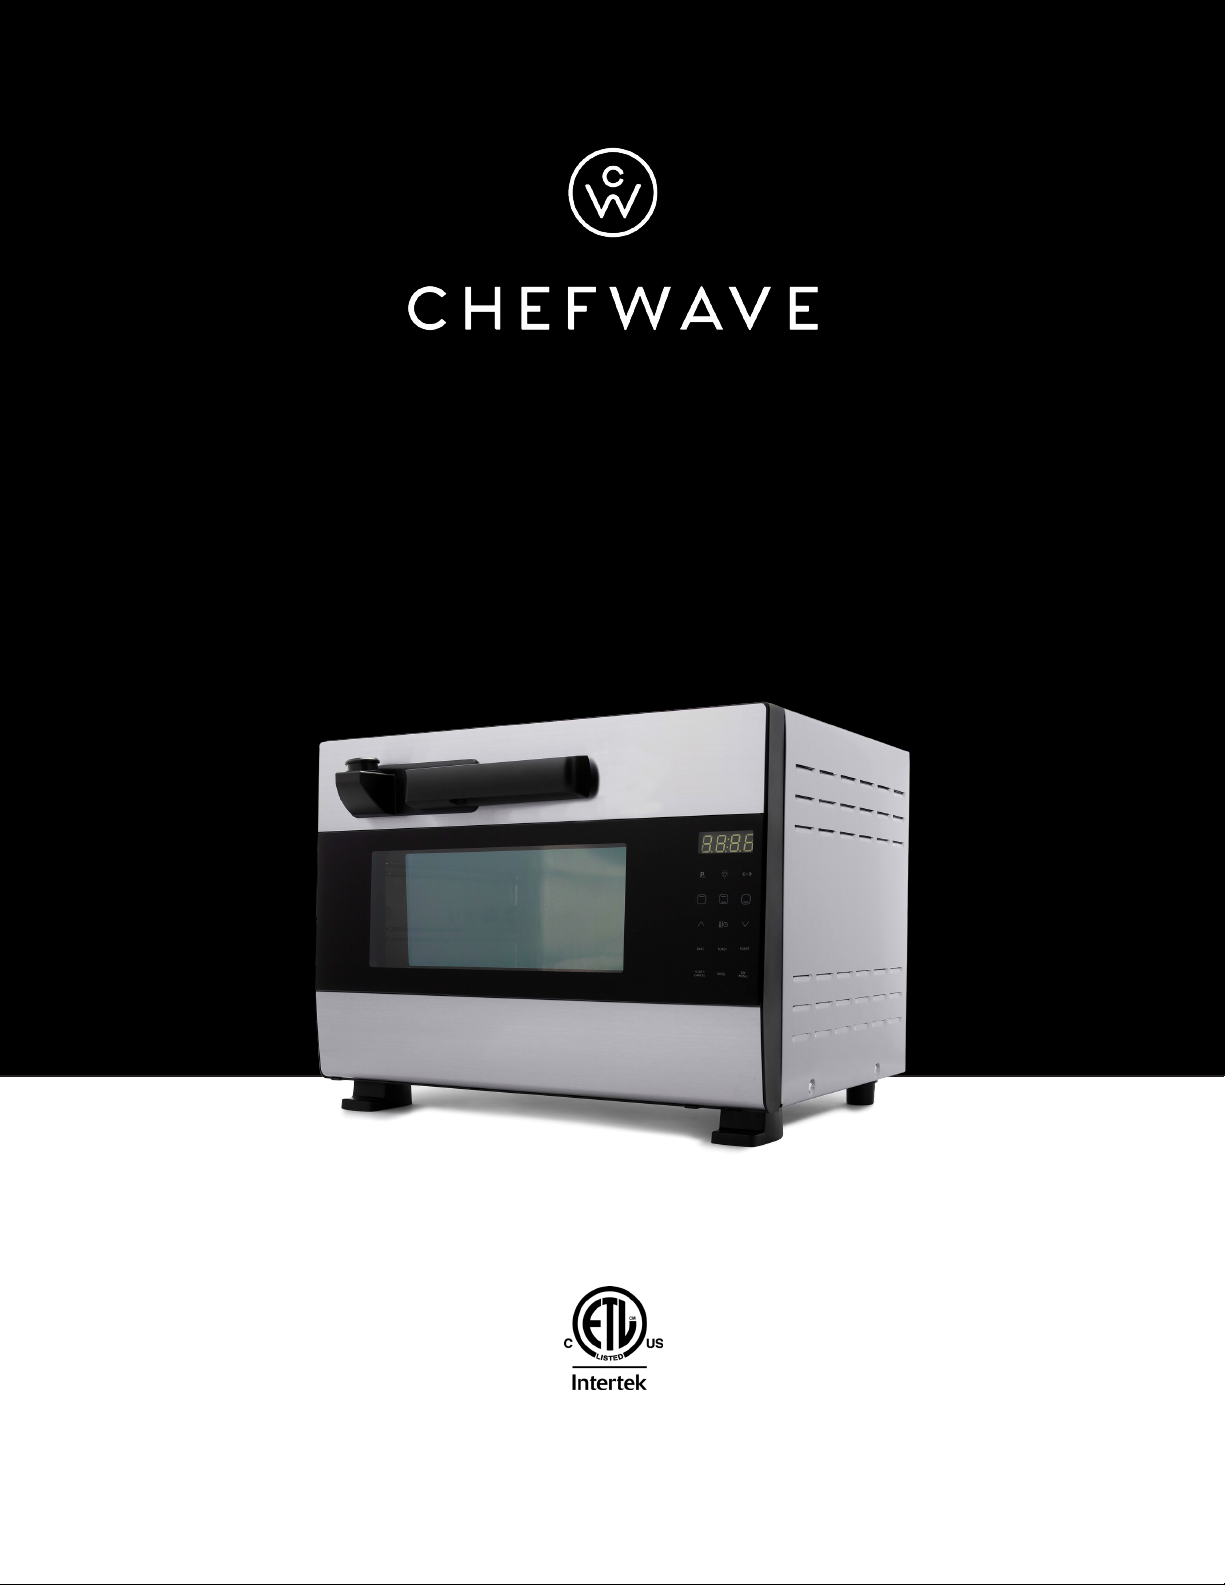
1600W DIGITAL COUNTERTOP
ROTISSERIE PRESSURE OVEN
With Micro-Pressure And Intelligent Control System
MODEL CW-PO01
120V, 50-60Hz, 1600W
FOR HOUSEHOLD USE, ONLY WORLWIDE PATENT PROTECTED.
Page 2

WELCOME!
Dear ChefWave ™ customer,
Congratulations on your purchase of the ChefWave ™ Digital Countertop
Rotisserie Pressure Oven. Thank you for your support. To ensure your safety
and many years of trouble-free operation, please read this manual carefully
before making any adjustments and keep it in a safe place for future reference.
Your pressure oven is built with precision and features a number of exciting
technologies that combine the best elements of a pressure cooker and
conventional oven all in one state-of-the-art appliance, allowing you to bake,
roast, broil, or toast your favorite foods quickly and conveniently.
We hope you enjoy your new ChefWave ™ pressure oven.
For technical assistance and warranty service, please email us at
Page 3

TABLE OF CONTENTS
Important Safeguards
Parts & Features
Control Panel
Cooking Accessories
Oven Door & Vent Release Valve
Oven Interior & Accessories
Using the Rotisserie
Anti-Block Nut
Oven Lamp
Cleaning the Pressure Oven
Quick Start Instructions
Function Capabilities & Default Settings
1
4
5
7
8
9
10
12
12
13
14
17
Cooking Chart
Troubleshooting
Important Notice
Recipe for Ribs
Recipe for Whole Chicken
Recipe for Pork Knuckle
Recipe for Pizza
Recipe for Chicken Wings
18
19
20
21
22
24
26
27
Page 4

IMPORTANT SAFEGUARDS
When using electrical appliances, basic safety precautions should be observed, including the
following:
• Read all instructions.
• To protect yourself from electric shock, do not immerse the cord or plugs in water or other
liquid.
• Close supervision is necessary when any appliance is used by or near children.
• Unplug the oven from the outlet when not in use and before cleaning. Allow the oven to
cool before putting on or taking off any parts.
• Do not operate any appliance with a damaged cord or plug. Do not operate any appliance if
the appliance malfunctions or if it has been damaged in any manner. Return the appliance
to the nearest authorized service facility for examination, repair, or adjustment.
• Do not use accessories that are not recommended by the oven manufacturer, as this may
cause injury.
• Do not use the oven outdoors.
• Do not allow the cord to hang over the edge of the counter or table. Do not allow the cord
to touch hot surfaces.
• Do not place the oven on or near a hot gas or electric burner, and do not place it inside a
heated oven.
• Use extreme caution when moving an appliance containing hot oil or other hot liquids.
• Always attach the cord to the oven first and then plug the cord into the wall outlet. To
disconnect, turn any controls to the “off” position and then remove the plug from the wall
outlet.
• Do not use the oven for anything other than its intended use.
• The exterior of the oven will become very hot during use. Do not touch hot surfaces
directly. Instead, use handles or knobs.
1
Page 5

• When operating the oven, keep at least four inches of space on all sides of the oven to
allow for adequate air circulation.
• Do not clean the oven with metal scouring pads. Pieces can break off the pad and touch
electrical parts, creating a risk of electric shock.
• A fire may occur if the oven is covered or if it is touching or in close proximity to flammable
materials such as curtains, draperies, walls, and the like while it is in operation. Do not store
any item on top of the oven when it is in operation or before it cools down.
• Use extreme caution when using containers other than those made of metal or glass.
• Do not cover the crumb tray or any part of the oven with metal foil. This will cause
overheating. Foil can be used to cover approved cooking containers.
• Do not place cardboard, plastic, paper, or anything similar inside the oven.
• Use extreme caution when removing trays or disposing of hot grease or other hot liquids.
• Do not store any materials other than the manufacturer’s recommended accessories
inside the oven when not in use.
• The oven should always remain unplugged from the wall outlet when not in use.
• Always wear protective, insulated oven mitts when inserting or removing items from the
hot oven.
• This oven has a tempered, heat-resistant safety glass door. The glass is stronger than
ordinary glass and is more resistant to breakage. Tempered glass can break, but the pieces
will not have sharp edges.
• Do not place your eyes or face in close proximity to the tempered safety glass door in the
event that the safety glass breaks.
• Avoid scratching the door surface or nicking its edges. If the door has a scratch or nick,
contact our toll-free customer service line before using the oven.
2
Page 6

• Always inspect the vent release valve to make sure that it is clear of any food particles or
other obstructions.
• Before opening the oven door, wait for the pressure to dissipate.
• Do not insert oversized food or metal utensils in the oven, as this may create a fire or a risk
of electric shock.
• To ensure continued protection from the risk of electric shock, connect the oven only to
properly grounded outlets.
SAVE THESE INSTRUCTIONS
3
Page 7
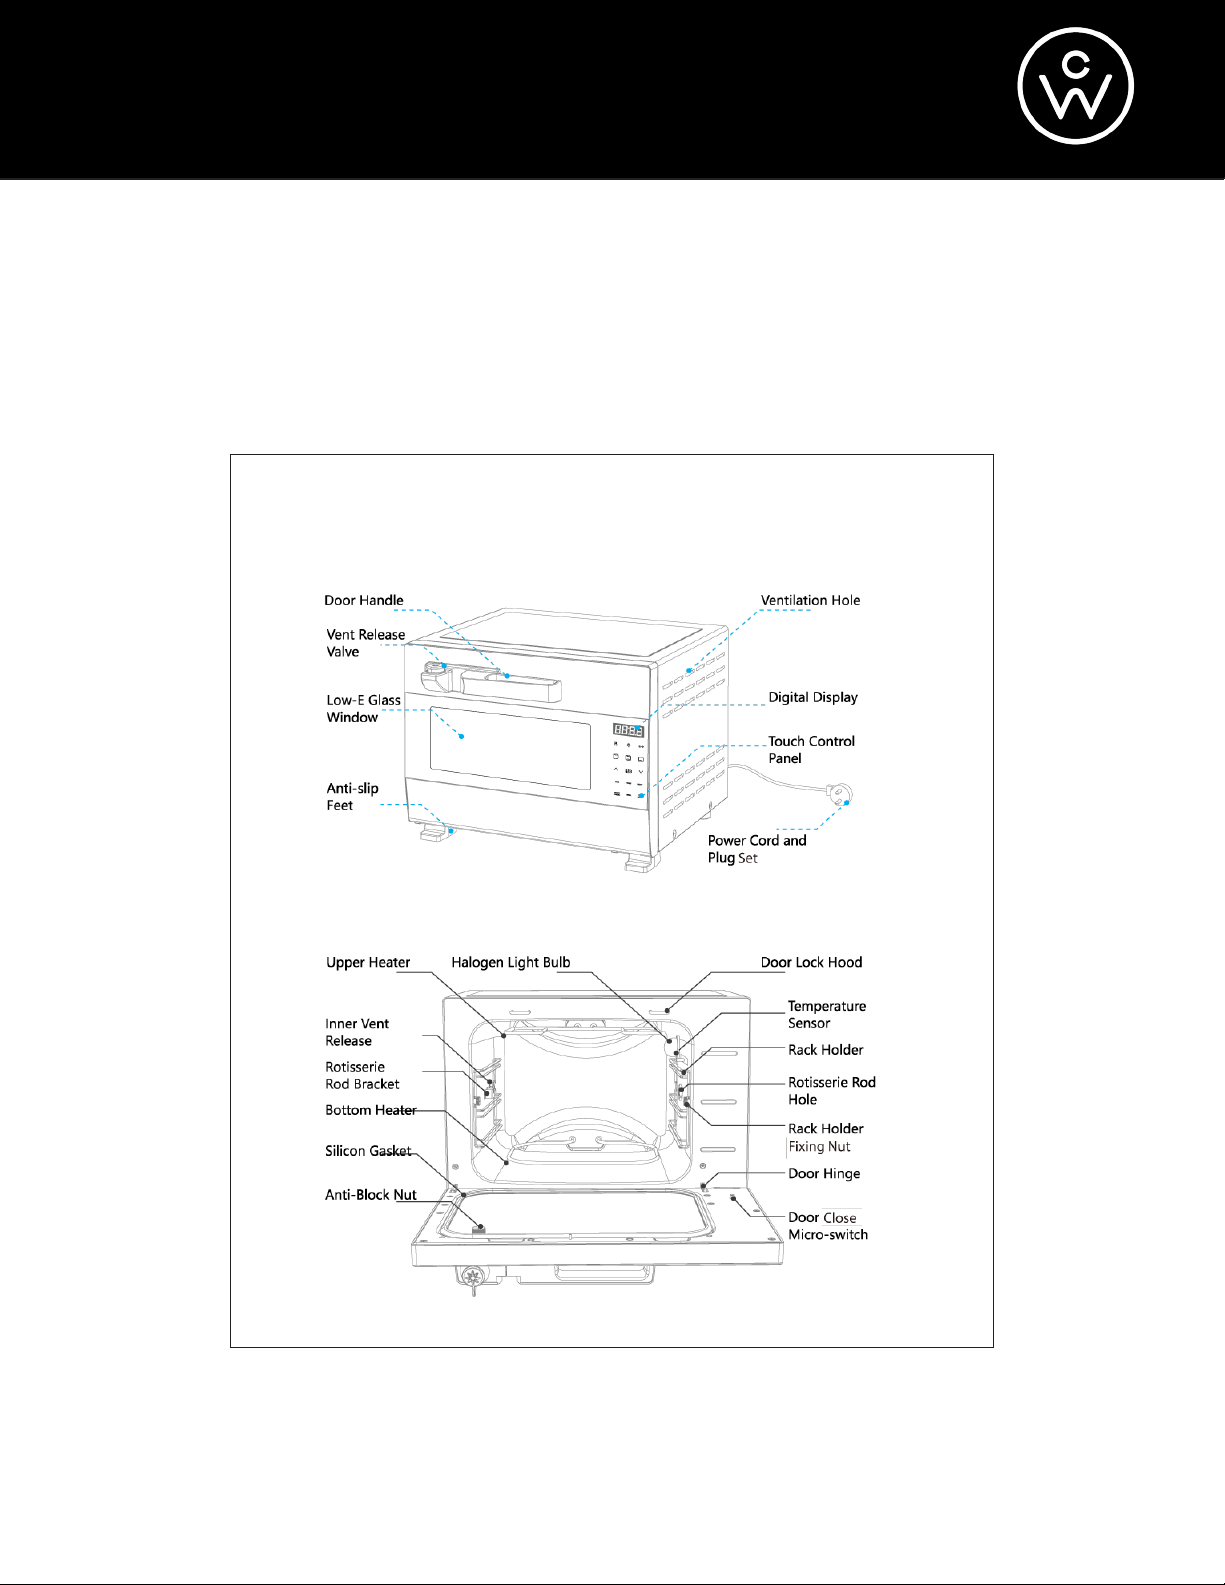
PARTS AND FEATURES
Know your oven
4
Page 8
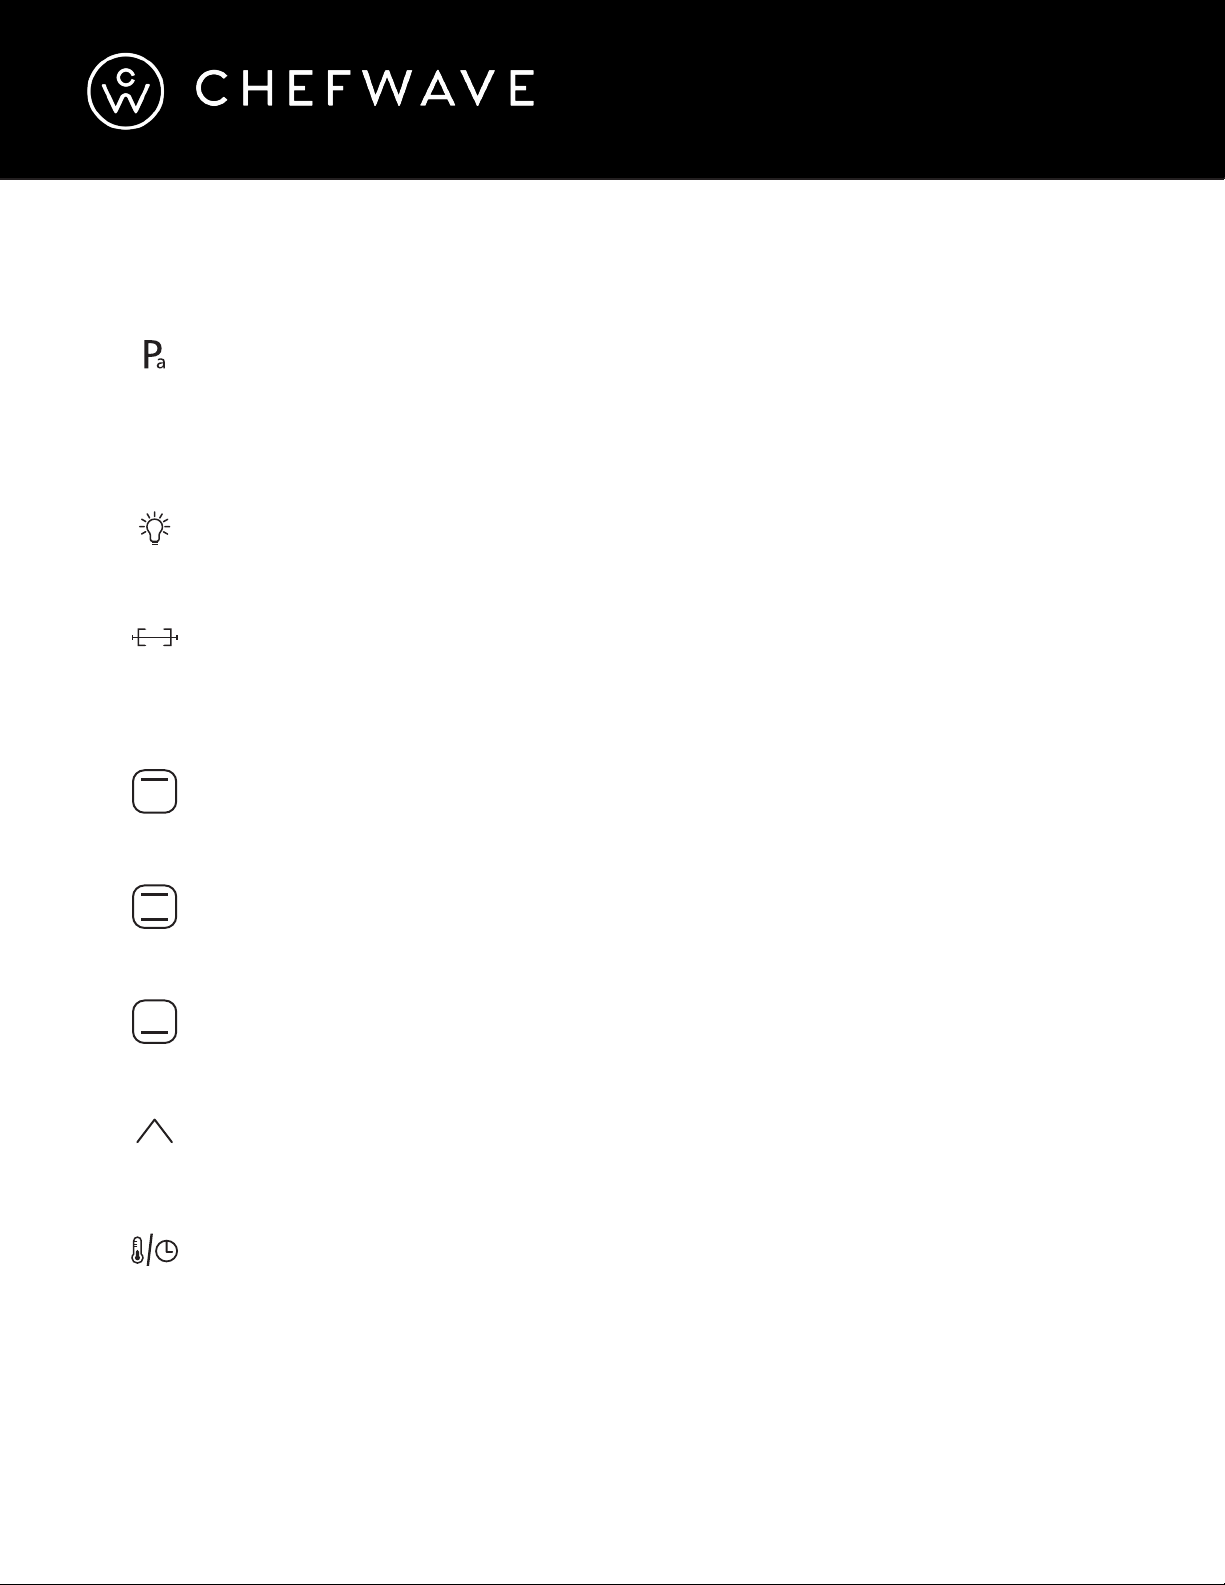
CONTROL PANEL
Pressure mode.
Use this button to pressurize your food. This function works in combination with the
rotisserie, roast, and broil settings, as well as alone with the three heating positions
(upper, lower, or both). It does not work with the bake or toast settings.
Oven lamp.
Use this button to turn the interior light on and off.
Rotisserie setting.
Use this button to activate the rotisserie. This function works in combination with the
roast setting.
Upper heater.
Use this button to activate the upper heating element.
Upper and lower heater.
Use this button to activate both the upper and lower heating elements.
Lower heater.
Use this button to activate the lower heating element.
Increase.
Use this button to increase the time or temperature.
Time/temperature mode.
Use this button to toggle between the time and temperature modes.
5
Page 9

CONTROL PANEL (continued)
Decrease.
Use this button to decrease the time or temperature.
Bake setting.
Use this function for cakes and more.
Toast setting.
Use this function for breads and more.
Roast setting.
Use this function for meat, vegetables, and more.
Start/Cancel.
Use this button to start cooking or to cancel a function.
Broil setting.
Use this function to brown the top of your food.
Do-It-Yourself.
Use this function to create customized settings.
6
Page 10
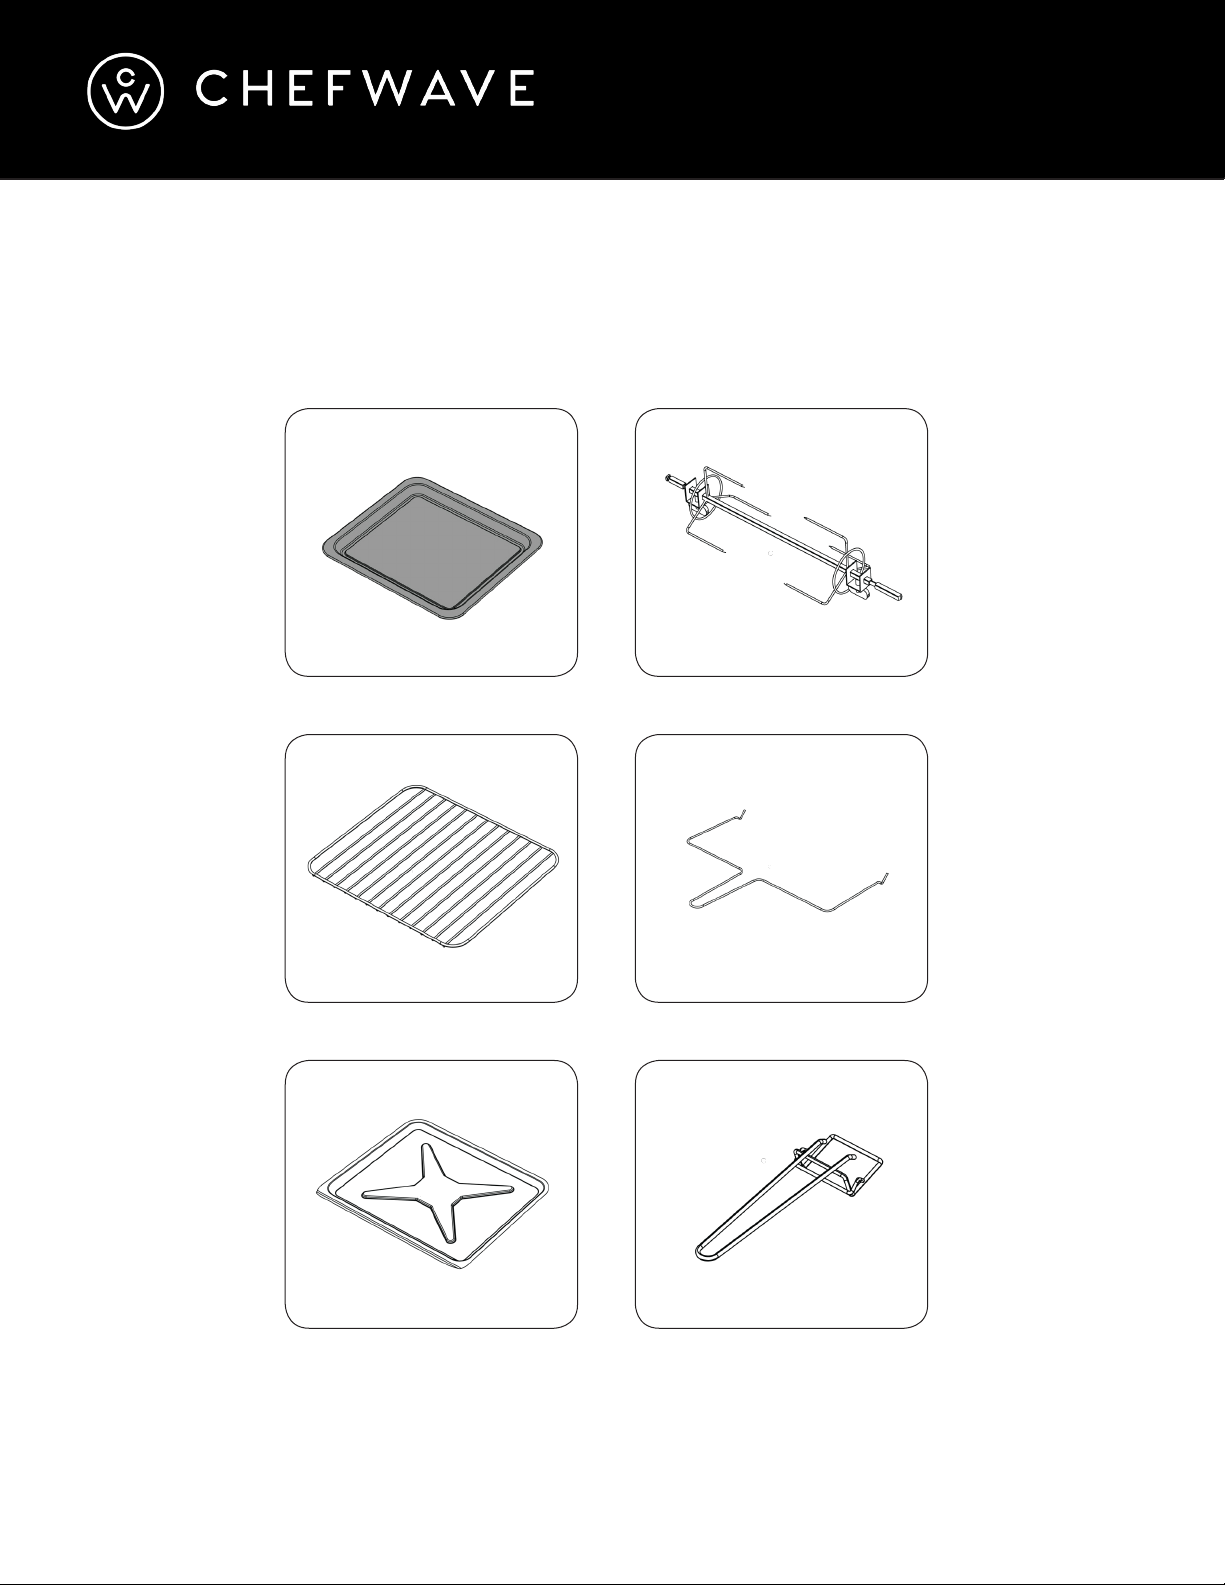
COOKING ACCESSORIES
Pan Rotisserie Tool
Wire Rack Rotisserie Removal Tool
Crumb Tray Pan/Rack/Tray Removal Tool
7
Page 11
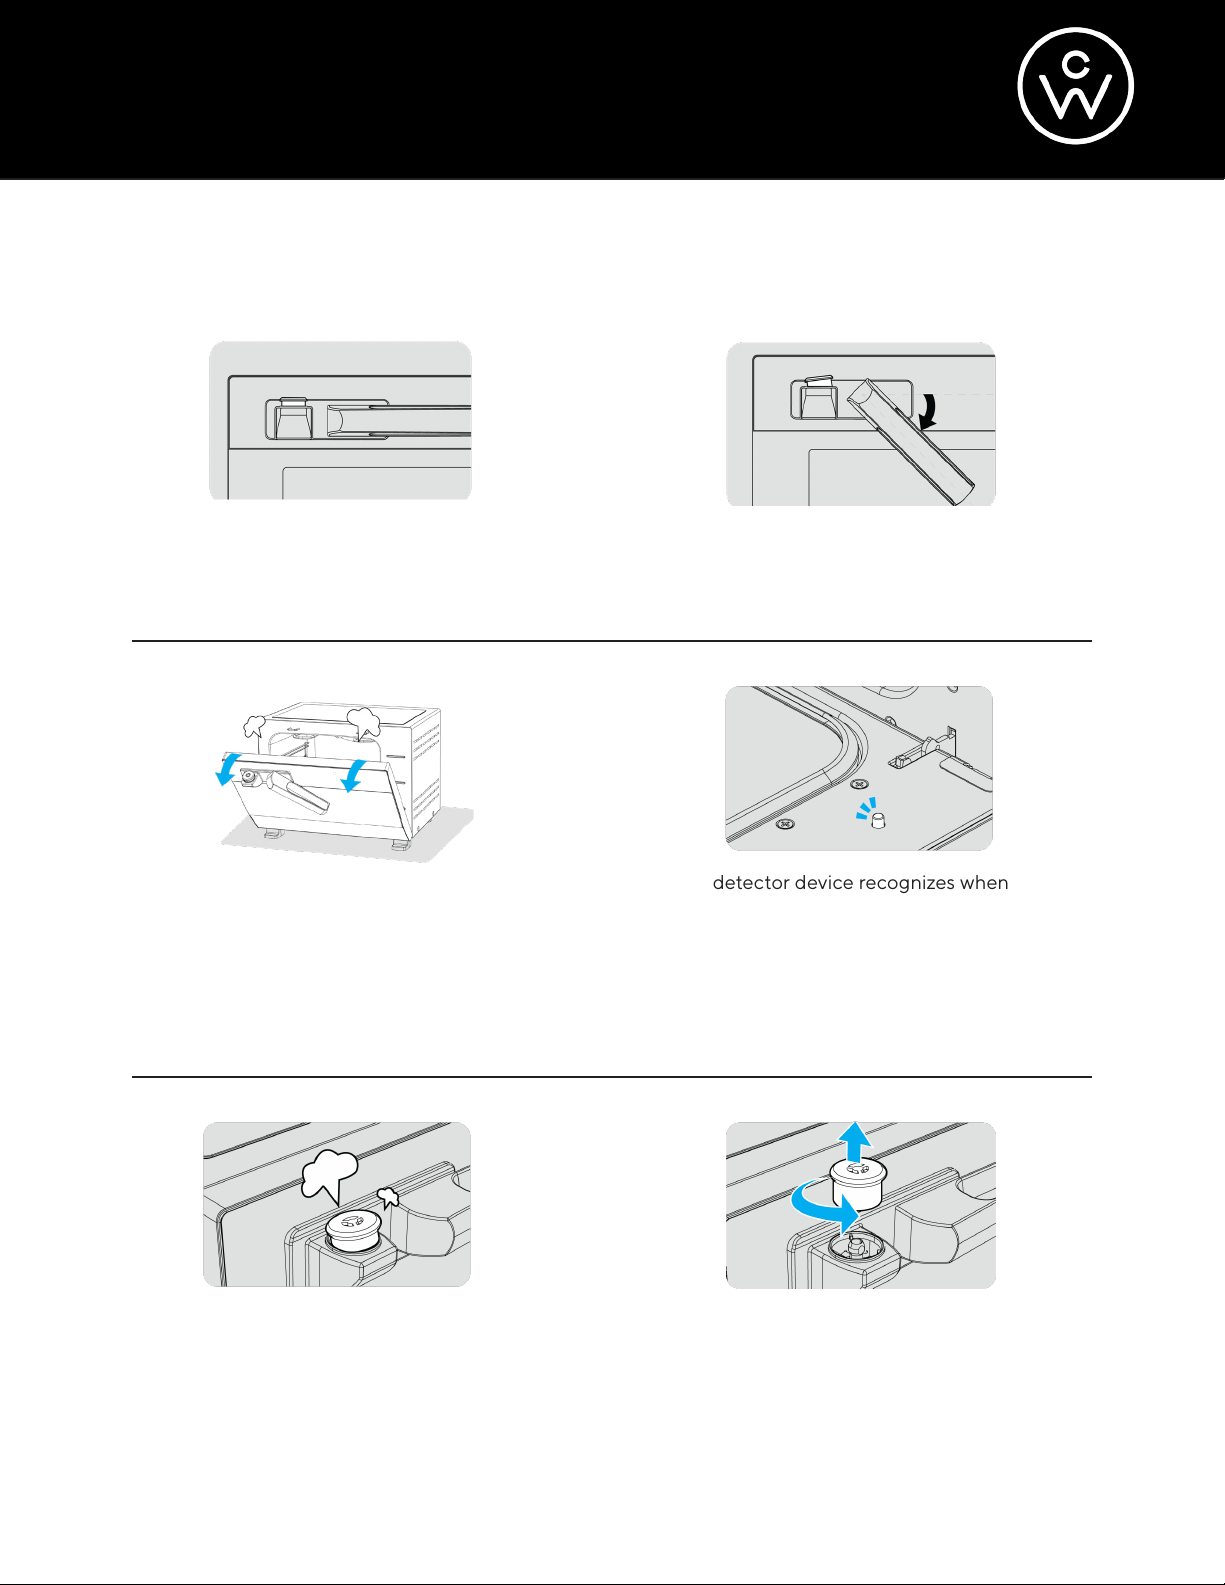
OVEN DOOR & VENT RELEASE VALVE
When the door handle is in a horizontal position,
the oven door is locked and the vent release
valve is closed.
CAUTION: Before opening the oven door,
be sure to wait until the steam is completely
released in order to avoid hot steam injury.
Do not open the oven door frequently during
operation.
To unlock and open the door, rotate the door handle
downward. The vent release valve will discharge the
internal steam.
The door detector device recognizes when the oven
door is opened or closed. If the oven door is opened
during operation, the oven will automatically stop all
cooking functions and enter standby mode. When
the door is closed, the oven will recover automatically
and return to the previous cooking functions after
five seconds.
While cooking, the vent release valve will
intermittently discharge steam to stabilize the
pressure inside the oven. Never cover or block
the vent release valve.
To remove the vent release valve, pinch the cap and
gently raise it upward. Rotate counterclockwise until
it is fully removed. To attach the vent release valve,
align it and gently rotate in a clockwise motion until it
is fully attached.
8
Page 12
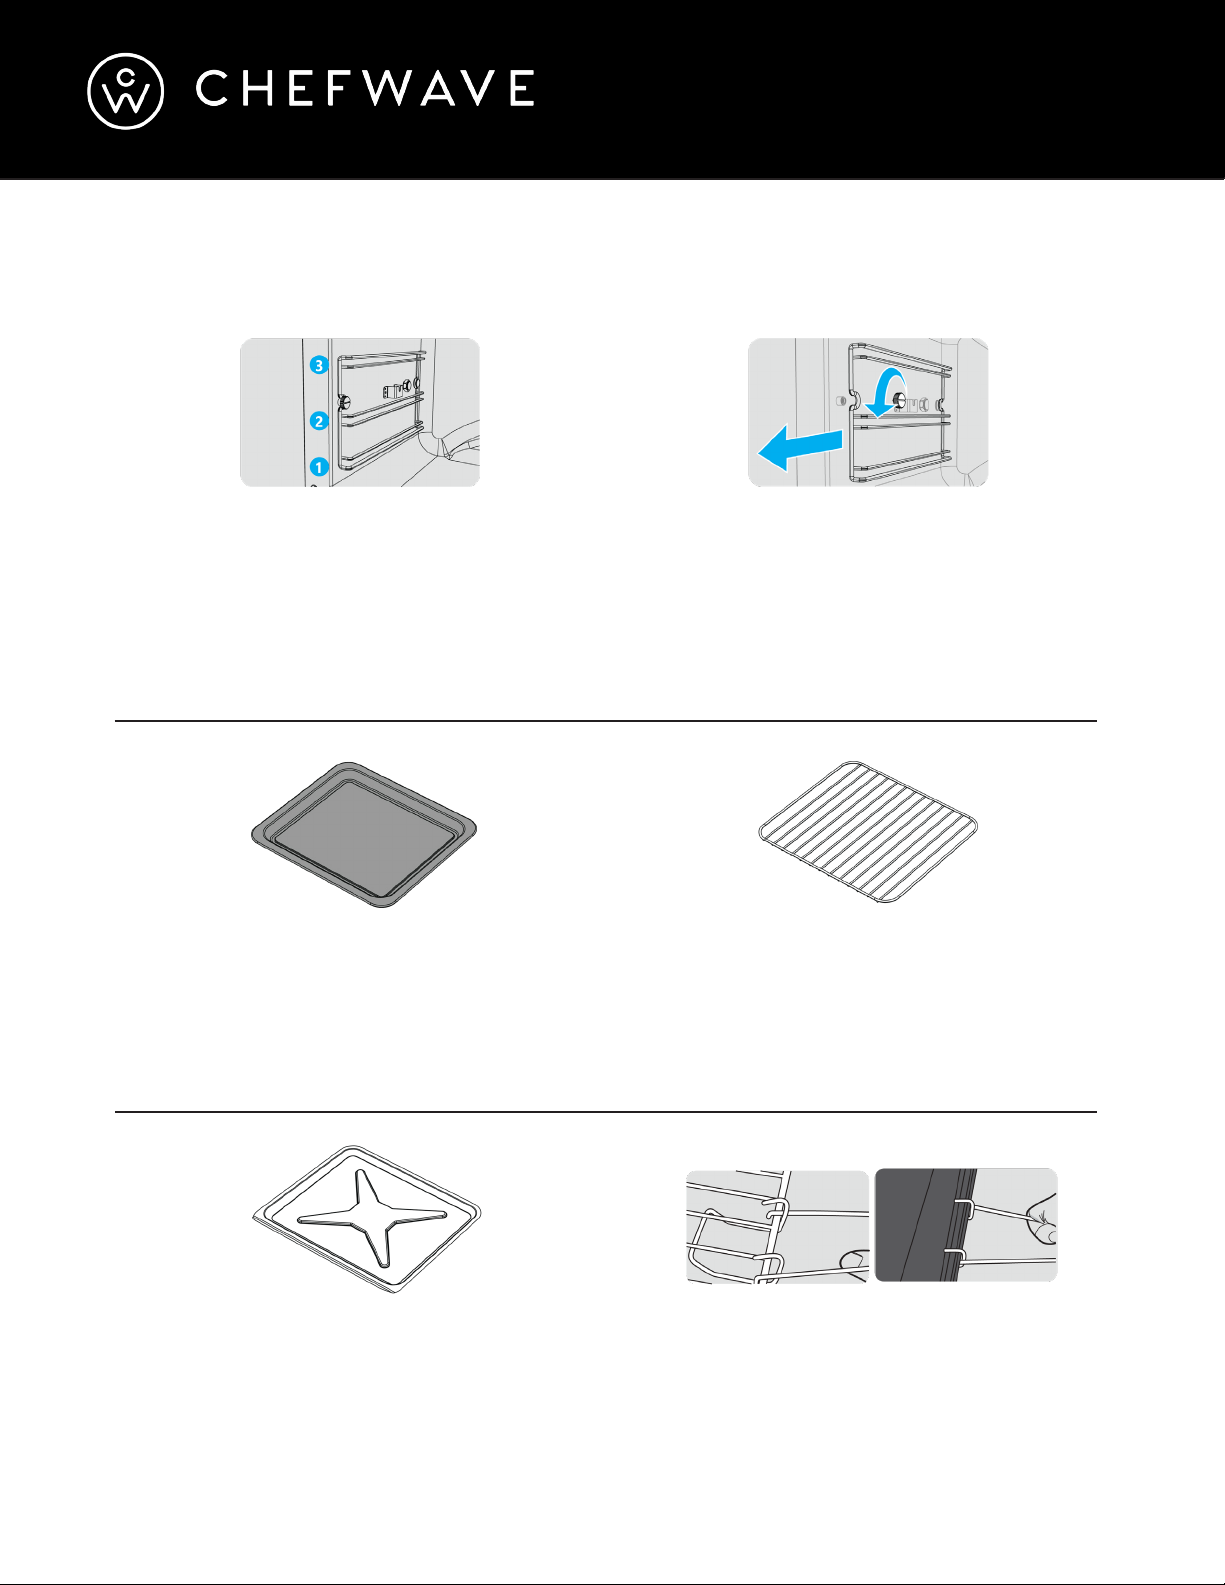
OVEN INTERIOR & ACCESSORIES
The pan or rack can be placed on one of three
different levels, depending upon your specific
needs. The upper level will produce extra heat
from above, browning the top of your food. The
lower level will produce extra heat from below,
crisping the bottom of your food. The center level
provides a standard amount of heat.
For easy clean up, cover the top of the pan with
foil before cooking. When cooking meat or fish,
wrap the food in foil and place it on the pan. Be
cautious of any oil or food overflow. The pan can
be immersed in water for soaking and cleaning.
Insert the pan or rack horizontally between the
guides on both sides of the oven. The guides
should be cleaned regularly. To remove them
for cleaning, loosen the fixing screw by turning
counterclockwise and then pull the guides
outward.
When cooking meat, there may be scraps or
fluids that drip from the wire rack. The crumb tray
can be positioned in the bottom of the oven to
collect it. The wire rack can be immersed in water
for soaking and cleaning.
For easy clean up, cover the top of the pan with
foil before cooking. When cooking meat or fish,
wrap the food in foil and place it on the pan. Be
cautious of any oil or food overflow. The pan can
be immersed in water for soaking and cleaning.
Always use the removal tool when removing the
hot pan, rack, or tray from the oven in order to
avoid burn injuries. Be cautious of any oil or food
overflow.
9
Page 13
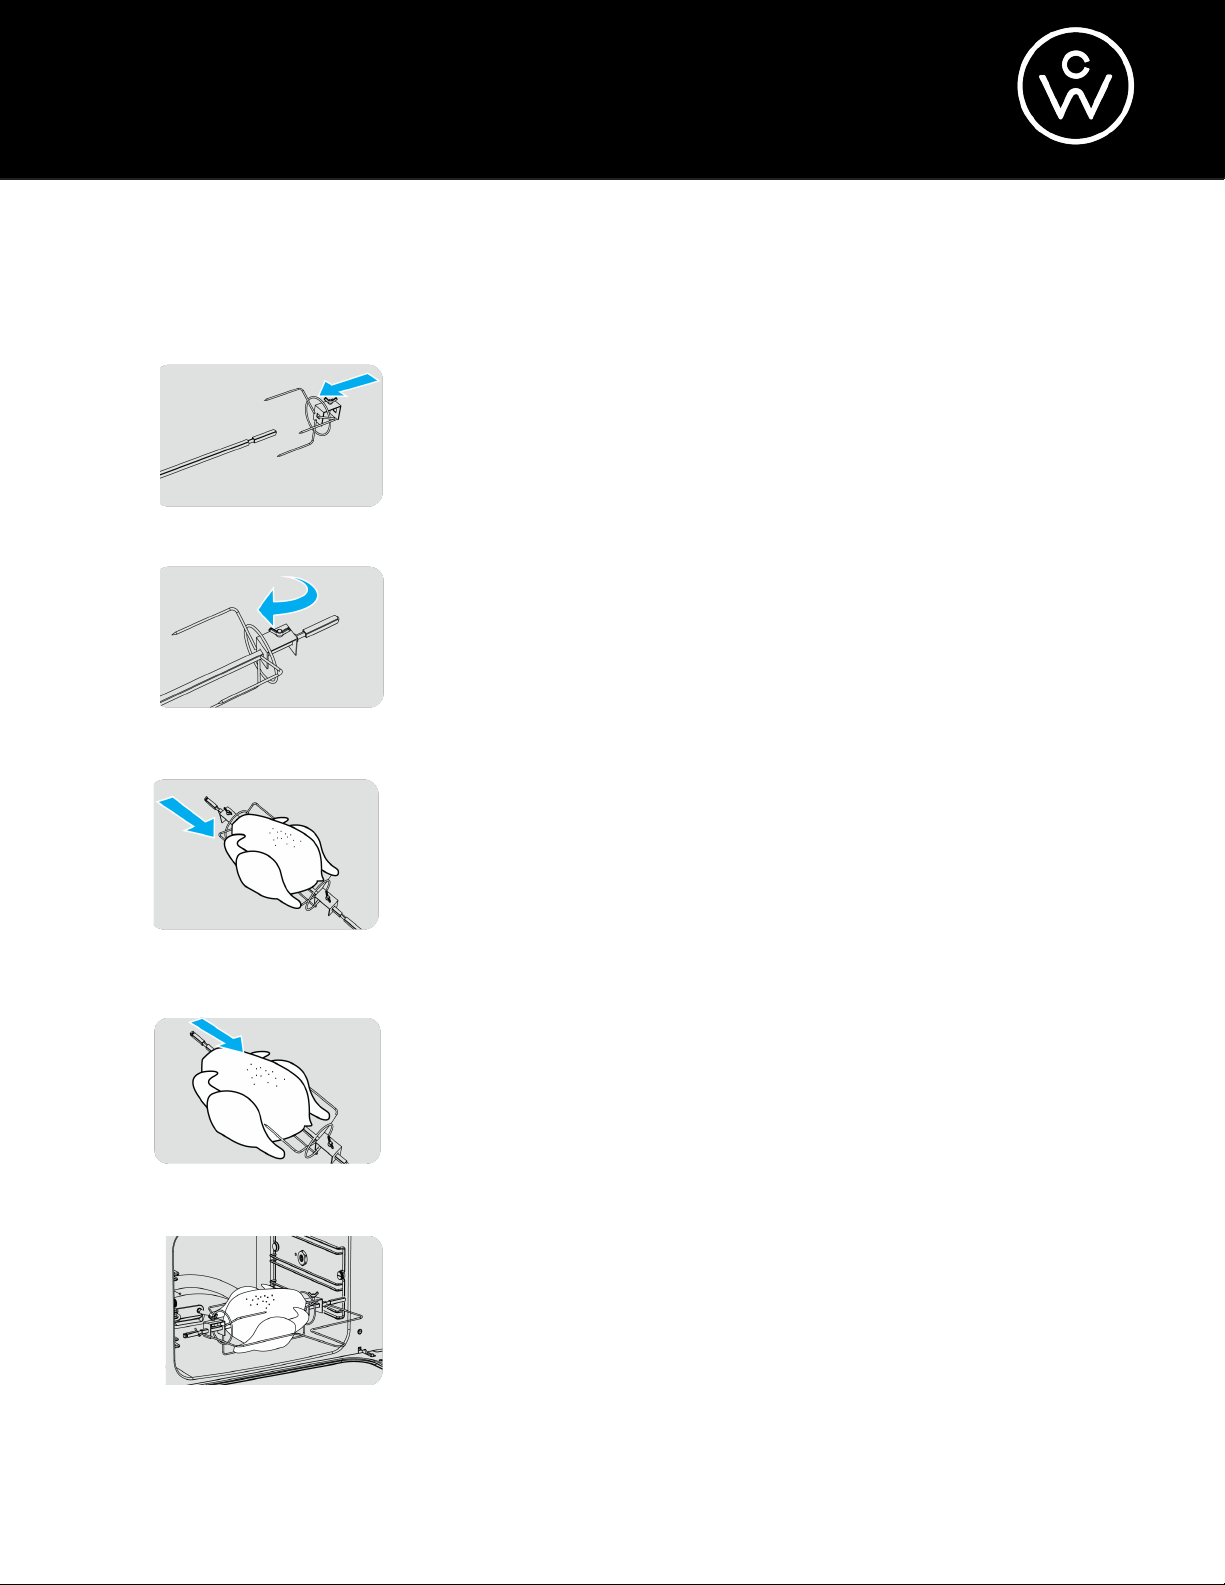
USING THE ROTISSERIE
STEP 1:
Place the rotisserie rod in the hole on the rotisserie fork.
STEP 2:
To attach the fork to the rod, tighten the screw on the fork by
turning clockwise.
STEP 3:
Slide the rod through the center of the meat and out the bottom
end. Firmly attach the fork to the meat or chicken leg. Tighten
the screw on the fork.
STEP 4:
Attach the other fork to the end of the rod. Firmly attach the
fork to the meat or chicken wing. Tighten the screw on the fork.
Be sure that the meat is centered and evenly balanced on the
rod.
STEP 5:
Using the rotisserie removal tool, carefully place the meat inside
the oven.
10
Page 14
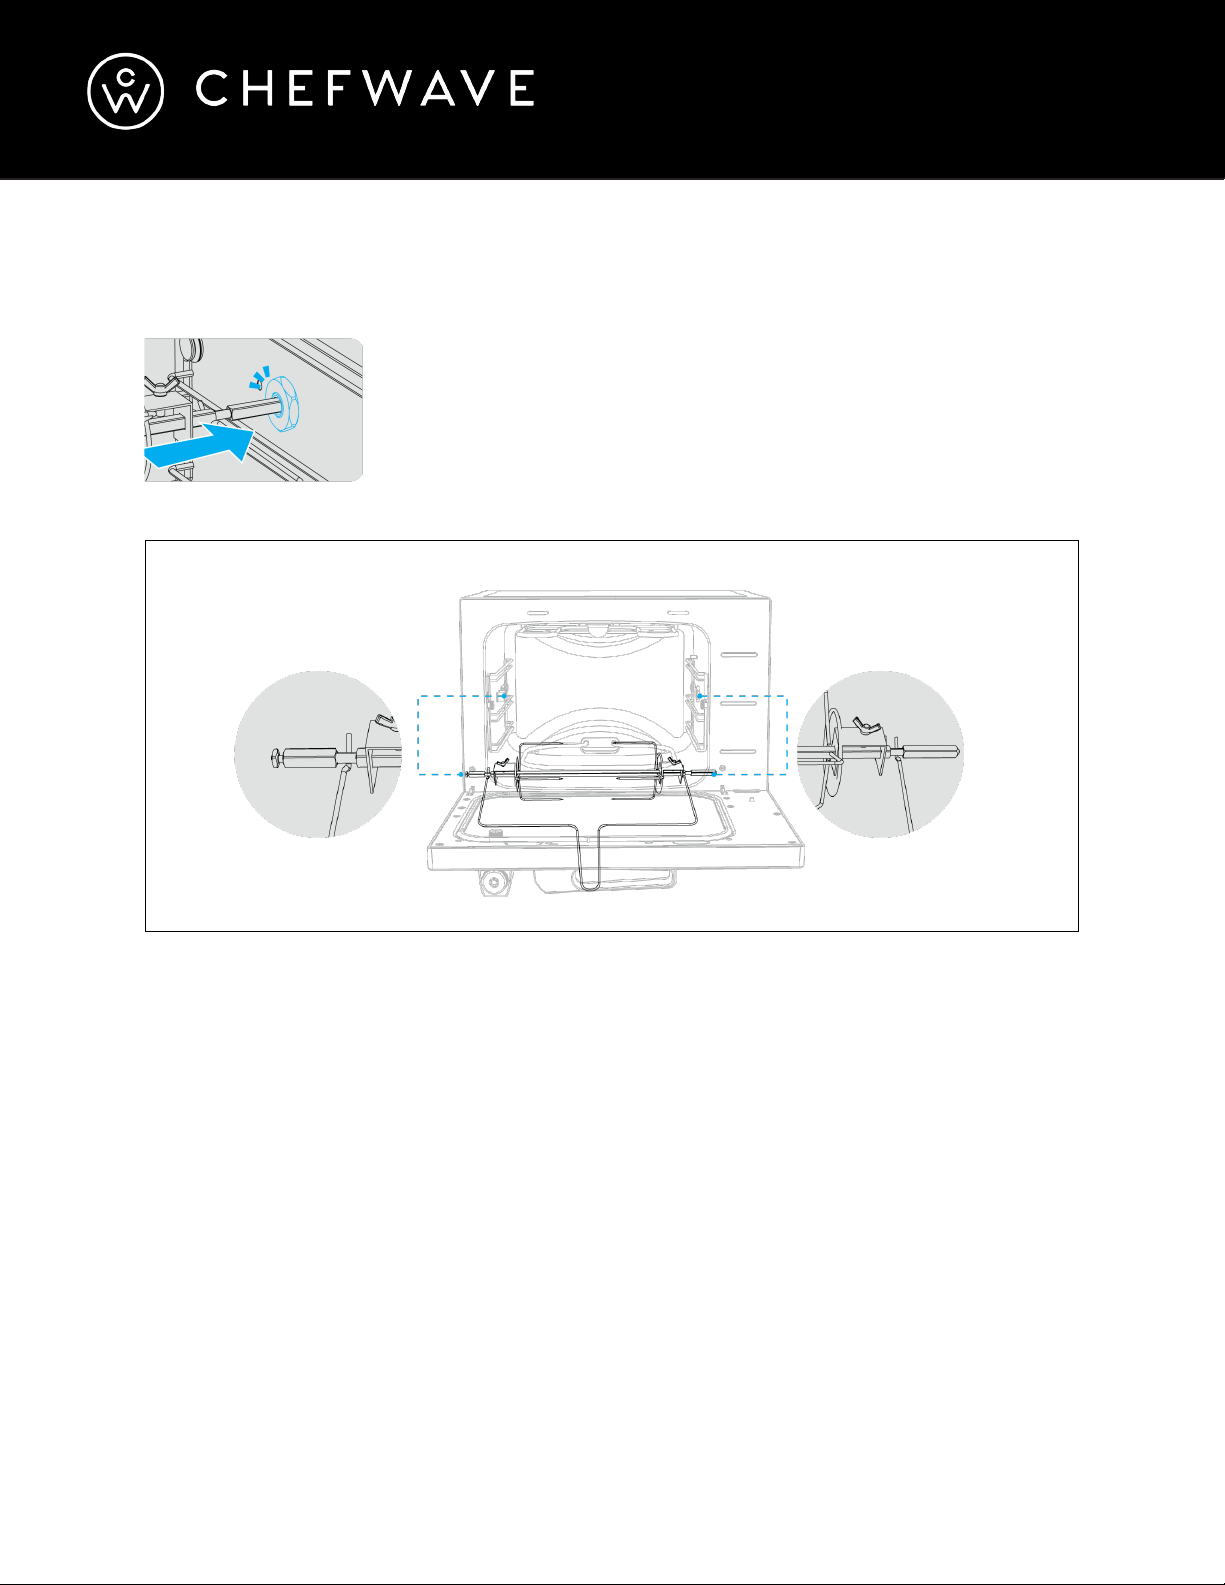
USING THE ROTISSERIE (continued)
STEP 6:
Insert the pointed end of the rod into the hole at the right side of
the oven. Place the other end of the rod on the support bracket
at the left side of the oven.
IMPORTANT NOTES
• When cooking chicken and other poultry, it is recommended that you first truss the bird
by securing the legs and wings with kitchen twine. A loose leg or wing may be burned
by the heater.
• Before cooking, always place the crumb tray below the lower heater to catch the
drippings.
• When cooking is complete, use the rotisserie removal tool to remove the rotisserie from
the oven.
11
Page 15
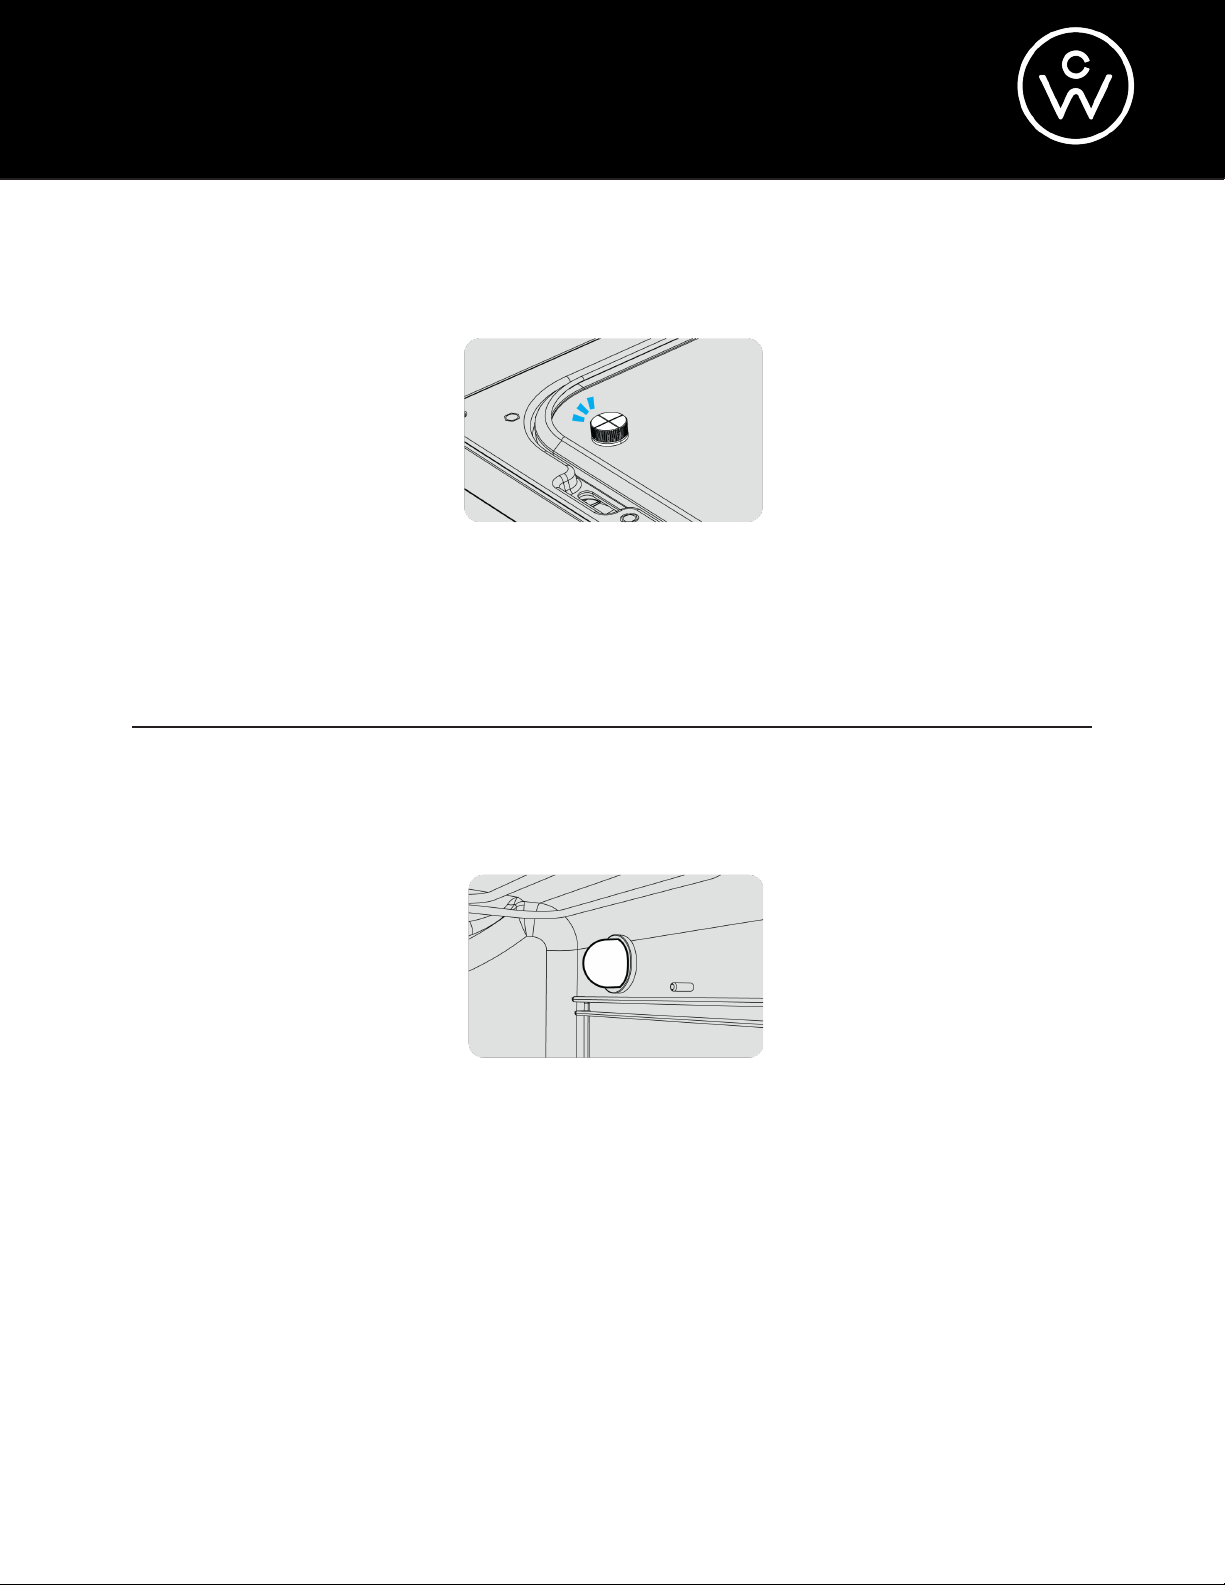
ANTI-BLOCK NUT
The anti-block nut is located on the inside of the oven door. Never block it or allow it to
become clogged. It should be cleaned regularly. To remove it for cleaning, loosen the nut
by turning it counterclockwise.
OVEN LAMP
Use the oven lamp button on the control panel to turn on the interior light. When you turn
on the light, it will turn off automatically after two minutes have elapsed. Press the oven
lamp button to turn on the light again, if desired.
The light bulb is sealed tightly to the oven with a special material. Do not attempt to
disassemble the light bulb yourself. If the light bulb is not working, please contact customer
service. (Contact information is provided on the Important Information page in this manual.)
12
Page 16

CLEANING THE PRESSURE OVEN
Please clean your pressure oven regularly to ensure that it provides lasting service.
CAUTION – To avoid electric shock or burns:
• Unplug the oven before cleaning
• Allow the oven to cool down before cleaning
• Never immerse the oven in water
• Never allow water or cleaning fluid to run into the oven
To clean the oven, use a damp cloth with mild dish liquid to clean the inside and outside. Do
not use the oven again until it is fully dry.
To clean the accessories, wash them by hand in warm water with mild dish liquid. If they are
heavily soiled, allow them to soak for 20-30 minutes. Carefully dry all parts after cleaning.
The accessories are all dishwasher safe, including the rotisserie tools, wire rack, and handle,
baking pan, and drip tray.
Never use abrasive, corrosive, or caustic cleaning materials, as they could damage the oven.
Do not clean the oven with metal scouring pads. Pieces can break off the pad and touch
electrical parts, creating a risk of electric shock.
13
Page 17

QUICK START INSTRUCTIONS
STEP 1:
PREPARE FOR COOKING
• Insert the pan, wire rack, and/or crumb tray inside the oven as needed.
• Place the food inside the oven and close the oven door.
• Plug in the oven by connecting the plug to the power source.
STEP 2:
SELECT THE FUNCTION
• Select the desired function on the control panel by pressing either the Bake, Toast,
Roast, or Broil button. NOTE: The default time and temperature settings for each of
these 4 functions can be found in the “Function Capabilities & Default Settings” chart.
• If you do not wish to use these pre-set functions, you can choose whether you’d like to
use the upper heater, lower heater, or both heaters by pressing the appropriate button
on the control panel.
• If you would like to use the DIY function to create customized settings or select from
your previously created customized settings, see Step 4.
• If you would like to utilize additional options, see Step 3. If you are ready to begin
cooking, skip to Step 5.
STEP 3:
SELECT ADDITIONAL OPTIONS
• If desired, press the Pressure Mode button to pressurize your food. The oven door must
be closed with the handle in a horizontal position in order to use the pressure mode.
This function works in combination with the rotisserie, roast, and broil settings, as well
as alone with the three heating positions (upper, lower, or both). It does not work with
the bake or toast settings.
NOTE: To cancel the pressure setting, press the Pressure Mode button again.
14
Page 18

• If desired, press the Rotisserie button to activate the rotisserie. This function works in
combination with the roast setting. NOTE: To cancel the rotisserie setting, press the
Rotisserie button again.
• If desired, press the Time/Temperature button once to adjust the default temperature
setting. Use the increase and decrease buttons to adjust the temperature.
• After setting the temperature, if desired, press the Time/Temperature button again to
adjust the default time setting. Use the increase and decrease buttons to adjust the
time.
• If you are ready to begin cooking, skip to Step 5.
STEP 4:
UTILIZE THE DIY FUNCTION
The DIY function allows you to create up to 10 customized setting combinations that you
can tailor to suit your specific needs.
• Press the DIY Menu button to enter DIY mode. The digital display will show “01,”
indicating that you are viewing the first of the 10 possible setting combinations. The
corresponding function buttons will light up on the control panel.
NOTE: The default settings for DIY mode are upper and lower heater, no pressure mode,
no rotisserie mode, time of 10 minutes, and temperature of 392 degrees Fahrenheit.
• Customize the settings as desired. You can select from upper heater, lower heater, both
heaters, pressure, rotisserie, temperature, and time.
• After you have selected your desired settings, press the DIY Menu button to store
the settings. The digital display will show “02” and allow you to customize the second
setting combination. Repeat this process as desired for each of the 10 possible setting
combinations.
NOTE: To exit the DIY function, press the Start/Cancel button.
15
Page 19

STEP 5:
COOKING
• To begin cooking, press the Start/Cancel button. NOTE: To stop cooking at any point,
press the Start/Cancel button.
• When cooking is complete, the oven will beep three times.
• To open the oven door, rotate the door handle downward.
• Use the removal tool to take the food out of the oven. In order to avoid hot steam
injury, be sure to wait until the steam and is completely released and be cautious of any
lingering steam inside the oven when opening the oven door. If using pressure mode,
be sure that all pressure has released before opening the oven door.
16
Page 20
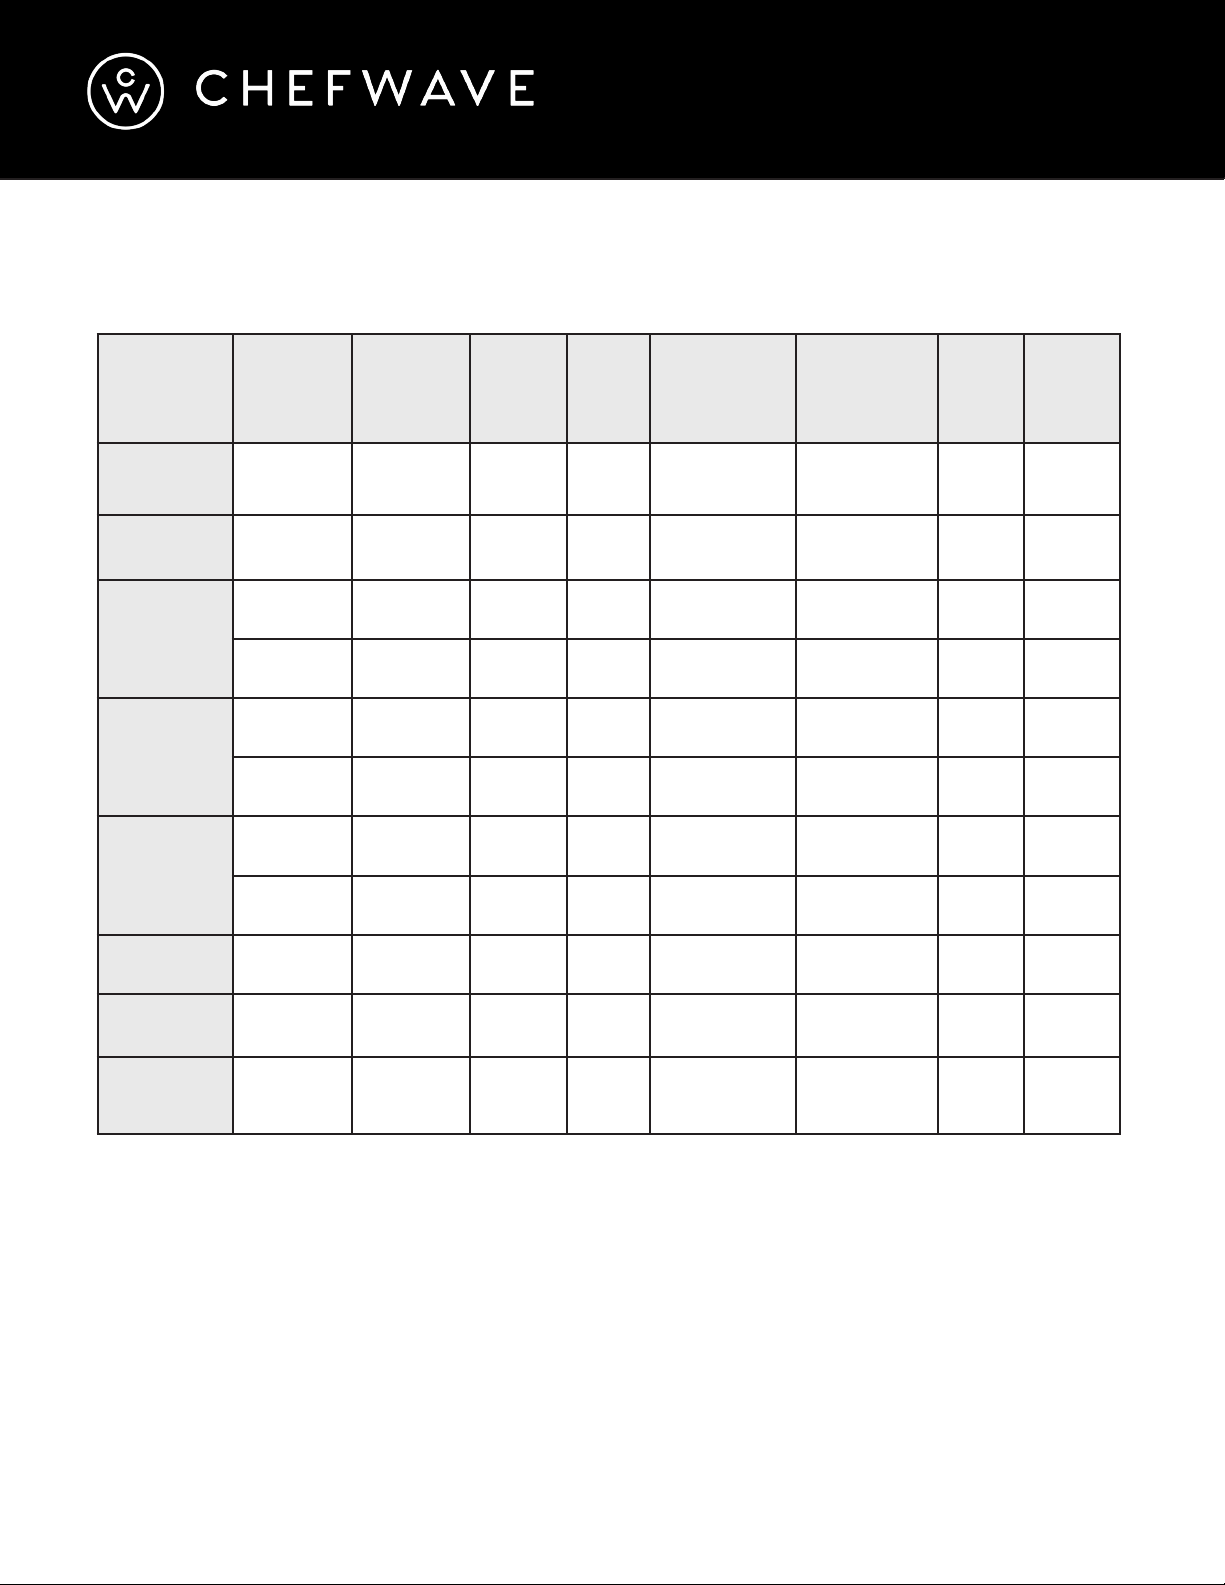
FUNCTION CAPABILITIES & DEFAULT SETTINGS
FUNCTION PRESSURE ROTISSERIE
BAKE
TOAST
No No 40 min
No No 5 min
No No
ROAST
Yes No
ROAST &
ROTISSERIE
No Yes 45 min
Yes Yes 45 min
No No 20 min
BROIL
Yes No 20 min
DE FAULT
TIME
45 min
45 min
TIME
RANGE
1 min-
1 hr
1 min12 min
1 min-
2 hr
1 min-
2 hr
1 min-
2 hr
1 min-
2 hr
1 min-
1.5 hr
1 min-
1.5 hr
DE FAULT
TEMPERATURE
(°F)
TEMPERATURE
RANGE
(°F)
UPPER
HE ATER
356 303-428 Yes Yes
392 320-464 Yes Yes
480 356-480 Yes Yes
480 356-480 Yes Yes
480 356-480 Ye s Yes
480 356-480 Ye s Yes
428 356-464 Yes Yes
428 356-464 Yes Yes
BOTTOM
HE ATER
UPPER
HE ATER
BOTTOM
HE ATER
UPPER &
BOTTOM
HE ATER
Yes No 20 min
Yes No 20 min
Yes No 20 min
1 min-
2 hr
1 min-
2 hr
1 min-
2 hr
320 140-464 Yes No
392 140-464 No Yes
446 140-464 Yes Ye s
17
Page 21
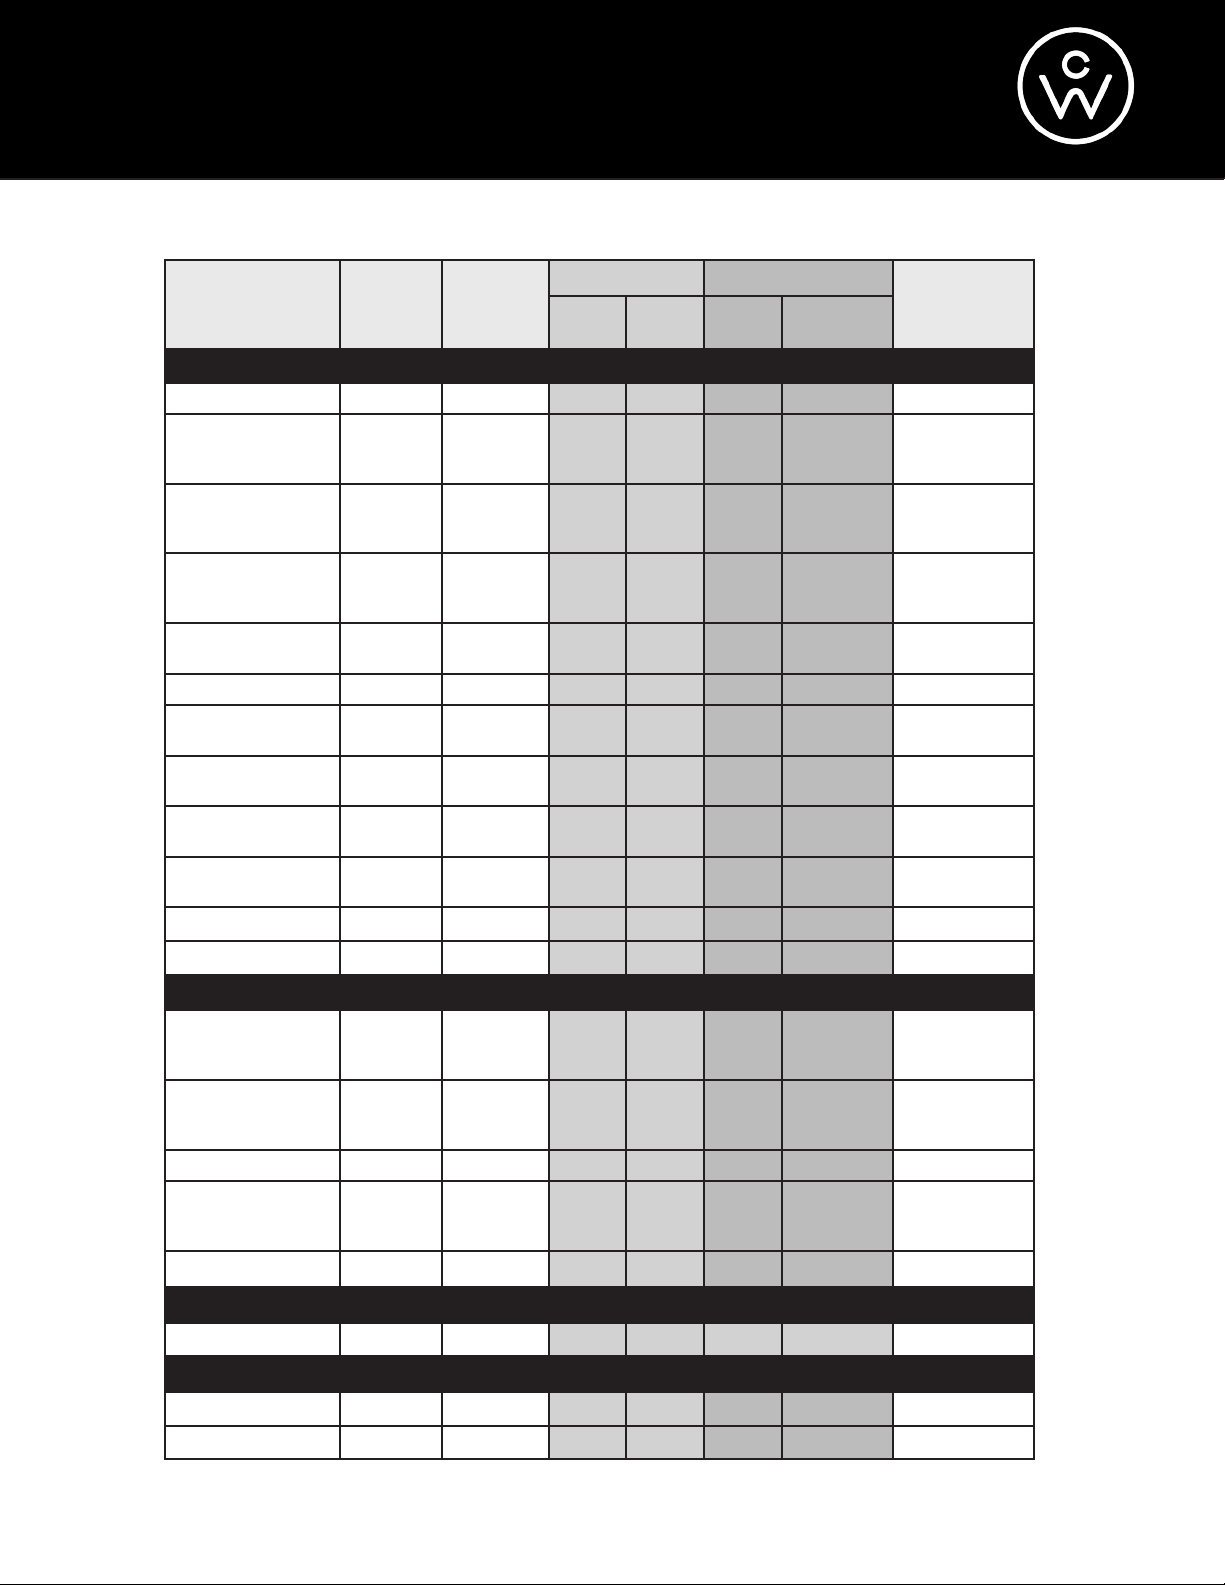
COOKING CHART
Recommended
Internal Temp
(U.S. FDA, °F)
TYPE Weight Rack
Pressure Mode Standard Mode
Temp
(°F)
Time
Temp
(°F)
Time
POULTRY
Chicken - Whole 2-3 lbs. Rotisserie 480 30 min 350 2 hr 165
Chicken - Whole 4-5 lbs. Middle 480 40 min 350
Chicken - Whole 6-7 lbs. Middle 480 45 min 350
Chicken - Whole 7-8 lbs. Bottom 480 50 min 350
Chicken 8 pc. Barbecue
Chicken - Butterflied 4 lbs. Middle 480 25 min 350 1 hr 165
Chicken Breast Boneless
Chicken Breast Boneless
Chicken Legs, Thighs
Chicken Legs, Thighs
Turkey Breast 4-5 lbs. Middle 480 35 min 350 1 hr 40 min 165
Turkey Breast 6-7 lbs. Middle 480 45 min 350 2 hr 20 min 165
3-4 lbs. Middle 480 20 min 350 1 hr 165
< 1 lb. Middle 480 10 min 350 30-40 min 165
1-2 lbs. Middle 480 15 min 350 40-45 min 165
3 lbs. Middle 480 30 min 350 45 min 165
5 lbs. Middle 480 35 min 350 50 min 165
2 hr to
2 hr 15 min 165
2 hr to
2 hr 15 min 165
2 hr to
2 hr 30 min 165
BEEF
Roast Beef Eye Round 2-3 lbs Bottom 480 50 min 325 2 hr 145
Roast Beef Eye Round 4-5 lbs. Bottom 480 70 min 325 2 hr 30 min 145
Prime Rib 6.5 lbs. Bottom 480 80 min 400 2 hr 20 min 145
Braised Beef 4-5 lbs. Middle 375
Ribeye Steak 10 oz. Upper 480 10 min 480 15 min 145
2 hr
30 min 325 3 hr 30 min 145
PORK
Pork Roast - Knuckle
1-2 lbs. Rotisserie 480 60 min 350 2 hr 50 min 145¹
FISH
Salmon Filet < 1 lb. Middle 480 6 min 400 10-12 min As desired
Salmon Filet 1-2 lbs. Middle 480 8 min 400 18-20 min As desired
According to the U.S . FDA, cook pork , roasts, and chops to 145° F as measured with a food thermometer b efore
removing meat from the heat source, with a 3-minute rest time before carving or consuming. This will result
in a product that is both safe and at its best quality – juicy and tender. Visit www.foodsafety.gov for more tips.
18
Page 22
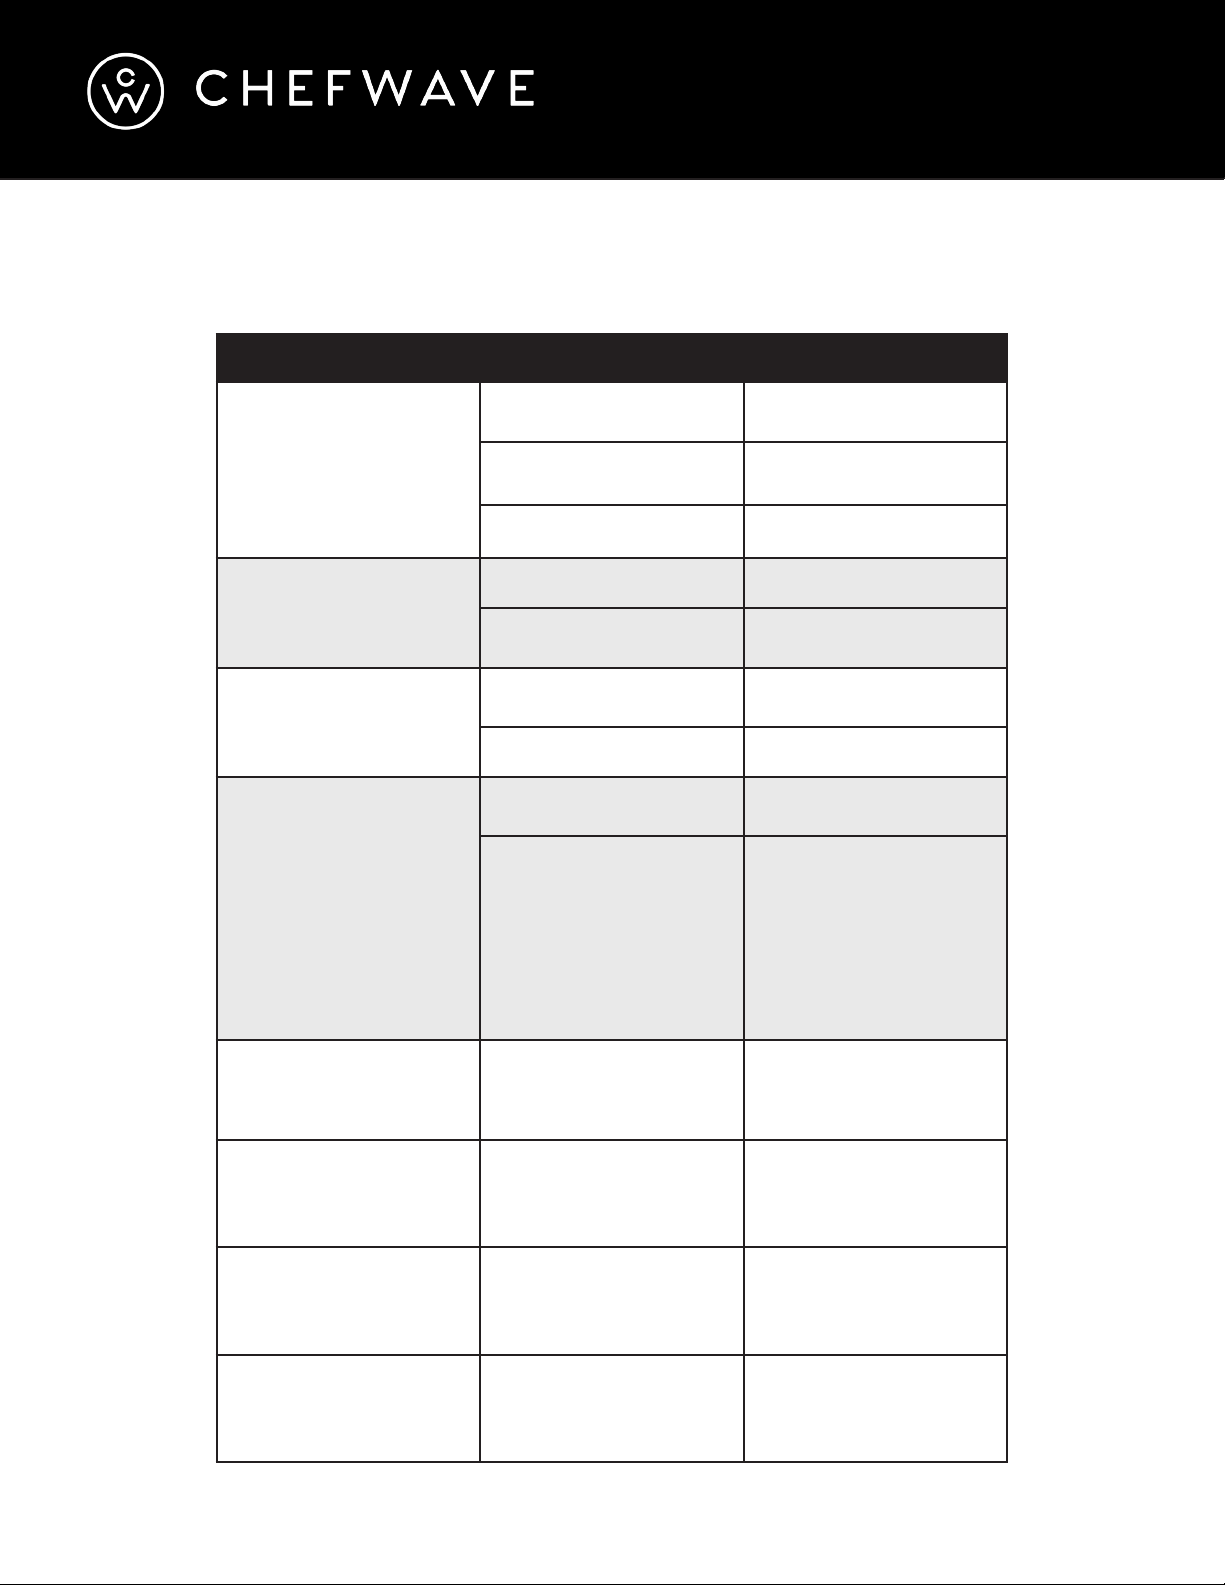
TROUBLESHOOTING
PROBLEM CAUSE SOLUTION
Oven does not turn on
Oven is not working
Heater is not working
Strange odor
Oven is not plugged in
Faulty fuse or power outlet
Oven is broken Contact customer service
Faulty function button Contact customer service
Incorrect operation
Internal wire terminal is
loose
Heating element is broken Contact customer service
Grease or food particles are
inside the oven
First use
Connect oven to power
outlet
Check fuse or use a
different power outlet
Refer to the operating
instructions in this manual
Contact customer service
Clean the oven to remove
all grease and food particles
The first time the oven
is used, a small amount
of smoke and/or a light
odor may exist. This is
not harmful and will stop
shortly. Ensure that there is
sufficient ventilation.
Oven lamp is not working Light bulb is broken Contact customer service
Control panel shows code
E1,
oven beeps 10 times
Control panel shows code
E2,
oven beeps 10 times
Control panel shows code
E4,
oven beeps 10 times
Temperature sensor open
circuit
Temperature sensor short
circuit
Temperature sensor has
failed
Contact customer service
Contact customer service
Contact customer service
19
Page 23

IMPORTANT NOTICE
dO NOT RETURN TO RETAIL STORE
If you experience problems with this oven, contact Consumer Relations at
Please save original box and packing materials in case service is required.
20
Page 24
RECIPES
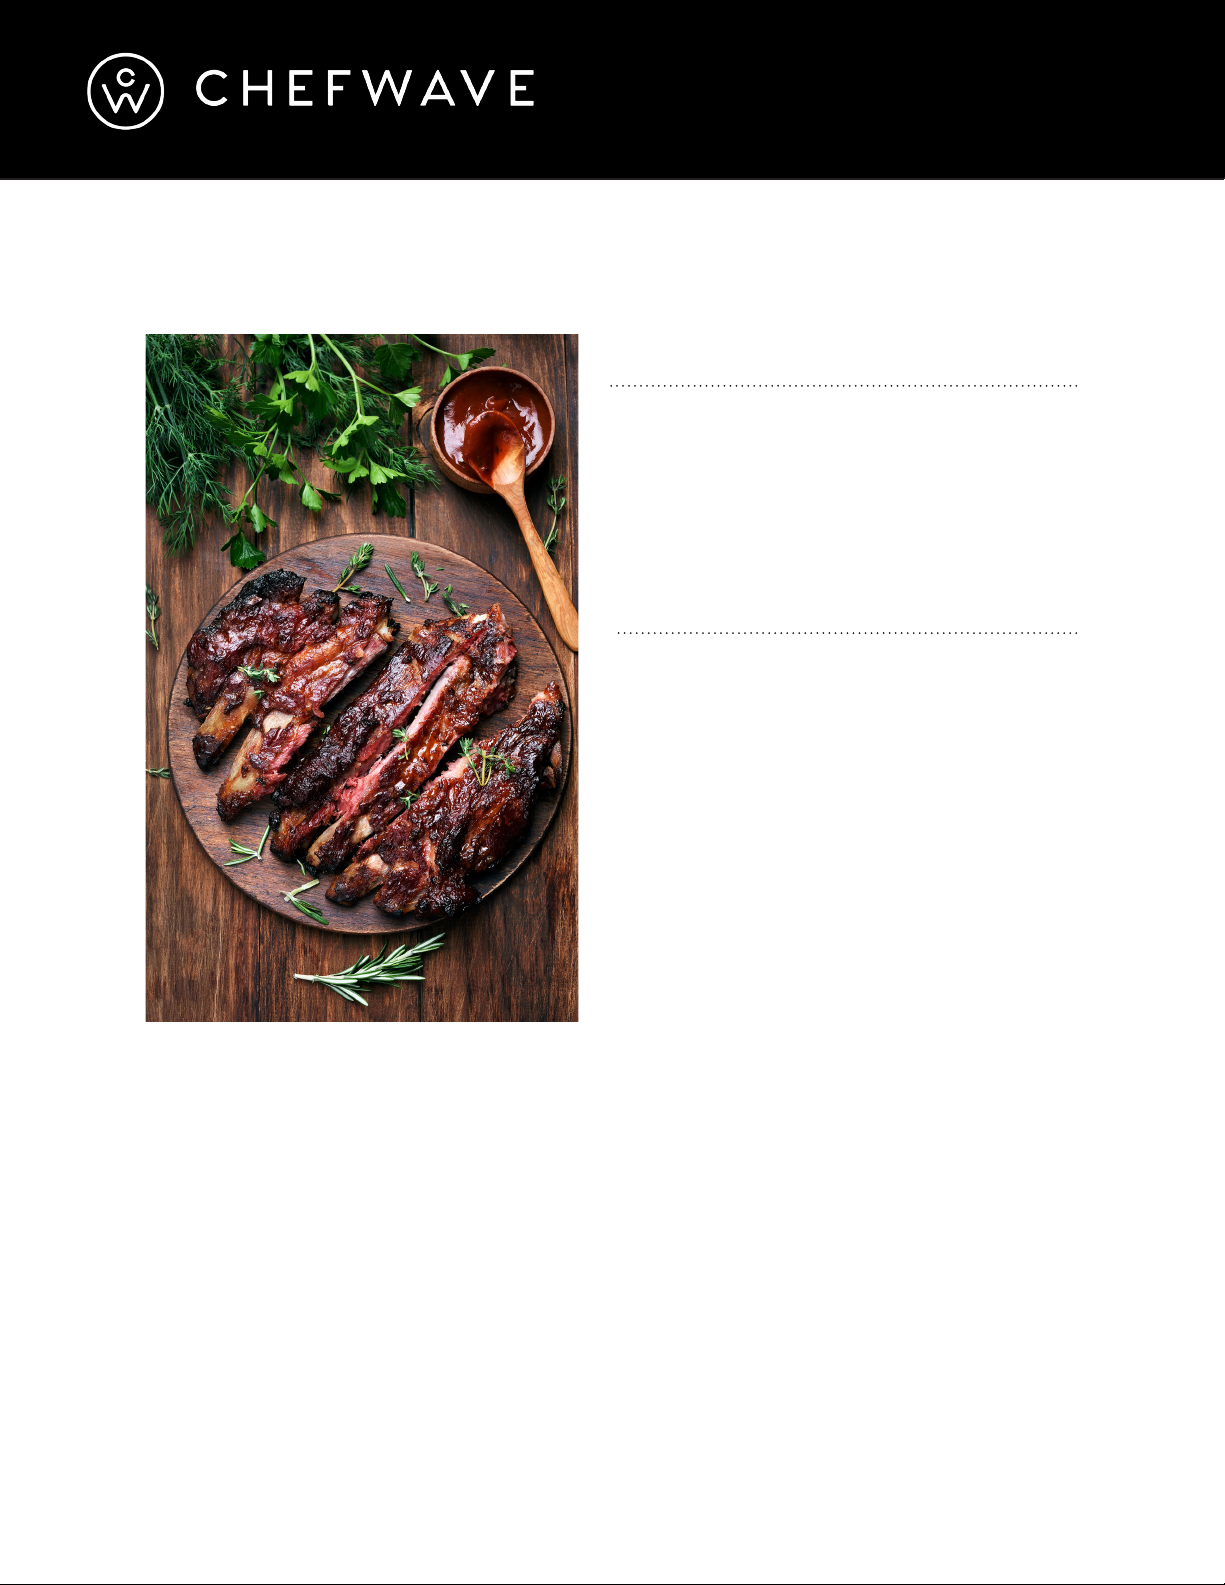
RIBS
INGREDIENTS
• Ribs (3 pieces, approx. 11 oz)
• Barbecue sauce
• Corn starch
• Cumin (as desired)
• Salt (as desired)
• Pepper (as desired)
STEP 1:
• Rinse the ribs under cold water. Pat dry.
• Mix the barbecue sauce, corn starch, salt,
cumin, and pepper. Apply to the ribs.
• Let sit 30-60 minutes.
STEP 2:
• Press the Roast button.
• Set the temperature to 450° F.
• Be sure that the Upper and Lower Heater
function is selected.
• Allow oven to preheat for 10 minutes.
STEP 3:
• Place the ribs on the wire rack. Use the rack removal tool to place the rack and ribs
inside the oven. Close the oven door.
• Press the Broil button.
• Be sure that the temperature is set to 450° F.
• Be sure that the cooking time is set to 20 minutes.
• Press the Pressure Mode button.
• Press the Start/Cancel button to begin cooking.
STEP 4:
• When cooking is complete, wait until the steam is completely released before opening
the oven door.
• Use the rack removal tool to remove the rack and ribs from the oven.
21
Page 25
RECIPES
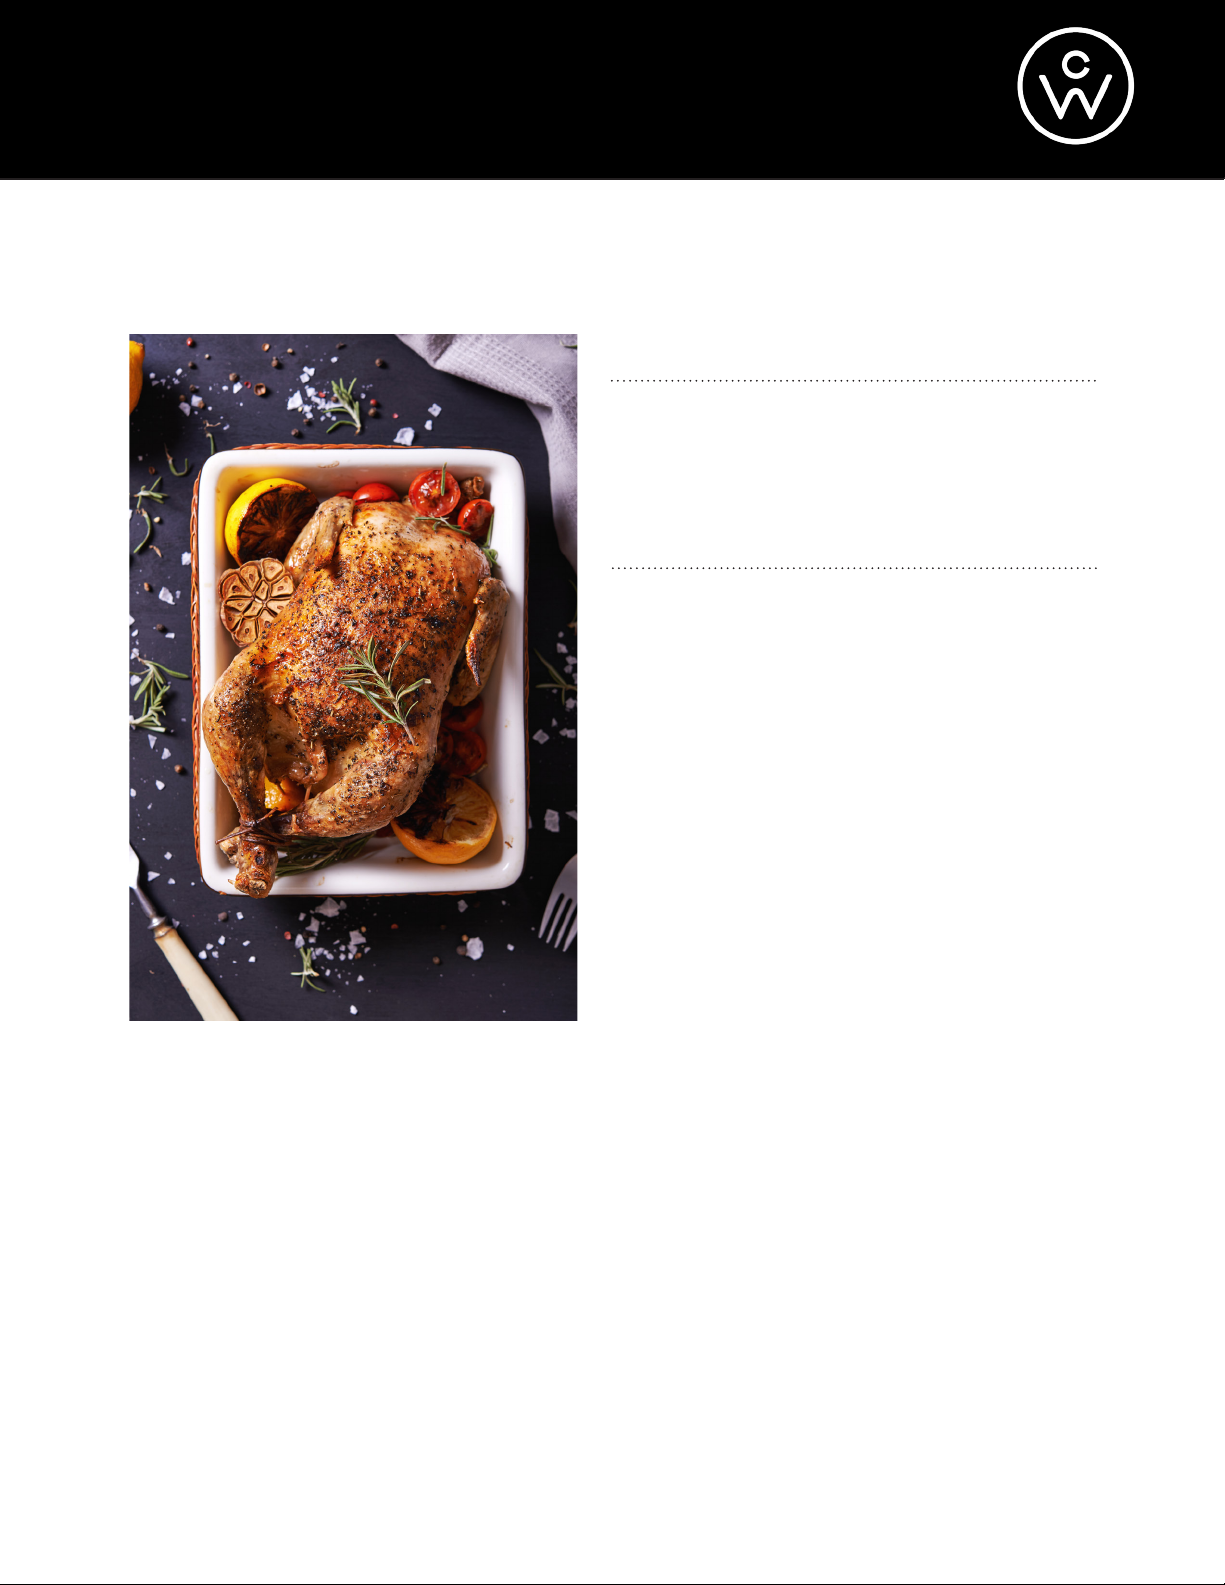
WHOLE CHICKEN
INGREDIENTS
• Whole chicken (4½-6½ lbs.)
• Your favorite sauce
• Salt (as desired)
• Pepper (as desired)
STEP 1:
• Rinse the chicken under cold water. Pat
dry.
• Apply the sauce, salt, and pepper to the
chicken.
• Let sit 30-60 minutes.
• Truss the chicken by securing the legs and
wings with kitchen twine.
• Skewer the chicken with the rotisserie tool.
(For more information, see the page “Using
the Rotisserie.”)
STEP 2:
• Press the Roast button.
• Set the temperature to 480° F.
• Be sure that the Upper and Lower Heater function is selected.
• Allow oven to preheat for 10 minutes.
STEP 3:
• Use the rotisserie removal tool to place the chicken and rotisserie inside the oven. Close
the oven door.
• Press the Roast button.
• Be sure that the temperature is set to 480° F.
• Be sure that the cooking time is set to 20 minutes.
• Press the Pressure Mode button.
• Press the Rotisserie button.
• Press the Start/Cancel button to begin cooking.
22
Page 26

RECIPES
STEP 4:
• When cooking is complete, wait until the steam is completely released before opening the
oven door.
• Use the rotisserie removal tool to remove the chicken and rotisserie from the oven.
23
Page 27
RECIPES
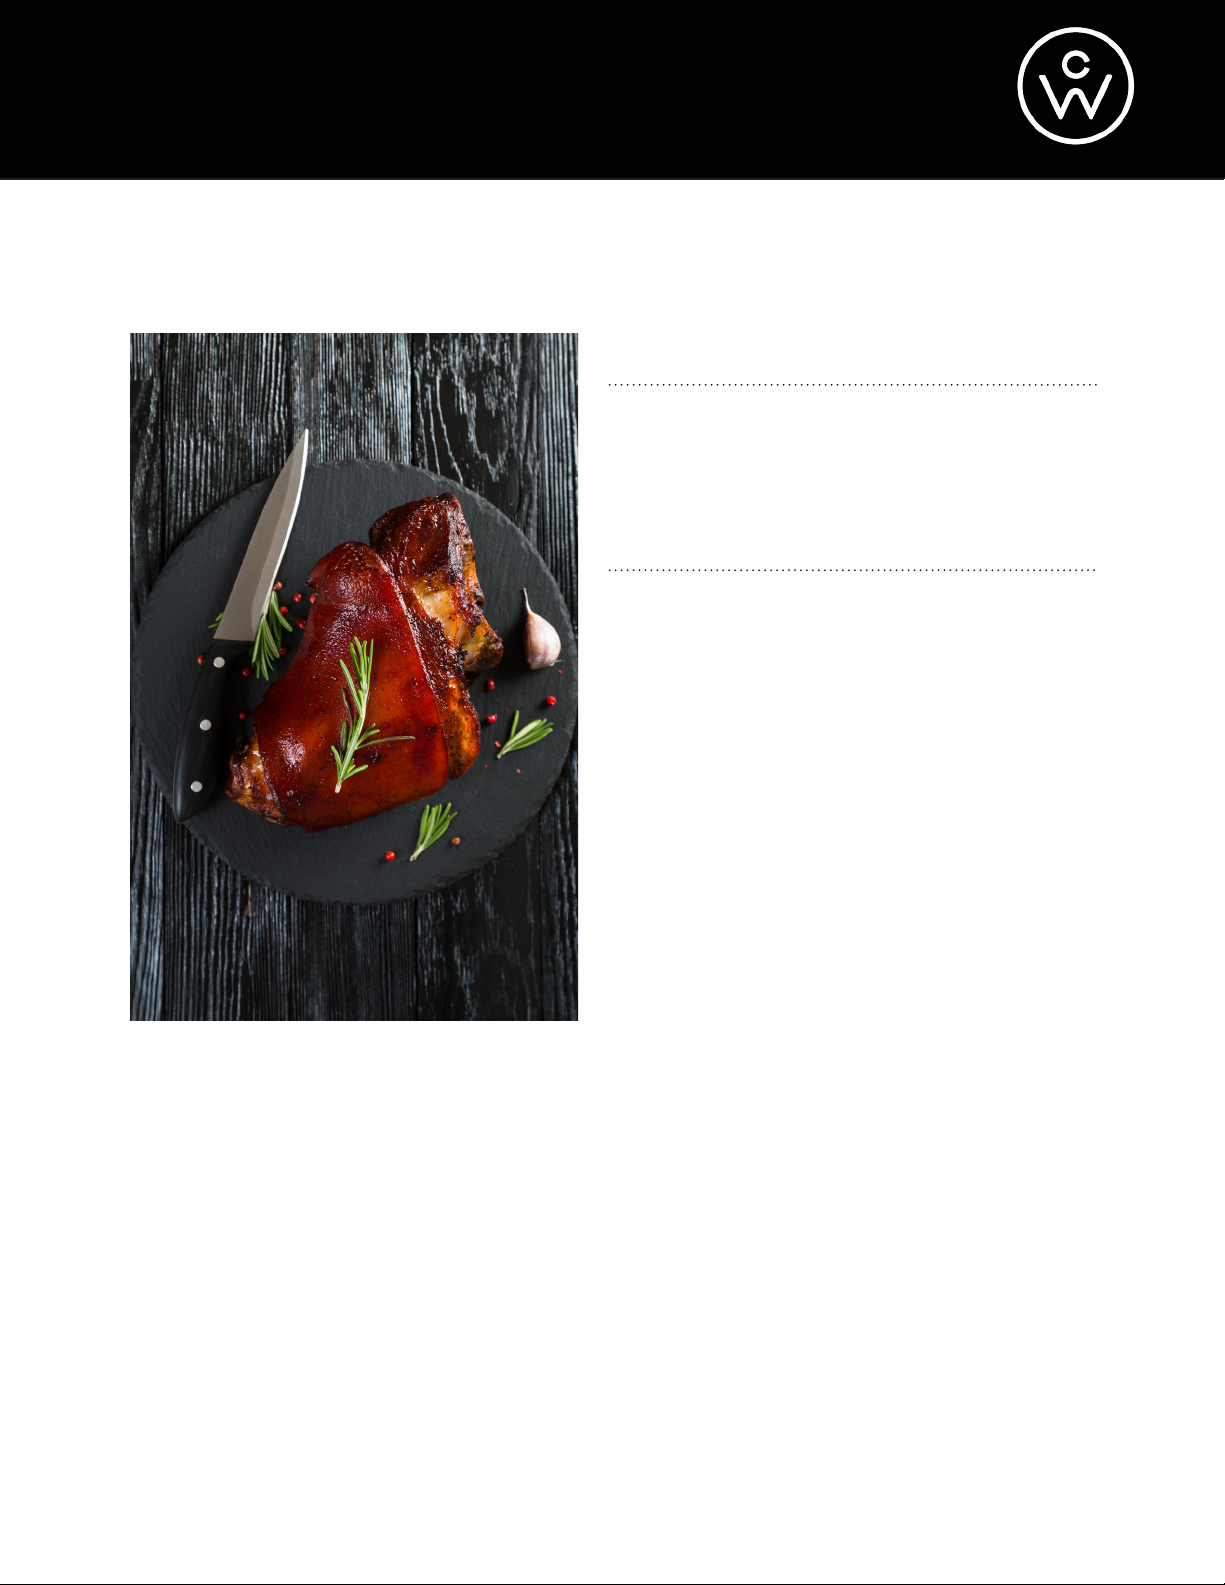
PORK KNUCKLE
INGREDIENTS
• Pork knuckle (3 lbs.)
• Your favorite sauce
• Salt (as desired)
• Pepper (as desired)
STEP 1:
• Rinse the pork knuckle under cold water.
Pat dry.
• Prick holes in the skin.
• Apply the sauce, salt, and pepper to the
pork knuckle.
• Let sit 60 minutes.
• Truss the pork knuckle by securing it with
kitchen twine.
• Skewer the pork knuckle with the rotisserie
tool. (For more information, see the page
“Using the Rotisserie.”)
• Press the Roast button.
• Set the temperature to 480° F.
STEP 2:
• Press the Roast button.
• Set the temperature to 480° F.
• Be sure that the Upper and Lower Heater function is selected.
• Allow oven to preheat for 10 minutes.
STEP 3:
• Use the rotisserie removal tool to place the pork knuckle and rotisserie inside the oven.
Close the oven door.
• Press the Roast button.
• Be sure that the temperature is set to 480° F.
• Be sure that the cooking time is set to 60 minutes.
• Press the Pressure Mode button.
• Press the Rotisserie button.
• Press the Start/Cancel button to begin cooking.
24
Page 28

RECIPES
STEP 4:
• When cooking is complete, wait until the steam is completely released before opening the
oven door.
• Use the rotisserie removal tool to remove the pork knuckle and rotisserie from the oven.
25
Page 29
RECIPES
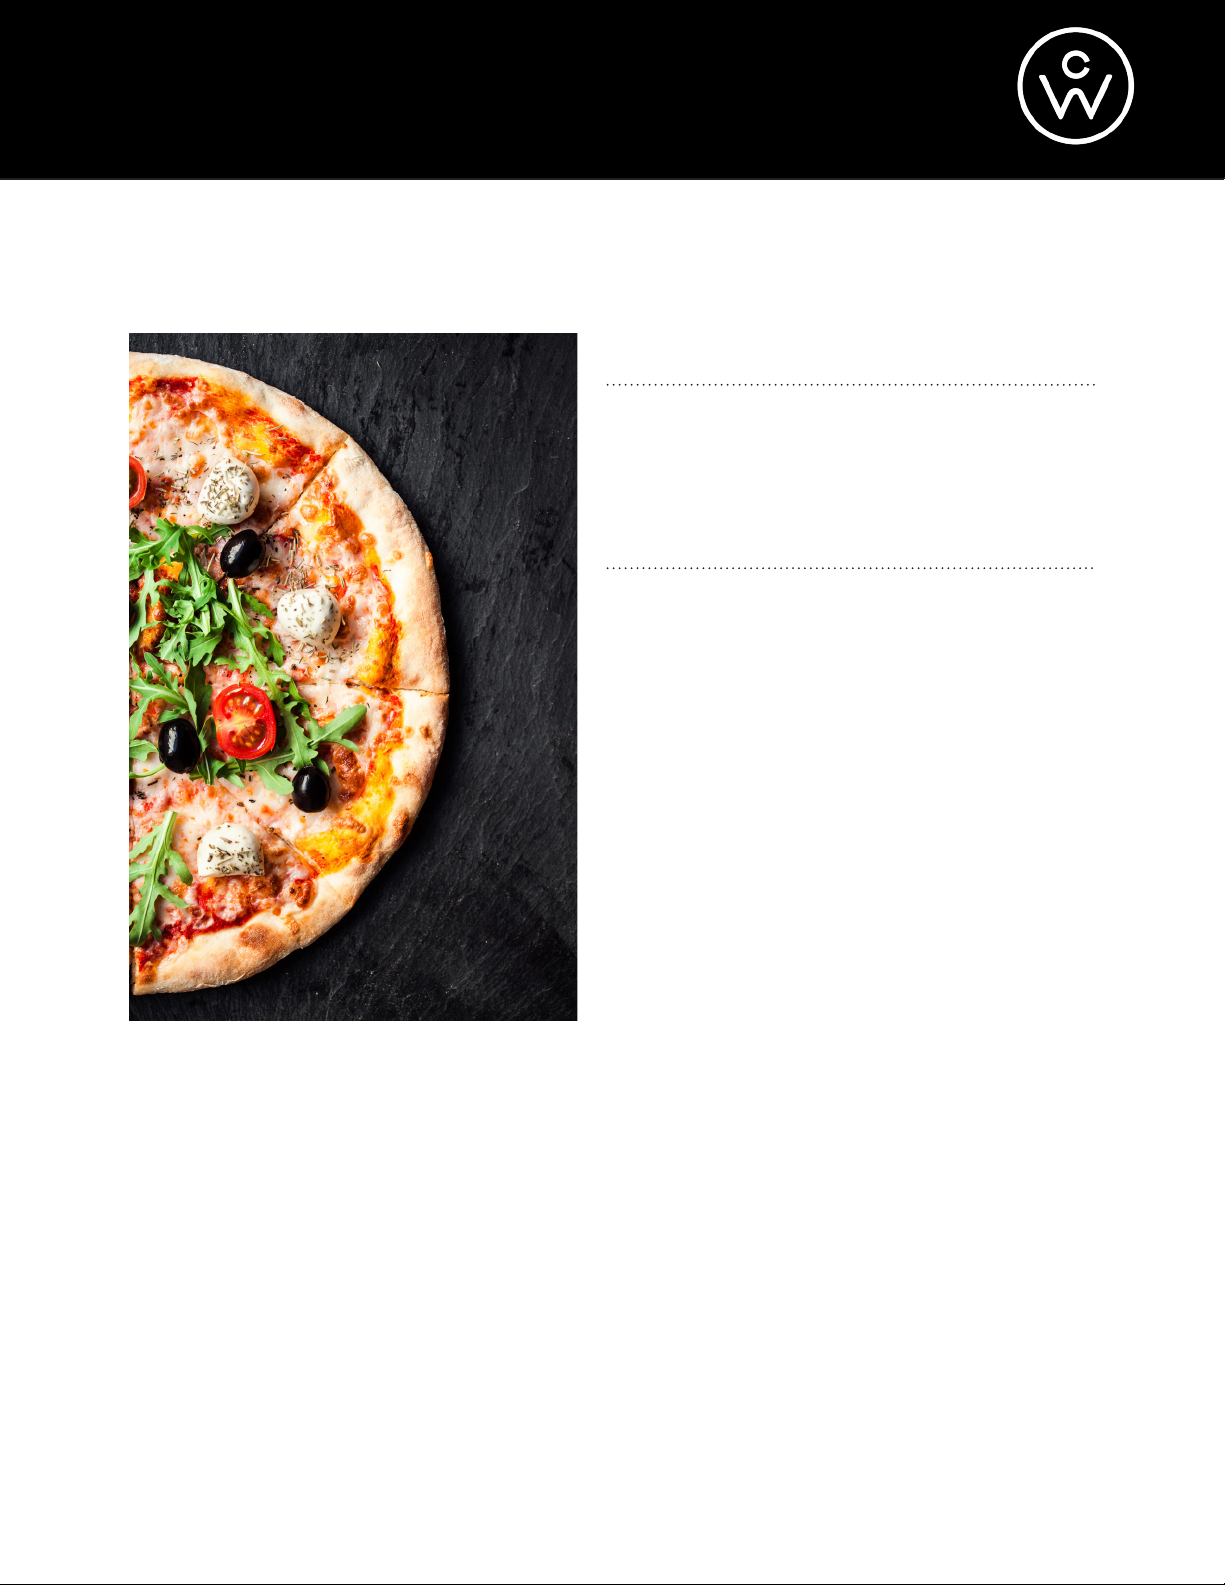
PIZZA
INGREDIENTS
• Pizza crust (6”-12”)
• Pizza sauce
• Mozzarella cheese
• Your favorite toppings
STEP 1:
• Wash and prepare the pizza toppings as
necessary.
• Place the pizza crust on the pan. Apply
pizza sauce, mozzarella cheese, and
toppings
STEP 2:
• Press the Roast button.
• Set the temperature to 425° F.
• Be sure that the Upper and Lower Heater
function is selected.
• Allow oven to preheat for 10 minutes
STEP 3:
• Place the pizza pan on the wire rack. Use the rack removal tool to place the rack and pizza
inside the oven. Close the oven door.
• Press the Bake button.
• Be sure that the temperature is set to 425° F.
• Be sure that the cooking time is set to 20 minutes.
• Press the Start/Cancel button to begin cooking.
STEP 4:
• When cooking is complete, wait until the steam is completely released before opening the
oven door.
• Use the rack removal tool to remove the rack and pizza from the oven.
26
Page 30
RECIPES
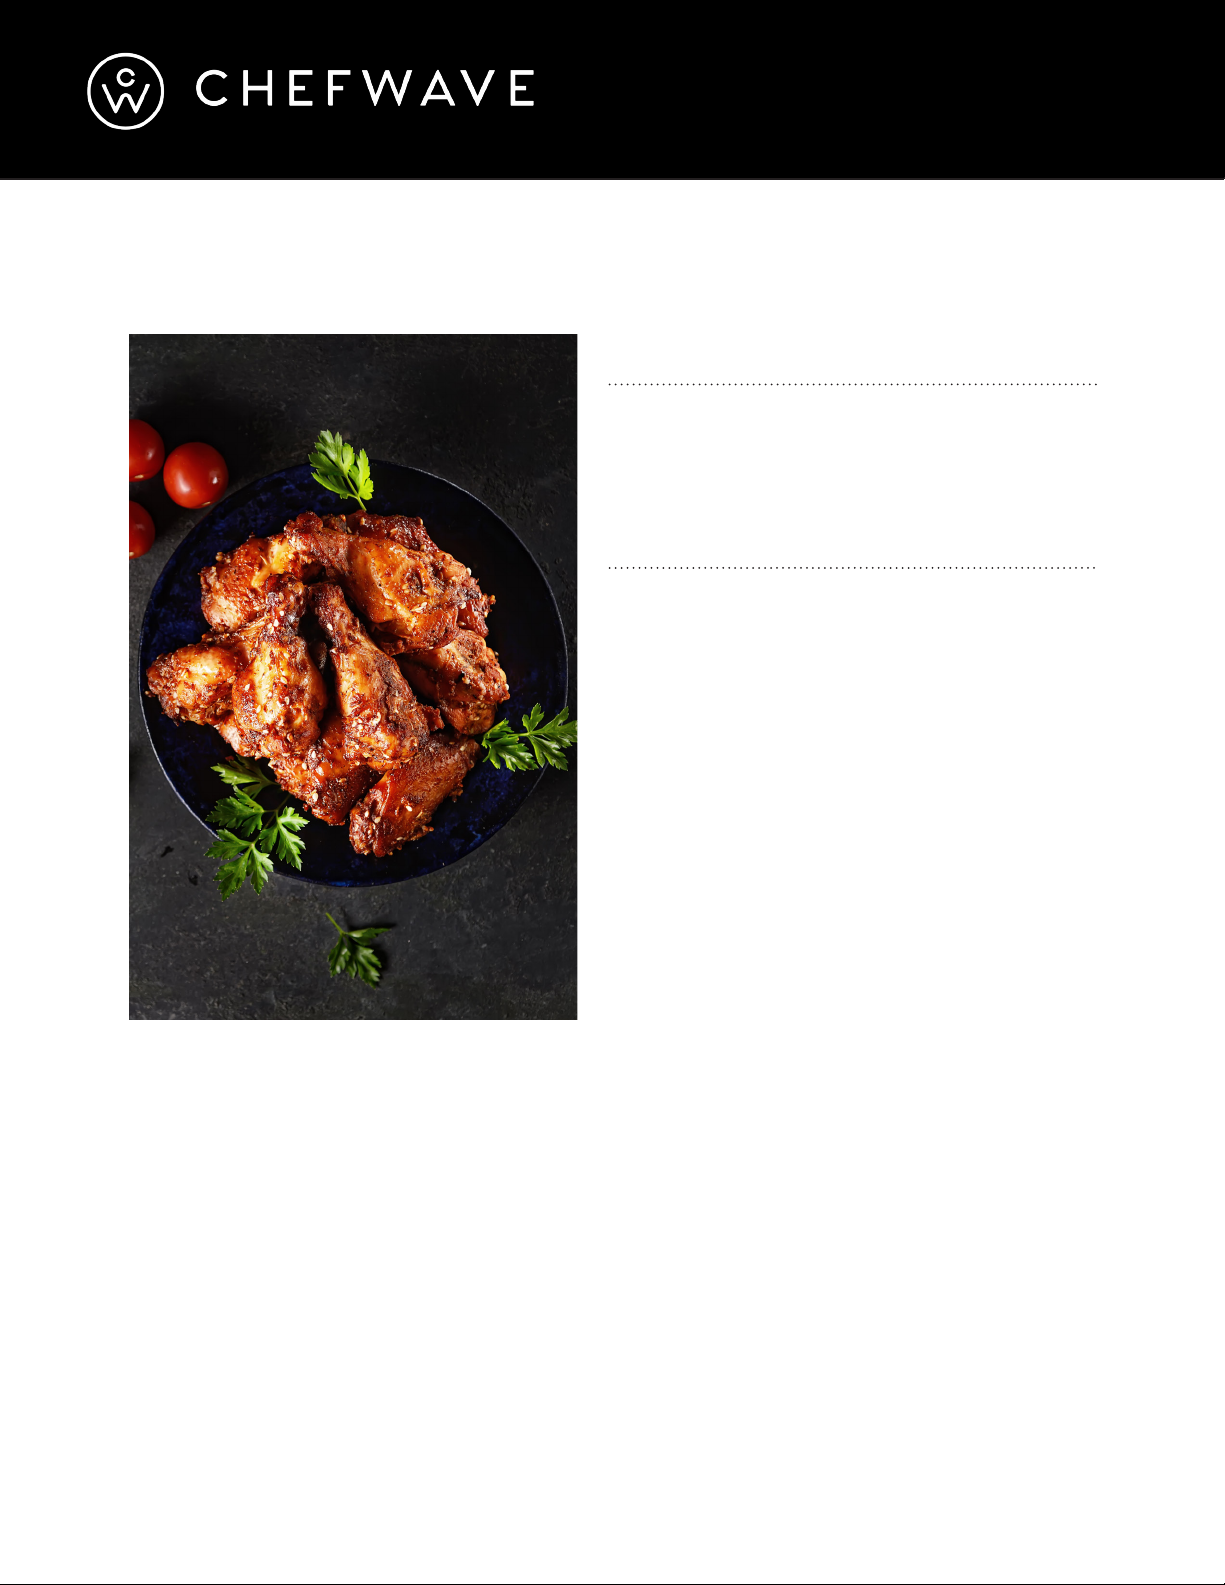
Chicken Wings
INGREDIENTS
• Chicken Wings (10-16 pieces)
• Your favorite sauce
• Salt (as desired)
•
STEP 1:
• Rinse the chicken wings under cold water.
Pat dry.
• Apply the sauce and salt to the chicken
wings.
• Let sit 30 minutes.
STEP 2:
• Press the Roast button.
• Set the temperature to 450° F.
• Be sure that the Upper and Lower Heater
function is selected.
• Allow oven to preheat for 10 minutes.
STEP 3:
• Place the chicken wings on the wire rack. Use the rack removal tool to place the rack and
chicken wings inside the oven. Close the oven door.
• Press the Broil button.
• Be sure that the temperature is set to 450° F.
• Be sure that the cooking time is set to 20 minutes.
• Press the Pressure Mode button.
• Press the Start/Cancel button to begin cooking.
STEP 4:
• When cooking is complete, wait until the steam is completely released before opening the
oven door.
• Use the rack removal tool to remove the rack and chicken wings from the oven.
27
Page 31

NOTES
28
Page 32

 Loading...