

Page 1

Instruction Manual
Item No.: 452543
120V, 60Hz, 1700W
Wards.com 1•888•557•3848
MODEL: CDF-2035
Montgomery Ward Customer Service
1112 7th Avenue, Monrfoe, WI 53566
8:00 am to Midnight, Monday through Friday
cipes
and coong
tips
inside!
by
Wards.com 1•888•557•3848
by
3.5-Qt. Deep Fryer with Timer
®
®
Page 2

Thank you for purchasing your Chef Tested 3.5-Qt. Deep Fryer with Timer
by Montgomery Ward. Put through the paces by the experts, we guarantee
that it will perform to the highest standard, time after time, with all the
convenience, easy cleanup and durability you rely on from Wards.
Creating delicious fried foods has never been easier! From crispy chicken and
onion rings to batter-fried fish and French fries—your new fryer has a 3.5-quart
chamber with a timer, allowing you to cook up a big batch of food and serve hot,
mouth-watering meals to your hungry family. Enjoy your fryer and be sure to visit
Wards.com for more great Chef Tested kitchen items!
3
PLEASE READ ALL OF THESE INSTRUCTIONS CAREFULLY BEFORE USING
YOUR 3.5-QT. DEEP FRYER
This product is intended for use in deep frying food.
Do NOT use this appliance for any other than its intended purpose.
WARNING: To avoid risks of electrical shock, burns or injuries, always make sure
the product is unplugged from the electrical outlet and completely cooled before
disassembling or cleaning.
When using any electrical appliance, basic safety precautions should always
be followed:
1. Before using this appliance, please check carefully to make sure voltage
(AC120V-60Hz) is compatible with your home and that the electrical cord is
connected to a properly grounded electrical outlet of similar voltage.
CAUTION: Risk of fire, electric shock, burns or injury if deep fryer is not
connected as instructed.
2. Remove all packaging, plastics and other materials from unit and wash all removable accessories before using for the first time.
3. ALWAYS attach plug to appliance first, then electrical cord into wall outlet.
4. Do NOT plug/unplug deep fryer into/from electrical outlet with wet hands or use
this appliance with wet hands.
5. ALWAYS place appliance on a flat, level, stable and heat-resistant surface.
6. Make sure that the deep fryer and all controls are OFF before inserting or
removing plug in electrical outlet.
7. To disconnect from electrical outlet, pull directly on plug; do not pull on the power
cord.
8. Do NOT let power cord hang over edge of table or counter or touch any hot
surfaces.
9. Do NOT place or use the unit or any parts on or near a hot gas or electric
burner, in a heated oven or on a stove top.
10. This appliance should not be used by or near children, or persons with certain
disabilities. Close supervision is necessary when deep fryer is used near
children.
11. EXTREME CAUTION must be used when moving deep fryer containing hot oil.
ALWAYS use oven mitts.
Important Safeguards ....................... 3–5
Polarized Plug.......................................6
Parts & Features ................................... 7
Added Safety Instructions .....................8
Cleaning & Care ................................8-9
Before Using for the First Time ............. 9
Assembly ...................................... 10–11
How to Use ................................... 12–13
Frying Guide & Tips ......................14–15
Recipes ......................................... 16–21
Warranty & Return Information ..... 22–23
by
ank you
for your
purchase!
Table of Contents
2
1•888•557•3848
Wards.com
Important Safeguards
PLEASE SAVE THESE INSTRUCTIONS
THIS APPLIANCE IS FOR HOUSEHOLD USE ONLY
© 2015 Montgomery Ward, Inc. All rights reserved.
®
Page 3

4
1•888•557•3848
Wards.com
4
5
Important Safeguards (cont’d)
12. Do NOT operate this or any other appliance with a damaged cord or plug or after
the appliance malfunctions, has been damaged in any way, has been dropped or
has been immersed in water or other liquids. For replacement parts or returns,
call our toll-free number.
13. To avoid risk of electrical shock, fire or injuries: Do NOT immerse in or
expose appliance, control panel, electrical cord or plug to water or other liquid.
14. The use of any accessories or attachments not recommended by the
manufacturer may cause injury.
15. Do NOT touch any hot surfaces. Always use handles, knobs and control
buttons to operate the unit.
16. Do NOT overfill oil pot. Oil capacity is 3.5 quarts.
17. CAUTION: Keep hands and utensils out of deep fryer while frying.
18. When hot oil is in deep fryer, use EXTREME CAUTION when removing lid.
DANGER: STEAM ESCAPING FROM DEEP FRYER CAN CAUSE BURNS,
SCALDING & SERIOUS INJURIES.
19. ALWAYS operate deep fryer with lid in place.
20. Make sure handle is properly assembled to basket and locked in place (see
Assembly instructions).
21. NEVER leave appliance unattended. If you must leave the room while the deep
fryer is on, take out any food that could be in the frying basket, turn
appliance OFF and remove plug from electrical outlet.
22. Unplug power cord from outlet when not in use. Clean and cover the unit and
store in a dry place if not being used for an extended period of time.
23. Do NOT store any materials other than manufacturer’s recommended
accessories in this unit when not in use.
24. Do NOT place any of the following materials in the unit: paper, cardboard,
plastic and/or similar nonfood items.
25. This appliance is NOT recommended for outdoor use.
26. If the deep fryer malfunctions during use, shut down unit IMMEDIATELY and
discontinue use. Do NOT attempt to open any part of the control panel. This
product has no user-serviceable parts. Do NOT use or replace with any unauthorized parts not intended for this unit. All parts for this appliance must be used
according to this instruction manual.
27. A fire may occur if the appliance is covered or touching flammable material
including curtains, draperies, walls, etc. when in operation.
28. Do NOT clean with metal scouring pads. Pieces can break off the pad and touch
electrical parts, involving a risk of electrical shock.
29. Be sure not to damage the heating element. (Do not bend or dent.)
Important Safeguards (cont’d)
KEEP OUT OF REACH OF CHILDREN. Do not leave appliance unattended
when in use or when appliance contains hot oil or food. Always supervise
children when they are near appliance. Do not allow children to operate or be
near the appliance when in use.
CAUTION: burns, injury and/or fire may result from non-compliance with all
operating procedures described in instructional manual.
FOR HOUSEHOLD USE ONLY • NOT FOR COMMERCIAL USE
SAVE THESE INSTRUCTIONS FOR FUTURE REFERENCE
Page 4

76
1•888•557•3848
Wards.com
Parts & Features
1. Timer Knob
2. Temperature Control Knob
3. Indicator Light (Red/Green)
4. Removable Oil Pot
5. Frying Basket
6. Frying Basket Handle
7. Frying Basket Holding Rings
8. Frying Basket Drip Hook
9. Exterior Housing
10. Lid
11. Power Cord with Magnetic Plug
12. Magnetic Control Plug Socket
13. Power Activating Switch
14. Holding Rails
15. Sliding Tabs
16. RESTART Button
17. Control Panel
18. Heating Element
19. Filter Cover
Polarized Plug
This appliance has a polarized plug (one blade is wider than the other). As a safety
feature to reduce the risk of electrical shock, this plug is intended to fit a polarized
outlet only one way. If the plug does not fit fully in the outlet, reverse the plug. If it
still does not fit, contact a qualified electrician. Do not attempt to modify the plug in
any way.
SHORT CORD INSTRUCTIONS
1. A short power supply cord is provided to reduce the risk resulting from
becoming entangled in or tripping over a longer cord.
2. Longer detachable power-supply cords or extension cords are available and may
be used if care is exercised in their use.
3. If a long detachable power cord or extension cord is used:
• The marked electrical rating of the detachable power supply cord or exten-
sion cord should be at least as great as the electrical rating of
the appliance.
• If the appliance is of the grounded type, the extension cord should be the
same type 3-wire.
• The longer cord should be arranged so that it will not drape over
the countertop or tabletop where it can be pulled on by children or tripped
over.
MAGNETIC PLUG: This appliance is equipped with an easy break-away
magnetic plug.
Page 5

1. NEVER add water to oil. Food with high moisture content may cause
foaming which may lead to overflow of oil. Remove ice particles from
frozen foods to prevent splattering. NEVER overfill oil pot or basket.
2. Oil & fat may burn when overheated. CAUTION: be careful when deep frying.
3. ALWAYS turn deep fryer OFF after each use and unplug from electrical outlet.
4. Let unit and oil cool down completely before disassembling or cleaning the
deep fryer. EXTREME CAUTION must be used when moving this or any
appliance containing hot oil, food, liquid, etc.
5. Do NOT operate deep fryer with an external timer or separate remote
control system.
6. Fill oil pot using Min/Max lines on the inside of the pot. Do NOT overfill or
under fill.
7. Never leave any food in oil after use.
8. Change oil in pot every 5 uses or so. Excessively used oil may cause
undesired taste and may have a lower tolerance to heat.
9. Use high-quality liquid frying oil (vegetable, peanut, grape seed, etc.).
10. If using shortening, cut into small pieces, turn temperature control to “LOW”
setting and add pieces slowly to pot. Once shortening has melted to oil level
as indicated by fill line on side of oil pot, set to desired temperature on control
panel. Do NOT overfill oil pot.
11. NEVER place unmelted shortening in deep frying basket.
12. Oil should never be heated to a point where it smokes. This would indicate that
oil has insufficient heat threshold and should not be used for cooking. Do NOT
use margarine, olive oil or butter as these will smoke at lower temperatures and
could cause fire.
13. Oil inside deep fryer will become very hot during use (can heat up to 375° F).
Be very careful when handling food and/or basket as it comes out of the fryer.
8
9
1•888•557•3848
Wards.com
Added Safety Instructions
3. Clean frying basket (5) in hot soapy water, rinse thoroughly and dry completely
before use.
4. Carefully lift control panel (17). Let oil drip back in oil pot (4) and place heating
element (18) on paper towel. Carefully and gently clean off any oil residue from
heating element (18). Do NOT immerse in or expose control panel (17), heating
element (18), electrical cord or plug to water or other liquid.
5. Discard oil from oil pot (4) or cover oil pot and keep refrigerated until next use.
6. If oil pot (4) is empty, clean in hot soapy water, rinse thoroughly and dry
completely inside and outside before use.
7. Clean exterior housing (9) with damp cloth. Dry thoroughly before use.
8. Do NOT use any abrasive scouring pads or cleaners.
HOW TO REPLACE THE FILTER:
This fryer is equipped with two filters (charcoal and odor) that should be replaced
every 6 months.
1. Unclip and remove the filter cover.
2. Take out and discard both the black and white filter pieces.
3. Replace with new filters (available at Wards.com).
NOTE: Filters can be gently rinsed in warm, soapy water and reused. But
they will need to be replaced after a considerable amount of usage.
Cleaning & Care (cont’d)
1. Discard all packaging and plastic bags.
CAUTION: Risk of suffocation—keep all packaging and plastic bags out of the
reach of children.
2. Wash frying basket (5) and oil pot (4) with a soft cloth in hot soapy water before
first use. Rinse thoroughly and wipe completely dry with a clean cloth. Make sure
oil pot (4) has no water left behind before adding oil.
3. Carefully wipe temperature control panel (17) and heating element (18) with a
damp cloth and wipe completely dry before use. Make sure heating element (18)
has no water or humidity left behind before adding oil.
Do NOT immerse or expose appliance, control panel, electrical cord or plug to
water or other liquid.
Before Using for the First Time
Cleaning & Care
1. Unplug unit from electrical wall outlet and from magnetic electrical socket (12).
Let the deep fryer and oil cool down completely before handling.
2. Lift lid (10) and use paper towel to absorb any oil that could drip. Lift out frying
basket (5) and let oil drip back into oil pot (4). Use paper towel to absorb any
excess oil.
Page 6

10 11
1•888•557•3848
Wards.com
Assembly (cont’d)
4. Fill oil in oil pot (4), making sure you do not fill past the maximum oil fill line (indicated on the side of the oil pot as shown in Figure 3).
Do NOT overfill oil pot (4) (capacity is 3.5 quarts)
5. Place lid (10) on oil pot (4).
6. Insert magnetic plug (11) into the back of the control panel, making sure it is
fully engaged in socket (12). NOTE: Magnetic plug (11) will only fit in the socket
(12) one way. Make sure to insert as indicated “This side up” (Figure 4).
Assembly
1. Assemble frying basket (5) by pinching handle fork (6) into basket holding rings
(7). Pull back handle (6) until locked into place correctly (Figure 1). CAUTION:
Ensure deep frying basket (5) has been correctly attached before frying.
2. Insert oil pot (4) into exterior housing unit (9).
3. Attach temperature control panel (17) and heating element (18) by lining the 2
sliding tabs (15) into holding rails (14) (located in the back of the unit) securely
in place (Figure 2). NOTE: Power activating switch (13) is activated when
temperature control panel (17) and heating element (18) are placed correctly
into holding rails.
Page 7

12
13
1•888•557•3848
Wards.com
How to Use
Place the deep fryer on a heat-resistant surface.
1. Insert plug into electrical outlet. Red indicator light (3) will turn ON.
2. Turn the temperature control knob (2) to the desired heat setting. Set timer to
desired frying time by turning timer knob (1). Red and green indicator lights (3)
will turn ON indicating heating element is in operation.
NOTE: Both temperature and timer settings must be turned on in order for fryer
to operate. Once the temperature has been reached, the green
temperature indicator light will turn OFF, indicating oil is now ready to fry.
NOTE: The green indicator light will switch on and off several times during fry-
ing. This is normal and indicates that the temperature is controlled by
thermostat and is being maintained.
3. Carefully take off lid (10).
4. Place food into frying basket (5) then carefully insert basket into oil.
CAUTION: Do NOT fill frying basket (5) more than 2/3 full. Do NOT overfill frying
basket.
WARNING: Be very careful when inserting frying basket (5) into hot oil as there
is a risk of oil splatter, burns or scalding.
ALWAYS use oven mitts when handling frying basket or removing lid.
5. Place lid (10) back on oil pot (4).
6. ALWAYS monitor food when frying.
WARNING: There is a risk of oil catching fire if overheated or if left to heat over
an extended period of time.
7. When food is fried to desired taste, using oven mitts, carefully remove lid
and set aside.
CAUTION: Lid (10) will be extremely hot and may drip with hot oil. Make sure
you do not place lid on any heated element or flammable material. Do NOT place
on any easily stainable surface.
8. Turn unit OFF and unplug from electrical outlet. Take out frying basket (5) and let
the oil drip from the food by placing the frying basket (5) onto the rim of the oil
pot (4) (with the drip hook sitting on the rim of the oil pot).
How to Use (cont’d)
9. Once excess oil has dripped from the frying basket (5), remove the basket and
empty the food onto a plate or dish.
10. Let unit and oil cool down completely before displacing or cleaning appliance.
11. Cooled down oil can be left in oil pot, covered and kept refrigerated.
Using the timer:
This fryer is equipped with a 30-minute dial timer.
1. Turn the dial clockwise to the correct length of time and release the knob.
2. The timer will ring when the desired length of time has been reached.
Page 8
Frying ps R
• Food will cook well once the proper oil temperature is achieved (within approx.
10 minutes). Be sure to check the oil temperature before placing the fry basket
into the unit. The adjustable temperature control is clearly marked and easy to
follow.
• When you fry several different kinds of food, always fry the food that uses
the lowest temperature setting first.
• Do not mix different types of oil for frying.
• Frying already pre-cooked foods may take less time to fry than completely
raw food.
• If you wish to fry frozen foods, it is highly recommended to remove any ice
build-up before frying. Ice or water can cause splattering of oil.
• You may use oil more than once. It is recommended that you filter used oil
before reusing.
• It is recommended to replace the oil after every 10-15 uses; or earlier if
the oil becomes brown and thick.
• Make sure food is always sliced thinly and evenly. This helps the food to be
fried evenly.
• Shake off any excess flour or bread crumb coating to prevent any clumps
from forming when frying.
• Frying already pre-cooked foods may take less time to fry than completely
raw food.
• If you wish to use the basket when frying foods coated with batter, it is
recommended to lower the basket into the hot oil first and then gently and
carefully place battered foods into the oil directly. This will prevent the batter
from catching and sticking to the wiring of the basket.
• Never fill the basket more than 2⁄3 full. In order to cook evenly, the food needs
space for even frying on all sides.
Batred Food Frying ps R
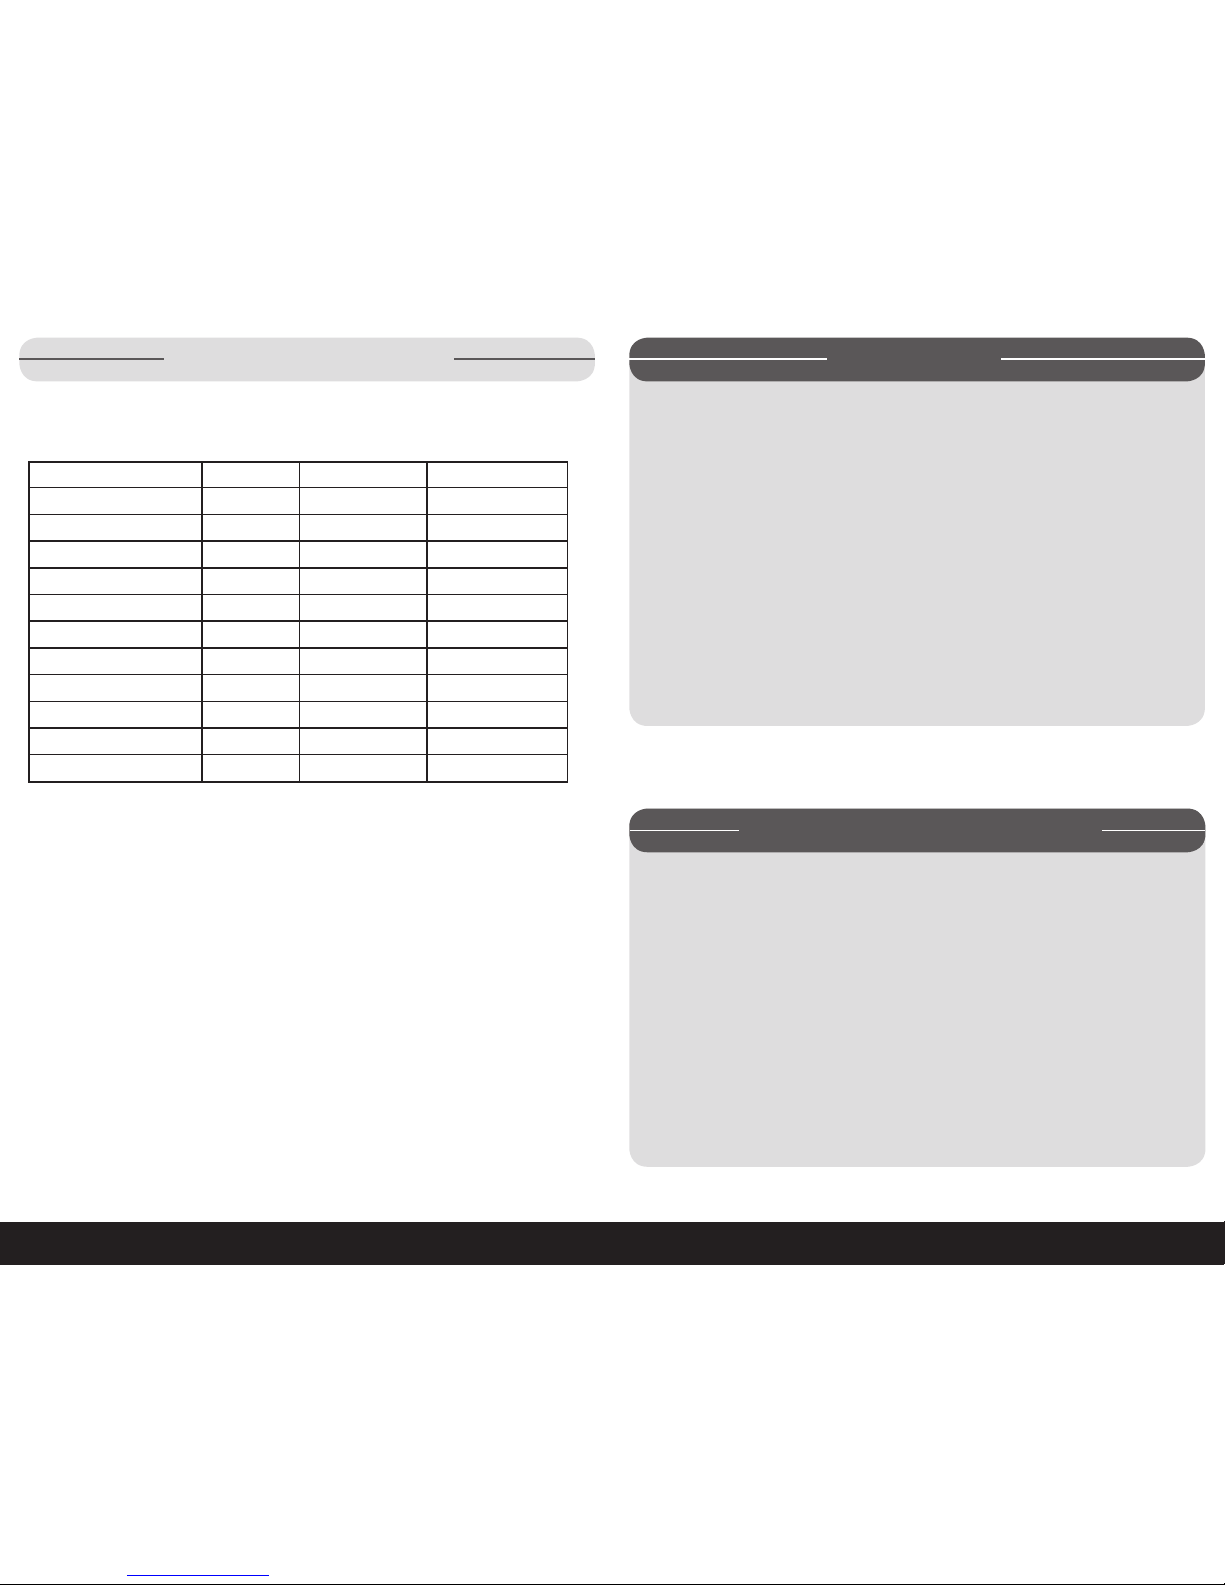
*French Fries being fried a 2nd time will be lighter and crispier.
The frying times given in the chart are only a guide and
should be adjusted according to the quantity of food being fried.
Frying Guide & Tips
FOOD
Shrimp
Onion
Mushrooms
Fish Fillet
Fish in Batter
Fish Sticks
Sliced Meat
Steak
Chicken Strips
French Fry - 1st
French Fry - 2nd*
TEMP.° F
285°
285°
285°
300°
300°
300°
340°
340°
360°
375°
375°
WEIGHT(oz.)
8
5
10.5
8
14
14
14
14
18
18
8
EST. TIME
3–5 minutes
3–4 minutes
6–8 minutes
5–6 minutes
6–8 minutes
6–8 minutes
7–10 minutes
7–10 minutes
7–10 minutes
6–10 minutes
3–5 minutes
HINTS:
1. Pre-fried (food dipped in batter/coating) requires a higher temperature than raw
food in order to have a crisp coating.
Pre-cooked food that does not have a batter/coating does not require a
higher temperature.
2. When frying dough-like food, scrape off excess dough and carefully place pieces
into oil.
3. Pat uncooked food dry to remove excess moisture and avoid oil splatter.
4. Rely on frying times found on food packaging or in recipe/cookbook.
1•888•557•3848
Wards.com
14 15
Page 9

BATTER RECIPES
Beer Batter
Mix 1½ cups of flour and 1½ cups of any kind of beer in a large mixing bowl. Cover
the bowl after mixing and allow the batter to sit at room temperature for
approximately 3 hours, then dip food into the mixture before frying*.
Egg Batter
Combine 2 egg yolks, ¾ cup of flour, 1½ teaspoons of vegetable oil, ½ teaspoon of
salt and 1 cup of milk. Mix thoroughly. Add more milk if desired to adjust the density
of the mixture, then dip food into the mixture before frying*.
Egg Coating
Combine 2 whole eggs with 1½ teaspoons of vegetable oil and a pinch of salt and
pepper to taste, then dip food into the mixture before frying*.
Extra Crispy Coating
Beat together ½ cup of milk and 1 whole egg in a small mixing bowl.
In a separate bowl, mix together ½ cup of flour and any of your favorite
seasonings such as salt, pepper, chili powder, garlic powder, etc. Dip
desired food into the wet mixture first, then dip into the dry flour mixture before
frying*.
Bread Crumb Coating
Beat together 1½ teaspoons of vegetable oil and 2 egg yolks in a small mixing bowl.
In a separate bowl, mix together ½ cup of bread crumbs, 1⁄3 cup of flour plus any of
your favorite seasonings such as salt, pepper, chili powder, garlic powder, etc. When
ready to fry, dip desired food into the wet mixture first, then dip into the dry bread
crumb mixture before frying*.
*See tips for frying food with batter coating on the previous page.
Beer Batter Fish Fillets
1 cup all-purpose flour 1 tsp. salt
1 tsp. baking powder
1
⁄2 tsp. dried dill weed
3
⁄4 cup beer
1
⁄2 cup milk
2 eggs 2 lbs. cod fillets
2 qts. vegetable oil for frying
• In a large bowl, mix together flour, salt, baking powder, and dill. Add beer, milk,
and eggs; mix well.
• Place fish fillets in batter mixture, coat well, and let stand for 15 minutes.
• Heat deep fryer to 375° F. Place fish in hot oil, and fry until golden brown.
• Cook fish in batches to maintain oil temperature. Serve.
Fried Chicken with Creamy Gravy
1
⁄2 cup milk 1 egg, beaten
1 cup all-purpose flour 2 tsp. garlic salt
1 tsp. paprika 1 tsp. ground black pepper
1
⁄4 tsp. poultry seasoning 3 cups vegetable oil
1 cup chicken broth 1 cup milk
1 (4-lb.) whole chicken, cut into pieces
• In a medium bowl, beat together 1⁄2 cup milk and the egg.
• In a resealable plastic bag, mix together the flour, garlic salt, paprika, pepper and
poultry seasoning.
• Place chicken in bag, seal, and shake to coat. Dip chicken in milk and egg
mixture, then once more in flour mixture.
• In the deep fryer, heat oil to 365° F until ready.
• Place coated chicken in the hot oil, and brown on all sides. Reduce heat to 325°
F, and continue cooking chicken until tender, approximately 20 minutes. Remove
chicken from fryer, and drain on paper towels.
• Reserve 2 tablespoons of the frying oil and place into a saucepan over low
heat. Stir in 2 tablespoons of the reserved flour mixture. Stirring constantly,
cook about 2 minutes. Whisk in chicken broth.
• Stir in 1 cup milk, and bring all to a boil over high heat, stirring constantly.
Reduce heat to low, and simmer for about 5 minutes.
• Serve immediately with the chicken.
• Repeat with remaining batter.
RecipesRecipes
16
1•888•557•3848
Wards.com
17
Page 10

Recipes
Avocado Egg Rolls
Dipping Sauce
3–4 tsp. white vinegar 2 garlic cloves
1 tsp. balsamic vinegar 2 green onions
1
⁄2 tsp. tamarind pulp 1 Tbsp. granulated sugar
1
⁄2 cup honey 1 tsp. ground black pepper
1 pinch powdered saffron 1 tsp. ground cumin
1
⁄2 cup chopped cashews
1
⁄4 cup olive oil
2
⁄3 cup fresh cilantro
Egg Rolls
1 large avocado, peeled, pitted & diced
2 Tbsp. sun-dried tomatoes packed in oil, chopped
1 Tbsp. minced red onion
1
⁄2 tsp. fresh cilantro, chopped
1 pinch salt
3 egg roll wraps
1 egg, beaten
• Stir together vinegars, tamarind, honey, and saffron in a microwave safe bowl, and
microwave for one minute.
• Stir until tamarind is dissolved.
• In a blender, purée tamarind mixture, cashews, 2⁄3 cup cilantro, garlic, onions,
sugar, pepper and cumin.
• Pour mixture into a bowl and stir in oil.
• Refrigerate until ready to use.
• Gently stir together avocado, tomatoes, onion, 1⁄2 teaspoon cilantro and salt.
• Distribute filling evenly onto center of each egg roll wrapper.
• Position a wrapper so that a corner is pointing toward you; fold the bottom corner
up, 1⁄4 of the way over the filling.
• Brush remaining corners and edges of the wrapper with egg, roll up from side
to side, fold top corner over all and press to seal.
• Repeat with remaining wrappers.
• Continue by deep-frying the egg rolls in 375° oil for 3–4 minutes, until golden
brown.
• Drain on brown paper bags.
• Slice egg rolls diagonally across middle and serve with prepared dipping sauce.
Corn Dogs
1
⁄2 cup yellow cornmeal
1
⁄2 cup flour
1 tsp. honey
1
⁄2 tsp. salt
1 egg, lightly beaten 6 skewers or sticks
6–8 hot dogs/Frankfurters 1 Tbsp. sugar
1 tsp. baking powder
1
⁄2 cup milk
1 Tbsp. melted shortening
• Combine the cornmeal, flour, sugar, honey, baking powder and salt, mixing well.
• Add the milk, egg and shortening, mixing until very smooth.
• Pour the mixture into a tall glass. Put the frankfurters on sticks.
• Dip them into the cornmeal batter to coat them evenly.
• Deep fry in oil heated to 375° F until golden brown.
• Drain on paper towels.
Buffalo Wings
24 wings (4 lbs.) Salt & pepper (optional)
4 cups cooking oil
1
⁄4 cup butter
2–5 tsp. hot sauce 1 tsp. white vinegar
• Cut off tips and separate wings at joint; sprinkle with salt and pepper.
• Heat oil in deep fryer to 350° F.
• Add 12 wings and cook 10 minutes, stirring occasionally.
• When wings are golden brown and crisp, remove and drain well. Add rest of wings;
repeat process.
• Meanwhile, melt butter in saucepan; add hot sauce and vinegar to taste Pour
sauce over wings and mix well to cover.
• Serve with blue cheese dressing and celery sticks.
Golden Fried Onion Rings
6 med. mild white onions 11⁄8 cup sifted flour
1
⁄2 tsp. salt 1 egg, slightly beaten
1 cup milk
• In the deep fryer, heat the oil to 350° F.
• Slice onion 1⁄4" thick and separate into rings.
• Combine remaining ingredients in a bowl and stir just until dry ingredients are
moistened.
• Dip onion rings into flour mixture.
• Fry several at a time in a deep fryer until golden brown. Drain on paper towel
and sprinkle with salt.
Recipes
1•888•557•3848
18
Wards.com
19
Page 11

Recipes
Fried Green Tomatoes
3–4 lg. green tomatoes 2 cups flour
1 Tbsp. salt 1 Tbsp. pepper
1 Tbsp. seasoning salt 2 eggs
2 cups milk Oil for frying
• Cut tomatoes into almost 1⁄2" thick slices.
• Mix flour, salt, pepper and seasoning salt in one bowl.
• Mix eggs and milk in another bowl. Dip each tomato slice into the milk mixture,
then into the flour, back to the milk and then to the flour again, coating well.
• Heat oil in a deep fryer to 350° F and add battered tomato slices a few
at a time, and cook for 5 minutes or until golden brown.
Funnel Cake
2 cups flour
1
⁄2 tsp. salt
1 tsp. baking powder 2 eggs
11⁄2 cups milk powdered sugar
• Combine all the above ingredients and mix thoroughly to create batter.
• In the deep fryer, heat the oil to 350° F.
• Put batter in funnel (be sure to cover hole with one finger), then, holding the funnel
over hot oil (be careful of hot oil!), release some of the batter in a circular motion,
crisscrossing a couple of times to form one funnel cake.
• The funnel cake will rise quickly and expand - so be careful how much batter
you use.
• Cook to light golden brown and flip to cook on other side.
• Remove from oil and place on paper towels.
• Sprinkle with powdered sugar and serve warm.
Recipes
Beignets (makes 2 dozen)
Vegetable oil for frying 1 cup all-purpose flour
4 tsp. sugar
1
⁄4 tsp. nutmeg
1 cup water or milk
1
⁄3 cup butter
1
⁄4 tsp. salt 1 tsp. vanilla extract
4 eggs, at room temp.
• In the deep fryer, heat the oil to 350° F.
• Combine the flour, sugar and nutmeg, and set aside.
• In a medium saucepan heat water or milk over medium heat. Add the butter
and salt and whisk until butter is melted. Add the vanilla and mix. Then add
flour mixture.
• Stir briskly with a wooden spoon until mixture releases from the sides of pan
and forms a ball. Remove from heat and beat until slightly cool.
• Add eggs, one at a time, beating well. Using 2 tablespoons, shape dough into
an oblong shape and drop into hot oil.
• Fry 3 or 4 at a time, turning beignets as they rise to the surface. Fry 3 to 4
minutes, until golden brown.
• Drain on paper towels and sprinkle with sifted confectioners' sugar.
Churros
Vegetable oil for frying 1 cup all-purpose flour
1 cup water 3 eggs
1
⁄2 cup margarine or butter
1
⁄4 cup sugar
1
⁄4 tsp. salt 1⁄4 tsp. ground cinnamon
• Prepare to fry the churros by heating oil in deep fryer to 360° F.
• To make churro dough, heat water, margarine and salt to rolling boil in 3-qt. saucepan; stir in flour.
• Stir vigorously over low heat until mixture forms a ball, about 1 minute; remove
from heat.
• Beat eggs all at once; continue beating until smooth and then add to saucepan
while stirring mixture.
• Spoon mixture into cake decorator’s tube with large star tip.
• Squeeze 4" strips of dough into hot oil. Fry 3 or 4 strips at a time until golden
brown, turning once, about 2 minutes on each side. Drain on paper towels.
• Mix sugar and cinnamon; roll churros in sugar mixture.
1•888•557•3848
Wards.com
20
21
Page 12

Returns
If any item, for any reason, does not meet your expectations, just return it to us.
We’ll gladly either:
• Refund your merchandise amount
• Credit your account
• Send a replacement
You can return any unused item in its original packaging within 60 days of its
receipt for a full refund of the purchase price (excluding shipping and handling
charges).
Please send returns to:
Montgomery Ward, Inc.
Attn: Customer Returns
2000 Harrison Suite 100
Clinton, IA 52732-6676
When returning an item:
• Use the original packaging and pack it securely.
• Please adequately insure your item in case you need to make a claim
with the carrier you choose for returning your item.
• Include your order number and reason for return.
• We recommend keeping the receipt for 4 weeks.
Montgomery Ward, Inc. warrants this Chef Tested product
to be free from defects in material and workmanship
for one year from provable date of purchase.
Within this warranty period, Montgomery Ward will repair or
replace, at its option, defective parts of this Chef Tested
product at no charge, provided the product is returned,
freight prepaid with proof of purchase to Montgomery Ward.
Allow 2-4 weeks for return shipping.
This warranty does not cover improper installation, misuse,
abuse or neglect on part of the owner. Warranty is also
invalid in any case that the product is taken apart or
serviced by an unauthorized service station.
This warranty gives you specific legal rights and they may
vary from state to state.
THE FOREGOING WARRANTIES ARE IN LIEU OF ALL
OTHER WARRANTIES AND CONDITIONS,
EXPRESS OR IMPLIED, INCLUDING
BUT NOT LIMITED TO THOSE OF MERCHANTIBILITY
OR FITNESS FOR A PARTICULAR PURPOSE.
1 Year Limited Warranty
Montgomery Ward Customer Service
8:00 am to Midnight CST, Monday through Friday
Wards.com 1•888•557•3848
®
1•888•557•3848
Wards.com
22 23
 Loading...