

Page 1

Owner's Manual
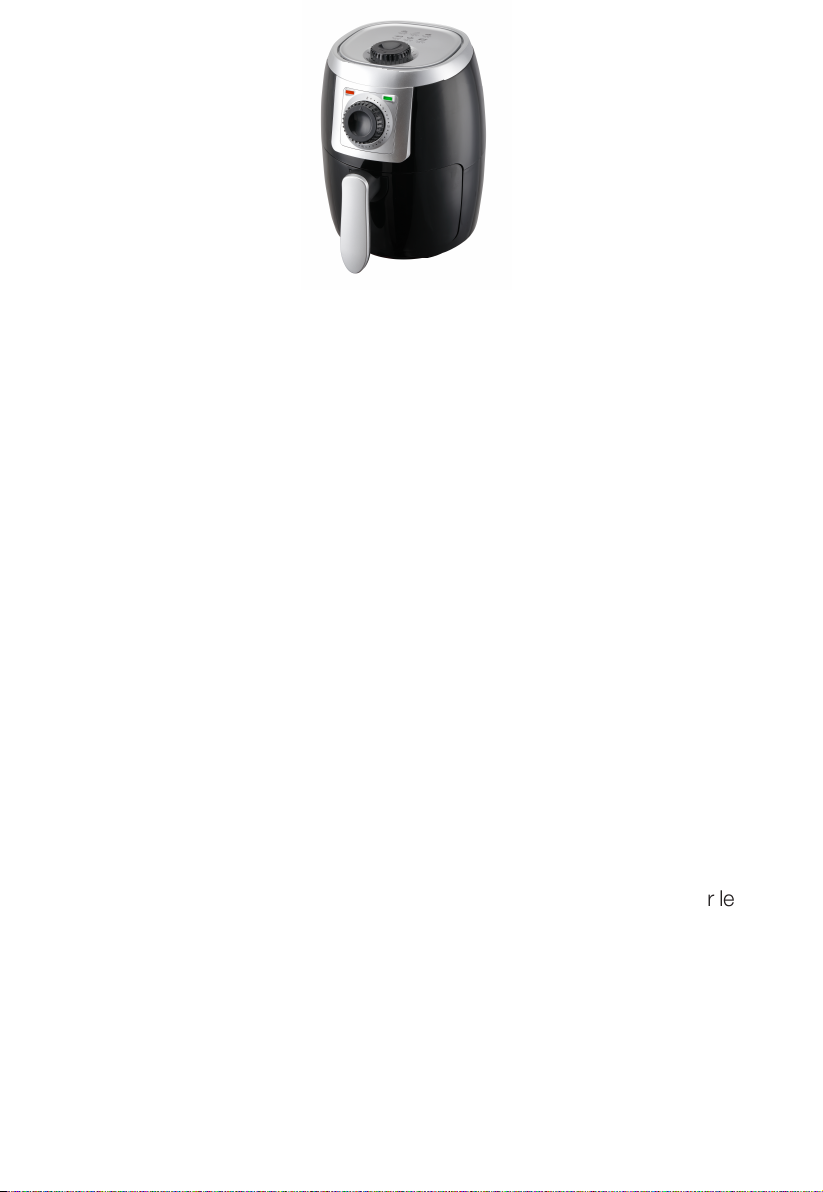
AIR FRYER
HOUSEHOLD USE ONLY
Model No.: AF005
Product Code: 4NPGGB0000010
Made in China
Item No.: AF005
Page 2
PRODUCT SPEC: AC120V 60Hz 1000W
INSTRUCTIONS MANUAL
Before operating your new appliance, please read all instructions carefully and save it
for future reference.
IMPORTANT SAFEGUARDS.
1. Read all instructions before using.
2. Do not touch hot surfaces. Use handles or knobs. Use oven mitts or potholders.
3. To protect against electrical shock, do not immerse the cord, plugs, or appliance
in water or other liquid.
4. This appliance is not intended for use by persons (including children) with reduced
physical, sensory, or mental capabilities, or lack of experience and knowledge,
unless they have been given supervision or instruction for safe use of the appliance.
5. Children should be supervised to ensure that they do not play with the appliance.
6. Unplug from outlet when not in use and before cleaning. Allow to cool before
putting on or taking off parts, and before cleaning the appliance.
7. Do not operate any appliance with a damaged cord or plug, after the appliance
malfunctions, or has been damaged in any manner. Bring it to a qualified technician
for examination, repair, or electrical or mechanical adjustment.
8. The use of accessory attachments is not recommended by the appliance manufacturer may result in fire, electric shock, or injuries.
9. Do not use outdoors.
10. Do not let the cord hang over the edge of the table or counter. Do not or let the
cord touch hot surfaces.
11. Do not place on or near hot gas, an electric burner, or in a heated oven.
12. Extreme caution must be used when moving an appliance containing hot oil or
other hot liquids.
13. Do not use the appliance for other than its intended use.
14. To disconnect, turn any control to “off”, then remove the plug from the wall
outlet.
15. Make sure to use on a heat resistant and even surface. Keep at least 15 cm
away from walls and other flammables.
16. Notice that the tray only can put food or liquid at the 2/3 of capacity.
Page 3
17. Turn the thermostat knob to the “0”, then the appliance will stop working.
18. Before the appliance stops working, the heater surface keeps warm for a long
time. Do not touch the surface before cooling.
19. CAUTION: TO REDUCE THE RISK OF ELECTRIC SHOCK, COOK
ONLY IN THE PROVIDED REMOVABLE CONTAINER.
20. CAUTION-HOT SURFACE.
21. CAUTION: TO ENSURE CONTINUED PROTECTION AGAINST RISK
OF ELECTRIC SHOCK, CONNECT TO PROPERLY GROUNDED OUTLETS
ONLY.
WARNING:
2-WIRE POLARIZED ATTACHMENT PLUG:
This appliance has a polarized plug (one blade is wider than the other).
To reduce the risk of electric shock, this plug is intended to fit into a
polarized outlet only one way. If the plug does not fit fully into the outlet,
reverse the plug. If it still does not fit, contact a qualified electrician. Do
not attempt to modify the plug in any way.
WARNING: When the appliance provided with a flexible cord less than 4-1/2 feet
(1.4m) in length, the extension cord should be a grounding-type 3-wire cord and
meet the following requirements:
1) A short power-supply cord should be used to reduce the risk resulting from
becoming entangled in or tripping over a longer cord.
2) Longer extension cords are available. They may be used if care is exercised in
their use.
3) If a longer extension cord is used:
a) The marked electrical rating of the extension cord should be as great as the
electrical rating of the appliance.
b) The cord should be arranged so that it will not drape over the countertop or
tabletop where it can be pulled on by children or tripped over unintentionally.
This appliance is intended for Household Use Only
SAVE THESE INSTRUCTIONS
INTRODUCTION
This air fryer provides an easy and healthy way of preparing your favorite ingredients.
By using hot rapid air circulation and a grill, it is able to make numerous dishes. The
best part is that the air fryer heats food at all directions and most of the ingredients
do not need any oil.
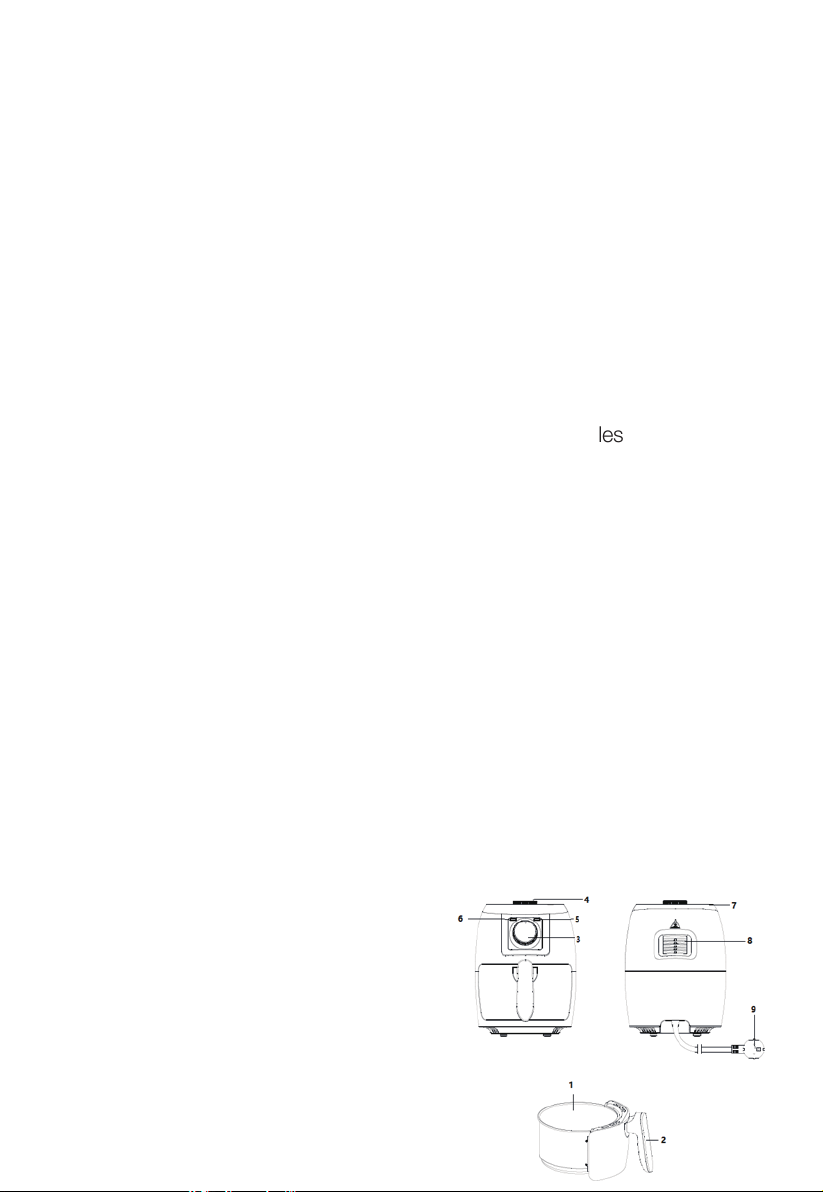
General description (Fig.1)
1. Pan
2. Basket handle
3. Timer (0-30 min)
4. Temperature control knob (80-200°C)
5. Heating-up light
6. Power on light
7. Air inlet
8. Air outlet
9. Main cord
Page 4

IMPORTANT
Please read this manual carefully before using the appliance as dangers may occur
under incorrect operations.
DANGER
-Do not immerse the housing in water or rinsing under the tap due to the multi electrical
and heating components.
-Avoid any liquid that will enter the appliance to prevent electric shock or a short-circuit.
-Keep all ingredients in the basket to prevent any contact from heating elements.
-Do not cover the air inlet and the air outlet when the appliance is working.
-Filling the oil catch plate with oil may cause a fire hazard.
-Do not touch the inside of the appliance while it is operating.
▲WARNING
・ Check if the voltage indicated on the appliance corresponds to the local main voltage
before connecting the appliance.
・ Do not use the appliance if the plug, main cord or if the appliance itself is damaged.
・ Children should be supervised to ensure that they do not play with the appliance.
・ Keep the main cord away from hot surfaces.
・ Do not plug in the appliance or operate the control panel with wet hands.
・ Only connect the appliance to an earthed wall socket. Always make sure that the
plug is inserted into the wall socket properly.
・ Never connect this appliance to an external timer switch in order to avoid a hazard-
ous situation.
・ Do not place the appliance on or near combustible materials such as a tablecloth
or curtain.
・ Do not place the appliance against a wall or against other appliance. Leave at
least 10cm free space on the back and sides and 10cm free space above the
appliance. Do not place anything on top of the appliance.
・ Do not use the appliance for any other purpose than described in this manual.
・ Do not let the appliance operate unattended.
・ During hot air frying, hot steam is released through the air outlet openings, Keep
your hands and face at a safe distance from the steam and from the air outlet
openings. Also, be careful of hot steam and air when removing the pan from the
appliance.
・ The accessible surfaces may become hot during use (Fig.2).
・ Immediately unplug the appliance if you see dark smoke coming out of the
appliance. Wait for the smoke emission to stop before removing the pan from the
appliance.
・ The baking tray becomes hot all over when it is used in the air fryer so always
use oven gloves when handling the baking tray.
▲CAUTION
・ Place the appliance on a horizontal, even, and stable surface.
・ This appliance is intended for normal household use only. It is not intended for use
in environments such as staff kitchens of shops, offices, farms, or other work environments. Nor is it intended to be used by clients in hotels, motels, bed and breakfasts,
and other residential environments.
・ If the appliance is used improperly or for professional or semi-professional purpos-
es, or if it is not used according to the instructions in the user manual, the guarantee
becomes invalid and refuses any liability for damage caused.
・ Always return the appliance to a service center for examination or repair. Do not
attempt to repair the appliance yourself, otherwise the guarantee becomes invalid.
・ Always unplug the appliance after use.
・ Let the appliance cool down for approx.30 minutes before handling or cleaning it.
・ Make sure the ingredients prepared in this appliance come out golden-yellow
instead of dark or brown. Remove burnt remnants. Do not fry fresh potatoes at a
temperature above 200°C /395°F (to minimize production of acrylamide).
Page 5
BEFORE FIRST USE
1. Remove all packaging material.
2. Remove any stickers or labels from the appliance.
3. Thoroughly clean the basket and pan with hot water, some detergent, and a non-abrasive sponge.
Note: You can also clean these parts in the dishwasher.
4. Wipe the inside and outside of the appliance with a moist cloth.This is an air fryer that
works on hot air. Do not fill the pan with oil or frying fat.
PREPARING FOR USE
1. Place the appliance on a stable, horizontal, and level surface. Do not place the appliance
on non-heat-resistant surfaces.
2. Place the basket in the pan properly (Fig.3).
3. Pull the main cord out of the cord storage compartment in the bottom of the appliance.
4. Do not fill the pan with oil or any other liquid.
5. Do not put anything on top of the appliance. This disrupts the airflow and affects the hot
air frying result.
USING THE APPLIANCE
The air fryer can prepare a large range of ingredients. The recipe booklet included help to
get to know the appliance.
HOT AIR FRYING
1. Put the main plug in an earthed wall socket.
2. Carefully pull the pan out of the air fryer. (Fig.6)
3. Put the ingredients in the basket. (Fig.5)
Note: Never fill the basket beyond the MAX indication or exceed the amount indicat-
ed in the table (see section ‘Settings’ in this chapter), as this could affect the quality
of the end result.
Tip: Use the separator to separate ingredients when you want to prepare different
ingredients at the same time. Place the separator in the basket and fill up each side
of the basket with the ingredients.
Make sure to check the preparation time and the temperature required for the
different ingredients before starting to prepare them simultaneously. Potato cubes
and schnitzel, for example, can be prepared simultaneously because they require the
same settings. Please note that the maximum amount for each of the ingredients is
half the normal amount.
4. Slide the pan back into the air fryer. (Fig.4)
Never use the pan without the basket in it.
Caution: Do not touch the pan during and sometime after use, as it gets very hot.
Only hold the pan by the handle.
5. Rotate the temperature control and timer knob to set the temperature and the
time needed for baking.
6. Determine the required preparation time for the ingredients (see section ‘Settings’
in this chapter)
7. Some ingredients require shaking halfway through the preparation time (see
section ‘Settings’ in this chapter).
To shake the ingredients, pull the pan out of the appliance by the handle and shake
it. Then slide the pan back into the air fryer.
Caution: Do not press the basket release button during shaking.
Tip: To reduce the weight, you can remove the basket from the pan and shake the
basket only. To do so, pull the pan out of the appliance, place it on a heat-resistant
surface and press the basket release button.
Tip: If the timer is set to half the preparation time, you will hear the timer bell when
you have to shake the ingredients. However, this means that you have to set the
timer again for the remaining preparation time after shaking.
8. Check if the ingredients are ready.
Page 6

If the ingredients are not ready yet, simply slide the pan back into the appliance and set
the timer to a few extra minutes.
9. To remove small ingredients (e.g. fries), press the basket release button and lift the
basket out of the pan.
Do not turn the basket upside down with the pan still attached to it, as any excess oil that
has collected on the bottom of the pan will leak onto the ingredients.
After hot air frying, the pan and the ingredients will be hot. Depending on the type of
ingredients in the air fryer, steam may escape from the pan.
10. Empty the basket into a bowl or onto a plate.
Tip: To remove large or fragile ingredients, use a pair of tongs to lift the ingredients out of
the basket.
11. When a batch of ingredients is ready, the air fryer is instantly ready for preparing
another batch.
SETTINGS
This table below helps you to select the basic settings for the ingredients you want to
prepare.
Note: Keep in mind that these settings are indications, as ingredients differ in origin,
size, shape, as well as, brand. We cannot guarantee the best setting for your ingredients.
Because the Rapid Air technology instantly reheats the air inside the appliance,
pulling the pan briefly out of the appliance during hot air frying barely disturbs the
process.
Min-Max
Amount(g)
Potato & fries
Thin frozen fries 300-400 18-25 200/395
Thick frozen fries 300-400 20-25 200/395 Yes
Potato gratin 500 20-25 200/395 Yes
Meat & Poultry
Steak 100-500 10-20 180/355 No
Pork chops 100-500 10-20 180/355 No
Hamburger 100-500 10-20 180/355 No
Sausage roll
Drumsticks
Chicken breast
Snacks
Spring rolls 100-400 8-10 200/395 Yes
Frozen chicken nuggets 100-500 10-15 200/395 Yes
Frozen fish fingers 100-400 6-10 200/395 No
Frozen bread crumbed
cheese snacks
Stuffed vegetables 100-400 10 160/320 No
100-500 13-15 200/395 No
100-500 25-30 180/355 No
100-500 15-20 180/355 No
100-400 8-10 180/355 No
Time
(min.)
Temp.
(°C/°F)
Shake
Yes
Extra
information
Use oven-
ready
Page 7

Baking
Use
baking tin
Use
oven dish
Min-Max
Amount(g)
Temp.
(°C/°F)
Shake
Extra
information
Cake 300 20-25 160/320 No
Quiche 400 20-22 180/355 No
Muffins
Sweet snacks 400 20 160/320 No
TIPS
・ Smaller ingredients usually require a slightly shorter preparation time than larger
ingredients.
・ A larger amount of ingredients only requires a slightly longer preparation time.
・ Shaking smaller ingredients halfway through the preparation time can optimize the
end result and can help prevent unevenly fried ingredients.
・ Do not prepare extremely greasy ingredients such as sausages in the air fryer.
・ Snacks that can be prepared in an oven can also be prepared in the air fryer.
・ The optimal amount for preparing crispy fries is 500 grams.
・ Use pre-made dough to prepare filled snacks quickly and easily. Pre-made dough
also requires a shorter preparation time than home-made dough.
・ Place the baking tray or oven dish in the air fryer basket if you want to bake a cake
or quiche or if you want to fry fragile ingredients or filled ingredients.
・ You can also use the air fryer to reheat ingredients. To reheat ingredients, set the
temperature to 150°C /302°F for up to10 minutes.
Note: When you use ingredients that rise (such as with cake, quiche, or muffins) the
baking tray should not be filled more than halfway.
Making home-made fries:
For the best results, we advise to use pre-baked (e.g. frozen) fries. If you want to make
home-made fries, follow the steps below.
1. Peel the potatoes and cut them into sticks.
2. Soak the potato sticks in a bowl for at least 30 minutes, take them out and dry them
with kitchen paper.
3. Remove the sticks from the bowl with your fingers or a kitchen utensil behind in the
bowl. Put the sticks in the basket.
4. Fry the potato sticks according to the instructions in this chapter.
Note: Add 3 minutes to the preparation time when you start frying while the AIR
FRYER is still cold.
300 15-18 200/395 No
additional
additional
baking tin/
CLEANING
Clean the appliance after every use.
The pan, baking tray, separator, basket, and the inside of the appliance have a
non-stick coating. Do not use metal kitchen utensils or abrasive cleaning materials to
clean them, as this may damage the non-stick coating.
1. Remove the main plug from the wall socket and let the appliance cool down.
Note: Remove the pan to let the air fryer cool down more quickly.
2. Wipe the outside of the appliance with a moist cloth.
Page 8
3. Clean the pan, baking tray, separator and basket with hot water, detergent, and a
non-abrasive sponge.
You can use a degreasing liquid to remove any remaining dirt.
Note: The pan, baking tray, separator and basket are dishwasher-proof.
Tip: If dirt is stuck to the basket, the baking tray, or the bottom of the pan, fill the pan
with hot water with some detergent. Put the basket in the pan and let the pan and the
basket soak for approximately 10 minutes.
4. Clean the inside of the appliance with hot water and a non-abrasive sponge.
5. Clean the heating element with a cleaning brush to remove any food residue.
STORAGE
Unplug the appliance and let it cool down.
Make sure all parts are clean and dry.
Push the cord into the cord storage compartment. Fix the cord by inserting it into the
cord fixing slot.
ORDERING ACCESSORIES
If you have any difficulties obtaining accessories for your appliance, please contact the
Consumer Care Centre in your country. You find its contact details in the worldwide
guarantee leaflet.
ENVIRONMENT
Do not throw away the appliance with the normal household waste at the end of its
life, but hand it in at an official collection point for recycling. By doing this, you help to
preserve the environment.
DISPOSAL
If you want to dispose of equipment with this symbol on the appliance and/or in
the user manual, follow the below procedure: Make sure that the appliance is
processed in a responsible manner at the end of its service life to guarantee the
maximum reuse of (parts of) the appliance. Do not dispose of the appliance with
unsorted waste, but hand it in at the store or take it to a recognized collection point.
Contact your municipality for information about the reception and collection systems
in your area. Make sure that the appliance can be reused if you want to dispose of
the appliance while it is still in good working condition or if it needs only a minor
repair.
 Loading...