

Chef'sChoice KrumKake Express 839, KrumKake Express 839-SE Instructions & Recipes
GB F
International
KrumKake Express
™
Instructions & Recipes for Model 839/839-SE
Instructions et recettes pour le modèle 839/839-SE
© 2011 EdgeCraft Corp.

2
IMPORTANT SAFEGUARDS
When using electrical appliances, basic safety precautions should always be
followed including the following:
1. Read all instructions before using the KrumKake Express™.
2. Do not touch hot surfaces. Always use plastic handle on lid and do not touch stainless
cover when hot.
3. To protect against fire, electric shock and injury to persons, do not immerse cord,
plug or KrumKake Express
™
in water or other liquid.
4. Close supervision is necessary when any appliance is used by or near children.
5. Before use, unwind the power cord completely and keep the cord away from hot parts
of the appliance.
6. Do not let power cord hang over edge of table or counter or touch hot surfaces.
7. Do not place on or near hot gas or electric burner, or in a heated oven.
8. Extreme caution must be used when moving an appliance containing hot oil or other
hot liquids.
9. Only operate the KrumKake Express
™
on a dry, flat, non-slip surface.
10. Do not use the KrumKake Express
™
outdoors.
11. Do not operate the KrumKake Express
™
with a damaged cord or plug. If it malfunctions
or has been damaged in any manner, return the KrumKake Express
™
to the EdgeCraft
Corporation Service Department for examination, repair or adjustment.
12. The use of accessory attachments not recommended by the EdgeCraft Corporation may
result in fire, electric shock or injury to persons.
13. Always unplug the KrumKake Express
™
from electrical outlet when not in use and
before cleaning, to avoid accidental electrical shock. Allow to cool before cleaning.
14. As long as the appliance is hot, even if unplugged, there is the danger of someone
getting burned. Do not touch and do not put it into storage while hot.
15. Do not use the KrumKake Express
™
for other than intended use.
16. For use only on 120V 60HZ power. Use a socket with a good ground connection.
Do not use a three to two way adapter on the three prong power cord provided.
17. For household use only.
18. SAVE THESE INSTRUCTIONS.

3
YOU MADE
A GOOD
CHOICE
W
ith the KrumKake Express™, you will want to treat the
entire family and neighbors to that great delicacy lauded for ages in Scandinavia and throughout northern
Europe. The truly modern and speedy KrumKake Express
™
bakes a waffle ready to roll into a small cone in less than 90
seconds. Follow your favorite Scandinavian recipe or any of
those suggested here. Fill the cones with traditional whipped
cream and Lingonberries or with fruits, preserves, ice cream,
French icing or sherbets for impressive desserts on those
special occasions.
It is often said that the KrumKake originated in Norway but some
in Sweden still argue that point. The Germans have evolved their
own recipes for this delicacy, which they call the Hörnchen (little
horn). Every region in Germany bakes a slightly different cone
filled with local preferences.
The versatile KrumKake Express
™
, allows you to bake any size
waffle up to 6” diameter to a golden brown or darker color.
For those enjoying this dessert for the first time we include a
collection of our favorite recipes.
4
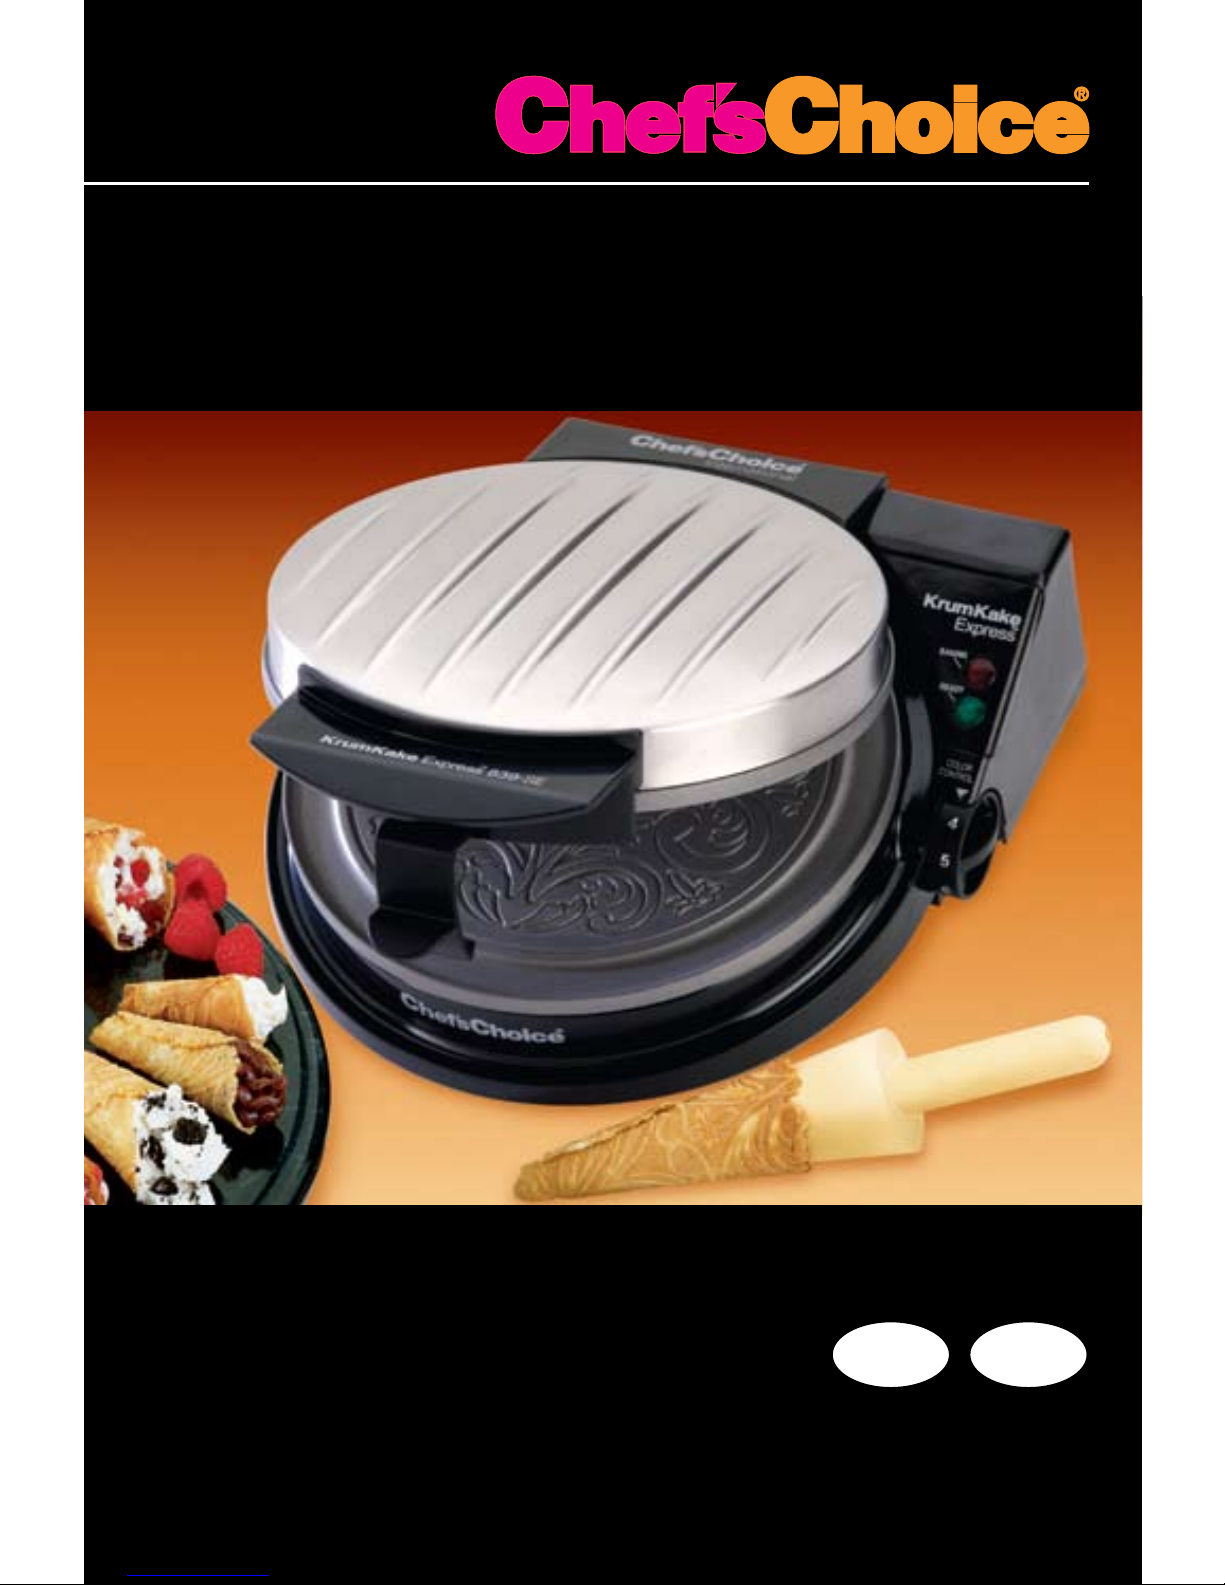
GETTING TO KNOW THE KRUMKAKE EXPRESS
™
Take a minute to identify the key features of the KrumKake Express™ (Figures 1 and 3). On the
right you will see a red “Baking” light and the green “Ready” light. The red light, when lighted,
indicates the baking plates are being heated. The green light, when lighted, signals that the
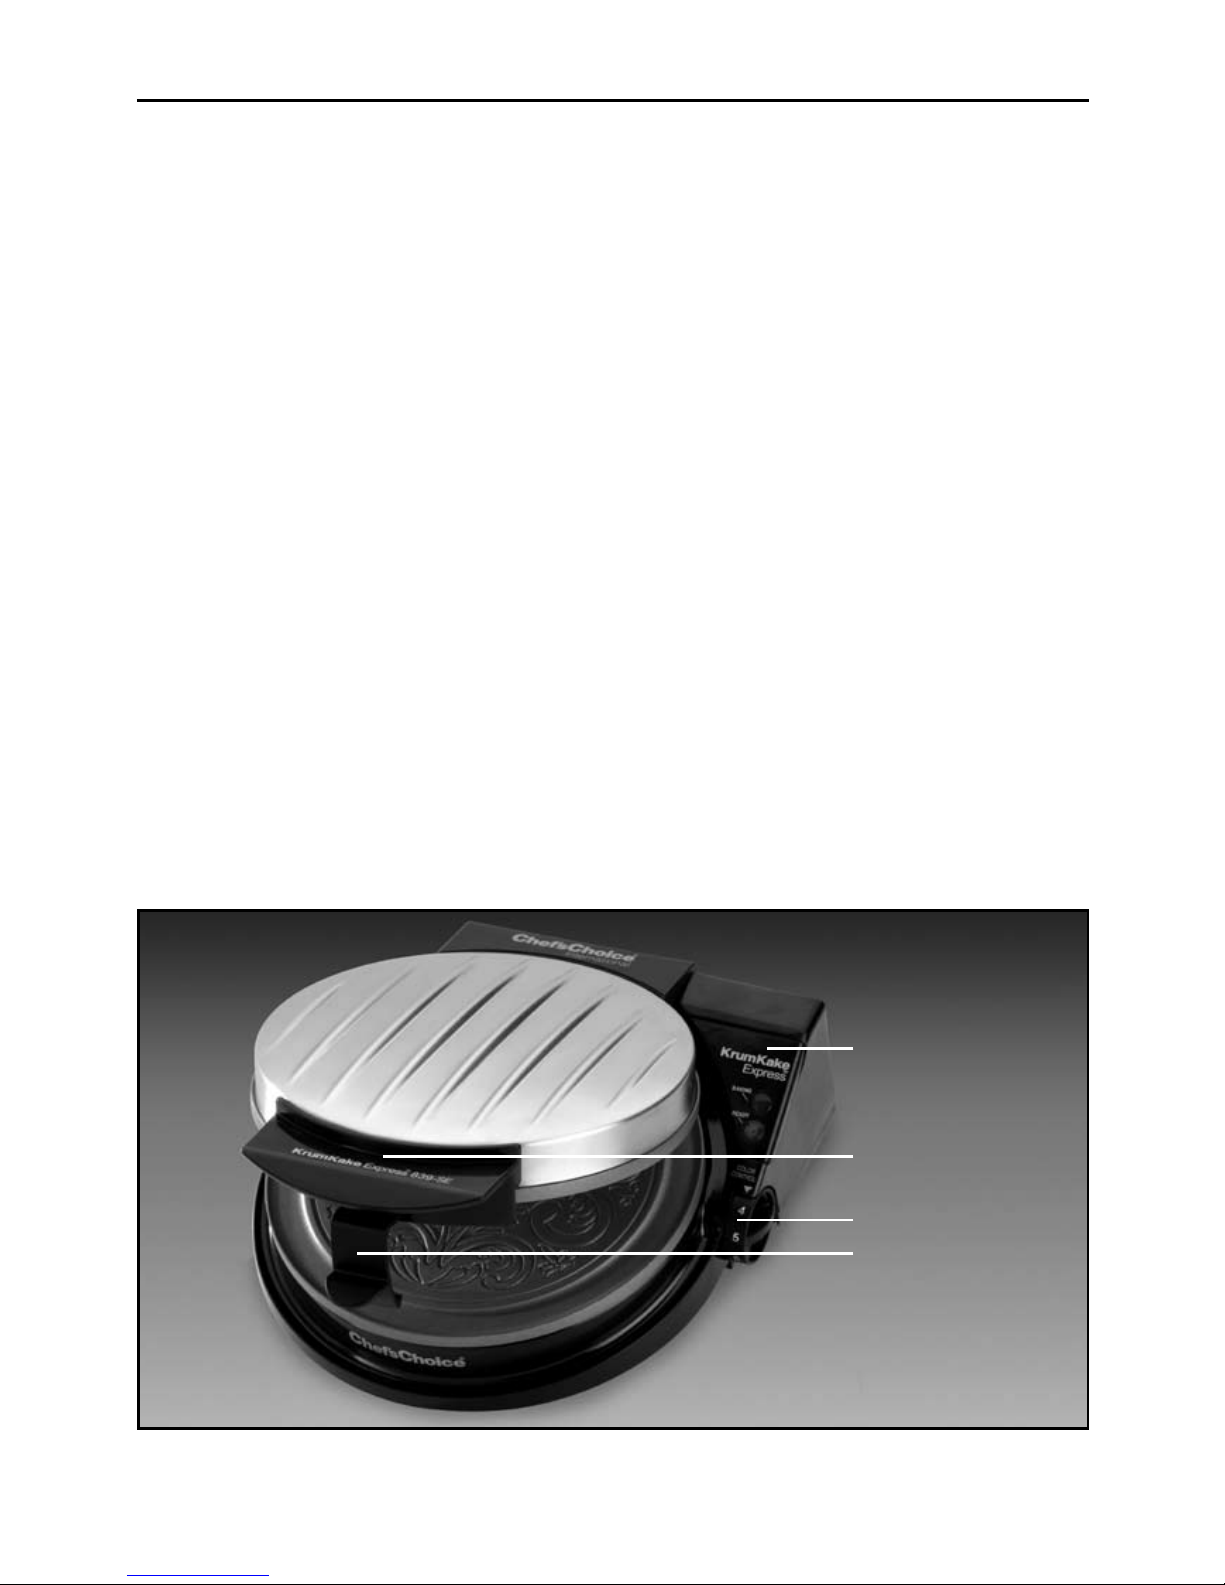
baking plates are up to temperature and “ready” to bake. To open the lid, release the locking
latch (Figure 2).
The Color Control Dial permits you to adjust the temperature of the waffle plates. In order to bake
at a higher temperature, increase the Dial setting. To reduce the temperature, turn the Dial down
to a lower setting. You will want to find the optimum Color Dial setting that bakes your krumkake
to just the right color. The best setting of the Color Control Dial is usually in the range of 2 to 3
½. When you find the best setting of the Color Control Dial the baking time is usually 60 to 80
seconds and you may be able to use the sequencing of red and green lights to help time the
baking cycle. Otherwise you will find it helpful to use a timer. As you make final adjustments of
the Color Control Dial, you will find that only small movements of that Dial, such as ½ graduation,
make a noticeable change to the color and timing.
The KrumKake Express
™
is equipped with a locking latch designed to minimize lifting of
the lid by the batter during the baking cycle and thus maintain uniform thickness. This latch
can be conveniently unlocked by lifting the finger release (Figure 2) which is an integral part of
the latch.
Provision has been made for cord storage as described in the cleaning and storage section. The
cord can be wrapped under the KrumKake Express
™
with the electrical plug secured in a slot
molded into the base.
The KrumKake Express
™
can be stored upright to save shelf space. Simply close the lid and
stand it up on the flat hinged end.
Figure 1. KrumKake Express™.
Handle for Lid
Control Panel
(See Figure 2)
Locking Latch
Color Control Dial
BEFORE YOU BAKE THE KRUMKAKE
Set the Color Control Dial to about 2 ½ to 3. Close the lid. Insert the KrumKake Express™ power
cord into a 120V-60HZ grounded outlet. For consistent baking times let it warm up and cycle a
few times to stabilize- about 5 minutes. The Green and Red lights will go on and off alternately
a few times.
Spray or wipe the baking plates lightly with a vegetable oil spray the first time you use the
KrumKake Express
™
and anytime thereafter should your krumkake wafers stick.
Use one of our recommended krumkake recipes included here or select a family favorite. One
krumkake (6” diameter) takes a little less than 2 tablespoons of batter. One tablespoon will
make a 4’ diameter krumkake. For best results, do not overfill the waffle iron.
BAKING YOUR FIRST KRUMKAKE
When the green light is ON, spoon the appropriate amount of batter directly in the center or
slightly above the center of the waffle pattern. Promptly close the lid. Press the lid down firmly
and, for a still thinner krumkake, fasten the latch which will spread the batter evenly across the
baking grid.
Lift the lid carefully in 60 seconds to check the color of
your first wafer. If the color is too light, bake another 15
to 20 seconds.
It may take a few tries to find the best setting of the Color
Control Dial; it is finely calibrated and sensitive. A small
movement of the Color Control Dial makes a noticeable
difference in the color of the krumkake. Adjust the Color
Control Dial ½ graduation higher to darken the cone and
½ graduation lower to lighten the krumkake. When you
have the setting just as you like, the green and red lights
usually can be used to time your baking cycle.
Figure 2. Locking latch.
5
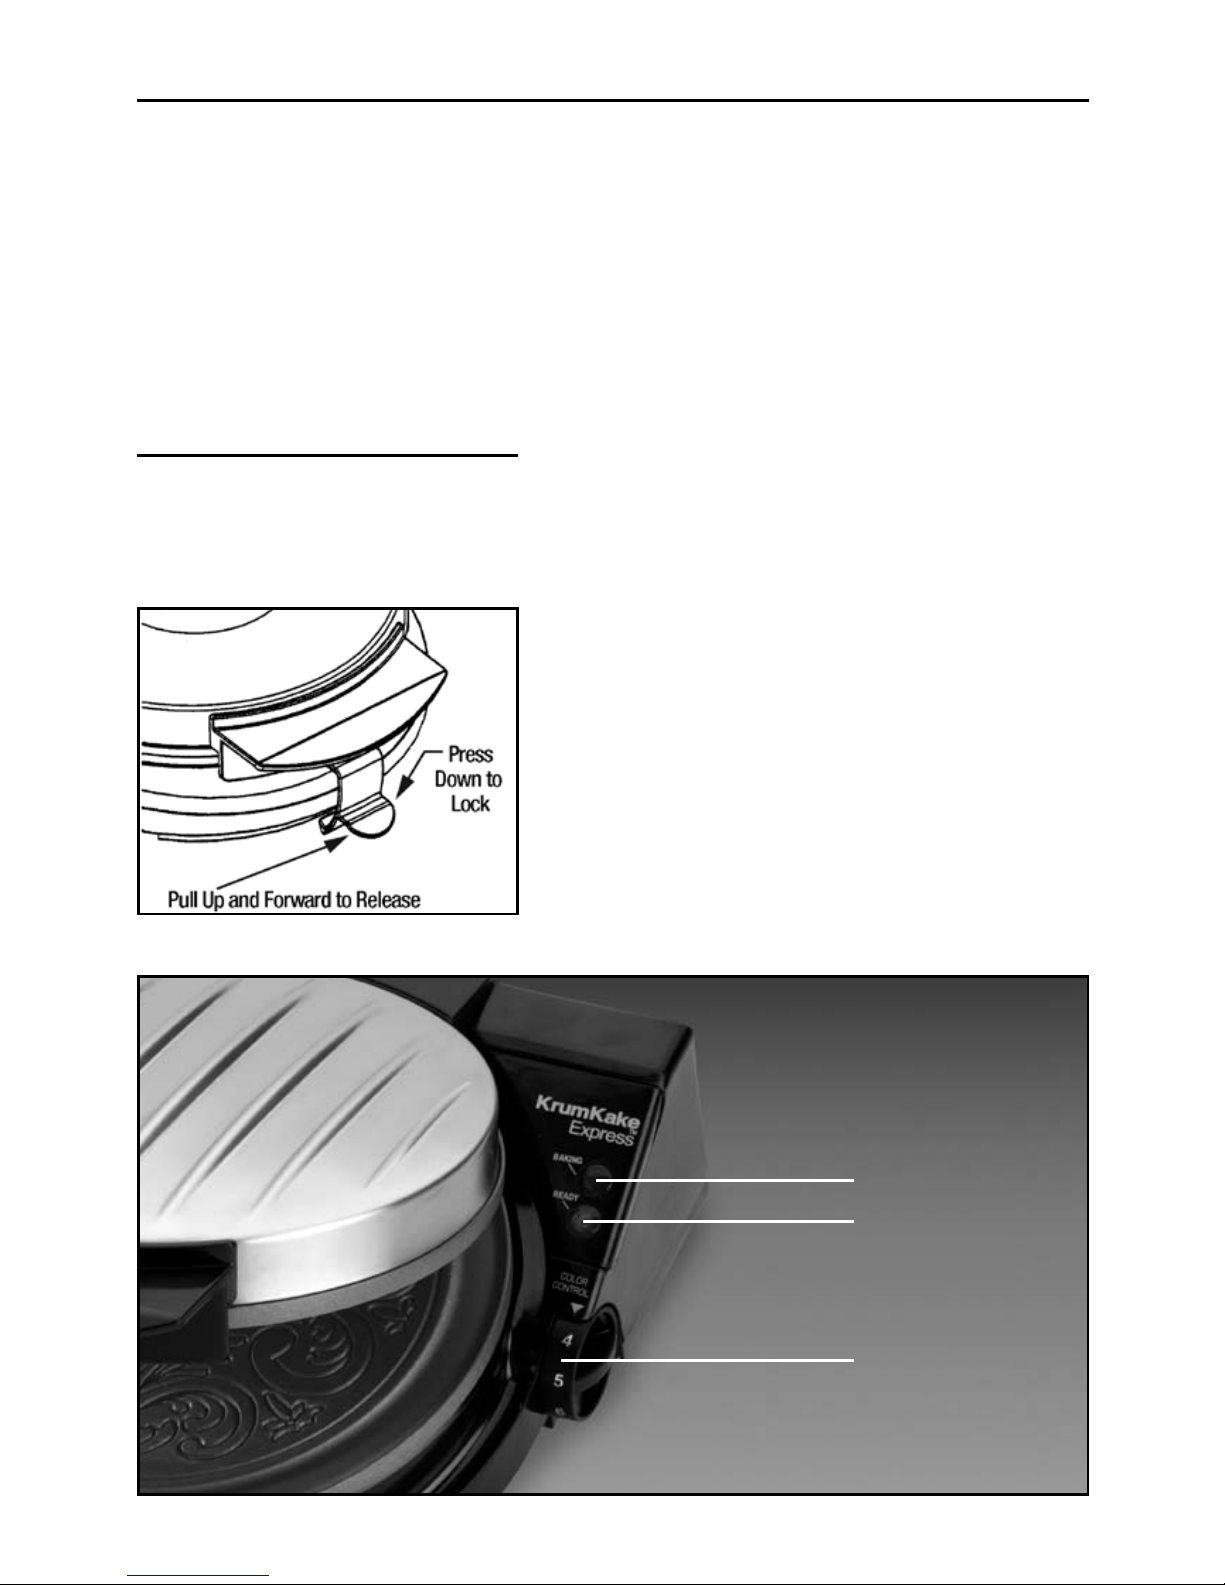
Figure 3. Control panel.
Red “Baking” Light
Green “Ready” Light
Color Control Dial

6
Here is how the red and green timer lights work. Ladle the batter onto the plate when the green
light is ON; in about 20-30 seconds it will go off and the red light will come ON. This indicates
that the plates are heating. In another 30 to 40 seconds, the red light goes off and the green
light will turn ON. Open the lid and check the krumkake. Bake a few more seconds if needed to
obtain the best color. If you find it easier, use a timer and bake your cones for 60 to 75 seconds
depending on size and desired color.
Note: Always unplug the KrumKake Express
™
immediately after use. Never leave it unattended
when plugged in. Children should not be allowed to use the KrumKake Express
™
except in the
presence of an attentive adult.
ROLLING THE CONE
The cone form provided with your KrumKake Express™ helps you make uniformly shaped cones
with ease. After a few cones, you will develop the knack of holding the warm cone and shaping
it into a neat form perfect for your favorite filling.
Follow the illustrated steps the first few times you make cones to perfect your skills. As soon
as the wafer is baked, remove it from the KrumKake Express
™
. Immediately place it on a thin
and dry soft cloth as shown below (Figure 4). Position the point of the cone-form, near the
circumference of the edge of the krumkake with the cone-form resting across the diameter
of the krumkake. Use the edge of the cloth to lift one edge of the krumkake up onto the cone
form. Then using the cloth initially to help support the hot krumkake, press it snugly against and
partially around the cone form (Figure 5). Then let the cloth fall back as you roll the cone forward
until the krumkake completely enwraps the cone form (Figure 6). Hold the krumkake on the
cone form. With the overlapped seam of the krumkake down under the cone, press firmly down
against the waffle and cone form to “freeze” the cone into shape. Hold the cone around the form
in this way until it is sufficiently cool and stiff enough to hold its shape.
The cloth helps to protect your fingers from the hot waffle. If your fingers are comfortable with
the heat, you may find the cloth unnecessary.
Set the warm cone aside in a cone holder or on its side until it cools or until you are ready to
serve. If you plan to use the cones later, allow them to cool and dry completely before storing
in a sealed plastic bag or tightly covered container. Most cones will keep several weeks when
packaged this way and stored in a cool dry place.
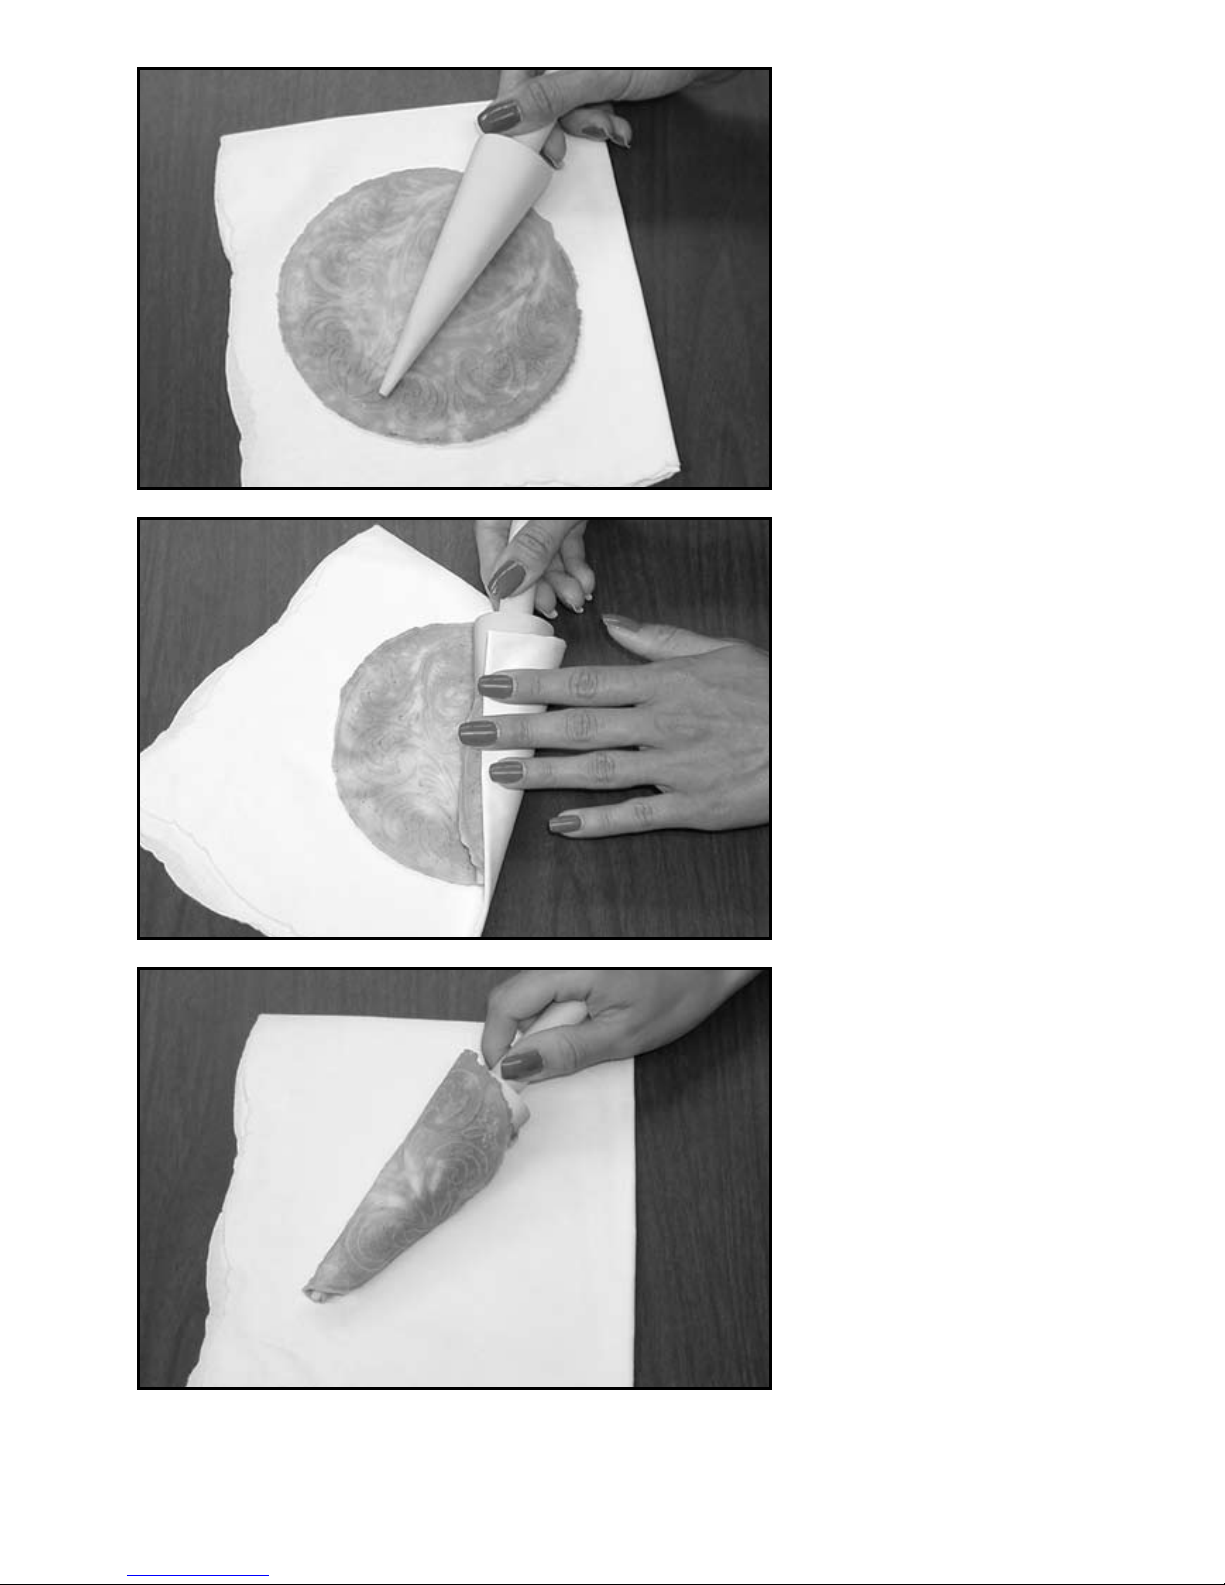
Figure 4.
Figure 5.
Figure 6.
7

8
RECIPES FOR DELICIOUS KRUMKAKES
Personal preferences for the krumkake vary from a light, lacy texture to a heavier consistency.
You may want to experiment with both the Scandinavian and German recipes included here. The
relative amounts of the main ingredients of the krumkake batter, namely flour, butter, sugar and
egg, vary significantly in the following recipes. The Scandinavian recipes are richer in butter,
sugar and eggs. You will find any of the following recipes easy to prepare and outstanding for
flavor and texture.
A Favorite German Recipe
For a crispy yet easy to roll krumkake try the following:
2
⁄3 cup water
1 cup general purpose flour
½ stick butter (4 tablespoons)
1 egg
½ to 1 teaspoon vanilla
½ cup granulated sugar (or slightly more for taste)
1. Boil the water. While it is cooling, add ½ stick butter to water and stir to melt the butter
completely. Add ½ cup of granulated sugar to water while still warm and stir to dissolve.
Allow to cool.
2. Add one cup of general purpose flour and 1 egg. Mix thoroughly while adding ½ to 1 teaspoon
of vanilla. This mixture will be relatively thin and will produce a thin crispy krumkake. Bake to a
golden brown.
3. Start with Color Control Dial at 2½. Use approximately 1½ tablespoons for a full 6” wafer. Spoon
the mix onto heated plates when “Ready” green light is ON. Lock the lid latch. The green light will
go OFF in about 30 seconds and the red “Baking” light will come ON. The green light will come
ON again in about another 30 seconds. Then open the lid of KrumKake Express and inspect wafer.
Cook longer if needed to reach a golden brown color.
4. Readjust Color Control dial if necessary to obtain a total bake cycle of about 80 seconds and
a golden brown color. Remove the wafer from KrumKake Express
™
and roll quickly (while hot)
around the Cone Form.
Makes about 15 cones
 Loading...