

Chef's Choice eXact-V 415 User Manual
GB RU
eXact-V® 415
Diamond Hone® Sharpener
Chef’sChoice®
eXact-V
Diamond Hone® Sharpener
As an owner of the Chef’sChoice® eXact-V® Diamond Hone®
Sharpener you have the world’s most advanced V-type knife
sharpener.
You will find that the accurate dual angle control technology and
precision diamond plating of ultrafine diamonds incorporated
in the eXact-V
conventional V-sharpeners. The novel use of two sharpening
angles the first with coarse grit followed by a slightly larger
angle with ultrafine diamonds can quickly create double-bevel
facets along the edge for unmatched sharpness of your favorite
sporting, camping or home knives.
6
3
4
11
5
®
415
®
creates sharper and more durable edges than
9
4
11
10
10
5
Figure 1.
7
8
2
2

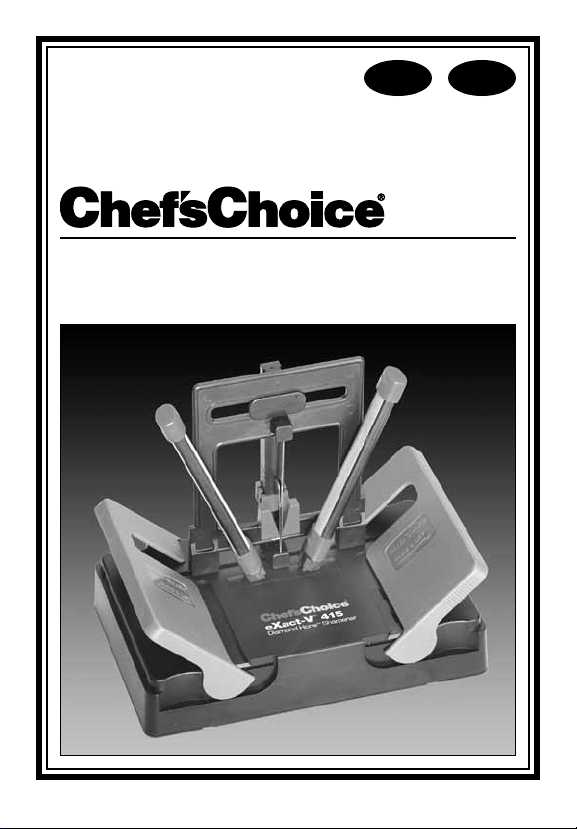
Description of the eXact-V
The eXact-V Diamond Hone Sharpener shown fully assembled (page 2)
consists of a support base (2) which doubles as a storage case for the knife
guiding assembly (3) and the two sharpening rods (4). Raised hand-guards (5)
are provided in order to protect the hand that steadies an end of the base while
the other hand is sharpening the knife. For your safety the use of these guards
is highly recommended and they can be conveniently folded down flat against
the base when not in use.
The knife guiding frame (3) mounted slidingly on its support post (6) can be
readily deflected sideways to the left or right by the sharpening action of the
knife blade, but normally it is restrained by a leaf spring mechanism (7) in a
center position. A red spring tensioner (8) mounted on the support post (6)
can be raised up to increase the spring tension which in turn increases the
sharpening force and the force needed to slide the guiding frame from its
center rest position.
In order to sharpen the knife edge the face of the knife blade is alternately
placed in intimate contact with the left or the right vertical frame guiding
surfaces (9) and moved down that surface while the knife edge contacts and
slides down the inclined abrasive surface (10).
Each of the two abrasive rods (4) has a coarser grit diamond abrasive coated
pad (Coarse) on one side and an ultra fine diamond abrasive (Fine) coated pad
on the other. These rods can be readily pulled out of the supporting base and
reversed which exchanges the diamond grit size from Coarse to Fine and
simultaneously changes the sharpening angle on each rod by 4 degrees. The
change in angle allows you to create a strong double bevel facet (resembling a
Gothic Arch design) on each side of the edge and hence a more durable edge.
The knife is sharpened by first making a number of alternating guided pulls
across and down the two Coarse diamond pads. The blade face must be aligned
with the vertical guide surface (9) on the right side as shown and then on the
left side. The abrasive rods are then rotated in order to sharpen the edge further
on the Fine abrasives to develop a razor sharp edge.
See following section “How to Sharpen” for detailed instructions.
®
3
Assembly of Sharpener
The sharpening components of the eXact-V® are conveniently stored within
the supporting base which acts as their carrying case (Figure 2) which is sized
to fit easily into a drawer, in your glove compartment, camping gear, or with
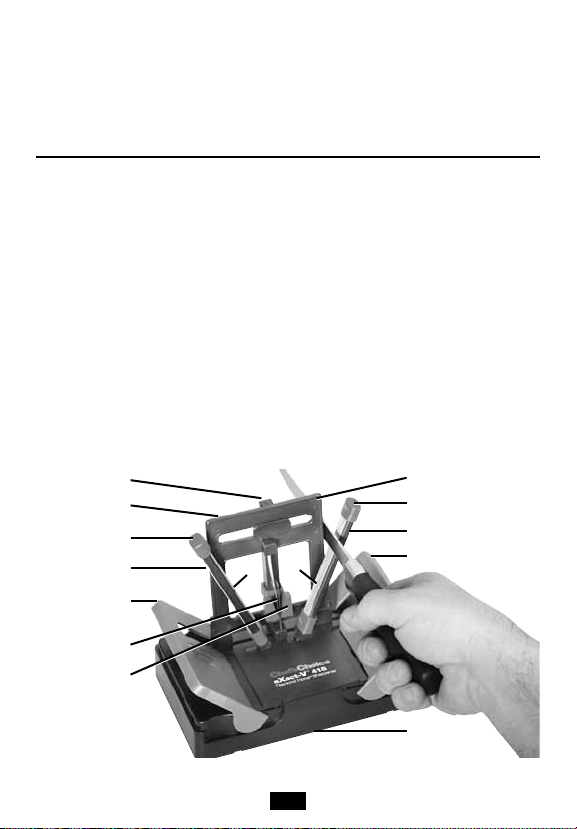
your fishing tackle. The bottom cover (Figure 2) of the supporting base is easily
removed by inserting a finger under the opening (2) at the end of the bottom
cover (1) and removing it as shown. Then the knife guiding assembly (3) can be
removed from the carrying case by pulling it upward carefully until it is released
from its retaining clips. Then the two sharpening rods (4) can be removed
similarly by pulling upward by their small ends (socket ends) until they release
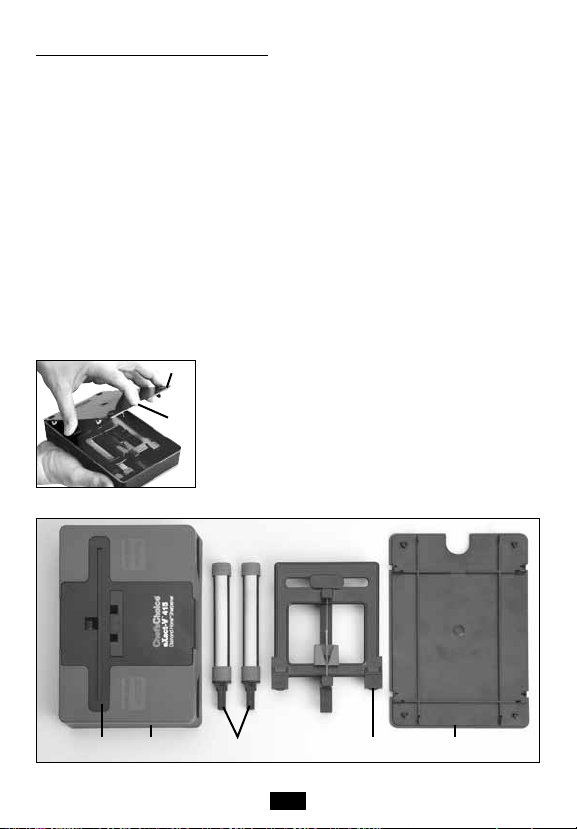
from their retaining clips. Figure 3 shows the supporting base (2), the two
sharpening rods (4), the knife guiding mechanism (3), and the bottom cover (1)
after removal of these components.
Refer to Figure 1 which shows the fully assembled sharpener with the knife
guiding assembly (3) and the two sharpening rods (4) mounted on the
supporting base.
The knife guiding assembly (3) can be mounted on
1
the supporting base (2) simply by inserting the
bottom end of its post (6) into the single larger
2
rectangular hole near the rear of the base. Insert the
post into that hole until it is fully seated and snaps
fully into a retaining clip at the bottom of that hole.
The post will fit into that opening only if the knife
Figure 2.
guiding frame (3) is on the front side of the post.
12 2 4 3 1
Figure 3.
4

The spring assembly will then be on the same side of the post adjacent to the
two abrasive rods. As the post is inserted the wheels along the bottom of the
sliding guide frame (3) must be aligned with and be inserted into the “grooved
track” (12) across the top of the supporting base (Fig.3). Check to make certain
that after assembly the sliding frame moves freely left or right and returns to
center by pressing a finger against either vertical guide surface.
Note that the designations “Coarse” and “Fine” molded into the top and bottom
caps of each sharpening rod. These notations designate the coarseness or
fineness of the diamond abrasive on that same side of each rod. Insert the rods
at an angle into the two small square holes located immediately in front of the
knife guiding frame assembly, with the Coarse diamond abrasive sides facing
each other. Always orient the abrasive rods so that the same type diamond
abrasives face each other. After initially sharpening with the Coarse diamonds
you will want to reverse each rod and finish sharpening with the Fine diamonds
as described later.
Each hand guard can be raised by first lightly pulling the guard in the direction
of the arrow on the guard, lifting it slightly and then pushing it to engage a slot
that will hold it in the raised position. You will want to replace the bottom cover
(1) which has small rubber feet that resist movement of the sharpener as you
sharpen the knife.
For instruction on storing the sharpening components see page 7.
How to Sharpen Your Knife
The eXact-V® Diamond Hone Sharpener is designed to put a razor sharp
edge on your favorite hunting and household knives. It is important to follow the
instructions carefully for best results.
Start by confirming that the “Coarse” sides of the abrasive rods face each
other. You will want to sharpen first with the “Coarse” abrasive. Raise one of the
hand guides to protect your hand that steadies the sharpener. Holding the knife
as shown in Figure 1 place the face of the blade flat against and in intimate
contact with the right guide surface (9) of the guide frame (3). Move the blade
forward as far as practical (toward the abrasive rod) in order to sharpen the
full blade length. Then slowly push the blade downward into contact with the
abrasive rod and simultaneously pull the blade toward you while retaining the
blade face in good alignment with the guide surface (9). As you move the knife
downward in contact with the abrasive rod the guide surface will move to the
left. Keep the face of the blade in good contact with the guide surface. Move the
knife slowly and deliberately until you gain experience and confidence with this
5
 Loading...