

Page 1
MODEL: RJ39-V2-BLACK
MODEL RJ39-V2-BLACK
PRECISION COOKER
CUSTOMER SERVICE
customerservice@chefman.com
888.315.6553
1 YEAR LIMITED WARRANTY
1
Page 2

MODEL: RJ39-V2-BLACK
Contents
1 Introduction
2 Safety Instructions
5 Features
6 Operating Instructions
9 Cleaning and Maintenance
10 Troubleshooting
11 Tips and Tricks
13 Notes
15 Terms and Conditions
16 Warranty Card
READ ALL INSTRUCTIONS BEFORE USE
For your safety and continued enjoyment of this product, always read the instruction manual before using.
2
Page 3

Congratulations!
You have made an excellent choice with the purchase of this quality
Chefman® product. By doing so, you now have the assurance and
peace of mind which comes from purchasing a product that has been
manufactured to the highest standards of performance and safety,
supported by the high quality standards of Chefman®.
To ensure customer satisfaction with your purchase, this Chefman® product is backed by
a comprehensive manufacturer’s 1-year warranty as well as outstanding after-sales service
through our dedicated Helpline. We hope you will enjoy using your purchase for many
years to come.
If you require technical support or in the unlikely event that your purchase is faulty,
please call our Helpline for immediate assistance. Faulty product claims made within the
1-year warranty period will be repaired or replaced free of charge provided that you have
satisfactory proof of purchase (keep your dated receipt). This guarantee is in addition to
your statutory rights. Your statutory rights are not affected. This limited warranty does not
apply in cases of damage caused by accident, improper use, abuse and force majeure.
This warranty gives you specific legal rights. You may have other legal rights that vary
depending on where you live. Some states or provinces do not allow limitations on implied
warranties or special, incidental, or consequential damages, so the foregoing limitations
may not apply to you.
This limited warranty will be invalidated if the appliance is tampered with in any way
whatsoever. In case of questions or technical problems please call our toll-free help line
number: 888-315-6553, Monday – Friday 9am to 5pm EST.
If the appliance has to be returned to us, it must be packed correctly as we cannot accept
any responsibility for damage caused in transit. We recommend you use a traceable,
insured delivery service.
Page 4

MODEL: RJ39-V2-BLACK
Introduction
Welcome to the gourmet world of Sous Vide precision cooking!
Have you ever wondered how gourmet restaurants deliver consistent quality food? The
answer is they use Sous Vide Cooking (pronounced “Sue Veed”) a French term which
translates to means “under vacuum.” It is a process which produces consistent, exact results
because the cooking time and temperature are carefully controlled by a precision cooker.
The Sous Vide precision cooker is a method of cooking in which consistent results are
achieved by using exact times and cooking temperatures.
History of Sous Vide
Sous Vide cooking was first discovered in 1799 by an American-born British physicist
and inventor named Benjamin Thompson. He did not agree with the idea of an American
Revolution and joined the British loyalists, serving as an advisor to General Gage of the
British King’s American Dragoons. After the war, he moved to London where he was knighted
by King George III. Later, he moved to Bavaria where he was appointed Army Minister. He
reorganized the army and was made Count of Rumford by the Holy Roman Emperor Francis
I. The empire was dissolved in 1806 after the creation of the Confederation of the Rhine by
Napoleon. Thompson then moved to France where he died in 1814 at the age of 61.
Thompson, a serious scientist, happened upon a process now called Sous Vide when he
accidently left a shoulder of mutton cooking overnight using low temperature. He was
amazed
at the results and chronicled his success in his book The Complete Works of Count
Rumford.
In the mid 1970’s, Chef Georges Pralus of the famous French restaurant Troisgros used a
similar technique to improve the texture of goose and duck liver, foie gras. He was able to
retain the fat content and quality of the liver, considered then a major accomplishment.
According to the New York Times food writer Julia Moskin, “Modern sous-vide cooking
originated in Switzerland in the 1960’s as a way to preserve and sterilize food in hospital
kitchens. Many restaurants now use the technique as a combination of cooking method
and storage shortcut because the food, once safely cooked under seal, can be quick-chilled
and refrigerated for days.” Others experimented following his lead using vacuum bags in
carefully controlled hot water. They experimented with all different kinds of foods and were
quite satisfied with the result. In Sous Vide, overcooking and undercooking are avoided so
that this method yields perfect food every time.
Today, Sous Vide has moved from avant garde to the home kitchen and thanks to advances
in modern science, it “combines the gentle, steady heat of poaching and an airtight seal, as
in traditional methods of cooking in clay. The food literally stews in its own juices: no air, no
water, no evaporation,” according to Wesley Genovart, the chef at Degustation, a restaurant
in the East Village, who has used “sous-viding” for everything from carrots to crème brulee.
According to Ms. Moskin, “In sous vide, the cooking temperature is around the same as the
serving temperature. For example, medium-rare steak is about 135 degrees, for as long as
it takes for the heat to slowly penetrate to the center. The whole steak, edge to edge to
edge, reaches 135 degrees and cannot overcook, because the water temperature never
goes any higher.”
(1), (2) © NYT 12/9/09 Sous Vide Moves from Avant Garde to the Countertop
2
1
Page 5

MODEL: RJ39-V2-BLACK
SAFETY INSTRUCTIONS
IMPORTANT SAFEGUARDS
THIS APPLIANCE IS FOR HOUSEHOLD USE ONLY.
WARNING: When using electrical appliances, especially when children are present, basic
safety precautions should always be followed in order to reduce the risk of fire, electric
shock, and/or injury to persons, including the following:
1. Before using the appliance read through the instructions and illustrations carefully.
2. Keep these instructions for future reference.
3. Check if the voltage indicated on the appliance corresponds to the local main voltage
before you connect the appliance.
4. Never use any accessories or parts from other manufacturers. Your warranty will become
invalid if such accessories or parts have been used.
5. Do not use the appliance if the power cable, the plug or other parts are damaged.
6. This appliance should not be used by children. Keep the appliance and its cord out of
reach of children.
7. Unplug the appliance immediately after use.
8. Appliances can be used by persons with reduced physical, sensory or mental
capabilities or lack of experience and knowledge only if they are supervised or
have been given instruction concerning use of the appliance in a safe way and if they
understand the hazards involved.
9. This appliance is only intended to be used in household and other similar applications.
Do not use this appliance outdoors.
10. Do not touch the hot surface of the unit or place hands in the water while cooking.
11. To protect against electrical shock, do not immerse the cord, plug, or the entire unit in
water or any other liquid.
12. Do not use an extension cord with this unit. Use grounded power sources only.
13. To avoid the possibility of personal injury, always unplug the appliance from the
electrical outlet before handling or cleaning.
14. Do not allow the cord to hang over the edge of table or counter, or touch hot surfaces.
15. Do not place on or near a hot gas or an electric burner, or in a heated oven.
16. Operate the appliance in water only. Keep the water level between the “MIN” and “MAX”
levels indicated on the shaft of the unit.
2
Page 6

MODEL: RJ39-V2-BLACK
SAFETY INSTRUCTIONS
17. Keep the appliance dry. Never operate the appliance unless the water level is between
the indicated “MIN” and “MAX” levels. Only the heater and circulator portion located on
the shaft of the unit should be underwater. Do not immerse the appliance cord, power
box, or upper portion of the appliance into water. If the appliance or any of its parts
become submerged, unplug the appliance immediately and contact us.
18. While cooking, energy can be saved by covering the pot or container. However,
make sure never to use cling wrap. Cling wrap should never come into contact with
the unit.
19. After completing the cooking cycle do not use the water remaining in the pot for
drinking or for further cooking.
CAUTION: The circulated water will get hot. Be very cautious when moving containers
of hot liquid. We recommend placing a trivet under the pot or container for as long as
the water is hot in order to protect the counter top or other cooking surface. We also
recommend using tongs to grab items from within the hot water.
SAVE THESE INSTRUCTIONS
This appliance is for HOUSEHOLD USE ONLY.
SHORT CORD INSTRUCTIONS
1. This unit includes a short power-supply cord in order to reduce the risks that result
from becoming entangled in or from tripping over a longer cord.
2. Longer extension cords are available and may be used if care is exercised in their use.
3. If an extension cord is used:
a. The marked electrical rating of the extension cord should be at least as great as
the electrical rating of the appliance;
b. If the appliance is of the grounded type, then the extension cord should be a
grounding type 3-wire cord; and
c. The longer cord should be arranged in such a fashion that it will not drape over
the counter top or table top where it can be pulled by children or tripped over.
LINE CORD SAFETY TIPS
1. Never pull or yank on the appliance or on the appliance cord.
2. To insert the plug, grasp it firmly and guide it into an outlet.
3. To disconnect the appliance, grasp the plug and remove it from the outlet.
4. Before each use, inspect the line cord for cuts and/or abrasion marks. If any are
found, this indicates that the appliance should be serviced and the line cord replaced.
Please return the appliance to an authorized service representative.
5. Never wrap the cord tightly around the appliance. This could place undue stress on
the cord at the point where it enters the appliance and cause it to fray and break.
3
Page 7

MODEL: RJ39-V2-BLACK
SAFETY INSTRUCTIONS
DO NOT OPERATE THE APPLIANCE IF THE LINE CORD SHOWS ANY DAMAGE
OR IF THE APPLIANCE WORKS INTERMITTENTLY OR STOPS WORKING
ENTIRELY.
CAUTION: To ensure continued protection against the risk of electric shock, only
connect to properly grounded outlets.
IMPORTANT: During the first few minutes of initial use, you may notice smoke
and/or a slight odor. This is normal and should quickly disappear. It will not recur
after the appliance has been used a few more times.
This appliance is not intended for use by children or by persons with reduced
physical, sensory or mental capabilities, or lack of experience and knowledge,
unless they are supervised or have been given instruction on proper use of the
appliance by a person responsible for their safety.
4
Page 8

MODEL: RJ39-V2-BLACK
Features
3
4
1
5
6
2
7
8
9
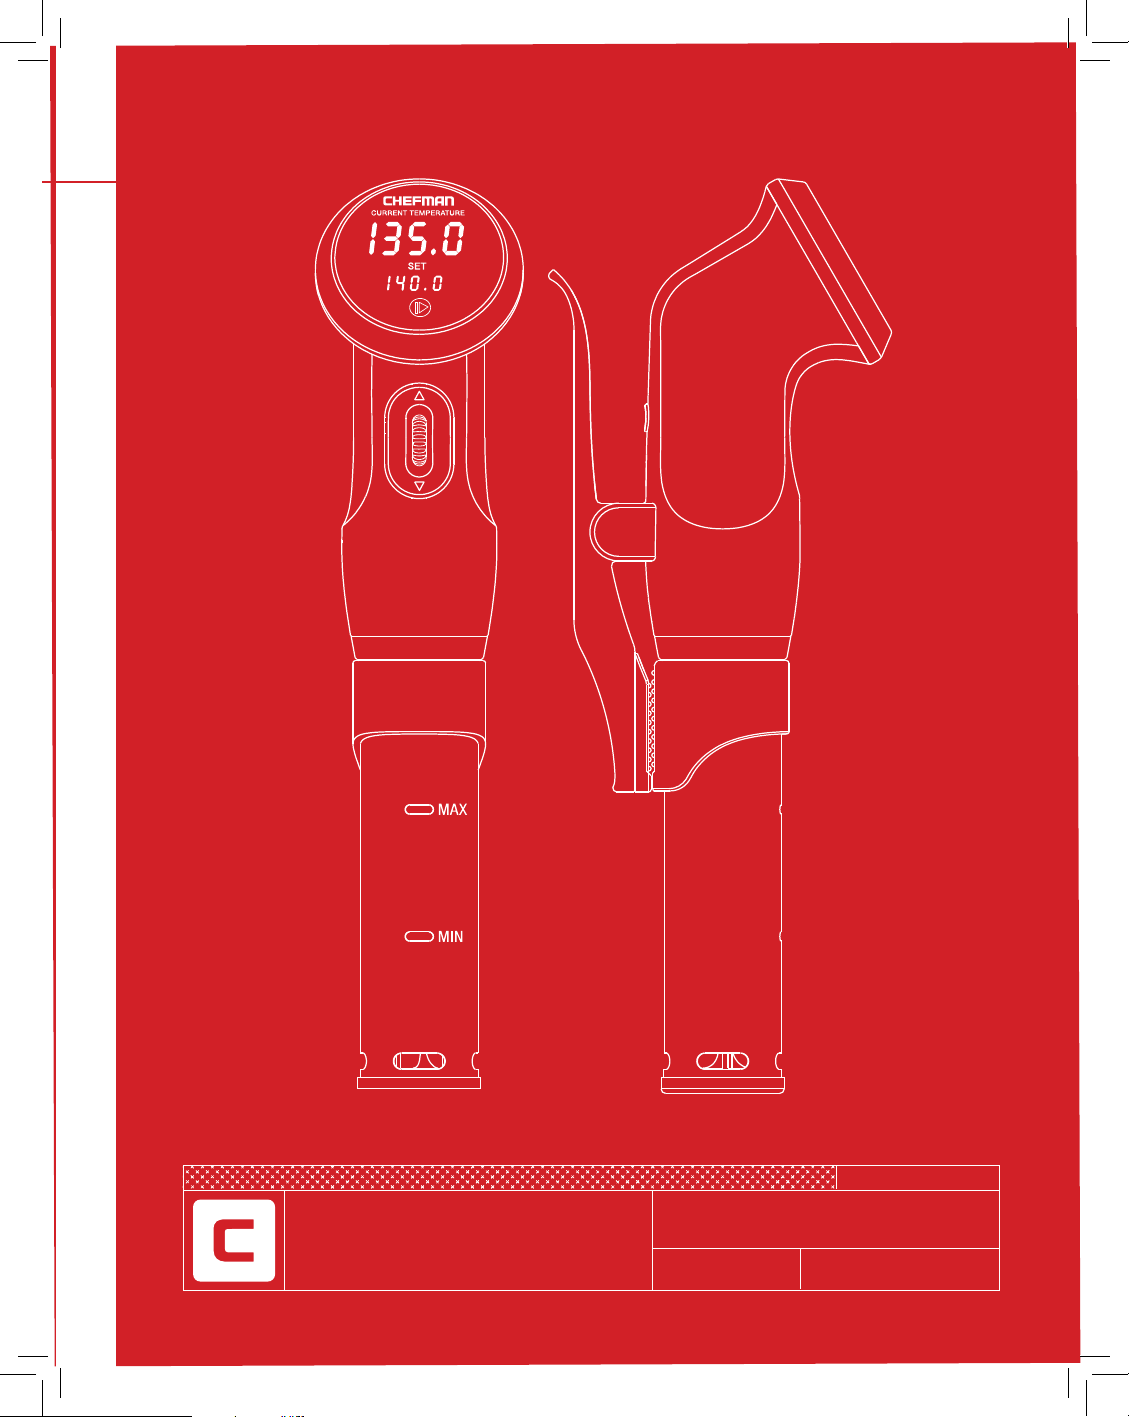
1. CLAMP
2. NON-SLIP RUBBER GRIP
3. CURRENT TEMPERATURE
4. SET TEMPERATURE/
COUNTDOWN TIMER
5. START/STOP BUTTON
6. CONTROL DIAL
7. MAXIMUM WATER LEVEL
8. MINIMUM WATER LEVEL
9. WATER INLET/OUTLET
NOTE: The unit can display temperatures in either Fahrenheit or Celsius scale. Press
and hold the START/STOP button for 6 seconds to convert from one scale to the other.
5
Page 9

MODEL: RJ39-V2-BLACK
Operating Instructions
Cooking with Your Precision Cooker
1. This unit will work with any pot or food grade container. Fill the pot or container with
water. Do not place the pot on a fire or stove top. Cooking with this unit requires no
other heat source.
2. Mount the Precision Cooker onto the pot or container and plug the unit into a wall
outlet. The unit will indicate the CURRENT TEMPERATURE in larger digits. The
smaller digits indicate the SET TEMPERATURE, which will begin displaying the
default temperature of 140 degrees Fahrenheit.
Caution: When mounting the Precision Cooker unit, make sure that the water level
remains in between the "MIN" and "MAX" lines indicated on the shaft of the unit.
3. Set the temperature by scrolling the CONTROL DIAL to reach the desired
temperature.
Note: For basic sous vide cooking information, refer to the cooking guide located
on page 8 of this manual. More useful information and recipes can be found at www.
chefmansousvide.com. For additional content that is sure to greatly enhance your
sous vide cooking experience, visit the Apple App Store or the Google Play Store and
download the Chefman Sous Vide app.
4. Press the START/STOP button (red color) on the screen to begin preheating the
water. Once pressed, the red icon will turn blue indicating that the unit is in use.
5. Place the uncooked food inside a bag. While any re-sealable food grade bag will
work, Chefman recommends vacuum sealing the food beforehand in order to
marinate and to fully lock in all of the flavor. The Chefman RJ45 Vacuum Sealer is
recommended as a very good option to vacuum seal foods for optimum flavor.
6. When using a re-sealable bag to cook, keep the bag slightly open on top and
immerse the bag into the water at an angle leaving the open corner jutting out of
the water. At this point, proceed to seal the final portion of the bag. In this way, the
water from the pot will serve to push air out of the bag for optimum sealing.
7. Once the CURRENT TEMPERATURE displays the same value as the SET
TEMPERATURE, the desired temperature has been achieved. At this point, use a
clamp and fasten the sealed bag of food to the inside of the pot to keep the bag
from moving around in the water.
6
Page 10

MODEL: RJ39-V2-BLACK
Operating Instructions
Note: The Precision Cooker unit has a water inlet and outlet located on the
bottom of the shaft. Water flowing out of the unit may be hotter than the rest
of the pot and if the food comes into direct contact with this stream of water
it may affect the desired cooking results. In order to ensure that the food does
not come into contact with the water flow for optimal cooking results, we
recommend securing the bag to the side of the pot that is opposite the Precision
Cooker unit.
8. Leave the food cooking for the recommended duration of time. Rest assured,
however, that the food is unlikely to overcook or burn since the temperature
remains consistent throughout the cooking cycle. Even if the Precision Cooker
is left running for an extended period of time, the food will maintain its precise
temperature the entire time.
Setting The Countdown Timer Feature
Note: The COUNTDOWN TIMER can be set even after the unit has begun
cooking.
Setting Time Then Temperature
1. Press and hold the START/STOP button for 3 seconds. The small digits on the
screen will display 00:00 and the digits on the left will begin blinking. The
digits on the left indicate hours and the digits on the right indicate minutes.
2. Use the CONTROL DIAL to adjust the COUNTDOWN TIMER to the desired
number of hours. Press the START/STOP button once to accept the hours
setting. Now the digits on the right will begin to blink.
3. Use the CONTROL DIAL to adjust the COUNTDOWN TIMER to the desired
number of minutes. Press the START/STOP button once to accept the minutes
setting.
4. Use the CONTROL DIAL to adjust the SET TEMPERATURE to the desired
temperature. Press the START/STOP button to accept the temperature setting
and to begin preheating the water.
Note: The COUNTDOWN TIMER will only begin counting down once the unit
reaches the SET TEMPERATURE. Do not be concerned that the timer does not
begin counting down immediately upon being set.
Setting Temperature Then Time
1. Use the CONTROL DIAL to adjust the SET TEMPERATURE to the desired
temperature.
7
Page 11

MODEL: RJ39-V2-BLACK
Operating Instructions
EGGS
POULTRY
PORK
BEEF
SEAFOOD
VEGETABLES
Poached
Hard Boiled
Light Meat
Dark Meat
Tender Cuts
Tough Cuts
Rare
Medium-Rare
Medium
Medium-Well
Well
Fish
Shellfish
Tender
Tough
145
165
146
165
140
140
128
134
144
150
155
122
130
183
183
TEMP (°F) MIN TIME
45 m
45 m
1 h
2 h
1.5 h
12 h
1 h
1 h
1 h
1 h
1 h
40 m
15 m
15 m
1 h
MAX TIME
2 h
2 h
3 h
6 h
4 h
48 h
2 h
2 h
2 h
2 h
2 h
1.5 h
45 m
1 h
3 h
2. Press and hold the START/STOP button for 3 seconds. The small digits on the
screen will display 00:00 and the digits on the left will begin blinking. The
digits on the left indicate hours and the digits on the right indicate minutes.
3. Use the CONTROL DIAL to adjust the COUNTDOWN TIMER to the desired
number of hours. Press the START/STOP button once to accept the hours
setting. Now the digits on the right will begin to blink.
4. Use the CONTROL DIAL to adjust the COUNTDOWN TIMER to the desired
number of minutes. Press the START/STOP button once to accept the minutes
setting and to begin preheating the water.
Note: The COUNTDOWN TIMER will only begin counting down once the unit
reaches the SET TEMPERATURE. Do not be concerned that the timer does not
begin counting down immediately upon being set.
Cooking Guide
m = Minutes h = Hours
EGGS
POULTRY
PORK
BEEF
SEAFOOD
VEGGIES
TEMP (°F/°C) MIN TIME MAX TIME
Poached 145.5°F 1h 1.5h
Hard Boiled 165°F/73.9°C 1h 1.5h
Light Meat 150°F/66°C 1h 3h
Dark Meat 167°F/75°C 45m 5h
Tender Cuts 150°F/66°C 1h 4h
Tough Cuts 158°F/70°C 18h 24h
Rare 129°F/54°C 1h 3h
Medium- Rare 134°F/56.5°C 1h 3h
Medium 140°F/60°C 1h 3h
Medium-Well 150°F/65.5°C 1h 3h
Well 160°F/71°C 1h 3h
Fish 122°F/50°C 40m 1.5h
Shellfish 131°F/55°C 15m 45m
Tender 180°F/82°C 1.5h 30m
Tough 185°F/85°C 15m 3h
8
Page 12

MODEL: RJ39-V2-BLACK
Cleaning & Maintenance
Cleaning and Descaling Instructions:
Descaling should be performed at a minimum of once a month. If you are located
in a region with hard water (mineral rich) or if the unit is used very often, descale
the unit more frequently.
1. Place the appliance in a pot and fill the pot with water to the "MAX" level
indicated on the shaft of the appliance.
2. Set the appliance temperature to 158ºF.
3. Add 5g of citric acid powder (Food Grade) per liter of water used.
Use gloves while handling and wash your hands afterwards.
4. Allow the water to circulate for 20 minutes at 158ºF.
5. Turn off and unplug the appliance.
6. When the appliance is cool, rinse the bottom in cold water and dry
before storing.
9
Page 13

MODEL: RJ39-V2-BLACK
Troubleshooting
1. The unit will not turn on.
Solution: Make sure that the machine is properly plugged into a grounded outlet and
check the power cable to see if it is ripped or worn down. Do not use the machine if
the power cord is damaged.
2. Unit is making a constant beeping sound and the display is not working.
Solution: The unit is not submerged in water between the "MIN" and "MAX" line. If
the water is above the "MAX" line or under the "MIN" line, the unit will not work and
will make a constant beeping sound. Place the unit in water with the water reaching
a level between the "MIN" and "MAX" lines to reset. Press the START/STOP button to
stop the beeping.
10
Page 14

MODEL: RJ39-V2-BLACK
Tips and Tricks for Precision Cooking
PREPARING FOOD IN THE BAG
1. Sous vide is the French term for “under vacuum.” Food cooks more efficiently
and at lower temperature in a vacuum. Therefore, goal is to remove all the air in
the bag. Any kind of food grade plastic sealable bag can be used. Chefs prefer
vacuum seal bags because the vacuum sealer removes all remaining air.
2. Choose a pot in which the Sous Vide Cooker as well as the cooking bag, can
be clipped on opposite sides. Make sure there is enough room to ensure
the cooker will never touch the bag. The cooker will be hot and circulate a
steady stream of water in the pot. This will allows for better control over the
temperature, which is clearly visible at all times on the dial/screen of the cooker.
3. Make sure to always have sufficient water in the pot to ensure evaporation is
not a problem. If something is going to be cooking for many hours or without
supervision, evaporation can be reduced by covering the pot / container with
foil. This should never touch the unit's shaft.
4. Water should be filled so that it is right below the upper MAX fill line. Removing
all air from the bag is an important component in creating the "Vacuum" so that
food does not float within bag. A food safe sous vide weight can be used inside
of the bag to ensure food is fully submerged.
5. The secret of sous vide cooking is to always make sure that the food is engulfed
in perfectly controlled water. Therefore, it is important to cook food at their
specific temperatures that are listed on the cooking guide. Also note when
cooking more than one bag in the pot simultaneously, that there is sufficient
space between the bags, allowing temperature to be evenly distributed on all
sides.
6. By using the WiFi feature, you can prepare your food according to your own
time table.
7. For best results, use seasonings (e.g. herbs and spices) that have been
dehydrated or dried. They work best and provide more flavor than fresh raw
spices (e.g. garlic or onion, paprika, basil etc.) Remember don’t over salt your
food, you can always add salt later, but you can’t take it out.
11
Page 15

MODEL: RJ39-V2-BLACK
Tips and Tricks for Precision Cooking
FOOD SAFETY
1. Prepared food should be served within 3 hours of cooking. Keep food in the
sealed bag until ready to be served.
2. Cooking Guide Times are guidelines but temperatures are may vary based on
specificity within sub categories."
3. If food is intended to be served at a later time, food should remain in the bag,
and stored in an ice bath until cool. Then food can be refrigerated.
4. For stored times exceeding 5 hours, food should remain in the bag, cooled in
an ice bath, and then can be stored in a freezer for later consumption.
ADVANTAGES OF SOUS VIDE
1. Because Sous vide is a longer process than conventional cooking, it is easier
to cook food to perfection (e.g. steak will not be stringy, shrimp will not be
rubbery).
2. Sous Vide cooked food that has been refrigerated or frozen retains more quality
than regular refrigerated or frozen cooked foods.
EASE OF PREPARATION
1. Insert food in a zip lock or vacuum sealed bag and add desired
seasoning.
2. Seal the bag, making sure that there is no remaining air.
3. Using the cooking guide on page 7, determine the specific time and
temperature needed for the food item being cooked.
4. Finishing Food—When you have completed the cooking process, your
food will be ready to eat but look unusual. Food should be seared
on all sides using a grill or a frying pan with a little bit of olive oil or
remaining juices from the bag. (Chefs often use a food torch to brown
the outside.)
12
Page 16

MODEL: RJ39-V2-BLACK
Notes
13
Page 17

MODEL: RJ39-V2-BLACK
Notes
14
Page 18

MODEL: RJ39-V2-BLACK
Terms & Conditions
Limited Warranty
RJ BRANDS, LLC D/B/A CHEFMAN (hereinafter referred to as "CHEFMAN®") warrants, subject to the conditions
stated below, that from the date of purchase, this product will be free from mechanical defects for a period of ONE
(1) year. CHEFMAN® at its option, will repair or replace this product found to be defective during the warranty period.
Should this product become defective by reason of improper workmanship or material defect during the specified
warranty period, CHEFMAN® will repair or replace the same effecting all necessary parts replacements for a period of
one year from the date of purchase. If product is no longer available we will replace it with a product of equal value.
Transportation charges on parts, or products in whole, submitted for repair or replacement, under this warranty, must
be borne by the purchaser. This warranty is void if the product is used for other than single-family household use or
subjected to any voltage and waveform other than as specified on the rating label (e.g., 120V ~ 60 Hz).
This warranty is available to consumers only. You are a consumer if you own a CHEFMAN® product that was
purchased at retail for personal, family or household use. Except as otherwise required under applicable law, this
warranty is not available to retailers or other commercial purchasers or owners.
CONDITIONS: This warranty is valid for the original USA and Canada retail purchaser from the date of initial retail
purchase and is not transferable. Keep the original sales receipt. Proof of purchase is required to obtain warranty
service or replacement. Dealers, service centers, or retail stores do not have the right to alter, modify or in any way,
change the terms and conditions of this warranty. Warranty registration is not necessary to obtain warranty on
CHEFMAN® Products. Save your proof of purchase receipt.
ABOUT YOUR PRODUCT WARRANTY: Most warranty repairs are handled routinely, but sometimes requests for
warranty service may not be appropriate. For example, warranty service would NOT apply if the product damage
occurred because of misuse, lack of routine maintenance, shipping, handling, 3rd party warehousing or improper
installation. Similarly, the warranty is void if the manufacturing date or the serial number on the product has been
removed or the equipment has been altered or modified. During the warranty period, the authorized service dealer,
at its option, will repair or replace any part that, upon examination, is found to be defective under normal use and
service.
NORMAL WEAR: This warranty does not cover normal wear of parts or damage resulting from any of the following:
negligent use or misuse of the product; improper voltage or current; use contrary to the operation instructions;
deviation from instructions regarding storage and transportation; repair or alteration by anyone other than
CHEFMAN® or an authorized service center. Further, the warranty does not cover Acts of God, such as fire, flood,
hurricanes and tornadoes. CHEFMAN® shall not be liable for any incidental or consequential damages caused by the
breach of any express or implied warranty. Except to the extent prohibited by applicable law, any implied warranty of
merchantability or fitness for a particular purpose is limited in duration to the duration of the above warranty. Some
states, provinces or jurisdictions do not allow the exclusion or limitation of incidental of consequential damages or
limitations on how long an implied warranty lasts, so the above limitations or exclusion may not apply to you. This
warranty gives you specific legal rights, and you may also have other rights that vary from state to state or province
to province.
HOW TO OBTAIN WARRANTY SERVICE: If your CHEFMAN® product should prove to be defective within the
warranty period, we will repair it, or if we think necessary, replace it. To obtain warranty service, simply email
customerservice@chefman.com or call our toll-free number 1-888-315-6553 for additional information from our
Customer Service Representatives, or send the defective product to Customer Service at Chefman, 1 Sharp Plaza,
Mahwah, NJ 07495.
This warranty is effective for the time periods listed above and subject to the conditions provided for within this
policy.
CALIFORNIA RESIDENTS ONLY:
California law provides that for In-Warranty Service, California residents have the option of returning a nonconforming
product (A) to the store where it was purchased or (B) to another retail store which sells CHEFMAN® products
of the same type. The retail store shall then, at its discretion, either repair the product, refer the consumer to an
independent repair facility, replace the product, or refund the purchase price less the amount directly attributable
to the consumer’s prior usage of the product. If the above two options do not result in the appropriate relief to
the consumer, the consumer may then take the product to an independent repair facility if service or repair can be
economically accomplished. CHEFMAN® and not the consumer will be responsible for the reasonable cost of such
service, repair, replacement, or refund for nonconforming products under warranty.
CHEFMAN® is a registered trademark of RJ BRANDS, LLC.
15
Page 19

MODEL: RJ39-V2-BLACK
Warranty
PRECISION COOKER
All data fields are required in order for us to process your request:
Model Number:
Full Name:
Address:
Phone:
Date of Purchase*:
*We recommend you keep the receipt with this warranty card
Retail Store of Purchase:
Description of Malfunction:
Return your completed warranty card to:
Email: (If applicable)
Chefman
1 Sharp Plaza
Suite 207
Mahwah, NJ
074 9 5
PRECISION COOKER
888.315.6553
Phone lines available Monday to Friday, 9am-5pm EST
customerservice@chefman.com
MODEL:
RJ39-V2-BLACK
1-YEAR LIMITED WARRANTY
16
Page 20

Visit chefmanSOUSVIDE.com for recipes, video tutorials
and tips tailor-made for your chefman Precision COOKER.
To log-in to ClubChefman.com follow the below steps:
1. Enter www.clubchefman.com into your web browser.
2. Click on "Sign Up Now" .
3. Fill in the required information as prompted.
NOTE: "Place of Purchase" refers to the store at
which you purchased your product.
4. Sign in using your User Name and Password.
CLUB CHEFMAN ACCESS CODE:
2131451
®
CLUBCHEFMAN.COM | CHEFMAN.COM
 Loading...