

Page 1

Toast-Air
®
Air Fryer +
OVen
This is your one-stop guide to using
your product. From the below links,
you can jump ahead to a specific
document if desired.
QUICK LINKS
• Quick Start Guide
• User Guide
• Cookbook
RJ50-SS-M20
Page 2
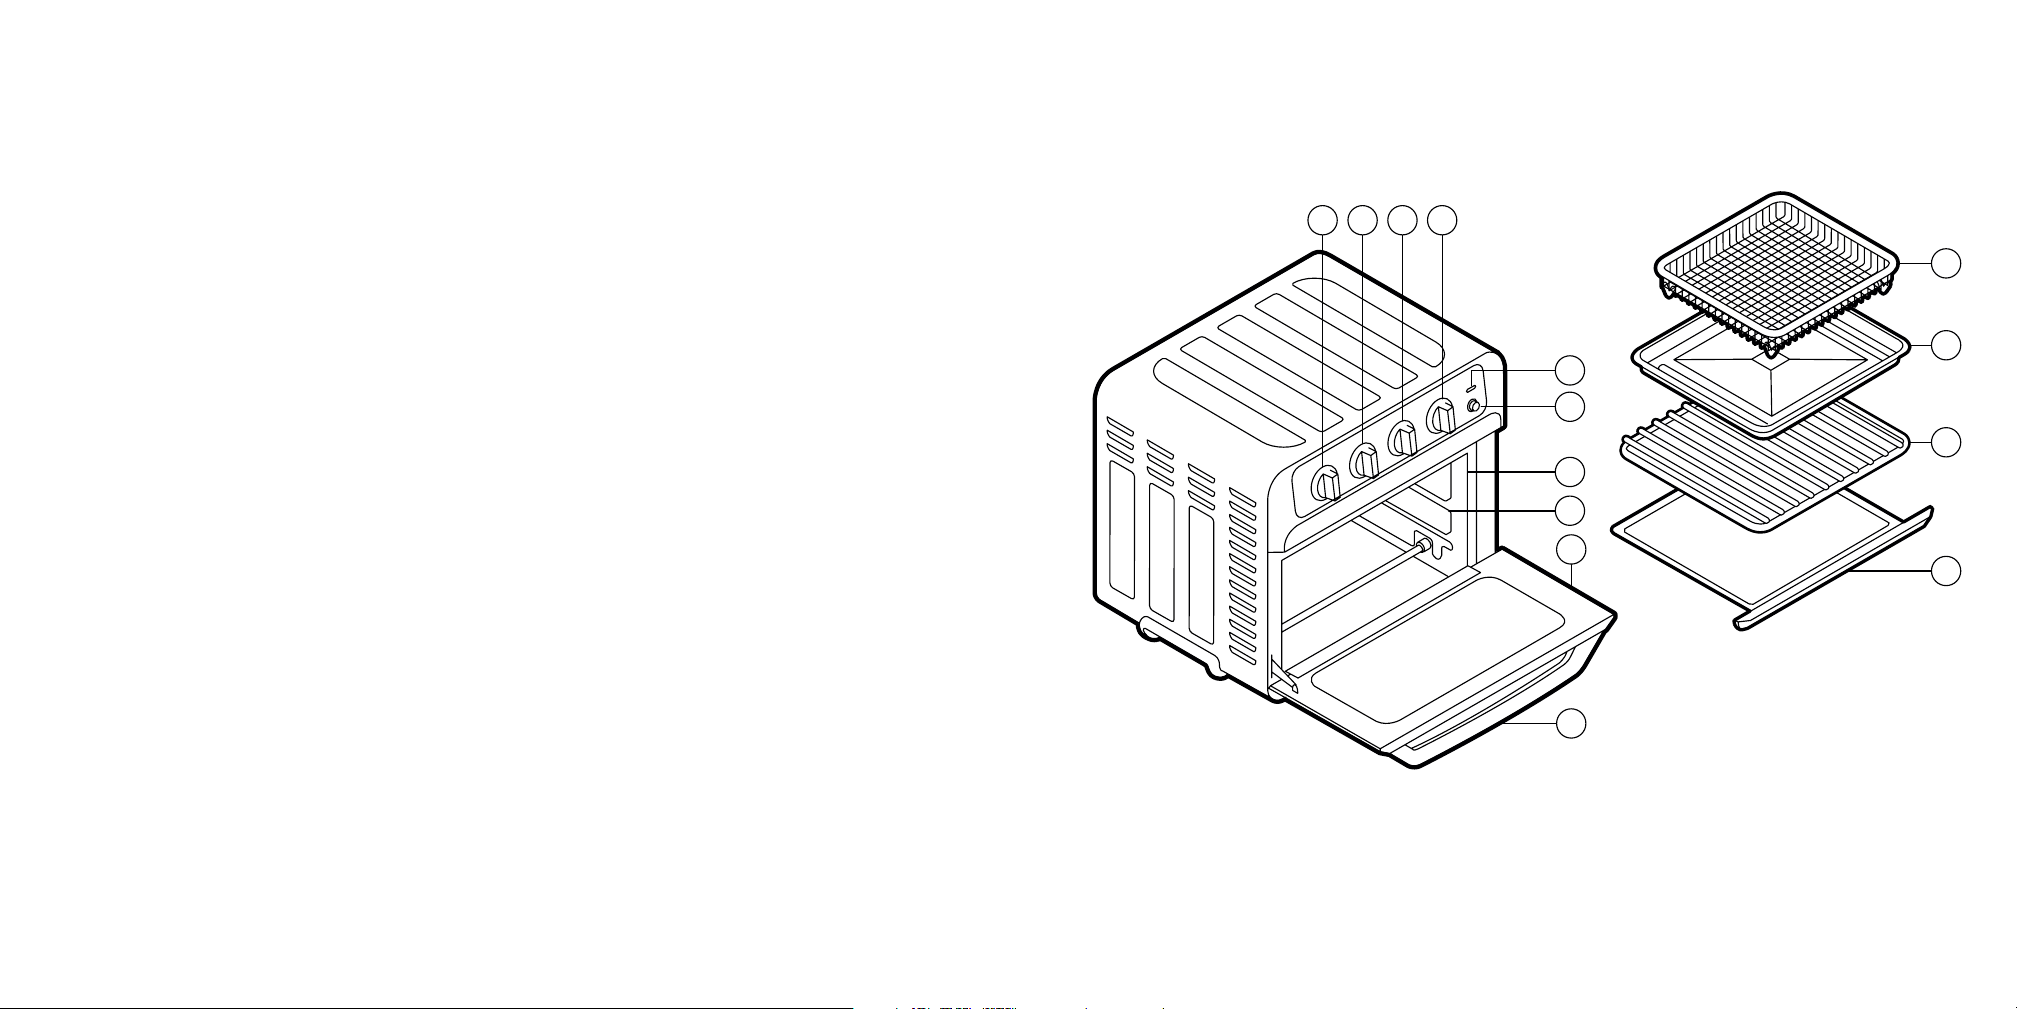
BEFORE FIRST USE Features AND Accessories
1. Read and remove all packing materials and stickers (except for rating label on bottom). Be
sure all accessories are accounted for.
23 4
2. Gently wipe the exterior and interior of the oven with a clean, damp cloth and dry thoroughly.
1
3. Hand wash and thoroughly dry removable crumb tray; crumb tray is NOT dishwasher safe.
Hand wash and dry bake/broil pan, wire rack, and basket. Rack and basket are also top-rack
dishwasher safe; broil pan is not dishwasher safe.
4. Place unit on a flat, heat-resistant surface at least 2 inches away from the wall or any other
objects.
CLEANING AND MAINTENANCE
1. Unplug the Toast-Air® and allow to cool completely before cleaning.
2. Gently wipe the exterior with a clean, damp cloth and dry thoroughly. Using a mild liquid
soap and a damp cloth or sponge, wipe glass on door. Do NOT use a spray glass cleaner.
3. Using a mild liquid soap and a damp cloth or sponge, wipe the interior walls. Do NOT use
abrasive cleaners.
4. Slide out the crumb tray and hand wash and dry; the crumb tray is NOT dishwasher safe.
5. Hand wash and dry broil pan, wire rack, and basket. Rack and basket are also top-rack
dishwasher safe; broil pan is not dishwasher safe.
6. Thoroughly dry the Toast-Air® and all its accessories before storing.
1. Oven Timer/On-Off Dial
2. Temperature Dial
3. Cook Function Dial
4. Toast Timer/On-Off Dial
5. Power Light
5
6
7
8
9
10
6. Oven Light Button
7. Easy-Clean Interior
8. Rack Insert Positions
9. Safety Auto-Shutoff Door
10. Cool-Touch Door Handle
11
1212
1313
14
11. Air Fry Basket
12. Broil/Bake Pan
13. Removable Wire Rack
14. Pull Out Crumb Tray
2 3
Page 3
How to USE Toast-Air
STEP
Ensure the crumb tray is
inserted in its position
below the oven door and
plug unit in.
®
STEP 3
Set Cook Function,
Temperature, and Timer dials
to desired settings. (For
toasting, set the Cooking
Function and Temperature
Dials to Toast, then set the
Toast Timer Dial to desired
shade to turn the oven on.)
NOTE: For times of less than 20 minutes, turn the Timer Dial past the
20-minute mark before setting to desired time.
STEP 4
STEP 2
Place food on the
broil/bake pan, wire rack,
or in basket on bake pan
and insert into the oven.
4 5
Once a timer is set, the
Power Light will come on,
and cooking will begin.
Cook until timer ends
(it will ring when done),
then carefully remove food
from unit, check for
doneness, and serve.
Page 4

COOKING FORWARD
Welcome!
Thank you for choosing the Toast-Air® Air Fryer + Oven as the newest addition
to your kitchen. Whether this is your first Chefman® appliance purchase or you’re
already part of our family, we’re happy to be cooking with you. The Toast-Air® is a
7-in-1 appliance that cooks food quicker than a conventional oven. Family sized for
convenience, it can easily toast 4 slices of bread at one time, bake a 10-inch pizza,
or air fry 2 pounds of chicken wings. Made of sleek stainless steel, the toaster looks
great on any counter, and cleaning it is a breeze, too.
CONTENTS
1 Safety Instructions
5 Features
6 Operating Instructions
13 Cooking Tips
We know you’re excited to get cooking, but please take a few minutes to read our
directions, safety instructions, and warranty information. Then get started with the
delicious recipes we’ve included as a bonus for you.
From our kitchen to yours,
The Chefman® Team
READ ALL INSTRUCTIONS BEFORE USE
For your safety and continued enjoyment of this product, always
read the instruction manual before using.
14 Troubleshooting FAQs
15 Cleaning and Maintenance
16 Notes
17 Terms and Conditions
19 Warranty
Page 5

SAFETY INSTRUCTIONS SAFETY INSTRUCTIONS
IMPORTANT SAFEGUARDS IMPORTANT SAFEGUARDS
WARNING: When using electrical appliances, basic safety precautions should always be
followed including the following:
1. Read all instructions.
2. Do NOT touch hot surfaces. Use handle or dials.
3. To protect against electrical shock do NOT immerse cord or plug in water or other
liquid.
4. Close supervision is necessary when any appliance is used by or near children.
5. Unplug from outlet when not in use and before cleaning. Allow to cool before putting
on or taking off parts.
6. Do NOT operate any Chefman® brand appliance with a damaged cord or plug or after
the appliance malfunctions or has been damaged in any manner. Contact Chefman®
Customer Support.
7. The use of accessory attachments not recommended by Chefman® may cause injuries.
8. Do NOT use outdoors.
9. Do NOT let cord hang over edge of table or counter or touch hot surfaces.
10. Do NOT place on or near a gas or electric burner, or in an oven.
11. Extreme caution must be used while moving the oven when it contains hot oil or other
hot liquids.
12. Always plug cord into the wall outlet first. To disconnect, turn off the oven by turning
the timer dial to the Off position, then remove plug from wall outlet.
13. Do NOT use the oven for other than intended use.
14. Oversize foods or metal utensils must NOT be inserted in the oven as they may create a
fire or risk of electric shock.
15. A fire may occur if the oven is covered with or touching flammable material, including
curtains, draperies, walls, and the like, when in operation. Do NOT store any item on top
of the oven when in operation.
16. Do NOT clean with metal scouring pads. Pieces can break off the pad and touch
electrical parts involving a risk of electric shock.
17. Extreme caution should be exercised when using containers constructed of anything
other than metal or glass.
18. Do NOT store any materials, other than Chefman® recommended accessories, in this
oven when not in use.
19. Do NOT place cardboard or plastic in the oven.
20. Do NOT cover crumb tray or any part of the oven with metal foil. This will cause
overheating.
SAVE THESE INSTRUCTIONS
1 2
Page 6

SAFETY INSTRUCTIONS
SAFETY INSTRUCTIONS
IMPORTANT SAFEGUARDS
SHORT CORD INSTRUCTIONS
A short power supply cord is provided to reduce the hazards of entanglement or tripping
over a longer cord. Longer detachable power-supply cords or extension cords are available
and may be used if care is exercised in their use. If a longer detachable power-supply
extension cord is used:
1. The marked electrical rating of the extension cord should be at least as great as the
electrical rating of the appliance.
2. The cord should be arranged so that it will not drape over the countertop or
tabletop where it can be pulled on by children or tripped over.
Do not place the appliance
on a stovetop or any other
heatable surface.
IMPORTANT SAFEGUARDS
POWER CORD SAFETY TIPS
1. Never pull or yank on cord or the appliance.
2. To insert plug, grasp it firmly and guide it into outlet.
3. To disconnect appliance, grasp plug and remove it from outlet.
4. Before each use, inspect the power cord for cuts and/or abrasion marks.
If any are found, this indicates that the appliance should be serviced, and
the power cord replaced. Please contact Chefman
5. Never wrap the cord tightly around the appliance, as this could place
undue stress on the cord where it enters the appliance and cause it to fray and
break.
DO NOT OPERATE APPLIANCE IF THE POWER CORD SHOWS
ANY DAMAGE OR IF APPLIANCE WORKS INTERMITTENTLY
OR STOPS WORKING ENTIRELY.
®
Support for assistance.
3 4
Page 7

FEATURES
2 3 4
1
OPERATING INSTRUCTIONS
BEFORE FIRST USE
1. Oven Timer/On-Off Dial
2. Temperature Dial
3. Cook Function Dial
4. Toast Timer/On-Off Dial
5. Power Light
5
6
7
8
9
10
6. Oven Light Button
7. Easy-Clean Interior
8. Rack Insert Positions
9. Safety Auto-Shutoff Door
10. Cool-Touch Door Handle
11. Air Fry Basket
12. Broil/Bake Pan
13. Removable Wire Rack
14. Pull Out Crumb Tray
11
1212
1313
14
1. Read and remove all packing materials and stickers from the inside and outside of
the Toast-Air® unit except for rating label on bottom, which should remain on unit. Be
sure that all accessories are accounted for before throwing away any packaging.
2. Gently wipe the exterior of the oven with a clean, damp cloth and dry thoroughly.
Wipe the interior with a mild liquid soap and a damp cloth or sponge.
NOTE: Do NOT use abrasive cleaners, like steel wool pads, as they may damage
the finish.
3. Hand wash the removable crumb tray and broil/bake pan and dry thoroughly; the
crumb tray and broil pan are NOT dishwasher safe.
4. Hand wash and dry the wire rack and basket. These accessories are also top-rack
dishwasher safe.
5. Place the Toast-Air® on a flat, heat-resistant surface positioned at least 2 inches away
from the wall or any other objects.
6. Ensure that crumb tray is inserted into bottom of unit. Do not operate unit without
crumb tray in place.
5 6
Page 8

®
HOW TO COOK IN THE TOAST-AIR
The Toast-Air® has multiple cooking functions, so you can customize your cooking for
perfect results every time. Metal, ovenproof glass, or ceramic bakeware without glass lids
can be used in the oven. However, the top of the container must be at least 1½-inches away
from the upper heating element. What follows is how to cook using the different settings.
AIR FRYER + OVEN
OPERATING INSTRUCTIONSOPERATING INSTRUCTIONS
7. To pause cooking, open the oven door. The timer will continue to countdown, but air
frying will stop (the oven will still be hot, however). When door is closed, air frying will
continue. To stop air frying before timer ends, turn the timer dial to Off.
NOTE: The interior light does not come on when you open the oven door. To turn it
on, press the Oven Light button on the control panel; press it again to turn it off.
NOTE: On first use, unit may emit a slight odor, which is normal and will dissipate with use.
AIR FRY
Air frying uses fast-moving hot air to cook food to crisp perfection without the need for oil.
It’s a great choice for cooking many frozen prepared foods as well as french fries, chicken
wings, and more.
1. Ensure the crumb tray is inserted in its position below the oven door and plug in unit.
2. Place food in basket and place basket on bake pan. Alternatively, place food directly
on wire rack and place bake pan in bottom position in oven as a drip tray.
3. Slide pan with basket or rack into oven.
4. Set Cook Function Dial to Air Fry.
5. Set the Temperature Dial to desired temperature.
6. Turn the Timer Dial to desired time; the Power Light will turn on and air frying will
begin.
NOTE: To set a time of less than 20 minutes, you must first turn the dial past the
20-minute mark, then turn it back to the lower time desired.
8. Cook until timer ends. A bell will ring and the Toast-Air® will turn off.
9. Using oven mitts, carefully remove food from the oven. Check for doneness, serve,
and enjoy!
BROIL OR CONVECTION BROIL
Broiling cooks via intense heat generated from the upper heating elements and is a good
choice for cooking meat or fish. It’s also good for browning foods like cheesy gratins and
casseroles. Convection broil does the same while blowing the hot air around for even
cooking.
1. Ensure the crumb tray is inserted in its position below the oven door and plug in unit.
2. Place food on broil pan or in basket on broil pan. NOTE: Using foil with Convection
Broil function can significantly affect the cook temperature and time.
3. Slide broil pan into the oven’s top rack position. NOTE: Be sure that food is not directly
touching the heating elements; lower pan if so.
4. Set Cook Function Dial to Broil or Convection Broil.
5. Set the Temperature Dial to Broil.
6. Turn the Timer Dial to desired time; the Power Light will turn on and broiling will begin
NOTE: To set a time of less than 20 minutes, you must first turn the dial past the
20-minute mark, then turn it back to the lower time desired.
7 8
Page 9

OPERATING INSTRUCTIONS OPERATING INSTRUCTIONS
7. To pause cooking, open the oven door. The timer will continue to countdown, but
broiling will stop (the heating elements and oven will still be hot, however). When door
is closed, broiling will continue. To stop broiling before timer ends, turn the timer dial to
Off.
NOTE: The interior light does not come on when you open the oven door. To turn it on,
press the Oven Light button on the control panel; press it again to turn it off.
8. Keep an eye on foods while broiling as they brown quickly. When timer ends, a bell will
ring and the Toast-Air® will turn off.
9. Using oven mitts, carefully remove food from the oven. Check for doneness, serve,
and enjoy!
BAKE OR CONVECTION BAKE
Baking is a general cooking method that works just like your regular oven. Use it to make
small-batch cookies, brownies, or to bake a cake. You can also roast meats and chicken using
the Bake function. Convection Bake moves the air around with a fan to cook foods faster and
hotter and is great for pizza.
1. Ensure the crumb tray is inserted in its position below the oven door and plug in unit.
2. Place food on bake pan or rack. NOTE: Using foil with Convection Bake function can
significantly affect the cook temperature and time.
6. Turn the Timer Dial to desired time; the Power Light will turn on and baking will begin.
NOTE: To set a time of less than 20 minutes, you must first turn the dial past the
20-minute mark, then turn it back to the lower time desired.
7. To pause cooking, open the oven door. The timer will continue to countdown, but
cooking will stop (the oven will still be hot, however). When door is closed, cooking
will continue. To stop cooking before timer ends, turn the timer dial to Off.
NOTE: The interior light does not come on when you open the oven door. To turn it
on, press the Oven Light button on the control panel; press it again to turn it off.
8. Cook until timer ends. A bell will ring and the Toast-Air® will turn off.
9. Using oven mitts, carefully remove basket or rack from the oven. Check food for
doneness, serve, and enjoy!
TOAST
The Toast-Air® can toast multiple slices of bread or bagels to the perfect brownness. And
you can keep an eye on your toast through the window.
1. Ensure the crumb tray is inserted in its position below the oven door and plug unit in
if necessary.
2. Place food on the wire rack and slide rack into the Toast-Air®.
3. Slide food into the oven. (NOTE: For baked goods, it’s wise to preheat empty oven for 5
minutes or so before adding food.)
4. Set Cook Function Dial to Bake or Convection Bake.
5. Set the Temperature Dial to desired temperature.
NOTE: If toasting one or two pieces of food, center them in the middle of the rack for
the best results.
3. Set the Cooking Function Dial to Toast.
4. Set the Temperature Dial to Toast.
9 10
Page 10

OPERATING INSTRUCTIONS OPERATING INSTRUCTIONS
5. Set the Toast Timer Dial to the desired shade: Light, Medium, or Dark or anywhere
in between. This will begin the timer and the toasting, and the red Power Light will
come on.
6. To pause toasting, open the oven door. The timer will continue to count down, but the
toasting will stop. (Oven will still be hot, however.) When oven door is closed, toasting
will continue. To stop toasting before timer ends, turn the Toast Timer Dial to Off.
7. Toast until timer ends. A bell will ring, the Power Light will turn off, and toasting will end.
8. Using oven mitts, carefully remove the food from the oven, serve, and enjoy!
WARM
The warm function heats the oven to 200˚F, perfect for reheating leftovers without drying
them out.
1. Ensure the crumb tray is inserted in its position below the oven door and plug in unit.
2. Place food on bake pan or rack.
3. Slide food into the oven.
4. Set Cook Function Dial to Warm.
5. Set the Temperature Dial to Warm.
7. To pause warming, open the oven door. The timer will continue to countdown but
warming will stop (the oven will still be hot, however). When door is closed, warming
will continue. To stop warming before timer ends, turn the timer dial to Off.
NOTE: The interior light does not come on when you open the oven door. To turn it
on, press the Oven Light button on the control panel; press it again to turn it off.
8. Warm until timer ends. A bell will ring and the Toast-Air® will turn off.
9. Using oven mitts, carefully remove basket or rack from the oven. Check food for
doneness, serve, and enjoy!
6. Turn the Timer Dial to desired time; the Power Light will turn on and broiling will begin
NOTE: To set a time of less than 20 minutes, you must first turn the dial past the
20-minute mark, then turn it back to the lower time desired.
11 12
Page 11

COOKING TIPS TROUBLESHOOTING FAQS
• If not cooking on the broil pan, consider inserting it in bottom rack position as a
drip tray for easy cleanup.
• If warming leftover cooked meat using the Warm function, fill the broil pan with
1 cup of water and place below the food being warmed to keep it from drying out.
• When working with delicate food that can easily crumble, take the rack out of the
Toast-Air® and assemble your food directly on the rack.
• If using a pizza stone, preheat the stone in the oven for at least 20 minutes before
baking your pizza. Place the stone in the Toast-Air® and set to highest temperature.
You can incorporate both preheating and cooking by setting the timer for
30-40 minutes to incorporate the preheating and baking times all in one cycle.
Why didn’t my Toast Air® ring to alert me my food was finished cooking?
If you’re cooking something for less than 20 minutes, be sure to turn the timer dial past
the 20-minute mark first, then set it to the desired time.
Why isn’t my food golden brown and crisp?
Try tossing food in a little oil before cooking to enhance brownness. Also, be sure to
distribute foods evenly on pan, rack, or in basket; do not stack food.
Can I air fry foods that have a wet batter like tempura?
No. Foods dredged with a wet batter like tempura or beer batter should not be cooked
in the Toast-Air® as the batter will slough off the food. However, breaded foods like
chicken nuggets cook up beautifully in the Toast-Air®.
Do you have to preheat the Toast-Air®?
You do not have to, but when baking, food will cook faster and more evenly if the unit
is preheated for at least 5 minutes. It’s also helpful to preheat a baking stone if using
one for pizza.
Can you cook raw meat and seafood in the Toast-Air?
Yes. Always check foods for doneness using proper food safety guidelines.
13 14
Page 12

CLEANING AND MAINTENANCE
The Toast-Air® Air Fryer + Oven is easy to clean. Simply follow the directions below.
1. Unplug the unit and allow to cool completely before cleaning.
2. Gently wipe the exterior with a clean, damp cloth and dry thoroughly.
3. Using a sponge, soft cloth, or nylon pad, wash the glass on the door with dish soap
and warm water. Do NOT use a spray glass cleaner.
4. Using a mild liquid soap and a damp cloth or sponge, wipe the interior walls. Do
NOT use abrasive cleaners like steel wool pads, as they may damage the finish. Be
sure to clean the top interior of the Toast-Air®. Removing grease on a regular basis
will prevent smoke caused by a buildup of oils and will keep cooking consistent.
5. Slide out the crumb tray and toss out crumbs. Wipe clean. Remove any baked-on
grease by soaking tray in hot, sudsy water. Use non-abrasive cleaners like a sponge,
cloth, or brush. The crumb tray is NOT dishwasher safe.
6. Hand wash the broil pan, wire rack, and basket and dry thoroughly. The rack and
basket are also top-rack dishwasher safe. The broil pan is not dishwasher safe.
7. Fully dry the Toast-Air® and all accessories before storing.
15
Page 13

TERMS AND CONDITIONS
Limited Warranty
TERMS AND CONDITIONS
Limited Warranty
Our products are backed by a limited 1-year warranty. To register, follow the
®
instructions on the Chefman
Warranty Registration page in this User Guide.
We offer a limited 1-year warranty from the date of purchase. This warranty
is void without proof of purchase within the USA, Canada, or Mexico. Service
centers and retail stores do not have the right to alter or change the Terms and
Conditions of this warranty.
WHAT THE WARRANTY COVERS
• Manufacturer Defects
Chefman
®
products are warranted against defects in material and
workmanship for a period of 1 year from the date of purchase when used in
®
accordance with the Chefman
User Guide.
• Qualified Replacements
If your product does not work as it should, we will send you a new one. If the
product is no longer available, we will replace it with one that is comparable.
THIS WARRANTY DOES NOT COVER
• Misuse - Damage that occurs from neglectful or improper use of products;
damage that occurs as a result of usage with incompatible voltage. See
Safety Instructions for information on proper use.
• Poor Maintenance - General lack of proper care. See Cleaning and
Maintenance for information on proper maintenance.
• Commercial Use - Damage that occurs from commercial use.
• Altered Products - Damage that occurs from alterations or modifications by
any entity other than Chefman
®
; removal of rating label.
• Catastrophic Events - Damage that occurs from fire, floods, or natural
disasters.
• Loss of Interest - Claims of loss of interest or enjoyment.
16 17
Page 14

Model/Modele: RJ25-C
Conveyor toaer
120v~60hz 1800W
CONFORMS TO UL STD. 1026
CERTIFIED TO CSA STD.C22.2 No.64
CAUTION: DO NOT IMMERSE IN WATER
ATTENTION: NE PAS PLONGER DANS L’EAU
WARNING: TO PREVENT ELECTRIC SHOCK,
UNPLUG BEFORE CLEANING
PRÉAVIS: POUR ÉVITER LES CHOCS ÉLECTRIQUES,
DÉBRANCHEZ L’APPAREIL AVANT DE L’UTILISER
READ INSTRUCTIONS BEFORE USING
LISEZ LES INSTRUCTIONS AVANT DE L’UTILISER
HOUSEHOLD USE ONLY
POUR USAGE DOMESTIQUE SEULEMENT
0000000
0000
XXXXXXXX
CHEFMAN® WARRANTY REGISTRATION CHEFMAN® WARRANTY REGISTRATION
Register your product to add an additional 3 months to your warranty.
What do I Need to Register my Product
•Contact Information
•Model Number
•Proof of Purchase
(online confirmation, receipt, gift receipt)
•Date code
MADE IN CHINA/FABRIQUE EN CHINE
NOTE: Label depicted here is an exmaple.
DATE CODE:
ACCESS CODE:
AC ONLY/ AC SEULEMENT
How Do I Register my Product?
We offer two convenient ways to access the Chefman
®
registration form:
1. Visit chefman.com/register.
2. Scan the QR code below to access site:
For product information, visit chefman.com
OTHER LIMITATIONS: ALL WARRANTIES OF ANY KIND WHATSOEVER, EXPRESS, IMPLIED AND
STATUTORY, ARE HEREBY DISCLAIMED. ALL IMPLIED WARRANTIES OF MERCHANTABILITY AND
FITNESS FOR A PARTICULAR PURPOSE ARE HEREBY DISCLAIMED, PROVIDED THAT IF ANY IMPLIED
WARRANTIES OF ANY KIND IS REQUIRED BY ANY JURISDICTION, INCLUDING MERCHANTABILITY
AND FITNESS FOR A PARTICULAR PURPOSE, THE DURATION OF SUCH IMPOSED IMPLIED
WARRANTY IS LIMITED TO ONE (1) YEAR. THIS WARRANTY DOES NOT COVER, AND CHEFMAN
SHALL NOT BE LIABLE FOR, INCIDENTAL, INDIRECT, SPECIAL OR CONSEQUENTIAL DAMAGES,
INCLUDING WITHOUT LIMITATION, DAMAGE TO, OR LOSS OF USE OF THE PRODUCT, OR LOST SALES
OR PROFITS OR DELAY OR FAILURE TO PREFORM THIS WARRANTY OBLIGATION. THE REMEDIES
PROVIDED HEREIN ARE THE EXCLUSIVE REMEDIES UNDER THIS WARRANTY, WHETHER BASED ON
CONTRACT, TORT OR OTHERWISE.
This Warranty gives you specific legal rights, and you may also have other rights that vary from state
to state or province to province. Some states or provinces do not allow the exclusions or limitations set
forth in this Warranty, so the above limitations or exclusions may not apply to you depending on the
jurisdiction of purchase.
®
Chefman
is a registered trademark of RJ BRANDS, LLC.
®
18 19
Page 15

Toast-Air™ Oven + Air Fryer
RECIPE BOOK
Page 16

Balsamic-Bacon Brussels Sprouts
INGREDIENTS
• 1 lb Brussels sprouts,
trimmed and halved
• 4 slices bacon, cut into
½-inch pieces
• 2 Tbsp olive oil
• 1 Tbsp balsamic vinegar
• 1½ tsp kosher salt
• 1 tsp freshly ground
black pepper
Air frying crisps both the bacon and the Brussels sprouts in
a dish that’s easy to love. Serve these sweet and sour sprouts
as an appetizer or alongside roasted chicken or steak.
1. Combine all ingredients in a large bowl and toss to
coat well.
2. Place Toast-Air™ air fry basket on the broil pan.
3. Transfer Brussels sprouts and bacon mixture to basket
and distribute evenly.
4. Slide broil pan with basket into the top rack position.
5. Set to Air Fry at 350°F for 20 minutes.
6. When the time expires, carefully remove the Brussels
sprouts and check that they are browned and tender
and the bacon is crisp.
7. Serve immediately.
PREP TIME
10 min
TOTAL TIME
30 min
SERVINGS
4
Page 17

PREP TIME
20 min
TOTAL TIME
40 min
SERVINGS
8-12
INGREDIENTS
• 3 large eggs
• 1⅓ cups buttermilk
• 2 ¼ cups all-purpose flour,
plus more as needed
• 2¼ cups bread flour
• ¼ cup granulated sugar
• 1 Tbsp plus ½ tsp kosher salt
• ¼ cup plus 1½ tsp baking
powder
• 8 oz (1 cup) unsalted
butter, cut into ½-inch cubes
and chilled
• Flaky sea salt, for garnish
SPECIAL EQUIPMENT
• Stand mixer with dough
hook attachment
• 3-inch round biscuit or
cookie cutter
• Pastry brush
Buttermilk Biscuits
Using very cold butter in the dough gives these biscuits their
impressive height and light texture.
1. Crack two of the eggs into a medium bowl. Add the buttermilk
and whisk until combined.
2. In a stand mixer fitted with the dough hook attachment, combine
the all-purpose flour, bread flour, sugar, salt, and baking powder.
Mix on low speed for about 30 seconds.
3. Add the butter cubes to the flour mixture and mix on low until
the butter is distributed and in small pea-size pieces.
4. Add the buttermilk mixture and mix on medium speed until the
dough releases from the sides of the bowl, about 3 minutes.
5. Lightly flour a work surface. Transfer dough to work surface and
lightly roll it out about 1-inch thick.
6. Using a 3-inch cutter, cut out 8 rounds.
7. Transfer rounds to the Toast-Air™ bake pan (ungreased) with
space between them. (These first biscuits will have the best shape
and texture; however, you can gather up the dough, reroll it gently
and cut up to four more biscuits to bake in a second batch.)
8. Beat the remaining egg and brush the tops of the biscuits with it.
Sprinkle each biscuit with a pinch of flaky sea salt.
9. Set to Bake at 400°F for 21 minutes and allow Toast-Air™ to
preheat empty for 5 minutes.
10. Slide bake pan into the top rack position.
11. Bake for the remaining 16 minutes; biscuits should be golden
brown on top.
12. Serve warm.
Page 18

Chocolate Crinkle Cookies
INGREDIENTS
• ½ cup all-purpose flour
• ¼ cup cocoa powder
• ½ tsp baking powder
• ¼ tsp salt
• ⅓ cup granulated sugar
• 2 Tbsp vegetable oil
• 1 large egg
• ¼ tsp vanilla extract
• ½ cup powdered sugar
SPECIAL EQUIPMENT
• Electric mixer with whisk
attachment
• Parchment paper
These classic cookies are a breeze to make. Want more
than ten? Simply double the recipe and bake in batches.
1. In a medium bowl, whisk the flour, cocoa powder, baking
powder, and salt.
2. In a separate bowl and using an electric mixer fitted with a
whisk attachment, beat the sugar and oil on medium speed
until combined, about 3 minutes. Add the egg and vanilla
and beat on medium until completely incorporated.
3. With the mixer running, add the flour mixture a little bit at a
time until well combined.
4. Scrape the dough onto a lightly floured surface, form it into
a ball, wrap in plastic wrap, and refrigerate for 2 hours.
5. Line the Toast-Air™ bake pan with parchment paper.
6. Using your hands, roll the chilled dough into ten 1-inch balls.
7. Roll each ball in the powdered sugar and place on the pre
pared pan with room between.
8. Slide pan into the top rack position.
9. Set to Bake at 350°F for 10 minutes.
-
PREP TIME
30 min
TOTAL TIME
2 HR 45 min
SERVINGS
10 Cookies
10. When the time expires, carefully remove pan and let cookies
cool for about 3 minutes.
11. Serve warm or let cool completely and store in an airtight
container for up to 2 days.
Page 19

Cinnamon-Sugar Donuts
INGREDIENTS
• ⅓ cup granulated sugar
• 1 Tbsp ground cinnamon
• 1 can refrigerated biscuit
dough
• Cooking oil spray,
preferably coconut
• 4 Tbsp butter, melted
in a medium pot and
kept warm
SPECIAL EQUIPMENT
• 1½-inch round cookie
cutter
These fragrant, crisp-on-the-outside, tender-in-the-inside treats
taste just like they were deep fried but cook up in minutes with
scant added oil.
1. Combine the sugar and cinnamon in a medium bowl.
2. Separate the biscuit dough into 8 biscuits. Using a 1½-inch
round cutter, cut out a circle from the center of each biscuit.
Reserve donuts and donut hole cut-outs separately.
3. Spray the donuts lightly with oil on all sides.
4. Place Toast-Air™ air fry basket on the bake pan, then transfer
donuts to the air fry basket.
5. Slide pan with basket into the top rack position.
6. Set to Air Fry at 375°F for 6 minutes.
7. When the time expires, check that the donuts are nicely
browned; if not air fry for another 1 minute. Carefully toss
the hot donuts in the melted butter and then with the
cinnamon-sugar mixture to coat.
8. Repeat steps 3 through 7 with the donut holes.
9. Serve warm.
PREP TIME
5 min
TOTAL TIME
20 min
SERVINGS
8
Page 20

Spicy Sesame Chicken Wings
INGREDIENTS
• 2 lb chicken wings
• 1 Tbsp vegetable oil
• 1 tsp kosher salt
• 2 Tbsp gochujang
• 2 Tbsp toasted sesame oil
• 1 tsp garlic powder
• Thinly sliced scallions,
for garnish
• Sesame seeds,
for garnish (optional)
Gochujang (a red fermented chili paste from Korea) adds
spicy, sweet, and savory flavors to these irresistible wings.
Many supermarkets now carry this versatile condiment; if
you can’t find it, substitute your favorite red chile paste.
1. In a large bowl, toss the wings with the vegetable oil and
salt to coat.
2. Place Toast-Air™ air fry basket on the bake pan, then
transfer wings to the air fry basket, distributing them
evenly.
3. Slide pan with basket into the top rack position.
4. Set to Air Fry at 400°F for 15 minutes.
5. Meanwhile, in a large bowl, stir gochujang, sesame oil, and
garlic powder together.
6. When the time expires, carefully transfer the wings (they
will not be fully cooked yet) to the large bowl with the
gochujang mixture and use tongs to toss until evenly
coated.
PREP TIME
5 min
TOTAL TIME
30 min
SERVINGS
4
7. Carefully return wings to air fry basket (basket will be
hot) and reinsert into oven on pan.
8. Set to Air Fry at 400°F for 5 minutes.
9. When the time expires, remove the wings, check for
doneness, and serve immediately sprinkled with scallions
and sesame seeds, if desired.
Page 21

Brown Sugar and Maple Sweet Potatoes
INGREDIENTS
• 2 medium sweet potatoes,
scrubbed and dried
• ½ tsp kosher salt
• ½ tsp freshly ground
black pepper
• 2 Tbsp unsalted butter,
cut into 4 pieces
• 1 Tbsp maple syrup
• 1 Tbsp brown sugar
These super sweet spuds would pair especially well with a spicy
main course.
1. Using a fork, poke holes in the sweet potatoes to allow
steam to escape during cooking.
2. Insert Toast-Air™ broil tray into lowest rack position in oven
to act as drip tray.
3. Place the sweet potatoes on the Toast Air™ wire rack and
insert the rack into the top rack position.
4. Set to Bake at 400°F for 45 minutes.
5. When the time expires, check that the potatoes are tender
and the skin is crispy; if not, cook for a little longer. Let baked
potatoes cool slightly, 4 to 5 minutes.
6. Cut the potatoes in half lengthwise, season each half with
salt and pepper, then rough up the potato flesh a bit with
a fork.
7. Top each half with the butter, a drizzle of syrup, and a
sprinkling of brown sugar and serve.
PREP TIME
5 min
TOTAL TIME
55 min
SERVINGS
4
Page 22

INGREDIENTS
Garlic and Citrus Shrimp Skewers
These garlicky, herb-flecked shrimp make a terrific appetizer
and would also be delicious served over rice or in a taco.
PREP TIME
TOTAL TIME
SERVINGS
• 3 Tbsp olive oil
• 2 Tbsp finely chopped garlic
• 2 tsp fresh lemon juice
• 2 tsp fresh orange juice
• ¼ cup finely chopped fresh
parsley
• ¼ cup finely chopped fresh
cilantro
• 1 tsp kosher salt
• ½ tsp freshly ground black
pepper
• 20 medium (31 to 40 per lb)
peeled raw shrimp
SPECIAL EQUIPMENT
• Skewers, wood or metal
1. If using wooden skewers, soak them in water for
20 minutes.
2. In a medium bowl, combine the oil, garlic, lemon and
orange juice, parsley, cilantro, salt, and pepper.
3. Add the shrimp and toss well to coat. Let marinate at
room temperature for 20 minutes or cover and refrigerate
for up to 1 hour.
4. Skewer the shrimp, 5 per skewer.
5. Place Toast-Air™ air fry basket on the broil pan, then place
skewers in the air fry basket.
6. Slide broil pan with basket into the top rack position.
7. Set to Air Fry at 450°F for 5 minutes.
8. When the time expires, the shrimp should be pink and
opaque throughout.
9. Serve immediately.
20 min
50 min
4
Page 23

PREP TIME
TOTAL TIME
SERVINGS
Spinach, Onion, and Gruyère Frittata
INGREDIENTS
• 1 Tbsp olive oil
• 1 large yellow onion,
thinly sliced
• 2 oz (2 cups) fresh baby
spinach
• 6 large eggs
• ¼ cup half and half
• 1½ tsp kosher salt
• 1 tsp freshly ground black
pepper
• ½ tsp garlic powder
• ½ tsp smoked paprika
• ¾ cup shredded Gruyère
or other Swiss cheese
• Cooking spray
• French bread, for serving
(optional)
SPECIAL EQUIPMENT
• 9-inch round baking pan
Enjoy this satisfying egg dish for breakfast with buttered
toast or as a light lunch or dinner paired with lightly dressed
greens.
1. Heat the oil in a large sauté pan over medium heat. Add
the onion and cook, stirring occasionally, until tender and
golden brown, 8 to 12 minutes. Remove from the heat,
add the spinach, and toss to wilt slightly.
2. In a medium bowl, whisk the eggs, half and half, salt,
pepper, garlic and paprika. Add the onion-spinach
mixture and the cheese and stir to combine.
3. Coat a 9-inch round baking pan with cooking spray, then
pour in the egg mixture. Place the round baking pan on
the Toast-Air™ broil pan and insert it into the top rack
position.
4. Set to Bake at 300°F for 22 minutes.
5. When the time expires, carefully remove the pan and let
the frittata cool briefly, then invert onto a cutting board
or serving plate.
6. Slice and serve immediately with some French bread
if desired.
20 min
40 min
4
Page 24

Montreal Strip Steak
INGREDIENTS
• 2 bone-in strip steaks,
each about 1 lb
• 1 Tbsp olive oil
• 2 Tbsp Montreal steak
seasoning
• Homemade or
prepared herb butter,
for serving (optional)
Montreal steak seasoning, available at the supermarket, gives
beef a deep, savory flavor. Once you’ve tried this recipe, feel free
to adjust the timing to get the doneness you prefer.
1. Rub both steaks all over with the olive oil and seasoning.
2. Place Toast-Air™ air fry basket on the broil pan, then place
steaks in basket.
3. Set to Air Fry at 450°F for 15 minutes and let oven preheat
empty for first 5 minutes.
4. Slide broil pan with air fry basket into the top rack position.
5. Air fry steaks for 5 minutes, then carefully flip and air fry for
another 5 minutes for medium rare (135°F). If you would like
your steaks more cooked, return them to the oven.
6. Transfer the steaks to a platter or plates and let rest a few
minutes before serving topped with herb butter, if desired.
PREP TIME
5 min
TOTAL TIME
25 min
SERVINGS
2 to 4
Page 25

Tortilla Chips
INGREDIENTS
• 5 (6-inch) corn tortillas
• 1 Tbsp olive oil
• 1 tsp kosher salt
• Guacamole, for serving
• Salsa, for serving
• Queso, for serving
SPECIAL EQUIPMENT
• Pastry brush
These homemade tortillas chips are so easy and so delicious you
may never go back to bagged!
1. Brush tortillas with the olive oil on both sides and sprinkle
with salt.
2. Stack tortillas, and with a large chef’s knife, cut into
8 wedges per tortilla.
3. Slide Toast-Air™ broil pan into the lowest rack setting to act
as drip tray.
4. Distribute tortilla wedges evenly in the Toast Air™ fry basket.
5. Slide air fry basket into the top rack position.
6. Set to Air Fry at 350°F for 8 minutes.
7. When the time has expired, the chips should be golden
brown; they will continue to crisp more as they cool.
8. Serve warm with salsa, guacamole, and/or queso or let
cool completely then store in an air-tight container for up
to 2 days.
PREP TIME
10 min
TOTAL TIME
20 min
SERVINGS
4
Page 26

®
21
 Loading...