

Page 1

MULTI-FUNCTION
AIR FRYER +
Rotisserie, Dehydrator & Oven
This is your one-stop guide to using your
product. From the below links, you can jump
ahead to a specific document if desired.
QUICK LINKS
• Quick Start Guide
• User Guide
• Recipe Book
RJ38-6-RDO
Page 2

QUICK START GUIDE
HOW TO USE THE AIR FRYER+
BEFORE FIRST USE
• Remove packing materials and stickers, but don't throw away the packing
materials just yet!
• The rotisserie spit and 2 rotisserie forks are packaged on top of the Styrofoam.
• The rotisserie retrieval tool is packaged vertically next to the Air Fryer+ in
cardboard.
• The rest of the tools (2 removable racks and 1 drip tray) are packaged inside
the Air Fryer+.
• Once everything is removed, gently wipe down the exterior. Wash all removable
parts with a sponge and warm, soapy water. All removable parts are top-rack
dishwasher safe.
• Dry thoroughly.
• Read all instructions and follow them carefully.
• Plug in the Air Fryer+.
• Ensure drip tray is in place.
• Put seasoned food on trays. Insert trays into unit. Close door.
• Press cooking preset button for the type of food you are cooking or
manually set time and temperature by using the TIME and TEMP buttons
in addtion to turning the dial on top of the unit.
• Press the START/STOP button on the top of the Air Fryer+.
• After cooking, use protective mitts to remove racks from Air Fryer+
CAUTION: Contents will be hot.
2
3
Page 3

HOW TO USE THE AIR FRYER+ PRESET CHART
HOW TO ASSEMBLE THE ROTISSERIE SPIT:
• Insert the rotisserie spit lengthwise into the center of the food.
• Secure it with the rotisserie forks and tighten the screws.
HOW TO INSERT THE ROTISSERIE SPIT:
• Guide the prepared rotisserie spit into the Air Fryer+ in the rotisserie rack position.
• Place the left side of the rotisserie spit into the round rotisserie gear located on the left
interior wall.
• Once it is in place, lift the right side of the rotisserie spit and place it in the rotisserie
holder on the right interior wall.
HOW TO USE THE ROTISSERIE RETRIEVAL TOOL:
• Use oven mitts when handling the HOT retrieval tool.
• Guide the retrieval tool into the Air Fryer+. Position it below the rotisserie spit.
• Use the retrieval tool to lift the right side of the rotisserie spit. Once it is free, lift
the left side.
Fries 20 minutes 400°F
Meat 20 minutes 400°F
Fish 10 minutes 400°F
Shrimp 10 minutes 400°F
Chicken 25 minutes 380°F
Rotisserie 45 minutes 400°F
Bake 30 minutes 350°F
Dehydrate 8 hours 140°F
• Carefully guide the rotisserie spit with food out of the Air Fryer+.
54
Page 4

FAQ
1. Why can’t I open the door?
After unboxing the Air Fryer+, be sure to remove the tape that’s on both sides.
NOTE: There may be some resistance when opening the door for the first time.
2. Why can’t I close the door after inserting my food and trays inside?
Make sure the trays are inserted the same way they came packaged. Insert the trays
curved side first.
3. Can I use plastic containers, paper towels or paper plates inside the Air Fryer?
No. Do NOT put anything inside the Air Fryer+ that you would not use in an oven or on a
stovetop.
4. Is it safe to use aluminum foil in the Air Fryer+?
Yes. You can put aluminum foil over the racks and the drip tray.
5. Can the drip tray be used for cooking purposes outside of the Air Fryer+?
No. It is not recommended to use any of the fryer’s tools for anything other than their
intended use with the Air Fryer+.
6. I feel a little amount of air escape around the door when using the Air Fryer+. Is this
normal?
Yes, totally normal. The door is not sealed airtight. There are a few spots where air
circulates.
7. How do I switch between Fahrenheit and Celsius?
Press and hold the TEMP button until your desired unit of temperature illuminates on the
top right of the screen.
6
Page 5

USER GUIDE
INTRODUCTION
COOKING FORWARD™
Thanks for purchasing a Chefman® appliance.
Love to cook or rarely enter the kitchen? We’ve got you covered. Creating
innovative kitchen appliances and guides for all skill levels just so happens to be
our expertise.
Saving time, reducing stress, and cooking more efficiently are just a few things to
enjoy as you create restaurant-quality meals using our products. You’ll embrace
a new world of culinary possibilities and cook with confidence. We like to call this
the cooking forward effect!
So go ahead, promote yourself from cook to head chef in your household.
(You deserve it!)
From our kitchen to yours,
The Chefman® Team
We're so excited for you to experience what it's like to make the perfect
homemade fries, rotisserie chicken, dessert or dehydrated fruit snacks right
at home. With the Chefman Air Fryer+ you can fry, roast, bake or dehydrate
your way to quick and easy weekday meals and everything in between.
To be able to take full advantage of all this Air Fryer+ has to offer, be sure to
read this User Guide before getting started.
READ ALL INSTRUCTIONS BEFORE USE
For your safety and continued enjoyment of this product, always read the instruction manual before using.
7
87
Page 6

FUN FACTS
CONTENTS
• Instead of traditional deep frying where food is submerged and cooked in
hot oil, air frying circulates heat using little or no oil.
• In the US, potatoes are typically the most consumed vegetable, with
Americans eating an average of 115.6 lbs of white potatoes a year, two-thirds
of which are in the form of French fries.
• As you chew hot food it cools, increasing taste intensity. The taste receptors
on our tongues are most active when food is between 86°-95°F.
11 Safety Instructions
15 Features
19 Operating Instructions
25 Tips
27 Cleaning and Maintenance
29 Terms and Conditions
30 Warranty Card
109
Page 7

SAFETY INSTRUCTIONS SAFETY INSTRUCTIONS
IMPORTANT SAFEGUARDS IMPORTANT SAFEGUARDS
When using electrical appliances, basic safety precautions should always be followed
including the following:
1. Read all instructions.
2. Do not touch hot surfaces. Use handles or knobs.
3. To protect against electrical shock do not immerse cord or plug in water or other
liquid.
4. Close supervision is necessary when any appliance is used by or near children.
5. Unplug from outlet when not in use and before cleaning. Allow to cool before
putting on or taking off parts.
6. Do not operate any appliance with a damaged cord or plug or after the appliance
malfunctions or has been damaged in any manner. Contact Chefman Customer
Service at 1-888-315-6553 or customerservice@chefman.com.
7. The use of accessory attachments not recommended by the appliance
manufacturer may cause injuries.
8. Do not use outdoors.
9. Do not let cord hang over edge of table or counter, or touch hot surfaces.
10. Do not place on or near a hot gas or electric burner, or in a heated oven.
11. Extreme caution must be used when moving an appliance containing hot oil or
other hot liquids.
12. Always plug cord into the wall outlet first. To disconnect, turn any control to "off",
then remove plug from wall outlet.
13. Do not use appliance for other than intended use.
14. Use extreme caution when removing tray or disposing of hot grease.
15. Do not clean with metal scouring pads. Pieces can break off the pad and touch
electrical parts, creating a risk of electric shock.
16. Place the Air Fryer+ on a flat, sturdy, heat resistant surface. Do not place the Air
Fryer+ near or on any type of heat source, such as a gas or electric burner, stove or
oven. Do not use near an open flame or flammable materials.
17. The Air Fryer+ will emit some heat. Allow sufficient space around Air Fryer+ when
in use and do not place near other items or appliances.
18. Never operate the Air Fryer+, or any appliance, on a gas or electric stovetop, even
if the stovetop is off and completely cool.
19. Appliances may emit heat or steam when in use; do not block inlets or outlets.
20. Check that your home power supply corresponds with the Air Fryer+’s intended
voltage.
21. Never wrap the cord tightly around the appliance during use or storage; this may
cause the wire to fray and break.
22. This product is not a deep fryer. It is NOT meant to be filled with oil. Never fill
any parts of the Air Fryer+ with oil. If you choose to use oil, toss food with oil in a
separate bowl and then transfer food to the removeable racks.
23. Do not leave uncooked ingredients in the Air Fryer+ for more than a short period
of time before cooking; raw meat, poultry, fish, fruits and vegetables can spoil.
24. Do not move the Air Fryer+ while it is full of food.
1211
Page 8

SAFETY INSTRUCTIONS SAFETY INSTRUCTIONS
IMPORTANT SAFEGUARDS IMPORTANT SAFEGUARDS
25. Do not move the Air Fryer+ during use. During initial use, you may notice some
smoke and/or a slight odor. This is normal and should quickly dissipate. It should
not reoccur after the appliance has been used a few more times.
26. Do not leave the Air Fryer+ unattended during use.
27. The exterior of the Air Fryer+ is designed to be cool to the touch. Some areas do
get HOT during use and touch screen may get warm. Do not touch the heating
elements. Do not place hands or other body parts near the air vents while Air
Fryer+ is in use; burns may result. Take caution when handling the hot Air Fryer+
racks and all removable parts.
28. Use protective mitts and/or tongs to remove hot food from the Air Fryer+.
29. All removable parts may be washed with a sponge and warm, soapy water. All
removable parts are top-rack dishwasher safe.
30. All parts may be air dried, but it is recommended to towel dry to prevent rust.
31. Store Air Fryer+ in a cool, dry place.
32. Save these Instructions.
SHORT CORD INSTRUCTIONS
A short power supply cord is provided to reduce the hazards of entanglement or tripping over
a longer cord. Longer detachable power-supply cords or extension cords are available and
may be used if care is exercised in their use. If a longer detachable power-supply extension
cord is used:
1. The marked electrical rating of the extension cord should be at least as great as the
electrical rating of the appliance.
2. The cord should be arranged so that it will not drape over the countertop or tabletop
where it can be pulled on by children or tripped over unintentionally.
POWER CORD SAFETY TIPS
1. Never pull or yank on cord or the appliance.
2. To insert plug, grasp it firmly and guide it into outlet.
3. To disconnect appliance, grasp plug and remove it from outlet.
4. Before each use, inspect the power cord for cuts and/or abrasion marks. If any are found,
this indicates that the appliance should be serviced, and the power cord replaced. Please
contact Chefman Customer Support for assistance.
5. Never wrap the cord tightly around the appliance, as this could place undue stress on the
cord where it enters the appliance and cause it to fray and break.
DO NOT OPERATE APPLIANCE IF THE POWER CORD SHOWS ANY DAMAGE OR IF
APPLIANCE WORKS INTERMITTENTLY OR STOPS WORKING ENTIRELY.
Do not place the appliance on a
stovetop or any other heatable
surface.
1413
Page 9
FEATURES FEATURES
2
4
7
9
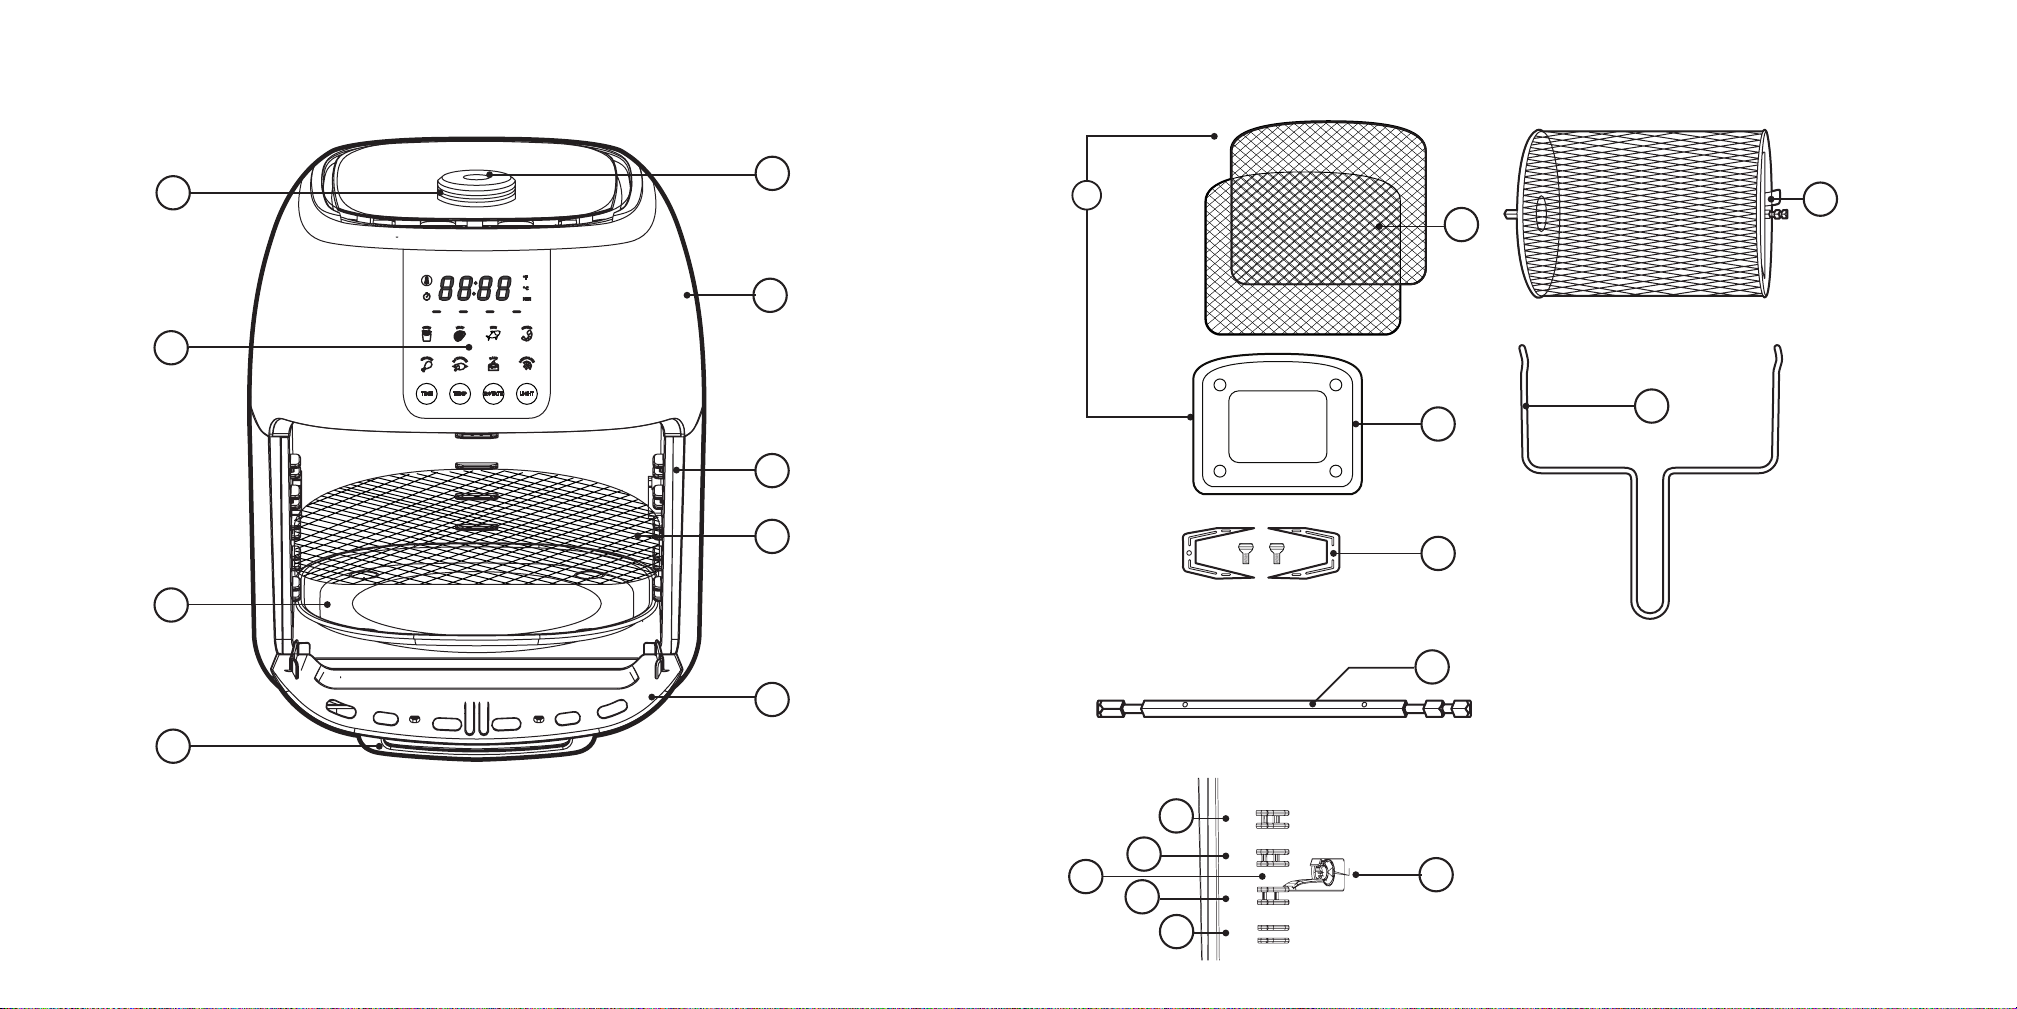
1. START/STOP BUTTON
2. TIME & TEMPERATURE DIAL
3. AIR FRYER+ HOUSING
4. CONTROL PANEL (SEE PAGE
6 FOR PRESET DESCRIPTIONS)
1
3
5
6
8
5. RACK HOLDERS
6. REMOVABLE RACK (2)
7. REMOVABLE DRIP TRAY
8. DOOR WITH VIEWING WINDOW
9. AIR FRYER+ DOOR HANDLE
Note:
**
Insert
rounded
side into
oven first.
LEFT SIDE RIGHT SIDE
7
8
9
10
11
6
12
2
1
3
4
5
PARTS AND ACCESSORIES
1. REMOVABLE RACKS (2)
2. ROTISSERIE BASKET
3. ROTISSERIE RETRIEVAL
TOOL
4. REMOVABLE DRIP TRAY
5. ROTISSERIE FORKS
WITH REMOVABLE
SCREWS (2)
6. ROTISSERIE SPIT
7. RACK POSITION 1
8. RACK POSITION 2
9. ROTISSERIE RACK
POSITION
10. RACK POSITION 3
11. RACK POSITION 4
12. ROTISSERIE GEARS
1615
Page 10
FEATURES FEATURES
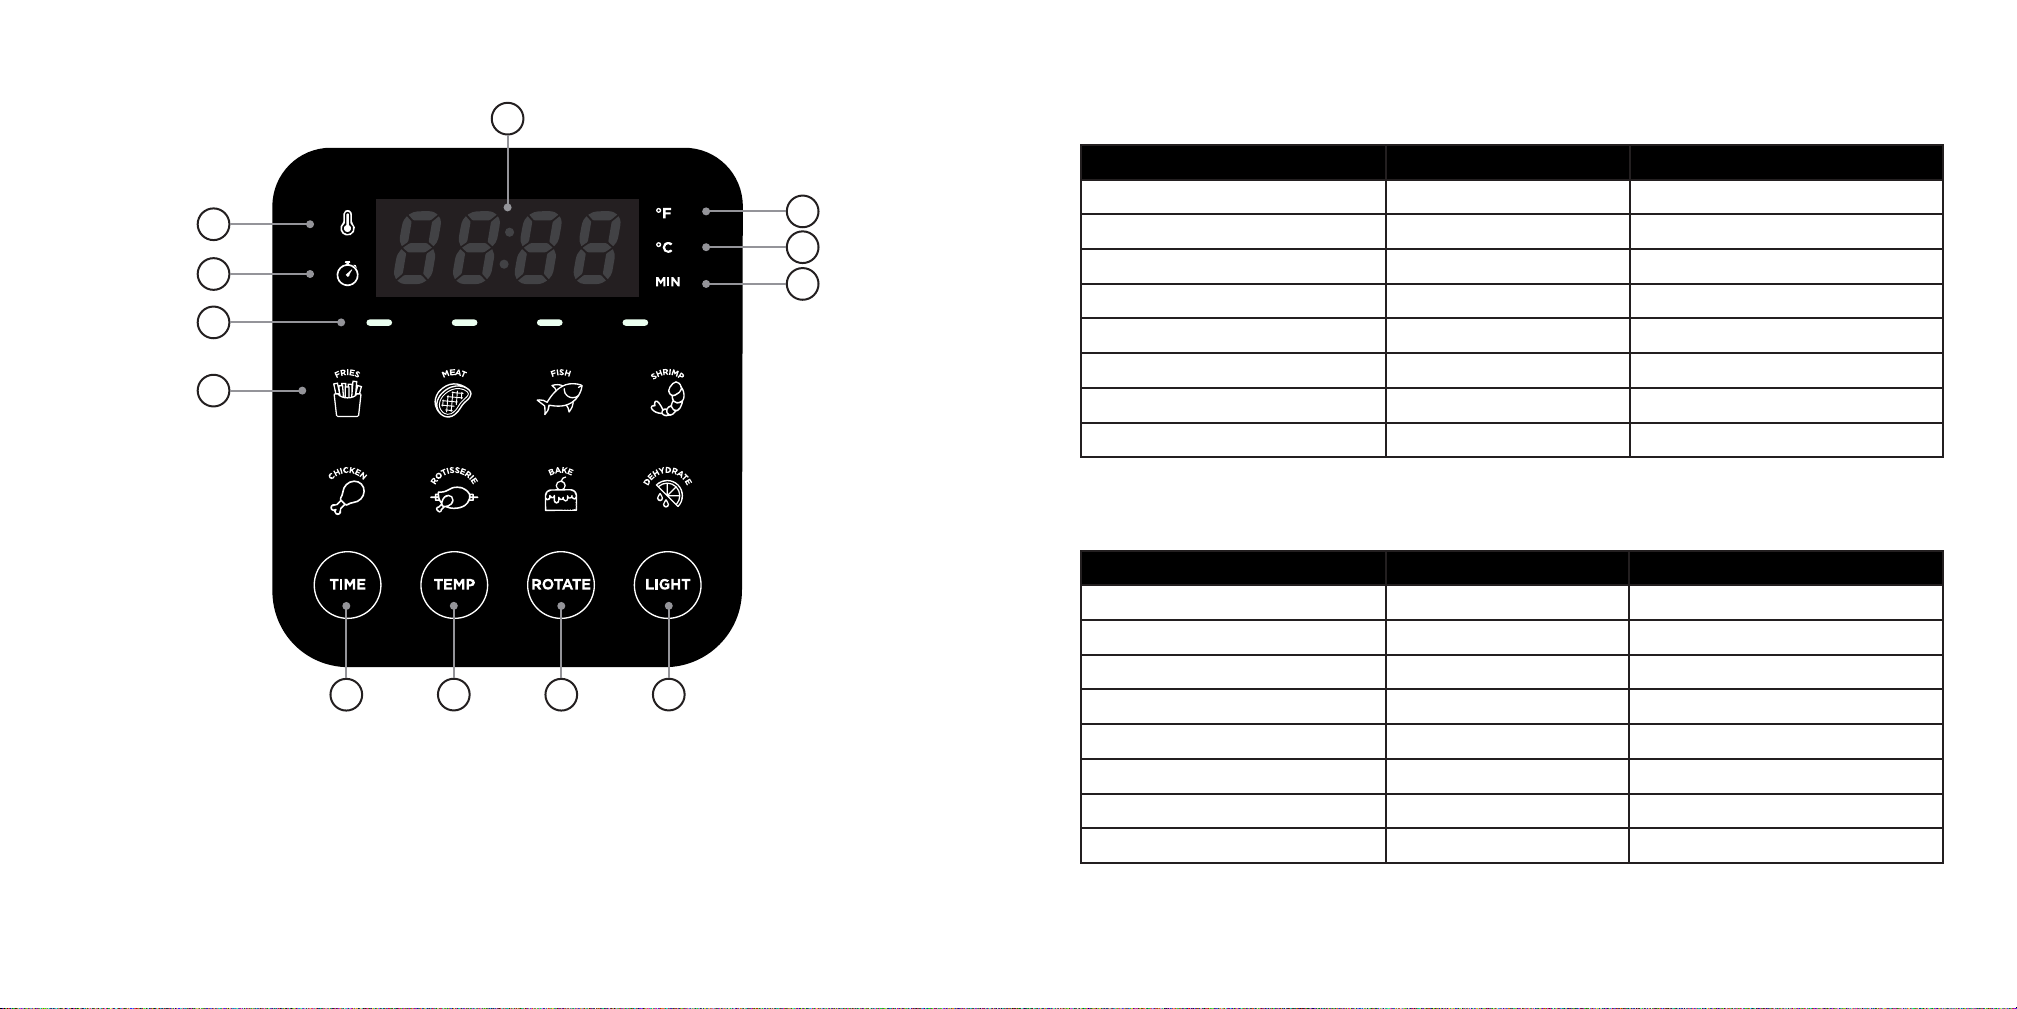
1
FUNCTION FULL TIME RANGE FULL TEMP RANGE
5
6
7
8
9
10
CONTROL PANEL AND PRESET SETTINGS
1. LCD SCREEN
2. FAHRENHEIT INDICATOR
3. CELSIUS INDICATOR
4. MINUTES INDICATOR
5. TEMPERATURE INDICATOR
6. TIME INDICATOR
11
12
7. RUNNING LIGHTS
8. PRESETS
9. TIME BUTTON**
10. TEMP BUTTON*
11. ROTATE BUTTON
12. LIGHT BUTTON
2
3
Fries 1-60 mins 130°-400°F
Meat 1-60 mins 130°-400°F
Fish 1-60 mins 130°-400°F
4
Shrimp 1-60 mins 130°-400°F
Chicken 1-60 mins 130°-400°F
Rotisserie 1-60 mins 130°-400°F
Bake 30 mins-24 hours 130°-400°F
Dehydrate 30 mins-24 hours 90°-170°F
**Twist time and temperature dial (located on top of Air Fryer+) clockwise to increase the time/temp and
counterclockwise to decrease the time/temp.
PRESET DEFAULT TIME DEFAULT TEMP
Fries 20 mins 400°F
Meat 20 mins 400°F
Fish 10 mins 400°F
Shrimp 10 mins 400°F
Chicken 25 mins 380°F
Rotisserie 45 mins 400°F
Bake 30 mins 350°F
Dehydrate 8 hours 140°F
*The TEMP button may be used to change Fahrenheit to Celsius and vice versa: Press and hold the TEMP
button until your desired unit illuminates on the top right part of the screen.
1817
Page 11

OPERATING INSTRUCTIONS OPERATING INSTRUCTIONS
BEFORE FIRST USE
1. Remove all packing materials and stickers from the inside and outside of the Air
Fryer+, but don't throw away the packing materials just yet! The rotisserie spit and
2 rotisserie forks are packaged on top of the Styrofoam. The rotisserie forks are
packaged in bubble wrap. Be careful opening as they have sharp edges.
2. The rotisserie retrieval tool is packaged vertically next to the Air Fryer+ in
cardboard.
3. The rest of the tools (the rotisserie basket, 2 removable racks and 1 drip tray) are
packaged inside the Air Fryer+.
4. Once everything is removed, gently wipe down the exterior with a damp cloth or
paper towel. Never immerse the Air Fryer+ or its plug in water or any other liquid.
The Air Fryer+'s housing is NOT dishwasher safe.
5. Wash all removable parts with a sponge and warm, soapy water. Racks and rotis-
serie basket may be washed with a bristled brush. Do not use abrasive cleaning
agents or scouring pads. All removable parts are dishwasher safe.
6. Dry thoroughly.
7. Before inserting the spit with a chicken (or your choice of food) on it into the Air
Fryer+, practice properly inserting it without any food first to familiarize yourself.
8. Read all instructions and follow them carefully.
HOW TO USE THE AIR FRYER+ WITH BASIC AIR FRYING PRESETS
(EXCLUDES ROTISSERIE)
1. Place the Air Fryer+ on a flat, steady surface away from all sources of heat and water.
2. Plug in the Air Fryer+. NOTE: All icons on the touch screen will illuminate.
3. Ensure drip tray is in place on the bottom of the Air Fryer+.
4. Place seasoned food on racks. Close door.
5. NOTE: The door of the Air Fryer+ will not be able to close if the drip tray is placed
in the unit backwards.
6. Select desired setting by pressing the desired icon.
7. If desired, press the TIME button to adjust the time by rotating the time and
temperature dial on the top of the Air Fryer+.
8. If desired, press the TEMP button to adjust the temperature by rotating the time
and temperature dial on the top of the Air Fryer+.
9. Press the START/STOP button located on the top of the Air Fryer+ to begin the
cooking process.
TIP: For the best and most even results, rotate the racks from the top positions to
the bottom positions, and vice versa, halfway through cooking.
10. While Air Fryer+ is running, screen will toggle between set temperature and
remaining time.
11. Press START/STOP at any time to stop the cooking process.
12. Use oven mitts to remove hot trays from Air Fryer+ and tongs to handle hot food.
HOW TO USE THE ROTISSERIE BASKET (MAX WEIGHT: 4 LBS)
1. Place the Air Fryer+ on a flat, steady surface away from all sources of heat and water.
2. Plug in the Air Fryer+.
3. Ensure drip tray is in place on the bottom of the Air Fryer+. NOTE: The door of the
Air Fryer+ will not be able to close if the drip tray is placed in the it backwards.
4. Place seasoned food inside rotisserie basket. Snap the lid closed.
5. Hold the sealed rotisserie basket in your hands so that the side with the lid is in your
right hand.
2019
Page 12

OPERATING INSTRUCTIONS OPERATING INSTRUCTIONS
6. Guide the basket into the rotisserie rack position in the Air Fryer+. Place the left
side of the basket into the round rotisserie gear located on the left interior wall.
Once it is in place, lift the right side of the basket and place it the rotisserie holder
on the right interior wall. Close door.
7. Select desired setting by pressing the desired icon. Press the ROTATE button.
(You may also just press the ROTISSERIE button which automatically activates the
rotating feature.)
8. If desired, press the TIME button to adjust the time by rotating the time and
temperature dial on the top of the Air Fryer+.
9. If desired, press the TEMP button to adjust the temperature by rotating the time
and temperature dial on the top of the Air Fryer+.
10. Press the START/STOP button located on the top of the Air Fryer+ to begin the cooking
process.
11. While the Air Fryer+ is running, the screen will toggle between set temperature
and remaining time.
12. Press START/STOP at any time to stop the cooking process.
13. Use oven mitts with the rotisserie retrieval tool to remove hot basket from Air
Fryer+. Allow basket to cool before unsnapping the hot lid.
HOW TO USE THE ROTISSERIE SPIT (MAX WEIGHT: 4LBS)
1. Place the Air Fryer+ on a flat, steady surface away from all sources of heat and
water.
2. Plug in the Air Fryer+.
3. Ensure drip tray is in place on the bottom of the Air Fryer+. NOTE: The door of the
Air Fryer+ will not be able to close if the drip tray is placed in the unit backwards.
4. See “How to Prepare the Rotisserie Spit with Food” below.
5. Hold the left side of the rotisserie spit in your left hand and the right side in your
right. (See image on page 5 for reference.)
6. Guide the prepared rotisserie spit into the Air Fryer+ in the rotisserie rack position.
Place the left side of the rotisserie spit into the round rotisserie gear located on the
left interior wall. Once it is in place, lift the right side of the rotisserie spit and place
it the rotisserie holder on the right interior wall. Close the door.
7. Press the ROTISSERIE button. (You may also select a different desired preset
button by pressing the desired icon, and then pressing the ROTATE button.)
8. If desired, press the TIME button to adjust the time by rotating the time and
temperature dial on the top of the Air Fryer+.
9. If desired, press the TEMP button to adjust the temperature by rotating the time
and temperature dial on the top of the Air Fryer+.
10. Press the START/STOP button located on the top of the Air Fryer+ to begin the cooking
process.
11. While Air Fryer+ is running, screen will toggle between set temperature and remaining
time.
12. Press START/STOP at any time to stop the cooking process.
13. Use oven mitts with the rotisserie retrieval tool to remove the hot spit with the hot
food from Air Fryer+.
HOW TO PREPARE THE ROTISSERIE SPIT (MAX WEIGHT: 4LBS)
Chicken
1. If cooking a chicken on the rotisserie spit, ensure that a) all the innards have been
removed, b) it is seasoned and c) properly trussed. For instructions on how to truss
a chicken, go to www.chefman.com/truss.
2221
Page 13

OPERATING INSTRUCTIONS OPERATING INSTRUCTIONS
2. Insert the rotisserie spit into the chicken’s cavity so that the chicken can hang
freely on the rod. Place the chicken with the rod on a cutting board.
3. Hold the rod in one hand, and one of the rotisserie forks, with the prongs pointed
toward the chicken, in the other hand. Insert the rod into the square notches on
the rotisserie fork.
CAUTION: Forks are sharp. Handle with care.
4. Poke the chicken with the fork and insert the prongs completely. Secure the fork
by tightening the screw. Repeat on the other side.
NOTE: Once the screws are tightened, there should be at least 1 inch of free
space on both ends of the rod. The chicken should also be secure; it should not
be able to slide back and forth on the rod.
Boneless meat (such as beef, pork, lamb, etc) or fruit (such as pineapple):
1. Insert the rotisserie spit, lengthwise, into the center of the meat or fruit. Place the
meat, or fruit, with the rod onto a cutting board.
2. Hold the rod in one hand, and the rotisserie fork, with the prongs pointed toward
the meat, in the other hand. Insert the rod into the square notches on the rotisserie
fork.CAUTION: Forks are sharp. Handle with care.
3. Poke the meat or fruit with the fork and insert the prongs completely. Secure the
fork by tightening the screw. Repeat on the other side.
NOTE: Once the screws are tightened, there should be at least 1 inch of free space
on both ends of the rod. The meat should also be secure; it should not be able to
slide back and forth on the rod.
HOW TO USE THE ROTISSERIE RETRIEVAL TOOL
1. Use oven mitts when handling the HOT retrieval tool.
2. Hold the retrieval tool by its handle.
3. Guide the retrieval tool into the Air Fryer+. Position it below the rotisserie spit or
basket.
4. Use the retrieval tool to lift the right side of the rotisserie spit. Once it is free, lift
the left side.
5. Carefully guide the hot rotisserie spit or basket and food from the Air Fryer+.
2423
Page 14

TIPS
TIPS
• Almost any food you cook in the oven can be air fried.
• Foods cook best and most evenly when they are of similar size and thickness. Smaller
pieces of food require less cooking time than larger items.
• Smaller pieces of food may be cooked at higher temperatures than larger items
because they generally require less time to cook.
• For best results in the shortest amount of time, air fry food in single layers.
• Most prepared foods do not need to be tossed in oil before air frying. Most already
contain oil and other ingredients that enhance browning and crispiness.
• Frozen appetizers and hors d’oeuvres air fry very well.
• Rotate trays halfway through the cooking cycle to ensure the most even results.
• Toss foods you are preparing from scratch, such as French fries, with oil, in a separate
bowl, to improve browning and crispiness. Fresh foods do not contain the same oils,
fats and other ingredients that prepared foods contain which promote browning and
crispiness.
• When making French fries using fresh potatoes, ensure they are completely dry before
cooking in the Air Fryer+. Even the smallest droplets of moisture will prevent them
from getting crispy.
• Coating battered foods in panko (Japanese-style breadcrumbs) or puffed rice, and
then spraying them with oil, help create crispy, healthier versions of your favorite fried
foods.
• Cook chicken until it reaches an internal temperature of 155°F and 165°F when rested.
• The Air Fryer+ is great for reheating food. To reheat your food, set the temperature
to 300°F for up to 10 minutes. Use a thermometer to ensure food reaches an internal
temperature of 165°F, the recommended food-safe temperature for reheating food.
• When air frying battered food, stick to thick, pasty batters. Thin batters, such as the
batters used to make tempura, will run and not set fast enough like they do in a deep
fryer.
2625
Page 15

CLEANING AND MAINTENANCE
FAQ
1. When the Air Fryer+ is unplugged and completely cool, gently wipe down
exterior with a damp cloth or paper towel. Never immerse the Air Fryer+ or
its plug in water or any other liquid. The Air Fryer+’s housing is NOT dishwasher
safe.
2. The hinge section where the door meets the Air Fryer+ may collect crumbs.
Clean away crumbs with a bristled brush or wet cloth.
3. Wash all removable parts with a sponge and warm, soapy water. Racks and
rotisserie basket may be washed with a bristled brush. Do not use abrasive
cleaning agents or scouring pads. All removable parts are top-rack
dishwasher safe.
4. Dry thoroughly.
5. Store in a cool, dry place.
1. Why can’t I open the door?
After unboxing the Air Fryer+, be sure to remove the tape that’s on both sides.
Note: There may be some resistance when opening the door for the first time.
2. Why can’t I close the door after inserting my food and trays inside?
Make sure the trays are inserted the same way they came packaged. Insert the trays
curved side first.
3. Can I use plastic containers, paper towels or paper plates inside the Air Fryer?
No. Do not put anything inside the Air Fryer+ that you would not use in an oven or
on a stovetop.
4. Is it safe to use aluminum foil in the Air Fryer+?
Yes. You can put aluminum foil over the racks and the drip tray.
5. Is it ok to use parchment paper in the Air Fryer+?
No, do not use parchment paper in the fryer.
6. Can the drip tray be used for cooking purposes outside of the Air Fryer+?
No. It is not recommended to use any of the fryer’s tools for anything other than their
intended use with the Air Fryer+.
7. I feel a little amount of air escape around the door when using the Air Fryer+. Is this normal?
Yes, totally normal. The door is not sealed airtight. There are a few spots around
where air circulates.
8. How do I switch between Fahrenheit and Celsius?
Press and hold the TEMP button until your desired unit of temperature illuminates on
the top right of the screen.
2827
Page 16

TERMS & CONDITIONS
Model/Modele: RJ25-C
Conveyor toaer
120v~60hz 1800W
CONFORMS TO UL STD. 1026
CERTIFIED TO CSA STD.C22.2 No.64
CAUTION: DO NOT IMMERSE IN WATER
ATTENTION: NE PAS PLONGER DANS L’EAU
WARNING: TO PREVENT ELECTRIC SHOCK,
UNPLUG BEFORE CLEANING
PRÉAVIS: POUR ÉVITER LES CHOCS ÉLECTRIQUES,
DÉBRANCHEZ L’APPAREIL AVANT DE L’UTILISER
READ INSTRUCTIONS BEFORE USING
LISEZ LES INSTRUCTIONS AVANT DE L’UTILISER
HOUSEHOLD USE ONLY
POUR USAGE DOMESTIQUE SEULEMENT
0000000
0000
XXXXXXXX
Limited Warranty
Our products are backed by a limited 1-year warranty. To register, follow the instructions on the Chefman®
Warranty Registration page in this User Guide.
We offer a limited 1-year warranty from the date of purchase. This warranty is void without proof of purchase
within the USA, Canada or Mexico. Service centers and retail stores do not have the right to alter or change
the Terms & Conditions of this warranty.
WHAT THE WARRANTY COVERS
• Manufacturer Defects
Chefman® products are warranted against defects in material and workmanship for a period of 1 year from
the date of purchase, when used in accordance with the Chefman® User Guide.
CHEFMAN® WARRANTY REGISTRATION
Register your product to extend your warranty for 3 months.
What do I need to register my product?
•Contact Information
•Model Number
•Proof of Purchase
(i.e. online confirmation, receipt, gift receipt)
•Date code
How do I register my product?
We offer 2 convenient ways to access the Chefman® registration form:
DATE CODE:
ACCESS CODE:
MADE IN CHINA/FABRIQUE EN CHINE
AC ONLY/ AC SEULEMENT
• Qualified Replacements
If your product does not work as it should, we will send you a new one. If the product is no longer available,
we will replace it with an identical product or one that is comparable.
THIS WARRANTY DOES NOT COVER
• Misuse - Damage that occurs from neglectful or improper use of products; damage that occurs as a result of
usage with incompatible voltage. See Safety Instructions for information on proper use.
• Poor Maintenance - General lack of proper care. See Cleaning & Maintenance Instructions for information on
proper maintenance.
• Commercial Use - Damage that occurs from commercial use.
• Altered Products - Damage that occurs from alterations or modifications by any entity other than
Chefman®; removal of rating label.
• Catastrophic Events - Damage that occurs from fire, floods or natural disasters.
• Loss of Interest - Claims of loss of interest or enjoyment.
1. Visit chefman.com/register.
2. Scan the QR code below to access the form:
Have a question?
Please reach out to us at Chefman.com/contact.
Need more help?
We’re here for you! Contact us at customersupport@chefman.com or 888.315.6553 Monday-Friday.
OTHER LIMITATIONS: ALL WARRANTIES OF ANY KIND WHATSOEVER, EXPRESS, IMPLIED AND STATUTORY, ARE HEREBY DISCLAIMED. ALL IMPLIED
WARRANTIES OF MERCHANTABILITY AND FITNESS FOR A PARTICULAR PURPOSE ARE HEREBY DISCLAIMED, PROVIDED THAT IF ANY IMPLIED
WARRANTIES OF ANY KIND IS REQUIRED BY ANY JURISDICTION, INCLUDING MERCHANTABILITY AND FITNESS FOR A PARTICULAR PURPOSE, THE
DURATION OF SUCH IMPOSED IMPLIED WARRANTY IS LIMITED TO ONE (1) YEAR. THIS WARRANTY DOES NOT COVER, AND CHEFMAN® SHALL NOT BE
LIABLE, FOR INCIDENTAL, INDIRECT, SPECIAL OR CONSEQUENTIAL DAMAGES, INCLUDING WITHOUT LIMITATION, DAMAGE TO, OR LOSS OF USE OF THE
PRODUCT, OR LOST SALES OR PROFITS OR DELAY OR FAILURE TO PREFORM THIS WARRANTY OBLIGATION. THE REMEDIES PROVIDED HEREIN ARE THE
EXCLUSIVE REMEDIES UNDER THIS WARRANTY, WHETHER BASED ON CONTRACT, TORT OR OTHERWISE.
This Warranty gives you specific legal rights, and you may also have other rights that vary from state to state or Province to Province. Some states or Provinces do not
allow the exclusions or limitations set forth in this Warranty, so the above limitations or exclusions may not apply to you depending on the jurisdiction of purchase.
Chefman® is a registered trademark of RJ BRANDS, LLC. ETLCM is a registered certification mark of Intertek Testing Services NA, Inc.
3029
Page 17

Multi-Function Air Fryer +
Rotisserie, Dehydrator & Oven
31
RECIPE BOOK
Page 18

INGREDIENTS
• 1 large onion, halved and
thinly sliced
• 2 tsp olive oil
• ¾ tsp kosher salt, divided
• 4, 6-oz burger patties
• ½ tsp garlic powder
• 3 tbsp mayonnaise
• 1 tsp finely chopped garlic
• 1 tbsp chives, thinly sliced
• 4 slices gruyere cheese
• 4 brioche buns
• Bibb lettuce or arugula,
rinsed and dried
• 2 plum tomatoes, sliced
FRENCH ONION BURGER
1. In a large bowl, combine 1 large onion, halved and thinly
sliced, with 2 tsp olive oil and ¼ tsp kosher salt. Evenly
arrange on racks. Place one rack into rack position 1 (closest
to the top) and rack position 2 (second closest to the top.)
2. Set air fryer to 350°F for 15 min.
3. While onions cook, prepare 4, 6-oz burger patties by
sprinkling both sides with ½ tsp garlic powder and
remaining ½ tsp kosher salt.
4. When timer expires, transfer onions to a serving bowl.
Arrange patties on one rack and place in rack position 1
(closest to the top.)
5. Set air fryer to 400°F for 20 min for medium doneness. Flip
burgers halfway through.
6. While burger patties cook, in a small bowl, combine 3 tbsp
mayonnaise, 1 tsp finely chopped garlic and 1 tbsp thinly
sliced chives.
7. When there are 3 minutes left, remove rack with burger
patties and top each with 1 slice gruyere cheese. Put rack
with burger patties into rack position 3 (second from the
bottom.)
8. Put 4 brioche buns on empty rack. Put rack in rack position
1 (closest to the top.)
9. When timer expires, spread mayonnaise mixture on the
inside of each bun. Top with 1 cooked burger, Bibb lettuce,
sliced tomato and ¼ cup cooked onions.
PREP TIME
5 min
TOTAL TIME
40 min
SERVINGS
4
3332
Page 19

PORK CHOPS (WITH WARM PINEAPPLE SALSA)
INGREDIENTS
• 2 thick, bone-in pork
chops
• 1 tsp kosher salt, divided
• ½ tsp chili powder
• 12 oz peeled pineapple, cut
into 2-inch slices
• ½ red onion, diced
• ½ jalapeno (optional)
• 2 tsp olive oil
• ¼ cup cilantro, roughly
chopped
1. Season 2, thick, bone-in pork chops on both sides with
½ tsp kosher salt and ½ tsp chili powder. Arrange on one
of the racks. Place the rack in rack position 1 (closest to
the top.)
2. In a large bowl, toss 12 oz peeled pineapple, cut into
2-inch slices, with ½ red onion, diced, ½ jalapeno
(optional), 2 tsp olive oil and remaining ½ tsp kosher
salt. Arrange on the second rack. Place the rack in rack
position 2 (second closest to the top.)
3. Set air fryer to 400°F for 15 min. When the timer expires,
flip the pork chops and toss the pineapple salsa. Set the
air fryer to 400°F for 5 min.
4. When the timer expires, leave the pork chops in the air
fryer with the door open to rest.
5. Transfer the pineapple mixture to a cutting board or the
bowl of a food processor. Roughly chop. Transfer to a
medium bowl and combine with ¼ cup cilantro, roughly
chopped.
6. Spoon the pineapple salsa over the pork chops and serve.
PREP TIME
10 min
TOTAL TIME
25 min
SERVINGS
2
3534
Page 20

STEAK FAJITAS
INGREDIENTS
• 1 green bell pepper,
seeded and cut into
¼-inch pieces
• ½ red onion, cut into
¼-inch pieces
• 2 tbsp fajita seasoning
• 1 tbsp olive oil
• 1 lb flank steak
• ½ tsp kosher salt
• 10 flour tortillas
• Sliced radishes, for serving
• Sour cream, for serving
• Lime wedges, for serving
1. In a large bowl combine 1 green bell pepper, seeded and
cut into ¼-inch pieces, ½ red onion, cut into ¼-inch pieces,
2 tbsp fajita seasoning and 1 tbsp olive oil. Evenly arrange
on racks. Place one rack into rack position 1 (closest to the
top) and rack position 2 (second closest to the top.) Set air
fryer to 400°F
for 10 min.
2. While peppers and onions are cooking, season 1 lb flank
steak with ½ tsp kosher salt.
3. When timer expires, remove racks and combine peppers
and onions onto one rack. Place rack into rack position 2
(second closest to the top.)
4. Put the seasoned flank steak on the empty rack. Place rack
into rack position 1 (closest to the top.)
5. Set air fryer for 400°F for 15 min. Flip flank steak halfway
through cooking.
6. When timer expires, transfer flank steak to a cutting board
to cool. When slightly cool, slice very thinly.
7. Assemble fajitas by placing three slices flank steak on
each tortilla. Top with cooked peppers and onions, sliced
radishes, sour cream and a lime wedge.
PREP TIME
10 min
TOTAL TIME
35 min
SERVINGS
10
3736
Page 21

PREP TIME
10 min
TOTAL TIME
30 min
SERVINGS
10 Tacos
CHICKEN TACOS (With Pickled OnIONS)
INGREDIENTS
• 1 ½ lb boneless chicken
thighs
• 2 tbsp freshly squeezed
lemon juice
• 1 tbsp smoked paprika
• ½ tsp kosher salt
• ¼ tsp ground cumin
• ¼ tsp granulated garlic
• 1 cup water
• ½ cup apple cider vinegar
• 2 tbsp granulated sugar
• ½ red onion, thinly sliced
• 10 corn tortillas
• Chopped cilantro, for
serving
• Sour cream, for serving
• Lime wedges, for serving
1. Put 1 ½ lb boneless chicken thighs in a plastic, zip-close bag.
Set aside. Add 2 tbsp freshly squeezed lemon juice, 1 tbsp
smoked paprika, ½ tsp kosher salt, ¼ tsp ground cumin and ¼
tsp granulated garlic. Add marinade to the bag and evenly coat
chicken. Let marinate for at least 15 min.
2. While chicken thighs are marinating, in a medium bowl, combine
1 cup water, ½ cup apple cider vinegar, 2 tsp granulated sugar and
¼ tsp kosher salt. Stir until sugar is dissolved.
3. Cut ½ red onion into thin slices. Add the slices to the bowl with the
water and vinegar mixture. Allow to sit and quickly pickle while
chicken thighs cook.
4. Remove chicken thighs from plastic zip-close bag and evenly
arrange on racks. Place one rack into
rack position 1 (closest to the top) and rack position 2 (second
closest to the top.)
5. Set air fryer to 400°F for 15 min. Rotate racks halfway through
cooking.
6. While chicken thighs cook, wrap 10 corn tortillas in aluminum foil.
Set aside.
7. When timer expires, transfer chicken thighs to a cutting board
to cool. While chicken thighs are cooling, transfer the wrapped
tortillas to the air fryer rack. Place the rack in rack position 4
(closest to the bottom.)
8. Set air fryer to 200°F for 5 min.
9. While the tortillas are heating, slice the chicken thighs.
10. When timer expires, assemble tacos by placing ¼ cup chicken on
each tortilla. Top with drained, pickled onions, chopped cilantro,
sour cream and a lime wedge.
3938
Page 22

HERBED ROTISSERIE CHICKEN
INGREDIENTS
• 1, 4-lb chicken
• 1 tsp kosher salt
• 1 tsp dried oregano
• 1 tsp dried rosemary
• 1 tsp dried thyme
• 1 tsp granulated garlic
• 1 lemon
1. Place 1, 4-lb chicken on a cutting board. Use paper towels
to pat dry. Season the chicken on all sides with 1 tsp each of
kosher salt, dried oregano, dried rosemary, dried thyme and
granulated garlic. Squeeze 1 lemon over the chicken and rub
all over. Insert the squeezed lemon into the chicken’s cavity.
2. Follow the instructions on page 8 in the user guide to
prepare the rotisserie spit.
3. Set air fryer to 400°F for 50 min.
4. When the timer expires, use the rotisserie retrieval tool to
remove the chicken and transfer to a cutting board. Allow to
cool before removing the rotisserie spit.
5. Remove the lemon from the cavity and discard before
cutting chicken.
PREP TIME
10 min
TOTAL TIME
60 min
SERVINGS
1 CHicken
4140
Page 23

SMOKY CHICKEN WINGS
INGREDIENTS
• 2 lbs chicken wings,
cut into segments
• 1 tbsp smoked paprika
• 1 tsp chili powder
• 1 tsp ground cumin
• 1 tsp kosher salt
• 1 tsp paprika
• ½ tsp cayenne pepper
• ½ tsp garlic powder
• ¼ tsp black pepper
1. Put 2 lbs chicken wings, cut into segments, in a large bowl.
Set aside.
2. In a separate small bowl, combine 1 tbsp smoked paprika,
1 tsp each of chili powder, ground cumin, kosher salt, and
paprika, ½ tsp each of cayenne pepper, garlic powder and
¼ tsp black pepper.
3. Combine the smoked paprika mixture and the wings in a
zip-close bag. Seal and toss until evenly coated.
4. Evenly arrange seasoned wings on racks. Put the racks into
rack positions 1 (closest to the top) and 3 (second from the
bottom).
5. Set air fryer to 400°F for 11 min.
6. When the timer expires, rotate racks and set air fryer again
to 400°F for 11 min.
7. Remove and transfer to a heat-safe surface for 5 min.
Serve.
PREP TIME
10 min
TOTAL TIME
35 min
SERVINGS
6
4342
Page 24

QUICK CHICKEN PARMESAN
INGREDIENTS
• ¼ cup all-purpose,
unbleached flour
• 1 large egg, beaten
• ½ cup seasoned Italian
bread crumbs
• 4 thin, chicken breasts
(or two breasts cut in half)
• ½ cup marinara sauce
• 4, 1-oz slices
fresh mozzarella cheese
• Parsley for garnish
(optional)
1. Put ¼ cup all-purpose, unbleached flour into a shallow
bowl. Put 1 large egg, beaten, into a second shallow bowl
and ½ cup seasoned Italian bread crumbs into a third
shallow bowl.
2. Dip both sides of 4 thin chicken breasts first into the flour,
then the egg and then the bread crumbs. Transfer to racks.
Put the racks into rack positions 1 (closest to the top) and
3 (second from the bottom). Set air fryer to 400°F for
5 min. When the timer expires, rotate the racks and set air
fryer to 400°F for 5 min.
3. When the timer expires, remove the trays and allow to cool
slightly. Line with aluminum foil and replace chicken. Put 2
tbsp marinara on each piece of chicken, and top with
2, 1-oz slices fresh mozzarella.
4. Put the trays back into the air fryer. Set air fryer again to
350°F for 4 min.
5. Remove and transfer to a heat-safe surface for 5 min.
Serve.
PREP TIME
15 min
TOTAL TIME
30 min
SERVINGS
4
4544
Page 25

PREP TIME
TOTAL TIME
SERVINGS
SESAME-GINGER SALMON (WITH SHISITO PEPPERS)
1. Put 1 lb Atlantic salmon in a plastic, zip-close bag.
INGREDIENTS
• 1 lb Atlantic salmon
• 1 tbsp low-sodium soy
sauce
• 1 tbsp toasted sesame oil
• 2 tsp mirin
• 1, 1-inch ginger piece,
grated
• 1 clove garlic, grated
• 3 scallions, sliced
(about 2 tbsp), for garnish
• 6 oz shishito peppers
• 2 tsp olive oil
• 1/2 tsp kosher salt
• 1/2 lime
Set aside.
2. In a small bowl, combine 1 tbsp low-sodium soy sauce,
1 tbsp toasted sesame oil, 2 tsp mirin, 1-inch piece ginger,
grated, and 1 clove garlic, grated.
3. Add the soy sauce mixture to the bag with the salmon.
Add 3 scallions, sliced (about 2 tbsp), and 2 tbsp toasted
sesame seeds. Close the bag and gently move the
ingredients around to evenly coat the salmon.
4. While the salmon marinates, prepare the shishito peppers.
In a medium bowl, toss 6 oz shisito peppers with 2 tsp
olive oil and ½ tsp kosher salt. Arrange the seasoned
shishito peppers on one of the racks. Place rack in rack
position 1 (closest to the top.)
5. Set the air fryer to 400°F for 8 min.
6. When the 8 min expire, remove the rack with the shishito
peppers from the air fryer. Transfer to a serving bowl with
½ lime, squeezed.
7. Brush the second rack with oil to help prevent the salmon
from sticking.
8. Transfer the marinated salmon to the rack (skin-side
down.) Place the rack in rack position 1 (closest to the
top.) Set air fryer to 400°F for 12 min. Check at 10 min and
remove once fully cooked through.
9. Serve the salmon with the shishito peppers and white
rice, if desired.
10 min
30 min
3
4746
Page 26

WARM BRUSCHETTA SHRIMP
INGREDIENTS
• 1 lb large shrimp
• 8 oz cherry tomatoes
• 1 tbsp olive oil
• ½ tsp kosher salt
• ¼ cup packed basil leaves,
thinly sliced
• 1 small garlic clove, minced
• 1 lb cooked linguine,
optional
1. In a large bowl, combine 1 lb large shrimp, 8 oz cherry
tomatoes, 1 tbsp olive oil and ½ tsp kosher salt. Evenly
arrange on racks. Place one rack into rack position 1
(closest to the top) and rack position 2 (second closest
to the top.)
2. Set air fryer to 400°F for 8 min.
3. When the timer expires, rotate the racks and set the air
fryer to 400°F for 4 min.
4. Carefully transfer the cooked shrimp to a clean large bowl.
Add ¼ cup packed basil leaves, thinly sliced, and 1 small
garlic clove, minced.
5. If desired, stir in 1 lb cooked linguine.
PREP TIME
10 min
TOTAL TIME
22 min
SERVINGS
2 CUPS
4948
Page 27

CRISPY LEMON BRUSSEL SPROUTS (WITH ASIAGO CHEESE)
INGREDIENTS
• 1 lb brussels sprouts, cut
into ¼-inch pieces
• 1 tbsp olive oil
• ¼ tsp kosher salt
• 2 tbsp shredded asiago
cheese
• 2 tbsp dried cranberries,
optional
• 2 tbsp freshly squeezed
lemon juice
1. In a large bowl combine 1 lb brussels sprouts, cut into
¼-inch pieces, 1 tbsp olive oil and ¼ tsp kosher salt.
2. Evenly arrange the seasoned brussels sprout pieces on
the racks. Place one rack into rack position 1 (closest to
the top) and rack position 2 (second closest to the top.)
Set air fryer to 400°F for 12 min. Rotate racks halfway
through cooking.
3. When timer expires, transfer brussels sprouts to a clean
large bowl. Add 2 tbsp shredded asiago cheese, 2 tbsp
dried cranberries, if desired, and 2 tbsp freshly squeezed
lemon juice; stir.
4. Serve as a side or appetizer.
PREP TIME
10 min
TOTAL TIME
22 min
SERVINGS
2 CUPS
5150
Page 28

PARMESAN TRUFFLE FRIES
INGREDIENTS
• 1 lb russet potatoes, cut
into ¼-inch thick pieces
• 2 tbsp olive oil
• 1 tsp kosher salt
• 2 tsp truffle oil
• ¼ cup grated parmesan
cheese
1. In a large bowl, combine 1 lb russet potatoes, cut into
¼-inch thick pieces, 2 tbsp olive oil and 1 tsp kosher salt.
Put the seasoned fries into the rotisserie basket. Snap
close.
2. Use the instructions on page 7 to put the rotisserie basket
into the air fryer. Set the air fryer to 400°F for 25 min.
3. When the timer expires, use the rotisserie retrieval tool to
remove the rotisserie basket from the air fryer. Allow to
cool slightly.
4. Carefully open the rotisserie basket and transfer the fries to
a clean large bowl. Add 2 tsp truffle oil and ¼ cup grated
parmesan cheese.
5. Serve with dipping sauce, if desired.
PREP TIME
10 min
TOTAL TIME
30 min
SERVINGS
4 CUPS
5352
Page 29

SMASHED HONEY POTATOES
INGREDIENTS
• 1 lb baby potatoes
• 1 tbsp honey
• 1 tbsp olive oil
• 1 tbsp finely chopped
rosemary
• 1 tsp kosher salt
• ½ tsp granulated garlic
• Parmesan cheese, for
garnish (optional)
• Fresh parsley, for garnish
(optional)
1. Put 1 lb baby potatoes into a large pot. Cover the potatoes
with 1 – 2 inches cold water. Bring the potatoes to a boil,
reduce to medium heat and let cook until very tender,
about 20 min total.
2. Drain the cooked potatoes and return them to the pot.
3. Add 1 tbsp honey, 1 tbsp olive oil, 1 tbsp finely chopped
rosemary, 1 tsp kosher salt and ½ tsp granulated garlic.
Toss.
4. When the seasoned potatoes are cool to the touch,
transfer to a cutting board. Use the bottom of a cup to
smash until thin but not broken apart.
5. Use a spatula to transfer the smashed potatoes to the air
fryer racks. Place one rack into rack position 1 (closest to
the top) and rack position 2 (second closest to the top.)
6. Set air fryer to 400°F for 10 min.
7. When the timer expires, rotate the racks and set the air fryer
to 400°F for 5 min.
8. When done, remove and transfer to a heat-safe surface for
5 min. Garnish with fresh parsley and parmesan, if desired.
PREP TIME
2 min
TOTAL TIME
37 min
SERVINGS
24 Potatoes
5554
Page 30

PREP TIME
TOTAL TIME
SERVINGS
INGREDIENTS
• ½ lb (about 16 pieces)
asparagus
• ⅓ cup all-purpose,
unbleached flour
• 1 large egg
• 2 tbsp water
• 1 ½ cups plain panko
bread crumbs
• Zest of one lemon
(about 2 tsp)
• ¼ cup pecorino romano
cheese
• ¼ tsp freshly ground
black pepper
ZESTY ASPARAGUS FRIES
1. Prepare ½ lb (about 16 pieces) asparagus by rinsing under
cold water. Without patting dry, cut asparagus in half so the
bottoms are separated from the tops.
2. Put ⅓ cup all-purpose, unbleached flour in a plastic, zip-close
bag. Put the damp asparagus pieces in the bag. Zip close,
leaving a lot of air in the bag. Shake to coat all pieces.
3. Crack 1 large egg into a different plastic, zip-close bag. Add
the 2 tbsp water. Zip close and shake until the egg and water
are homogenous.
4. Remove the asparagus pieces from the bag with the flour
and shake off any excess. Transfer to the bag with the egg.
Zip close, leaving a lot of air in the bag. Shake to evenly coat
all the asparagus pieces.
5. In another plastic, zip-close bag, prepare the breadcrumbs
by combining 1 ½ cups panko bread crumbs, zest of 1 lemon,
¼ cup pecorino romano cheese and ¼ tsp pepper.
6. Remove the asparagus pieces from the egg mixture, letting
any excess drip into the bag. Transfer the individual pieces
into the crumbs, shaking slightly before adding the next
piece.
7. Once all the pieces are in the bag, zip close while leaving a lot
of air in the bag; shake to combine. Remove the pieces and
arrange evenly on racks. Put the racks into rack positions
1 (closest to the top) and 3 (second from the bottom).
8. Set the air fryer to 380°F for 9 min. When the timer expires,
switch the trays and put back into the air fryer. Set the air
fryer again to 380°F for 9 min.
9. Remove and transfer to a heat-safe surface for 5 min. Serve.
15 min
35 min
32 Fries
5756
Page 31

NUTTY BLONDIES
INGREDIENTS
• 1 stick unsalted butter,
melted
• ½ cup granulated sugar
• 2 large eggs
• 1 tsp pure vanilla extract
• 1 cup all-purpose,
unbleached flour
• ¼ tsp table salt
• ½ cup toasted,
unsweetened
shredded coconut
• ½ cup semi-sweet
chocolate chips
• ½ cup toasted walnuts,
chopped
1. Line an 8x8 metal baking pan with parchment paper, or
grease with butter.
2. Combine 1 stick unsalted butter, melted, and ½ cup
granulated sugar, creaming until smooth.
3. Add 2 large eggs and 1 tsp pure vanilla extract and beat
until creamy.
4. Fold in 1 cup all-purpose, unbleached flour, ¼ tsp table
salt, ½ cup toasted walnuts, chopped, ½ cup semi-sweet
chocolate chips and ½ cup toasted, unsweetened and
shredded coconut.
5. Spread the thick mixture into the baking pan, and smooth
out so that the mixture is evenly deep in the pan.
6. Place a rack in rack position 3 (second closest to the
bottom.) Put the baking pan on the rack and close the
door.
7. Set air fryer to 340°F for 30 min.
8. When the timer expires, carefully remove the pan and set
on a rack to cool.
9. Once blondies are completely cool, remove from the pan.
Cut into 4 even rows and columns.
PREP TIME
10 min
TOTAL TIME
30 min
SERVINGS
16
5958
Page 32

ROTISSERIE CORNISH HEN
INGREDIENTS
• 25 oz Cornish Hen
• 1 ½ tbsp olive oil
• 1 tsp salt
• 1 tsp garlic powder
• 1 tsp onion powder
• 1 tsp pepper
• 1 tsp thyme
1. Make sure all of the giblets are cleaned and removed from
the Cornish hen. You can buy it from the store removed,
have your butcher do it or easily wash it out in the sink.
2. Once you have a clean Cornish hen, rub 1 ½ tbsp olive oil
on it and then sprinkle with 1 tsp each of all the seasonings:
salt, garlic powder, onion powder, pepper and thyme.
3. Once seasoned, insert and attach the rotisserie forks
through the Cornish hen and make sure it is tightly
clamped and locked in place.
4. Insert and attach the rotisserie fork into the holes in the air
fryer (refer to the instructions on page 8 of the User Guide)
and cook at 400°F for 20 minutes.
5. Once your Cornish hen is done cooking and golden brown,
use the rotisserie retrieval tool to remove the rotisserie
from the air fryer, carefully remove the forks and serve with
your favorite side dishes.
PREP TIME
15 min
TOTAL TIME
35 min
SERVINGS
1 Hen
6160
Page 33

PARMESAN PICKLE CHIPS
INGREDIENTS
• 1 (32 oz) jar of whole
pickles
• ⅔ cup of panko bread
crumbs
• ⅓ cup of parmesan cheese
• ¼ tsp dill weed
• 2 eggs
1. Slice the pickles into ¼ inch pieces.
2. Lay the pickle chips out on a paper towel and pat dry.
3. Spray the basket of your air fryer with cooking spray.
4. In a bowl, add panko bread crumbs, parmesan cheese, and
dill weed.
5. In another bowl, whisk together the egg mixture.
6. Roll in the breadcrumbs mixture until fully coated.
7. Place chips into air fryer basket.
8. Insert in to the air fryer.
9. Set temperature to 400°F.
10. Cook for 10-15 or until golden brown.
11. Serve with ranch or your favorite dip.
PREP TIME
10 min
TOTAL TIME
15 min
SERVINGS
1 JAR of PICKELS
6362
Page 34

CAJUN SHRIMP AIR FRY
INGREDIENTS
• 12 large shrimp (16/20 per
lb), shelled and deveined
• 1 tbsp of olive oil
• Lime wedge (optional)
Cajun spice:
• 1 tbsp onion powder
• 1 tbsp garlic powder
• 1 tbsp cayenne pepper
• 1 tbsp smoked paprika
• 2 ½ tbsps kosher salt
• ¾ tbsp black pepper
• ¼ tbsp sage
• ½ tbsp oregano
• ½ tbsp thyme
1. Preheat your air fryer to 390°F for 5 min.
2. Clean the shrimp if needed.
3. Place the shrimp into a bowl with 1 tbsp olive oil and toss
to coat.
4. Put the bowl of shrimp on top of a bowl of ice as you
prepare the seasoning.
5. In a small mixing bowl, add all Cajun spice ingredients
and mix.
6. Add the Cajun spice mix to the shrimp and toss to ensure
each shrimp is fully coated.
7. Add the shrimp on a tray and insert into the air fryer.
Cook for 10 minutes until the shrimp are cooked through.
8. Do not overcrowd the trays or the shrimp will cook
unevenly. Cook the shrimp in batches if needed.
9. When the shrimp are done cooking, plate and serve with
lime wedges, if desired.
PREP TIME
15 min
TOTAL TIME
25 min
SERVINGS
12 Shrimp
6564
Page 35

®
66
 Loading...