

Page 1
User manual
Induction Hob
CHE654SC
CHE655SC
EHC65 U
7
Page 2
Contents
Safety information 2
Installation instructions 3
Product description 6
Operating instructions 7
Helpful hints and tips 7
Care and cleaning 8
What to do if… 9
Environment concerns 9
Warranty 10
Subject to change without notice.
Safety information
For your safety and correct operation
of the appliance, read this manual
carefully before the installation and use.
Always keep these instructions with the
appliance also if you move or sell it.
The users must fully know the operation and safety functions of the appliance.
Children and vulnerable people safety
Warning! Do not let persons, children
included, with reduced physical
sensory, reduced mental functions or
lack of experience and knowledge to
use the appliance. They must have
supervision or instruction for the
operation of the appliance by a person
who is responsible for their safety.
• Keep all packaging away from children.
There is the risk of suffocation or injury.
• Keep the children away from the appliance during and after the operation, until
the appliance is cold.
Safety during operation
• Remove all packaging, stickers and layers from the appliance before the first
use.
• Set the cooking zones to "off" after each
use.
• The risk of burns! Do not put the objects
made of metal, for example cutlery or
saucepan lids, on the surface that you
cook. They can become hot.
• The Users with an implanted pacemaker
must keep their upper body minimum 30
cm from induction cooking zones that are
activated.
Warning! Fire risk! Too hot fats and
oils can occur with ignition very quickly.
Correct operation
• Always monitor the appliance during operation.
• The appliance is only for domestic use!
• Do not use the appliance as a work or a
storage surface.
• Do not put or keep very flammable liquids
and materials, easy fusible objects (made
of plastic or aluminium) on or near the
appliance.
• Be careful when you connect the appliance to the near sockets. Do not let the
electricity bonds touch the appliance or
hot cookware. Do not let the electricity
bonds to tangle.
How to prevent a damage to the
appliance.
• If the objects or cookware fall on the
glass, the surface can be damaged.
• Cookware made of cast iron, cast aluminium or with damaged bottoms can
cause scratch of the glass. Do not move
them on the surface.
• Do not let cookware boil dry to prevent
the damage to cookware and glass .
• Do not use the cooking zones with empty
cookware or without cookware.
• Do not put the aluminium foil on the appliance.
• Make sure that the airflow space of 5 mm
between the worktop and front of the unit
below it stays opened.
Warning! If there is a crack on the
surface, disconnect power supply
to prevent the electrical shock.
2
Page 3
each use. Do not rely on the pan
Set the cooking zone to “off” after
•
• The electrical mains terminal is live.
separate remote-control system to
Do not use an external timer or a
Installation instructions
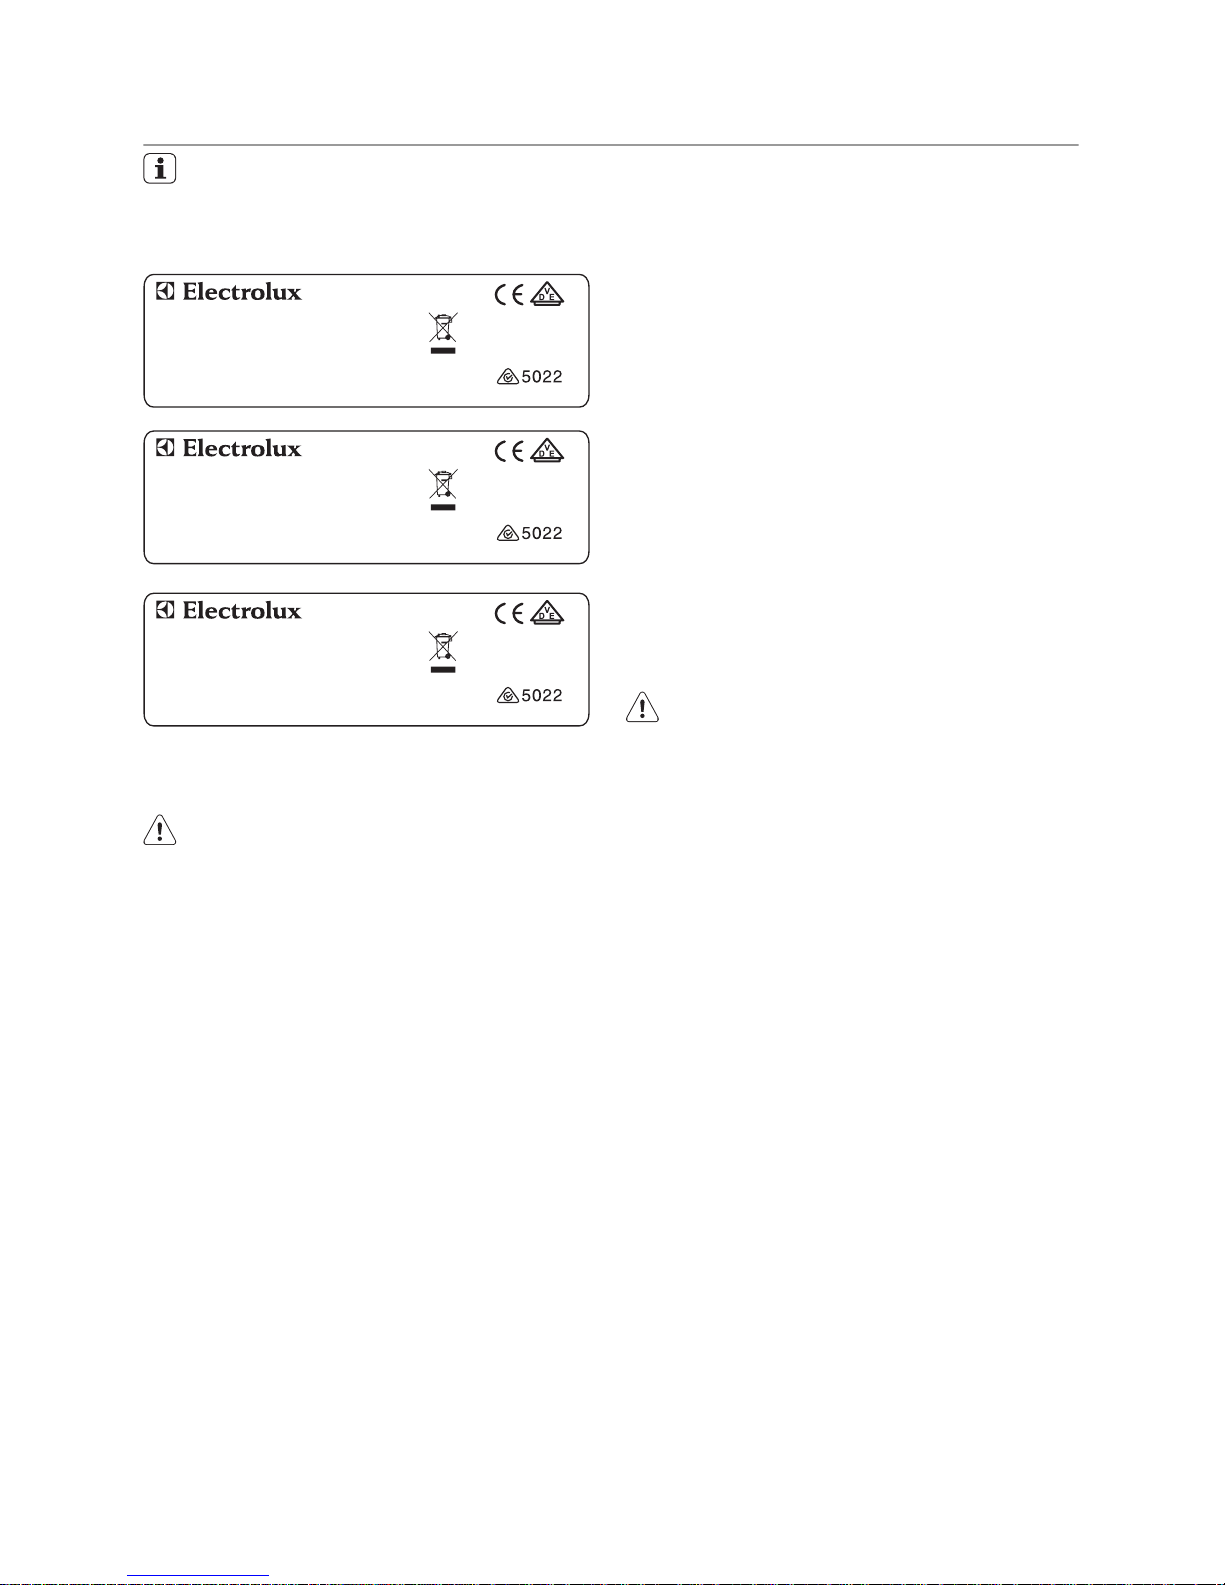
Before the installation, note down
the serial number (Ser. Nr.) from the
rating plate. The rating plate of the
appliance is on its lower casing.
PNC: 949163195
Made in China Model: CHE654S
APP NO.: 55GADE8AU
AU APP NO.: S/91
S NO.: 50Hz 6.9 KW
220 - 240 V AC
~ 220 - 240 V
PNC: 949163202
Made in China Model: CHE655S
APP NO.: 55 GAD EC AU
AU APP NO.: S/91
S NO.: 50Hz 6.9 KW
220 - 240 V AC
~ 220 - 240 V
The Safety Instructions
Warning! You must read these!
• Make sure that the appliance is not damaged because of transportation. Do not
connect a damaged appliance. If it is
necessary, speak to the supplier.
• Only an authorized servicing technician
can install, connect or repair this appliance. Use only original spare parts.
• Only use the built-in appliances after you
assemble the appliance into correct builtin units and work surfaces that align to
the standards.
• Do not change the specifications or
change this product. Risk of injury and
damage to the appliance.
• Fully obey the laws, ordinances, directives and standards in force in the country where you use the appliance (safety
regulations, recycling regulations, electrical safety rules etc.)!
• Keep the minimum distances to other appliances and units!
• Install shock protection, for example install the drawers only with a protective
floor directly below the appliance!
• Keep safe the cut surfaces of the worktop from moisture with a correct sealant!
• Seal the appliance to the work top with
no space between with a correct sealant!
• Keep safe the bottom of the appliance
from steam and moisture, e.g. from a
dishwasher or oven!
• Do not install the appliance adjacent to
doors and below windows! If not, when
you open the doors or windows they can
push off hot cookware from the appliance.
Warning! Risk of injury from electrical
current. Carefully obey the instructions
for electrical connections.
• Make electrical mains terminal free of
voltage.
• Install correctly to give shock protection.
• Loose and incorrect plug and socket
connections can make the terminal become too hot.
• A qualified electrician must install the
connections in the clamps correctly.
• Use a strain relief clamp on cable.
• Use the correct mains cable of type
H05BB-F Tmax 90°C (or higher) for a single phase or two phase connection.
• Replace the damaged mains cable with a
special cable (type H05BB-F Tmax 90°C;
or higher). Speak to your local Service
Centre.
The appliance must have the electrical installation which lets you disconnect the appliance from the mains at all poles with a
contact opening width of minimum 3 mm.
You must have correct devices to isolate:
line protecting cut-outs, fuses (screw type
fuses removed from the holder), earth leakage trips and contactors.
3
operate the appliance.
detector
•
PNC: 94916314
Made in China Model: EHC65 U
APP NO.: 55 GAD EC AU
AU APP NO.: S/91
S NO.: 50Hz 6.9 KW
220 - 240 V AC
~ 220 - 240 V
7
7
Page 4
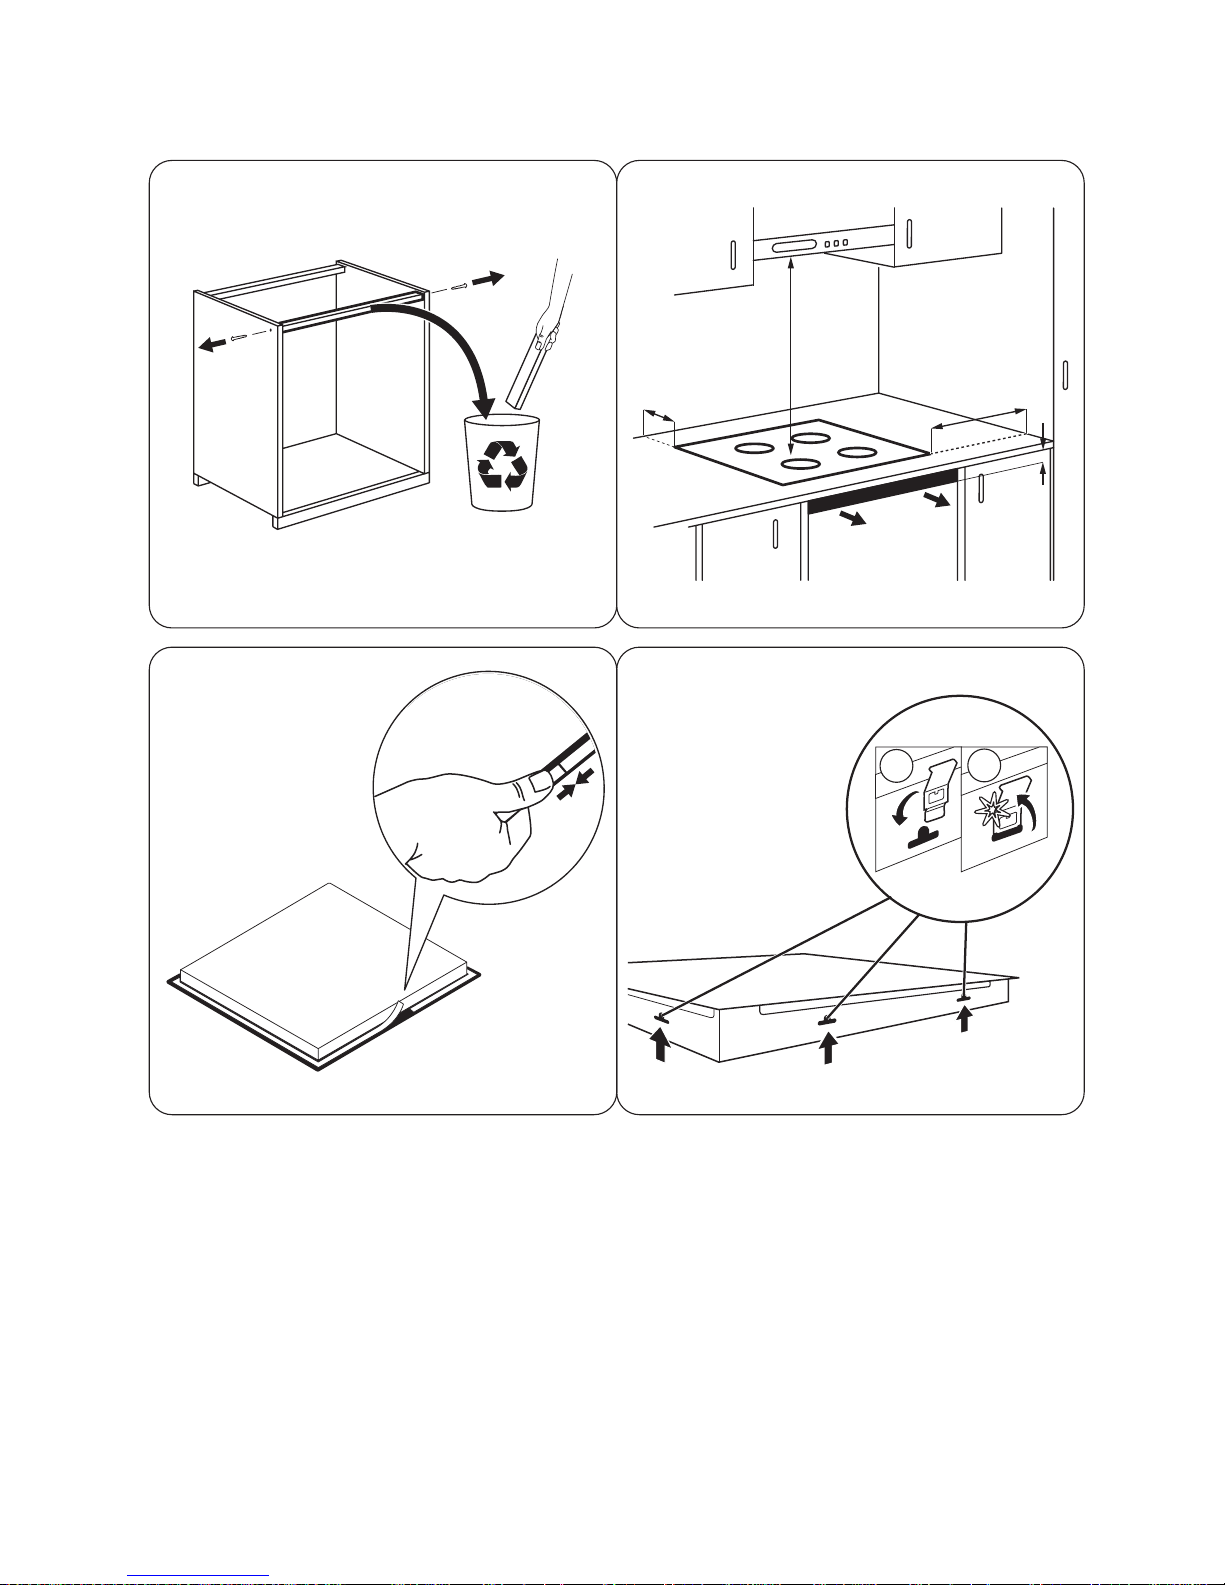
Assembly
min.
50mm
min.
50mm
min.
500mm
min.
5mm
1
2
4
Page 5
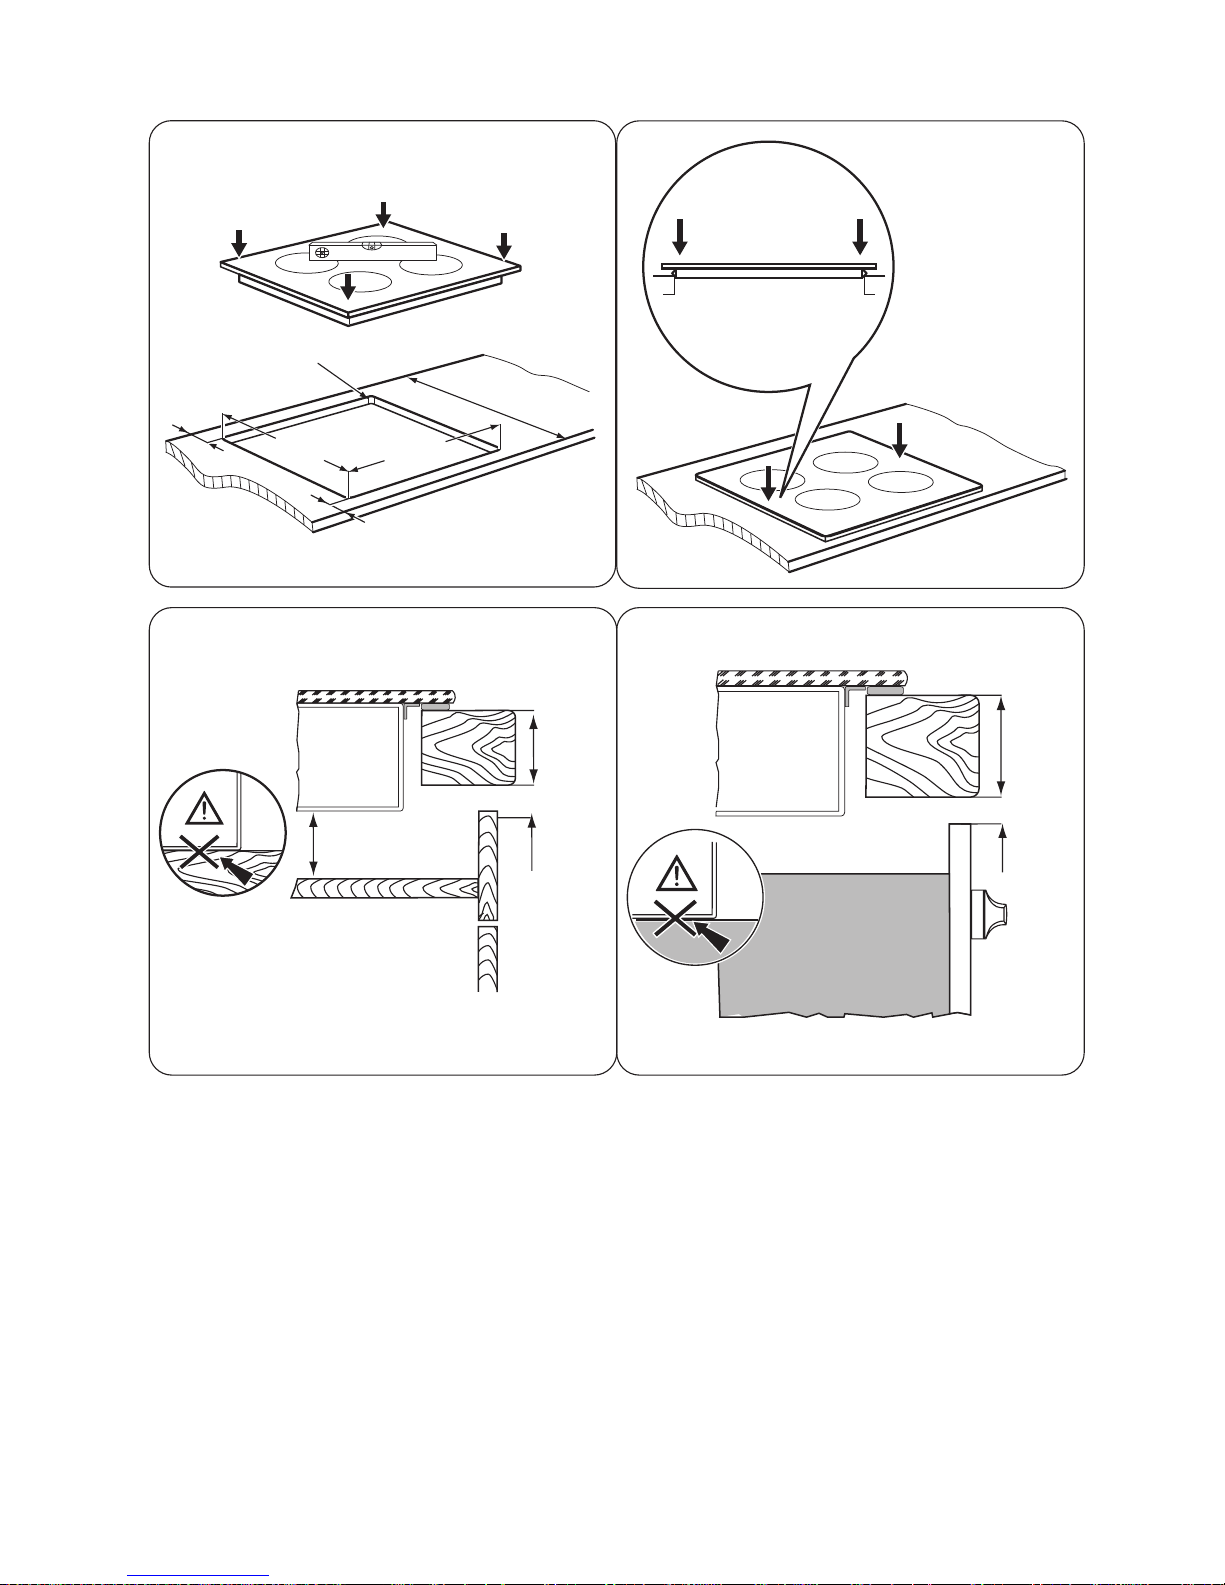
=
=
490
+1
mm
560
+1
mm
600mm
R 5mm
min.
25 mm
min.
5 mm
min.
20 mm
min.
38 mm
min.
5 mm
5
Page 6
Product description
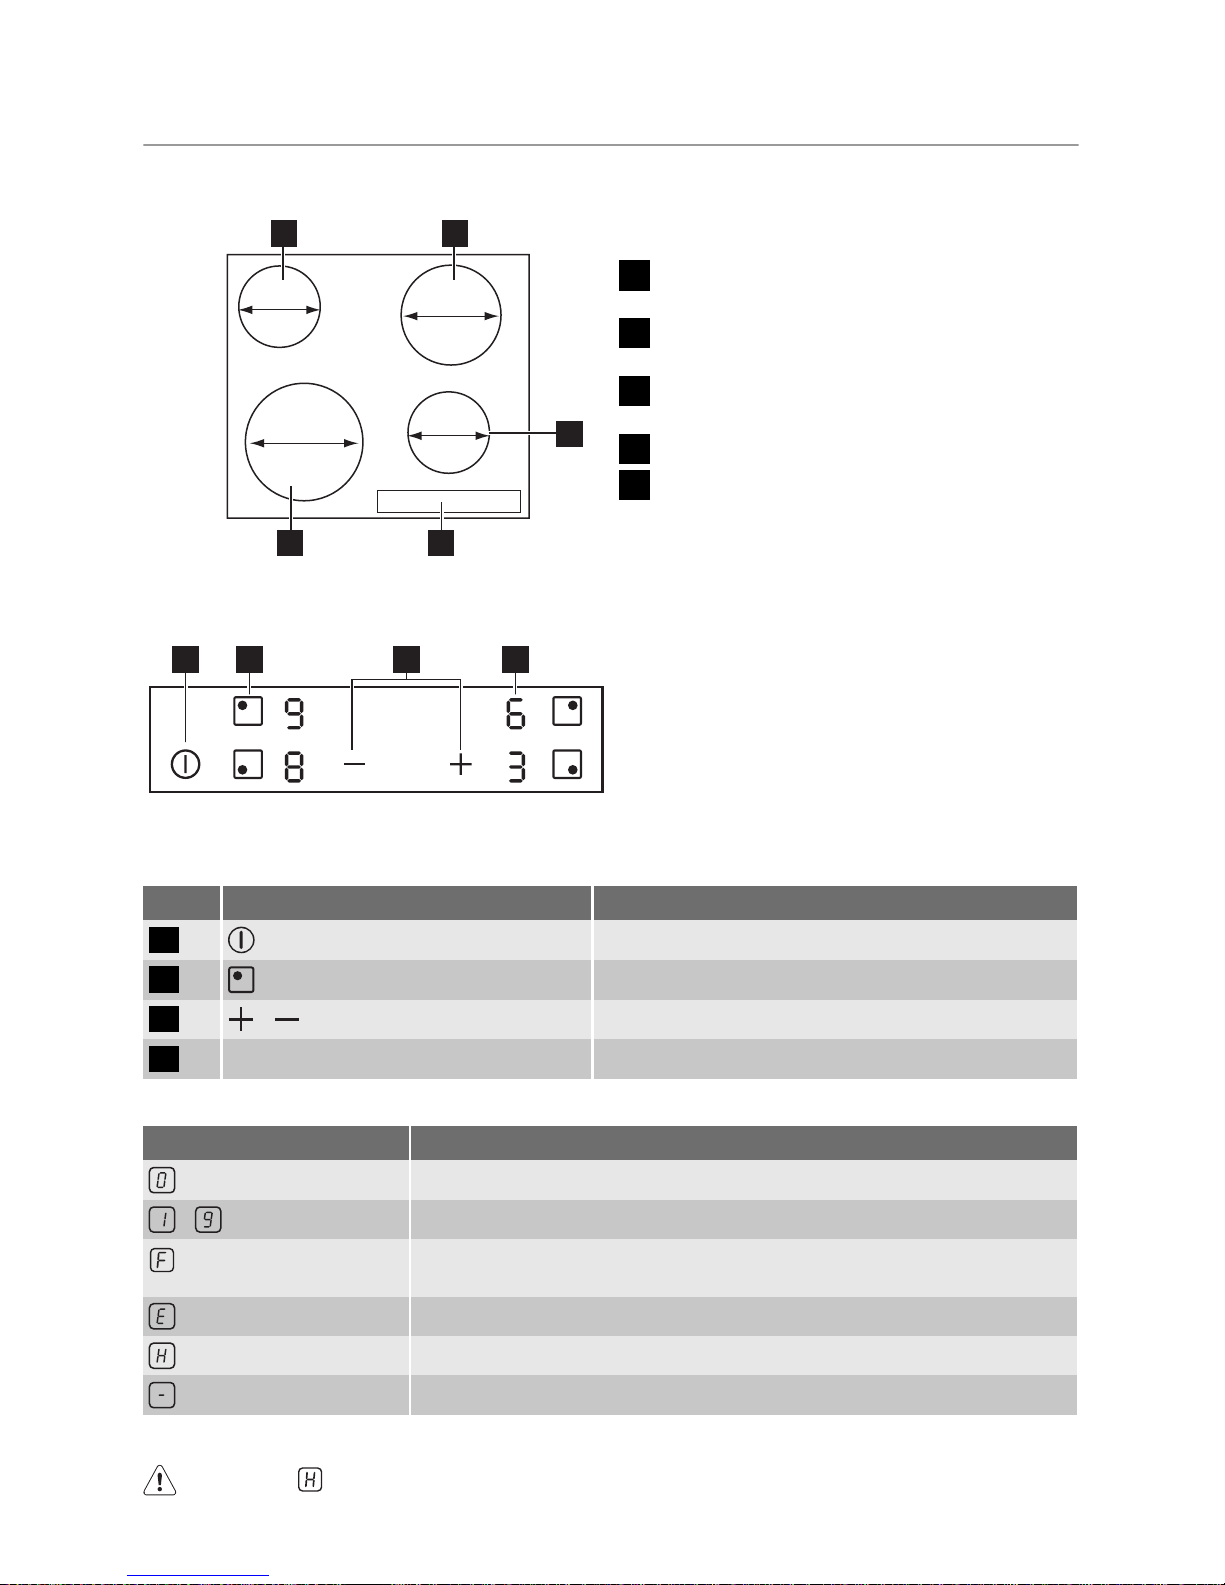
General overview
210
mm
180
mm
145
mm
145
mm
1 2
45
3
1
Induction cooking zone 1400 W (minimum cookware diameter =125 mm).
2
Induction cooking zone 1800 W (minimum cookware diameter =145 mm).
3
Induction cooking zone 1400 W (minimum cookware diameter =125 mm).
4
Control panel
5
Induction cooking zone 2300 W (minimum cookware diameter =180 mm).
Control panel layout
1 2 43
Use the sensor fields to operate the appliance. The displays and indicators tell
which functions operate.
sensor field function
1
It activates and deactivates the appliance.
2
It activates the cooking zone.
3
/
It increases and decreases the heat settings.
4
Heat setting display It shows the heat setting.
Heat setting displays
Display Description
The cooking zone is deactivated.
-
The cooking zone operates.
The cookware is incorrect or too small, or there is no cookware on the
cooking zone.
There is a malfunction.
A cooking zone stay hot (residual heat).
The Automatic Switch Off operates.
Residual heat indicator
Warning! The risk of burns from
residual heat!
The induction cooking zones make the heat
necessary for cooking directly in the bottom
of the cookware. The glass ceramic is hot
from the heat of the cookware.
6
Page 7
Operating instructions
Activation and deactivation
Touch
for 1 second to activate or deac-
tivate the appliance.
Automatic Switch Off
The function deactivates the appliance
automatically if:
•
All cooking zones are deactivated
.
• You do not set the heat setting after you
activate the appliance.
• You spill something or put something on
the control panel for more than 10 seconds, (a pan, a cloth, etc.). Remove the
object or clean the control panel.
• The appliance become too hot (e.g.
when, a saucepan boils dry). Before you
use the appliance again, the cooking
zone must be cool.
• You use not correct cookware. The symbol
comes on and the cooking zone
deactivates automatically after 2 minutes.
• You do not deactivate a cooking zone or
change the heat setting. After some time,
comes on and the appliance deacti-
vates. See the table.
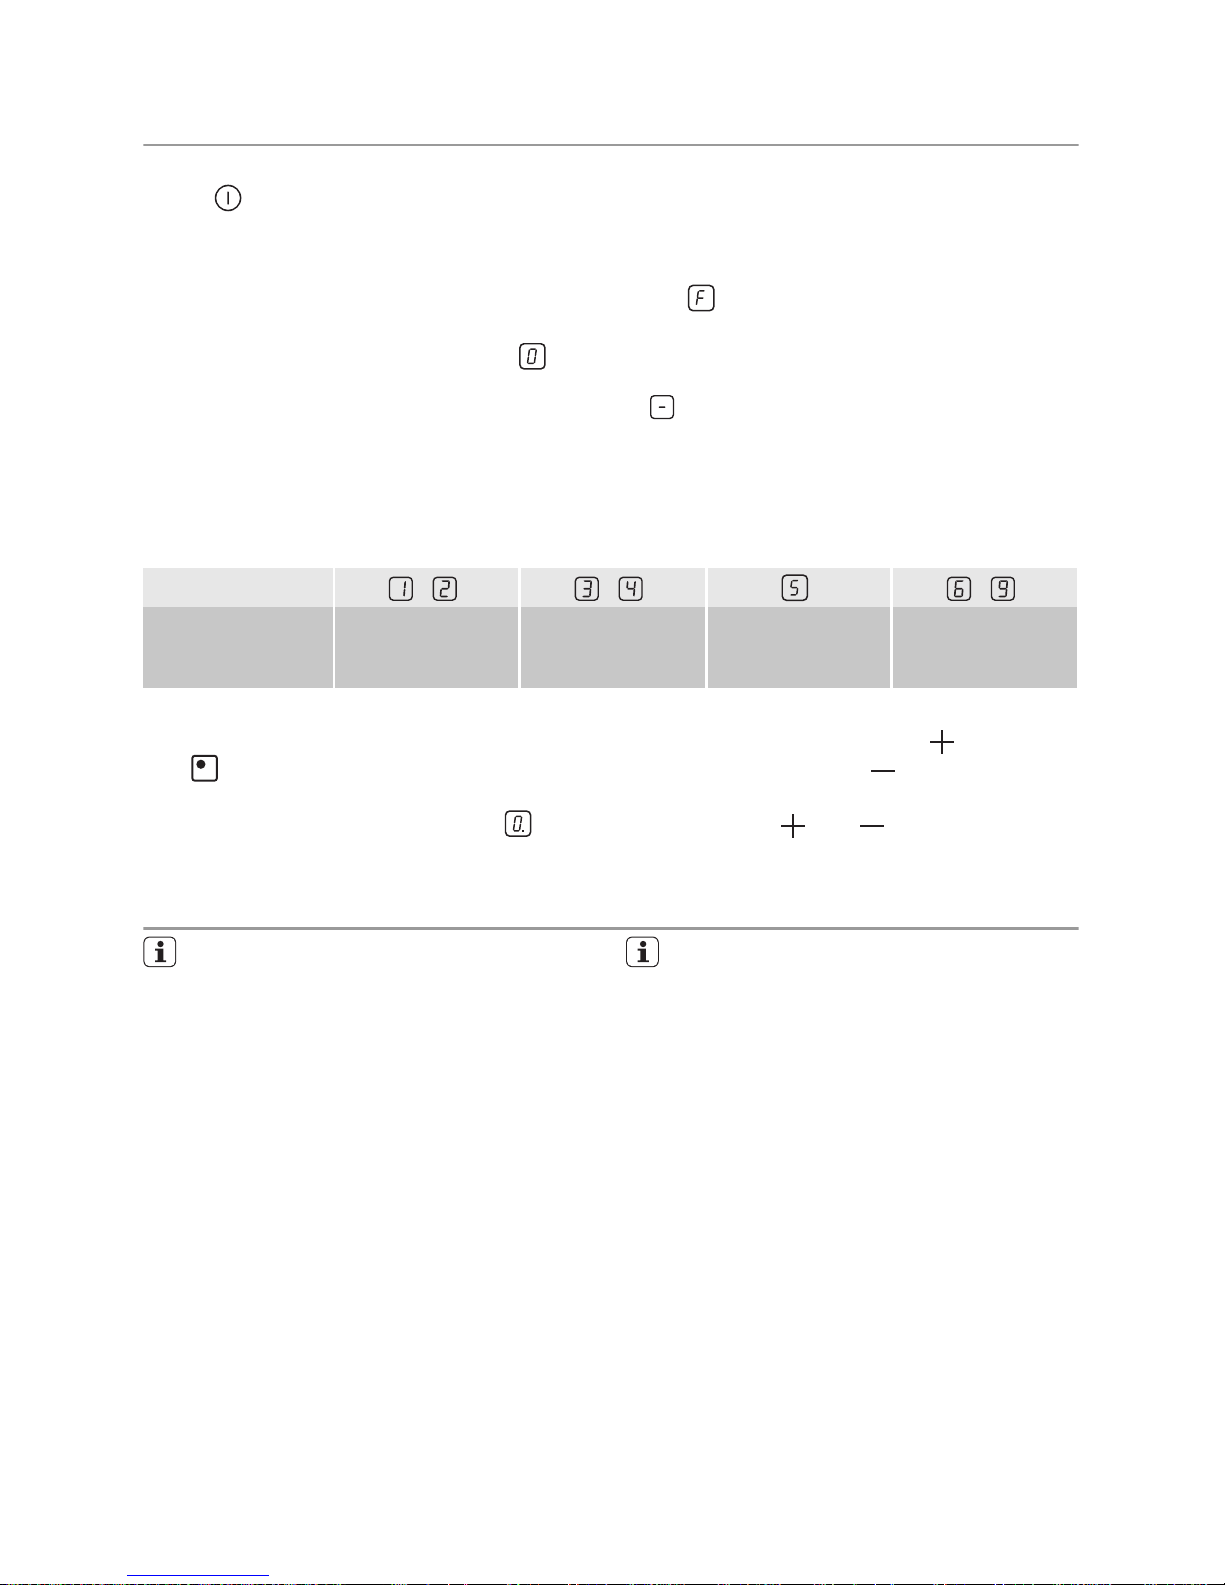
The times of Automatic Switch Off
The heat setting
- - -
The cooking
zone deacti-
vates after
6 hours 5 hours 4 hours 1.5 hours
The cooking zone selection
To set the cooking zone touch the sensor
field related with the cooking zone. The
display shows the selection by the dot adjacent to the heat setting indication ( ).
The heat setting
Set the cooking zone. Touch to increase
the heat setting. Touch to decrease the
heat setting. The display shows the heat
setting. Touch
and at the same time
to deactivate the cooking zone.
Helpful hints and tips
Use the induction cooking zones with
correct cookware.
Cookware for induction cooking zones
Important! For induction cooking zones a
strong electro-magnetic field creates the
heat in the cookware very quickly.
Cookware material
• correct: cast iron, steel, enamelled steel,
stainless steel, the bottom made of multilayer (with correct mark from a manufacturer).
• not correct: aluminium, copper, brass,
glass, ceramic, porcelain.
Cookware is correct for an induction
hob if …
• ... some water boils very quickly on a
zone set to the highest heat setting.
• ... a magnet pulls on to the bottom of the
cookware.
The bottom of the cookware must
be as thick and flat as possible.
Cookware dimensions: induction
cooking zones adapt to the dimension
of the bottom of the cookware automatically to some limit.
The noises during operation
If you can hear
• crack noise: cookware is made of different materials (Sandwich construction).
• whistle sound: you use one or more
cooking zones with high power levels and
the cookware is made of different materials (Sandwich construction).
• humming: you use high power levels.
• clicking: electric switching occurs.
• hissing, buzzing: the fan operates.
The noises are normal and do not refer
to appliance malfunction.
7
Page 8
Energy saving
• If it is possible, always put the lids on
the cookware.
• Put cookware on a cooking zone before you start it.
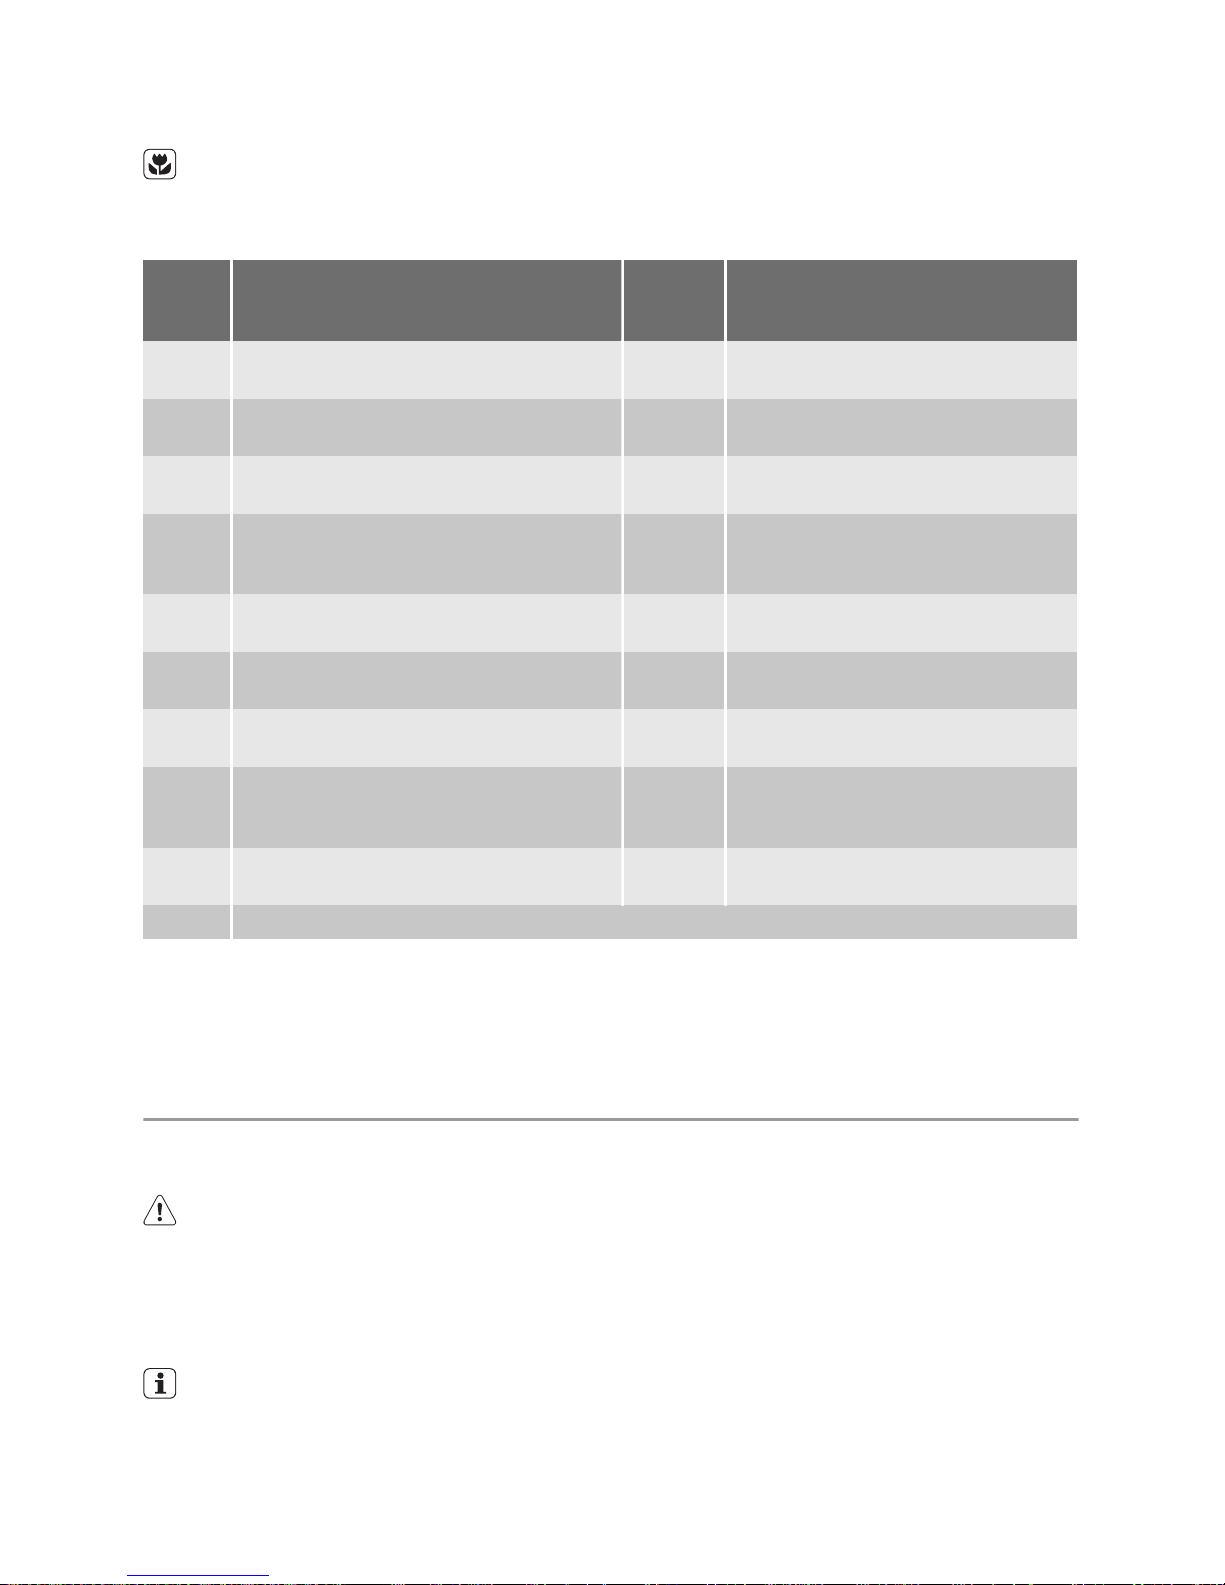
The Examples of cooking applications
The data in the table is for guidance only.
Heat
setting
Use to: Time Hints
1 Keep warm the food you cooked as re-
quired
Put a lid on a cookware
1-2 Hollandaise sauce, melt: butter, choco-
late, gelatine
5-25
min
Mix from time to time
1-2 Solidify: fluffy omelettes, baked eggs 10-40
min
Cook with a lid on
2-3 Simmer rice and milkbased dishes,
heating up ready-cooked meals
25-50
min
Add the minimum twice as much
liquid as rice, mix milk dishes part
procedure through
3-4 Steam vegetables, fish, meat 20-45
min
Add some tablespoons of liquid
4-5 Steam potatoes 20-60
min
Use max. ¼ l water for 750 g of potatoes
4-5 Cook larger quantities of food, stews
and soups
60-150
min
Up to 3 l liquid plus ingredients
6-7 Gentle fry: escalope, veal cordon bleu,
cutlets, rissoles, sausages, liver, roux,
eggs, pancakes, doughnuts
as necessary
Turn halfway through
7-8 Heavy fry, hash browns, loin steaks,
steaks
5-15
min
Turn halfway through
9 Boil large quantities of water, cook pasta, sear meat (goulash, pot roast), deep-fry chips
Information on acrylamides
Important! According to the newest
scientific knowledge, if you brown food
(specially the one which contains starch),
acrylamides can pose a health risk. Thus,
we recommend that you cook at the lowest
temperatures and do not brown food too
much.
Care and cleaning
Clean the appliance after each use.
Always use cookware with clean bottom.
Warning! The sharp objects and
abrasive cleaning agents can cause
damage to the appliance.
For your safety, do not clean the appliance with steam cleaners or high-pressure cleaners.
Scratches or dark stains on the glassceramic cause no effect on how the
appliance operates.
To remove the dirt:
1. – Remove immediately: melted plas-
tic, plastic foil, and food with sugar. If
not, the dirt can cause damage to
the appliance. Use a special scraper
for the glass . Put the scraper on the
glass surface at an acute angle and
move the blade on the surface .
–
Remove after the appliance is
sufficiently cool: limescale rings ,
water rings, fat stains, shiny metallic
discolorations. Use a special cleaning
agent for glass ceramic or stainless
steel.
8
Page 9
2. Clean the appliance with a moist cloth
and some detergent.
3. At the end rub the appliance dry
with a clean cloth.
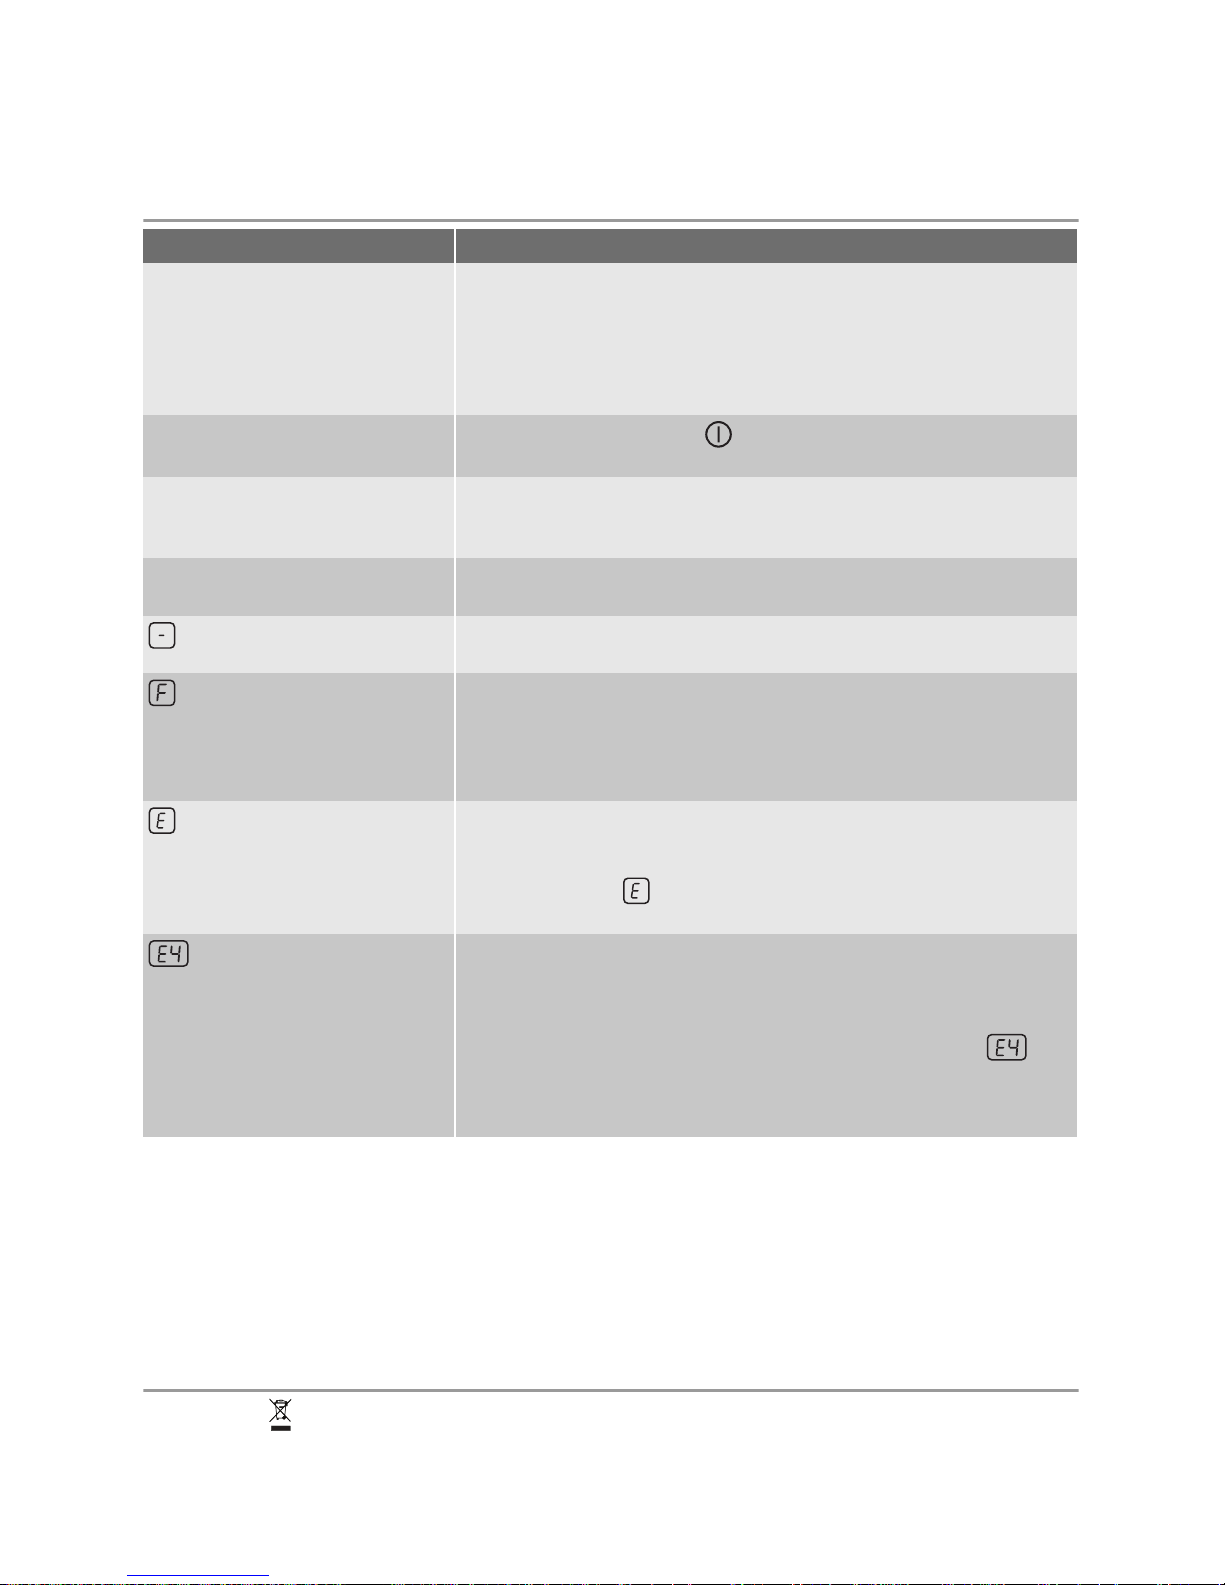
What to do if…
Problem Possible cause and remedy
You cannot activate the appliance or operate it.
• Activate the appliance again and set the heat setting in 10 seconds.
• You touched 2 or more sensor fields at the same time. Only
touch one sensor field.
• There is water or fat stains on the control panel. Clean the control panel.
The appliance deactivates.
You put something on the . Remove the object from the sensor field.
The residual heat indicator
does not come on.
The cooking zone is not hot because it operated only for a short
time. If the cooking zone should be hot, speak to the service centre.
The sensor fields become hot. The cookware is too large or you out it too near to the controls.
Put large cookware on the rear cooking zones if it is necessary.
comes on
The Automatic Switch Off operates. Deactivate the appliance and
activate it again.
comes on
• No cookware on the cooking zone. Put cookware on the cooking zone.
• Not correct cookware. Use the correct cookware.
• The diameter of the bottom of the cookware is too small for the
cooking zone. Move cookware to a smaller cooking zone.
and number comes on.
There is an error in the appliance.
Disconnect the appliance from the electrical supply for some
time. Disconnect the fuse from the electrical system of the house.
Connect again. If comes on again, speak to the service centre.
comes on
There is an error in the appliance, because a cookware boils dry.
The protection against become too hot for the cooking zone operates. The Automatic Switch Off operates.
Deactivate the appliance. Remove the hot cookware. After, ap-
proximately 30 seconds activate the cooking zone again.
should go out of the display, residual heat indicator can stay. Let
the cookware become sufficiently cool and check it with the section Cookware for the induction cooking zone.
If you tried the above solutions and cannot
repair the problem, speak to your dealer or
the customer service. Give the data from
the rating plate, three digit letter code for
the glass ceramic (it is in the corner of the
glass surface) and an error message that
comes on.
Make sure, you operated the appliance correctly. If not the servicing by a customer
service technician or dealer will not be free
of charge, also during the warranty period.
The instructions about the customer service
and conditions of guarantee are in the guarantee booklet.
Environment concerns
The symbol on the product or on its
packaging indicates that this product may
not be treated as household waste. Instead
it should be taken to the appropriate
collection point for the recycling of electrical
and electronic equipment. By ensuring this
9
Page 10
product is disposed of correctly, you will
help prevent potential negative
consequences for the environment and
human health, which could otherwise be
caused by inappropriate waste handling of
this product. For more detailed information
about recycling of this product, please
contact your local council, your household
waste disposal service or the shop where
you purchased the product.
Packaging material
The packaging materials are friendly to
the environment and can be recycled.
The plastic components are identified
by marking: >PE<,>PS<, etc. Discard
the packaging materials as household
waste at the waste disposal facilities in
your municipality.
Warranty
FOR SALES IN AUSTRALIA AND NEW
ZEALAND
APPLIANCE: BUILT-IN OVEN, COOKTOP
AND FREESTANDING COOKER
This document sets out the terms and
conditions of the product warranties
for Electrolux Appliances. It is an important document. Please keep it with
your proof of purchase documents in a
safe place for future reference should
you require service for your Appliance.
1. In this warranty
a) ‘acceptable quality’ as referred to in
clause 10 of this warranty has the
same meaning referred to in the
ACL;
b) ‘ACL’ means Trade Practices
Amendment (Australian Consumer
Law) Act (No.2) 2010;
c) ‘Appliance’ means any Electrolux
product purchased by you accompanied by this document;
d) ‘ASC’ means Electrolux’ authorised
serviced centres;
e) ‘Electrolux’ means Electrolux Home
Products Pty Ltd of 163 O’Riordan
Street, Mascot, NSW 2020, ABN 51
004 762 341 in respect of Appliances purchased in Australia and
Electrolux (NZ) Limited of 3-5 Niall
Burgess Road, Mount Wellington, in
respect of Appliances purchased in
New Zealand;
f) ‘major failure’ as referred to in
clause 10 of this warranty has the
same meaning referred to in the
ACL and includes a situation when
an Appliance cannot be repaired or
it is uneconomic for Electrolux, at its
discretion, to repair an Appliance
during the Warranty Period;
g) ‘Warranty Period’ means:
– where the Appliance is used for
personal, domestic or household
use (i.e. normal single family use)
as set out in the instruction manual, the Appliance is warranted
against manufacturing defects in
Australia for 24 months and in
New Zealand for 24 months, following the date of original purchase of the Appliance;
– where the Appliance is used for
commercial purposes (including
being used to directly assist a
business or where the Appliance
is used in a multi-family communal or share type environment),
the Appliance will then be warranted against manufacturing defects in Australia for 3 months
and in New Zealand for 3
months, following the date of
original purchase of the Appliance.
h) ‘you’ means the purchaser of the
Appliance not having purchased the
Appliance for re-sale, and ‘your’ has
a corresponding meaning.
2. This warranty only applies to Appliances purchased and used in Australia or
New Zealand and is in addition to (and
does not exclude, restrict, or modify in
any way) any non-excludable statutory
warranties in Australia or New Zealand.
3. During the Warranty Period Electrolux
or its ASC will, at no extra charge if
your Appliance is readily accessible for
service, without special equipment and
10
Page 11

subject to these terms and conditions,
repair or replace any parts which it considers to be defective. Electrolux or its
ASC may use remanufactured parts to
repair your Appliance. You agree that
any replaced Appliances or parts become the property of Electrolux. This
warranty does not apply to light globes,
batteries, filters or similar perishable
parts.
4. Parts and Appliances not supplied by
Electrolux are not covered by this warranty.
5. You will bear the cost of transportation,
travel and delivery of the Appliance to
and from Electrolux or its ASC. If you
reside outside of the service area, you
will bear the cost of:
a) travel of an authorised representa-
tive;
b) transportation and delivery of the
Appliance to and from Electrolux or
its ASC,
In all instances, unless the Appliance is
transported by Electrolux or an Electrolux authorised representative, the Appliance is transported at the owner’s cost
and risk while in transit to and from
Electrolux or its ASC.
6. Proof of purchase is required before
you can make a claim under this warranty.
7. You may not make a claim under this
warranty unless the defect claimed is
due to faulty or defective parts or workmanship. Electrolux is not liable in the
following situations (which are not exhaustive):
a) the Appliance is damaged by:
– accident
– misuse or abuse, including failure
to properly maintain or service
– normal wear and tear
– power surges, electrical storm
damage or incorrect power sup-
ply
– incomplete or improper installa-
tion
– incorrect, improper or inappropri-
ate operation
– insect or vermin infestation
– failure to comply with any addi-
tional instructions supplied with
the Appliance;
b) the Appliance is modified without
authority from Electrolux in writing;
c) the Appliance’s serial number or
warranty seal has been removed or
defaced;
d) the Appliance was serviced or re-
paired by anyone other than Electrolux, an authorised repairer or
ASC.
8. This warranty, the contract to which it
relates and the relationship between
you and Electrolux are governed by the
law applicable where the Appliance
was purchased. Where the Appliance
was purchased in New Zealand for
business purposes the Consumer
Guarantee Act does not apply.
9. To the extent permitted by law, Electrolux excludes all warranties and liabilities
(other than as contained in this document) including liability for any loss or
damage whether direct or indirect arising from your purchase, use or non use
of the Appliance.
10. For Appliances and services provided
by Electrolux in Australia, the Appliances come with a guarantee by Electrolux that cannot be excluded under the
Australian Consumer Law. You are entitled to a replacement or refund for a
major failure and for compensation for
any other reasonably foreseeable loss
or damage. You are also entitled to
have the Appliance repaired or replaced if the Appliance fails to be of acceptable quality and the failure does
not amount to a major failure. The benefits to you given by this warranty are in
addition to your other rights and remedies under a law in relation to the Appliances or services to which the warranty relates.
11. At all times during the Warranty Period,
Electrolux shall, at its discretion, determine whether repair, replacement or refund will apply if an Appliance has a valid warranty claim applicable to it.
12. For Appliances and services provided
by Electrolux in New Zealand, the Appliances come with a guarantee by
11
Page 12
Electrolux pursuant to the provisions of
the Consumer Guarantees Act, the
Sale of Goods Act and the Fair Trading
Act.
13. To enquire about claiming under this
warranty, please follow these steps:
a) carefully check the operating in-
structions, user manual and the
terms of this warranty;
b) have the model and serial number
of the Appliance available;
c) have the proof of purchase (eg an
invoice) available;
d) telephone the numbers shown be-
low.
14. You accept that if you make a warranty
claim, Electrolux and its ASC may exchange information in relation to you to
enable Electrolux to meet its obligations
under this warranty.
Important Notice
Before calling for service, please ensure that the steps listed in point 13 above have been
followed.
FOR SERVICE
or to find the address of your
nearest state service centre in
Australia
Please call 13 13 4 9
For the cost of a local call (Australia on-
ly)
SERVICE AUSTRALIA
ELECTROLUX HOME
PRODUCTS
www.electrolux.com.au
FOR SPARE PARTS
or to find the address of your
nearest state spare parts centre in Australia
Please call 13 13 50
For the cost of a local call (Australia on-
ly)
FOR SERVICE
or to find the address of your
nearest authorised service centre in New Zealand
Free call 0800 10 66 10
(New Zealand only)
SERVICE NEW ZEALAND
ELECTROLUX HOME
PRODUCTS
www.electrolux.co.nz
FOR SPARE PARTS
or to find the address of your
nearest state spare parts centre in New Zealand
Free call 0800 10 66 20
(New Zealand only)
12
Page 13

13
Page 14

14
Page 15

15
Page 16

892952002-B3-09042012
 Loading...