

Page 1
HD Outdoor Dome Camera (CV167)
Installation Quick Reference
THINGS YOU NEED FOR INSTALLATION
Included in the box:
• CheckVideo® HD Outdoor Bullet Camera
If this CheckVideo device will be monitored
by a central station, please contact
the central station for a username and
password on their existing CheckVideo
account. The central station will add the
device to their account.
• Bag of mounting parts: screws (5), drywall
mounts (5), hex wrench, 2 Phoenix connectors
• 32GB MicroSD card, pre-inserted
• Power Over Ethernet (PoE) injector
• Power cable adapter (female connector)
• Liquid tight conduit connector and
alternate rubber seal. Must be used in
outdoor installations to ensure weather
tight seal
1
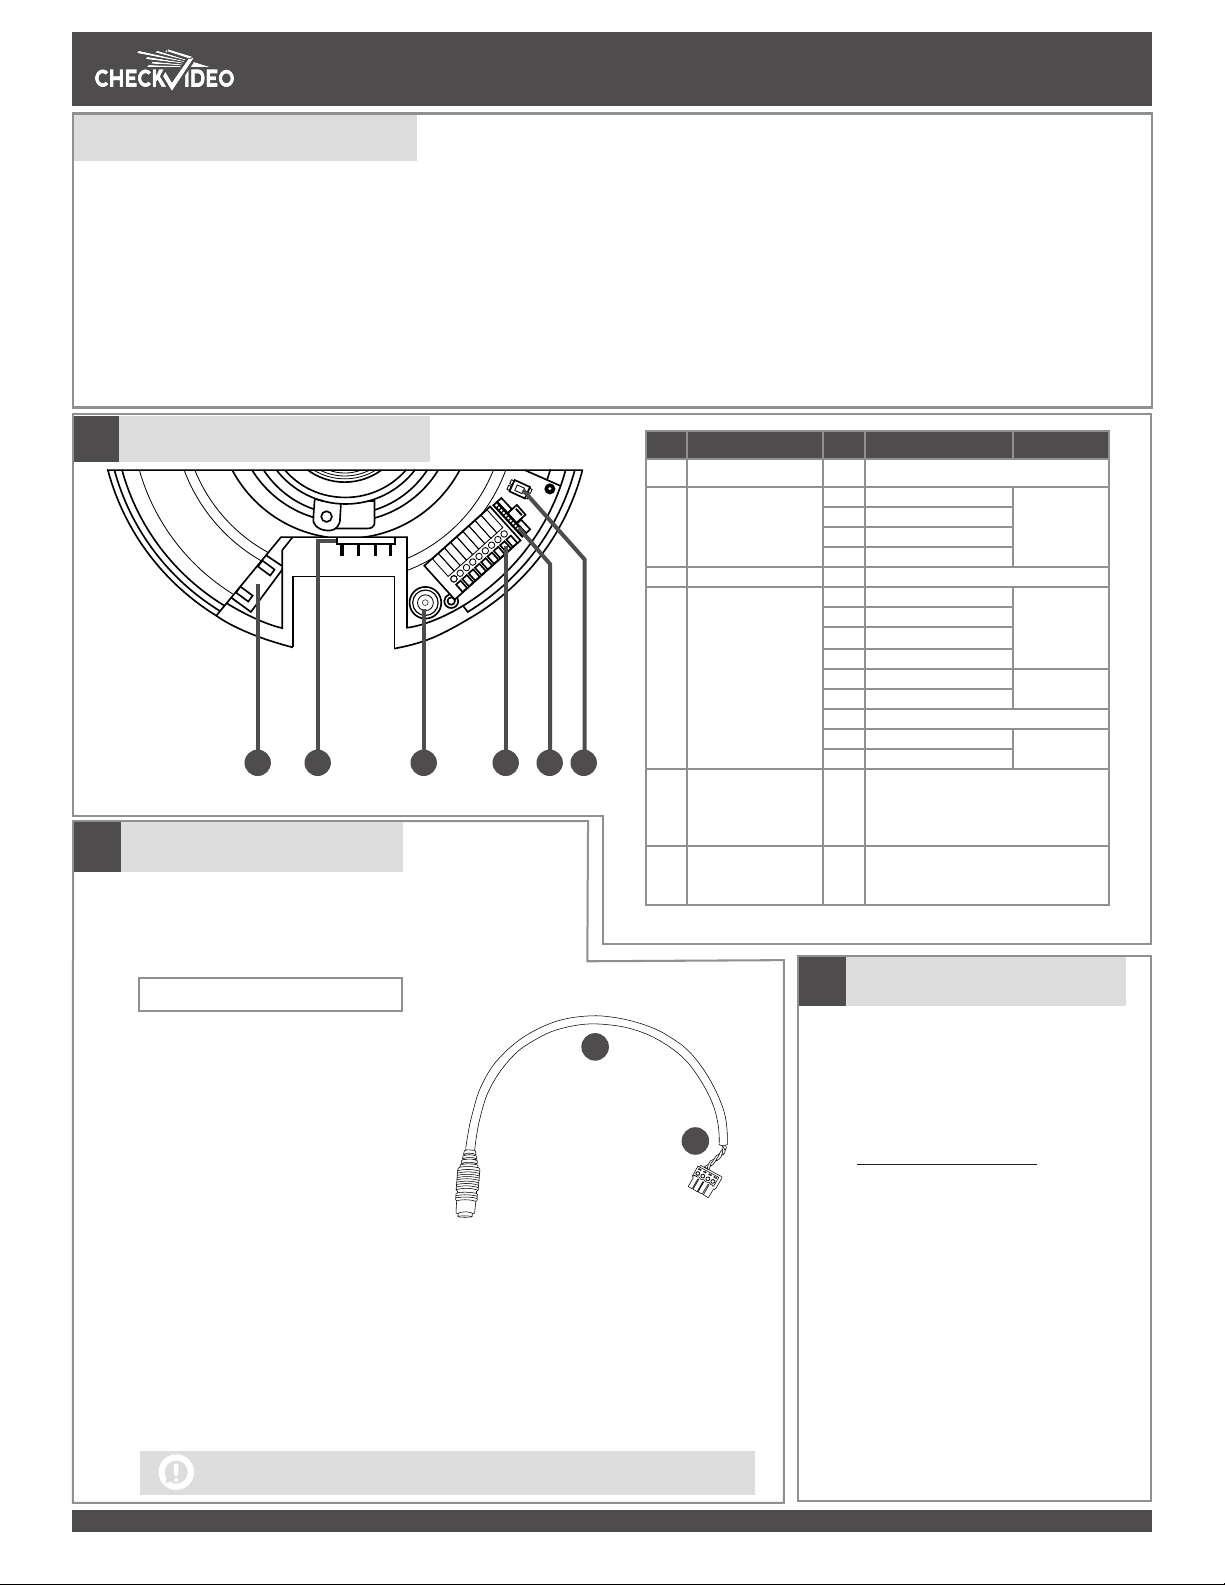
REVIEW THE CAMERA CONNECTORS
1 2 3 4
123456789
1 2 3 4 5 6
2 CONNECT CAMERA TO ROUTER
1. For later reference, enter the device’s serial number
in the space below. This number is found on the
underside of the camera:
You’ll also need:
• PC or Mac® with Broadband Internet
Service
• Router, connected to the Internet
• Phillips screwdriver
• Cat-5 network cables
• 12VDC/24VAC, 2A camera power supply,
not provided
No. Connector Pin Definition Remarks
1 RJ-45 - For network and PoE connections
2 Power
(DC 12V / AC 24V)
3 BNC - For analog video output
4 Alarm & Audio I/O 1 Alarm In — Alarm
5 microSD Card Slot - microSD card pre-inserted in card
6 Reset Button - Press the button with one finger
1 AC24V 1 Power
2 AC24V 2
3 GND
4 DC 12V +
2 Alarm In +
3 Alarm Out —
4 Alarm Out +
5 Audio Out R Audio Out
6 Audio Out L
7 Audio GND
8 Audio In R Audio In
9 Audio In L
slot for continuous recording. Do
not remove the microSD card when
the camera is powered on.
for at least 10 seconds to restore
settings.
connection
connection
(future)
(future)
3 ADD CHECKVIDEO HD CAMERA
2. Before installing the camera in its
final location, connect the router
A
to “Data In” on the PoE injector and
connect the injector’s “Data & Power
Out” port to the Camera using Cat-5
network cables. Note: Runs can be
A: Power Cable Adapter
B: Phoenix Connector
B
no longer than 100 meters. Connect
the PoE injector to a power outlet.
You may eliminate the PoE injector
by using a PoE-enabled router.
3. If you intend to take advantage of the camera’s onboard heater, the camera must
be powered using a 12VDC/24VAC power supply. Attach the camera’s “Power”
connector (Step 1, connector 2) to the power cable adapter using the optional
Phoenix connector and plug in a power supply to the female barrel connector. When
using a separate power supply, the PoE injector is no longer necessary. Instead use
a Cat-5 network cable to connect the camera’s network jack to the router.
4. If the connections have been made correctly, the network jack on the camera will
light green and yellow. This will be your sign to continue.
Outdoor installations require that you use the provided liquid tight conduit
connector. Please contact CheckVideo Support for installation instructions.
© 2017 CheckVideo, LLC. CheckVideo is a registered trademark of CheckVideo, LLC. All rights reserved. 7CVCPQC000E-07.03
1. If monitored by a Central
Station, contact them to add
the device to your account. If
self-monitored, go to the CheckVideo dashboard login page:
portal.checkvideo.net
2. On the CheckVideo Dashboard,
click on Devices > Add Device
3. In Register Device section, enter
the serial number found on the
underside of the camera and
define a Device Name
4. Click the Text Device button
to make sure the CheckVideo
Soware Service (CVSS) can
communicate to the device
5. When prompted, update the
device firmware.
Page 2
4 INSTALL CAMERA
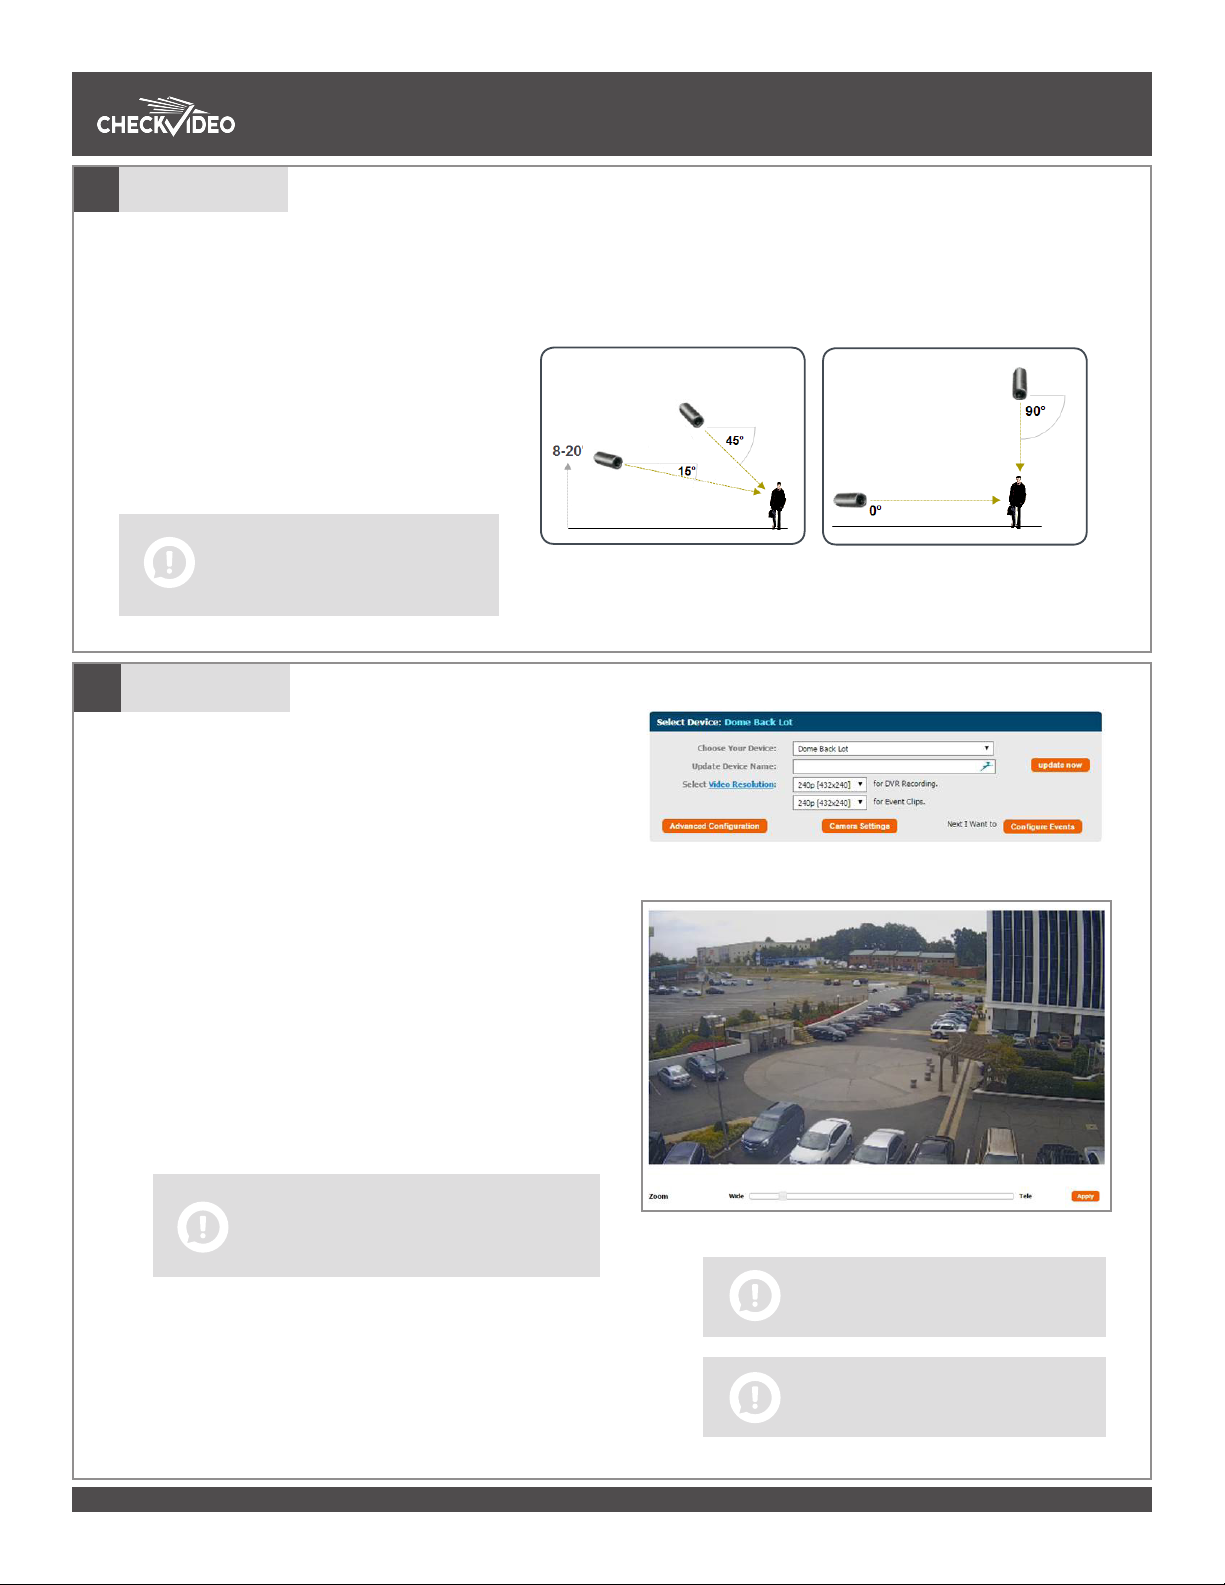
To optimize event detection, place your
CheckVideo HD Camera as follows:
• HEIGHT: Each camera must be installed 8 to
20 feet o the ground.
• DISTANCE: If you are mainly detecting
people at a 3mm focal length, the distance
between the camera and the people you
wish to detect should be 15 to 50 feet. If
you are primarily concerned with detecting
vehicles, the range is 40 to 150 feet.
The CheckVideo Camera Placement
Guide includes a summary checklist on
improving your camera placement.
HD Outdoor Dome Camera (CV167)
Installation Quick Reference
The Camera can be placed on a ceiling, wall or shelf. Once you’ve
determined where to place the Camera, run Cat-5 network cable from the
router to the desired location. Adjust the camera angle seeking to maintain
a 15 to 45 degree downward tilt.
Power the camera (refer to Step 2 for additional information)
,
Fig. 3 - MORE EFFECTIVE: Cameras
are at a 15 to 45 degree downward tilt
and are mounted 8 to 20 feet high
Fig. 4 - LESS EFFECTIVE: Cameras are directly overhead (90 degrees) or parallel to
(0 degrees) the target
5 CONFIGURATION
1. On the CheckVideo Dashboard, click on Devices >
Configure Device.
2. Select Device: Choose the camera from the dropdown
and click the Camera Settings button. To Zoom and
Focus the camera, move the slide bar from Wide to
Tele and click Apply. The camera will set the zoom and
focus while you wait, notifying you when the update is
complete.
3. Configure Events: Click the Edit button to create a zone
for a particular object type. Then use your mouse to
draw the zone by clicking the le mouse button wherever you want to define a point of the zone. The zone
should cover the entire area where you want to detect
an event. Within Schedule Configuration, select the event
type, duration, and time span. Select the appropriate
checkboxes to send User and Central Station Notifications.
Click Add to populate the Event Schedule.
Note: You are required to select which Users will
receive notifications. You will do this in the Select
Notification Method portion of the page.
4. Select Notification Method - Central Stations:
Select a Central Station type that should receive alert metadata.
5. Select Notification Method - Users: Click the checkbox next
to any user(s) who should receive notifications for this camera
and their method of notification.
© 2017 CheckVideo, LLC. CheckVideo is a registered trademark of CheckVideo, LLC. All rights reserved. 7CVCPQC000E-07.03
Remember to refresh the image if you
have adjusted zoom and focus settings.
Make sure your Internet browser is set to
100% when drawing zone(s).
 Loading...