

Page 1

TThhee PPoorrttaabbllee IInnvveennttoorryy W
Waanndd
UUsseerr M
Maannuuaall
Version: 1.3.1
Modif ied: 10/25/2001
Page 2

The ILS Inventory Wand
Table of Contents
1. THE ILS INVENTORY WAND..............................................................................................................................4
1.1. O
1.2. P
1.3. P
1.4. C
1.5. T
1.6. S
1.7. S
1.8. W
1.9. H
VERVIEW
OWERING UP TH E INVENTORY WAND
OWERING UP AN D CHARG IN G TH E
........................................................................................................................................................... 4
................................................................................................................ 4
PPT 2700.................................................................................................... 5
1.3.1. Powering Up............................................................................................................................................... 5
1.3.2. Charging the Device................................................................................................................................... 5
1.3.3. Charging the Spare Battery........................................................................................................................ 6
1.3.4. Using the PPT 2700.................................................................................................................................... 7
1.3.5. Check on the Status of the Batteries........................................................................................................... 7
OLLECTING INVENTORY DATA AN D SCANNING LIBRARY MATERIALS
RANS FER RING T HE INVENTORY DATA COLLECTED
EARCH ING TH E INVENTORY
............................................................................................................................. 12
......................................................................................... 11
............................................................. 8
1.6.1. Preparing a Search List File .................................................................................................................... 12
1.6.2. Search Mode Screen.................................................................................................................................13
HELF ORDER SEARCH
...................................................................................................................................... 15
1.7.1. Selecting a Shelf Order Search File ......................................................................................................... 16
1.7.2. Shelf Order Search Screen ....................................................................................................................... 16
1.7.3. Shelf Order Alert ...................................................................................................................................... 17
1.7.4. Shelf Order Results................................................................................................................................... 19
IRELESS OPERATIONS
INTS ON USING TH E
..................................................................................................................................... 21
PPT 2700........................................................................................................................22
Page 2 o f 23
Page 3

IGURE
F
IGURE
F
IGURE
F
IGURE
F
IGURE
F
IGURE
F
IGURE
F
IGURE
F
IGURE
F
IGURE
F
IGURE
F
IGURE
F
IGURE
F
IGURE
F
IGURE
F
IGURE
F
IGURE
F
IGURE
F
IGURE
F
IGURE
F
IGURE
F
IGURE
F
IGURE
F
IGURE
F
IGURE
F
NVENTORY WAND
1-1: I
OWERING UP THE
1-2: P
HARGING THE
1-3: C
OCKING THE
1-4: D
HARGING THE SPARE BATTERY
1-5: C
ETTINGS PANEL
1-6: S
ATTERY STATUS
1-7: B
ONNECTING CAB LE TO
1-8: C
URNING
1-9: T
1-10: ILS I
NVENTORY COLLECTION
1-11: I
NVENTORY COLLECTION IN PROGRESS
1-12: I
NVENTORY WAND OPERATIONS
1-13: I
1-14: S
TEM SEARCH SCREEN
1-15: I
TEM FOUND ALERT
1-16: I
1-17: S
1-18: S
1-19: S
1-20: S
1-21: S
1-22: S
1-23: W
1-24: W
1-25: R
PPT 2700 ON.................................................................................................................................. 9
NVENTORY MAIN SCREEN
ELECT THE SEARCH LIST FILE SCREEN
ELECT THE SHELF ORDER FILE
HELF ORDER SEARCH SCREEN
HELF ORDER ALERT
HELF ORDER ALERT
HELF ORDER RESULTS SCREEN
HELF ORDER VIEW LIST SCREEN
IRELESS
IRELESS FILE TRANSFER SCREEN
UNNING PROGRAMS
.......................................................................................................................................... 4
PPT 2700.......................................................................................................................... 5
PPT 2700............................................................................................................................... 6
PPT 2700.................................................................................................................................6
............................................................................................................................................. 7
............................................................................................................................................ 8
PPT 2700.................................................................................................................8
................................................................................................................................. 14
.................................................................................................................................... 15
– N
– O
PPT 2700 ILS I
.................................................................................................................................. 23
The ILS Inventory Wand
Table of Figures
..................................................................................................................... 7
..................................................................................................................... 9
............................................................................................................................ 10
...................................................................................................... 11
................................................................................................................ 12
...................................................................................................... 13
.................................................................................................................. 16
.................................................................................................................. 17
OT IN LIST
UT OF RANGE
NVENTORY MAIN SCREEN
........................................................................................................... 18
...................................................................................................... 19
................................................................................................................. 20
.............................................................................................................. 20
................................................................................. 21
............................................................................................................. 22
Page 3 o f 23
Page 4
The ILS Inventory Wand
1. The ILS Inventory Wand
1.1. Overview
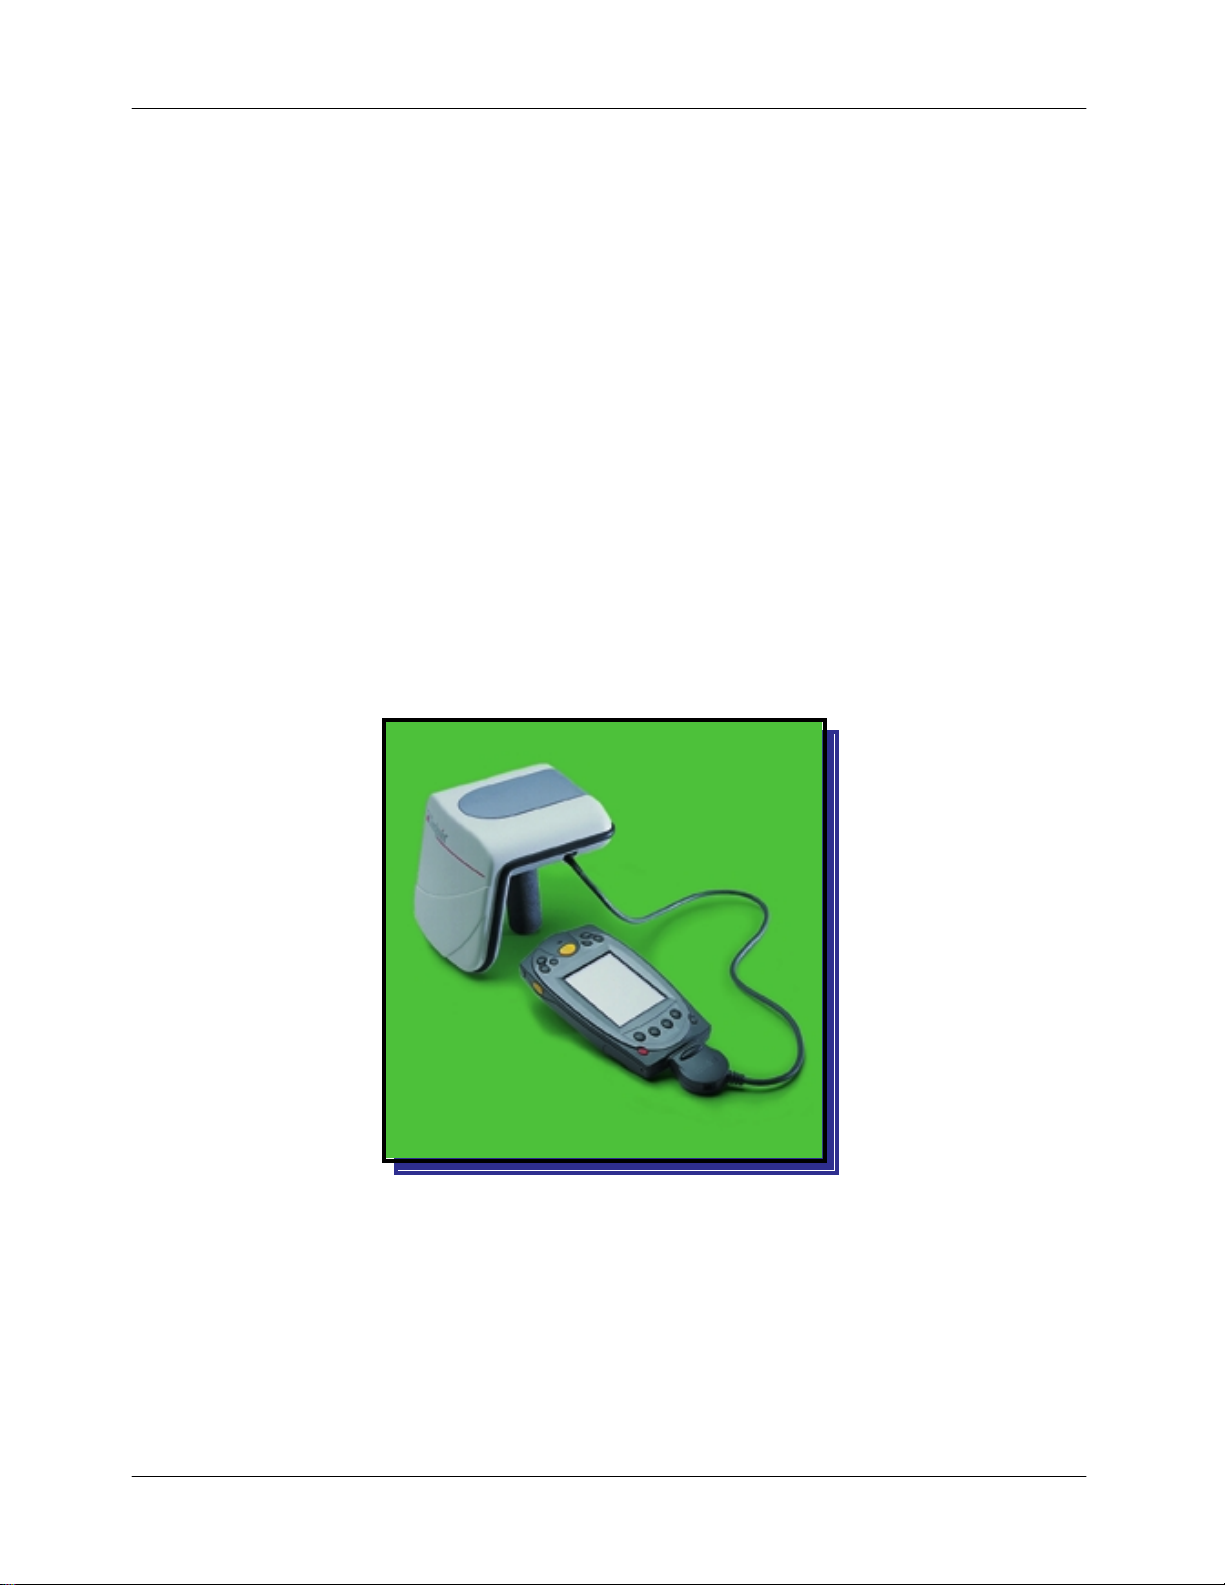
The Intelligent Library System (ILS) Inventory Wand is a key component in Checkpoint's
family of ILS products. Consisting of a lightweight, handheld sensing unit, the Inventory Wand
combines convenien ce with versatility . An extendable handle makes it easy to read items
placed in hard-to-reach areas, while the sophisticated antenna design and electronics make
the Inventory Wand the longest-range portable reader available. This feature is exceptional
when checking inventory or trying to locate materials that haven’t been shelved properly.
The ILS Inventory Wand is designed with e ase of use in mind. The handheld antenna contains
three LED's: the green light indicates power "on", the red light alerts the user that a
Circ ulation Circuit is being read, and the yellow one indicates a low battery.
The ILS Inventory Wand enables a fast, efficient and accurate method for taking inventory of
the library mater ial.
The Portable Data Terminal (PPT 2700) enables data to be uploaded or downloaded from the
ILS Application Server, providing bo th inventory and sea r ch capability.
Figure 1-1: Inventory Wand
1.2. Powering Up the Inventory Wand
Prior to using the Inventory Wand for any significant inventory collection or inventory search
session it is imperative that its battery is fully charged. Connect the battery to the battery
charger and plug the adapter into an outlet to begin charging. The estimated charging time is
4-6 hours.
Page 4 o f 23
Page 5
The ILS Inventory Wand
When the battery is completely charged, connect the Inventory Wand battery to the top of the
Inventory Wand. Once you have started using the Inventory Collection or the Search
Inventory programs, the Inventory Wand will be p owered up.
1.3. Powering Up and Charging the PPT 2700
1.3.1.
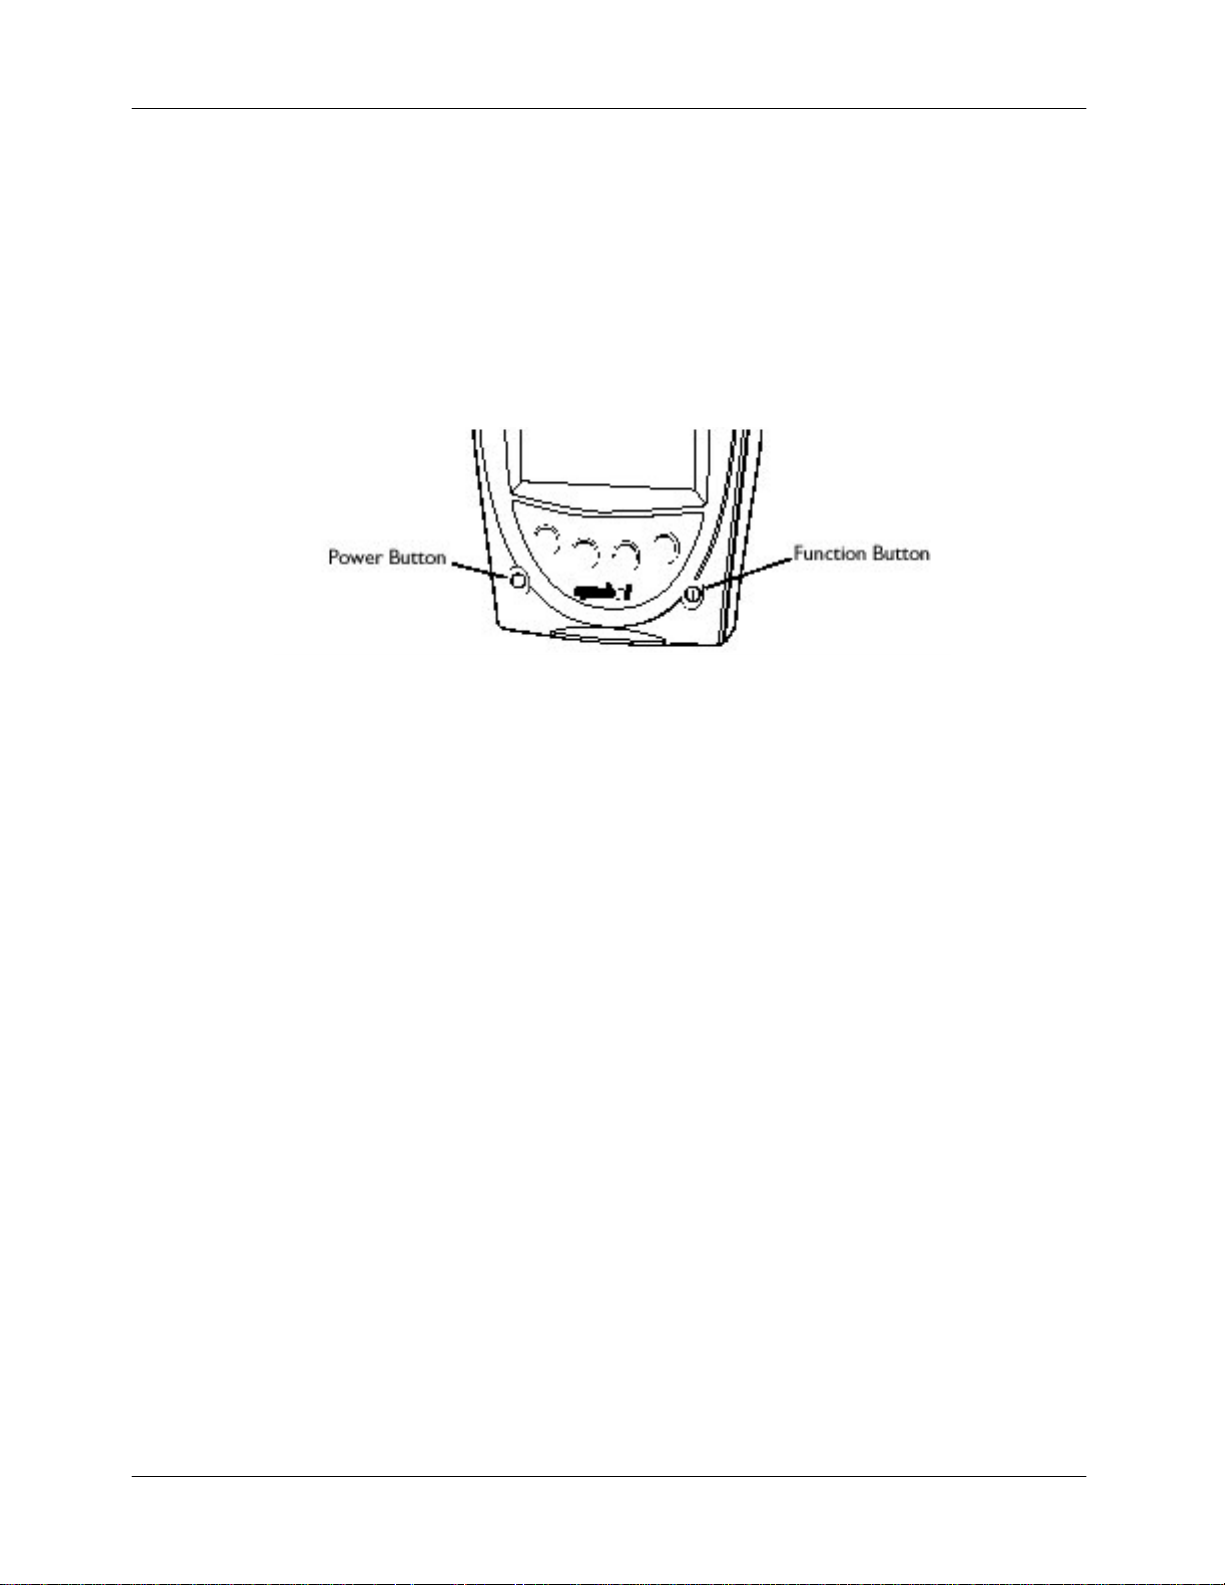
Press the power button on the lower left-hand side of the terminal to turn the PPT 2700 on
and off.
Note
Power Save mode. This means that the device will power down. To turn it on press the red
power button. You will be return ed to the last screen presented prior to shut off.
1.3.2.
Before using your terminal for the first time, charge the battery. Also, when battery voltage is
low, a warning message appears indicating the battery needs to be charged. You can charge
the battery using the CRD 2700 cradle. Your terminal is equipped with a memory backup
battery that automatically charges from the main lithium-ion battery. This backup battery
retains data in memory when the terminal's battery is removed, and takes several hours to
charge when you first use yo ur terminal.
: If you have not used the PPT 2700 within the configured time , the device will go into
Powering Up
Figure 1-2: Powering Up t he PPT 2700
Charging the Device
: If you remove your lithium-ion battery before the backup battery is fully charged, data
Note
may be lost. For this reason DO NOT remove the battery within the first ten hours of use.
Using the Cradle to Charge the Battery
To charge the terminal's b attery using the cradle:
1. Connect the power supply to the power port on the back of the cradle, and the other
end of the power supply to a wall outlet.
Page 5 o f 23
Page 6
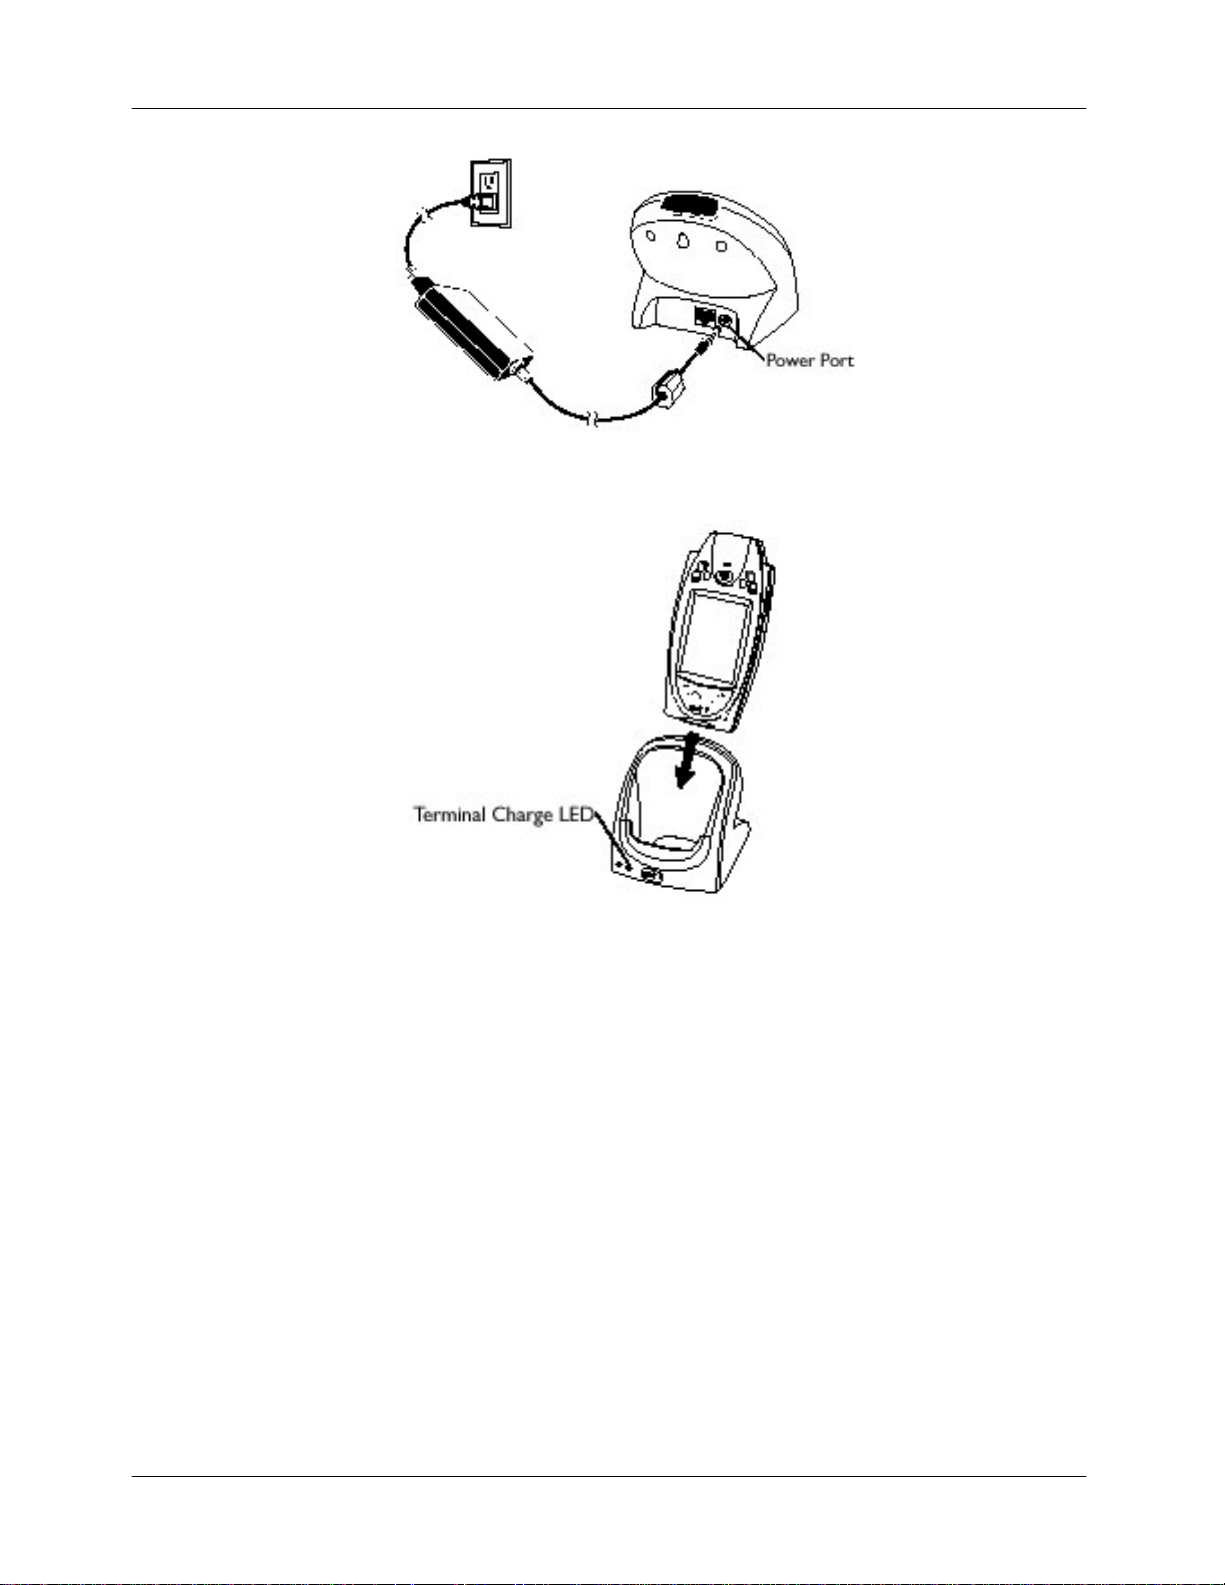
Figure 1-3: Charg ing the PPT 2700
2. Ins ert the PPT 2700 terminal in the cradle.
The ILS Inventory Wand
Figure 1-4: Docking the PPT 2700
3. The Terminal Charge LED turns red to indicate charging, then green when the battery
is fully charged. The terminal's battery is fully charged after approximately 2 1/2 hours.
1.3.3.
To charge a spare ba ttery, insert the battery in the spare battery-charging slot in the back of
the cradle, oriented so the contacts are facing down and towards the back of the cradle. Press
the battery down into the slot until firmly seated.
The Spare Battery Charge LED turns red to indicate charging, then green when the battery is
fully charged. The battery is fully charged after approximately 2 1/2 hours.
Charging the Spare Battery
Page 6 o f 23
Page 7
Figur e 1-5: Charging the Spare Battery
The ILS Inventory Wand
1.3.4.
In this section the word tap is used instead of click because the stylus supplied must be used
to tap the touch screen. The stylus is stored in a silo on the back of the PP T 2700. Please refer
to the Symbol “PPT 2700 Series Quick Reference Guide” for information regarding use of this
device.
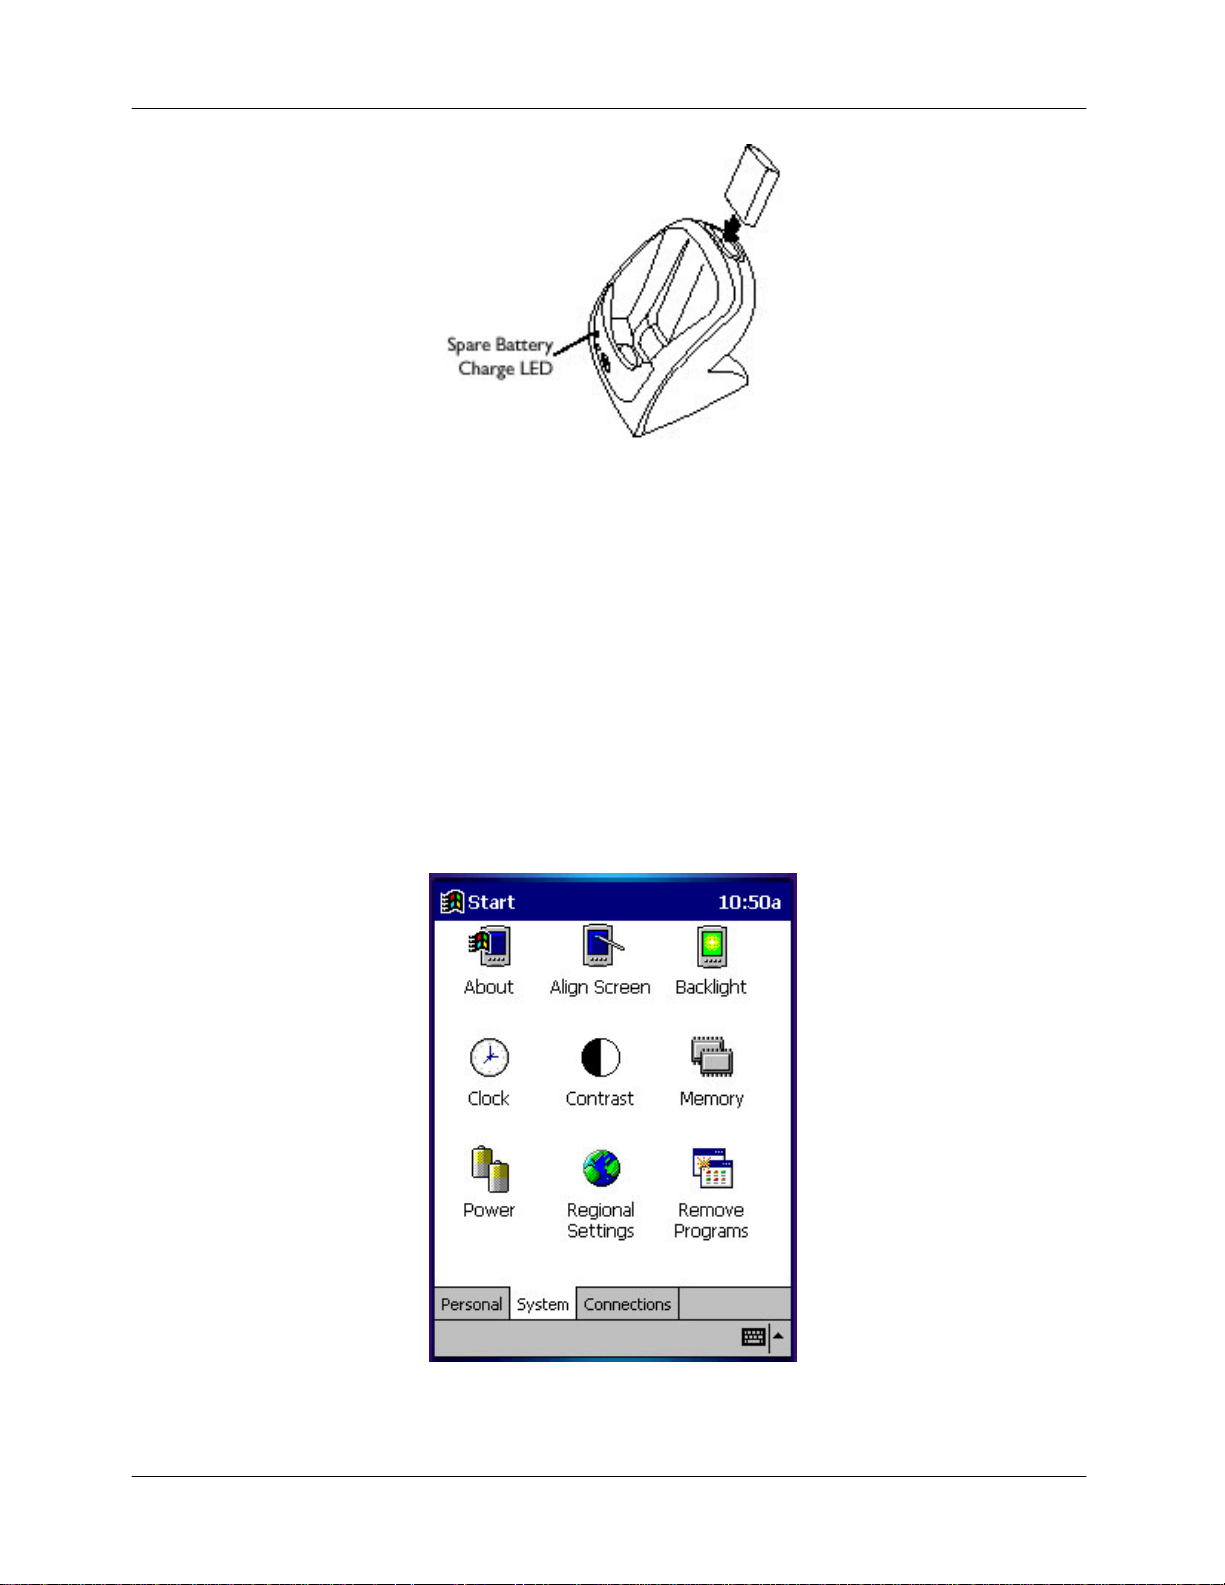
1.3.5.
It may become necessary to check the status of the PPT 2700’s bat tery power. To check the
power status of the battery:
1. Tap the Window s icon in the upper left hand corner of the screen.
2. Tap o n the Settings menu item.
3. Tap o n the System tab at the bottom of the screen.
Using the PPT 2700
Check on the Status of the Bat teries
Figure 1-6: Settings Panel
Page 7 o f 23
Page 8

The ILS Inventory Wand
4. Tap on the Power icon on this screen. This will show you the power status of both the
main and the backup b atteries. A warning will appear when either battery is low.
Figure 1-7: Battery Status
1.4. Collecting Inventory Data and Scanning Library
Materials
Now that the Inventory Wand has b een initialized you are ready to start collecting inventory
information.
1. Connect the cable from the Inventory Wand to the PPT 2700.
Figure 1-8: Connecti ng Cable to PPT 2700
2. Turn the PPT 2700 on. To do this, press the red button in the lower-left hand corner of
the device.
Page 8 o f 23
Page 9

The ILS Inventory Wand
Figure 1-9: Turning PPT 2700 O n
3. Once you have started the PPT 2700, you will be presented with the ILS Inventory Main
Menu Screen.
Figure 1-10: ILS Inv entory Main Sc r een
: If you are not presented with this screen, tap the start button in the upper-left hand
Note
corner of the screen. Tap on the "ILS Inventory" menu item provided in the start menu. This
will launch the program needed to collect and search th e inventory.
4. Tap o n the Inventory Collection button loc ated in the center of the screen.
5. Tap the Start button located in the bottom-left hand corner of the screen. If a previous
inventory collection file was no t transferred to the ILS Server, you will be asked if you
want to append t o the file. Answering Yes will continue the previous inventory
collection, and new items being appended to the file. If you a nswer No, you will be
asked to confirm that you do not wish to keep the existing data. Tap OK if you are
sure, and a new inventory file will be created. Tap Cancel and you will append to the
file. If you wanted to transfer the previous file, you can immediately tap done to
initiate a file transfer.
Page 9 o f 23
Page 10

Figure 1-11: Inventory Collection
The ILS Inventory Wand
6. Begin to scan the tagged items. Hold the wand in your hand about three inches from
the material you wish to scan. Notice that the red light on the wand is now blinking.
This indicates that the wand is detecting tagged materials. The wand can detect
circulation circuits up to a distance of 8 inches. Therefore it is important to keep th e
wand fo cused on the intended inventory items to avoid unwa nted data from being
collected.
You will notice that once you have scanned a tag, the bar code number for that tag will
appear on the PPT 2700 in the "Most Rec ently Scanned Items" field. The "Items Read"
field will supply you with the total number of invento ry tags read over time. The "Available
Memory" field will supply you with the percentage of memory still available.
7. Once you have completed scanning all of the desired ta gs, tap the DONE button.
Page 10 o f 23
Page 11

The ILS Inventory Wand
Figure 1-12: Inventory Collection In Progress
1.5. Transferring the Inventory Data Collected
Once you have completed scanning the tags, you are ready to transfer the data.
1. A pop up screen will appear asking you if you want to transfer the data collected. Tap
the OK button to do so.
: If you wish to continue the inventory collection progress after you have pressed Done,
Note
then press Cancel to p revent file transfer and reenter inventory collection mode.
2. (Batch Mode only) Unplug the cable from the bottom of the PPT 2700.
3. (Batch Mode only) Dock the PPT 2700 into the cradle.
4. A Transferring… screen will appear on the PPT 2700 while d ata is transferring to the ILS
Application Server.
5. Onc e the transfer is completed, the ILS Application Server will display the Inventory
Wand Operations window. At this time the inventory you transferred is converted to a
text file containing the list of barcodes. The file name and location will be displayed in
the Transfer Status Display window. The file is now ready to be transferred to the
circulation system. When the process is finished click the <Close> button.
Page 11 o f 23
Page 12

The ILS Inventory Wand
Figure 1-13: Invento ry Wand Operations
6. The PPT 2700 will read "Transfer Complete". Tap the OK button. This will return you
to the ILS Inventory Main Screen. You may begin another inventory collection by
selecting Start, or exit to the main screen by clicking the ok button found at the topright of the screen.
1.6. Searching the Inventory
To begin searching the inventory, tap the <Item Search> button located in the bottom right
hand corner of the ILS Inventory Main Screen. An Item Search file must be prepared on the
ILS Application Server.
1.6.1.
An Item Search List file is identified by the “.psl” file extension. The file can be created from
the results of other search operations, or may be transferred from the ILS Application Server
to the P PT 2700. The file may be created by a re port on the circulation system, or simply by
using Notepad to enter barcodes.
Preparing a Search List File
Page 12 o f 23
Page 13

The ILS Inventory Wand
Figure 1-14: Select the Search List File Screen
Transferring and Selecting the Search List File
1. To transfer a s earch list file (or files) from the ILS Application Serve r , it must be placed
in the synchronization directory for your PPT 2700. There should be a shortc ut to this
directory on the desktop of the Application Server. Once the file is in the correct
location, dock the PPT 2700 and the file(s) will be automatically t ransferred. Refer to
the Wireless Operations sect ions for details of file transfer using a Wireless PPT 2700.
2. Once the files have been transferred, tap the <Item Search> button. The Select the
Search List File screen is used to choose the desired file. The down arrow to the right of
the Type field can be used to choose files of other types that can be used as search
lists. Tap the file name to select it to be used for the search. The <Cancel> button at
the top-right can be used to return to the main screen.
1.6.2.
There are several ways to view information on the Search Mode Screen.
Option 1 - Check the Items Found button
found in the field below.
Option 2 - Check the Items Not Found button
the system has not yet found.
Option 3 - Check the Show All Items butto n
the Items Not Yet Found. This is the default selection. Tap the other buttons at any time to
change the view.
When the Alerts enabled button is checked, an alert display and sound will o ccur for each i tem
that is found. The search will stop temporarily, allowing you to locate the item found on the
shelf. Tap this button to disable this feature.
Search Mo de Screen
: This will show you all of the barcodes that were
: This will show you all of the barcodes that
: This will show you both the Items Found and
Tap the Start button to begin searching for the barcodes . Y ou will notice that the barcode
display field(s) will begin to reflect changes in the status of the search items, depending on
Page 13 o f 23
Page 14

The ILS Inventory Wand
the sea r ch option you chose. “Items found” will be listed as you find them. “Items not found”
will be removed from the list as you find them.
Figure 1-15: Item Search Screen
Begin to scan the inventory items. Hold the wand in yo ur hand about three inches from the
material you wish to scan. Notice that the red light on the wand is now o n. This indicates
that the wand is detecting tagged materials. The wand can detect circulation circuits up to a
distance of 8 inches. Therefore it is important to keep the wand focused on the intended
inventory items to avoid unwanted data from being collected.
: While the r ed light may flash w hen the scanner detects any tag, a b arcode will only
Note
appear in the “Items found” list if it matches an item present in your Search Items list.
When an alert is displayed, the barcode, shelf location, and title of the item will be displayed.
Tap the <Continue> button to resume the search.
Page 14 o f 23
Page 15

Figure 1-16: Item Fo und Alert
The ILS Inventory Wand
When you are finished searching tap the <Done> b utton at the b ottom of the screen. If all of
the items are found, an alert screen will notify you. Tap the Ok button to continue. At this
time, the I tem Search result files will be generated. A pop-up will appear asking you to "Please
dock the PPT 2700 unit and press OK to begin transfer of the Search Results file". Tap the OK
button. (Note: In Wireless mode the file transfer is automatic.)
: If you would like to abort the file transfer, ta p the Cancel button on this pop up. You
Note
will the n be back at the Item Search screen.
The Search Re sults file will be transferred to the configured directory on the ILS Application
Server. Refer to section 1.5 Transferring the Inventory Data Collected for details. This file
will list all of the barcodes searched. If a barco de was found, the date and time of the search
will be listed . If the barcode was not found, t he date and time will not be listed.
Two additional files will also be created to list the items found and the items not found. The
items found file will have the file extension “.psf”. The items not found file will have the file
extension “.psm”. The filename of the item search list file will be used, with the appropriate
file extension added. These files may be used to perform another search, or may be processed
as results of the search on the circulation system.
1.7. Shelf Order Search
The Shelf Order search may be used to verify the contents of a shelf against a shelf order list
ge nerated by th e circulation system. Items scanned will be compared to the shelf order list to
determine if they are “in order”, “not in the list”, or “not found”. This allows f or verification
and sorting of the shelf contents. This is another method ava ilable for performing inventory.
To begin a Shelf Order search, tap the <Shelf Order> button located at the bottom-left of the
ILS Inventory Main Screen.
Page 15 o f 23
Page 16

The ILS Inventory Wand
1.7.1.
An Shelf Order Search file is identified by the “.pso” file extension. The file can be transferred
from the ILS Application Server to the PPT 2700. The file can be created by a running a Shelf
Order rep ort on the circulation system.
Select ing a Shelf Order Search File
Figure 1-17: Select the Shelf Order File
Transferring and Selecting the Shelf Order File
1. To transfer a shelf order file (or files) from the ILS Application Server, it must be
placed in the synchronization directory for your PPT 2700. There should be a
shortcut to this directory on the desktop of the Application Server. Once the file is
in the correct location, dock the PPT 2700 and the file(s) will be automatically
transferred. Refer to the Wireless Operations sections for details of file transfer
using a Wireless PPT 2700.
2. Once the files have been transferred, tap the <Shelf Order> button. The Select the
Shelf Order File screen is used to choose the desired file. The down arrow to the
right of the Type field can be used to choose files of other types that can be used as
shelf order lists. Tap the file name to select it to be used for the search. The
<Cancel> button at the top-right can be used to return to the main screen.
1.7.2.
The Shelf Order Search screen has an Alerts Enabled button. When this button is checked, an
alert display and sound will occur for items of interest. Tap this button to disable alerts. Alerts
will occur for the following reasons:
The Offset in use display indicates the current setting for the offset used to determine when
an item is considered to be in shelf order. An offset is needed because the wand can read
items in a “random” order within its read range. The offset may be adjusted by changing the
1. Out of range – the item read was found in the Shelf Order list, but was not located
close enough to the last item in the she lf order.
2. Not in list – the item read was not found in the Shelf Order list.
Shelf Order Search Screen
Page 16 o f 23
Page 17

The ILS Inventory Wand
number and tapping the <Set> button. This allows for adjustment when items of different
thickness are being scanned.
Tap the Start button be begin the Shelf Order Search. You must begin reading items at the
starting shelf location in the list.
The Shelf Order Search screen displays the following information:
1. Items in file – the original count of the items read from the Shelf Order file.
2. Items Read – the number of items read during the search.
3. Items in order – the number of items that were read in shelf order.
4. Items not in order – the number of items that were read that are not in shelf order.
Figure 1-18: Shelf Order Search Screen
The Offset in use and the Alerts enabled settings may be changed at any time during the
search.
When you are finished searching tap the <Done> b utton at the b ottom of the screen. If all of
the items shelf order list are found, an alert screen will notify you. Tap the Ok button to
continue.
1.7.3.
When a Shelf Order Alert is displayed for an ite m that is not in the list, only the barcode will
be displayed. The Item Status field will indica te “Not in List”.
The <Show Prev.> button will display the previous item read. You ca n tap this button to
display the last item in order to assist in locating the item on the shelf. This item should
probably be removed from the shelf, since it is not in the shelf order list.
The <Show Next> button will display the next item read.
The <Show Item> button returns the display to the item that is not in the list.
Tap the Continue button when you are ready to resume the scan. Be sure to start at the
position you were in when the alert occurred.
Shelf Order Alert
Page 17 o f 23
Page 18

Figure 1-19: Shelf Order A lert – Not in List
The ILS Inventory Wand
When a Shelf Order Alert is displayed for an item that is not in shelf order, the barcode, shelf
location, and title will be displayed. The Item Status field will indicate “Out of Range”.
The <Show Prev.> button will display the previous item read. You ca n tap this button to
display the last item in order to assist in locating the item on the shelf. This item should
probably be repositioned on the shelf, since it was found in the wrong order in the shelf order
list.
The <Show Next> button will display the next item read.
The <Show Item> button returns the display to the item that is not in the list.
The Offset to last item in order field will display the offset value from the last item read in
order. For an alert to occur, this offset is greater than the Offset in use that is displayed.
Tap the Continue button when you are ready to resume the scan. Be sure to start at the
position you were in when the alert occurred.
Page 18 o f 23
Page 19

The ILS Inventory Wand
Figure 1-20: Shelf Order A lert – Out of Range
Remember that the Offset in use and the Alert enable settings may be changed once the
search is resumed.
1.7.4.
When the shelf order search is completed, the Shelf Order Results screen is displayed. You
can create result files of various types, including a new search list file. The entire list of items
read may be displayed and scrolled through. Note that there is no prompt given to perform file
transfer at this point. Once the result files have b een created, you can dock the PPT 2700 to
copy the files to the ILS Application Server. Ref er to the Wireless Operations sections for
details of file transfer using a Wireless PPT 2700.
The Shelf order results window shows the counters from the completed search. Tap on the
counter of interest before selecting one of the file buttons.
The <New Search List> button will create a new Search List file “.psl” that can be used to
perform a new Item Search. For example, if the “Items not in file” lin e is selected, a new
search could be performed to locate the items that do not belong on the shelf.
The <Create File> button will create a new Search Order Result file. The type of f ile created is
selected based on which counter is selected in the Shelf order results window. The file
extension is indicated in parentheses below.
1. Items in file – the original count of the items in the Shelf Order file. (no file is created.)
2. Items in order – the number of items that were read in shelf order. (“.pio”)
3. Items out of order – the number of items that were read that are not in shelf order.
(“.poo”)
4. Items not found – the number of items in the Shelf Order file that were not found.
(“.pmi”)
5. Items not in file – the number of items read that were not in the Shelf Order file.
(“.pnl”)
Shelf Order Results
Page 19 o f 23
Page 20

The ILS Inventory Wand
The File Created field shows the path of the file that was last created when either the <New
Search List> or <Create File> button was selected.
Figure 1-21: Shelf Order R esults Scr een
The View List button uses the Shelf Order View List screen to display the entire results of the
scan. Each item read will be displayed in order, with the appropriate status info rmation. Use
the <Show Prev.> and <Show Next> buttons to step through the list.
Tap the Done button to return to the Shelf Order Results screen.
Figure 1-22: Shelf Order View Lis t Screen
Page 20 o f 23
Page 21

The ILS Inventory Wand
Tap the Done button when you are finished with the Shelf Order Results screen. The Shelf
Order screen will be displayed. Tap the Ok button at the top-right of the screen to return to
the ILS Inventory main screen. Or, you may tap the Start button to repeat the last Shelf Order
search.
1.8. Wireless Operatio ns
The Wireless PPT 2700 offers the ability to transfer files to and from t he ILS Application Se rver
using the Wireless network. To transfer files, select the <Wireless File Transfer> button from
the ILS Inventory Main Screen.
Figure 1-23: Wir eless PPT 2700 IL S Inventory Main Screen
The top line of the screen indicates the direction of the file transfer currently selected.
The down arrow to the right of the “All Files (*.*)” line allows you to choose the file type to be
displayed. When a new selection is made, the file list displayed below will be updated.
To transfer a file, tap the file name, then tap the <Copy File> button. Only one file at a time is
transferred.
The Status field displays the results of the file transfer. When it completes successfully, the file
is removed from the list. Any error will be ind icated in this field.
Tap the < Get Files> button to change the file transfer direction to copy files from the ILS
Application Server to the PPT 2700.
Tap the < Put Files> button to change the file transfer direction to copy files from the PPT
2700 to the ILS Application Server.
Tap the Done button when you are finished with the Wireless File Transfer screen.
Page 21 o f 23
Page 22

Figure 1-24: Wireless File Transfer Screen
The ILS Inventory Wand
1.9. Hints on Using the PP T 2700
There are no double-clicks on the PPT 2700 unit. All actions are accomplished by a single tap.
If you have not used the PPT 2700 within the configured time, the device will go into Power
Save mode. This means that the device will turn off. To turn it back on, press the red power
button. You will be returned to the las t scree n pre sented prior to shut off.
If you have trouble closing the ILS Inventory Program, tap on the Windows icon in the upper
left hand corner of the screen. Tap on the Systems tag and then on the memory icon. Tap on
the R unning Programs tab. This will show you all of the programs currently running. To close
only one program, highlight the program name and tap the Stop button. To stop all
programs, simply tap the Stop All button.
Page 22 o f 23
Page 23

The ILS Inventory Wand
Figure 1-25: Running Progr ams
Page 23 o f 23
 Loading...