

Page 1

Intelligent Library System (ILS) 2.6
User Guide
P/N 7305198
Page 2

Intelligent Library System 2.6 (ILS) User Guide
Copyright © 2/15/06 by Checkpoint Systems Inc.
Released February 15, 2006.
Published by:
Checkpoint Systems Inc.
101 Wolf Drive
Thorofare, NJ 08086
1st Edition - January 5, 2006
Part number: 7305198
For use with Checkpoint’s Intelligent Library System Version 2.6.
Checkpoint, Circulation Circuit, Intelligent Library System are registered trademarks of
Checkpoint Systems, Inc.
All rights reserved. Information in this document is subject to change without notice. Compani e s,
names and data used in examples herein are fictitious unless otherwise noted. No part of the
contents of this book may be reproduced or transmitted in any form or by any means without the
written permission of the publisher.
Portions of this software is licensed under the GPL license (see license.txt in your installation
directory). In compliance of Section 3 of the GPL terms, contact your Checkpoint Representative
for a source distribution.
Other product and company names herein may be trademarks of their respective owners.
Windows and Windows 2000 © Microsoft, Inc., Redmond, Wash.
Other products © or ® their respective manufacturers or copyright holders
.
Document revision information
Rev Description Date Author
00 Initial Draft 1/5/06 M. Reeves
01 Edits 2/15/06 M. Reeves
Document Conventions
Caution: This is a Caution or Warning icon. When it appears, the corresponding text i nd icates a cautionary
statement by which you must abide.
Note: This is a Note icon. When it appears, the corresponding text indicates a helpful note or tip when
using the feature.
The following usage conventions are used throughout the Intelligent Library System User
Manual.
Button Name - This describes a button or selection on the screen. For example, the
<DONE> button is represented in this document as Done.
Key Name - This describes a keystroke on a keyboard. For example Ctrl represents the
Control key on a keyboard.
ii
Page 3

Important Information to our Users in North America
FCC Regulatory Compliance Statement
Checkpoint Systems, Inc., offers Radio Frequency Identification Products that have been FCC certified or
verified to 47 CFR Part 15 Subparts B/C and/or 47 CFR Part 18. Appropriately, one of the following labels
will apply to the approval:
NOTE
: This equipment has been tested and found to comply with the limits for a class A digital device,
pursuant to Part 15 of th e FC C R u le s. T he se lim i ts are designed to provide reasonable protection against
harmful interference w hen the equipment is operate d in a comm ercial environment. This equipment
generates, uses, and can radiate interference to radio communications. Operation of this equipment in a
residential area is likely to cau s e harmful interference in which ca se th e us er w il l be req ui red to c o rrec t the
interference at his own expense.
- OR -
This device complies w ith P art 15 o f th e FC C R ules. Operation is subject to th e follo w i n g two
conditions: (1) including this device may not cause harmful interference, and (2) this device must
accept any interference received, including interference that may cause undesired operation, which
may include intermittent decreases in detection and/or intermittent increases in alarm activity.
- OR -
NOTE: This equipment has been tested and found to comply with the limits for a miscellaneous type
ISM device, pursuant to Part 18 of the FCC Rules. This equipment generates, uses, and can radiate
radio frequency energy and, if not installed and used in accordance with the instruction manual, may
cause harmful interference to radio communications. However, there is no guarantee that interference
will not occur in a particular installation. If this equipment does cause harmful interference to radio
communications reception, which can be determined by turning the equipment off and on, please
contact Checkpoint Systems, Inc., at 1 (800) 257-5540 for further assistance.
Equipment Safety Compliance Statement
Checkpoint Systems Radio Frequency Identification products have been designed to be safe during normal
use and, where applicable, certain components of the system or accessory sub-assemblies have been
certified, listed or recognized in accordance with
UL 1037, UL 1310, UL 60950-1, CSA C22.2 No. 205, CSA C22.2 No. 220, CSA C22.2 No. 223, CSA
C22.2 No. 60950-1. Additional approvals may be pending.
WARNING:
equipment not expressly approved by the party responsible for assuring compliance could void the user’s
authority to operate the equipment in a safe or otherwise regulatory compliant manner.
Changes or modifications to Checkpoint’s Radio Frequency Identification (RFID)
one or more
of the following Safety standards: UL 1012,
iii
Page 4

Important Information to our Users in Europe
CE Compliance Statement
Where applicable, Checkpoint Systems, Inc., offers certain Radio Frequency Identification (RFID) products
that have CE Declarations of Conformity according to R&T TE D irec tive 99/5/EC.
System Electromagnetic Compatibility (EMC), has been tested and notified through Spectrum Management
Authorities if necessary, using accredited laboratories, whereby, conformity is declared by voluntarily
accepted European Telecommunications Standards Institute (ETSI) standards EN 301489-3 and EN
300330-2.
NOTE: Certain Radio Frequency Identification (RFID) equipment have been tested and found to conform
with the CE emission and immunity requirement in Europe. This equipment generates, uses, and can radiate
radio frequency energy and, if not installed and used in accorda n c e wi th th e inst ruc tio n m a nu a l, m ay ca u se
harmful interference to radio communications. Under unusual circumstances, interference from external
sources may degrade the system performance, which may include intermittent decreases in detection and/or
intermittent increases in ala rm activity. However, there is no guarantee that interference will not occur in a
particular installation. If this equipment experiences frequent interference from external sources or does
cause harmful interference to radio communications reception, which can be determined by turning the
equipment off and on, please contact a Checkpoint Systems representative for further assistance.
Equipment Safety Compliance Statement
Checkpoint Systems Radio Frequency Identification products have been designed to be safe during normal
use and, where applicable, certain components of the system or accessory sub-assemblies have been
declared safe according
recognized in accordance with one or more
50364, EN 60742. Additional approvals may be pending.
WARNING:
expressly approved by the party responsible for assuring compliance could void the user’s authority to
operate the equipment in a safe or otherwise regulatory compliant manner.
to the European Low Voltage Directive (LVD) by being certified, listed, or
of the following European safety standards; EN 60950, EN
Changes or modifications to Checkpoint’s Radio Frequency Identification equipment not
iv
Page 5

T
ABLE OF
C
ONTENT S
Introduction..............................................................................................................................................1-1
Library Network Topology . . . . . . . . . . . . . . . . . . . . . . . . . . . . . . . . . . . . . . . . . . . . . . . . . . . . . . . . . . .1-3
Single Branch . . . . . . . . . . . . . . . . . . . . . . . . . . . . . . . . . . . . . . . . . . . . . . . . . . . . . . . . . . . . . . . . . . . . . . . . . . 1-3
Single Server, Multi-Branch Architecture . . . . . . . . . . . . . . . . . . . . . . . . . . . . . . . . . . . . . . . . . . . . . . . . . . . . . 1-4
Peer-to-Peer Communication . . . . . . . . . . . . . . . . . . . . . . . . . . . . . . . . . . . . . . . . . . . . . . . . . . . . . . . . . . . . . . 1-4
Document Overview . . . . . . . . . . . . . . . . . . . . . . . . . . . . . . . . . . . . . . . . . . . . . . . . . . . . . . . . . . . . . . .1-5
Intended Audience . . . . . . . . . . . . . . . . . . . . . . . . . . . . . . . . . . . . . . . . . . . . . . . . . . . . . . . . . . . . . . . . . . . . . . 1-5
Related Documentation . . . . . . . . . . . . . . . . . . . . . . . . . . . . . . . . . . . . . . . . . . . . . . . . . . . . . . . . . . . . . . . . . . 1-5
System Overview . . . . . . . . . . . . . . . . . . . . . . . . . . . . . . . . . . . . . . . . . . . . . . . . . . . . . . . . . . . . . . . . .1-6
How RF Query Circuits . . . . . . . . . . . . . . . . . . . . . . . . . . . . . . . . . . . . . . . . . . . . . . . . . . . . . . . . . . . . . . . . 1-6
How ILS Maintains the Library’s Collection Database . . . . . . . . . . . . . . . . . . . . . . . . . . . . . . . . . . . . . . . . . . . 1-6
Patron Checkout and Check-In . . . . . . . . . . . . . . . . . . . . . . . . . . . . . . . . . . . . . . . . . . . . . . . . . . . . . . . . . . 1-7
Staff Checkout and Check-In . . . . . . . . . . . . . . . . . . . . . . . . . . . . . . . . . . . . . . . . . . . . . . . . . . . . . . . . . . . . 1-7
Book Return Check-In . . . . . . . . . . . . . . . . . . . . . . . . . . . . . . . . . . . . . . . . . . . . . . . . . . . . . . . . . . . . . . . . . 1-7
Inventory Collection . . . . . . . . . . . . . . . . . . . . . . . . . . . . . . . . . . . . . . . . . . . . . . . . . . . . . . . . . . . . . . . . . . . 1-9
Exit Monitoring . . . . . . . . . . . . . . . . . . . . . . . . . . . . . . . . . . . . . . . . . . . . . . . . . . . . . . . . . . . . . . . . . . . . . 1-10
Programming Circuits . . . . . . . . . . . . . . . . . . . . . . . . . . . . . . . . . . . . . . . . . . . . . . . . . . . . . . . . . . . . . . . . 1-10
Off-line Processing . . . . . . . . . . . . . . . . . . . . . . . . . . . . . . . . . . . . . . . . . . . . . . . . . . . . . . . . . . . . . . . . . . 1-10
Components . . . . . . . . . . . . . . . . . . . . . . . . . . . . . . . . . . . . . . . . . . . . . . . . . . . . . . . . . . . . . . . . . . . .1-11
Intelligent Circulation Circuit . . . . . . . . . . . . . . . . . . . . . . . . . . . . . . . . . . . . . . . . . . . . . . . . . . . . . . . . . . . . . . .1-11
ILS Intelligent Sensor . . . . . . . . . . . . . . . . . . . . . . . . . . . . . . . . . . . . . . . . . . . . . . . . . . . . . . . . . . . . . . . . . . . 1-12
Local Security Controller . . . . . . . . . . . . . . . . . . . . . . . . . . . . . . . . . . . . . . . . . . . . . . . . . . . . . . . . . . . . . . . . 1-12
Staff Station Reader . . . . . . . . . . . . . . . . . . . . . . . . . . . . . . . . . . . . . . . . . . . . . . . . . . . . . . . . . . . . . . . . . . . . 1-13
Patron Self-Checkout Station II . . . . . . . . . . . . . . . . . . . . . . . . . . . . . . . . . . . . . . . . . . . . . . . . . . . . . . . . . . . 1-13
Portable Reader . . . . . . . . . . . . . . . . . . . . . . . . . . . . . . . . . . . . . . . . . . . . . . . . . . . . . . . . . . . . . . . . . . . . . . . 1-14
Intelligent Library Controller . . . . . . . . . . . . . . . . . . . . . . . . . . . . . . . . . . . . . . . . . . . . . . . . . . . . . . . . . . . . . . 1-15
Exception Ticket Printer . . . . . . . . . . . . . . . . . . . . . . . . . . . . . . . . . . . . . . . . . . . . . . . . . . . . . . . . . . . . . . . . . 1-15
CheckVIEW . . . . . . . . . . . . . . . . . . . . . . . . . . . . . . . . . . . . . . . . . . . . . . . . . . . . . . . . . . . . . . . . . . . . . . . . . . 1-16
ILS Remote Monitor . . . . . . . . . . . . . . . . . . . . . . . . . . . . . . . . . . . . . . . . . . . . . . . . . . . . . . . . . . . . . . . . . . . . 1-16
Circulation Circuit Programming Station . . . . . . . . . . . . . . . . . . . . . . . . . . . . . . . . . . . . . . . . . . . . . . . . . . . . 1-16
CheckPASS . . . . . . . . . . . . . . . . . . . . . . . . . . . . . . . . . . . . . . . . . . . . . . . . . . . . . . . . . . . . . . . . . . . . . . . . . . 1-17
Application Server...................................................................................................................................2-1
Check System Status . . . . . . . . . . . . . . . . . . . . . . . . . . . . . . . . . . . . . . . . . . . . . . . . . . . . . . . . . . . . . .2-2
Self-Checkout Station Status . . . . . . . . . . . . . . . . . . . . . . . . . . . . . . . . . . . . . . . . . . . . . . . . . . . . . . . . . . . . . . 2-2
Host Status . . . . . . . . . . . . . . . . . . . . . . . . . . . . . . . . . . . . . . . . . . . . . . . . . . . . . . . . . . . . . . . . . . . . . . . . . . . . 2-4
Interrogator Status . . . . . . . . . . . . . . . . . . . . . . . . . . . . . . . . . . . . . . . . . . . . . . . . . . . . . . . . . . . . . . . . . . . . . . 2-4
This section cannot be hidden from view. . . . . . . . . . . . . . . . . . . . . . . . . . . . . . . . . . . . . . . . . . . . . . . . . . . 2-5
Edit Interrogator . . . . . . . . . . . . . . . . . . . . . . . . . . . . . . . . . . . . . . . . . . . . . . . . . . . . . . . . . . . . . . . . . . . . . 2-5
Exit Alarms . . . . . . . . . . . . . . . . . . . . . . . . . . . . . . . . . . . . . . . . . . . . . . . . . . . . . . . . . . . . . . . . . . . . . . . . . . . . 2-6
v
Page 6

Scheduling Checkout Cache Synchronizatio n an d Host Recon n e ctions . . . . . . . . . . . . . . . . . . . . . . .2-6
Synchronizing the Checkout Cache . . . . . . . . . . . . . . . . . . . . . . . . . . . . . . . . . . . . . . . . . . . . . . . . . . .2-8
Downloading Inventory from the Portable Reader . . . . . . . . . . . . . . . . . . . . . . . . . . . . . . . . . . . . . . .2-10
Generating Reports . . . . . . . . . . . . . . . . . . . . . . . . . . . . . . . . . . . . . . . . . . . . . . . . . . . . . . . . . . . . . .2-11
Specifying a Time Period for Any Report . . . . . . . . . . . . . . . . . . . . . . . . . . . . . . . . . . . . . . . . . . . . . . . . . 2-12
Checkout Discrepancy Report . . . . . . . . . . . . . . . . . . . . . . . . . . . . . . . . . . . . . . . . . . . . . . . . . . . . . . . . . . . . 2-14
Patron Discrepancy Report . . . . . . . . . . . . . . . . . . . . . . . . . . . . . . . . . . . . . . . . . . . . . . . . . . . . . . . . . . . . . . 2-15
Generic Reports . . . . . . . . . . . . . . . . . . . . . . . . . . . . . . . . . . . . . . . . . . . . . . . . . . . . . . . . . . . . . . . . . . . . . . . 2-18
Exit Alarm Report . . . . . . . . . . . . . . . . . . . . . . . . . . . . . . . . . . . . . . . . . . . . . . . . . . . . . . . . . . . . . . . . . . . . . . 2-21
Check In Report . . . . . . . . . . . . . . . . . . . . . . . . . . . . . . . . . . . . . . . . . . . . . . . . . . . . . . . . . . . . . . . . . . . . . . . 2-23
Working with the Bridge Interface . . . . . . . . . . . . . . . . . . . . . . . . . . . . . . . . . . . . . . . . . . . . . . . . . . .2-25
Changing the Op Mode of a Staff Station Reader . . . . . . . . . . . . . . . . . . . . . . . . . . . . . . . . . . . . . . . . . . . . . 2-25
Creating Staff Station Reader Groups . . . . . . . . . . . . . . . . . . . . . . . . . . . . . . . . . . . . . . . . . . . . . . . . . . . . . . 2-25
Changing the Op Mode of Multiple Staff Station Readers . . . . . . . . . . . . . . . . . . . . . . . . . . . . . . . . . . . . . . . 2-26
Maintenance . . . . . . . . . . . . . . . . . . . . . . . . . . . . . . . . . . . . . . . . . . . . . . . . . . . . . . . . . . . . . . . . . . . .2-26
Display System Information . . . . . . . . . . . . . . . . . . . . . . . . . . . . . . . . . . . . . . . . . . . . . . . . . . . . . . . .2-27
Patron Self-Checkout St ation................................................................................................... ..............3-1
Overview . . . . . . . . . . . . . . . . . . . . . . . . . . . . . . . . . . . . . . . . . . . . . . . . . . . . . . . . . . . . . . . . . . . . . . .3-1
Beginning a Self-Checkout Station Session . . . . . . . . . . . . . . . . . . . . . . . . . . . . . . . . . . . . . . . . . . . . .3-2
Presenting a Patron ID Card, Step 1 . . . . . . . . . . . . . . . . . . . . . . . . . . . . . . . . . . . . . . . . . . . . . . . . . .3-3
Scanning Items for Checkout, Step 2 . . . . . . . . . . . . . . . . . . . . . . . . . . . . . . . . . . . . . . . . . . . . . . . . . .3-5
Viewing Items that Could Not be Checked Out . . . . . . . . . . . . . . . . . . . . . . . . . . . . . . . . . . . . . . . . . . . . . . . . 3-7
Finishing Checkout, Step 3 . . . . . . . . . . . . . . . . . . . . . . . . . . . . . . . . . . . . . . . . . . . . . . . . . . . . . . . . .3-8
Loading Roll Paper . . . . . . . . . . . . . . . . . . . . . . . . . . . . . . . . . . . . . . . . . . . . . . . . . . . . . . . . . . . . . . . .3-8
Powering On the Self-Checkout Station . . . . . . . . . . . . . . . . . . . . . . . . . . . . . . . . . . . . . . . . . . . . . . . . . . . . . 3-10
Powering Off the Self-Checkout Station . . . . . . . . . . . . . . . . . . . . . . . . . . . . . . . . . . . . . . . . . . . . . . . . . . . . . .3-11
Portable Reader.......................................................................................................................................4-1
Overview . . . . . . . . . . . . . . . . . . . . . . . . . . . . . . . . . . . . . . . . . . . . . . . . . . . . . . . . . . . . . . . . . . . . . . .4-1
Inventory Wand LED Indicators . . . . . . . . . . . . . . . . . . . . . . . . . . . . . . . . . . . . . . . . . . . . . . . . . . . . . . . . . . . . 4-2
Charging the Inventory Wand Battery . . . . . . . . . . . . . . . . . . . . . . . . . . . . . . . . . . . . . . . . . . . . . . . . .4-3
Maintaining the Portable Data Terminal . . . . . . . . . . . . . . . . . . . . . . . . . . . . . . . . . . . . . . . . . . . . . . . .4-4
Charging the Portable Data Terminal . . . . . . . . . . . . . . . . . . . . . . . . . . . . . . . . . . . . . . . . . . . . . . . . . . . . . . . . 4-4
Using the Serial Charging Cable to charge the battery . . . . . . . . . . . . . . . . . . . . . . . . . . . . . . . . . . . . . . . . 4-4
Using the Universal Cable Cup to charge the battery . . . . . . . . . . . . . . . . . . . . . . . . . . . . . . . . . . . . . . . . . 4-5
Powering On and Off the Portable Data Terminal . . . . . . . . . . . . . . . . . . . . . . . . . . . . . . . . . . . . . . . . . . . . . . 4-6
Using the Portable Data Terminal . . . . . . . . . . . . . . . . . . . . . . . . . . . . . . . . . . . . . . . . . . . . . . . . . . . . .4-7
Turning On/Off Ba cklight . . . . . . . . . . . . . . . . . . . . . . . . . . . . . . . . . . . . . . . . . . . . . . . . . . . . . . . . . . . . . . . . . 4-7
Checking the Status of the Batteries . . . . . . . . . . . . . . . . . . . . . . . . . . . . . . . . . . . . . . . . . . . . . . . . . . . . . . . . 4-7
Performing a Reset . . . . . . . . . . . . . . . . . . . . . . . . . . . . . . . . . . . . . . . . . . . . . . . . . . . . . . . . . . . . . . . . . . . . 4-10
vi
Page 7

Performing a Soft Reset . . . . . . . . . . . . . . . . . . . . . . . . . . . . . . . . . . . . . . . . . . . . . . . . . . . . . . . . . . . . . . 4-10
Performing a Hard Reset . . . . . . . . . . . . . . . . . . . . . . . . . . . . . . . . . . . . . . . . . . . . . . . . . . . . . . . . . . . . . 4-10
Collecting Inventory Data . . . . . . . . . . . . . . . . . . . . . . . . . . . . . . . . . . . . . . . . . . . . . . . . . . . . . . . . . .4-12
Transferring Inventory Data . . . . . . . . . . . . . . . . . . . . . . . . . . . . . . . . . . . . . . . . . . . . . . . . . . . . . . . .4-16
Searching the Inventory . . . . . . . . . . . . . . . . . . . . . . . . . . . . . . . . . . . . . . . . . . . . . . . . . . . . . . . . . . .4-17
Preparing an Item Search List File . . . . . . . . . . . . . . . . . . . . . . . . . . . . . . . . . . . . . . . . . . . . . . . . . . . . . . . . . 4-17
Transferring the Search List File . . . . . . . . . . . . . . . . . . . . . . . . . . . . . . . . . . . . . . . . . . . . . . . . . . . . . . . . 4-18
Importing the Search List File . . . . . . . . . . . . . . . . . . . . . . . . . . . . . . . . . . . . . . . . . . . . . . . . . . . . . . . . . . 4-19
Scanning for Inventory . . . . . . . . . . . . . . . . . . . . . . . . . . . . . . . . . . . . . . . . . . . . . . . . . . . . . . . . . . . . . . . 4-22
Conducting Shelf Order Search . . . . . . . . . . . . . . . . . . . . . . . . . . . . . . . . . . . . . . . . . . . . . . . . . . . . .4-25
Selecting or Creating a Shelf Order Search File . . . . . . . . . . . . . . . . . . . . . . . . . . . . . . . . . . . . . . . . . . . . 4-25
Transferring the Shelf Order File . . . . . . . . . . . . . . . . . . . . . . . . . . . . . . . . . . . . . . . . . . . . . . . . . . . . . . . . 4-25
Importing Shelf Order File . . . . . . . . . . . . . . . . . . . . . . . . . . . . . . . . . . . . . . . . . . . . . . . . . . . . . . . . . . . . . 4-26
Shelf Order Search Window . . . . . . . . . . . . . . . . . . . . . . . . . . . . . . . . . . . . . . . . . . . . . . . . . . . . . . . . . . . . . . 4-29
Shelf Order Results . . . . . . . . . . . . . . . . . . . . . . . . . . . . . . . . . . . . . . . . . . . . . . . . . . . . . . . . . . . . . . . . . . . . 4-31
Creating a New Search List . . . . . . . . . . . . . . . . . . . . . . . . . . . . . . . . . . . . . . . . . . . . . . . . . . . . . . . . . . . 4-32
Creating a File from Shelf Order Results . . . . . . . . . . . . . . . . . . . . . . . . . . . . . . . . . . . . . . . . . . . . . . . . . 4-32
Viewing Shelf Order Results . . . . . . . . . . . . . . . . . . . . . . . . . . . . . . . . . . . . . . . . . . . . . . . . . . . . . . . . . . . 4-33
Saving Custom Search Files . . . . . . . . . . . . . . . . . . . . . . . . . . . . . . . . . . . . . . . . . . . . . . . . . . . . . . .4-34
ILS Remote Monitor.................................................................................................................................5-1
Installing Web Site Certificate on a Client Computer . . . . . . . . . . . . . . . . . . . . . . . . . . . . . . . . . . . . . .5-2
Verifying Successful Certificate Installation . . . . . . . . . . . . . . . . . . . . . . . . . . . . . . . . . . . . . . . . . . . . .5-3
Setting Hyperlink on Client’s Computer . . . . . . . . . . . . . . . . . . . . . . . . . . . . . . . . . . . . . . . . . . . . . . . . . . . . . . 5-4
Setting Up and Managing User Accounts . . . . . . . . . . . . . . . . . . . . . . . . . . . . . . . . . . . . . . . . . . . . . .5-5
Adding a User Account . . . . . . . . . . . . . . . . . . . . . . . . . . . . . . . . . . . . . . . . . . . . . . . . . . . . . . . . . . . . . . . . . . 5-5
Modifying a User Account . . . . . . . . . . . . . . . . . . . . . . . . . . . . . . . . . . . . . . . . . . . . . . . . . . . . . . . . . . . . . . . . 5-6
Removing a User Account . . . . . . . . . . . . . . . . . . . . . . . . . . . . . . . . . . . . . . . . . . . . . . . . . . . . . . . . . . . . . . . . 5-7
Unlocking a Locked Account . . . . . . . . . . . . . . . . . . . . . . . . . . . . . . . . . . . . . . . . . . . . . . . . . . . . . . . . . . . . . . 5-7
Using ILS Remote Monitor . . . . . . . . . . . . . . . . . . . . . . . . . . . . . . . . . . . . . . . . . . . . . . . . . . . . . . . . . .5-8
Launching ILS Remote Monitor in a Single Server, Multi-Branch Environment . . . . . . . . . . . . . . . . . . . . . . . . 5-8
Using ILS Remote Monitor in a Peer-to-Peer Environment . . . . . . . . . . . . . . . . . . . . . . . . . . . . . . . . . . . . . . . 5-9
Changing Branch Views . . . . . . . . . . . . . . . . . . . . . . . . . . . . . . . . . . . . . . . . . . . . . . . . . . . . . . . . . . . . . . . . . . 5-9
Viewing Status . . . . . . . . . . . . . . . . . . . . . . . . . . . . . . . . . . . . . . . . . . . . . . . . . . . . . . . . . . . . . . . . . . . . . . . . 5-10
Viewing and Printing Reports . . . . . . . . . . . . . . . . . . . . . . . . . . . . . . . . . . . . . . . . . . . . . . . . . . . . . . . . . . . . . .5-11
Uploading Portable Reader inventory files . . . . . . . . . . . . . . . . . . . . . . . . . . . . . . . . . . . . . . . . . . . . . . . . . . . 5-12
Logging out . . . . . . . . . . . . . . . . . . . . . . . . . . . . . . . . . . . . . . . . . . . . . . . . . . . . . . . . . . . . . . . . . . . . . . . . . . 5-12
Exception Ticket Printer....................................................................................................... ..................6-1
Introduction . . . . . . . . . . . . . . . . . . . . . . . . . . . . . . . . . . . . . . . . . . . . . . . . . . . . . . . . . . . . . . . . . . . . .6-1
Printer Layout . . . . . . . . . . . . . . . . . . . . . . . . . . . . . . . . . . . . . . . . . . . . . . . . . . . . . . . . . . . . . . . . . . . .6-2
Control Panel . . . . . . . . . . . . . . . . . . . . . . . . . . . . . . . . . . . . . . . . . . . . . . . . . . . . . . . . . . . . . . . . . . . . . . . . . . 6-3
vii
Page 8

Using the Exception Ticket Printer . . . . . . . . . . . . . . . . . . . . . . . . . . . . . . . . . . . . . . . . . . . . . . . . . . . .6-3
Setting the Printer’s Cut Type . . . . . . . . . . . . . . . . . . . . . . . . . . . . . . . . . . . . . . . . . . . . . . . . . . . . . . .6-4
Inserting Paper . . . . . . . . . . . . . . . . . . . . . . . . . . . . . . . . . . . . . . . . . . . . . . . . . . . . . . . . . . . . . . . . . . .6-5
Running a Self-Test . . . . . . . . . . . . . . . . . . . . . . . . . . . . . . . . . . . . . . . . . . . . . . . . . . . . . . . . . . . . . . .6-6
Installing the Cover . . . . . . . . . . . . . . . . . . . . . . . . . . . . . . . . . . . . . . . . . . . . . . . . . . . . . . . . . . . . . . . .6-6
Installing a Power Switch Cover . . . . . . . . . . . . . . . . . . . . . . . . . . . . . . . . . . . . . . . . . . . . . . . . . . . . . . . . . . . . 6-6
Installing a Connector Cover . . . . . . . . . . . . . . . . . . . . . . . . . . . . . . . . . . . . . . . . . . . . . . . . . . . . . . . . . . . . . . 6-6
Error Codes . . . . . . . . . . . . . . . . . . . . . . . . . . . . . . . . . . . . . . . . . . . . . . . . . . . . . . . . . . . . . . . . . . . . .6-7
Troubleshooting . . . . . . . . . . . . . . . . . . . . . . . . . . . . . . . . . . . . . . . . . . . . . . . . . . . . . . . . . . . . . . . . . .6-8
Removing Jammed Paper . . . . . . . . . . . . . . . . . . . . . . . . . . . . . . . . . . . . . . . . . . . . . . . . . . . . . . . . . . . . . . . . 6-8
Removing an Autocutter Jam . . . . . . . . . . . . . . . . . . . . . . . . . . . . . . . . . . . . . . . . . . . . . . . . . . . . . . . . . . . 6-8
Cleaning the Print Head . . . . . . . . . . . . . . . . . . . . . . . . . . . . . . . . . . . . . . . . . . . . . . . . . . . . . . . . . . . .6-9
Specifications . . . . . . . . . . . . . . . . . . . . . . . . . . . . . . . . . . . . . . . . . . . . . . . . . . . . . . . . . . . . . . . . . . . .6-9
CheckVIEW...............................................................................................................................................7-1
Staff Co mputer Requirements . . . . . . . . . . . . . . . . . . . . . . . . . . . . . . . . . . . . . . . . . . . . . . . . . . . . . . . . . . . . . 7-2
Using CheckVIEW in Monitor Mode . . . . . . . . . . . . . . . . . . . . . . . . . . . . . . . . . . . . . . . . . . . . . . . . . . .7-3
Using CheckVIEW in Host Mode . . . . . . . . . . . . . . . . . . . . . . . . . . . . . . . . . . . . . . . . . . . . . . . . . . . . .7-4
Adding/Removing Self-Checkout Stations to CheckVIEW . . . . . . . . . . . . . . . . . . . . . . . . . . . . . . . . . . . . . 7-4
Reinstalling Missing Files . . . . . . . . . . . . . . . . . . . . . . . . . . . . . . . . . . . . . . . . . . . . . . . . . . . . . . . . . . . . . . 7-6
Uninstalling CheckVIEW . . . . . . . . . . . . . . . . . . . . . . . . . . . . . . . . . . . . . . . . . . . . . . . . . . . . . . . . . . . . . . . 7-6
Using CheckVIEW to Shut Down a Self-Checkout Station . . . . . . . . . . . . . . . . . . . . . . . . . . . . . . . . . . . . . 7-6
Circulation Circuit Programmer ............................................................................................................8-1
Overview . . . . . . . . . . . . . . . . . . . . . . . . . . . . . . . . . . . . . . . . . . . . . . . . . . . . . . . . . . . . . . . . . . . . . . .8-1
What is included . . . . . . . . . . . . . . . . . . . . . . . . . . . . . . . . . . . . . . . . . . . . . . . . . . . . . . . . . . . . . . . . . . . . . . . . 8-1
How it works . . . . . . . . . . . . . . . . . . . . . . . . . . . . . . . . . . . . . . . . . . . . . . . . . . . . . . . . . . . . . . . . . . . . . . . . . . . 8-1
Programming Circulation Circuits . . . . . . . . . . . . . . . . . . . . . . . . . . . . . . . . . . . . . . . . . . . . . . . . . . . . .8-2
Configuring the CCP . . . . . . . . . . . . . . . . . . . . . . . . . . . . . . . . . . . . . . . . . . . . . . . . . . . . . . . . . . . . . . . . . . 8-2
Programming Circuits for RFID Items Only . . . . . . . . . . . . . . . . . . . . . . . . . . . . . . . . . . . . . . . . . . . . . . . . . . . 8-2
Programming Continuously . . . . . . . . . . . . . . . . . . . . . . . . . . . . . . . . . . . . . . . . . . . . . . . . . . . . . . . . . . . . . 8-2
Programming Circuits for RFID and Barcode Items . . . . . . . . . . . . . . . . . . . . . . . . . . . . . . . . . . . . . . . . . . . . . 8-5
Removing the CCP Software . . . . . . . . . . . . . . . . . . . . . . . . . . . . . . . . . . . . . . . . . . . . . . . . . . . . . . . . . . . . . . 8-6
Troubleshooting . . . . . . . . . . . . . . . . . . . . . . . . . . . . . . . . . . . . . . . . . . . . . . . . . . . . . . . . . . . . . . . . . .8-7
Label Printing Error . . . . . . . . . . . . . . . . . . . . . . . . . . . . . . . . . . . . . . . . . . . . . . . . . . . . . . . . . . . . . . . . . . . 8-7
Fault appears when printing . . . . . . . . . . . . . . . . . . . . . . . . . . . . . . . . . . . . . . . . . . . . . . . . . . . . . . . . . . . . 8-7
Resetting the Printer . . . . . . . . . . . . . . . . . . . . . . . . . . . . . . . . . . . . . . . . . . . . . . . . . . . . . . . . . . . . . . . . . . 8-7
LabelView does not find *.inf file . . . . . . . . . . . . . . . . . . . . . . . . . . . . . . . . . . . . . . . . . . . . . . . . . . . . . . . . . . . 8-7
Configuring the Print Driver . . . . . . . . . . . . . . . . . . . . . . . . . . . . . . . . . . . . . . . . . . . . . . . . . . . . . . . . . . . . . 8-8
Configuring the Print Driver Port . . . . . . . . . . . . . . . . . . . . . . . . . . . . . . . . . . . . . . . . . . . . . . . . . . . . . . . . . 8-8
Affixing Circulation Circuits...................................................................................................................9-1
Types of Circulation Circuits . . . . . . . . . . . . . . . . . . . . . . . . . . . . . . . . . . . . . . . . . . . . . . . . . . . . . . . . .9-1
viii
Page 9

Applying Circulation Circuits to Books . . . . . . . . . . . . . . . . . . . . . . . . . . . . . . . . . . . . . . . . . . . . . . . . .9-2
Applying Circulation Circuits to Video Cassettes . . . . . . . . . . . . . . . . . . . . . . . . . . . . . . . . . . . . . . . . .9-3
Applying Circulation Circuits to CDs and DVDs . . . . . . . . . . . . . . . . . . . . . . . . . . . . . . . . . . . . . . . . . .9-4
To place barcode labels on CDs . . . . . . . . . . . . . . . . . . . . . . . . . . . . . . . . . . . . . . . . . . . . . . . . . . . . . . . . . 9-4
To place Circulation Circuits on Jewel Case CD cases . . . . . . . . . . . . . . . . . . . . . . . . . . . . . . . . . . . . . . . . 9-4
To place content Circulation Circuits on CDs and DVDs . . . . . . . . . . . . . . . . . . . . . . . . . . . . . . . . . . . . . . . 9-5
To place Circulation Circuits on DiscMate DVD cases . . . . . . . . . . . . . . . . . . . . . . . . . . . . . . . . . . . . . . . . 9-6
To place Circulation Circuits on DiscMate CD cases: . . . . . . . . . . . . . . . . . . . . . . . . . . . . . . . . . . . . . . . . . 9-7
Applying Circulation Circuits to Audio Material . . . . . . . . . . . . . . . . . . . . . . . . . . . . . . . . . . . . . . . . . . .9-8
To place Circulation Circuits on Audio Cases with T apes on Both Inside Sections: . . . . . . . . . . . . . . . . . . 9-8
Applying Circulation Circuits to Kits . . . . . . . . . . . . . . . . . . . . . . . . . . . . . . . . . . . . . . . . . . . . . . . . . . .9-8
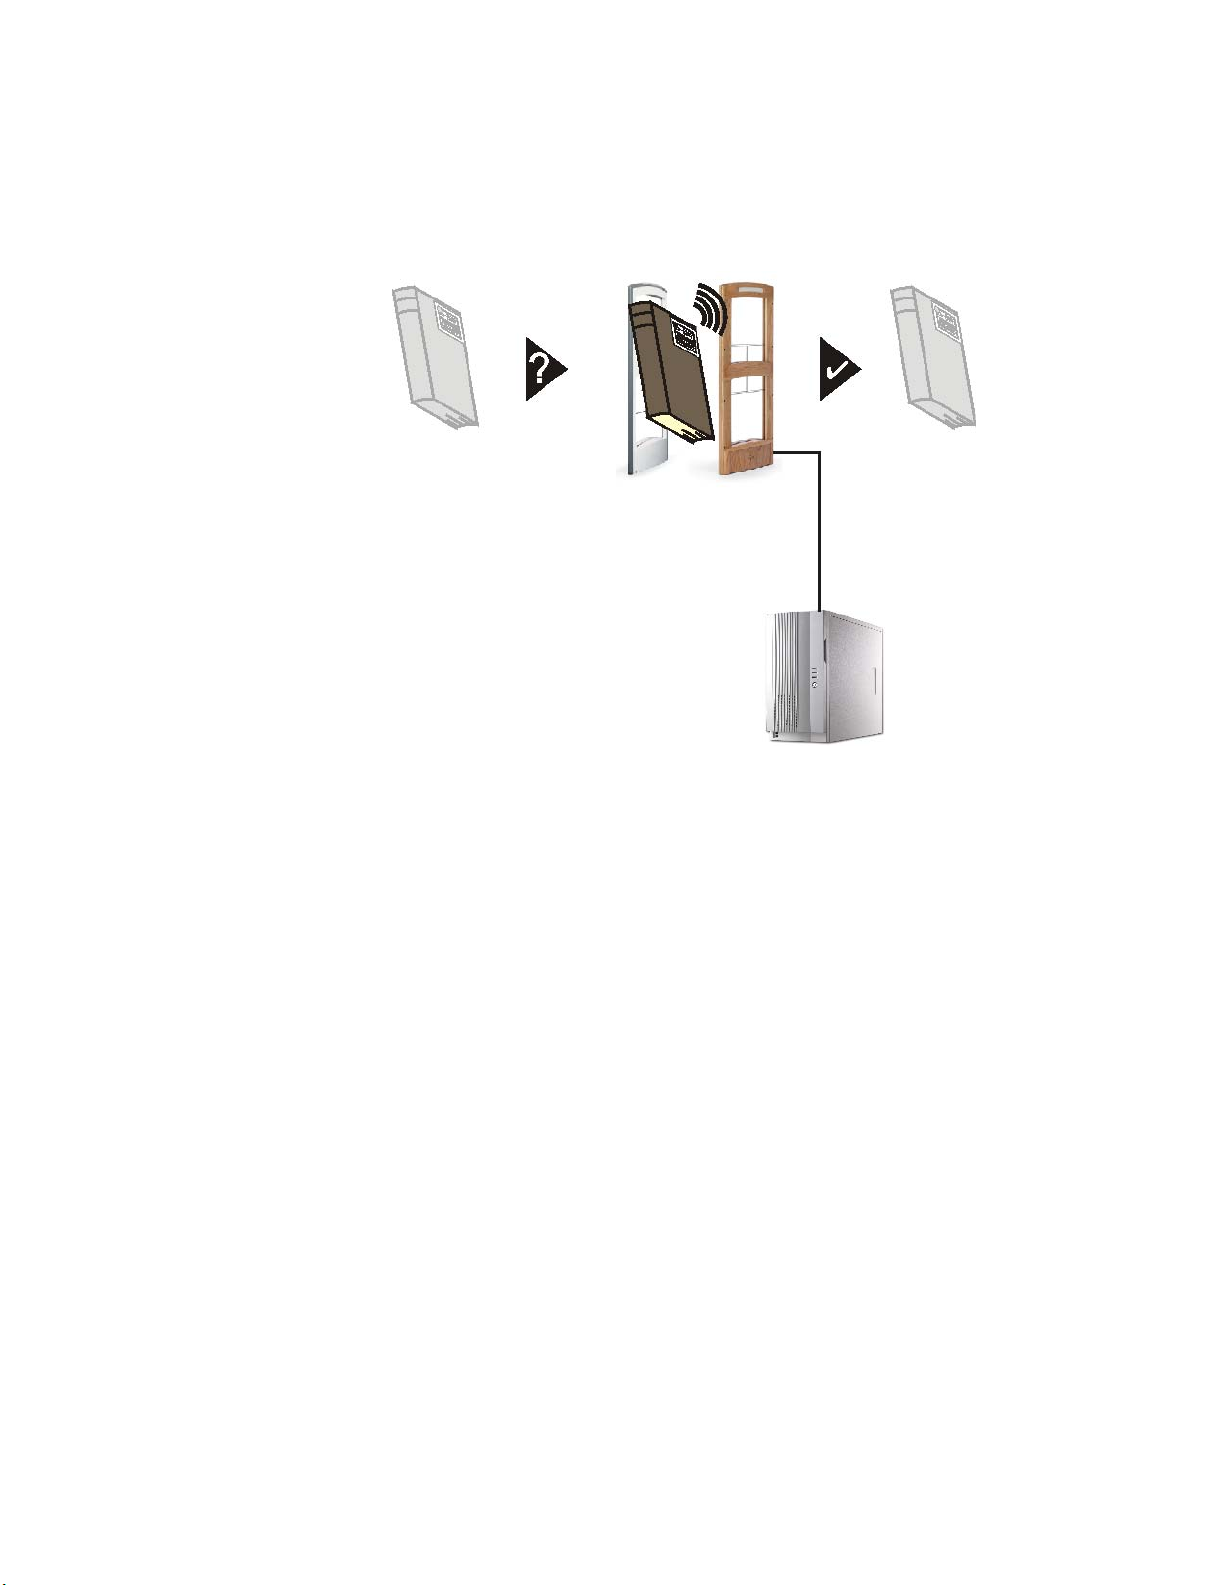
Using DiscMate......................................................................................................................................10-1
Overview . . . . . . . . . . . . . . . . . . . . . . . . . . . . . . . . . . . . . . . . . . . . . . . . . . . . . . . . . . . . . . . . . . . . . .10-1
LEDs on the Intelligent Unlocking Station . . . . . . . . . . . . . . . . . . . . . . . . . . . . . . . . . . . . . . . . . . . . . . . . . . . 10-2
Using the Standard Unlocking Station . . . . . . . . . . . . . . . . . . . . . . . . . . . . . . . . . . . . . . . . . . . . . . . . . . . . . . 10-2
Using the Intelligent Unlocking Station . . . . . . . . . . . . . . . . . . . . . . . . . . . . . . . . . . . . . . . . . . . . . . . . . . . . . . 10-3
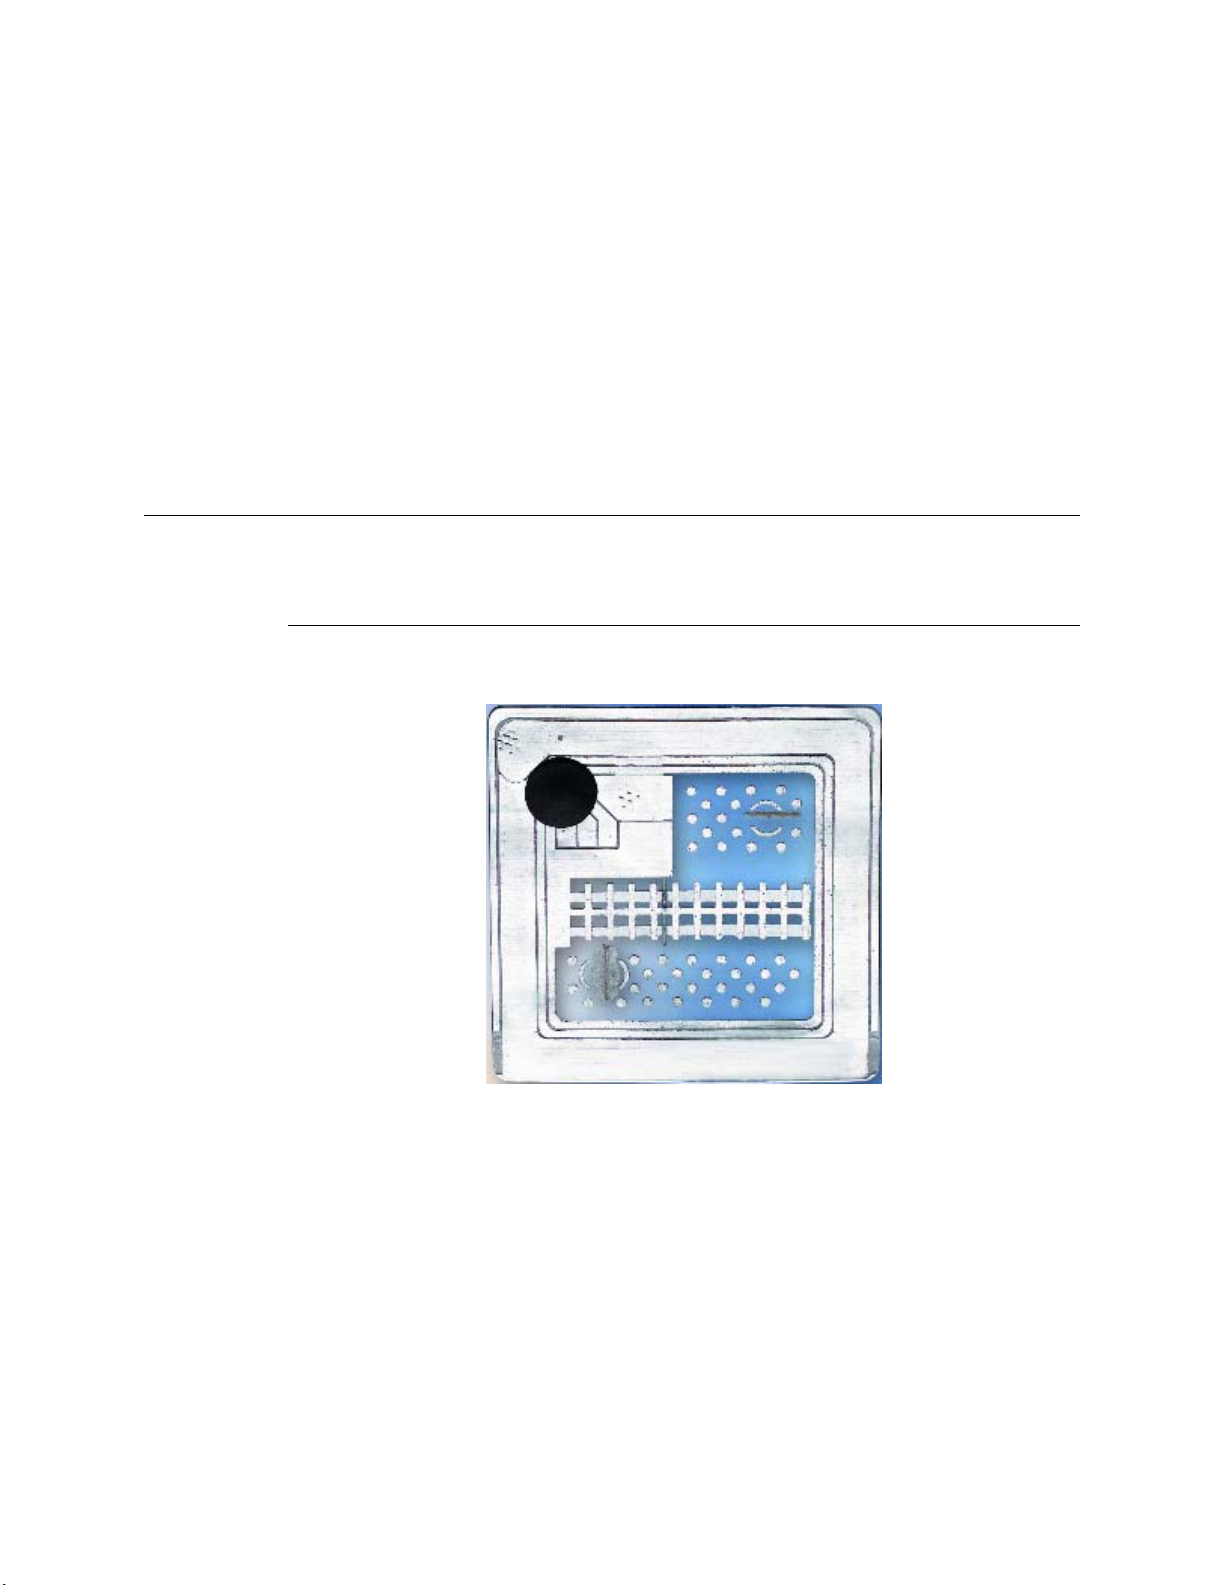
Intelligent Unlocking Station Case Insertion Diagram . . . . . . . . . . . . . . . . . . . . . . . . . . . . . . . . . . . . . . . . 10-4
Linking Procedure . . . . . . . . . . . . . . . . . . . . . . . . . . . . . . . . . . . . . . . . . . . . . . . . . . . . . . . . . . . . . . .10-5
Configuring Hardware to Link Media . . . . . . . . . . . . . . . . . . . . . . . . . . . . . . . . . . . . . . . . . . . . . . . . . . . . . . . 10-5
Circuit Linking Hardware Diagram . . . . . . . . . . . . . . . . . . . . . . . . . . . . . . . . . . . . . . . . . . . . . . . . . . . . . . . 10-6
Linking Electronic Media with Confirmation . . . . . . . . . . . . . . . . . . . . . . . . . . . . . . . . . . . . . . . . . . . . . . . . . . 10-7
Linking Electronic Media Continuously . . . . . . . . . . . . . . . . . . . . . . . . . . . . . . . . . . . . . . . . . . . . . . . . . . . . . 10-8
Removing Linked Media . . . . . . . . . . . . . . . . . . . . . . . . . . . . . . . . . . . . . . . . . . . . . . . . . . . . . . . . . . . . . . . . 10-10
DVD Linking Reports . . . . . . . . . . . . . . . . . . . . . . . . . . . . . . . . . . . . . . . . . . . . . . . . . . . . . . . . . . . .10-11
Accessing and Printing Linking Reports . . . . . . . . . . . . . . . . . . . . . . . . . . . . . . . . . . . . . . . . . . . . . . . . . . . . .10-11
Type of Reports . . . . . . . . . . . . . . . . . . . . . . . . . . . . . . . . . . . . . . . . . . . . . . . . . . . . . . . . . . . . . . . . . . . . . . 10-12
Linking Summary Report . . . . . . . . . . . . . . . . . . . . . . . . . . . . . . . . . . . . . . . . . . . . . . . . . . . . . . . . . . . . . 10-12
Check-out Detail Report . . . . . . . . . . . . . . . . . . . . . . . . . . . . . . . . . . . . . . . . . . . . . . . . . . . . . . . . . . . . . 10-13
Staff Check-In Exception Report . . . . . . . . . . . . . . . . . . . . . . . . . . . . . . . . . . . . . . . . . . . . . . . . . . . . . . . 10-13
Drop Box Exception Report . . . . . . . . . . . . . . . . . . . . . . . . . . . . . . . . . . . . . . . . . . . . . . . . . . . . . . . . . . . 10-13
CheckPASS ............................................................................................................................................1 1-1
Using CheckPASS . . . . . . . . . . . . . . . . . . . . . . . . . . . . . . . . . . . . . . . . . . . . . . . . . . . . . . . . . . . . . . .11-2
T roubleshooting Guide.........................................................................................................................12-1
Contact Technical Support . . . . . . . . . . . . . . . . . . . . . . . . . . . . . . . . . . . . . . . . . . . . . . . . . . . . . . . . .12-1
Self-Checkout Station Scenarios . . . . . . . . . . . . . . . . . . . . . . . . . . . . . . . . . . . . . . . . . . . . . . . . . . . . 12-1
Valid Patron ID Not Recognized . . . . . . . . . . . . . . . . . . . . . . . . . . . . . . . . . . . . . . . . . . . . . . . . . . . . . . . . 12-1
Nothing Happens After an Item is Scanned . . . . . . . . . . . . . . . . . . . . . . . . . . . . . . . . . . . . . . . . . . . . . . . 12-2
Graphics Display Incorrectly or Not at All . . . . . . . . . . . . . . . . . . . . . . . . . . . . . . . . . . . . . . . . . . . . . . . . . 12-2
Printer Does Not Print . . . . . . . . . . . . . . . . . . . . . . . . . . . . . . . . . . . . . . . . . . . . . . . . . . . . . . . . . . . . . . . . 12-2
Printer Status of Unknown . . . . . . . . . . . . . . . . . . . . . . . . . . . . . . . . . . . . . . . . . . . . . . . . . . . . . . . . . . . . . 12-3
ix
Page 10

Touch Screen Does Not Respond . . . . . . . . . . . . . . . . . . . . . . . . . . . . . . . . . . . . . . . . . . . . . . . . . . . . . . . 12-3
Self-Checkout Station Fails to Start . . . . . . . . . . . . . . . . . . . . . . . . . . . . . . . . . . . . . . . . . . . . . . . . . . . . . . 12-4
Application Server Scenarios . . . . . . . . . . . . . . . . . . . . . . . . . . . . . . . . . . . . . . . . . . . . . . . . . . . . . . .12-4
Self-Checkout Station Not Displaying . . . . . . . . . . . . . . . . . . . . . . . . . . . . . . . . . . . . . . . . . . . . . . . . . . . . 12-4
Trouble Printing a Report . . . . . . . . . . . . . . . . . . . . . . . . . . . . . . . . . . . . . . . . . . . . . . . . . . . . . . . . . . . . . 12-4
Error Message Displays when Running a Report . . . . . . . . . . . . . . . . . . . . . . . . . . . . . . . . . . . . . . . . . . . 12-5
Exit Alarms Do Not Occur . . . . . . . . . . . . . . . . . . . . . . . . . . . . . . . . . . . . . . . . . . . . . . . . . . . . . . . . . . . . . 12-5
Host Status Incorrectly Reports Offline . . . . . . . . . . . . . . . . . . . . . . . . . . . . . . . . . . . . . . . . . . . . . . . . . . . 12-5
Exit Interrogator Scenarios . . . . . . . . . . . . . . . . . . . . . . . . . . . . . . . . . . . . . . . . . . . . . . . . . . . . . . . . .12-5
Exit Alarms Do Not Occur . . . . . . . . . . . . . . . . . . . . . . . . . . . . . . . . . . . . . . . . . . . . . . . . . . . . . . . . . . . . . 12-5
No Sound Occurs for an Exit Alarm . . . . . . . . . . . . . . . . . . . . . . . . . . . . . . . . . . . . . . . . . . . . . . . . . . . . . 12-6
Incorrect Exit Alarm . . . . . . . . . . . . . . . . . . . . . . . . . . . . . . . . . . . . . . . . . . . . . . . . . . . . . . . . . . . . . . . . . . 12-6
Staff Station Reader Scenarios . . . . . . . . . . . . . . . . . . . . . . . . . . . . . . . . . . . . . . . . . . . . . . . . . . . . .12-6
Valid Circuit Not Recognized . . . . . . . . . . . . . . . . . . . . . . . . . . . . . . . . . . . . . . . . . . . . . . . . . . . . . . . . . . . 12-6
Scanned Item Does Not Display on Monitor . . . . . . . . . . . . . . . . . . . . . . . . . . . . . . . . . . . . . . . . . . . . . . . 12-7
Recovery Procedures . . . . . . . . . . . . . . . . . . . . . . . . . . . . . . . . . . . . . . . . . . . . . . . . . . . . . . . . . . . . .12-8
Restarting the Self-Checkout Station . . . . . . . . . . . . . . . . . . . . . . . . . . . . . . . . . . . . . . . . . . . . . . . . . . . . 12-8
Restarting the Complete System . . . . . . . . . . . . . . . . . . . . . . . . . . . . . . . . . . . . . . . . . . . . . . . . . . . . . . . . 12-8
Restarting the Intelligent Library Controller program . . . . . . . . . . . . . . . . . . . . . . . . . . . . . . . . . . . . . . . . . 12-8
CheckVIEW Troubleshooting . . . . . . . . . . . . . . . . . . . . . . . . . . . . . . . . . . . . . . . . . . . . . . . . . . . . . . .12-9
Solution 1 - IP Address used on Staff computer . . . . . . . . . . . . . . . . . . . . . . . . . . . . . . . . . . . . . . . . . . . . 12-9
Solution 2 - Correct default settings on Self-Checkout Station . . . . . . . . . . . . . . . . . . . . . . . . . . . . . . . . . 12-9
System Connection Diagram . . . . . . . . . . . . . . . . . . . . . . . . . . . . . . . . . . . . . . . . . . . . . . . . . . . . . .12-11
System Maintenance.............................................................................................................................13-1
Intelligent Library Controller System Maintenance . . . . . . . . . . . . . . . . . . . . . . . . . . . . . . . . . . . . . . .13-1
Transaction Database Maintenance . . . . . . . . . . . . . . . . . . . . . . . . . . . . . . . . . . . . . . . . . . . . . . . . . . . . . . . 13-2
Synchronize Offline Transactions . . . . . . . . . . . . . . . . . . . . . . . . . . . . . . . . . . . . . . . . . . . . . . . . . . . . . . . 13-3
Backup Transaction Database . . . . . . . . . . . . . . . . . . . . . . . . . . . . . . . . . . . . . . . . . . . . . . . . . . . . . . . . . 13-4
Purge the Transaction Database . . . . . . . . . . . . . . . . . . . . . . . . . . . . . . . . . . . . . . . . . . . . . . . . . . . . . . . . 13-5
Compact the Transaction Database . . . . . . . . . . . . . . . . . . . . . . . . . . . . . . . . . . . . . . . . . . . . . . . . . . . . . 13-7
Reboot the Application Server . . . . . . . . . . . . . . . . . . . . . . . . . . . . . . . . . . . . . . . . . . . . . . . . . . . . . . . . . 13-8
Backup the Application Server . . . . . . . . . . . . . . . . . . . . . . . . . . . . . . . . . . . . . . . . . . . . . . . . . . . . . . . . . . . .13-11
Backup . . . . . . . . . . . . . . . . . . . . . . . . . . . . . . . . . . . . . . . . . . . . . . . . . . . . . . . . . . . . . . . . . . . . . . . . . . .13-11
Restore . . . . . . . . . . . . . . . . . . . . . . . . . . . . . . . . . . . . . . . . . . . . . . . . . . . . . . . . . . . . . . . . . . . . . . . . . . 13-12
Load Paper into Patron Self-Checkout Station Printer . . . . . . . . . . . . . . . . . . . . . . . . . . . . . . . . . . .13-13
Safety Warnings . . . . . . . . . . . . . . . . . . . . . . . . . . . . . . . . . . . . . . . . . . . . . . . . . . . . . . . . . . . . . . . .13-15
Specifications . . . . . . . . . . . . . . . . . . . . . . . . . . . . . . . . . . . . . . . . . . . . . . . . . . . . . . . . . . . . . . . . . .13-16
Mechanical . . . . . . . . . . . . . . . . . . . . . . . . . . . . . . . . . . . . . . . . . . . . . . . . . . . . . . . . . . . . . . . . . . . . . . . . . . 13-16
Electrical . . . . . . . . . . . . . . . . . . . . . . . . . . . . . . . . . . . . . . . . . . . . . . . . . . . . . . . . . . . . . . . . . . . . . . . . . . . 13-16
Interfaces . . . . . . . . . . . . . . . . . . . . . . . . . . . . . . . . . . . . . . . . . . . . . . . . . . . . . . . . . . . . . . . . . . . . . . . . . . . 13-16
Peripherals . . . . . . . . . . . . . . . . . . . . . . . . . . . . . . . . . . . . . . . . . . . . . . . . . . . . . . . . . . . . . . . . . . . . . . . . . . 13-16
Environmental . . . . . . . . . . . . . . . . . . . . . . . . . . . . . . . . . . . . . . . . . . . . . . . . . . . . . . . . . . . . . . . . . . . . . . . 13-16
x
Page 11

C HAPTER
C
HAPTER
0
I
NTRODUCTION
The Intelligent Library System 2.6 (ILS) is an integrated security tracking and database
system that maintains a library’s collection using Radio Frequency Identification (RFID)
to wirelessly coordinate the subscription status of library materials. This protects
collections, streamlines operations, and improves patron service. When using ILS,
libraries reduce losses, enhance staff productivity, increase circulation flow, and improve
patron satisfaction. ILS operates in conjunction with the library’s Library Management
System (LMS) or Automated Circulation System (ACS).
ILS includes the following components:
• Circulation Circuit (inventory tag)
• Patron Identification Card
• Intelligent Sensor
• Patron Self-Checkout Station
• Staff Station Reader
• Intelligent Library Controller (Application Server)
• Portable Reader (optional)
• Exception Ticket Printer (optional)
• ILS Remote Monitor (optional)
• CheckVIEW (optional)
• CheckPASS (optional)
• Circulation Circuit Programming Station (optional)
• DiscMate (optional)
Introduction: 1-1
Page 12
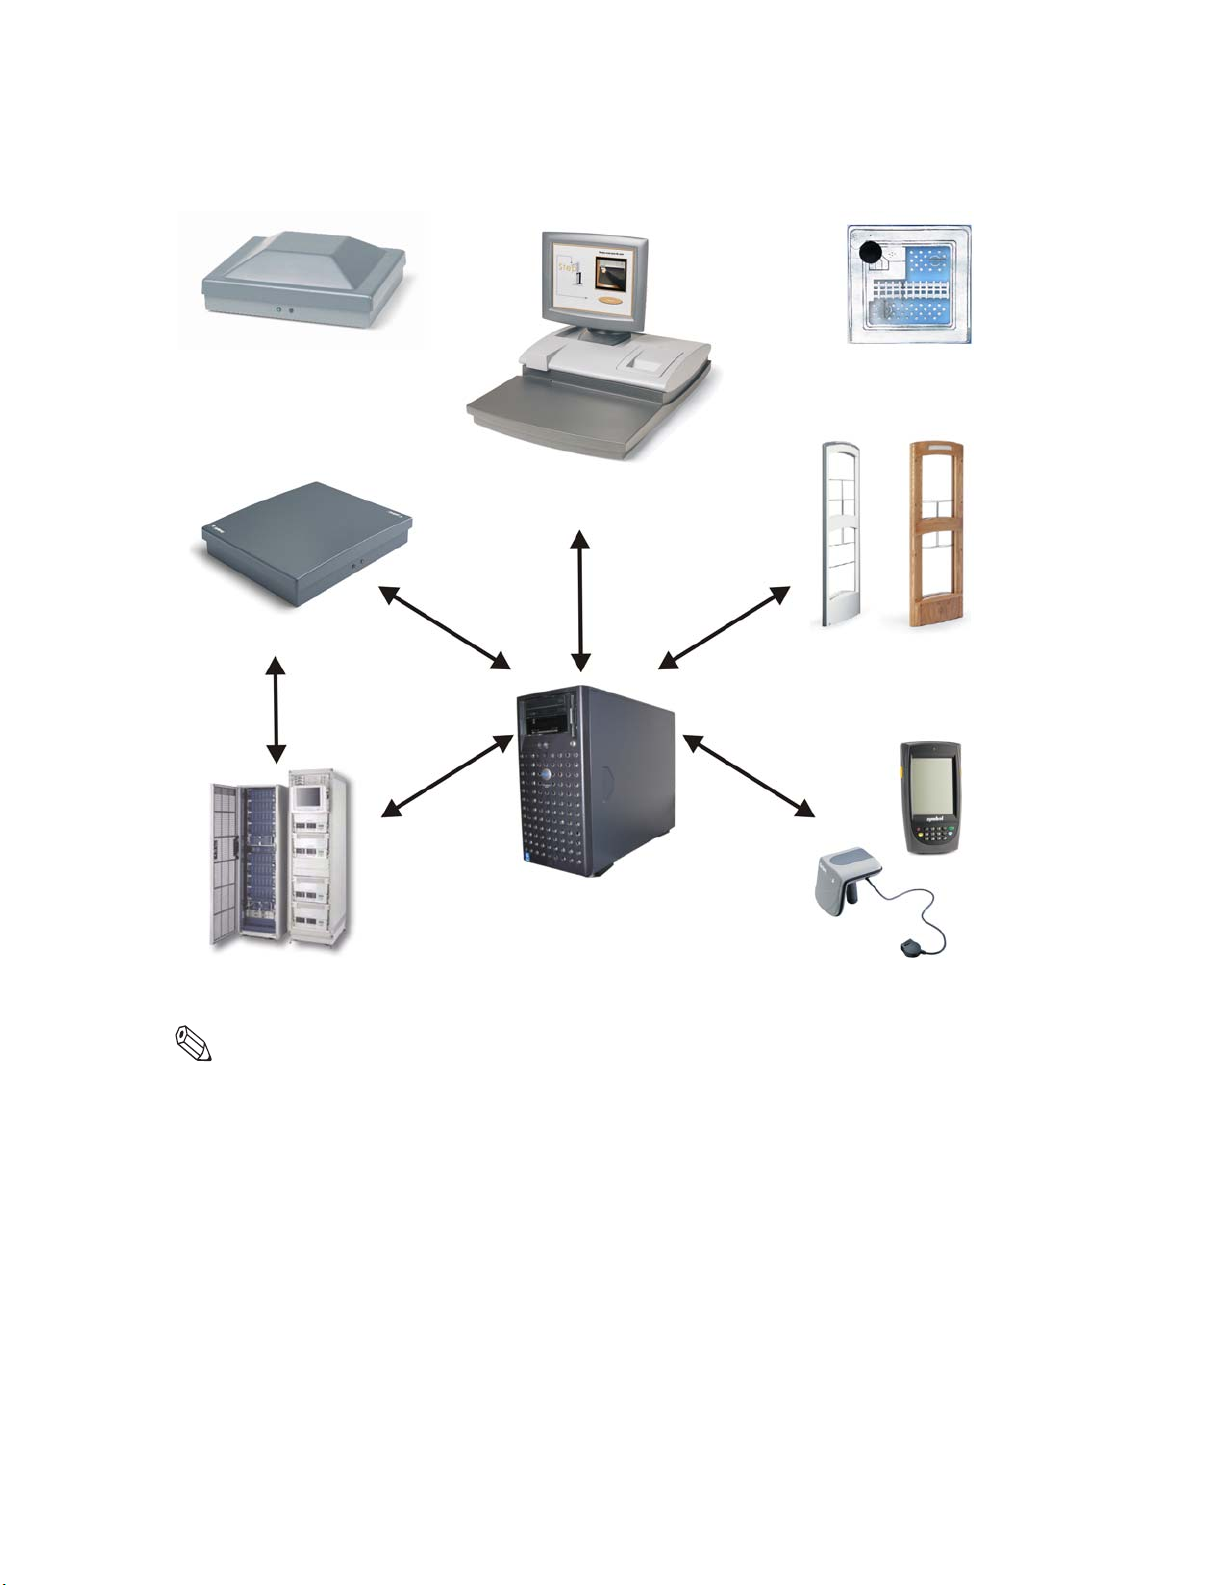
The following configuration illustrates an example of the ILS components and
connections in a typical ILS setup.
Circulation Circuit
Programming Station
Staff Station Reader
Circulation Circuit
Self-Checkout Station
Intelligent Sensors
Intelligent Library Controller
Library Management
System
Note: Your specific ILS configuration may not include one or more of the components shown.
1-2 ILS 2.5 User Guide
Figure 1.1
Portable Reader
Sample Intelligent Library Sy stem Components
Page 13

Library Network Topology
In addition to supporting the Single Branch topology, ILS Version 2.6 supports the
following library topologies:
• “Single Branch”
• “Single Server, Multi-Branch Architecture”
• “Peer-to-Peer Communication”
Figure 1.2 depicts the library network topologies supported by ILS Version 2.6.
Single Branch
Single Server,
Multi-Branch
Application Server
Peer-to-Peer
= branch
Figure 1.2
Single Branch
Local Security
Controller
Peer Branch Peer Branch
Library Network Topologies Supported by ILS Version 2.5
Main Branch
Main BranchPeer Branch
The Single Branch scenario represents the current implementation of ILS, where one
Application Server controls all of the components within a single branch library.
Introduction: Library Network Topology 1-3
Page 14

Single Server , Multi-Branch Architecture
New with this release, ILS Version 2.6 enables a single server to manage the circulation of
not only its only branch but multiple remote branches as well, granting the administrator
greater power and ease to manage the entire system. In this scenario, Local Security
Controllers are used to assist the Application Server.
The Local Security Controller (LSC) is a combination hardware and software solution for
a multi-branch ILS deployment. The LSC assists the Intelligent Library Controller in
maintaining the response speed of Exit Interrogators, managing the connection between
the Exit Interrogators at the branch and the remote Application Server to provide
maximum caching performance. The LSC also enables the intelligent sensors to operate
(with limitations) if the main server is down. This scenario is normally used with libraries
containing up to 20 branches.
Peer-to-Peer Communication
New with this release is the ability to run a library’s security and inventory management
system from any ILS Server. This enables a granular redundant system that is crash
resistant because each node can run the entire system, as well as, holding a complete copy
of the checkout cache database at any time.
The main Application Server communicates to each node (peer server) the latest
circulation database in a configurable matter of time (from seconds to hours or even
daily); meaning circulation records are nearly always up to date. This means that exit gates
(intelligent sensors) are updated throughout the day at every branch. This allows a patron
to walk to another branch (for example on a college campus) and their library material will
respond with the correct check-in or checkout status. This scenario is normally used for
libraries containing more than 20 branches.
1-4 ILS 2.5 User Guide
Page 15

Document Overview
This manual provides a general overview of the ILS technology and illustrates the use and
operation of each component.
This manual has been designed for the librarian and administrator and contains all the
information necessary to take full advantage of the system capabilities. The Intelligent
Library System enhances your library experience because of the system's inherent ease of
use and efficiency.
This manual is organized into chapters, with each chapter describing a system peripheral,
such as the Self-Checkout Station. Each peripheral is designed with a specific system role
in mind. For example, patrons typically use the Self-Checkout Station, while Library staff
use the Portable Reader. Read the sections that apply to your role for ILS system
operation.
This manual is divided into the following chapters that cover system peripherals and
important ILS tasks.
• Introduction (See page 1-1)
• Application Server (See page 2-1)
• Self-Checkout Station (See page 3-1)
• Portable Reader (See page 4-1)
• ILS Remote Monitor (See page 5-1)
• CheckVIEW (See page 7-1)
• Exception Ticket Printer (See page 6-1)
• CheckPASS (See page 11-1)
• Tagging procedures (See page 9-1)
• Troubleshooting Guide (See page 12-1)
• System Maintenance Guide (See page 13-1)
Intended Audience
This document is intended for library staff and administrators as well as Checkpoint
Systems field service staff. The library staff includes librarians, support staff, and
temporary staff. The Field Service staff is comprised of the Checkpoint installers and
technical support personnel. These audiences need to understand the basic functions,
operations, and procedures related to the ILS.
Related Documentation
The following documents provide additional ILS and related information.
• Release Notes
• Circulation Circuit Programming Station User Manual
Introduction: Document Overview 1-5
Page 16
System Overview
The following sections describe how the Intelligent Library System interacts with a
library’s circulation system to maintain its collection.
How RF Query Circuits
The Intelligent Library components - Self-Checkout Station, Intelligent Sensor, Staff
Station Reader, and Portable Reader - all use a Radio Frequency (RF) antenna and
transceiver system (interrogator) which detects and reads the Intelligent Circulation
Circuits. Communications occur when an interrogator’s radio field is triggered by a circuit
passing through it. When energized, the circuit presents the programmed item-specific
information to the interrogator for further processing.
Circulation
Circuit
1
0
1
A
U
.
.
.
.
.
Radio Field
Sample Interrogator
(Staff Station Reader)
.
.
.
.
.
.
.
?
?
?
?
?
?
Figure 1.3
.
Circulation Circuit Interrogated
The data, routed by the Intelligent Library Controller, is compared to the Library
Management System (LMS) database, in order to identify the checkout status of an item.
How ILS Maintains the Library’s Collection Database
The Intelligent Library Controller is the communications gateway between the ILS
subsystems and the library’s Library Management System (LMS) so that the check-in,
self-checkout, inventory management, and security activities can all be accomplished.
All library materials including books, CD/DVD materials, videotapes, and cassettes are
tagged with a permanent RFID Circulation Circuit™ (inventory tag). This tag contains
information that uniquely identifies the item within the library circulation database. Patron
cards identify patrons when the card is scanned at the Self-Checkout Station. The card
stores coded information unique to the individual patron that identifies the user to the
Library Management System. The patron can then be validated as eligible or ineligible to
use the library checkout privilege.
1-6 ILS 2.5 User Guide
Page 17

Patron Checkout and Check-In
Patrons use Self-Checkout Stations to checkout library materials. Self-Checkout Stations
include a patron card reader, an RFID Circulation Circuit interrogator, a touch screen
monitor, and a printer in one compact unit. This provides the patron with library
transaction capability without any librarian assistance. A patron scans the RFID Patron
Card and library materials, identifying the patron and linking the library materials to the
individual through a communications session with the Library Management System via
the Intelligent Library Controller.
When the patron checks out materials, the patron and checked out item information is
stored in both the LMS and ILS databases, allowing ILS to operate in both on- and off-line
modes. When materials are checked out from a Self-Checkout Station, the ILS asks the to
the patron to checkout items from the LMS. If privileges are granted then a checkout
request to the LMS is generated for each item.
If the patron is checking in library materials, the ILS makes a check-in request to the LMS,
which updates its database and reports the result back to the ILS.
Staff Checkout and Check-In
The library staff typically uses a Staff Station Reader in situations where a patron needs
help from a librarian or when a librarian is checking in or checking out library materials.
The Staff Station Reader interrogates tags and functions the same as current bar code
scanners used in Library Management Systems.
Book Return Check-In
The Staff Station Reader can also be integrated into a book return slot. When library
materials are placed in the book return, the tags on the items are read and sent to the LMS.
The LMS then updates its database and passes back the transaction status to the ILS.
Introduction: System Overview 1-7
Page 18
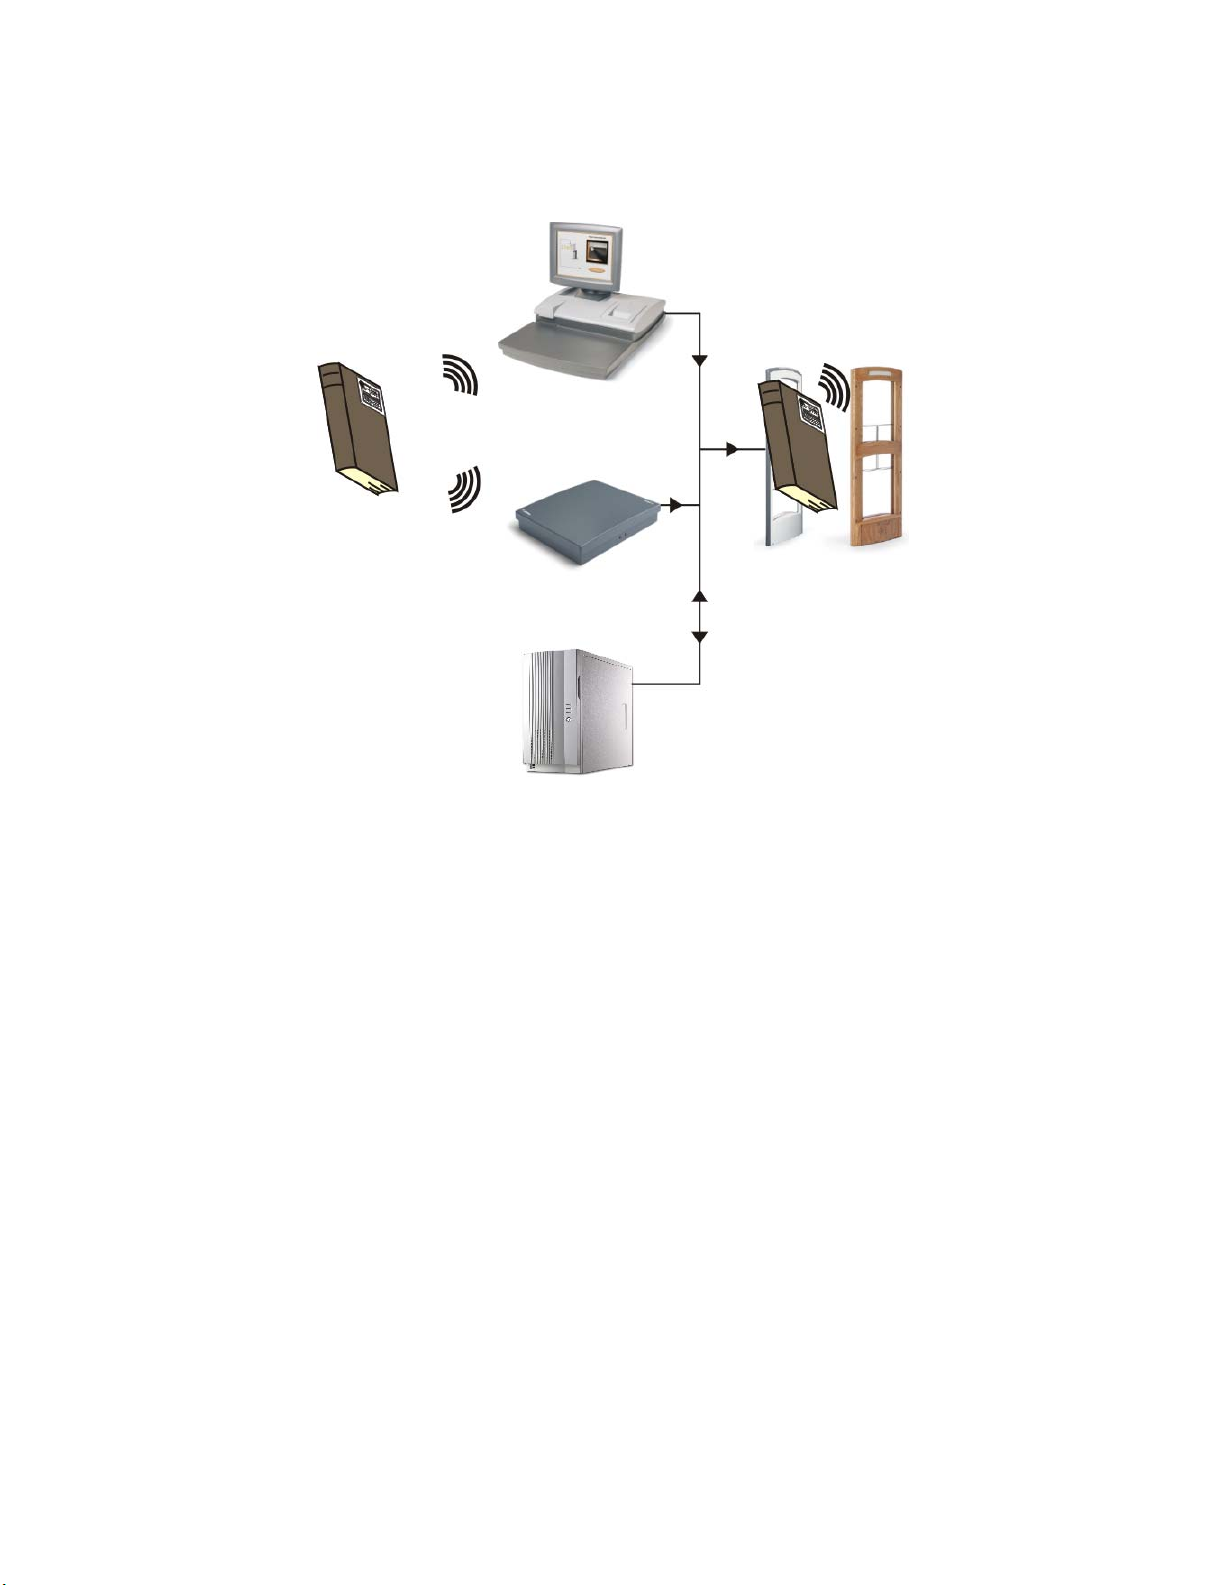
Checkout Process
Diagrammed here is how library materials are checked out.
Self-Checkout Station
Staff Station Reader
Intelligent Library Controller
Figure 1.4
1
The Circulation Circuit, encoded with the necessary information, is wirelessly read by
Check Out Flow
Intelligent Sensors
either the Self-Checkout Station or the Staff Station Reader.
2 The Station or Reader communicates with the Intelligent Library Controller which,
after successful verification, communicates back to the Station or Reader that the book
is checked out.
3 When exiting the library, the book passes through the Intelligent Sensors which
verifies the status of the book and allows it to exit the library without triggering an
alarm.
1-8 ILS 2.5 User Guide
Page 19
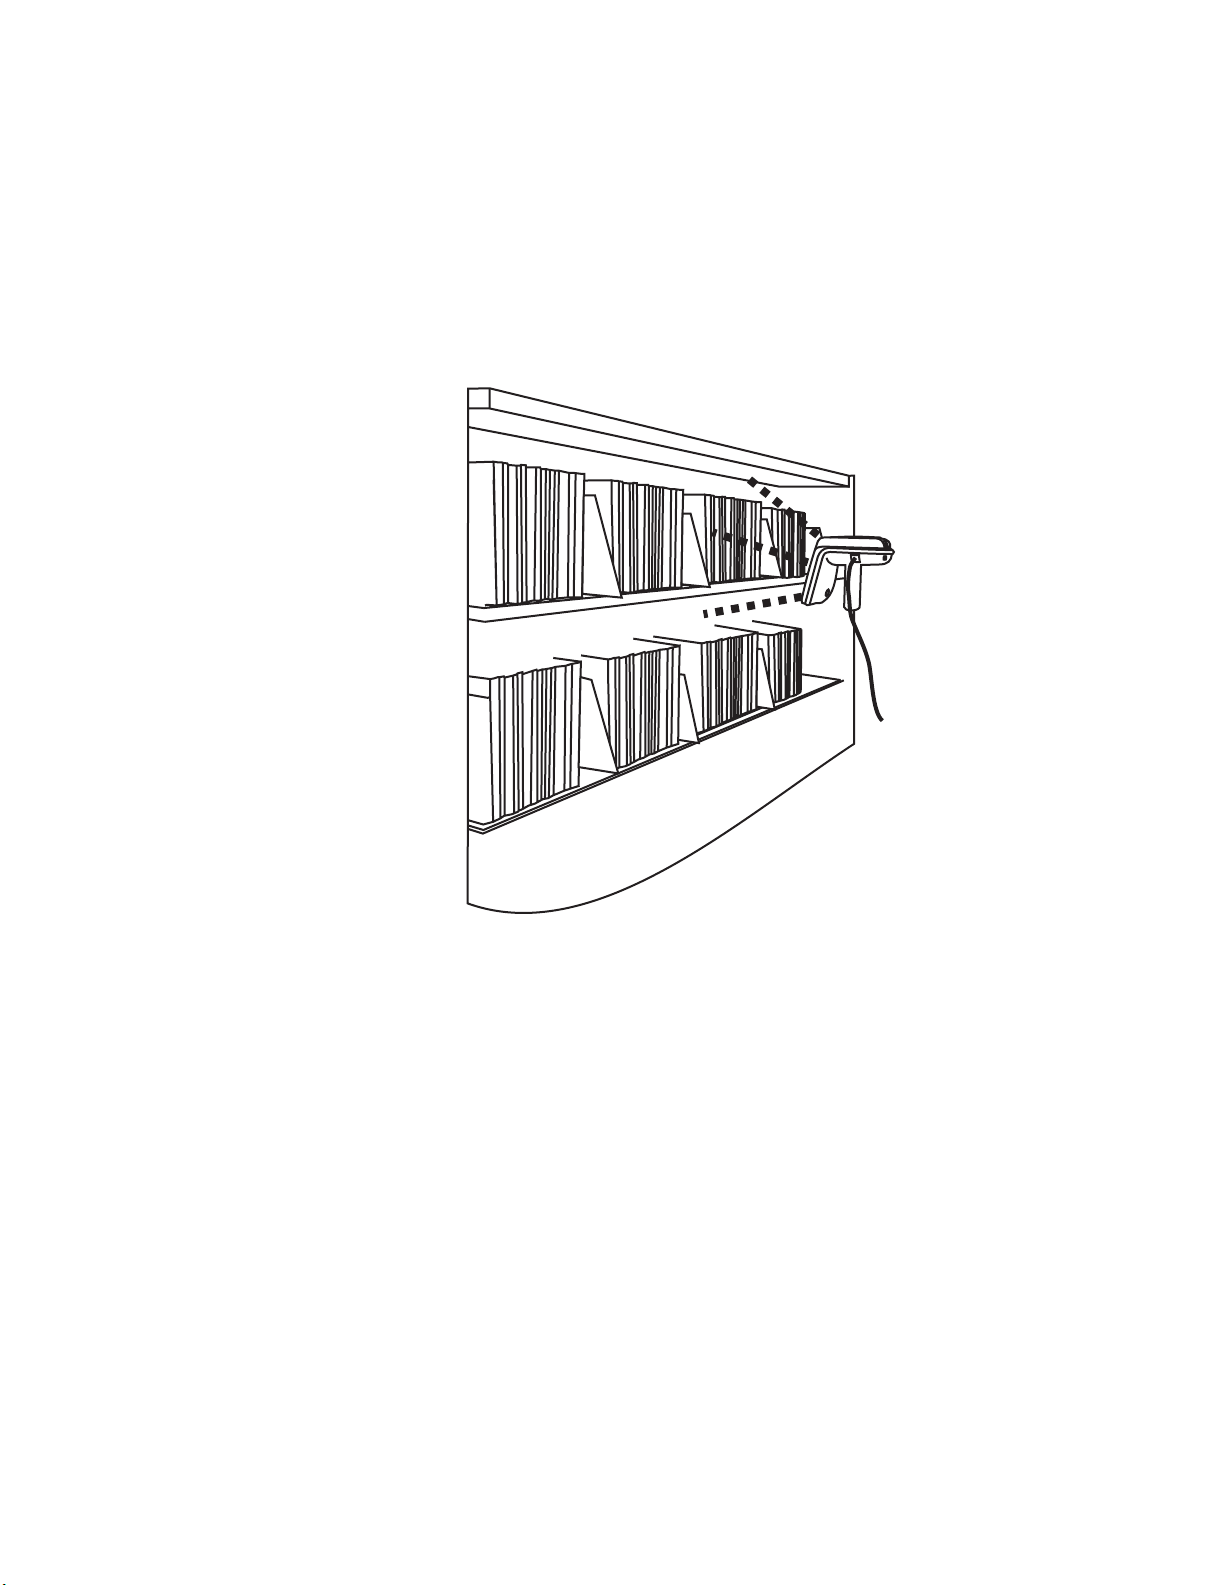
Inventory Collection
You can use the Portable Reader to inventory the library’s contents or to find individual
items. The unit is a battery powered hand-held device that interrogates RFID Circulation
Circuits as you walk by tagged items, when the unit detection head is within a ten-inch
(25 cm) radius.
The Portable Reader searches for specified items using its search function. Single or
multiple item IDs can be uploaded to the data terminal and when a scanned ID matches,
the user receives an audible alert and the ID is displayed on the data terminal.
Figure 1.5
Portable Reader Taking Inventory
The Item Identifiers on the tagged articles are read and stored in a Portable Data Terminal
which can be downloaded in real-time to the Intelligent Library Controller using the
wireless data-terminal option or downloaded after the inventory is completed as a batch
file using the standard data terminal. The inventory data is then communicated to the
Library Management System, which compares the information from the Portable Reader
to item information in the circulation database.
Introduction: System Overview 1-9
Page 20
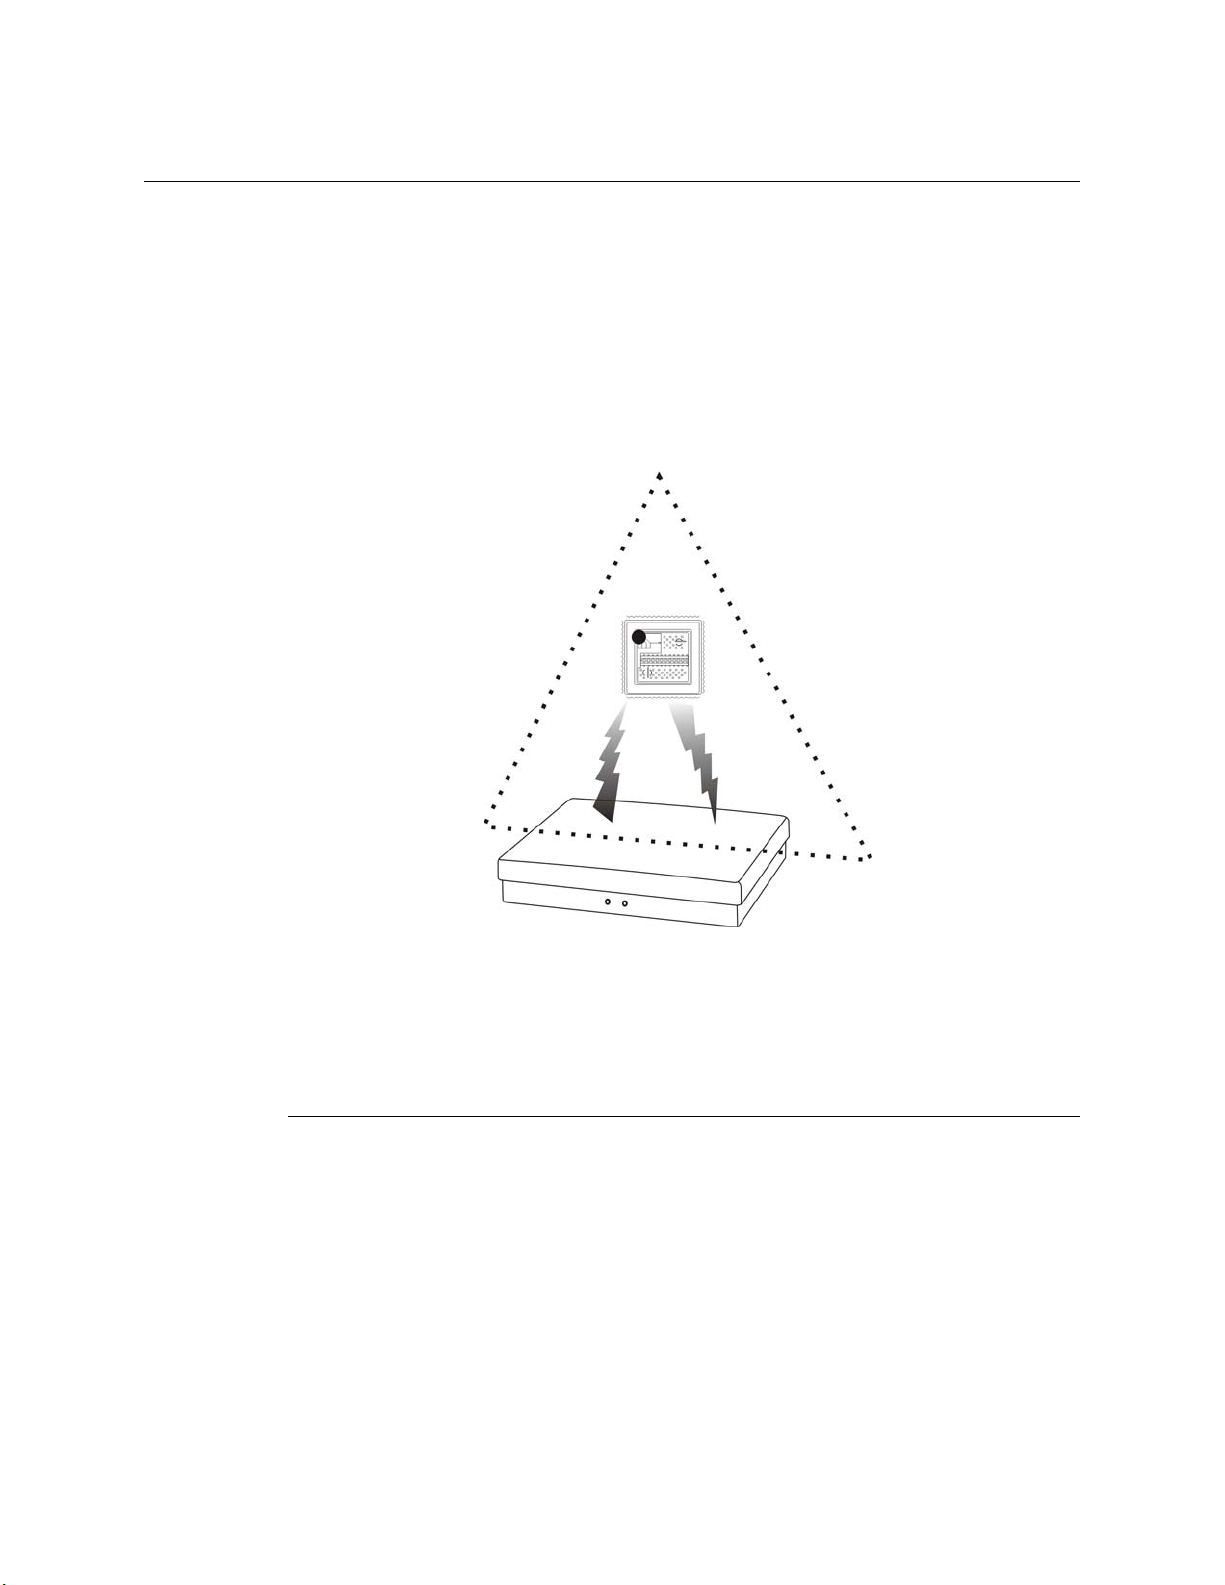
Exit Monitoring
The Intelligent Sensor protects exit/entry aisles against unchecked library materials
leaving the secured area by determining whether tagged items have checked (authorized/
no alarm) or unchecked (unauthorized/alarm) events.
Intelligent Sensors
Intelligent Library Controller
Figure 1.6
Exit Monitoring
Programming Circuits
The optional Circulation Circuit Programming Station allows libraries to read and create
their own RFID Circulation Circuit tags and print barcode labels. This can also be used to
convert library materials with barcodes to RFID tags programmed with the barcode value.
A tag format file (created by Checkpoint field service staff using the Tag Designer
software) is used to program the tags in a compatible format. Tags are programmed by
passing them over the Circulation Circuit Programming Station. See “Circulation Circuit
Interrogated” on page 1-6 for an illustration of this process.
Off-line Processing
The Off-line Processing feature enables the Intelligent Library Controller and
Self-Checkout Stations to continue operating when disconnected from the library’s
circulation system. While the circulation system is offline, the Intelligent Library
Controller records significant events on the system, which are then reported to the
circulation server when synchronization reoccurs. For example, at the time of
synchronization, the due date is sent to the circulation server.
When Off-line Processing is turned on, the word ON appears next to Off-line Processing.
The feature is turned on or off by Checkpoint field service personnel by setting a table
parameter on the Intelligent Library Controller. If using the Bridge Interface (“ILS
Without an LMS Connection”), Off-line Processing should never be turned on.
1-10 ILS 2.5 User Guide
Page 21
ILS Without an LMS Connection
It is possible for ILS to operate without an active Library Management System (LMS)
interconnection using the ILS Bridge Interface feature. The Bridge Interface feature
allows libraries with non-supported circulation vendors or no circulation systems to use
the security and Staff Station Reader functionality of the ILS.
With the Bridge Interface, the user of the ILS Control program monitors and changes the
operation mode (check-in or checkout) of the Staff Station Readers. A library that is using
the Bridge Interface can use a Staff Station Reader for checkout, but cannot use a
Self-Checkout Station.
Components
The following sections describe in detail each of the ILS system components.
Intelligent Circulation Circuit
The Intelligent Circulation Circuit is an advanced RFID integrated circuit bonded to a
label which is then attached to library material.
Figure 1.7
The circuit stores 96 programmable bits of information about an item that can be read on a
single Radio Frequency, 13.56 MHz, up to a distance of 4 feet (1.2 m). The circuit allows
for the reading of multiple circuits using an anticollision algorithm, as well as error
detection and correction methods.
Intelligent Circulation Circuit
Introduction: Components 1-11
Page 22
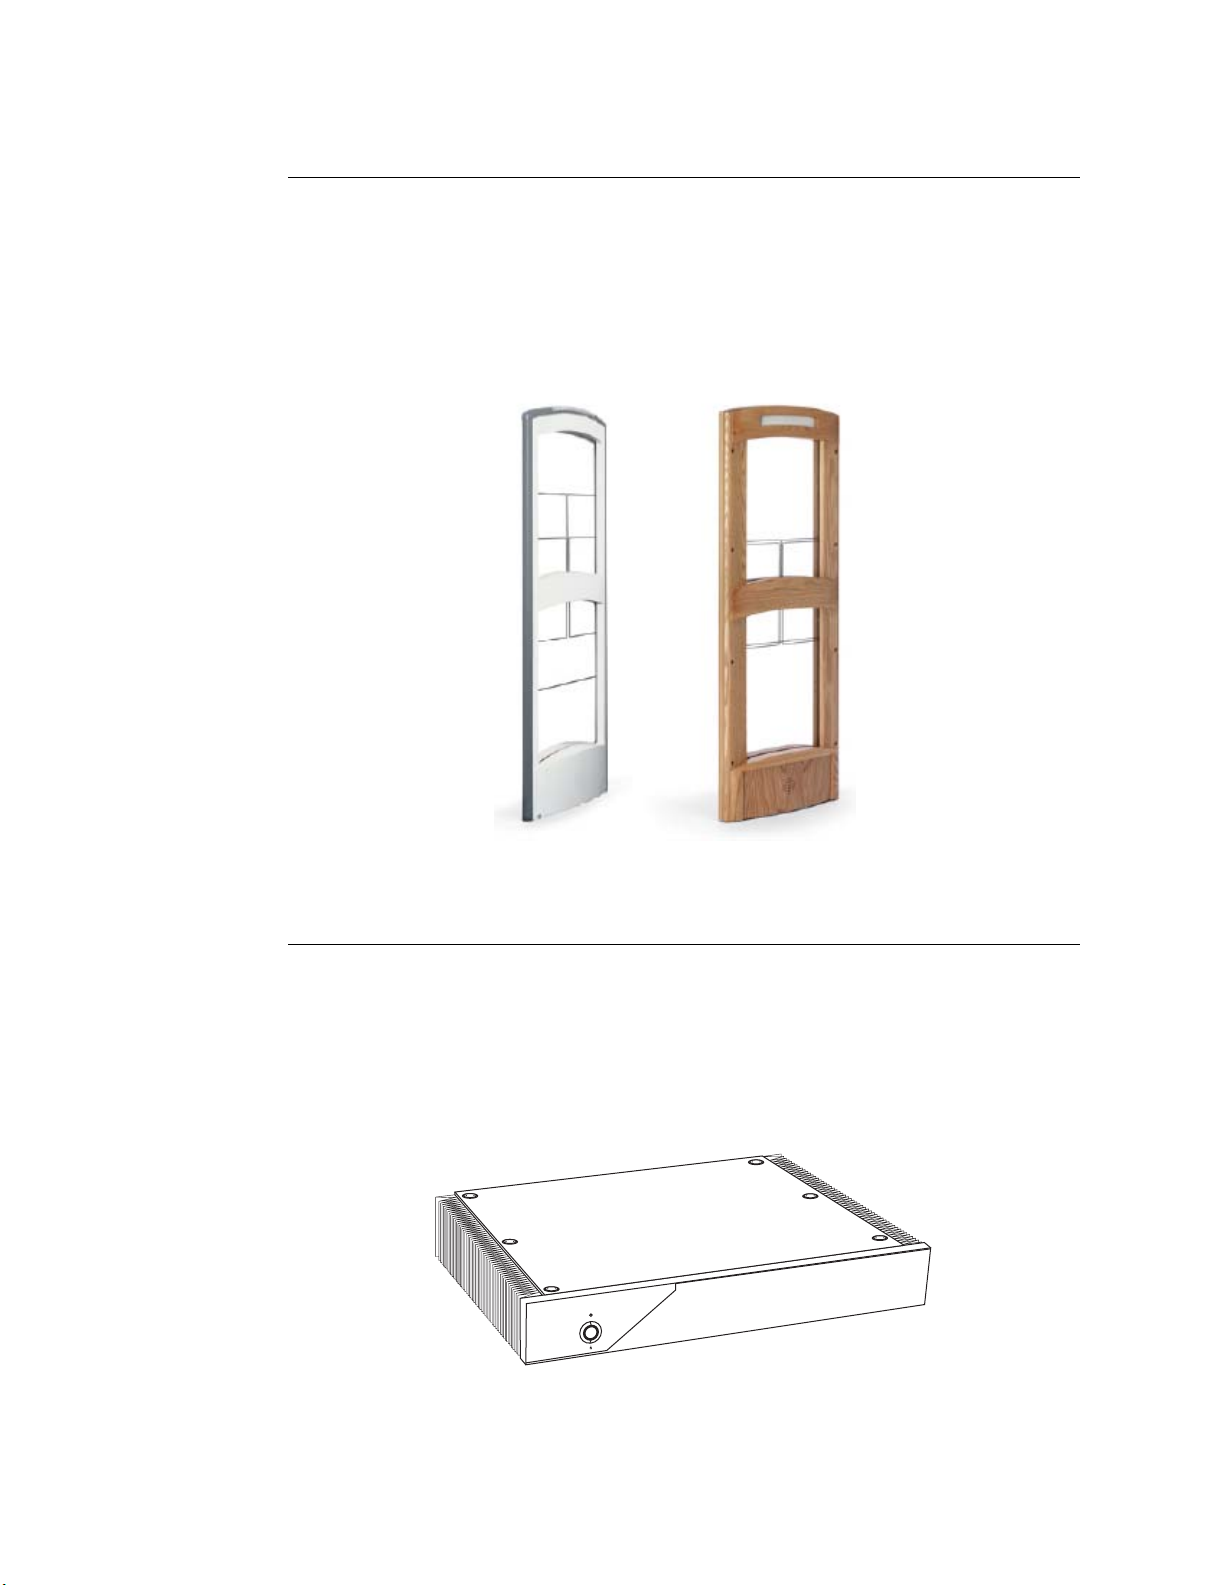
ILS Intelligent Sensor
The ILS Intelligent Sensor (exit gates) provides security at library exits and corrals by
generating a radio field that gathers circuit information from a distance up to 24 inches
(61 cm). Two intelligent sensors form a secure aisle up to 48 inches (122 cm) wide for
circuit detection range. Additionally, the sensor communicates back to the Library
Management System via the Intelligent Library Controller in real-time, determining
whether an item has been checked out. If items in the interrogation field are not properly
checked out, an alarm sounds and the book title appears on an exit alarm screen.
Figure 1.8
ILS Intelligent Sensors
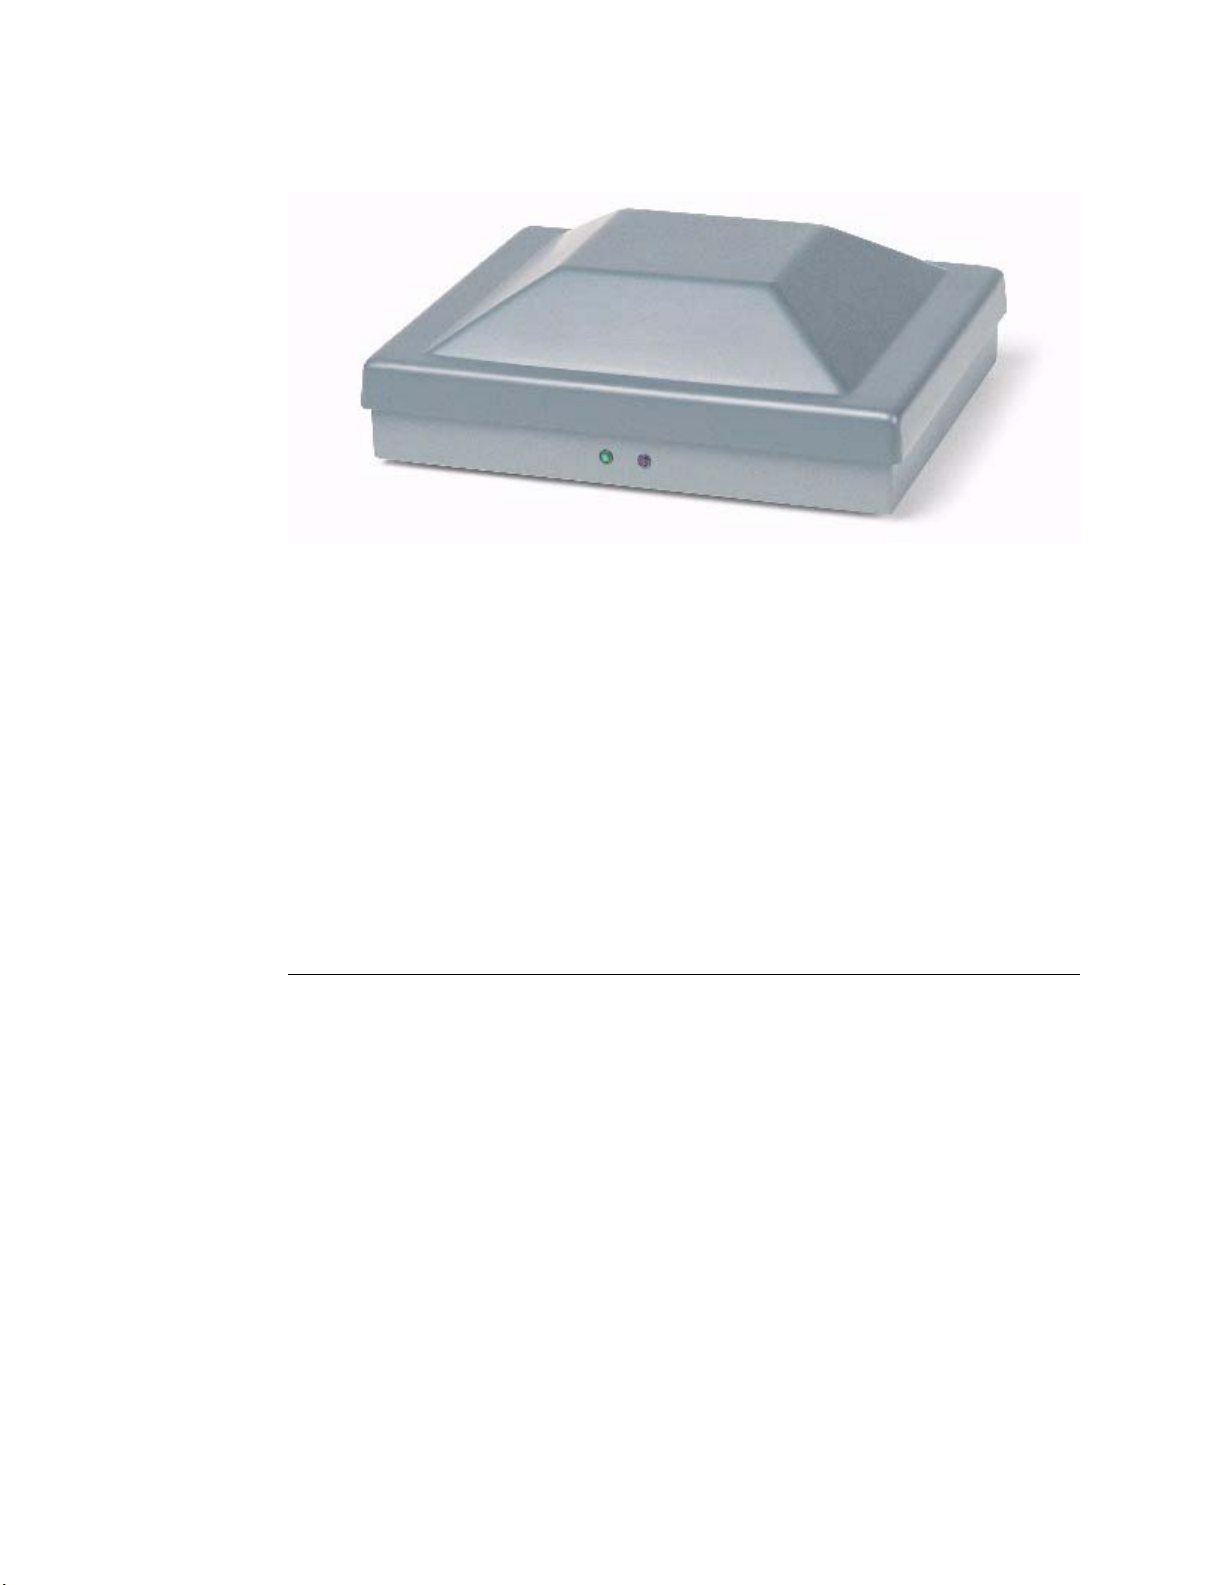
Local Security Controller
The Local Security Controller (LSC) is a combination hardware and software solution for
a single server, multi-branch ILS deployment. The LSC assists the Intelligent Library
Controller in maintaining the response speed of Intelligent Sensors (exit gates), managing
the connection between the Exit Interrogators at the branch and the remote Application
Server to provide maximum caching performance. The LSC also enables the exit gates to
operate (with limitations) if the main server is down. This scenario is normally used with
libraries containing up to 20 branches.
Figure 1.9
Local Security Controller
1-12 ILS 2.5 User Guide
Page 23
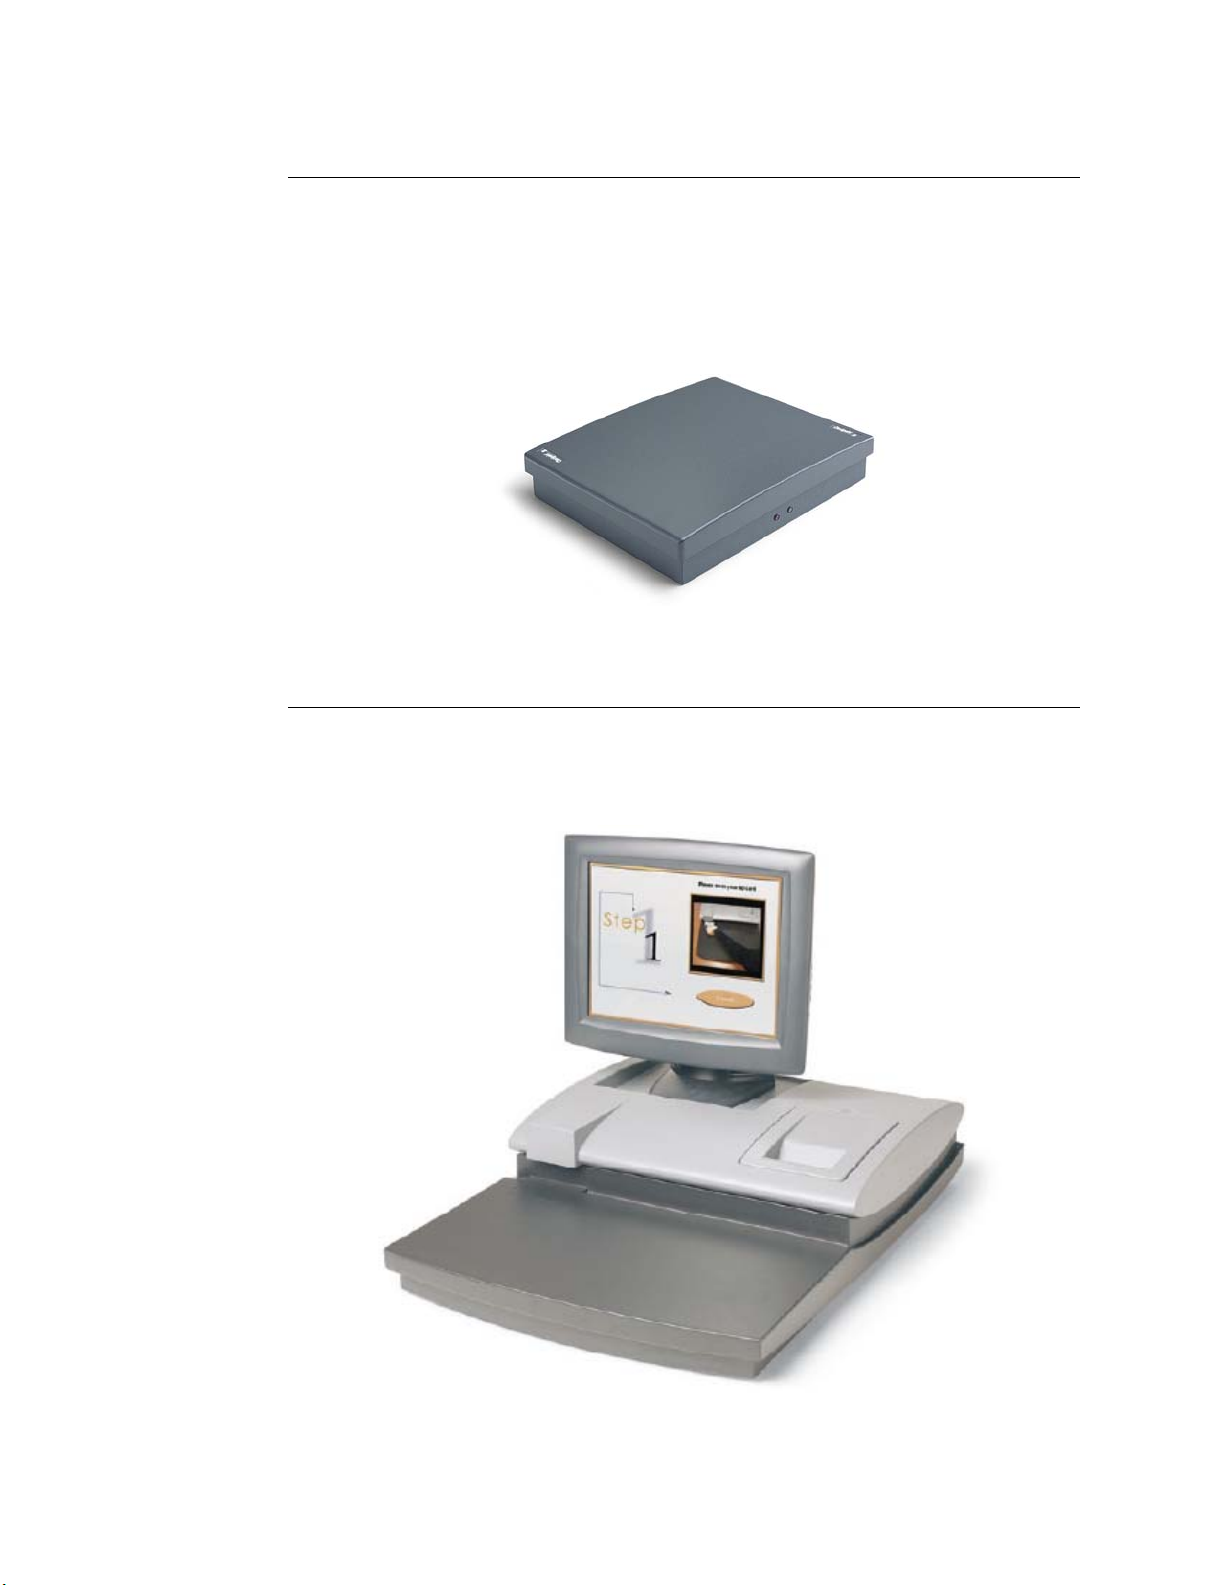
St aff S t ation Reader
The Staff Station Reader functions as an interface to ILS and circulation activities for
library personnel. The Staff Station Reader reads RFID Circulation Circuits (tags) when a
book is placed on the reader at up to 12 inches (30 cm) from the reader in a vertical
direction. The Staff Station Reader communicates thro ugh data links with both the Library
Management System and ILS, providing library staff the ability to perform typical
functions with both the library system and RFID tagged items. For example, library staff
can find the status of RFID tagged items that have been processed by ILS.
Figure 1.10
ILS Staff Station Reader
Patron Self-Checkout St ation II
The Self-Checkout Station enables a library patron to checkout library materials without
the assistance of the library staff. The system may report messages if there is a problem
conducting the checkout transaction; for example, overdue fines have locked the patron’s
account.
Figure 1.11
ILS Self-Checkout Station
Introduction: Components 1-13
Page 24

The Self-Checkout Station supports multiple languages simultaneously. When
programmed, a language selection screen is presented to the patron to select a language for
the self-checkout transaction.
A typical scenario for a patron to check out a book is as follows.
1 A patron arrives at the Self-Checkout Station and selects a language (if using multiple
languages).
2 The patron is identified by the system with their patron ID card.
3 The system confirms the patron’s eligibility to conduct a transaction through validation
of the patron ID card.
4 The patron is led through the transaction process by communication with the system
through a touch screen monitor. The patron checks out items by passing them one at a
time over a short-range wireless interrogator that is located in the Self-Checkout
Station.
a The short-range interrogator generates a radio field, which activates and
interrogates the tagged item.
b The interrogated item ID is passed to the Intelligent Library Controller.
c The Intelligent Library Controller determines the item status and actions that can be
taken via communications with the Library Management System.
d The Intelligent Library Controller updat es the Self-Checkout Station, which notifies
the patron about their transaction status.
5 After the patron scans all the items to be checked out, the patron touches Done and
receives a receipt for the transaction, listing all materials checked out and the
respective due dates.
Portable Reader
The Portable Reader provides inventory management functions, such as inventory
reconciliation and item search. The device consists of a hand-held, rechargeable battery
operated wand that generates a radio field that scans RFID tagged items. The wand is
attached with cabling to a data terminal, which can be carried in one hand or strapped onto
the wrist, storing information read by the wand. The data stored in the terminal can be
downloaded to the Intelligent Library Controller in real-time either with the standard data
terminal or wirelessly.
1-14 ILS 2.5 User Guide
Page 25
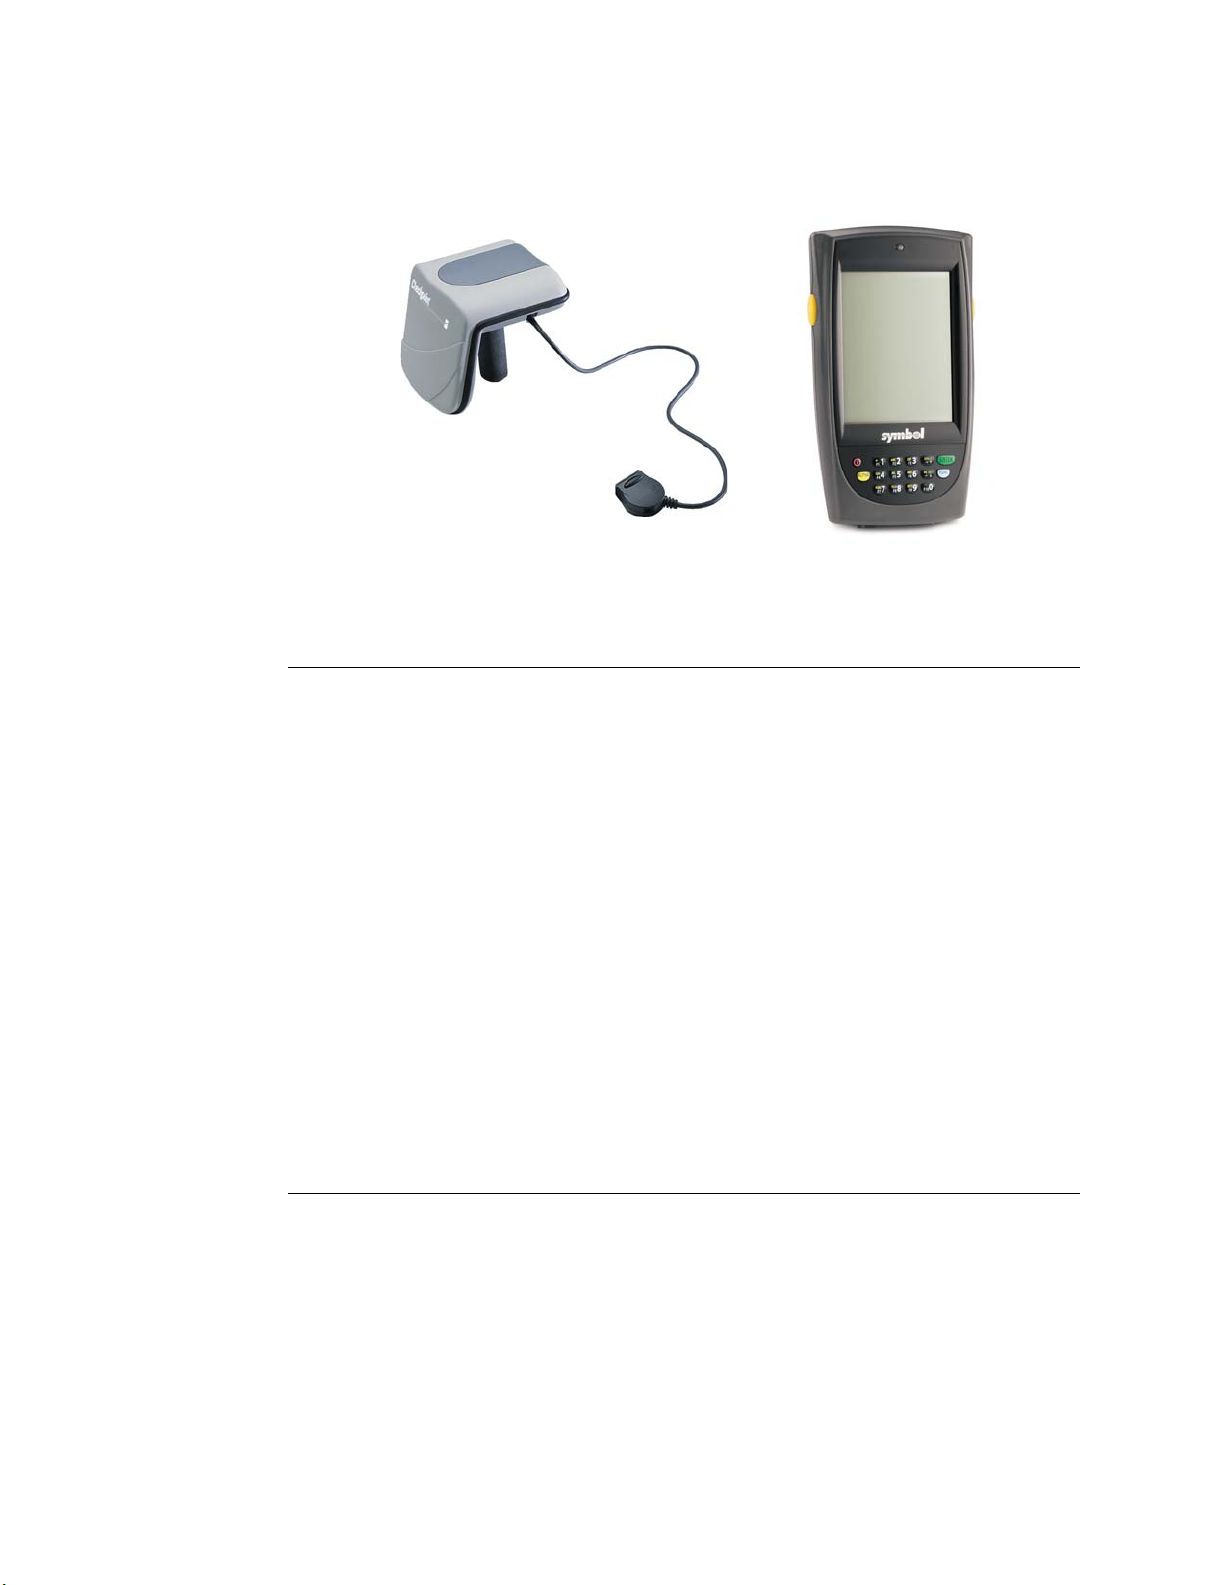
The wand can also be used for item searches and shelf order checking. Item information is
uploaded to the data terminal, allowing you to scan the ID. Once found, an audible alert
sounds and the ID displays.
Inventory Wand
Portable Data Terminal
Figure 1.12
ILS Portable Reader
Intelligent Library Controller
The Intelligent Library Controller software:
• Functions as the communications gateway between the Intelligent Library subsystems
and the Library Management System
• Identifies and configures all peripheral Intelligent Library sub-systems
• Tracks and directs all ILS transactions
The Intelligent Library Controller operates whether the Library Management System is
on-line or off-line. In off-line mode, the server tracks whether an item is being checked
out, checked in, and determines whether tagged items going through secured areas are
authorized. If unauthorized items are detected by the system, the server signals the
Intelligent Sensor (the gates) to alarm. Any transactions that occur independent of the
Library Management System are updated when the ILS system comes back on-line.
The Intelligent Library Controller interfaces to the Library Management System and other
subsystem components using the 3M
Card (NIC). The Ethernet NIC uses the TCP/IP protocol and session and the physical
cable is 10BaseT.
©
protocol (SIP2) over an Ethernet Network Interface
Exception Ticket Printer
New in ILS Version 2.6 is the option to automatically print a hold receipt for library
material at designated book drops. This means that when library material is returned via a
book drop, if the library material is designated with a hold, a print er automatically prints a
receipt. This frees library staff from having to manually check-in each item for its hold
status. Instead, a staff member just checks the print receipt and then secures the receipt
with the item on hold.
Introduction: Components 1-15
Page 26

One exception ticket printer can service multiple interrogators. This means that a receipt
might print at the exception ticket printer near Drop Box A for a book that is returned at
Drop Box B.
CheckVIEW
New in Version 2.6 is the CheckVIEW utility, enabling library staff to remotely monitor
up to four different Self-Checkout Stations at one time from any computer within the
library. This enables library staff to manage issues such as:
• Patrons who are having difficulty using the touch screen
• Stations that may have hardware or system problems
• Viewing the patrons’ check out list to reconcile any discrepancies concerning
availability
Staff members can use their mouse and keyboard to assist patrons by assuming control of
a specific Self-Checkout Station window to step a patron through a checkout procedure.
ILS Remote Monitor
New in Version 2.6, ILS Remote Monitor is an optional utility that allows library staff
operating in a single server, multi-branch or peer-to-peer environment to view the status of
other branches on the network from any computer on that network. This enables a staff
member to monitor system status, identify a troublesome Self-Checkout Station, print a
pre-run report, or transfer files.
The ILS Remote Monitor works on any computer (with a web browser) that is connected
to the library network.
Circulation Circuit Programming St ation
The optional Circulation Circuit Programming Station programs Circulation Circuits,
either with the retrospective item identifier from the existing barcode or when new
materials are added to the collection. This reduces the time it takes to convert a library
collection from barcode to RFID Circulation Circuits as well as add additional materials.
The Circulation Circuit Programming Station enables the library to easily link new
materials into ILS instead of waiting several weeks for pre-programmed tags. In addition,
the Circulation Circuit Programming Station can be integrated into an optional portable
1-16 ILS 2.5 User Guide
Page 27
workstation that allows the library staff to program Circulation Circ uits while moving
around the library.
Figure 1.13
Circulation Circuit Programmer
When adding a new item to the collection and programming the Circulation Circuit, the
library can also print a barcode label. In many cases, libraries will continue to support the
use of barcodes in addition to the RFID inventory Circulation Circuits, mainly for
compatibility with other branch libraries still using barcodes.
Using the Circulation Circuit Programming Station software application, libraries
program the Circulation Circuits by passing them over the tag programming surface. After
programming the Circulation Circuit, the application automatically reads, verifies, and
displays the data that was written to the Circulation Circuit. Refer to “Affixing Circulation
Circuits” on page 9-1 for instructions on how to attach circuits to library materials.
There is separate Circulation Circuit Programmer User Guide available that describes the
usage of this product.
CheckPASS
CheckPASS is an optional utility (new in Version 2.6) that allows library patrons to pay
library fees at a Self-Checkout Station, without staff assistance. Outside of the ILS
product, patrons use a self-service unit to add cash to their account balances. Within ILS,
patrons are reminded of outstanding library fees when they attempt to check out materials.
They can then pay with the touch of a button at the Self-Checkout Station. Patrons save
time and library staff is freed to perform other tasks.
See “CheckPASS” on page 11-1 for further information.
Introduction: Components 1-17
Page 28

Notes
1-18 ILS 2.5 User Guide
Page 29

C HAPTER
C
HAPTER
0
A
PPLICATION
The Application Server hardware hosts the Intelligent Library Controller software, which
is the core-processing component of the Intelligent Library System. The Intelligent
Library Controller performs many functions, including:
• Storing transactions performed at the Self-Checkout Stations
• Downloading inventory data from the ILS Portable Reader
• Generating reports
• Connecting to the Library Management System (LMS)
S
ERVER
In addition, the Intelligent Library Controller provides a single station for system
configuration and diagnostics. If the LMS becomes unavailable, the Intelligent Library
Controller can support automated checkout functions without the LMS, using a feature
known as Off-Line Processing. Off-Line Processing is a site-specific option, so it may not
be available to you.
This chapter describes the Application Server and its components and how they operate
within the ILS. It also provides information on:
• Checking system, host, interrogator, and exit alarm status (page 2-2)
• Scheduling Checkout Cache Synchronization and Host Reconnections (page 2-6)
• Synchronizing the Checkout Cache (page 2-8)
• Downloading inventory information from the Portable Reader (page 2-10)
• Generating, saving, and printing reports, including Checkout Discrepancy, Patron
Discrepancy, Exit Alarm, Check-In Exception, and Generic reports (page 2-11)
• Communicating and coordinating data exchange with Local Security Controllers at
remote branches (page 2-25)
• Working in Bridge Mode (page 2-25)
Application Server: 2-1
Page 30

Check System St atus
The Intelligent Library Controller provides current information on the status of the ILS
system and ILS Portable Reader. You also use it to generate reports.
The four main sections of the Intelligent Library Controller window include:
• Self-Checkout Station Status (page 2-2)
• Host Status (page 2-4)
• Interrogator Status (page 2-4)
• Exit Alarms (page 2-6)
With the exception of the Interrogator Status section, these sections can be displayed or
hidden from view.
Menu
Bar
Self-Check
out Station
Status
Button
Bar
Host
Status
Interrogator
Status
Exit Alarms
Figure 2.1
Intelligent Library Controller window
You navigate using the menu bar or the button bar. The button bar provides shortcut
buttons to the most commonly-used features. Use the Hide button to hide or show
individual areas of the window.
Self-Checkout St ation S tatus
The Self-Checkout Station Status section displays information about the operational state
of the Self-Checkout Stations, including:
• Station Name
Displays the name of each Self-Checkout Station.
2-2 ILS 2.6 User Guide
Page 31

• System State
Identifies whether or not the Self-Checkout Station is connected (on-line) or not
connected (off-line) to the LMS.
• Printer State
Displays messages about the printer, including: OK, out of paper, I/O error, and so on.
These messages are generated by Windows.
Figure 2.2
System Status Section
To display the System Status Section:
Click System Status in the button bar. See Figure 2.3.
Figure 2.3
OR
System Status Button
Select Status > System Status Display in the menu bar. See Figure 2.4.
Figure 2.4
System Status Menu Selection
Application Server: Check System Status 2-3
Page 32

Host St atus
The Host Status section notifies you if the host (Librar y Management System) is on-line or
off-line and whether or not Off-Line Processing is enabled.
Figure 2.5
The Off-Line Processing feature allows a library to configure the Intelligent Library
Controller and Self-Checkout Stations so they can continue to operate while the LMS is
off-line. While the LMS is off-line, the Intelligent Library Controller records significant
events (such as check-ins and checkouts) and reports them to the LMS later, during cache
synchronization.
Off-Line Processing must be enabled on an Application Server that uses the Bridge
Interface. The Bridge Interface allows libraries with non-supported circulation vendors, or
no LMS at all, to use the ILS security and Staff Station reader features. See “Working with
the Bridge Interface” on page 2-25 for more information.
This feature is optional and may or may not be enabled (allowed) at your site.
• If Off-Line Processing is enabled, the Off-Line Processing status is ON.
• If Off-Line Processing is disabled, the Off-Line Processing status is OFF.
Host Status Area
Interrogator St atus
The Interrogator Status section shows information about interrogators (Self-Checkout
Stations, Staff Station Readers, and Intelligent Sensor exit gates), including:
• Description
The IP address, port number, and the location of the interrogator.
•Branch
The library branch at which the interrogator resides.
• Op Mode
Used in bridge mode to denote the function of the interrogator, including Check In,
Checkout, Drop Box, or Exit. If your site does not use the Bridge Interface, the Op
Mode denotes the function of the interrogator, including Drop Bo x, Exit, or Tag Pad.
2-4 ILS 2.6 User Guide
Figure 2.6
Interrogator Status Section
Page 33
• Status
Operational status of the interrogator (on-line or off-line).
• Details
Shows a history of connections for each interrogator, including IP address, port
number, whether the connection was a connect or disconnect, connection date, and
connection time. The number in parentheses (#) shows how many reconnections were
attempted. (A high number of attempts may indicate network problems.)
This section cannot be hidden from view.
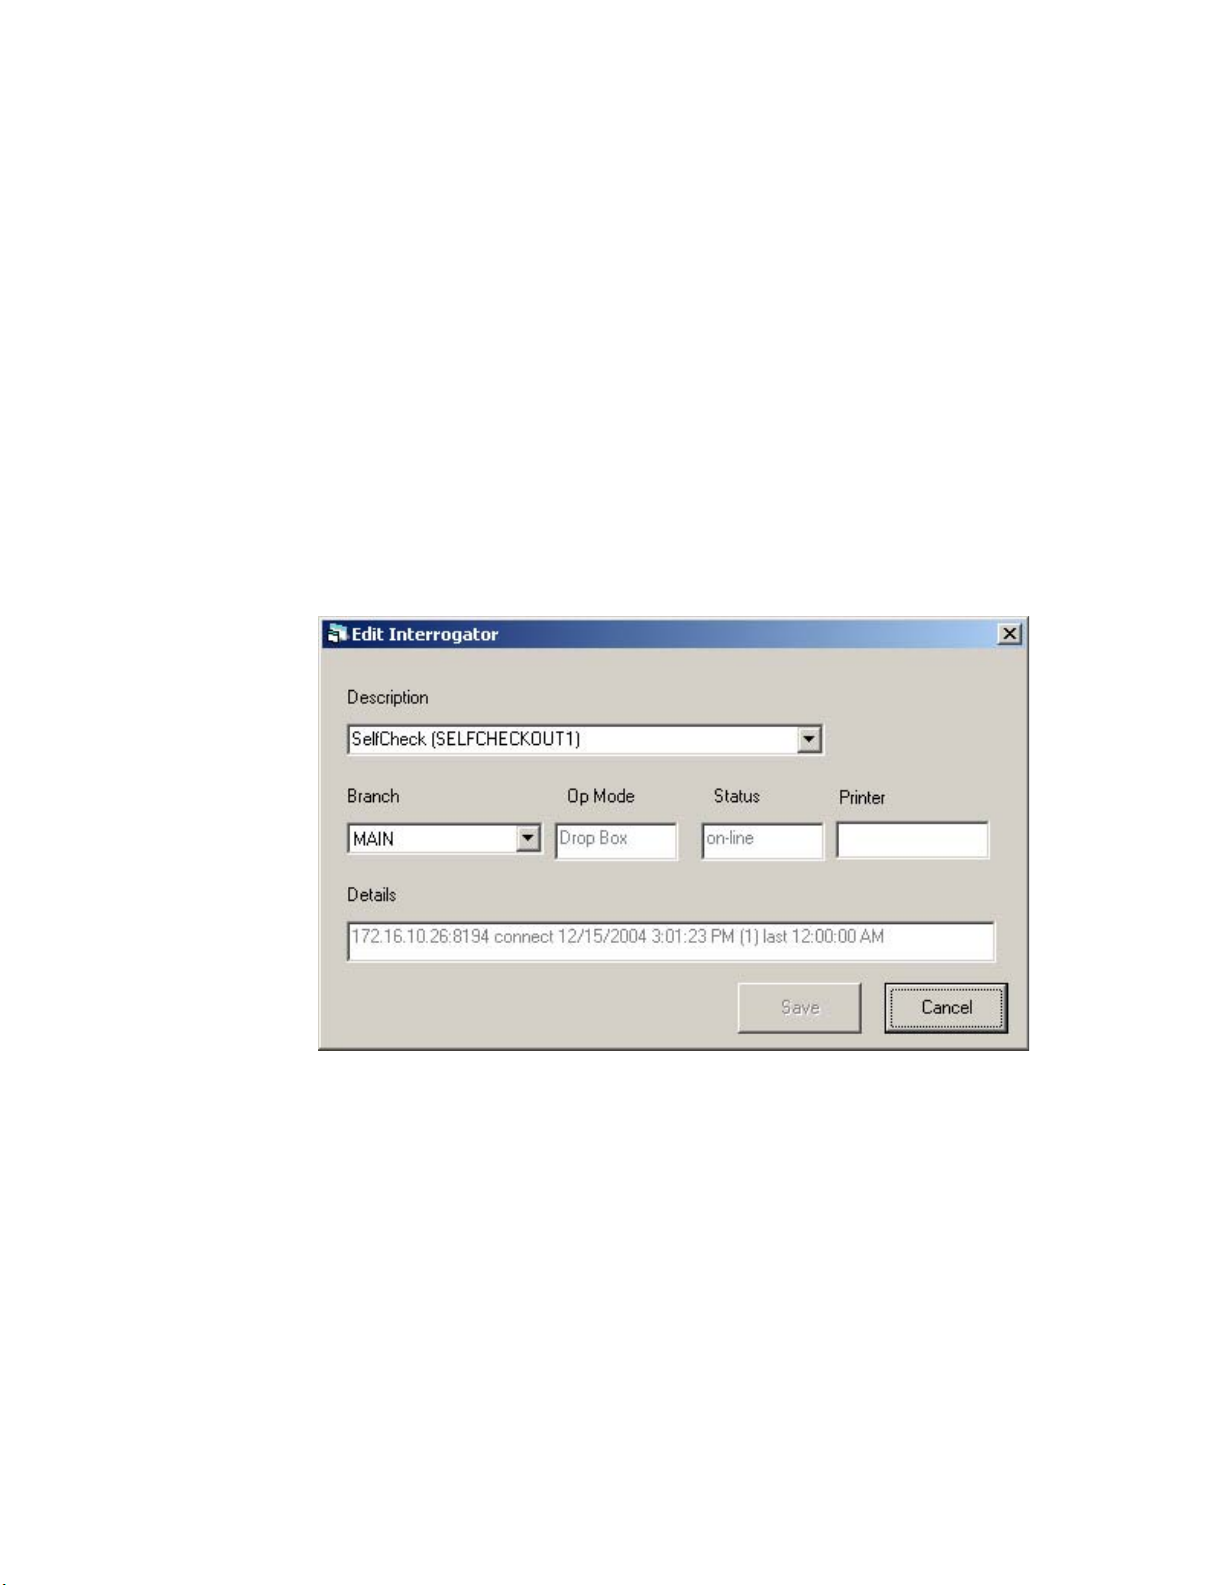
Edit Interrogator
To view or edit the information for an individual interrogator:
1 In the Intelligent Library System Control window, select Maintenance > Edit
Interrogators.
2 Type the ILS username and password in the ILS Login window. The default
username is ils and the default password is maint. The Edit Interrogator window
displays:
Figure 2.7
3
If necessary, use the drop-down list boxes to select the desired Interrogator (desc.)
Edit Interrogator Window
and Branch (Figure 2.7). In the example above, SELFCHECKOUT1 will be assigned
to the Main branch.
4 Make the desired modifications, and click Save. For example, you can change the
description of the component in the Description drop-down menu by typing over the
existing description. Click Cancel to clear any changes you do not wish to save.
5 Close the Edit Interrogator window by clicking the X.
Application Server: Check System Status 2-5
Page 34

Exit Alarms
The Exit Alarms section displays information about each exit alarm that has occurred,
including:
Figure 2.8
• Date and time of exception
• Item identifier
• Book Title of the exception
• Branch at which the exception occurred
• Exit location is the exit gate at which the exception occurred
Exit Alarms Section
Scheduling Checkout Cache Synchronization and Host
Reconnections
Use Task Scheduler to schedule Checkout Cache Synchronization and Host
Reconnections to execute automatically at the desired time. It is recommended that they
occur once each day, during non-circulation hours.
For an explanation of Checkout Cache Synchronization, see “Synchronizing the Checkout
Cache” on page 2-8. You should schedule this task to occur once each day.
Host reconnection refers to re-establishing the Application Server’s connection with the
Library Management System. Various tasks that the LMS performs (such as backup) can
cause it to close its connection to the Application Server. You should schedule the
reconnection to happen after the LMS performs these types of tasks.
To display the Task Scheduler and schedule the tasks:
2-6 ILS 2.6 User Guide
Figure 2.9
Task Scheduler Navigation
Page 35

1 Select Maintenance > Task Scheduler.
Figure 2.10
2
In the ILS Task Scheduler window, click View Current Schedule or Modify Current
Task Scheduler Menu
Schedule, depending on which task you want to perform. View Current Schedule does
not allow you to change the schedule.
3 Type the ILS username and password in the ILS Login window. The default
username is ils and the default password is maint.
4 Click OK to log in to the Task Scheduler. The Task Scheduler window displays:
Figure 2.11
In the ILS Task Scheduler dialog box, enter the following information:
5
a Type a Task ID number. Valid Task ID numbers are:
Task Scheduler dialog box (Modify)
3200 = Checkout Cache Synchronization
3201 = Host Reconnect
3401 = Transaction Purge (marks for deletion records older than 14 days in
Transaction database)
3402 = Transaction Compact (deletes marked records in Transaction database)
Application Server: Scheduling Checkout Cache Synchronization and Host Reconnections 2-7
Page 36

b Click the Disable Task checkbox to override the scheduled time that the task
should run. The task will not run until you clear the checkbox.
c Enter a name for the task.
d Select whether the task should be run Weekly/Daily or Monthly.
If you select Monthly, enter the day of the month on which the task should run.
e For each day of the week that you want the task to run, enter a time to start the task.
If you do not want the task to run on a particular day, leave that day’s time field
empty or clear it, as needed.
Note Be sure to schedule Checkout Cache Synchronization to occur soon after the checkout cache file is
transferred from the LMS to the Application Server by the library staff.
You can scroll to different tasks using the arrows at the bottom of the window.
f To save your changes, click Save, then click Close at the bottom of the dialog box.
To ignore changes, click Cancel.
Synchronizing the Checkout Cache
Under normal conditions, you schedule the Checkout Cache to synchronize automatically.
However, Field Service personnel may ask you to perform this task manually or they may
perform the task themselves.
Checkout cache synchronization works as follows:
1 Each night, the library staff generates a list of item identifiers of checked-out material
from the LMS. The library staff transfers this checkout cache file to the C:\inetpub\
ftproot directory on the Application Server.
2 Checkout Cache Synchronization should be scheduled to occur after the checkout
cache file is transferred to the Application Server.
3 When the Checkout Cache synchronizes, the Application Server deletes its own, older
version of the checkout cache file, and uses the newly transferred file as its new
checkout cache file.
To manually synchronize the Checkout Cache:
1 If have not already done, transfer the latest checkout cache file from the LMS to the
Application Server.
2
From the menu, select Maintenance > Checkout Cache > Synchronize.
2-8 ILS 2.6 User Guide
Figure 2.12
Synchronize Checkout Cache
Page 37

3 Type a user name and password in the ILS Login dialog box and click OK. The
default username is ils and the default password is maint. The Checkout Cache
Synchronize window displays.
Figure 2.13
In the Checkout Cache Synchronize window, navigate to and select the checkout cache
4
Checkout Cache file location
file (the one that was downloaded from the LMS), usually located at c:\InetPub\
FTPRoot. The name of the file is customizable for each library.
5 Click Open to start the synchronization.
When Checkout Synchronization begins, a “cache synchronization in progress”
message displays.
Figure 2.14
Cache synchronization in progress message
A message displays when the process is successfully completed.
Figure 2.15
Cache synchronization complete message
Application Server: Synchronizing the Checkout Cache 2-9
Page 38

Downloading Inventory from the Portable Reader
Downloading inventory information is a two-step process. First, you download the
information from the Portable Reader to the Intelligent Library Controller. Then the
Intelligent Library Controller converts the information to the inventory file format used by
the LMS and copies it to a directory from which the LMS accesses it (using FTP).
To download inventory information from the Portable Reader to the Intelligent Library
Controller:
1 Dock the Portable Data Terminal in its docking station. Inventory transfer begins
immediately.
Figure 2.16
2
Once complete, click Close to close the window. The inventory file is now ready to be
uploaded by the LMS.
Portable Reader Operations Screen - Automatic Transfer
2-10 ILS 2.6 User Guide
Page 39

Generating Reports
This section describes the ILS reports provided by the Intelligent Library Controller and
gives instructions for generating them. Available reports include:
• Checkout Discrepancy Report
Use this report only if your site allows off-line processing. This report lists off-line
checkout events that were rejected by the LMS after it returned to on-line processing.
See “Checkout Discrepancy Report” on page 2-14.
• Patron Discrepancy Report
Use this report only if your site allows off-line processing. This report lists off-line
patron status events that were rejected by the LMS after it returned to on-line
processing. Before you can successfully generate this report, you must use the Offline
Synchronize function (see “Synchronize Offline Transactions” on page 13-3) to move
off-line transactions into the transaction database. See “Patron Discrepancy Report” on
page 2-15.
• Generic Reports
You specify this report’s parameters to create custom reports. See “Generic Reports”
on page 2-18.
• Exit Alarm Report
This report lists items that caused an alarm at specified exits. See “Exit Alarm Report”
on page 2-21.
• Check In Report
This report lists items that failed to check in or that require special handling. See
“Check In Report” on page 2-23.
After generating a report, you can view or print it. If you generate a report for a specific
branch, you can save, view, or print it; or view later from an ILS Remote Monitor at
another location. You cannot generate Intelligent Library Controller reports when using
ILS Remote Monitor. See “Using ILS Remote Monitor” on page 5-8 for further details.
You can navigate to the most commonly requested reports (Checkout Discrepancy, Patron
Discrepancy, and Exit Alarm) by using the buttons on the button bar, as well as the
Reports menu.
Application Server: Generating Reports 2-11
Page 40

Specifying a Time Period for Any Report
You can specify a time period in one of three ways:
• “Choose a Time Period”
• “Use the Calendar”
• “Enter the From and To information” yourself
Choose a Time Period
1 Choose the time period by using the drop-down list labelle d Time Period of Interest.
Choices include: Today, Yesterday, This Week, Last Week, This Month, Last Month,
and All Data.
2 Enter a From and To time, or leave the fields blank to accept the default times:
From = 12:00:00 A.M.
To = 11:59:59 P.M.
2-12 ILS 2.6 User Guide
Figure 2.17
Time Period fields
Page 41
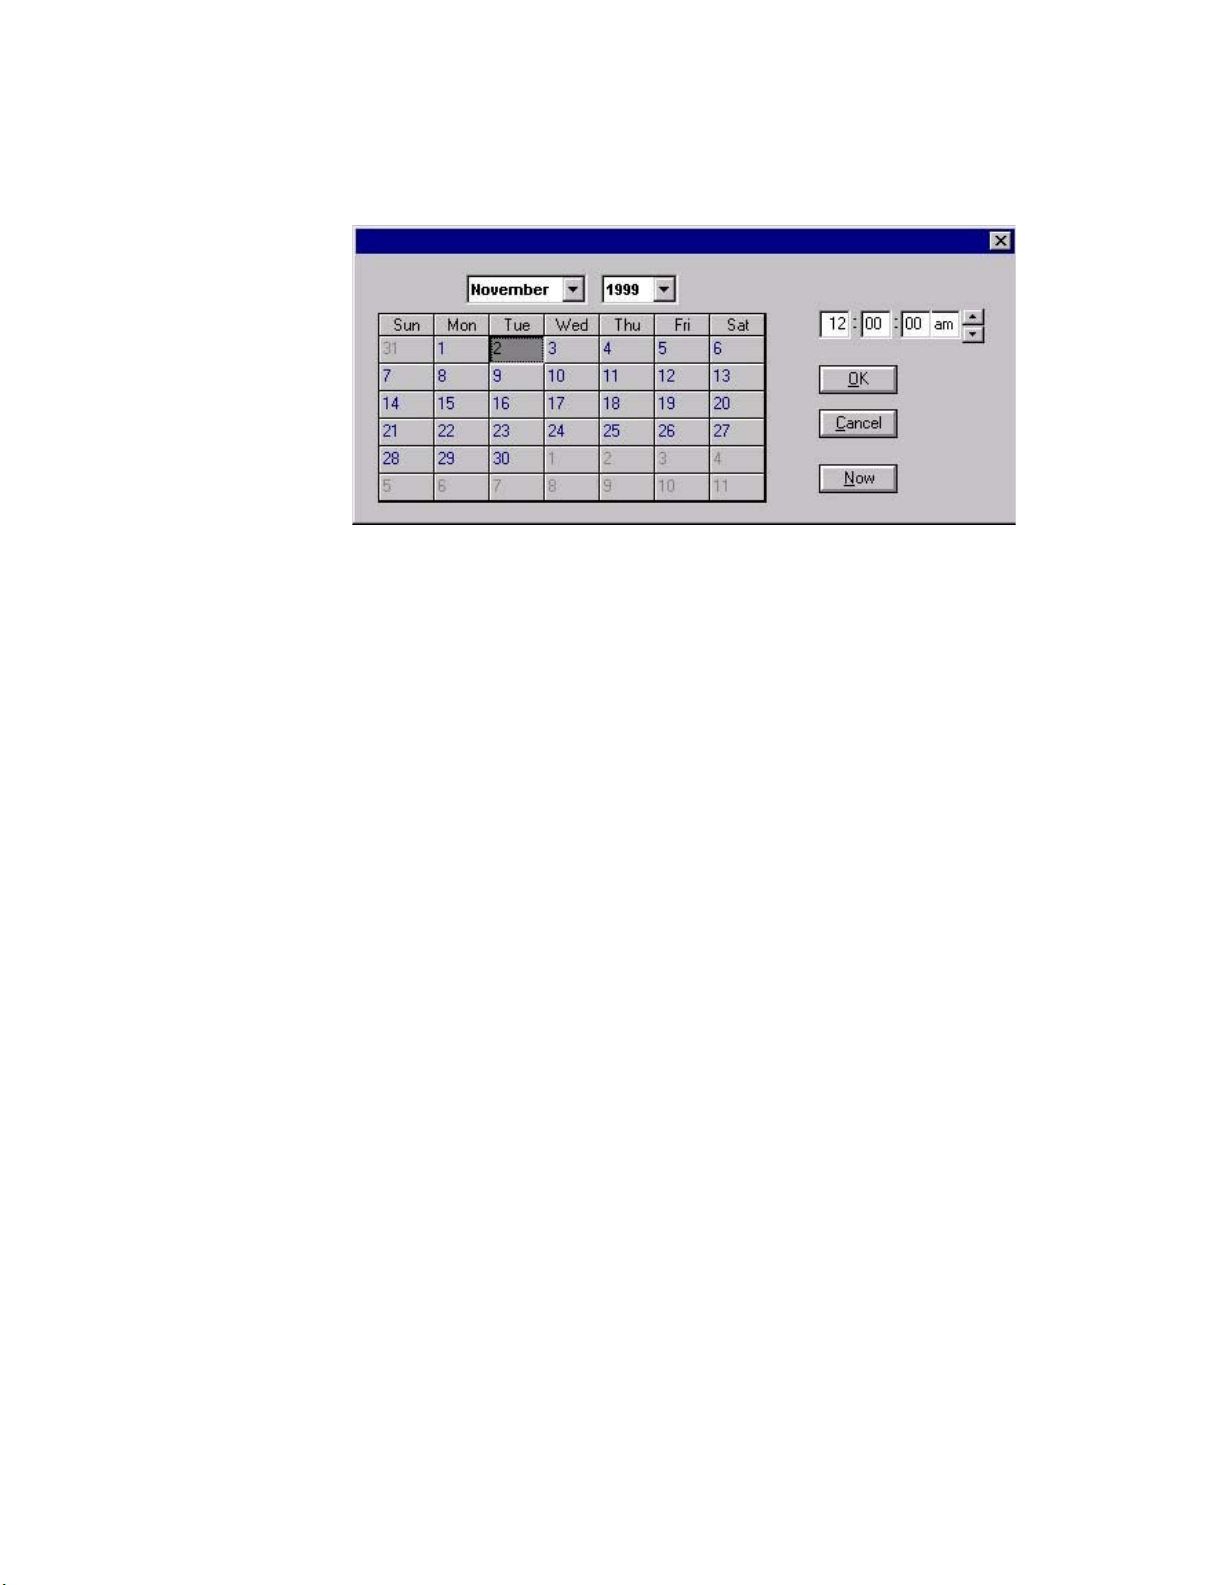
Use the Calendar
1 Click From (or To) to display the calendar form.
Figure 2.18
Select the month and year from the drop-down lists.
1
2 Select the day from the calendar table.
3 Specify the time. Enter the time yourself, or select the time by pressing the up-down
Calendar
arrow buttons at the end of the field. Click Now to use the current time.
4 Click OK.
Enter the From and To information
In the From and To fields, enter the date and time yourself. Valid date and time
formats include:
Date: MM/DD/YY or MM/DD/YYYY
Time: HH:MM AM or PM
Application Server: Generating Reports 2-13
Page 42

Checkout Discrepancy Report
Use this report only if your site allows off-line processing. This report lists off-line
checkout events that were rejected by the LMS after it returned to on-line processing.
Before you can successfully generate this report, you must use the Offline Synchronize
function (see “Synchronize Offline Transactions” on page 13-3) to move off-line
transactions into the transaction database.
When the LMS returns on-line, use the Offline Synchronize function (see “Synchronize
Offline Transactions” on page 13-3) to move off-line transactions into the transaction
database.
To generate the Checkout Discrepancy Report:
1 In the Intelligent Library System Control window, select Reports > Checkout
Discrepancy, or click the Checkout Discrepancy Report button.
In the Specific Report: Checkout Discrepancy List window, enter the time period for
2
which to run the report. See “Specifying a Time Period for Any Report” on page 2-12
for details on the different ways to enter time criteria.
3 If desired, enter the Item ID of the specific item for which you are searching for which
you are searching.
4 If desired, restrict the report to a specific branch by selecting that branch in the Branch
drop-down list box. If selected, you will have the ability to save the report for viewing/
printing in ILS Remote Monitor.
2-14 ILS 2.6 User Guide
Figure 2.19
Checkout Discrepancy List window
Page 43

5 Click Generate Report. The report displays.
Figure 2.20
Resolve any discrepancies using the Library Management System.
6
Sample Checkout Discrepancy Report
The Checkout Discrepancy Report contains the following fields.
Table 2.1
Field Name Possible
Branch Name of branch The branch at which the discrepancy occurred.
Patron Identifier ID Number The patron ID number in this transaction.
Transaction Date Date/Time Date and time of the transaction.
Item Identifier ID Number The item number in this transaction.
Title Book title Book title.
Station Name Name of Station Station where the transaction occurred.
Final Transaction Date Date/Time The date and time that an off-line incomplete transaction was synchronized.
Screen Message Text Message Message returned from the LMS for this transaction.
Checkout Discrepancy Report Field Names and Data Description
Data Description
Field Data
Patron Discrepancy Report
Use this report only if your site allows off-line processing. This report lists off-line patron
status events that were rejected by the LMS after it returned to on-line processing. Before
you can successfully generate this report, you must use the Offline Synchronize function
(see “Synchronize Offline Transactions” on page 13-3) to move off-line transactions into
the transaction database.
To generate the Patron Discrepancy Report:
1 When the LMS returns to an on-line state, use the Offline Synchronize function (see
“Synchronize Offline Transactions” on page 13-3) to move off-line transactions into
the transaction database.
Application Server: Generating Reports 2-15
Page 44

2 In the Intelligent Library System Control window, select Reports > Patron Status
Discrepancy, or click the Patron Discrepancy Report button. The Patron Status
Discrepancy window displays:
Figure 2.21
3
In the Specific Report: Patron Discrepancy List window, enter the time period for
Patron Status Discrepancy List window
which to run the report. See “Specifying a Time Period for Any Report” on page 2-12
for details on the different ways to enter time criteria.
4 If desired, enter the Patron ID for which you are searching.
5 If desired, restrict the report to a specific branch by selecting that branch in the Branch
drop-down list box. If selected, you will have the ability to save the report for viewing/
printing in ILS Remote Monitor.
6 Click Generate Report. The report displays.
2-16 ILS 2.6 User Guide
Figure 2.22
Sample Patron Discrepancy Report
Page 45

7 Resolve any discrepancies using the Library Management System.
The Patron Discrepancy Report contains the following fields.
Table 2.2
Patron Discrepancy Report Field Names and Descriptions
Field Name Possible Field Data Data Description
Branch Name of branch The branch at which the discrepancy occurred.
Patron Identifier ID Number The patron ID number in this transaction.
Transaction Date Date/Time Date and time of the transaction.
Station Name Name of Station Station where the transaction occurred.
Final Transaction Date Date/Time The date and time that an off-line incomplete transaction was synchronized.
Screen Message Text Message Message returned from the LMS for this transaction.
Application Server: Generating Reports 2-17
Page 46
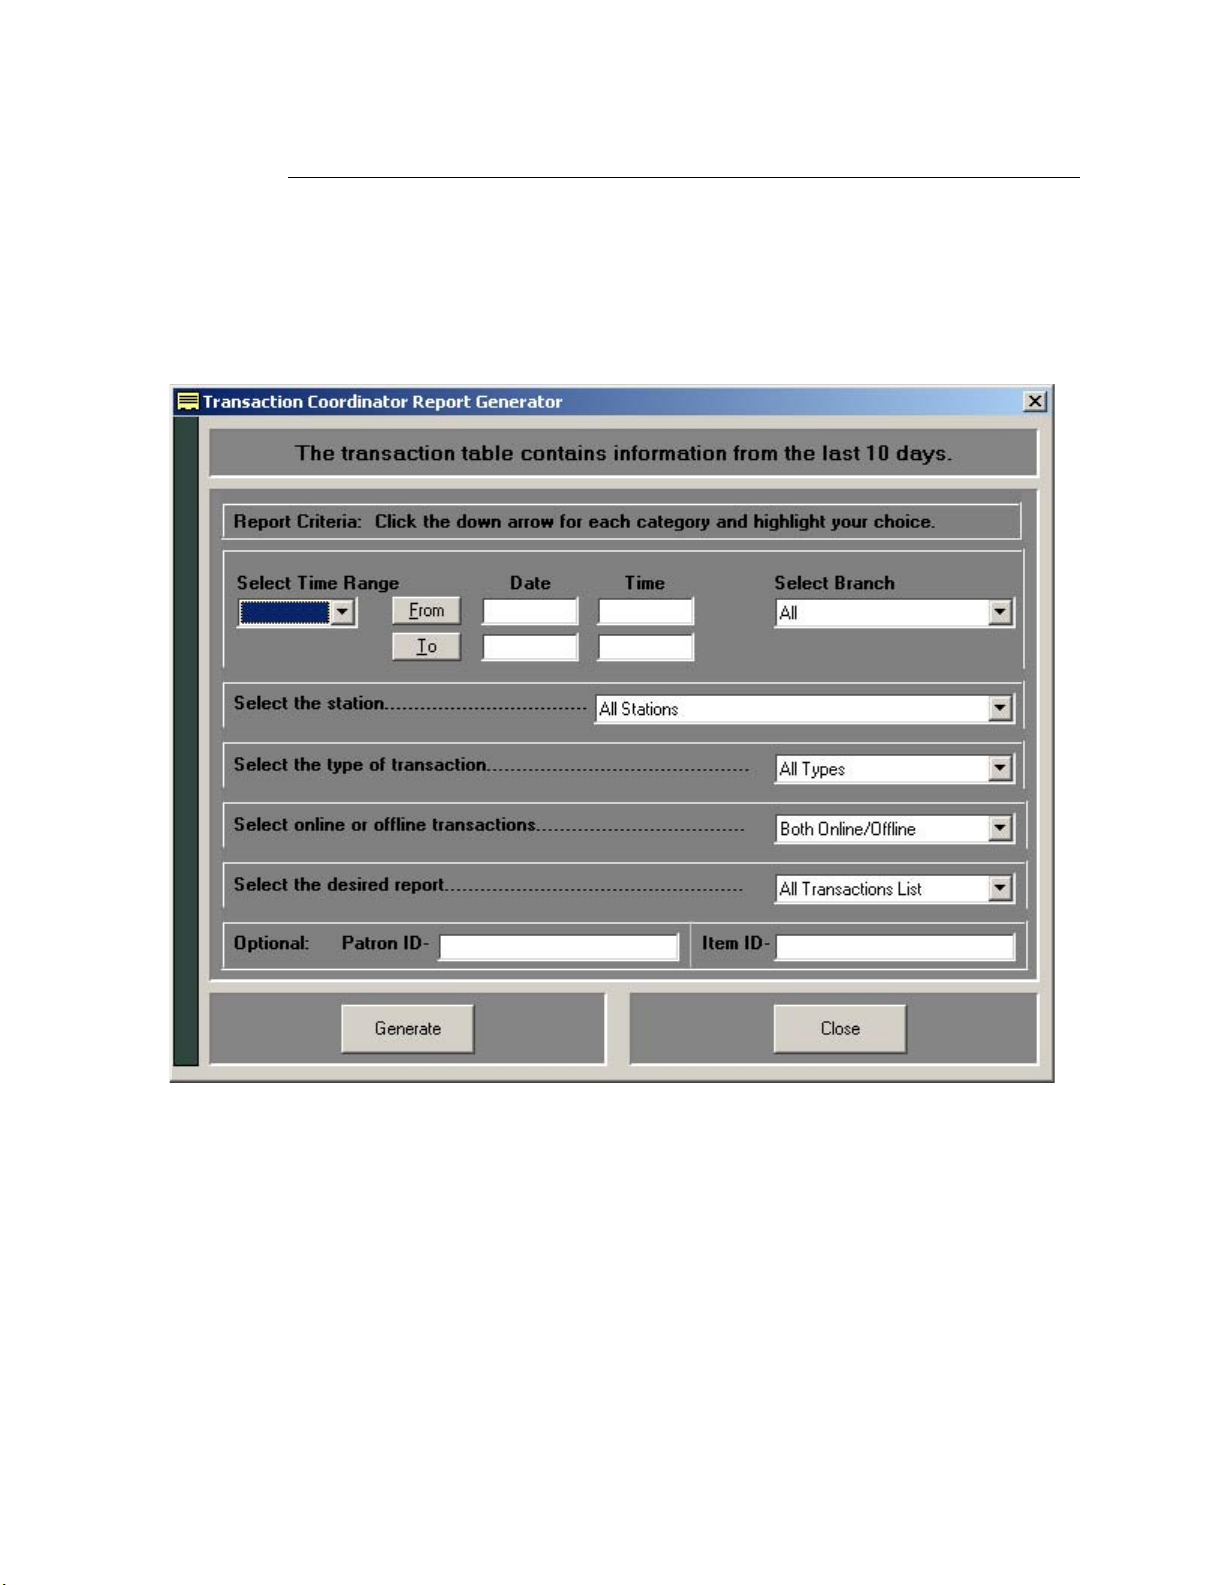
Generic Reports
The Intelligent Library Controller stores all activity, such as patron validation, checkout,
check-in, and exit alarms, as a transaction. You can generate custom reports from these
activities, which list specific transactions and transaction counts.
To generate a Generic Report:
1 In the Intelligent Library System Control window, select Reports > Generic Report.
The Generic Report window displays:
In the Transaction Coordinator Report Generator window, enter the time period for
2
which to run the report. This is the only required field. See “Specifying a Time Period
for Any Report” on page 2-12 for details on the different ways to enter time criteria.
3 In the drop-down lists, select:
a A particular Self-Checkout Station, or keep the default All Stations.
b A particular type of transaction, or keep the default All Types. Choices include:
Check In, Check Out, Patron Status, or Item Information.
c The type of processing, or keep the default Both Online/Offline.
2-18 ILS 2.6 User Guide
Figure 2.23
Generic Report window
Page 47
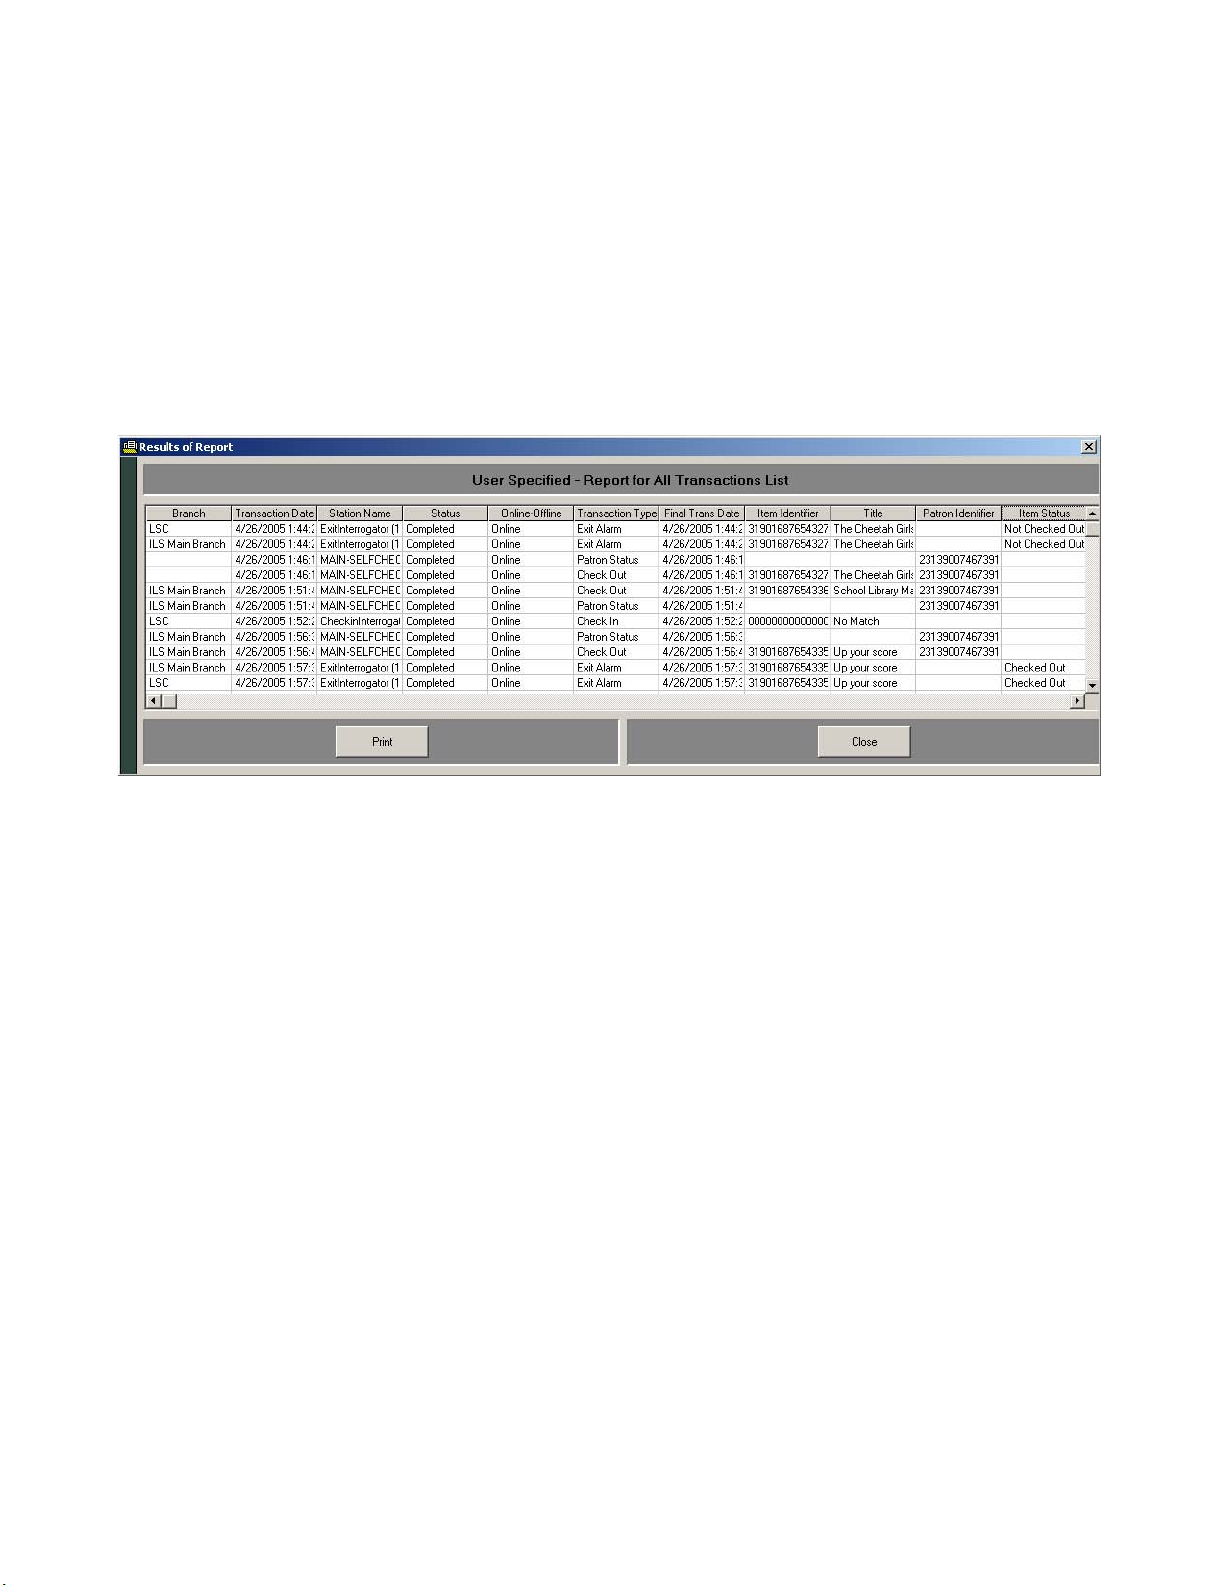
d The type of report to generate (list or count), or keep the default All Transactions
List. Choices include: All Transactions Count, Discrepancy Count, Discrepancy
List, Failed Transaction Count, Failed Transaction List, Successful Transaction
Count, and Successful Transaction List.
4 If desired, enter the Patron ID for which you are searching.
5 If desired, enter the Item ID for which you are searching.
6 If desired, restrict the report to a specific branch by selecting that branch in the Branch
drop-down list box. If selected, you will have the ability to save the report for viewing/
printing in ILS Remote Monitor.
7 Click Generate. The report displays.
Figure 2.24
Sample Generic Report
Application Server: Generating Reports 2-19
Page 48

The Generic Report contains the following fields.
Table 2.3
User Specified - Report for All Transaction List Field Names and Descriptions
Field Name Possible Field Data Data Description
Branch Branch Name of the branc h .
Transaction date Date/Time Date and time of the transaction.
Station Name Name of Interrogator Name of the interrogator where the transaction occurred.
Status Completed The transaction was successfully completed on-line.
Offline-Complete The transaction was an off-line incomplete transaction that was
subsequently successfully completed online during off-line
synchronization.
Offline-Incomplete The transaction was not completed on-line.
Discrepancy The transaction was an off-line incomplete transaction that was
OffLine-OnLine Offline Transaction completed off-line.
Online Transaction completed on-line to the LMS.
Transaction Type Patron Status Patron scans their ID card at a Patron Self-Checkout Station.
Checkin An item automatically checked in to the LMS.
Checkout An item is scanned at the Patron Self-Checkout Station.
ItemStatus An item is scanned at the circulation desk.
ExitAlarm An item generated an alarm at an exit because it was not checked out.
Final Transaction Date Date/Time The date and time that an off-line incomplete transaction was synchronized.
Item Identifier ID Number The item number in this transaction.
Patron Identifier ID Number The patron ID numbers in this transaction.
Item Status Checked Out The item is checked out.
Checked In The item is checked in.
Status Unavailable The item’s status is unknown.
subsequently rejected during off-line synchronization.
8 You can view the reports on the screen, print them, or return to the previous screen.
2-20 ILS 2.6 User Guide
Page 49

Exit Alarm Report
This report lists items that caused an alarm at specified exits.
To generate an Exit Alarm Report:
1 In the Intelligent Library System Control window, select Reports > Exit Alarm, or
click on the Exit Alarm Report button. The Exit Alarm Report window displays:
Figure 2.25
2
In the Specific Report: Exit Alarm Report window, enter the time period for which to
Exit Alarm Report window
run the report. See “Specifying a Time Period for Any Report” on page 2-12 for details
on the different ways to enter time criteria.
3 If desired, restrict the report to a specific branch by selecting that branch in the Branch
drop-down list box. If selected, you will have the ability to save the report for viewing/
printing in ILS Remote Monitor.
Application Server: Generating Reports 2-21
Page 50

4 Click Generate Report. The report displays:
Figure 2.26
Sample Exit Alarm Report
The Generic Report contains the following fields.
Table 2.4
Field Name Possible Field Data Data Description
Transaction date Date/Time Date and time of transaction
Item Identifier ID Number The item number in this transaction
Book Title Book title Name of the book.
Branch Name of branch The branch at which the discrepancy occurred.
Exit Location Name of the exit and/or IP Address Name of the exit
Exit Alarm Report Field Names and Descriptions
2-22 ILS 2.6 User Guide
Page 51

Check In Report
This report lists items that failed to check-in or that require special handling.
To generate the Check In Report:
1 In the Intelligent Library System Control window, select Reports > Check In. The
Check In Report window displays:
Figure 2.27
2
In the Specific Report: Check In Report window, enter the time period for which to
Check In Report window
run the report. See “Specifying a Time Period for Any Report” on page 2-12 for details
on the different ways to enter time criteria.
3 If desired, select a particular check-in station, or keep the default All available.
4 If desired, restrict the report to a specific branch by selecting that branch in the Branch
drop-down list box. If selected, you will have the ability to save the report for viewing/
printing in ILS Remote Monitor.
Application Server: Generating Reports 2-23
Page 52
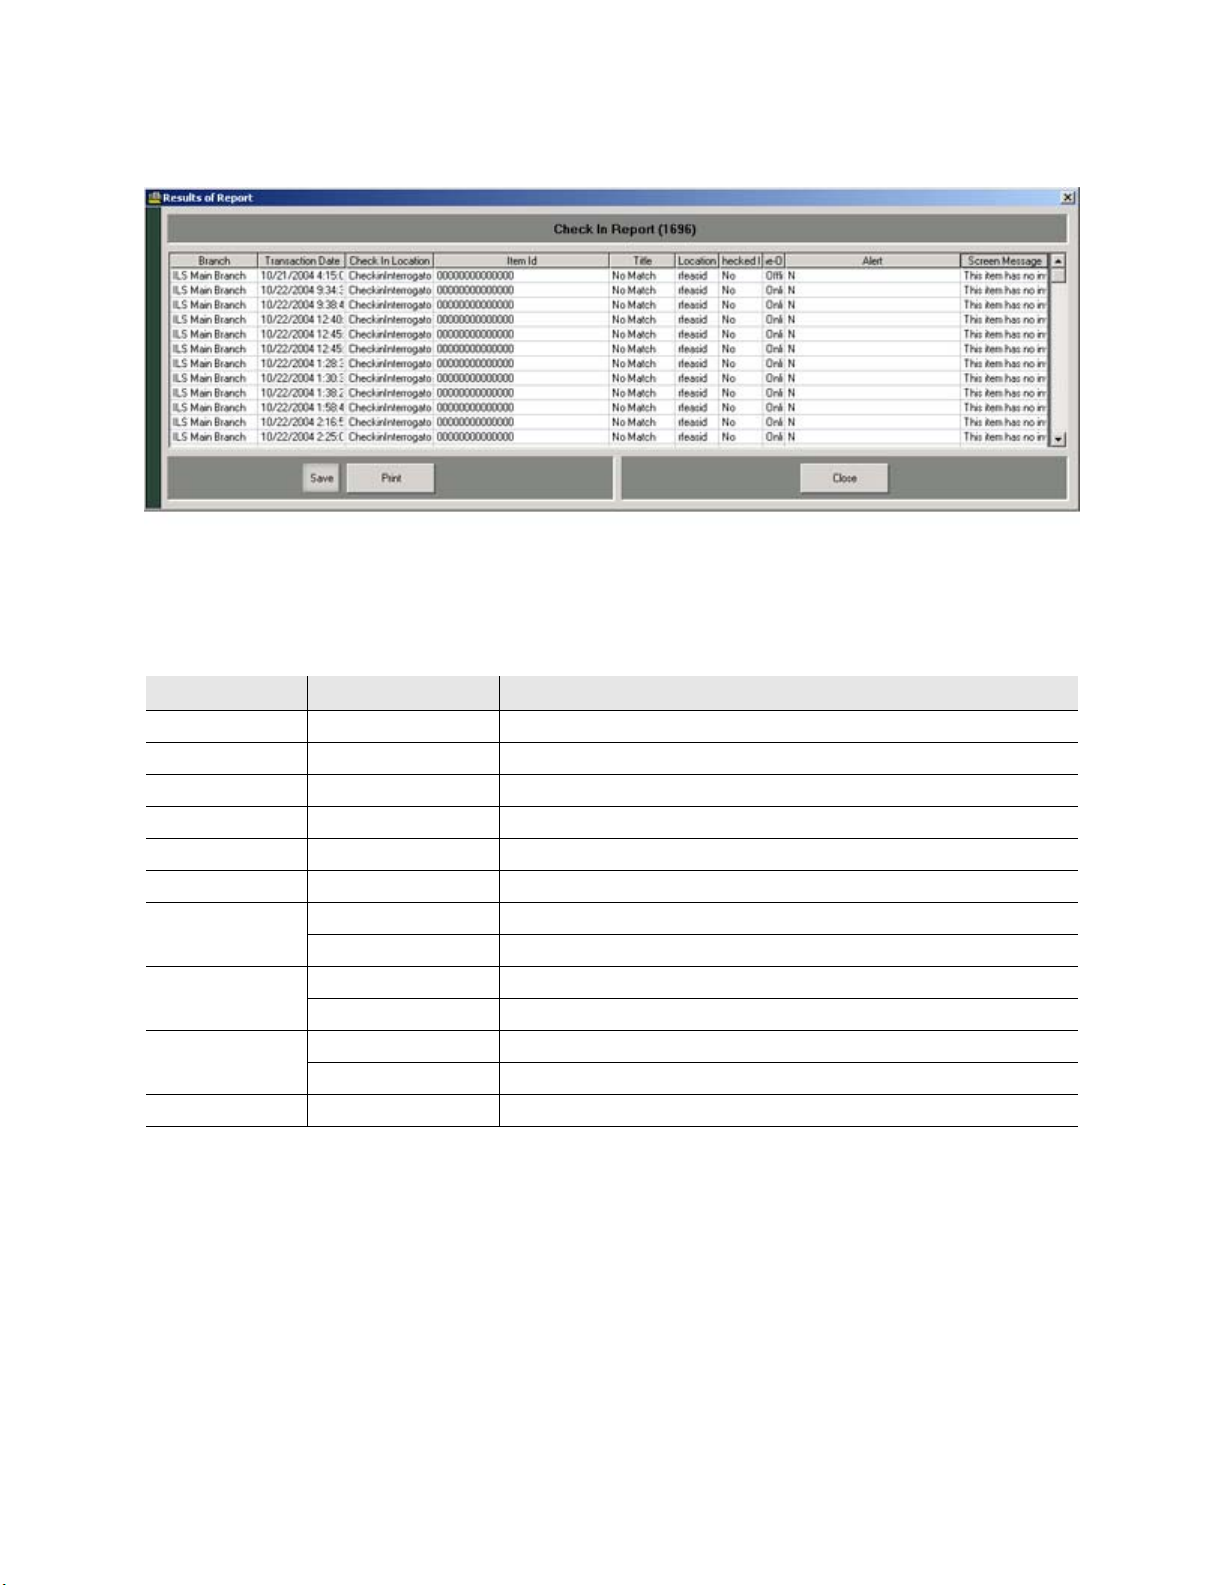
5 Click Generate Report. The report displays:
Figure 2.28
Sample Check In Report
The Check In Report contains the following fields.
Table 2.5
Field Name Possible Fie ld Data Data Description
Branch Name of branch Name of branch at which check-in occurred
Transaction Date Date/Time Date and time of the transaction.
Check-in Location Name of location Location of the check-in station.
Item ID ID Number The item identifier number in this transaction.
Title Item title Title of the item checked-in.
Location Name of location Location of check-in.
Checked-In Y Item was checked in
OFFLine-Online OffLine Transaction completed off-line.
Alert Y An exit alarm was issued.
Screen Message Text of Message The specific error message received from the LMS for this transaction.
Check In Report Field Names and Descriptions
N Item was not che cke d-in.
OnLine Transaction completed on-line to the LMS.
N An exit alarm was not issued.
2-24 ILS 2.6 User Guide
Page 53
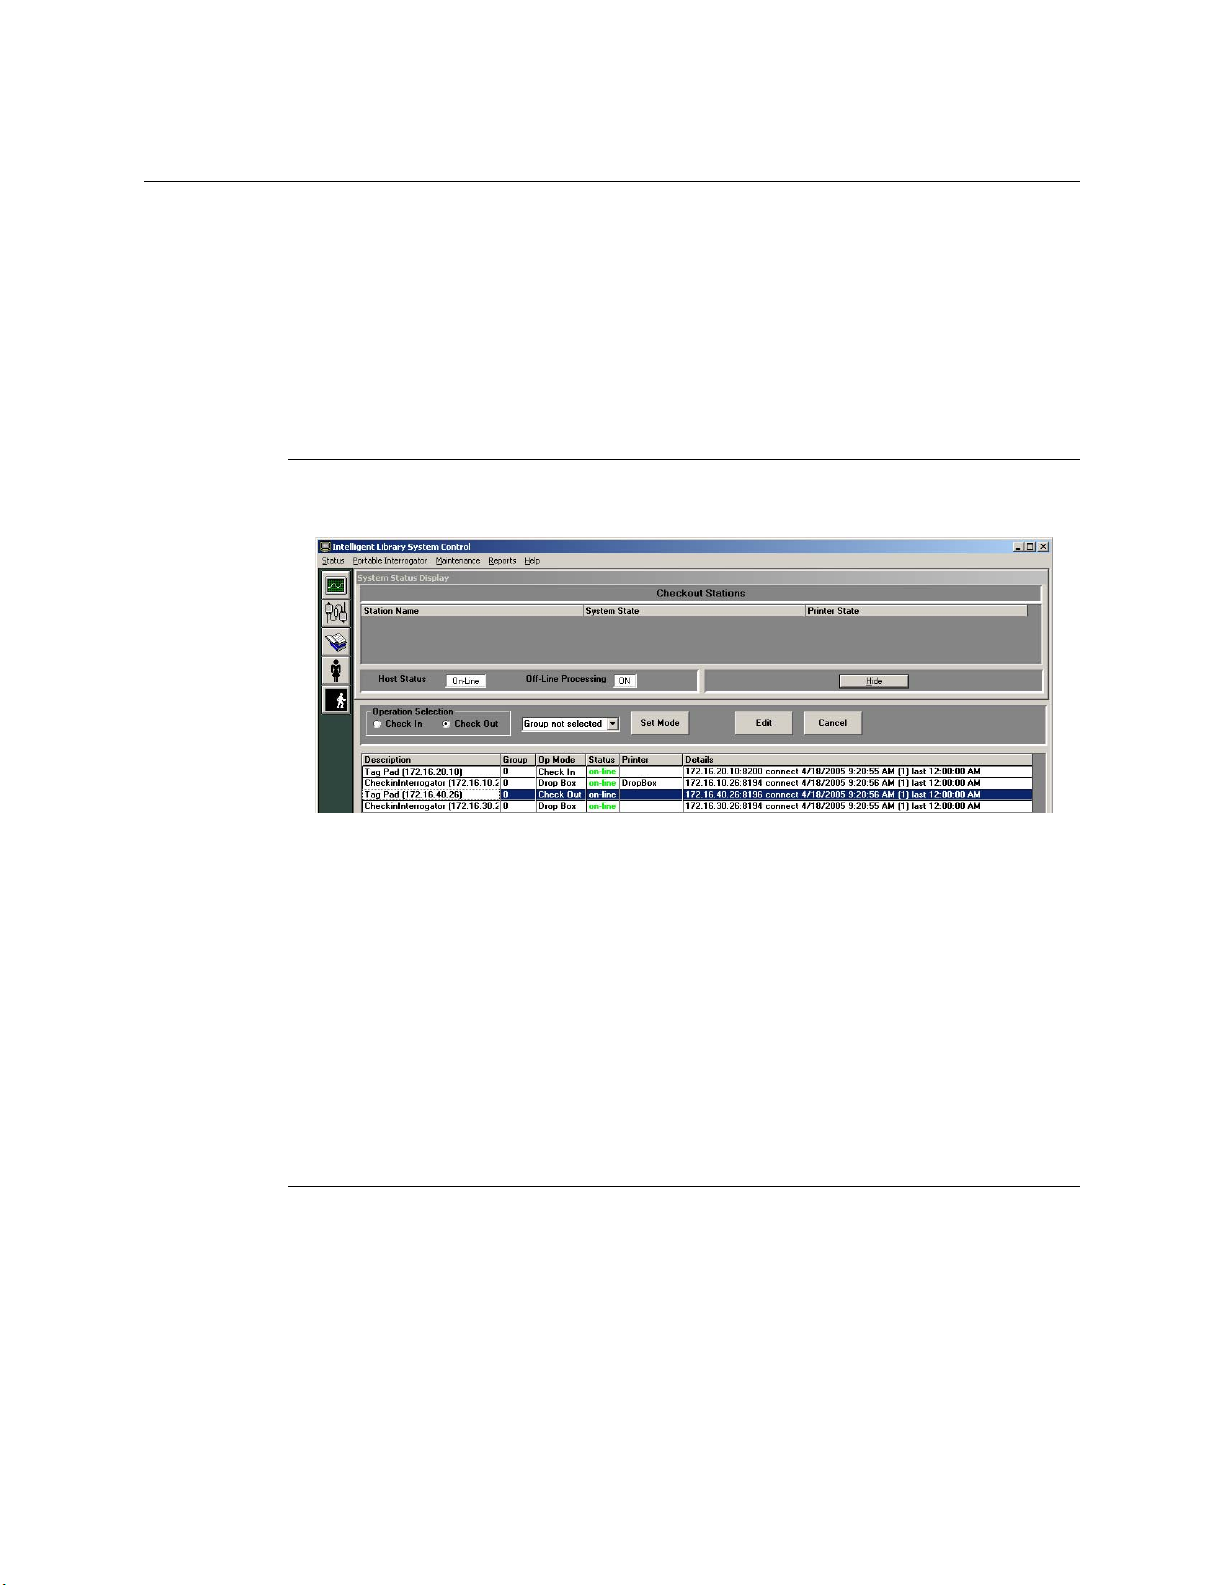
Working with the Bridge Interface
The Bridge Interface allows libraries with non-supported circulation vendors, or no LMS
at all, to use the ILS security and Staff Station reader features. Self-Checkout Stations are
not available when using Bridge mode.
You can change the operation mode of the Staff Station Readers programmed as a tag pad
to either check-in or checkout materials during normal operations. You can also group
individual tag pads together so that you can quickly change a gr oup to either check-in or
checkout personalities.
Changing the Op Mode of a St aff S t ation Reader
In Bridge mode, you can change the function of the Staff Station Reader to become either
a check-in or checkout device.
Figure 2.29
On the Intelligent Library Controller in the Interrogator Status area, select a Staff
1
Station Reader. The description should indicate if the device is a Staff Station Reader
(tag pad).
2 In the Operation Selection field, select either Check In or Check Out, as desired.
3 Click Set Mode. The Staff Station Reader highlighted changes its Op Mode, from
either Check In to Check Out or vice versa, which you verify in the Op Mode column.
4 Click Save to save your changes.
5 Repeat the procedure to change the personality back.
Bridge Mode
Creating St aff S t ation Reader Groups
Staff Station Readers can be grouped together so that you can quickly change the
personality for a group of Staff Station Readers to either check-in or checkout.
1 On the Intelligent Library Controller in the Interrogator Status area, select a Staff
Station Reader.
Application Server: Working with the Bridge Interface 2-25
Page 54
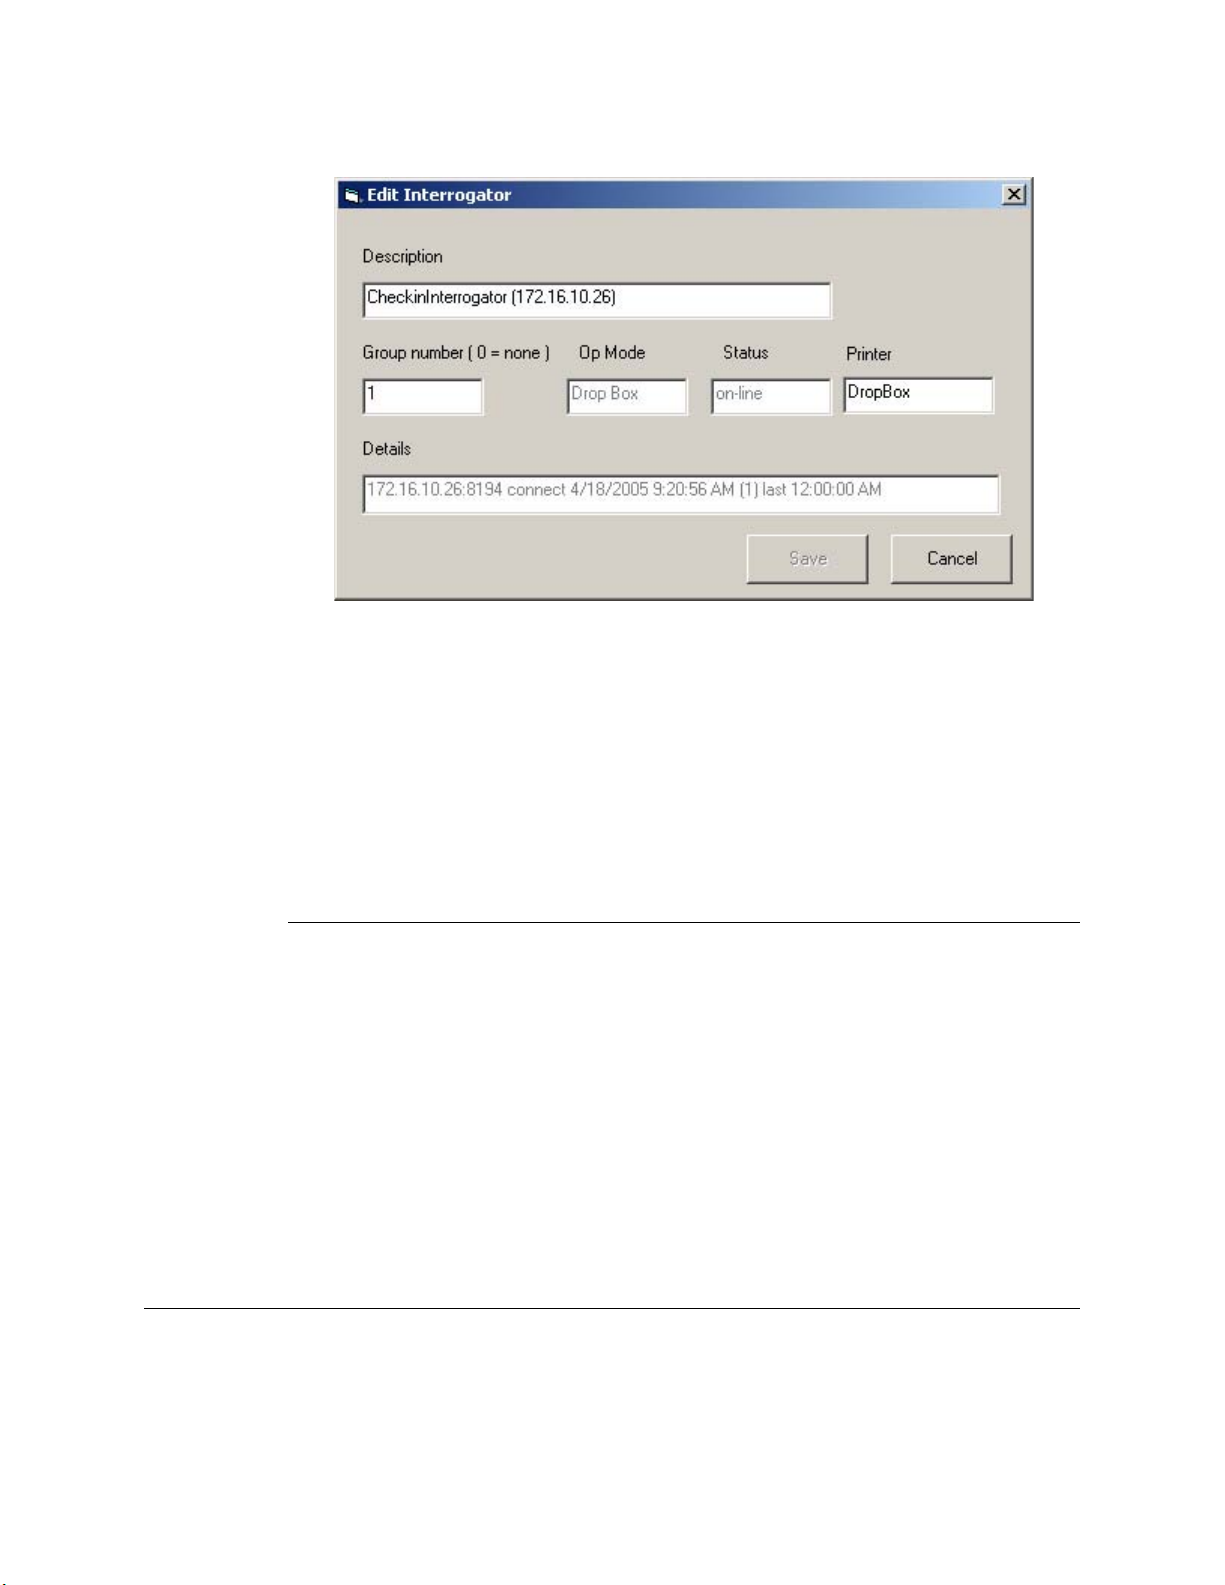
2 Click Edit. The Edit Interrogator window displays.
Figure 2.30
3
Type a Group number in the Group number dialog box.
4 Click Save.
5 Close the window using the top right-hand corner X.
6 Click Save on the main window to save your changes.
7 Repeat step 2 through step 6 for each Staff Station Reader you wish to assign to a
Edit Interrogator Window
group. You can create multiple groups.
Changing the Op Mode of Multiple Staff S tation Readers
Once you have assigned multiple Staff Station Readers to a group number (accomplished
at “Creating Staff Station Reader Groups”), you can now alter the check-in or checkout
personality of a group with one operation.
1 On the Intelligent Library Controller in the Operation Selection area, select the
function desired, either Check In or Check Out.
2 From the drop-down menu next to Operation Selection, select the Group number
desired, for example all Staff Station Readers in Group 1.
3 Click Set Mode. All the Staff Station Readers in Group 1 change to reflect the new
check-in or checkout personality selected.
4 Click Save to save your changes.
Maintenance
See “Intelligent Library Controller System Maintenance” on page 13-1 for information on
maintaining the Application Server.
2-26 ILS 2.6 User Guide
Page 55

Display System Information
To display copyright and version information about ILS:
1 In the Intelligent Library System Control window, select Help > About ILS.
Figure 2.31
Click System Info to see a detailed listing of all components and their versions.
2
Figure 2.32
Help About Navigation
Help About ILS window
Application Server: Display System Information 2-27
Page 56

Notes
2-28 ILS 2.6 User Guide
Page 57

C HAPTER
C
HAPTER
0
P
ATRON
The Self-Checkout Station enables library patrons to check out library materials without
the assistance of library staff. The Self-Checkout Station guides patrons smoothly through
the checkout process with step-by-step instructions to assist in checking out materials
properly. The process is quick, efficient, and (if available) delivers a printed receipt listing
the checked out materials and their due dates.
The Self-Checkout Station delivers data, item identification and its checkout status, to the
Library Management System, which processes the information and updates the library
records. The processing occurs almost instantaneously, allowing a speedy and efficient
checkout.
S
ELF
-C
HECKOUT
S
TATION
Note: The Self-Checkout Station is the same as the CheckStati on II.
Overview
Note: The sample windows shown in this chapter may differ slightl y than the windows shown on your
There are three steps to checking out library material:
• “Presenting a Patron ID Card, Step 1” - Identify yourself with your library card
• “Scanning Items for Checkout, Step 2” - Check out materials
• “Finishing Checkout, Step 3” - Finish and collect your receipt (if available)
The windows on the Self-Checkout Station reflect this order, showing Step 1, Step 2, and
Step 3, identifying the checkout process.
The following pages details the process a patron uses to check out library material.
library’s Self-Checkout Station. Your library may have a different Self-Checkout Station model,
operating environment, welcome logo, or other windows.
Patron Self-Checkout Station: Overview 3-1
Page 58

Beginning a Self-Checkout St ation Session
If the Self-Checkout Station is configured to use multiple languages, the first window
shown is the ILS multiple language welcome window.
Figure 3.1
ILS Multiple Language Welcome window
If configured to use a single language, the first window shown is the ILS single language
welcome window.
Figure 3.2
Touch the screen or select a language to begin the checkout process.
1
ILS Single Language Welcome window
• Some libraries support multiple institutions. If so, you are presented with a multiple
institution selection window in which you select the correct institution.
2 After you have removed your finger, the image changes to the Patron Identification
window.
3-2 ILS 2.6 User Guide
Page 59

Presenting a Patron ID Card, Step 1
Have your patron ID card ready and follow the instructions shown on the window, seen
here.
Figure 3.3
On the right side of the window, you are given visual instructions on how to present
1
Patron Identification window
your patron ID card for authorization. Your ID card may be different than the type of
ID card illustrated in the sample Patron Identification window; if so, simply follow the
visual instructions on the Patron Identification window specific to your institution.
2 If you have been authorized to check out items, the Item Entry window is displayed.
3 If your site uses the optional CheckPASS feature that allows library patrons to pay
library fees at a Self-Checkout Station, and if you owe fees to the library, you are
prohibited from checking out library material until the fee is paid. See “CheckPASS”
on page 11-1 for details.
Patron Self-Checkout Station: Presenting a Patron ID Card, Step 1 3-3
Page 60
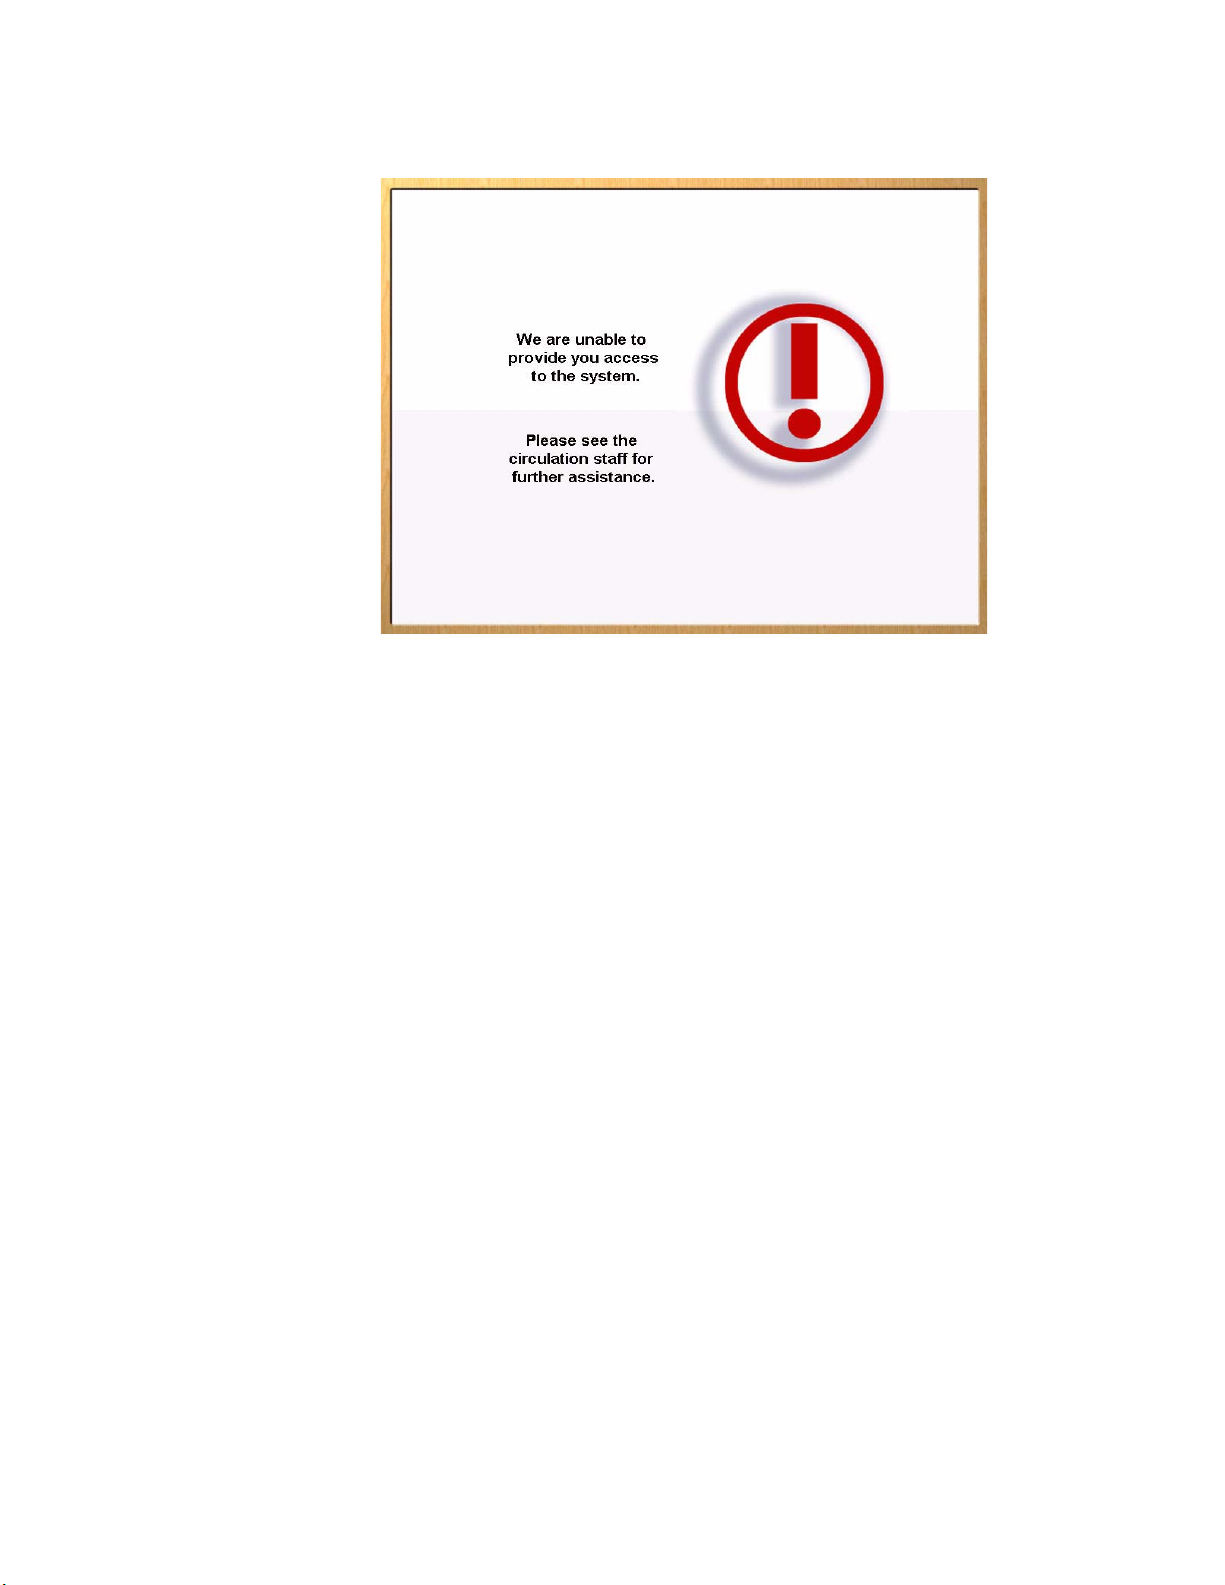
4 If you have not been authorized, the Patron Identification Failure window appears.
Figure 3.4
Patron Identification Failure window
Contact the librarian desk for further assistance. After a short period the Welcome window
is displayed again allowing normal checkout procedure.
3-4 ILS 2.6 User Guide
Page 61
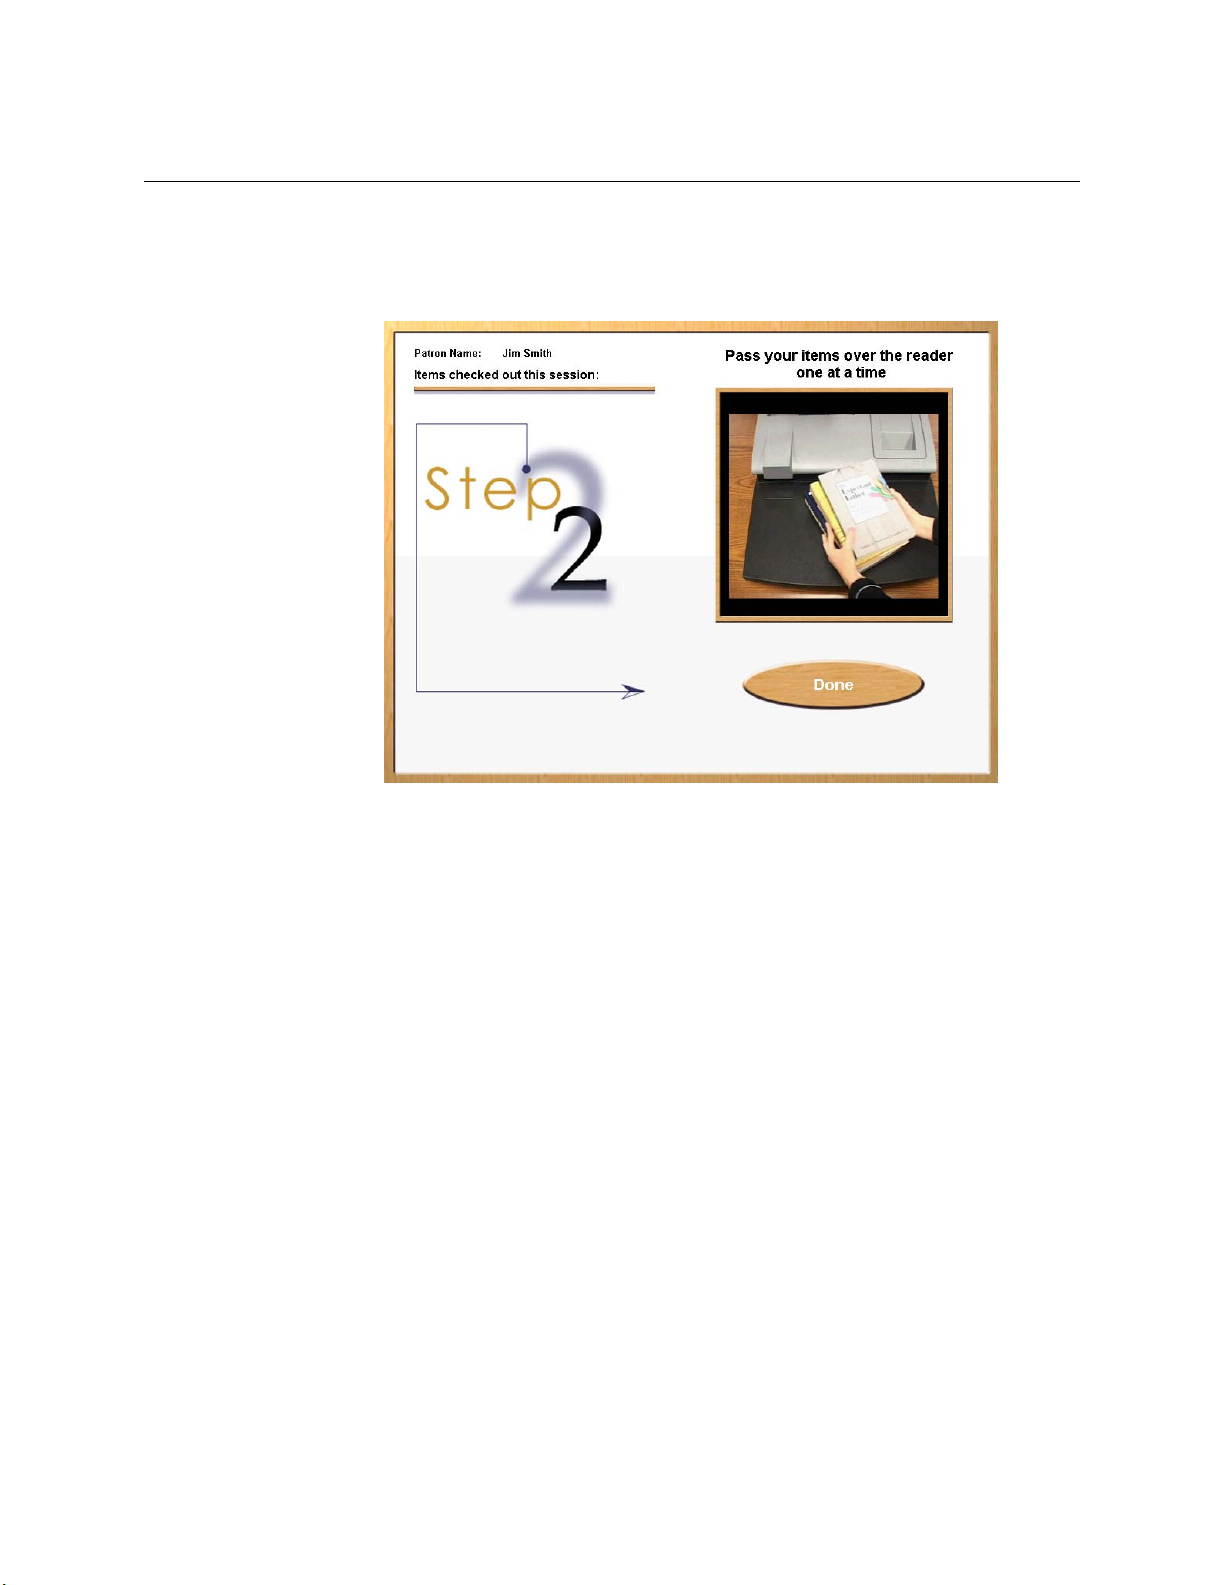
Scanning Items for Checkout, Step 2
Once authorized for checkout, the window advances and instructions appear on how to
check out each item. On the left side of the window, the patron’s name displays at the top.
Once you have checked out items, a list of those items displays as shown in the Items
Identification window - Item List shown below.
Figure 3.5
Take one (or more) of the items you wish to check out and slowly pass it over the
1
surface area of the item identification pad. You do not need to slide it on the pad in
order for the item to be identified. Simply move the item over the pad in a smooth
fashion, about 4 inches (10 cm) above the pad area.
Item Identification window - Begin
Patron Self-Checkout Station: Scanning Items for Checkout, Step 2 3-5
Page 62

2 Repeat the above step for each item you want to check out. As you pass the item over
the pad, the system identifies each item and lists it on the left side of the window. Some
institutions may provide additional information along with the item name.
Figure 3.6
Items Identification window - Item List
At anytime in the checkout process you may touch Done to complete your checkout
session. The Done button is on the right bottom of the window.
If you have checked out more items than can display on the window, the list
automatically scrolls to show the most recent items at the top of the list. To see items
that have already scrolled off the bottom of the list, touch the Down Arrow. Press the
Up Arrow to see the most recent items checked out.
3
Press Done to end your session.
3-6 ILS 2.6 User Guide
Figure 3.7
Items Identification window - Scroll
Page 63

Viewing Items that Could Not be Checked Out
If any item you tried to check out is not accepted, a message appears indicating the system
was unable to process the item. Listed are the title (if available) of the item and the reason
for denied access. If the title is not available, No Match appears next to Title.
Figure 3.8
Item Identification window - Failure
If numerous items have been rejected so that all cannot be fully displayed on the left, a
scroll bar appears to the right of the list. To see items that have already scrolled off the
bottom of the list, touch the Down Arrow. Press the Up Arrow to see the most recent
items.
Contact your librarian for assistance with items that were not successfully checked out.
You may continue with the check out of additional items by returning to the Item
Identification window.
Press Continue to continue your session.
Patron Self-Checkout Station: Scanning Items for Checkout, Step 2 3-7
Page 64

Finishing Checkout, Step 3
The Step 3 window displays when you have finished checking out all your items and
touched Done. The window instructs you to collect your printed receipt and shows you the
total number of items checked out.
Collect the printed receipt from the receipt dispenser. Your receipt lists the items you have
checked out as well as the return due date for each item.
Note: Some institutions may not provide a printed receip t.
Loading Roll Paper
When the paper runs low or out, follow these directions for replacing the roll paper for the
Self-Checkout Station’s printer.
Figure 3.9
End Session window
3-8 ILS 2.6 User Guide
Page 65
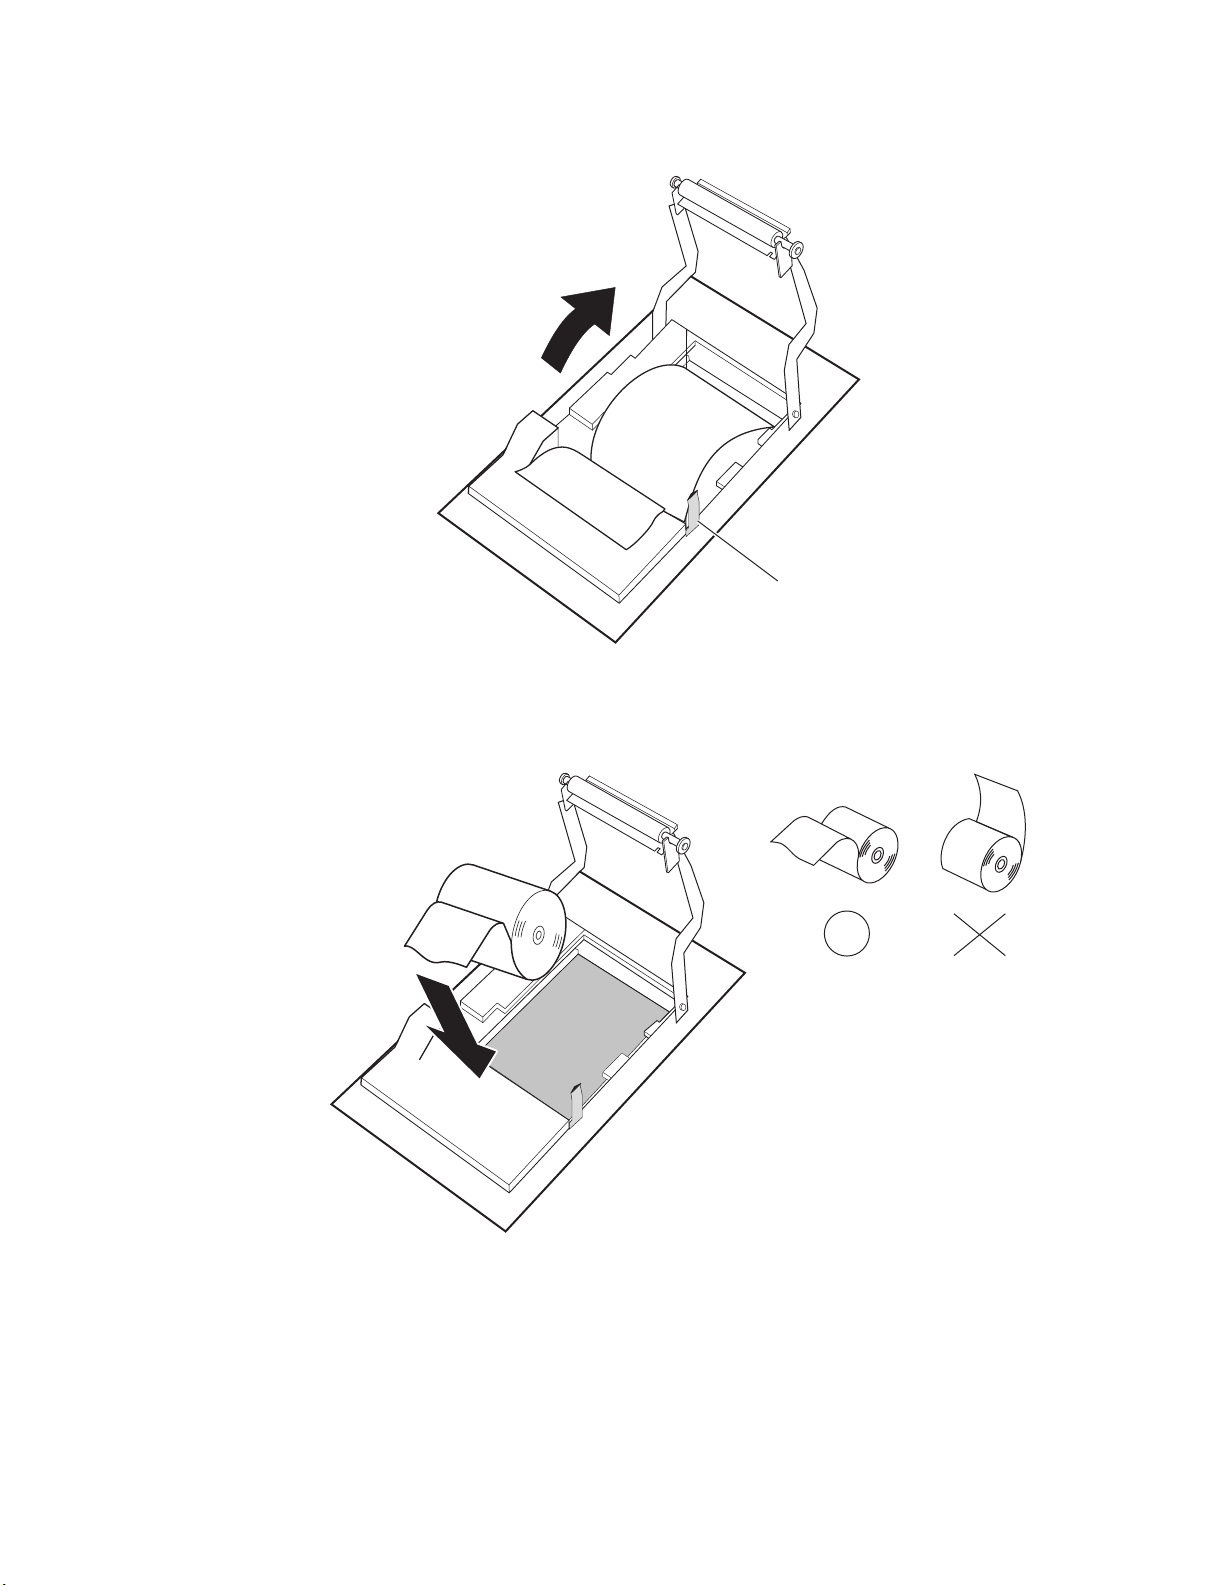
1 Remove the printer cover on the Self-Checkout Station.
Paper Roll
Release Lever
Figure 3.10
Press the paper roll release lever to the front of the unit and swing the paper guide up
2
Paper Roll Release
and away from the printer.
Do not insert paper
in this direction.
Figure 3.11
Insert paper in
this direction.
Insert Paper
Remove the empty roll and lower in the new roll, with the paper facing the correct
3
direction.
Patron Self-Checkout Station: Loading Roll Paper 3-9
Page 66

4 Pull the paper out a bit, as seen below in Figure 3.12, “Lower the Paper Guide.”
Figure 3.12
5
Rotate the paper guide back down until you position the guide in between the main roll
Lower the Paper Guide
and the paper fed underneath the paper guide.
6 Once the paper guide clicks into place, the paper cutter should activate and partially cut
the paper. If not, then reseat the paper guide again. If the cutter still fails to activate,
reboot the Self-Checkout Station and try again.
Powering On the Self-Checkout St ation
The following procedure powers on a Self-Checkout Station:
Power On/Off Switch
Figure 3.13
Turning On the Self-Checkout Station
On the back panel of the Self-Checkout Station, flip on the power switch.
1
2 The Self-Checkout Station starts, logs in, and launches the CheckPC program
automatically.
3-10 ILS 2.6 User Guide
Page 67

Powering Off the Self-Checkout St ation
The following procedure shuts down a Self-Checkout Station using CheckVIEW:
1 Launch CheckVIEW on the library staff’s computer by clicking Start > Programs >
Checkpoint Systems > CheckVIEW Monitor from the library staff’s computer.
2 Access the specific Self-Checkout Station by selecting View from the menu and then
select one of the Display (1-4) options for the desired Self-Checkout Station.
3 On the keyboard, press CTRL + SHIFT + DEL.
4 Click Shut down. The Self-Checkout Station enters a shut down sequence until it
states that Self-Checkout Station can be turned off.
Power On/Off Switch
Figure 3.14
Go to the Self-Checkout Station and turn off the power switch.
5
Turning Off the Self-Checkout Station
Patron Self-Checkout Station: Loading Roll Paper 3-11
Page 68

Notes
3-12 ILS 2.6 User Guide
Page 69

Overview
C HAPTER
C
HAPTER
0
P
ORT ABLE
The Portable Reader is an easy-to-use wireless long range reader that changes how library
staff take inventory. The Portable Reader combines convenience with versatility, using a
lightweight, handheld portable data terminal connected to an exte ndable inventory wand.
This makes it easy to read items in hard-to-reach areas, and, because of the sophisticated
antenna design and electronics, the Portable Reader becomes a very long-range reader.
This is very useful for taking inventory or trying to locate materials that have not been
shelved properly.
R
EADER
The Portable Reader consists of two units:
• An inventory wand
• A portable data terminal
The handheld inventory wand, using a built-in antenna to scan for circulation circuits,
connects to a Portable Data Terminal (PDT), which stores the information retrieved from
and accessed by the wand. The PDT enables data to be uploaded or downloaded from the
Intelligent Library Controller, providing both inventory and searching capability.
The Portable Reader enables a fast, efficient and accurate method for taking inventory of
library materials.
Inventory Wand
Figure 4.1
Portable Data Terminal
Portable Reader
Portable Reader: Overview 4-1
Page 70

Inventory Wand LED Indicators
The inventory wand uses three LED lights:
Green
Red
Yellow
Table 4.1
Figure 4.2
Wand LED Indicators
Wand LED Indicators
LED Description
Green The power is on
Red Circulation circuit is being read
Yellow Low battery condition
4-2 ILS 2.6 User Guide
Page 71

Charging the Inventory W and Battery
Prior to using the inventory wand for any significant inventory collection or inventory
search session, ensure that its battery is fully charged to guarantee that the entire collection
is inventoried all at once.
Press here and lift
the battery upwards
Figure 4.3
Extracting Inventory Wand battery
To extract the battery from the inventory wand:
1 Rotate the inventory wand so that the antenna is facing away from you as shown in
“Extracting Inventory Wand battery”.
2 Press the tab in the middle of the battery and lift it carefully upwards.
3 Once disconnected, rotate the battery until you see the power connection jack.
Connect power
plug here
Figure 4.4
4
Using the cable from the battery c harger, connect the battery to the battery charger and
Inventory Wand power plug connection
plug the adapter into an outlet to begin charging. The estimated charging time is 4 to 6
hours.
Portable Reader: Charging the Inventory Wand Battery 4-3
Page 72

There is an LED indicator on the battery charger that indicates when the battery is
completely charged.
5 When charging completes, disconnect the power plug. Insert the front of the battery
(with the tab) first into the wand’s battery receptacle, then rotate the back of battery
down until it clicks into place.
Maintaining the Portable Data Terminal
This section details how to charge and turn on and off the portable data terminal.
Charging the Portable Data T erminal
Before using your terminal for the first time, charge the battery fully using the CRD 2800
cradle or synchronization cable. Your terminal is equipped with a memory backup battery
that automatically charges from the main lithium-ion battery. This backup battery retains
data in memory when the terminal's battery is removed, and takes several hours to charge
when you first use your terminal.
Note: If you remove your lithium-ion battery before the backup ba ttery is fully charged, data may be lost.
For this reason DO NOT remove the battery within the first ten hours of use.
When battery voltage is low, a warning message displays indicating the battery needs to
be charged.
There are two methods to charging the PDT:
1 Using the Serial Charging Cable
2 Using the Universal Cable Cup
Using the Serial Charging Cable to charge the battery
1 Insert the cable into the bottom of the terminal.
*
.
Serial Charging
Cable
Figure 4.5
Insert Synchronization Cable
4-4 ILS 2.6 User Guide
Page 73

2 Plug the power cable into a wall outlet and plug the other end into the battery charging
receptacle on the side of the synchronization cable.
Figure 4.6
*
.
Battery charging with serial charging cable
Serial Charging
Cable
Using the Universal Cable Cup to charge the battery
To charge the battery using the Universal Cable Cup:
1 On the cable cup, ensure the locking tabs are in the open position (up).
2 Insert the PDT into the cable cup.
3 Press down on the two locking tabs.
Locking Tabs
Figure 4.7
Lightly pull on the cable cup to ensure that it is securely attached to the terminal.
4
Portable Reader: Maintaining the Portable Data Terminal 4-5
Insert PDT into cable cup
Page 74

5 Open the rubber cap covering the power port.
Rubber Cap
Figure 4.8
6
Plug the power connector into the power port. The battery is fully charged after
Connecting power cable
approximately 2 1/2 hours.
Powering On and Off the Portable Data T erminal
1 To turn on the PDT, press the red power button on the lower left-hand side of the
terminal to turn on the unit.
*
.
Power Button
Figure 4.9
Note: When not using the Portable Data Terminal within a set amount of time, the device enters a Power
Save mode, meaning the device powers down. To turn it back on press the red power button. You
are returned to the last window presented prior to shut off.
2 To turn off the unit, press and hold the power button until the screen turns grey, then
press the power again.
Powering On the Portable Data Terminal
4-6 ILS 2.6 User Guide
Page 75

Using the Portable Dat a Terminal
In this chapter the word tap is used instead of click because the stylus supplied is used to
tap the touch screen. There are no double-clicks on the Portable Data Terminal unit as all
actions are accomplished by a single tap. The stylus is stored in a silo on the back of the
Portable Data Terminal.
Please refer to the Symbol Portable Data Terminal Series Quick Reference Guide for
more information regarding use of this device.
Turning On/Off Backlight
Use the key combinations below to adjust the backlight.
Scroll Keys
Power Button
*
.
Alpha Key
Figure 4.10
Table 4.1
Keys Description
Press and hold Turns the display backlight and keypad backlight on and off.
Press
Press + Increase display backlight (increase brightness).
Remote User Manager Access Privileges
+ Decrease display backlight (decrease brightness).
Alphanumeric Keys
Backlight On/Off
When both backlights (display and keypad) are off, the backlights
turn on in the following order when the button is held:
• First the display backlight turns on, continue to hold, then the
keypad backlight turns on.
• When either backlight is on, the backlights turn off when the
power button is pressed and held.
Enter Key
Function Key
The backlight turns off after a configurable amount of time.
Note: You can alter the setting in Start > Settings > System > Backlight.
Checking the St atus of the Batteries
It may become necessary to check the status of the Portable Data Terminal’s battery
power. Use the following procedure:
1 Tap the Start icon in the upper left hand corner of the window.
2 Tap the Settings menu item.
Portable Reader: Using the Portable Data Terminal 4-7
Page 76
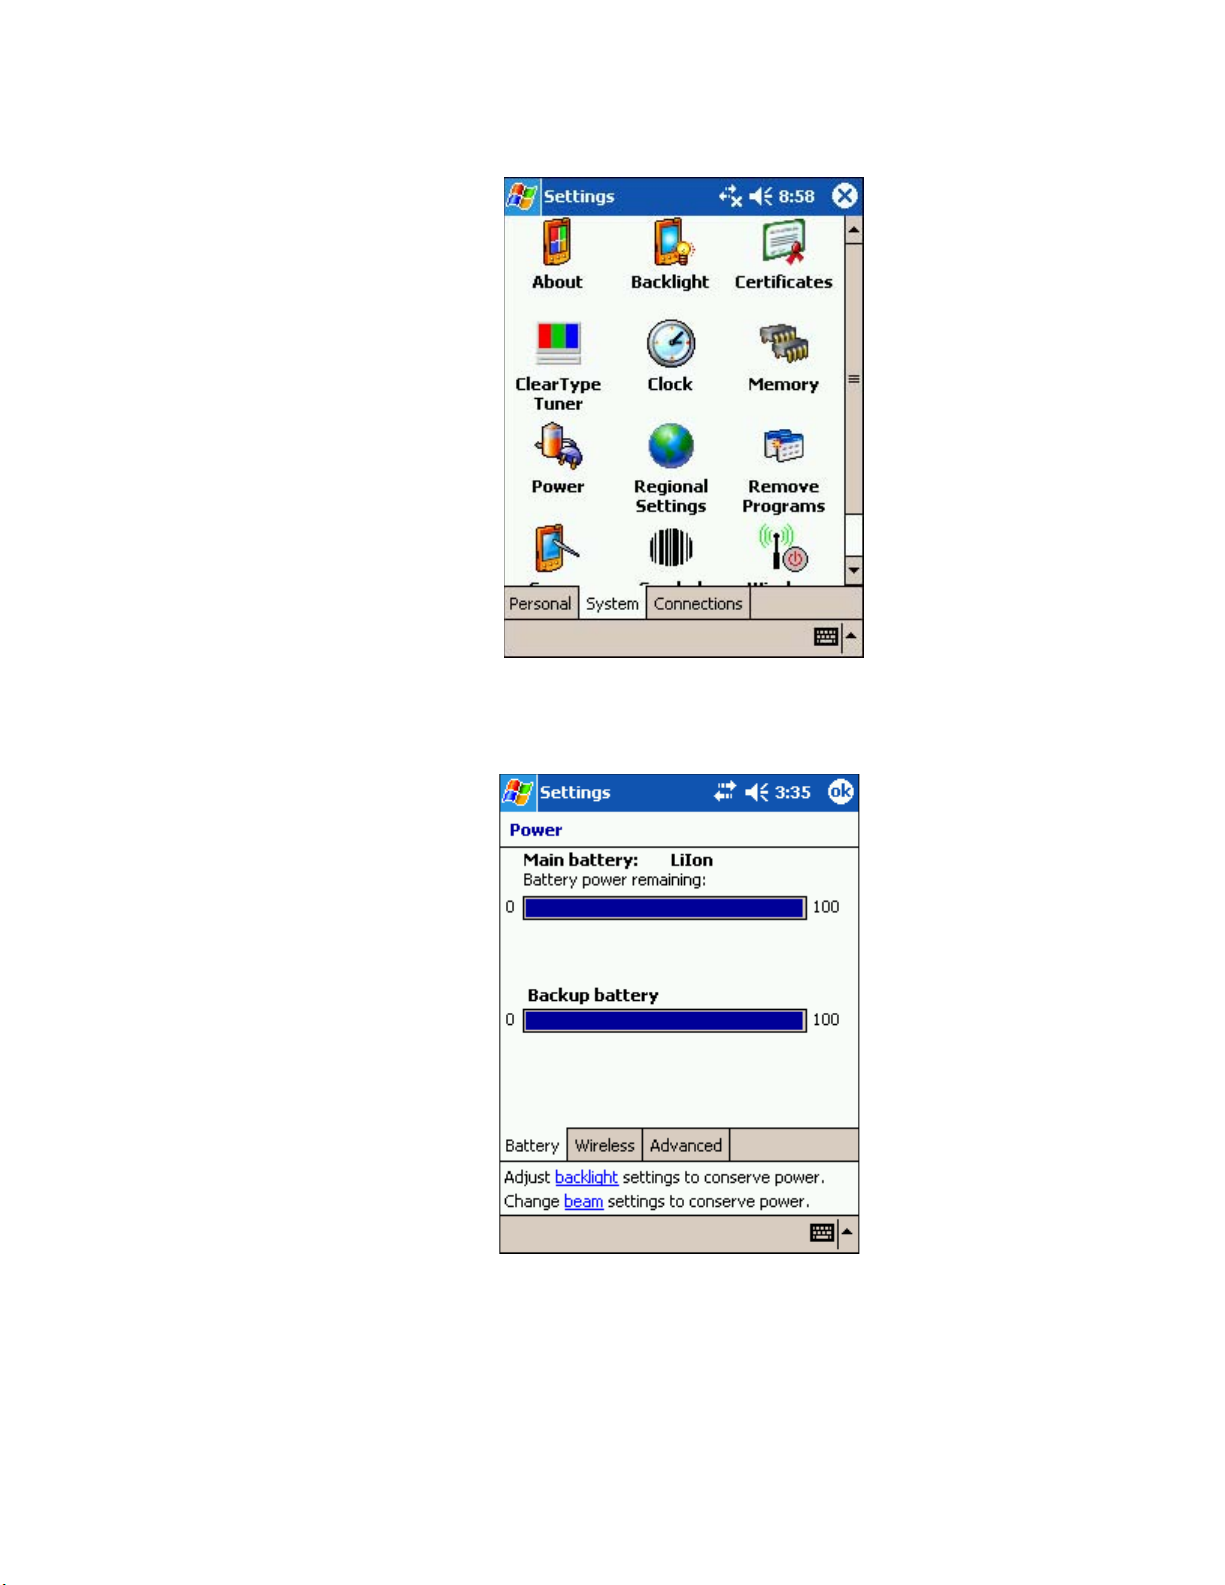
3 Tap the System tab at the bottom of the Settings Panel window.
Figure 4.11
4
Tap the Power icon. The Battery Status window displays. This window shows you the
Settings Window
power status of both the main and the backup batteries.
4-8 ILS 2.6 User Guide
Figure 4.12
Battery Status
Page 77

A warning displays if either battery is low.
Figure 4.13
Low Battery Warning
Portable Reader: Using the Portable Data Terminal 4-9
Page 78

Performing a Reset
If your PDT stops responding to input from buttons or the screen, reset it by performing a
soft or hard reset. Only perform a hard reset if a soft reset fails to clear the problem.
Performing a Soft Reset
A soft reset restarts the terminal and saves all stored records and entries.
Caution Files that remain open during a warm boot may not be retained. DO NOT pe rform a soft reset if the
terminal is suspended. Press the power button to wake the terminal.
Right Scan
Trigger
Figure 4.14
Soft reset buttons
To perform a soft reset, press and keys while holding down either the left or
right scan trigger and then releasing the keys.
The unit resets, during which the display shows a startup screen.
Performing a Hard Reset
A hard reset restarts your Portable Data Terminal terminal and erases all stored records
and entries, including any extra programs installed in the Main Memory such as the ILS
Inventory program. Therefore, never perform a hard reset unless a soft reset does not solve
your problem.
Note: You can restore any data previously synchronized with your computer during the next ActiveSync
operation.
Caution: With a hard reset, the current date and time, formats, preference s, and other settings are restored to
their factory default settings.
To perform a hard reset:
1 Remove the hand strap above the locking screw by sliding the end of the strap towards
the bottom of the unit.
4-10 ILS 2.6 User Guide
Locking Screw
Figure 4.15
Locking screw
Page 79

2 Turn the locking screw counterclockwise until the cover releases from the terminal and
lift the battery door away from the terminal.
Reset Button
3 While holding down the button, use the tip of the stylus (or similar object without
a sharp tip) to gently press the Reset button.
4 Release the button.
5 Replace the battery cover and hand strap and press the button. As the terminal
initializes its unique Flash File system, the Symbol splash screen displays for about a
minute.
6 Follow the prompts when Aligning the Screen appears to perform an initial setup of
the terminal.
Portable Reader: Using the Portable Data Terminal 4-11
Page 80

Collecting Inventory Data
Now that the Portable Data Terminal has been initialized, you are ready to begin
collecting inventory information.
1 Connect the synchronization cable from the inventory wand to the Portable Data
Terminal.
*
.
Synchronization
Cable
Figure 4.16
2
Turn on the Portable Data Terminal by pressing the red button in the lower-left hand
Attaching Synchronization Cable to Portable Data Terminal
corner of the device.
*
.
Power Button
Figure 4.17
Powering On the Portable Data Terminal
4-12 ILS 2.6 User Guide
Page 81
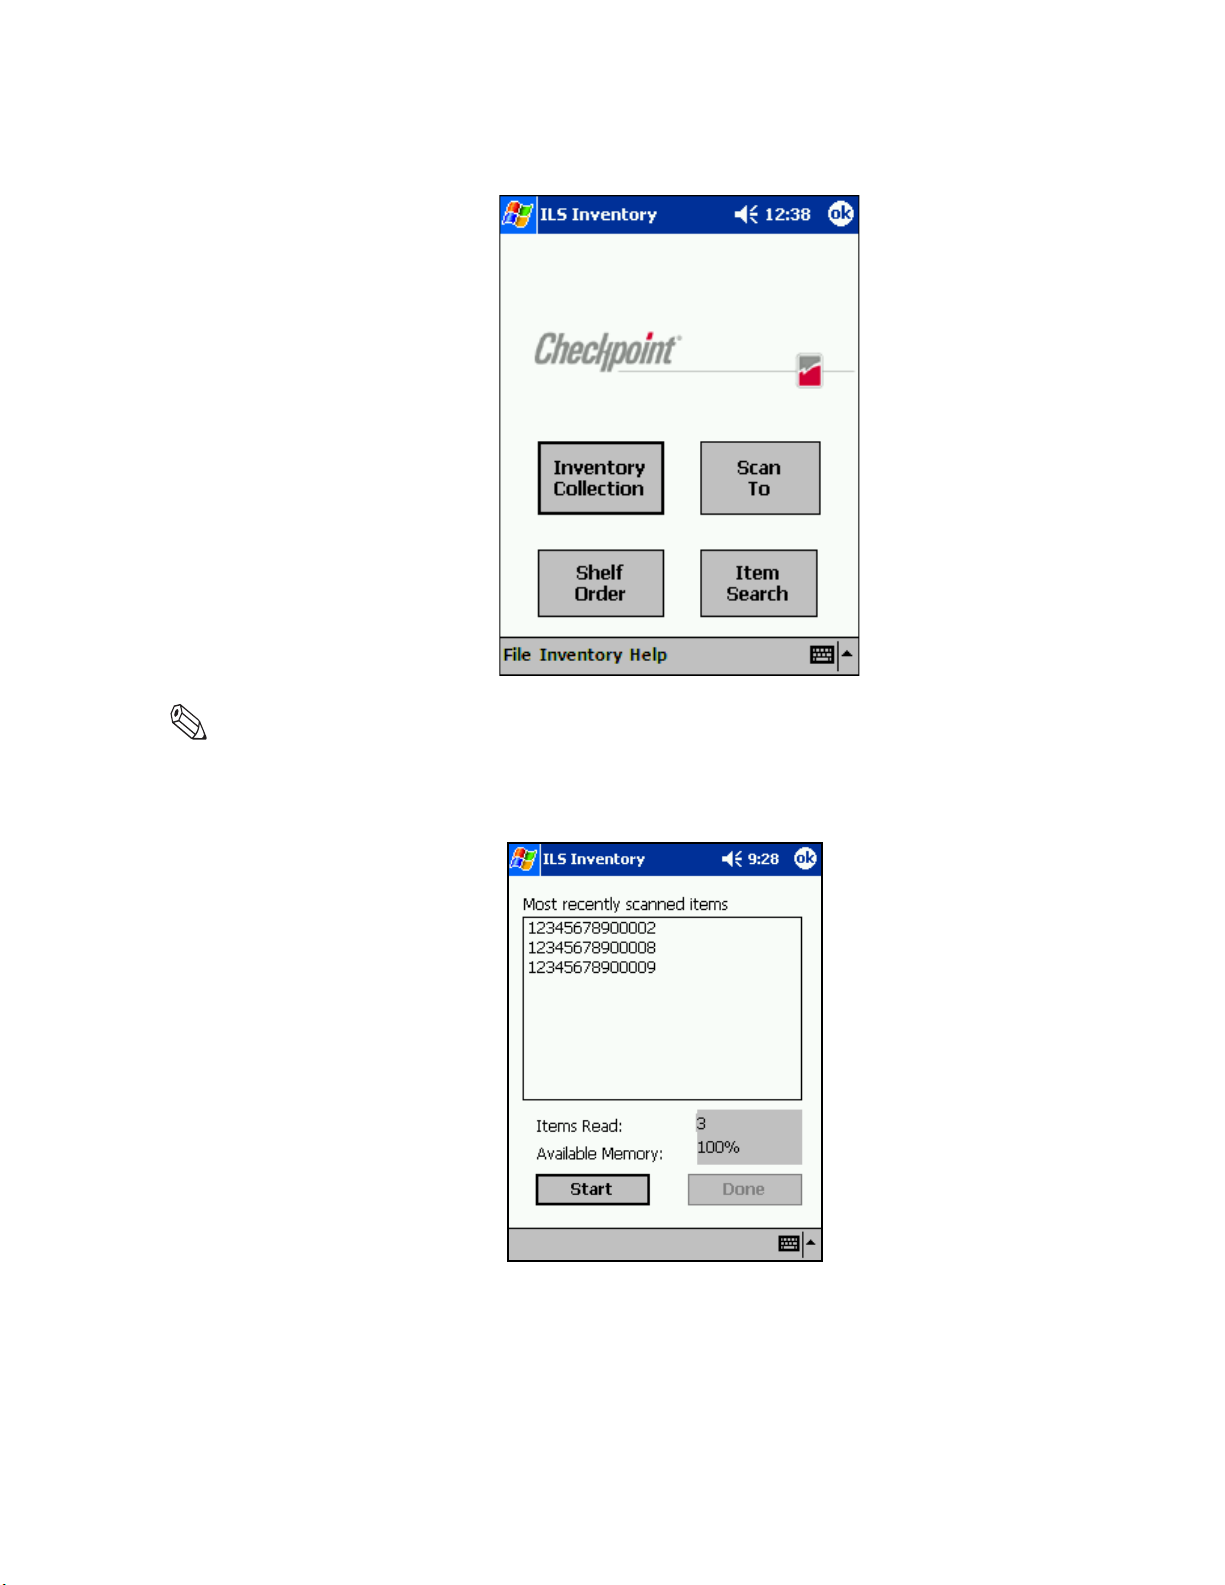
Once you have powered on the Portable Data Terminal, you are presented with the ILS
Inventory main menu window.
Figure 4.18
ILS Inventory Main window
Note: If you do not see the main ILS Inventory window, tap the Start button in the upp er-left hand corner of
the screen. Tap on the ILS Inventory menu item in the start menu to launch the program.
3 Tap Inventory Collection located in the center of the screen.
Figure 4.19
Tap Start located in the bottom-left hand corner of the screen.
4
5 If a previous inventory collection file was not transferred to the ILS Server, you will be
Inventory Collection
asked if you want to add (append) to the file.
Portable Reader: Collecting Inventory Data 4-13
Page 82

• Selecting Yes continues the previous inventory collection and new items are added
to the file.
• If you select No, you are asked to confirm that you do not wish to keep the existing
data. Tap OK if sure and a new inventory file is created. Tap Cancel to append to
the file (as if you had selected Yes).
• If you want to transfer the previous file after selecting Yes, you can immediately tap
Done to initiate a file transfer.
6 Begin scanning for items.
3-8 in
7-20cm
Hold the wand in your hand about three inches (7 cm) from the material you wish to
scan. Notice that the red light on the wand blinks, indicating that the wand is detecting
circulation circuits. The wand detects Circulation Circuits up to a distance of 8 inches
(20 cm); therefore, it is important to keep the wand focused on the intended inventory
items to avoid unwanted data from being collected.
4-14 ILS 2.6 User Guide
Figure 4.20
Scanning Books
Page 83

Alternatively, you can use the barcode scanner of the PDT to scan for barcodes. Press
either the left or right scan trigger button to activate the barcode scanner, which beams
from the front of the PDT.
Figure 4.21
Inventory Collection In Progress
Once you begin scanning, the following information displays in the ILS Inventory
screen:
• Most recently scanned items
The bar code number for that circuit displays on the Portable Data Terminal in the
Most Recently Scanned Items field.
• Items Read
Field displays the total number of inventory tags read over time.
• Available Memory
Field displays the percentage of memory still available.
7 Once completed scanning, tap Done. See “Transferring Inventory Data” on page 4-16
for instructions on data transfer.
Portable Reader: Collecting Inventory Data 4-15
Page 84

T ransferring Inventory Dat a
Once you complete scanning inventory, follow these instructions to transfer the data.
1 After you have finished collecting inventory by tapping Done, a dialog window
displays asking if you want to transfer the data collected. Tap OK to do so.
Note: If you wish to continue the inventory collection after you have pressed Done, press Cancel to
prevent file transfer and re-enter inventory collection mode.
2 Unplug the cable from the bottom of the Portable Data Terminal.
3 Dock the Portable Data Terminal into the cradle. A Transferring window displays on
the Portable Data Terminal while data is transferring to the Intelligent Library
Controller.
Once the transfer is completed, the Intelligent Library Controller displays the Portable
4
Reader Operations window. The inventory you transferred is converted by the
Intelligent Library Controller to a text file containing the list of barcodes. The file
name and location is displayed in the Transfer Status Display window. When the
process is finished, click Close on the Portable Interrogator Operations window.
The Intelligent Library Controller then converts the information to the inventory file
format used by the LMS and copies it to a directory from which the LMS can copy it
(using FTP).
5 The Portable Data Terminal displays Transfer Complete. Tap OK to return to the ILS
Inventory Main window.
You may begin another inventory collection by selecting Start. Or, exit to the main
window by clicking OK found at the top-right of the screen.
4-16 ILS 2.6 User Guide
Figure 4.22
Portable Interrogator Operations
Page 85

Searching the Inventory
Use this function to search for missing or desired materials. Library material must have a
circulation circuit attached to it for this function to succeed. Also, it is helpful if scanning
for more than one item that you prepare an Item Search List file before searching.
Preparing an Item Search List File
An Item Search List file contains the barcodes you wish to find. The file uses the .psl file
extension and can be created:
• By formatting a report from the circulation system
• By formatting an Inventory Search or Shelf Order Search file conducted with the
Portable Reader
• Using a text editor (like Notepad) to manually enter item information
Create the file in the following manner:
1 Gather your barcode data of missing items. If you have conducted an Inventory Search,
you can use this file by changing the extension to “.psl” and following the formatting
identified in step 2.
If you are producing a report from your circulation system, ensure that it follows the
parameters explained in the step 2.
2 Enter the data by typing or copying and pasting the data into a simple text editor, like
Notepad, shown in the figure below: “Sample PSL File”.
• The barcode numbers must be in a single row, with a return at the end of each line.
• If you wish the call number and book title to appear associated with that barcode,
you must separate the information with a pipe symbol “|”.
• You can also have just a call number or just a book title appear as well with the
associated barcode. If you want just a Book Title to appear with that barcode, you
must include two pipes sequentially to account for the empty call title column.
If your data resides in a more complex spreadsheet program like Microsoft Excel
®
, it is
not recommended that you copy the data from Excel and paste it into your text editor as
the correct pipe symbol is not used to separate data. However, you can manually alter
the file if you choose to paste the data from a spreadsheet.
Barcode only
Barcode with Call #
Barcode with Call # and Book Title
Barcode with only Book Title
Figure 4.23
3
Once the data is entered, save with a descriptive name and close the file. Note the
Sample PSL File
location where you saved the file.
Portable Reader: Searching the Inventory 4-17
Page 86

4 Navigate to the location of your file and change the extension of the file to PSL. For
example, “Item Search.txt” becomes “Item Search.psl”.
Figure 4.24
PSL File Name Change
The next section informs you how to transfer this file to the Portable Data Terminal using
the docking station.
T ransferring the Search List File
To transfer a search list file (or files) from the Intelligent Library Controller to your
Portable Data Terminal
1 Place the search file (for example, Item Search.psl) in the synchronization directory for
your Portable Data Terminal. There should be a shortcut to this directory on the
desktop of the Intelligent Library Controller.
2 Once the file is in the correct location, dock the Portable Data Terminal and the file(s)
is automatically transferred.
3 Once the file(s) has been transferred remove the Portable Data Terminal from its
cradle.
4 If ILS Inventory is not running on your Portable Data Terminal, launch the program by
tapping the Start button in the upper-left hand corner of the screen, then tap ILS
Inventory.
4-18 ILS 2.6 User Guide
Page 87

Importing the Search List File
To import the search list file:
1 From the main screen of ILS Inventory, tap Item Search. The Item Search window
displays.
Figure 4.25
2
Follow either instruction for importing barcodes:
a If you are searching for a single barcode, you can input the number directly into the
Search List File
Item Search Barcode field. Tap Add when finished and the barcode number appears
below.
The name of the search result file is stated in the Result File field (for example,
“search2.*” in the example above) unless you use the Save As to enter a different
name. See “Saving Custom Search Files” on page 4-34 for details.
Portable Reader: Searching the Inventory 4-19
Page 88

b If you have created a search file, tap Import. The Import window displays.
Figure 4.26
c
Ensure that Item Search List Files (*.psl) is selected as the type, using the down
Search File Import
arrow at right to select the type of file displayed. Your search file appears below in
the Name field (the example shows “Item Search” already highlighted).
d Tap the file name (for examp le, you would tap Item Search, shown abov e), and the
file imports automatically. If the import is successful, you are returned to the Item
Search window. If unsuccessful, double-check that the format of the file is a plain
text file that uses the extension *.psl. See “Preparing an Item Search List File” on
page 4-17 for more details about preparing the file.
4-20 ILS 2.6 User Guide
Page 89
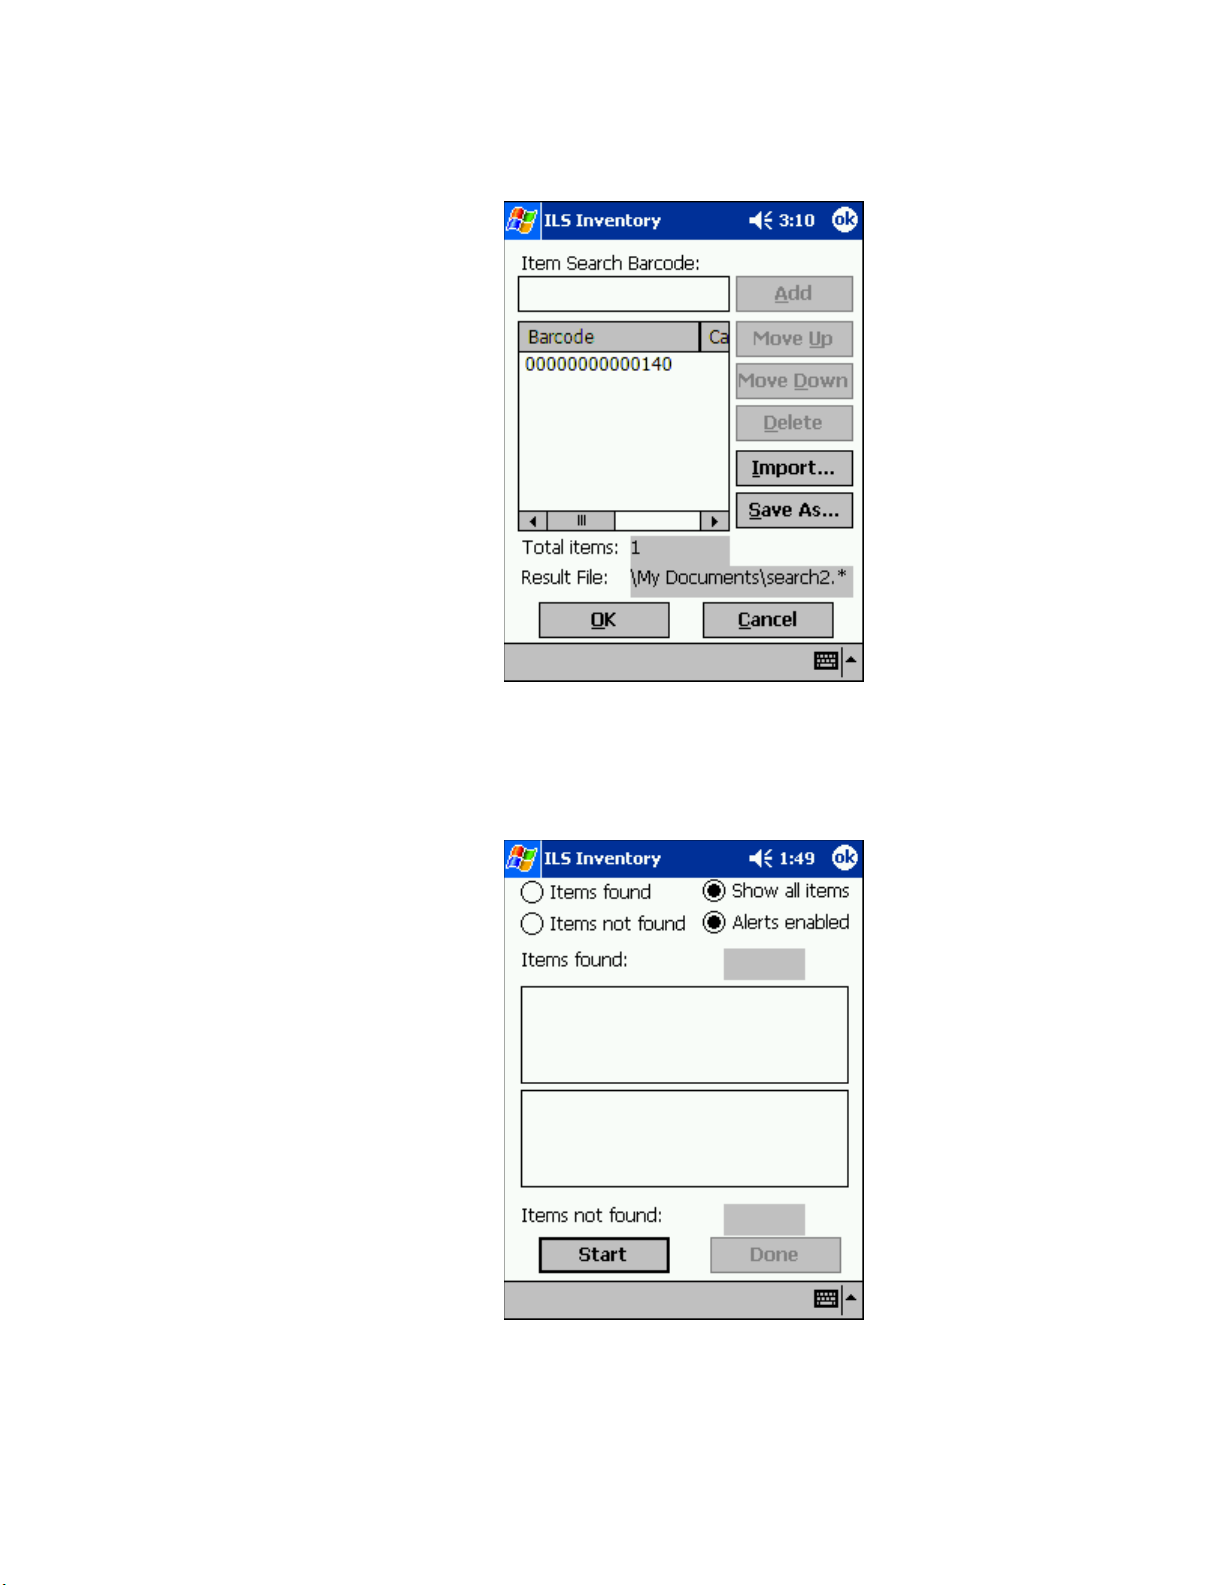
3 In the Item Search window, the Barcodes field displays the barcodes that will be used
in searching for items.
Figure 4.27
Item Search Input
If you need to move or delete a particular barcode, highlight it and select the
appropriate action at right.
4 Tap OK. You see the ILS Inventory window.
Figure 4.28
5
Tap Start to begin your inventory search.
Inventory Search
Portable Reader: Searching the Inventory 4-21
Page 90

Scanning for Inventory
There are several ways to view information on the Search Mode window.
• View 1 - Items Found
Indicates all of the barcodes that were found.
• View 2 - Items Not Found
Indicates all of the barcodes that the system has not yet found.
• View 3 - Show All Items
Shows both the Items Found and the Items Not Yet Found. This is the default
selection.
• Alerts Enabled
When the Alerts enabled is selected, an alert displays and sound occurs for each
item found. The search mechanism stops temporarily, allowing you to locate the
item found on the shelf. To disable this feature, tap it.
1 Tap a different view at any time to change.
2 Use the inventory wand to scan for barcodes, sweeping back and forth. See “Scanning
Books” on page 4-14 for a details.
Notice that the barcode display field(s) reflects changes in the status of the search
items, depending on the search option you chose. Items found (the field above) are
listed as you find them. Items not found (the field below) are removed from the list as
you find them.
Notice that the red light on the wand flickers when it finds circulation circuits. It is
important to keep the wand focused on the intended inventory items to avoid unwanted
data from being collected.
4-22 ILS 2.6 User Guide
Figure 4.29
Item Search window
Page 91
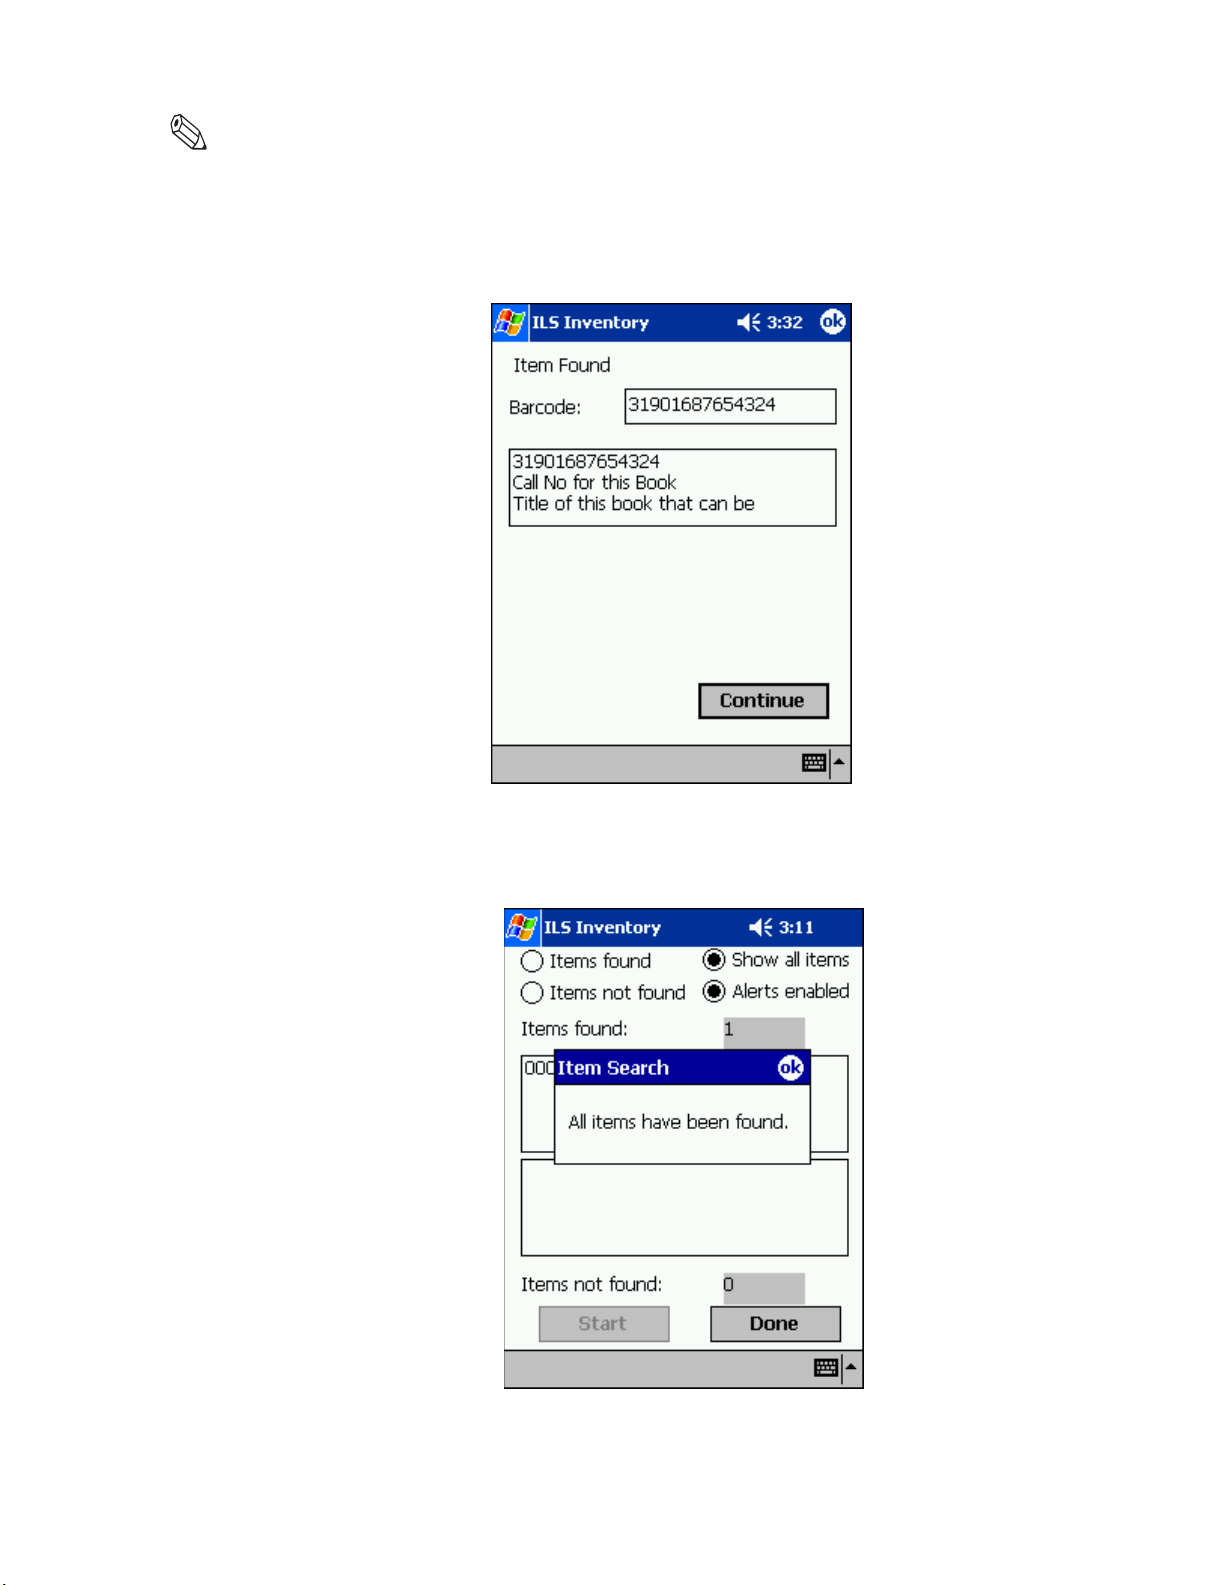
Note: While the red light may flash when the scanner detects any tag, a barcode only displays in the Items
found list if it matches an item present in your Search Items list.
3 When a barcode is found; the barcode, shelf location, and title of the item (if all
configured in your search file) display. Retrieve the item, if necessary, and tap
Continue to resume the search.
Figure 4.30
4
When finished, tap Done at the bottom of the screen. If all of the items are found, an
Item Found Alert
alert window notifies you.
Figure 4.31
Portable Reader: Searching the Inventory 4-23
All Items Found
Page 92
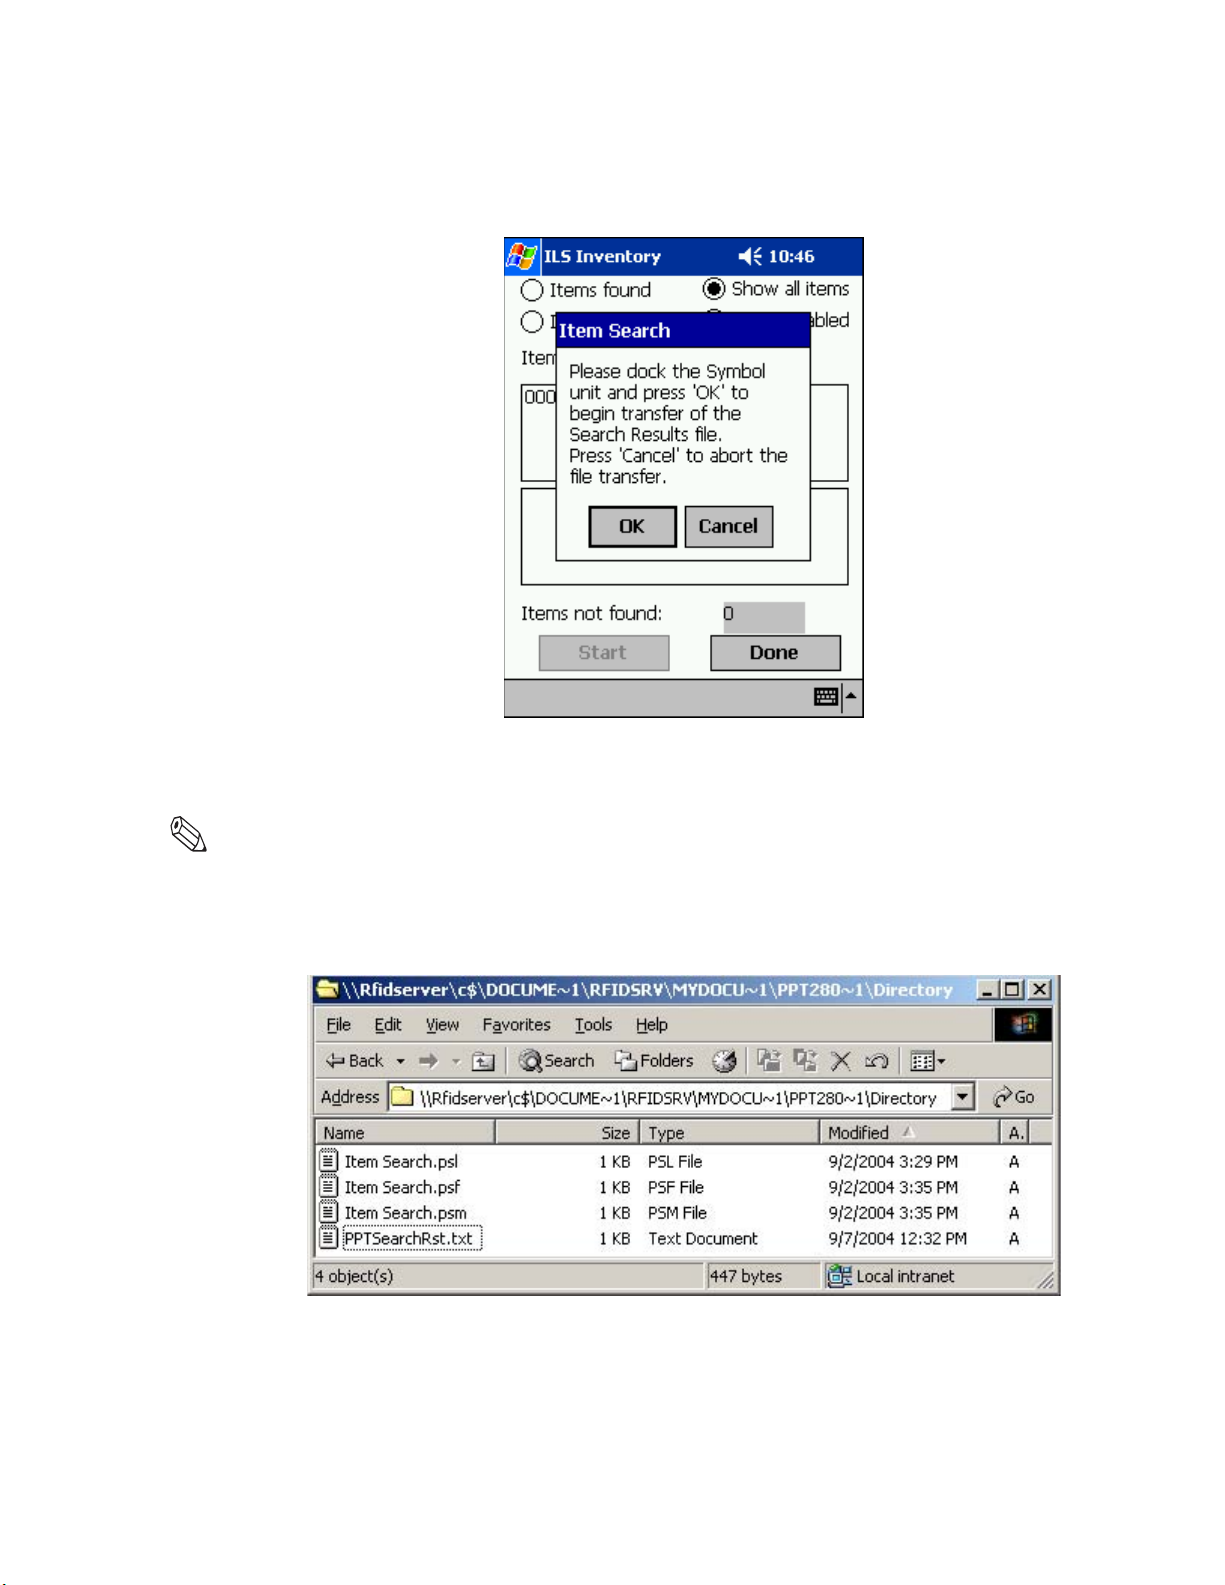
5 Tap OK to continue and the Item Search result files are generated.
A dialog box displays asking you to dock the Portable Data Terminal to transfer the
Search Results file.
Figure 4.32
6 Tap OK and place the Portable Data Terminal into the docking station to begin the
Portable Data Terminal Docking
transfer.
Note: In Wireless mode the file transfer is automatic. If you would like to abort the file transfer, tap Cancel.
You are returned to the Item Search window.
The Search Results files are transferred to the configured directory on the Intelligent
Library Controller. Refer to “Transferring Inventory Data” on page 4-16 for details.
Figure 4.33
Sample search results directory
The “PPTSearchRst.txt” file lists all of the barcodes searched. If a barcode was found,
the date and time of the search are listed. If the barcode was not found, the date and
time are not listed.
4-24 ILS 2.6 User Guide
Page 93

Two additional files are also created to list the items found and the items not found.
• The Items Found file uses the file extension *.psf.
• The Items Not Found file uses the file extension *.psm.
These files may be used to perform another search, or may be processed as results of
the search on the circulation system.
Every time you upload the results of an Item Search, the search results file
“PPTSearchRst.txt” is overwritten with the new data automatically. Thus, if you wish
to retain the previous data, save the file elsewhere before synchronizing.
Conducting Shelf Order Search
Use Shelf Order Search to verify the contents of a shelf against a shelf order list generated
by the Library Management System. Items scanned are compared to the shelf order list to
determine if they are in order, not in the list, or not found. This enables verification and
sorting of the shelf contents.
Selecting or Creating a Shelf Order Search File
A Shelf Order Search file is identified by a *.pso file extension and is transferred from the
Intelligent Library Controller to the Portable Data Terminal. To select or create a Shelf
Order file:
1 Create the file by running a Shelf Order report on the circulation system or by creating
a Shelf Order file manually.
2 See “Preparing an Item Search List File” on page 4-17 for details on how to format the
file, as you configure the file using the exact same methodology as in preparing a
Search List file, only you use the “.pso” extension when saving the file.
T ransferring the Shelf Order File
To transfer a Shelf Order file:
1 To transfer a shelf order file (or files) from the Intelligent Library Controller to your
Portable Data Terminal, place the file (for example, Shelf Order.pso) in the
synchronization directory for your Portable Data Terminal. There should be a shortcut
to this directory on the desktop of the Intelligent Library Controller.
2 Once the file is in the correct location, dock the Portable Data Terminal and the file is
automatically transferred.
3 Once the file(s) has been transferred, remove the Portable Data Terminal from its
cradle.
4 If ILS Inventory is not running on your Portable Data Terminal, launch the program by
tapping the Start button in the upper-left hand corner of the screen, then tap ILS
Inventory.
Portable Reader: Conducting Shelf Order Search 4-25
Page 94

Importing Shelf Order File
To import a Shelf Order file:
1 From the main screen of ILS Inventory, tap Shelf Order. The Shelf Order window
displays.
Figure 4.34
2
Follow either instruction for importing a shelf order list:
a If you are checking a single barcode, you can input the number directly into the
Shelf Order Window
Shelf Order Barcode field. Tap Add when finished and the barcode number appears
below.
The name of the search result file is stated in the Result File field (for example,
“sorder1.*” in the example above) unless you use the Save As to enter a different
name. See “Saving Custom Search Files” on page 4-34 for details.
4-26 ILS 2.6 User Guide
Page 95

b If you have created a shelf order search file, tap Import. The Import window
displays.
Figure 4.35
c
Ensure that Shelf Order List Files (*.pso) is selected as the type, using the down
Search File Import
arrow at right to select the type of file displayed. Your search file appears below in
the Name field (the example shows “shelf order” already highlighted).
d Tap the file name (for example, you would tap shelf order, shown above), and the
file imports automatically. If the import is successful, you are returned to the Shelf
Order Barcode window. If unsuccessful, double-check that the format of the file is a
plain text file that uses the extension *.pso. See “Preparing an Item Search List
File” on page 4-17 for more details about preparing the file.
Portable Reader: Conducting Shelf Order Search 4-27
Page 96

3 In the Shelf Order Barcode window, the Barcodes field displays the barcodes that are
used in searching for items.
Figure 4.36
Item Search Input
If you need to move or delete a particular barcode, highlight it and select the
appropriate action at right.
4 Tap OK. You are taken to the ILS Inventory window.
4-28 ILS 2.6 User Guide
Figure 4.37
Shelf Order Start
 Loading...