

Page 1

Page 2

Introduction
TTaabbllee ooff CCoonntteennttss
Chapter 1 Introduction .............................................................................1-1
1.1. Document Overview.......................................................................................................1-2
1.2. Intended Audience..........................................................................................................1-3
1.3. Related Documentation..................................................................................................1-3
1.4. System Overview ...........................................................................................................1-3
1.5. Component Descriptions................................................................................................1-5
1.5.1. ILS Intelligent Sensor .............................................................................................1-5
1.5.2. Staff Station Reader ................................................................................................1-5
1.5.3. Patron Self-Checkout Station..................................................................................1-5
1.5.4. Patron ID Card........................................................................................................1-6
1.5.5. Handheld Portable Reader.......................................................................................1-6
1.5.6. Application Server ..................................................................................................1-6
1.5.7. Intelligent Circulation Circuit.................................................................................1-7
1.5.8. Circulation Circuit Programming Station ...............................................................1-7
Chapter 2 Patron Self-Checkout Station..................................................2-1
2.1. Welcome Screens ...........................................................................................................2-1
2.2. Patron Identification Screen...........................................................................................2-3
2.3. Patron Identification Failure Screen...............................................................................2-4
2.4. Item Identification Screen - Begin .................................................................................2-4
2.5. Item Identification Screen - Item List ............................................................................2-5
2.6. Item Identification Screen - Scroll .................................................................................2-6
2.7. Item Identification Screen - Failed.................................................................................2-7
2.8. Item Identification Screen - Failed - Scroll....................................................................2-8
2.9. End Session Screen ........................................................................................................2-9
Chapter 3 Handheld Portable Reader.......................................................3-1
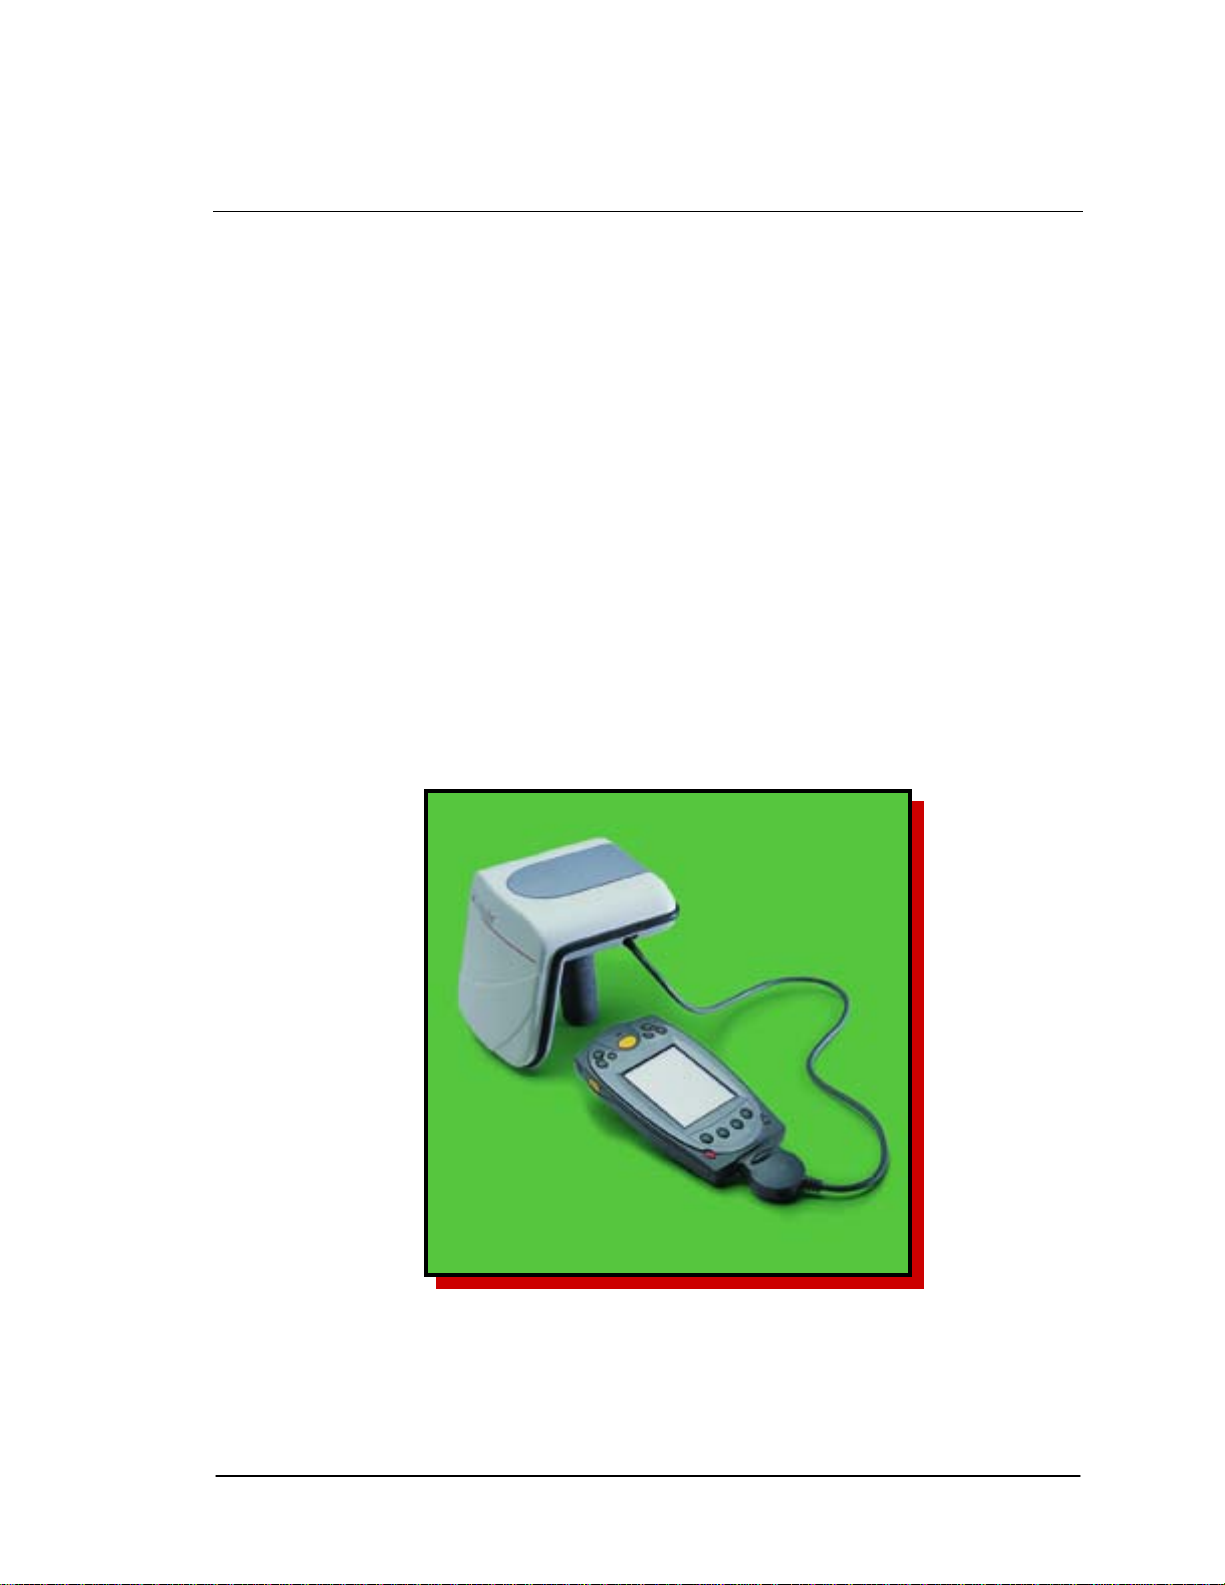
3.1. Overview........................................................................................................................3-1
3.2. Powering Up the Handheld Portable Reader..................................................................3-2
3.3. Powering Up and Charging the PPT 2700/2800 ............................................................3-2
3.3.1. Powering Up ...........................................................................................................3-2
3.3.2. Charging the Device................................................................................................3-2
3.3.3. Charging the Spare Battery.....................................................................................3-3
3.3.4. Using the PPT 2700/2800.......................................................................................3-4
3.3.5. Check on the Status of the Batteries........................................................................3-4
3.4. Collecting Inventory Data and Scanning Library Materials...........................................3-5
3.5. Transferring the Inventory Data Collected.....................................................................3-8
3.6. Searching the Inventory..................................................................................................3-9
3.6.1. Preparing a Search List File....................................................................................3-9
3.6.2. Search Mode Screen.............................................................................................. 3-10
3.7. Shelf Order Search .......................................................................................................3-12
3.7.1. Selecting a Shelf Order Search File......................................................................3-13
3.7.2. Shelf Order Search Screen....................................................................................3-13
3.7.3. Shelf Order Alert...................................................................................................3-15
3.7.4. Shelf Order Results...............................................................................................3-16
3.8. Wireless Operations .....................................................................................................3-18
3.9. Hints on Using the PPT 2700/2800..............................................................................3-20
Page ii Intelligent Library System (ILS) 2.0 User Manual
Page 3

Introduction
Chapter 4 Application Server................................................................... 4-1
4.1. The Application Server Control Screen .........................................................................4-1
4.2. System Status .................................................................................................................4-2
4.3. Task Scheduler...............................................................................................................4-4
4.4. Inventory Download Operations ....................................................................................4-6
4.5. Reports ...........................................................................................................................4-7
4.5.1. Checkout Discrepancy Reporting (off-line processing)..........................................4-7
4.5.2. Patron Discrepancy Reporting (off-line processing).............................................4-10
4.5.3. Generic Report Generation ...................................................................................4-14
4.5.4. Exit Alarm Reporting............................................................................................4-18
4.5.5. Check In Exception Reporting..............................................................................4-22
4.6. Maintenance .................................................................................................................4-25
4.6.1. Purge .....................................................................................................................4-25
4.6.2. Checkout Cache Synchronize ...............................................................................4-26
4.7. Miscellaneous...............................................................................................................4-27
4.7.1. Shutdown Button...................................................................................................4-27
4.7.2. Help About............................................................................................................4-27
4.7.3. System Info Button ...............................................................................................4-28
4.7.4. Offline Transactions Synchronize.........................................................................4-28
4.7.5. Shutdown Checkout Stations................................................................................4-29
4.8. Installing a Printer........................................................................................................4-29
Chapter 5 Tagging Procedures................................................................. 5-1
5.1. Tagging Book Materials................................................................................................. 5-1
5.2. Tagging Video Materials................................................................................................5-1
5.3. Tagging CD Materials with a Preprogrammed Circulation Circuit ...............................5-2
5.4. Tagging CD Materials with Circulation Circuit Programmed On-Site..........................5-3
5.5. Tagging Audio Materials................................................................................................5-3
5.6. Tagging Kit Materials ....................................................................................................5-4
Chapter 6 Troubleshooting Guide............................................................ 6-1
6.1. Patron Self-Checkout Station.........................................................................................6-1
6.2. Application Server..........................................................................................................6-3
6.3. Exit Interrogator.............................................................................................................6-5
6.4. Tag Pad...........................................................................................................................6-6
6.5. Recovery Procedures......................................................................................................6-6
6.6. System Connection Diagram..........................................................................................6-8
6.7. Contacts..........................................................................................................................6-8
Chapter 7 System Maintenance Guide..................................................... 7-1
7.1. Transaction Database Backup ........................................................................................7-1
7.2. Application Server Tape Backup and Restore................................................................7-1
7.3. Patron Self-Checkout Station Printer Paper Reloading..................................................7-3
7.4. Safety Warnings.............................................................................................................7-6
7.5. Specifications .................................................................................................................7-7
Intelligent Library System (ILS) 2.0 User Manual Page iii
Page 4

Introduction
TTaabbllee ooff FFiigguurreess
Figure 1-1: Sample Intelligent Library System Components .......................................................1-1
Figure 2-1: ILS Multiple Language Welcome Screen..................................................................2-1
Figure 2-2: ILS Single Language Welcome Screen......................................................................2-2
Figure 2-3: Patron Identification Screen.......................................................................................2-3
Figure 2-4: Patron Identification Failure Screen...........................................................................2-4
Figure 2-5: Item Identification Screen - Begin.............................................................................2-4
Figure 2-6: Items Identification Screen - Item List.......................................................................2-5
Figure 2-7: Items Identification Screen - Scroll............................................................................2-6
Figure 2-8: Item Identification Screen - Failure ........................................................................... 2-7
Figure 2-9: Item Identification Screen - Failed - Scroll................................................................2-8
Figure 2-10: End Session Screen..................................................................................................2-9
Figure 3-1: Handheld Portable Reader..........................................................................................3-1
Figure 3-2: Powering Up the PPT 2700/2800...............................................................................3-2
Figure 3-3: Charging the PPT 2700/2800.....................................................................................3-3
Figure 3-4: Docking the PPT 2700/2800......................................................................................3-3
Figure 3-5: Charging the Spare Battery........................................................................................3-4
Figure 3-6: Settings Panel.............................................................................................................3-5
Figure 3-7: Battery Status.............................................................................................................3-5
Figure 3-8: Connecting Cable to PPT 2700/2800.........................................................................3-6
Figure 3-9: Turning PPT 2700/2800 On.......................................................................................3-6
Figure 3-10: ILS Inventory Main Screen......................................................................................3-6
Figure 3-11: Inventory Collection ................................................................................................3-7
Figure 3-12: Inventory Collection In Progress .............................................................................3-8
Figure 3-13: Handheld Portable Reader Operations.....................................................................3-9
Figure 3-14: Select the Search List File Screen..........................................................................3-10
Figure 3-15: Item Search Screen.................................................................................................3-11
Figure 3-16: Item Found Alert....................................................................................................3-12
Figure 3-17: Select the Shelf Order File.....................................................................................3-13
Figure 3-18: Shelf Order Search Screen.....................................................................................3-14
Figure 3-19: Shelf Order Alert – Not in List ..............................................................................3-15
Figure 3-20: Shelf Order Alert – Out of Range..........................................................................3-16
Figure 3-21: Shelf Order Results Screen ....................................................................................3-17
Figure 3-22: Shelf Order View List Screen................................................................................3-18
Figure 3-23: Wireless PPT 2700/2800 ILS Inventory Main Screen........................................... 3-19
Figure 3-24: Wireless File Transfer Screen................................................................................3-20
Figure 3-25: Running Programs..................................................................................................3-21
Figure 4-1: Application Server Control Screen ............................................................................4-1
Figure 4-2: System Status Button.................................................................................................4-2
Figure 4-3: System Status Selection .............................................................................................4-2
Figure 4-4: System Status Screen .................................................................................................4-3
Figure 4-5: Task Scheduler Navigation........................................................................................4-4
Figure 4-6: Task Scheduler Menu.................................................................................................4-4
Figure 4-7: Task Scheduler (Modify)...........................................................................................4-5
Figure 4-8: Task Scheduler (View Only)......................................................................................4-5
Figure 4-9: Handheld Portable Reader Operations Screen - Automatic Transfer.........................4-6
Figure 4-10: Checkout Discrepancy Report Button......................................................................4-7
Figure 4-11: Checkout Discrepancy Report Menu.......................................................................4-7
Figure 4-12: Checkout Discrepancy List Screen ..........................................................................4-8
Page iv Intelligent Library System (ILS) 2.0 User Manual
Page 5

Introduction
Figure 4-13: Calendar...................................................................................................................4-9
Figure 4-14: Sample Checkout Discrepancy Report...................................................................4-10
Figure 4-15: Patron Discrepancy Report Button.........................................................................4-11
Figure 4-16: Patron Discrepancy Report Menu..........................................................................4-11
Figure 4-17: Patron Status Discrepancy List Screen ..................................................................4-11
Figure 4-18: Calendar.................................................................................................................4-12
Figure 4-19: Sample Patron Discrepancy Report .......................................................................4-13
Figure 4-20: Generic Report Menu.............................................................................................4-14
Figure 4-21: Generic Report Screen ...........................................................................................4-15
Figure 4-22: Calendar.................................................................................................................4-16
Figure 4-23: Sample Generic Report..........................................................................................4-17
Figure 4-24: Exit Alarm Report Button......................................................................................4-19
Figure 4-25: Exit Alarm Report Menu........................................................................................4-19
Figure 4-26: Exit Alarm Report Screen......................................................................................4-19
Figure 4-27: Calendar.................................................................................................................4-20
Figure 4-28: Sample Exit Alarm Report.....................................................................................4-21
Figure 4-29: Check In Exception Report Menu..........................................................................4-22
Figure 4-30: Check In Report Screen .........................................................................................4-22
Figure 4-31: Calendar.................................................................................................................4-23
Figure 4-32: Sample Check In Report........................................................................................4-24
Figure 4-33: Purge Navigation....................................................................................................4-26
Figure 4-34: End Purge...............................................................................................................4-26
Figure 4-35: Synchronize Navigation.........................................................................................4-27
Figure 4-36: Shutdown Button....................................................................................................4-27
Figure 4-37: Help About Navigation..........................................................................................4-28
Figure 4-38: Help About Screen.................................................................................................4-28
Figure 4-39: Transaction Coordinator Offline Synchronization Navigation..............................4-29
Figure 4-40: Shutdown Patron Self-Checkout Stations..............................................................4-29
Figure 5-1: Tagging Book Materials.............................................................................................5-1
Figure 5-2: Tagging Video Materials ...........................................................................................5-2
Figure 5-3: Tagging CD Materials with Preprogrammed Circulation Circuit..............................5-2
Figure 5-4: Tagging CD Materials with Preprogrammed Circulation Circuit..............................5-3
Figure 5-5: Tagging Audio Materials...........................................................................................5-4
Figure 5-6: Tagging Kit Materials................................................................................................5-5
Figure 6-1: System Connection Diagram......................................................................................6-8
Figure 7-1: Patron Self-Checkout Station Printer Paper Reloading – Roll Release.....................7-3
Figure 7-2: Patron Self-Checkout Station Printer Paper Reloading – Roll Installation................7-3
Figure 7-3: Patron Self-Checkout Station Printer Paper Reloading – Cutter’s Guide..................7-4
Figure 7-4: Patron Self-Checkout Station Printer Paper Reloading – Crosshatches.....................7-4
Figure 7-5: Patron Self-Checkout Station Printer Paper Reloading – Winding Roll....................7-5
Figure 7-6: Patron Self-Checkout Station Printer Paper Reloading – Resume Button.................7-5
Intelligent Library System (ILS) 2.0 User Manual Page v
Page 6

Introduction
NOTES
Page vi Intelligent Library System (ILS) 2.0 User Manual
Page 7
Introduction
Chapter 1 Introduction
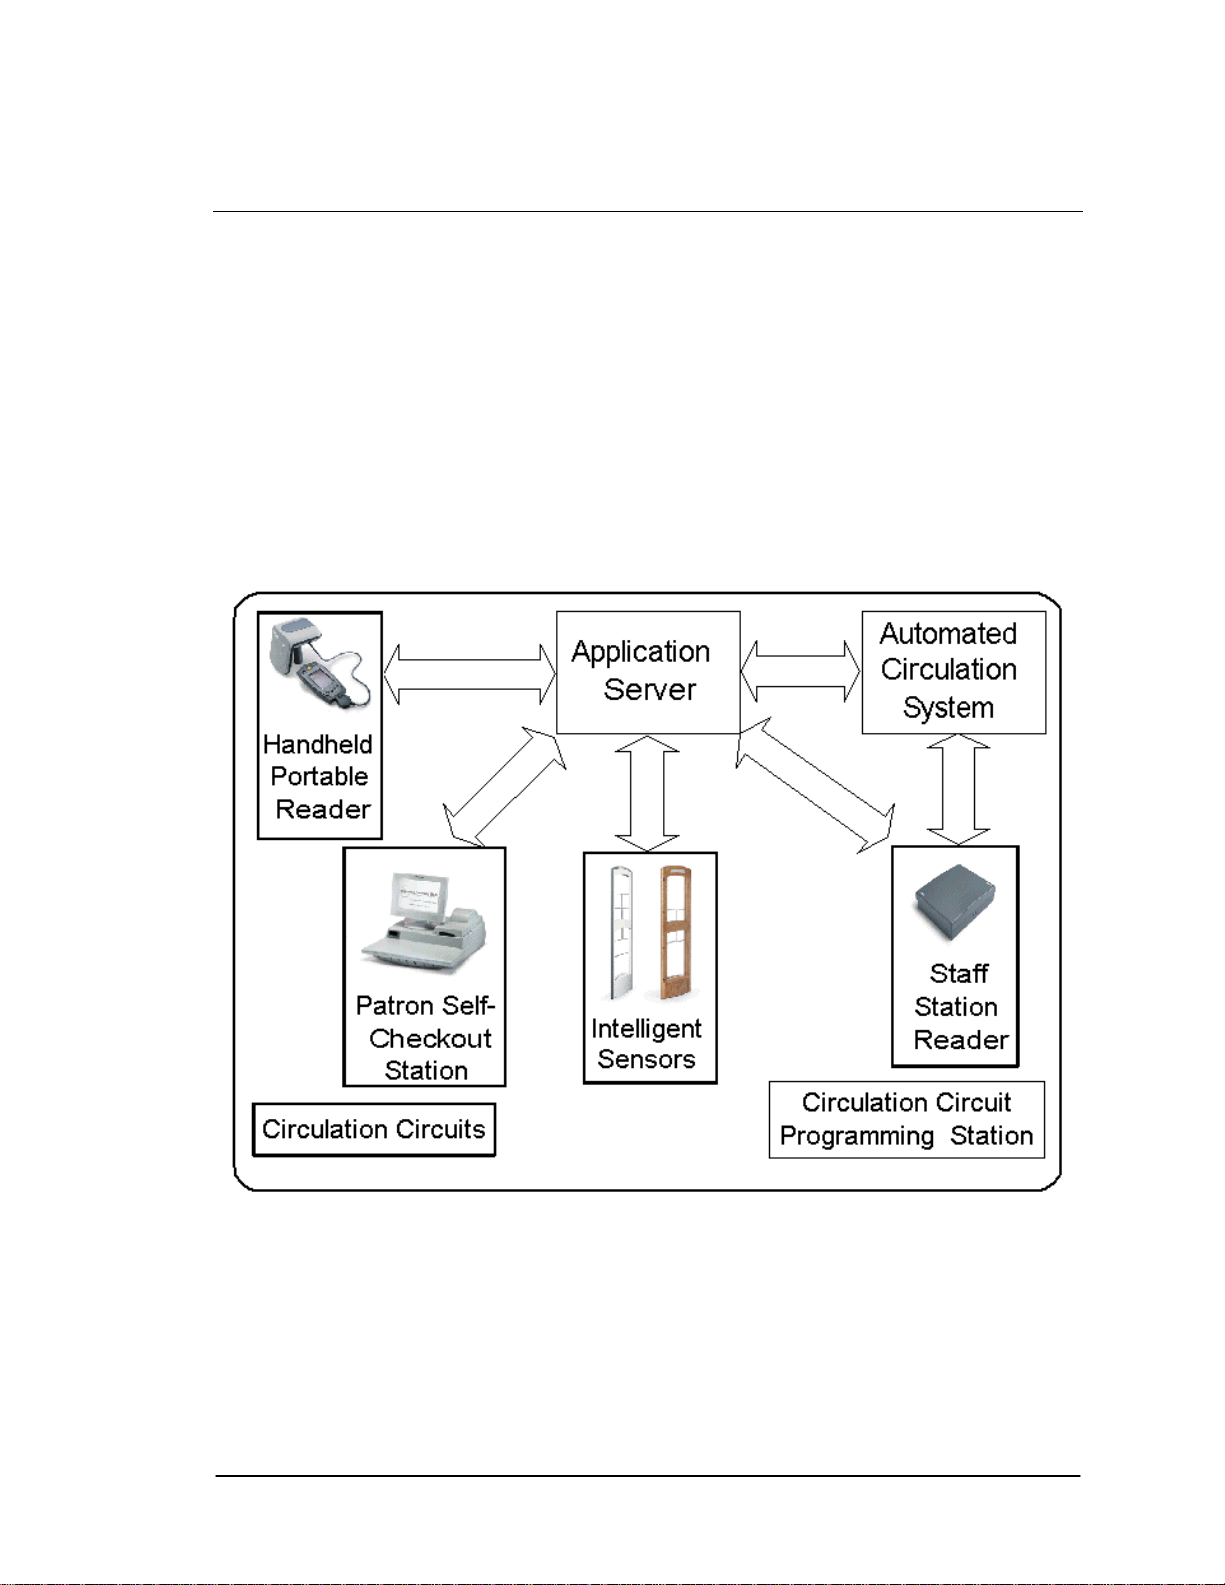
The Intelligent Library System (ILS) is a product designed to help libraries protect collections,
streamline operations, and improve patron service. Through ILS, libraries can reduce losses,
enhance staff productivity, increase circulation, and improve patron satisfaction. The ILS operates
in conjunction with the library’s Automated Circulation System (ACS).
ILS consists of the following standard and optional components: Circulation Circuit (inventory
tag), Patron Identification Card, Intelligent Sensor, Patron Self-Checkout Station, Staff Station
Reader, Application Server, Handheld Portable Reader, and optional Circulation Circuit
Programming Station.
Figure 1-1 shows an example of the ILS components and connections in a typical ILS setup.
Note: Your specific ILS configuration may not include one or more of the components shown.
Figure 1-1: Sample Intelligent Library System Components
he ILS components communicate with each other through physical connections using variousT
protocols and application programming interfaces (A
ntelligent Sensor, Staff Station Reader, and Handheld Portable Reader devices alI
di r stem (interrogator) designed to detect and read
ra o-f equency (RF) antenna and transceiver sy
Intelligent Circulation Circuits (tags on library materials). Communications occur by detecting
and interrog telligent Circulation Circuit for its unique item
specific info
Intelligent Library System (ILS) 2.0 User Manual Page 1-1
ating an IC chip embedded in the In
rmation.
PIs). The Patron Self-Checkout Station,
l incorporate a
Page 8

Introduction
1.1. Document Overview
This manua l overview of the ILS technology and illustrates the use and
operation of
l provides a genera
each component.
This manual has been designed specifically for the patron, librarian, and administrator. It contains
ll the information necessary to take full advantage of the system capabilities. Whether you are a
a
stud t member, the Intelligent Library System will enhance your library
en or a library staff
experience. rent ease of use and efficiency allow patrons and staff more time to
focus on oth
The system's inhe
er activities.
This manual is organized in chapters, with each chapter describing a system peripheral, such as
e Patron Self-Checkout Station. Each peripheral is designed with a specific system role in mind.
th
For example, patrons typically use the Patron Self-Checkout Station, while Library staff use t
Handheld Portable Read
he g ole is listed below.
T su gested reading for each r
er. Read the sections that apply to your role for ILS system operation.
he
• Patron
Introduction
Patron Self-Checkout S
tation
• Library Administrator
Introduction
Patron Self-Checkout Station
Handheld Portable Reader
Application Server
• Library Staff
Introduction
Patron Self-Checkout Station
Handheld Portable Reader
Application Server
This manual is divided into the following chapters that cover system peripherals and
important ILS tasks.
•
Chapter 1 Introduction
• Chapter 2 Patron Self-Checkout Sta
• Chapter 3 Handheld Portable Reader
• Chapter 4 Application Server
• Chapter 5 Tagging Procedures
• Chapter 6 Troubleshooting Guide
tion
• Chapter 7 System Maintenance Guide
The following usage conventions are used throughout
Manual.
the Intelligent Library System User
Page 1-2 Intelligent Library System (ILS) 2.0 User Manual
Page 9

Introduction
Button Name - This describes a button or selection on the screen. For example, the <DONE>
utton is represented in this document as Done.
b
Key a ibes a keystroke on a keyboard. For example Ctrl represents the control
N me - This descr
key
.
A sample screen illustration from the Pat
picture of a device represents each activity
description of the activities to be performed. After each description are step-by-step inst
on how to use the system to perform that activity.
ron Self-Checkout Station, Application Server, or a
you may perform. Under each picture is a short
ructions
1.2. Intended Audience
his document is intended for library patrons, staff, and administrators as well as Checkpoint
T
Systems field service staff. The library staff includes librarians, staff, and temporary staff. The
Field Service staff is comprised of the Checkpoint installers and the technical support personnel.
These audiences need to understand the basic functions, operations, and procedures related to the
ILS.
1.3. Related Documentation
The following documents provide additional ILS and related information.
• Upgrade Procedures
• Release Notes
• Circulation Circuit Programming Station User Manual
1.4. System Overview
The Intelligent Library Sy
irculation System (ACS). ILS includes the following components: Circulation Circuit
C
(inventory tag), Patron Identification Card, Intelligent Sensor, Patron Self-Checkout Station, Staff
Station Reader, Application Server, Handheld Portable Reader, and optional Circulation Circuit
Programming Station as shown in Figure 1-1 on page 1-1.
It is possible for ILS to operate without an ACS interconnection using the ILS Bridge I
feature. The Bridge Interface feature allows libraries with non-supported circulation vendo
no circulation systems to use the security and Staff Station Reader functionality of the ILS. With
the Bridge Interface, the user of the ILS Control program can moni
ode (check-in or check-out) of the Staff Station Readers. A library that is using the Bridge
m
Interface can use a staff-station reader for checkout, but cannot use a Patron Self-Checkout
Station.
he Off-line Processing feature allows libraries to configure the Application Server and Patron
T
Self-Checkouts to continue to operate while offline with the library’s circulation system. While
the circulation system is offline, the Application Server records significant events. These event
are reported to the circulation server when synchronization occurs. At the time of
synchronization, the Due Date is sent to the circulation server. When off-line processing is t
on, the word ON appears next to Off-Line Processing. The feature is turned on or off by
stem operates together with the library’s existing Automated
nterface
rs or
tor and change the operation
s
urned
Intelligent Library System (ILS) 2.0 User Manual Page 1-3
Page 10

Introduction
Checkpoint field service personnel by setting a table parameter on the Application Server. If
using the Bridge Interface (described earlier), off-line processing should never be turned on at the
ame application server.
s
The Intelligent Library, Patron Self-Checkout Station, Intelligent Sensor, Staff Station Reader,
and Handheld Portable Reader all have a Radio Frequency (RF) antenna and transceiver system
(interrogator) designed to detect and read the Intelligent Circulation Circuits. Communication
occur by detecting and interrogating an IC chip embedded in the Intelligent Circulation Circuit
(tag) for unique item specific information. Each interrogator includes an Applications
Programming Interface (API) for bi-d
terrogated RFID Tag data is taken and compared to the library circulation database, in order to
In
quickly and automatically identify the checkout status of an item.
The Application Server component is the communications gateway between the ILS subsystem
and the library Automated Circulation System (ACS) so that the check-in, self-checkout,
inventory management, and security activities can all be accomplished.
All library materials including books, CD/DVD materials, videotap
ith a permanent RFID Circulation Circuit (inventory tag). This tag contains information that
w
uniquely identifies the item within the library circulation database. Patron cards identify patron
when the card is scanned at the RFID Patron Self-Checkout Station. The card stores coded
information unique to the individual patron that will identify the user to the library circulation
system. The patron can then be validated as eligible or ineligible to use the library checkout
privilege.
When the patron is checking out materials, the patron and checked out item information is stored
in both the ACS and ILS databases. This duplication of records allows ILS to operate in an offline mode, as well as on-line. If the patron is checking-in library materials, then the ILS make
check-in request to the ACS, which updates its database and reports the result back the ILS.
When materials are checked from a self-checkout station the ILS will request to grant privile
to the patr
e ACS is generated for each item.
th
The library staff typically uses a Staff Station Reader in situations where a patron needs help fro
a librarian or when a librarian is checking in
not necessary when the Staff Station Reader is used. The pad can only interrogate tags and
is
functions the same as current bar code scanners used in library circulation systems do. Th
Circulation Staff Reader can also be integrated into a book return slot. When library materials are
placed in the book return, the tags on the items are read and sent to the ACS. The ACS then
updates its database and passes back transaction status to the ILS.
Library inventories can be taken by using the Handheld Portable Reader. The unit is a battery
powered hand-held device that interrogates RFID Circulation Circuits when the unit detection
head is within a ten-inch radius of tagged items. Inv
ems. The item Identifiers on the tagged items are read and stored in a portable data terminal.
it
The stored information can be downloaded real-time to the Application Server using the wirele
data-terminal option or downloaded after the inventory is completed as a batch file using the
standard data terminal. The inventory data is then communicated to the library circulation system
which can compare the information from the portable reader to item information in the circ
database. The Handheld Portable Reader can also search for specified items using its searc
function. Single or multiple item IDs can b
on to checkout items from the ACS. If privileges are granted then a checkout request to
irectional communications and program portability.
es, and cassettes are tagged
or checking out library materials. A Patron ID Card
entory is taken by walking by library tagged
e uploaded to the data terminal and when a scanned ID
s
s
s
s a
ges
m
e
ss
ulation
h
,
Page 1-4 Intelligent Library System (ILS) 2.0 User Manual
Page 11

Introduction
matches one in the list the user receives an audible ale
terminal.
The ILS Intelligent Sensor protects Exit/Entry aisles against unchecked library
the secured area by determining whether tag
unchecked (non-authorized/alarm) events.
Patron Self-Checkout Stations combine patron card readers, a RFID Circulation Circuit
interrogator, touch screen monitor, and printer in one compact unit. This provides the patron w
library transaction capability without any librarian assistance. A patron can scan the RFID
Card and library materials, identifying the patron and linking the library materials to the
individual through a communications session with the Library Circulation System via the
Application S
languages. With multiple languages, a language selection screen is presented to the patron to
select a language for the self-checkout tran
The optional Circulation Circuit Programming Station allows libraries to read and create their
own RFID Circulation Circuit tags and print barcode labels. This can also be used to convert
library materials with barcodes to RFID tags programmed with the barcode value. A tag format
file (created by Checkpoint field service staff using the Tag Designer software) is used to
program the tags in a compatible format. Tags are programmed by passing them over the
Circulation Circuit Programming Station.
erver. The Patron Self-Checkout Station can be configured to support multiple
ged items have a checked (authorized/no alarm) or
saction.
rt and the ID is displayed on the data
materials leaving
Patron
ith
1.5. Component Descriptions
The following sections describe in detail each of the ILS system components.
1.5.1. ILS Intelligent Sensor
The ILS Intelligent Sensor provides security at library exits and corrals. It generates a magnetic
field that activates a tag and can receive the tag information from a distance up to 24 inches. Tw
intelligent sensors are used to form a secure aisle with up to 48 inches of tag detection range.
Additionally the interrogator can communicate with the library circulation system via the
Application Server in real-time, determining whether an item or items being interrogated have
been checked out. Enunciators are alarmed if items in the interrogation field are not properly
checked out.
1.5.2. Staff Station Reader
The Staff Station Reader is an interface for library personnel. The pad reads RFID Circulation
Circuits (tags) when a book is placed on the pad at up to 12 inches from the pad in the vertical
direction. The pad communicates through data links directly with both the library circulation
system and the ILS. This provides the library with a means to perform typical functions with the
system and RFID tagged items. It also allows the ILS system to request information from the
circulation database in order to fin
the library circulation database.
d the status of RFID tagged items that have been processed by
o
ir
1.5.3. Patron Self-Checkout Station
The Patron Self-Checkout Station provides a library patron the ability to checkout library
materials without
Intelligent Library System (ILS) 2.0 User Manual Page 1-5
the assistance of the library staff. The Patron Self-Checkout Station can be
Page 12

Introduction
configured to support multiple languages. With mu
presented to the patron to select a language for the s
system may report patron or item messages if there is a problem conducting the checkout
transaction. A typical scenario for a patron to check out a book would be as follows. A patron
comes to the Patron Self-Checkout Station and selects a language (if using multiple languages
Then the patron identifies him or herself to the system with a patron ID card. The system then
confirms the patron’s eligibility to conduct a transaction through validation of the patron ID car
Next the patron is led through the transaction process by communication with the system
a touch screen monitor. The patron can checkout items by passing them one at a time over a
short-range interrogator that is located in the Patron Self-Checkout Station. The short-range
interrogator generates a magnetic field, which activates and interrogates the tagged item. The
interrogated item ID is passed to the Application Server. The application server determines the
item status and actions that can be taken via communications with t
System. Then the Application Server updates the
patron about their transaction status. Afte
patron then touches Done, and receives a receipt for the transaction listing all materials checked
out and the respective due dates.
r the patron scans all the items to be checked out, the
ltiple languages, a language selection screen is
elf-checkout transaction. Additionally the
).
through
he Library Circulation
Patron Self-Checkout Station, which notifies the
1.5.4. Patron ID Card
The Patron ID Card provides the system with a method to identify the patron to determine
whether he or she is clear to check out items. It also provides the ability to associate tagged item
with the patron.
d.
s
1.5.5. Handheld Portable Reader
The Handheld Portable Reader is a hand held device used t
nctions by passing the tag reader near RFID tagged items located in the library. The device
fu
consists of a hand-held, rechargeable battery operated reader that generates a magnetic fi
which is used to read RFID tagged items. The wand is attached through cabling to a data
terminal, which can be carried in one hand or strapped onto the wrist. The data terminal stores
information read by the wand. The data stored in the terminal can be downloaded to the
Application Server in real-time with the wireless option or after an inventor
the standard data terminal. This data can be used to reco
also be used for item searches and shelf order checking. Item information can also be uploaded to
the data terminal. When an item ID is scanned with the reader that matches an ID contained in the
data terminal, an audible alert is triggered and the ID is displayed.
o provide inventory management
eld,
y has been taken with
ncile library inventory. The wand can
1.5.6. Application Server
The Application Server’s primary functions are to be the communications
peripheral Intelligent Library subsystems and the Library Automated Circulation System, and to
identify and configure all peripheral Intelligent Library sub-systems and to track and direct all
ILS transactions.
The Application Server can operate in an on-line or off-line mode with the Library Circulation
System. In the off-line mode, the server can track whether an item is being checked-out, checkedin, and determine whether tagged items going through secured areas are authorized. If
unauthorized-tagged items are detected by the system, the server will signal the Intelligent Sensor
to alarm. Any transactions that occur independent of the library c
hen the ILS system is back in the on-line configuration.
w
irculation system are updated
gateway between the
Page 1-6 Intelligent Library System (ILS) 2.0 User Manual
Page 13

Introduction
The Application Server interfaces to the library circulation system and other subsystem
components using the 3M protocol (SIP2) over an Ethernet Network Interface Card (NIC). The
Ethernet NIC uses the TCP/IP protocol and session. The physical cable is 10BaseT.
1.5.7. Intelligent Circulation Circuit
The Intelligent Circulation Circuit provides a method of assigning 96 one time programmable bits
of information to an item that can be read at a single radio frequency, 13.56 MHz, up to a distance
of 4 feet. The tag allows for the reading of multiple tags through an anti-collision algorithm and
error detection and correction. The tag also allows for adjacent tags to be read in the interrogation
field by de-coupling the tag from another in a manner that does not stop its operation.
1.5.8. Circulation Circuit Programming Station
Libraries use the optional Circulation Circuit Programming Station to program circulation circuits
with the item identifier from the barcode when converting the retrospective library collection.
Circuits are also programmed when new materials are added to the collection. This reduces the
time it takes to convert a library collection from barcode to RFIG circulation circuits. The
Circulation Circuit Programming Station enables the library to easily link new materials into the
ILS instead of waiting several weeks for pre-programmed tags. In addition, the Circulation
Circuit Programming Station is integrated into a portable workstation that allows the library staff
to program circulation circuits while moving around the library.
When adding a new item to the collection and programming the circulation circuit, the library can
also print a barcode label. In many cases, libraries will continue to support the use of barcodes in
addition to the RFID inventory circulation circuits, mainly for compatibility with other branch
libraries still using barcodes. Using the Circulation Circuit Programming Station software
application, libraries program the circulation circuits by passing them over the tag programming
surface. After programming the circulation circuit, the application automatically reads, verifies,
and displays the data that was written to the circulation circuit. Refer to Chapter 5 Tagging
Procedures for instructions on how to affix tags to library materials.
Intelligent Library System (ILS) 2.0 User Manual Page 1-7
Page 14

Introduction
Page 1-8 Intelligent Library System (ILS) 2.0 User Manual
Page 15

Patron Self-Checkout Station
Chapter 2 Patron Self-Checkout Station
The Patron Self-Checkout Station is used by library patrons to check out library materials without
the assistance of library staff. The Patron Self-Checkout Station is the main device used by the
general public. It is designed to deliver ease of use and foolproof operations. By using an
interactive graphical user interface (GUI), touch screen, and hands-free operations, the Patron
Self-Checkout Station guides patrons smoothly through the checkout process. As the touch
screens display on the monitor, step-by-step instructions help the library patron checkout
materials properly. The process is quick, efficient and delivers a printed receipt listing the
checked out materials and their due dates.
Behind the scenes, the Patron Self-Checkout Station is delivering data to the library automated
circulation system, which processes the information and updates the library records. The data
communicated includes information such as item identification and inventory data related to the
library materials being checked out. The processing takes place almost instantaneously, allowing
a speedy and thorough checkout.
Note: The sample screens shown in this chapter may be slightly different than the screens shown
on your library’s self-checkout station. Your library may have a different self-checkout station
model or different operating environment.
2.1. Welcome Screens
If the Patron Self-Checkout Station is configured to use multiple languages, the first screen
shown is the ILS Multiple Language Welcome Screen (Figure 2-1).
Figure 2-1: ILS Multiple Language Welcome Screen
Intelligent Library System (ILS) 2.0 User Manual Page 2-1
Page 16

Patron Self-Checkout Station
If the Patron Self-Checkout Station is configured to use a single language, the first screen shown
is the ILS Single Language Welcome Screen (Figure 2-2).
Figure 2-2: ILS Single Language Welcome Screen
e you touch the screen to begin or select a language for the self-cOnc heckout, you will continue
through the checkout process using screens in the selected language (if multiple languages are
used). After you touch the Welcome screen or select a language, you are then presented with the
Patron Identification Screen (Figure 2-3). Some libraries support multiple institutions. If there are
multiple institutions, you will be presented with a Multiple Institution Selection Screen in which
you need to select the correct institution.
1) Touch the screen or select a language to begin the checkout process.
2) Remove your finger from the touch screen. After you have removed your finger, the
image will change to the Patron Identification Screen or Institution Selection Screen
depending on your libraries needs.
Note: If the library supports more than one institution, you may be presented with the
Multiple Institution Selection Screen in which you will need to select the correct institution.
Otherwise, proceed to the Patron Identification Screen section.
Page 2-2 Intelligent Library System (ILS) 2.0 User Manual
Page 17
Patron Self-Checkout Station
2.2. Patron Identification Screen
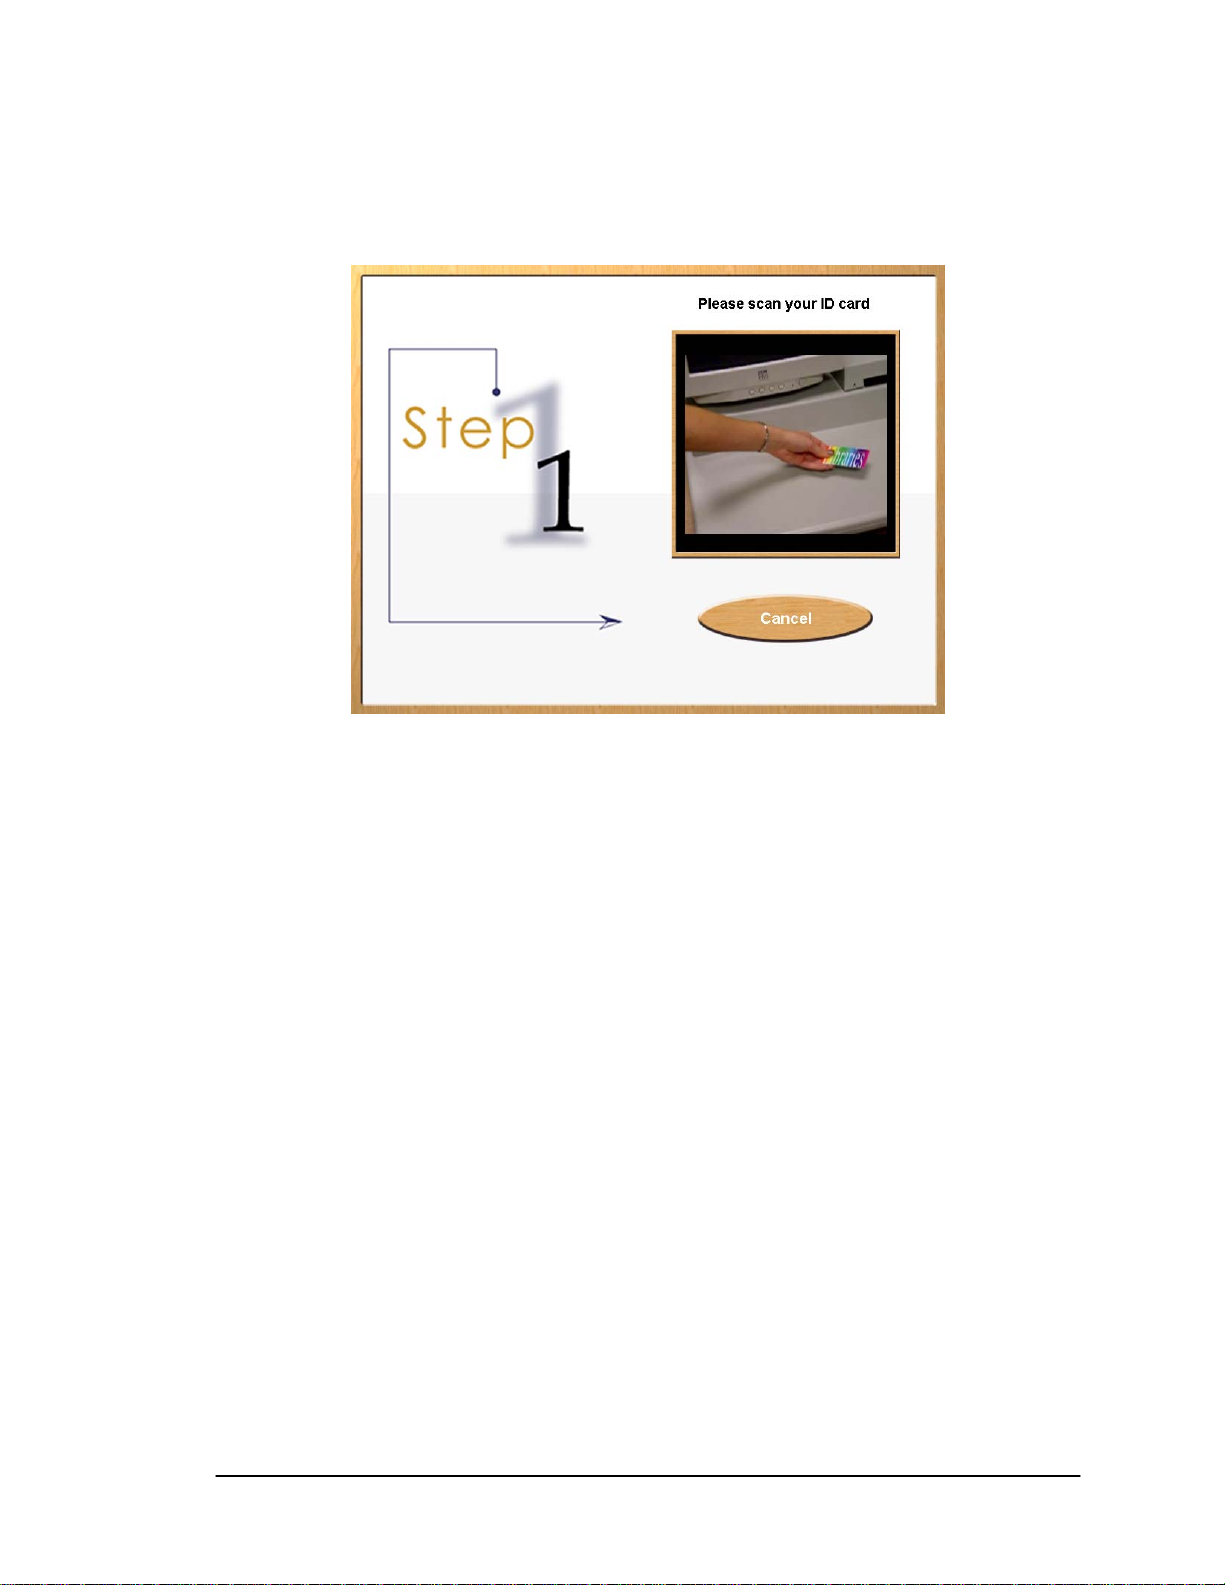
Figure 2-3: Patron Identification Screen
You should have your patron ID card ready and follow the instructions shown on the screen. This
is illustrated in Figure 2-3: Patron Identification Screen.
Watching the right side of the screen, you are given visual instructions on how to present your
patron ID card for authorization. Your ID card may be different than the type of ID illustrated in
Figure 2-3: Patron Identification Screen. If so, simply follow the visual instructions given on
the Patron Identification Screen specific to your institution.
If you have been authorized to checkout items, the Item Entry Screen is displayed. If you have not
been authorized, you will see the Patron Identification Failure Screen illustrated in Figure 2-4:
Patron Identification Failure Screen.
Intelligent Library System (ILS) 2.0 User Manual Page 2-3
Page 18
Patron Self-Checkout Station
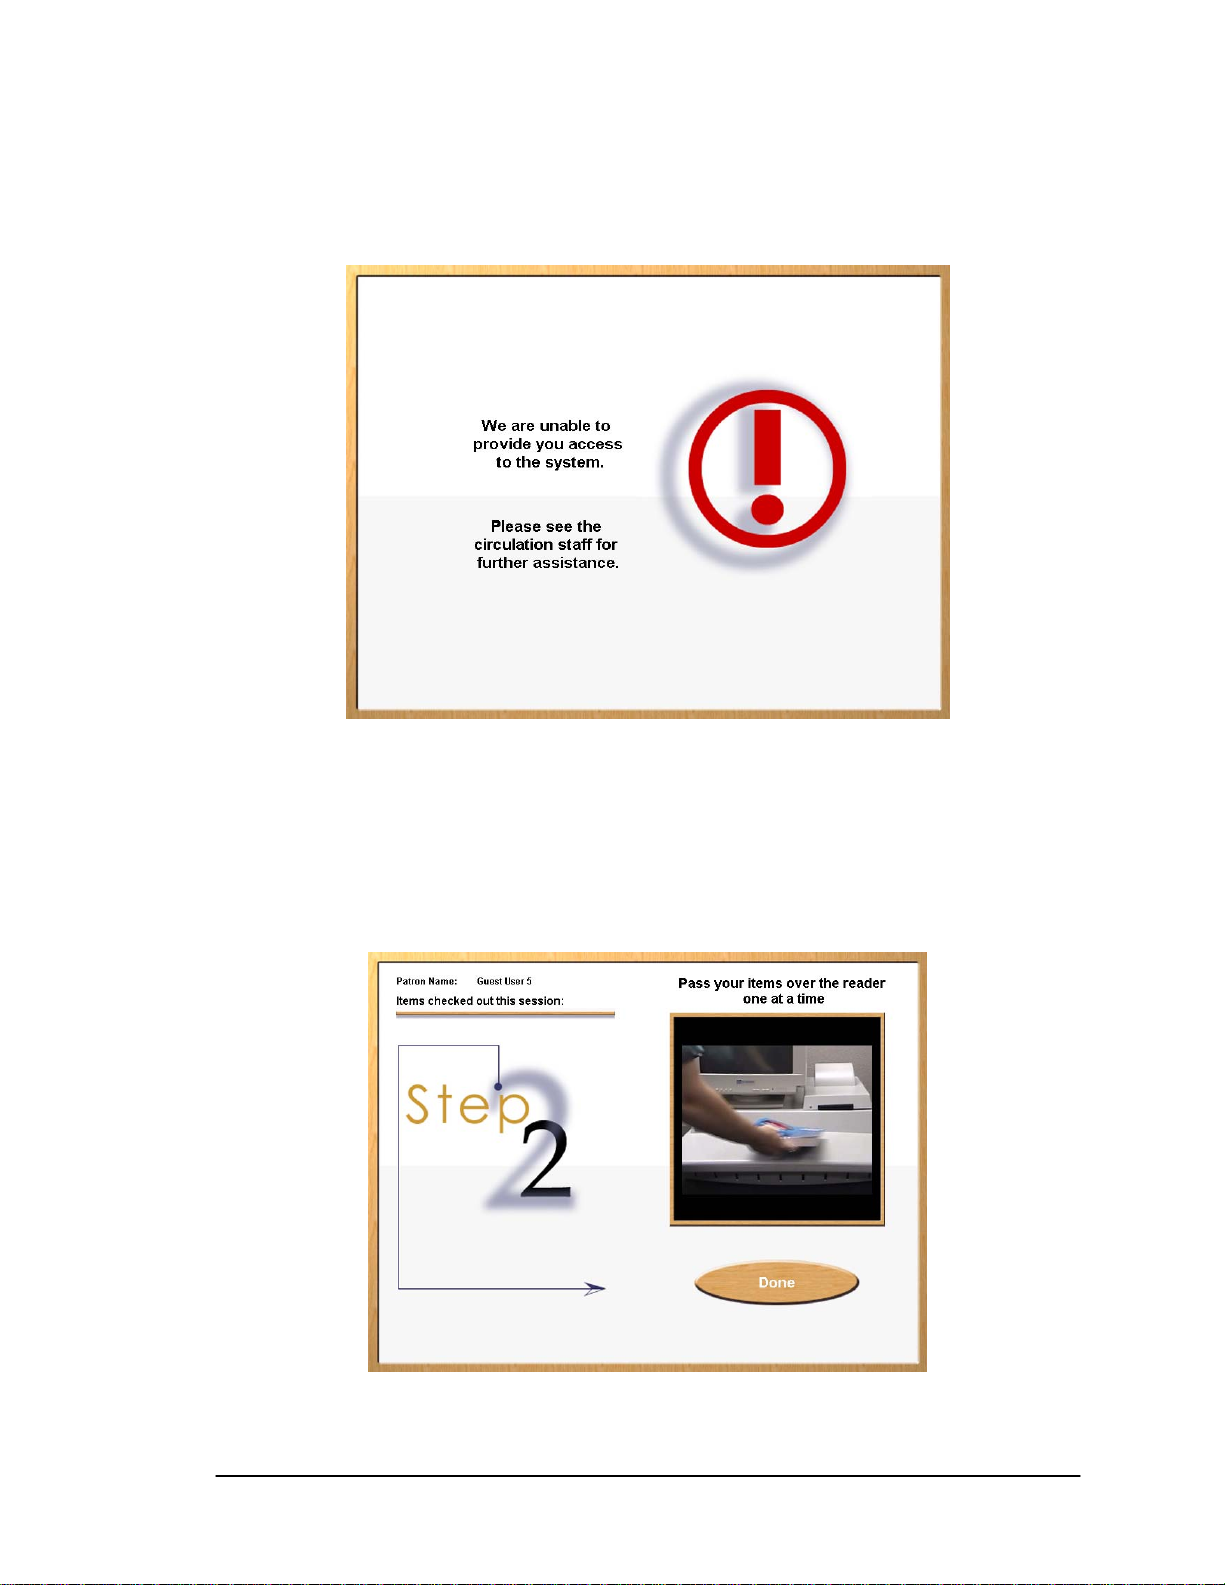
2.3. Patron Identification Failure Screen
Figure 2-4: Patron Identification Failure Screen
If there are ever any questions concerning your authorization, go directly to the librarian desk for
assistance. After a short time period the Welcome Screen will be displayed again. At that time you
may attempt to checkout items again.
2.4. Item Identification Screen - Begin
Figure 2-5: Item Identification Screen - Begin
Page 2-4 Intelligent Library System (ILS) 2.0 User Manual
Page 19
Patron Self-Checkout Station
Now that you have been dvance and you see
instructions on how to checkout each item. On the left side of the screen you see your name at the
top and the heading Items Checked Out This Session. Once you have checked out items a list of
those items is displa
Take one of the items you wish to checkout and slowly pass it over the surface area of th
entification pad. You do not need to slide it on the pad in order for the item to be identified.
id
Simply move the item over the pad in a smooth fashion, just a couple of inches above the pad
area.
Repeat the above step for each ite
authorized for checkout, the visuals on the screen a
yed as shown in Figure 2-6: Items Identification Screen - Item List.
e item
m you want to checkout.
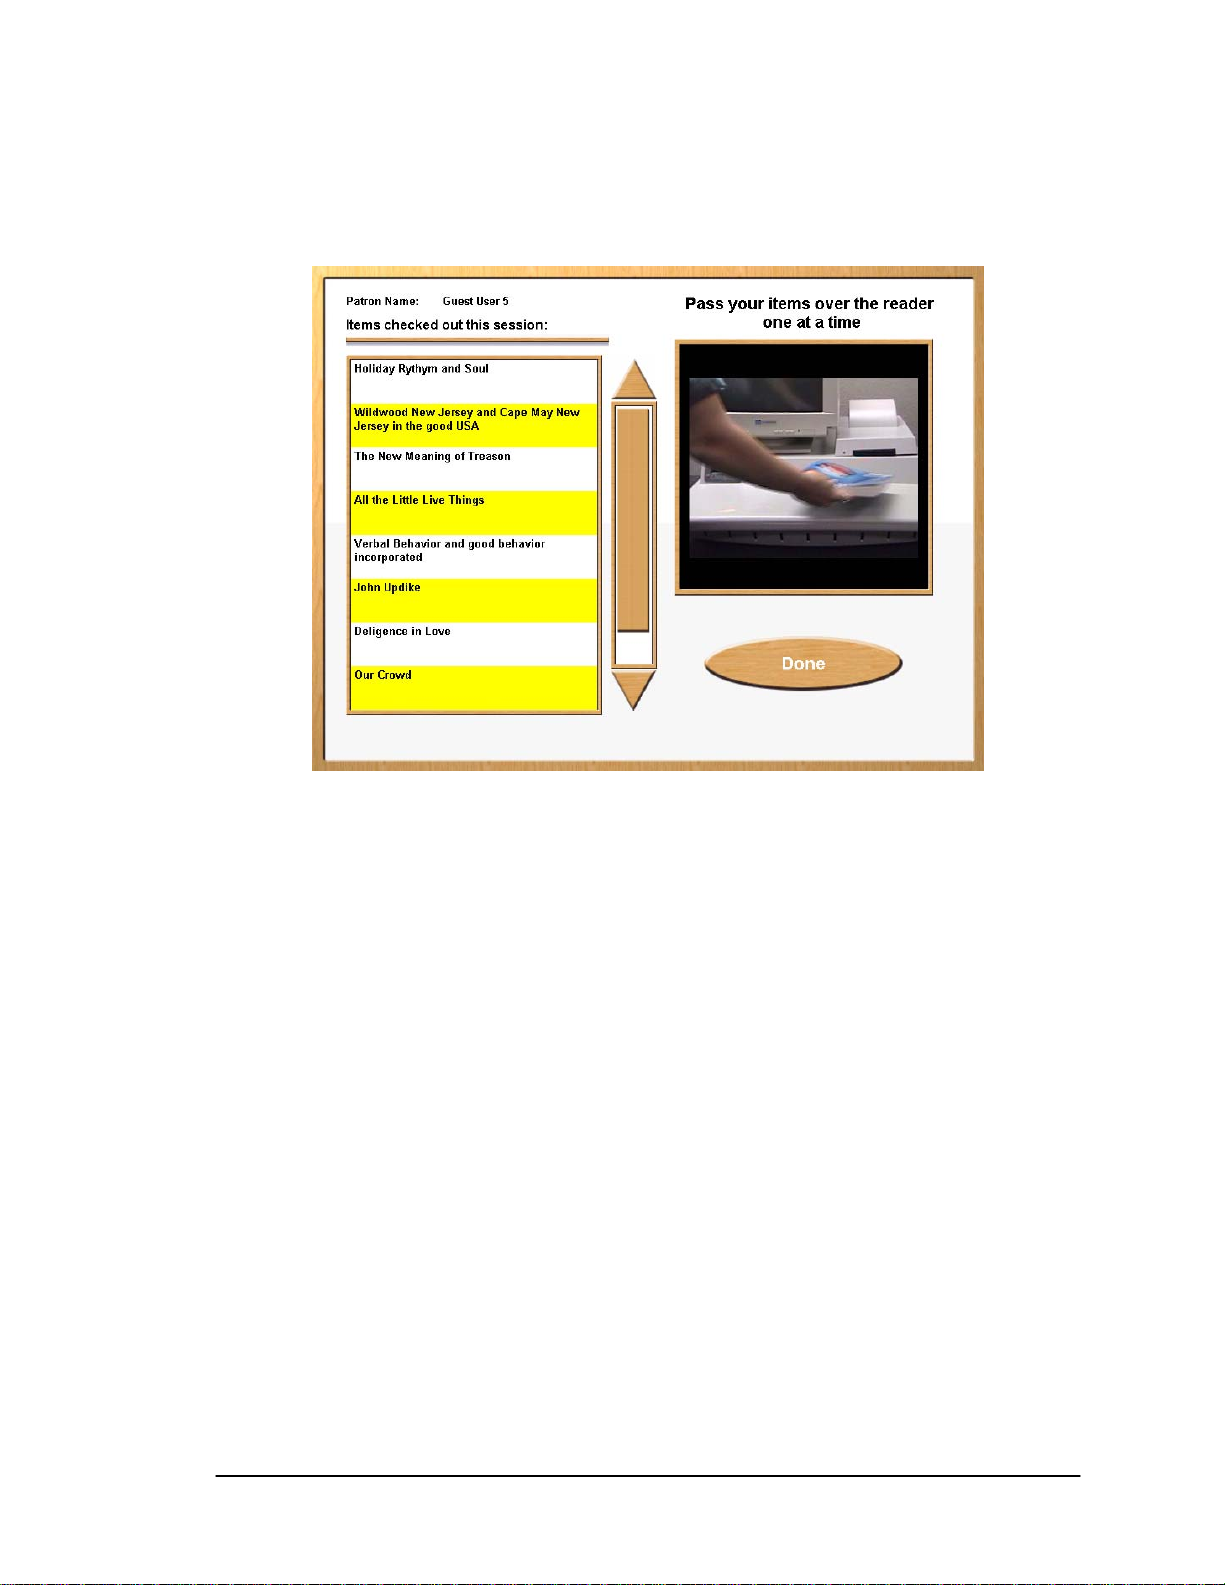
2.5. Item Identification Screen - Item List
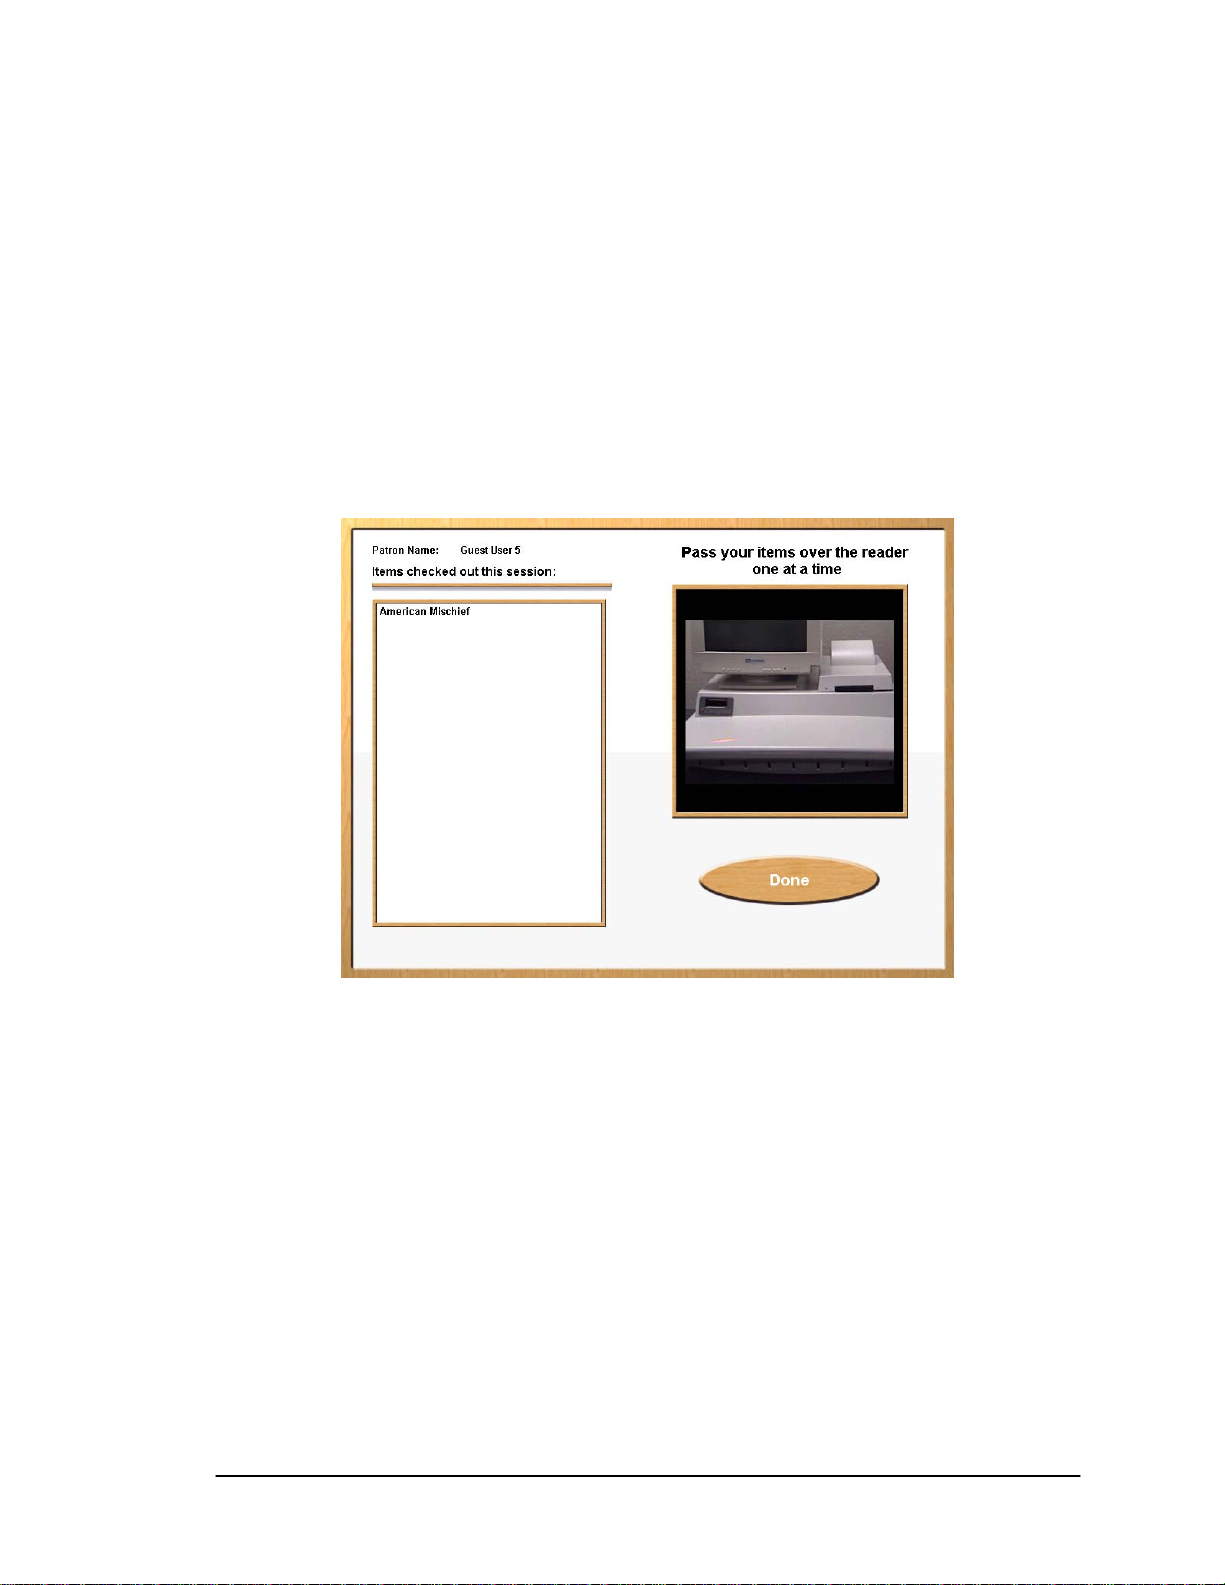
Figure 2-6: Items Identification Screen - Item List
As you pass the item over the pad, the system identifies each item and lists it on the left side of
the screen.
Note: Some institutions may provide additional information along with the item name.
At anytime in the checkout process you may touch Done to complete your checkout session. The
Done is on the right bottom of the screen.
Press Done to end your session.
Intelligent Library System (ILS) 2.0 User Manual Page 2-5
Page 20
Patron Self-Checkout Station
2.6. Item Identification Screen - Scroll
Figure 2-7: Items Identification Screen - Scroll
If you have a several items to check out and the listing of those items fills the item area on the
screen, you will see a scroll bar with arrows at the top and bottom. Use these buttons to move the
list up or down to view all of the items you have checked out.
If you have checked out more items than can display on the screen, the list will automatically
scroll down to show the most recent items that were checked out. To see previously checked-out
items that have already scrolled up off the screen, touch the Up Arrow button facing upward at
the top of the scroll bar. To scroll back down to the most recent items checked out, press the
Down Arrow button facing downward at the bottom of the scroll bar.
Press Done to end your session.
Page 2-6 Intelligent Library System (ILS) 2.0 User Manual
Page 21
Patron Self-Checkout Station
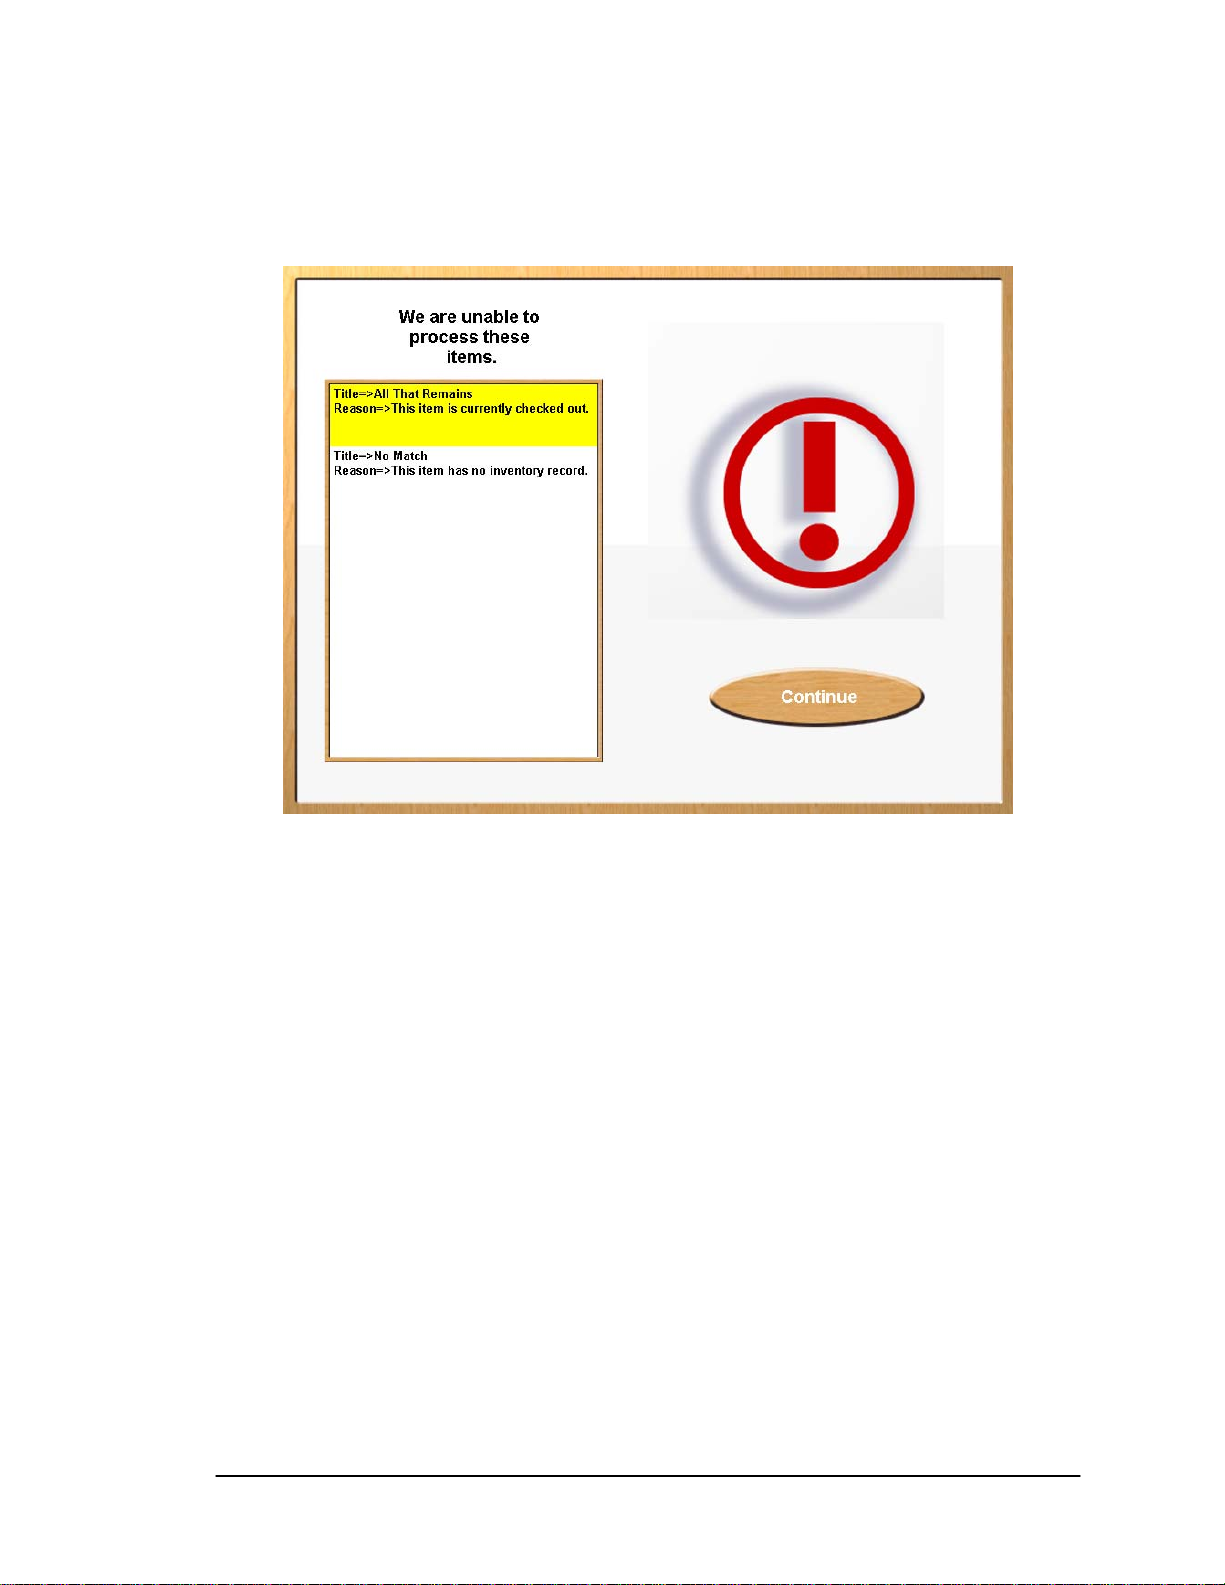
2.7. Item Identification Screen - Failed
Figure 2-8: Item Identification Screen - Failure
This screen displays if any item you presented for check out is not accepted. On the left side of
the screen you will see a message telling you the system was unable to process the item you
presented for checkout. The screen lists the Title (if available) of the item and identifies the
reason for denied access. You can contact your librarian for assistance with items that where not
successfully checked out. You may continue with the checkout of additional items by returning to
the Item Identification Screen.
Press Continue to continue your session.
Intelligent Library System (ILS) 2.0 User Manual Page 2-7
Page 22
Patron Self-Checkout Station
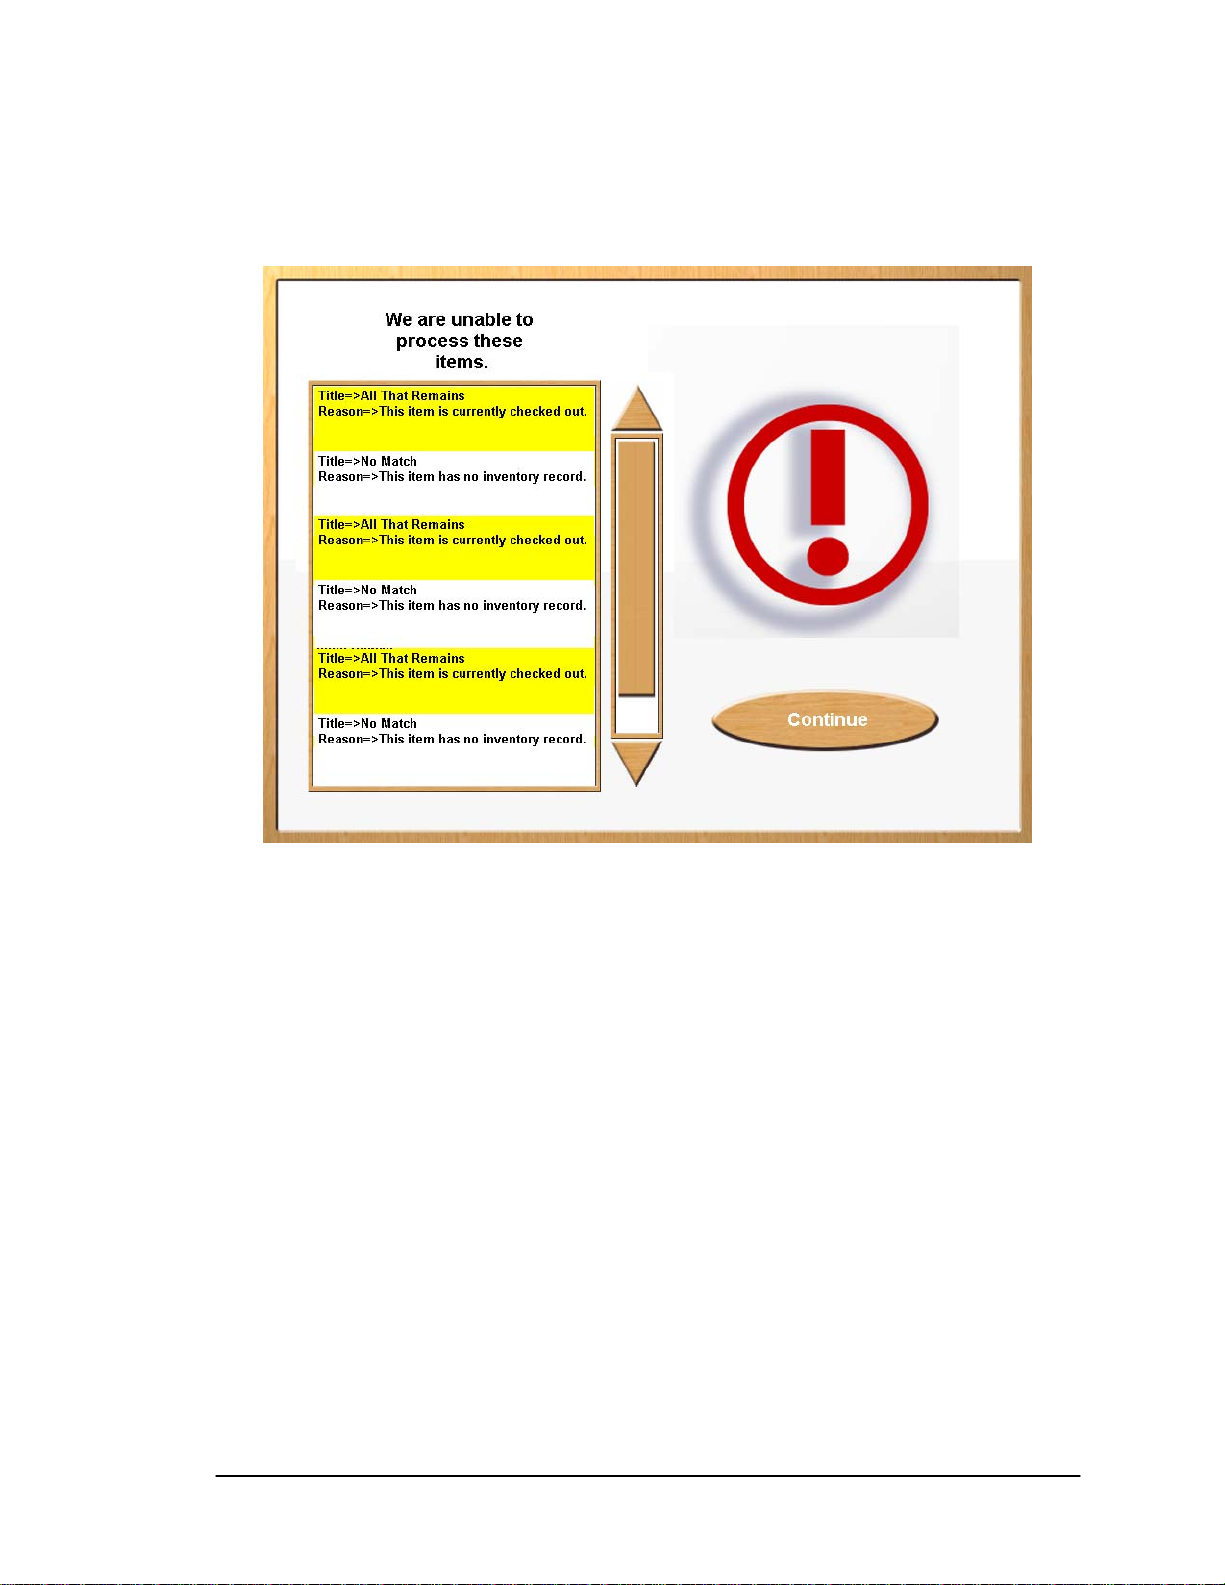
2.8. Item Identification Screen - Failed - Scroll
Figure 2-9: Item Identification Screen - Failed - Scroll
If there are numerous items that have been rejected so that all cannot be fully displayed on the
left, a scroll bar will display to the right of the list. The Continue button now displays on the
right side of the screen. Use the scroll buttons to view the list.
Touch Up Arrow to scroll up the list.
OR
Touch Down Arrow to scroll down the list.
Press Continue to continue your session.
Page 2-8 Intelligent Library System (ILS) 2.0 User Manual
Page 23
Patron Self-Checkout Station
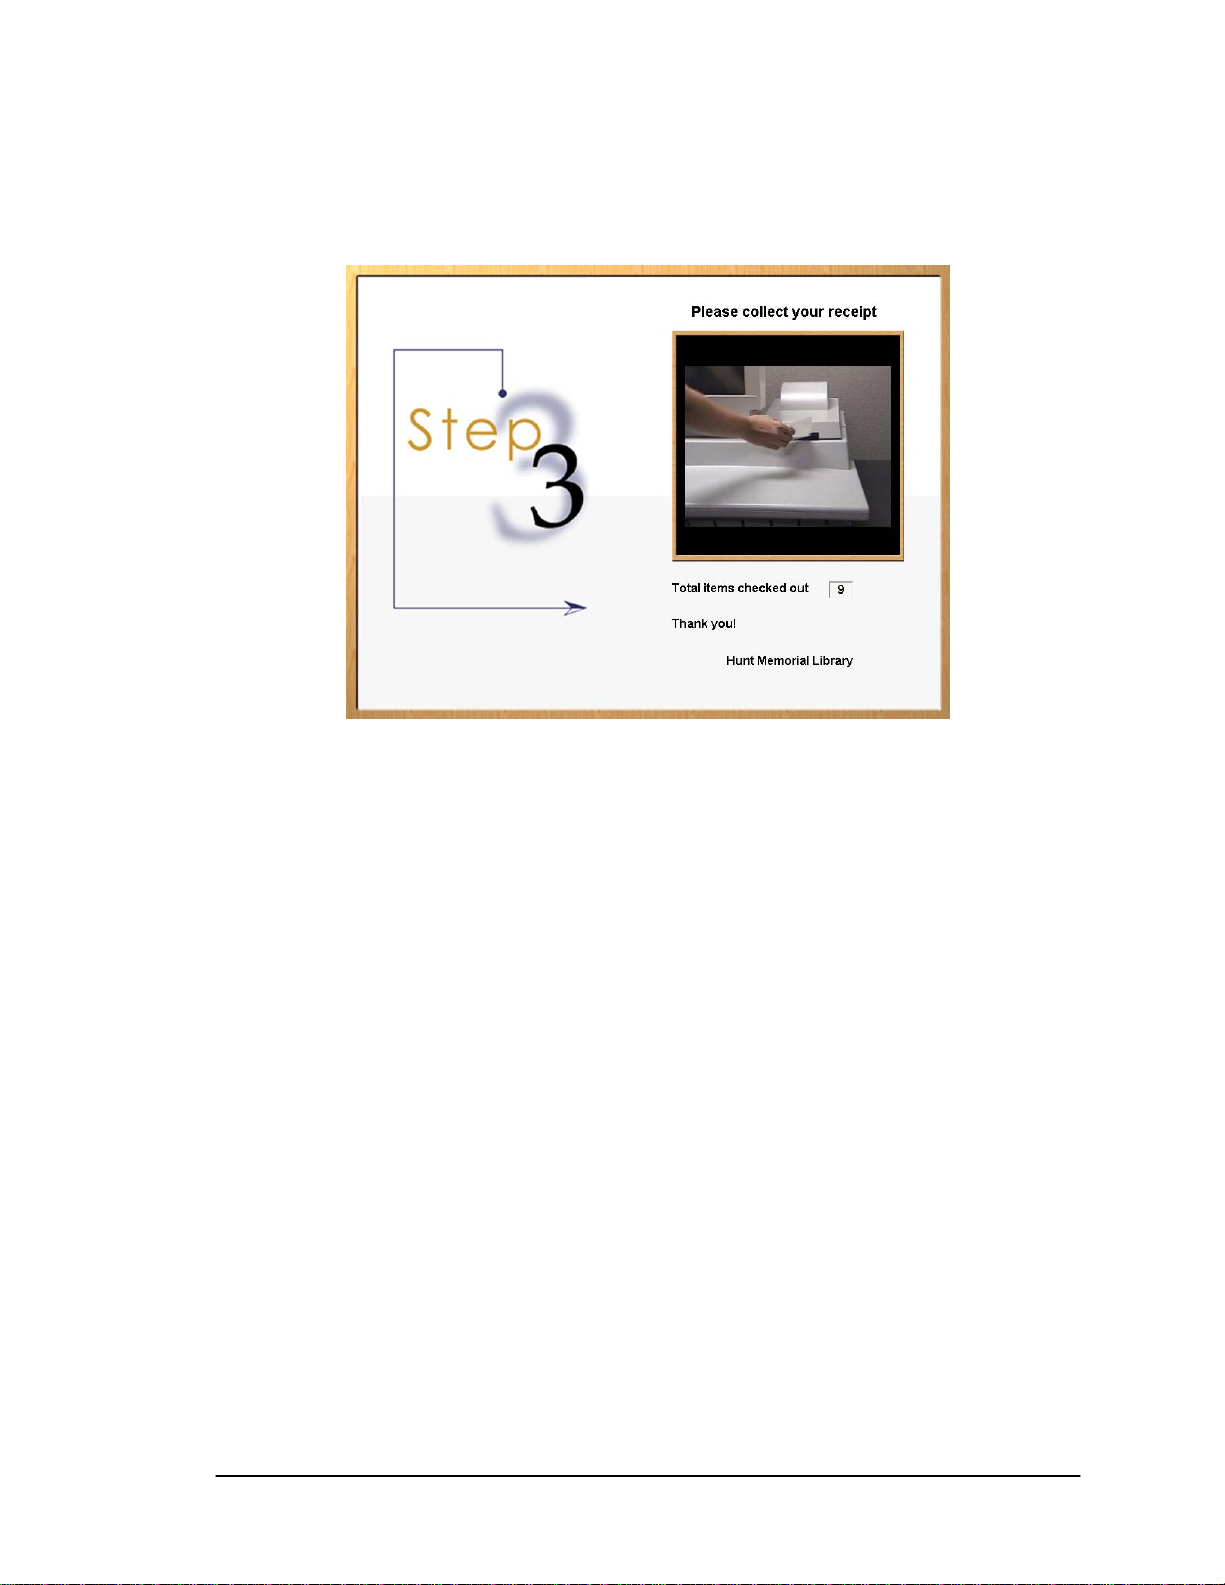
2.9. End Session Screen
Figure 2-10: End Session Screen
When you have finished checking out all your items and touched Done, the End Session Screen
displays, instructing you to collect your printed receipt and showing you the total number of
items you have checked out. Collect the printed receipt from the receipt dispenser. Your receipt
will list the items you have checked out as well as the return due date for each item.
Note: Some institutions may not provide a printed receipt.
Intelligent Library System (ILS) 2.0 User Manual Page 2-9
Page 24

Patron Self-Checkout Station
IImmppoorrttaanntt IInnffoorrmmaattiioonn ttoo oouurr UUsseerrss iinn NNoorrtthh AAmmeerriicca
a
FCC Regulatory Compliance Statement
Checkpoint Systems, Inc., offers Radio Frequency Identification Products that have been FCC certified or
verified to 47 CFR Part 15 Subparts B/C and/or 47 CFR Part 18. Appropriately, one of the following labels will
apply to the approval:
NOTE: This equipment has been tested and found to comply with the limits for a class A digital device,
pursuant to Part 15 of the FCC Rules. These limits are designed to provide reasonable protection against
harmful interference when the equipment is operated in a commercial environment. This equipment
generates, uses, and can radiate interference to radio communications. Operation of this equipment in a
residential area is likely to cause harmful interference in which case the user will be required to correct the
interference at his own expense.
- OR -
This device complies with Part 15 of the FCC Rules. Operation is subject to the following two conditions:
(1) including this device may not cause harmful interference, and (2) this device must accept any
interference received, including interference that may cause undesired operation, which may include
intermittent decreases in detection and/or intermittent increases in alarm activity.
- OR -
NOTE: This equipment has been tested and found to comply with the limits for a miscellaneous type
ISM device, pursuant to Part 18 of the FCC Rules. This equipment generates, uses, and can radiate
radio frequency energy and, if not installed and used in accordance with the instruction manual, may
cause harmful interference to radio communications. However, there is no guarantee that interference
will not occur in a particular installation. If this equipment does cause harmful interference to radio
communications reception, which can be determined by turning the equipment off and on, please
contact Checkpoint Systems, Inc., at 1 (800) 257-5540 for further assistance.
Equipment Safety Compliance Statement
Checkpoint Systems Radio Frequency Identification products have been designed to be safe during normal
use and, where applicable, certain components of the system or accessory sub-assemblies have been
certified, listed or recognized in accordance with
1037, UL 1310, UL 60950-1, CSA C22.2 No. 205, CSA C22.2 No. 220, CSA C22.2 No. 223, CSA C22.2 No.
60950-1. Additional approvals may be pending.
WARNING:
not expressly approved by the party responsible for assuring compliance could void the user’s authority to
operate the equipment in a safe or otherwise regulatory compliant manner.
Changes or modifications to Checkpoint’s Radio Frequency Identification (RFID) equipment
one or more
Page 2-10 Intelligent Library System (ILS) 2.0 User Manual
of the following Safety standards: UL 1012, UL
Page 25

Patron Self-Checkout Station
IImmppoorrttaanntt IInnffoorrmmaattiioonn ttoo oouurr UUsseerrss iinn EEuurrooppee
CE Compliance Statement
Where applicable, Checkpoint Systems, Inc., offers certain Radio Frequency Identification (RFID) products
that have CE Declarations of Conformity according to R&TTE Directive 99/5/EC.
System Electromagnetic Compatibility (EMC), has been tested and notified through Spectrum Management
Authorities using laboratories, whereby, conformity is declared by voluntarily accepted European
Telecommunic ations Standards Institute (ETSI) standards EN 301489-3 and EN 300330-2.
NOTE: Certain Radio Frequency Identification (RFID) equipment have been tested and found to conform
with the CE emission and immunity requirement in Europe. This equipment generates, uses, and can radiate
radio frequency energy and, if not installed and used in accordance with the instruction manual, may cause
harmful interference to radio communications. Under unusual circumstances, interference from external
sources may degrade the system performance, which may include intermittent decreases in detection
and/or intermittent increases in alarm activity. However, there is no guarantee that interference will not occur
in a particular installation. If this equipment experiences frequent interference from external sources or does
cause harmful interference to radio communications reception, which can be determined by turning the
equipment off and on, please contact a Checkpoint Systems representative for further assistance.
Equipment Safety Compliance Statement
Checkpoint Systems Radio Frequency Identification products have been designed to be safe during normal
use and, where applicable, certain components of the system or accessory sub-assemblies have been
declared safe according
recognized in accordance with one or more
50364, EN 60742. Additional approvals may be pending.
WARNING:
expressly approved by the party responsible for assuring compliance could void the user’s authority to
operate the equipment in a safe or otherwise regulatory compliant manner.
Changes or modifications to Checkpoint’s Radio Frequency Identification equipment not
to the European Low Voltage Directive (LVD) by being certified, listed, or
of the following European safety standards; EN 60950, EN
Intelligent Library System (ILS) 2.0 User Manual Page 2-11
Page 26

Patron Self-Checkout Station
NOTES
Page 2-12 Intelligent Library System (ILS) 2.0 User Manual
Page 27
Handheld Portable Reader
Chapter 3 Handheld Portable Reader
3.1. Overview
The Intelligent Library System (ILS) Handheld Portable Reader is a key component in
Checkpoint's family of ILS products. Consisting of a lightweight, handheld sensing unit, the
Handheld Portable Reader combines convenience with versatility. An extendable handle makes it
easy to read items placed in hard-to-reach areas, while the sophisticated antenna design and
electronics make the Handheld Portable Reader the longest-range portable reader available. This
feature is exceptional when checking inventory or trying to locate materials that haven’t been
shelved properly.
The ILS Handheld Portable Reader is designed with ease of use in mind. The handheld antenna
contains three LED's: the green light indicates power on, the red light alerts the user that a
Circulation Circuit is being read, and the yellow one indicates a low battery.
The ILS Handheld Portable Reader enables a fast, efficient and accurate method for taking
inventory of the library material.
The Portable Data Terminal (PPT 2700/2800) enables data to be uploaded or downloaded from
the Application Server, providing both inventory and search capability.
Figure 3-1: Handheld Portable Reader
Intelligent Library System (ILS) 2.0 User Manual Page 3-1
Page 28
Handheld Portable Reader
3.2. Powering Up the Handheld Portable Reader
Prior to using the Handheld Portable Reader for any significant inventory collection or inventory
search session it is imperative that its battery is fully charged. Connect the battery to the battery
charger and plug the adapter into an outlet to begin charging. The estimated charging time is 4-6
hours.
When the battery is completely charged, connect the Handheld Portable Reader battery to the top
of the Handheld Portable Reader. Once you have started using the Inventory Collection or the
Search Inventory programs, the Handheld Portable Reader will be powered up.
3.3. Powering Up and Charging the PPT 2700/2800
3.3.1. Powering Up
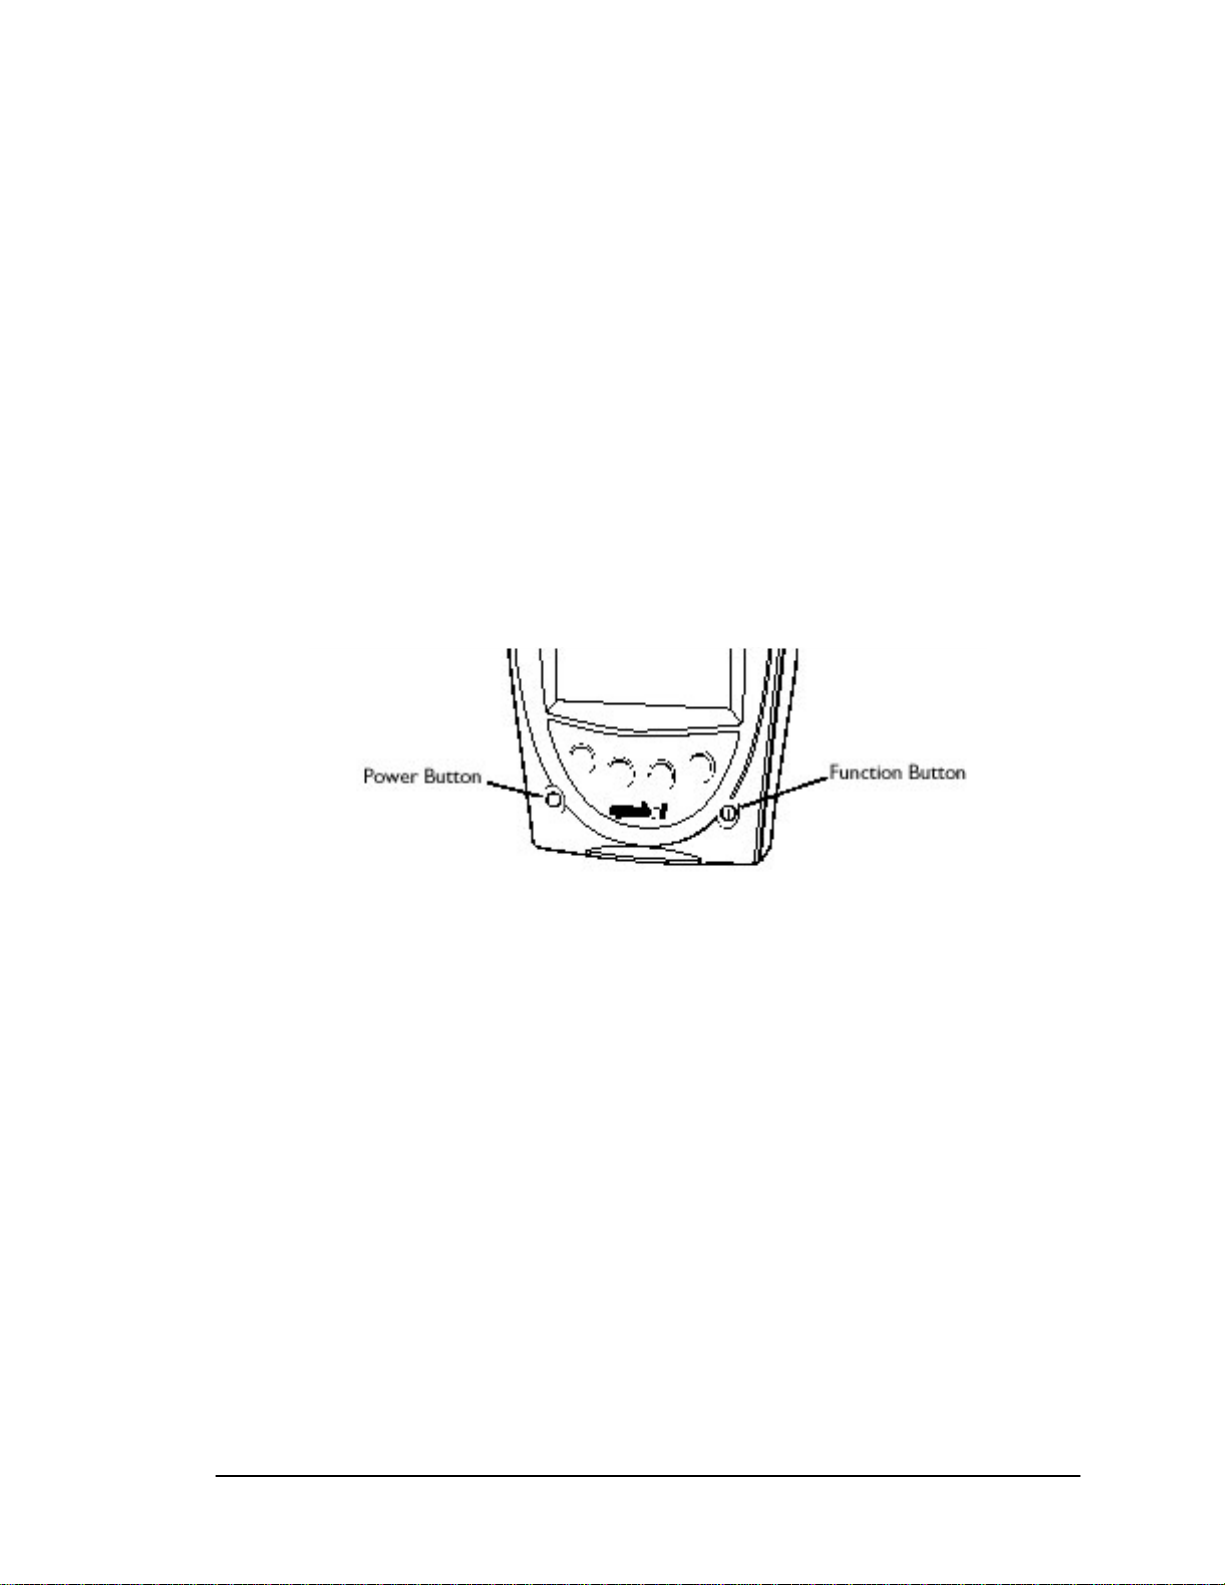
Press the power button on the lower left-hand side of the terminal to turn the PPT 2700/2800 on
and off.
Figure 3-2: Powering Up the PPT 2700/2800
Note: If you have not used the PPT 2700/2800 within the configured time, the device will go into
Power Save mode. This means that the device will power down. To turn it on press the red power
button. You will be returned to the last screen presented prior to shut off.
3.3.2. Charging the Device
Before using your terminal for the first time, charge the battery. Also, when battery voltage is
low, a warning message displays indicating the battery needs to be charged. You can charge the
battery using the CRD 2800 cradle. Your terminal is equipped with a memory backup battery that
automatically charges from the main lithium-ion battery. This backup battery retains data in
memory when the terminal's battery is removed, and takes several hours to charge when you first
use your terminal.
Note: If you remove your lithium-ion battery before the backup battery is fully charged, data may
be lost. For this reason DO NOT remove the battery within the first ten hours of use.
Using the Cradle to Charge the Battery
To charge the terminal's battery using the cradle:
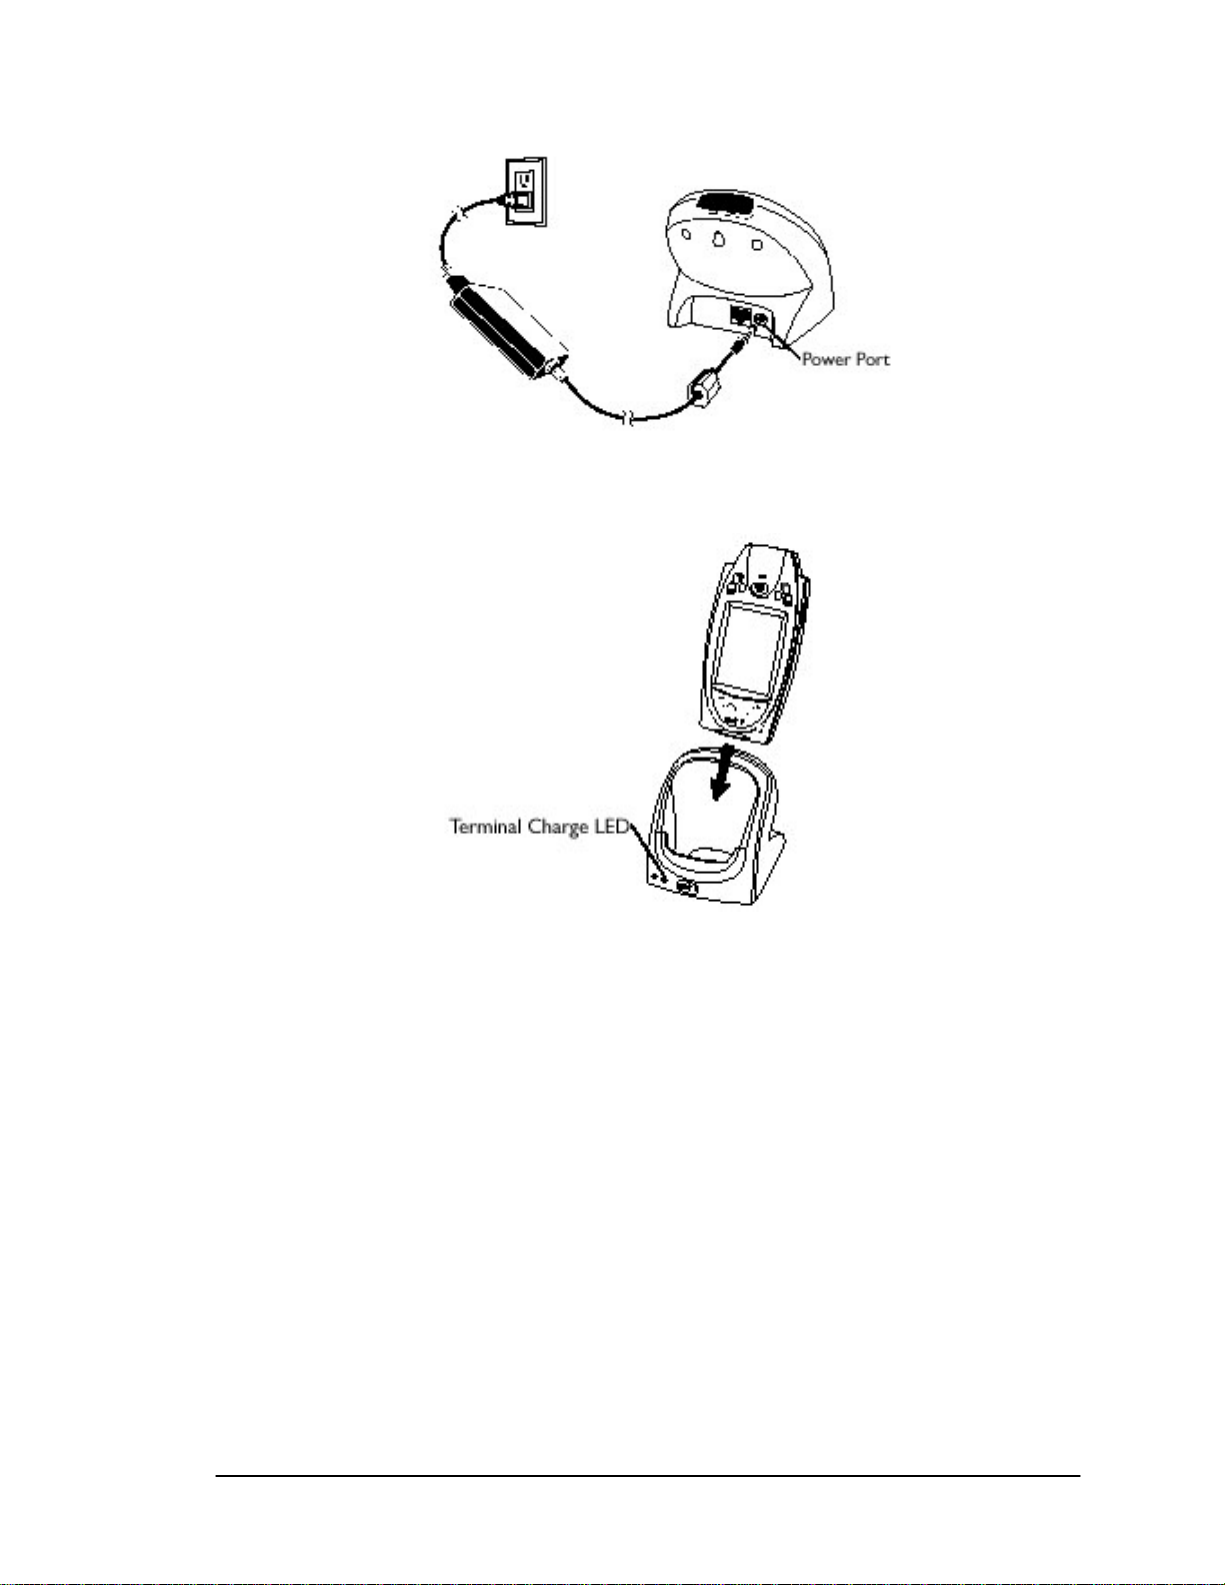
Connect the power supply to the power port on the back of the cradle, and the other end of the
power supply to a wall outlet.
Page 3-2 Intelligent Library System (ILS) 2.0 User Manual
Page 29
Handheld Portable Reader
Figure 3-3: Charging the PPT 2700/2800
Insert the PPT 2700/2800 terminal in the cradle.
Figure 3-4: Docking the PPT 2700/2800
The Terminal Charge LED turns red to indicate ch ng, then green when the battery is fully
charged. The terminal's battery is fully charged after approximately 2 1/2 hours.
argi
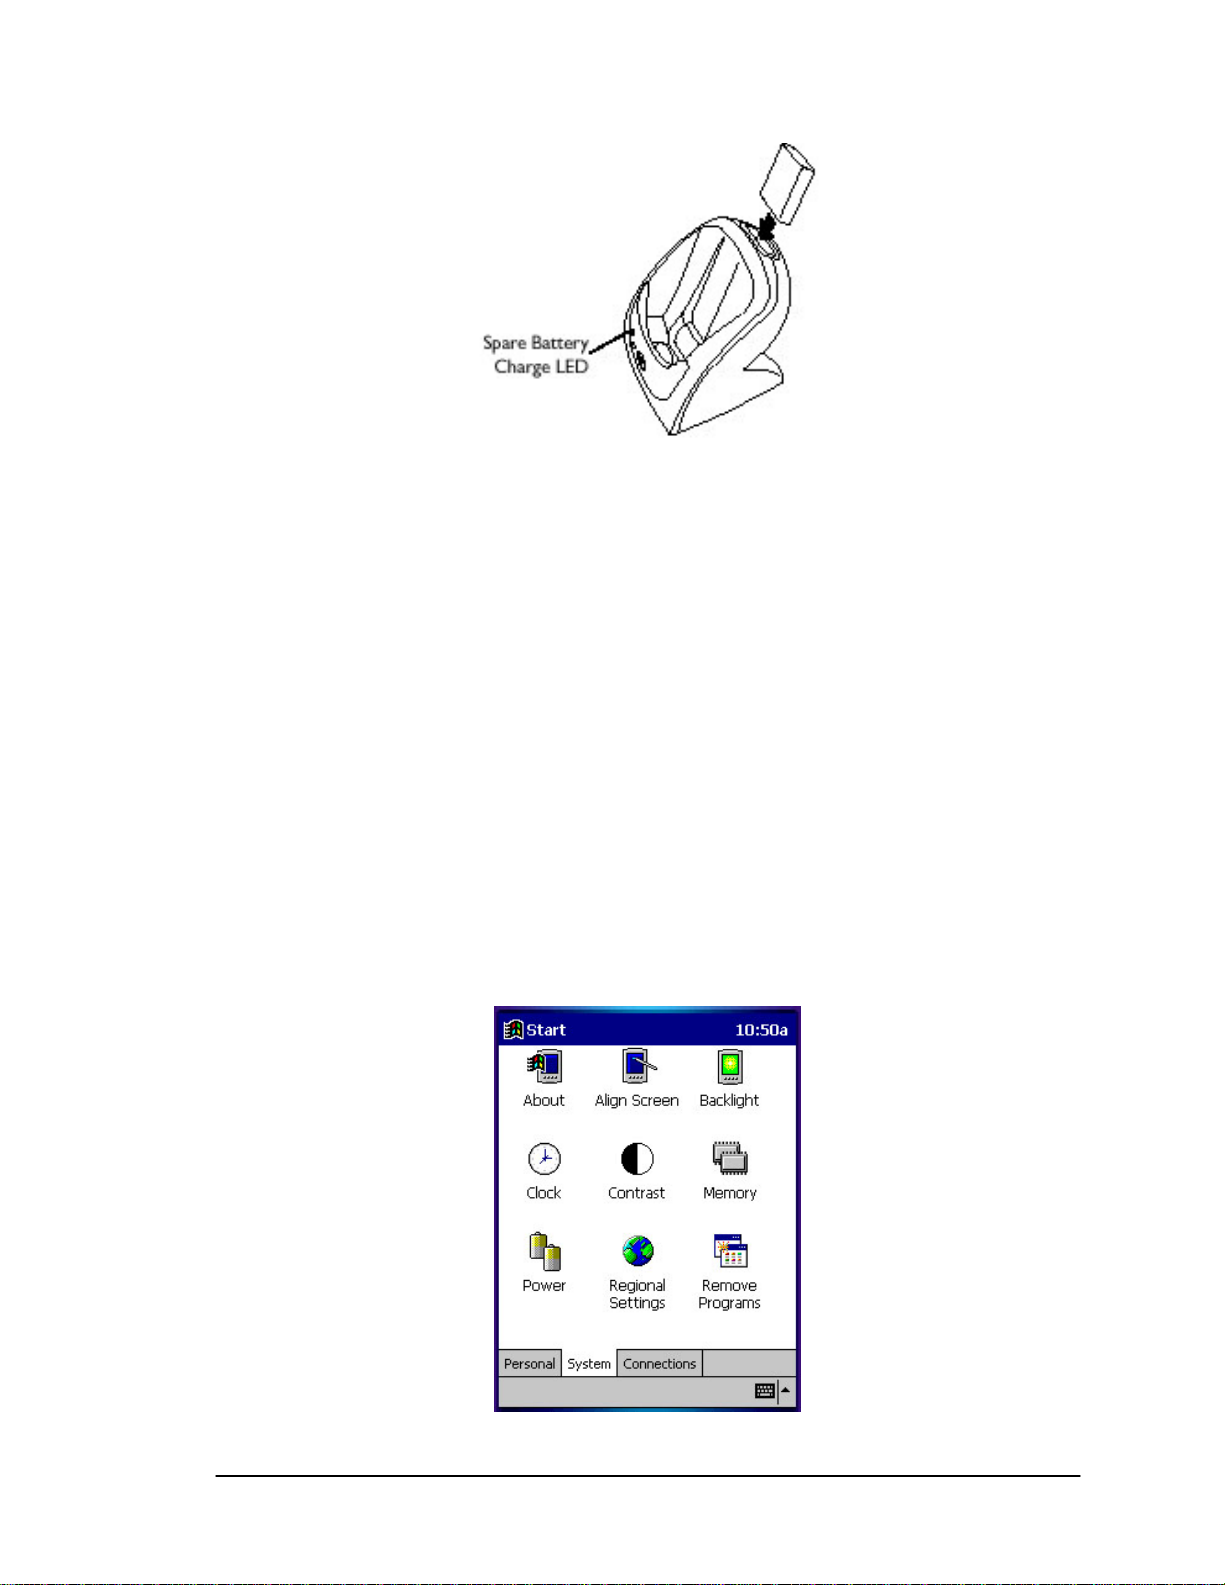
3.3.3. Charging the Spare Battery
To charge a spare battery, insert the battery in the spare battery
cradle, oriented so the contacts are facing down a
battery down into the slot until firmly seated.
The Spare Battery Charge LED turns red to indicate charging, then green when the battery is fu
charged. The
Intelligent Library System (ILS) 2.0 User Manual Page 3-3
battery is fully charged after approximately 2 1/2 hours.
nd towards the back of the cradle. Press the
-charging slot in the back of the
lly
Page 30
Handheld Portable Reader
Figure 3-5: Charging the Spare Battery
3.3.4. Using the PPT 2700/2800
In this section the word tap is used instead of click because the stylus supplied must be used to
tap the touch screen. The stylus is stored in a silo on the back of the PPT 2700/2800. Please refer
to the Symbol PPT 2700/2800 Series Quick Reference Guide for information regarding use of
this device.
3.3.5. Check on the Status of the Batteries
It may b
following p
ecome necessary to check the status of the PPT 2700/2800’s battery power. Use the
rocedure to check the power status of the battery:
1. Tap the Windows icon in the upper left hand corner of the screen.
2. Tap the Settings menu item. The Sett gs Panel (Figure 3-6) screen displays.
3. Tap the System tab at the bottom of the Settings Panel screen.
in
Page 3-4 Intelligent Library System (ILS) 2.0 User Manual
Page 31

Handheld Portable Reader
Figure 3-6: Settings Panel
4. Tap the Power icon on this screen. The Battery Status screen (Figure 3-7) displays.
This screen shows you the power status of both the main and the backup batteries. A
warning will display if either battery is low.
Figure 3-7: Battery Status
3.4. Collecting Inventory Data and Scanning Library
Materials
Now that the Handheld Portable Reader has been initialized you are ready to start collecting
inventory information.
Connect the cable from the Handheld Portable Reader to the PPT 2700/2800.
Intelligent Library System (ILS) 2.0 User Manual Page 3-5
Page 32

Handheld Portable Reader
Figure 3-8: Connecting Cable to PPT 2700/2800
Turn the PPT 2700/2800 on. To do this, press the red button in the lower-left hand corner of the
device.
Figure 3-9: Turning PPT 2700/2800 On
Once you have started the PPT 2700/2800, you will be presented with the ILS Inventory Main
Menu Screen (Figure 3-10).
Figure 3-10: ILS Inventory Main Screen
Note: If you are not presented with this screen, tap the start button in the upper-left hand corner
of the screen. Tap on the ILS Inventory menu item provided in the start menu. This will launch
the program needed to collect and search the inventory.
Tap on the Inventory Collection button located in the center of the screen. Tap the Start button
located in the bottom-left hand corner of the screen. If a previous inventory collection file was not
transferred to the ILS Ser he file. Answering Yes
will continue the previous inventory collection, and new items being appended to the file. If you
answer No, you will be asked to confirm that you do not wish to keep the existing data. Tap OK
if you are sure, and a new inventory file will be created. Tap Cancel and you will
Page 3-6 Intelligent Library System (ILS) 2.0 User Manual
ver, you will be asked if you want to append to t
append to the
Page 33

Handheld Portable Reader
file. If you wanted to transfer the previous file, you can immediately tap done to initiate a file
transfer.
Figure 3-11: Inventory Collection
Begin to scan the tagged items. Hold the wand in your hand about three inches from the material
you wish to scan. Notice that the red light on the wand is now blinking. This indicates that the
wand is detecting tagged materials. The wand can detect circulation circuits up to a distance of 8
inches. Therefore it is important to keep the wand focused on the intended inventory items to
avoid unwanted data from being collected.
You will notice that once you have scanned a tag, the bar code number for that tag will display on
the PPT 2700/2800 in the Most Recently Scanned Items field. The Items Read field will supply
you with the total number of inventory tags read over time. The Available Memory field will
supply you with the percentage of memory still available.
Once you have comple ton. ted scanning all of the desired tags, tap the DONE but
Intelligent Library System (ILS) 2.0 User Manual Page 3-7
Page 34

Handheld Portable Reader
Figure 3-12: Inventory Collection In Progress
3.5. Transferring the Inventory Data Collec
Once yo
will dis ansfer the data collected. Tap OK to do so.
Not
press C nter inventory collection mode.
(Ba
(Batch
A
Application Server.
Once the transfer is completed, the App
O
containing the list of barcodes. The file name and location will be displayed in the Transfer Status
Display window. The file is now ready to be transferred to the circulation system. When the
process is finished click the <Close> button.
u have completed scanning the tags, you are ready to transfer the data. A pop up screen
play asking you if you want to tr
e: If you wish to continue the inventory collection progress after you have pressed Done,
ancel to prevent file transfer and ree
tch Mode only) Unplug the cable from the bottom of the PPT 2700/2800.
Mode only) Dock the PPT 2700/2800 into the cradle.
Transferring… screen will display on the PPT 2700/2800 while data is transferring to the
lication Server will display the Handheld Portable Reader
perations window. At this time the inventory you transferred is converted to a text file
ted
Page 3-8 Intelligent Library System (ILS) 2.0 User Manual
Page 35

Handheld Portable Reader
Figure 3- erations
The PPT 2700/2800 will read Transfer Complete. Tap OK. This will return you to the ILS
Inventory Main Screen. You may begin another inventory collection by selecting Start, or exit to
the main screen by clicking OK found at the top-right of the screen.
13: Handheld Portable Reader Op
3.6. Searching the Invent
To begin searching the inventory, tap the <Item Search> button located in the bottom right hand
corner of the ILS Inventory Main Screen. An Item Search file must be prepare
pplication Server.
A
3.6.1. Preparing a Se
An Item Search List file is identified by the.psl file extension. The file can be created from the
results of other search operations, or may be transferred from the Application Server to the PPT
2700/2800. The file may be created by a report on the circulation system, or simply by using
Notepad to enter barcodes.
arch List File
ory
d on the
Intelligent Library System (ILS) 2.0 User Manual Page 3-9
Page 36

Handheld Portable Reader
Figure 3-14: Select the Search List File Screen
Transferring and Selecting the Search L
To transfer a search list file (or files) from the Application Server, it must be placed in the
synchronization directory for your PPT 2700/2800. There should be a shortcut to this directory on
the desktop of the Application Server. Once the file is in the correct location, dock the PPT
2700/2800 and the file(s) will be automatically transferred. Refer to the Wireless Operations
ections for details of file transfer using a Wireless PPT 2700/2800. s
Once the files have been transferred, tap the <Item Search> button. The Select the Search List
ile screen is used to choF
sed to choose files of other types that can be used as search lists. Tap the file name to select it to
u
be used for the search. The <Cancel> button at the top-right can
screen.
ose the desired file. The down arrow to the right of the Type field can be
ist File
be used to return to the main
3.6.2. Search Mode Screen
here are several ways to view inT
• Option 1 - Check the Items Found button: This will show you all of the barcodes that
were found in the fie
• Option 2 - Check the Items Not Found bu
that the system has not yet found.
• Option 3 - Check the Show All Items button: This will show you both the Items F
and the Items Not Yet Found. This is the default selection. Tap the other buttons at an
time to change the view.
When the Alerts enabled button is checked, an alert display and sound will occur for each item
that is found. The search will stop temporarily, allowing you to locate the item found on the shelf.
Tap this button to disable this feature.
formation on the Search Mode Screen.
ld below.
tton: This will show you all of the barcodes
ound
y
Page 3-10 Intelligent Library System (ILS) 2.0 User Manual
Page 37

Handheld Portable Reader
Tap the Start button to begin searching for the barcodes. You will notice that the barcode display
field(s) will begin to reflect changes in the status of the search items, depending on the search
u ind them. Items not found will be removed option yo chose. Items found will be listed as you f
from the list as you find them.
Figure 3-15: Item Search Screen
egin to scan the inventory items. Hold the wand in your hand about three inches from the
B
materia ow on. This indicates that the
w
inch . nventory items to
a
N ay flash when the scanner detects any tag, a barcode will only displa
in the Items found list if it matches an item present in your Search Items list.
When an alert is displayed, the barcode, shelf location, and title of the item will be displayed. Tap
Continue to resume the search.
l you wish to scan. Notice that the red light on the wand is n
and is detecting tagged materials. The wand can detect circulation circuits up to a distance of 8
es Therefore it is important to keep the wand focused on the intended i
void unwanted data from being collected.
ote: While the red light m y
Intelligent Library System (ILS) 2.0 User Manual Page 3-11
Page 38

Handheld Portable Reader
Figure 3-16: Item Found Alert
When you are finished searc If all of the items are
found, an alert screen will notify you. Tap OK to continue. At this time, the Item Search result
files will be generated. A pop-up will display asking you to Please dock the PPT 2700/2800 unit
and press OK to begin transfer of the Search Results file. Tap OK. (Note: In Wireless mode the
file transfer is automatic.)
ote: If you would like to abort the file transfer, tap the Cancel button on this pop up. You will
N
en be back at the Item Search screen.
th
he Search Results file will be transferred to the configured directory on the Application Server.
T
Refer to section 3.5 Transferring the Inventor
the barcodes searched. If a barcode w
barcode was not found, the date and time will not be listed.
wo additional files will also be created to list the items foT
found file will have the file extension.psf. The items not found file will have the file
extension.psm. The filename of the item search list file will be used, with the appropriate file
extension added. These files may be used to perform another search, or may be processed as
esults of the search on the circulation system. r
.7. Shelf Order Search
3
The Shelf Order search may be used to verify the contents of a shelf against a shelf order list
generated by the circulati
determine if they are in order, not in the list, or not found. This allows for verification and sorting
of the shelf contents. This is another method available for performing inventory.
To begin a Shelf Order search, tap the <Shelf Order> button located at the bottom-left of the ILS
Inventory Main Screen.
hing tap Done at the bottom of the screen.
y Data Collected for details. This file will list all of
as found, the date and time of the search will be listed. If the
und and the items not found. The items
on system. Items scanned will be compared to the shelf order list to
Page 3-12 Intelligent Library System (ILS) 2.0 User Manual
Page 39

Handheld Portable Reader
3.7.1. Selecting a Shelf Order Search File
A Shelf Order Search file is identified by the.pso file extension. The file can be transferred from
the Application Server to the PPT 2700/2800. The file can be created by a running a S
port on the circulation system. re
helf Order
Figure 3-17: Select the Shelf Order File
Transferring and Selecting the Shelf Order File
To transfer a shelf order file (or files) from the Application Server, it must be placed in the
synchronization directory for your PPT 2700/2800. There should be a shortcut to this directory on
the desktop of the Application Server. Once the file is in the correct location, dock the PPT
2700/2800 and the file(s) will be automatically transferred. Refer to the Wireless Operations
sections for details of file transfer using a Wireless PPT 2700/2800.
Once the files have been transferred, tap the <S
File screen is used to cho of the Type field can be
used to choose files of other types that can be used as shelf order lists. Tap the file name to select
it to be used for the search. The <Cancel> button at the top-right can be used to return to the main
screen.
ose the desired file. The down arrow to the right
3.7.2. Shelf Order Search S
The Shelf Order Search screen has an Alerts Enabled button. When this button is checked, an
alert display and sound will occur for items of interest. Tap this button to disable alerts. Alerts
will occur for the following reasons:
• Out of range – the item read was found in the Shelf Order list, but was not located c
enough to the last item in the shelf
• Not in list – the item read was not found in the Shelf Order list.
helf Order> button. The Select the Shelf Order
creen
lose
order.
Intelligent Library System (ILS) 2.0 User Manual Page 3-13
Page 40

Handheld Portable Reader
The Offset in use display indicates the current setting for the offset used to determine when an
item is considered to be in shelf order. An offset is needed because the wand can read items in
random order within its read range. The offset may be adjusted
pping the <Set> button. This allows for adjustment when items of different thickness are being
ta
scanned.
Tap the Start button be begin the S
helf location in the list.
s
he Shelf Order Search screen displays the following information:
T
• Items in file – the original count of the items read from the Shelf Order file.
• Items Read – the number of items read during the search.
• Items in order – the number of items that were read in shelf order.
• Items not in order – the number of items that were read that are not in shelf order.
helf Order Search. You must begin reading items at the starting
by changing the number and
a
Figure 3-18: Shelf Order Search Screen
The Offset in use and the Alerts enabled settings may be changed at any time during the search.
When you are finished searching tap Done at the bottom of the screen. If all of the items shelf
order list are found, an alert screen will notify you. Tap OK to continue.
Page 3-14 Intelligent Library System (ILS) 2.0 User Manual
Page 41

Handheld Portable Reader
3.7.3. Shelf Order
When a Shelf Order Alert is displayed for an item that is not in the list, only the barcode will be
displayed. The Item Status field will indicate Not in List.
The <Show Prev> button will display the previous item read. You can tap this button to display
the last item in order to assist in locating the it
removed from the shelf, since it is not in the s
The <Show Next> button will display the next item read.
he <Show Item> button retuT
ap Continue when you are ready to resume the scan. Be sure to start at the position you were in
T
when the alert occurred.
Alert
em on the shelf. This item should probably be
helf order list.
rns the display to the item that is not in the list.
Figure 3-19: Shelf Order Alert – Not in List
When a Shelf Order Alert is displayed for an item that is not in shelf order, the barcode, shelf
location, and title will be displayed. The Item Status field will indicate Out of Range.
The <Show Prev.> button will display the previous item read. You can tap this button to display
the last item in order to assist in locating the item on the shelf. This item should probably be
repositioned on the shelf, since it was found in the wrong order in the shelf order list.
The <Show Next> button will display the next item read.
The <Show Item> button returns the display to the item that is not in the list.
The Offset to last item in order field will display the offset value from the last item read in order.
For an alert to occur, this offset is greater than the Offset in use that is displayed.
Intelligent Library System (ILS) 2.0 User Manual Page 3-15
Page 42

Handheld Portable Reader
Tap Continue when you are ready to resume the scan. Be sure to start at the position you were in
when the alert occurred.
Figure 3-20: Shelf Order Alert – Out of Range
Remember that the Offset in use and the Alert enable settings may be changed once the search is
resumed.
.7.4. Shelf Order Results
3
When the shelf order search is completed, the Shelf Order Results screen is displayed. You c
create result files of various types, including a new search list file. The entire list of items rea
ay be displayed and scrolled through. Note that there is no prompt given to perform file transfer
m
at this point. Once the result files have been created, you can dock the PPT 2700/2800 to copy the
files to the Application Server. Refer to the Wireless Operations sections for details of file
transfer using a Wireless PPT 2700/2800.
The Shelf order results window shows the counters from the completed search. Tap on the
ounter of interest before selc
The <New Search List> button will create a new Search List file.psl that can be used to perform a
new Item Search. For example, i ed, a new search could be
performed to locate the items that do not belong on the shelf.
The <Create File> button will create a new Search Order Result file. The type of file created is
selected based on which counter is selected in the Shelf order results window. The file extension
is indicated in parentheses below.
• Items in file – the original count of the items in the Shelf Order file. (no file is created.)
• Items in order – the number of items that were read in shelf order. (.pio)
ecting one of the file buttons.
f the Items not in file line is select
an
d
Page 3-16 Intelligent Library System (ILS) 2.0 User Manual
Page 43

Handheld Portable Reader
• Items out of order – the number o e read that are not in shelf order. (.poo)
• Items not found – the number of items in the Shelf Order file that were not found. (.pmi)
• Items not in file – the number of items read that were not in the Shelf Order file. (.pnl)
• The File Created field shows the path of the file that was last created when either the
<New Search List> or <Create File> button was selected.
f items that wer
Figure 3-21: Shelf Order Results Screen
The View List button uses the Shelf Order View List screen to display the entire results of the
scan. Each item read will be displayed in order, with the appropriate status information. Use the
<Show Prev.> and <Show Next> buttons to step through the list.
Tap Done to return to the Shelf Order Results screen.
Intelligent Library System (ILS) 2.0 User Manual Page 3-17
Page 44

Handheld Portable Reader
Figure 3-22: Shelf Order View List Screen
Tap Done when you are finished with the Shelf Order Results screen. The Shelf Order screen will
be displayed. Tap OK at the top-right of the screen to return to the ILS Inventory main screen.
Or, you may tap the Start button to repeat the last Shelf Order search.
3.8. Wireless Operations
The Wireless PPT 2700/2800 offers the ability to transfer files to and from the Application Server
using the Wireless network. To transfer files, select the <Wireless File Transfer> button from the
ILS Inventory Main Screen.
Page 3-18 Intelligent Library System (ILS) 2.0 User Manual
Page 45

Handheld Portable Reader
Figure 3-23: Wireless PPT 2700/2800 ILS Inventory Main Screen
The top line of the screen indicates the direction of the file transfer currently selected.
The down arrow to the right of the All Files (*.*)line allows you to choose the file type to be
displayed. When a new selection is made, the file list displayed below will be updated.
To transfer a file, tap the file name, then tap the <Copy File> button. Only one file at a time is
transferred.
The Status field displays the results of the file transfer. When it completes successfully, the file is
removed from the list. Any error will be indicated in this field.
Tap the <Get Files> button to change the file transfer direction to copy files from the Application
Server to the PPT 2700/2800.
Tap the <Put Files> button to change the file transfer direction to copy files from the PPT
2700/2800 to the Application Server.
Tap Done when you are finished with the Wireless File Transfer screen.
Intelligent Library System (ILS) 2.0 User Manual Page 3-19
Page 46
Handheld Portable Reader
Figure 3-24: Wireless File Transfer Screen
3.9. Hints on Using the PPT 2700/2800
There are no double-clicks on re accomplished by a single
tap.
If you have not used the PPT 2700/2
Power Save mode. This means that the device will turn off. To turn it back on,
power button. You will be returned to the last screen presented pr
If you have trouble closing the ILS Inventory Program, tap on th
hand corner of the screen. Tap on the Systems tag and then on the memory icon. Tap on the
Running Programs tab. This will show you all of the programs currently running. To close only
one program, highlight the program name and tap the Stop button. To stop all programs, simply
tap the Stop A
ll button.
the PPT 2700/2800 unit. All actions a
800 within the configured time, the device will go into
press the red
ior to shut off.
e Windows icon in the upper left
Page 3-20 Intelligent Library System (ILS) 2.0 User Manual
Page 47

Handheld Portable Reader
Figure 3-25: Running Programs
Intelligent Library System (ILS) 2.0 User Manual Page 3-21
Page 48

Handheld Portable Reader
NOTES
Page 3-22 Intelligent Library System (ILS) 2.0 User Manual
Page 49

Application Server
Chapter 4 Application Server
The Application Server is the core-processing component of the Intelligent Library System. The
Application Server handles multiple functions including the following:
• Storing transactions performed at the Patron Self-Checkout Stations.
• Downloading inventory data from the ILS Handheld Portable Reader.
• Generation of reports.
• Connectivity to the host library circulation system.
In addition, it provides a single station for system configuration and diagnostics. If the host
system becomes unavailable, the Application Server has the capability to support automated
checkout functions without the host. This is known as Off-Line Processing. This feature is a sitespecific option so it may not be available to ot available on
your system. Please see your M
IS department for further details.
4.1. The Application Server Control Screen
you. There may be other options n
Figure 4-1: Application Server Control Screen
The Application Server Control screen provides current informat
system, the ILS Handheld Portable Reader, and is used to generate reports.
The menu bar lists categories of system features. This is located just under the title bar near the
top of the screen. Just point and click on any category to view a list of selections. Navigate to the
option that represents the system function you want perform and click that function. Some
options may be grayed out which means that the function is not available.
The butt
commonly used system features. These buttons have a graphical face and allow you to choose a
Intelligent Library System (ILS) 2.0 User Manual Page 4-1
on bar located on the left side of the screen provides short-cut buttons to the most
ion on the status of the ILS
Page 50

Application Server
system feature without using the menu bar. If you move the mouse pointer over a button, a popup screen (fly-by-help) will display describing what system function each button will perform.
4.2. System Status
There are multiple ways to navigate to the System Status Screen. The first is by clicking System
Status button as shown in Figure 4-2: System Status Bu
tton.
Figure 4-2: System Status Button
The second way to navigate to the Sy
en select the System Status Display option as shown in Figure 4-3: System Status Selection.
th
The System Status screen (Figure 4-4) gives you the capability to view the Station Name, the
System State, and the Printer State.
The Station Name refers to each location of a Checkout Station.
The System State identifies if the Station is on-line or off-line.
The Printer State informs you of the printer status, for example OK, out of paper, I/O error, etc.
(I/O error is a general printer error which could indicate there is a paper jam, loss of power to the
printer, etc.).
stem Status Screen is to select the Status pull-down menu,
Figure 4-3: System Status Selection
Page 4-2 Intelligent Library System (ILS) 2.0 User Manual
Page 51
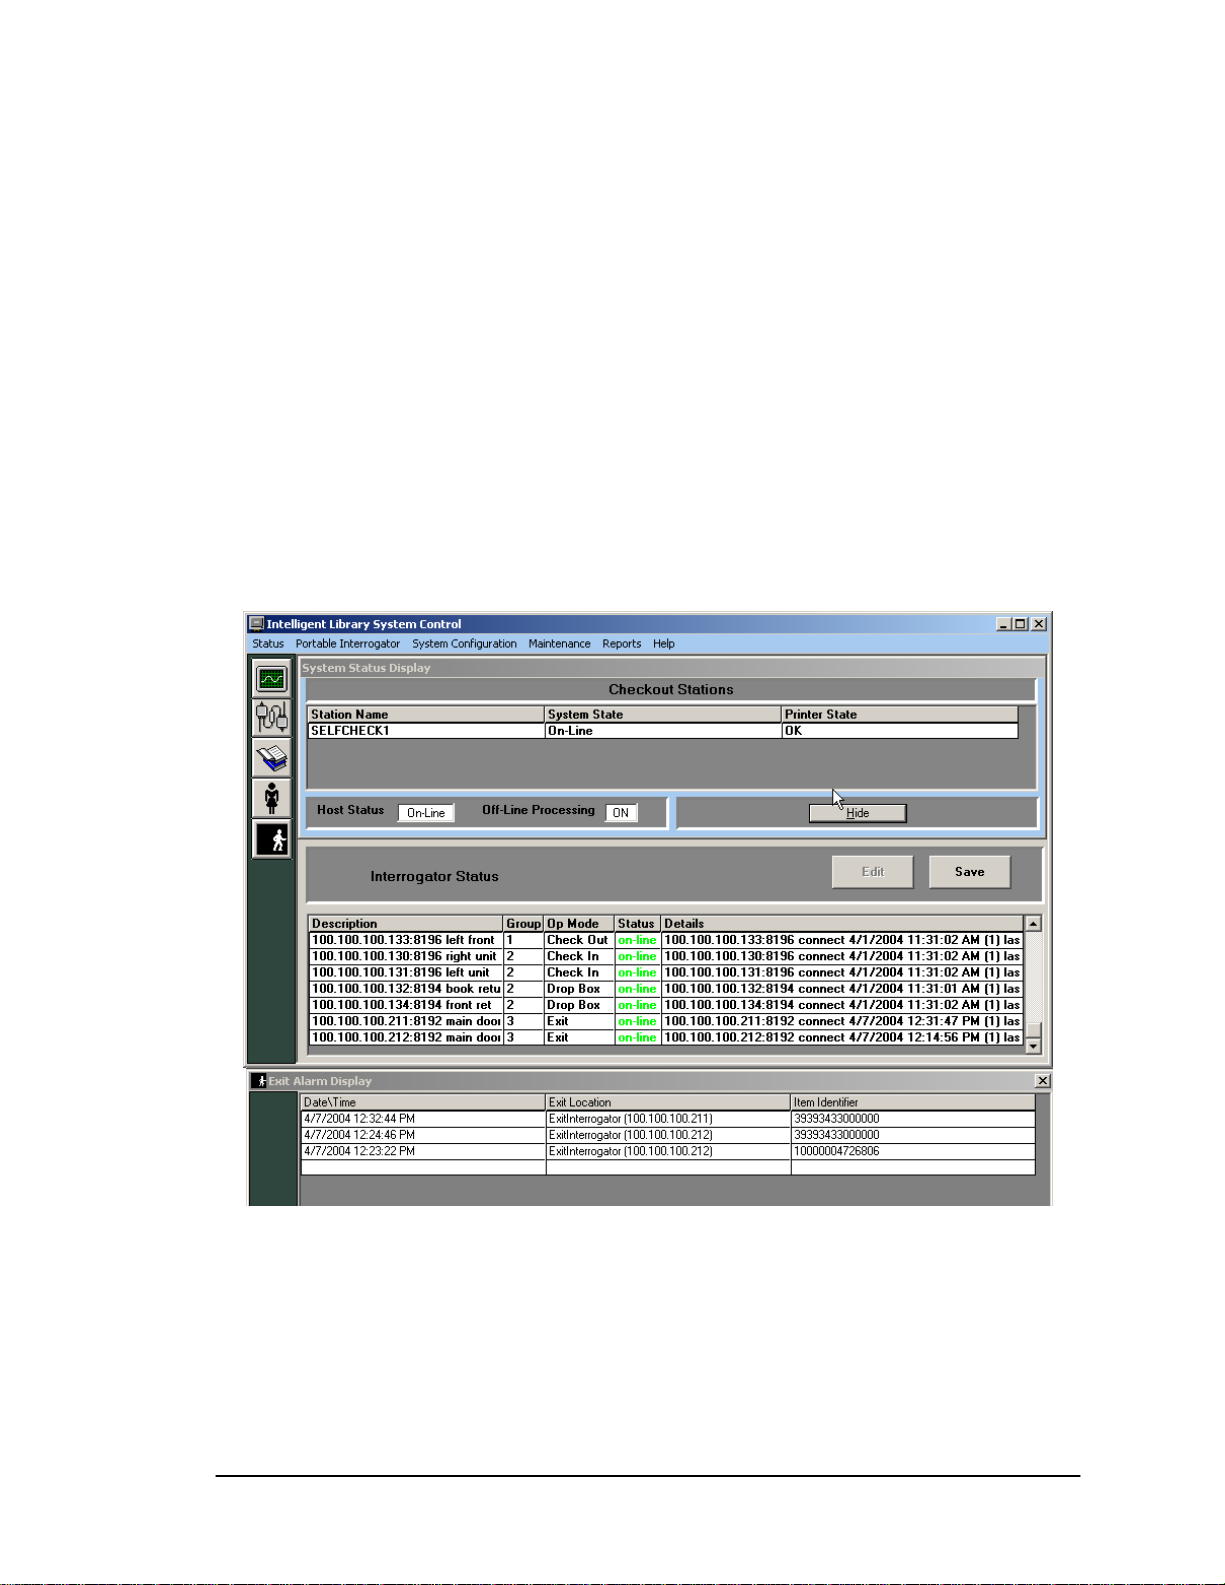
Application Server
Just beneath the Checkout Stations status is the Host Status, which tells you if the host (library
circulation system), is on-line or off-line.
The Off-line Processing feature allows libraries to configure the Application Server and Patron
Self-Checkouts to continue to operate while offline with the library’s circulation system. While
the circulation system is offline, the Application Server records significant events. These events
are reported to the circulation server when synchronization occurs. At the time of
synchronization, the Due Date is sent to the circulation server. When off-line processing is turned
on, the word ON appears next to Off-Line Processing, as shown in Figure 4-4. The feature is
turned on or off by Checkpoint field service personnel by setting a table parameter on the
Application Server. If using the Bridge Interface (described earlier), off-line processing should
never be turned on at the same application server.
The hide button allows you to hide or show the system status display. T n of the
screen shows the Exit A s by Date\Time, Exit
Location, and by Item I ent alarm first.
larm Display. The display lists up to 200 exit alarm
dentifier. The display will always show the most rec
he lower portio
Figure 4-4: System Status Screen
Intelligent Library System (ILS) 2.0 User Manual Page 4-3
Page 52

Application Server
4.3. Task
Use Task Scheduler to schedule Checkout Cache Synchronization and Host Reconnections to be
perform me of day. The menu selection is shown in the figure below.
ed automatically at any ti
Scheduler
Figure 4-5: Task Scheduler Navigation
After sel figuration pull-down menu, a dialog box is
presente
selection e g
box. When vi o
the sche e displayed.
ecting Task Scheduler from the System Con
d with buttons to view the current schedule or to modify the current schedule. Both
s r quire you to enter a user name and password to continue to the Task Scheduler dialo
ewing the current schedule, the user will not be able to make any modifications t
dul d tasks. Figure 4-6: Task Scheduler Menu shows the buttons that are
Figure 4-6: Task Scheduler Menu
Figure 4-7: y option for the task scheduler. The Task
Scheduler itself contains a listing called Scheduled Time for the specified task to be run each day.
Leave a day running that day.
asks are identified using a Task ID number. Currently the task ID numbers are as follows:
T
Checkout Cache Sy
Host Re
Page 4-4 Intelligent Library System (ILS) 2.0 User Manual
Task Scheduler (Modify) shows the Modif
's entry blank to prevent the task from
nchronization 3200
connect 3201
Page 53

Application Server
A check
scheduled ti
The Task Period can be set to Weekly/Daily or Monthly. When Monthly is selected a text box
will display h the task should be run. A time can then be
entered under Scheduled Time.
T
select Cancel.
box is available to disable execution of the current task. When this box is checked, all
mes will be ignored and the task will never run until the box is unchecked.
to accept the day of the month on whic
o accept changes, select Save, then Close at the bottom of the dialog box. To ignore changes,
Figure 4-7: Task Scheduler (Modify)
Figure 4-8: Task Sche the Task Scheduler.
When reviewing the cu odifications to the
cheduled tasks.
s
duler (View Only) shows the View Only option for
rrent schedule, the user will not be able to make any m
Figure 4-8: Task Scheduler (View Only)
Intelligent Library System (ILS) 2.0 User Manual Page 4-5
Page 54

Application Server
4.4. Inventory Download Operations
The Automated procedure for downloading inventory information from the Handheld Portable
Reader is enabled by the automatic transfer mode. This provides an automatic method of starting
the download sequence without initiation from the Handheld Portable Reader Operations Screen.
The transfer is automatically started by properly docking a Handheld Portable Reader base in the
docking station. The figure below illustrates the beginning of a transfer sequence.
Figure 4-9: Han matic Transfer
Downloading information automatically from the Handheld Portable Reader requires little active
participation by the Library staff. You can monitor the automatic downloading process by
watching the corresponding screens on the Application Server monitor.
Once the Handheld Portable Reader is properly docked, the screen will display a message
recognizing the proper docking. By looking at the Transfer Status Display on the right side of the
screen you can follow the transfer process step by step.
The screen shows the information transfer process beginning, the transfer process in progress, and
the completion of the transfer process. Upon completion of the file transfer from the Handheld
Portable Reader to the Application Server, the file is normally converted to the inventory file
format used by the Circulation System. It is then copied to a directory where it is available for the
Circulation System's Inventory application to copy and process (using FTP). Additionally, since
the entire process is done automatically, it will show you that the Handheld Portable Reader has
been cleared of data and is being reset for future use. Click Close to remove the Handheld
Portable Reader Operations screen.
dheld Portable Reader Operations Screen - Auto
Page 4-6 Intelligent Library System (ILS) 2.0 User Manual
Page 55

Application Server
4.5. Reports
This sec
The followi
4.5.1. orting (off-line processing)
T
system when retur
Discrepancy Report. The first is by clicking
the figu
tion includes information on the ILS reports available through the Application Server.
ng reports are available:
•
Checkout Discrepancy Report (off-line processing) (Section 4.5.1)
• Pat )
• 3)
• on 4.5.4)
• rting (Section 4.5.5)
ron Discrepancy Report (off-line processing) (Section 4.5.2
Generic Report Generation (Section 4.5.
Exit Alarm Reporting (Secti
Check In Exception Repo
Checkout Discrepancy Rep
his report provides a list of off-line checkout events that were rejected by the host circulation
ned to on-line operation. There are two ways to get to the Checkout
on the Checkout Discrepancy button as shown in
re below.
Figure 4-10: Checkout Discrepancy Report Button
The sec to select Reports from
the pull n in Figure 4-11: Checkout
Discrepancy Report Men
Intelligent Library System (ILS) 2.0 User Manual Page 4-7
ond way to get to the Checkout Discrepancy Report Screen is
-down menu, and then select Checkout Discrepancy as show
u.
Figure 4-11: Checkout Discrepancy Report Menu
Page 56

Application Server
Figure 4-12: Checkout Discrepancy List Screen
The gen t ber of criteria fields including time period and
ID. However, if the Time Period of Interest fields are blank or not specified, the report can't be
generated. There are three methods you can use to create a report:
First method:
Second meth
era ed report can be filtered based on a num
1. Choose the time period of interest by clicking on the drop down button. Choices are
Today, Yesterday, This Week, Last Week, This Month, Last Month, and All Data.
2. The From and To date will automatically display. You can key in the time or leave it
blank. If you leave it blank, the default time will be used:
3. From = 12:00:00 A.M.
4. To = 11:59:59 P.M.
5. Click on the
od:
1. Click calendar form
Generate Report button.
From and the displays.
Page 4-8 Intelligent Library System (ILS) 2.0 User Manual
Page 57

Application Server
Figure 4-13: Calendar
2. Select the month and year using the drop down buttons.
3. Select the day from the calendar table.
4. Specify the time at the upper right hand corner of the form. You can key in the time
or select the time by pressing the up-down arrow buttons at the end of the field.
5. You can click on the Now button if you want to use the current time.
6. Click on OK to confirm the changes.
7. Verify the selection shown next to From.
8. Click To and the calendar form displays. As shown above.
9. Select the month and year from the drop down buttons.
10. Then select the day from the calendar table.
11. Specify the time at the upper right hand corner of the form. You can key in the time
or select the time by pressing the up-down arrow buttons at the end of the field.
12. You can click on the Now button if you want to use the current time.
13. Click on OK to confirm the changes or the Cancel button to cancel the changes.
14. Verify the selection shown next to To.
15. Click on the Generate Report button.
Third method:
1. Key in the From d . Date formats c n use 2 or 4
digit years: (MM/ ould be entered using the 12hour format: (HH:MM AM or PM).
the changes or the Cancel button to cancel
ate or a combination of date and time
DD/YY or MM/DD/YYYY). Time sh
a
2. Key in the To date or a combination of date and time. Date formats can use 2 or 4
digit years: (MM/DD/YY or MM/DD/YYYY). Time should be entered using th
hour format: (HH:MM AM or
3. Click on the eport button.
Note: Any combination
To create a report bas ic Patron ID do the following:
1. Type in the Patr n the Search for Specific
2. Click on the Generate R
Intelligent Library System (ILS) 2.0 User Manual Page 4-9
Generate R
of the methods may be used.
ed on a specif
on ID i ID.
PM).
eport button.
e 12-
Page 58

Application Server
Figure 4-14: Sample Checkout Discrepancy Report
Field N Data Description
Patron Identifier ID Number The patron ID number in this
Transaction Date Dat Date and time of the
Item Identifier ID Number The item number in this
Station Na Station where the transaction
Final Transaction Date Date/Time The date and time that an off-
Screen Mes from the host
ame Possible Field Data
transaction.
e/Time
transaction.
nsaction. tra
me Name of Station
occurred.
line incomplete transaction
was synchronized.
sage Text message Message return
for this transact
ion.
4.5.2. Patron
This rep ts that were rejected by the host circulation
system wh Patron Discrepancy
Report. n in the figure below.
Page 4-10 Intelligent Library System (ILS) 2.0 User Manual
ort provides a list of off-line patron status even
en returned to on-line operation. There are two ways to get to the
The first is by clicking the Patron Discrepancy button as show
Discrepancy Reporting (off-line processing)
Page 59

Application Server
Figure 4-15: Patron Discrepancy Report Button
The second way to get to the Patron Discrepancy Report Screen is to select the Reports pull-
own menu, and then select Patron Status Discrepancy as shown in Figure 4-16: Patron d
Discrepancy Report Menu.
Figure 4-16: Patron Discrepancy Report Menu
List Screen Figure 4-17: Patron Status Discrepancy
Intelligent Library System (ILS) 2.0 User Manual Page 4-11
Page 60

Application Server
The generated report can be filter r of criteri riod and
ID. However, if the Time Period of Interest fields are blank or n rt can't be
generated. To create the report, d g: There are three
report:
First method:
1. Choo od of inte drop down button. Choices are
2. The From and To da tically display. Y it
3. From = 12:00:00 A.M.
4. To = 11:59:59 P.M.
5. Click on the Generate Report button.
Second method:
1. Click From calendar form
se the time peri rest by clicking on the
Today, Yesterday, This Week, Last Week, This Mo
you leave it blank, the default time will be
and the displays.
ed based on a numbe a fields including time pe
ot specified, the repo
o the followin methods you can use to create a
nth, Last Month, and All Data.
te will automa ou can key in the time or leave
used: blank. If
Figure 4-18: Calendar
2. Select the month and year using the drop down buttons.
3. Then select the day from the calendar table.
4. Specify the time at the upper right hand corner of th
or select the time by pressing the up-down arrow buttons at the end of the field.
5. You can click on the Now button if you want to use the current time.
6. Click on OK to confirm the changes or the Cancel button to cancel the changes.
7. Verify the selection shown next to From.
8. Click To and the .
Page 4-12 Intelligent Library System (ILS) 2.0 User Manual
calendar form displays. As shown above
e form. You can key in the time
Page 61

Application Server
9. Select the month and year from the drop down buttons.
10. Then select the day from the calendar table.
11. Specify the time at the upper right hand corner of the form. You can key in the time
or select the time by pressing the up-down arrow buttons at the end of the field.
12. You can click on the Now button if you want to use the current time.
13. Click on OK to confirm the changes or the Cancel button to cancel the changes.
14. Verify the selection shown next to To.
15. Click on the Gene
Third method:
1. Key in the From Date formats can use 2 or 4
digit years: (MM/DD/YY or MM/DD/YYYY). Time should be entered using the 12hour format: (HH:MM AM or PM).
2. Key in the
digi
hou
3.
Click on the Generate Report button.
Note: Any combination of the methods may be used.
To crea c Patron ID do the following:
te a report based on a specifi
1. Type in the Patron ID in the Search for Specific ID.
2. Click on the Generate Report button.
To date or a combination of date and time. Date formats can use 2 or 4
t years: (MM/DD/YY or MM/DD/YYYY). Time should be entered using the 12r format: (HH:MM AM or PM).
rate Report button.
date or a combination of date and time.
Figure 4-19: Sample Patron Discrepancy Report
Intelligent Library System (ILS) 2.0 User Manual Page 4-13
Page 62

Application Server
Field N Data Data Description ame Possible Field
Patron Iden ID Number The patron ID number in this
Transaction Date Date/Time Date and time of the
Station Name Name of Station Station where the transaction
Final Transaction Date Date/Time The date and time that an off-
Screen Message Text message Message return from the host
tifier
transaction.
transaction.
occurred.
line incomplete transaction
was synchronized.
for this transaction.
4.5.3. Generic Report Generation
The Application Server stores all acti m internally as a transaction. A
transaction is logged for each significant activity such as patron validation, checkout, checkin,
and an e oordinator to store the
transact ese records to list specific
transact rt generator allows custom reports to be
created
Navigat
the Generic
xit alarm. It is the responsibility of the system's Transaction C
ions in the system database. Reports can be generated from th
ions and transaction counts. A Generic Repo
as needed.
ion to the Generic Report Screen is accomplished by selecting the Reports Menu and then
Report item as illustrated in the figure below.
vity generated by the syste
Figure 4-20: Generic Report Menu
Page 4-14 Intelligent Library System (ILS) 2.0 User Manual
Page 63

Application Server
Fi creen
gure 4-21: Generic Report S
igure 4-21: Generic Report Sc s the selections available for this report. The number
F
f days of activity is displayed at the top of the screen just under the title bar. In the main body of
o
the screen, you are instructed to click the down arrow for
choice. Each category is described below.
Category Options
Select Time Range You can narrow your report to one of the time periods liste
Station You can choose a specific Patron Self-Checkout Station or
Type of Transaction Checkouts, Patron Information or All Types
Online/Offline transactions Online, Offline or Both
Desired report Here you will choose whether you want a list of the specified
The Select Time Range must be filled in order to generate a report. However, if the Select Time
Range fields are blank or not specified the report can't be generated. There are three methods y
can use to create a report:
First method:
1. Choose the time period of interest by icking on the drop down button. Choices are
Today, Yesterday ast Month, and All Data.
reen show
each category and highlight your
d
or leave it set to all available.
Exit Alarm or choose All Stations.
transactions or a count.
ou
cl
, This Week, Last Week, This Month, L
2. The From and To date will automatically display. You can key in the time or leave it
blank. If you leave it blank, the default time will be used:
3. From = 12:00:00 A.M.
Intelligent Library System (ILS) 2.0 User Manual Page 4-15
Page 64

Application Server
4. To = 11:59:59 P.M.
Second method:
1. Click From and the calendar form displays.
Figure 4-22: Calendar
2. Select the month and year using the drop down buttons.
3. Select the day from the calendar table.
4. Specify the time at the upper right hand corner of the form. You can key in the time
or select the time by pressing the up-down arrow buttons at the end of the field.
5. You can click on the Now button if you want to use the current time.
6. Click on OK to confirm the changes or the Cancel button
7. Verify the selection shown next to From
8. Click To and the calendar form displays. As shown above.
9. Select the month and year from the drop down buttons.
10. Then select the day from the calendar table.
rner of the form. You can key in the time
11. Specify the time at the upper right hand co
or select the time by pressing the up-down
12. You can click on the Now button if you want to use the curr
.
arrow buttons at the end of the field.
to cancel the changes.
ent time.
n to cancel the changes.
13. Click on OK to confirm the changes or the Cancel butto
14. Verify the selection shown next to To.
Page 4-16 Intelligent Library System (ILS) 2.0 User Manual
Page 65

Application Server
Third method:
1. Key in the From date or a combination
digit years: (MM/DD/YY or MM/DD/YYYY). Time should be entered using the 12hour format: (HH:MM AM or PM).
2. Key in t
digit years: (MM/DD/YY or MM/DD/YYYY). Time should be entered using the 12hour format: (HH:MM AM or PM).
Note: Any combination of the metho
You als
Type the ID
include only
Note: Patro ded in a report.
O
o have the option to include a Patron ID or Item ID to narrow your report even further.
in the appropriate box before clicking the Generate button. Your report will now
transactions specific to that ID.
n and Item IDs are optional and do not have to be inclu
nce you have made your choices, click the Generate button.
he To date or a combination of date and time. Date formats can use 2 or 4
of date and time. Date formats can use 2 or 4
ds may be used.
Figure 4-23:
Field Name Possible Field Data
Transaction Date on. Date/Time Date and time of the transacti
Station Name action Name of Station Station where the trans
Status
Intelligent Library System (ILS) 2.0 User Manual Page 4-17
Completed he transaction was successfully T
Offline-Complete
Offline-Incomplete The transaction was not
Sample Generic Report
Data Description
occurred.
completed on-line.
The transaction was an off-line
incomplete transaction that was
subsequently succ
completed online during of
synchronization.
completed on-line.
essfully
f-line
Page 66

Application Server
Discrepancy The transaction was an off-line
incomplete transaction that wa
subsequently rejected during off-
line synchronization.
Offline Transaction completed off-line. OffLine-OnLine
OnLine Transaction completed on-line to
the host system.
Transaction Type
Final Transaction Date Date/Time The date and time that an off-
Item Identifier ID Number The item number in this
Patron Identifier ID Number The patron ID numbers in this
You have a few options to view the records on the screen, print them, or return to the previous
screen.
SCROLL: You can use the scroll bar to view all of the records.
PRINT: You can print this report by clicking the Print button and entering the number of copies
you wish.
RETURN: Click the Close button to return to the Generic Report Screen.
Expand Report Columns: Information in each column may be wider than the column width.
You can expand the column width by positioning the mouse point over the column divider next to
a column heading. When the resize pointer displays, left click and move the mouse to the desired
width.
Copy and Paste: You can copy an ID to include in another report by left clicking the ID, right
click and select Copy. Paste by right clicking and select Paste.
Patron Status Patron scans their ID card at a
Checkin An item automatically checked
in to the circulation system.
Checkout An item is scanned at the Patron
Self-Checkout Station.
ItemStatus An item is scanned at the
circulation desk.
ExitAlarm An item generated an alarm at an
exit because it was not checked
out.
line incomplete transaction was
synchronized.
transaction.
transaction.
s
Patron Self-Checkout Station.
4.5.4. Exit Alarm Reporting
This report provides a list of item identifiers that have caused an alarm at a specific exit location.
There are two ways to get to the clicking on the Exit Alarm
Report button shown in Figure 4 .
Page 4-18 Intelligent Library System (ILS) 2.0 User Manual
Exit Alarm Report. The first is by
-24: Exit Alarm Report Button
Page 67

Application Server
Figure 4-24: Exit Alarm Report Button
The second way to get to the Exit Alarm Report Screen is to s
nd then select Exit Alarm as shown in the figure ba
Figure 4-25: Exit Alarm Report Menu
elow.
elect Reports pull-down menu
Figure 4-26: Exit Alarm Report Screen
Intelligent Library System (ILS) 2.0 User Manual Page 4-19
Page 68

Application Server
The generated report can be fi
fields are blank or not specifie
use to create a report:
irst method:
F
1. Choose the time period of interest by icking on the drop down button. Choices are
Today, Yesterday Last Month, and All Data.
2. The From and To date will automatically display. You can key in the time or leave it
blank. If you leave it blank,
3. From = 12:00:00 A.M.
4. To = 11:59:59 P.M.
5. Click on the Generate Report button.
Second method:
1. Click From and the calendar form
displays.
ltered based on a time period. However, if Time Period of Interest
d, the report can't be generated. There are three methods you can
cl
, This Week, Last Week, This Month,
the default time will be used:
Figure 4-27: Calendar
2. Select the month and year using the drop dow
Select the day from the calendar table.
3.
4. Specify the time at the upper right hand corner of the form. You can key in the time
or select the time by pressing the up-down arrow buttons at the end of the field.
5. You can click on the Now button if you want to use the current time.
6. Click on OK to confirm the changes or the Cancel button to cancel the changes.
7. Verify the selection shown next to From.
8. Click To and the calendar form displays. As shown in Figure 4-27: Calendar.
Page 4-20 Intelligent Library System (ILS) 2.0 User Manual
n buttons.
Page 69

Application Server
9. Select the month and year from the drop down buttons.
10. Select the day from the calendar table.
11. Specify the time at the upper right hand corner of the form. You can key in the time
or select the time by pressing the up-down arrow buttons at the end of the field.
12. You can click on the Now button if you want to use the current time.
13. Click on OK to confirm the changes or the Cancel button to cancel the changes.
14. Verify the selection shown next to To.
15. Click on the Generate Report button.
Third method:
1. Key in the From date or a co
digit years: (MM/DD/YY or M
hour format: (HH:MM AM or PM).
2. Key in the To date or a combination of date and time. Date formats can use 2 or 4
digit years: (MM/DD/YY or MM/DD/YYYY). Time should be entered using
hour format: (HH:MM AM or PM).
3. Click on the Generate Report button.
Note: Any combination of the methods may
Figure 4-28: Sample Exit Alarm Report
mbination of date and time. Date formats can use 2 or 4
M/DD/YYYY). Time should be entered using the 12-
the 12-
be used.
Field Name Possible Field Data Data Description
Transaction Date Date/Time Date and time of the
transaction.
Item Identifier ID Number The item number in this
transaction.
Exit Location Name of the exit and/or IP
Address
Intelligent Library System (ILS) 2.0 User Manual Page 4-21
Name of the exit
Page 70

Application Server
4.5.5. Check In Exception Reporting
This report provides a list of exceptions that occurred when patrons returned materials. This
report allows the tracking of items that failed check in, as well as items that require special
handling. You can get to the Check In Exception Report by selecting Reports from the pulldown menu, and then selecting Check In as shown in the figure below.
Figure 4-29: Check In Exception Report Menu
Figure 4-30: Check In Report Screen
Figure 4-30: Check In Report Screen shows the selection criteria options available for this report.
The generated report can be filtered based on a time period, date range, and check in station.
However, if Time Period of Interest fields are blank or not specified, the report can't be generated.
There are three methods you can use to create a report:
First method:
1. Choose the time period of interest by clicking on the drop down button. Choices are
Today, Yesterday, This Week, Last Week, This Month, Last Month, and All Data.
2. The From and To date will automatically display. You can key in the time or leave it
blank. If you leave it blank, the default time will be used:
Page 4-22 Intelligent Library System (ILS) 2.0 User Manual
Page 71

Application Server
3. From = 12:00:00 A.M.
4. To = 11:59:59 P.M.
Second method:
1. Click From and the calendar form displays.
Figure 4-31: Calendar
2. Select the month and year using the drop down buttons.
3.
Select the day from the calendar table.
4. m. You can key in the time
Specify the time at the upper right hand corner of the for
or select the time by pressing the up-down arrow buttons
5. You can click on the Now button if you want to use the current time.
6. Click on OK to confirm the changes or the Cancel button to cancel the changes.
7. Verify the selection shown next to From.
8. Click To and the calendar form displays. As shown above.
9. Select the month and year from the drop down buttons.
10. Then select the day from the calendar table.
11. Specify the time at the upper right hand corner of the form. You can key in the time
or select the time by pressing the up-down arrow buttons at the end of the field.
12. You can click on t urrent time.
he Now button if you want to use the c
at the end of the field.
13. Click on OK to confirm the changes or the Cancel button to cancel the changes.
14. Verify the selection shown next to To.
Intelligent Library System (ILS) 2.0 User Manual Page 4-23
Page 72

Application Server
Third method:
1. Key in the From date or a combination of date and time. Date formats can use 2 or
digit years: (MM/DD/YY or MM/DD/YYYY). Time should be entered using the 1
hour format: (HH:MM AM or PM).
2. Key in the To date or a combination of date and time. D
digit years: (MM/DD/YY or MM/DD/YYYY
hour format: (HH:MM AM or PM).
Note: Any combination of the methods may be used.
You also have the option to include a Patron ID or Item ID to narrow your report even further.
Type the ID in the appropriate box before clicking the Generate button. Your report will now
include only transactions specific to that ID.
Note: Patron and Item IDs are optional and do not have to be included in a report.
Once you have made your choices, click the Generate button.
). Time should be entered using the 12-
ate formats can use 2 or 4
4
2-
Figure 4-32: Sample Check In Report
Field Name Possible Field Data Data Description
Transaction Date
Check-in Location Name of location Location of the check-in station.
Item Id ID Number The item identifier number in
Title -in. Item title Title of the item checked
Location Name of location Location of check-in.
Checked-In
OffLine completed off-line. -OnLine Offline Transaction
Page 4-24 Intelligent Library System (ILS) 2.0 User Manual
Date/Time Date and time of the transaction.
this transaction.
Y Item was checked-in.
N Item was not checked-in.
Page 73

Application Server
OnLine Transaction completed on-line to
the host system.
Y An exit alarm was issued. Alert
N An exit alarm was not issued.
Screen Message Text of Message The specific error message
received from the host for this
transaction.
You have a few options to view the records on the screen, print them, or return to the previous
screen.
SCROLL: You can use the scroll bar to view all of the records.
PRINT: Y copies
you wish.
RETURN: Click the Close button to return to the Generic Report Screen.
Expand Report Columns: Information in each column may be wider than the column w
You can expand the column width by positioning the mouse point over the column divid
a c r displays, left click and move the mouse to the desired
olumn heading. When the resize pointe
wi
dth.
Copy and Paste: You can copy an ID to include in another report by left clicking the ID, righ
click and select Copy. Paste by right clicking and select Paste.
ou can print this report by clicking the Print button and entering the number of
idth.
er next to
t
4.6. Maintenance
4.6.1.
Note: The following ILS f
offline if us
use of them he database before doing the purge (7.1 Transaction
Database Backup). Purges should normally be performed during non-circulation hours.
The Purge option clears all records from the transact
configurable number of days. Figure 4-33: Purge Navig
completed.
urge option. Figure 4-34: End Purge shows the dialog P
Purge
unctions can cause unpredictable behavior or cause the system to go
ed inappropriately. It is recommended that only qualified system administrators make
. It is suggested that you backup t
ion database that are older than a
ation shows how to navigate to the
box that is displayed after the Purge is
Intelligent Library System (ILS) 2.0 User Manual Page 4-25
Page 74

Application Server
Figure 4-33: Purge Navigation
Figure 4-34: End Purge
4.6.2. Checkout Cache Synchronize
The Checkout Cache Synchronize option comp
recorded checked out items with the host system. Figure 4-35: Syn
how to navigate to the Checkout Cache Synchronize o
A u n ser
ser ame and password must be entered in order to synchronize the Checkout Cache. The u
must th e provided by the Host that the Checkout Cache will be synchronized
against. The tPub\FTPRoot.
Note: This
en navigate to the fil
file is typically located in Ine
procedure is normally automated. The system will be offline during the operation.
ares and reconciles the system's internal cache of
chronize Navigation shows
ption.
Page 4-26 Intelligent Library System (ILS) 2.0 User Manual
Page 75

Application Server
Figure 4-35: Synchronize Navigation
4.7. Miscellaneous
4.7.1. Shutdown Button
The Shutdown button shuts down the Application Server. In order for the Application Server to
remain in a shutdown state, all Patron Self-Checkout Stations should be shutdown prior to
shutting down the Application Server.
Figure 4-36: Shutdown Button
4.7.2. Help About
The Help About option is used to display copyright information. The figure below shows how to
navigate to the Help About screen.
Intelligent Library System (ILS) 2.0 User Manual Page 4-27
Page 76

Application Server
Figure 4-37: Help About Navigation
4.7.3. System Info Button
The System Info button provides a detailed listing of all components and their versions.
Figure 4-38: Help About Screen
4.7.4. Offline Transactions Synchronize
The Offline Transactions Synchronize button is used for synchronizing off-line transactions with
the host system. It is not available on systems that do not support off-line processing.
Page 4-28 Intelligent Library System (ILS) 2.0 User Manual
Page 77

Application Server
Figure 4-39: Transaction Coordinator Offline Synchronization Navigation
4.7.5. S
The Shutdown Checkout S ts down all the Patron Self-Checkout
Stations
hutdown Checkout Stations
tations button remotely shu
.
Figure 4-40: Shutdown Patron Self-Checkout Stations
talling a Printer 4.8. Ins
Printer installation procedures will vary
installed.
printer wil
automatically install the appropriate printer drivers and software. Otherwise, most printer
installations will proceed
Intelligent Library System (ILS) 2.0 User Manual Page 4-29
The best procedure is to follow the directions included with the printer. Usually your
l come with an installation program on a floppy disk or CD-ROM that will
as follows:
3. Double-click on My Comput
4. Double-click on Printers.
according to the make and model of printer being
er.
Page 78

Application Server
5. Double-click on Add Printer.
6. Make sure My Computer is selected. Click Next.
7. Select the checkbox next to LPT1. Click Next.
8. From the next dialog box you can click on Have Disk if you have drivers for you
printer in a specific location. Or, you can select the make and model of your printer
from the listings.
9. Follow the onscreen directions to complete the installation.
Page 4-30 Intelligent Library System (ILS) 2.0 User Manual
Page 79

Tagging Procedures
Chapter 5 Tagging Procedures
This sec
determin
For info
Circuit P g
5
When tagging book materials, use the following steps:
tion provides instructions on where to place the Circulation Circuit (tag) and how to
e what type of tag to use for books, CDs, audio materials, and kit materials.
rmation on the optional Circulation Circuit Programming Station, refer to the Circulation
ro ramming Station User Manual.
.1. Tagging Book Materials
1. Place the Circu
horizontally one-inch from the spine and vertically centered on the page.
Avoid metallic covers. If it is necessary to use a metallic cover, photocopy and
replace the cover.
Cut a minimum of 3 x 3 section from the back of the cover and place the circulation
2.
circuit in this section.
Avoid placing the Circulation Circuit over the EAS tags.
Your Cover Label options are plain and single barcode.
lation Circuit on a non-text area of a page closest to the front cover,
Figure 5-1: Tagging Book Materials
5.2.
W
Tagging Video Materials
hen tagging Video Materials, use the following steps:
Intelligent Library System (ILS) 2.0 User Manual Page 5-1
Page 80

Tagging Procedures
The preferred location is on the front inside cover both centered horizontally and vertically.
the video label is metallic, place the circulation circuit in the lower front inside cover of the
If
case.
If the ca
Y
rd stock is metallic, photocopy and replace the card stock.
our Cover Label options are plain and double barcode
Figure 5-2: Tagging Video Materials
5.3. Tagging CD Materials with a Preprogrammed
Circulation Circuit
When taggi
ng CD Materials with a preprogrammed circulation circuit, use the following steps:
1.
Disassemble the CD and place the circulation circuit with the printed barcode cover
label in the lower right corner.
Figure 5-3: Tagging CD Materials with Preprogrammed Circulation Circuit
. Reassemble the CD.
2
. Place the second peelable barcode on the back of the CD case.
3
Page 5-2 Intelligent Library System (ILS) 2.0 User Manual
Page 81

Tagging Procedures
Figure 5-4: Tagging CD Materials with Preprogrammed Circulation Circuit
5.4. Tagging CD Materials with Circulation Circuit
grammed On-Site Pro
When tagging CD Material with Circulation Circuit P
steps:
1. Disassemble CD and place the circulation circuit with
right corner
2. Reassemble CD
Your cover label options are plain and the recommended application is mater
existing barcode labels.
rogrammed On-Site, use the following
plain cover label in the lower
ial with
5.5. Tagging Audio Materials
When ta
The preferre nside front cover, centered horizontally
and vertically.
gging Audio Materials, use the following steps:
d location for the circulation circuit is on the i
. For audio cases that contain tapes on both inside sections of the audio case. Remove
1
the card stock from the outside sleeve of the front cover.
Attach the circulation circuit in the sleeve and replace the card stock
2.
If the card stock is metallic, photocopy and replace the card stock.
3.
Your cover labels options are as follows:
Intelligent Library System (ILS) 2.0 User Manual Page 5-3
Page 82

Tagging Procedures
Plain - Recom
programmed
programmed.
mended for materials that have barcodes. The circulation circuits are
on-site
The circulation circuits are pre-Double Barcode - Recommended for new materials.
Figure 5-5: Tagging Audio Materials
5.6. Ta
When ta
gging Kit Materials, use the following steps:
• Place the cir
material in the kit.
gging Kit Materials
culation circuit on the outside of the bag or on the most valuable library
Your cover label options are:
Plain - Recommended for material that has barcodes. The circulation circuits are
programmed on-site.
Single Barcode - Recommended for
located on the bag or is easily scann
Double Barcode - Recommended for new materials where the printed barcode on the
cover label cannot be scanned.
new material where the circulation circuit is
ed.
Page 5-4 Intelligent Library System (ILS) 2.0 User Manual
Page 83

Tagging Procedures
Figure 5-6: Tagging Kit Materials
Intelligent Library System (ILS) 2.0 User Manual Page 5-5
Page 84

Tagging Procedures
NOTES
Page 5-6 Intelligent Library System (ILS) 2.0 User Manual
Page 85

Troubleshooting Guide
Chapter 6 Troubleshooting Guide
Consult this document for procedures to follow to correct problems that may arise with various
ILS components. Follow the steps in the corresponding Solutions section.
6.1. Patron Self-Checkout Station
Problem
Patron Self-Checkout Station does not recognize a valid patron ID when using the Barcod
Scanner...
olutions
S
1. Make sure the Patron Self-Checkout Station is at the Patron Entry screen (video
depicting a patron ID being scanned). If so, make sure you are using the same read
depicted in the video. The Barcode scanner will beep when it reads a valid barcode.
it does not, go to Recovery Section A.
2. If the scanner still does not recognize the patron ID, the lens might need to be
cleaned.
e
er
If
3. If the problem still persists, the scanner may be damaged and mi
Problem
If you s
Solutio
Problem
f the Patron Self-Checkout Station freeI
more than
Solutio
can an item and nothing happens...
ns
1. If the video demonstrating an item checkout stops, the system is proce
2. If it hangs more than 1 minute, follow the instructions.
3. If the video demonstration continues without a slight pause after th ned,
4. If none of the above solutions work, proceed to Recovery Section A.
n
Pro
replaced or reconfigured. Proceed to Recovery Section C.
request. Wait a few moments.
the Patron Self
item could be damaged or belong to another library.
one minute...
ceed to Recovery Section A.
-Checkout Station did not register your request. Try another item. The
zes on any screen and does not respond to user input for
ght need to be
ssing your
e item is scan
Intelligent Library System (ILS) 2.0 User Manual Page 6-1
Page 86

Troubleshooting Guide
Problem
If the graphics (pictures or videos) are not displaying or are incorrect...
Solutio
Problem
If the printer eckout Station printer status reports an error...
Solutions
n
Network connection could have been lost while the Patron Self-Checkout Station was
starting. Check all network connections to t
AppServer. If the connections are secure, proceed to Recovery Section A.
does not print or the Patron Self-Ch
1. Check to make sure all the receipts are removed from the printer. There may be
several receipts waiting to be printed. Remove each one until all the pending receipts
are printed.
2. The printer may be out of paper. Refer to the appropriate section of the User Manual
for paper replacement procedures. Go to Contact Section.
3. The printer may be jammed. Refer
paper replacement procedures.
he Patron Self-Checkout Station and
to the appropriate section of the User Manual for
Problem
If the Self-C
Unknown, w
Solutions
1. Rebooting the Patron Self-Checkout Station when print
2. Power off the Patron Self-Checkout Station unit, attach a keyboard, and then power it
3. Go to Settings/Printers. Select File/Open.
4. print jobs that are on hold, and delete them.
5. Close the various windows, then shut down the Patron Self-Checkout Station. Using
6. Power the unit off, remove the keyboard
heck (On the ILS Server) Station Status screen indicates a Printer Status of
hen printer is working correctly.
jobs are in the printer queue
can cause this problem. A keyboard must be attached to the Patron Self-Checkout
Station to perform the procedure to correct this condition:
back on. Be prepared to hold down one of the shift keys on the keybo
network logon display. This prevents the Patron Self-Checkout Station program from
starting. Select Start (Press the Windows key or Alt-S).
Select the
the start menu
Station.
go to Shutdown - Shutdown.
, then power on the Patron Self-Checkout
ard during the
Page 6-2 Intelligent Library System (ILS) 2.0 User Manual
Page 87

Troubleshooting Guide
Problem
If the Touch Screen does not respond...
Solutions
1. Check the cable on the back of the monitor which is plugged into the co
marked Touch Interface. Make sure this cable is securely plugged in.
2. If all the connections are secure, the Touch Screen may be operating properly but the
Patron Self-Checkout Station is not currently accepting input or you are not touching
a hot spot that accepts inp
Note: The Touch Screen monitor must be turned on prior to starting the Patron Self-Checkout
Station so that it works with Windows. If the monitor is turned on after starting/restarting the
Patron Self-Checkout Station, the Touch Screen won't respond to user input. Power loss could
also cause the same result.
Problem
If the Patron Self-Checkout Station fails to start during power up and there is a screen displaying
some kind of error condition...
Solutions
1. Let the scandisk program run (blue screen) and wait until it is done.
2. Check all network connections on the Patron Self-Checkout Station and AppServer.
If they display to be secure, proceed to Recovery Section A.
Note: I e tron Self-Checkout Stations must
be shutdown or details.
f th App Server is shut down or loses power, all the Pa
and restarted. See Recovery Section B f
ut. If so, proceed to Recovery Section A.
nnection
6.2. Application Server
Problem
If a Patron Self-Checkout Station(s) is not displaying in the System Status Display...
Solutions
1. Make sure the Patron Self-Checkout Station is started. Look at the Patron SelfCheckout Station and make sure it does not show the message, We are currently
unable to provide access to the system. If that message is present, the problem lies
with the connection between the Patron Self-Checkout Station and the Application
Server, and not with the Application Server itself. Make sure the network is
connected and configured properly.
2. If the Patron Self-Checkout Station is behaving normally but is missing from the
Station Name listing on the Application Server proceed to Recovery Section B.
Intelligent Library System (ILS) 2.0 User Manual Page 6-3
Page 88

Troubleshooting Guide
Problem
If you have trouble printing a report:
Solutio
Problem
If you receive an error message when running a report...
Solutions
Problem
If Exit Alarms do not occur when they should...
Solutions
ns
Print a test page using the Windows NT Printer Control Panel. If this is unsuccessful,
consult Windows NT's Printing Troubleshooting Guide. If the test page prints
successfully proceed to Recovery Section C.
The printer could be out of paper or there may be a problem with the configuration
database, proceed to Recovery Section C.
1. There may be a problem with the configuration database, proceed to ecovery
Section C.
2. Power down and restart each Exit Interrogator. Wait several minutes and trigger an
exit alarm. If nothing happens, proceed to Recovery Section B.
R
Problem
If Host Status shows Offline when it shouldn't...
Solutions
1. The Host Status indicator will only be accurate when a Patron Self-Checkout Station
is running and properly connected to the Application Server. If there are no Patron
Self-Checkout Stations connected, this field can not be updated.
2. Problems that cause the Offline are,
3. Self-Check problem,
4. Host circulation system is down, and /or
5. Connection problem to host. Need to restart the Patron Self-Checkout Station and
make sure the connection wire is connected.
Page 6-4 Intelligent Library System (ILS) 2.0 User Manual
Page 89

Troubleshooting Guide
6.3. Exit Interrogator
Problem
If Exit Alarms do not occur when they should...
Solutions
1. Power down and restart the Exit Interrogator. Wait a few minutes and trigger an exit
alarm. If nothing happens proceed to Recovery Sections D and B.
2. If the alarm shows up in the Exit Alarm display but no alarm occurs, the
configuration of the Exit Alarm groups is not correct. Proceed to Recovery Section C.
Proble
Exit Al
Solutio
Problem
Exit Alarm occurs when item is checked out
Solutions
m
arm sound not playing, but an Exit Alarm is displayed on the Application Server...
ns
Power down and restart the Exit Interrogator. Wait several minutes and trigger an exit
alarm. If nothing happens proceed to Recovery Sections D and B.
1. Several conditions could cause this to happen:
2. If the item was checked out while the ILS system was offline to the circulation
system and a successful cache sync has not occurred. In this condition, a previously
checked out item would alarm following check out and when it is returned.
3. If the item was just checked out using a circulation desk Tag Pad, turn off the Tag
Pad used, then turn it back on. If the problem continues, proceed to Recovery Section
D, then C.
4. If the patron used the Self-Check, verify that the item was checkout using a
circulation terminal. If not, the customer failed to check the item out. If it was
checked out, proceed to Recovery Section C.
Intelligent Library System (ILS) 2.0 User Manual Page 6-5
Page 90

Troubleshooting Guide
6.4. Tag Pad
Problem
The Tag Pad reader does not recognize a valid item tag...
olutions S
1. Check to make sure t
You can feel air throu
running. Check to m
into a power source and that all the remaining cable connections are secure. Refer to
the connection diagram.
2. If the tag pad is on and the item ID is still not recognized try a different item ID. If
several items are not scanned, power off then power on the tag pad. Wai
approximately 30 seconds while the software initializes. Try the items again. If you
are still having problems proceed to Recovery Section C.
3. LED indication is on the back of the Tag Pad. Blinking green indicates that the Tag
Pad is reading the item ID. If no green blinking occurs, turn in off, then on again the
Tag Pad. If you are still having problems proceed to Recovery Section C. If green
blinking occurs, and no changes occur on the terminal, proceed to Recovery Section
D and C.
Problem
Item scanned does not display in the terminal (Barcode Reader).
Solutions
Turn off the Barcode Reader and turn off the Tag Pad. Then, turn on the Tag Pad again
and turn on the Barcode Reader. If you are still having problems proceed to Recovery
Section C.
Problem
Item entered does not display in the terminal (Non-PC Keyboard Wedge).
Solutions
Turn off the Non-PC Keyboard Wedge and turn back on the power again. If you are still
having problems proceed to Recovery Section C.
he tag pad is on. The internal ventilation fan should be running.
gh the air vents located on the side of the tag pad if the fan is
ake sure the power cord is connected to the tag pad and plugged
t
6.5. Recovery Procedures
Follow the steps outlined in the section to which you were directed. If the recovery steps fail to
correct the problems, contact Technical Support.
Section A - Restarting the Patron Self-Checkout Station
1. Power off the Patron Self-Checkout Station by using the power switch located at the
rear of the station case.
2. Wait approximately 10 seconds after power off, then power on the station.
Page 6-6 Intelligent Library System (ILS) 2.0 User Manual
Page 91

Troubleshooting Guide
3. If scandisk (blue screen) displays after, wait until it automatically scans the disk by
itself.
This will take several m
on the hard disk. You should not have to start any of the applications on the
files
Patron Self-Checkout Station. All necessary
Section B - Complete Syste
1. Power off all of the Patron Self-Checkout Stations b
at the rear of the station case.
hutdown the RFID Application Server by selecting its icon on the Windows pop-up
2. S
ask Bar.
T
3. Locate and click the Shutdown
4. If any error mess
5. Shutdown and restart the server computer.
6. After the RFID Application Server program is restarted, power on the Patron SelfCheckout Stations.
You should not have to start any of the applications on the Patron Self-Checkout
Station. All necessary applications will start automatically.
inutes to process. It will detect any bad sectors and corrupted
applications will start automatically.
m Restart
y using the power switch located
button.
ages display close them by clicking on Abort or OK or Cancel.
Section C - Technical S
Before calling technical support please note the date and time of the probl
steps you had taken already. Please refer to Contact Section.
Section D - RFI
1. Shutdown the Application Server by selecti
2. Locate and click the Shutdown button.
3. If any error messages display close them by clicking on or or l
4. Allow th
5. If the program
D Application Server program Restart
Checkout Station
Server by selec
upport
ng its icon on the Windows taskbar.
Abort OK Cance
e RFID Application Server to automatically be launched by the Patron Self-
(should be running).
does not start within about a minute, sta
ting it in the Start menu under Applications\RFID.
rt the RFID Application
em and what
Intelligent Library System (ILS) 2.0 User Manual Page 6-7
Page 92

Troubleshooting Guide
6.6. System Connection Diagram
Figure 6-1: System Connection Diagram
6.7. Contacts
For Technical support:
Checkpoint Technical Support
(800) 257-5540 x4100
The contact and ordering information for the printer paper required for the Patron Self-Checkout
Station is:
John Waldron
Instruments & Equipment Co.
800-432-1255
Part #: TRF-82-8
Reference Checkpoint when ordering paper
Page 6-8 Intelligent Library System (ILS) 2.0 User Manual
Page 93

System Maintenance Guide
Chapter 7 System Maintenance Guide
The following section contains detailed instructions for executing various system maintenance
tasks.
7.1. Transaction Database Backup
After long periods of use, the ILS Transaction database can become quite large if a purge is not
performed regularly. But prior to permanently purging database records and losing them
permanently, a backup of the database can be performed to preserve these records as long as they
are desired.
The location of the Transaction database varies depending on the directory chosen for installation
of the ILS software. The base directory of the ILS software will typically be C:\RFID.
Wherever the location of the RFID directory, the Transaction database will always be located
under RFID\Applications\DB\TransCoord\. The filename is transaction.mdb.
Creating a temporary backup is recommended prior to performing a purge.
1. Open Windows Explorer.
2. Navigate to the RFID\Applications\DB\TransCoord\ directory.
3. Right-click on transaction.mdb. Select Copy.
4. Navigate to the folder you would like to store the backup copy.
5. Right-click on white space within that folder's file listing. Select Paste.
6. It is advisable to rename the backup file. Click on the file to select it.
7. Press F2.
8. Type the new name of the backup file. Make sure you preserve the .mdb extension.
9. Press Enter.
7.2. Application Server Tape Backup and Restore
The following serves as a guideline for backing up all files on a server and restoring them as
needed. Your steps may vary slightly.
Backup
1. In order to perform a complete backup, the ILS Server application must be exited and
you must be logged in as an Administrator. First, follow the procedures in this
document (4.7.1 Shutdown Button) for shutting down the ILS Server.
Intelligent Library System (ILS) 2.0 User Manual Page 7-1
Page 94

System Maintenance Guide
2. In order to logon as Administrator, the Autolog program must be disabled. Select
Run from the Start menu.
3. Enter Autolog.
4. Select Disable Autolog and press OK.
5. Select Shutdown from the Start menu.
6. Select Close All Programs and Log on as a Different User. Press OK.
7. Log on as Administrator.
8. The ILS Server will automatically launch. Wait for it to complete and then shut down
the program again.
9. Launch the Windows NT backup program. It is located in the Start menu under
Programs / Administrative Tools.
10. In the Drives window, select the drive that you want to back up.
Restore
11. On the Select menu, click Check.
12. On the Operations menu, click Backup.
13. When the backup is complete logoff, then log back on as RFIDSRV. Once logged
back in enable the Autolog process (refer to steps 2-4 above) by entering the
appropriate password and selecting Enable Auto Logon.
1. Follow steps 1 through 9 from the backup instructions.
2. To restore individual files in a backup set on a tape: in the Tapes window, load the
catalog of the backup set from which you want to restore certain files.
3. Select all the files you want to restore using the appropriate method:
4. To select contiguous files, click the first filename, hold down SHIFT, and click the
last contiguous filename.
5. To select non-contiguous files, click a filename, hold down CTRL, and click each
filename.
6. On the Select menu, click Check. A check mark displays in the check box for each
selected file.
7. On the Operations menu, click Restore.
Page 7-2 Intelligent Library System (ILS) 2.0 User Manual
Page 95

System Maintenance Guide
•
7.3. Patron Self-Checkout Station Printer Paper
Reloading
Use the following procedure to reload the paper in the patron self-checkout station.
1. Remove the printer cover from the Self-Checkout Station chassis.
2. Insert a tool (small screwdriver) into the printer cover access hole and push against
the cover release button.
Figure 7-1: Patron Self-Checkout Station Printer Paper Reloading – Roll Release
3. Remove the used paper roll core from the printer.
4. Install the paper roll.
OPEN
Lever
Arm
Paper roll
Remove the arm from the frame
and install the paper roll
Figure 7-2: Patron Self-Checkout Station Printer Paper Reloading – Roll Installation
Intelligent Library System (ILS) 2.0 User Manual Page 7-3
Page 96

System Maintenance Guide
5. Pass the paper over the damper shaft, then pass it under the thermal head and cutter
guide.
6. Feed the paper until the end enters the presenter's roller.
Figure 7-3: Patron Self-Checkout Station Printer Paper Reloading – Cutter’s Guide
7. Firmly press the areas indicated with crosshatches on the thermal head until the lever
is reset.
Cutter’s Guide
Figure 7-4: Patron Self-Checkout Station Printer Paper Reloading – Crosshatches
8. Carefully place the paper roll on the frame, then wind the roll to remove any slack in
the paper. (Incorrectly installing the paper roll may bend the frame or cause a paper
jam.)
Page 7-4 Intelligent Library System (ILS) 2.0 User Manual
Page 97
System Maintenance Guide
Figure 7-5: Patron Self-Checkout Station Printer Paper Reloading – Winding Roll
9. Press the RESUME button indicated by the arrow.
Figure 7-6: Patron Self-Checkout Station Printer Paper Reloading – Resume Button
Intelligent Library System (ILS) 2.0 User Manual Page 7-5
Page 98

System Maintenance Guide
7.4. Safety Warnings
Barcode Scanner:
LASER RADIATION
DO NOT STARE INTO BEAM
CLASS 2 LASER PRODUCT
See the Metrologic Instruments IS 4110 and IS4120 ScanQuest
®
P
P
Laser Scan Engine Installation
and User’s Guide on other Safety intructions, warnings and technical specifications.
Page 7-6 Intelligent Library System (ILS) 2.0 User Manual
Page 99

System Maintenance Guide
7.5. Specifications
Mechanical
Dimensions: 29 “ L x 20.75 " W x 6.25 " H
(736.60 mm x 527.05 mm x 158.75 mm)
Weight: 26 lbs. ( 9.7 kg)
Materials: Acrylic / PVC alloy
Monitor: See the Planar PT1503NT User’s Manual.
Electrical
Emissions: FCC Part 15, RSS 210, ETSI 300 330 Compliant
Immunity: ETSI 301489 Compliant
RF Transmit Frequency: 13.56 MHz
Demodulation type: AM
Read range: Up to 10” with a 2.1” x 2.1” Circulation CircuitP
Console Power Requirements: 24 VDC, 50-60 Hz, 1.6 A
Safety: Requires dedicated circuit to prevent power surges and spikes from damaging the
system. Requires power strip with power and modern surge protection. UL/cUL 60950-1
compliant.
Interfaces
Diagnostics: RS-232
Host: IEEE 802.3, 10 Base-T Ethernet, NE 2000 Compatible Read range
Peripherals
Monitor: Touch Screen 15" flat screen - standard
Printer: Star Micronics TSP 600 Series (643C)
Patron Card Reader (standard): Metrologic IS 4120
Power Supply: 90-264 VAC, 47 – 63 Hz IEC input, 24 VDC @ 4A output, UL Listed
Environmental
Operating temperature:
32 degrees F to 104 degrees F (0 degrees C to 40 degrees C)
Storage Temperature:
-22 degrees to 140 degrees F ( -30 degrees C to 60 degrees C)
Storage/operating humidity
5% to 95%, non-condensing
Tag Compatibility
RFID Based Circulation Circuit
®
P
Intelligent Library System (ILS) 2.0 User Manual Page 7-7
Page 100

System Maintenance Guide
NOTES
Page 7-8 Intelligent Library System (ILS) 2.0 User Manual
 Loading...