

Page 1

– 1 –
TABLE OF CONTENTS
PAGE
1.0 Introduction . . . . . . . . . . . . . . . . . . . . . . . . . . . . . . . . . . . . . . . . . . .
02
1.1 Complete Kit
1.2 Overview
2.0 TEM-1 Setup . . . . . . . . . . . . . . . . . . . . . . . . . . . . . . . . . . . . . . . . .
04
3.0 Battery Test And Replacement . . . . . . . . . . . . . . . . . . . . . . . . . . . .
05
3.1 Battery Test
3.2 Battery Replacement
4.0 Taking A Measurement . . . . . . . . . . . . . . . . . . . . . . . . . . . . . . . . . .
06
6.0 Electrodes . . . . . . . . . . . . . . . . . . . . . . . . . . . . . . . . . . . . . . . . . . . .
07
7.0 Specifications . . . . . . . . . . . . . . . . . . . . . . . . . . . . . . . . . . . . . . . . .
09
7.1 Temperature Error Compensation
8.0 Using the Cup Electrode (optional) . . . . . . . . . . . . . . . . . . . . . . . . 12
9.0 Conversion Tables . . . . . . . . . . . . . . . . . . . . . . . . . . . . . . . . . . . . . . 14
10.0 Warranty . . . . . . . . . . . . . . . . . . . . . . . . . . . . . . . . . . . . . . . . . . . . . 24
– 24 –
10.0 LIMITED WARRANTY
ELECTROMATIC Equipment Co., Inc. (ELECTROMATIC) warrants to the original
purchaser that this product is of merchantable quality and confirms in kind and quality
with the descriptions and specifications thereof. Product failure or malfunction arising
out of any defect in workmanship or material in the product existing at the time of
delivery thereof which manifests itself within one year from the sale of such product,
shall be remedied by repair or replacement of such product, at ELECTROMATIC’s
option, except where unauthorized repair, disassembly, tampering, abuse or misapplication has taken place, as determined by ELECTROMATIC. All returns for warranty or
non-warranty repairs and/or replacement must be authorized by ELECTROMATIC, in
advance, with all repacking and shipping expenses to the address below to be borne by
the purchaser.
THE FOREGOING WARRANTY IS IN LIEU OF ALL OTHER WARRANTIES,
EXPRESSED OR IMPLIED, INCLUDING BUT NOT LIMITED TO, THE
WARRANTY OF MERCHANTABILITY AND FITNESS FOR ANY PARTICULAR
PURPOSE OR APPLICATION. ELECTROMATIC SHALL NOT BE RESPONSIBLE
NOR LIABLE FOR ANY CONSEQUENTIAL DAMAGE, OF ANY KIND OR
NATURE, RESULTING FROM THE USE OF SUPPLIED EQUIPMENT, WHETHER
SUCH DAMAGE OCCURS OR IS DISCOVERED BEFORE, UPON OR AFTER
REPLACEMENT OR REPAIR, AND WHETHER OR NOT SUCH DAMAGE IS
CAUSED BY MANUFACTURER’S OR SUPPLIER’S NEGLIGENCE WITHIN ONE
YEAR FROM INVOICE DATE.
Some State jurisdictions or States do not allow the exclusion or limitation of incidental
or consequential damages, so the above limitation may not apply to you. The duration
of any implied warranty, including, without limitation, fitness for any particular purpose
and merchantability with respect to this product, is limited to the duration of the
foregoing warranty. Some states do not allow limitations on how long an implied
warranty lasts but, not withstanding, this warranty, in the absence of such limitations,
shall extend for one year from the date of invoice.
ELECTROMATIC Equipment Co., Inc.
600 Oakland Ave. Cedarhurst, NY 11516—USA
Tel: 1-800-645-4330/ Tel: 516-295-4300/ Fax: 516-295-4399
Every precaution has been taken in the preparation of this manual. Electromatic Equipment Co., Inc.,
assumes no responsibility for errors or omissions. Neither is any liability assumed for damage resulting from the use of information contained herein. Any brand or product names mentioned herein are
used for identification purposes only, and are trademarks or registered trademarks of their respective
holders
Page 2
– 2 –
1.0 INTRODUCTION
The Check-Line TEM-1 textile moisture meter determines the residual
moisture in yarn bobbins, fabric folls, filaments, fiber flocks, etc.
The measuring principle of the TEM-1 is based on the electrical
conductivity of the material which always bears a fixed relation to the
moisture. All changes in resistance inside the measuring ranges of
interest are sufficiently pronounced to ensure a high degree of accuracy
for the readings obtained with the TEM-1.
NOTE: The distribution of moisture is never uniform, but varies both
over the entire surface and also inside the material. Therefore,
different probes types, referred to here as electrodes, are used
to measure the moisture content and detect differences in
moisture content.
NOTE: The TEM-1 is a high-quality instrument. However, over time,
even the best product is subject to a certain amount of wear.
We recommend that you return the meter and accessories
every twelve months for a routine check-up. The meter and its
calibration will be thoroughly examined, so that you can be
sure that the meter is operating correctly.
1.1 Complete Kit
The TEM-1 is supplied as a complete with leather carrying case,
electrode holder (p/n # 204) electrodes (p/n #'s 205, 207) and
connecting cable (p/n # 200
– 23 –
Page 3
– 3 –
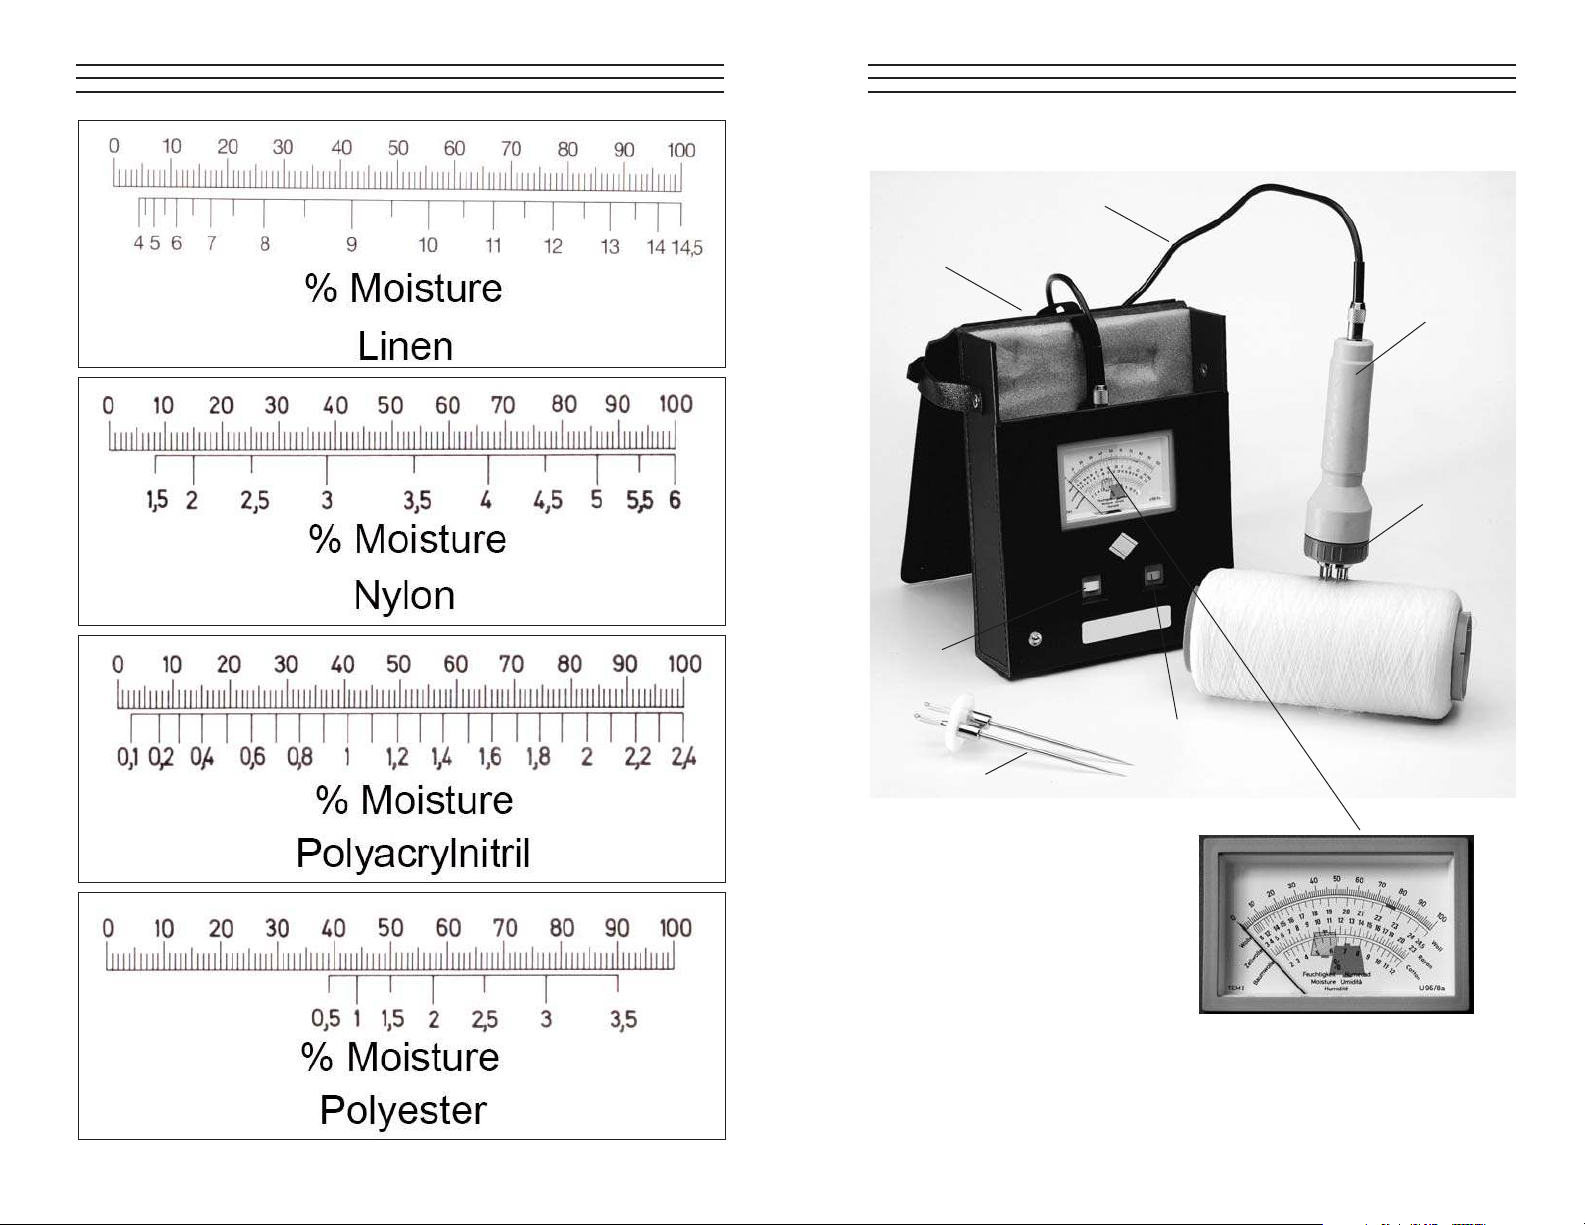
1.2 Overview
The TEM-1 Display provides direct
readings for wool, rayon and cotton.
For other materials, the 0–100 scale is
used in conjunction with the tables
found in Section 9.0.
Connection Cable
Electrode
Holder
Sample under test
Carrying Case
Retaining
Ring
#207
Electrode
Red Battery
Check Button
White
Measure
Button
– 22 –
Page 4
– 4 –
2.0 TEM-1 SETUP
1. Open the carrying case and carefully
remove the TEM-1 moisture meter.
2. Locate the cable receptacle on the top
of the TEM-1 and insert either end of
the connection cable. You will hear a
click when the plug is seated. See A
3. Insert the opposite end of the cable into
the receptacle in the base of the
Electrode Holder. Press until you hear
a click indicating the the plug is seated.
See B.
4. Unscrew and remove the dark grey
retaining ring. See C.
5. Select the proper electrode for your
application. See Section 5.0 for a list
and descriptions of the electrodes
available for the TEM-1.
6. Once the proper electrode has been
selected, insert the two connecting
pins on the bottom of the electrode
into the two receptacles on the top
of the Electrode Holder. See D.
IMPORTANT NOTE: Inserting electrodes
The pins on the electrodes are very sharp. When inserting an electrode,
grasp it by the white plastic base, keeping your hand away from the
ends of the pins and press it into position.
IMPORTANT NOTE: Removing electrodes
The pins on the electrodes are very sharp. To remove the Electrode, first
Unscrew and remove the retaining ring. Grasp the white plastic base of
the electrode and carefully push up while wiggling the electrode from
side to side until it is free. DO NOT place your hand above the pins and
attempt to pull the Electrode out as an injury may result.
7. Replace the grey retaining ring and hand tighten.
8. Perform a Battery Check and described in Section 3.0
A.
B.
C.
D.
– 21 –
Page 5

– 5 –
3.0 BATTERY TEST AND REPLACEMENT
To ensure an accurate reading, it is necessary to test the strength of the
battery before each measuring session.
3.1 Battery Test
1. Press and hold the red test button
on the front of the meter. If the
measuring needle swings up and
stops in the red area of the dial
(see arrow), there is sufficient battery
power for accurate measurements.
2. If the meter needle stops below
the red area, the battery needs to
be replaced before measurements
can be taken.
3.2 Battery Replacement
1. Remove the gauge from the
carrying case. Turn over locate
the battery compartment.
2. Insert the tip of a small flat-head
screwdriver (or similar instrument
into the slot shown at left and
gently twist open the lid.
NOTE: The battery compartment lid is attached to the case.
3. Remove and disconnect the old 9V
battery and replace with a new one
(alkaline or rechargeable).
4. Carefully close the lid by pressing
on the two corners until the lid snaps
back into position.
5. Repeat the Battery Test. If successful
the TEM-1 is ready for use.
– 20 –
Page 6

– 6 –
4.0 TAKING A MEASUREMENT
1. After completing the setup and battery check, insert the ends of the
selected electrode into the test material.
(Do we need more explanation of how to do this?)
2. Press the white Test Button. The measuring needle will swing up
and stop. Reading are made on the upper or lower scale depending
upon the material being tested as follows:
• Wool, rayon, cotton: The three lower scales indicate the moisture
content of the sample directly in percent.
• Other materials: Note the reading on the upper scale then refer
to the conversion charts in Section 9.0 to cover the meter reading
into an accurate measurement of percent moisture.
The three lower scales provide direct
readings for wool, rayon and cotton
Upper scale. Conversion tables for 36 fiber types are
included in Section 9.0.
– 19 –
Page 7

– 7 –
5.0 ELECTRODES
A variety of measuring electrodes are available for the TEM-1 to
accommodate different applications.
Ordering information?
Needle Electrodes
Needle Electrodes are used for
making measurements of cops,
bobbins or hanks or yarn
# 205 = 25mm length
# 206 = 45mm length
# 207 = 100mm length
Knife Electrode #210
The Knife Electrode is for
measuring on webs, rolls and
bales of textile fabrics and bulk
fibers by applying the blades
to or inserting them between
the plies of fabric.
Roller Electrode #211
The Roller Electrode is used for measuring
moving webs of material.
Flow Electrode #212
The Flow Electrode is used for measuring
threads and yarns.
Surface Electrode #213
The Surface Electrode is used for measuring
threads and yarns.
– 18 –
Page 8

– 8 –
Compression Screw Electrode #201
The Compression Screw Electrode with
automatic friction clutch applies constant
pressure to assure accurate measurements
of individual samples.
Cup Electrode #202
The Cup Electrode is used for measuring
compressible material in the form of flocks
or tufts. The constant pressure exerted upon
the material thanks to the friction clutch
assures accurate reproducible readings. the
electrodes connects to the moisture meter
directly, without the use of a universal
connecting cable. See Section 8.0.
– 17 –
Page 9

– 9 –
7.0 SPECIFICATIONS
7.1 Temperature Error Compensation
Indicating errors due to differences in ambient temperature as normally encountered are negligible and withing the permissible tolerance. For extremely accurate measurements, the temperature error
may be corrected as follows:
• TEM-10 moisture meters are calibrated at 68 °F (20 °C).
When making measurements at 68 °F, the temperature error
is zero.
• When measuring below 68 °F, add 0.1% moisture to the
dial reading for every 1.8 °F (1 °C) degree below 68 °F.
• When measuring above 68 °F, deduct 0.1% moisture from
the dial reading for every 1.8 °F (1 °C) degree above 68 °F.
Measuring ranges Wool: 8 to 24.5% moisture content
Rayon: 3 to 23% moisture content
Cotton: 2 to 12% moisture content
Comparison
Measurement 0 - 100 scale
Power 9V battery (alkaline or rechargeable)
Weight 0.88 lbs. (400 g)
Dimensions 7.87"x 9.84" x 2.76" (250 x 200 x 70mm)
(L x W x H)
– 16 –
Page 10

– 10 – – 15 –
Page 11

– 11 –– 14 –
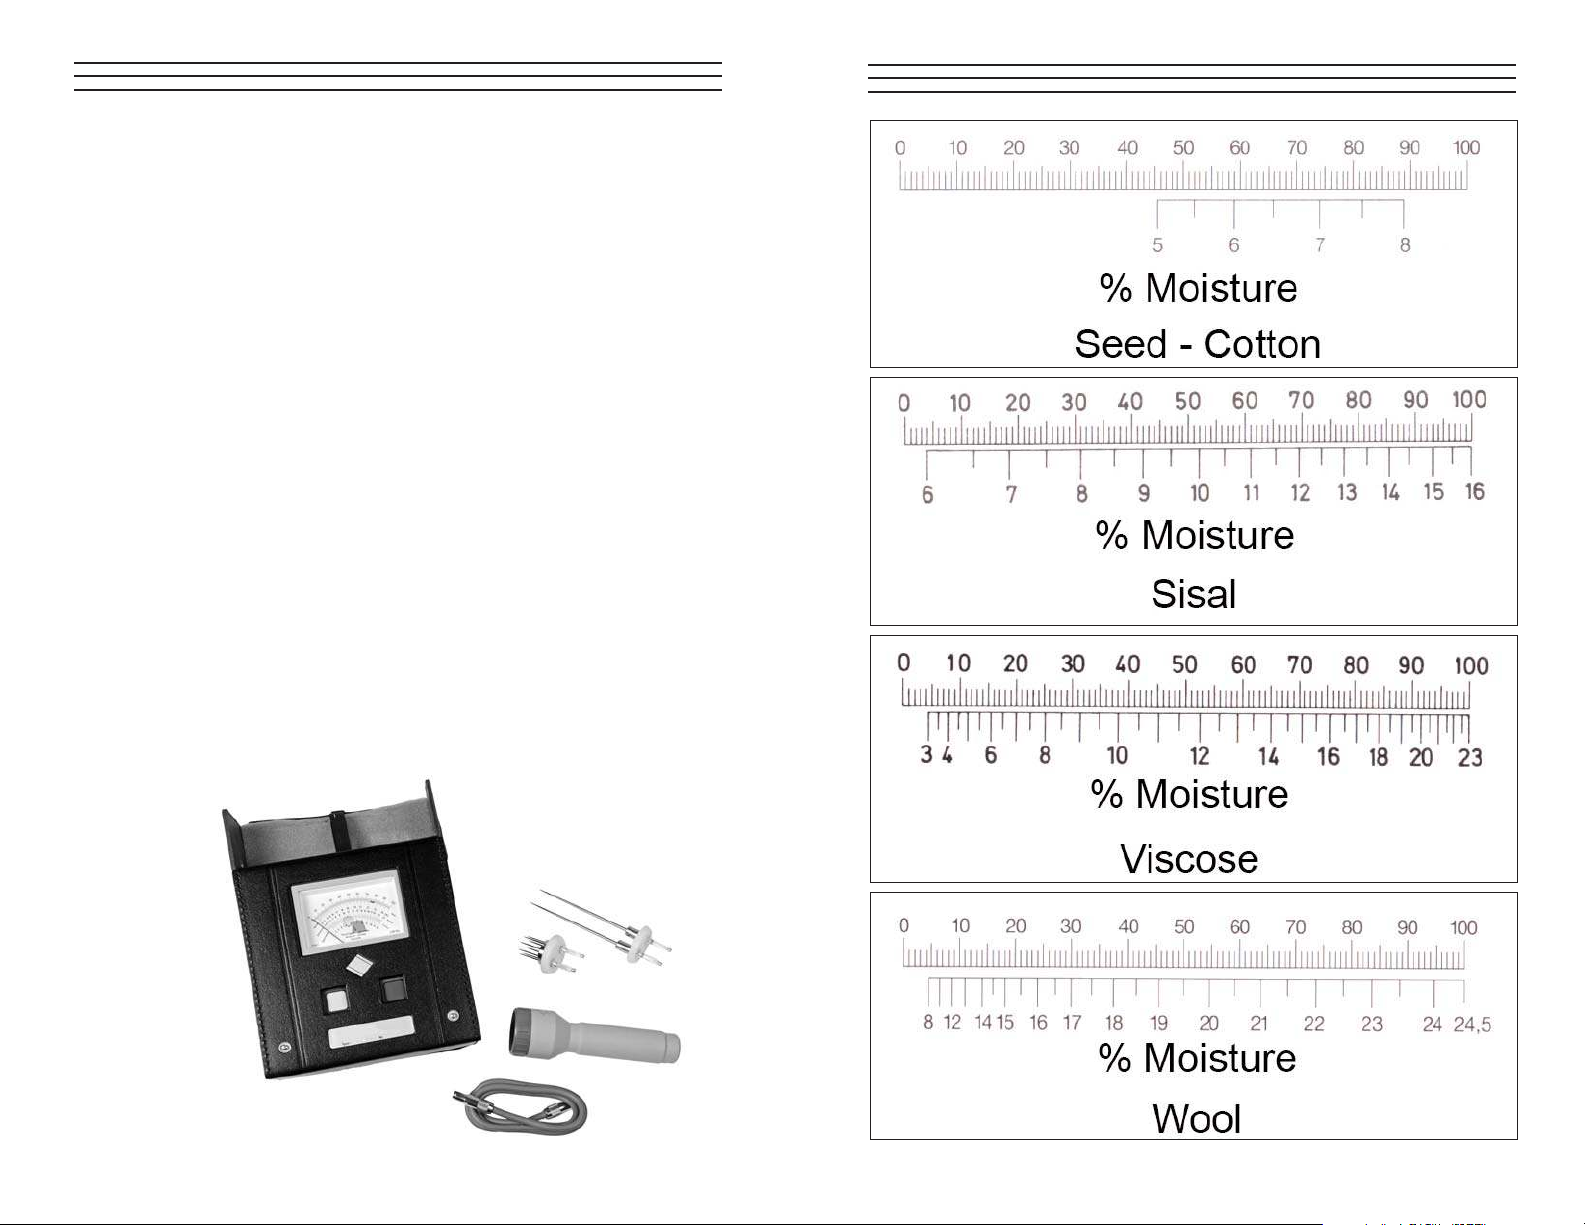
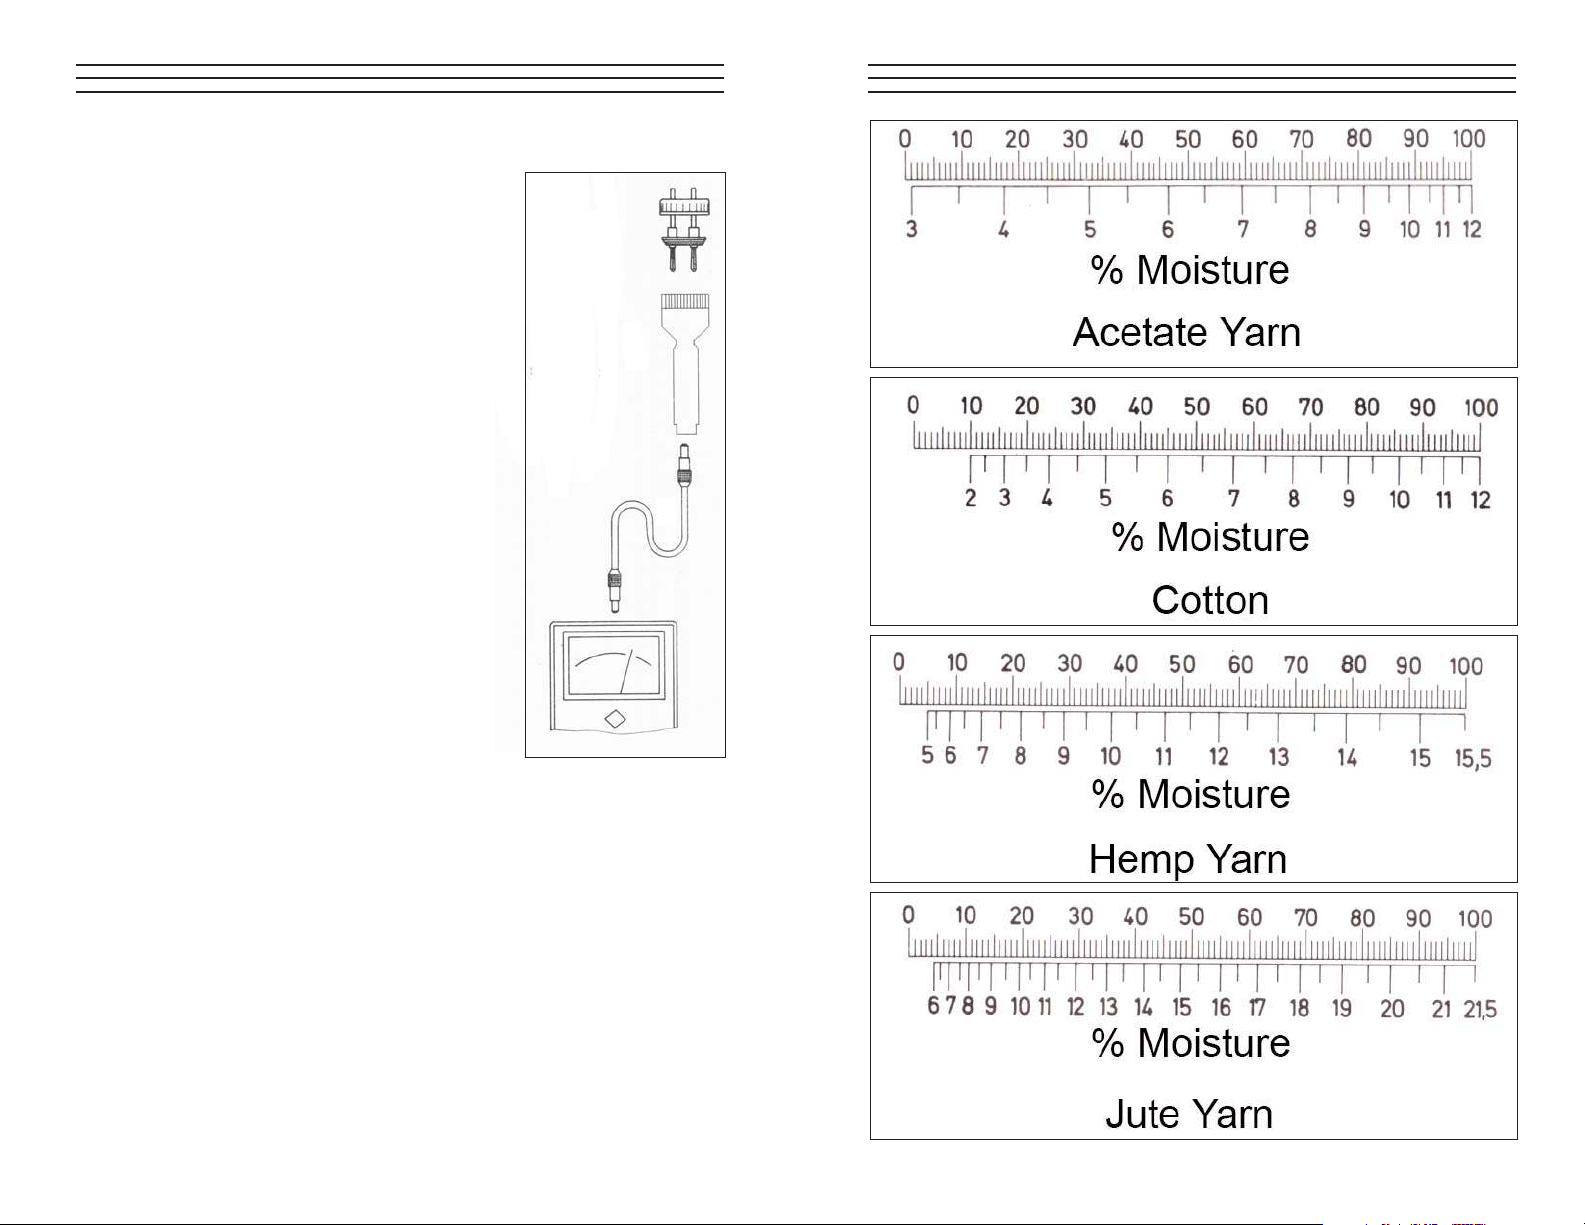
10.0 COMPARISON TABLES
The procedure for using the conversion tables in this section is as
follows:
1. Follow the direction in section 4.0 Taking a measurement.
2. Note the reading on the upper scale of the TEM-1
3. Find that number on the upper scale of the appropriate conversion
table. The lower scale provides a conversion to percent moisture
for that reading.
Page 12

– 12 –
9.0 USING THE CUP ELECTRODE (P/N 202)
Handwheel
Upper part of cup
electrode
Product to be measured
Lower part of cup
electrode
Lower part of cup
electrode
Plug
Retaining pin
Press disc
Locking ball
Built-in friction clutch
NOTE: Before beginning, perform a battery check, see section 3.0
1. Unlock the upper part of th electrode and pull up and away.
2. Fill the lower part or cup with the product to be measured up to
the level mark.
3. Turn the handwheel of the upper part counterclockwise to move
the press disc up as far as it will go.
– 13 –
4. Introduce the locking ball of the upper part in the retaining pins
of the lower part and lock in the first notch.
5. Turn the handwheel. If the upper part clockwise to compress the
material to be measured, The pressure required for a reliable
measurement is reached as soon as the slipping clutch is felt to
slip. The measurement can now be made. If the slipping clutch
is not felt to slip, turn the pressure screw all the way up again
and hook the locking ball into the second notch. If the clutch
still fails to slip, the cup has not been filled with enough
material. Add more material and proceed once more as
described above until the clutch is felt to slip.
6. Now, plug the cup electrode into the measuring jack in the upper
side of the TEM-1.
7. Depress the white measuring button and read the moisture
content directly using the 3 lower scales; or note the upper scale
reading and refer to the conversion tables in Section.
8. The material measured must be fully removed from the cup
electrode after each measurement. in case of a pulpy or pasty
substance, the cup electrode must be removed from the meter for
a more thorough cleaning.
Page 13

TEXTILE MOISTURE METER
TEM-1
Operating Instructions
CHECK•LINE
®
BY ELECTROMATIC
ELECTROMATIC
E Q U I P M E N T C O., I N C.
600 Oakland Ave., Cedarhurst, NY 11516–U.S.A.
TEL: 516-295-4300 • FAX: 516-295-4399
CHECK•LINE
®
INSTRUMENTS
 Loading...