Page 1

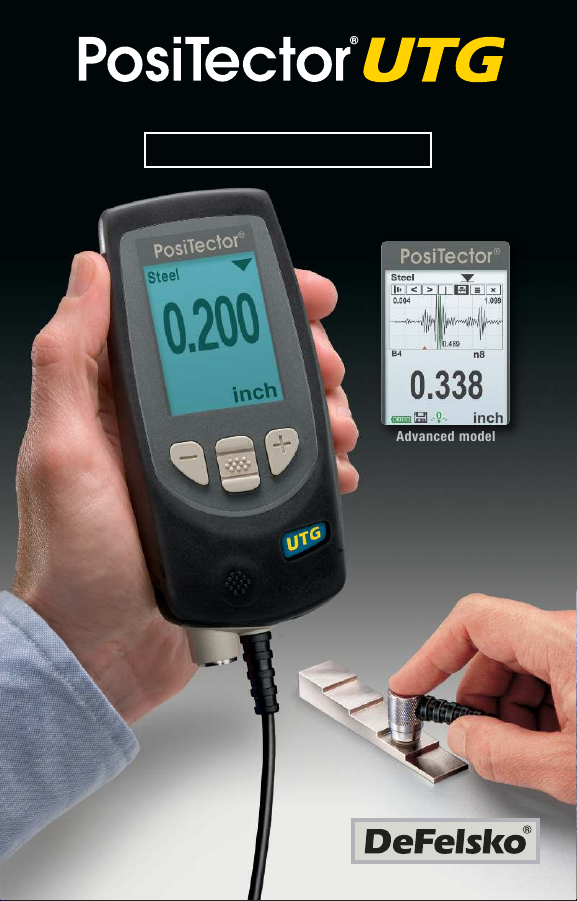
Ultrasonic Thickness Gage
Quick Guide v. 3.0
Adv ance d m odel
Page 2

Introduction
Introduction
The PosiTector UTG is a hand-held Ultrasonic Thickness Gage
that uses the non-destructive ultrasonic pulse-echo principle to
measure the wall thickness of a wide variety of materials. It
consists of a body (Standard or Advanced) and probe (UTGC or
UTGM, see pg. 2).
This Quick Guide summarizes the basic functions of the instrument. Download the full instruction manual at:
www.defelsko.com/manuals
Quick Start
Quick Start
The PosiTector UTG powers-up when the center navigation
button is pressed. To preserve battery life, the instrument
powers down after approximately 5 minutes of no activity. All
settings are retained.
1. Remove the protective rubber cap from the probe.
2. Power-up Gage by pressing the center navigation button.
3. Zero the probe (see pg. 6)
4. Select the correct velocity of sound (see pg. 7)
5. Measure the part (see pg. 3)
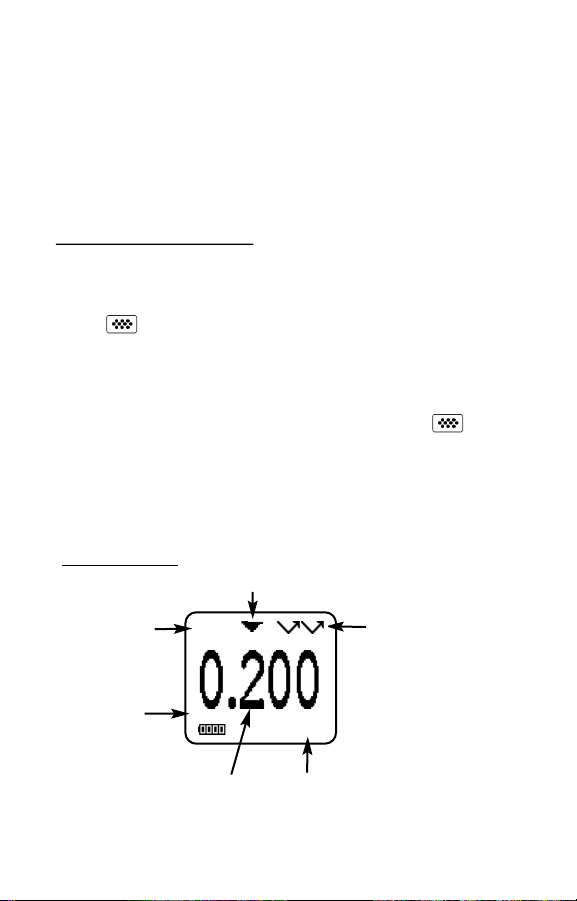
Typical Display
Currently
selected
material
Battery
Icon
The Coupled Symbol appears when the
probe is ultrasonically connected with a
surface.
Steel
Current
Measurement
inch
Unit of
Measurement
Measurement
Mode currently set
to multiple-echo
(UTGM probe only)
1
Page 3

Probes
Probes
To disconne
ins
trum
horizo
body. R
W
hen
d
ete
se
lf-ch
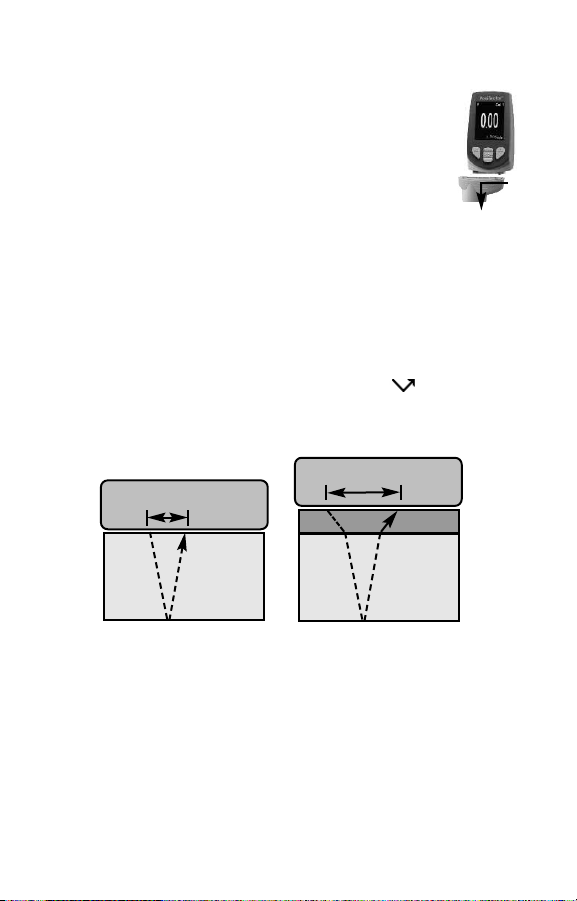
PosiTector UTG probes transmit an ultrasonic pulse into the
material to be measured. This pulse travels through the material
towards the other side. When it encounters an interface such as air
(back wall) or another material, the pulse is reflected back to the
probe. The time required for the pulse to propogate through the
material is measured by the Gage, represented as t1and t2 below.
PosiTector UTGC and UTGM (in single-echo mode) probes
determine thickness by measuring t1(uncoated) or t2 (coated),
dividing it by two and then multiplying by the velocity of sound for
that material (steel). See Figure 1.
ct a
pro
be from
a
ent an
d slide
ntally (in the direction of the arro
everse the
pow
ered-up
rm
in
es what typ
eck.
Probe
the
se steps to attach a n
the
e of probe
t
1
body,
plastic probe
P
osiTector
is attache
powe
w) a
ew probe.
Probe
r-dow
conn
way from
autom
atica
d and doe
t
2
coating
n the
ecto
the
s a
r
lly
steel
Figure 1
For uncoated materials t1relates directly to material thickness.
When a material is coated the propagation time is increased and
is shown above as t
Coatings such as paint have a slower velocity of sound than that
of metal. Thus the single-echo technique will produce a thickness
result greater than the actual combined coating+metal thickness.
.
2
t
steel
t
>
1
2
2
Page 4

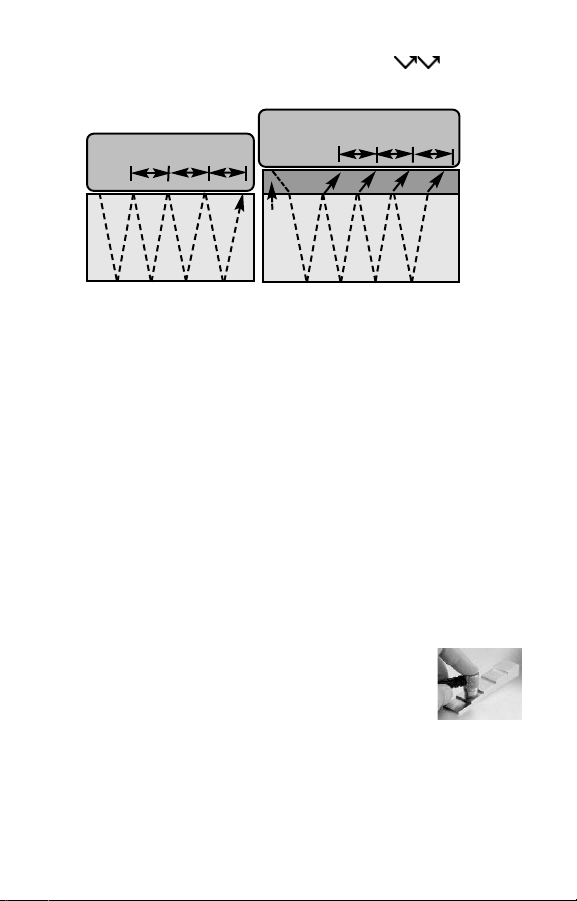
The PosiTector UTGM in multiple-echo mode determines
thickness by measuring the time between at least three consecutive back wall echoes.
t
t
t
1
Probe
2t3
t
Probe
1
t
2
3
Coating
Figure 2
In the figure above, multiple-echo mode measures only the time
between echoes. Regardless of whether the steel is coated or not,
all times between echoes are the same. In multiple-echo mode
the Gage determines thickness by measuring t1+t2+t3, dividing it
by six and then multiplying by the velocity of sound for that material. The resultant thickness calculation made by the instrument is
therefore an accurate measurement of the steel thickness only,
disregarding the coating thickness.
The velocity of sound is expressed in inches per microsecond or
meters per second. It is different for all materials. For example,
sound travels through steel faster (~0.233 in/µs) than it travels
through plastic (~0.086 in/µs).
How to Measure
How to Measure
1. Remove rubber cap from probe. Couplant (glycol
gel - included) must be applied to the surface to be
tested to eliminate air gaps between the wear face
and the surface. A single drop of couplant is sufficient
when taking a spot measurement.
2. Place the probe flat on the surface. Use moderate pressure to
press against the top of the probe with the thumb or index finger.
steel
3
Page 5

When the probe senses echoed ultrasound, a coupled symbol
will appear on the display and thickness values will be displayed. While the probe is coupled, the PosiTector UTG continually updates the display.
3. When the probe is removed from the surface, the last measurement will remain on the display.
Occasionally, excess couplant will remain on the probe when the
probe is lifted from the surface. This may cause the PosiTector
UTG to display a final measurement value different from those
observed when the probe was on the surface. Discard this value
and repeat the measurement.
Surface Conditions
Surface Conditions
Ultrasonic measurements are affected by the condition,
roughness and contour of the surface to be tested.
Measurement results may vary on coarse surfaces. Where
possible, it is recommended to seat the transducer on a smooth
flat surface that is parallel to the opposite side of the material.
On rough surfaces, the use of a generous amount of couplant
minimizes the surface effects and serves to protect the transducer
from wear, particularly when dragging the probe across a surface.
UTGM Probes:
(in multiple-echo mode) may occasionally be unable to give a
measurement result even when the "coupled" symbol appears.
Use additional couplant and lighter pressure on the probe when
measuring. Alternatively, laying a plastic shim on the surface with
couplant applied to both sides to simulate a painted surface will
help produce a steel-only thickness measurement (multiple-echo
mode). Switching the Gage to single-echo SE mode (see pg. 9)
will also help produce a steel-only thickness measurement.
On smooth, uncoated metal surfaces the Gage
4
Page 6

Calibration, Verification and Adjustment
Calibration, Verification and Adjustment
Three steps ensure best accuracy…
1.Calibration - typically done by the manufacturer or a qualified
lab. All probes include a Certificate of Calibration
2.Verification of Accuracy - as done by the user on known
reference standards such as calibration step blocks.
3.Adjustment - to a known thickness or sound velocity for the
material to be measured
Calibration
Calibration is the controlled and documented process of
measuring traceable calibration standards and verifying that the
results are within the stated accuracy of the Gage. Calibrations
are typically performed by the Gage manufacturer or by a certified
calibration laboratory in a controlled environment using a
documented process.
Verification
Gage accuracy can and should be verified using known reference
standards of the material to be tested.
Verification is an accuracy check performed by the user using
known reference standards. A successful verification requires the
Gage to read within the combined accuracy of the Gage and the
reference standards.
Adjustment
Adjustment, or Calibration Adjustment is the act of aligning the
Gage's thickness readings to match that of a known reference
sample. See Calibration Adjustment pg. 6.
5
Page 7

Cal Settings Menu
Cal Settings Menu
Zero
PosiTector UTG probes can be "zeroed" to compensate for tem-
perature and wear. This action is not required when operating in
multiple-echo mode (UTG M probes only) except when the instrument is new and after a Reset (pg. 8). However it ensures best
accuracy when operating in SE (single-echo) mode. Therefore it is
a good idea to "zero" the probe before each work shift and when
the temperature of the part changes. During zeroing, it does not
matter what the current velocity setting is.
1. Make sure the instrument is on and the probe is wiped clean.
2. Apply a single drop of couplant onto the zero plate located on
the underside of the probe connector. DO NOT apply couplant
directly onto the probe face.
3. Select the Zero menu option and follow the on-screen prompts.
Calibration Adjustment
The PosiTector UTG is factory calibrated. But in order for it to take
accurate thickness measurements of a particular material it must
be set to the correct sound velocity for that material. Be aware that
material composition (and thus its sound velocity) can vary from
stated tables and even between lots from a manufacturer.
Adjustment to a sample of known thickness of the material to be
measured ensures that the Gage is adjusted as close as possible
to the sound velocity of that specific material. Samples should be
flat, smooth and as thick as the maximum expected thickness of
the piece to be tested.
The PosiTector UTG allows four simple adjustment choices. All
four methods are based on the simple premise of adjusting the
sound velocity. The first three adjustment methods make 1-point
calibration adjustments to optimize the linearity of the PosiTector
UTG over small ranges. The fourth method makes a 2-point
calibration adjustment to allow for greater accuracy over a large
range.
6
Page 8

Thickness
The most common method of adjustment is to measure a sample
of known thickness. Select a reference standard of material as
close as possible in composition to the intended application. For
best results, the thickness of the reference standard should be
equal to or slightly greater than the thickness of the part to be
measured.
Material
If a known thickness of the material is not available, but the material is known, this quick adjustment allows the user to load one of
several preprogrammed material velocities.
Velocity
If the sound velocity for the test material is known, the Gage can
be adjusted to that specific sound velocity.
2 Pt Adjust
A 2-Point adjustment allows for greater accuracy while
simultaneously adjusting probe zero. Select two reference
standards as close as possible in composition to the intended
application. For best results, the thickness of the thicker reference
standard should be equal to, or slightly greater than the thickest
part to be measured. The thickness of the thinner reference
standard should be as close as possible to the lower end of the
expected measurement range.
Cal Lock
When checked, the icon appears and the current Cal settings
are “locked” to prevent further user adjustments. Uncheck to make
further adjustments.
7
Page 9

Setup Menu
Setup Menu
Reset
Reset (soft reset) restores factory settings and returns the
instrument to a known condition. The following occurs:
- All batches, stored measurements, images, and batch names
are erased.
- All calibration adjustments are cleared and returned to the
Gage’s factory calibration settings.
- Menu settings are returned to the following:
Memory = OFF
Statistics Mode = OFF
Hi Lo Alarm = OFF
Scan Mode = OFF
A Scan = OFF
B Scan = OFF
Cal Lock = OFF
Bluetooth = OFF
Display = None
SE Mode = OFF
Perform a more thorough Hard Reset by powering down the
instrument, waiting several seconds, then simultaneously holding
both the center and (+) buttons until the Reset symbol
appears. This returns the instrument to a known, “out-of-the-box”
condition. It performs the same function as a menu Reset with the
addition of:
- Bluetooth Pairing info is cleared.
- Menu settings are returned to the following:
Units = millimeter
Flip Display = Normal
Auto Sync = OFF
White on Black = OFF
Language = English
- Date and Time are not affected by either Reset.
NOTE:
Battery Type = Alkaline
Backlight = Normal
Bluetooth Streaming = OFF
USB Drive= ON
Scan
Normally, the PosiTector UTG takes a single spot measurement
at a rate of 6 readings per second while in contact with a surface.
When the probe is lifted, the last reading will remain on the display.
It is sometimes necessary to examine a larger region to locate the
thinnest point. When Scan is selected, the PosiTector UTG will
measure at a rate of 20 readings per second and display min/max
values.
8
Page 10

A Scan
A display in which the received pulse amplitude is
represented along y axis and the travel distance
of the ultrasonic pulse is represented along the x
axis.
(Advanced models only)
B Scan
A display in which a cross sectional profile of the
test material is represented.
SE Mode
Switches from multiple-echo to single-echo mode:
- To detect pits and flaws
- To increase the measurement range
- To obtain thickness measurements in circumstances where
multiple-echo can not
Battery Type
from a choice of “Alkaline”, “Lithium” or “NiMH” (Nickel-metal hydride
rechargeable). If NiMH is selected, the instrument will trickle charge the
batteries while connected via USB to a PC or optional AC charger (gage
must be powered ON). The battery state indicator icon is calibrated for the
selected battery type. No damage will occur if the wrong battery type is
selected. DeFelsko recommends eneloop (NiMH) rechargeable batteries.
Statistics
A statistical summary will appear on the display. Remove the last
measurement by pressing the (-) button. Press (+) to clear
statistics.
HiLo Alarm
Allows the Gage to visibly and audibly alert the user when
measurements exceed user-specified limits.
x - Average
↑
(Advanced models only)
(UTGM multiple-echo probes only)
Selects the type of batteries used in the instrument
Statistics Mode
Statistics Mode
x
- Maximum Value
σ - Standard Deviation
↓ - Minimum Value
9
Page 11

Memory Management
Memory Management
The PosiTector UTG can record readings in memory for printing
to the optional Bluetooth wireless printer, downloading or
synchronizing with PosiTector.net. Readings are time-stamped as
they are taken.
Scroll through display modes
(Advanced only)
Delete last reading
Access the Menu
Create a new batch
(Advanced only)
Restore brightness
after dimming
(Advanced only)
Standard models
store up to 250 readings in one batch.
Advanced models store 100,000 readings in up to 1,000
batches. “New Batch” closes any currently opened batch and
creates a new batch name using the lowest available number. The
icon appears. New batch names are date stamped when they
are created.
NOTE:
instrument. Download the full instruction manual at:
www.defelsko.com/manuals
Screen Capture
Press both (-)(+) buttons at any time to capture and save an image
copy of the current display. The last 10 screen captures are stored
in memory and can be accessed when connected to a computer
(see USB mass storage pg. 11).
USB mass storage - connect your PosiTector to a PC/Mac using
the supplied USB cable to access and print stored readings and
graphs. No software or internet connection required.
PosiTector.net - a free web-based application offering secure
centralized storage of thickness readings. Access your readings
from any web connected device. www.PosiTector.net
This Quick Guide summarizes the basic functions of the
Outputting Stored Readings
Outputting Stored Readings
10
Page 12

Connect Menu
Sync Now
Immediately initiates synchronization with PosiTector.net when
connected (USB or Bluetooth) to an internet connected PC
running PosiTector Desktop Manager.
Auto SYNC
Allows the instrument to automatically synchronize with
PosiTector.net when initially connected to an internet connected
PC running PosiTector Desktop Manager.
Additional measurements added to memory while connected are
synchronized only when the USB cable is disconnected, then
reconnected or when Connect>Sync Now is selected.
USB Drive
The instrument uses a USB mass storage device class which
provides a simple interface to retrieve data in a manner similar to
USB flash drives, cameras or digital audio players.
NOTE:
cable. The batteries are not used and the body will not
automatically power down. If rechargeable (NiMH) batteries are
installed, the instrument will trickle charge the batteries.
Allows individual readings to be sent to a computer or compatible
device as they are taken using Bluetooth wireless technology.
See www.defelsko.com/bluetooth
Determines if a software update is available for your instrument.
Must be connected to an internet connected PC running
PosiTector Desktop Manager. See www.defelsko.com/update
NOTE:
When connected, power is supplied through the USB
Bluetooth
Updates
The instrument may perform a Hard Reset (pg. 8)
Connect Menu
(Advanced models only)
11
Page 13

Returning for Service
Returning for Service
Before returning the instrument for service…
1.Install new or newly recharged batteries in the proper alignment
as shown within battery compartment.
2.Examine the probe tip for dirt or damage.
3.Perform a Hard Reset (pg. 8) and a Zero (pg. 6)
If you must return the instrument for service, describe the problem
fully and include measurement results, if any. Be sure to also
include the probe, your company name, company contact,
telephone number and fax number or email address.
Website: www.defelsko.com/support
Limited Warranty, Sole Remedy and Limited
Limited Warranty, Sole Remedy and Limited
Liability
Liability
DeFelsko's sole warranty, remedy, and liability are the express
limited warranty, remedy, and limited liability that are set forth on
its website: www.defelsko.com/terms
www.defelsko.com
© DeFelsko Corporation USA 2012
This manual is copyrighted with all rights reserved and may not be reproduced or transmitted, in whole
or part, by any means, without written permission from DeFelsko Corporation.
DeFelsko and PosiTector are trademarks of DeFelsko Corporation registered in the U.S. and in other
countries. Other brand or product names are trademarks or registered trademarks of their respective
holders.
Every effort has been made to ensure that the information in this manual is accurate. DeFelsko is not
responsible for printing or clerical errors.
All Rights Reserved
12
 Loading...