

Page 1

- 1 -
Table of Contents
1.0 Introduction . . . . . . . . . . . . . . . . . . . . . . . . . . . . . . . . . . . . . . . . . . . . . . .02
1.1 Package Contents
2.0 Safety Instructions . . . . . . . . . . . . . . . . . . . . . . . . . . . . . . . . . . . . . . . . . .
02
3.0 Overview . . . . . . . . . . . . . . . . . . . . . . . . . . . . . . . . . . . . . . . . . . . . . . . . .03
4.0 Assembly and Connection . . . . . . . . . . . . . . . . . . . . . . . . . . . . . . . . . . . .04
4.1 Typical Connection Examples
5.0 Operation . . . . . . . . . . . . . . . . . . . . . . . . . . . . . . . . . . . . . . . . . . . . . . . .06
6.0 Flash Tube Replacement . . . . . . . . . . . . . . . . . . . . . . . . . . . . . . . . . . . . . 7
7.0 Specifications . . . . . . . . . . . . . . . . . . . . . . . . . . . . . . . . . . . . . . . . . . . . . .08
8.0 Warranty . . . . . . . . . . . . . . . . . . . . . . . . . . . . . . . . . . . . .
0inside back cover
- 8 -
General
Range 0 to 12,500 FPM (flashes per minute)
Power Input 15 to 28 VDC / 12 W
DIN 41524 5-pin standard connector
Universal power supply available
External Trigger Input 3 to 30 V / max. 5 mA
(potential free optocoupler)
DIN 41524 5pin standard connector
Uout = 24 V max. 200 mA
Housing Material Aluminum
Size 6.0" x 5.1" x 4.4"
(150 x 130 x 112mm)
Weight 870 g
Ambient Temp 32 to 104 °F
(0° to 40 °C)
Storage Temp –13 to 158 °F
(–25° to 70 °C)
Humidity Max. 95 % not condensed
Flash Tube Parameters
Lifetime > 200,000,000 flashes (@ 6,000 FPM)
Flash Duration < 5 µs
Light Emission Flash 10 Mega-Lux /12"
(30 cm)
Light Emission 500 Lux / 30 cm / 12" (@ 6,000 FPM)
Illumination Area 7.8" x 12"
(20 x 30 cm)
Flash Color 6,000 – 6,500 K
Flash Energy 600 mJ @ 1,200 FPM
Certifications
EMV/EM
C 2004/108/EC
EN 61010:2001
2006/95/EC
7.0 SPECIFICATIONS
Page 2
- 2 -
1.0 INTRODUCTION
Congratulations on your purchase of a Checkline®LS-5-12000 Linear
Stroboscope. It uses the principle of stroboscopic lighting to create an illusion of stopped motion, allowing detailed inspection of objects moving at
high speeds.
NOTE: When using a stroboscope, it is important to remember that while
objects may appear to become motionless, they are, in fact, still moving.
Exercise proper care to prevent injury.
Please read this instruction manual thoroughly before operating your stroboscope. If you have any questions not answered by this manual, call your local
supplier, or visit our web chat interface at www.checkline.com for full product
support.
1.1 Package Contents
LS-5-12000 Stroboscope is shipped fully assembled in a metal
enclosure. Your package should contain the following items:
• Stationary stroboscope
• Flash tube, factory installed
• Operating instruction
• Connector (1) for trigger input and supply
After unpacking, please examine your stroboscope for signs of
mishandling during shipping. If damage has occurred, contact
Electromatic before attempting to plug in the instrument. Notify
your shipping carrier immediately for damage claim instructions.
2.0 SAFETY
LS-5-12000 stroboscopes operate at dangerously high voltages.
Disconnect the unit from the power supply and wait two minutes
for the capacitor to discharge before replacing the flash tube. Any
service beyond flash tube replacement is not recommended.
• Do not look directly at the emitted light; it can damage your eyes.
It may also trigger seizures in people with photosensitive epilepsy.
• Flash tubes are filled with high-pressure gas. When handling the flash
tube always always wear safety glasses and protective gloves.
• Do not allow inflammable liquids and water enter the stroboscope.
• When operating the stroboscope with the front screen facing upwards,
the screen can heat up.
• The stroboscope must not be used in explosion hazard areas.
- 7 -
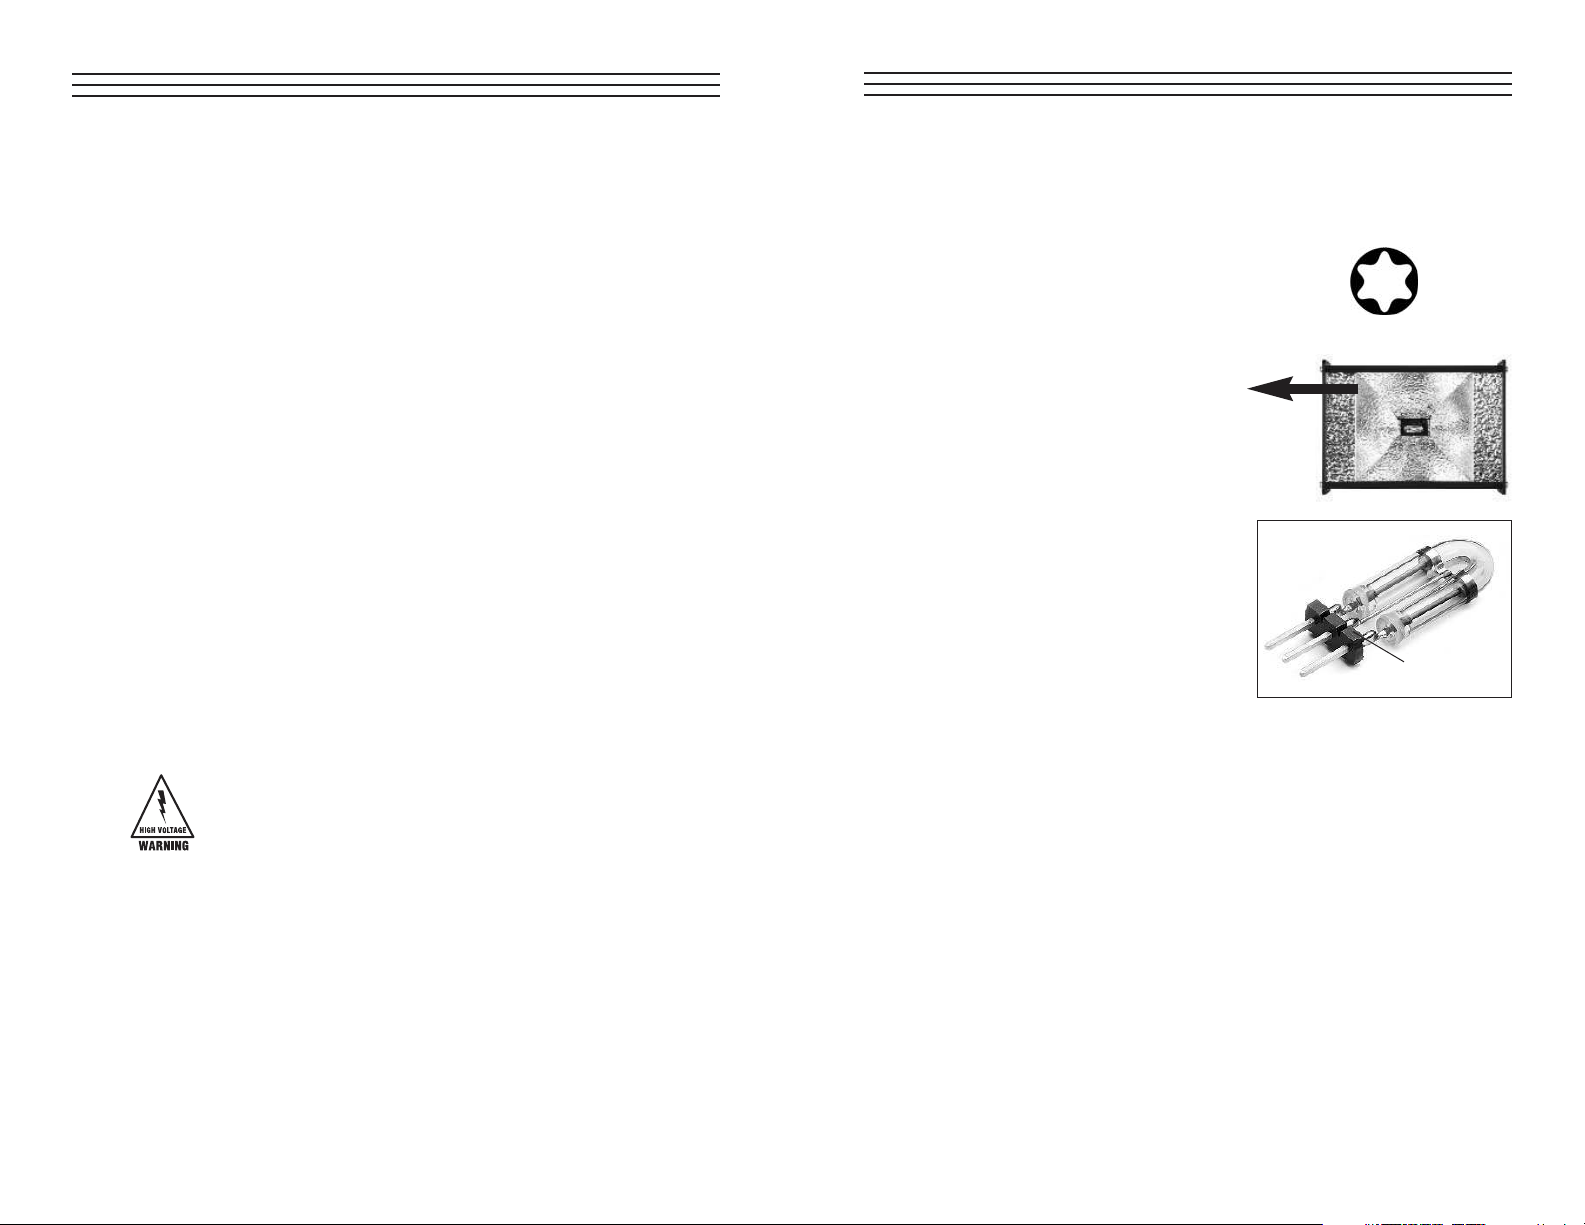
6.0 FLASH TUBE REPLACEMENT
1 . Switch off the LS-5-12000 and remove the power supply plug. Wait two (2)
minutes for the capacitor to discharge before continuing.
2. Loosen the six (6) T10-TORX screws on
the side of the unit with the yellow label.
NOTE: Do not open the screws on the
other side of the unit. They are
not T10-TORX type.
3 . Slide front screen out laterally.
4 . Using a clean cloth, carefully remove
the old flashbulb.
WARNING: Never touch the flashtube
to your bare skin.
5 Pick up new flashbulb with a clean
cloth (free of dust and grease) and
insert into the socket with the colored
mark facing up. Ensure that the
flashtube is correctly positioned in
the socket.
NOTE: Only use the original
flashtubes from the manufacturer.
NOTE: Incorrect positioning will reduce the reflector’s luminous
efficiency.
6. Re-insert the front screen and replace the screws.
NOTE: Never operate the stroboscope without a front screen or with a
defective front screen.
Mark
T10 TORX Screw
Page 3

- 3 -
3.0 OVERVIEW
Metal Enclosure
Flash Tube
Reflector
Screw-Off Plastic Lens
On Back:
Sockets for trigger input
and supply voltage, ON/OFF Switch,
LED Power Indicator
Plug for trigger input and
power supply
On Bottom:
3 threaded holes for
equipment mounting, tripod connection
Optional Accessories
• Spare flash tube
• Tripod/ wall mounting bracket
• Power supply unit
• Additional plug for trigger
input/power supply
• Connecting cable with plug
connector to the LS-5-12000
and open cable connection
for external equipment
• LS-5-RCU Control Unit
(not shown)
- 6 -
5.0 OPERATION
1. Position the stationary
stroboscope and connect the
trigger input signal and supply
voltage to the sockets as outlined
in Section 4.0
2. Switch the stroboscope on. The
red LED will light, indicating that
the unit is ready for use.
2 . As soon as the trigger signal is
applied, the strobe will start to
flash with the trigger frequency.
3. If the flashing frequency coincides with the movement frequency,
a stationary image will appear.
NOTE: Astationary image will not only appear with an identical
flashing frequency, but also with multiples and fractions of
the flashing frequency.
Page 4

- 4 -
4.0 ASSEMBLY AND CONNECTION
Point the stroboscope at the object to be observed.
On the bottom of the stroboscope are 3 threaded
holes, which allow you to affix it to the equipment
to be observed or a stand (available as an option):
• Center = 1 x 1/4” threaded hole
• Right and left, with a total distance of 60mm = 2 x M5 threaded holes
The stationary stroboscope has two
identical assigned sockets (located on
the back of the unit) for the combined
input of trigger signal and supply
voltage. The assignment of plug
contacts is shown in Fig. 1.
CAUTION: Please make the
connections in accordance
with the wiring diagram (Fig. 1).
The trigger input is potential-free.
The potential-free input is suitable
for PNP and NPN signals. A matching
plug for these input sockets is included with the stroboscope.
RECOMMENDATION: Use shielded
cable to connect the trigger signal.
CAUTION: Do not trigger the stroboscope with signals above 12,500 FPM.
4.1 Typical connection examples:
Please take connection examples from Figures 2 to 5. Note that you will
need optional accessories for some of the examples (stationary stroboscope, AC Adapter, sensor, etc.)
Fig. 2 Trigger signal and supply
voltage from external
equipment
Fig. 1
Fig. 2
- 5 -
Fig. 3 Trigger signal from external
equipment, supply voltage
from optional AC Adapter.
Fig. 4 Trigger signal from optional
sensor, supply voltage for
strobe and sensor from
optional AC Adapter.
Fig. 5 Trigger signal from optional
stroboscope control unit,
supply voltage from optional
AC Adapter.
The voltage is either supplied by the
strobe power supply unit (available
as an option) or the equipment being
observed.
NOTE: When using the LS-5-12000 stroboscope without a
stroboscope control unit, the stroboscope flashes with the
trigger signal of the connected equipment. This signal cannot
be influenced without a stroboscope control unit.
Fig. 3
Fig. 4
Fig. 5
Page 5

8.0 WARRANTY
ELECTROMATIC Equipment Co., Inc. (ELECTROMATIC) warrants to the original
purchaser that this product is of merchantable quality and confirms in kind and quality
with the descriptions and specifications thereof. Product failure or malfunction arising
out of any defect in workmanship or material in the product existing at the time of
delivery thereof which manifests itself within one year from the sale of such product,
shall be remedied by repair or replacement of such product, at ELECTROMATIC’s
option, except where unauthorized repair, disassembly, tampering, abuse or
misapplication has taken place, as determined by ELECTROMATIC. All returns
for warranty or non-warranty repairs and/or replacement must be authorized by
ELECTROMATIC, in advance, with all repacking and shipping expenses to the address
below to be borne by the purchaser.
THE FOREGOING WARRANTY IS IN LIEU OF ALL OTHER WARRANTIES,
EXPRESSED OR IMPLIED, INCLUDING BUT NOT LIMITED TO, THE
WARRANTY OF MERCHANTABILITY AND FITNESS FOR ANY PARTICULAR
PURPOSE OR APPLICATION. ELECTROMATIC SHALL NOT BE RESPONSIBLE
NOR LIABLE FOR ANY CONSEQUENTIAL DAMAGE, OF ANY KIND OR
NATURE, RESULTING FROM THE USE OF SUPPLIED EQUIPMENT, WHETHER
SUCH DAMAGE OCCURS OR IS DISCOVERED BEFORE, UPON OR AFTER
REPLACEMENT OR REPAIR, AND WHETHER OR NOT SUCH DAMAGE IS
CAUSED BY MANUFACTURER’S OR SUPPLIER’S NEGLIGENCE WITHIN ONE
YEAR FROM INVOICE DATE.
Some State jurisdictions or States do not allow the exclusion or limitation of incidental
or consequential damages, so the above limitation may not apply to you. The duration
of any implied warranty, including, without limitation, fitness for any particular purpose
and merchantability with respect to this product, is limited to the duration of the
foregoing warranty. Some states do not allow limitations on how long an implied
warranty lasts but, not withstanding, this warranty, in the absence of such limitations,
shall extend for one year from the date of invoice.
ELECTROMATIC Equipment Co., Inc.
600 Oakland Ave. Cedarhurst, NY 11516—USA
Tel: 1-800-645-4330/ Tel: 516-295-4300/ Fax: 516-295-4399
Every precaution has been taken in the preparation of this manual. Electromatic Equipment Co.,
Inc., assumes no responsibility for errors or omissions. Neither is any liability assumed for damages
resulting from the use of information contained herein. Any brand or product names mentioned
herein are used for identification purposes only, and are trademarks or registered trademarks of their
respective holders
Page 6

ELECTROMATIC
E Q U I P M E N T C O., I N C.
600 Oakland Ave., Cedarhurst, NY 11516–U.S.A.
TEL: 516-295-4300 • FAX: 516-295-4399
CHECK•LINE
®
INSTRUMENTS
LS-5-12000
LINEAR STROBOSCOPE
Operating Instructions
CHECK•LINE
®
BY ELECTROMATIC
 Loading...