

Page 1

Set Up & User Guide
www.CheckBoxSystems.net
CheckBox Wireless Hotspotstm are designed to be Easy to
Install, Easier to Manage and Easiest to Afford. To make set
up as easy as possible, please take a moment to completely
read through these instructions before you begin.
Wireless Hotspots
HSV5
Page 2

2
Welcome
We have designed CheckBox Wireless Hotspotstm to be easy to install,
easier to manage and easiest to afford. For best results, before
beginning to set up your system, please take the time to read through
this booklet completely. The answer to most questions can be found in
here.
We are constantly working on adding new features to CheckBox, and
as these features develop they will be added to your system
automatically via system updates. These updates may change the way
some of your administration screens and features function. To keep
current on these new features you can download an updated version of
this booklet at www.CheckBoxSystems.net
Thank you for purchasing a CheckBox System!
Wireless Hotspots
Page 3

3
Table of Contents
Installing CheckBox…………………….……………………………4
Logging into your management screens.…………………………….6
Setting up guest access………………………………………………9
Using credit cards & PayPal…….…...………………………………10
Free access……………………………….…………………………11
PermaCode…………………………………………………………12
Customizing your welcome screen………………………………...13
Accessing your system from outside the hotspot………………….15
Accessing your system from the Internet………………………….16
Network setup……………………………………………………….7
Current network configuration…………………………………......15
Administering active clients…………………………………………18
Client Usage Policy…………………………………………………19
Signal strength, power levels and antennas…………………………20
Mesh repeaters and the mesh node status display…………………22
NX Meshing Access Point Installation.……………………………..24
System Alerts………………………………...……………………...25
Optional Services……………………………...…………………….26
Final Installation Checklist………………………………………….27
Warranty Information……………………………...…..…Back Cover
Page 4

4
Installing CheckBox
Locating the equipment
The CheckBox HSv5 must be located indoors in a dry area. The HSv5 should be located
close to power and the Internet connection(s)
Connecting the equipment
The CheckBox HSv5 will connect to your cable, DSL, or local area network using an
Ethernet network cable. Depending upon your particular DSL or Cable modem the jack
may be marked “LAN”, “PC”, “Host” or something else.
The CheckBox HSv5 can connect to three different network connections (or up to seven
Internet connections with the optional expansion card), although it can be used with one
or two Internet connections.
Connect your CheckBox HSv5 as follows:
Eth3 connects to your first Internet connection.
Eth2 connects to your second Internet connection (if you have one).
Eth1 connects to your third Internet connection (if you have one).
Eth0 connects to the local area network or wired mesh node repeaters.
Power connects to the included AC power cord.
Eth0 will connect to your Guest area network - the part of your network that your
guests connect to. This may be a wired network feed through a series of Ethernet
switches, a wireless network fed to one or more CheckBox meshing access points or
other wireless access points, or a combination of wired and wireless connections.
Guest traffic should not be connected through other routers before being connected to
CheckBox. Other routers connected between the guests and the CheckBox will cause
failure to identify individual devices on the network and failure to authenticate users
properly.
Page 5

5
Connecting CheckBox
The best way to connect your CheckBox System is directly to your DSL, Fiber or cable
modem. You may also connect it through a switch or hub to the DSL or cable modem.
In order to keep guest network traffic separate from your office computers, office
computers should not be connected through the CheckBox. A typical setup as shown
below will keep office and guest data separate while allowing the CheckBox to share the
Internet connection with one modem.
You may also use an Ethernet switch attached to your CheckBox to connect multiple
CheckBox Meshing Access Points to your CheckBox. You can also connect a wired PC
for guests to use to this switch. When connecting multiple access points or guest PCs to
the CheckBox be sure to use an Ethernet switch and not a router—routers plugged into
the guest network after CheckBox will cause issues with guest being properly
authenticated and managed.
Page 6

6
Logging into your Administration screens
The administration screens are used to manage your system, create and print tickets
for your users and view your system status. The administration screens also allow you
to view users on the system (Active Clients), view tickets not yet used, and to delete
tickets from the system. These screens are accessed through a web browser on your
computer, and can be accessed from inside the hotspot or from outside the hotspot
from anywhere on the internet. To learn how to access the system from outside the
hotspot see Accessing Your System from the Internet section in this guide.
To access CheckBox from inside the hotspot make sure your computer is connected to
the system, either by a wireless connection or through a wired Ethernet port
connected to the CheckBox Master. If you are connecting wirelessly select the wireless
network “hotspot”, the default name for the CheckBox wireless network. You can
change this name later.
Open your web browser and you should see a generic welcome screen.
This is the welcome screen your
guests will see when they first log
on to your hotspot (you can
customize this screen - see page
13). From here your guests are
prompted to enter a ticket number,
credit card or any of the access
methods that you have enabled
before they can connect to the
internet. Of course you do not have
tickets since you have not yet
created them! To access the
administration screens enter the
following in the address bar (NOT
your search box):
http://192.168.17.1:3456/admin
This will bring up a page warning
you that no password has yet
been set for the administration
screens for your CheckBox.
Create a password that is a
combination of letters and
numbers. Do not use any spaces
or special characters (such as
&,*,@, !)
Enter your chosen password
twice and press Set Password. A box will pop up so that you can test your password.
If your are asked for a user name, leave the user name box empty.
Page 7

7
Network Setup
You probably will not need to make any changes in the network setup of your CheckBox
system as most Internet Service Providers use DHCP, Dynamic Host Configuration
Protocol, to tell the devices connected to their network what address and other
parameters to use.
If your Internet Service Provider uses static IP addresses, or if you are connecting
CheckBox to a an internal company network you may need to set some network
parameters manually.
To enter Network Setup click on Network Setup on the top menu and then Internet in
the drop down menu. The Network Setup page will appear.
In the Network Setup
page you will see a
summary of the Internet
connections currently
connected to each of
the ports on your
CheckBox.
This page will show you
the recent data rates
(speed) and maximum
data rate on each link.
CheckBox will use this
information to determine
the percentage of the
data traffic that each
connection will carry, and will adjust this
percentage on the fly.
Clicking on the Eth3, Eth2, or Eth1 will
take you to an Internet Access Setup
screen for that connection.
If the Internet connection is set for
DHCP (automatic configuration) the IP
address received via DHCP will be
displayed here.
If you need to set a fixed (static or
permanent IP address) click on Fixed
and then enter the IP address,
Netmask, Gateway and DNS
information in the appropriate boxes.
Click Update and then restart your
system.
Page 8

8
Local Address
Local Address refers to the IP addresses the CheckBox system assigns to users on
the system. By default this address is in the 192.168.17.xxx range. This setting
should not be changed under most circumstances. If there is a need to change this
address range, select Network Setup on the top menu and then Local from the drop
down menu and enter the new address range in here and press update.
NEVER SET THE LOCAL ADDRESS RANGE TO BE THE SAME AS THE
ADDRESS RANGE OF THE INTERNET CONNECTION. This will cause routing
errors and you will lose contact with the unit.
Wireless
The CheckBox HSv5 can host CheckBox mesh node access points in wired and
wireless modes. At least one CheckBox meshing access point must be wired into the
CheckBox HSv5 for wireless operation.
The SSID is the Service Set Identification - the name of a wireless network that is
broadcast to announce the networks presence.
When using CheckBox mesh node access points the ssid and channel of the access
points is set and controlled from with in the management screens of the HSv5. If you
are using other brands of access points you will need to manage channel changes
and SSID as per their manufacturer’s directions.
By default the ssid is “hotspot”. To change the ssid select Network Setup from the
top menu and then Wireless from the drop down menu. Enter the new name and
press update. It is important that your name contain only letters and numbers - no
spaces or symbols.
Important: If you are using mesh repeaters allow 10 minutes after update for
the mesh repeaters to reconfigure their SSID. During this period Do Not make
any other system changes (i.e. Local Address or channel) or you run the risk of
the repeaters becoming lost.
By default CheckBox is set to channel 6. Different networks can co-exist on the same
channel in the same area, however if you are running another network or there are
other networks in your area you may wish to change the channel. To change the
channel from the Network Setup -> Wireless screen select the channel from the
drop down box and press update.
Important: If you are using mesh repeaters allow 10 minutes after update for
the mesh repeaters to reconfigure their channel. During this period Do Not
make any other system changes (i.e. Local Address or SSID) or you run the risk
of the repeaters becoming lost.
Page 9

9
In order for guests to access the Internet through your CheckBox System they have to
be authenticated. There are several ways your guests can authenticate, including:
Access Tickets
PermaCodes
Credit Cards and PayPal
Free Access
In addition to these methods your CheckBox can also be tied to your company loyalty
card rewards program and integrated into point-of-sale systems. For more information
on integrating CheckBox with loyalty programs and point-of-sale systems please contact
CheckBox Support.
The system will automatically generate the appropriate buttons and boxes on your
welcome screen; If you have not printed any tickets and have enabled free access and
credit cards, then the system will not display a box to enter access tickets. If you have
not enabled credit card payments or free access and have created tickets then only the
ticket box will be displayed on your welcome screen. If you have not enabled free
access or printed tickets and have enabled credit cards then only the credit card buttons
will be displayed.
Access Tickets allow you to create and distribute tickets for your guests that allow
them an amount of time online that
you determine. These tickets can be
good for an amount of time ranging
from 15 minutes to one year. You
can give these tickets away or sell
them.
Tickets can only be used by one
device and guest can not share
tickets or re-use them.
To create tickets click on Access Controls on the menu at the top. Select the duration
of the tickets you wish to generate and their expiry date (shelf life) and then click on the
Generate Tickets button.
A new window will open with a sheet of ten tickets that you can print on a standard
printer. The sheet can be cut up, or you can use standard business card stock (Avery
5870 or equivalent) and the tickets will print on the cards.
If you do not see the window of tickets open after
selecting Generate Tickets be sure that you have
pop up blockers disabled or that you allow pop ups
from the site.
The Graphic on the ticket can be changed under
Customize Site.
Setting up Guest Access
Page 10
10
With CheckBox you can accept credit cards automatically through the welcome page.
CheckBox uses the PayPal system to clear the transactions and deposit the funds into
your account, and allows you to set the pricing and duration. Using credit cards you do
not need to be present to hand out tickets - great for unattended locations such as
marinas and public spaces.
To accept credit cards and PayPal you will need a Business Account with PayPal if you
do not already have one. Go to www.paypal.com to setup an account. If you have an
existing personal account you will need to upgrade to a business account). Make Sure
you specify a Business Account when setting up your PayPal Account
After your PayPal Business account setup has been completed you will need to log in to
your PayPal account and set up the following options:
On your PayPal Account Page go to Profiles and locate and Select Website Payment
Preferences.
In Website Payment Preferences select the following options
Auto Return: On
Return URL: http://192.168.17.1:3456/paypalreturn
Payment Data Transfer (optional): On
Encrypted Website Payment: Off
PayPal Account Optional: On
Contact Telephone Number: Off
Express Checkout Settings: No
Press Save and then go back up to Payment Data Transfer (optional) and you will now
have an Identity Token. It is very important that you copy this token carefully (using
copy & paste) in the next step. We strongly suggest that you copy this token into a
blank document to store for safekeeping.
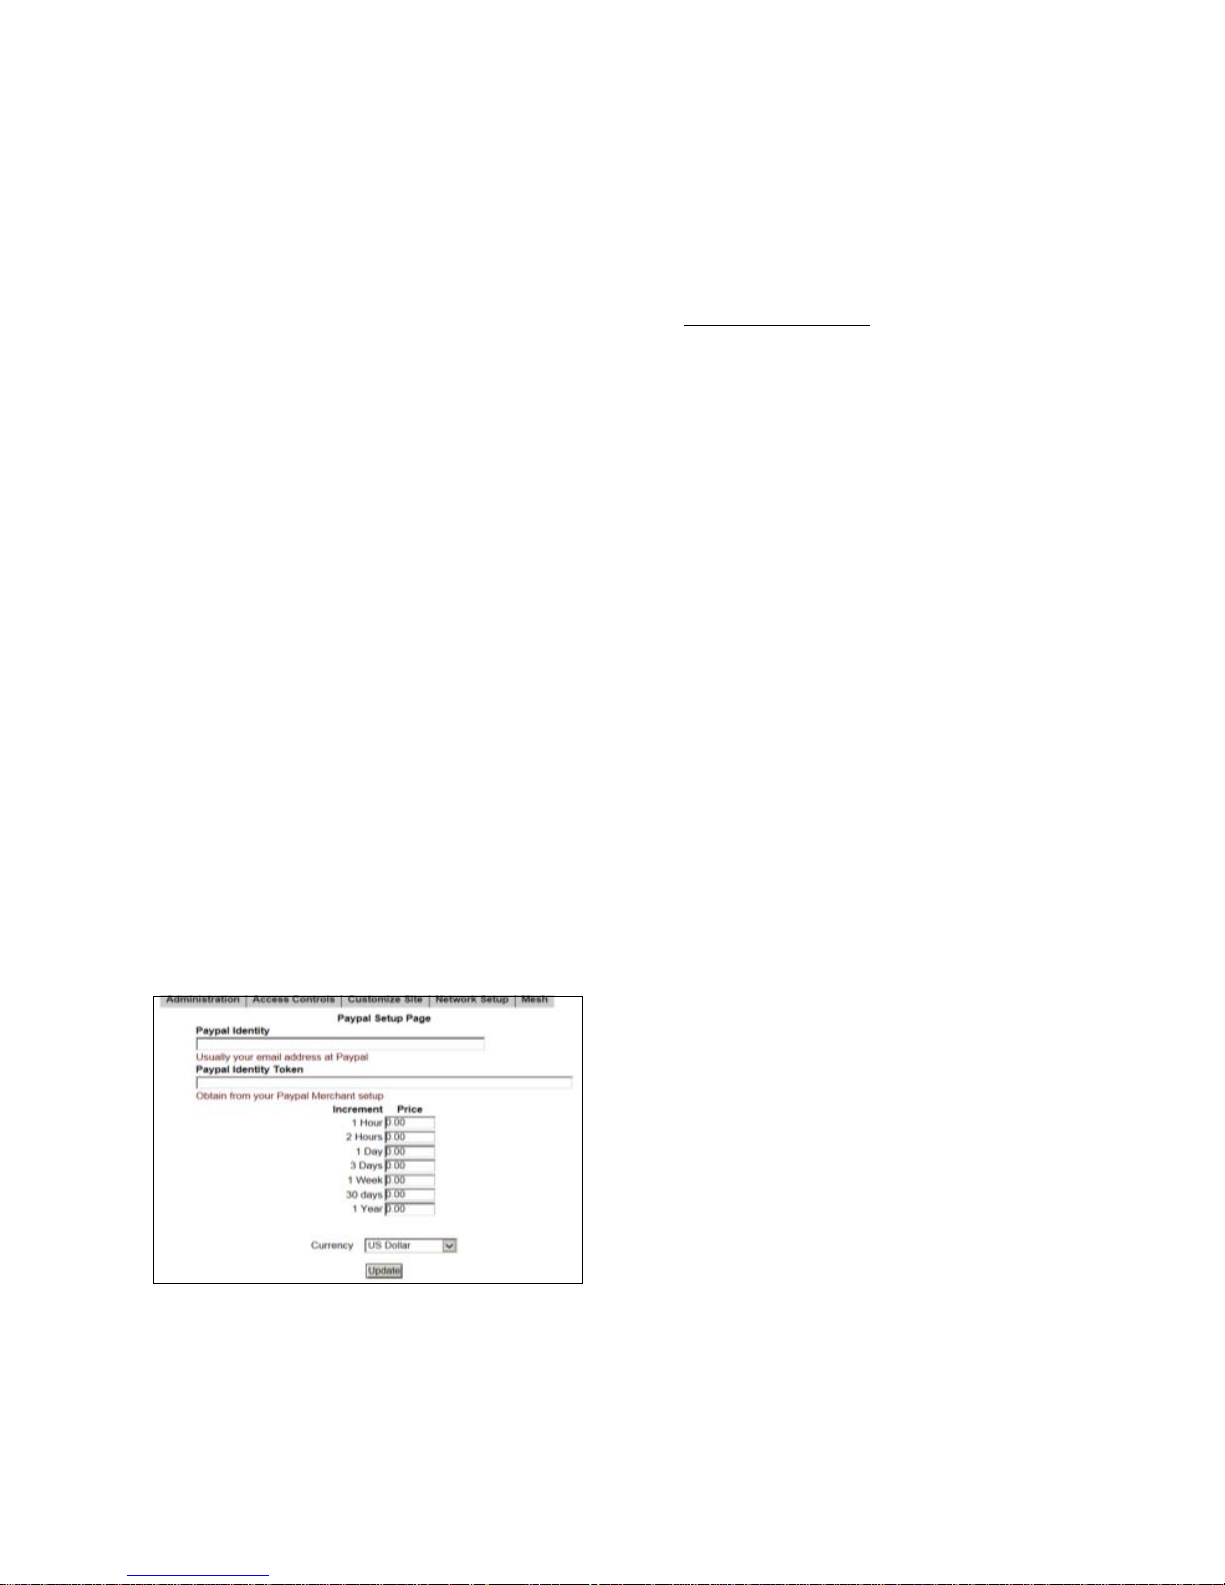
Once you have completed setting up your PayPal account and have copied your identity
token, open the administration page on your CheckBox System and go to Access
Controls on the top menu and then PayPal
Setup in the drop down menu.
In the box marked PayPal Identity enter your
PayPal ID (typically your email address).
In the PayPal Identity Token box paste your
PayPal Identity Token.
Set your prices, and leave as zero’s any time
increments that you do not wish to offer.
Press the Update button when done.
It would be a good idea at this point to run some sample charges through the system. You
can refund those charges when you are done testing by using the PayPal merchant tools
in your PayPal Account Management Screen.
Please Note: The PayPal software module is provided to process credit card transactions
securely through PayPal utilizing PayPal’s systems. CheckBox Systems is not affiliated
with PayPal and does not offer support for managing PayPal merchant accounts.
Using Credit Cards & PayPal
Page 11

11
Free Access
The Free Access System allows you to give your guests free access two different ways:
You can allow free access once per period, for example 15 minutes free every day, or 1
day free per week. This is great for a coffee shop or restaurant that wants to advertise
free internet access but prevent guests from taking up a table for hours upon hours. The
guests will still get your welcome screen when they first log on, and if they qualify for free
access (if they have not had free access already in the predefined period) then they will
be invited to try the access for free. Once the free period has expired the guest will be
required to enter a valid ticket number or credit card (if you have those options enabled)
and the free option will not be displayed for that guest.
If you wish to allow unrestricted free access to your customers, but still have the customers view your site welcome page, you can set the Trial Time and Trial Period time to be
the same. For example; by setting the Trial Time and Trial Period both to 60 minutes,
your clients will see the welcome page once every hour.
To enable Free Access, select
Access Controls in the top menu
and then Free Access Setup on
drop down.
Select the Trial Time, how much
time you want to allow them on the
system, and then select the Trial
Period, the amount of time that
must elapse before they get a new
free trial.
Press Update.
You may also customize the message your users see by selecting
Customize Site on the top menu
and Free Access Text on the drop
down hand menu and editing the
message.
Note: Free Access users are treated differently than permanent, ticketed, permacode
and credit card users by the Client Usage Policy. Free Access users will receive one-half
of the bandwidth allotment of all other categories of users set in the Client Usage Policy.
Page 12
12
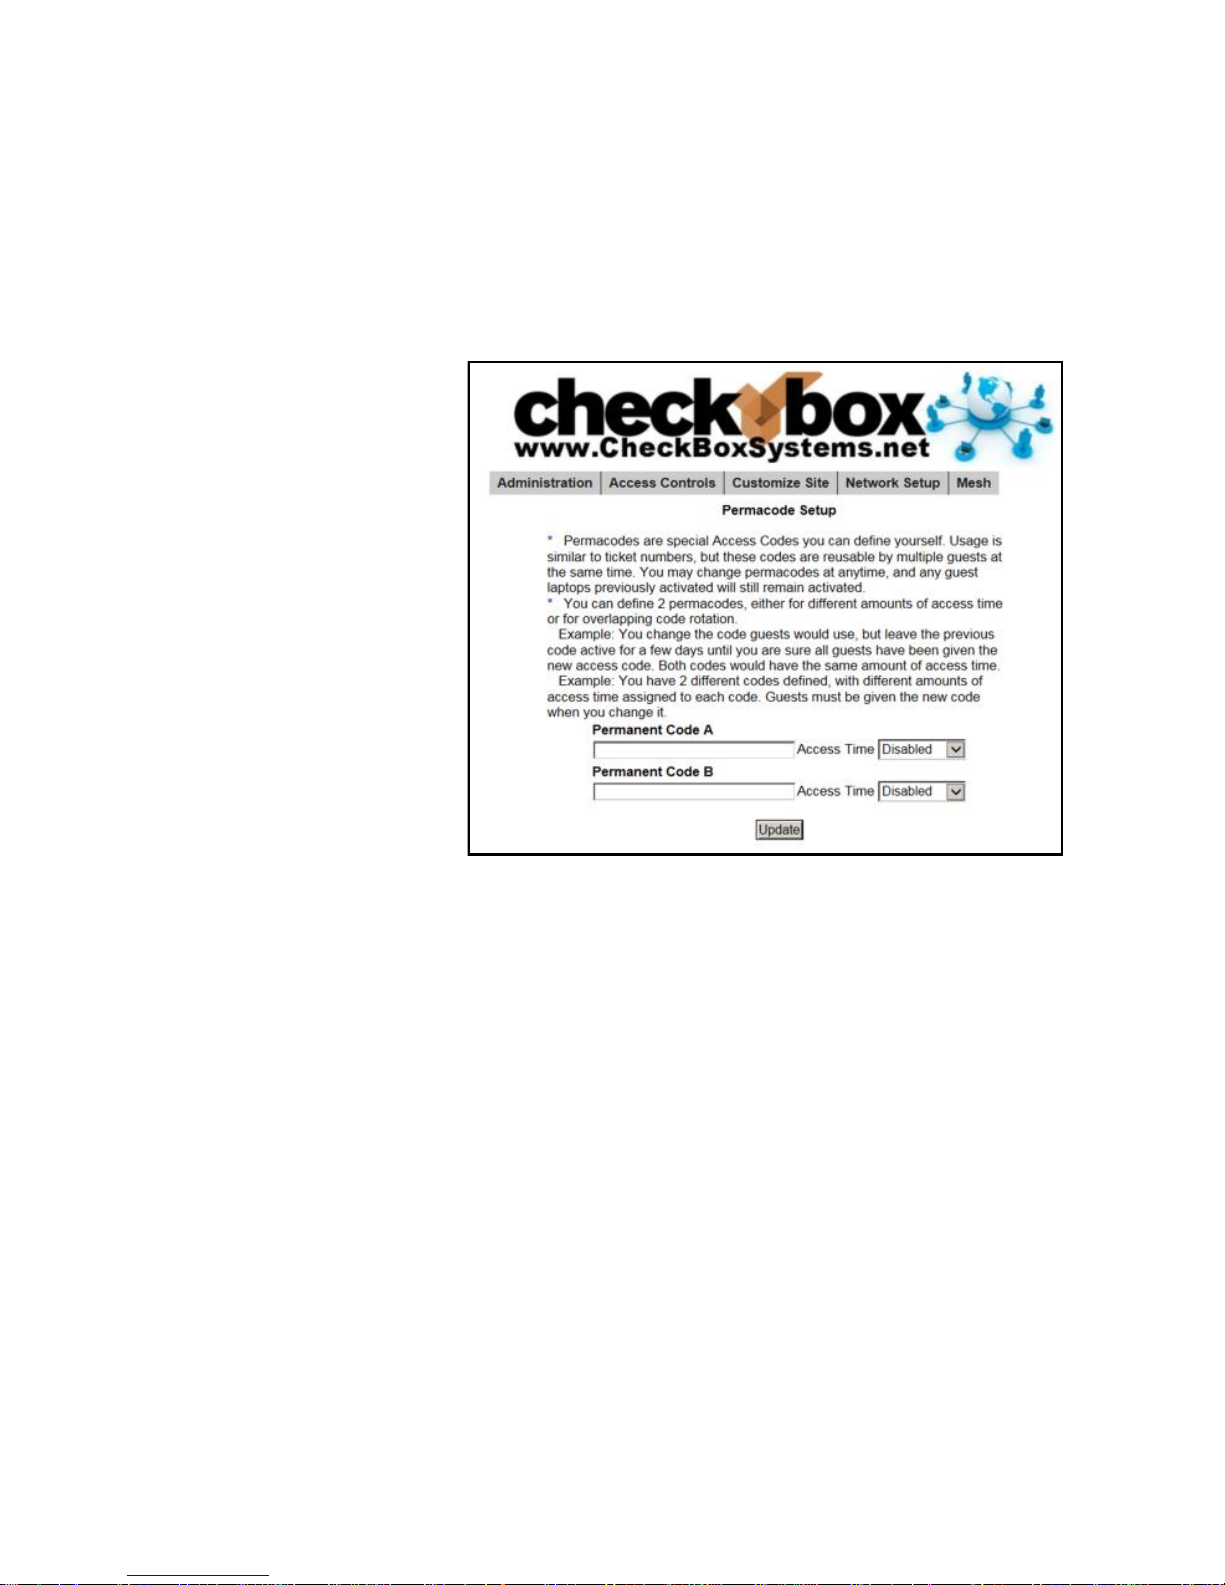
Permacode
Permacodes are special Access Codes you can define yourself. Usage is similar to
ticket numbers, but these codes are reusable by multiple guests at the same time.
You may change permacodes at anytime, and any guest devices previously
activated will still remain activated until the time set for their code has expired.
Permacodes are great for group events or special promotions and can save the
need for printing and
distributing large amounts
of tickets for one time
events.
You can have two
different codes defined,
with different amounts of
access time assigned to
each code.
To set up Permacodes
click on the Access
Controls button on the
top level menu, and then
select the Permacode
button on the drop down
menu.
Create your code word(s)
and select the amount of
time each code word is valid for and press update.
Guests now need to simply type the code into the box on the welcome page, and
they will be let on-line for the amount of time assigned to each code.
Permacodes can consist of letters and numbers, but not spaces or special
characters. To make it easier for your guests Permacodes are not case sensitive.
Page 13
13
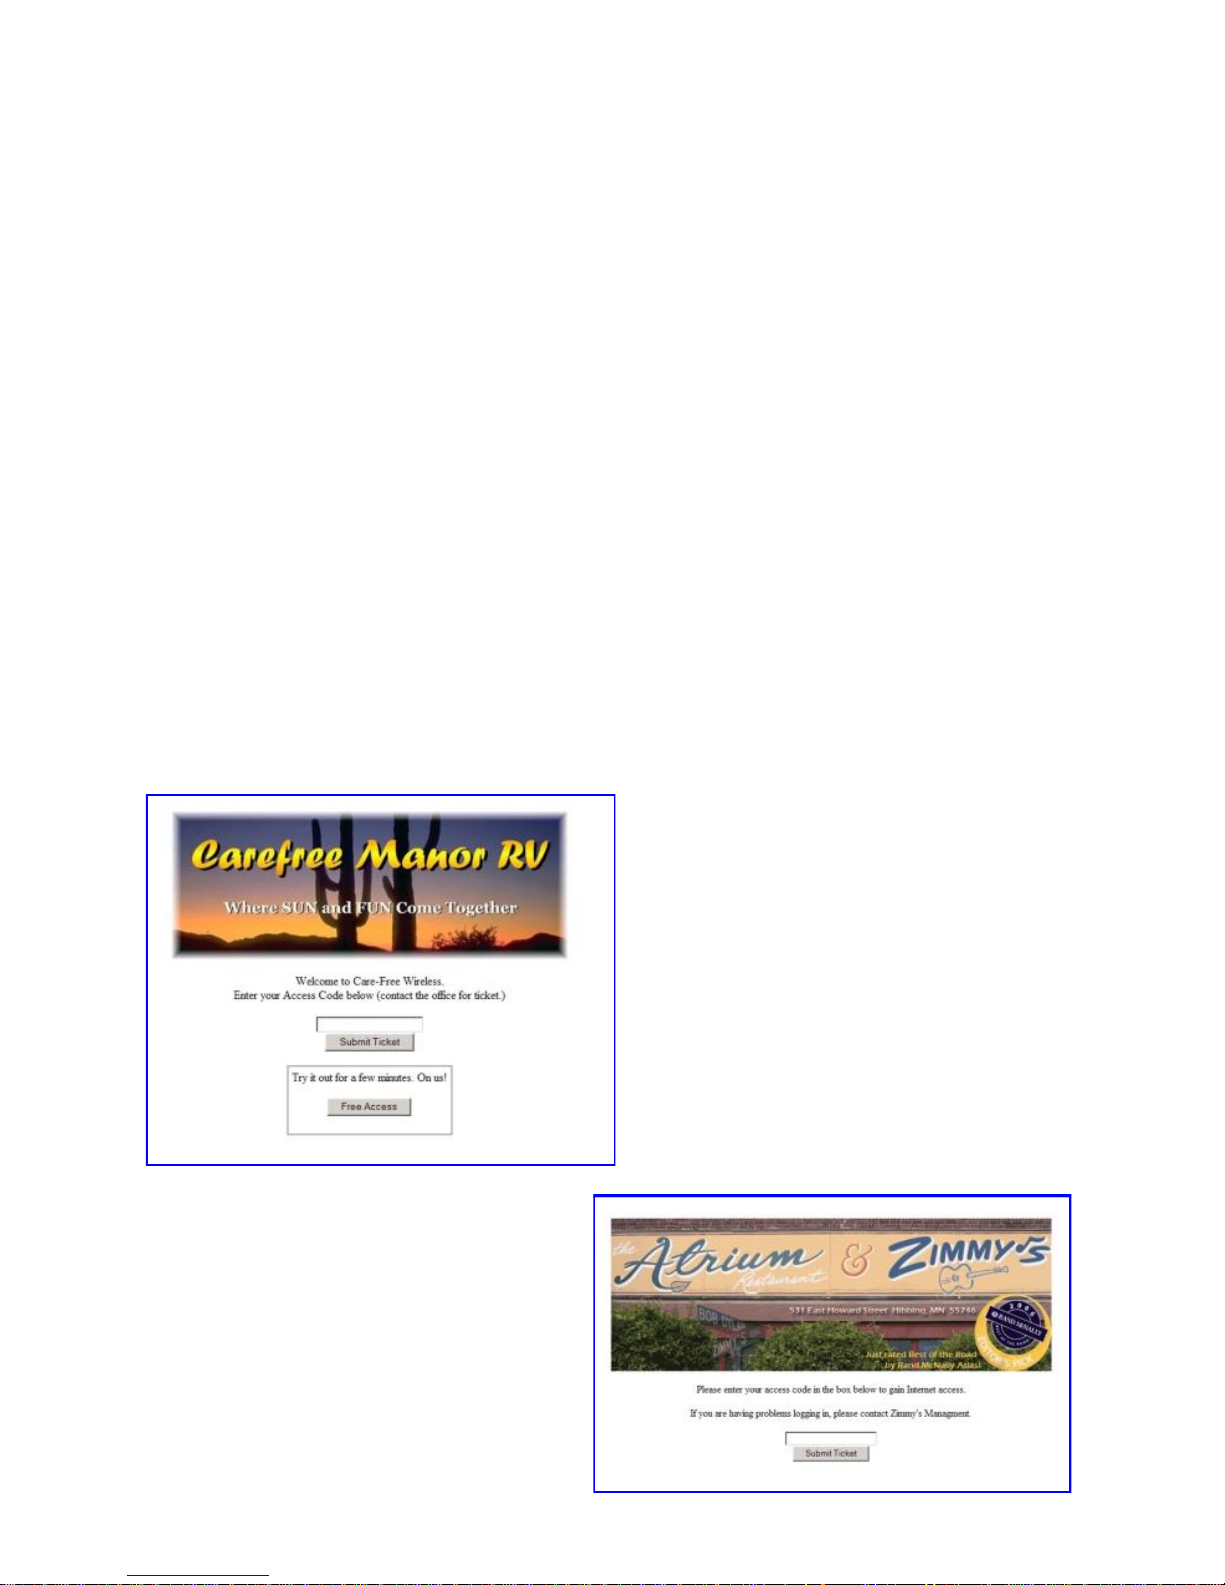
Customizing your Welcome Screen
As you enable access methods the system will add the appropriate buttons and boxes to
your welcome screen. You can customize the look of your welcome screen by uploading a
picture or logo in .JPG format.
To upload an image click on Customize Site in the top menu and then select Update
Site Logo on the drop down.
To change the message your guests see on the welcome page select Customize Site
and then Edit Logon Text from the drop down menu. In this box you will see some html
tags and then the default text. You can change the text to your own message, and if you
are familiar with html you can customize fonts and colors with the html tags.
After your guests successfully login they will see a Welcome Message. If their ticket number is invalid they will see a Failed Login Message. These messages can also be custom-
ized by selecting the options in the drop down menu under Customize Site.
Examples of Welcome Screens
For tips on how to size your graphics
see the section Tips For Uploading
Graphics on the next page.
Page 14

14
Tips for Uploading Graphics
CheckBox provides the option to upload a graphic for the welcome page and a different
graphic that prints out on the tickets. Your guests will be accessing your CheckBox with
devices that have different screen sizes. The graphic that you upload may look great on a
desktop or laptop with a large screen, but be too large for a smartphone or tablet.
For best results these graphics should not be too large, either in pixels or file size. Pixels
refers to the number of dots in a picture, these dots make up the picture itself. If a picture
is described as 200 x 400 pixels, the picture is 200 dots wide by 400 dots tall. If the pixel
count is too big then the picture may not fit on the page or it may push other elements of
the page off the screen. It is important to remember that not all screens are the same size!
It may look fine on your screen but may not fit on somebody else’s screen!
File size refers to the amount of data used to record the picture information. Too little data
and the picture looks course, blurry or grainy. Too much information and the picture takes
too much space in storage and takes too long to download.
So what is the “right” size? For the welcome screen logo generally an image that is no
bigger than 320 pixels wide and 120 pixels tall works best. You can make them less wide
or less tall. As for file size, somewhere between 20Kb and 60Kb is about right. CheckBox
will not accept graphic larger than 100Kb in size
For the Welcome Screen CheckBox can accept files in .jpg, .bmp and .gif format. Most
devices can display all three formats.
For the logo on your ticket, an image that is 110 pixels tall by 200 pixels wide is ideal, with
a file size around 20 kb.
There are many tools you can use to resize your graphic, including Adobe Photoshop,
and shareware tools such as Irfanview (http://www.irfanview.com).
An example of a welcome
screen
Page 15

15
Accessing Your System from Outside The Hotspot
But Inside Your Network
If you have your CheckBox connected to your company network you can access the
Hotspot Administration Screens from any device on your network, even if these devices
are not connected to the CheckBox system. In order to access your CheckBox from your
office network or router you will need to know the WAN IP address assigned to the
CheckBox by your network. If you have access to the Hotspot through a wireless client
you can find this address in the Hotspot Administration Screen by clicking on Network
Setup. In the section marked “Internet Connections” you will see the IP address listed
immediately under eth3 for modems plugged into port 3, eth2 for modems plugged into
port 2, and eth1 for modems plugged into port 1. This is the IP address assigned by your
ISP or internal router to our system.
If you are using the expansion card to add additional modem ports to your HSv5 you will
also see sections for eth4 eth5, eth6 and eth7.
Once you have determined the IP address assigned to your CheckBox by your network
you can access it by entering the IP address
in the address bar of your web browser with
http:// in front of the address and :3456/
admin after the address. For example, if the
IP address assigned by your network to the
CheckBox was 10.0.0.21 then you would
enter http://10.0.0.21:3456/admin.
This will bring up a password login box just as it would if you were connected from inside
the hotspot, and all administrative functions are accessible.
Page 16
16
Accessing Your System From The Internet
There are two ways to access your CheckBox System remotely through the internet.
The first way is to log in through the CheckBox Support System at
www.checkboxsystems.net. There you will find a link to log into your CheckBox system
from anywhere. The second way is to log on directly to your CheckBox via the system’s
IP address.
In order to access your CheckBox System through the CheckBox Support web site you
will need a site number and user name. Please contact support@CheckBoxSystems.net
to obtain your Site number and user name. CheckBox Support will respond with your
remote ID and instruction on how to use it to access your system.
You can also access the CheckBox remotely by IP address, if your CheckBox is
connected to your cable or DSL modem through a router, you will need to enable static
routing, DMZ, or virtual servers through your router. Please refer to your router
manufacturer’s instructions for details on how to enable static routing or virtual servers.
Due to variations between different router models CheckBox support can not assist with
making changes to your office router.
In order to access your CheckBox from the internet, you need to know the IP address
assigned to you by your internet service provider. An IP address is a unique number
much like a telephone number that identifies a unique machine on the internet. No two
IP addresses can be the same on the internet. Most ISP’s use dynamic IP addresses
which may change periodically, in order to conserve the pool of available IP addresses.
Some ISP’s will provide a static (non-changing) IP address upon request, and may
charge for this service.
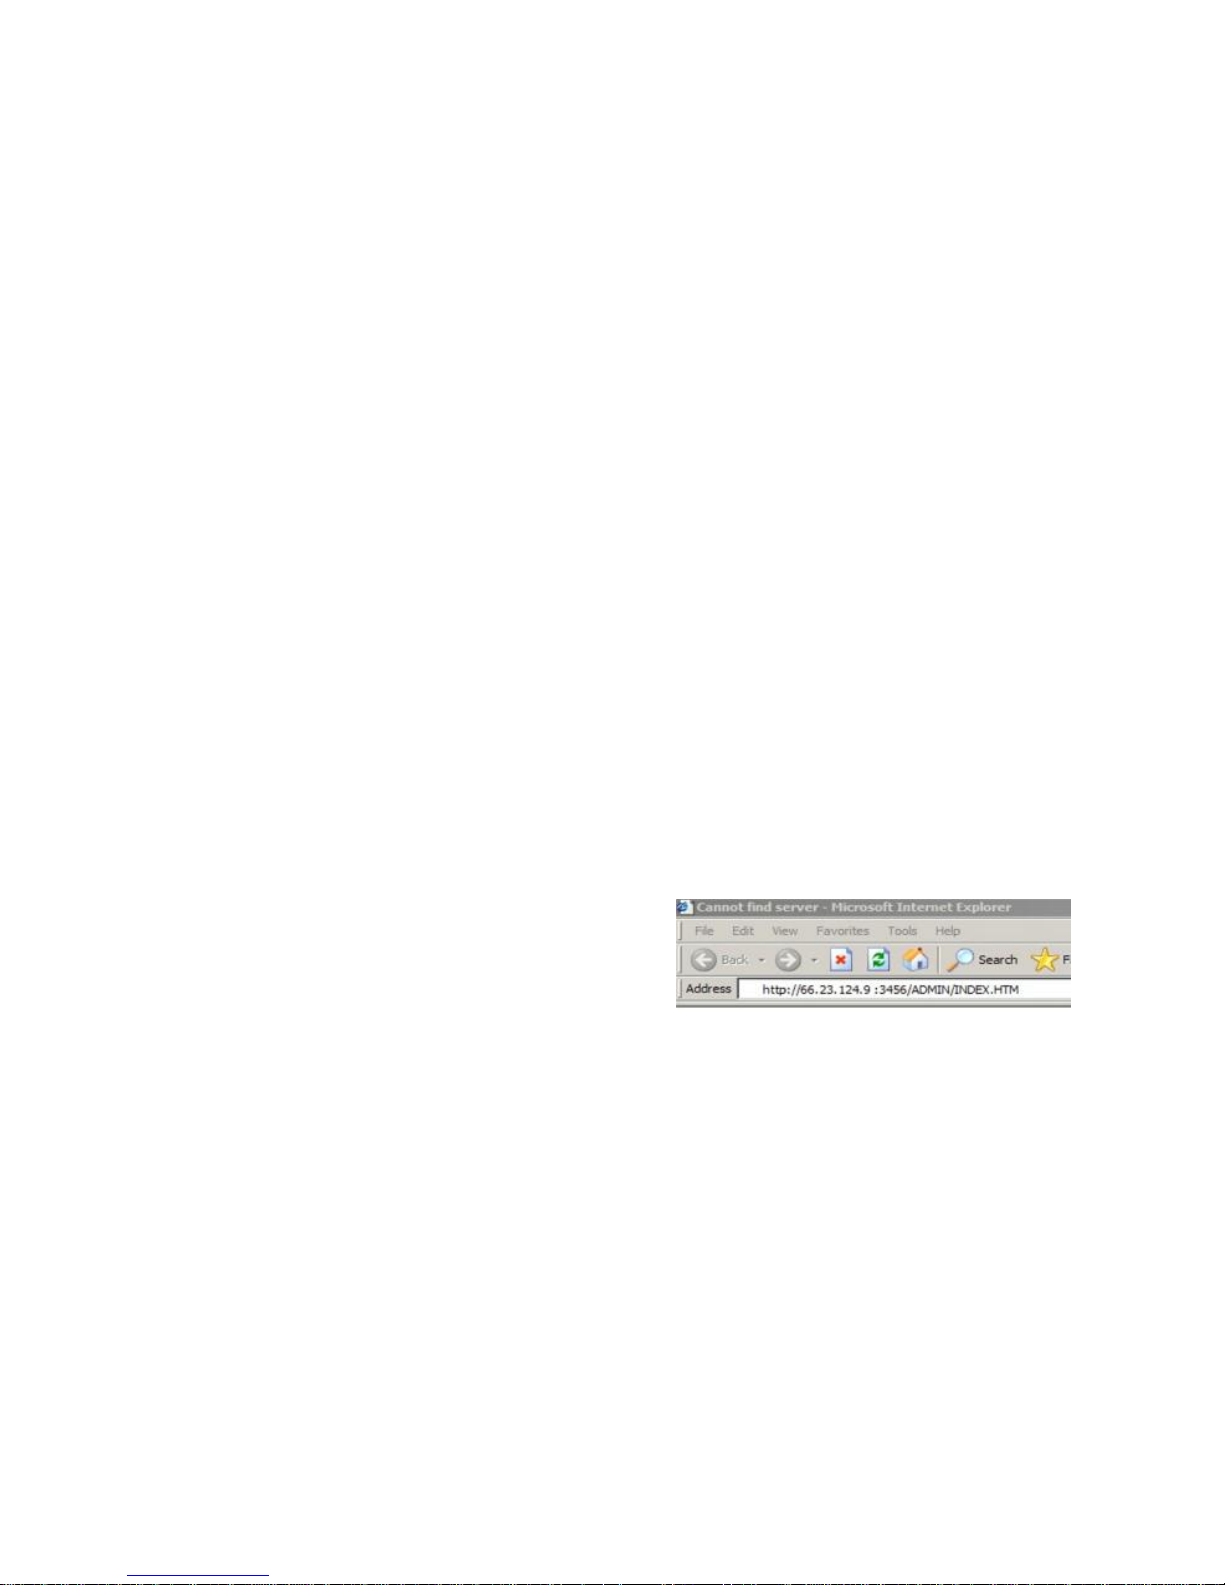
To access CheckBox through the internet you will enter the IP address assigned by your
ISP in the address bar of your web browser with http:// in front of the address
and :3456/admin after the address. For example, if the static IP address for the
CheckBox was 66.23.124.9 then you would enter
http:// 66.23.124.9:3456/admin
This will then bring up a password login box just it
would if you were connected from inside the
hotspot, and all administrative functions are
accessible.
Page 17

17
Accessing Your System From Anywhere - An Easier Way
You can also access your system remotely using the Remote Access provided by the
CheckBox Support Server. Accessing your system from the CheckBox Support Server
does not require you to know or remember your IP address, and works no matter how
often how often your IP address changes. This services is available at no charge for any
system covered under the original warranty or an extended support agreement.
To access your CheckBox System remotely you will need your site ID number, user
name and password. The site ID number is a four digit number assigned by CheckBox
Support. Your user name is also assigned by CheckBox Support. Your remote access
password is the same password that you use to access your CheckBox System when
you are logging in directly to the CheckBox. If you do not have a site ID number and user
name, please contact support@checkboxsystems.net to request one.
To Access your site via the Remote Access go to www.checkboxsystems.net and click
on the Login on the top of the page.
In the Site Lookup box, enter your 4 digit site
ID number then press site lookup.
A login box will pop up, requesting a
username and password. (The actual box
may look different depending upon your web
browser). Enter your user name and
password and press OK.
You will see a summary of your system status as last
reported to the CheckBox support system. You are not
yet in your local CheckBox.
Typically your system status is updated every few
hours. Any unit highlighted in green is working. Any
item highlighted in yellow,
pink or red is experiencing a
malfunction. A unit
highlighted in blue is
currently undergoing a
software update.
Click on the Name of your Site (the first item listed under
Location) and you will be connected into your CheckBox
System.
If you receive an error message after clicking on the name of your site then your site is not
Page 18

18
Administering Active Clients
Under normal circumstances guests will get online, use their time and then
automatically be logged off the system without any intervention from you or your staff.
However there are options to manually adjust a guest’s time remaining, delete a guest
from the system, and manually add a guest.
By selecting Administration in the top menu and
then Active Clients on the drop down menu you will
see a list of all client computers currently ticketed.
Client computers are listed by their MAC address, a
unique electronic serial number assigned to each
network adapter. You can see their time remaining
and whether or not they are online. By clicking on
their ticket number or time left you can manually add
time or delete the client from the system. You can also rename the ticket to identify
users or devices.
By selecting All Clients on the drop down menu you will see not only clients with tickets
but also those clients that have connected with the hotspot system but who have not
entered a ticket, credit card or free access. (Although these clients have been
recognized by the system, they have not been
allowed onto the internet yet, or have been on the
internet and their time has expired.) These devices
will be identified with a ticket number of “none”.
Here you can manually allow them online by
clicking on that ticket number and selecting the an
amount of time.
The third column for each client lists how much
data traffic they have put through the system. This
information is in kilobytes, and is counted from the
time they activate their ticket.
The last two columns list the access point or repeater that the client is connected to,
and the strength of the signal that the system is receiving from the client. Generally the
received signal strength of the client is roughly equal the signal that the client is
receiving from the system. In most cases, signals greater than 12 to 15 should result in
a good connection. These signals are 5 minute averages, and it is normal for these to
fluctuate.
Labeling Users
For easy identification, you can change the label name
for a user in the system. For example, if you have
several computers in the office that are permanent
clients, and some users that are employees with long
term tickets, you can label them by their name.
To change the label of a user, simply click on their ticket
number in the ticket column (If they used PayPal, Free
Access or if you enabled them manually click on the
PayPal transaction number, “Free”, or “Manual” label in the ticket column). Enter the
new label or name in the box marked “Identity” and press update. When entering a
name or label, do not use spaces or special characters.
Page 19

19
Client Usage Policy
With the Client Usage Policy function, you can set how much bandwidth a guest can
consume. Bandwidth is the amount of data a guest passes through the system. The
system can only pass a finite amount of data at a time, with the limiting factor usually
being the internet connection itself. Most internet connections such as cable or DSL pass
between 3Mb to 50Mb. Fiber can pass up to 1Gb of data, while satellite and T1 circuits
can be slower than 1Mb. Some internet service providers, especially satellite based
providers, have limits on how much data can be used per day or per month.
Most guests will never reach their bandwidth limits.
However some guests may attempt to use the
system for downloading large files, such as movies
or video. This can cause excessive usage and
negatively impact all of your guests. If you use
satellite or if your ISP has a daily or monthly
download limit, one guest could easily consume
your entire allotment.
The Client Usage Policy is a system-wide rule that sets limits for all users of the system. It
allows you to set an hourly limit on the amount of data each user can consume. Before
reaching the limit each user will have full access to the bandwidth on the internet
connection—the system will divide the available bandwidth evenly among the active
users. When a user begins to approach their hourly limit that user will be reduced to a
slower speed calculated to prevent them from exceeding the hourly limit you have set in
the Client Usage Policy.
To set the Client Usage Policy select the
Administration on the top menu and then select
the Client Usage Policy on the drop down menu.
Choose what type of Internet connection you have
and then choose one of the preset Policies or you can
choose custom and manually set a limit.
The last column in the Active Clients table shows the Usage Policy status of each
individual active user. If the policy box is green, the user has full access to available
bandwidth. If the policy box is yellow, the user is approaching the bandwidth limit set by
the system and their speed has been reduced. The reduced speed will be displayed in
the yellow box.
You can allow exceptions to the usage policy for certain
users to allow them unrestricted bandwidth - this feature is
particularly handy for your own computer or the office
computers. To set up a user for unrestricted bandwidth,
simply click on the green or yellow policy box and a screen
will open that allows you to select unrestricted usage. You
only need to set unrestricted usage once per ticket, and the
user will remain unrestricted until their ticket expires. If this
is for an office computer consider setting a Permanent ticket
by clicking on the ticket number and setting it to Permanent.
Free Access users are treated differently than permanent, ticketed, permacode
and credit card users by the Client Usage Policy. Free Access users will receive
one-half of the bandwidth allotment of all other categories of users set in the
Client Usage Policy.
Page 20

20
Signal Strength, Power Levels & Antennas
Data communication between your guest’s devices and the CheckBox is a two-way
transaction, not a one-way transaction like a radio or TV broadcast is. When your guest's
wireless device tries to access data, that is their device calling your access point. For a
successful connection not only does a signal need to get from the CheckBox to the user’s
laptop, but they need to get a signal back to the CheckBox. Laptop wireless cards are not
all created equal and few have an external antenna. Therefore it is not unusual for a guest
to “see” a signal of a few bars, or “good” on their laptops but have a difficult time
maintaining a connection. This is usually a case of the laptop seeing the signal from the
CheckBox but the guest does not have the strength to call back to the CheckBox.
Another issue wireless users often encounter is the “signal strength” meters displayed on
their screens. These signal strength displays are an approximation of the signal strength
averaged over a period of time and do not take into account signal noise, the interference
inherit in every radio transmission. This can lead to users seeing a strong signal displayed,
but still not be able to establish a connection.
Of course just the opposite can occur; sometimes users will see a weak signal but yet
make a solid connection. Regardless of what the signal strength display reads the bottom
line for the user is always this: Can they connect and is the connection fast enough?
One way to improve the range of the signal is by adding a long range antenna to your
access point (the access point in this case is the CheckBox system). Long range antennas
are rated in “dbi” and can sometimes help and sometimes can make the situation worse.
While a standard antenna sends out radio waves equally in all directions like a balloon,
long range antennas achieve greater range by changing the shape of the signal.
Instead of sending out the signal in a balloon shape some antennas flatten out the balloon
into more of a donut, sending less of the signal straight up into the sky and more out
towards the edges. These antennas can generally extend the usable range from 10% to
30%. However they can introduce two new problems; the case of the laptop seeing the
CheckBox but the CheckBox not being able to see the laptop mentioned above, or a case
where the “donut” is so flat that it shoots over the heads of the users, like a layer of fog
traveling a few feet off of the ground.
A second type of antenna re-shapes the signal even more, sending it in a pinpoint beam.
These antennas can increase range ten-fold or more, however if the user is not in the
direct path of the signal they will not be able to see it. Even if they are in the direct path if
they are not able to send a signal back the full distance they will not be able to establish a
connection. These high-gain point-to-point antennas are best used in pairs, one on each
end of the path, and while not practical for laptops they are good for connecting buildings in
remote locations or repeaters in areas not contiguous to other units.
There are other ways to improve the range of the signal for users. One way is to improve
the sensitivity of the radio receiver at both ends. While we do not have control over the
quality of the user’s laptops we have made the receiver in the CheckBox very sensitive.
Page 21

21
Another way to improve range is to increase transmit power. Again, since we do not have
control over the quality of the user’s laptops we cannot affect their transmit power, but we
could boost ours. CheckBox uses the maximum legal power for unlicensed operation in the
frequencies (channels) it occupies. There are some hotspot companies that do use higher
power, but that is risky for the property owner: Unlicensed operation at higher power can
result in the property owner being fined.
When you boost the transmit power on one end of the connection but not the other you
also run into the problem of one side being able to see the signal from the other side but
not being able to send a signal back.
Since laptops do not have good antennas and do not generally use the maximum output
power they really benefit from having a high density signal. The best way to have a high
density signal is by using multiple access points.
Determining the proper number of access points requires taking into consideration several
factors:
How great a distance do you need to cover?
What are the surroundings? Are there walls or open spaces? Is the building made of wood,
rebar reinforced concrete, or steel?
Is there any interference in the area?
On a flat open field with no interference a signal can travel up to 1000’. When we start
adding walls, other devices and users, that distance will begin to shrink.
For example, a hotel with two wings each 200 feet long and three floors per wing, made of
rebar reinforced concrete, might need 6 or more meshing access points to provide solid
coverage. Another hotel, constructed of wood but with similar dimensions, may only need 4
meshing access points to provide solid coverage.
Another example would be a campground that is on an open flat field. To provide complete
coverage however you need to penetrate the aluminum skin of the travel coaches which
might require mesh repeaters spaced every 300 feet, so that no coach is more than 150
feet from a unit.
If that hotel happens to be at the end of an airport runway with a radar system nearby or
that campground has a cell tower in the middle of the property then interference from those
devices may necessitate additional units to overcome the interference.
Page 22
22
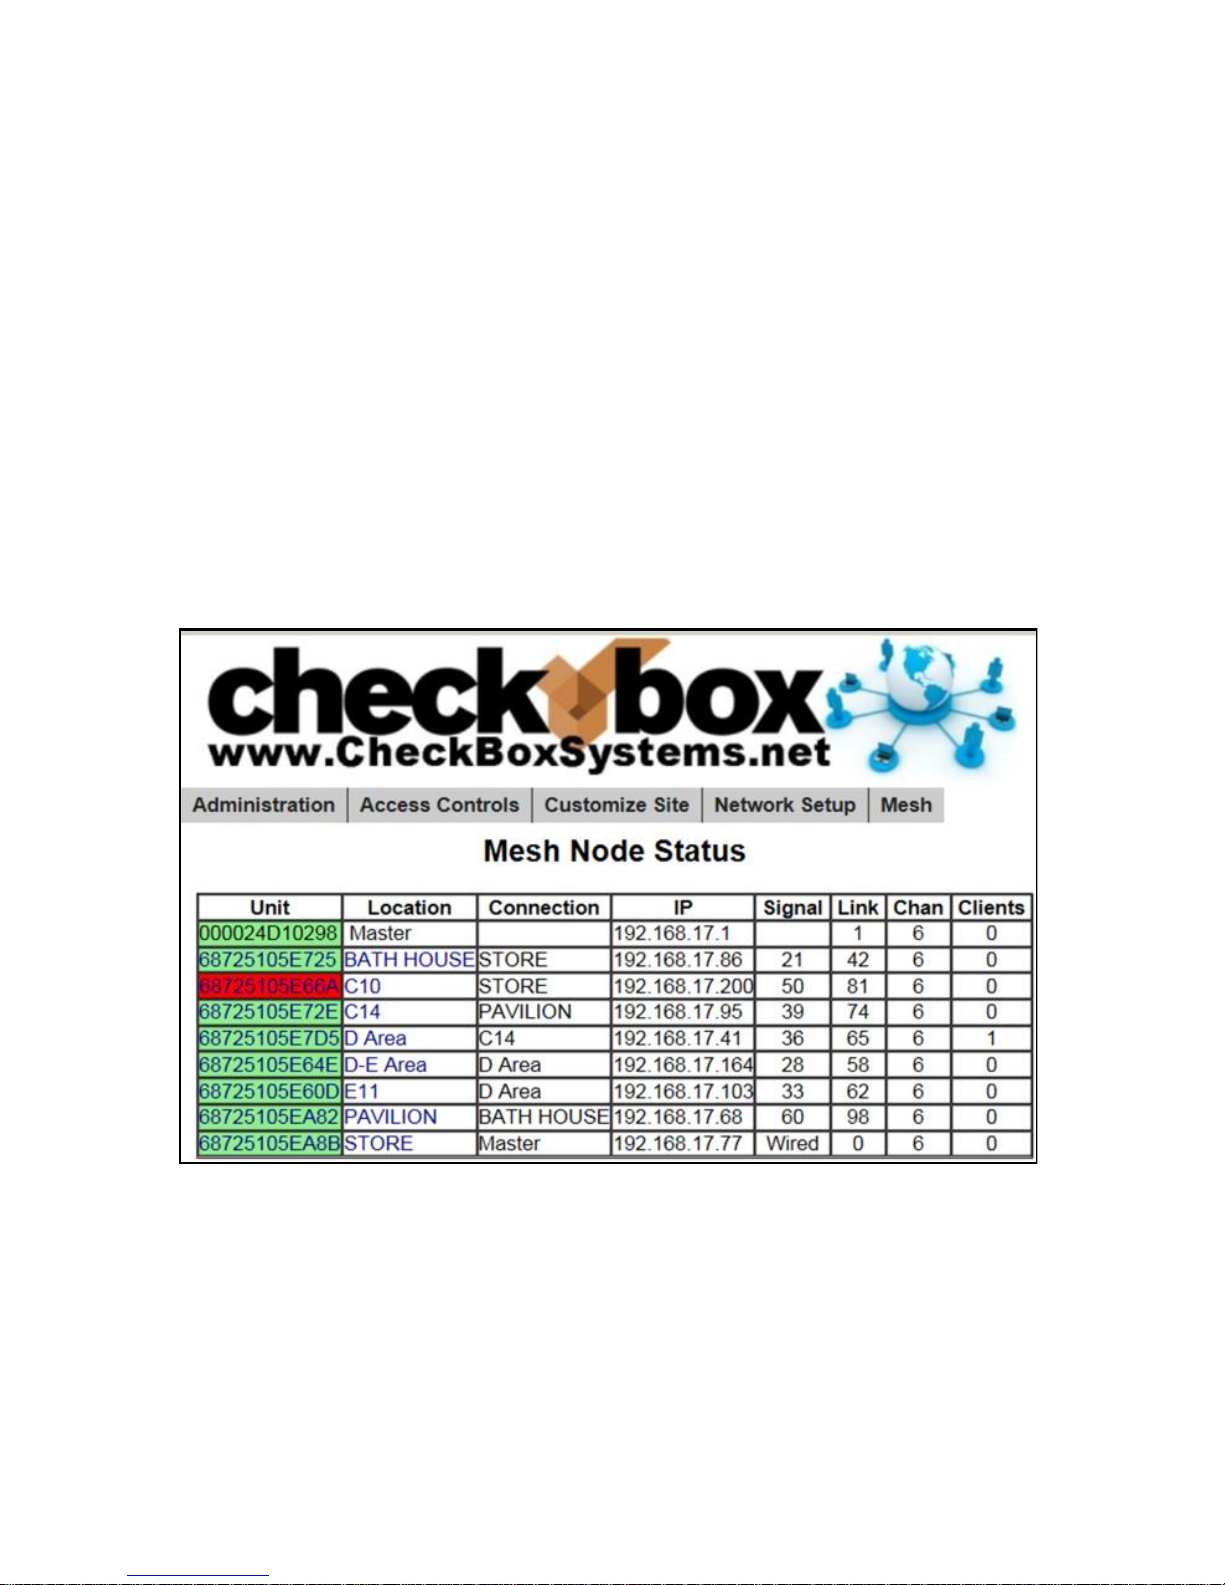
Mesh Repeaters & Mesh Node Status Display
You can extend the range of your system using CheckBox Meshing Access Point
Repeaters. These devices relay the data stream from your master unit further
throughout your facility. Mesh Repeaters only need power, they do not need a
wired connection back to the master unit. Not only do Mesh Repeaters extend the
wireless signal, they also provide a wired port to allow computers, printers, VoIP
telephones and other Ethernet devices to access the network.
CheckBox Mesh units are self-configuring. As long as they can receive a signal
from one of their peers or the master they will establish a connection among
themselves and actively determine the best route back to the master unit.
Once your Mesh Repeaters are in place you can monitor their status by selecting
Mesh on the top menu. You can check the status of your repeaters by clicking on
the Mesh button on the top menu.
The first column identifies the repeater unit by it’s MAC address. MAC stands for
“Media Access Control” and is the equivalent to an electronic serial number for all
network devices.
The second column shows the units name or location; this is a label you can
change by clicking in this box and entering a name or location. By default it is a
row of “*****” You also will click on the row of”*****” the first time a repeater is
added to a system to allow it into the mesh.
IMPORTANT: The first time a mesh repeater is added to the network it will show
up highlighted in blue in the mesh status display. Until you click on this repeater
Page 23

23
to accept it into the system it can not service clients or pass traffic. You must
click on blue units to allow them to join the system. This only needs to be done
once, and after a unit has joined the system it will be remembered by the
system, even after power failures or prolonged storage. Labeling the repeaters
here makes it easier to remember where they are located.
The third column shows the name or location of the unit from which this unit gets
it’s connection, this may be the master or another repeater if the units have
daisy chained themselves. Mesh repeaters are constantly evaluating their
connections and “talking” to other repeaters and the master to determine the
best route back to the master and the internet. You may see this change
occasionally as the system reconfigures itself to deal with changing conditions.
The fourth column shows the IP (network) address of the unit.
The fifth column shows the current signal strength of this unit to it’s upstream
connection. The signal strength is a 5 minute average, and it is normal for this to
fluctuate. Any unit with a low signal strength will be highlighted in Yellow or Red.
Units highlighted in yellow will have slower connections that will be unreliable.
Units in Red are not able to support traffic or users as they have a very low or no
connection (often as the result of issues with power or wiring at the unit). For
stable connections signals above 30 are best. The signal is only displayed for
access points running in wireless mode (access points without a wired Ethernet
connection to the CheckBox), any wired units will display "wired" in this column.
The sixth column shows the Link Quality. It is a calculated score (maximum 100),
computed by using an algorithm to determine the overall quality the wireless
service of that access point. It takes into account things like the upstream radio
connection, the noise around the access point, other devices connecting to it, etc.
Generally, values above 50 in this column will provide a stable connection. Please
note that this is only calculated for wireless access points - any wired access points
will typically show a value of 0 or 1.
The seventh column indicates what channel the access point is operating on.
Systems with multiple wired access points can change the channel of each wired
access point by clicking on the unit name and adjusting the preferred channel
accordingly.
The last column shows how many clients are using this repeater.
Page 24

24
NX Meshing Access Point Installation
CheckBox-NX-AP-PoE meshing access points are available in indoor only and indoor/
outdoor models. For outdoor areas, or areas with high moisture or tough environments
use the CheckBox NX-Outdoor-AP-PoE. Before starting the installation, please make a
note of the serial number of each access point and keep a record of where you physically
install each one. This will assist you when naming the unit in the mesh display, and help
with troubleshooting in the future.
Indoor unit
Wall Mounting – Remove the white bracket from the CheckBox-NX-AP-
PoE meshing access point and use the bracket as a template to mark
holes for the mounting screws. If appropriate drill a hole to pass the
Ethernet cable through the wall with the cable coming out in the notched
area of the bracket to line up with the Ethernet port on the unit.
Ceiling Tile Mounting – Remove the ceiling tile from the ceiling and use
the metal mounting plate on the top side of the ceiling tile as a template.
Drill three small holes for the mounting screws and one large hole in the smaller circle to
pass the Ethernet cable through.
On the bottom side of the ceiling panel align the white bracket so that the mounting holes
match up and use the included screws and nuts to secure the white bracket to the bottom
of the ceiling tile.
Once the mounting bracket has been secured, connect the CheckBox-NX-AP-PoE
meshing access point to the Ethernet cable and attach the unit to the bracket with a twist.
Outdoor unit
Remove the white bracket from the NX-Outdoor-AP-PoE meshing access
point and use as a template to mark holes for the mounting screws. Once the
mounting bracket has been secured, connect the NX-AP-PoE meshing
access point to the Ethernet cable and attach the unit to the bracket.
The CheckBox-NX-AP-PoE meshing access point is powered by the included
power supply and connected to the unit via an Ethernet cable. Connect the
other end of the Ethernet cable to the included PoE power supply into the port
marked “POE”. The CheckBox-NX-AP-PoE meshing access point cannot be
powered by a powered Ethernet switch. Connecting the unit to a powered
Ethernet switch can damage the unit and will void the warranty.
The CheckBox-NX-AP-PoE meshing access point can be used as a wired AP,
wired back to the CheckBox controller via a physical network connection, or it
can be used in a meshing configuration, connecting to the network wirelessly.
If you wish to connect to the network physically, plug the network connection
into the port marked LAN on the power supply. If you wish to use the unit in a
meshing configuration the LAN port can remain empty.
Once the CheckBox-NX-AP-PoE meshing access point is installed and powered up be
sure to log into your master controller admin screen to accept the unit into your mesh.
Page 25

25
System Alerts
You can receive an email or text message if your CheckBox Master unit, one
of your repeaters, or your internet connection goes off-line. These System
Alerts are issued by the CheckBox Support Server, which monitors your
system. This monitoring service is included in the first year warranty that
comes with every CheckBox System, and is also included in the Extended
Warranty Program.
Before you can set up alerts you will need a Remote Site log-in. If you do not have a remote
site log-in you can request one from CheckBox by sending an email to
support@checkboxsystems.net.
To set up alerts for your CheckBox;
1. Log in to the CheckBox support servers through your remote site login but do not click on
the name of your site to log all the way into your local CheckBox.
2. After logging into the support site click on "Update Site Information".
3. Set your Alerts to either Aggressive, Normal or Relaxed
4. Enter the email address you want the alerts sent to
5. Click the
"Update Site Info"
button
The first time you
activate the alerts
for your CheckBox,
the support system
will need to
download some
configuration updates to your CheckBox units, which may take up to 4 hours to complete.
Setting alerts to Aggressive will generate an alert if a CheckBox mesh node or a master unit
is late for any of it’s scheduled check in cycles. This may cause an excessive amount of
alerts to be generated. It is not uncommon for a unit to be late or to miss a check in cycle
due to network congestion or high traffic.
Setting alerts to Normal will generate an alert if a CheckBox mesh node or a master unit is
late or misses two check in cycles. This is the setting most users will want.
Setting alerts to Relaxed will generate an email if a CheckBox mesh node or a master unit
fails to check in with the support server within the last 62 minutes. This setting is suitable for
users with frequent power issues or issues with their internet service provider.
Many cell phone providers allow you to receive emails as text messages. If you wish to
have the alerts sent to your cell phone as a text message, check with your cell phone
provider as to the address format to use (often it looks something like
yourphonenumber@cellphoneprovider.net) Some cell phone providers charge for incoming
text messages. You may be charged by your cell phone provider to receive these
messages.
Page 26

26
Optional Services:
Extended Hours Support provides extended hours for phone support for your staff and
management, including weekends and holidays for only $49.95 per month, with no long
term contract required. Extended Hours Support provides coverage until midnight,
Eastern Time, and from 9am to midnight Saturday, Sunday and Holidays.
Extended Hours Support is available with no long term contract – you can go month-to-
month, and subscribe only during your busy season if you wish.
Guest Support
24/7 live support for guests and end users
Dedicated toll free number
Tracking of support incidents and escalation
Can be used seasonally - no long term contract required.
Guest support is provided 24/7 by professional support staff at a dedicated support
number. Support staff are available to assists guests connecting to the wireless service,
configuring their wireless settings and logging on. Support staff have instant, real-time
access to systems, can perform diagnostics, and when appropriate restart networks and
alert property owners to issues, as well as escalating critical system issues to advanced
technical support.
Guest support is priced on a per-room/per-campsite/per-boat-slip basis per month. Guest
support requires that the site is also subscribed to Site Monitoring. For more information
or to order these services please contact your dealer.
Support Options
Comparison
Hardware Warranty &
Standard Support
Extended Hours
Support
Guest Support
Support for Staff &
Management
Yes Yes Yes
Support for Guests
No No Yes
Hours of Availability
(Eastern)
9am to 5pm
Mon—Fri
9am to Midnight
Mon Sun including Holidays
24/7/365
cost
Varies per unit model
$49.95 per month
(requires Hardware Warranty &
Support if not under original
warranty)
$1.50 per guest unit
(requires Hardware Warranty &
Support if not under original
warranty)
Page 27

27
Final Installation Checklist
After you have completed installing your system use this checklist to make sure
everything is ready for your guests.
Physical Installation - CheckBox
CheckBox master unit is connected to power
CheckBox master unit is connected to internet connection
Network connection cable for CheckBox master is not stapled or cable
tied to AC wiring or power lines.
Physical Installation - Mesh Repeaters
Repeaters are connected to power
[Outdoor units only] Repeaters are mounted at least 20 feet off of the ground and
at least 4 feet away from other antennas.
Serial number of each repeater is noted for labeling by location in mesh display.
System Setup - CheckBox Master
Set administrative password
[For systems with Mesh Repeaters] Accept mesh repeaters into network on
Mesh page
Upload your graphic for Welcome Screen and Tickets
Set up your Welcome Message
Change SSID in Network Setup
Print out user tickets [for systems using tickets]
Set up Free Access [for systems using free access]
Set up PayPal credit card system [for systems using PayPal]
Page 28

28
System builds 3.43 & higher
CheckBox Systems LLC, Copyright 2014
Your Suggestions are Welcome
This is the third generation of this product, and many of the added features,
improvements and refinements have been made at the suggestion of our users. We
absolutely welcome your feedback and suggestions.
Warranties and Service
We have worked hard to design the best possible system for you and your guests. We
want you be completely satisfied with your system. If you are not completely satisfied
please let us know and we will try to make it right. If you are still not satisfied you may
return the system in it’s original condition within 30 days from the date of purchase for
a full refund, less shipping and installation.
This system includes a one year warranty from the date of purchase and one year of
standard support. This warranty covers repair or replacement of the components of
the system as we determine necessary. The warranty does not cover damage due to
improper installation, use of unauthorized accessories (including, but not limited to
external antennas and power amplifiers) lightning, vandalism or physical abuse.
Standard support is for use by the site management and employees and is provided
via telephone or email at our option delivered during standard business hours.
Standard support does not include guest support, on-site visits, after hours calls, or
assistance with other network issues and items not related to this system. In no
event shall CheckBox Systems be responsible for consequential damages due to the
failure of this system or any of it’s components. We reserve the right to terminate
support in the unlikely event of excessive, or abusive calls. Under no circumstances
will Checkbox Systems LLC liabilities exceed the original purchase price of the
product. This is a network access device, and the end user is ultimately responsible
for network and data security.
 Loading...