

Page 1

il
LT600 SERIES | GETTING STARTED GUIDE
GNSS DATA COLLECTING TERMINAL
Page 2

CONTENTS
1. Introduction
...................................................................................................................................................
2
1.1. Technical Assistance
...........................................................................................................................
2
1.2. Your Comments
..................................................................................................................................
2
1.3. Safety Information
..............................................................................................................................
2
1.4. Use and Care
......................................................................................................................................
2
2. Overview
.......................................................................................................................................................
3
2.1. Features
..............................................................................................................................................
3
2.2. Specifications
......................................................................................................................................
3
3. LT600 Overview
.............................................................................................................................................
5
3.1. Front View
..........................................................................................................................................
5
3.2. Back View
...........................................................................................................................................
7
3.3. Side View
............................................................................................................................................
8
4. Basic Operation
.............................................................................................................................................
9
4.1. Power on
............................................................................................................................................
9
4.2. Insert SIM Card
.................................................................................................................................
10
4.3. Language & input
.............................................................................................................................
11
4.4. Date & Time
......................................................................................................................................
12
4.5. Display
..............................................................................................................................................
13
4.6. Portrait & Landscape
........................................................................................................................
14
4.7. WIFI
..................................................................................................................................................
15
4.8. Bluetooth
..........................................................................................................................................
15
4.9. USB Connection
................................................................................................................................
16
4.10. Use Camera
....................................................................................................................................
16
4.11. Log in 4G
.........................................................................................................................................
17
4.12. Scheduled power on & off
.............................................................................................................
18
4.13. Location
..........................................................................................................................................
19
5. Getting Started With Map Cloud 3.0
...........................................................................................................
20
5.1. Register
.............................................................................................................................................
20
5.2. Install & Update GNSSTool
...............................................................................................................
21
5.3. Build New Project
.............................................................................................................................
22
5.4. Coordinate System Settings
..............................................................................................................
23
5.5. Import Base Map
..............................................................................................................................
25
5.6. Data Collection
.................................................................................................................................
25
5.7. Export Data
.......................................................................................................................................
26
6. Getting Started With GNSSTool
...................................................................................................................
28
6.1. Register
.............................................................................................................................................
28
6.2. Connection
.......................................................................................................................................
29
6.3. CORS Login
........................................................................................................................................
31
6.4. Sky Plot
.............................................................................................................................................
32
6.5. Debugging Data
................................................................................................................................
33
Page 3

2 / 35
1. INTRODUCTION
Thank you for choosing CHC LT600 Series GNSS Hand-held Receiver.
This Getting Started Guide will provide useful information about your receiver. It will also guide you
through your first step of using LT600 Series in the field.
1.1. T
ECHNICALASSISTANCE
If you have a problem and cannot find the information you need in the product documentation,
contact your local dealer from which you purchased the LT600 Series. Alternatively, please request
technical support using the CHC Website (www.chcnav.com) or CHC technical support email
(support@chcnav.com).
1.2. Y
OURCOMMENTS
Your feedback about this Getting Started Guide will help us to improve it in future revision. Please
e-mail your comments to support@chcnav.com.
1.3. S
AFETYINFORMATION
This manual describes CHC LT600 Series GNSS Data Collecting Terminal. Before using the LT600 Series,
please make sure that you have read and understood this Getting Started Guide, as well as the safety
requirements.
1.4. U
SE ANDCARE
The LT600 Series is designed to withstand the rough environment that typically occurs in the field.
However, the LT600 Series is high-precision electronic equipment and should be treated with
reasonable care.
Page 4

3 / 35
2. OVERVIEW
2.1. FEATURES
LT600 is a high accuracy GNSS data collecting terminal independently developed by CHC,
which adopts industrial third level design, IP65 protection level. Positioning accuracy of the
LT600 could reach decimeter, with alternative configuration of 1D/2D bar code scanning,
RFTD, Infrared, NFC and so on. Equipped with high sensitive point touch pen, LT600 makes it
more convenient to collect data and map ground. 4G cellular modem with
Dual-SIM-Dual-Standby offers more choices of experiencing high speed data transmitting.
With 8 inch screen and 16:9 scale, LT600 provides you more open vision and more
convenience.
2.2. SPECIFICATIONS
LT600
Operating System
Android 5.1
CPU
Quad-core 1GHz
RAM
2GB
Flash Memory
32GB
Memory Extend
Micro SD, up to 128G
GNSS
Support GPS+GLONASS or GPS+BDS
Accuracy
Stand alone:2-5m; SBAS: 2m
Channel
72
Cold Start
30s
Warm Start
1s
WIFI
802.11 b/g/n
Cellular Modem
TDLTE, TDSCDMA, EDGE, GSM, WCDMA
Bluetooth
V4.1
USB
Micro USB, OTG( support hot plug)
Bar Code
1D/2D bar code scanner(optional)
Li-ion Battery
9000mAh
Voltage
3.8V
Battery Life
>12h(continuous work)
Charging Time
<4h
Front Camera
2.0 megapixel
Back Camera
8.0 megapixel
Flash Light
Support
Page 5

4 / 35
Physical specifications
Display
· Size: 8inch Corning Gorilla Glass touch screen
· Resolution: 1280*800
· Brightness: 450cd/m
2
· Touch screen: Capacitance touch, 5 points touch screen
· Point touch pen: Mapping pen with high accuracy
Physical
· Dust proof and waterproof: IP65
· Shock: Survives 1.5 meter drop onto concrete
· Humidity: 5%RH - 95%RH (without condensation)
· Dimension: 235mm*138mm* 30mm (L*W*H)
· Weight: 660g (with battery)
· Operating temperature:-20 °C to + 60 °C
· Storage temperature: -30 °C to + 70 °C
Physical Properties
· Bar code: 1D/2D scanning mode (optional)
· NFC: Optional
· G-sensor: Support
· Light sensor: Support
· Distance sensor: Support
· E-compass: Support
· Gyroscope: Support
Page 6

5 / 35
3. LT600 OVERVIEW
3.1. F
RONTVIEW
Power Button
- Turn ON: Press the button for 1-2 seconds, the Power Indicator will turn on and the boot
screen will appear, and then the LT600 will enter the operation system after 30 seconds.
- Turn OFF: Press the button for 1-2 seconds, the SELECT dialogue box will pop up, select
Power off to turn off the device.
- Restart: Press the button for 1-2 seconds, the SELECT dialogue box will pop up, select
Restart to restart the device.
Page 7

6 / 35
Menu Button
Click this button to bring out the start menu.
Home Button
Use the home button to return main menu.
Return Button
Press this button to go back to previous menu.
SIM
Insert SIM card into this card slot.
TF
Insert TF card into this card slot.
Charging/Data Interface
This interface is used for battery charging and data transmission between LT600 and PC
through USB cable.
Headset Jack
Insert your headset into this socket.
Page 8

7 / 35
3.2. BACK VIEW
Page 9

8 / 35
3.3. SIDE VIEW
Page 10

9 / 35
4. BASIC OPERATION
4.1. POWER ON
Before powering on LT600, please make sure the battery has plenty of power. Then
long press the power button for 1-2 seconds to turn on LT600 and enter its home
screen (Figure 1).
Figure 1 Figure 2
Click to make a phone call.
Click to access contacts information.
Click to open messaging.
Click to open browser.
Click to open the drawer to see all the apps that have been installed (Figure 2).
Page 11

10 / 35
Figure 3 Figure 4
Use virtual button key to facilitate your operation with LT600.
Click to go back to previous menu.
Click to return home screen.
Click to see all the running apps (Fig. 3) and then you can remove apps by sliding
them towards left or right side (Fig. 4).
4.2. I
NSERT
SIM C
ARD
Please power off the LT600 first and refer 3.3 dFront View to insert the cards into slots
correctly. Then power on LT600 (refer to 4.2 Power on), Click OK in the pop up dialogue
to turn on the SIM card.
Page 12

11 / 35
Two SIM cards can be inserted into LT600 together, but they can’t be used at the same
time. Users have to switch between two cards while using Mobile data, Calls or SMS
messages.
4.3. L
ANGUAGE&INPUT
Click Settings/Language & input/Language to select language.
Page 13

12 / 35
4.4. D
ATE
& T
IME
Click Settings/Date & time and enter Date & time interface.
If you want to use date and time from network or GPS, click Automatic date & time to
select Use network-provided time or Use GPS-provided time:
Page 14
13 / 35
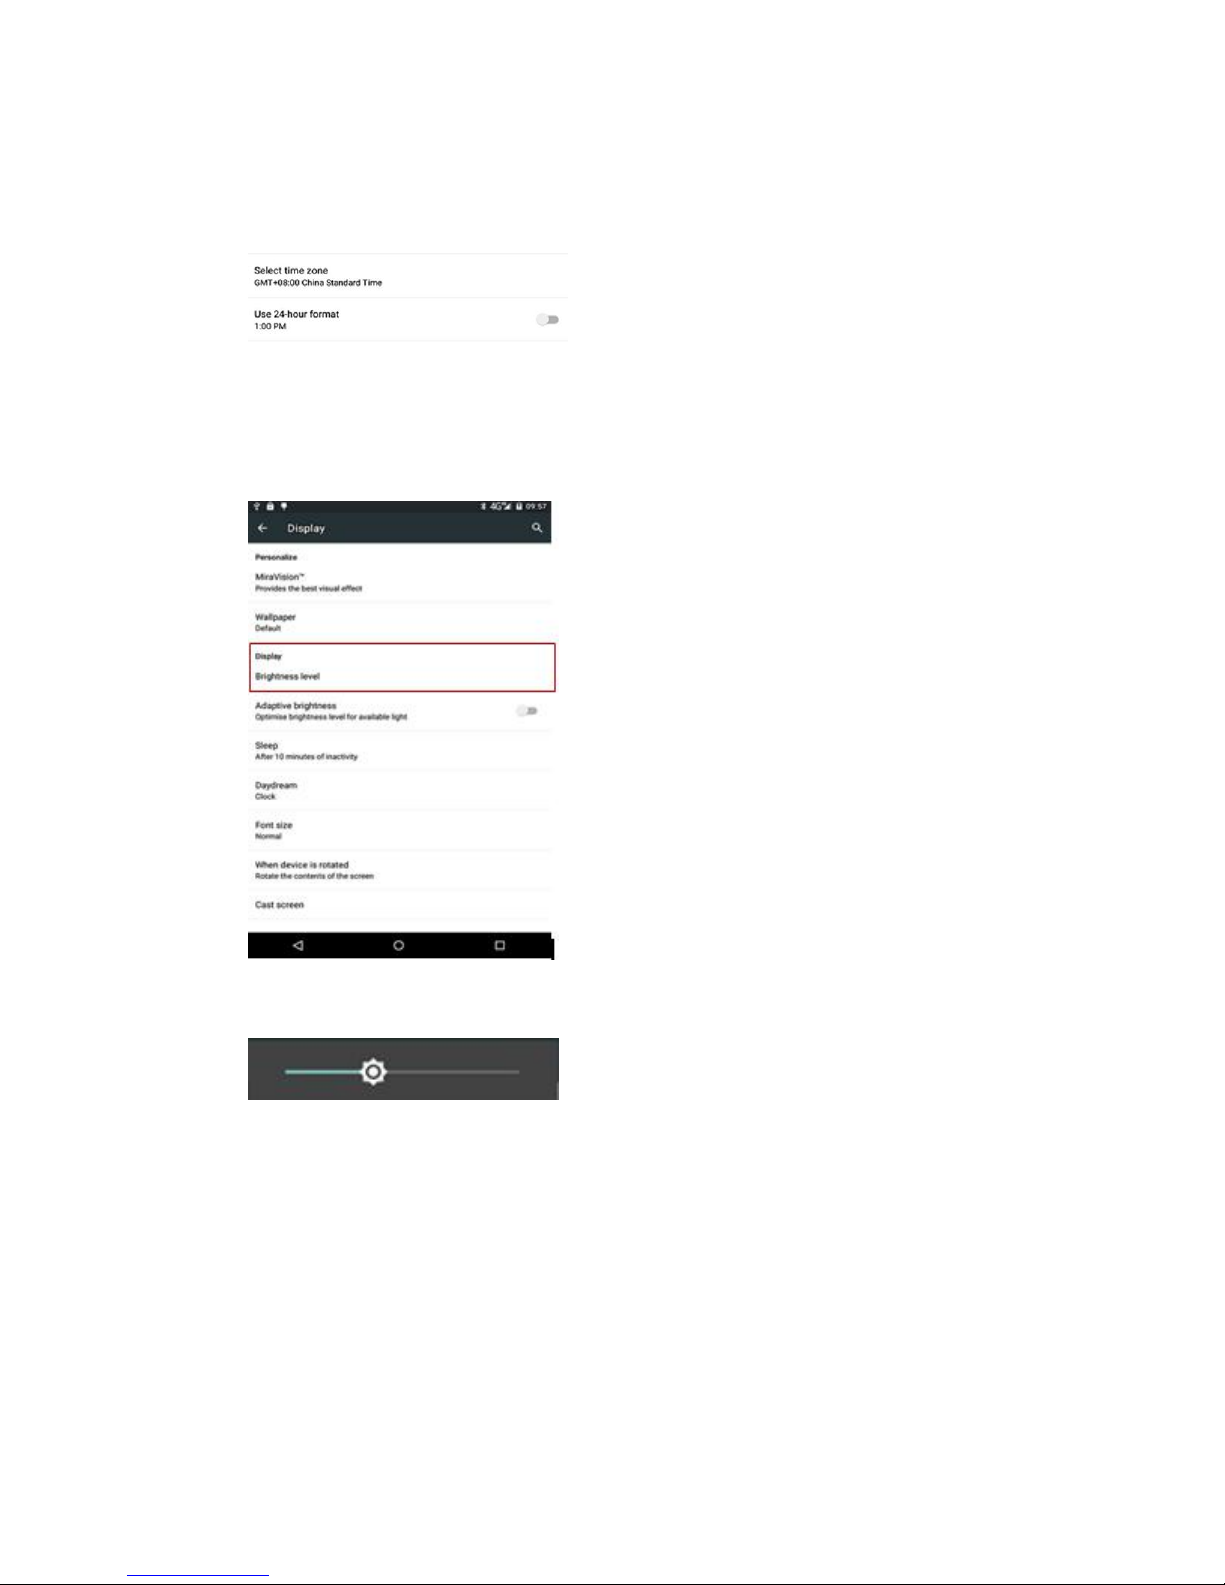
If you want to set date and time by yourself, please turn off the Automatic date & time
first and then click Set date and Set time to start your own settings. You can also
customize your time zone and choose whether to use 24-hour format in this interface.
4.5. D
ISPLAY
Click Settings/Display to enter Display interface.
Brightness adjusting: Click Brightness level to adjust it according to your preference.
Page 15

14 / 35
Sleep: Click to optimize the inactivity time.
Font size: Click to change the font size.
4.6. P
ORTRAIT
& L
ANDSCAPE
Click Settings/Accessibility/Auto-rotate screen to switch between Portrait and
Landscape mode.
Page 16

15 / 35
4.7. WIFI
Click Settings/WIFI to switch on WIFI. Select WIFI and type in its password to connect.
4.8. B
LUETOOTH
Click Settings/Bluetooth to turn on the Bluetooth. Find nearby devices and pair with it.
Page 17

16 / 35
4.9. USB CONNECTION
For connection or data transmission between LT600 and the office computer, please use the
USB data cable. Select connection type as Media device (MTP) in notification center as
shown below.
Before connection, please click Settings/Developer options/USB debugging to make
sure this function is switched on. After USB data cable is connected with PC, wait until the
Allow USB debugging dialogue pops up, click OK.
You can also use Android mobile phone assistant to manage the documents and data
stored in LT600 and install software like MapCloud3.0, GNSSTool.
4.10. USE CAMERA
Click Camera icon to open it.
Page 18
17 / 35
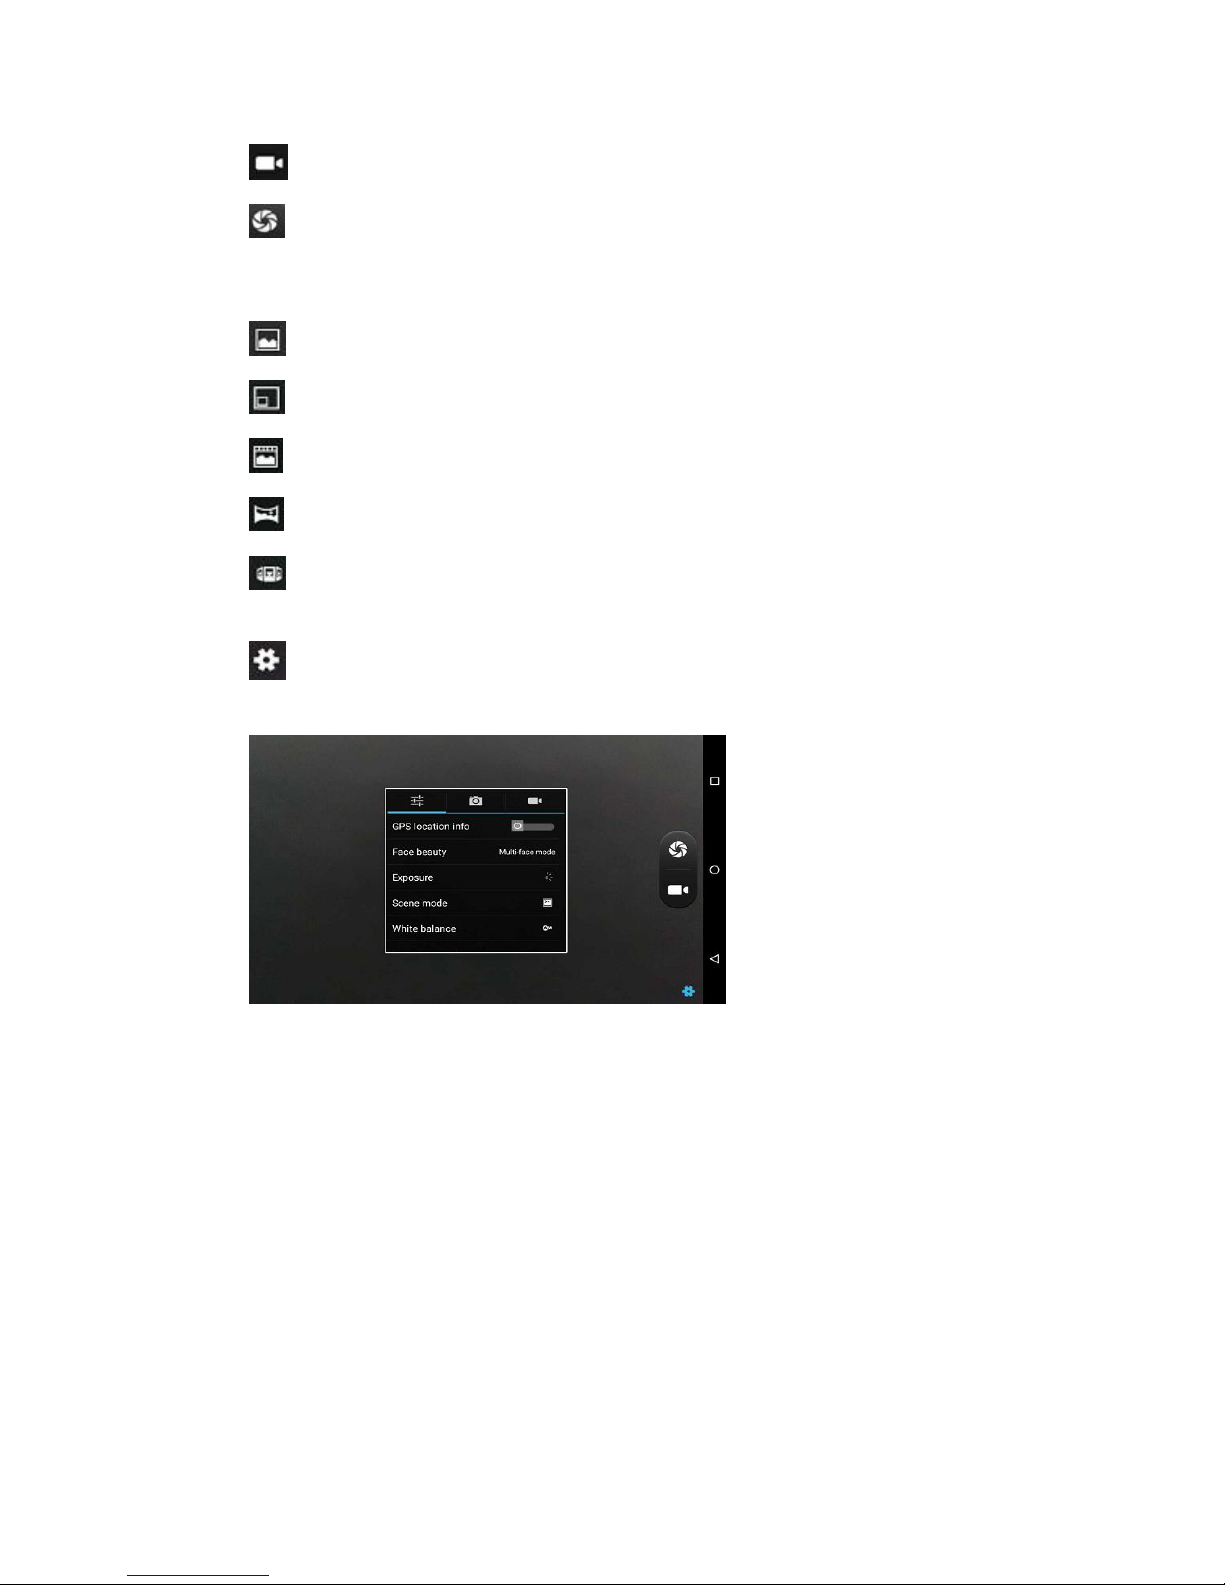
Click to start recording the video, click again to finish.
Click to take a photo.
Slide fingers in the left column to switch between 5 different modes:
Normal mode
PIP mode
Live photo mode
Panarama mode
Multi angle view mode
Camera Settings
Click to configure related parameters
4.11. L
OG IN
4G
After inserting your SIM card, click Settings/More/Mobile Networks/Preferred network
type and select corresponding network type of your SIM card. Then Click SIM card icon
in the pull down menu and turn on Mobile data and click More Settings to see data
usage.
Page 19

18 / 35
4.12. S
CHEDULED POWER ON&OFF
LT600 allows users to achieve scheduled power on and off by setting the power up & off
time and repeat time.
Set Scheduled power on time and click OK.
Page 20

19 / 35
Set scheduled power on repeat time and click OK.
Scheduled power off time settings is the same with Scheduled power on.
4.13. L
OCATION
Click Settings/Location to switch on location service.
Page 21

20 / 35
5. GETTING STARTED WITH MAP CLOUD 3.0
Map Cloud 3.0 is a type of mobile GIS data collecting software developed independently by
CHC. Combining map display, GPS data collecting, edit, attribute input, this software
provides a perfect GIS solution for users. Let’s get started from the registration part.
5.1. REGISTER
1. Click Settings > Register in the upper right corner to find your Device ID and send it to
support@chcnav.com. We will provide the License you need for registration.
Page 22

21 / 35
2. After applying license successfully, users can check registration information like expire
date as shown below.
5.2. INSTALL & UPDATE GNSSTOOL
Click GNSSTool icon in the upper right corner to install or update the GNSSTool software.
Page 23

22 / 35
5.3. BUILD NEW PROJECT
1. Open MapCloud3.0 and click "+" to build new project > choose "Project Template" and
"Coordinate System" >click "√" to finish;
2. Click satellite icon in the upper right corner >click "Connect" >choose "Connect Method,
Device Type" >Local Connection Successful >Return.
Page 24

23 / 35
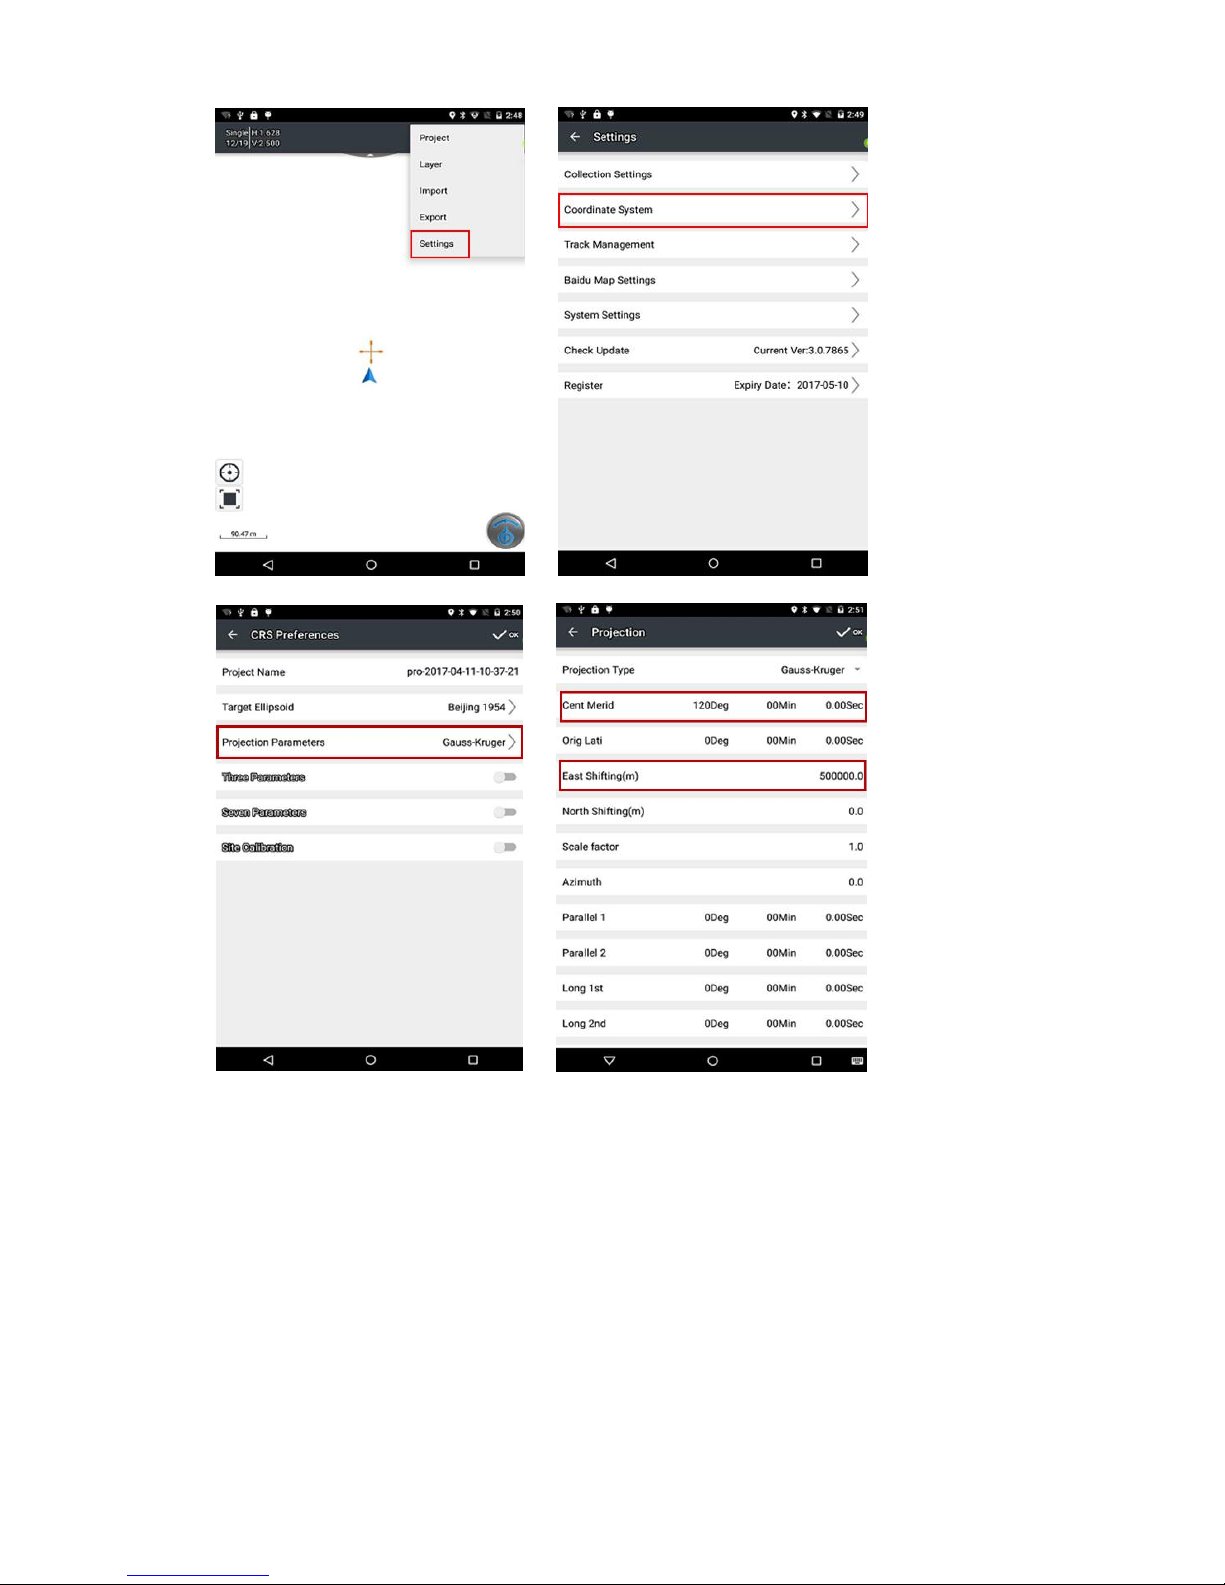
5.4. COORDINATE SYSTEM SETTINGS
1. Click Menu >"Settings" >"Coordinate System" >"Projection Parameters" >Set “Central
Meridian” and “East Shifting” >click "√" to save;
Page 25
24 / 35
2. Type in 3 or 7 parameters, or open “Site Calibration” >click "+" to add known
point >click “Calculate” > click "√" to save and then starts collecting.
Page 26

25 / 35
5.5. IMPORT BASE MAP
1. Click menu button of hand-held receiver >”Import” >”Import Vector Data” or “Import
Map” > choose the file to be imported.
5.6. DATA COLLECTION
Page 27

26 / 35
1. Click the button in the lower right corner >”Point” >”GPS” >click save to finish collecting
(the same for line or area collecting)
5.7. E
XPORTDATA
1. Click menu button of the hand-held receiver >"Export" >click “Export Vector
Data” >choose the point/line/area layer and its format you want to export >click " √ " to
export.
Page 28

27 / 35
Page 29

28 / 35
6. GETTING STARTED WITH GNSSTOOL
GNSSTool is a kind of service mainly used for access to data and Local, Bluetooth and WIFI
connection. External App can send command to receiver by using GNSSTool through
broadcasts. Thus users only need to connect with GNSSTool to achieve communication with
the receiver. It will be running in the background once connected and there is no need to
start it again.
6.1. REGISTER
1. Before using GNSSTool, users need to register first. Please find your Device SN in register
interface and send it to support@chcnav.com,CHC will provide Register Code for you.
Unregistered GNSSTool only allow for 30 minutes tryout.
2. After registration, users can see the software version and expire date in register
interface.
Page 30

29 / 35
6.2. CONNECTION
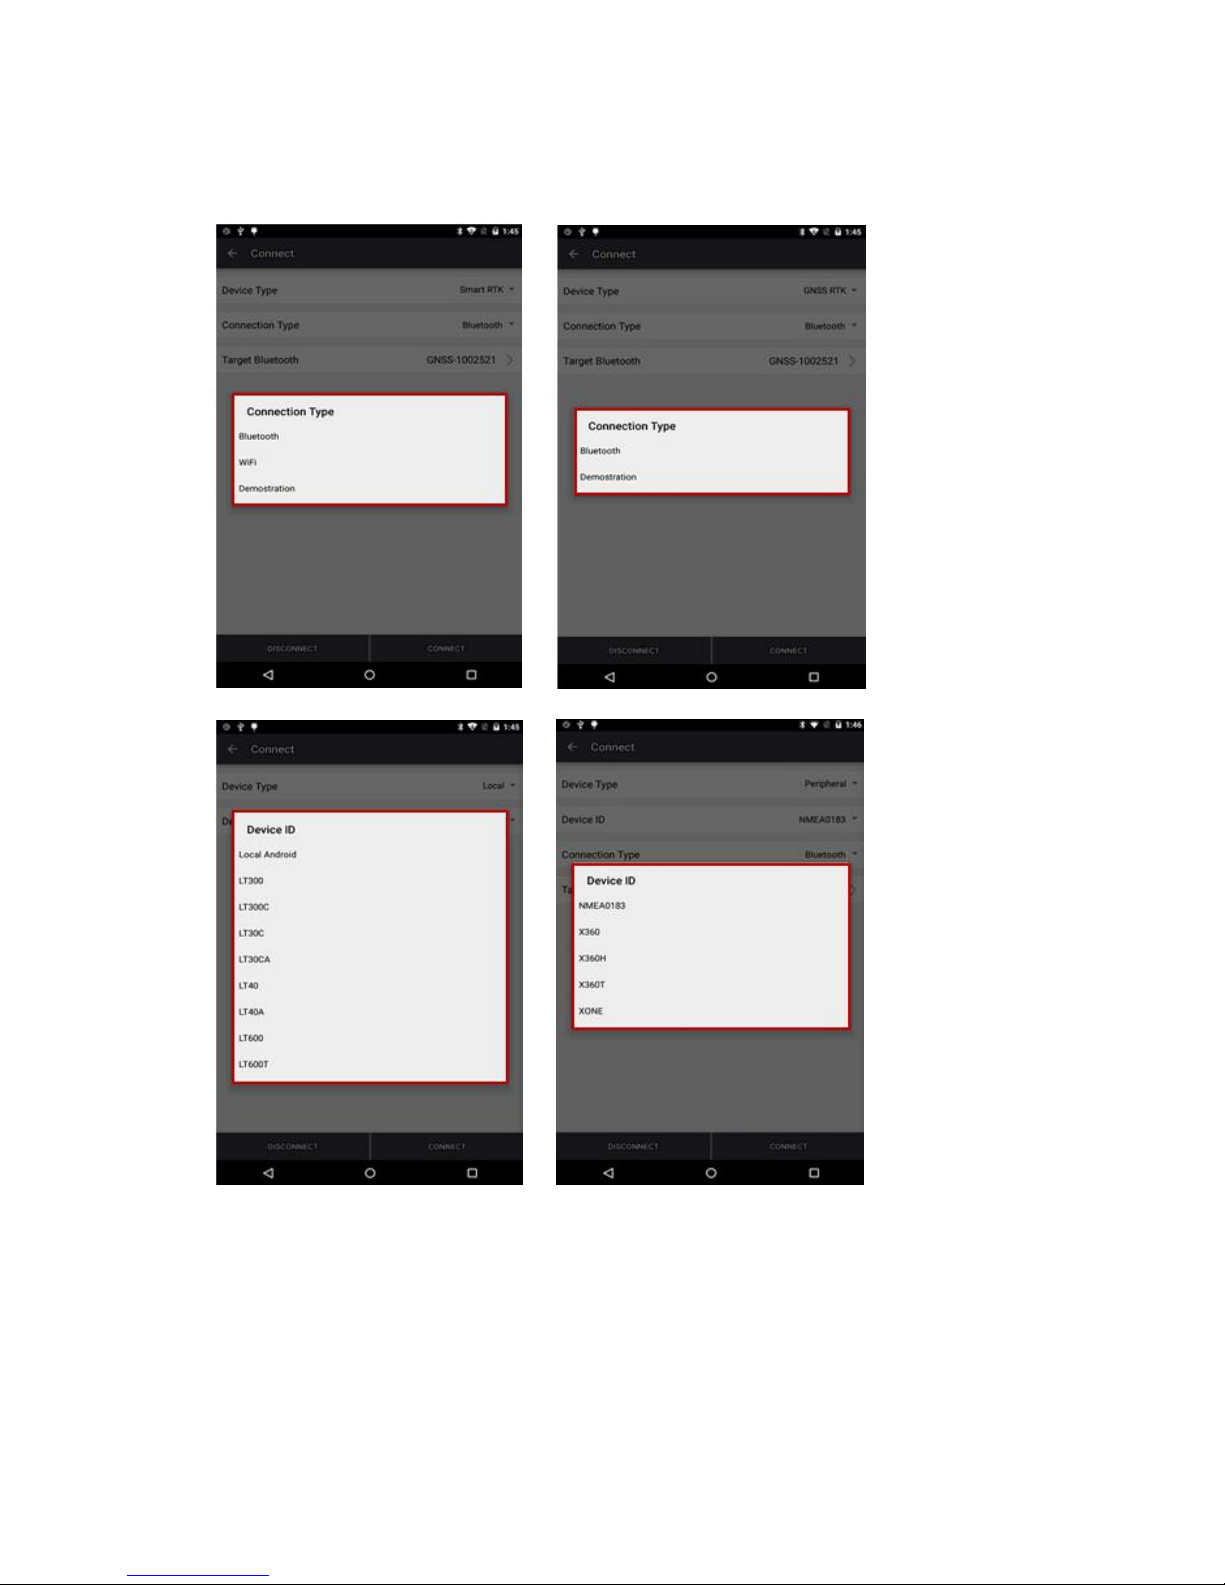
1. Open GNSSTool, click Connect and select Device Type and Connection Type/Device ID
in connect interface.
2. Device Type: GNSSTool currently supports 4 types of device: Smart RTK, GNSS RTK,
Local and Peripheral. Local supports typical mobile phone and CHC customized hand-held
controller like LT40 and LT600. Peripheral supports NMEA0183, X360 Series and other
devices. Here for LT600, we choose Local.
Page 31
30 / 35
3. Connection Type: For smart RTK (like i80), we select Bluetooth, WIFI or Demonstration.
For GNSS RTK (like X91), we select Bluetooth, and Demonstration. For Local and Peripheral,
we select the specific device type that we use. Here we select LT600 for Connection Type.
4. Click Connect to connect with the receiver, then go back to the previous interface.
Page 32

31 / 35
6.3. CORS LOGIN
After connection successful, we can log in CORS to receive differential data. Users can log in
CORS in 4 different ways: CORS, APIS, TCP and RTCM SDK. Before log in CORS, please make
sure the device has been connected and the hand-held is connected to the Internet.
GNSSTool will automatically disconnect CORS if the device is disconnected.
1. Click Diff Data Source in the main interface, select Diff Data Source as CORS.
Page 33

32 / 35
2. Type in IP, Port, Source Table and other parameters and then click LOGIN.
6.4. SKY PLOT
1. Click Sky Plot and see how many satellites (including GPS, GLONASS, BDS, GALILEO and
SBAS) the device is currently tracking and data of satellites list.
Page 34

33 / 35
6.5. DEBUGGING DATA
1. Click Debugging Data to see NMEA0183 standard data in data debugging interface. Click
HEX to change the data display format from hex into txt, or pause, save and clear it by using
the upper side buttons. Users can also check Hex in the lower left corner to send commands
to OEM board for debugging.
Page 35

34 / 35
CHC - Shanghai HuaCe Navigation Technology Ltd.
Building C, NO. 599 Gaojing Road,
Qingpu District, 201702 Shanghai, China
Tel: +86 21 542 60 273
Fax: +86 21 649 50 963
Email: sales@chcnav.com | support@chcnav.com
Website: www.chcnav.com
 Loading...