

Page 1

CAMERA THERMIQUE
THERMAL CAMERA
WÄRMEBILDKAMERA
TERMOCAMERA INFRAROSSI
CAMARA DE TERMOGRAFIA
CÂMARA TERMOGRÁFICA
VÄRMEKAMERA
热感应摄像机
TERMOKAMERA
LÄMPÖKAMERA
THERMISCHE CAMERA
KAMERA TERMICZNA
CAMERĂ TERMICĂ
C.A 1950
FRANÇAIS Guide de démarrage, p. 1
ENGLISH Quick Start Guide, p. 5
DEUTSCH Schnellstartanleitung, S. 9
ITALIANO Inizio rapido, p. 13
ESPAÑOL Inicio rápido, p. 17
PORTUGUÊS Guia básico, p. 21
SVENSKA Startguide, s. 25
中文 启动说明书, p. 29
ČEŠTINA Návod k uvedení do provozu, p. 33
SUOMI Käynnistysohje, s. 37
NEDERLANDS Startgids, p. 41
POLSKI Instrukcja uruchomienia, s. 45
ROMÂNĂ Ghid de iniŝiere, p. 49
Page 2

Le marquage CE indique la conformité aux directives européennes « Basse Tension » et
«Compatibilité Electromagnétique » (2006/95/CE et 2004/108/CE).
Dans l’Union Européenne, ce produit fait l’objet d’un tri sélectif des déchets pour le recyclage des
matériels électriques et électroniques conformément à la Directive DEEE 2002/96/EC : ce matériel
ne doit pas être traité comme déchet ménager. Les piles et les accumulateurs usagés ne doivent
pas être traités comme des déchets ménagers. Rapportez-les au point de collecte approprié pour
le recyclage.
La conception de ce produit permettra un processus de recyclage et de valorisation de la plupart
de ses constituants.
Français
ATTENTION
La caméra infrarouge est un équipement de mesure optique sensible, attention à ce qui suit :
1. Ne jamais viser le soleil, une soudure au laser ou toute autre source de fort rayonnement
thermique.
2. Éviter l'exposition à la poussière, objectif ouvert.
3. Ne pas toucher l'objectif avec les doigts.
4. Éviter les chocs et les chutes.
Si des éléments de la caméra sont endommagés ou présentent des problèmes à la suite du non
respect des consignes énumérées ci-dessus, le constructeur ainsi que le distributeur ne seront en
aucun cas responsables et tous les frais mis en jeu seront entièrement à la charge de l’opérateur.
Signification des symboles utilisés sur l’appareil :
1. ETAPES DU DEMARRAGE RAPIDE
1. Insérer des piles chargées dans la caméra.
2. Insérer la carte mémoire micro SD dans son logement.
3. Ouvrir le volet de protection des objectifs.
4. Appuyer sur la touche ON / OFF :
- si la fenêtre correspondante apparaît, saisir la date et l’heure.
- si vous venez d’insérer des accumulateurs, configurez le gestionnaire de batteries (voir notice de
fonctionnement §. 1.4.1.).
5. Viser la cible :
- soit avec l’affichage IR,
- soit avec l’image visible, gâchette ou touches .
6. Arrêter l’acquisition, touche .
7. Sauvegarder l’image courante, touche .
8. Transférer l’image vers le PC :
- soit à l’aide du câble USB,
- soit avec un lecteur de carte micro SD.
Pour plus d’informations, consultez la notice de fonctionnement fournie sur le CD-ROM.
1
Page 3

Volet de protection des objectifs
Objectif caméra infra rouge
Objectif caméra visible
Gâchette multifonction
Connecteur USB
Logement Carte SD
Volet caoutchouc
Clavier
Gâchette multifonction
Français
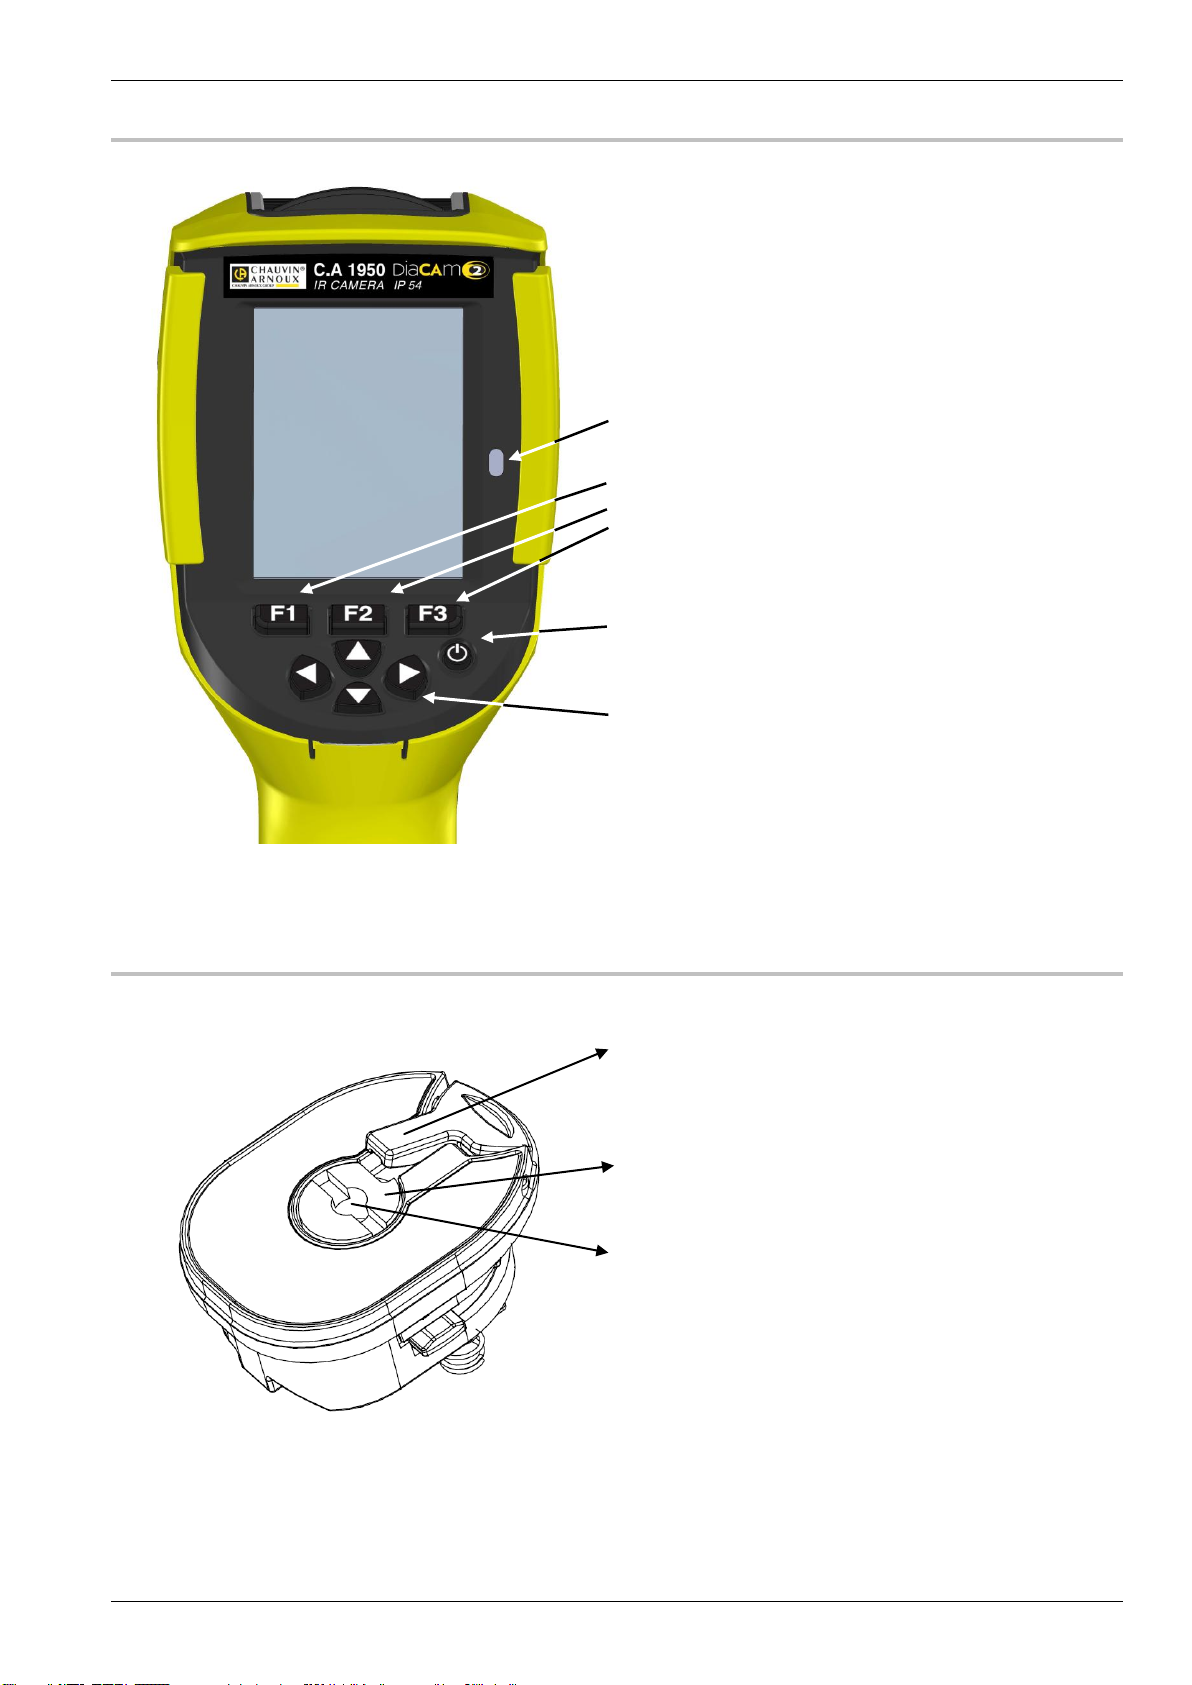
2. STRUCTURE DE LA FACE AVANT
3. INTERFACE
2
Page 4

Capteur luminosité
Touches multifonctions associées à l’affichage
à l’écran
Touche ON / OFF
Touches Flèches Haut/Bas/Droite/Gauche
Levier de verrouillage de la vis ¼ de tour
Vis ¼ de tour pour ouverture de la trappe
Insert pour pied photographique ¼ pouce
Français
4. DESCRIPTION DES TOUCHES
5. STRUCTURE DE LA TRAPPE A PILE
3
Page 5

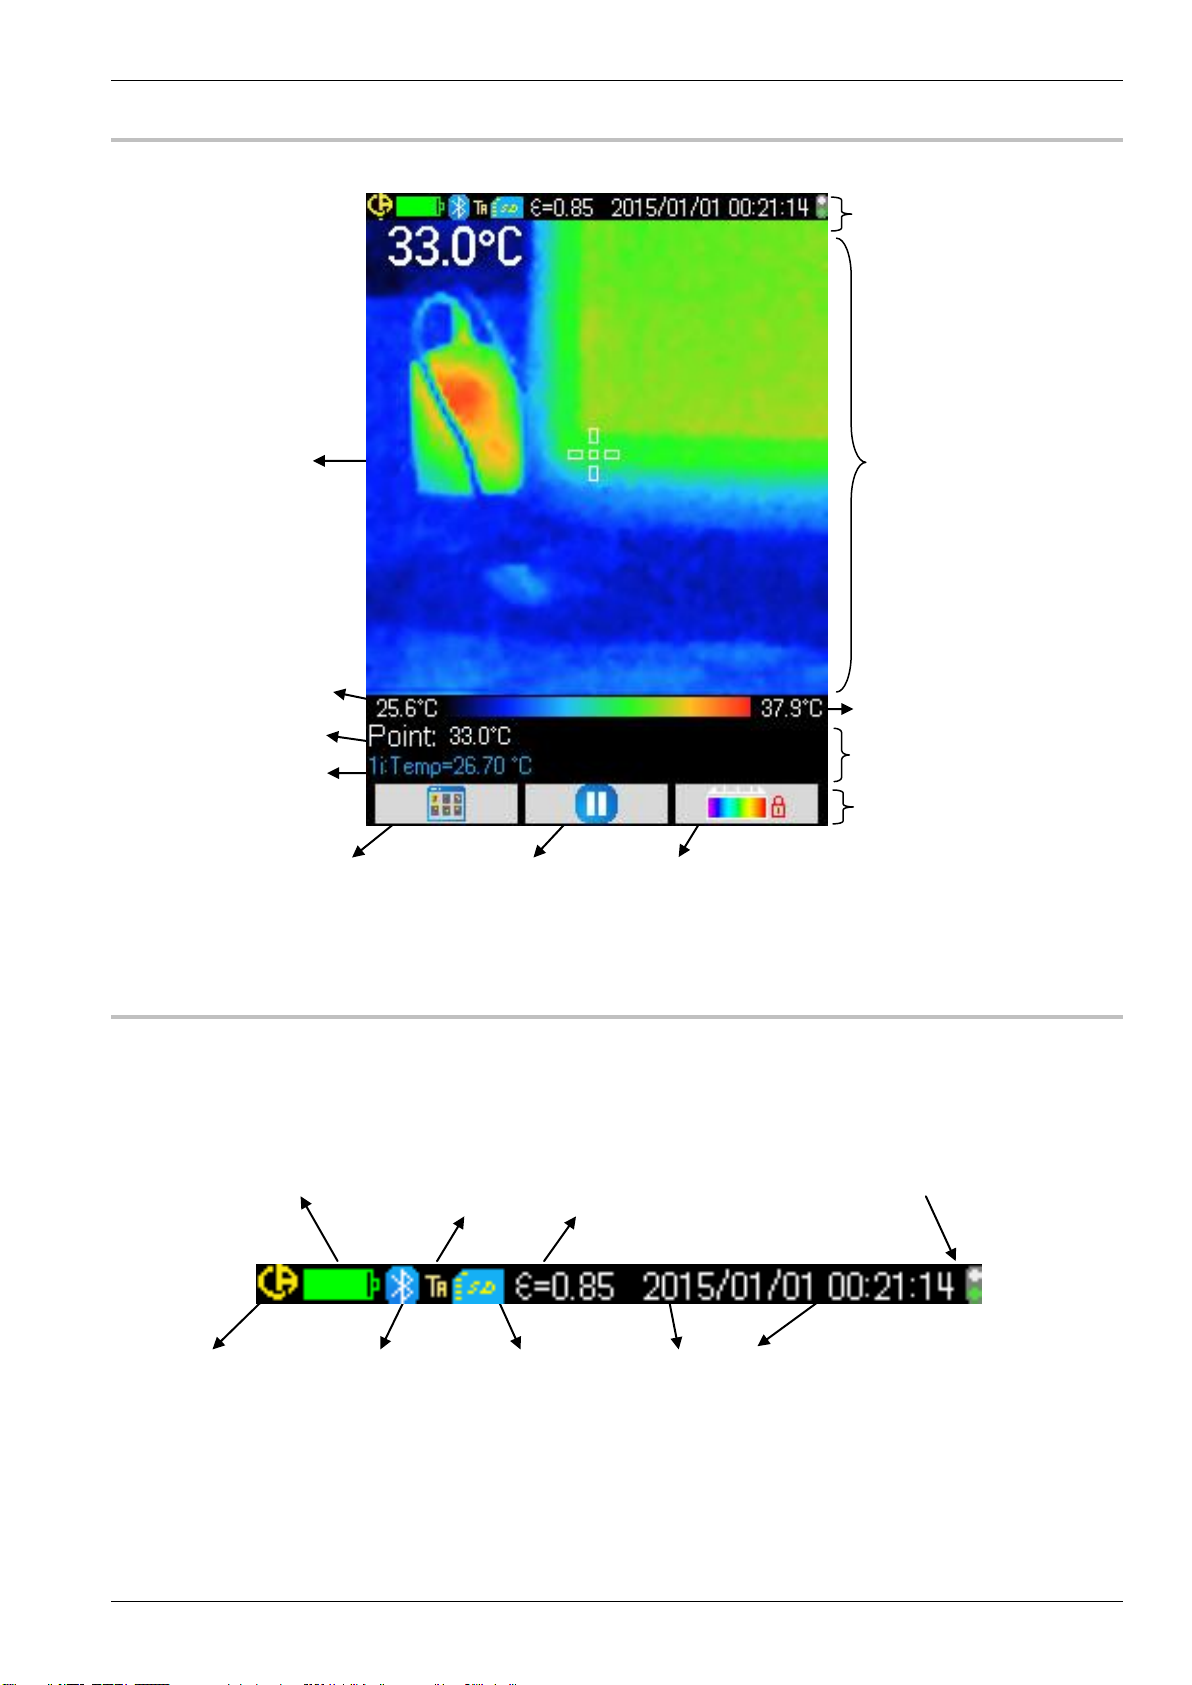
Image
Affichage des mesures
Fonctions associées
aux touches F1, F2, F3
Verrouillage de la palette de couleurs,
les T° min et max sont figées.
Ouverture du dernier menu
Arrêt de l’acquisition
Mesure BT
Mesures curseurs
Température de la couleur gauche
de la palette des couleurs
Curseur point
Température de la couleur droite
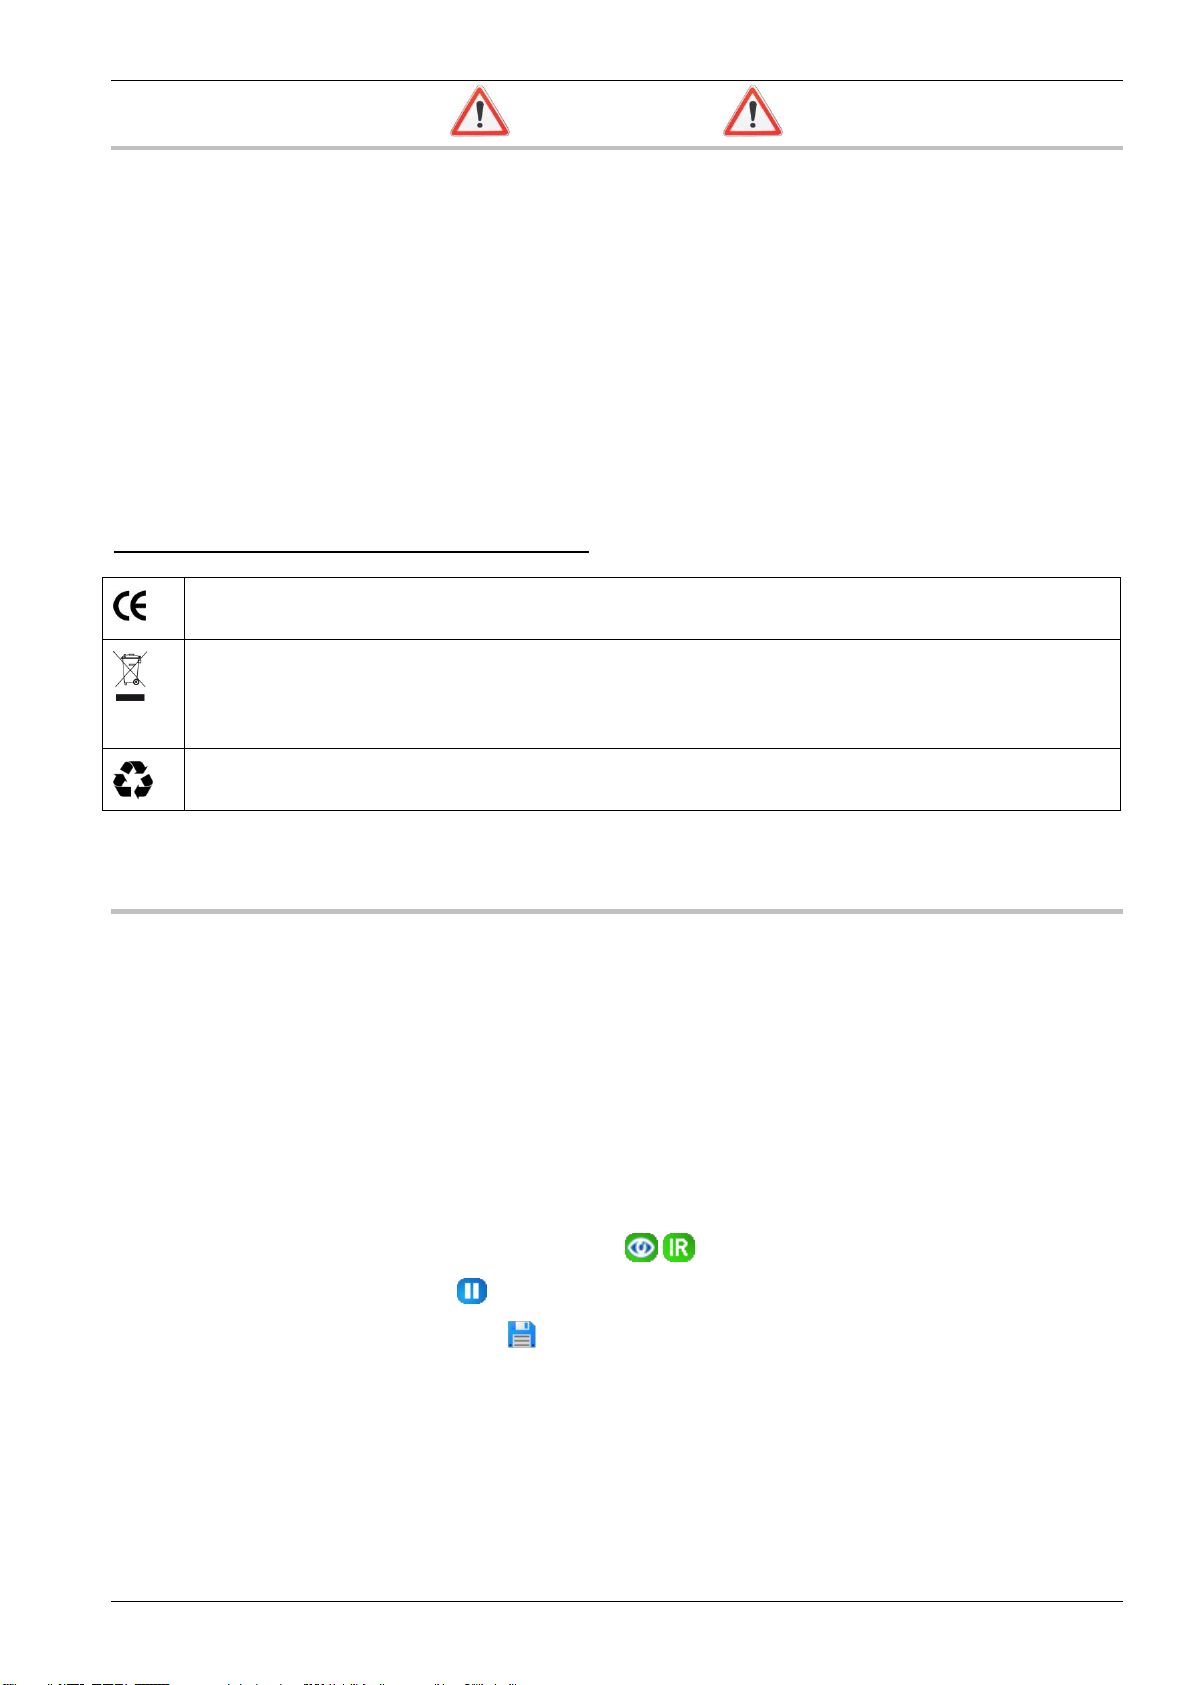
de la palette des couleurs
Barre d’état, voir ci-dessous
Présence/Absence
carte micro SD
Fonction associée
à la gâchette
Bluetooth active
Etat de la batterie
Date et heure de l’image courante
Activation/Désactivation/
Correction des
paramètres d’influence
Sigle
Acquisition en continu (vert)
Acquisition figée (rouge)
Français
6. AFFICHAGE
7. BARRE D’ETAT
4
Page 6

The CE marking indicates compliance with the European "Low Voltage" and "Electromagnetic
Compatibility" directives (2006/95/EC and 2004/108/EC).
In the European Union, this product is subject to selective collection and recycling at end-of-life as
waste electric and electronic equipment under directive 2002/96/EC (WEEE): this equipment must
not be treated as an ordinary household waste. The spent batteries must not be treated as
household wastes. Take them to the appropriate collection point for recycling.
This product is designed to allow the recovery and recycling of most of its constituents.
English
ATTENTION
An infrared camera is a sensitive optical measuring device; pay special attention to the following
points:
1. Never aim the camera at the sun, a laser welding, or other source of powerful thermal radiation.
2. Avoid exposing to dust with the lens flap open.
3. Do not touch the lens with your fingers.
4. Avoid jolting or dropping the camera.
If parts of the camera are damaged or present problems following failure to heed the warnings listed
above, neither the manufacturer nor the distributor shall be held liable, and all costs incurred shall
be borne solely by the operator.
Meanings of the symbols used on the device:
1. QUICK START STEPS
1. Insert charged batteries in the camera.
2. Insert the micro SD memory card in its slot.
3. Open the flap protecting the lenses.
4. Press the ON/OFF key :
- If the corresponding window appears, enter the date and time.
- If you just insert batteries, configure battery manager (see instructions, user’s manual §. 1.4.1.)
5. Aim at the target:
- either with the IR display,
- or with the visible image, the trigger, or the keys.
6. Stop the acquisition, key.
7. Save the current image, key.
8. Transfer the image to the PC:
- either using the USB cable,
- or using a micro SD card reader.
For more information, refer to the user’s manual on the CD-ROM.
5
Page 7

Lens protection flap
Lens of infrared camera
Lens of visible camera
Multiple-function trigger
USB connector
Slot for SD card
Rubber flap
Keypad
Multiple-function trigger
English
2. STRUCTURE OF THE FRONT PANEL
3. INTERFACE
6
Page 8
Brightness sensor
Multiple-function keys associated with the display
on the screen
ON/OFF key
Up/Down/Right/Left Arrow Keys
Tab locking the quarter-turn screw
Quarter-turn screw for opening the cover
Insert for ¼" camera tripod
English
4. DESCRIPTION OF THE KEYS
5. STRUCTURE OF THE BATTERY COMPARTMENT COVER
7
Page 9
Image
Display of the measurements
Functions associated
with the F1, F2, & F3 keys
Locking of the palette of colours,
the min. and max. T° are frozen.
Opening of the last menu opened
To stop
acquisition
BT
Cursor
Temperature of the left-hand colour
of the palette of colours
Point cursor
Temperature of the right-hand
colour of the palette of colours
Status bar, see below
Presence/Absence
of micro SD card
Function associated
with the trigger
Bluetooth active
Condition of the
battery
Date and time of the current image
Activation/Deactivation/Correction
of the parameters of influence
Acronym
Continuous acquisition
(green)
English
6. DISPLAY
7. STATUS BAR
8
Page 10

Die CE-Kennzeichnung bestätigt die Übereinstimmung mit den europäischen EMV- und
Niederspannungsrichtlinien (2006/95/EG und 2004/108/EG).
Das Produkt muss in der UE gemäß der Richtlinie WEEE 2002/96/EC einer Abfalltrennung zur
Wiederaufbereitung von Elektro- und Elektronik-Altgeräten unterzogen werden und darf nicht als
Haushaltsmüll entsorgt werden. Gebrauchte Batterien und Akkus dürfen nicht als Haushaltsmüll
entsorgt werden. Diese müssen bei einer geeigneten Sammelstelle der Wiederverwertung
zugeführt werden.
Das Design dieses Produkts ist so angelegt, dass für die meisten seiner Komponenten ein
Verwertungs- und Rückgewinnungsprozess möglich ist.
Deutsch
ACHTUNG
Eine Infrarotkamera ist ein empfindliches optisches Messgerät, bitte beachten Sie daher die
folgenden Hinweise:
1. Richten Sie die Kamera niemals Richtung Sonne, Laserschweißen oder eine andere intensive Wärmestrahlungsquelle.
2. Vermeiden Sie Staubbelastung bei offener Linse.
3. Berühren Sie die Linse nicht mit den Fingern.
4. Vermeiden Sie Stöße und Stürze.
Wenn die Kamerakomponenten als Folge der Nichtbeachtung der oben genannten Anweisungen
beschädigt wurden oder sonstige Probleme auftreten, haften Hersteller und Händler keinesfalls. Alle
damit verbundenen Kosten gehen vollständig zu Lasten des Bedieners.
Bedeutung der auf dem Gerät verwendeten Symbole:
1. SCHNELLSTART
1. Legen Sie die aufgeladenen Batterien in die Kamera.
2. Führen Sie die Micro-SD-Speicherkarte in den Schlitz ein.
3. Öffnen Sie die Schutzklappe der Linsen.
4. Drücken Sie die Taste ON / OFF :
- Wenn das entsprechende Fenster angezeigt wird, geben Sie Datum und Uhrzeit.
- Konfigurieren Sie den Batteriemanager, wenn Sie nur Batterien einsetzen (siehe Bedienungsanleitung §. 1.4.1.).
5. Peilen Sie das Messziel an:
- entweder mit der IR-Anzeige,
- oder mit dem sichtbaren Bild, dem Auslöser oder den Tasten .
6. Beenden Sie die Erfassung, Taste .
7. Speichern Sie das aktuelle Bild, Taste .
8. Übertragen Sie das Bild auf den PC:
- entweder mit einem USB-Kabel
- oder mit Hilfe eines SD-Kartenlesers.
Weitere Informationen finden Sie in der auf der CD-ROM mitgelieferten Bedienungsanleitung.
9
Page 11

Schutzklappe der Linsen
IR-Kameralinse
Kameralinse sichtbares Bild
Multifunktionsauslöser
USB-Anschluss
SD-Kartenschlitz
Gummiklappe
Tastenfeld
Multifunktionsauslöser
Deutsch
2. AUFBAU DER VORDERSEITE
3. SCHNITTSTELLE
10
Page 12

Lichtsensor
Multifunktionstasten für die Anzeige
am Bildschirm
Taste ON/OFF
Pfeiltaste Hinauf/Hinunter/Rechts/Links
Verriegelungshebel der Drehschraube
Drehschraube zum Öffnen des Faches
Öffnung für ¼ Zoll-Stativ
Deutsch
4. BESCHREIBUNG DER TASTEN
5. AUFBAU DES BATTERIEFACHS
11
Page 13

Bild
Messanzeige
Funktionen der
Tasten F1, F2, F3
Sperren der Farbpalette,
die Mindest- und Höchsttemperaturen bleiben fix
Öffnen des zuletzt geöffneten
Menüs
Beenden der
Erfassung
BT-Messung
Cursor-Messungen
Farbtemperatur
links in der Farbpalette
Cursorpunkt
Farbtemperatur rechts in der
Farbpalette
Statusanzeige, siehe unten
SD-Mikrokarte
vorhanden/nicht
Funktion des
Auslösers
Bluetooth aktiv
Batteriestatus
Datum und Zeit des aktuellen Bildes
Aktivieren/Deaktivieren/Korrigieren
der Einflussgrößen
Kürz
Dauererfassung (grün)
Erfassung gehalten (rot)
Deutsch
6. ANZEIGE
7. STATUSLEISTE
12
Page 14
La marcatura CE indica la conformità alle direttive europee "Bassa Tensione" e “Compatibilità
Elettromagnetica” (2006/95/CE e 2004/108/CE).
Nell’Unione Europea, questo prodotto è oggetto di una cernita dei rifiuti per il riciclo dei materiali
elettrici ed elettronici conformemente alla Direttive DEEE 2002/96/EC: questo materiale non va
trattato come rifiuto domestico. Le pile e gli accumulatori usati non vanno trattati come rifiuti
domestici. Riportateli nell’apposito centro di raccolta in vista del riciclo.
La concezione di questo prodotto permetterà un processo di riciclo e di valorizzazione della
maggior parte dei suoi elementi costitutivi.
Italiano
ATTENZIONE
Una videocamera a infrarossi è uno strumento di misura ottico sensibile quindi prestate attenzione
alle seguenti precauzioni:
1. Non mirare mai il sole, una saldatura al laser o qualsiasi altra sorgente di forte radiazione
termica.
2. Evitare l'esposizione alla polvere se l’obiettivo è aperto.
3. Non toccare l’obiettivo con le dita.
4. Evitare gli urti e le cadute.
Se certi elementi della videocamera sono danneggiati o presentano problemi in seguito al mancato
rispetto delle precauzioni di cui sopra, il costruttore e il distributore non saranno mai responsabili e
i costi sostenuti saranno tutti a carico dell’operatore.
Significato dei simboli utilizzati sullo strumento:
1. AVVIO RAPIDO
1. Inserire le pile cariche nella videocamera.
2. Inserire la scheda di memoria micro SD nel suo alloggiamento.
3. Aprire il coperchio di protezione degli obiettivi.
4. Premere il tasto ON/OFF:
- Se viene visualizzata la finestra, digitare la data e l'ora.
- Configurare direttore batteria se è sufficiente inserire le batterie (vedi libretto d’istruzioni §. 1.4.1.)
5. Mirare il bersaglio:
- con la visualizzazione a IR,
- oppure con l’immagine visibile, grilletto o tasti .
6. Fermare l’acquisizione, tasto .
7. Salvare l’immagine corrente, tasto .
8. Trasferire l’immagine verso il PC:
- mediante il cavo USB,
- oppure con un lettore di scheda micro SD.
Per maggiori informazioni, consultate il libretto d’istruzioni fornito con il CD-ROM.
13
Page 15

Coperchio di protezione degli obiettivi
Obiettivo videocamera a infrarossi
Obiettivo videocamera visibile
Grilletto multifunzionale
Connettore USB
Alloggiamento Scheda SD
Coperchio gomma
Tastiera
Grilletto multifunzionale
Italiano
2. STRUTTURA DEL LATO ANTERIORE
3. INTERFACCIA
14
Page 16

Sensore luminosità
Tasti multifunzionali associati al display sullo
schermo
Tasto ON/OFF
Tasti Frecce Alto/Basso/Destra/Sinistra
Leva di bloccaggio della vite ¼ di giro
Vite ¼ di giro per apertura del vano
Inserto per supporto fotografico ¼ pollice
Italiano
4. DESCRIZIONE DEI TASTI
5. STRUTTURA DEL VANO DELLE PILE
15
Page 17

Immagine
Visualizzazione delle misure
Funzioni associate
ai tasti F1, F2, F3
Bloccaggio della gamma dei colori,
le T° mini e maxi sono congelate.
Apertura dell’ultimo menu aperto
Arresto
dell’acquisizione
Misura BT
Misure cursori
Temperatura del colore a sinistra
della gamma dei colori
Cursore punto
Temperatura del colore a destra della
gamma dei colori
Barra di stato, vedi più avanti
Presenza/Assenza
scheda micro SD
Funzione associata
al grilletto
Bluetooth attiva
Stato della batteria
Data e ora dell’immagine corrente
Attivazione/Disattivazione/Correzione
dei parametri d’influenza
Sigla
Acquisizione in continuo (verde)
Acquisizione congelata (rossa)
Italiano
6. DISPLAY
7. BARRA DI STATO
16
Page 18

La marca CE indica la conformidad con las directivas europeas sobre «Baja Tensión» y
«Compatibilidad electromagnética» (2006/95/CE y 2004/108/CE).
En la Unión Europea, este producto deberá ser objeto de una recogida selectiva de residuos con
vistas a reciclar los materiales eléctricos y electrónicos de conformidad con la directiva RAEE
2002/96/CE: este material no se debe tratar como un residuo doméstico. Las pilas y los
acumuladores usados no se deben tratar como residuos domésticos. Llévelos al punto de
recogida adecuado para su reciclaje.
El diseño de este producto permitirá un proceso de reciclado y valorización de gran parte de sus
componentes.
Espańol
ATENCIÓN
Una cámara infrarroja es un equipo de medida óptico sensible, preste la debida atención a las
siguientes observaciones:
1. Nunca apunte el sol, una soldadura por rayo láser o cualquier otra fuente de alta radiación
térmica.
2. Evítese la exposición al polvo con el objetivo abierto.
3. No toque el objetivo con los dedos.
4. Evítense los golpes y caídas.
Si se han dañado elementos de la cámara o si presentan problemas debido a la inobservancia de
las indicaciones arriba indicadas, el fabricante como el distribuidor no serán responsables y todos
los gastos soportados correrán a cargo del operador.
Significado de los símbolos utilizados en el instrumento:
1. INICIO RÁPIDO
1. Insertar pilas en la cámara.
2. Insertar la tarjeta de memoria micro SD en la ranura correspondiente.
3. Abrir la cubierta de los objetivos.
4. Pulsar la tecla ON/OFF:
- Si aparece la ventana, introduzca la fecha y la hora.
- Configurar gestor de la batería si usted acaba de insertar las pilas (vea el manual de instrucciones
§. 1.4.1.).
5. Apuntar el objetivo:
- o bien con la visualización IR,
- o bien con la imagen visible, gatillo o teclas .
6. Detener la adquisición, tecla .
7. Guardar la imagen actual, tecla .
8. Transferir la imagen al PC:
- o bien con el cable USB,
- o bien con un lector de tarjeta micro SD.
Para más información, consulte el manual de instrucciones suministrado con el CD-ROM.
17
Page 19

Cubierta de los objetivos
Objetivo cámara infrarroja
Objetivo cámara visible
Gatillo multifunción
Conector USB
Ranura Tarjeta SD
Cubierta de caucho
Teclado
Gatillo multifunción
Espańol
2. ESTRUCTURA DEL FRONTAL
3. INTERFAZ
18
Page 20

Sensor de luz
Teclas multifunción asociadas a la visualización
en pantalla
Tecla ON/OFF
Teclas Flechas Arriba / Abajo / Derecha / Izquierda
Palanca de bloqueo del tornillo ¼ de vuelta
Tornillo ¼ de vuelta para abrir la tapa
Zapata para trípode ¼ pulgadas
Espańol
4. DESCRIPCIÓN DE LAS TECLAS
5. ESTRUCTURA DE LA TAPA DE LAS PILAS
19
Page 21

Imagen
Visualización de las
Funciones asociadas
a las teclas F1, F2, F3
Bloqueo de la gama de colores,
las Tº mín. y máx. están congeladas.
Abertura del último menú abierto
Paro de la
adquisición
Medida BT
Medidas cursores
Temperatura del color de la
izquierda
Cursor punto
Temperatura del color de la
derecha de la gama de colores
Barra de estado, véase a
Presencia/Ausencia
tarjeta micro SD
Función asociada
al gatillo
Bluetooth activo
Estado de la batería
Fecha y hora de la imagen actual
Activación/Desactivación/Corrección
de los parámetros de influencia
Símbolo
Adquisición en continuo (verde)
Adquisición congelada (rojo)
Espańol
6. VISUALIZACIÓN
7. BARRA DE ESTADO
20
Page 22

A marcação CE indica a conformidade com as diretivas europeias de "Baixa Tensão"
(2006/95/CE) e "Compatibilidade Eletromagnética" (2004/108/CE).
Na União Europeia, este produto é objeto de recolha seletiva dos resíduos para reciclagem dos
materiais elétricos e eletrónicos em conformidade com a Diretiva DEEE 2002/96/EC: este material
não deve ser tratado como resíduo doméstico. As pilhas e acumuladores usados não devem ser
tratados como resíduos domésticos. Proteja o ambiente e descarte-os no ponto de recolha
apropriado para a reciclagem.
A conceção deste produto permitirá submeter a maioria dos seus constituintes a um processo de
reciclagem e valorização.
Português
ATENÇÃO
A câmara infravermelha é um instrumento de medição ótica sensível. Cumpra as seguintes
recomendações:
1. Nunca apontar para o sol, para uma solda a laser ou para qualquer outra fonte de forte radiação
térmica.
2. Evitar a exposição à poeira e manter a objetiva tampada quando o aparelho não estiver em
utilização.
3. Não tocar a objetiva com os dedos.
4. Evitar choques e quedas.
O fabricante e o distribuidor exoneram-se de qualquer responsabilidade em caso de avaria ou
disfunção de elementos da câmara emergente da inobservância das instruções acima. Nessas
circunstâncias, todas as eventuais despesas serão inteiramente a cargo do operador.
Significado dos símbolos utilizados no instrumento:
1. ETAPAS DE INÍCIO RÁPIDO
1. Inserir pilhas carregadas na câmara.
2. Inserir o cartão de memória micro SD no seu alojamento.
3. Abrir a tampa de proteção das objetivas.
4. Premir a tecla ON/OFF:
- Se a janela correspondente aparecer, inserir a data e a hora.
- Se acabou de inserir acumuladores, configure o gestor de baterias (ver manual de operação, §1.4.1.).
5. Apontar para o alvo:
- Através da imagem infravermelha;
- Ou através da imagem visual, do gatilho ou das teclas .
6. Interromper a aquisição: prema a tecla .
7. Guardar a imagem ativa: prema a tecla .
8. Transferir a imagem para o PC:
- Com o cabo USB;
- Ou com um leitor de cartão micro SD.
Para mais informações, consulte o manual de operação fornecido no CD-ROM.
21
Page 23

Tampa de proteção das objetivas
Objetiva da câmara infravermelha
Objetiva da câmara visual
Gatilho multifuncional
Conector USB
Alojamento do cartão SD
Tampa de borracha
Teclado
Gatilho multifuncional
Português
2. ESTRUTURA DA FACHADA
3. INTERFACE
22
Page 24

Sensor de luminosidade
Teclas multifuncionais associadas à apresentação
no ecrã
Tecla ON/OFF
Teclas de seta Alto/Baixo/Direita/Esquerda
Alavanca de travamento do parafuso ¼ de volta
Parafuso ¼ de volta para a abertura do
compartimento
Encaixe para tripé fotográfico ¼''
Português
4. DESCRIÇÃO DAS TECLAS
5. ESTRUTURA DO COMPARTIMENTO DAS PILHAS
23
Page 25

Imagem
Apresentação das medições
Funções associadas
às teclas F1, F2, F3
Travamento da palete de cores.
As T° mín e máx são congeladas.
Abertura do último menu aberto
Interrupção
da aquisição
Medição BT
Medições dos
Temperatura da cor esquerda
da palete de cores
Cursor/ponteiro
Temperatura da cor direita da
palete de cores
Barra de estado: ver a seguir
Função associada
ao gatilho
Estado da bateria
Ativação/Desativação/
Correção dos
parâmetros de influência
Aquisição contínua (verde)
Aquisição congelada
(vermelho)
Presença/Ausência de
cartão micro SD
Bluetooth ativo
Data e hora da imagem ativa
Sigla
Português
6. APRESENTAÇÃO
7. BARRA DE ESTADO
24
Page 26

CE-märkningen indikerar överensstämmelse med de europeiska direktiven för “Lågspänning" och
“Elektromagnetisk kompatibilitet” (2006/95/EG resp. 2004/108/EG).
Inom Europeiska unionen är denna produkt föremål för selektiv avfallshantering för källsortering
och återvinning av elektrisk och elektronisk utrustning i enlighet med direktiv WEEE 2002/96/EG:
Denna utrustning får inte behandlas som hushållsavfall. Förbrukade batterier och ackumulatorer
bör inte behandlas som hushållsavfall. Ta dem till lämplig återvinningsstation.
Tack vare produktens utformning kan merparten av dess beståndsdelar återvinnas och
återanvändas.
Svenska
OBSERVERA
Den infraröda kameran är ett känsligt optiskt mätinstrument – observera följande:
1. Sikta aldrig mot solen, en svetslåga eller någon annan källa för kraftig värmestrålning.
2. Undvik exponering för damm, med öppet objektiv.
3. Rör inte objektivet med fingrarna.
4. Undvik stötar och fall.
Om någon som helst del av kameran blir skadad eller uppvisar funktionsfel till följd av att
ovanstående instruktioner ej observerats kan varken tillverkaren eller distributören under några
omständigheter hållas ansvarig och samtliga uppkomna omkostnader skall i helhet betalas av
operatören.
Innebörd av symbolerna som används på instrumentet:
1. STEG I SNABBSTARTEN
1. Sätt in laddade batterier i kameran.
2. Sätt in mikro-SD-kortet i dess lagring.
3. Öppna objektivens skyddslucka.
4. Tryck på tangenten ON/OFF:
- om motsvarande fönster visas, mata in datum och tid.
- om du nyligen har satt in ackumulatorer, konfigurera batterihanteraren (se bruksanvisning §1.4.1.).
5. Sikta på målet:
- antingen med indikeringen IR,
- eller med den synliga bilden, avtryckaren eller knapparna .
6. Upphäv målfångning .
7. Spara aktuell bild, tangent .
8. För över bilden till Pc:n:
- antingen med USB-kabeln,
- eller med en läsenhet för mikro-SD-kort.
För ytterligare information, se bruksanvisningen som medföljer på CD-ROM-skivan.
25
Page 27

Skyddslucka för objektiven
Objektiv infraröd kamera
Objektiv dagsljuskamera
Flerfunktionsavtryckare
USB-anslutning
SD-kortlagring
Gummilucka
Knappsats
Flerfunktionsavtryckare
Svenska
2. UPPBYGGNAD AV FRAMSIDAN
3. GRÄNSSNITT
26
Page 28

Ljussensor
Flerfunktionstangenter kopplade till
bildskärmens
indikering
ON/OFF-tangent
Piltangenter Upp/Ned/Höger/Vänster
Låsarm för ¼-varvsskruven
¼-varvsskruv för öppnande av luckan
Fäste för ¼ -tums fotostativ
Svenska
4. TANGENTBESKRIVNING
5. UPPBYGGNAD AV BATTERILUCKAN
27
Page 29

Bild
Visning av mätningar
Funktioner knutna
till tangenterna F1, F2, F3
Låsning av färgskalan,
min- och max-T° är frysta
Öppning av senast öppnad meny
Stopp av
målfångning
BT-mätning
Markörmätningar
Temperatur för vänster färg på
färgskalan
Punktmarkör
Temperatur för höger färg på
färgskalan
Statusfält, se nedan
Närvaro/Frånvaro
av mikro-SD-kort
Funktion knuten
till avtryckaren
Bluetooth aktiv
Batteristatus
Datum och tid av nuvarande bild
Aktivering/Deaktivering/
Korrigering av
inverkansparametrar
Logga
Kontinuerlig målfångning (grön)
Fryst målfångning (röd)
Svenska
6. INDIKERING
7. STATUSFÄLT
28
Page 30

CE标志表明设备符合欧盟“低压”设备的标准和“电磁设备兼容性”标准。(2006/95/CE
和2004/108/CE)
根据欧盟DEEE2002/96/EC指令, 在欧盟国家内,该产品属于可回收利用的电力和电子产品,
不可随意丢弃,需分拣后进行特别处理,不能与生活垃圾一起处理。使用过的电池和储能器也不能与
生活垃圾一起处理,请将它们放到指定的电子产品垃圾回收点。
该产品在设计时就已考虑到产品和大部分部件都可回收重新利用。
中文
注意事项
红外线摄像机是一台光敏测量设备,请注意以下事项:
1. 请勿对准太阳、激光焊机或其他强热光源。
2. 请避免在多尘的环境下打开镜头。
3. 请勿用手指触摸镜头。
4. 请避免摄像机遭到撞击或跌落。
如因未遵守上述指令而造成摄像机部件的损坏或使用时出现问题, 制造商和销售商均不对此负任何责任,因
此造成的所有维修费用也将由操作人员承担。
设备上使用的符号的意义:
1. 快速启动的步骤
1. 将冲好电的电池插入摄像机。
2. 将SD存储卡插入插口。
3. 打开镜头盖。
4. 按下开/关按钮:
- 如出现相应的窗口,设置日期和时间。
- 如您刚刚插入储能器, 设置电池管理( 见运行说明书 §1.4.1)。
5. 对准目标:
- 或选择红外线显示模式
- 或选用可见光图像显示模式,扳机键或按钮 .
6. 停止获取图像,按钮 .
7. 保存当前图像,按钮 .
8. 将图像传输到电脑:
- 或通过USB数据线,
- 或通过SD存储卡读取器。
如需获得更多信息,请参阅后附CD盘中的运行说明书。
29
Page 31

镜头盖
红外线摄像机镜头
可见光摄像机镜头
多功能扳机键
USB插
SD卡插
橡胶护板
键盘
多功能扳机键
中文
2. 正面结构
3. 侧面
30
Page 32

光源感测器
与屏幕显示相关的多功能按钮
开/关按钮
箭头键上/下/右/左
¼转螺丝电池锁止柄
¼转螺丝打开电池盖
¼英寸三脚架插
中文
4. 按钮功能描述
5. 电池盖结构
31
Page 33

图像
测量显示
与F1, F2, F3键相关的显示
锁定色带,最低温和最高温被冻结。
打开的最后一个菜单
停止获取图片
BT测量
鼠标测量
色带左边温度
鼠标点
色带右边温度
状态条, 详见下方解释
SD存储卡已插入/未插入
与扳机键相关的功能
蓝牙已激活
电池电量
当前图像的日期和时间
激活/锁闭/影响参数的修改
公司标识
持续获取图像( 绿色)
冻结获取的图像( 红色)
中文
6. 显示
7. 状态条
32
Page 34

Symbol CE označuje shodu se směrnicemi EU o nízkonapěťových zařízeních a elektromagnetické
kompatibilitě (2006/95/CE a 2004/108/CE).
V rámci Evropské unie tento produkt podléhá povinnosti třídění odpadu pro recyklaci elektrického
a elektronického zařízení podle směrnice WEEE 2002/96/EC: Toto zařízení nelze likvidovat jako
směsný odpad z domácnosti. Použité baterie a akumulátory nelze likvidovat jako směsný odpad
z domácnosti. Předejte je na příslušné místo odběru recyklovaného odpadu.
Konstrukce výrobku umožňuje recyklaci a opakované využití většiny součástí
Čeština
POZOR
Infračervená kamera je citlivé optické měřicí zařízení, dbejte na dodržování následujících pokynů:
1. Nikdy se nedívejte na slunce, laserové svařování ani na jakýkoli jiný zdroj silného tepelného
záření.
2. Vyhněte se působení prachu při otevřeném objektivu.
3. Nedotýkejte se objektivu prsty.
4. Vyhněte se nárazům a pádům.
Dojde-li k poškození součástí kamery nebo problému v důsledku nedodržení výše uvedených
pokynů, výrobce ani prodejce nenese žádnou odpovědnost a všechny náklady nese uživatel.
Význam symbolů používaných na přístroji:
1. FÁZE RYCHLÉHO UVEDENÍ DO PROVOZU
1. Vložte nabité baterie do kamery.
2. Vložte paměťovou kartu typu micro SD do příslušného otvoru.
3. Otevřete ochranný kryt objektivů.
4. Stiskněte tlačítko ON/OFF.
- zobrazí-li se příslušné okno, zadejte datum a čas.
- pokud jste vložili akumulátory, nastavte správce baterií (viz návod k obsluze, bod 1.4.1.).
5. Zaměření cílového objektu:
- pomocí IR zobrazení,
- pomocí viditelného obrazu, spouště nebo tlačítek .
6. Zastavte snímání tlačítkem .
7. Uložte aktuální snímek tlačítkem .
8. Přenos snímku do PC:
- pomocí kabelu USB,
- pomocí čtečky karet micro SD.
Další informace naleznete v návodu k obsluze na disku CD-ROM.
33
Page 35

Ochranný kryt objektivů
Objektiv infračervené kamery
Objektiv video kamery
Multifunkční spoušť
Konektor USB
Otvor pro kartu SD
Pryžový kryt
Klávesnice
Multifunkční spoušť
Čeština
2. KONSTRUKCE PŘEDNÍ ČÁSTI
3. ROZHRANÍ
34
Page 36

Čidlo intenzity světla
Multifunkční tlačítka přidružená k zobrazení
na displeji
Tlačítko ON/OFF
Směrová tlačítka nahoru/dolů/vpravo/vlevo
Páčka pro zajištění šroubu
Otočení šroubu o ¼ otáčky pro otevření krytu
Otvor pro fotografický stativ velikosti ¼ palce
Čeština
4. POPIS TLAČÍTEK
5. KONSTRUKCE KRYTU BATERIE
35
Page 37

Obraz
Zobrazení měření
Funkce přidružené
k tlačítkům F1, F2, F3
Uzamknutí palety barev,
hodnoty minimální a maximální teploty
jsou zafixovány.
Otevření poslední otevřené
Zastavení snímání
Měření
nejnižší
teploty
Měření na kurzoru
Nejnižší teplota barvy
na paletě
Kurzor
Nejvyšší teplota barvy na paletě
Stavový řádek, viz níže
Přítomnost/absence
karty micro SD
Funkce spojená
se spouští
Bluetooth aktivní
Stav baterie
Datum a čas aktuálního snímku
Aktivace/deaktivace/
Korekce
parametrů ovlivňujících
Zkrat
Probíhá snímání (zelená)
Snímání zafixováno
Čeština
6. ZOBRAZENÍ
7. STAVOVÝ ŘÁDEK
36
Page 38

CE-merkintä ilmaisee pienjännitedirektiivin ja sähkömagneettinen yhteensopivuus EMC-direktiivin
mukaisuuden (2006/95/EY ja 2004/108/EY).
Tämä tuote on Euroopan Unionin sähkö- ja elektroniikkalaiteromun jätehuollon WEEE-direktiivin
(2002/96/EY) alainen. Tuotetta ei saa käsitellä kotitalousjätteenä. Käytöstä poistettuja paristoja ja
akkuja ei saa käsitellä talousjätteenä. Sen sijaan ne on toimitettava asianmukaiseen
kierrätyspisteeseen.
Tämä tuote ja suurin osa sen perusosista voidaan kierrättää ja hyödyntää.
Suomi
HUOMIO
Infrapunakamera on herkkä optinen mittauslaite. Huomioi seuraavat:
1. Älä milloinkaan suuntaa aurinkoa, laserhitsausta tai mitään muuta voimakasta
lämpösäteilylähdettä kohti.
2. Vältä altistamista pölylle, jos objektiivi on avoinna.
3. Älä kosketa objektiivia sormilla.
4. Vältä iskut ja pudotukset.
Valmistaja tai jälleenmyyjä eivät ole vastuussa yllä mainittujen ohjeiden noudattamatta jättämisestä
johtuvista kameran osien vahingoittumisista tai toiminnanhäiriöistä ja käyttäjä on yksin vastuussa
kaikista näihin liittyvistä kuluista.
Laitteessa käytettyjen symbolien merkitys:
1. NOPEAN KÄYNNISTYKSEN VAIHEET
1. Aseta ladatut akkuparistot kameraan.
2. Aseta micro-SD muistikortti paikoilleen.
3. Avaa objektiivien suojaläppä.
4. Paina ON/OFF-painiketta:
- jos ilmestyy vastaava ikkuna, syötä päivämäärä ja aika.
- jos olet asettanut akkuja, konfiguroi akkuparistojen hallinto (katso käyttöohje §1.4.1.).
5. Suuntaa kohdetta:
- joko IR-näytön kanssa,
- tai näkyvän kuvan kanssa, liipaisin tai -painikkeet.
6. Lopeta kaappaus -painike.
7. Tallenna nykyinen kuva, -painike.
8. Siirrä kuva PC:lle:
- joko USB-kaapelin avulla,
- tai micro-SD kortinlukijalla.
Katso lisätiedot CD-ROM levyllä olevasta käyttöohjeesta.
37
Page 39

Objektiivien suojaläppä
Infrapunakameran objektiivi
Näkyvän kameran objektiivi
Monitoiminen liipaisin
USB-liitin
SD-kortin sijoituspaikka
Muoviläppä
Näppäimistö
Monitoiminen liipaisin
Suomi
2. ETUOSAN RAKENNE
3. RAJAPINTA
38
Page 40

Valaistuksen anturi
Näytön yhdistetyt monitoimiset painikkeet
ON/OFF-painike
Nuolipainikkeet Ylös/Alas/Oikea/Vasen
Ruuvin (1/4 kierre) lukitusvipu
Ruuvi (1/4 kierre) luukun avaamiseen
Kuvausjalustan (1/4 tuuma) sijoitukseen
Suomi
4. PAINIKKEIDEN KUVAUS
5. PARISTOLUUKUN RAKENNE
39
Page 41

Kuva
Mittausten näyttö
F1-, F2-, F3-painikkeisiin
yhdistetyt toiminnot
Väripaletin lukitus, kiinnitetyt mini ja
maksi lämpötilat.
Avaa viimeksi avatun valikon
Lopeta kaappaus
BT-mittaus
Kursorin mittaukset
Väripaletin vasemman värin lämpötila
Kursorin piste
Väripaletin oikean värin lämpötila
Tilannepalkki, katso alla
MicroSD-kortti
Läsnä / Poissa
Liipaisimeen
yhdistetty toiminto
Bluetooth
aktivoituna
Akun tila
Nykyisen kuvan päivämäärä ja aika
Aktivointi / Deaktivointi /
Vaikutusparametrien korjaus
Lyhenne
Jatkuva kaappaus (vihreä)
Kiinnitetty kaappaus (punainen)
Suomi
6. NÄYTTÖ
7. TILANNEPALKKI
40
Page 42

De CE-markering geeft de conformiteit betreffende de Europese “Laagspannings” en
"Elektromagnetische compatibiliteit" aan (2006/95/EG en 2004/108/EG).
In de Europese Unie wordt dit product als gescheiden afval ingezameld voor de recycling van het
elektrische en elektronische materiaal, overeenkomstig de AEEA-richtlijn 2002/96/EG: Dit
materiaal dient niet als huishoudelijk afval verwerkt te worden. De lege batterijen en accu’s mogen
niet als huisvuil weggeworpen worden. Breng ze naar een hiervoor bedoeld recyclingcentrum.
Door zijn ontwerp kunnen de meeste bestanddelen van dit product gerecycled en hergebruikt
worden.
Nederlands
LET OP
De infrarode camera is gevoelige optische meetapparatuur, let op het volgende:
1. Nooit op de zon, laserlassen of enige andere sterke warmtestralingsbron richten.
2. Blootstelling aan stof vermijden wanneer de lens open staat.
3. De lens niet aanraken met uw vingers.
4. Schokken en valpartijen vermijden.
Als er elementen van de camera beschadigd zijn of problemen vertonen als gevolg van het niet in
acht nemen van bovenvermelde instructies, dan kunnen de fabrikant en de dealer in geen geval
aansprakelijk worden geacht en blijven de te maken kosten volledig voor rekening van de bediener.
Betekenis van de op het apparaat gebruikte symbolen:
1. STAPPEN VOOR EEN SNELLE START
1. Plaats de batterijen in de camera.
2. Plaats de micro SD geheugenkaart in zijn vakje.
3. Open de veiligheidsklep van de lenzen.
4. Druk op de toets ON/OFF:
- voer, als het bijbehorende venster verschijnt, de datum en de tijd in.
- als u accu's moet inbrengen, configureer de accumanager dan (zie de gebruikshandleiding §1.4.1.).
1. Op het onderwerp richten:
- ofwel met de IR-weergave,
- ofwel met het zichtbare beeld, de trekker of de toetsen .
2. Het vergaren stoppen, toets .
3. Het huidige beeld opslaan, toets .
4. Het beeld naar de PC doorsturen:
- ofwel met behulp van de USB-kabel,
- ofwel met een micro SD kaartlezer.
Raadpleeg voor meer informatie de op de CD-ROM meegeleverde gebruikshandleiding.
41
Page 43

Beveiligingsklep voor de lenzen
Infrarode cameralens
Zichtbare cameralens
Multifunctionele trekker
USB-aansluiting
Vakje SD kaart
Rubber klepje
Toetsenbord
Multifunctionele trekker
Nederlands
2. STRUCTUUR VAN DE VOORZIJDE
3. INTERFACE
42
Page 44

Sensor lichtsterkte
Multifunctionele toetsen behorend bij de weergave
op het scherm
ON/OFF-toets
Pijltoetsen Omhoog/Omlaag/Rechts/Links
Vergrendelingshendel van de kwartslagschroef
Kwartslagschroef om het vakje te openen
Inkeping voor statief ¼ inch
Nederlands
4. BESCHRIJVING VAN DE TOETSEN
5. STRUCTUUR VAN HET BATTERIJVAKJE
43
Page 45

Beeld
Weergave van de metingen
Functies behorend bij de
toetsen F1, F2, F3
Vergrendeling van het kleurenpalet,
de min. en max. T° worden vastgehouden.
Opening laatst geopende menu
Stoppen met vergaren
LS-meting
Metingen cursors
Temperatuur van de linker kleur
van het kleurenpalet
Cursor punt
Temperatuur van de rechter kleur
van het kleurenpalet
Statusbalk, zie hieronder
Aan-/Afwezigheid
micro SD kaart
Functie van de
trekker
Bluetooth actief
Toestand accu
Datum en tijdstip huidige beeld
In-/Uitschakeling/
Correctie van de
invloedsparameters
Logo
Continue vergaring (groen)
Vastgehouden vergaring
(rood)
Nederlands
6. WEERGAVE
7. STATUSBALK
44
Page 46

Oznakowanie CE wskazuje na zgodność z dyrektywami europejskimi „Niskie napięcia” i
„Zgodność elektromagnetyczna” (2006/95/WE i 2004/108/WE).
W Unii Europejskiej, ten produkt podlega zbiórce selektywnej odpadów, aby gwarantować
recykling urządzeń elektrycznych i elektronicznych zgodnie z dyrektywą WEEE 2002/96/WE:
tego wyposażenia nie należy usuwać razem z odpadami gospodarczymi. Zużytych baterii i
akumulatorów nie należy wyrzucać razem z odpadami gospodarczymi. Należy je przekazać do
odpowiedniego punktu zbiórki, aby poddać je recyklingowi.
Ten produkt zaprojektowano w sposób pozwalający na poddanie go recyklingowi i odzyskanie
większości jego elementów składowych.
Polski
UWAGA
Kamera na podczerwień jest optycznym przyrządem pomiarowym o dużej czułości, który
przestrzegania następujących zasad:
1. Nigdy nie celować w słońce, spawy laserowe lub inne źródła silnego promieniowania
termicznego.
2. Unikać narażenia na działanie pyłu przy otwartym obiektywie.
3. Nie dotykać obiektywu palcami.
4. Unikać uderzeń i upadków.
Jeżeli elementy kamery ulegną uszkodzeniu lub wykazują nieprawidłowe działanie z powodu
nieprzestrzegania zaleceń wymienionych powyżej, producent i dystrybutor nie ponoszą żadnej
odpowiedzialności, a wszelkie koszty ponosi operator.
Znaczenie symboli używanych na urządzeniu:
1. ETAPY SZYBKIEGO URUCHAMIANIA
1. Włożyć naładowane akumulatory do kamery.
2. Włożyć kartę pamięci micro SD do gniazda.
3. Otworzyć osłonę obiektywu.
4. Nacisnąć przycisk ON/OFF:
- jeżeli wyświetli się następujące okno, należy wpisać datę i godzinę.
- jeżeli akumulatory włożono niedawno, należy skonfigurować sterownik akumulatorów (patrz instrukcja
obsługi §1.4.1.).
5. Wycelować w cel:
- za pomocą wyświetlacza IR,
- za pomocą widocznego obrazu, spustu lub przycisków .
6. Przerwać zapis przyciskiem .
7. Zapisać bieżący obraz przyciskiem .
8. Przesłać obraz do PC:
- za pomocą kabla USB,
- za pomocą czytnika kart micro SD.
Aby dowiedzieć się więcej, należy skorzystać z instrukcji dostarczonej na płycie CD-ROM.
45
Page 47

Osłona obiektywu
Obiektyw kamery na podczerwień
Obiektyw kamery światłą widzialnego
Spust wielofunkcyjny
Złącze USB
Gniazdo karty SD
Osłona gumowa
Klawiatura
Spust wielofunkcyjny
Polski
2. OPIS PANELU PRZEDNIEGO
3. INTERFEJS
46
Page 48

Czujnik jasności
Przyciski wielofunkcyjne wyświetlacza
na ekranie
Przycisk ON/OFF
Przyciski strzałek Góra/Dół/Prawo/Lewo
Dźwignia blokowania śruby ¼-obrotowej
Śruba ¼-obrotowa do otwierania pokrywy
Wkładka do płytki do statywu ¼ cala
Polski
4. OPIS PRZYCISKÓW
5. POKRYWA BATERII
47
Page 49

Obraz
Wyświetlacz pomiarów
Funkcje powiązane
przycisków F1, F2, F3
Blokada palety kolorów,
T° min. i maks. są zamrożone.
Otwarcie ostatniego menu
Wyłączanie zapisu
Pomiar BT
Pomiary z
Temperatura koloru z lewej strony
palety kolorów
Kursor
punktowy
Temperatura koloru z prawej
strony palety kolorów
Pasek stanu, patrz poniżej
Obecność/Brak
karty micro SD
Funkcja
powiązana ze
Bluetooth włączony
Stan akumulatora
Data i godzina bieżącego obrazu
Włączanie/wyłączanie/
Korekta
parametrów wpływu
Skrót
Zapis ciągły (zielony)
Zapis zamrożony (czerwony)
Polski
6. WYŚWIETLACZ
7. PASEK STANU
48
Page 50

Marcajul CE arată conformitatea cu directivele europene privind „Tensiunea joasă“ şi
„Compatibilitatea electromagnetică“ (2006/95/CE şi 2004/108/CE).
În Uniunea Europeană, acest produs face obiectul unei trieri selective a deşeurilor, în vederea
reciclării aparatelor electrice şi electronice, conform Directivei DEEE 2002/96/CE: acest
echipament nu trebuie tratat ca deşeu menajer. Bateriile şi acumulatorii uzaţi nu trebuie trataţi ca
deşeuri menajere. Duceţi-le la punctul de colectare corespunzător, în vederea reciclării.
Concepţia acestui produs va permite un proces de reciclare şi de valorificare a majorităţii
constituenţilor săi.
Romănă
ATENŜIE
Camera cu infraroşii este un echipament optic de măsurat sensibil; atenŝie la următoarele:
1. Niciodată nu vizaŝi soarele, o sudură cu laser sau orice altă sursă de radiaŝie termică puternică.
2. Evitaŝi expunerea la praf, cu obiectivul deschis.
3. Nu atingeŝi obiectivul cu degetele.
4. Evitaŝi şocurile şi căderea.
Dacă unele elemente ale camerei sunt deteriorate sau prezintă probleme ca urmare a nerespectării
recomandărilor enumerate mai sus, atât constructorul, cât şi distribuitorul nu vor răspunde în niciun
caz, iar toate cheltuielile aferente vor fi suportate în totalitate de către operator.
Semnificaŝia simbolurilor utilizate pe aparat:
1. ETAPE DE PORNIRE RAPIDĂ
1. Introduceţi în cameră bateriile încărcate.
2. Introduceţi cardul de memorie micro SD în locaşul său.
3. Deschideţi capacul de protecţie al obiectivului.
4. Apăsaţi pe tasta PORNIT/OPRIT:
- dacă apare fereastra corespunzătoare, introduceţi data şi ora.
- dacă introduceţi acumulatori, configuraţi gestionarea bateriilor (vezi instrucţiunile de funcţionare
§1.4.1.).
5. Vizaţi ţinta:
- fie cu afişajul IR,
- fie cu imaginea spectrului vizibil, trăgaciul sau tastele .
6. Opriţi achiziţia, tasta .
7. Salvaţi imaginea curentă, tasta .
8. Transferaţi imaginea pe PC:
- fie cu ajutorul cablului USB,
- fie cu un cititor de card micro SD.
Pentru mai multe informaţii, consultaţi instrucţiunile de utilizare furnizate pe CD-ROM.
49
Page 51

Capac de protecţie a obiectivelor
Obiectiv cameră infraroşii
Obiectiv cameră spectru vizibil
Trăgaci multifuncţional
Conector USB
Locaş card SD
Capac din cauciuc
Tastatură
Trăgaci multifuncţional
Romănă
2. STRUCTURA FEŜEI ANTERIOARE
3. INTERFAŜĂ
50
Page 52

Senzor de luminozitate
Taste multifuncţionale asociate afişajului
pe ecran
Tasta PORNIT/OPRIT
Taste cu săgeţi Sus/Jos/Dreapta/Stânga
Mâner de blocare a şurubului 1/4 tură
Şurub 1/4 tură pentru deschiderea capacului
Inserţie pentru trepied 1/4 ţol
Romănă
4. DESCRIEREA TASTELOR
5. STRUCTURA CAPACULUI BATERIILOR
51
Page 53

Imagine
Afişarea măsurătorilor
Funcţii asociate
tastelor F1, F2, F3
Blocarea paletei de culori,
T° min. şi max. sunt îngheţate.
Deschiderea ultimului meniu
Oprire achiziţie
Măsurare BT
Măsurători cu
Temperatura culorii stângi
din paleta de culori
Cursor
punctual
Temperatura culorii drepte
din paleta de culori
Bară de stare, vezi mai jos
Prezenţă/Absenţă
card micro SD
Funcţie asociată
trăgaciului
Bluetooth activ
Starea bateriei
Data şi ora imaginii curente
Activare/Dezactivare/
Corecţia
parametrilor de influenţă
Siglă
Achiziţie continuă (verde)
Achiziţie îngheţată (roşu)
Romănă
6. AFIŞAJ
7. BARĂ DE STARE
52
Page 54

DEUTSCHLAND - Chauvin Arnoux GmbH
Straßburger Str. 34 - 77694 Kehl / Rhein
Tel: (07851) 99 26-0 - Fax: (07851) 99 26-60
SCHWEIZ - Chauvin Arnoux AG
Moosacherstrasse 15 - 8804 AU / ZH
Tel: 044 727 75 55 - Fax: 044 727 75 56
UNITED KINGDOM - Chauvin Arnoux Ltd
Unit 1 Nelson Ct - Flagship Sq - Shaw Cross Business Pk
Dewsbury, West Yorkshire - WF12 7TH
Tel: 01924 460 494 - Fax: 01924 455 328
CHINA - Shanghai Pujiang Enerdis Instruments Co. Ltd
3 Floor, Building 1 - N° 381 Xiang De Road
Hongkou District - 200081 SHANGHAI
Tel: +86 21 65 21 51 96 - Fax: +86 21 65 21 61 07
中国 – 上海浦江埃纳迪斯仪表有限公司
上海市虹口区祥德路381号3号楼3楼
Tel: +86 21 65 21 51 96 - Fax: +86 21 65 21 61 07
ITALIA - Amra SpA
Via Sant’Ambrogio, 23/25 - 20846 Macherio (MB)
Tel: 039 245 75 45 - Fax: 039 481 561
ESPAÑA - Chauvin Arnoux Ibérica S.A.
C/ Roger de Flor, 293 - 1a Planta - 08025 Barcelona
Tel: 902 20 22 26 - Fax: 934 59 14 43
ÖSTERREICH - Chauvin Arnoux Ges.m.b.H
Slamastrasse 29/2/4 - 1230 Wien
Tel: 01 61 61 9 61-0 - Fax: 01 61 61 9 61-61
MIDDLE EAST - Chauvin Arnoux Middle East
P.O. BOX 60-154 - 1241 2020 JAL EL DIB (Beirut) LEBANON
Tel: (01) 890 425 - Fax: (01) 890 424
SCANDINAVIA - CA Mätsystem AB
Sjöflygvägen 35 - SE 18304 TÄBY
Tel: +46 8 50 52 68 00 - Fax: +46 8 50 52 68 10
USA - Chauvin Arnoux Inc - d.b.a AEMC Instruments
200 Foxborough Blvd. - Foxborough - MA 02035
Tel: (508) 698-2115 - Fax: (508) 698-2118
http://www.chauvin-arnoux.com
190, rue Championnet - 75876 PARIS Cedex 18 - FRANCE
Tél. : +33 1 44 85 44 85 - Fax : +33 1 46 27 73 89 - info@chauvin-arnoux.fr
Export : Tél. : +33 1 44 85 44 86 - Fax : +33 1 46 27 95 59 - export@chauvin-arnoux.fr
07 - 2015
X04333B00 - Ed. 1
53
 Loading...